Loading ...
Loading ...
Loading ...
REPLACINGNYLONTIMINGCAMSONACCUMULATORMECHANISMS
Eiectrica} Shock Hazard
Disconnect power before servicing.
Replace all parts and panels before operating.
Failure to do so can result in death or electrical shock.
1. Unplug dryer or disconnect power.
2. Unlock control panel using a Phillips screwdriver.
* Loosen two screws securing timer bracket and lift timer
assembly out, but do not remove.
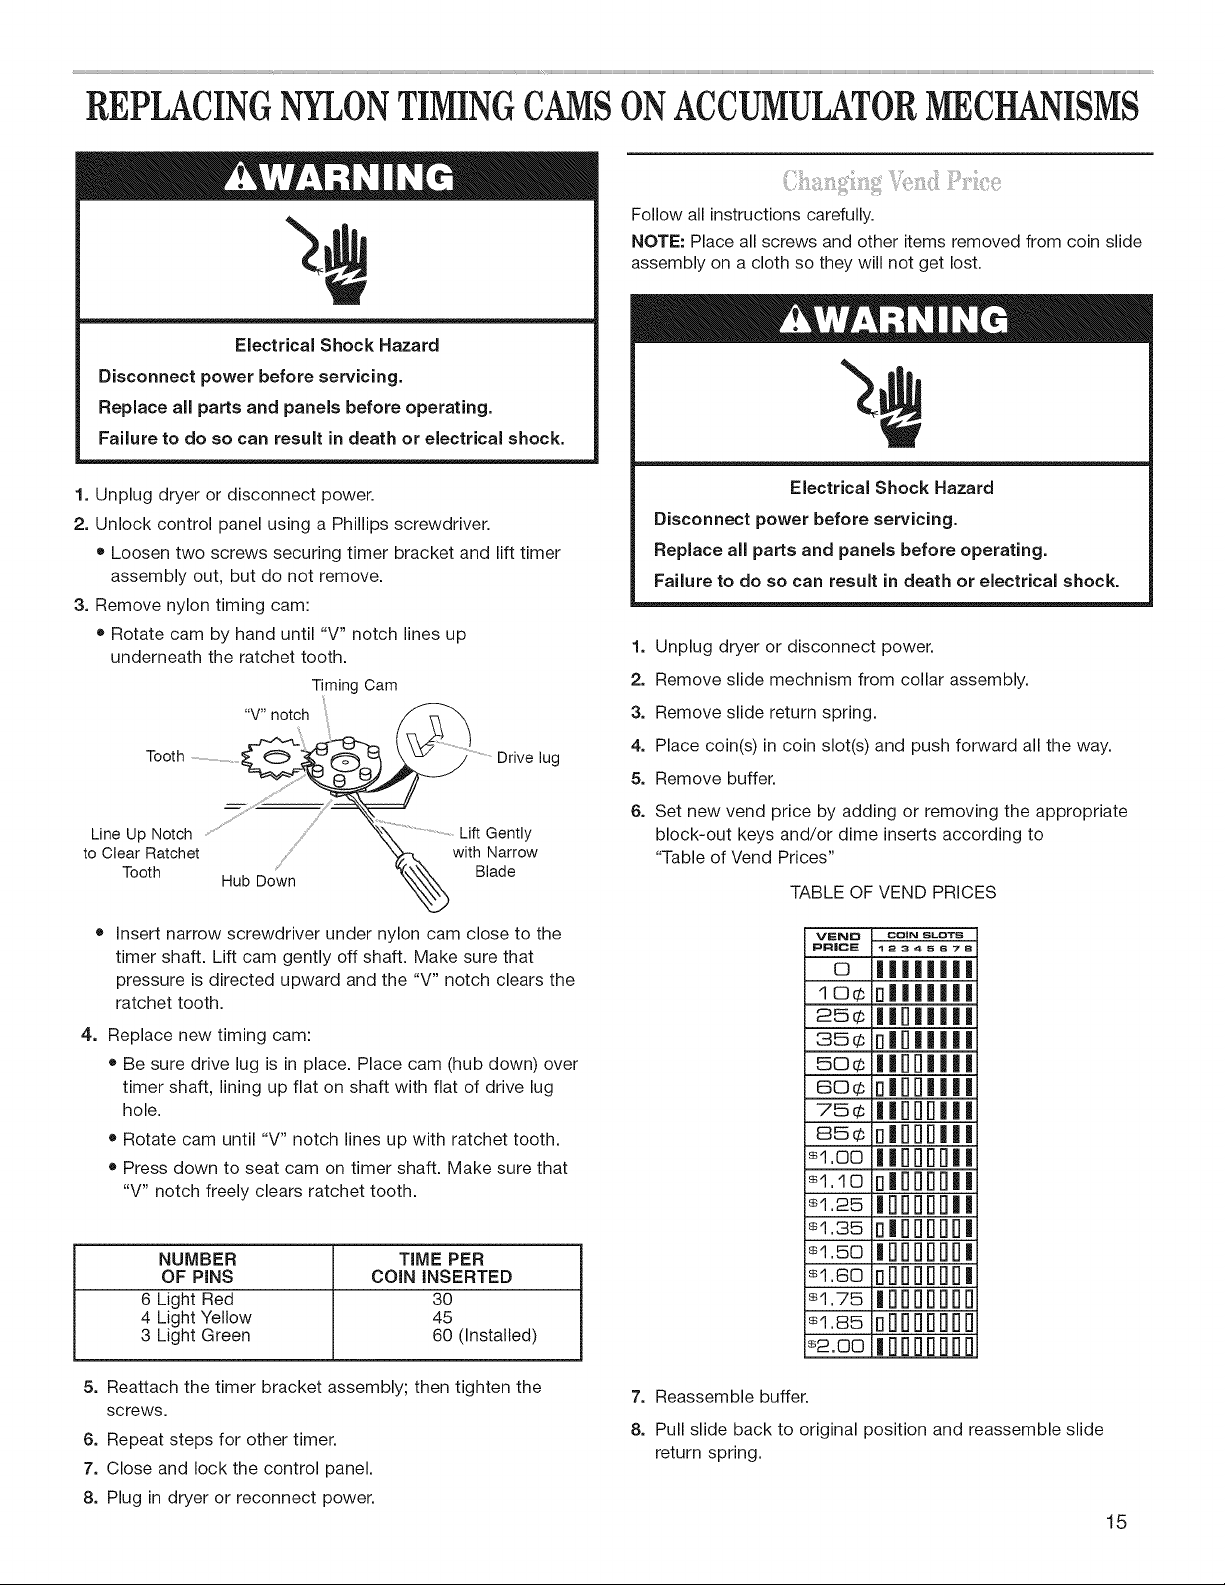
3. Remove nylon timing cam:
Rotate cam by hand until "V" notch lines up
underneath the ratchet tooth.
Timing Cam
"V" notch :
Tooth ........................._ Drive lug
Line Up Notch Lift Gently
to Clear Ratchet with Narrow
Tooth Blade
Hub Down
<>
Follow all instructions carefully.
NOTE: Place all screws and other items removed from coin slide
assembly on a cloth so they will not get lost.
Electrical Shock Hazard
Disconnect power before servicing.
Replace all parts and panels before operating.
Failure to do so can result in death or electrical shock.
1. Unplug dryer or disconnect power.
2. Remove slide mechnism from collar assembly.
3. Remove slide return spring.
4. Place coin(s) in coin slot(s) and push forward all the way.
5. Remove buffer.
6. Set new vend price by adding or removing the appropriate
block-out keys and/or dime inserts according to
"Table of Vend Prices"
TABLE OF VEND PRICES
=
Insert narrow screwdriver under nylon cam close to the
timer shaft. Lift cam gently off shaft. Make sure that
pressure is directed upward and the "V" notch clears the
ratchet tooth.
Replace new timing cam:
Be sure drive lug is in place. Place cam (hub down) over
timer shaft, lining up flat on shaft with flat of drive lug
hole.
Rotate cam until "V" notch lines up with ratchet tooth.
Press down to seat cam on timer shaft. Make sure that
"V" notch freely clears ratchet tooth.
NUMBER T{ME PER
OF P{NS COiN iNSERTED
6 Light Red 30
4 Light Yellow 45
3 Light Green 60 (Installed)
5. Reattach the timer bracket assembly; then tighten the
screws.
6. Repeat steps for other timer.
7. Close and lock the control panel.
8. Plug in dryer or reconnect power.
VEND COiN SLOTS
PR|CE 1_34s878
o ||||||||
lO¢ o|||||||
25¢ I|rl||l|l
35¢ a|B|||||
50¢ I Irll-ll I I I
eo¢ 0111111111
75¢ ||Bill]|||
85¢ ull]rll]|l|
• I.OO 111-1i11-1i-111
• 1.10 rlIBDBDII
•1.25 lFIrlFIrlFI|l
•1.35 ulOgOgO|
• 1.5o iDrl_rl_rll
•1.60 oH_H_H_|
•1.75 |H_H_H_H
•I.a5 uH_H_H_H
•2.oo |FIrlFIrlFIrlFI
7. Reassemble buffer.
8. Pull slide back to original position and reassemble slide
return spring.
15
Loading ...
Loading ...
Loading ...