Loading ...
Loading ...
Loading ...
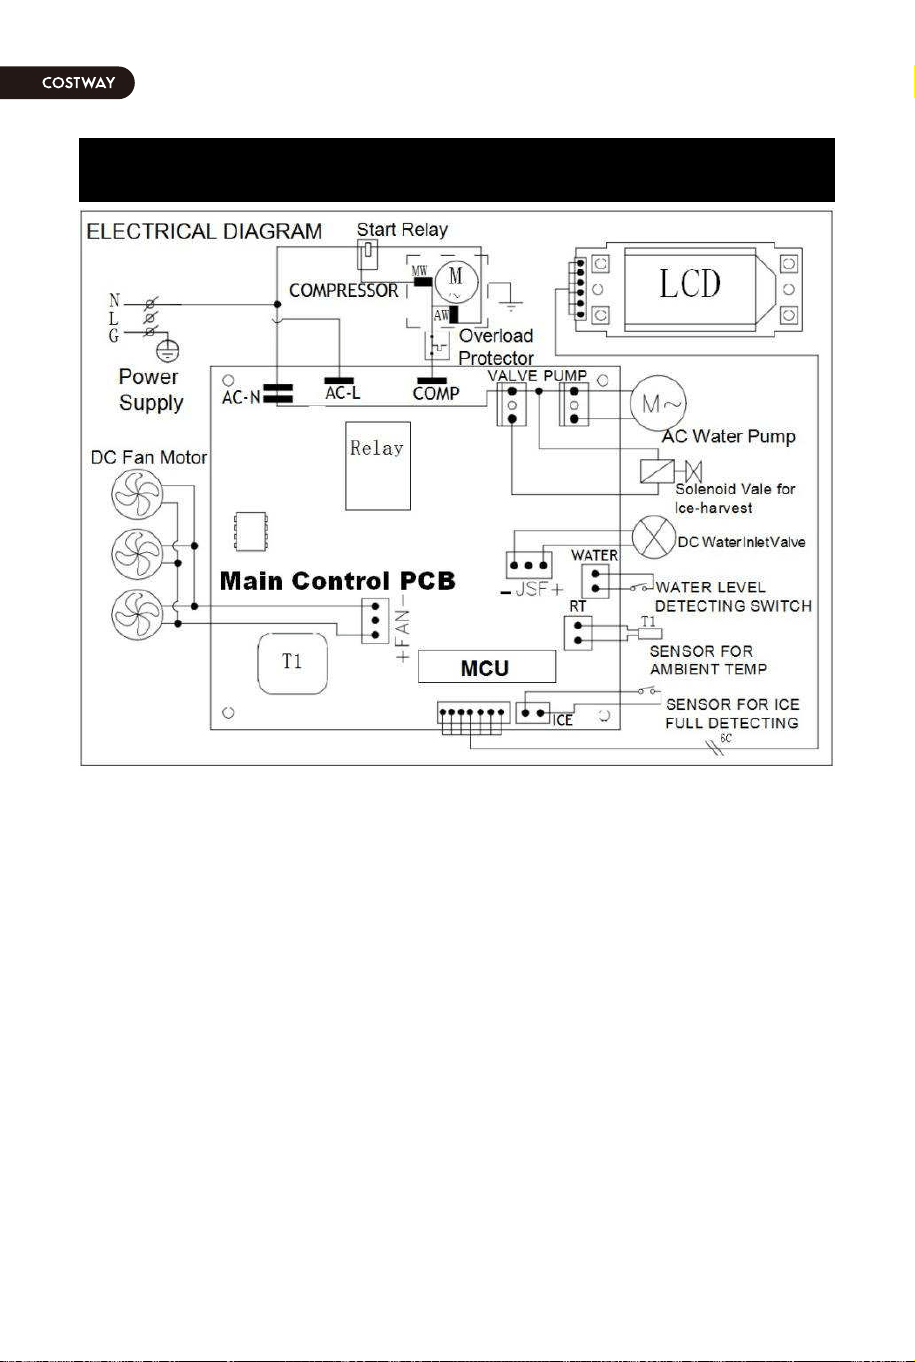
WIRING DIAGRAM
Normal Sounds
Your new ice maker may make sounds that are not familiar to you. Most of the new
sounds are normal. Hard surfaces like the floor, walls and cabinets can make the
sounds seem louder than they actually are. The following describes the kinds of
sounds that might be new to you and what may be making them.
-You will hear a swooshing sound when the water valve opens to fill the water tank
for each cycle.
-Rattling noises may come from the flow of the refrigerant or the water line. Items
stored on top of the ice maker can also make noises.
-The high-efficiency compressor may make a pulsating or high-pitched sound.
-Water running from the water tank to the evaporator plate may make a splashing
sound.
-Water running from the evaporator to the water tank may make a splashing sound.
-As each cycle ends, you may hear a gurgling sound due to the refrigerant flowing in
your ice maker .
-You may hear air being forced over the condenser by the condenser fan. During the
harvest cycle, you may hear the sound of ice cubes falling into the ice storage bin.
-When you first start the ice maker, you may hear water running continuously. The
ice maker is programmed to run a rinse cycle before it begins to make ice.
CAUTION
Preparing the Ice Maker for Long Storage
If the ice maker will not be used for a long time, or is to be moved to another place, it
will be necessary to drain out all of the water in the system.
1.Allow all of the ice cubes to be ejected from the evaporator of ice maker.
2.Turn off the unit, and unplug the power cord.
3.Shut off the water supply at the main water supply.
4.Disconnect the water supply hose from the water inlet valve.
5.Pull out the Water drain pipe of the water tank indicating “H” in above illustration to
drain out the water in the water tank. When all of the water have been drained out,
to reinstall back the water drain pipe of the water tank.
6.Then drain out all of the water from the water drain port located at unit back
indicating “7”in above illustration.
7.Disconnect the water drain pipe to the main drain pipeline or floor drain, plug on
the drain cap again.
8.Drop the door open to allow for circulation and prevent mold and mildew.
9.Leave water supply hose and power cord disconnected until ready to reuse.
10.Dry the interior & wipe the outside of the unit.
11.Put a plastic bag on the unit to resist out dust & dirt.
CLEANING & MAINTENANCE
WARNING: Before carrying out any cleaning or maintenance operations, unplug the
ice maker from the main power supply electricity. (EXCEPTION: Ice maker
self-cleaning program).
Do not use any alcohol or fume for cleaning/sanitization of the ice maker. It may
cause cracks on the plastic parts.
Ask a trained service person to check and clean the condenser at least once a year,
in order to let the unit work properly.
This appliance must be cleaned by use of a water jet.
If the ice maker has been left unused for a long time, before the next use it
must be thoroughly cleaned. Follow carefully any instructions provided for
cleaning or use of sanitizing solution. Do not leave any solution inside the
ice maker after cleaning.
Periodic cleaning and proper maintenance will ensure efficiency, top
performance, hygienic, and long life. The maintenance intervals listed are based
on normal conditions. You may want to shorten the intervals if you have pets, or
the unit is used outdoors, or there are other special considerations.
22 23
Loading ...
Loading ...
Loading ...