Loading ...
Loading ...
Loading ...
28
29
30
31
32
33
34
35
36
37
38
39
40
41
42
43
44
45
46
47
48
49
50
51
52
53
54
55
Drain tube on liner
Water drainage port
Water drainage cap
Operation panel paper
Control switch for Led light
Operation panel PCB fix board
Operation panel PCB
Operation panel PCB box
Main PCB box
Main PCB
Main PCB cover
Foaming cabinet
Ice scoop
Ice basket
Back-cover plate
Back support column
Top hinge
Top cover
Screw hole cover
Fix plate
Water outlet tube form pump
Magnet switch
Evaporator frame
Water dividing pipe, eight holes
Cap of the water dividing pipe
Evaporator
Ice full detecting plate
LED light
Silicone tube,FDA
ABS Gray,FDA
Rubber Black
PET,thickness 0.25mm
Electrical part DC5V
ABS Black
Electrical part DC5V
ABS Black
ABS 5V Black
Electrical part AC115V
ABS 5V Black
Sheet metal +foams
ABS White
PP White
Zinc-Plate sheet δ=0.6
PP Black
SPCC δ=2.5mm Zinc-plated
ABS Black
ABS Black
SPCC δ=2.5mm Zinc-plated
Silicone tube,FDA
Electrical part DC5V
ABS White
ABS White
Silicone,FDA
Copper Nickle plated
ABS White
Electrical part DC5V white light
1
1
1
1
1 (assortative)
1
1
1
1
1
1
1
1
1
1
4
1
1
1
1
1
1
1
1
1
1
1
1
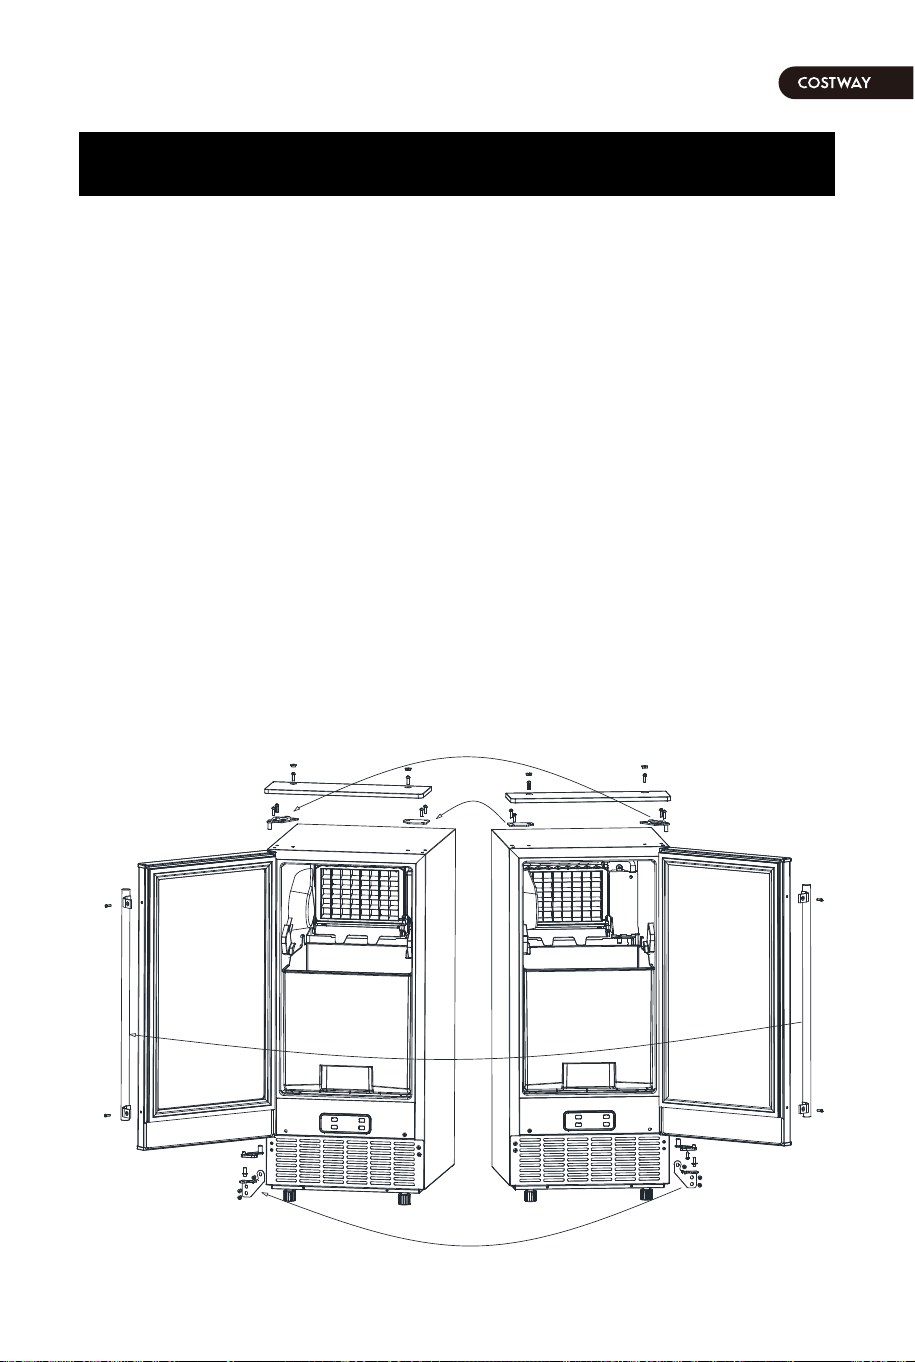
Top
Hinge
Top
Hinge
Handle
Handle
Fix plate
Top cover
OPERATING PROCEDURES & MAINTENANCE
UNPACKING YOUR ICE MAKER
1.Remove the exterior and interior packaging. Check if all the accessories,
including instruction manual, ice scoop, white water inlet pipe, 4 ways to 2
ways water quick connector and the water draining pipe, etc., are inside or
not. If any parts are missing, please contact our customer service.
2.Remove the tapes for fixing the door and inner cabinet, ice scoop, etc..
Roughly clean the inner cabinet & ice scoop with wet cloth.
3.Put the ice maker on a level & flat floor, without direct sunlight and other
sources of heat (i.e.: stove, furnace, radiator). Make sure that there is at
least 20 inch gap between the air outlet and the obstacles, and at least 2
inch between the wall.
4.Allow 4 hours for the refrigerant fluid to settle before plugging the ice
maker in if the unit maybe fall upside down during shipping or transportation.
5.The appliance must be positioned so that the plug is accessible.
WARNING: connect to the potable water supplying only. Only use
drinking water.
DOOR REVERSING (Optional)
If you want the refrigerator door to open from the opposite side, you can
reverse the door swing.
Left fix
piece
Left
bottom
hinge
Right fix
piece
Right
bottom
Hinge
12 13
Loading ...
Loading ...
Loading ...