Loading ...
Loading ...
Loading ...
19WWW.SENIXTOOLS.COM
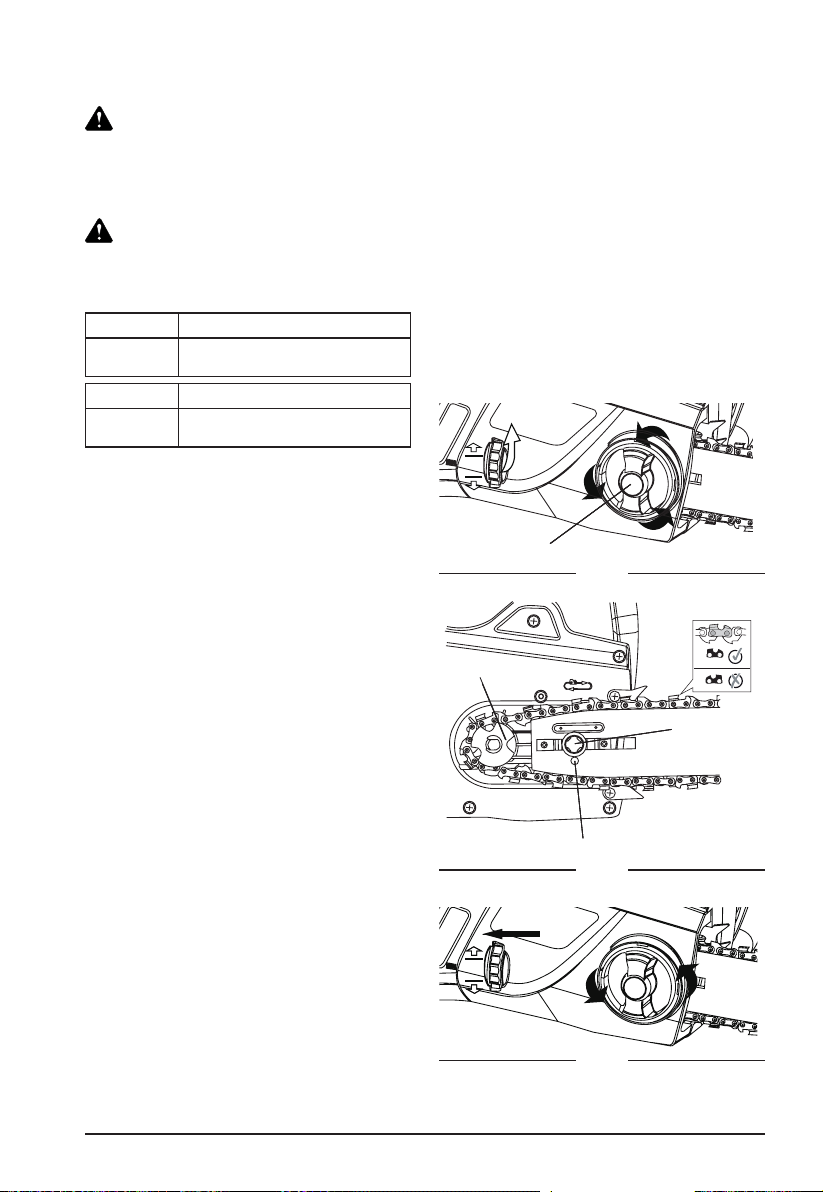
Locking Knob
REPLACING THE SAW CHAIN
AND CHAIN BAR
REPLACING THE POWER CORD
If the supply cord of this power tool is
damaged, it must be replaced by a specially
prepared cord. Inspect the power cord and
plug often. If damaged, have replaced by a
qualiedservicedealer.
WARNING!
APPROVED SAW BAR/SAW CHAIN:
WARNING!
Do not connect the chain saw to extension
cord and power source before it is completely
assembled. Always use gloves when handling
the chain.
Replace chain when cutters are too worn
to sharpen or when chain breaks. Only use
replacement chain noted in this manual.
Always include new drive sprocket when
replacing chain. This will maintain proper
driving of chain.
When handling saw chains, always wear
protective gloves.
SawBar: Oregon, 18 inch, 180SDEA041
Saw Chain:
Oregon, 18” (457 mm),
91PJ062X
1.Placethesawbodyonarmandlevel
surface.
2. Rotate the bar adjust locking knob
counterclockwise (Fig. 20) to remove the
cover from the saw’s body.
3. Wearing protective gloves, wrap the saw
chain around the chain bar, making sure
that the teeth are aimed in the direction of
rotation. The chain should be properly set
in the slot running along the entire outside
edge of the chain bar.
4.Placethesawchainaroundthesprocket
(Fig. 21) while lining up the slot in the chain
bar with the internal bolt at the base of the
saw and the chain tensioning pin in the
chain bar’s pin hole (Fig. 18). The chain
tensioning pin may need adjustment to
properly align with the hole in the chain bar.
Use the chain tensioning wheel to adjust its
locationuntilittsinthechainbar.
5. Turn the chain tensioning wheel to
preliminarily tighten the chain bar enough
that it stays in place. While holding the bar
still, place the cover back onto the saw.
Make sure the tab properly lines up with
the slot on the body of the saw (Fig. 22).
Lock the cover in place with the cover
locking knob by turning it clockwise until it
engages. Adjust the chain tension.
Fig. 20
Internal Bolt
Chain Tensioning Pin
Sprocket
Fig. 21
Fig. 22
SawBar: Oregon, 16 inch, 160SDEA041
Saw Chain:
Oregon, 16” (406 mm),
91PJ057X
Loading ...
Loading ...
Loading ...