Loading ...
Loading ...
Loading ...
18 WWW.SENIXTOOLS.COM
A
B
C
D
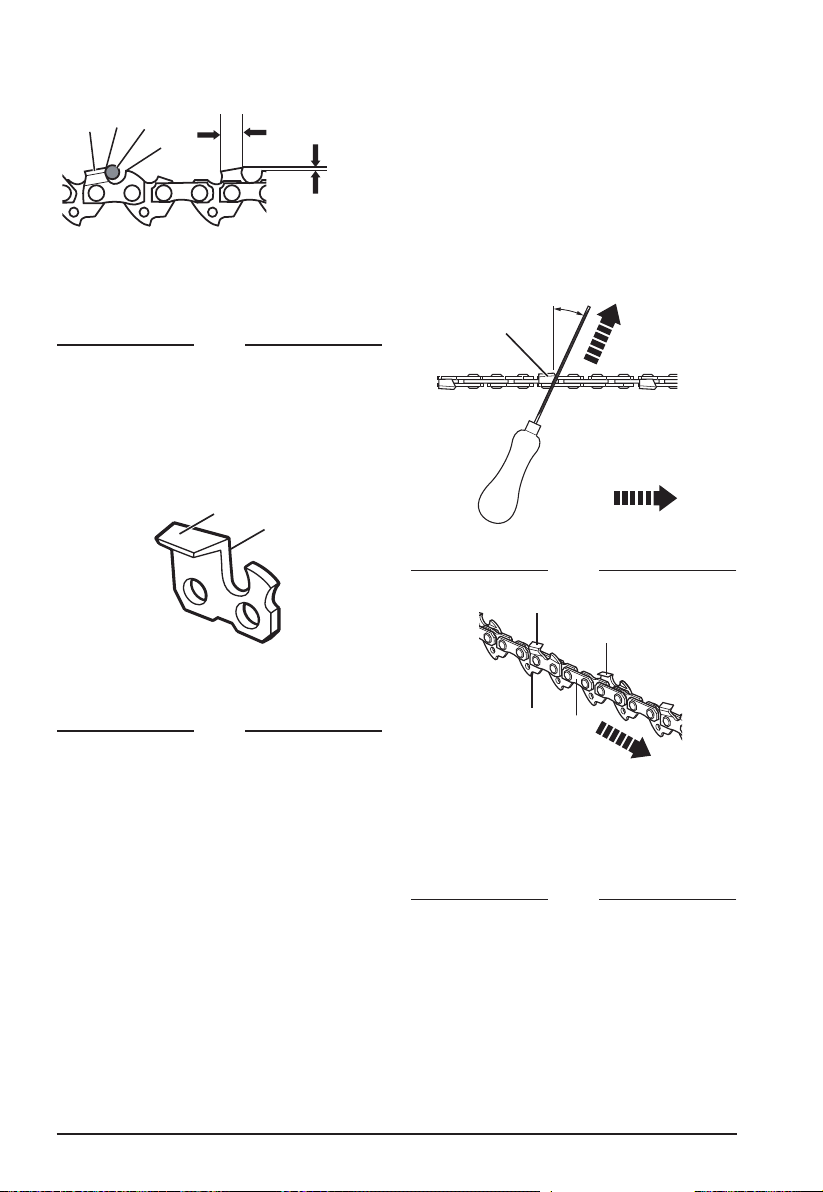
Cutter
Length
Depth Gauge
Setting 0.025 in.
A - Top Plate
B - Cutting Tip
C - File Position
D - Ridge
Fig. 16
Fig. 17
Fig. 18
Fig. 19
To sharpen the chain:
1. Using protective gloves, ensure the chain is
correctly tensioned on the guide bar.
2.Usearoundlewithadiameter1.1times
the cutting tooth depth. Make sure 20% of
thelediameterisabovethecutter’stop
plate (Fig. 17).
3. File at an angle perpendicular to the bar,
and at an angle of 25° to the direction of
travel (Fig. 18).
4. File each tooth from the inside towards
outsideonly.Fileonesideofthechainrst
then turn the saw around and repeat the
process.
• Sharpeneachtoothequallybyusingthe
same number of strokes.
• Keepallcutterlengthsequal(Fig.19).
Each time the cutting tip is sharpened the
cutting length is reduced. When the cutter
length is reduced to 0.16 inch (4 mm), the
chain is worn out and should be replaced.
• Thedepthgaugesettingisalsoreduced
with each sharpening. Every 5 sharpenings
NOTE:Aleguideisavailablefrommost
chainsaw retailers and is the easiest way to
holdtheleatthecorrectposition.
B
A
A - Top Plate
B - Side Plate
use a depth gauge measuring tool to check
the height between the cutting tip and the
ridge (Fig. 16). When necessary, use a
atletoledowntheridgetoachieve
the .025 inch depth gauge setting. Depth
gauge measuring tools are available from
most chainsaws retailers.
• Ifthesawisnotfunctioningproperly,take
ittoaqualiedchainsawservicecenterto
have the saw inspected. Use only identical
parts as listed in this manual.
25°
A
SAW CHAIN DIRECTION
Sharpening Angle
FILE
DIRECTION
Outside
Inside
A - Left-hand Cutter
A
B
C
D
A - Right-hand Cutter
B - Left-hand Cutter
C - Bumper Drive Link
D - Tie Strap
SAW CHAIN DIRECTION
Loading ...
Loading ...
Loading ...