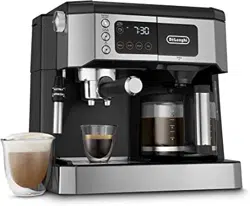
Loading ...
Loading ...
Loading ...
8
5. ANTICHLORINE FILTER
The lter eliminates the taste of chlorine in the water. To install
the lter, proceed as follows:
• Release the lter support from its slot by pulling it upwards
(g. 1).
• Remove the Antichlorine lter from the plastic sachet and
rinse it under a running tap (g. 2).
• Open the lter support and carefully put the lter in place
as shown in g. 2.
• Close the lter container carefully (g. 2), and reposition it
in its slot, pushing it rmly downwards.
•
The Antichlorine lter should be replaced after 80 cycles, and
at least after every 6 months of operation.
6. FIRST USE
When using the machine for the rst time, all the accessories
and the internal circuits must be washed as follows:
DRIP COFFEE MAKER:
• Run the coee machine without using ground coee for 2
full cycles.
ESPRESSO MAKER:
• Open the lid and remove the water tank.
• Fill the water tank up to the max level.
• Insert the water tank in its housing by pushing the water
tank down until the botton and close the lid (it is also pos-
sible to ll the tank using a carafe).
• Insert the required coee lter in the portalter and attach
the empty portalter onto the machine.
• Place a large container under the spouts (34 /oz, 1l capa-
city).
• Press the “Espresso ON/OFF” and buttons and di-
scharge half the tank from the boiler outlet.
• Turn the steam dial to and discharge the remaining
water from the cappuccino maker then turn the steam dial
back to OFF.
• Empty the container and put it back under the spouts and
proceed with a second rinse.
7. PREPARATION OF DRIP COFFEE
7.1 Setting the clock
When the coee machine is connected to the outlet for the rst
time, “AM 0:00” will ash on the display.
To set the time, proceed as follows:
1. Press and hold the “HOUR” button (Fig. 3) for three seconds
until the number of hours ashes on the display.
2. Before the display stops ashing (about 5 seconds), set the
hour by pressing the “HOUR” button repeatedly.
3. Set the minutes by pressing the “MIN” button (Fig. 3)
repeatedly. (To speed up the operation, hold the button
down.)
4. After setting the time, wait 5 seconds. When the display
stops ashing, the time set is saved.
To reset the time, press and hold the HOUR button for three
seconds, and then follow the procedure as described start-
ing from point 2.
Please note: In the event of a temporary power failure, the
time set does not remain saved in the memory.
7.2 Programming the automatic start (AUTO
BUTTON)
The machine can be programmed to make drip coee automati-
cally. First, make sure that the time is set correctly.
To set the delayed start (i.e. the time you want the coee to be
made), proceed as follows:
1. Press and hold the AUTO button (Fig. 4) for about three
seconds until 0:00 ashes on the display.
2. Before the display stops ashing (about 5 seconds), set the
desired hour by pressing the “HOUR” button repeatedly.
3. Set the minutes by pressing the “MIN” button repeatedly.
4. After 5 seconds, the display will stop ashing and the pro-
grammed time will be saved.
5. After you have programmed the machine as described
above, just press the AUTO button to have coee made at
the time set (The AUTO Button will turn illuminated and
will stay illuminated).
Please note:
• If you want to change the start time after it has been set,
press the AUTO button for about 2 seconds and then set a
new time as described starting from point 2.
• Keep in mind that at the time set, the machine will start to
make drip coee only. The espresso maker does not come
on.
• To cancel the automatic start, you have to press the Auto
button again (it will turn o and will not stay illuminated).
7.3 Keep warming set
The machine is factory-set to keep the coee warm for two
hours after brewing.
However, this setting can be changed as follows:
1. Press and hold the “Coee ON/OFF” button (Fig. 5) for three
seconds until 0:00 ashes on the display.
2. Modify the time by repeatedly pressing the HOUR button
(and also the MIN button if required).
3. After setting the time, wait 5 seconds. When the display
stops ashing, the time will be saved.
Please note: If 0:00 is set, the machine switches o. (You can
set a time between 1 minute and 11hours and 59 minutes).
Loading ...
Loading ...
Loading ...