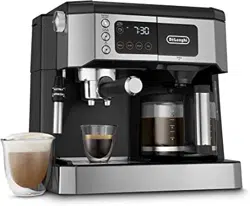
Loading ...
Loading ...
Loading ...
11
be cleaned after each use.
Proceed as follows:
1. Deliver a little steam for a few seconds by turning the
steam dial counterclockwise (g. 24). This causes the froth-
er to discharge any milk left inside. Turn the machine o by
pressing the “Espresso ON/OFF” button.
2. With one hand, hold the frother spout rmly, with the oth-
er, release the frother by turning it counterclockwise, then
pull o downwards (g. 27).
3. Remove the steam connection nozzle from the spout by
pulling it downwards.
4. Wash the frother and steam connection nozzle thoroughly
with warm water.
5. Make sure the two holes shown by the arrows in g. 28 are
not blocked. If necessary, clean with a pin.
6. Put the steam connection nozzle back, pressing forcefully
upwards to insert it onto the steam tube.
7. Replace the frother by pushing upwards and turning clock-
wise.
12. HOT WATER
1. Press the “Espresso ON/OFF” button(g. 12) to turn the ma-
chine on, the integrated light ashes to indicate that the
machine is heating up.
2. In the meantime, place a mug under the frother.
3.
“Espresso ON/OFF” integrated light stops ashing, press the
button (g. 15) and at the same time turn the steam
dial counterclockwise to ON (g. 24). Water comes
out of the frother.
4. To interrupt hot water delivery, press the button
again and turn the steam dial clockwise to OFF.
You should not deliver hot water for more
than 60 seconds.
13. CLEANING
Danger!
• While cleaning, never immerse the coee maker in water.
It is an electrical machine.
• Before cleaning the outside of the machine, turn it o, un-
plug from the mains socket and allow to cool.
13.1 Cleaning the drip tray
Important!
The drip tray is tted with a level indicator (red) showing the le-
vel of water it contains. As soon as the indicator begin to protru-
de from the cup tray, the drip tray must be emptied and cleaned,
otherwise the water may overow the edge and damage the
machine, the surface it rests on or the surrounding area.
1. Remove the drip tray.
2. Remove the cup tray, empty the water and clean the drip
tray with a cloth, then reassemble the drip tray.
3. Put the drip tray back in place.
13.2 Espresso lter cleaning and maintenance
Clean the coee lters weekly:
1 and 2 cup lters
1. Extract the perforated lter by pulling the tab (g. 29);
2. Rinse the lters under running water (g. 30);
3. Make sure the holes are not blocked. If necessary, clean
with a pin (gs. 30 and 31);
4. Place the perforated lter in the lter housing and press as
far as it will go.
Pod lter
Rinse under running water. Make sure the holes are not blocked.
If necessary, clean with a pin (gs. 30 and 31).
13.3 Cleaning the boiler outlet
About every 300 espressos, the boiler outlet must be cleaned
as follows:
• Make sure the machine is not hot and that it is unplugged
from the mains;
• Use a screwdriver to release the screw xing the espresso
boiler outlet (g. 32);
• Remove the boiler outlet;
• Clean the boiler with a damp cloth (g. 32);
• Clean the outlet thoroughly with hot water using a brush.
Make sure the holes are not blocked. If necessary, clean
with a pin.
• Rinse under running water, brushing all the time.
• Replace the boiler outlet, making sure it is correctly posi-
tioned on its gasket.
Failure to clean as described above voids the warranty.
13.4 Other cleaning operations
1. Do not use solvents or abrasive detergents to clean the cof-
fee maker. Use a soft damp cloth only.
2. Clean the portalter, lters and water tank regularly.
Danger!
While cleaning, never immerse the coee maker in water. It is
an electrical machine.
Loading ...
Loading ...
Loading ...