Loading ...
Loading ...
Loading ...
6
Assembly, Operation & Maintenance Instructions
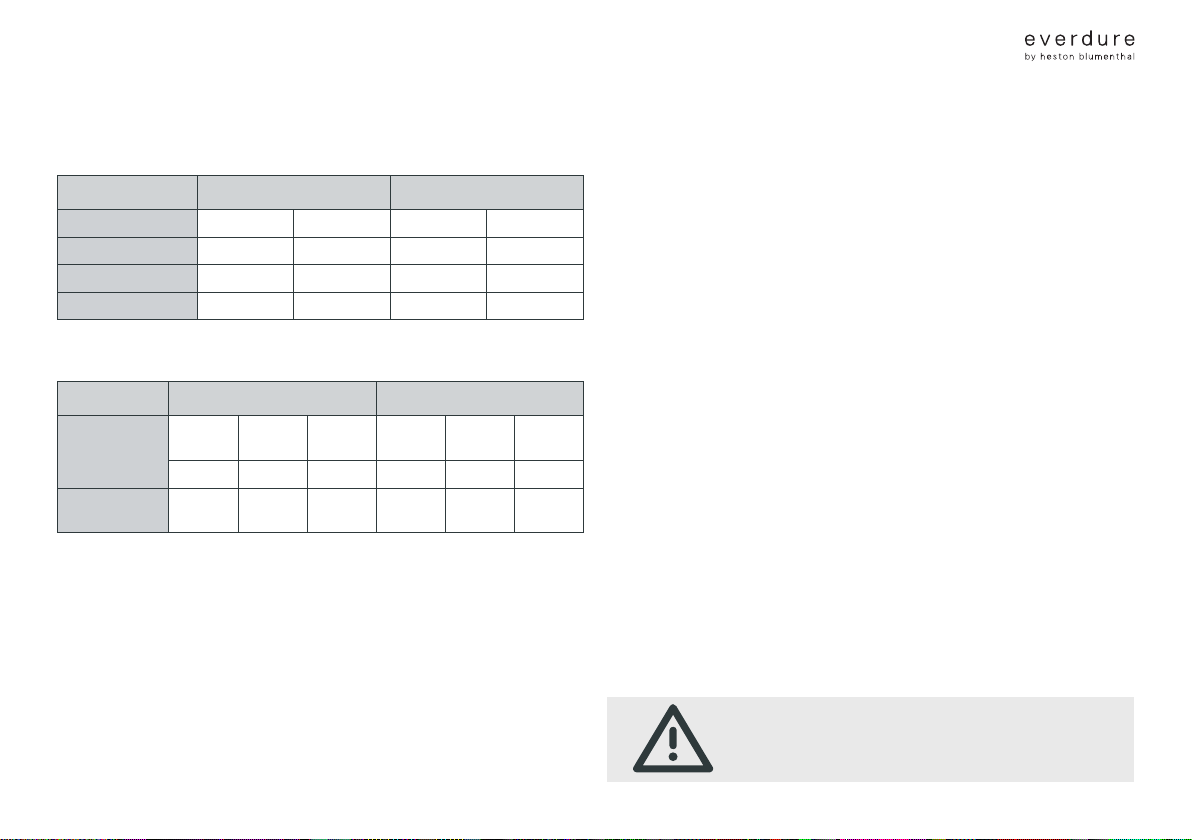
APPLIANCE DETAILS
Barbeque
FORCE
TM
FURNACE
TM
Gas Type ULPG N.G ULPG N.G
Burner Pressure 2.75 kPa 1.0 kPa 2.75 kPa 1.0 kPa
Injector Diameter: Ø0.95 mm Ø1.60 mm Ø0.85 mm Ø1.45 mm
Heat Input: 23 MJ/ hr 23 MJ/ hr 29.1 MJ/ hr 29.1 MJ/ hr
Note: The size of the injector diameter is stamped on one of the hexagon faces (e.g. ‘165’ for
Ø1.65mm injector).
Barbeque
FORCE
TM
FURNACE
TM
Barbeque only LENGTH
(mm)
WIDTH
(mm)
HEIGHT
(mm)
LENGTH
(mm)
WIDTH
(mm)
HEIGHT
(mm)
1170 515 410 1310 515 410
Barbeque and
stand
1170 750 1170 1310 750 1170
Air is admitted at the underside of the combustion chamber (two 35mm x 20mm gaps
between the fat tray and the chamber through an oval hole 75mm x 135mm in size).
Exhaust gases are emitted around the edge of the plates (6mm gap) and through a
275mm x 40mm slot in the rear of the hood. When using an open grill, aeration also takes
place through the slots of the grill.
GAS CONNECTIONS
LOCAL AUTHORITY REQUIREMENTS
Check Gas Type and specications plate on the underside of the right-hand servery. All
gas tting work, service and repairs can only be performed by an authorised person in
accordance with AS5601 and local gas regulations. Hose connections are G1/2-14 for
ULPG & NG
NATURAL GAS
FORCE
TM
& FURNACE
TM
barbeques can be converted to use natural gas ONLY with
a FORCE
TM
& FURNACE
TM
NG conversion kit. Fit the NG injector (into the valve),
regulator and NG hose following the supplied instructions. Conversion of any barbeque
from ULPG to NG (or vice versa) must be done by a licensed gas tter/technician. Refer
to AS5601 for piping sizes. Please contact Everdure by Heston Blumenthal for further
information.
FOR ULPG CYLINDER CONNECTION
1. To achieve the optimum performance from your barbeque, an approved gas cylinder
(POL tting) of 4kg or 9kg capacity must be used. Take care to keep the hose away
from the hot barbeque.
2. Do not connect gas to a barbeque that is not secured in the supplied stand or on a
stable raised surface. The cylinder must be placed on the cylinder support hook at the
right hand side of the stand when one is used. The cylinder should be lower than the
barbeque & in a protected place when not using the stand.
3. Connect the cylinder to the barbeque, via the hose and regulator. Firmly tighten joints,
but do not over-tighten. Take care not to damage the regulator tting. Check that the
gas control knob/valve is in the O position before opening the gas cylinder.
NOTE: Only one gas cylinder should be stored on the stand at any one time.
LEAK TESTING
1. Make sure the gas control knob is O and turn the cylinder valve On.
2. Check for leaking joints by brushing with solution of half-liquid detergent and half water.
If a leak is present, bubbles will appear (or you may hear a hissing sound). Retightening
connections can generally repair a leaking joint. You must also check the gas hose and
connection at the gas cylinder. If a leak cannot be resolved, do not proceed.
DO NOT USE NAKED FLAME FOR LOCATING GAS LEAKS.
IF A LEAK PERSISTS CALL AN AUTHORISED GAS FITTER.
Loading ...
Loading ...
Loading ...