RCTC8GB
Universal Remote Control
Owner’s Manual
Manual del Propietario (parte posterior)
RCTC8GB US 00 R341U1
Battery Saver
Your remote control saves charge by
automatically turning off if any key is pressed
for more than 15 seconds. This saves your
charge should your remote get stuck in a place
where the keys remain depressed, such as
between sofa cushions.
Before you start using the remote, it’s a
good idea to charge it completely.
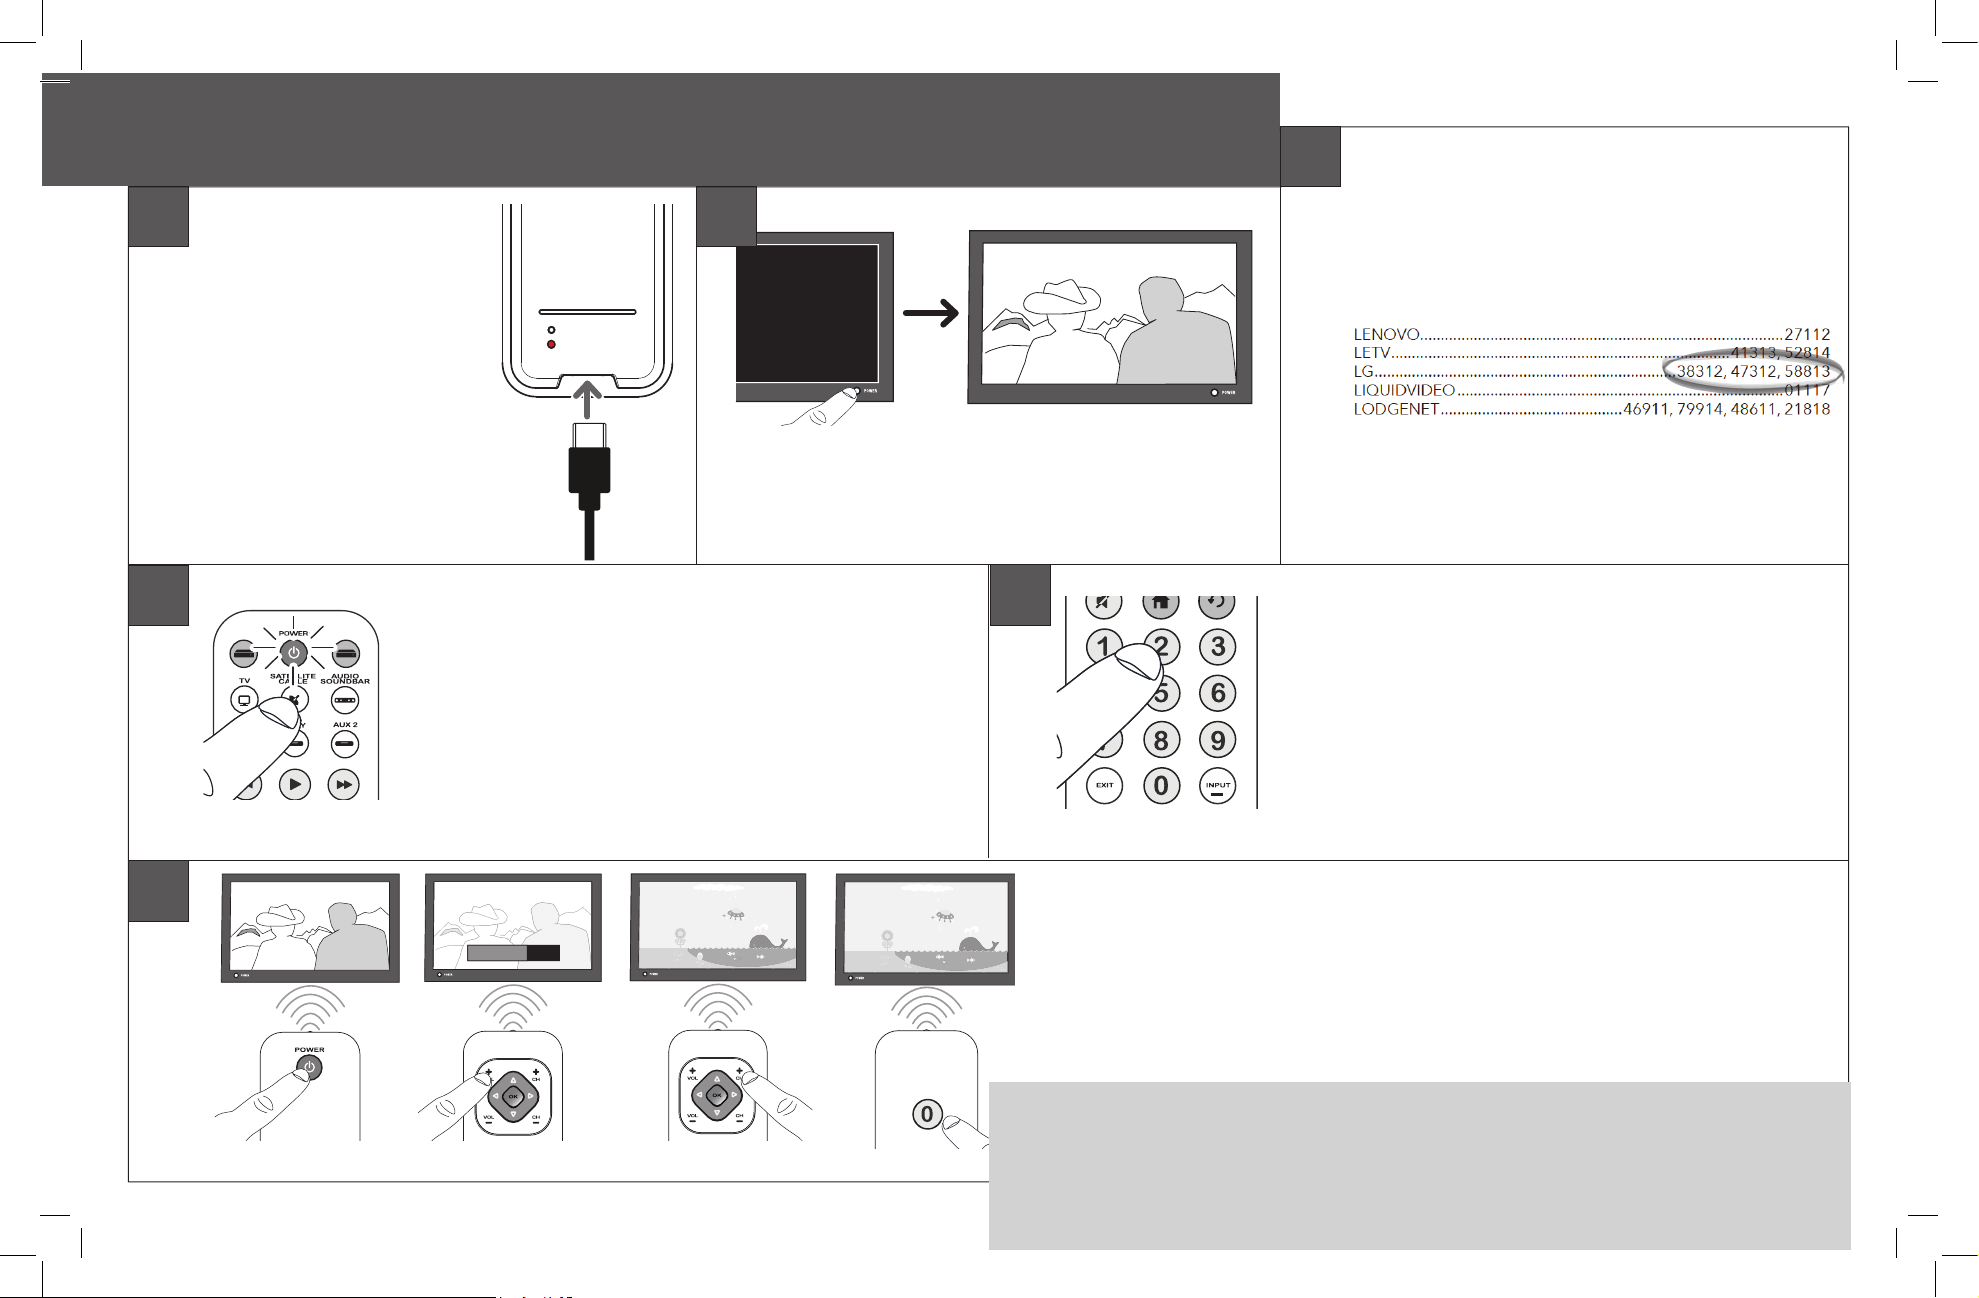
To charge the remote:
1. Plug the charging cable into the
charging jack on the back/bottom
of the remote.
2. Plug the other end into a USB
power source. The red charging
indicator illuminates. The green
indicator illuminates when the
remote is fully charged.
Step 1: Charge the remote
Step 2: Program your remote
To use this remote with your streaming player and TV, rst you
need to program it to control your devices. There are three ways
you can program the remote to operate your devices. Try them in
the order listed.
• The Direct Code Entry lets you enter a code from the
accompanying code list for your brand of device.
• The Auto Code Search: Top Brands searches through the
codes for select brands of devices.
• The Auto Code Search: All Brands goes automatically through
all the codes for the device you’re trying to control.
IMPORTANT!
This remote is already programmed to operate most Samsung
TVs, DVD and Blu Ray players, Comcast cable boxes, Roku
streaming players, and JBL audio products. Just press the
corresponding key—DVD/B RAY for a DVD or Blu Ray player, TV
for a television, SATELLITE/CABLE for a cable box, STREAM 1
or STREAM 2 for a streaming player, or AUDIO/SOUNDBAR for
an audio device or soundbar.
This remote also supports control of CEC enabled RF devices,
like the Amazon Fire TV Stick, Google Chromecast, and Roku
Stick, via HDMI CEC connection. For this control you don’t
need to program the remote for the RF device, just for the TV.
Consult your TV’s owner’s manual for instructions on enabling
HDMI CEC control.
Direct Code Entry
Direct Code Entry lets you enter a code from the accompanying
code list for your brand of device.
1. Manually turn on the device you want
to control.
3. Press and hold the device key you
want to program for about 2 seconds,
until the POWER key illuminates and
stays on. Then release the key.
2. Find the Code List that came with
the remote. Locate the section for
the type of device you’re trying to
program, and nd your brand in that
section. Circle the codes for your
brand and keep them handy.
4. Enter the rst ve-digit code for your
brand in the code list (the POWER key
ashes after each digit).
NOTES
Test the remote with the device to make sure the device key is
programmed with the correct code for maximum functionality.
If some features don’t work, try a different code in the list.
Remember to enter the code for future reference in the box
provided in the Code Retrieval section of this manual.
If your brand isn’t listed in the code list, use the Auto Code
Search method to program the remote control.
NO, it’s still illuminated: You have either entered a code
number that is not in the code lists or missed a step in the
code entry procedure. Try step 4 again.
5. When you’ve nished entering the
ve-digit code, look at the POWER
key.
Did the POWER key turn off?
YES: You’re done! You’ve
programmed this device key.
MENU
STREAM 2STREAM 1
MENU
STREAM 2STREAM 1
POWER
MENU
STREAM 2STREAM 1
POWER
Auto Code Search: Top Brands
This search goes automatically through all device codes for the
select brands listed below. If your brand of device is listed, this
search can be quick and easy.
3. Manually turn on the device you want to
control.
1. Press and hold the device key you want
to program for about 2 seconds, until
the POWER key illuminates and stays
on. Then release the key.
2. Enter the ve-digit device code for
your device you want to operate.
11111 TV
22222 VCR
33333 Streaming Player
44444 Satellite Receiver, Cable Box, Digital TV Converter
55555 DVD / Blu Ray Player
88888 Projector
66666 Audio/Amplier
66664 Soundbar
The POWER key ashes after the rst four digits and turns off
after the fth.
4. Press and hold the device key you want
to program for 2 seconds, until the
POWER key illuminates and stays on.
Then release the key.
5. Point the remote directly at the front
panel of the device you want to control.
Press POWER on the remote.
The remote starts sending the on/
off command for a new code every 2
seconds.
When your device turns off:
Press the
key to store the code. You’re done! You’ve
programmed this device key.
If your device turns off but you waited more than 2 seconds:
Press the
key to go backwards through the last few codes.
When your device turns back on again, press
to store that
code.
Testing the Code for Maximum Functionality
1. Try a variety of the device’s functions with the remote. If
some device features don’t work, go to the next step to try a
different code.
2. Repeat the Brand Code Search from step 3.
3. Test the key’s functionality again by attempting to control
a variety of the device’s functions. If the code that has
been stored controls the majority of the device’s functions,
programming is complete. If the code stored does not give
maximum functionality, try another code.
NOTES
Throughout the programming of each key, be sure to keep the
remote pointed at the IR sensor of the device you are currently
programming the remote to control.
Test the remote with the device to make sure the device key is
programmed with the correct code for maximum functionality.
If some features don’t work, try a different code. See the
“Testing the Code for Maximum Functionality” section below
for more information.
DVD-BLURAY
BLACK WEB, DENON, FUNAI, HITACHI, INSIGNIA, JVC,
LG, MAGNAVOX, MEMOREX, ONKYO, ONN, OPPO,
PANASONIC, PHILIPS, PHILIPS-MAGNAVOX, PIONEER,
RCA, SAMSUNG, SANYO, SHARP, SONY, SYLVANIA,
TOSHIBA, VIZIO
PROJECTOR
3M, BENQ, EPSON, LG, MITSUBISHI, NEC, OPTOMA,
PANASONIC, SONY, VIEWSONIC
VCR
HITACHI, JVC, MAGNAVOX, PHILIPS, RCA, SAMSUNG,
SANSUI, SANYO, SHARP, SONY, YAMAHA
AUDIO
BOSE, DENON, HARMAN/KARDON, KENWOOD,
MARANTZ, ONKYO, PHILIPS, PIONEER, PYLE, SAMSUNG,
SHERWOOD, SONY, TEAC, YAMAHA
SOUNDBAR
BOSE, DEFINITIVE TECHNOLOGY, DENON, HARMAN/
KARDON, ILIVE, INSIGNIA, JBL, KLIPSCH, LG, MAGNAVOX,
ONKYO, ONN, PHILIPS, POLK AUDIO, RCA, ROKU,
SAMSUNG, SANYO, SHARP, SONOS, SONY, TCL, TOSHIBA,
VIZIO, WOHOME, YAMAHA
CD PLAYER
HARMAN/KARDON, KENWOOD, MAGNAVOX, ONKYO,
PHILIPS, RCA, SANSUI, SANYO, SHERWOOD, TEAC, SONY,
YAMAHA, ZENITH
MENU
STREAM 2STREAM 1
MENU
STREAM 2STREAM 1
POWER
MENU
STREAM 2STREAM 1
POWER
TV
APEX, ELEMENT, EMERSON, HAIER, HISENSE, HITACHI,
INSIGNIA, JVC, LG, MAGNAVOX, MITSUBISHI, OLEVIA,
ONN, PHILIPS, PHILIPS-MAGNAVOX, PIONEER, POLAROID,
PROSCAN, RCA, ROKU TV, SAMSUNG, SANSUI, SANYO,
SCEPTRE, SEIKI, SHARP, SKYWORTH, SONY, SUNBRITE TV,
SYLVANIA, TCL, TOSHIBA, VIZIO, WESTINGHOUSE
STREAM
ALTICE, APPLE TV, ASUS, AT&T, BOXEE, CHANNEL
MASTER, DIGITAL STREAM, D-LINK, IVIEW, LETV, LG,
MAGNAVOX, MICCA, NETGEAR, NVIDIA, ONN, PHILIPS,
RCA, ROKU, SAMSUNG, SHARP, SLING, SONY, TIVO,
UNBLOCK TECH, VANKYO, VIZIO, WD (WESTERN
DIGITAL), XBOX, XIAOMI, XTREAMER
SAT-CBL
ADELPHIA, AMINO, ARRIS, AT&T, BELL, CABLE
ONE, CABLEVISION, CHANNEL MASTER, CHARTER
COMMUNICATIONS, CHARTER DIGITAL, CISCO, COMCAST/
XFINITY, CONSOLIDATED COMMUNICATIONS, COX,
DIRECTV, DISH NETWORK, ENTONE, HOMEWORX, HUMAX,
MEDIACOM, MOTOROLA, OPTIMUM, PACE, SAMSUNG,
SCIENTIFIC ATLANTA, SHAW, SKY NETWORK, SONY,
SPECTRUM, SUDDEN LINK, TIVO, UNIVERSAL, VERIZON
Auto Code Search: All Brands
This search goes automatically through all the codes for the device
you’re trying to control. When you nd the one that operates your
device, you can stop the search and store that code.
1. Press and hold the device key you want
to program for about 2 seconds, until
the POWER key illuminates and stays on.
Then release the key.
5. Point the remote directly at the front panel of the device you
want to control. Press
on the remote.
The remote starts sending the on/off command for a new code
every 2 seconds.
When your device turns off:
Press the
key to store the code. You’re done! You’ve
programmed this device key.
If your device turns off but you waited more than 2 seconds:
Press the
key to go backwards through the last few codes.
When your device turns back on again, press
to store that
code.
3. Manually turn on the device you want to
control.
2. Enter the ve-digit device code for your
device you want to operate.
11111 TV
22222 VCR
33333 Streaming Player
44444 Satellite Receiver, Cable Box,
Digital TV Converter
55555 DVD / Blu Ray Player
88888 Projector
66666 Audio/Amplier
66664 Soundbar
The POWER key ashes after the rst four digits and turns off
after the fth.
4. Press and hold the device key you
want to program for about 2 seconds,
until the POWER key illuminates. Then
release the key.
Testing the Code for Maximum Functionality
1. Try a variety of the device’s functions with the remote. If
some device features don’t work, go to the next step to try
a different code.
2. Repeat the search from step 3.
3. Test the key’s functionality again by attempting to control
a variety of the device’s functions. If the code that has
been stored controls the majority of the device’s functions,
programming is complete. If the code stored does not give
maximum functionality, try another code.
NOTES
Throughout the programming of each key, be sure to keep the
remote pointed at the IR sensor of the device you are currently
programming the remote to control.
Test the remote with the device to make sure the device key is
programmed with the correct code for maximum functionality.
If some features don’t work, try a different code. See the
“Testing the Code for Maximum Functionality” section below
for more information.
MENU
STREAM 2STREAM 1
MENU
STREAM 2STREAM 1
POWER
MENU
STREAM 2STREAM 1
POWER
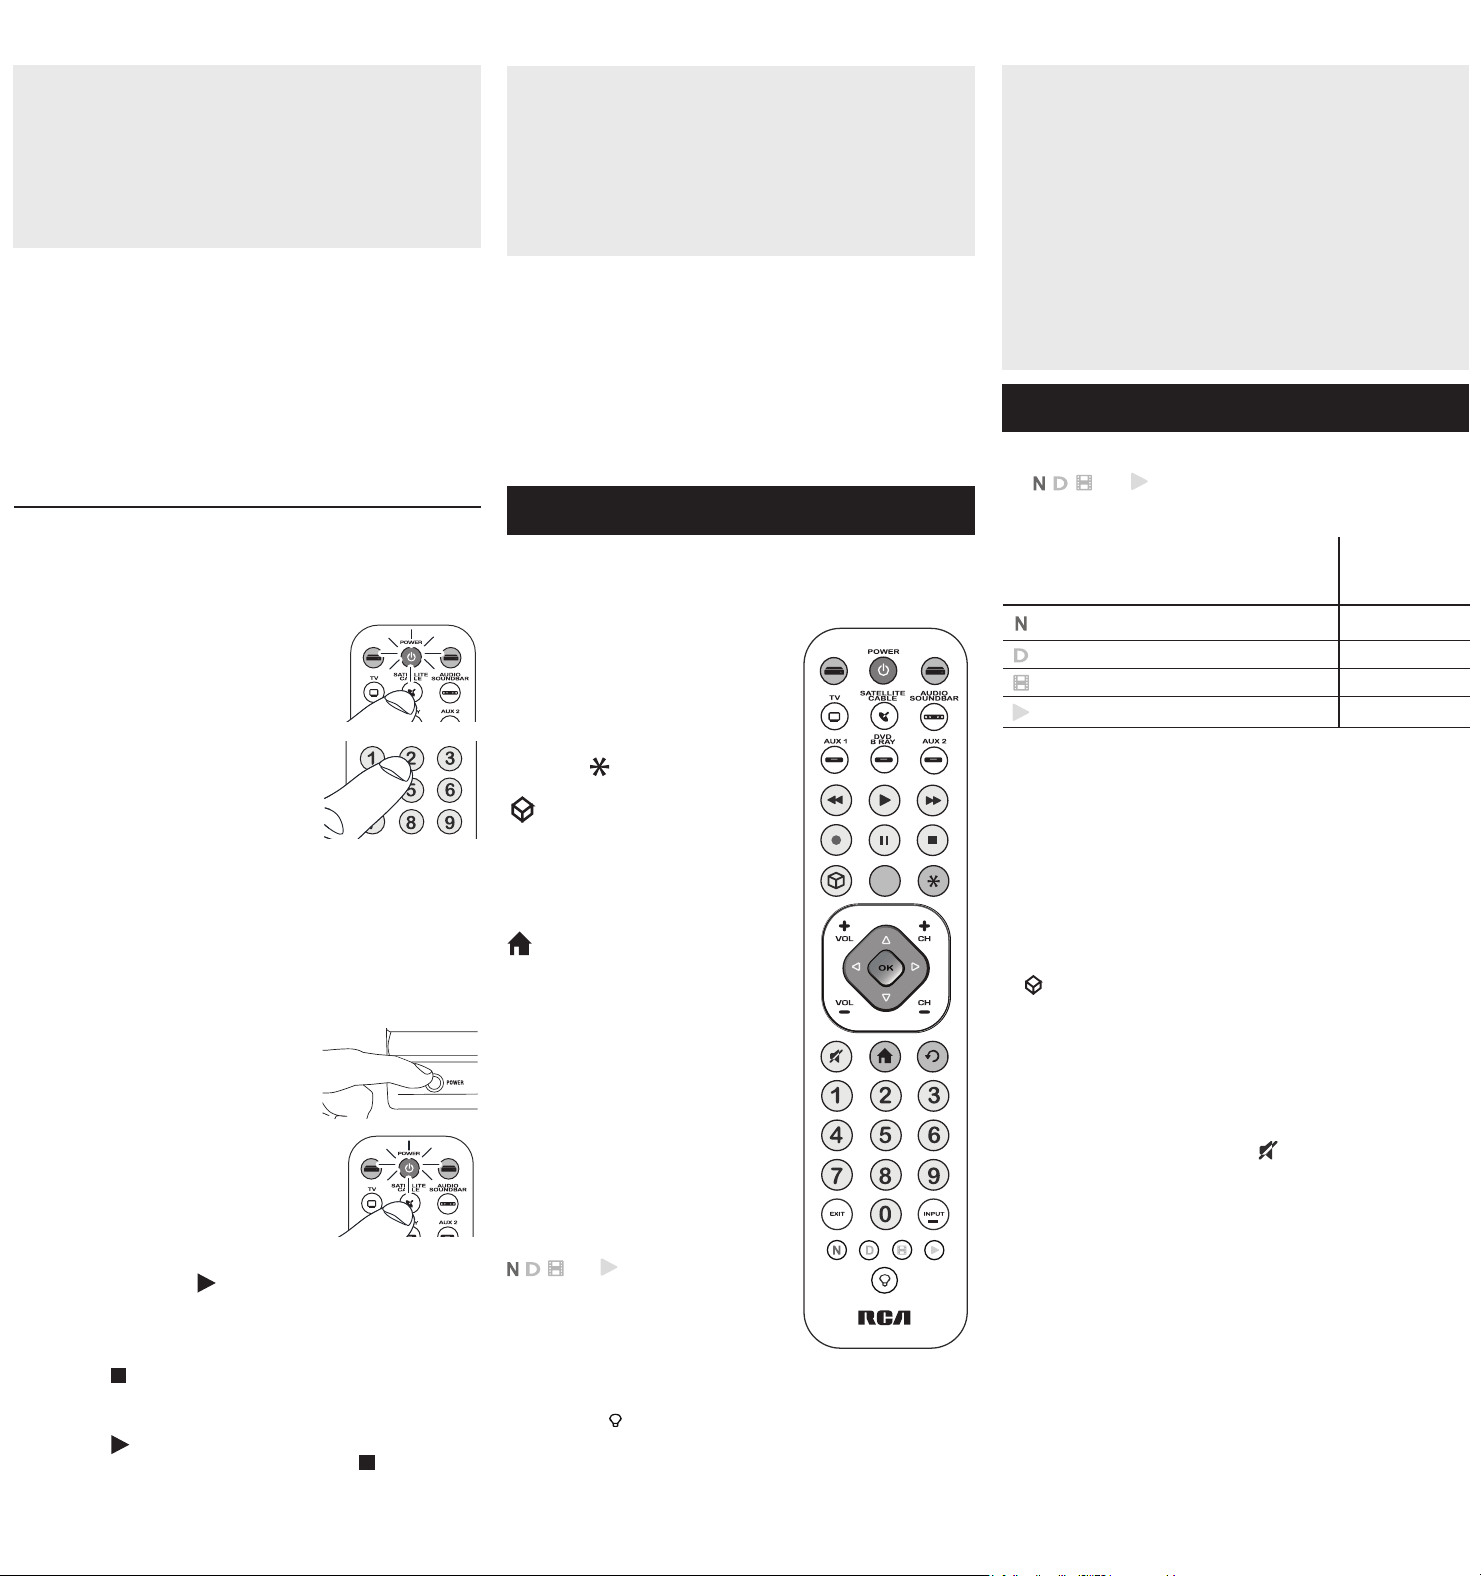
Tour of the Remote
In most cases, the keys on this remote perform the same functions
as the keys on your original remotes once you’ve programmed this
remote to operate your components. Many keys on this remote have
other functions as well.
MENU
STREAM 2STREAM 1
Actual model may
vary from illustration
IMPORTANT
The shortcut keys mimic the functionality of your device’s
original remote — for example, if the original remote that
came with your SmartTV doesn’t have a YouTube key, chances
are this remote’s YouTube key will not automatically give you
direct access to YouTube on your SmartTV. You can, however,
set up a macro on that key to perform this function. See the
Shortcut / Macro Keys section for more information.
Because this remote controls more than one device, you must
rst “tell” the remote which device you wish to operate. That
means, if you wish to operate your TV, you must rst press the
TV key to put the remote in the TV Mode. The remote stays
in that device mode until you press a different device key.
For example, if your remote is in TV Mode and you want to
operate the DVD player, you must press the DVD/B RAY key to
change device modes.
Illuminated POWER key serves as an
indicator light to provide feedback.
Device keys (TV, SATELLITE/CABLE,
STREAM 1 and 2, DVD/B RAY,
AUDIO/SOUNDBAR, AUX 1 and 2)
put the remote in the right mode to
control your device.
MENU and
access device menu
and information screens.
controls Samsung Hub functionality
on TVs. It may also control similar
functionality on other devices (see your
device manual for information).
EXIT exits remote programming; it also
performs the same functions as on your
original remotes.
puts the remote in guide mode
for satellite receivers or cable boxes,
and accesses the home screen for
streaming players.
Arrow keys and OK act as navigation
and selection keys in device guides
and menu systems.
The INPUT — (dash) key has three
functions: (1) it toggles through all the
video sources connected to your TV;
(2) when the remote is in VCR mode,
this button toggles between VCR and
the TV input; (3) when you’re entering
digital channel numbers directly, this
button lets you separate the main
channel number from the sub-channel
number (like 59.1).
, , , and provide direct access
to Netix, Disney+, Hulu, and YouTube
if supported by your streaming player
or smart TV. These keys also provide
additional functionality on other
components and can execute macro
functions if programmed (see the
Shortcut / Macro Keys section).
Backlight key (
) turns backlighting
on/off.
Advanced Functions
Shortcut/Macro Keys
The , , , and keys have different functions depending on
the device you’re controlling and whether you press or press and
hold them.
Press
Press & Hold
(2+ seconds)
SmartTV,
Streaming Player
(if supported)
DVD/Bluray,
Satellite/Cable
(if supported)
Netix red key Macro 1
Disney+ blue key Macro 2
Hulu green key Macro 3
YouTube yellow key Macro 4
Setting Up Macros
Macros are multi-step functions you can program to a single
keypress, like accessing a streaming service directly if your
streaming player or TV doesn’t support hot keys.
To set up a macro:
1. Press and hold the device key for the device you want to use the
macro on. (For example, press and hold the TV key to program
a macro for TV.) The POWER key illuminates.
Note: Each macro works for a single device only.
2. Press the App key you want to use to store the macro. The
POWER key blinks and stays illuminated.
3. Press the keys you want in the order you want for the macro.
(For example, to access a streaming service on your TV, press
, then use the arrow keys to highlight the service, and press
OK). Note: Each App key can store a maximum of 14 macro
steps overall.
4. Press the App key again to store the macro. The POWER key
turns off.
To use the macro: Make sure you’re in the right device mode.
Then press and hold the App key storing the macro.
Channel Lock
Channel lock automatically sends channel commands, like the
CH and 0–9 number keys, to your satellite receiver, cable box,
or digital TV converter when you’re in TV mode. This can save
you keypresses if you use a device other than your TV to change
channels.
To turn channel lock on:
1. Press and hold the device key you want to use to change
channels for about 2 seconds until the POWER key illuminates.
Then release the device key.
2. Press the CH + key once. The POWER key ashes once and
remains on.
3. Press OK to lock channel commands to this device. The POWER
key ashes twice and turns off.
To turn channel lock off:
1. Press any device key for about 2 seconds until the POWER key
illuminates. Then release device key.
2. Press the CH — key once. The POWER key ashes once and
remains on.
3. Press OK to unlock channel commands. The POWER key ashes
twice and turns off.
TV Volume Lock and Advanced Volume Lock
TV Volume Lock allows the VOL and keys, when pressed in
SATELLITE/CABLE, STREAM, or DVD/B RAY modes, to go directly
to your TV. TV Volume Lock occurs automatically and allows you to
control the TV volume without exiting the current mode.
Note: TV Volume Lock does not occur in cases where the component code has
its own volume/mute controls, such as some satellite receivers.
Advanced Volume Lock lets you lock volume controls to a different
component, like a soundbar or audio receiver.
To use Advanced Volume Lock:
1. Press and hold the device key you want to use to control volume
for about 2s until the POWER key illuminates and stays on. Then
release the device key.
2. Press VOL+ once. The POWER key ashes once and remains
illuminated.
3. Press OK once to lock volume commands to this device. The
POWER key ashes twice and turns off.Volume commands will
now go to the device you specied.
To turn Advanced Volume Lock off:
1. Press and hold the device key that currently controls volume for
about 2s until the POWER key illuminates and stays on. Then
release the device key.
Code Retrieval
If you used one of the Code Search methods to program your remote
or if you used the Direct Entry method but don’t remember the code
you used, you can retrieve each device’s ve-digit code and write it
down for reference below.
1. Press and hold the device key (TV, SATELLITE/CABLE, STREAM1/2,
AUDIO/SOUNDBAR, DVD/B RAY, AUX1/2) whose code you wish to
retrieve for 2 seconds until the POWER key illuminates and stays on.
Then release device key.
2. Press the MENU key. The POWER key ashes once and remains
illuminated.
3. To retrieve the rst number in the code, press the 1 key on the
remote. The POWER key blinks to show the number that is the rst
digit in the code. For example, if the POWER key blinks 3 times
when you press the 1 key, the rst number in the code is 3. Write this
number in the corresponding box below.
Repeat for each number in the code—press 2 to see the second
number in the code, 3 for the third, and so on until you have all 5.
4. Press MENU to exit code retrieval.
TIP: To exit the Code Retrieval at any time, press the MENU key.
TV CODE
_ _ _ _ _
SATELLITE/
CABLE
CODE
_ _ _ _ _
STREAM 1
CODE
_ _ _ _ _
STREAM 2
CODE
_ _ _ _ _
DVD/B RAY
CODE
_ _ _ _ _
AUDIO/
SOUNDBAR
CODE
_ _ _ _ _
AUX1 CODE
_ _ _ _ _
AUX2 CODE
_ _ _ _ _
2. Press VOL- once. The POWER key ashes once and remains
illuminated.
3. Press OK once to unlock Volume commands. The POWER key
ashes twice and then turns off. Volume commands will now go
to your TV.
Troubleshooting
Problem: The remote can’t be programmed to operate your
device.
• If you are testing the remote while programming it, you may be too far away
from the device or at a wrong angle. There must be an unobstructed path
between the remote and the IR sensor on the device. Move closer and make
sure you point the remote at the device you’re trying to control.
• If you’re using the Direct Entry programming method to enter the codes for
your brand and the unit is still not functioning properly, try one of the automatic
search methods.
• Make sure the remote is charged. Insert the charging cable into the charging
port on the bottom of the remote. Plug the other end of the cable into a USB
power source, like a computer or USB adapter (not included). The red indicator
on the back of the remote illuminates while the remote is charging. The green
indicator turns on when the remote is fully charged.
Problem: The remote doesn’t perform commands properly.
• Make sure the remote is in the correct mode by pressing the corresponding
device key (TV, SATELLITE/CABLE, STREAM 1 and 2, DVD/B RAY, AUDIO/
SOUNDBAR, AUX1/2). This tells the remote which device to operate.
• Make sure device is ready (for example, the DVD player has a disc loaded).
• You may have pressed an invalid key for the mode the remote is in.
• If you’re trying to enter a channel number directly, try pressing the OK key after
entering the channel number as this is a requirement of certain models and
brands.
• The programmed code may only be able to control some of your device
features (for example, only turns a device on and off). To conrm that the device
key is programmed with the correct code for maximum functionality, test the
device. Attempt to control a variety of the device’s functions with the remote. If
some of the features of your devices don’t work, try programming the remote
with a different code in the list using the Direct Code Entry Method, until you
nd the code that allows the remote to control the majority of your device’s
functions. Different codes can provide different levels of functionality.
Problem: The POWER key does not light when you press a key.
• You may have pressed an invalid key for the mode the remote is in.
• Make sure the remote is in the correct mode by pressing the corresponding
device key (TV, SATELLITE/CABLE, STREAM 1 and 2, DVD/B RAY, AUDIO/
SOUNDBAR, AUX1/2). This tells the remote which device to operate.
• Make sure the remote is charged. Insert the charging cable into the charging
port on the bottom of the remote. Plug the other end of the cable into a USB
power source, like a computer or USB adapter (not included). The red indicator
on the back of the remote illuminates while the remote is charging. The green
indicator turns on when the remote is fully charged.
Problem: Remote backlighting doesn’t work.
• Press the key to activate backlighting.
• Make sure the remote is charged. Insert the charging cable into the charging
port on the bottom of the remote. Plug the other end of the cable into a USB
power source, like a computer or USB adapter (not included). The red indicator
on the back of the remote illuminates while the remote is charging. The green
indicator turns on when the remote is fully charged.
Problem: The remote will not change channels on device.
• Make sure the remote is in the correct mode by pressing the corresponding
device key (TV, SATELLITE/CABLE, STREAM 1 and 2, DVD/B RAY, AUDIO/
SOUNDBAR, AUX1/2). This tells the remote which device to operate.
• Press the OK key after you enter a channel number.
• Remove any obstacles between the remote and the device. Make sure to aim
the remote at the IR sensor on the device.
Problem: The device’s menu does not appear on the TV screen.
• Make sure you have connected the device to your TV properly and selected
the correct input. (See your devices’ Owner’s Manuals for proper connection
procedures.)
• Make sure the remote is in the correct mode by pressing the corresponding
device key (TV, SATELLITE/CABLE, STREAM 1 and 2, DVD/B RAY, AUDIO/
SOUNDBAR, AUX1/2). This tells the remote which device to operate.
• Menu access isn’t supported for all brands. You may need to use your original
remote control to access menu functions for some devices.
Problem: The remote’s shortcut/macro keys don’t work as
expected.
• Make sure the remote is in the correct mode by pressing the corresponding
device key (TV, SATELLITE/CABLE, STREAM 1 and 2, DVD/B RAY, AUDIO/
SOUNDBAR, AUX1/2). This tells the remote which device to operate.
• The shortcut keys mimic the functionality of your device’s original remote — for
example, if the original remote that came with your SmartTV doesn’t have
a YouTube key, chances are this remote’s YouTube key will not automatically
give you direct access to YouTube on your SmartTV. You can, however, set up
a macro on that key to perform this function. See the Shortcut / Macro Keys
section for more information.
For more information, including instructional videos,
remote programming codes, and customer support, visit
www.RCACodeSupport.com
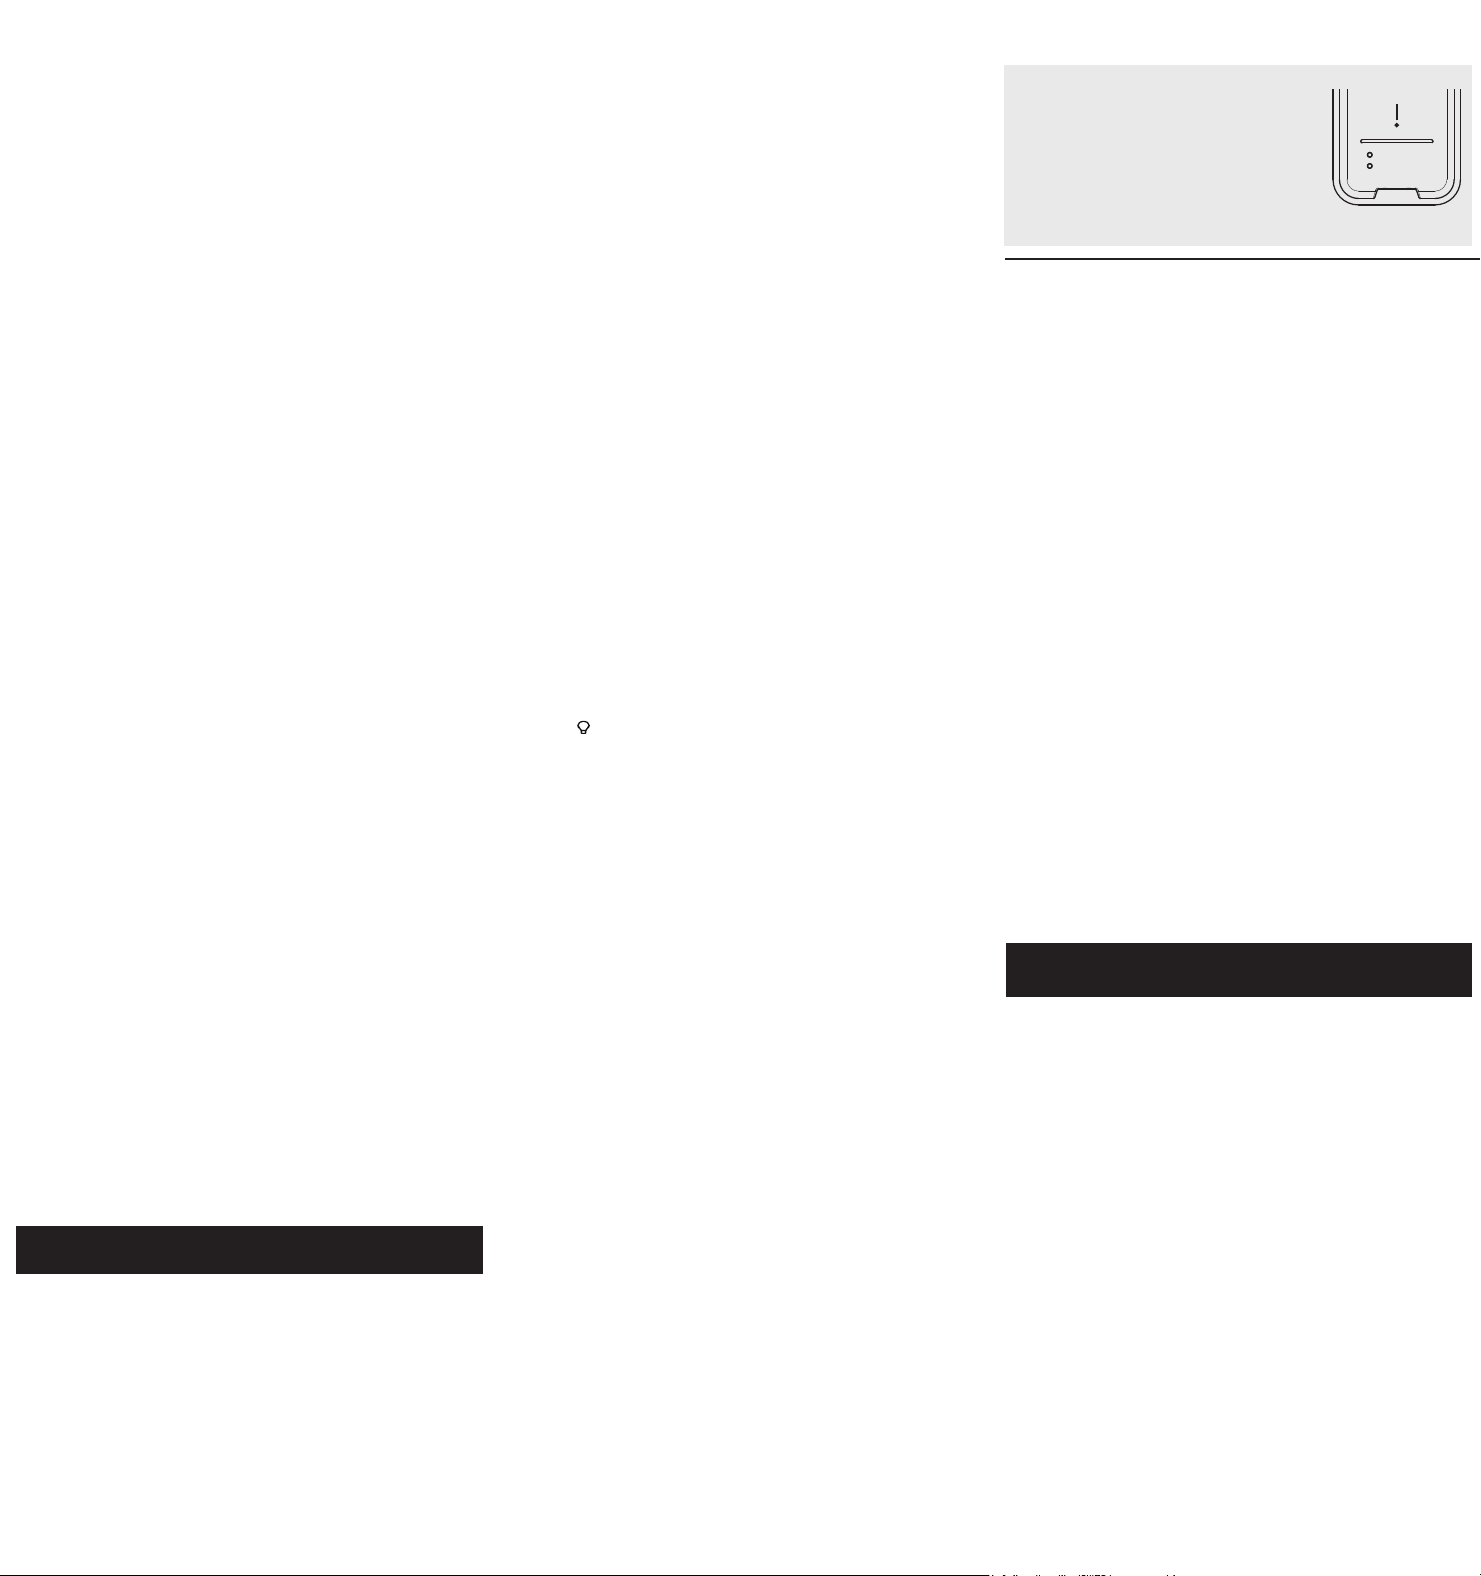
TO RESET THE REMOTE:
Find the reset port on the back of the
remote, toward the bottom and in the
middle of the back. Unbend a paper clip
and insert it into this hole until you reach
the reset button on the inside of the
remote. Press for 2-3 seconds to reset
the remote. You will need to recharge the
remote and reprogram it to control your devices.
Reset port
Care and Maintenance
• Keep the remote dry. If it gets wet, wipe it dry immediately.
• Use and store the remote only in normal temperature environments.
• Handle the remote gently and carefully. Don’t drop it.
• Keep the remote away from dust and dirt.
• Wipe the remote with a damp cloth occasionally to keep it looking new.
• Modifying or tampering with the remote’s internal devices can cause
malfunction and invalidate its warranty.
Ecology
Your product must be disposed of properly according to local laws and
regulations. Because this product contains a rechargeable battery, the product
must be disposed of separately from the household waste.
Problem: The remote does not operate your device.
• Make sure the remote is in the correct mode by pressing the corresponding
device key (TV, SATELLITE/CABLE, STREAM 1 and 2, DVD/B RAY, AUDIO/
SOUNDBAR, AUX1/2). This tells the remote which device to operate.
• Remove any obstacles between the remote and the device. Make sure
you’re aiming the remote at the device’s IR sensor.
• Make sure the remote is charged. Insert the charging cable into the charging
port on the bottom of the remote. Plug the other end of the cable into a
USB power source, like a computer or USB adapter (not included). The red
indicator on the back of the remote illuminates while the remote is charging.
The green indicator turns on when the remote is fully charged.
©2022 Voxx Accessories Corporation Trademark(s) ® Registered
Voxx Accessories Corporation (the “Company”) warrants to you the
original retail purchaser of this product that should it, under normal use
and conditions, be proven defective in material or workmanship during its
lifetime while you own it, such defect(s) will be repaired or replaced (at the
Company’s option) without charge for parts and repair labor.To obtain repair
or replacement within the terms of the warranty, the product is to be delivered
with proof of warranty coverage (e.g. dated bill of sale), specication of
defect(s), transportation prepaid, to an approved warranty station. For the
location of the nearest warranty station to you, call toll-free to our control
ofce: 1-800-645-4994.
This Warranty does not cover product purchased, serviced or used outside
the United States or Canada. This Warranty is not transferable and does
not extend to costs incurred for installation, removal or reinstallation of
the product. This Warranty does not apply if in the Company’s opinion,
the product has been damaged through alteration, improper installation,
mishandling, misuse, neglect, accident, or the simultaneous use of different
battery types (e.g. alkaline, standard or rechargeable). THE EXTENT OF
THE COMPANY’S LIABILITY UNDER THIS WARRANTY IS LIMITED TO THE
REPAIR OR REPLACEMENT PROVIDED ABOVE AND, IN NO EVENT, SHALL
THE COMPANY’S LIABILITY EXCEED THE PURCHASE PRICE PAID BY
PURCHASER FOR THE PRODUCT.
This Warranty is in lieu of all other express warranties or liabilities. ANY
IMPLIED WARRANTIES, INCLUDING ANY IMPLIED WARRANTY OF
MERCHANTABILITY OR FITNESS FOR A PARTICULAR PURPOSE SHALL
BE LIMITED TO DURATION OF THIS WARRANTY. IN NO CASE SHALL
THE COMPANY BE LIABLE FOR ANY CONSEQUENTIAL OR INCIDENTAL
DAMAGES WHATSOEVER. No person or representative is authorized
to assume for the Company any liability other than expressed herein in
connection with the sale of this product.
Some states/provinces do not allow limitations on how long an implied
warranty lasts or the exclusion or limitation of incidental or consequential
damage so the above limitations or exclusions may not apply to you. This
Warranty gives you specic legal rights and you may also have other rights,
which vary from state/province to state/province.
Limited Lifetime Warranty
FCC Statement:
This device complies with part 15 of the FCC Rules. Operation is subject
to the following two conditions: (1) This device may not cause harmful
interference, and (2) this device must accept any interference received,
including interference that may cause undesired operation.
Note: This equipment has been tested and found to comply with the limits
for a Class B digital device, pursuant to part 15 of the FCC Rules. These limits
are designed to provide reasonable protection against harmful interference
in a residential installation. This equipment generates, uses and can radiate
radio frequency energy and, if not installed and used in accordance with the
instructions, may cause harmful interference to radio communications. However,
there is no guarantee that interference will not occur in a particular installation. If
this equipment does cause harmful interference to radio or television reception,
which can be determined by turning the equipment off and on, the user is
encouraged to try to correct the interference by one or more of the following
measures:
• Reorient or relocate the receiving antenna.
• Increase the separation between the equipment and receiver.
• Connect the equipment into an outlet on a circuit different from that to
which the receiver is connected.
• Consult the dealer or an experienced radio/TV technician for help.
Caution: Any changes or modications not expressly approved by the party
responsible for compliance could void the user’s authority to operate this
equipment.
ISED Compliance Statement CAN ICES-003(B) / NMB-003(B)
RCTC8GB
Universal Remote Control
Owner’s Manual
Manual del Propietario (parte posterior)
RCTC8GB US 00 R341U1
Battery Saver
Your remote control saves charge by
automatically turning off if any key is pressed
for more than 15 seconds. This saves your
charge should your remote get stuck in a place
where the keys remain depressed, such as
between sofa cushions.
Before you start using the remote, it’s a
good idea to charge it completely.
To charge the remote:
1. Plug the charging cable into the
charging jack on the back/bottom
of the remote.
2. Plug the other end into a USB
power source. The red charging
indicator illuminates. The green
indicator illuminates when the
remote is fully charged.
Step 1: Charge the remote
Step 2: Program your remote
To use this remote with your streaming player and TV, rst you
need to program it to control your devices. There are three ways
you can program the remote to operate your devices. Try them in
the order listed.
• The Direct Code Entry lets you enter a code from the
accompanying code list for your brand of device.
• The Auto Code Search: Top Brands searches through the
codes for select brands of devices.
• The Auto Code Search: All Brands goes automatically through
all the codes for the device you’re trying to control.
IMPORTANT!
This remote is already programmed to operate most Samsung
TVs, DVD and Blu Ray players, Comcast cable boxes, Roku
streaming players, and JBL audio products. Just press the
corresponding key—DVD/B RAY for a DVD or Blu Ray player, TV
for a television, SATELLITE/CABLE for a cable box, STREAM 1
or STREAM 2 for a streaming player, or AUDIO/SOUNDBAR for
an audio device or soundbar.
This remote also supports control of CEC enabled RF devices,
like the Amazon Fire TV Stick, Google Chromecast, and Roku
Stick, via HDMI CEC connection. For this control you don’t
need to program the remote for the RF device, just for the TV.
Consult your TV’s owner’s manual for instructions on enabling
HDMI CEC control.
Direct Code Entry
Direct Code Entry lets you enter a code from the accompanying
code list for your brand of device.
1. Manually turn on the device you want
to control.
3. Press and hold the device key you
want to program for about 2 seconds,
until the POWER key illuminates and
stays on. Then release the key.
2. Find the Code List that came with
the remote. Locate the section for
the type of device you’re trying to
program, and nd your brand in that
section. Circle the codes for your
brand and keep them handy.
4. Enter the rst ve-digit code for your
brand in the code list (the POWER key
ashes after each digit).
NOTES
Test the remote with the device to make sure the device key is
programmed with the correct code for maximum functionality.
If some features don’t work, try a different code in the list.
Remember to enter the code for future reference in the box
provided in the Code Retrieval section of this manual.
If your brand isn’t listed in the code list, use the Auto Code
Search method to program the remote control.
NO, it’s still illuminated: You have either entered a code
number that is not in the code lists or missed a step in the
code entry procedure. Try step 4 again.
5. When you’ve nished entering the
ve-digit code, look at the POWER
key.
Did the POWER key turn off?
YES: You’re done! You’ve
programmed this device key.
MENU
STREAM 2STREAM 1
MENU
STREAM 2STREAM 1
POWER
MENU
STREAM 2STREAM 1
POWER
Auto Code Search: Top Brands
This search goes automatically through all device codes for the
select brands listed below. If your brand of device is listed, this
search can be quick and easy.
3. Manually turn on the device you want to
control.
1. Press and hold the device key you want
to program for about 2 seconds, until
the POWER key illuminates and stays
on. Then release the key.
2. Enter the ve-digit device code for
your device you want to operate.
11111 TV
22222 VCR
33333 Streaming Player
44444 Satellite Receiver, Cable Box, Digital TV Converter
55555 DVD / Blu Ray Player
88888 Projector
66666 Audio/Amplier
66664 Soundbar
The POWER key ashes after the rst four digits and turns off
after the fth.
4. Press and hold the device key you want
to program for 2 seconds, until the
POWER key illuminates and stays on.
Then release the key.
5. Point the remote directly at the front
panel of the device you want to control.
Press POWER on the remote.
The remote starts sending the on/
off command for a new code every 2
seconds.
When your device turns off:
Press the
key to store the code. You’re done! You’ve
programmed this device key.
If your device turns off but you waited more than 2 seconds:
Press the
key to go backwards through the last few codes.
When your device turns back on again, press
to store that
code.
Testing the Code for Maximum Functionality
1. Try a variety of the device’s functions with the remote. If
some device features don’t work, go to the next step to try a
different code.
2. Repeat the Brand Code Search from step 3.
3. Test the key’s functionality again by attempting to control
a variety of the device’s functions. If the code that has
been stored controls the majority of the device’s functions,
programming is complete. If the code stored does not give
maximum functionality, try another code.
NOTES
Throughout the programming of each key, be sure to keep the
remote pointed at the IR sensor of the device you are currently
programming the remote to control.
Test the remote with the device to make sure the device key is
programmed with the correct code for maximum functionality.
If some features don’t work, try a different code. See the
“Testing the Code for Maximum Functionality” section below
for more information.
DVD-BLURAY
BLACK WEB, DENON, FUNAI, HITACHI, INSIGNIA, JVC,
LG, MAGNAVOX, MEMOREX, ONKYO, ONN, OPPO,
PANASONIC, PHILIPS, PHILIPS-MAGNAVOX, PIONEER,
RCA, SAMSUNG, SANYO, SHARP, SONY, SYLVANIA,
TOSHIBA, VIZIO
PROJECTOR
3M, BENQ, EPSON, LG, MITSUBISHI, NEC, OPTOMA,
PANASONIC, SONY, VIEWSONIC
VCR
HITACHI, JVC, MAGNAVOX, PHILIPS, RCA, SAMSUNG,
SANSUI, SANYO, SHARP, SONY, YAMAHA
AUDIO
BOSE, DENON, HARMAN/KARDON, KENWOOD,
MARANTZ, ONKYO, PHILIPS, PIONEER, PYLE, SAMSUNG,
SHERWOOD, SONY, TEAC, YAMAHA
SOUNDBAR
BOSE, DEFINITIVE TECHNOLOGY, DENON, HARMAN/
KARDON, ILIVE, INSIGNIA, JBL, KLIPSCH, LG, MAGNAVOX,
ONKYO, ONN, PHILIPS, POLK AUDIO, RCA, ROKU,
SAMSUNG, SANYO, SHARP, SONOS, SONY, TCL, TOSHIBA,
VIZIO, WOHOME, YAMAHA
CD PLAYER
HARMAN/KARDON, KENWOOD, MAGNAVOX, ONKYO,
PHILIPS, RCA, SANSUI, SANYO, SHERWOOD, TEAC, SONY,
YAMAHA, ZENITH
MENU
STREAM 2STREAM 1
MENU
STREAM 2STREAM 1
POWER
MENU
STREAM 2STREAM 1
POWER
TV
APEX, ELEMENT, EMERSON, HAIER, HISENSE, HITACHI,
INSIGNIA, JVC, LG, MAGNAVOX, MITSUBISHI, OLEVIA,
ONN, PHILIPS, PHILIPS-MAGNAVOX, PIONEER, POLAROID,
PROSCAN, RCA, ROKU TV, SAMSUNG, SANSUI, SANYO,
SCEPTRE, SEIKI, SHARP, SKYWORTH, SONY, SUNBRITE TV,
SYLVANIA, TCL, TOSHIBA, VIZIO, WESTINGHOUSE
STREAM
ALTICE, APPLE TV, ASUS, AT&T, BOXEE, CHANNEL
MASTER, DIGITAL STREAM, D-LINK, IVIEW, LETV, LG,
MAGNAVOX, MICCA, NETGEAR, NVIDIA, ONN, PHILIPS,
RCA, ROKU, SAMSUNG, SHARP, SLING, SONY, TIVO,
UNBLOCK TECH, VANKYO, VIZIO, WD (WESTERN
DIGITAL), XBOX, XIAOMI, XTREAMER
SAT-CBL
ADELPHIA, AMINO, ARRIS, AT&T, BELL, CABLE
ONE, CABLEVISION, CHANNEL MASTER, CHARTER
COMMUNICATIONS, CHARTER DIGITAL, CISCO, COMCAST/
XFINITY, CONSOLIDATED COMMUNICATIONS, COX,
DIRECTV, DISH NETWORK, ENTONE, HOMEWORX, HUMAX,
MEDIACOM, MOTOROLA, OPTIMUM, PACE, SAMSUNG,
SCIENTIFIC ATLANTA, SHAW, SKY NETWORK, SONY,
SPECTRUM, SUDDEN LINK, TIVO, UNIVERSAL, VERIZON
Auto Code Search: All Brands
This search goes automatically through all the codes for the device
you’re trying to control. When you nd the one that operates your
device, you can stop the search and store that code.
1. Press and hold the device key you want
to program for about 2 seconds, until
the POWER key illuminates and stays on.
Then release the key.
5. Point the remote directly at the front panel of the device you
want to control. Press
on the remote.
The remote starts sending the on/off command for a new code
every 2 seconds.
When your device turns off:
Press the
key to store the code. You’re done! You’ve
programmed this device key.
If your device turns off but you waited more than 2 seconds:
Press the
key to go backwards through the last few codes.
When your device turns back on again, press
to store that
code.
3. Manually turn on the device you want to
control.
2. Enter the ve-digit device code for your
device you want to operate.
11111 TV
22222 VCR
33333 Streaming Player
44444 Satellite Receiver, Cable Box,
Digital TV Converter
55555 DVD / Blu Ray Player
88888 Projector
66666 Audio/Amplier
66664 Soundbar
The POWER key ashes after the rst four digits and turns off
after the fth.
4. Press and hold the device key you
want to program for about 2 seconds,
until the POWER key illuminates. Then
release the key.
Testing the Code for Maximum Functionality
1. Try a variety of the device’s functions with the remote. If
some device features don’t work, go to the next step to try
a different code.
2. Repeat the search from step 3.
3. Test the key’s functionality again by attempting to control
a variety of the device’s functions. If the code that has
been stored controls the majority of the device’s functions,
programming is complete. If the code stored does not give
maximum functionality, try another code.
NOTES
Throughout the programming of each key, be sure to keep the
remote pointed at the IR sensor of the device you are currently
programming the remote to control.
Test the remote with the device to make sure the device key is
programmed with the correct code for maximum functionality.
If some features don’t work, try a different code. See the
“Testing the Code for Maximum Functionality” section below
for more information.
MENU
STREAM 2STREAM 1
MENU
STREAM 2STREAM 1
POWER
MENU
STREAM 2STREAM 1
POWER
Tour of the Remote
In most cases, the keys on this remote perform the same functions
as the keys on your original remotes once you’ve programmed this
remote to operate your components. Many keys on this remote have
other functions as well.
MENU
STREAM 2STREAM 1
Actual model may
vary from illustration
IMPORTANT
The shortcut keys mimic the functionality of your device’s
original remote — for example, if the original remote that
came with your SmartTV doesn’t have a YouTube key, chances
are this remote’s YouTube key will not automatically give you
direct access to YouTube on your SmartTV. You can, however,
set up a macro on that key to perform this function. See the
Shortcut / Macro Keys section for more information.
Because this remote controls more than one device, you must
rst “tell” the remote which device you wish to operate. That
means, if you wish to operate your TV, you must rst press the
TV key to put the remote in the TV Mode. The remote stays
in that device mode until you press a different device key.
For example, if your remote is in TV Mode and you want to
operate the DVD player, you must press the DVD/B RAY key to
change device modes.
Illuminated POWER key serves as an
indicator light to provide feedback.
Device keys (TV, SATELLITE/CABLE,
STREAM 1 and 2, DVD/B RAY,
AUDIO/SOUNDBAR, AUX 1 and 2)
put the remote in the right mode to
control your device.
MENU and
access device menu
and information screens.
controls Samsung Hub functionality
on TVs. It may also control similar
functionality on other devices (see your
device manual for information).
EXIT exits remote programming; it also
performs the same functions as on your
original remotes.
puts the remote in guide mode
for satellite receivers or cable boxes,
and accesses the home screen for
streaming players.
Arrow keys and OK act as navigation
and selection keys in device guides
and menu systems.
The INPUT — (dash) key has three
functions: (1) it toggles through all the
video sources connected to your TV;
(2) when the remote is in VCR mode,
this button toggles between VCR and
the TV input; (3) when you’re entering
digital channel numbers directly, this
button lets you separate the main
channel number from the sub-channel
number (like 59.1).
, , , and provide direct access
to Netix, Disney+, Hulu, and YouTube
if supported by your streaming player
or smart TV. These keys also provide
additional functionality on other
components and can execute macro
functions if programmed (see the
Shortcut / Macro Keys section).
Backlight key (
) turns backlighting
on/off.
Advanced Functions
Shortcut/Macro Keys
The , , , and keys have different functions depending on
the device you’re controlling and whether you press or press and
hold them.
Press
Press & Hold
(2+ seconds)
SmartTV,
Streaming Player
(if supported)
DVD/Bluray,
Satellite/Cable
(if supported)
Netix red key Macro 1
Disney+ blue key Macro 2
Hulu green key Macro 3
YouTube yellow key Macro 4
Setting Up Macros
Macros are multi-step functions you can program to a single
keypress, like accessing a streaming service directly if your
streaming player or TV doesn’t support hot keys.
To set up a macro:
1. Press and hold the device key for the device you want to use the
macro on. (For example, press and hold the TV key to program
a macro for TV.) The POWER key illuminates.
Note: Each macro works for a single device only.
2. Press the App key you want to use to store the macro. The
POWER key blinks and stays illuminated.
3. Press the keys you want in the order you want for the macro.
(For example, to access a streaming service on your TV, press
, then use the arrow keys to highlight the service, and press
OK). Note: Each App key can store a maximum of 14 macro
steps overall.
4. Press the App key again to store the macro. The POWER key
turns off.
To use the macro: Make sure you’re in the right device mode.
Then press and hold the App key storing the macro.
Channel Lock
Channel lock automatically sends channel commands, like the
CH and 0–9 number keys, to your satellite receiver, cable box,
or digital TV converter when you’re in TV mode. This can save
you keypresses if you use a device other than your TV to change
channels.
To turn channel lock on:
1. Press and hold the device key you want to use to change
channels for about 2 seconds until the POWER key illuminates.
Then release the device key.
2. Press the CH + key once. The POWER key ashes once and
remains on.
3. Press OK to lock channel commands to this device. The POWER
key ashes twice and turns off.
To turn channel lock off:
1. Press any device key for about 2 seconds until the POWER key
illuminates. Then release device key.
2. Press the CH — key once. The POWER key ashes once and
remains on.
3. Press OK to unlock channel commands. The POWER key ashes
twice and turns off.
TV Volume Lock and Advanced Volume Lock
TV Volume Lock allows the VOL and keys, when pressed in
SATELLITE/CABLE, STREAM, or DVD/B RAY modes, to go directly
to your TV. TV Volume Lock occurs automatically and allows you to
control the TV volume without exiting the current mode.
Note: TV Volume Lock does not occur in cases where the component code has
its own volume/mute controls, such as some satellite receivers.
Advanced Volume Lock lets you lock volume controls to a different
component, like a soundbar or audio receiver.
To use Advanced Volume Lock:
1. Press and hold the device key you want to use to control volume
for about 2s until the POWER key illuminates and stays on. Then
release the device key.
2. Press VOL+ once. The POWER key ashes once and remains
illuminated.
3. Press OK once to lock volume commands to this device. The
POWER key ashes twice and turns off.Volume commands will
now go to the device you specied.
To turn Advanced Volume Lock off:
1. Press and hold the device key that currently controls volume for
about 2s until the POWER key illuminates and stays on. Then
release the device key.
Code Retrieval
If you used one of the Code Search methods to program your remote
or if you used the Direct Entry method but don’t remember the code
you used, you can retrieve each device’s ve-digit code and write it
down for reference below.
1. Press and hold the device key (TV, SATELLITE/CABLE, STREAM1/2,
AUDIO/SOUNDBAR, DVD/B RAY, AUX1/2) whose code you wish to
retrieve for 2 seconds until the POWER key illuminates and stays on.
Then release device key.
2. Press the MENU key. The POWER key ashes once and remains
illuminated.
3. To retrieve the rst number in the code, press the 1 key on the
remote. The POWER key blinks to show the number that is the rst
digit in the code. For example, if the POWER key blinks 3 times
when you press the 1 key, the rst number in the code is 3. Write this
number in the corresponding box below.
Repeat for each number in the code—press 2 to see the second
number in the code, 3 for the third, and so on until you have all 5.
4. Press MENU to exit code retrieval.
TIP: To exit the Code Retrieval at any time, press the MENU key.
TV CODE
_ _ _ _ _
SATELLITE/
CABLE
CODE
_ _ _ _ _
STREAM 1
CODE
_ _ _ _ _
STREAM 2
CODE
_ _ _ _ _
DVD/B RAY
CODE
_ _ _ _ _
AUDIO/
SOUNDBAR
CODE
_ _ _ _ _
AUX1 CODE
_ _ _ _ _
AUX2 CODE
_ _ _ _ _
2. Press VOL- once. The POWER key ashes once and remains
illuminated.
3. Press OK once to unlock Volume commands. The POWER key
ashes twice and then turns off. Volume commands will now go
to your TV.
Troubleshooting
Problem: The remote can’t be programmed to operate your
device.
• If you are testing the remote while programming it, you may be too far away
from the device or at a wrong angle. There must be an unobstructed path
between the remote and the IR sensor on the device. Move closer and make
sure you point the remote at the device you’re trying to control.
• If you’re using the Direct Entry programming method to enter the codes for
your brand and the unit is still not functioning properly, try one of the automatic
search methods.
• Make sure the remote is charged. Insert the charging cable into the charging
port on the bottom of the remote. Plug the other end of the cable into a USB
power source, like a computer or USB adapter (not included). The red indicator
on the back of the remote illuminates while the remote is charging. The green
indicator turns on when the remote is fully charged.
Problem: The remote doesn’t perform commands properly.
• Make sure the remote is in the correct mode by pressing the corresponding
device key (TV, SATELLITE/CABLE, STREAM 1 and 2, DVD/B RAY, AUDIO/
SOUNDBAR, AUX1/2). This tells the remote which device to operate.
• Make sure device is ready (for example, the DVD player has a disc loaded).
• You may have pressed an invalid key for the mode the remote is in.
• If you’re trying to enter a channel number directly, try pressing the OK key after
entering the channel number as this is a requirement of certain models and
brands.
• The programmed code may only be able to control some of your device
features (for example, only turns a device on and off). To conrm that the device
key is programmed with the correct code for maximum functionality, test the
device. Attempt to control a variety of the device’s functions with the remote. If
some of the features of your devices don’t work, try programming the remote
with a different code in the list using the Direct Code Entry Method, until you
nd the code that allows the remote to control the majority of your device’s
functions. Different codes can provide different levels of functionality.
Problem: The POWER key does not light when you press a key.
• You may have pressed an invalid key for the mode the remote is in.
• Make sure the remote is in the correct mode by pressing the corresponding
device key (TV, SATELLITE/CABLE, STREAM 1 and 2, DVD/B RAY, AUDIO/
SOUNDBAR, AUX1/2). This tells the remote which device to operate.
• Make sure the remote is charged. Insert the charging cable into the charging
port on the bottom of the remote. Plug the other end of the cable into a USB
power source, like a computer or USB adapter (not included). The red indicator
on the back of the remote illuminates while the remote is charging. The green
indicator turns on when the remote is fully charged.
Problem: Remote backlighting doesn’t work.
• Press the key to activate backlighting.
• Make sure the remote is charged. Insert the charging cable into the charging
port on the bottom of the remote. Plug the other end of the cable into a USB
power source, like a computer or USB adapter (not included). The red indicator
on the back of the remote illuminates while the remote is charging. The green
indicator turns on when the remote is fully charged.
Problem: The remote will not change channels on device.
• Make sure the remote is in the correct mode by pressing the corresponding
device key (TV, SATELLITE/CABLE, STREAM 1 and 2, DVD/B RAY, AUDIO/
SOUNDBAR, AUX1/2). This tells the remote which device to operate.
• Press the OK key after you enter a channel number.
• Remove any obstacles between the remote and the device. Make sure to aim
the remote at the IR sensor on the device.
Problem: The device’s menu does not appear on the TV screen.
• Make sure you have connected the device to your TV properly and selected
the correct input. (See your devices’ Owner’s Manuals for proper connection
procedures.)
• Make sure the remote is in the correct mode by pressing the corresponding
device key (TV, SATELLITE/CABLE, STREAM 1 and 2, DVD/B RAY, AUDIO/
SOUNDBAR, AUX1/2). This tells the remote which device to operate.
• Menu access isn’t supported for all brands. You may need to use your original
remote control to access menu functions for some devices.
Problem: The remote’s shortcut/macro keys don’t work as
expected.
• Make sure the remote is in the correct mode by pressing the corresponding
device key (TV, SATELLITE/CABLE, STREAM 1 and 2, DVD/B RAY, AUDIO/
SOUNDBAR, AUX1/2). This tells the remote which device to operate.
• The shortcut keys mimic the functionality of your device’s original remote — for
example, if the original remote that came with your SmartTV doesn’t have
a YouTube key, chances are this remote’s YouTube key will not automatically
give you direct access to YouTube on your SmartTV. You can, however, set up
a macro on that key to perform this function. See the Shortcut / Macro Keys
section for more information.
For more information, including instructional videos,
remote programming codes, and customer support, visit
www.RCACodeSupport.com
TO RESET THE REMOTE:
Find the reset port on the back of the
remote, toward the bottom and in the
middle of the back. Unbend a paper clip
and insert it into this hole until you reach
the reset button on the inside of the
remote. Press for 2-3 seconds to reset
the remote. You will need to recharge the
remote and reprogram it to control your devices.
Reset port
Care and Maintenance
• Keep the remote dry. If it gets wet, wipe it dry immediately.
• Use and store the remote only in normal temperature environments.
• Handle the remote gently and carefully. Don’t drop it.
• Keep the remote away from dust and dirt.
• Wipe the remote with a damp cloth occasionally to keep it looking new.
• Modifying or tampering with the remote’s internal devices can cause
malfunction and invalidate its warranty.
Ecology
Your product must be disposed of properly according to local laws and
regulations. Because this product contains a rechargeable battery, the product
must be disposed of separately from the household waste.
Problem: The remote does not operate your device.
• Make sure the remote is in the correct mode by pressing the corresponding
device key (TV, SATELLITE/CABLE, STREAM 1 and 2, DVD/B RAY, AUDIO/
SOUNDBAR, AUX1/2). This tells the remote which device to operate.
• Remove any obstacles between the remote and the device. Make sure
you’re aiming the remote at the device’s IR sensor.
• Make sure the remote is charged. Insert the charging cable into the charging
port on the bottom of the remote. Plug the other end of the cable into a
USB power source, like a computer or USB adapter (not included). The red
indicator on the back of the remote illuminates while the remote is charging.
The green indicator turns on when the remote is fully charged.
©2022 Voxx Accessories Corporation Trademark(s) ® Registered
Voxx Accessories Corporation (the “Company”) warrants to you the
original retail purchaser of this product that should it, under normal use
and conditions, be proven defective in material or workmanship during its
lifetime while you own it, such defect(s) will be repaired or replaced (at the
Company’s option) without charge for parts and repair labor.To obtain repair
or replacement within the terms of the warranty, the product is to be delivered
with proof of warranty coverage (e.g. dated bill of sale), specication of
defect(s), transportation prepaid, to an approved warranty station. For the
location of the nearest warranty station to you, call toll-free to our control
ofce: 1-800-645-4994.
This Warranty does not cover product purchased, serviced or used outside
the United States or Canada. This Warranty is not transferable and does
not extend to costs incurred for installation, removal or reinstallation of
the product. This Warranty does not apply if in the Company’s opinion,
the product has been damaged through alteration, improper installation,
mishandling, misuse, neglect, accident, or the simultaneous use of different
battery types (e.g. alkaline, standard or rechargeable). THE EXTENT OF
THE COMPANY’S LIABILITY UNDER THIS WARRANTY IS LIMITED TO THE
REPAIR OR REPLACEMENT PROVIDED ABOVE AND, IN NO EVENT, SHALL
THE COMPANY’S LIABILITY EXCEED THE PURCHASE PRICE PAID BY
PURCHASER FOR THE PRODUCT.
This Warranty is in lieu of all other express warranties or liabilities. ANY
IMPLIED WARRANTIES, INCLUDING ANY IMPLIED WARRANTY OF
MERCHANTABILITY OR FITNESS FOR A PARTICULAR PURPOSE SHALL
BE LIMITED TO DURATION OF THIS WARRANTY. IN NO CASE SHALL
THE COMPANY BE LIABLE FOR ANY CONSEQUENTIAL OR INCIDENTAL
DAMAGES WHATSOEVER. No person or representative is authorized
to assume for the Company any liability other than expressed herein in
connection with the sale of this product.
Some states/provinces do not allow limitations on how long an implied
warranty lasts or the exclusion or limitation of incidental or consequential
damage so the above limitations or exclusions may not apply to you. This
Warranty gives you specic legal rights and you may also have other rights,
which vary from state/province to state/province.
Limited Lifetime Warranty
FCC Statement:
This device complies with part 15 of the FCC Rules. Operation is subject
to the following two conditions: (1) This device may not cause harmful
interference, and (2) this device must accept any interference received,
including interference that may cause undesired operation.
Note: This equipment has been tested and found to comply with the limits
for a Class B digital device, pursuant to part 15 of the FCC Rules. These limits
are designed to provide reasonable protection against harmful interference
in a residential installation. This equipment generates, uses and can radiate
radio frequency energy and, if not installed and used in accordance with the
instructions, may cause harmful interference to radio communications. However,
there is no guarantee that interference will not occur in a particular installation. If
this equipment does cause harmful interference to radio or television reception,
which can be determined by turning the equipment off and on, the user is
encouraged to try to correct the interference by one or more of the following
measures:
• Reorient or relocate the receiving antenna.
• Increase the separation between the equipment and receiver.
• Connect the equipment into an outlet on a circuit different from that to
which the receiver is connected.
• Consult the dealer or an experienced radio/TV technician for help.
Caution: Any changes or modications not expressly approved by the party
responsible for compliance could void the user’s authority to operate this
equipment.
ISED Compliance Statement CAN ICES-003(B) / NMB-003(B)
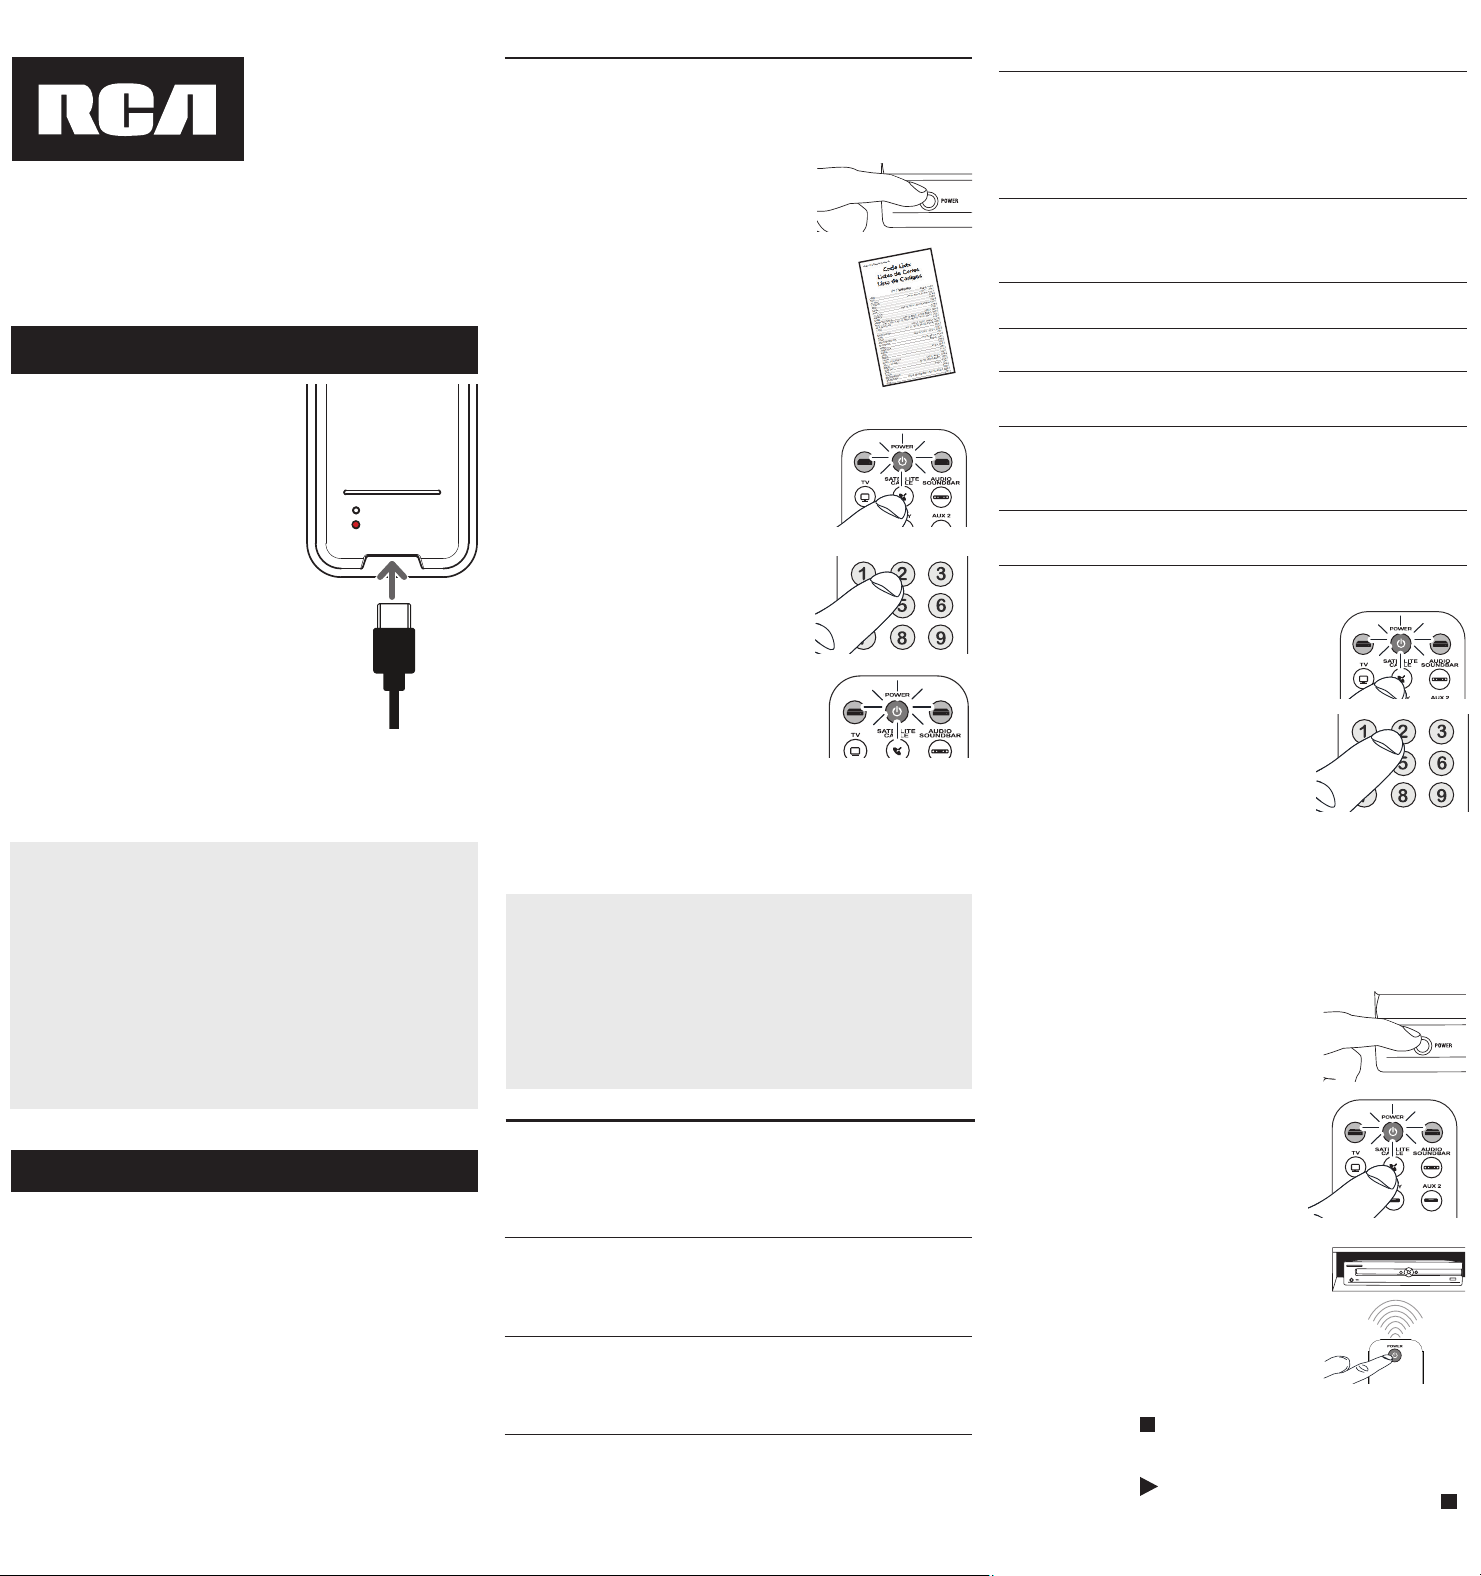
RCTC8GB
Manual del propietario
del control remoto universal
Owner’s Manual (English on back)
MENU
STREAM 2STREAM 1
MENU
STREAM 2STREAM 1
POWER
MENU
STREAM 2STREAM 1
POWER
Ahorro de Batería
Su control remoto universal ahorra la potencia
de la batería al apagar automáticamente
cualquier tecla que se oprima por más de 15
segundos. Esta acción prolonga la vida útil de
la batería en caso de que el control remoto
quede pillado en un lugar donde las teclas
permanezcan oprimidas, tal como entre los
cojines de un sofá.
Antes de comenzar a utilizar el control
remoto, se recomienda cargarlo por
completo.
Para cargar el control remoto:
1. Conecte el cable de carga en el
conector de carga ubicado en la
parte inferior/posterior del control
remoto.
2.
Conecte el otro extremo a una fuente
de alimentación USB. Se encenderá
el indicador de carga rojo. Cuando el
control remoto esté completamente
cargado, se encenderá el indicador
verde.
Paso 1: Cargue el control remoto
Paso 2: Programe el control remoto
Para utilizar este control remoto universal con su sistema de
entretenimiento en el hogar, necesitará primero programarlo
para manejar sus dispositivos. Para programar el control remoto
universal para manejar sus dispositivos, utilice uno de los tres
métodos a continuación. Intente cada una de ellas en el orden
indicado.
• La Entrada Directa de Códigos le permite ingresar un código de
la lista de códigos suministrada para la marca de su dispositivo.
• La función Búsqueda automática de códigos: principales marcas
realiza la búsqueda por los códigos para determinadas marcas
de dispositivos.
• La función Búsqueda automática de códigos: todas las marcas
explora automáticamente todos los códigos para el dispositivo
que está intentando controlar.
IMPORTANTE!
Este control remoto ya está programado para funcionar con la mayoría
de los televisores, reproductores de DVD y Blu Ray Samsung, aparatos
de cable Comcast, y reproductores de streaming Roku. Simplemente
oprima la tecla correspondiente: DVD/B RAY para un reproductor
de DVD, TV para un televisor, SATELLITE/CABLE para un aparato de
cable,
STREAM 1 o STREAM 2 para un reproductor de streaming,
AUDIO/SOUNDBAR para un dispositivo de audio o barra de
sonido
.
Este control remoto también admite el control de dispositivos
RF compatibles con CEC, como Amazon Fire TV Stick, Google
Chromecast y Roku Stick, a través de la conexión CEC HDMI. Para este
control, no necesita programar el control remoto para el dispositivo RF,
solo para la TV. Consulte el manual de usuario de la TV para obtener
instrucciones sobre cómo activar el control CEC HDMI.
Entrada Directa de Códigos
La Entrada Directa de Códigos le permite ingresar un código de la
lista de códigos suministrada para la marca de su dispositivo.
1. Encienda manualmente el dispositivo
que desea manejar.
3. Mantenga oprimida la tecla de
dispositivo que desea programar
durante aproximadamente 2 segundos
hasta que la tecla POWER permanezca
encendida. A continuación, suelte la
tecla.
4. Ingrese el primer código de cinco
códigos para la marca correspondiente
en la lista de códigos (la tecla POWER
parpadea después de cada dígito).
2. Encuentre la Lista de Códigos
suministrada con el control remoto.
Encuentre la sección para el tipo de
dispositivo que desea programar,
y localice la marca en esa sección.
Marque con un círculo los códigos
para la marca y manténgalos a mano.
5. Cuando haya terminado de ingresar el
código de cinco dígitos, mire la tecla
POWER.
¿La tecla POWER se apagó?
SÍ: ¡Todo listo! Programó esta tecla de dispositivo.
NO, sigue encendida: Ingresó un número de código que
no está en las listas de códigos o le faltó un paso en el
procedimiento de ingreso de código. Pruebe el paso 4
nuevamente.
NOTAS
Pruebe el control remoto con el dispositivo para asegurarse que
la tecla de dispositivo esté programada con el código correcto y
garantizar así su máxima funcionalidad. Si no puede utilizar alguna de
las funciones, intente con otro código de la lista.
Recuerde ingresar el código para referencia futura en el recuadro
provisto en la sección Recuperación de Códigos de este manual.
Si la marca del dispositivo no está en la lista de códigos, utilice el
método de búsqueda automática de códigos para programar el
control remoto.
MENU
STREAM 2STREAM 1
MENU
STREAM 2STREAM 1
POWER
MENU
STREAM 2STREAM 1
POWER
Búsqueda automática de códigos: principales marcas
Esta búsqueda explora automáticamente todos los códigos de
dispositivo para las marcas seleccionadas detalladas a continuación. Si
la marca del dispositivo está incluida en la lista, esta búsqueda puede
ser rápida y sencilla.
1. Mantenga oprimida la tecla de
dispositivo que desea programar durante
aproximadamente 2 segundos hasta que
la tecla POWER permanezca encendida. A
continuación, suelte la tecla.
SAT-CBL
ADELPHIA, AMINO, ARRIS, AT&T, BELL, CABLE
ONE, CABLEVISION, CHANNEL MASTER, CHARTER
COMMUNICATIONS, CHARTER DIGITAL, CISCO, COMCAST/
XFINITY, CONSOLIDATED COMMUNICATIONS, COX,
DIRECTV, DISH NETWORK, ENTONE, HOMEWORX, HUMAX,
MEDIACOM, MOTOROLA, OPTIMUM, PACE, SAMSUNG,
SCIENTIFIC ATLANTA, SHAW, SKY NETWORK, SONY,
SPECTRUM, SUDDEN LINK, TIVO, UNIVERSAL, VERIZON
DVD-BLURAY
BLACK WEB, DENON, FUNAI, HITACHI, INSIGNIA, JVC,
LG, MAGNAVOX, MEMOREX, ONKYO, ONN, OPPO,
PANASONIC, PHILIPS, PHILIPS-MAGNAVOX, PIONEER,
RCA, SAMSUNG, SANYO, SHARP, SONY, SYLVANIA,
TOSHIBA, VIZIO
PROYECTOR
3M, BENQ, EPSON, LG, MITSUBISHI, NEC, OPTOMA,
PANASONIC, SONY, VIEWSONIC
VCR
HITACHI, JVC, MAGNAVOX, PHILIPS, RCA, SAMSUNG,
SANSUI, SANYO, SHARP, SONY, YAMAHA
AUDIO
BOSE, DENON, HARMAN/KARDON, KENWOOD,
MARANTZ, ONKYO, PHILIPS, PIONEER, PYLE, SAMSUNG,
SHERWOOD, SONY, TEAC, YAMAHA
BARRA DE
SONIDO
BOSE, DEFINITIVE TECHNOLOGY, DENON, HARMAN/
KARDON, ILIVE, INSIGNIA, JBL, KLIPSCH, LG,
MAGNAVOX, ONKYO, ONN, PHILIPS, POLK AUDIO, RCA,
ROKU, SAMSUNG, SANYO, SHARP, SONOS, SONY, TCL,
TOSHIBA, VIZIO, WOHOME, YAMAHA
REPRODUCTOR
DE CD
HARMAN/KARDON, KENWOOD, MAGNAVOX, ONKYO,
PHILIPS, RCA, SANSUI, SANYO, SHERWOOD, TEAC,
SONY, YAMAHA, ZENITH
2. Ingrese el código de dispositivo para el
dispositivo que desea controlar.
11111 TV
22222 VCR
33333 Reproductor de streaming
44444 Receptor de satélite, aparato de
cable, convertidor de TV digital
55555 Reproductor de DVD/Blu Ray
88888 Proyector de video
66666 Amplicador de audio
66664 Barra de sonido
3. Encienda manualmente el dispositivo que
desea manejar.
La tecla POWER parpadea luego de los primeros cuatro
dígitos y se apaga después del quinto.
4. Mantenga oprimida la tecla de
dispositivo que desea programar
durante aproximadamente 2 segundos
hasta que la tecla POWER permanezca
encendida. A continuación, suelte la
tecla.
5. Apunte el control remoto directamente
hacia el panel frontal del dispositivo
que desea controlar. Oprima la tecla
POWER en el control remoto.
El control remoto comienza enviando
el comando de encendido/apagado
para obtener un nuevo código cada 2
segundos.
Cuando el dispositivo se apaga:
Oprima la tecla
para almacenar el código. ¡Todo listo!
Programó esta tecla de dispositivo.
Si el dispositivo se apaga, pero esperó más de 2 segundos:
Oprima la tecla
para retroceder a los últimos códigos.
Cuando el dispositivo vuelva a encenderse, oprima la tecla
para almacenar ese código.
Cómo Probar el Código
para Obtener Máxima Funcionalidad
1. Pruebe una variedad de funciones del dispositivo con el
control remoto. Si no puede utilizar alguna de las funciones
del dispositivo, vaya al próximo paso e intente un código
diferente.
2. Repita la búsqueda del código desde el paso 3.
3. Vuelva a probar la funcionalidad de las teclas intentando
controlar diferentes funciones del dispositivo. Si el código que
se almacenó controla la mayoría de las funciones del dispositivo,
se completó la programación. Si el código no otorga la máxima
funcionalidad, pruebe con otro.
NOTAS: A través de la programación de cada tecla, asegúrese
de mantener el control remoto apuntado directamente al sensor
infrarrojo del dispositivo que está actualmente programando
con el control remoto.
Pruebe el control remoto con el dispositivo para asegurarse que
la tecla de dispositivo esté programada con el código correcto
y garantizar así su máxima funcionalidad. Si no puede utilizar
alguna de las funciones, intente con otro código. Para obtener
mayor información, consulte la sección “Cómo Probar el Código
para Obtener Máxima Funcionalidad” a continuación.
TV
APEX, ELEMENT, EMERSON, HAIER, HISENSE, HITACHI,
INSIGNIA, JVC, LG, MAGNAVOX, MITSUBISHI, OLEVIA,
ONN, PHILIPS, PHILIPS-MAGNAVOX, PIONEER, POLAROID,
PROSCAN, RCA, ROKU TV, SAMSUNG, SANSUI, SANYO,
SCEPTRE, SEIKI, SHARP, SKYWORTH, SONY, SUNBRITE TV,
SYLVANIA, TCL, TOSHIBA, VIZIO, WESTINGHOUSE
STREAM
ALTICE, APPLE TV, ASUS, AT&T, BOXEE, CHANNEL
MASTER, DIGITAL STREAM, D-LINK, IVIEW, LETV, LG,
MAGNAVOX, MICCA, NETGEAR, NVIDIA, ONN, PHILIPS,
RCA, ROKU, SAMSUNG, SHARP, SLING, SONY, TIVO,
UNBLOCK TECH, VANKYO, VIZIO, WD (WESTERN
DIGITAL), XBOX, XIAOMI, XTREAMER
MENU
STREAM 2STREAM 1
MENU
STREAM 2STREAM 1
POWER
MENU
STREAM 2STREAM 1
POWER
Búsqueda automática de códigos: todas las marcas
Esta busca explora automáticamente todos los códigos para el
dispositivo que está intentando controlar. Cuando encuentre el
código que controla su dispositivo, puede detener la búsqueda y
almacenar ese código.
1. Mantenga oprimida la tecla de
dispositivo que desea programar
durante aproximadamente 2 segundos
hasta que la tecla POWER permanezca
encendida. A continuación, suelte la
tecla.
3. Encienda manualmente el
dispositivo que desea manejar.
4. Mantenga oprimida la tecla de
dispositivo que desea programar
durante aproximadamente 2 segundos
hasta que la tecla POWER permanezca
encendida. A continuación, suelte la
tecla.
5. Apunte el control remoto directamente hacia el panel frontal
del dispositivo que desea controlar. Oprima la tecla
en el
control remoto.
El control remoto comienza enviando el comando de
encendido/apagado para obtener un nuevo código cada 2
segundos.
Cuando el dispositivo se apaga:
Oprima la tecla
para almacenar el código. ¡Todo listo!
Programó esta tecla de dispositivo.
Si el dispositivo se apaga, pero esperó más de 2 segundos:
Oprima la tecla
para retroceder a los últimos códigos.
Cuando el dispositivo vuelva a encenderse, oprima la tecla
para almacenar ese código.
2. Ingrese el código de dispositivo para el
dispositivo que desea controlar.
11111 TV
22222 VCR
33333 Reproductor de streaming
44444 Receptor de satélite, aparato de
cable, convertidor de TV digital
55555 Reproductor de DVD/Blu Ray
88888 Proyector de video
66666 Amplicador de audio
66664 Barra de sonido
La tecla POWER parpadea luego de los primeros cuatro
dígitos y se apaga después del quinto.
Cómo Probar el Código para Obtener Máxima
Funcionalidad
1. Pruebe una variedad de funciones del dispositivo con el
control remoto. Si no puede utilizar alguna de las funciones
del dispositivo, vaya al próximo paso e intente un código
diferente.
2. Repita la búsqueda del código desde el paso 3.
3. Vuelva a probar la funcionalidad de las teclas intentando
controlar diferentes funciones del dispositivo. Si el código que
se almacenó controla la mayoría de las funciones del dispositivo,
se completó la programación. Si el código no otorga la máxima
funcionalidad, pruebe con otro.
Pruebe el control remoto con el dispositivo para asegurarse que
la tecla de dispositivo esté programada con el código correcto
y garantizar así su máxima funcionalidad. Si no puede utilizar
alguna de las funciones, intente con otro código. Para obtener
mayor información, consulte la sección “Cómo Probar el Código
para Obtener Máxima Funcionalidad” a continuación.
Tour of the Remote
En la mayoría de los casos, las teclas del control remoto
desempeñan las mismas funciones que las teclas de los controles
remotos originales una vez programa este control remoto para
manejar los componentes. La mayoría de las teclas de este control
remoto tienen otras funciones.
El modelo actual puede ser
diferente al ilustrado
IMPORTANTE
Las teclas de acceso directo imitan la funcionalidad del
control remoto original de su dispositivo; por ejemplo, si el
control remoto incluido con su Smart TV no tiene una tecla
de YouTube, lo más probable es que la tecla de YouTube de
este control remoto no le permita obtener acceso directo
automático a YouTube en su Smart TV. Sin embargo, puede
congurar una macro en esa tecla para ejecutar esta función.
Para obtener más información, consulte la sección Teclas de
acceso directo/macro.
Dado que este control remoto maneja más de un dispositivo,
deberá primero “indicarle” al control remoto cuál dispositivo
desea manejar. En otras palabras, si desea manejar el televisor,
deberá primero oprimir la tecla TV para poner el control
remoto en el Modo TV. El control remoto permanece en ese
modo de dispositivo hasta que oprima una tecla de dispositivo
diferente. Por ejemplo, si el control remoto se encuentra en el
Modo TV y desea manejar el Lector de DVD, deberá oprimir la
tecla DVD/B RAY para cambiar los modos de dispositivo.
MENU
STREAM 2STREAM 1
La tecla POWER iluminada sirve
de luz indicadora para ofrecer
retroalimentación.
Las teclas de dispositivo (TV,
SATELLITE/CABLE, STREAM 1 y 2,
DVD/B RAY, AUDIO/SOUNDBAR,
AUX 1 y 2) ponen el control remoto
en el modo correcto para manejar el
dispositivo.
MENU e
acceden al menú y a las
pantallas de información del dispositivo.
controla la funcionalidad del
Concentrador de Samsung en los
televisores. También podría controlar
una funcionalidad similar en otros
dispositivos (consulte el manual de su
dispositivo para obtener información).
EXIT sale de la programación del control
remoto; además, desempeña las mismas
funciones que en los controles remotos
originales.
pone el control remoto en modo
Guide (guía) para receptores de satélite
o aparatos de cable, y accede a la
pantalla inicial para reproductores de
streaming.
Las teclas de echa y OK actúan como
teclas de navegación y selección en los
sistemas de menú y guías de dispositivo.
La tecla INPUT — (guión) tiene tres
funciones: (1) alterna entre todas
las fuentes de video conectadas al
televisor; (2) cuando el control remoto
se encuentra en el modo VCR, este
botón alterna entre la entrada VCR y
TV; (3) cuando ingresa directamente
números de canales digitales, este
botón le permite separar el número del
canal principal del número del canal
secundario (tal como 59.1).
, , , y proporcionan acceso
directo a Netix, Disney+, Hulu y
YouTube si el reproductor multimedia o
Smart TV admiten estas funciones. Estas
teclas también ofrecen una funcionalidad
adicional en otros componentes y
pueden ejecutar funciones de macro si
están programadas (consulte la sección
Teclas de acceso directo/macro).
La tecla de luz de fondo (
) enciende y
apaga la luz de fondo.
NOTAS: A través de la programación de cada tecla, asegúrese
de mantener el control remoto apuntado directamente al sensor
infrarrojo del dispositivo que está actualmente programando
con el control remoto.
CÓDIGO TV
_ _ _ _ _
CÓDIGO
SATELLITE/
CABLE
_ _ _ _ _
CÓDIGO
STREAM 1
_ _ _ _ _
CÓDIGO
STREAM 2
_ _ _ _ _
CÓDIGO
DVD/B RAY
_ _ _ _ _
CÓDIGO
AUDIO/
SOUNDBAR
_ _ _ _ _
CÓDIGO
AUX1
_ _ _ _ _
CÓDIGO
AUX2
_ _ _ _ _
Funciones Avanzadas
Teclas de acceso directo/macro
Las teclas , , , y tienen diferentes funciones según el dispositivo que
está controlando y si las oprime o las mantiene oprimidas.
Oprimir
Mantener
oprimido
(2+ segundos)
Smart TV, reproductor
multimedia
(si se admite)
DVD/Bluray, TV por
cable/satelital
(si se admite)
Netix tecla roja Macro 1
Disney+ tecla azul Macro 2
Hulu tecla verde Macro 3
YouTube tecla amarilla Macro 4
Conguración de macros
Las macros son funciones de varios pasos que puede programar en una sola
pulsación de tecla, como acceder directamente a un servicio de streaming si
el reproductor multimedia o la TV no admiten las teclas de acceso directo.
Para congurar una macro:
1. Mantenga oprimida la tecla de dispositivo para el dispositivo en el que
quiere utilizar la macro. (Por ejemplo, mantenga oprimida la tecla TV para
programar una macro para TV). Se encenderá la tecla POWER.
Nota: Cada macro funciona únicamente para un solo dispositivo.
2. Oprima la tecla de aplicación que quiere utilizar para almacenar la macro.
La tecla POWER parpadeará y permanecerá encendida.
3. Oprima las teclas deseadas en el orden deseado para la macro. (Por
ejemplo, para acceder a un servicio de streaming en su TV, oprima
y, a continuación, utilice las teclas de echa para seleccionar el servicio y
oprima OK).
Nota: Cada tecla de aplicación puede almacenar hasta un máximo de 14
pasos de macro.
4. Oprima la tecla de aplicación nuevamente para almacenar la macro. La
tecla POWER se apaga.
Para utilizar la macro: asegúrese de estar en el modo de dispositivo
correcto. A continuación, mantenga oprima la tecla de aplicación que tiene
almacenada la macro.
Bloqueo de volumen para la TV y bloqueo de
volumen avanzado
El bloqueo de volumen para la TV permite que las teclas VOL y , al
presionarlas en los modos SATELLITE/CABLE, STREAM o DVD BLU RAY, se
activen directamente para la TV. El bloqueo de volumen para la TV se activa
de forma automática y le permite controlar el volumen de la TV sin salir del
modo actual.
Nota: El bloqueo de volumen para la TV no se activa en aquellos casos en
los que el código del componente tiene sus propios controles de volumen/
silencio, como ocurre con algunos receptores satelitales.
El bloqueo de volumen avanzado le permite bloquear los controles de
volumen en un componente diferente, como una barra de sonido o receptor
de audio.
Para utilizar el bloqueo de volumen avanzado:
1. Mantenga oprimida la tecla de dispositivo que desea utilizar para controlar
el volumen durante 2 segundos hasta que la tecla POWER se encienda y
permanezca encendida. A continuación, suelte la tecla de dispositivo.
2. Oprima VOL+ una vez. La tecla POWER parpadea una vez y permanece
encendida.
3. Oprima OK una vez para bloquear los comandos de volumen en ese
dispositivo. La tecla POWER parpadea dos veces y se apaga. Las comandos
de voz ahora se activarán para el dispositivo especicado.
2. Oprima VOL- una vez. La tecla POWER parpadea una vez y permanece
encendida.
3. Oprima OK para desbloquear los comandos de volumen. La tecla POWER
parpadea dos veces y luego se apaga. Los comandos de volumen ahora se
activarán para la TV.
Bloqueo de Canales
Bloqueo de Canales envía automáticamente comandos de canal, tales como
CH y las teclas numéricas 0-9, a su receptor de satélite, aparato de cable o
convertidor de TV digital cuando se encuentra en el modo TV. Esto puede
ahorrarle opresiones de teclas si utiliza un dispositivo diferente a su televisor
para cambiar canales.
Para activar el bloqueo de canales:
1. Mantenga oprimida la tecla de dispositivo que desea utilizar para cambiar
de canal durante aproximadamente 2 segundos hasta que se encienda la
tecla POWER. A continuación, suelte la tecla de dispositivo.
2. Oprima la tecla CH+ una vez. La tecla POWER parpadea una vez y
permanece encendida.
3. Oprima OK para bloquear los comandos de canal de este dispositivo. La
tecla POWER parpadea dos veces y se apaga.
Para desactivar el bloqueo de canales:
1. Oprima cualquier tecla de dispositivo durante aproximadamente 2
segundos hasta que se encienda la tecla POWER. A continuación, suelte la
tecla de dispositivo.
2. Oprima la tecla CH– una vez. La tecla POWER parpadea una vez y
permanece encendida.
3. Oprima OK para bloquear los comandos de canal. La tecla POWER
parpadea dos veces y se apaga.
Recuperación de Códigos
Si utilizó uno de los métodos de búsqueda de código para programar el control
remoto o si utilizó el método de entrada directa, pero no recuerda el código
que utilizó, puede recuperar el código de cinco dígitos de cada dispositivo y
anotarlo para referencia a continuación.
1. Mantenga oprimida la tecla de dispositivo (TV, SATELLITE/CABLE,
STREAM1/2, AUDIO/SOUNDBAR, DVD/B RAY, AUX1/2) cuyo código
desea recuperar durante aproximadamente 2 segundos hasta que la tecla
POWER se encienda y permanezca encendida. A continuación, suelte la
tecla de dispositivo.
2. Oprima la tecla MENU. La tecla POWER parpadea una vez y permanece
encendida.
3. Para recuperar el primer número de código, oprima la tecla 1 en el control
remoto. La tecla POWER parpadea para mostrar el número que es el
primer dígito del código. Por ejemplo, si la tecla POWER parpadea 3 veces
al oprimir la tecla 1, el primer número del código es 3. Anote este número
en el cuadro correspondiente que aparece a continuación.
Repita este procedimiento para cada número del código: oprima 2
para ver el segundo número del código, 3 para ver el tercero y así
sucesivamente hasta tener los 5 números.
4. Oprima MENU para salir del modo de recuperación de códigos.
CONSEJO: Para salir del modo de recuperación de códigos en cualquier
momento, oprima la tecla MENU.
Resolución de Problemas
• Asegúrese de que el control remoto esté cargado. Inserte el cable de carga
en el conector de carga ubicado en la parte inferior control remoto. Conecte
el otro extremo del cable de alimentación en una fuente de alimentación
USB, como una computadora o adaptador de USB (no incluido). El indicador
rojo ubicado en la parte posterior del control remoto se encenderá durante
la carga del control remoto. El indicador verde se enciende cuando el
control remoto está completamente cargado.
Problema: El control remoto no ejecuta los comandos debidamente.
• Asegúrese que el control remoto se encuentre en el modo correcto
oprimiendo la tecla de dispositivo correspondiente (TV, SATELLITE/CABLE,
STREAM 1 and 2, DVD/B RAY, AUDIO/SOUNDBAR, AUX1/2). Esto le indica
al control remoto el dispositivo que debe manejar.
• Asegúrese que el dispositivo se encuentre listo (por ejemplo, el Lector de
DVD tenga un disco cargado).
• Puede haber oprimido una tecla inválida para el modo en que se encuentra el
control remoto.
• Si está tratando de ingresar directamente un número de canal, intente oprimir
la tecla OK luego de ingresar el número del canal ya que algunas marcas y
modelos requieren esta acción.
• Existe la posibilidad de que un código programado pueda manejar únicamente
algunas de las funciones del dispositivo (por ejemplo, sólo enciende y apaga un
dispositivo). Para conrmar que la tecla de dispositivo ha sido programada con
el código correcto para obtener máxima funcionalidad, pruebe el dispositivo.
Intente manejar una variedad de funciones del dispositivo con el control
remoto. Si algunas de las funciones de sus dispositivos no trabajan, intente
programar el control remoto con un código diferente en la lista a través del
Método de Entrada Directa de Códigos hasta que encuentre el código que le
permita al control remoto manejar la mayoría de las funciones del dispositivo.
Diferentes códigos pueden proporcionar diferentes niveles de funcionalidad.
Problema: La tecla POWER no se ilumina cuando oprime una tecla.
• Puede haber oprimido una tecla inválida para el modo en que se encuentra el
control remoto.
• Asegúrese que el control remoto se encuentre en el modo correcto oprimiendo
la tecla de dispositivo correspondiente (TV, SATELLITE/CABLE, STREAM 1 and
2, DVD/B RAY, AUDIO/SOUNDBAR, AUX1/2). Esto le indica al control remoto el
dispositivo que debe manejar.
• Asegúrese de que el control remoto esté cargado. Inserte el cable de carga
en el conector de carga ubicado en la parte inferior control remoto. Conecte
el otro extremo del cable de alimentación en una fuente de alimentación USB,
como una computadora o adaptador de USB (no incluido). El indicador rojo
ubicado en la parte posterior del control remoto se encenderá durante la carga
del control remoto. El indicador verde se enciende cuando el control remoto
está completamente cargado.
PARA RESTABLECER EL CONTROL REMOTO:
Busque el puerto de restablecimiento ubicado
en la parte posterior del control remoto, hacia la
parte inferior y en el centro de la parte posterior.
Desarme un clip e introdúzcalo en este oricio
hasta llegar al botón de restablecimiento ubicado
en el interior del control remoto. Oprima durante
2-3 segundos para restablecer el control remoto.
Deberá volver a cargar el control remoto y volver a
programarlo controlar los dispositivos.
Puerto de
restablecimiento
Cuidado y Mantenimiento
• Mantenga el control remoto seco. Si se moja, séquelo inmediatamente.
• Utilice y almacene el control remoto únicamente en entornos de temperatura
normal.
• Maneje el control remoto de forma cuidadosa. No lo deje caer.
• Mantenga el control remoto resguardado del polvo y la suciedad.
• Limpie el control remoto con un paño húmedo de vez en cuando para
mantenerlo en buenas condiciones de operación.
• Modicar o sabotear los dispositivos internos del control remoto podría
ocasionar desperfectos y anular la garantía.
Ecología
Este producto debe desecharse de manera correcta según lo disponen las
leyes y los reglamentos locales. Ya que este producto incluye una batería
recargable, el mismo no debe desecharse junto con los desperdicios
domésticos.
Problema: El control remoto no maneja su dispositivo.
• Asegúrese que el control remoto se encuentre en el modo correcto
oprimiendo la tecla de dispositivo correspondiente (TV, SATELLITE/CABLE,
STREAM 1 y 2, DVD/B RAY, AUDIO/SOUNDBAR, AUX1/2). Esto le indica al
control remoto el dispositivo que debe manejar.
• Retire los obstáculos ubicados entre el control remoto y el dispositivo.
Asegúrese de apuntar el control remoto directamente al sensor infrarrojo
del dispositivo.
• Asegúrese de que el control remoto esté cargado. Inserte el cable de carga
en el conector de carga ubicado en la parte inferior control remoto. Conecte
el otro extremo del cable de alimentación en una fuente de alimentación
USB, como una computadora o adaptador de USB (no incluido). El indicador
rojo ubicado en la parte posterior del control remoto se encenderá durante
la carga del control remoto. El indicador verde se enciende cuando el
control remoto está completamente cargado.
Problema: El control remoto no puede programarse para manejar su
dispositivo.
• Si está probando el control remoto mientras lo está programando, podría
estar demasiado alejado del dispositivo o en un ángulo incorrecto.
Deberá haber una trayectoria sin obstáculos entre el control remoto y el
sensor infrarrojo del dispositivo. Acérquese más y asegúrese de apuntar
directamente al dispositivo que está intentando manejar.
• Si está utilizando el método de programación de Entrada Directa
para ingresar los códigos para su marca y la unidad aún no funciona
debidamente, intente uno de los métodos de búsqueda automática.
Problema: No funciona la luz de fondo del control remoto
• Oprima la tecla
para activar la luz de fondo.
• Asegúrese de que el control remoto esté cargado. Inserte el cable de carga
en el conector de carga ubicado en la parte inferior control remoto. Conecte
el otro extremo del cable de alimentación en una fuente de alimentación
USB, como una computadora o adaptador de USB (no incluido). El indicador
rojo ubicado en la parte posterior del control remoto se encenderá durante
la carga del control remoto. El indicador verde se enciende cuando el
control remoto está completamente cargado.
Problema: El control remoto no cambia canales en el dispositivo.
• Asegúrese que el control remoto se encuentre en el modo correcto oprimiendo
la tecla de dispositivo correspondiente (TV, SATELLITE/CABLE, STREAM 1 y 2,
DVD/B RAY, AUDIO/SOUNDBAR, AUX1/2). Esto le indica al control remoto el
dispositivo que debe manejar.
• Oprima la tecla OK luego de haber ingresado un número de canal.
• Retire los obstáculos ubicados entre el control remoto y el dispositivo.
Asegúrese de apuntar el control remoto directamente al sensor IR del
dispositivo.
Problema: El menú del dispositivo no aparece en la pantalla del televisor.
• Asegúrese de haber conectado debidamente el dispositivo al televisor y haber
seleccionado la entrada correcta. (Consulte el Manual del Propietario de los
dispositivos para informarse sobre los procedimientos de conexión correctos.)
• Asegúrese que el control remoto se encuentre en el modo correcto oprimiendo
la tecla de dispositivo correspondiente (TV, SATELLITE/CABLE, STREAM 1 y 2,
DVD/B RAY, AUDIO/SOUNDBAR, AUX1/2). Esto le indica al control remoto el
dispositivo que debe manejar.
• El acceso a los menús no es respaldado por todas las marcas. Posiblemente sea
necesario utilizar el control remoto original para lograr acceso a las funciones de
menú de algunos dispositivos.
Problema: Las teclas de acceso directo/macro del control remoto no
funcionan como se espera.
• Make sure the remote is in the correct mode by pressing the corresponding
device key (TV, SATELLITE/CABLE, STREAM 1 y 2, DVD/B RAY, AUDIO/
SOUNDBAR, AUX1/2). This tells the remote which device to operate.
• The shortcut keys mimic the functionality of your device’s original remote — for
example, if the original remote that came with your SmartTV doesn’t have
a YouTube key, chances are this remote’s YouTube key will not automatically
give you direct access to YouTube on your SmartTV. You can, however, set up
a macro on that key to perform this function. See the Shortcut / Macro Keys
section for more information.
Para obtener más información, incluido videos instructivos, códigos de
programación con control remoto y asistencia al cliente, visite
www.RCACodeSupport.com
Garantía Limitada Durante la Vida Útil del Producto
Información FCC
Este aparato obedece las especicaciones de la Parte 15 de las regulaciones
FCC. Las funciones están sujetas a las siguientes condiciones: 1) Este aparato
no puede causar interferencias dañinas, y 2) este aparato puede recibir
cualquiera interferencia, incluyendo aquellas que puedan causar funciones no
deseadas.
Nota: Se probó este equipo y podemos armar que cumple con las
restricciones establecidas para un dispositivo digital Clase B, de acuerdo
con la Sección 15 de la Reglamentación de FCC. Estas restricciones fueron
designadas para brindar una protección razonable frente a la interferencia
perjudicial en una instalación residencial. Este equipo genera, usa y puede
irradiar energía de radiofrecuencia y, si no está instalado o no se lo utiliza de
acuerdo con las instrucciones, puede ocasionar interferencias perjudiciales
para las comunicaciones de radio. Sin embargo, no existe ninguna garantía
de que no se vaya a producir una interferencia en una instalación particular.
Si este equipo produce una interferencia perjudicial con la recepción de la
radio o la televisión, lo cual podría determinarse apagando y encendiendo el
equipo, se le pide al usuario que intente corregir la interferencia siguiendo
una o varias de las siguientes medidas.
• Vuelva a orientar o cambie de lugar la antena receptora.
• Aumente la separación entre el equipo y el receptor.
• Conecte este equipo a un tomacorriente en un circuito diferente al que
esté conectado el receptor.
• Consulte al distribuidor o a un técnico experimentado de radio y televisión
para solicitar asistencia.
Precaución: Cualquier cambio o modicación no expresamente aprobados por la
parte responsable por el cumplimiento podría invalidar la autoridad del usuario para
operar este equipo.
Declaración de conformidad ISED CAN ICES-003(B) / NMB-003(B)
Voxx Accessories Corporation (la “Compañía”) le garantiza a usted, el comprador
original de este producto que si, bajo condiciones y uso normales, se encontrara
que presenta defectos materiales o de mano de obra durante su vida útil mientras
sea de su propiedad, tales defectos serán reparados o reemplazados (a opción
de la Compañía) sin cargo alguno por las piezas y labores de reparación. Para
obtener los servicios de reparación o reemplazo dentro de los términos de esta
garantía, el producto se entregará con prueba de cubierta de garantía (por
ejemplo, factura fechada de venta), especicación de los defectos, transporte
prepagado, a una estación de garantía aprobada. Para ubicar la estación de
garantía más cercana a su domicilio, llame sin costo a nuestra ocina de control:
al 1-800-645-4994.
Esta Garantía no cubre un producto adquirido, mantenido o utilizado fuera de
los Estados Unidos o Canadá. Esta Garantía no es transferible y no incluye los
costos incurridos en la instalación, remoción o reinstalación de este producto.
Esta Garantía no aplica si, es opinión de la Compañía que, este producto ha
sufrido daños debido a alteraciones, instalación inadecuada, abuso, uso indebido,
negligencia, accidente o el uso simultáneo de baterías de tipos diferentes (p.ej.,
alcalinas, estándar o recargables). EL ALCANCE DE LA RESPONSABILIDAD DE
LA COMPAÑÍA BAJO ESTA GARANTÍA ESTÁ LIMITADO A LA REPARACIÓN
O EL REEMPLAZO PROVISTO ARRIBA Y, EN NINGÚN CASO, DEBERÁ LA
RESPONSABILIDAD DE LA COMPAÑÍA EXCEDER EL PRECIO DE COMPRA
PAGADO POR EL COMPRADOR DE ESTE PRODUCTO. Esta Garantía reemplaza
cualesquiera otras responsabilidades o garantías expresas. CUALESQUIERA
GARANTÍAS IMPLÍCITAS, INCLUYENDO CUALQUIER GARANTÍA IMPLÍCITA DE
COMERCIABILIDAD O ADAPTABILIDAD PARA UN PROPÓSITO EN PARTICULAR
ESTARÁN LIMITADAS A LA DURACIÓN DE ESTA GARANTÍA. EN NINGÚN
CASO LA COMPAÑÍA SERÁ RESPONSABLE POR DAÑOS EMERGENTES O
INCIDENTALES. Ninguna persona ni representante está autorizado a asumir, a
nombre de la Compañía, ninguna responsabilidad salvo la expresada aquí en
conexión con la venta de este producto.
Algunos estados/provincias no permiten limitaciones sobre la duración de
una garantía implícita o la exclusión o la limitación de daños incidentales
o emergentes, de modo que es posible que las limitaciones o exclusiones
anteriores no se apliquen en su caso. Esta Garantía le conere derechos legales
especícos; según el estado/provincia, puede disfrutar además de otros derechos.
Para desactivar el bloqueo de volumen avanzado:
1. Mantenga oprimida la tecla de dispositivo que controla actualmente el
volumen durante aproximadamente 2 segundos hasta que la tecla POWER
se encienda y permanezca encendida. A continuación, suelte la tecla de
dispositivo.
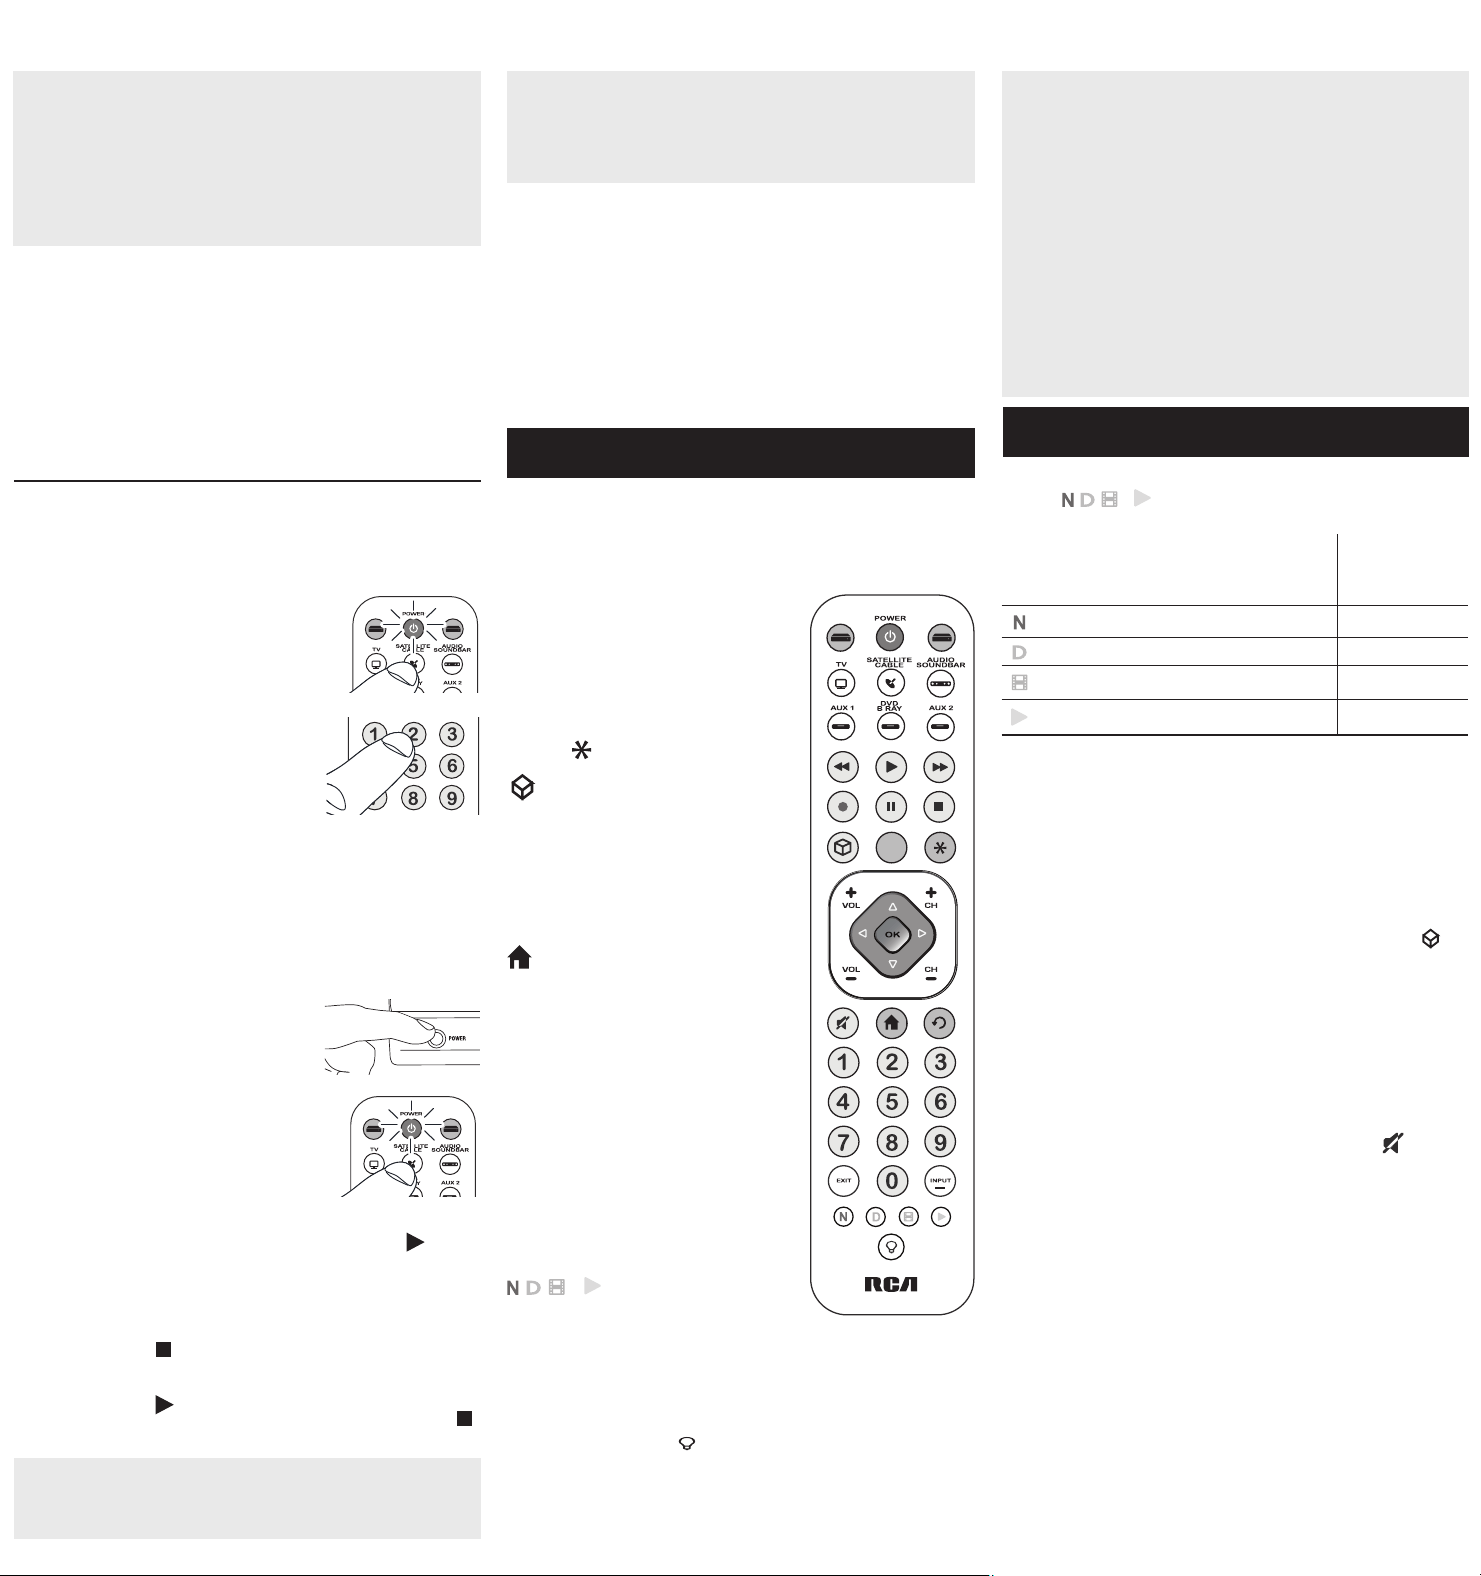