
Warranty information
Warranty information
12 Month Limited Warranty
Applies to RCA Clock Radios
AUDIOVOX ACCESSORIES CORP. (the Company) warrants
to the original retail purchaser of this product that should
this product or any part thereof, under normal use and
conditions, be proven defective in material or workmanship
within 12 months from the date of original purchase, such
defect(s) will be repaired or replaced with reconditioned
product (at the Company’s option) without charge for parts
and repair labor.
To obtain repair or replacement within the terms of this
Warranty, the product is to be delivered with proof of
warranty coverage (e.g. dated bill of sale), specifi cation of
defect(s), transportation prepaid, to the Company at the
address shown below.
This Warranty does not extend to the elimination of
externally generated static or noise, to correction of antenna
problems, loss/interruptions of broafast or internet service,
to costs incurred for installation, removal or reinstallation of
product, to corruptions caused by computer viruses, spyware
or other malware, to loss of media, fi les, data or content,
or to damage to tapes, discs, removable memory devices or
cards, speakers, accessories, computers, computer peripherals,
other media players, home networks or vehicle electrical
systems.
This Warranty does not apply to any product or part thereof
which, in the opinion of the Company, has suffered or
been damaged through alteration, improper installation,
mishandling, misuse, neglect, accident, or by removal or
defacement of the factory serial number/bar code label(s).
THE EXTENT OF THE COMPANY’S LIABILITY UNDER THIS
WARRANTY IS LIMITED TO THE REPAIR OR REPLACEMENT
PROVIDED ABOVE AND, IN NO EVENT, SHALL THE
COMPANY’S LIABILITY EXCEED THE PURCHASE PRICE PAID BY
PURCHASER FOR THE PRODUCT.
This Warranty is in lieu of all other express warranties or
liabilities. ANY IMPLIED WARRANTIES, INCLUDING ANY
IMPLIED WARRANTY OF MERCHANTABILITY, SHALL BE
LIMITED TO THE DURATION OF THIS WRITTEN WARRANTY.
ANY ACTION FOR BREACH OF ANY WARRANTY HEREUNDER
INCLUDING ANY IMPLIED WARRANTY OF MERCHANTABILITY
MUST BE BROUGHT WITHIN A PERIOD OF 24 MONTHS
FROM DATE OF ORIGINAL PURCHASE. IN NO CASE SHALL
THE COMPANY BE LIABLE FOR ANY CONSEQUENTIAL OR
INCIDENTAL DAMAGES FOR BREACH OF THIS OR ANY OTHER
WARRANTY. No person or representative is authorized to
assume for the Company any liability other than expressed
herein in connection with the sale of this product.
Some states do not allow limitations on how long an implied
warranty lasts or the exclusion or limitation of incidental or
consequential damage so the above limitations or exclusions
may not apply to you. This Warranty gives you specifi c legal
rights and you may also have other rights which vary from
state to state.
Recommendations before returning your product for a
warranty claim:
• Properly pack your unit. Include any remotes, memory
cards, cables, etc. which were originally provided with
the product. However DO NOT return any removable
batteries, even if batteries were included with the
original purchase. We recommend using the original
carton and packing materials. Ship to the address shown
below.
• Note that product will be returned with factory default
settings. Consumer will be responsible to restore any
personal preference settings.
Audiovox Electronics Corp.
Attn: Service Department.
150 Marcus Blvd.
Hauppauge N.Y. 11788
1-800-645-4994
For Canada Customers, please ship to:
Audiovox Return Centre
c/o Genco
6685 Kennedy Road,
Unit#3, Door 16,
Mississuaga, Ontario
L5T 3A5
EN/F/E
It is important to read this user manual prior to using your new product for the fi rst time.
Nous vous recommandons de lire ce manuel d’instructions avant d’utiliser votre nouveau produit pour la première fois.
Es importante leer este manual antes de usar por vez primera su equipo.
Product registration
Thank you for purchasing an RCA product. We pride ourselves on the
quality and reliability of all our electronic products but if you ever
need service or have a question, our customer service staff stands
ready to help. Contact us at www.rcaaudiovideo.com. PURCHASE
REGISTRATION: Registering On-line will allow us to contact you in
the unlikely event a safety notifi cation is required under the Federal
Consumer Safety Act. Register Online at:
WWW.RCAAUDIOVIDEO.COM. Click on Product Registration and
Fill Out the Brief Questionnaire.
Enregistrement du produit
Merci d’avoir acheté un produit RCA. Nous sommes fi ers de la qualité
et de la fi abilité de tous nos produits électroniques, mais en cas de
nécessité de réparation ou pour toute question, le personnel de
notre service clientèle est prêt à vous aider. Contactez-nous sur
www.rcaaudiovideo.com. ENREGISTREMENT D’ACHAT: Enregistrer votre produit en ligne nous permettra de communiquer
avec vous pour tout avis de sécurité au sujet du produit en vertu du Federal Consumer Safety Act (Loi fédérale de protection
du consommateur). Enregistrez votre produit en ligne sur: WWW.RCAAUDIOVIDEO.COM. Cliquez sur Enregistrement
produit et remplissez le court questionnaire.
Enregisregistro del productotrement du produit
Gracias por comprar un producto RCA. Nos enorgullece la calidad y fi abilidad de todos nuestros productos electrónicos, pero si
alguna vez necesita servicios técnicos o si tiene alguna pregunta, nuestro personal de atención al cliente está a su disposición
para ayudarle. Comuníquese con nosotros en www.rcaaudiovideo.com. REGISTRO DE COMPRA: El registro en línea nos
permitirá comunicarnos con usted en el caso de tener que enviarle algún aviso de seguridad en virtud de la Ley Federal de
Seguridad del Consumidor. Registre el producto en línea en: WWW.RCAAUDIOVIDEO.COM. Haga clic en Registro del
producto y responda al cuestionario.
user manual
guide de l’utilisateur
manual de usuario
v2.0 (1.0.2.0) (EN/F/E)
Clock
Alarm
Setting clock manually
1. Slide the TIME SET/ALARM SET switch to the TIME
SET position to enter clock setting mode.
2. Press HR to set the hour.
• The clock is in 12 hour format. The PM indicator will
appear for showing a PM time.
3. Press MIN to set the minute.
4. Slide the TIME SET/ALARM SET switch to the LOCK
position to confi rm and exit clock setting mode.
Slide the DIMMER LOW/HIGH to adjust the brightness of
the display.
Light
IMPORTANT SAFETY INSTRUCTIONS
PLEASE READ AND SAVE THIS FOR FUTURE REFERENCE
Some of the following information may not apply to your
particular product; however, as with any electronic product,
precautions should be observed during handling and use.
• Read these instructions.
• Keep these instructions.
• Heed all warnings.
• Follow all instructions.
• Do not use this apparatus near water.
• Clean only with dry cloth.
• Do not block any ventilation openings. Install in
accordance with the manufacturer’s instructions.
• Do not install near any heat sources such as radiators,
heat registers, stoves, or other apparatus (including
amplifi ers) that produce heat.
• Do not defeat the safety purpose of the polarized or
grounding-type plug. A polarized plug has two blades
with one wider than the other. A grounding type plug
has two blades and a third grounding prong. The wide
blade or the third prong is provided for your safety. If
the provided plug does not fi t into your outlet, consult
an electrician for replacement of the obsolete outlet.
• Protect the power cord from being walked on or
pinched particularly at plugs, convenience receptacles,
and the point where they exit from the apparatus.
• Only use attachments/accessories specifi ed by the
manufacturer.
• Use only with the cart, stand,
tripod, bracket, or table specifi ed
by the manufacturer, or sold with
the apparatus. When a cart is
used, use caution when moving
the cart/apparatus combination to
avoid injury from tip-over.
English
RCD30
• Unplug this apparatus during lightning storms or when
unused for long periods of time.
• Refer all servicing to qualifi ed service personnel.
Servicing is required when the apparatus has been
damaged in any way, such as power-supply cord or
plug is damaged, liquid has been spilled or objects
have fallen into the apparatus, the apparatus has been
exposed to rain or moisture, does not operate normally,
or has been dropped.
ADDITIONAL SAFETY INFORMATION
• Apparatus shall not be exposed to dripping or splashing
and no objects fi lled with liquids, such as vases, shall be
placed on the apparatus.
• Always leave suffi cient space around the product for
ventilation. Do not place product in or on a bed, rug,
in a bookcase or cabinet that may prevent air fl ow
through vent openings.
• Do not place lighted candles, cigarettes, cigars, etc. on
the product.
• Connect power cord only to AC power source as marked
on the product.
• Care should be taken so that objects do not fall into the
product.
• Do not attempt to disassemble the cabinet. This product
does not contain customer serviceable components.
• The marking information is located at the bottom of
apparatus.
• To be completely disconnect the power input, the Mains
plug of apparatus shall be disconnected from the mains.
• Mains plug is a disconnect device. The mains plug
should not be obstructed OR should be easily accessed
during intended use.
• The ventilation should not be impeded by covering
the ventilation openings with items such as newspaper,
table-cloths, curtains etc.
• No naked fl ame sources, such as lighted candled, should
be placed on the apparatus.
• Attention should be drawn to the environmental aspects
of battery disposal.
• The use of apparatus in moderate climates.
CAUTION: TO PREVENT ELECTRIC SHOCK DO NOT USE THIS
(POLARIZED) PLUG WITH AN EXTENSION CORD, RECEPTACLE
OR OTHER OUTLET UNLESS THE BLADES CAN BE FULLY
INSERTED TO PREVENT BLADE EXPOSURE.
]
Portable Cart Warning
Plugging in for power
AC OUTLET POWER SUPPLY: 120 V ~ 60 Hz
The AC power plug is polarized (one blade
is wider than the other) and only fi ts into
AC power outlets one way. If the plug will
not go into the outlet completely, turn the
plug over and try to insert it the other way.
If it still does not fi t, contact a qualifi ed
electrician to change the outlet, or use a
different one. Do not attempt to bypass this
safety feature.
Electrical consumption
Power Supply: 120 V ~ 60 Hz
Power Consumption: 5 Watts
Important battery precautions
• Any battery may present a risk of fi re, explosion, or
chemical burn if abused. Do not try to charge a battery
that is not intended to be recharged, do not incinerate,
and do not puncture.
• Non-rechargeable batteries, such as alkaline batteries,
may leak if left in your product for a long period of
time. Remove the batteries from the product if you are
not going to use it for a month or more.
• If your product uses more than one battery, do not mix
types and make sure they are inserted correctly. Mixing
types or inserting incorrectly may cause them to leak.
• Discard any leaky or deformed battery immediately.
They may cause skin burns or other personal injury.
• Please help to protect the environment by recycling or
disposing of batteries according to federal, state, and
local regulations.
WARNING: The battery (battery or batteries or battery pack)
shall not be exposed to excessive heat such as sunshine, fi re
or the like.
Ecology
Help protect the environment - we recommend that you
dispose of used batteries by putting them into specially
designed receptacles.
Before you begin
Avant de commencer
Plugging in for power
• Connect the power cord to a convenient wall outlet.
• Once connected with power, the clock fl ashes. Refer to
the Clock section for instructions on properly setting the
Clock.
Battery back-up operation
• This clock is equipped with a timekeeping system that
can be powered with a 9-volt alkaline battery (not
included). The power failure protection circuit will not
operate unless battery is installed.
• When normal household power is interrupted, the
battery will power the clock to keep track of time and
alarm settings programmed into memory.
• When the battery backup functions, the digital display
will not light, however, the function of alarm still occurs
during the power interruption if remaining battery
power is adequate.
• Normal operation will resume after AC power is
restored so you will not have to reset the time or the
alarm.
To install the battery:
1. Remove battery compartment door (located at the back
of the clock) by applying thumb pressure to the tab
on battery door and then lift the door out and off the
cabinet.
Battery
compartment
2. Connect a 9-volt alkaline battery (not included) to the
connector plug.
3. Replace the compartment door.
Branchement de l’alimentation
• Branchez le cordon d’alimentation à une prise murale
appropriée.
• Lorsque l’alimentation est branchée, l’horloge clignote.
Consultez la rubrique « Horloge » pour des instructions
sur le réglage de l’horloge.
Alimentation par la pile de secours
• Ce réveil est muni d’un système de mémorisation de
l’heure qui peut être alimenté par une pile alcaline de
9 volts (non fournie). Le circuit de protection contre les
pannes de courant ne fonctionne pas si la pile n’est pas
installée.
• Lorsque l’alimentation résidentielle normale est
interrompue, la pile alimente le réveil pour maintenir
les réglages de l’horloge et de l’alarme programmés en
mémoire.
• Lorsque le réveil est alimenté par la pile de secours,
l’affi chage numérique ne s’allume pas; par contre, la
fonction d’alarme s’active malgré la panne de courant si
la puissance de la pile est suffi sante.
• Le fonctionnement normal reprend lorsque l’alimentation
CA est rétablie; ainsi, vous n’aurez pas à régler l’horloge
et l’alarme à nouveau.
Pour installer la pile :
1. Retirez le couvercle du compartiment de la pile (situé
à l’arrière de l’horloge) en appuyant avec votre pouce
sur la languette puis en soulevant le couvercle hors du
compartiment.
Compartiment
de la pile
2. Branchez une pile alcaline de 9 volts (non fournie) à
la fi che.
3. Replacez le couvercle du compartiment.
Setting alarm time
1. Slide the TIME SET/ALARM SET switch to the ALARM
SET position to enter alarm setting mode.
2. Press HR to set the hour.
• The clock is in 12 hour format. The PM indicator will
appear for showing a PM time.
3. Press MIN to set the minute.
4. Slide the TIME SET/ALARM SET switch to the LOCK
position to confi rm and exit alarm setting mode.
Turning on/off the alarm
1. Slide the ALARM ON/OFF switch to the ON position.
The AL indicator will turn on to show that the alarm is
on.
2. Slide the ALARM ON/OFF switch to the OFF position.
The AL indicator will turn off to show that the alarm is
off.
Ways to turn off alarm
• To silence the wake function momentarily, press
SNOOZE. The alarm will be on again when the snooze
period (9 minutes) is over.
• To disable the wake function completely, slide the
ALARM ON/OFF switch to the OFF position. The AL
indicator will turn off to show that the alarm is off.
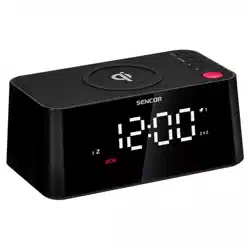
Top view
HR – Adjust hour in clock setting mode or alarm setting
mode
MIN – Adjust minute in clock setting mode or alarm
setting mode
SNOOZE – Enter snooze mode where the alarm will quiet
but sound again once the snooze period is over
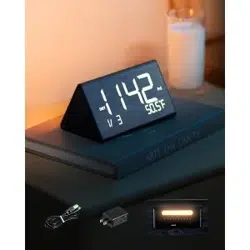
Back view
ALARM ON/OFF – Turn the alarm on/off
DIMMER LOW/HIGH – Adjust the brightness of the display
TIME SET/ALARM SET – Enter clock setting mode or
alarm setting mode
General controls
Alkaline (NEDA 1604A/IEC 6LR61) type
battery is recommended. Carbon-zinc battery
may be used but memory holding time will
be substantially reduced. Memory holding
time for a fresh alkaline battery is approximately 8
hours (if alarm is not operated) which should take
care of short, nuisance-type AC power failures. To
preserve battery life, the unit should remain plugged
into an AC outlet. As the battery gets older, its
voltage drops and memory may be lost. Be sure to
replace the battery periodically. Battery should be
removed if the unit will be stored for more than one
month. A leaky battery can badly damage unit.
Power failure indicator
If you have not installed the 9-volt alkaline battery in the
product, or the battery runs out while power is interrupted,
all the settings (clock and alarm) will be lost. After AC power
is restored, the Digital Display will fl ash to indicate that
power was interrupted and you should readjust the time
settings.
Note: It is recommended to replace the battery at least once
per year even if no power failures have occurred.
IMPORTANTES INSTRUCTIONS DE SECURITE
BIEN LIRE ET CONSERVER POUR RÉFÉRENCE ULTÉRIEURE
Français
Il
est
possible que certains des articles ci-dessous ne s’appliquent
pas à votre appareil. Cependant, il faut prendre certaines
précautions quand on manipule et utilise tout appareil
électronique.
• Lisez ces instructions.
• Conservez ces instructions.
• Portez attention à tous les avertissements.
• Observez toutes les instructions.
• N’utilisez pas cet appareil près de l’eau.
• Nettoyez avec un chiffon sec seulement.
• N’obstruez pas les ouvertures de ventilation. Exécutez
l’installation selon les instructions du fabricant.
• N’installez pas près d’une source de chaleur tel que
radiateur, grille de chauffage, poêle ou autres appareils
(incluant les amplifi cateurs) qui produisent de la chaleur.
• Ne déjouez pas le dispositif de sécurité des fi ches
polarisées ou avec mise à la terre. Une fi che polarisée
comprend deux lames, l’une étant plus large. Une
fi che avec mise à la terre comprend deux lames et
une broche de mise à la terre. La lame la plus large
ou la broche de mise à la terre assurent votre sécurité.
Si la fi che fournie ne convient pas à la prise murale,
consultez un technicien pour remplacer la prise murale.
• Assurez-vous que personne ne marche sur le cordon
d’alimentation ou qu’il n’est pas coincé près des fi ches,
des prises et à la sortie des appareils.
• N’utilisez que les accessoires spécifi és par le fabricant.
• N’utilisez qu’avec le chariot, support,
trépied, crochet ou table spécifi ée
par le fabricant ou vendue avec
l’appareil. Lorsque vous utilisez un
chariot, portez attention lorsque
vous déplacer le chariot et l’appareil
pour éviter les blessures dues au
renversement.
• Débranchez l’appareil pendant les orages ou si vous ne
l’utilisez pas pendant de longues périodes.
• Confi ez l’entretien à du personnel compétent.
Les réparations sont nécessaires si l’appareil a été
endommagé de quelque façon que ce soit, comme un
cordon d’alimentation ou une fi che en mauvais état,
si un liquide a été renversé sur l’appareil, si des objets
sont tombés sur l’appareil, si l’appareil a été exposé à
l’eau ou à l’humidité, si l’appareil ne fonctionne pas
normalement ou s’il est tombé.
INFORMATIONS DE SECURITES SUPPLEMENTAIRES
• L’appareil ne doit pas être exposé à des infi ltrations ou
éclaboussures d’eau et aucun objet rempli de liquide –
tel qu’un vase – ne doit jamais être placé sur l’appareil.
• Toujours laisser suffi samment d’espace autour de
l’appareil pour assurer la ventilation. Ne pas placer
l’appareil sur un lit, un tapis ou sur un étagère ou
dans un meuble qui pourrait bioquer les ouvertures de
ventilation.
• Ne pas placer de chandelles, de cigarettes, de cigares,
etc, sur l’appareil.
• Ne brancher le cordon d’alimentation que dans une
prise de courant c.a. comme indiqué sur l’appareil.
• Prendre garde que des objets ne tombent pas dans
l’appareil.
• Ne pas tenter de démonter l’appareil. Celui-ci ne
contient pas de composants pouvant être réparés par
l’utilisateur.
• Les renseignements sur les caractéristiques sont situés
sur le dessous de l’appareil.
• Pour couper complètement l’alimentation électrique, la
fi che pour prise muraledoit être débranché de la prise.
• La fi che pour prise murale sert de dispositif de
débranchement. La fi che pour prise murale ne doit
pas être obstrué ET doit demeurer accessible pendant
l’utilisation.
• La ventilation ne doit pas être limitée en recouvrant les
orifi ces de ventilation avec des objets comme un journal,
une nappe, des rideaux, etc.
• Aucune source de fl amme nue, comme une chandelle
allumée, ne doit être déposée sur l’appareil.
• Soyez conscients des conséquences environnementales
lorsque vous vous débarrassez des piles.
• L’appareil doit être utilisé dans des conditions
climatiques normales.
ATTENTION: POUR PRÉVENIR LES CHOCS ÉLECTRIQUES
NE PAS UTILISER CETTE FICHE POLARISÉE AVEC UN
PROLONGATEUR, UNE PRISE DE COURANT, OU UNE AUTRE
SORTIE DE COURANT SAUF SI LES LAMES PEUVENT ÉTRE
INSÉRÉES À FOND SANS EN LAISSER AUCUNE PARTIE À
DECOUVERT.
Branchement
ALIMENTATION COURANT ALTERNATIF : 120 V ~ 60 Hz
La prise de l’appareil est polarisée (une des
fi ches est plus large que l’autre) et ne peut
s’enclencher que d’une seule façon dans
une prise de courant alternatif. Si la prise
n’est pas complètement insérée dans la prise
murale, retournez la prise et essayez de
l’insérer dans l’autre sens. Si elle ne rentre
toujours pas, contactez un électricien agréé pour changer la
prise ou utilisez une autre prise. N’essayez pas de contourner
cette mesure de sécurité.
Consommation électrique
Alimentation électrique : 120 V ~ 60 Hz
Consommation électrique : 5 watts
Précautions importantes concernant la pile
• Toute pile peut présenter un risque d’incendie,
d’explosion ou de brûlure chimique si elle n’est pas
manipulée avec soin. N’essayez pas de recharger une
pile qui n’est pas conçue pour être rechargée; n’essayez
pas de l’incinérer ou de la percer.
• Les piles non rechargeables, comme les piles alcalines,
peuvent couler si elles sont laissées dans votre appareil
pendant une longue période. Retirez les piles de
l’appareil si vous ne l’utilisez pas pendant plus d’un
mois.
• Si votre appareil utilise plus d’une pile, ne mélangez
pas les types de pile et assurez-vous qu’elles sont
installées correctement. Si différents types de piles sont
mélangés ou si elles sont installées incorrectement, elles
pourraient couler.
• Jetez immédiatement les piles déformées ou qui
coulent. Les piles qui coulent peuvent causer des
brûlures et d’autres blessures.
• Aidez à protéger l’environnement en recyclant ou en
disposant des piles selon les réglementations fédérales,
provinciales et locales.
AVERTISSEMENT : La pile (pile, piles ou bloc-piles) ne doit pas
être exposée à une chaleur intense, telle que la lumière du
soleil, un feu, etc.
Environnement
Aidez à protéger l’environnement : nous vous recommandons
de disposer des piles en les déposant dans les endroits prévus
pour les recevoir.
]
Avertissement pour
transport par chariot
Illustrations contained within this publication are for Illustrations contained within this publication are for
representation only and subject to change.representation only and subject to change.
The descriptions and characteristics given in this document The descriptions and characteristics given in this document
are given as a general indication and not as a guarantee. In are given as a general indication and not as a guarantee. In
order to provide the highest quality product possible, we order to provide the highest quality product possible, we
reserve the right to make any improvement or modifi cation reserve the right to make any improvement or modifi cation
without prior notice. without prior notice.
Les illustrations de cette publication sont fournies à titre
indicatif seulement et sont sujettes à changement.
Les descriptions et les caractéristiques décrites dans ce
document représentent une indication générale et ne
constitue pas une garantie. Afi n d’offrir la meilleure qualité
de produit possible, nous nous réservons le droit de faire
toute amélioration ou modifi cation et ce, sans préavis.
Las ilustraciones contenidas dentro de esta publicación son
para propósitos de ilustración solamente y están sujetas a
cambio.
Las descripciones y las características presentadas en este
documento son dadas a modo de indicación general y no de
garantía. Con el fi n de proporcionarle la más alta calidad de
producto posible, nos reservamos el derecho a hacer mejoras
o modifi caciones sin previo aviso.
© 2012 Audiovox Accessories Corporation
111 Congressional Blvd., Suite 350
Carmel, IN 46032
Trademark(s) ® Registered
Marque(s) ® Deposée(s)
Marca(s) ® Registrada(s)
Printed in China
Imprimé en Chine
Impreso en China
Visit http://store.audiovox.com to find the best
accessories for your products.
Visitez http://store.audiovox.com pour trouver les
meilleurs accessoires pour vos appareils.
Visite http://store.audiovox.com donde encontrará los
mejores accesorios para sus productos.
Garantía limitada
Garantía Limitada de 12 Meses
Aplica a Radios Reloj RCA
AUDIOVOX ACCESSORIES CORP. (la Compañía) garantiza al
comprador al menudeo original de este producto que en el
caso de que se compruebe que este producto o alguna parte
del mismo, bajo condiciones y uso normales, sea defectuoso
en material o mano de obra en un plazo de doce meses
desde la fecha de compra original, tal(es) defecto(s) será(n)
reparado(s) o reemplazado(s) con producto reacondicionado
(a opción de la Compañía) sin cargo por las partes y la labor
de reparación.
Para obtener el reemplazo o reparación dentro de los
términos de esta Garantía, el producto debe ser entregado
con prueba de cobertura de la garantía (por ejemplo, la
nota de venta fechada), especifi cación de defecto(s), fl ete
prepagado, a la Compañía en la dirección que se muestra
más adelante.
Esta Garantía no se extiende a la eliminación de ruido
o estática generados externamente, a la corrección de
problemas de antenas, interrupciones/pérdida de transmisión
o de servicio de internet, a costos incurridos por instalación,
remoción o reinstalación de producto, a corrupciones
causadas por virus de computadoras, spyware u otro
malware, a pérdida de medios, archivos, datos o contenido,
o a daño a cintas, discos, tarjetas o dispositivos de memoria
removibles, bocinas, accesorios, computadoras, periféricos
de computadora, otros reproductores de medios, redes en el
hogar o sistemas eléctricos en vehículos.
Esta Garantía no aplica a algún producto o parte del mismo
que, en opinión de la Compañía, haya sufrido o haya sido
dañado mediante alteración, instalación inadecuada, mal
manejo, mal uso, negligencia, accidente, o por la remoción o
eliminación de etiqueta(s) con el número de serie de fábrica/
código de barras. LA EXTENSIÓN DE LA RESPONSABILIDAD DE
LA COMPAÑÍA BAJO ESTA GARANTÍA ESTÁ LIMITADA A LA
REPARACIÓN O REEMPLAZO PROVISTOS ANTERIORMENTE Y,
EN NINGÚN CASO, LA RESPONSABILIDAD DE LA COMPAÑÍA
EXCEDERÁ EL PRECIO DE COMPRA PAGADO POR EL
COMPRADOR POR EL PRODUCTO.
Esta Garantía substituye todas las otras garantías o
responsabilidades específi cas. CUALQUIER GARANTÍA
IMPLÍCITA, INCLUYENDO CUALQUIER GARANTÍA IMPLÍCITA
DE APTITUD PARA COMERCIALIZACIÓN, ESTARÁ LIMITADA
A LA DURACIÓN DE ESTA GARANTÍA ESCRITA. CUALQUIER
ACCIÓN POR VIOLACIÓN DE ALGUNA GARANTÍA BAJO
LA PRESENTE, INCLUYENDO CUALQUIER GARANTÍA
IMPLÍCITA DE APTITUD PARA COMERCIALIZACIÓN DEBE
SER PRESENTADA DENTRO DE UN PERIODO DE 24 MESES
DESDE LA FECHA DE COMPRA ORIGINAL. EN NINGÚN CASO
LA COMPAÑÍA SERÁ RESPONSABLE POR ALGÚN DAÑO
CONSECUENCIAL O INCIDENTAL POR LA VIOLACIÓN DE
ESTA O DE CUALQUIER OTRA GARANTÍA. Ninguna persona
o representante está autorizado para asumir por parte de la
Compañía alguna responsabilidad distinta que lo expresado
en este documento en relación con la venta de este producto.
Algunos estados no permiten limitaciones en cuanto a la
duración de una garantía implícita o la exclusión o limitación
de daño consecuencial o incidental, por lo tanto las
limitaciones o exclusiones anteriores pueden no ser aplicables
a usted. Esta Garantía le otorga derechos legales específi cos
y puede ser que usted tenga también otros derechos que
varíen de estado a estado.
Recomendaciones antes de enviar su producto para
una reclamación en garantía:
• Empaque apropiadamente su unidad. Incluya cualquier
control remoto, tarjetas de memoria, cables, etc. que
fueron originalmente suministrados con el producto.
Sin embargo NO regrese baterías removibles, incluso
si las baterías fueron incluidas con la compra original.
Recomendamos usar los materiales de empaque y la
caja originales. Envíe a la dirección que se muestra a
continuación.
• Tome nota de que el producto será regresado con las
confi guraciones predeterminadas de fábrica. El cliente
será responsable de restaurar cualquier confi guración de
su preferencia personal.
Audiovox Electronics Corp.
Atn: Departamento de Servicio.
150 Marcus Blvd.
Hauppauge N.Y. 11788
1-800-645-4994
Para clientes en Canad·, favor de enviar a:
Audiovox Return Centre
c/o Genco
6685 Kennedy Road,
Unit#3, Door 16,
Mississuaga, Ontario
L5T 3A5
Garantie limitée
Garantie limitée de 12 mois
S’applique aux radios-réveils de RCA
AUDIOVOX ACCESSORIES CORP. (la Compagnie) garantie au
premier acheteur au détail de ce produit que si ce produit
ou toute pièce de ce dernier, pour une utilisation et dans des
conditions normales, révèle un défaut matériel ou de main
d’oeuvre dans les douze (12) mois suivants la date du premier
achat, un tel défaut sera réparé ou remplacé par un produit
remis en état (au choix de la Compagnie) sans frais pour les
pièces et la main d’œuvre.
Pour obtenir une réparation ou un remplacement selon les
conditions de cette Garantie, le produit doit être envoyé avec
une preuve de garantie (p. ex., une facture datée de l’achat),
des renseignements sur le(s) défaut(s) et le port prépayé à la
Compagnie à l’adresse indiquée ci-dessous.
Cette Garantie ne couvre pas l’élimination des bruits ou
parasites externes, la solution de problèmes d’antenne, la
perte/l’interruption de transmissions ou de l’accès à Internet,
les coûts de l’installation, du retrait ou de la réinstallation
du produit, les altérations causées par un virus informatique,
un logiciel espion ou autre programme malveillant, la perte
de médias, de fi chiers, de données ou de contenus, les
dommages à des cassettes, des disques, des dispositifs ou des
cartes-mémoire amovibles, des haut-parleurs, des accessoires,
des ordinateurs, des périphériques d’ordinateurs, d’autres
lecteurs multimédias, des réseaux résidentiels ou des systèmes
électriques de véhicule.
Cette Garantie ne s’applique pas au produit ou à toute pièce
de ce dernier qui, selon la Compagnie, a été endommagé
par ou a souffert d’une modifi cation, d’une installation
incorrecte, d’une manutention incorrecte, d’un abus, de
négligence, d’un accident ou dont l’étiquette portant le
numéro de série/le code à barres usiné a été retirée ou
dégradée. L’ÉTENDUE DE L’OBLIGATION DE LA COMPAGNIE
SOUS CETTE GARANTIE SE LIMITE À LA RÉPARATION OU AU
REMPLACEMENT INDIQUÉ CI-DESSUS; L’OBLIGATION DE LA
COMPAGNIE NE DOIT EN AUCUN CAS DÉPASSER LE PRIX
D’ACHAT PAYÉ PAR L’ACHETEUR POUR CE PRODUIT.
Cette Garantie remplace toutes les autres garanties ou
obligations explicites. TOUTE GARANTIE IMPLICITE, INCLUANT
LA GARANTIE IMPLICITE DE QUALITÉ MARCHANDE, DOIT
ÊTRE LIMITÉE À LA DURÉE DE LA PRÉSENTE GARANTIE ÉCRITE.
TOUTE ACTION POUR UNE CONTRAVENTION AUX TERMES DE
LA PRÉSENTE GARANTIE, INCLUANT LA GARANTIE IMPLICITE
DE QUALITÉ MARCHANDE, DOIT ÊTRE ENTREPRISE DANS
UNE PÉRIODE DE VINGT-QUATRE (24) MOIS À PARTIR DE LA
DATE ORIGINALE DE L’ACHAT. LA COMPAGNIE NE DEVRA EN
AUCUN CAS ÊTRE TENUE RESPONSABLE DES DOMMAGES
INDIRECTS OU ACCESSOIRES SUITE À LA VIOLATION DE
CETTE OU DE TOUTE AUTRE GARANTIE. Aucune personne et
aucun représentant n’est autorisé à assumer au nom de la
Compagnie toute obligation autre que celles indiquées dans
la présente en lien avec la vente de ce produit.
Certaines provinces ne permettent pas les limites à la
durée des garanties implicites ou l’exclusion des dommages
indirects ou accessoires, alors certaines limites ou exclusions
ci-dessus pourraient ne pas s’appliquer à vous. Cette Garantie
vous donne certains droits spécifi ques et vous pourriez avoir
d’autres droits, qui varient selon la province.
Recommandations avant de retourner votre produit
pour une réclamation sous garantie :
• Emballez correctement votre appareil. Incluez toute
télécommande, carte-mémoire, câble, etc. qui étaient
fournis avec l’appareil. Par contre, NE retournez PAS les
piles amovibles, même si les piles étaient fournies lors
de l’achat original. Nous vous recommandons d’utiliser
la boîte et le matériel d’emballage originaux. Envoyez le
tout à l’adresse indiquée ci-dessous.
• L’appareil sera renvoyé avec les réglages par défaut. Le
consommateur sera responsable du rétablissement des
réglages personnalisés.
Audiovox Electronics Corp.
Attn : Service Department.
150 Marcus Blvd.
Hauppauge N.Y. 11788
1-800-645-4994
Pour les consommateurs canadiens, veuillez envoyer votre
appareil à :
Audiovox Return Centre
c/o Genco
6685 Kennedy Road,
Unit#3, Door 16,
Mississauga, Ontario
L5T 3A5
IMPORTANTE INSTRUCCIONES DE SEGURIDAD
FAVOR DE GUARDAR ESTO PARA UNA REFERENCIA FUTURA
Español
Alguna de la siguiente información quizá no se aplique a
su producto en particular. Sin embargo, como con cualquier
producto electrónico, se deben tomar precauciones durante
su manejo y uso.
• Lea estas instrucciones.
• Conserve estas instrucciones.
• Tome en cuenta todas las advertencias.
• Siga todas las instrucciones.
• No use este aparato cerca del agua.
• Limpie solamente con un paño seco.
• No bloquee ninguna de las aperturas de ventilación.
Instale de acuerdo con las instrucciones del fabricante.
• No instale cerca de fuentes de calor tales como
radiadores, registros de calor, estufas, u otros aparatos
(incluyendo amplifi cadores) que produzcan calor.
• No elimine el propósito de seguridad de la clavija
polarizada o del tipo a tierra. Una clavija polarizada
tiene dos cuchillas, una más ancha que la otra. Una
clavija del tipo a tierra tiene dos cuchillas y una tercera
punta para conexión a tierra. La cuchilla ancha o la
tercera punta son suministradas para su seguridad. Si la
clavija suministrada no se adapta dentro de su toma de
corriente, consulte a un electricista para que reemplace
la toma de corriente obsoleta.
• Proteja el cable de corriente de pisotones o machucones
particularmente en las clavijas,
receptáculos de conveniencia, y en
punto donde salen del aparato.
• Use solamente accesorios/aditamentos
especifi cados por el fabricante.
• Use solamente con el carro, soporte,
trípode, consola, o mesa especifi cados
por el fabricante, o vendidos con el aparato. Cuando
se utiliza un carro, tenga precaución al mover la
combinación de carro/aparato para evitar lesión
ocasionada por volcadura.
• Desconecte este aparato durante tormentas eléctricas o
cuando no sea utilizado por largos períodos de tiempo.
• Refi era todo el servicio a personal de servicio califi cado.
El servicio es requerido cuando el aparato ha sido
dañado de alguna forma, tal como daño a la clavija o
al cable de corriente, cuando se ha derramado líquido o
han caído objetos dentro del aparato, el aparato ha sido
expuesto a lluvia o humedad, no funciona normalmente,
o ha sido tirado.
INFORMACION ADICIONAL DE SEGURIDAD
• El aparato no debe quedar expuesto a goteos o
salpicaduras de líquidos, y, por lo tanto, no se deben
colocar sobre el aparato objetos que contengan líquidos,
como por ejemplo vasos.
• Siempre deje sufi ciente espacio para ventilación
alreadedor del producto. No ponga el producto en la
cama, alfombra, librero o gabinete que pueda obstruir
la corriente de aire a través de apeturas de ventilación.
• No pongan velas, cigarillos o cigarros encendidos encima
de producto.
• Conecte sólo en receptáculos de corriente alterna como
esta indicado en el producto.
• Tome precauciones para evitar que caigan objetos
dentro del producto.
• No intente desensamblar el gabinete. Este producto no
contiene componentes que requieran servicio por parte
del cliente.
• La información de señalamiento está ubicada en la
parte inferior del aparato.
• Para desconectar completamente la entrada de
corriente, la clavija principal del aparato deberá
desconectarse de la toma de corriente.
• La clavija principal es un dispositivo de desconexión. La
clavija principalno deberá ser bloqueado O deberá ser
fácilmente accesible durante el uso para el cual está
diseñado.
• No se deberá obstruir la ventilación cubriendo las
aperturas de ventilación con elementos tales como
periódicos, paños, cortinas, etcétera.
• Ninguna fuente de fl ama abierta, tal como velas
encendidas, deberá colocarse sobre el aparato.
• Se deberá poner atención a los aspectos ambientales al
eliminar las baterías.
• El uso del aparato en climas moderados.
PRECAUCIÓN: PARA PREVENIR CHOQUE ELÉCTRICO NO
USE ESTA CLAVIJA (POLARIZADA) CON UNA EXTENSIÓN,
RECEPTÁCULO U OTRO TIPO DE TOMA DE CORRIENTE A
MENOS QUE LAS CUCHILLAS ESTÉN COMPLETAMENTE
INSERTADAS PARA EVITAR QUE QUEDEN EXPUESTAS.
Conexión a la red
FUENTE DE ALIMENTACIÓN CA: 120 V ca ~ 60 Hz
The AC power plug is polarized (one blade
is wider than the other) and only fi ts into
AC power outlets one way. If the plug will
not go into the outlet completely, turn the
plug over and try to insert it the other way.
If it still does not fi t, contact a qualifi ed
electrician to change the outlet, or use a different one. Do
not attempt to bypass this safety feature.
Consumo eléctrico
Fuente de alimentación: 120 V ~ 60 Hz
Consumo de energía: 5 Watts
Precauciones importantes para la batería
• Cualquier batería puede presentar un riesgo de fuego,
explosión o quemadura química si es mal tratada. No
trate de cargar una batería que no esté diseñada para
ser recargada, no incinere y no perfore.
• Baterías no recargables, tales como las baterías alcalinas,
pueden tener fugas si son dejadas en su producto por
un largo periodo de tiempo. Retire las baterías del
producto si usted no lo va a usar por un mes o más.
• Si su producto usa más de una batería, no mezcle tipos
y asegúrese de que estén insertadas correctamente.
Mezclar tipos de baterías o insertarlas incorrectamente
puede causar que tengan fugas.
• Deseche inmediatamente cualquier batería con fugas o
deformada. Ellas pueden causar quemaduras de la piel u
otra lesión personal.
• Por favor ayude a proteger el ambiente reciclando
o eliminando las baterías de conformidad con las
regulaciones federales, estatales y locales.
ADVERTENCIA: La batería (batería o baterías o paquete de
baterías) no deberá ser expuesta a calor excesivo tal como el
sol, fuego o similares.
Medio ambiente
Ayude a cuidar el medio ambiente. Le recomendamos
que deseche las baterías gastadas en los contenedores
especialmente diseñados para ello.
Avant de commencer
Une pile alcaline de type NEDA 1604A/IEC
6LR61 est recommandée. Vous pouvez utiliser
une pile carbone/zinc, mais la période de
rétention en mémoire sera signifi cativement
réduite. Le temps de rétention en mémoire d’une
nouvelle pile alcaline est d’environ huit heures
(si l’alarme n’est pas utilisée), ce qui devrait être
suffi sant pour les pannes de courant de courte durée.
Pour prolonger la durée de vie de la pile, l’appareil
devrait toujours être branché à une prise CA. Lorsque
la pile vieillit, son voltage diminue et les réglages
en mémoire peuvent être perdus. Assurez-vous de
remplacer la pile régulièrement. La pile devrait
être retirée si l’appareil est entreposé pendant
plus d’un mois. Une pile qui coule peut gravement
endommager l’appareil.
Indicateur de panne de courant
Si vous n’avez pas installé la pile alcaline de 9 volts dans
l’appareil, ou si la pile est déchargée et que l’alimentation CA
est débranchée, tous les réglages (horloge et alarme) seront
perdus. Lorsque l’alimentation CA est rétablie, l’affi chage
numérique clignote pour indiquer que l’alimentation a été
interrompue et que vous devez régler l’horloge à nouveau.
Remarque : Nous vous recommandons de remplacer la pile
chaque année même si aucune panne de courant n’a eu lieu.
Horloge
Alarme
Réglage manuel de l’horloge
1. Glissez le commutateur TIME SET/ALARM SET à la
position TIME SET pour passer en mode de réglage
de l’horloge.
2. Appuyez sur HR pour régler le champ des heures.
• L’affi chage de l’horloge est en format 12 heures.
L’indicateur PM s’affi che pour indiquer l’après-midi.
3. Appuyez sur MIN pour régler le champ des minutes.
4. Glissez le commutateur TIME SET/ALARM SET à la
position LOCK pour confi rmer et quitter le mode de
réglage de l’horloge.
Glissez le commutateur DIMMER LOW/HIGH pour régler la
luminosité de l’affi chage.
Éclairage
Réglage de l’heure de l’alarme
1. Glissez le commutateur TIME SET/ALARM SET à la
position ALARM SET pour passer en mode de réglage
de l’alarme.
2. Appuyez sur HR pour régler le champ des heures.
• L’affi chage de l’horloge est en format 12 heures.
L’indicateur PM s’affi che pour indiquer l’après-midi.
3. Appuyez sur MIN pour régler le champ des minutes.
4. Glissez le commutateur TIME SET/ALARM SET à la
position LOCK pour confi rmer et quitter le mode de
réglage de l’alarme.
Activation/désactivation de l’alarme
1. Glissez le commutateur ALARM ON/OFF à la position
ON. L’indicateur AL s’allume pour indiquer que l’alarme
est activée.
2. Glissez le commutateur ALARM ON/OFF à la position
OFF. L’indicateur AL s’éteint pour indiquer que l’alarme
est désactivée.
Pour désactiver l’alarme
• Pour désactiver la fonction de réveil temporairement,
appuyez sur SNOOZE. L’alarme s’active à nouveau lorsque
la période de rappel (9 minutes) est terminée.
• Pour désactiver la fonction de réveil complètement,
glissez le commutateur ALARM ON/OFF à la position
OFF. L’indicateur AL s’éteint pour indiquer que l’alarme
est désactivée.
Vue du haut
HR – Réglage de l’heure en mode de réglage de l’horloge
ou de l’alarme
MIN – Réglage des minutes en mode de réglage de
l’horloge ou de l’alarme
SNOOZE – Activation du mode de rappel; l’alarme est
désactivée, mais s’active à nouveau à la fi n de la période
de rappel
Vue de l’arrière
ALARM ON/OFF – Activation/désactivation de l’alarme
DIMMER LOW/HIGH – Réglage de la luminosité de
l’affi chage
TIME SET/ALARM SET – Passage en mode de réglage de
l’horloge ou de l’alarme
Commandes générales
Antes de comenzar
Conexión a la corriente
• Conecte el cable de corriente a una toma de pared
adecuada.
• Una vez conectado y con corriente, el reloj parpadea.
Para instrucciones sobre la confi guración correcta del reloj
consulte la sección Reloj.
Operación de respaldo con batería
• Este reloj está equipado con un sistema de mantenimiento
del tiempo que puede recibir energía de una batería
alcalina de 9 V (no incluida). El circuito de protección
contra fallas de energía no funcionará a menos que la
batería esté instalada.
• Cuando la corriente doméstica normal sea interrumpida,
la batería dará energía al reloj para mantener el
seguimiento de las confi guraciones de tiempo y alarma
programadas en memoria.
• Cuando el respaldo de batería funcione, la pantalla
digital no se iluminará, sin embargo, la función de alarma
todavía ocurre durante la interrupción de corriente si la
energía remanente de la batería es adecuada.
• La operación normal se reanudará después de que la
corriente CA sea restaurada de manera que usted no
tendrá que volver a confi gurar el tiempo o la alarma.
Para instalar la batería:
1. Retire la puerta del compartimiento de la batería
(ubicada en la parte posterior del reloj) aplicando presión
del dedo a la lengüeta en la puerta de la batería y luego
levante la puerta hacia afuera del gabinete.
Compartimiento
de la batería
2. Conecte una batería alcalina de 9 V (no incluida) a la
clavija del conector.
3. Vuelva a colocar la puerta del compartimiento.
Se recomienda la batería del tipo alcalino
(NEDA 1604A/IEC 6LR61). La batería
Carbono-Zinc puede ser usada pero el
tiempo de retención de memoria se
reducirá sustancialmente. El tiempo de retención
de memoria para una batería alcalina nueva es de
aproximadamente 8 horas (sin funcionamiento de
alarma) lo cual deberá ser sufi ciente para las molestas
interrupciones de corriente CA de corta duración.
Para preservar la vida de la batería, la unidad deberá
permanecer conectada a una toma de corriente CA.
Conforme la batería se torne vieja, su voltaje cae y
la memoria puede perderse. Asegúrese de remplazar
periódicamente la batería. La batería deberá
removerse si la unidad va a ser almacenada por
más de un mes. Una batería con fugas puede dañar
seriamente la unidad.
Indicador de falla de energía
Si usted no ha instalado la batería alcalina de 9 V en el
producto, o si la batería queda sin energía mientras la
corriente está interrumpida, todas las confi guraciones (reloj y
alarma) se perderán. Después de que se restaure la corriente
CA, la pantalla digital parpadeará para indicar que hubo una
interrupción en la corriente y que usted deberá reajustar las
confi guraciones de tiempo.
Nota: se recomienda remplazar la batería al menos una vez al
año aún si no han ocurrido interrupciones de corriente.
Reloj
Alarma
Ajuste manual del reloj
1. Deslice el interruptor TIME SET/ALARM SET a
la posición TIME SET para entrar al modo de
confi guración de reloj.
2. Presione HR para establecer la hora.
• El reloj está en formato de 12 horas. El indicador PM
aparecerá para mostrar un tiempo PM.
3. Presione MIN para establecer los minutos.
4. Deslice el interruptor TIME SET/ALARM SET a la
posición LOCK para confi rmar y salir del modo de
confi guración de reloj.
Deslice el interruptor DIMMER LOW/HIGH para ajustar el
brillo de la pantalla.
Luz
Ajuste del tiempo de alarma
1. Deslice el interruptor TIME SET/ALARM SET a la posición
ALARM SET para entrar al modo de confi guración de
alarma.
2. Presione HR para establecer la hora.
• El reloj está en formato de 12 horas. El indicador PM
aparecerá para mostrar un tiempo PM.
3. Presione MIN para establecer los minutos.
4. Deslice el interruptor TIME SET/ALARM SET a la posición
LOCK para confi rmar y salir del modo de confi guración
de alarma.
Encendido y apagado de la alarma
1. Deslice el interruptor ALARM ON/OFF a la posición ON.
El indicador AL se encenderá para mostrar que la alarma
está activa.
2. Deslice el interruptor ALARM ON/OFF a la posición OFF.
El indicador AL se apagará para mostrar que la alarma
está desactivada.
Formas de apagar la alarma
• Para silenciar momentáneamente la función despertar,
presione SNOOZE. La alarma se reactivará nuevamente
cuando el período dormitar (9 minutos) termine.
• Para desactivar completamente la función despertar,
deslice el interruptor ALARM ON/OFF a la posición OFF.
El indicador AL se apagará para mostrar que la alarma
está desactivada.
Vista superior
HR – Ajusta la hora en el modo de confi guración de reloj o
en el modo de confi guración de alarma
MIN – Ajusta los minutos en el modo confi guración de reloj
o en el modo confi guración de alarma
SNOOZE – Entra al modo dormitar en que la alarma se
silenciará pero sonará nuevamente después de que el
término dormitar termine
Vista posterior
ALARM ON/OFF – Enciende/apaga la alarma
DIMMER LOW/HIGH – Ajusta el brillo de la pantalla
TIME SET/ALARM SET – Entra al modo de confi guración
de reloj o al modo de confi guración de alarma
Controles generales
]
Advertencia sobre el
Carro Portátil