Set the Time
1. Press and hold the CLK/MEM
button until the hours digits
start to ash on the display.
2. Use the SET — /
+
and SET+ /
+
buttons to adjust the hour.
Press CLK/MEM button to set it.
3. Use the SET — /
+
and SET+ /
+
buttons to adjust the minutes.
Press CLK/MEM button to set the minutes and exit time setting.
AM/FM Weather Alert
Clock Radio
User’s Guide
RCDW10 IB 03
Getting Started
Remove the protective lm from the clock’s display
Gently peel off the protective lm covering the display.
Power the Weather Alert Clock Radio
Weather alert clock radio, top
CLK / MEM
SOURCE / AL OFF
+
SET
NOAA
DIMMER
AL2
VOL
AL1
VOL +
SNOOZE / SLEEP
Everyday Use
Setting the Alarm
1. Make sure the radio is off. Press and hold the /SOURCE/AL
OFF button if it isn’t.
2. To set Alarm 1, press and hold the AL1/VOL+ button. The
alarm hour digits begin to ash on the display.
2. Use the SET — /
+
and SET+ /
+
buttons to adjust the alarm
hour. Press the AL1/VOL+ button to set it.
3. Use the SET — /
+
and SET+ /
+
buttons to adjust the alarm
minutes. Press the AL1/VOL+ button to set the alarm minutes.
Once you’ve set the alarm, the Buzzer alarm indicator lights up.
To set Alarm 2, use the AL2/VOL— button instead of the AL1/
VOL+ button.
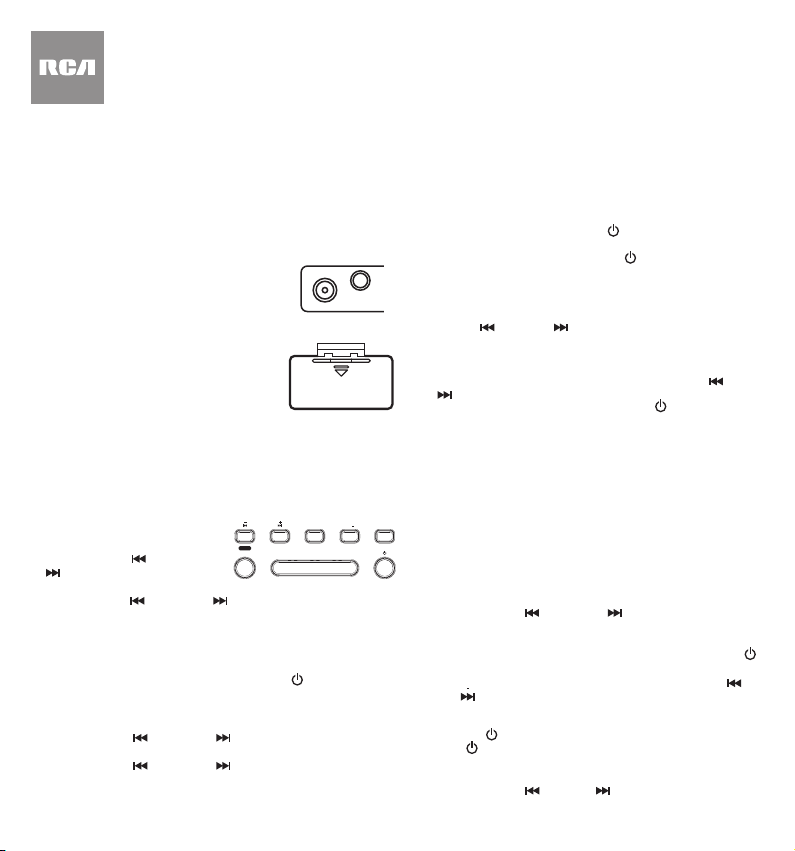
Battery
compartment
POWER IN
AUX IN
Weather alert
clock radio, back
POWER IN
AUX IN
1. Plug the power adapter into the POWER
IN jack on the back of the weather alert
clock radio.
2. Plug the other end into an AC outlet.
Note: If you’re not planning to use the
weather alert clock radio for a week or
more, unplug it from AC power.
Battery Backup
The weather alert clock radio offers a battery
backup system that will keep time during
power outages. To use the battery backup:
1. Remove the battery compartment door on
the back of the weather alert clock radio.
2. Insert 2 AAA batteries (not included) in the battery
compartment. Make sure you match the +/– markings inside the
compartment.
3. Replace the compartment door.
To turn the alarm on/of or choose the sound: Make sure the
radio is off. Press the AL1/VOL+ button to toggle between alarm
sounds and alarm off (or AL2/VOL— for Alarm 2). The AL 1 (or AL
2 for Alarm 2) indicator shows the alarm sound: Buzzer or Radio
(or no indicator for alarm off). Note: If you’ve set the alarm to radio,
the alarm will wake you to the last station you were listening to.
To snooze the alarm: Press the SNOOZE/SLEEP button once
while the alarm is sounding. The alarm will sound again after the
9 minute snooze period has ended. You can continue repeating
snooze for up to approximately one hour.
To turn off the alarm: Press the SOURCE/AL OFF button while the
alarm is sounding.
Listening to the AM/FM/NOAA Radio
1. While the radio is off, press the /SOURCE/AL OFF button to
turn on FM radio. The display shows the current station.
To switch audio sources, press the /SOURCE/AL OFF button
repeatedly: one press for AM radio, two presses for NOAA
weather radio, three presses for the auxiliary input, and four
presses to cycle back to FM radio.
2. To search for the next station in your area, press and hold the
SET — /
+
or SET+ /
+
button for around a second, until the
radio starts searching for the next radio station in that direction
on the dial.
The search operation nds stations with strong signals. To nd
weaker stations, give a single press to the SET — /
+
or SET+ /
+
button to tune manually.
3. To turn off the radio, press and hold the /SOURCE/AL OFF
button for several seconds.
To adjust the volume: Use the AL1/VOL+ and AL2/VOL — buttons.
IMPORTANT: For best FM reception, fully extend the telescopic
antenna on the back of the clock. For AM radio, turn the entire radio to
get the best signal (the radio has a built-in antenna for AM reception).
Saving Radio Stations to Memory
The radio can store up to 10 AM and 10 FM radio stations to mem-
ory for quick access.
1. Tune the radio to the desired station.
2. Press and hold the CLK/MEM button to store this radio station in the
next available memory slot. The display shows the preset number
assigned to this station (for example, P01 for the rst preset).
3. Use the SET — /
+
and SET+ /
+
buttons to set the number
you want to use for this preset. Then press the CLK/MEM button
to conrm.
To access preset stations: Make sure the radio is on (press
/
SOURCE/AL OFF if it isn’t) and in AM or FM mode. Then press the
CLK/MEM button to access presets and use the SET — /
+
and
SET+ /
+
buttons to nd the preset you want.
Listening to the Weather Radio (NOAA)
1. Press the /SOURCE/AL OFF button to turn on the radio.
2. Press /SOURCE/AL OFF button twice to select weather radio
mode. The display shows CH1 and the indicator next to NOAA
illuminates.
3. Press the SET – /
+
or SET+ /
+
button to tune to the weather
radio station you want. There are total 7 channels. IMPORTANT:
There might be several weather radio channels available in your
area. Make sure you nd the one that’s best for your exact location.
CHANNEL Frequency (MHZ)
CH1 162.4000
CH2 162.4250
CH3 162.4500
CH4 162.4750
CH5 162.5000
CH6 162.5250
CH7 162.5500
To adjust the volume: Use the AL1/VOL+ and AL2/VOL — buttons.
To turn off the weather radio: Press the
/SOURCE/AL OFF button.
IMPORTANT: For best weather radio reception, fully extend the
telescopic antenna.
Using NOAA Alerts
The NOAA weather band is a service broadcast of the U.S. National
Oceanic and Atmospheric Administration, available in all 50 U.S.
states, Puerto Rico and the U.S. Virgin Islands. This weather radio
can automatically alert you when NOAA issues an alert in your area.
To use NOAA alerts:
1. Identify which weather radio channel transmits weather
information for your specic location. Make sure the weather
radio is tuned to that channel.
2. Turn the radio off. Press the SET — /
+
/ NOAA button to turn
the NOAA alert function on or off. The indicator light next to
NOAA on the display lights up when NOAA alerts are active and
the radio is off.
When NOAA alerts are turned on, the weather radio will sound
an alarm if there is a severe weather emergency in your area,
then turn on the weather band channel for information about
the alert. You can press /SOURCE/AL OFF button to turn it off.
Notes:
• If you move to another city or state, you will need to nd the
channel to use for that location.
• To receive weather radio broadcasts and alerts, the radio must
be within the range of the local broadcast site (10 - 40 miles,
depending on terrain and obstructions).
• The NOAA Weather Service broadcasts a test alert every
Wednesday between 11am and Noon.
Using the Auxiliary Input
This AM/FM Weather Alert Clock Radio has in auxiliary input jack
you can use to listen to music from your phone, MP3 player, or
other device with a headphone jack.
1. Insert one end of a 3.5mm audio cable (not included) into the
headphone or audio out jack on your phone, MP3 player, or
other device. Insert the other end of the cable into the AUX IN
jack on the back of the clock radio.
2. Press the
/SOURCE/AL OFF button until AUX appears on the
display.
3. Make sure the volume on your phone, MP3 player, or other
device is around 75%. Start playing audio on your phone, MP3
player, or other device.
To adjust the volume: Use the AL1/VOL+ and AL2/VOL — buttons
on the clock radio.
To stop using the auxiliary input: Press and hold the /SOURCE/
AL OFF button for several seconds. Then unplug your device from
the AUX IN jack.
Tour of the Weather Alert Clock Radio
Top
Back
SET — /
+
/ NOAA and SET+ /
+
tune to radio stations (press
and hold to scan for the next station) and adjust the time when
setting the clock or alarm. SET — /
+
/ NOAA turns NOAA alerts
on and off when the radio is off.
DIMMER toggles between the two display brightness settings.
AL1/VOL+ and AL2/VOL — increases or decreases volume while
the radio’s on. Press when the radio’s off to turn on Alarm 1 or 2,
cycle through the alarm sounds (buzzer, radio), and turn off the
alarm. Press and hold to set the alarm time.
CLK/MEM recalls preset stations. Press and hold while listening
to the radio to set a preset station. When the radio’s off, press and
hold to set the clock.
SNOOZE/SLEEP snoozes the alarm when it’s sounding and starts a
sleep timer at other times when the radio’s on.
/SOURCE/AL OFF turns the radio on and off. It also silences all
alarms or alerts.
Telescoping Antenna extends to improve reception for FM and
weather band stations.
POWER IN plugs into the included power adapter
AUX IN lets you plug in an external audio source and listen to it
through the weather alert clock radio.
Battery Compartment houses the 2 AAA batteries (not included)
for battery backup, which keeps time during power outages.
Using the Sleep Function
In sleep mode, the radio or auxiliary input will turn off automatically
after a specied time (up to 90 minutes).
1. Make sure the radio is on and tuned to the station you want to
fall asleep to.
2. Press the SNOOZE/SLEEP button. The display shows the default
sleep time of 90 minutes.
To decrease the sleep timer, press the SNOOZE/SLEEP button
repeatedly. The timer decreases by 10 minutes to 00 (off).
Once the sleep timer has reached zero, the radio turns off
automatically.
Using the Display Dimmer
The DIMMER button on the top of the weather alert clock radio
toggles between two display brightness settings: regular and
dimmed.
Réglage de l’heure
1. Appuyer sur le bouton CLK/
MEM (Horloge/mémoire) et
le maintenir enfoncé jusqu’à
ce que les chiffres des heures
commencent à clignoter à
l’écran.
2. Utiliser les boutons SET — /
+
et SET+ /
+
pour régler l’heure. Appuyer sur le bouton CLK/
MEM pour conrmer.
3. Utiliser les boutons SET — /
+
et SET+ /
+
pour régler les
minutes. Appuyer sur le bouton CLK/MEM pour conrmer les
minutes et quitter le réglage de l’heure.
Radio-réveil d’alerte
météo AM/FM
Guide de l’utilisateur
Guide de démarrage
Retirer le lm protecteur de l’écran de l’horloge
Retirer délicatement le lm de protection qui recouvre l’écran.
Alimentation du radio-réveil d’alerte météo
1. Brancher l’adaptateur secteur dans la prise
POWER IN à l’arrière du radio-réveil d’alerte
météo.
2. Brancher l’autre extrémité sur une prise
secteur.
Remarque : En cas de non-utilisation du
radio-réveil d’alerte météo pendant une semaine ou plus, le
débrancher du secteur.
Piles de secours
Le radio-réveil d’alerte météo comprend un
système de piles de secours an que l’afchage
conserve l’heure même en cas de coupure de
courant. Pour utiliser les piles de secours :
1. Retirer le couvercle du compartiment à piles
situé à l’arrière du radio-réveil d’alerte météo.
2. Insérer 2 piles AAA (non incluses) dans le compartiment à
piles. S’assurer de faire correspondre les marques +/ – dans le
compartiment.
3. Replacer le couvercle du compartiment.
Radio-réveil alerte météo, dessus
CLK / MEM SOURCE / AL OFF
+
SET
NOAA
DIMMER
AL2
VOL
AL1
VOL +
SNOOZE / SLEEP
Utilisation quotidienne
Réglage de l’alarme
1. Vérier que la radio est éteinte. Si ce n’est pas le cas, appuyer
sur le bouton
/SOURCE/AL OFF (Source/alarme éteinte) et le
maintenir enfoncé.
2. Pour régler Alarm 1 (Alarme 1), appuyer sur le bouton AL1/
VOL+ et le maintenir enfoncé. Les chiffres de l’heure de l’alarme
commencent à clignoter à l’écran.
3. Utiliser les boutons SET — /
+
et SET+ /
+
pour régler l’heure
de l’alarme. Appuyer sur le bouton AL1/VOL+ pour conrmer.
4. Utiliser les boutons SET — /
+
et SET+ /
+
pour régler les
minutes de l’alarme. Appuyer sur le bouton AL1/VOL+ pour
conrmer les minutes de l’alarme. Une fois que la fonction alarme
POWER IN
AUX IN
Compartiment
à piles
Radio-réveil alerte
météo, arrière
POWER IN
AUX IN
est réglée, le voyant Buzzer (Roneur) d’alarme s’allume.
Pour régler Alarm 2 (Alarme 2), utiliser le bouton AL2/VOL— au
lieu du bouton AL1/VOL+.
Pour activer/désactiver l’alarme ou choisir le son : Vérier que la
radio est éteinte. Appuyer sur le bouton AL1/VOL+ pour basculer
entre les sons de l’alarme et l’alarme désactivée (ou AL2/VOL—
pour l’alarme 2). Le voyant AL 1 (ou AL 2 pour l’alarme 2) indique
le son de l’alarme : Buzzer (Roneur) ou Radio (ou aucun voyant
pour l’alarme désactivée).
Remarque : Si l’alarme est sur la radio, l’alarme se produira sur la
dernière station écoutée.
Pour répéter l’alarme : Appuyer une fois sur le bouton SNOOZE/
SLEEP (Répétition/veille) pendant que l’alarme retentit. L’alarme
se déclenche à nouveau après la n de la période de répétition
de 9 minutes. Il est possible de poursuivre la répétition de l’alarme
jusqu’à environ une heure.
Pour désactiver l’alarme : Appuyer sur le bouton SOURCE/AL
OFF (Source/alarme éteinte) pendant que l’alarme retentit.
Écoute de la radio AM/FM/NOAA
1. Lorsque la radio est éteinte, appuyer sur le bouton /SOURCE/
AL OFF (Source/alarme éteinte) pour allumer la radio FM. L’écran
afche la station en cours d’utilisation.
Pour changer de source audio, appuyer à plusieurs reprises sur
le bouton
/SOURCE/AL OFF : une pression pour la radio AM,
deux pressions pour la radio météo NOAA, trois pressions pour
l’entrée auxiliaire et quatre pressions pour revenir à la radio FM.
2. Pour rechercher la station suivante dans votre région, appuyer
sur le bouton SET — /
+
ou SET+ /
+
pendant environ une sec-
onde, jusqu’à ce que la radio commence à rechercher la station
suivante dans cette direction sur le cadran.
L’opération de recherche permet de trouver les stations dont le
signal est puissant. Pour trouver des stations dont le signal est
plus faible, appuyer une fois sur le bouton SET — /
+
ou SET+ /
+
pour effectuer un réglage manuel.
3. Pour éteindre la radio, appuyer sur le bouton
/SOURCE/AL
OFF pendant plusieurs secondes.
Réglage du volume : Utiliser les boutons AL1/VOL+ et AL2/VOL—.
IMPORTANT : Pour une meilleure réception FM, déployer com-
plètement l’antenne télescopique à l’arrière du radio-réveil. Pour la
radio AM, orienter toute la radio pour obtenir le meilleur signal (la
radio est dotée d’une antenne intégrée pour la réception AM).
Sauvegarde des stations de radio en mémoire
Pour permettre un accès rapide des stations, la radio peut enregis-
trer en mémoire jusqu’à 10 stations AM et 10 stations FM.
1. Syntoniser la radio sur la station souhaitée.
2. Appuyer sur le bouton CLK/MEM (Horloge/mémoire) et le
maintenir enfoncé pour enregistrer cette station de radio dans
le prochain emplacement mémoire disponible. L’écran afche
le numéro de présélection attribué à cette station (par exemple,
P01 pour la première présélection).
3. Utiliser les boutons SET — /
+
et SET+ /
+
pour dénir le
numéro à utiliser pour cette présélection. Puis appuyer sur le
bouton CLK/MEM pour conrmer.
Pour accéder aux stations préréglées : Vérier que la radio est
allumée [appuyer sur
/SOURCE/AL OFF (si elle ne l’est pas] et en
mode AM ou FM. Appuyer ensuite sur le bouton CLK/MEM pour
accéder aux présélections et utiliser les boutons SET — /
+
et SET+
/
+
pour trouver la présélection souhaitée.

Set the Time
1. Press and hold the CLK/MEM
button until the hours digits
start to ash on the display.
2. Use the SET — /
+
and SET+ /
+
buttons to adjust the hour.
Press CLK/MEM button to set it.
3. Use the SET — /
+
and SET+ /
+
buttons to adjust the minutes.
Press CLK/MEM button to set the minutes and exit time setting.
AM/FM Weather Alert
Clock Radio
User’s Guide
RCDW10 IB 03
Getting Started
Remove the protective lm from the clock’s display
Gently peel off the protective lm covering the display.
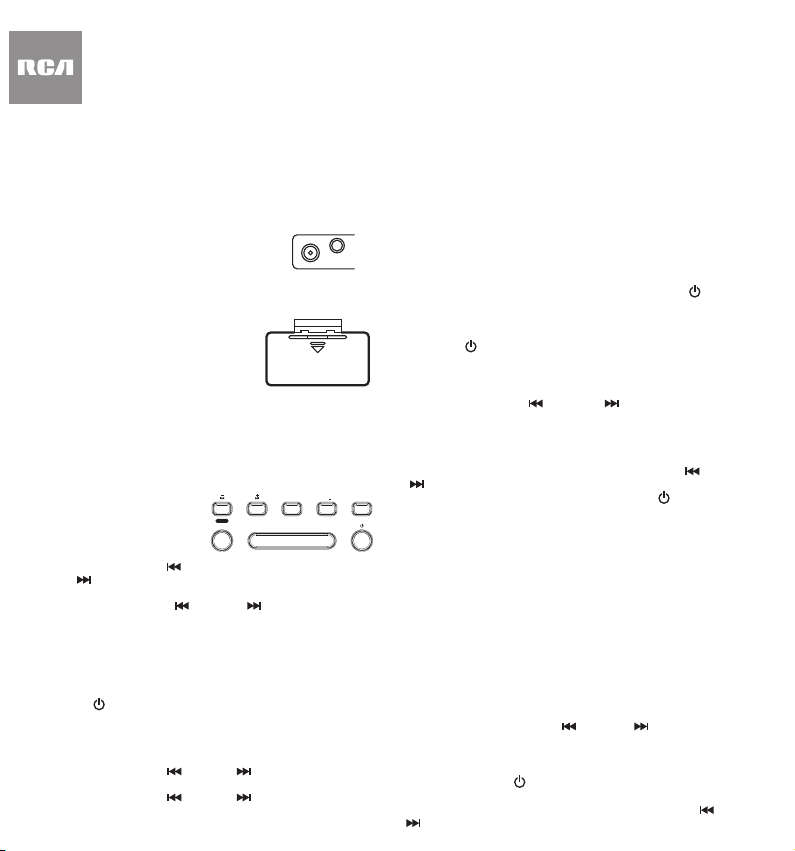
Power the Weather Alert Clock Radio
Weather alert clock radio, top
CLK / MEM
SOURCE / AL OFF
+
SET
NOAA
DIMMER
AL2
VOL
AL1
VOL +
SNOOZE / SLEEP
Everyday Use
Setting the Alarm
1. Make sure the radio is off. Press and hold the /SOURCE/AL
OFF button if it isn’t.
2. To set Alarm 1, press and hold the AL1/VOL+ button. The
alarm hour digits begin to ash on the display.
2. Use the SET — /
+
and SET+ /
+
buttons to adjust the alarm
hour. Press the AL1/VOL+ button to set it.
3. Use the SET — /
+
and SET+ /
+
buttons to adjust the alarm
minutes. Press the AL1/VOL+ button to set the alarm minutes.
Once you’ve set the alarm, the Buzzer alarm indicator lights up.
To set Alarm 2, use the AL2/VOL— button instead of the AL1/
VOL+ button.
Battery
compartment
POWER IN
AUX IN
Weather alert
clock radio, back
POWER IN
AUX IN
1. Plug the power adapter into the POWER
IN jack on the back of the weather alert
clock radio.
2. Plug the other end into an AC outlet.
Note: If you’re not planning to use the
weather alert clock radio for a week or
more, unplug it from AC power.
Battery Backup
The weather alert clock radio offers a battery
backup system that will keep time during
power outages. To use the battery backup:
1. Remove the battery compartment door on
the back of the weather alert clock radio.
2. Insert 2 AAA batteries (not included) in the battery
compartment. Make sure you match the +/– markings inside the
compartment.
3. Replace the compartment door.
To turn the alarm on/of or choose the sound: Make sure the
radio is off. Press the AL1/VOL+ button to toggle between alarm
sounds and alarm off (or AL2/VOL— for Alarm 2). The AL 1 (or AL
2 for Alarm 2) indicator shows the alarm sound: Buzzer or Radio
(or no indicator for alarm off). Note: If you’ve set the alarm to radio,
the alarm will wake you to the last station you were listening to.
To snooze the alarm: Press the SNOOZE/SLEEP button once
while the alarm is sounding. The alarm will sound again after the
9 minute snooze period has ended. You can continue repeating
snooze for up to approximately one hour.
To turn off the alarm: Press the SOURCE/AL OFF button while the
alarm is sounding.
Listening to the AM/FM/NOAA Radio
1. While the radio is off, press the /SOURCE/AL OFF button to
turn on FM radio. The display shows the current station.
To switch audio sources, press the /SOURCE/AL OFF button
repeatedly: one press for AM radio, two presses for NOAA
weather radio, three presses for the auxiliary input, and four
presses to cycle back to FM radio.
2. To search for the next station in your area, press and hold the
SET — /
+
or SET+ /
+
button for around a second, until the
radio starts searching for the next radio station in that direction
on the dial.
The search operation nds stations with strong signals. To nd
weaker stations, give a single press to the SET — /
+
or SET+ /
+
button to tune manually.
3. To turn off the radio, press and hold the /SOURCE/AL OFF
button for several seconds.
To adjust the volume: Use the AL1/VOL+ and AL2/VOL — buttons.
IMPORTANT: For best FM reception, fully extend the telescopic
antenna on the back of the clock. For AM radio, turn the entire radio to
get the best signal (the radio has a built-in antenna for AM reception).
Saving Radio Stations to Memory
The radio can store up to 10 AM and 10 FM radio stations to mem-
ory for quick access.
1. Tune the radio to the desired station.
2. Press and hold the CLK/MEM button to store this radio station in the
next available memory slot. The display shows the preset number
assigned to this station (for example, P01 for the rst preset).
3. Use the SET — /
+
and SET+ /
+
buttons to set the number
you want to use for this preset. Then press the CLK/MEM button
to conrm.
To access preset stations: Make sure the radio is on (press
/
SOURCE/AL OFF if it isn’t) and in AM or FM mode. Then press the
CLK/MEM button to access presets and use the SET — /
+
and
SET+ /
+
buttons to nd the preset you want.
Listening to the Weather Radio (NOAA)
1. Press the /SOURCE/AL OFF button to turn on the radio.
2. Press /SOURCE/AL OFF button twice to select weather radio
mode. The display shows CH1 and the indicator next to NOAA
illuminates.
3. Press the SET – /
+
or SET+ /
+
button to tune to the weather
radio station you want. There are total 7 channels. IMPORTANT:
There might be several weather radio channels available in your
area. Make sure you nd the one that’s best for your exact location.
CHANNEL Frequency (MHZ)
CH1 162.4000
CH2 162.4250
CH3 162.4500
CH4 162.4750
CH5 162.5000
CH6 162.5250
CH7 162.5500
To adjust the volume: Use the AL1/VOL+ and AL2/VOL — buttons.
To turn off the weather radio: Press the
/SOURCE/AL OFF button.
IMPORTANT: For best weather radio reception, fully extend the
telescopic antenna.
Using NOAA Alerts
The NOAA weather band is a service broadcast of the U.S. National
Oceanic and Atmospheric Administration, available in all 50 U.S.
states, Puerto Rico and the U.S. Virgin Islands. This weather radio
can automatically alert you when NOAA issues an alert in your area.
To use NOAA alerts:
1. Identify which weather radio channel transmits weather
information for your specic location. Make sure the weather
radio is tuned to that channel.
2. Turn the radio off. Press the SET — /
+
/ NOAA button to turn
the NOAA alert function on or off. The indicator light next to
NOAA on the display lights up when NOAA alerts are active and
the radio is off.
When NOAA alerts are turned on, the weather radio will sound
an alarm if there is a severe weather emergency in your area,
then turn on the weather band channel for information about
the alert. You can press /SOURCE/AL OFF button to turn it off.
Notes:
• If you move to another city or state, you will need to nd the
channel to use for that location.
• To receive weather radio broadcasts and alerts, the radio must
be within the range of the local broadcast site (10 - 40 miles,
depending on terrain and obstructions).
• The NOAA Weather Service broadcasts a test alert every
Wednesday between 11am and Noon.
Using the Auxiliary Input
This AM/FM Weather Alert Clock Radio has in auxiliary input jack
you can use to listen to music from your phone, MP3 player, or
other device with a headphone jack.
1. Insert one end of a 3.5mm audio cable (not included) into the
headphone or audio out jack on your phone, MP3 player, or
other device. Insert the other end of the cable into the AUX IN
jack on the back of the clock radio.
2. Press the
/SOURCE/AL OFF button until AUX appears on the
display.
3. Make sure the volume on your phone, MP3 player, or other
device is around 75%. Start playing audio on your phone, MP3
player, or other device.
To adjust the volume: Use the AL1/VOL+ and AL2/VOL — buttons
on the clock radio.
To stop using the auxiliary input: Press and hold the /SOURCE/
AL OFF button for several seconds. Then unplug your device from
the AUX IN jack.
Tour of the Weather Alert Clock Radio
Top
Back
SET — /
+
/ NOAA and SET+ /
+
tune to radio stations (press
and hold to scan for the next station) and adjust the time when
setting the clock or alarm. SET — /
+
/ NOAA turns NOAA alerts
on and off when the radio is off.
DIMMER toggles between the two display brightness settings.
AL1/VOL+ and AL2/VOL — increases or decreases volume while
the radio’s on. Press when the radio’s off to turn on Alarm 1 or 2,
cycle through the alarm sounds (buzzer, radio), and turn off the
alarm. Press and hold to set the alarm time.
CLK/MEM recalls preset stations. Press and hold while listening
to the radio to set a preset station. When the radio’s off, press and
hold to set the clock.
SNOOZE/SLEEP snoozes the alarm when it’s sounding and starts a
sleep timer at other times when the radio’s on.
/SOURCE/AL OFF turns the radio on and off. It also silences all
alarms or alerts.
Telescoping Antenna extends to improve reception for FM and
weather band stations.
POWER IN plugs into the included power adapter
AUX IN lets you plug in an external audio source and listen to it
through the weather alert clock radio.
Battery Compartment houses the 2 AAA batteries (not included)
for battery backup, which keeps time during power outages.
Using the Sleep Function
In sleep mode, the radio or auxiliary input will turn off automatically
after a specied time (up to 90 minutes).
1. Make sure the radio is on and tuned to the station you want to
fall asleep to.
2. Press the SNOOZE/SLEEP button. The display shows the default
sleep time of 90 minutes.
To decrease the sleep timer, press the SNOOZE/SLEEP button
repeatedly. The timer decreases by 10 minutes to 00 (off).
Once the sleep timer has reached zero, the radio turns off
automatically.
Using the Display Dimmer
The DIMMER button on the top of the weather alert clock radio
toggles between two display brightness settings: regular and
dimmed.
Réglage de l’heure
1. Appuyer sur le bouton CLK/
MEM (Horloge/mémoire) et
le maintenir enfoncé jusqu’à
ce que les chiffres des heures
commencent à clignoter à
l’écran.
2. Utiliser les boutons SET — /
+
et SET+ /
+
pour régler l’heure. Appuyer sur le bouton CLK/
MEM pour conrmer.
3. Utiliser les boutons SET — /
+
et SET+ /
+
pour régler les
minutes. Appuyer sur le bouton CLK/MEM pour conrmer les
minutes et quitter le réglage de l’heure.
Radio-réveil d’alerte
météo AM/FM
Guide de l’utilisateur
Guide de démarrage
Retirer le lm protecteur de l’écran de l’horloge
Retirer délicatement le lm de protection qui recouvre l’écran.
Alimentation du radio-réveil d’alerte météo
1. Brancher l’adaptateur secteur dans la prise
POWER IN à l’arrière du radio-réveil d’alerte
météo.
2. Brancher l’autre extrémité sur une prise
secteur.
Remarque : En cas de non-utilisation du
radio-réveil d’alerte météo pendant une semaine ou plus, le
débrancher du secteur.
Piles de secours
Le radio-réveil d’alerte météo comprend un
système de piles de secours an que l’afchage
conserve l’heure même en cas de coupure de
courant. Pour utiliser les piles de secours :
1. Retirer le couvercle du compartiment à piles
situé à l’arrière du radio-réveil d’alerte météo.
2. Insérer 2 piles AAA (non incluses) dans le compartiment à
piles. S’assurer de faire correspondre les marques +/ – dans le
compartiment.
3. Replacer le couvercle du compartiment.
Radio-réveil alerte météo, dessus
CLK / MEM SOURCE / AL OFF
+
SET
NOAA
DIMMER
AL2
VOL
AL1
VOL +
SNOOZE / SLEEP
Utilisation quotidienne
Réglage de l’alarme
1. Vérier que la radio est éteinte. Si ce n’est pas le cas, appuyer
sur le bouton
/SOURCE/AL OFF (Source/alarme éteinte) et le
maintenir enfoncé.
2. Pour régler Alarm 1 (Alarme 1), appuyer sur le bouton AL1/
VOL+ et le maintenir enfoncé. Les chiffres de l’heure de l’alarme
commencent à clignoter à l’écran.
3. Utiliser les boutons SET — /
+
et SET+ /
+
pour régler l’heure
de l’alarme. Appuyer sur le bouton AL1/VOL+ pour conrmer.
4. Utiliser les boutons SET — /
+
et SET+ /
+
pour régler les
minutes de l’alarme. Appuyer sur le bouton AL1/VOL+ pour
conrmer les minutes de l’alarme. Une fois que la fonction alarme
POWER IN
AUX IN
Compartiment
à piles
Radio-réveil alerte
météo, arrière
POWER IN
AUX IN
est réglée, le voyant Buzzer (Roneur) d’alarme s’allume.
Pour régler Alarm 2 (Alarme 2), utiliser le bouton AL2/VOL— au
lieu du bouton AL1/VOL+.
Pour activer/désactiver l’alarme ou choisir le son : Vérier que la
radio est éteinte. Appuyer sur le bouton AL1/VOL+ pour basculer
entre les sons de l’alarme et l’alarme désactivée (ou AL2/VOL—
pour l’alarme 2). Le voyant AL 1 (ou AL 2 pour l’alarme 2) indique
le son de l’alarme : Buzzer (Roneur) ou Radio (ou aucun voyant
pour l’alarme désactivée).
Remarque : Si l’alarme est sur la radio, l’alarme se produira sur la
dernière station écoutée.
Pour répéter l’alarme : Appuyer une fois sur le bouton SNOOZE/
SLEEP (Répétition/veille) pendant que l’alarme retentit. L’alarme
se déclenche à nouveau après la n de la période de répétition
de 9 minutes. Il est possible de poursuivre la répétition de l’alarme
jusqu’à environ une heure.
Pour désactiver l’alarme : Appuyer sur le bouton SOURCE/AL
OFF (Source/alarme éteinte) pendant que l’alarme retentit.
Écoute de la radio AM/FM/NOAA
1. Lorsque la radio est éteinte, appuyer sur le bouton /SOURCE/
AL OFF (Source/alarme éteinte) pour allumer la radio FM. L’écran
afche la station en cours d’utilisation.
Pour changer de source audio, appuyer à plusieurs reprises sur
le bouton
/SOURCE/AL OFF : une pression pour la radio AM,
deux pressions pour la radio météo NOAA, trois pressions pour
l’entrée auxiliaire et quatre pressions pour revenir à la radio FM.
2. Pour rechercher la station suivante dans votre région, appuyer
sur le bouton SET — /
+
ou SET+ /
+
pendant environ une sec-
onde, jusqu’à ce que la radio commence à rechercher la station
suivante dans cette direction sur le cadran.
L’opération de recherche permet de trouver les stations dont le
signal est puissant. Pour trouver des stations dont le signal est
plus faible, appuyer une fois sur le bouton SET — /
+
ou SET+ /
+
pour effectuer un réglage manuel.
3. Pour éteindre la radio, appuyer sur le bouton
/SOURCE/AL
OFF pendant plusieurs secondes.
Réglage du volume : Utiliser les boutons AL1/VOL+ et AL2/VOL—.
IMPORTANT : Pour une meilleure réception FM, déployer com-
plètement l’antenne télescopique à l’arrière du radio-réveil. Pour la
radio AM, orienter toute la radio pour obtenir le meilleur signal (la
radio est dotée d’une antenne intégrée pour la réception AM).
Sauvegarde des stations de radio en mémoire
Pour permettre un accès rapide des stations, la radio peut enregis-
trer en mémoire jusqu’à 10 stations AM et 10 stations FM.
1. Syntoniser la radio sur la station souhaitée.
2. Appuyer sur le bouton CLK/MEM (Horloge/mémoire) et le
maintenir enfoncé pour enregistrer cette station de radio dans
le prochain emplacement mémoire disponible. L’écran afche
le numéro de présélection attribué à cette station (par exemple,
P01 pour la première présélection).
3. Utiliser les boutons SET — /
+
et SET+ /
+
pour dénir le
numéro à utiliser pour cette présélection. Puis appuyer sur le
bouton CLK/MEM pour conrmer.
Pour accéder aux stations préréglées : Vérier que la radio est
allumée [appuyer sur
/SOURCE/AL OFF (si elle ne l’est pas] et en
mode AM ou FM. Appuyer ensuite sur le bouton CLK/MEM pour
accéder aux présélections et utiliser les boutons SET — /
+
et SET+
/
+
pour trouver la présélection souhaitée.
Set the Time
1. Press and hold the CLK/MEM
button until the hours digits
start to ash on the display.
2. Use the SET — /
+
and SET+ /
+
buttons to adjust the hour.
Press CLK/MEM button to set it.
3. Use the SET — /
+
and SET+ /
+
buttons to adjust the minutes.
Press CLK/MEM button to set the minutes and exit time setting.
AM/FM Weather Alert
Clock Radio
User’s Guide
RCDW10 IB 03
Getting Started
Remove the protective lm from the clock’s display
Gently peel off the protective lm covering the display.
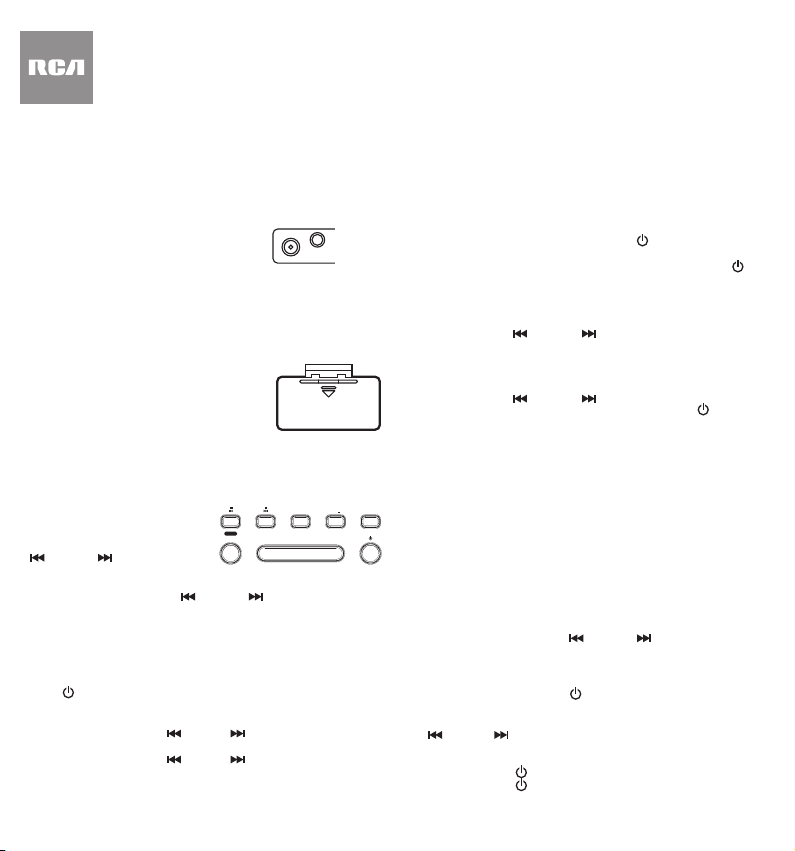
Power the Weather Alert Clock Radio
Weather alert clock radio, top
CLK / MEM
SOURCE / AL OFF
+
SET
NOAA
DIMMER
AL2
VOL
AL1
VOL +
SNOOZE / SLEEP
Everyday Use
Setting the Alarm
1. Make sure the radio is off. Press and hold the /SOURCE/AL
OFF button if it isn’t.
2. To set Alarm 1, press and hold the AL1/VOL+ button. The
alarm hour digits begin to ash on the display.
2. Use the SET — /
+
and SET+ /
+
buttons to adjust the alarm
hour. Press the AL1/VOL+ button to set it.
3. Use the SET — /
+
and SET+ /
+
buttons to adjust the alarm
minutes. Press the AL1/VOL+ button to set the alarm minutes.
Once you’ve set the alarm, the Buzzer alarm indicator lights up.
To set Alarm 2, use the AL2/VOL— button instead of the AL1/
VOL+ button.
Battery
compartment
POWER IN
AUX IN
Weather alert
clock radio, back
POWER IN
AUX IN
1. Plug the power adapter into the POWER
IN jack on the back of the weather alert
clock radio.
2. Plug the other end into an AC outlet.
Note: If you’re not planning to use the
weather alert clock radio for a week or
more, unplug it from AC power.
Battery Backup
The weather alert clock radio offers a battery
backup system that will keep time during
power outages. To use the battery backup:
1. Remove the battery compartment door on
the back of the weather alert clock radio.
2. Insert 2 AAA batteries (not included) in the battery
compartment. Make sure you match the +/– markings inside the
compartment.
3. Replace the compartment door.
To turn the alarm on/of or choose the sound: Make sure the
radio is off. Press the AL1/VOL+ button to toggle between alarm
sounds and alarm off (or AL2/VOL— for Alarm 2). The AL 1 (or AL
2 for Alarm 2) indicator shows the alarm sound: Buzzer or Radio
(or no indicator for alarm off). Note: If you’ve set the alarm to radio,
the alarm will wake you to the last station you were listening to.
To snooze the alarm: Press the SNOOZE/SLEEP button once
while the alarm is sounding. The alarm will sound again after the
9 minute snooze period has ended. You can continue repeating
snooze for up to approximately one hour.
To turn off the alarm: Press the SOURCE/AL OFF button while the
alarm is sounding.
Listening to the AM/FM/NOAA Radio
1. While the radio is off, press the /SOURCE/AL OFF button to
turn on FM radio. The display shows the current station.
To switch audio sources, press the /SOURCE/AL OFF button
repeatedly: one press for AM radio, two presses for NOAA
weather radio, three presses for the auxiliary input, and four
presses to cycle back to FM radio.
2. To search for the next station in your area, press and hold the
SET — /
+
or SET+ /
+
button for around a second, until the
radio starts searching for the next radio station in that direction
on the dial.
The search operation nds stations with strong signals. To nd
weaker stations, give a single press to the SET — /
+
or SET+ /
+
button to tune manually.
3. To turn off the radio, press and hold the /SOURCE/AL OFF
button for several seconds.
To adjust the volume: Use the AL1/VOL+ and AL2/VOL — buttons.
IMPORTANT: For best FM reception, fully extend the telescopic
antenna on the back of the clock. For AM radio, turn the entire radio to
get the best signal (the radio has a built-in antenna for AM reception).
Saving Radio Stations to Memory
The radio can store up to 10 AM and 10 FM radio stations to mem-
ory for quick access.
1. Tune the radio to the desired station.
2. Press and hold the CLK/MEM button to store this radio station in the
next available memory slot. The display shows the preset number
assigned to this station (for example, P01 for the rst preset).
3. Use the SET — /
+
and SET+ /
+
buttons to set the number
you want to use for this preset. Then press the CLK/MEM button
to conrm.
To access preset stations: Make sure the radio is on (press
/
SOURCE/AL OFF if it isn’t) and in AM or FM mode. Then press the
CLK/MEM button to access presets and use the SET — /
+
and
SET+ /
+
buttons to nd the preset you want.
Listening to the Weather Radio (NOAA)
1. Press the /SOURCE/AL OFF button to turn on the radio.
2. Press /SOURCE/AL OFF button twice to select weather radio
mode. The display shows CH1 and the indicator next to NOAA
illuminates.
3. Press the SET – /
+
or SET+ /
+
button to tune to the weather
radio station you want. There are total 7 channels. IMPORTANT:
There might be several weather radio channels available in your
area. Make sure you nd the one that’s best for your exact location.
CHANNEL Frequency (MHZ)
CH1 162.4000
CH2 162.4250
CH3 162.4500
CH4 162.4750
CH5 162.5000
CH6 162.5250
CH7 162.5500
To adjust the volume: Use the AL1/VOL+ and AL2/VOL — buttons.
To turn off the weather radio: Press the
/SOURCE/AL OFF button.
IMPORTANT: For best weather radio reception, fully extend the
telescopic antenna.
Using NOAA Alerts
The NOAA weather band is a service broadcast of the U.S. National
Oceanic and Atmospheric Administration, available in all 50 U.S.
states, Puerto Rico and the U.S. Virgin Islands. This weather radio
can automatically alert you when NOAA issues an alert in your area.
To use NOAA alerts:
1. Identify which weather radio channel transmits weather
information for your specic location. Make sure the weather
radio is tuned to that channel.
2. Turn the radio off. Press the SET — /
+
/ NOAA button to turn
the NOAA alert function on or off. The indicator light next to
NOAA on the display lights up when NOAA alerts are active and
the radio is off.
When NOAA alerts are turned on, the weather radio will sound
an alarm if there is a severe weather emergency in your area,
then turn on the weather band channel for information about
the alert. You can press /SOURCE/AL OFF button to turn it off.
Notes:
• If you move to another city or state, you will need to nd the
channel to use for that location.
• To receive weather radio broadcasts and alerts, the radio must
be within the range of the local broadcast site (10 - 40 miles,
depending on terrain and obstructions).
• The NOAA Weather Service broadcasts a test alert every
Wednesday between 11am and Noon.
Using the Auxiliary Input
This AM/FM Weather Alert Clock Radio has in auxiliary input jack
you can use to listen to music from your phone, MP3 player, or
other device with a headphone jack.
1. Insert one end of a 3.5mm audio cable (not included) into the
headphone or audio out jack on your phone, MP3 player, or
other device. Insert the other end of the cable into the AUX IN
jack on the back of the clock radio.
2. Press the
/SOURCE/AL OFF button until AUX appears on the
display.
3. Make sure the volume on your phone, MP3 player, or other
device is around 75%. Start playing audio on your phone, MP3
player, or other device.
To adjust the volume: Use the AL1/VOL+ and AL2/VOL — buttons
on the clock radio.
To stop using the auxiliary input: Press and hold the /SOURCE/
AL OFF button for several seconds. Then unplug your device from
the AUX IN jack.
Tour of the Weather Alert Clock Radio
Top
Back
SET — /
+
/ NOAA and SET+ /
+
tune to radio stations (press
and hold to scan for the next station) and adjust the time when
setting the clock or alarm. SET — /
+
/ NOAA turns NOAA alerts
on and off when the radio is off.
DIMMER toggles between the two display brightness settings.
AL1/VOL+ and AL2/VOL — increases or decreases volume while
the radio’s on. Press when the radio’s off to turn on Alarm 1 or 2,
cycle through the alarm sounds (buzzer, radio), and turn off the
alarm. Press and hold to set the alarm time.
CLK/MEM recalls preset stations. Press and hold while listening
to the radio to set a preset station. When the radio’s off, press and
hold to set the clock.
SNOOZE/SLEEP snoozes the alarm when it’s sounding and starts a
sleep timer at other times when the radio’s on.
/SOURCE/AL OFF turns the radio on and off. It also silences all
alarms or alerts.
Telescoping Antenna extends to improve reception for FM and
weather band stations.
POWER IN plugs into the included power adapter
AUX IN lets you plug in an external audio source and listen to it
through the weather alert clock radio.
Battery Compartment houses the 2 AAA batteries (not included)
for battery backup, which keeps time during power outages.
Using the Sleep Function
In sleep mode, the radio or auxiliary input will turn off automatically
after a specied time (up to 90 minutes).
1. Make sure the radio is on and tuned to the station you want to
fall asleep to.
2. Press the SNOOZE/SLEEP button. The display shows the default
sleep time of 90 minutes.
To decrease the sleep timer, press the SNOOZE/SLEEP button
repeatedly. The timer decreases by 10 minutes to 00 (off).
Once the sleep timer has reached zero, the radio turns off
automatically.
Using the Display Dimmer
The DIMMER button on the top of the weather alert clock radio
toggles between two display brightness settings: regular and
dimmed.
Réglage de l’heure
1. Appuyer sur le bouton CLK/
MEM (Horloge/mémoire) et
le maintenir enfoncé jusqu’à
ce que les chiffres des heures
commencent à clignoter à
l’écran.
2. Utiliser les boutons SET — /
+
et SET+ /
+
pour régler l’heure. Appuyer sur le bouton CLK/
MEM pour conrmer.
3. Utiliser les boutons SET — /
+
et SET+ /
+
pour régler les
minutes. Appuyer sur le bouton CLK/MEM pour conrmer les
minutes et quitter le réglage de l’heure.
Radio-réveil d’alerte
météo AM/FM
Guide de l’utilisateur
Guide de démarrage
Retirer le lm protecteur de l’écran de l’horloge
Retirer délicatement le lm de protection qui recouvre l’écran.
Alimentation du radio-réveil d’alerte météo
1. Brancher l’adaptateur secteur dans la prise
POWER IN à l’arrière du radio-réveil d’alerte
météo.
2. Brancher l’autre extrémité sur une prise
secteur.
Remarque : En cas de non-utilisation du
radio-réveil d’alerte météo pendant une semaine ou plus, le
débrancher du secteur.
Piles de secours
Le radio-réveil d’alerte météo comprend un
système de piles de secours an que l’afchage
conserve l’heure même en cas de coupure de
courant. Pour utiliser les piles de secours :
1. Retirer le couvercle du compartiment à piles
situé à l’arrière du radio-réveil d’alerte météo.
2. Insérer 2 piles AAA (non incluses) dans le compartiment à
piles. S’assurer de faire correspondre les marques +/ – dans le
compartiment.
3. Replacer le couvercle du compartiment.
Radio-réveil alerte météo, dessus
CLK / MEM SOURCE / AL OFF
+
SET
NOAA
DIMMER
AL2
VOL
AL1
VOL +
SNOOZE / SLEEP
Utilisation quotidienne
Réglage de l’alarme
1. Vérier que la radio est éteinte. Si ce n’est pas le cas, appuyer
sur le bouton
/SOURCE/AL OFF (Source/alarme éteinte) et le
maintenir enfoncé.
2. Pour régler Alarm 1 (Alarme 1), appuyer sur le bouton AL1/
VOL+ et le maintenir enfoncé. Les chiffres de l’heure de l’alarme
commencent à clignoter à l’écran.
3. Utiliser les boutons SET — /
+
et SET+ /
+
pour régler l’heure
de l’alarme. Appuyer sur le bouton AL1/VOL+ pour conrmer.
4. Utiliser les boutons SET — /
+
et SET+ /
+
pour régler les
minutes de l’alarme. Appuyer sur le bouton AL1/VOL+ pour
conrmer les minutes de l’alarme. Une fois que la fonction alarme
POWER IN
AUX IN
Compartiment
à piles
Radio-réveil alerte
météo, arrière
POWER IN
AUX IN
est réglée, le voyant Buzzer (Roneur) d’alarme s’allume.
Pour régler Alarm 2 (Alarme 2), utiliser le bouton AL2/VOL— au
lieu du bouton AL1/VOL+.
Pour activer/désactiver l’alarme ou choisir le son : Vérier que la
radio est éteinte. Appuyer sur le bouton AL1/VOL+ pour basculer
entre les sons de l’alarme et l’alarme désactivée (ou AL2/VOL—
pour l’alarme 2). Le voyant AL 1 (ou AL 2 pour l’alarme 2) indique
le son de l’alarme : Buzzer (Roneur) ou Radio (ou aucun voyant
pour l’alarme désactivée).
Remarque : Si l’alarme est sur la radio, l’alarme se produira sur la
dernière station écoutée.
Pour répéter l’alarme : Appuyer une fois sur le bouton SNOOZE/
SLEEP (Répétition/veille) pendant que l’alarme retentit. L’alarme
se déclenche à nouveau après la n de la période de répétition
de 9 minutes. Il est possible de poursuivre la répétition de l’alarme
jusqu’à environ une heure.
Pour désactiver l’alarme : Appuyer sur le bouton SOURCE/AL
OFF (Source/alarme éteinte) pendant que l’alarme retentit.
Écoute de la radio AM/FM/NOAA
1. Lorsque la radio est éteinte, appuyer sur le bouton /SOURCE/
AL OFF (Source/alarme éteinte) pour allumer la radio FM. L’écran
afche la station en cours d’utilisation.
Pour changer de source audio, appuyer à plusieurs reprises sur
le bouton
/SOURCE/AL OFF : une pression pour la radio AM,
deux pressions pour la radio météo NOAA, trois pressions pour
l’entrée auxiliaire et quatre pressions pour revenir à la radio FM.
2. Pour rechercher la station suivante dans votre région, appuyer
sur le bouton SET — /
+
ou SET+ /
+
pendant environ une sec-
onde, jusqu’à ce que la radio commence à rechercher la station
suivante dans cette direction sur le cadran.
L’opération de recherche permet de trouver les stations dont le
signal est puissant. Pour trouver des stations dont le signal est
plus faible, appuyer une fois sur le bouton SET — /
+
ou SET+ /
+
pour effectuer un réglage manuel.
3. Pour éteindre la radio, appuyer sur le bouton
/SOURCE/AL
OFF pendant plusieurs secondes.
Réglage du volume : Utiliser les boutons AL1/VOL+ et AL2/VOL—.
IMPORTANT : Pour une meilleure réception FM, déployer com-
plètement l’antenne télescopique à l’arrière du radio-réveil. Pour la
radio AM, orienter toute la radio pour obtenir le meilleur signal (la
radio est dotée d’une antenne intégrée pour la réception AM).
Sauvegarde des stations de radio en mémoire
Pour permettre un accès rapide des stations, la radio peut enregis-
trer en mémoire jusqu’à 10 stations AM et 10 stations FM.
1. Syntoniser la radio sur la station souhaitée.
2. Appuyer sur le bouton CLK/MEM (Horloge/mémoire) et le
maintenir enfoncé pour enregistrer cette station de radio dans
le prochain emplacement mémoire disponible. L’écran afche
le numéro de présélection attribué à cette station (par exemple,
P01 pour la première présélection).
3. Utiliser les boutons SET — /
+
et SET+ /
+
pour dénir le
numéro à utiliser pour cette présélection. Puis appuyer sur le
bouton CLK/MEM pour conrmer.
Pour accéder aux stations préréglées : Vérier que la radio est
allumée [appuyer sur
/SOURCE/AL OFF (si elle ne l’est pas] et en
mode AM ou FM. Appuyer ensuite sur le bouton CLK/MEM pour
accéder aux présélections et utiliser les boutons SET — /
+
et SET+
/
+
pour trouver la présélection souhaitée.

Écoute de la météo (NOAA)
1. Appuyer sur le bouton /SOURCE/AL OFF (Source/alarme
éteinte) pour allumer la radio.
2. Appuyer deux fois sur le bouton
/SOURCE/AL OFF pour
sélectionner le mode radio météo. L’écran afche CH1 et le
voyant en regard de NOAA s’allume.
3. Appuyer sur le bouton SET — /
+
ou SET+ /
+
pour syntoniser
la station météo désirée. Il y a 7 canaux au total. IMPORTANT : Il
peut y avoir plusieurs canaux de radio météo disponibles dans
votre région. Il est recommandé de trouver celui qui convient le
mieux à votre lieu exact.
2. Appuyer sur le bouton
/SOURCE/AL OFF (Source/alarme
éteinte) jusqu’à ce que AUX apparaisse à l’écran.
3. Vérier que le volume du téléphone, du lecteur MP3 ou de tout
autre appareil est d’environ 75 %. Lancer la lecture audio sur le
téléphone, le lecteur MP3 ou un autre appareil.
Réglage du volume : Utiliser les boutons AL1/VOL+ et AL2/VOL—.
Pour arrêter d’utiliser l’entrée auxiliaire : Appuyer sur le bouton
/SOURCE/AL OFF et le maintenir enfoncé pendant plusieurs
secondes. Puis débrancher l’appareil de la prise AUX IN.
CANAL Fréquence (MHZ) CANAL Fréquence (MHZ)
CH1 162,4000 CH5 162,5000
CH2 162,4250 CH6 162,5250
CH3 162,4500 CH7 162,5500
CH4 162,4750
Réglage du volume : Utiliser les boutons AL1/VOL+ et AL2/VOL—.
Pour éteindre la radio météo : Appuyer sur le bouton
/SOURCE/
AL OFF.
IMPORTANT : Pour une meilleure réception des stations météo,
déployer complètement l’antenne télescopique.
Utilisation des alertes NOAA
La bande météo NOAA est un service diffusé par la National
Oceanic and Atmospheric Administration des États-Unis, disponible
dans les 50 États américains, à Porto Rico et dans les îles Vierges
américaines. Cette radio météo peut vous avertir automatiquement
lorsque la NOAA émet une alerte dans votre région.
Pour utiliser les alertes NOAA :
1. Identier le canal de radio météo qui transmet les informations
météo pour votre lieu spécique. Vérier que la radio météo est
syntonisée sur ce canal.
2. Éteindre la radio. Appuyer sur le bouton SET — /
+
/ NOAA pour
activer ou désactiver la fonction d’alerte NOAA. Le voyant en
regard de NOAA sur l’écran s’allume lorsque des alertes NOAA
sont actives et que la radio est éteinte.
Lorsque des alertes NOAA sont activées, la radio météo émet
une alarme en cas d’urgence météorologique dans votre
région, puis active le canal de la bande météo pour obtenir des
informations sur l’alerte. Pour la désactiver, il suft d’appuyer sur
le bouton
/SOURCE/AL OFF (Source/alarme éteinte).
Remarques :
• Si un déménagement a lieu vers une autre ville ou un autre état, il
sera nécessaire de trouver le canal à utiliser pour ce lieu.
• Pour recevoir les diffusions et les alertes de la radio météo, la
radio doit se trouver dans le rayon d’action du site de diffusion
local (16 à 64 km, selon le terrain et les obstructions).
• Le service météorologique de la NOAA diffuse une alerte test
tous les mercredis entre 11 heures et midi.
Utilisation de l’entrée auxiliaire
Ce radio-réveil d’alerte météo AM/FM est doté d’une prise d’entrée
auxiliaire qu’il est possible d’utiliser pour écouter la musique d’un
téléphone, d’un lecteur MP3 ou de tout autre appareil doté d’une
prise casque.
1. Insérer une extrémité d’un câble audio de 3,5 mm (non inclus)
dans la prise casque ou sortie audio d’un téléphone, d’un lecteur
MP3 ou un autre appareil. Insérer l’autre extrémité du câble dans
la prise AUX IN (Entrée aux) à l’arrière du radio-réveil.
Présentation du radio-réveil d’alerte météo
Dessus
Arrière
Les boutons SET — /
+
/ NOAA et SET+ /
+
permettent de
syntoniser les stations de radio (appuyer et maintenir pour rechercher
la station suivante) et de régler l’heure lors du réglage de l’horloge
ou de l’alarme. Le bouton SET — /
+
/ NOAA active et désactive les
alertes NOAA lorsque la radio est éteinte.
Le bouton DIMMER permet de permuter les deux réglages de
luminosité de l’écran.
Les boutons AL1/VOL+ et AL2/VOL— augmentent ou diminuent le
volume lorsque la radio est allumée. Appuyer sur ces boutons lorsque
la radio est éteinte pour activer l’alarme 1 ou 2, faire déler les sons
de l’alarme (roneur, radio) et désactiver l’alarme. Appuyer sur ces
boutons et les maintenir enfoncés pour régler l’heure des alarmes.
Le bouton CLK/MEM rappelle les stations préréglées. Appuyer sur
le bouton et le maintenir enfoncé pendant l’écoute de la radio pour
sélectionner une station préréglée. Lorsque la radio est éteinte, ap-
puyer sur ce bouton et le maintenir enfoncé pour régler l’heure.
Le bouton SNOOZE/SLEEP permet de faire taire l’alarme lorsqu’elle
retentit et de lancer une minuterie de veille à d’autres moments
lorsque la radio est allumée.
Le bouton
/SOURCE/AL OFF permet d’allumer et d’éteindre la
radio. Il permet également de faire taire toutes les alarmes ou alertes.
L’antenne télescopique se déploie pour améliorer la réception des
stations FM et de la bande météo.
L’entrée POWER IN permet de brancher l’adaptateur secteur fourni.
L’entrée AUX IN permet de brancher une source audio externe et
de l’écouter via le radio-réveil d’alerte météo.
Le compartiment à piles abrite les deux piles AAA de secours
(non incluses) an que l’afchage conserve l’heure même en cas de
coupure de courant.
Utilisation de la fonction de veille
En mode veille, la radio ou l’entrée auxiliaire s’éteint automatique-
ment après une durée déterminée (jusqu’à 90 minutes).
1. Vérier que la radio est allumée et réglée sur la station choisie
pour s’endormir.
2. Appuyer sur le bouton SNOOZE/SLEEP. L’écran afche la durée
de veille par défaut, soit 90 minutes.
Pour diminuer le temps de sommeil, appuyer plusieurs fois sur le
bouton SNOOZE/SLEEP. La minuterie diminue de 10 minutes à
chaque pression jusqu’à 00 (arrêt). Une fois que la minuterie de
mise en veille a atteint zéro, la radio s’éteint automatiquement.
Utilisation du gradateur d’écran
Le bouton DIMMER (Gradateur) situé sur le dessus du radio-réveil
d’alerte météo permet de permuter les deux réglages de luminos-
ité de l’écran : normale et atténuée.
Ajuste la hora
1. Mantenga oprimido el botón
CLK/MEM hasta que los
dígitos de hora comiencen a
parpadear en la pantalla.
2. Utilice los botones SET — /
+
y SET+ /
+
para ajustar la
hora. Oprima el botón CLK/
MEM para jarla.
3. Utilice los botones SET — /
+
y SET+ /
+
para ajustar los
minutos. Oprima el botón CLK/MEM para jar los minutos y salir
de la conguración de hora.
Radio reloj de alertas
meteorológicas AM/FM
Guía de usuario
Primeros pasos
Extraiga la película protectora de la pantalla del reloj
Despegue con suavidad la película protectora que cubre la pantalla.
Alimentación de la radio reloj de alertas meteorológicas
1. Conecte el adaptador de alimentación
al conector POWER IN ubicado en
la parte posterior de la radio reloj de
alertas meteorológicas.
2. Enchufe el otro extremo en un
tomacorriente de CA.
Nota: Si no utilizará la radio reloj de alertas meteorológicas durante
una semana o más, desenchúfela de la alimentación de CA.
Respaldo con baterías
La radio reloj de alertas meteorológicas ofrece un sistema de
respaldo con baterías que conservará la hora durante cortes en el
suministro eléctrico. Para utilizar el respaldo con baterías:
1. Extraiga la tapa del compartimiento de las
baterías ubicado en la parte posterior de la
radio reloj de alertas meteorológicas.
2. Inserte 2 baterías “AAA” (no incluidas) en el
compartimiento de las baterías. Asegúrese
de hacer coincidir las polaridades “+” y “–”
del compartimiento.
3. Vuelva a colocar la tapa del compartimiento.
Radio reloj de alertas climáticas,
parte posterior
CLK / MEM
SOURCE / AL OFF
+
SET
NOAA
DIMMER
AL2
VOL
AL1
VOL +
SNOOZE / SLEEP
Uso diario
Ajuste de la alarma
1. Asegúrese de que la radio esté apagada. Mantenga oprimido el
botón
/SOURCE/AL OFF si no lo está.
2. Para ajustar la alarma 1, mantenga oprimido el botón AL1/VOL+. Los
dígitos de hora de alarma comenzarán a parpadear en la pantalla.
3. Utilice los botones SET — /
+
y SET+ /
+
para ajustar la hora de la
alarma. Oprima el botón AL1/VOL+ para jarla.
4. Utilice los botones SET — /
+
y SET+ /
+
para ajustar los minutos
de la alarma. Oprima el botón AL1/VOL+ para jarla los minutos
de la alarma. Una vez que haya ajustado la alarma, se encenderá el
indicador de alarma Buzzer.
Para ajustar la alarma 2, utilice el botón AL2/VOL— en lugar del botón
AL1/VOL+.
POWER IN
AUX IN
Compartimiento
de las baterías
Radio reloj de alertas
climáticas, parte posterior
POWER IN
AUX IN
Para activar/desactivar la alarma y elegir el sonido: asegúrese de
que la radio esté apagada. Oprima el botón AL1/VOL+ para cambiar
entre los sonidos de la alarma y la alarma desactivada (o AL2/VOL—
para la alarma 2). El indicador AL 1 (o AL 2 para la alarma 2) muestra el
sonido de la alarma: Buzzer o Radio (o ningún indicador en el caso de
la alarma desactivada). Nota: Si establece la alarma en el modo de ra-
dio, la alarma se activará con la última estación que estuvo escuchando.
Para posponer la alarma: oprima el botón SNOOZE/SLEEP una
vez mientras esté sonando la alarma. La alarma volverá a sonar
nuevamente después de que haya nalizado el período de 9 minutos
de repetición de alarma. Puede continuar posponiendo la alarma
durante aproximadamente una hora.
Para desactivar la alarma: oprima el botón SOURCE/AL OFF mien-
tras esté sonando la alarma.
Cómo escuchar la radio AM/FM/NOAA
1. Con la radio apagada, oprima el botón /SOURCE/AL OFF
para encender la radio FM. La pantalla muestra la estación actual.
Para cambiar entre las fuentes de audio, oprima el botón
/
SOURCE/AL OFF varias veces: oprima una vez para radio AM,
dos veces para la radio de clima de la NOAA, tres veces para la
entrada auxiliar y cuatro veces para volver a la radio FM.
2. Para buscar la siguiente estación disponible en su área, oprima
el botón SET — /
+
o SET+ /
+
durante aproximadamente
un segundo hasta que la radio comience a buscar la siguiente
estación de radio en esa dirección en el dial.
La operación de búsqueda encuentra las estaciones con señales
fuertes. Para buscar estaciones con señales más débiles, oprima
el botón SET — /
+
o SET+ /
+
para sintonizar manualmente.
3. Para apagar la radio, mantenga oprimido el botón
/SOURCE/
AL OFF durante varios segundos.
Para ajustar el volumen: utilice los botones AL1/VOL+ y AL2/VOL—.
IMPORTANTE: Para la mejor recepción de radio FM, extienda por
completo la antena telescópica ubicada en la parte posterior del
reloj. En el caso de la radio AM, gire la radio completa para obten-
er la mejor señal (la radio posee una antena incorporada para la
recepción de AM).
Cómo guardar las estaciones de radio en la memoria
La radio puede almacenar en la memoria hasta 10 estaciones de
radio AM y 10 FM para su rápido acceso.
1. Sintonice la radio en la estación deseada.
2. Mantenga oprimido el botón CLK/MEM para almacenar la estación
de radio en la siguiente ranura de memoria disponible. La pantalla
muestra el número prestablecido asignado a esta estación (por
ejemplo, P01 corresponde a la primera estación predenida).
3. Utilice los botones SET — /
+
y SET+ /
+
para denir el
número que desea utilizar para este estación predenida. A
continuación, oprima el botón CLK/MEM para conrmar.
Para acceder a las estaciones predenidas: asegúrese de que la
radio esté encendida (oprima
/SOURCE/AL OFF si no lo está) y en
el modo de AM o FM. A continuación, oprima el botón CLK/MEM
para acceder a las estaciones predenidas y utilice los botones SET
— /
+
y SET+ /
+
para buscar la estación predenida deseada.
Cómo escuchar la radio de clima (NOAA)
1. Oprima el botón /SOURCE/AL OFF para encender la radio.
2. Oprima el botón
/SOURCE/AL OFF dos veces para
seleccionar el modo de radio de clima. La pantalla muestra CH1
y se enciende el indicador junto a NOAA.
3. Oprima el botón SET — /
+
o SET+ /
+
para sintonizar a la
estación de radio de clima deseada. Existe un total de 7 canales.
IMPORTANTE: Es posible que existan varios canales de radio de
clima disponibles en su área. Asegúrese de buscar aquel que sea
el mejor para su ubicación exacta.
CANAL Frecuencia (MHZ) CANAL Frecuencia (MHZ)
CH1 162.4000 CH5 162.5000
CH2 162.4250 CH6 162.5250
CH3 162.4500 CH7 162.5500
CH4 162.4750
Para ajustar el volumen: utilice los botones AL1/VOL+ y AL2/VOL—.
Para apagar la radio de clima: oprima el botón
/SOURCE/AL OFF.
IMPORTANTE: Para la mejor recepción de la radio de clima, extienda
por completo la antena telescópica.
Cómo usar las alertas de la NOAA
La banda de clima NOAA es una radiodifusión de servicio de
la Ocina Nacional de Administración Oceánica y Atmosférica,
disponible en los 50 estados de EE. UU., Puerto Rico y las Islas
Vírgenes de EE.UU. Esta estación de radio puede alertarlo
automáticamente cuando la NOAA emite una alerta en su área.
Para utilizar las alertas de la NOAA:
1. Identique qué canal de radio de clima transmite la información del
clima para su ubicación especíca. Asegúrese de que la radio de
clima esté sintonizada en ese canal.
2. Apague la radio. Oprima el botón SET — /
+
/ NOAA para activar
o desactivar la función de alertas de la NOAA. La luz indicadora
ubicada junto a NOAA en la pantalla se enciende cuando las alertas
de la NOAA están activadas y la radio está apagada.
Cuando se activan las alertas de la NOAA, la radio de clima emitirá
una alarma si existe una emergencia climática grave en su área y
luego activará el canal de banda de clima para brindar información
sobre la alerta. Puede oprimir
/SOURCE/AL OFF para desactivar.
Notas:
• Si cambia de estado o ciudad, deberá buscar el canal que se utiliza
para dicha ubicación.
• Para recibir radiodifusiones y alertas climáticas, la radio deberá estar
dentro del alcance del sitio de transmisión local (de 10 a 40 millas,
según el terreno y las obstrucciones).
• El servicio de clima de la NOAA transmite una alerta de prueba
todos los miércoles entre las 11 de la mañana y las 12 del mediodía.
Uso de la entrada auxiliar
Esta radio reloj de alertas meteorológicas AM/FM incluye un
conector de entrada auxiliar que puede utilizar para escuchar
música desde un teléfono, reproductor de MP3 u otro dispositivo
que tenga un conector para auriculares.
1. Inserte un extremo de un cable de audio de 3.5 mm (no incluido)
en el conector de salida de audio o auriculares de un teléfono,
reproductor de MP3 u otro dispositivo. Inserte el otro extremo
del cable en el conector AUX IN (ENTRADA AUXILIAR) ubicado
en la parte posterior del radio reloj.
2. Oprima el botón
/SOURCE/AL OFF hasta que aparezca AUX
en la pantalla.
3. Asegúrese de que el volumen en el teléfono, reproductor de
MP3 u otro dispositivo esté ajustado en un 75 %. Comience a
reproducir en el teléfono, reproductor de MP3 u otro dispositivo.
Para ajustar el volumen: utilice los botones AL1/VOL+ and AL2/
VOL— del radio reloj.
Para dejar de utilizar la entrada auxiliar: mantenga oprimido
el botón
/SOURCE/AL OFF durante varios segundos. A
continuación, desconecte el dispositivo del conector AUX IN.
Recorrido por la radio reloj
de alertas meteorológicas
Parte superior
Parte posterior
SET — /
+
/ NOAA y SET+ /
+
permiten sintonizar las estaciones
de radio (mantenga oprimido para buscar la siguiente estación
disponible) y denir la hora y los minutos al ajustar al reloj o la
alarma. SET — /
+
/ NOAA permiten activar y desactivar las alertas
de la NOAA cuando la radio está apagada.
DIMMER permite cambiar entre las dos conguraciones de brillo
de pantalla.
AL1/VOL+ y AL2/VOL— permiten subir o bajar el volumen cuando
la radio está encendida. Oprima cuando la radio esté apagada
para activar la alarma 1 o 2, cambiar entre los sonidos de la alarma
(avisador acústico o radio) y desactivar la alarma. Mantenga oprimi-
do para ajustar la hora de la alarma.
CLK/MEM permite acceder a las estaciones predenidas.
Mantenga oprimido mientras escucha la radio para establecer
una estación como predenida. Cuando la radio está apagado,
mantenga oprimido para ajustar el reloj.
SNOOZE/SLEEP permite posponer la alarma cuando está sonan-
do y activar el temporizador de apagado en los otros momentos
cuando la radio está encendida.
/SOURCE/AL OFF permite encender y apagar la radio. También
permite silenciar todas las alarmas o alertas.
La antena telescópica se extiende para mejorar la recepción de las
estaciones de radio FM y banda de clima.
La entrada POWER IN permite enchufar el adaptador de
alimentación incluido.
La entrada auxiliar le permite conectar una fuente de audio externa y
escuchar el sonido a través de la radio reloj de alertas meteorológicas.
El compartimiento de las baterías permite insertar 2 baterías “AAA”
(no incluidas) para el respaldo con baterías, que permite conservar la
hora durante cortes en el suministro eléctrico.
Uso de la función de apagado automático
En el modo de apagado automático o entrada auxiliar, la radio se
apagará automáticamente después de un tiempo especicado
(hasta 90 minutos).
1. Asegúrese de que la radio esté encendida y sintonizada en la
estación con la que quiere quedarse dormido.
2. Oprima el botón SNOOZE/SLEEP. La pantalla muestra el tiempo
de apagado automático predeterminado de 90 minutos.
Para reducir el tiempo del temporizador de apagado automático,
oprima varias veces el botón SNOOZE/SLEEP. El temporizador
de apagado se reduce de a 10 minutos hasta 00 (desactivado).
Una vez que el temporizador de apagado automático llegue a 0,
la radio se apagará automáticamente.
Uso del atenuador de pantalla
El botón DIMMER ubicado en la parte superior de la radio reloj de
alertas meteorológicas permite cambiar entre las dos congura-
ciones de brillo de pantalla: normal y atenuado.