
Model: GT1 Pro
User Manual
EN
T1 Pro
Outdoor
Cam

Contents
About This Guide .................................................................. 2
Introduction........................................................................... 3
Camera Appearance .............................................................4
Camera Local Storage .......................................................... 5
Camera Setup........................................................................ 6
Main Device Controls ........................................................... 9
Camera Settings.................................................................. 11
Camera Reset ..................................................................... 21
Discover GNCC................................................................... 22
FCC Statement.................................................................... 23
EN
1

About This Guide
This guide provides a brief introduction to the GNCC 2K Security Camera
T1 Pro and the osaio App, as well as regulatory information.
Features available in osaio may vary by model and software version.
osaio availability may also vary by region or ISP. All images, steps, and
descriptions in this guide are only examples and may not reflect your
actual osaio experience.
Conventions
In this guide, the following convention is used:
Convention Description
Key information appears in blue, including management
page text such as menus, items, buttons, and so on.
Hyperlinks are in teal and underlined. You can click to
redirect to a website.
Blue
Underline
More Info
• Specifications can be found on the product page at
https://gncchome.com
• A GNCC VIP CLUB is provided for you to discuss our products at
https://www.facebook.com/groups/gncchome
• Any Questions can be answered via
EN
2

Introduction
With the GNCC 2K Security Camera T1 Pro connected to your home
network, you can get the full Monitor Real-time Live Video of any space
in your apartment, garage, or courtyard. With a 110° wide-angle view,
the T1 Pro has everything covered. Motion Alarms and Motion detection,
to monitor at set intervals and scare away humans, 24/7 to protect the
safety of your family and property.
•
2K Clear Video–Sharp and clear 3MP Full HD provides high-quality
video right in the palm of your hand.
•
Instant Motion Alerts–No need to check your GNCC 2K Security
Camera T1 Pro throughout the day. Get automatic alerts when it
detects motion. Take quick action when you see your child go to the
pool, an intruder entering your front door, or a thief stealing your
courier.
•
Motion Alarm–When motion activity is detected, GNCC 2K Security
Camera T1 Pro sounds the siren to drive away the bad guys.
•
Clear Night Vision–GNCC 2K Security Camera T1 Pro has 3 million
pixels and 4-night vision devices, even at night it is as clear as day.
•
Two-Way Audio-Use crisp two-way audio to communicate with
couriers, and family, or drive away unwanted guests.
•
Activity Zones-Control what alerts you receive by creating activity
zones, at no charge, around areas that are important to you.
•
24/7 Recording-Support continuous video recording with Cloud and
a Micro SD card inserted into GNCC 2K Security Camera T1 Pro.
EN
3

Camera Appearance
GNCC 2K Security Camera T1 Pro has a system LED that changes color
according to its status, a lens, microphone, speaker, an SD card slot, a
250cm cable, and a RESET button. Refer to below for details.
System LED
• Flashing Red: Ready for setup
• Flashing Green: Connecting to Wi-Fi
• Solid green: Connection Succeeded
• Alternating Red and Green: Wrong Wi-Fi Password
Microphone: Built-in microphone
Do NOT insert objects into the hole
Speaker
The sound comes out of the camera
Micro SD Slot
Insert a microSD card for recording. (Up to 128GB)
RESET Button
Tilt your camera lens up to find the RESET button
• Press and hold for over 5s: Reset to Factory mode
Lens
RESET Button
Microphone
System LED
Infrared Night
Vision Light
Speaker
Micro SD Slot
EN
4
Camera Local Storage
GNCC provides options for your video recording. You can subscribe to
a GNCC Cloud to store 30-day video clips in the cloud for added backup
and more beneficial functions.
Or you can save the footage continuously on a Micro SD Card (UP to
128GB) and play it back with your osaio app. The camera will overwrite
the oldest files when the Micro SD Card memory is full. Of course, you
can format your full Micro SD Card in the ‘Storage’ on the osaio App
Settings.
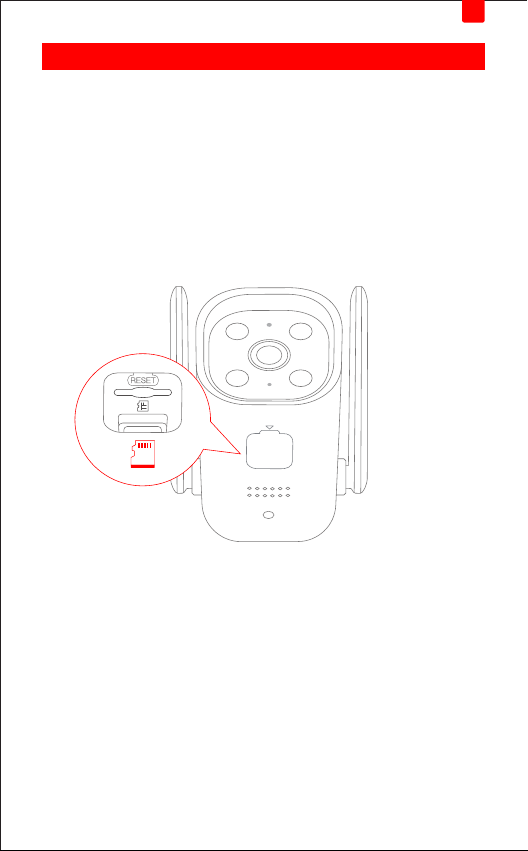
See the instructions below to insert a Micro SD Card into your GNCC
T1 Pro.
• Micro SD Card isn’t included.
1. Pick up the T1Pro camera and find the SD Card slot.
2. Holding the card in the correct orientation, carefully insert the SD
Card into the slot. Push in the SD Card until you hear a clicking sound.
EN
5
Camera Setup
Follow the steps below to get started with your new GNCC T1 Pro
Security Camera.
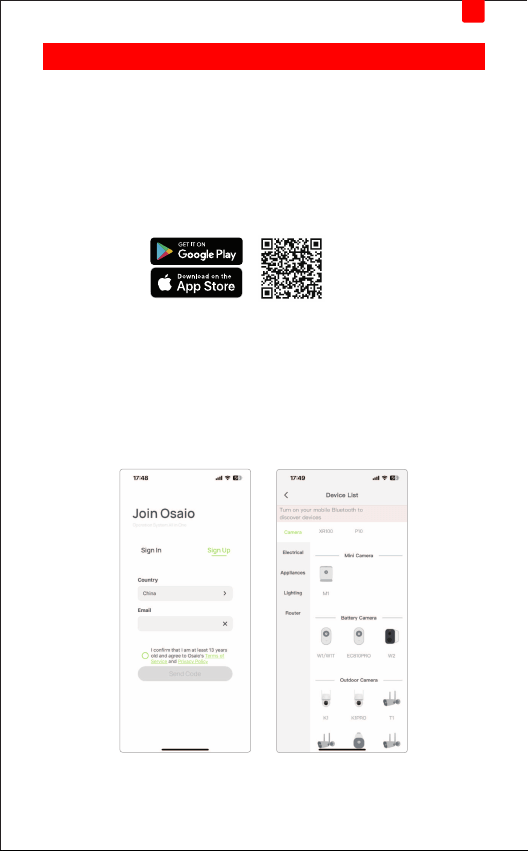
Step 1. Download osaio
Get the osaio App from the App Store or Google Play, or by scanning
the QR code below.
Step 2. Log In
Open the osaio App, and log in with your osaio ID. If you don't have an
account, Register one first with your email address. (2-1)
Step 3. Start Setup
Tap the button in the osaio App and select Cameras > T1 Pro. (3-1)
iOS/Android
(2-1) (3-1)
EN
6
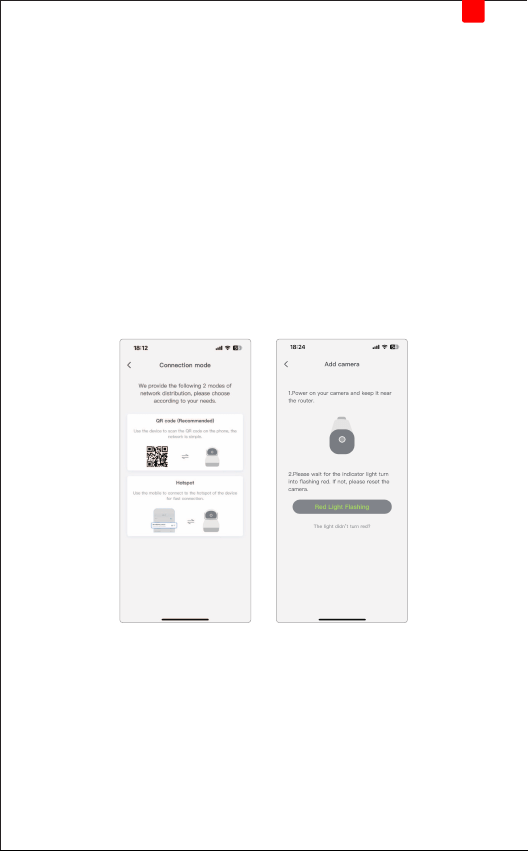
Step 4. Set Up Camera
Connection Mode:
We provide the following 2 modes of network distribution, please choose
according to your needs.
① QR Code (Recommended)
Use the camera to Scan the QR code on the phone and then follow the
App instructions to configure your camera and add it to your home
2.4GHZ Wi-Fi. (4-1)
② Hot Spot
Use the mobile to connect to the hotspot of the camera and then follow
the App instructions to configure your camera and add it to your home
2.4GHZ Wi-Fi. (4-2)
(4-1) (4-2)
EN
7

Step 5. Place Camera
Place your camera install on a wall or ceiling with the provided indicator
label and mounting screws.
• For soft surfaces: Directly screw the screws in.
• For cement wall: Drill two φ6mm holes with the help of an indicator
label, insert the plastic expansion tubes into holes, and screw the
mounting screws into the expansion tubes.
Note: Screws and expansion tubes are included in the package.
EN
8
Main Device Controls
After you successfully set up your camera, you will see the home page of
the osaio App. Here you can view and manage all devices that you've
added to osaio. Tap your camera to enter the live view page and further
manage it.
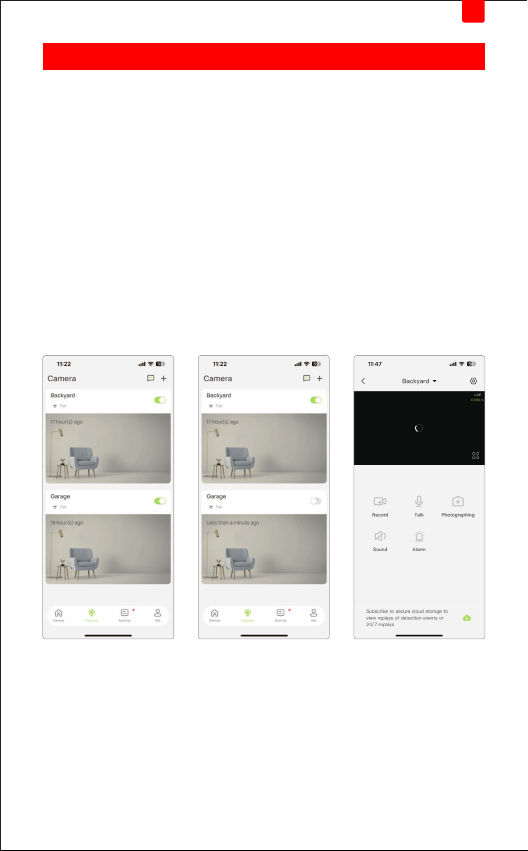
1. Home Page
You can see all your osaio devices listed in the Home page. (5-1)
2. Turn ON/OFF your camera
Turn on/off your camera quickly by tapping the switch on the home page.
If the camera is off, it means you are entering the privacy mode and
cannot stream live video. (5-2) (5-3)
(5-1) (5-2) (5-3)
EN
9
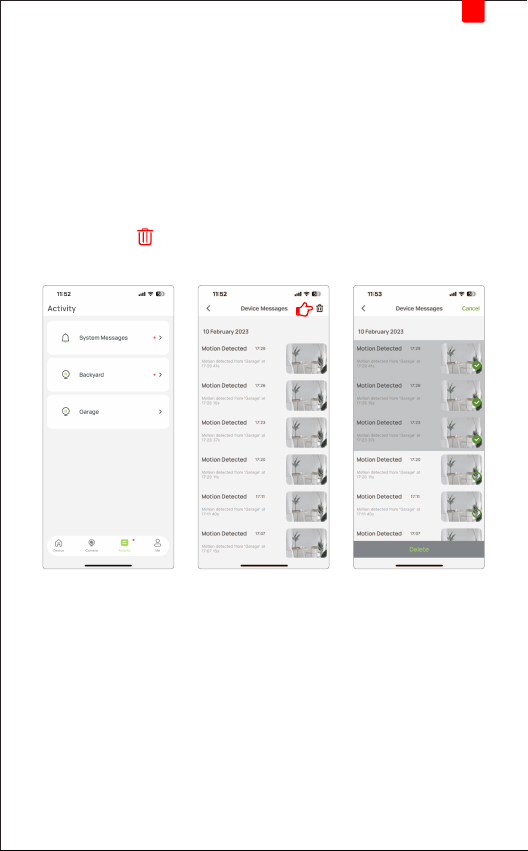
Motion & Sound Notification
In this section, there will be ‘System messages’ and detection notifications
for the camera you have installed and named. (6-1)
After you have Cloud / SD Card card storage, you can directly enter
the corresponding monitoring screen by clicking the detection
notification message, otherwise, it will jump to the real-time
monitoring screen.
• You can click and select the corresponding monitoring notification
to delete. (6-2) (6-3)
(6-1) (6-2) (6-3)
EN
10
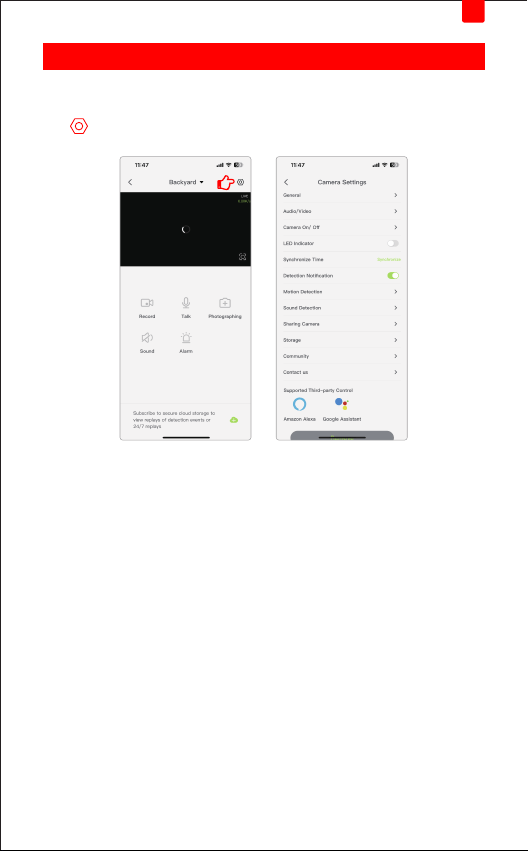
Camera Settings
Tap your camera in the Home page to enter the live view page and then
tap.
EN
11
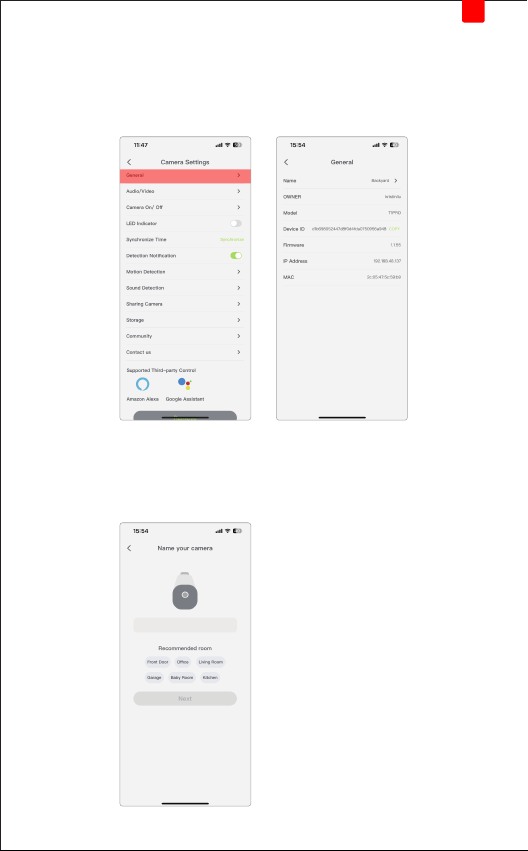
1. General
Click 'General' to enter and you can see the specific information of the
camera, including Name, Owner, Camera Model, Device ID, Firmware,
IP Address, MAC.
Name Your Camera
You can name your T1 Pro Security Camera here, it can be Front Door/
Office/Garage and so on.
EN
12
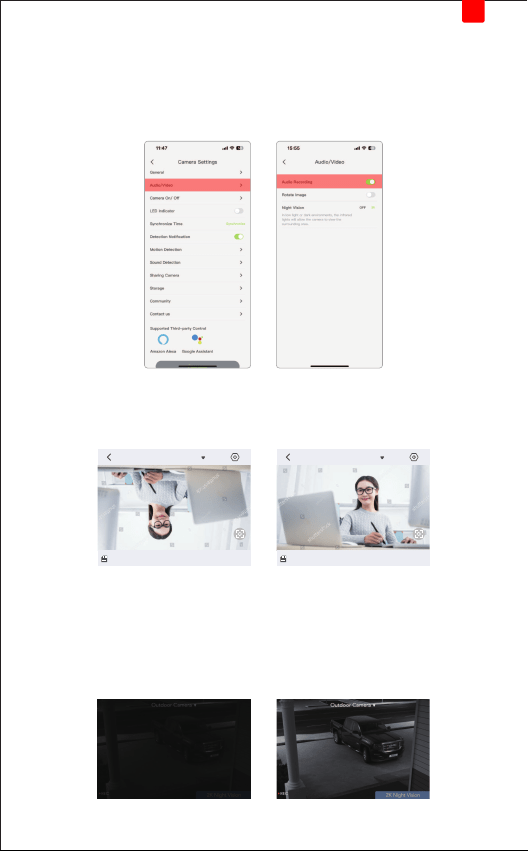
2. Audio/Video
This section includes ‘Audio Recording’, ‘Rotate Image’ and ‘Night Vision’.
Audio Recording: When this switch is turned on, the camera will save the
video sound when recording the surveillance video.
Rotate Image:
When you install the camera upside down on the ceiling, turn on this
switch, and the reversed surveillance video will return to normal.
Night Vision:
When "OFF" is selected, the camera will not turn on the infrared night
vision function at night, and cannot see a clear night vision picture.
When "IR" is selected, In low light or dark environments, the infrared
lights will allow the camera to view the surrounding area.
outdoor camera
2/24 2/25 2/26 2/27 2/28
Today
LIVE
LIVE
43.00K/s
2023-03-03 10:00:10
outdoor camera
2/24 2/25 2/26 2/27 2/28
Today
LIVE
LIVE
43.00K/s
2023-03-03 10:00:10
EN
13
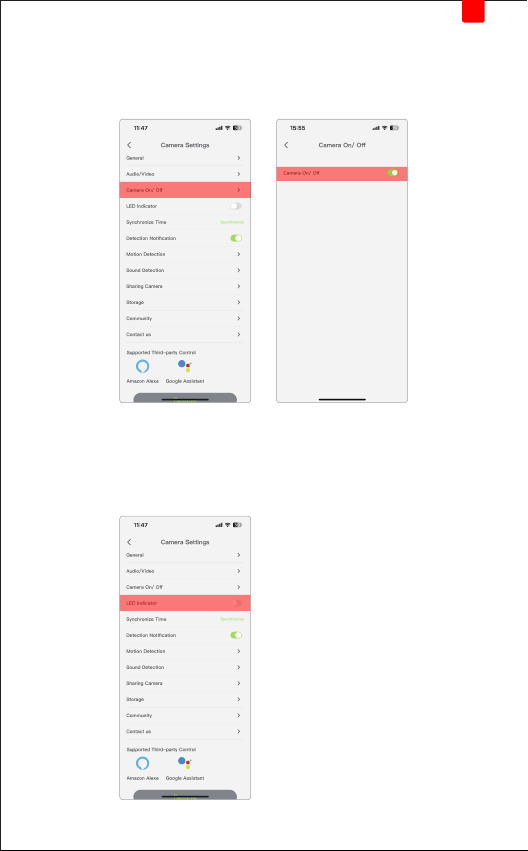
3. Camera ON/OFF
If the camera is off, it means you are entering the privacy mode and
cannot stream live video.
4. LED Indicator
After connecting the camera, you can choose to turn off the camera light
to avoid light interference caused by the camera light.
EN
14
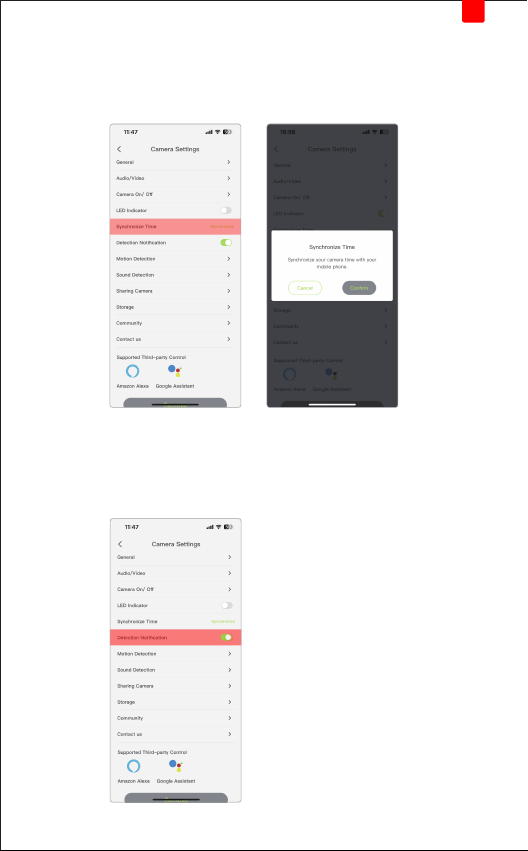
5. Synchronize Time
Click 'Synchronize' to automatically calibrate the time in your time zone,
so as to ensure the accuracy of setting the camera on and off time.
6. Detection Notification
The Motion/Sound Detection Notification can only be received normally
when this button is turned on, otherwise no notification will be given.
EN
15
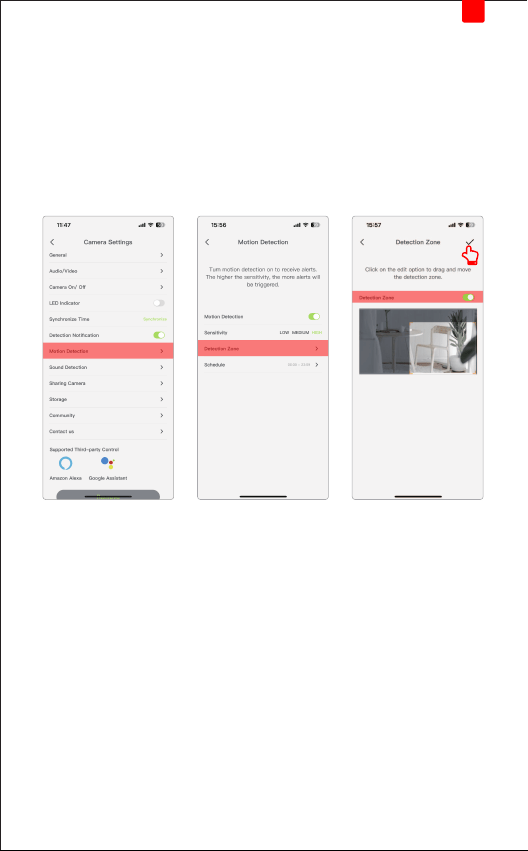
7. Motion Detection
Turn motion detection on to receive alerts. The higher the sensitivity, the
more alerts will be triggered.
Detection Zone:
Click 'Edit' at the top right of the page to freely select the area you need
to monitor. After selecting, remember to click '√' in the upper right corner
to confirm the modification.
EN
16
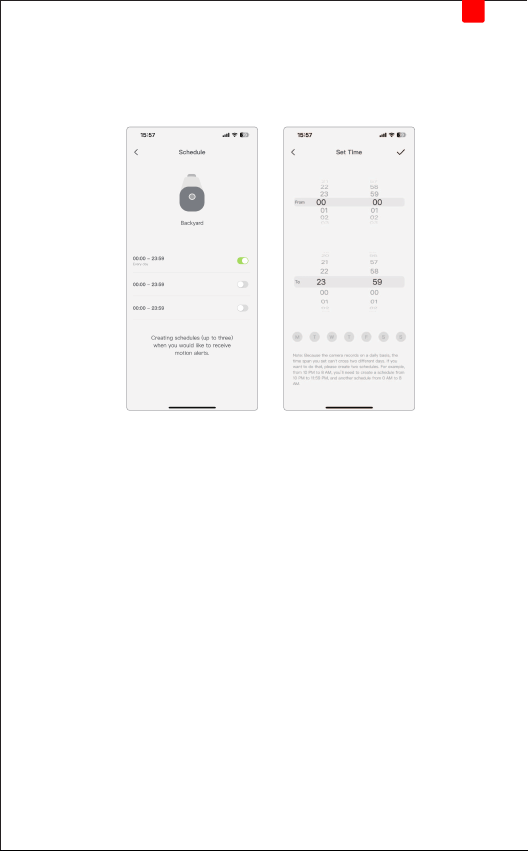
Schedule:
Customize the time of Camera's Motion detection ON/OFF to match
your usage time and protect privacy.
• The Bottom: 'W' 'T' 'W' 'T' 'F' 'S' 'S' stands for Monday, Tuesday...Sunday
• Because the camera records on a daily basis, the time span you set
can't cross two different days. If you want to do that, please create two
schedules. For example, from 10 PM to 8 AM, you'll need to create a
schedule from 10 PM to 11:59 PM, and another schedule from 0 AM
to 8 AM.
EN
17
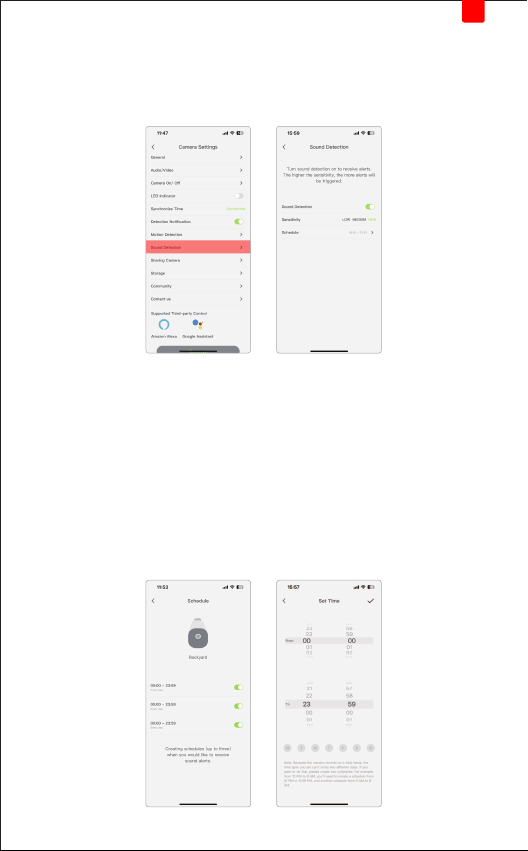
8. Sound Detection
Turn sound detection on to receive alerts.
The higher the sensitivity, the more alerts will be triggered.
Schedule:
Customize the time of Camera's Sound detection ON/OFF to match
your usage time and protect privacy.
• The Bottom: 'W' 'T' 'W' 'T' 'F' 'S' 'S' stands for Monday, Tuesday...Sunday
• Because the camera records on a daily basis, the time span you set
can't cross two different days. If you want to do that, please create
two schedules. For example, from 10 PM to 8 AM, you'll need to
create a schedule from 10 PM to 11:59 PM, and another schedule
from 0 AM to 8 AM.
EN
18
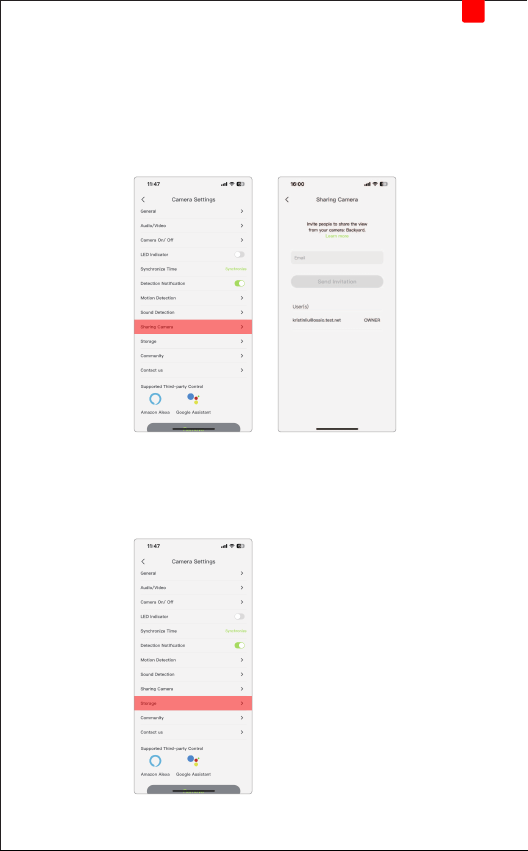
9. Sharing Camera
Share the camera with your friends and family, and protect your family
and property together. (Share with up to 3 users)
• The users to be shared need to register osaio App with email first
and then agree to the invitation in the account.
10. Storage
You can choose cloud storage/SD card storage freely.
EN
19
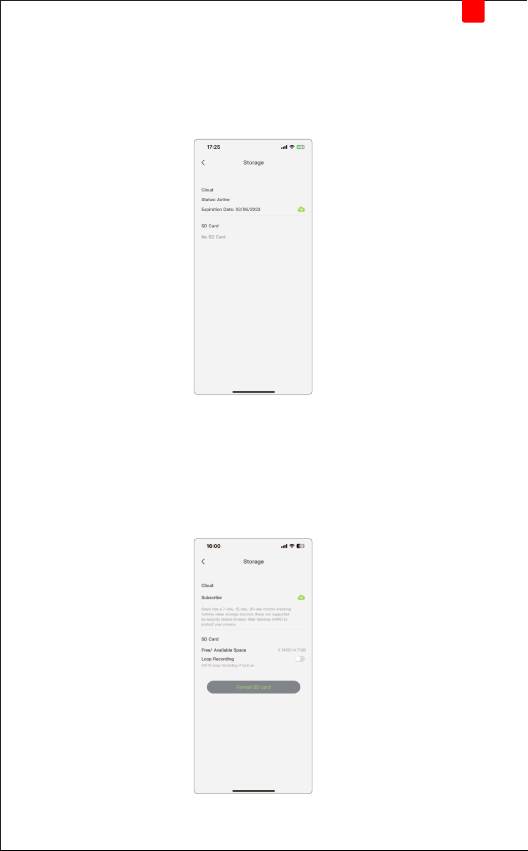
SD Storage:
You can reset the SD card directly here, and you can also choose the
type of video recorded by the SD card (continuous recording/motion
detection recording).
• the SD card up to 128GB.
Cloud storage:
osaio has a 7-day, 15-day, and 30-day motion-tracking full-time video
storage solution; these are supported by security-tested Amazon Web
Services (AWS) to protect your privacy.
EN
20
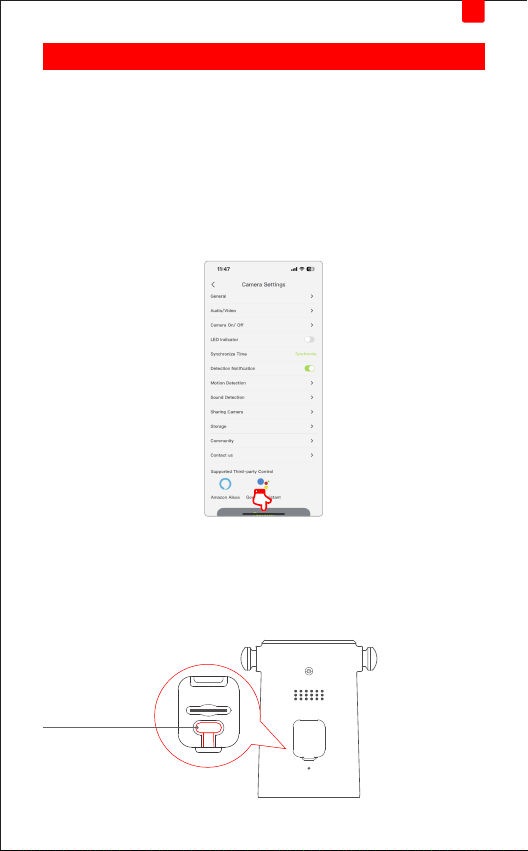
GNCC T1 Pro Security Camera provides two methods to reset your
camera.
Camera Reset
Method 1:
Tap your camera and go to the Devices Settings page. Then tap
Remove Device in the bottom.
Your camera will be removed from your osaio account and restored to
factory settings.
Method 2:
Open the rubber plug at the bottom of the camera, long press the
'Reset Button' to reset the camera.
Reset Button
Reset
EN
21
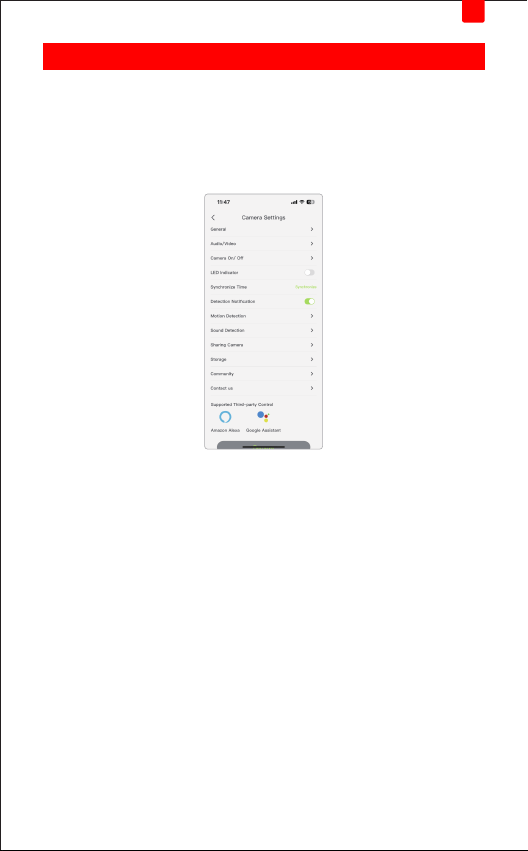
Discover GNCC
Use the osaio app to pair your Amazon Alexa or Google Home Assistant,
and enjoy a full hands-free experience.
Launch the osaio App. Go to the sidebar and tap Work with osaio. You
can choose Amazon Alexa/Google Assistant for detailed instructions.
EN
22

FCC Statement
This device complies with Part 15 of the FCC Rules. Operation is subject
to the following two conditions: (1) this device may not cause harmful
interference, and (2) this device must accept any interference received,
including interference that may cause undesired operation.
Changes or modifications not expressly approved by the party responsible
for compliance could void the user’s authority to operate the equipment.
This equipment has been tested and found to comply with the limits for
a Class B digital device, pursuant to Part 15 of the FCC Rules. These
limits are designed to provide reasonable protection against harmful
interference in a residential installation. This equipment generates, uses
and can radiate radio frequency energy and, if not installed and used in
accordance with the instructions, may cause harmful interference to radio
communications. However, there is no guarantee that interference will
not occur in a particular installation.
If this equipment does cause harmful interference to radio or television
reception, which can be determined by turning the equipment off and
on, the user is encouraged to try to correct the interference by one or
more of the following measures:
-- Reorient or relocate the receiving antenna.
-- Increase the separation between the equipment and receiver.
-- Connect the equipment into an outlet on a circuit different from that
to which the receiver is connected.
-- Consult the dealer or an experienced radio/TV technician for help.
23

Made in China
Version 1.0
