User Manual

Language Contents
Dear Customer ········································································01
Projection Size Description ·····················································02
Packing List·············································································03
Projector ··················································································04
Remote Control········································································05
Remote Control Pairing ···························································06
Network Settings ·····································································07
Focus Settings·········································································07
Keystone Correction Settings··················································08
Inputs·······················································································08
Bluetooth Speaker Mode·························································09
Screen Mirroring······································································09
Troubleshooting·······································································10
Important Precautions·····························································12
Statement ················································································13
English ··············································································
Deutsch ·············································································
Français ············································································
Italiano ··············································································
Español ··············································································
日本語 ················································································
01-14
15-29
30-44
45-59
60-74
75-89

Please read the product instruction carefully:
Thank you for purchasing and using the products.
For your safety and interests, you should read the Product Instruction carefully before using this product.
About the product instruction:
Trademarks and names mentioned in the instruction belong to their respective right owners.
All instructions shown are for illustration purposes only. Actual product may vary due to product enhancements.
We will not be liable for any personal injury, property, or other damage caused by your failure to comply with product instructions or
precautions.
Dear Customer
* Dangbei reserves the right to interpret and modify the instructions.
01

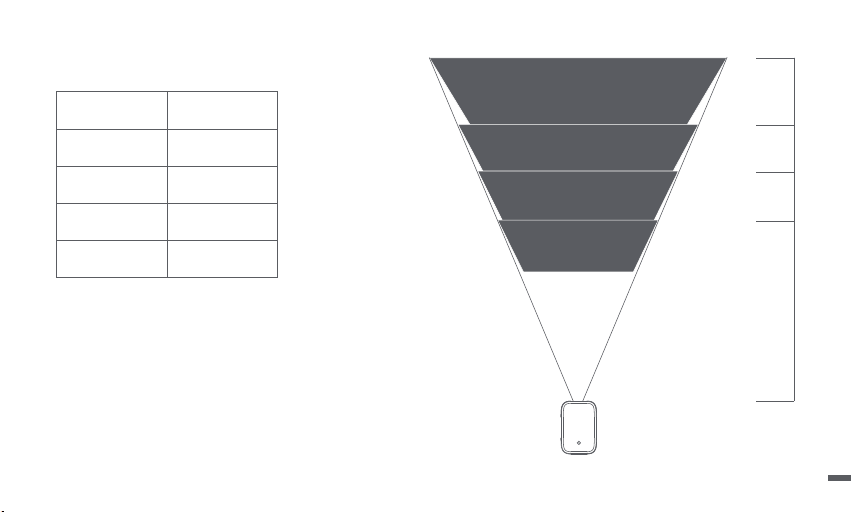
Projection Size Description
* The best recommended projection size is 100 inches.
Size
Screen
(Length*Width:cm)
3.15m
2.65m
2.2m
1.67m
120 inches
60 inches
80 inches
100 inches
177*100
221*124
265*149
80 inches
133*7560 inches
100 inches
120 inches
02

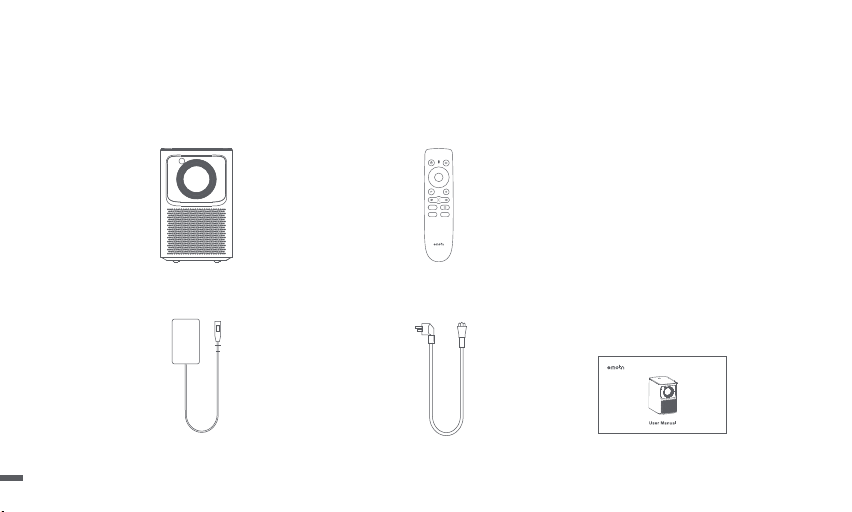
Power Adapter
Power Cable
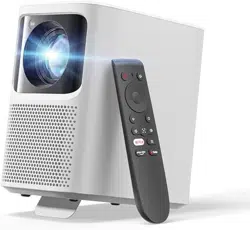
Projector
User Manual
Remote Control
Packing List
Before using this product, please check that all items are in the box.
03

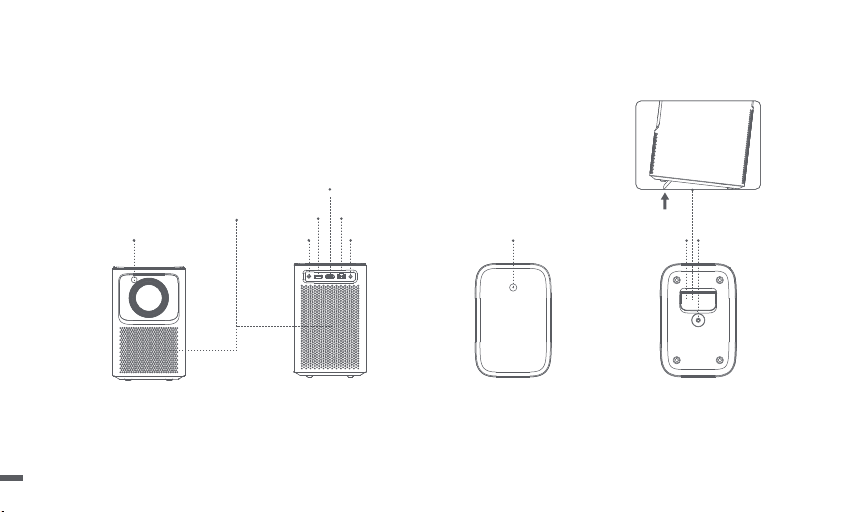
Projector
Overview and interface description.
Rear view
TOF
Ventilation holes (Do not block)
Power buttonLine out Adjustable kickstand PTZ bracket
socket
USB2.0
HDMI
LAN
Front view
Bottom ViewTop View
DC IN
04
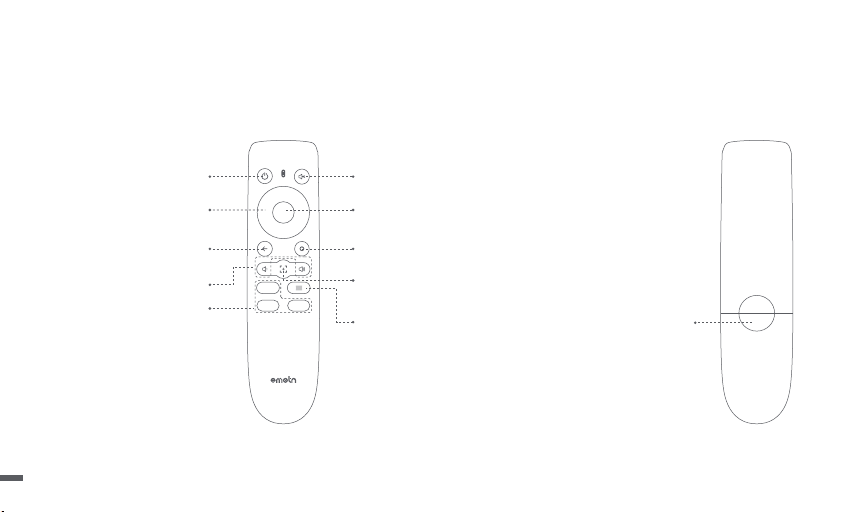
Battery Compartment
Remote Control
ㆍOpen the battery compartment cover of the remote control.
ㆍInstall 2 AAA batteries. *
ㆍPut back the cover.
* Please insert new batteries according to the polarity indication.
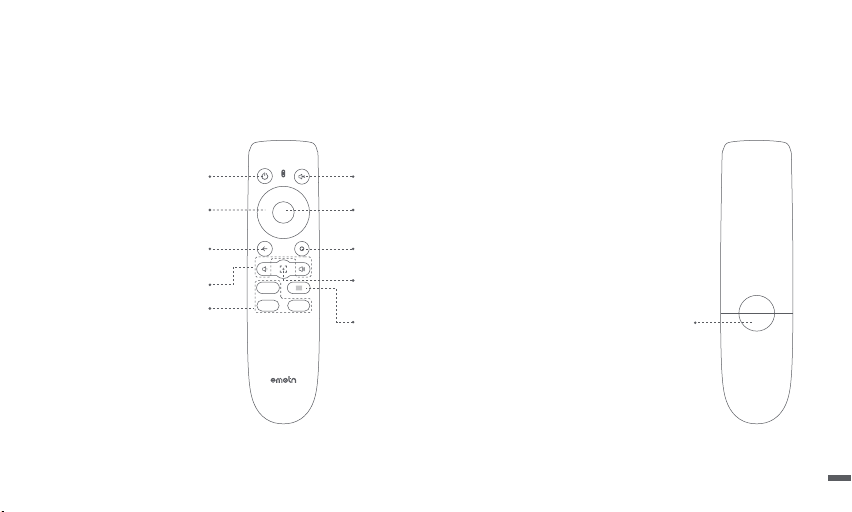
Power
Turn ON/OFF projector
Mute
Cuts off the sound temporality
Return
Return to the previous page
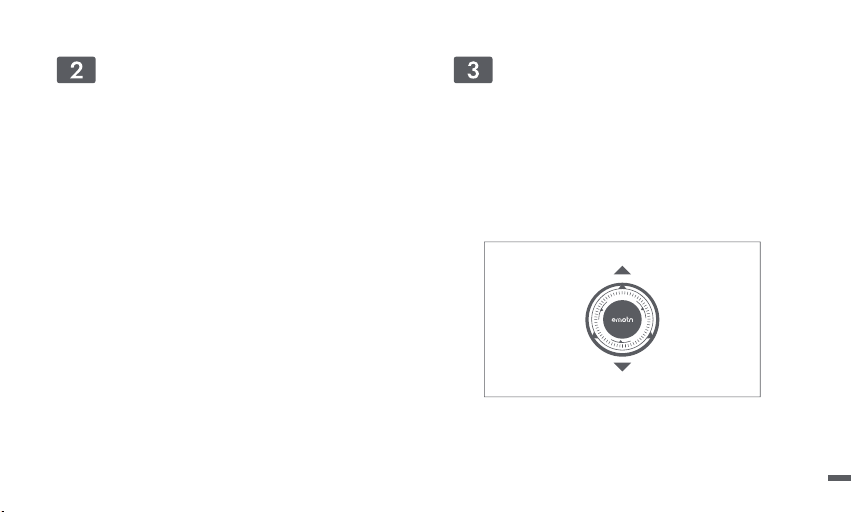
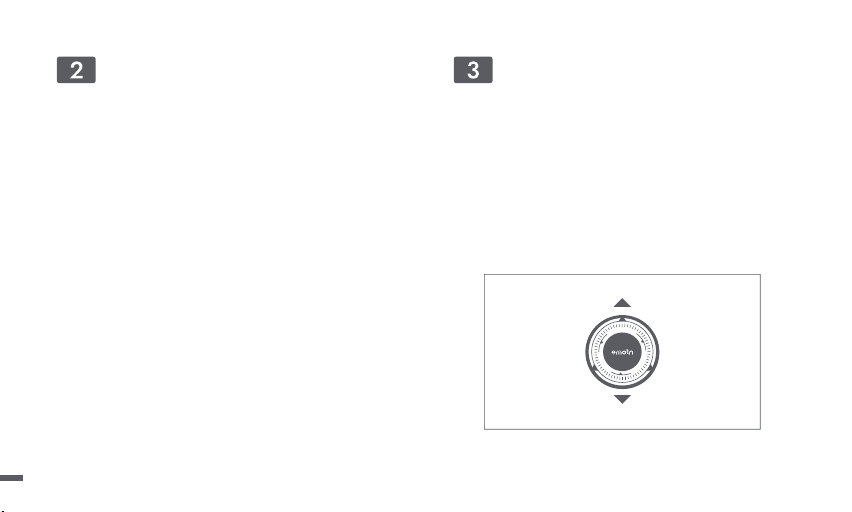
OK
Press to confirm a selection or entry
Pause/Resume play
Home
Access home page
Menu
Access more setting options during play
Focus Shortcut
Press: Pop-up manual focus icon
Press and hold: Autofocus
App Buttons
Connect to the video streaming
Navigation
Volume Down/Volume Up
05
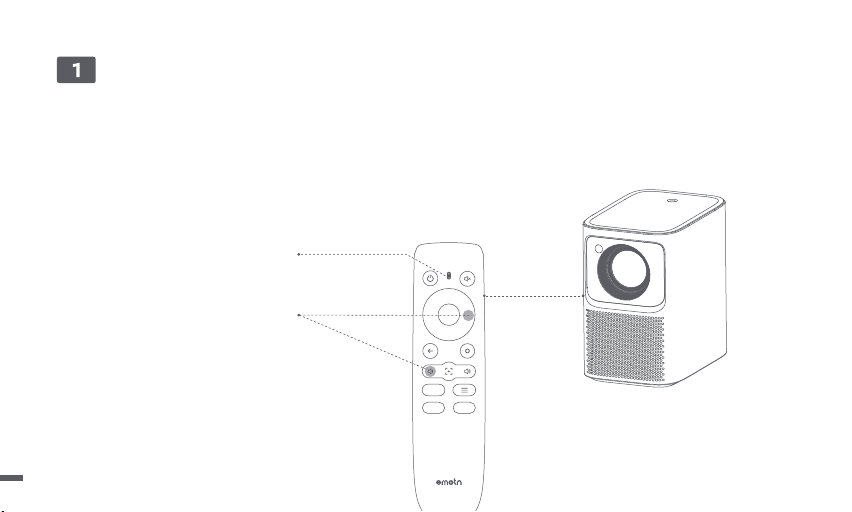
ㆍPlace the remote control within 10cm of the projector.
ㆍFor first-time use, follow the on-screen projector instructions: Press and hold [Volume Down] and [Right] simultaneously until an indicator light
begins flashing.
ㆍThis means that the remote control enters the pairing mode.
ㆍWhen the indicator light stops flashing, means connection is successful.
Remote Control Pairing
10 cm
Indicator light
Press and hold for pairing *
* If pairing is unsuccessful, repeat the above steps after the
remote control indicator light stops flashing.
06
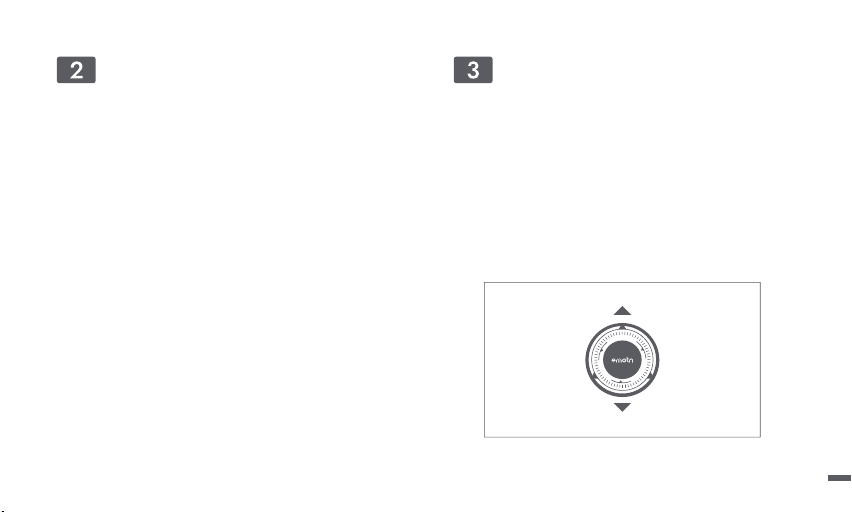
Focus
ㆍEnter [Settings] -- [Focus]
ㆍSelect [Auto], the screen will automatically clear.
ㆍSelect [Manual], press the remote control up/down button of
the navigation key to adjust the focus according to the
display screen. When the screen is clear,stop the operation.
Network
ㆍEnter [Settings] -- [Network]
ㆍSelect the wired network or Wi-Fi.
Manual Focus
07

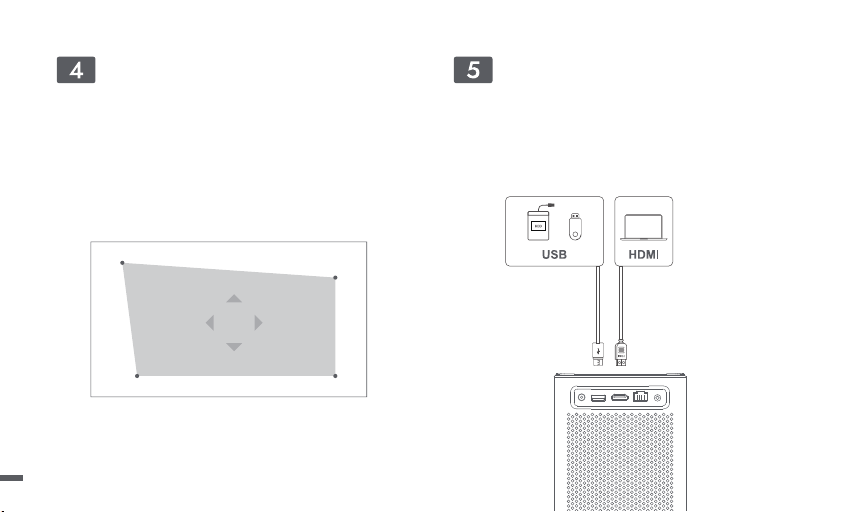
Keystone Correction
ㆍEnter [Settings] -- [Keystone]
ㆍSelect [Auto], the screen will be automatically corrected.
ㆍSelect [Manual], to adjust the four points and the size of the frame.
Inputs
ㆍEnter [Inputs] -- HDMI/HOME/USB.
ㆍWatch the content from the different signal sources.
Manual Keystone
08
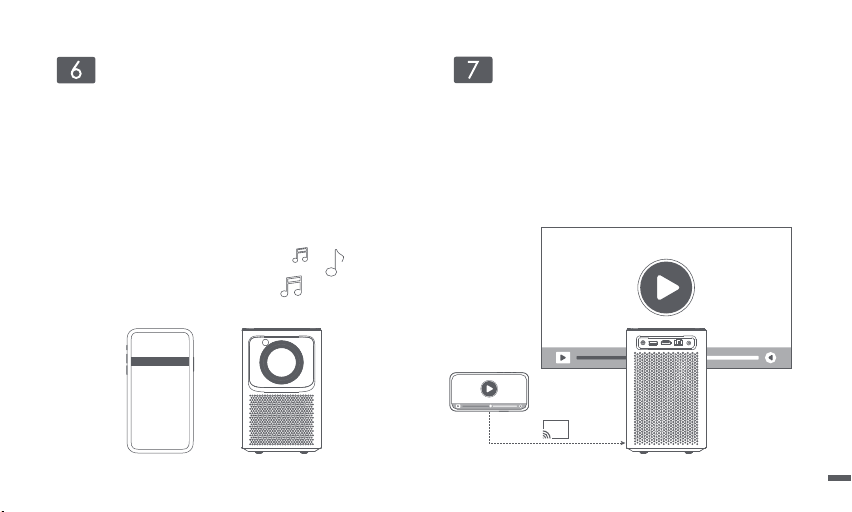
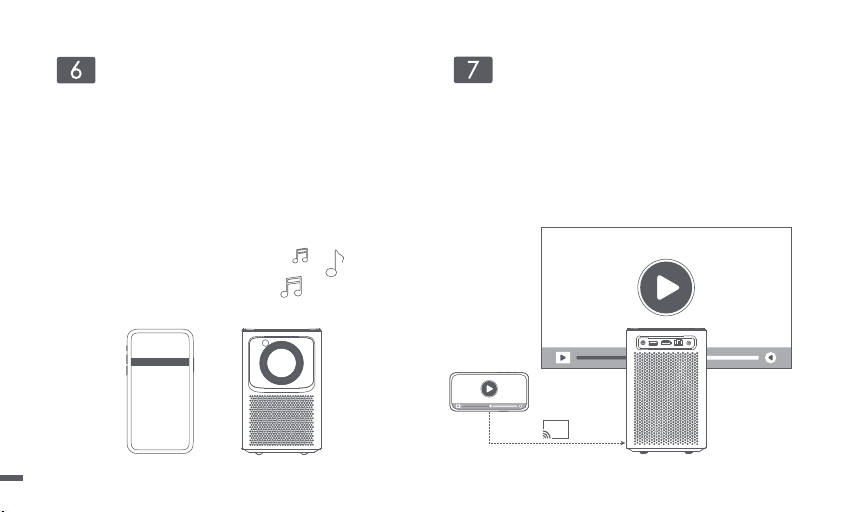
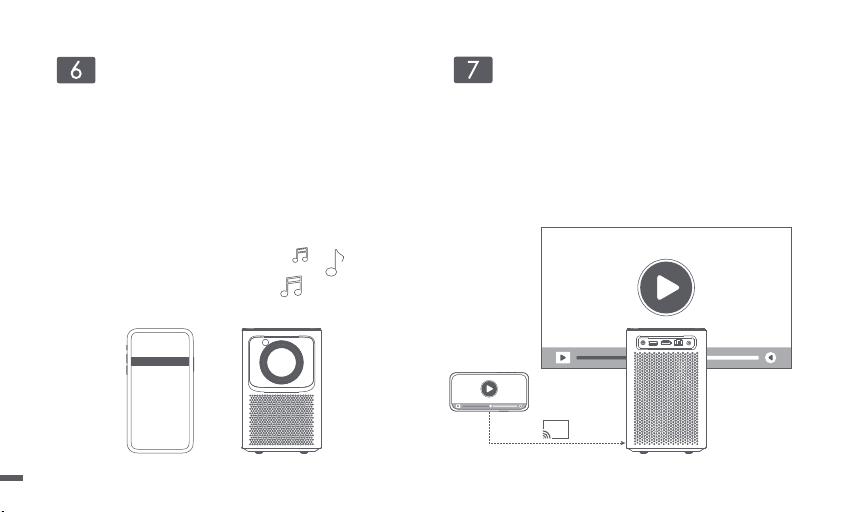
Bluetooth Speaker Mode Screen Mirroring
ㆍYou can wirelessly cast the screen of your smartphone or tablet
onto the projection surface.
ㆍPlease open the screencast APP to learn more about the
operation method.
ㆍOpen the device's Bluetooth Speaker application.
ㆍTurn on the Bluetooth of the mobile phone or tablet, select the
device of [Emotn_PRJ], and connect.
ㆍThe device can play music content from mobile phones or tablets.
AirPods Not Connected
Not Connected
Emotn_PRJ Connected
HomePod mini
Bluetooth
09

1.No audio output
a. Be sure not to press the remote control "Mute" button.
b. Be sure the projector interface "LINE OUT", "HDMI ARC" or Bluetooth does not connect to the external audio device.
2. No image output
a. Press the power button on the top cover. If powered on, the button indicator light will turn off.
b. Be sure the power adaptor has power output.
3. No network
a. Enter settings, and check the network connection status in the network option.
b. Be sure the network cable inserts the projector interface "LAN" normally.
c. Be sure the router is configured correctly.
4. Blurry Image
a. Adjust the focus ring or keystone.
b. Projector and screen/wall must be at the effective distance.
c. Projector lens is not clean.
5. Non-rectangular Image
a. Place the projector perpendicular to the screen/wall, if the keystone correction function is not used.
b. Use the keystone correction function to adjust the display.
Troubleshooting
10

6. Automatic keystone correction failed
a. Be sure the TOF on the front panel not be blocked or dirty.
b. The best automatic keystone correction distance is 1.5-2.5m, horizontal ±20°.
7. Autofocus failed
a. Be sure the TOF on the front panel not be blocked or dirty.
b. The best autofocus distance is 1.3-2.5m, horizontal ±20°.
8. Remote Control is unresponsive
a. Be sure the remote control is paired successfully via Bluetooth communication. If the pairing is successful, the indicator light does not
flash when the button is pressed.
b. If the pairing is unsuccessful, the Remote Control at IR communication, the indicator light does flash when the button is pressed.
c. Be sure there are no interferences or obstructions between the projector and remote control.
d. Check the battery charge and installation polarity.
9. Connect the Bluetooth devices
Enter settings, open the Bluetooth option to check the Bluetooth device list, and connect the device.
10. Others
Please feel free to contact us.
suppor[email protected]
11

ㆍDo not look directly at the projection beam with your eyes, because the strong beam may harm your eyes.
ㆍDo not block or cover the heat dissipation holes of the device to avoid affecting the heat dissipation of internal parts and damaging the
device.
ㆍKeep away from humidity, exposure, high temperature, low pressure, and magnetic environment.
ㆍDo not place the device in areas susceptible to excessive dust and dirt.
ㆍPut the device in the flat and stable station, do not put it in the place prone to vibration.
ㆍDo not allow children to handle the device without supervision.
ㆍNo not place heavy or sharp objects on this device.
ㆍAvoid extreme vibrations as they may damage the internal components.
ㆍPlease use correct type of battery for the remote control.
ㆍOnly use attachments/accessories specified or provided by the manufacturer. (such as the exclusive power adapter, bracket, etc)
ㆍDo not disassemble the device personally, repair the device only for staff authorized by the company.
ㆍPlace and use the device in an environment of 0°C-40°C.
ㆍDo not use the earphones for a long time. Excessive sound from the earphones can damage your hearing.
ㆍThe plug is considered as disconnect device of adapter.
ㆍAs with any bright source, do not stare into the direct beam.
ㆍThe adapter shall be installed near the equipment and shall be easily accessible.
ㆍProtect the power cord from being walked on or pinched, particularly at plugs, convenience receptacles, and the point where they exit
from this device.
ㆍUnplug this device if there are lightning storms or when unused for a long period of time.
ㆍWhere the power plug or an appliance coupler is used as the disconnect device, the disconnect device shall remain readily operable.
ㆍBefore you make or change any connections, ensure that all devices are disconnected from the power outlet.
ㆍNever touch the power cable or the power connector with wet hands.
Important Precautions
12

We declare that this device is in compliance with the essential requirements and other relevant provisions of Directive 2014/53/EU.
Satisfies all the technical regulations applicable to the product within the scope of UK Radio Equipment Regulations (SI 2017/1206);
UK Electrical Equipment (Safety) Regulations (SI 2016/1101); and UK Electromagnetic Compatibility Regulations (SI 2016/1091).
This device operating frequency:2402-2480MHz(EIRP<20dBm),2412-2472MHz(EIRP<20dBm),5150~5250MHz(EIRP<23dBm),
5250~5350MHz(EIRP<20dBm),5470~5725MHz(EIRP<27dBm),5725~5850MHz(EIRP<13.98dBm).
FCC STATEMENT
This equipment has been tested and found to comply with the limits for a Class B digital device, pursuant to Part 15 of the FCC Rules.
These limits are designed to provide reasonable protection against harmful interference in a residential installation. This equipment
generates uses and can radiate radio frequency energy and, if not installed and used in accordance with the instructions, may cause
harmful interference to radio communications. However, there is no guarantee that interference will not occur in a particular installation.
If this equipment does cause harmful interference to radio or television reception, which can be determined by turning the equipment
off and on, the user is encouraged to try to correct the interference by one or more of the following measures:
-- Reorient or relocate the receiving antenna.
-- Increase the separation between the equipment and receiver.
-- Connect the equipment to an outlet on a circuit different from that to which the receiver is connected.
-- Consult the dealer or an experienced radio/TV technician for help.
Changes or modifications not expressly approved by the party responsible for compliance could void the user's authority to operate the
equipment.
13

IC STATEMENT
CAN ICES-3 (B)/NMB-3 (B)
This Class B digital apparatus complies with Canadian ICES-003.
Cet appareil numérique de classe B est conforme à la norme canadienne ICES-003.
This device contains licence-exempt transmitter(s)/receiver(s) that comply with Innovation, Science and Economic Development Canada’s
licence-exempt RSS(s). Operation is subject to the following two conditions:
(1) This device may not cause interference.
(2) This device must accept any interference, including interference that may cause.
undesired operation of the device
L’émetteur/récepteur exempt de licence contenu dans le présent appareil est conforme aux CNR d’Innovation, Sciences et Développement
économique Canada applicables aux appareils radio exempts de licence. L’exploitation est autorisée aux deux conditions suivantes :
1.L’appareil ne doit pas produire de brouillage;
2.L’appareil doit accepter tout brouillage radioélectrique subi, même si le brouillage est susceptible d’en compromettre le fonctionnement.
For projectors only
The distance between user and products should be no less than 20cm.
La distance entre l'utilisateur et le produit ne doit pas être inférieure à 20 cm.
5.2 GHz band is restricted to indoor use only.
La bande de 5.2 GHz est réservée à l'usage intérieur.
Manufactured under license from Dolby Laboratories. Dolby, Dolby Audio,and the double-D symbol are trademarks of Dolby Laboratories
Licensing Corporation.
14

Sprachen Inhaltsverzeichnis
Liebe Benutzerin und lieber Benutzer ·····································16
Beschreibung der Projektionsgröße········································17
Packliste ··················································································18
Projektor ··················································································19
Fernsteuerung ·········································································20
Paarung der Fernbedienung···················································21
Netzwerk-Einstellungen···························································22
Fokussierungseinstellungen····················································22
Keystone-Korrektur·································································· 23
Eingänge ·················································································23
Bluetooth-Lautsprechermodus················································24
Bildschirm-Spiegelung····························································24
Fehlerbehebung Dépannage ··················································25
Wichtige Hinweise···································································27
Aussage ··················································································28
English ··············································································
Deutsch ············································································
Français ············································································
Italiano ··············································································
Español ··············································································
日本語 ················································································
01-14
15-29
30-44
45-59
60-74
75-89

Bitte lesen Sie das Handbuch sorgfältig durch:
Vielen Dank für den Kauf und die Verwendung der Produkte.
Zu Ihrer Sicherheit und Ihren Interessen lesen Sie bitte das Handbuch sorgfältig durch, bevor Sie dieses Produkt verwenden.
Zur Produktbeschreibung:
TDie in diesem Hinweis genannten Marken und Namen gehören ihren jeweiligen Rechteinhabern.
Im Falle von Abweichungen zwischen dem Inhalt dieses Handbuchs und dem tatsächlichen Produkt hat das tatsächliche Produkt Vorrang.
Wenn Sie die Produktanweisungen oder Vorsichtsmaßnahmen nicht befolgen und dadurch Personen-, Sach- oder andere Schäden
verursachen, übernehmen wir keine Verantwortung.
Liebe Benutzerin und lieber Benutzer
* Wir behalten uns das Recht vor, dieses Handbuch zu interpretieren und zu ändern.
16

Beschreibung der Projektionsgröße
* Die empfohlene Projektionsgröße beträgt vorzugsweise 100 inches.
Projektionsgröße
Bildschirm
(Länge*Breite:cm)
3.15m
2.65m
2.2m
1.67m
120 inches
60 inches
80 inches
100 inches
177*100
221*124
265*149
80 inches
133*7560 inches
100 inches
120 inches
17

Netzadapter
Netzkabel
Beamer
Bedienungsanleitung
Fernbedienung
Packliste
Bevor Sie das Gerät benutzen, überprüfen Sie bitte alle Teile im Karton, um sicherzustellen, dass sie vollständig sind.
18
Beamer
Erscheinungsbild und Schnittstellenbeschreibung.
Rückansicht
DC IN
Lüftungsöffnungen
(Blockieren Sie es nicht)
EinschaltknopfLine out Verstellbarer Ständer PTZ-Standsockel
USB2.0
HDMI
LAN
Vorderansicht
UnteransichtOberansicht
TOF
19

Fernsteuerung
ㆍÖffnen Sie die Abdeckung des Batteriefachs der Fernbedienung.
ㆍBauen Sie zwei Batterien Nr. 7 ein. *
ㆍSchließen Sie den Batteriefachdeckel.
* Bitte bringen Sie die Plus- und Minuspole der Batterie korrekt an.
Netztaste
Den Beamer ein/ausschalten
Stumm
Schneiden Sie das Geräusch zeitlich ab
Zurück-Taste
Zurück zur vorherigen Seite
Bestätigungstaste
Drücken Sie diese Taste, um die Auswahl oder Eingabe zu bestätigen.
iedergabe anhalten oder fortsetzen.
Home-Taste
Die Startseite öffnen
Menütaste
Während der Wiedergabe,
auf weitere Einstellungsmöglichkeiten zugreifen.
Fokussierungskurztaste
Kurzes Drücken: Die manuelle Fokuskarte aufrufen.
Langes Drücken: Autofokus.
App Schaltfläche
Stellen eine Verbindung zum
Video-Streaming her.
Navigationstaste
Lautstärke auf/ab
Batteriefach
20

ㆍStellen Sie die Fernbedienung nicht weiter als 10 cm vom Gerät entfernt auf.
ㆍBefolgen Sie beim ersten Mal die Anweisungen des Boot-Assistenten: Halten Sie gleichzeitig die rechte Taste der Lautstärketaste und die
Navigationstaste gedrückt, bis das Licht blinkt.
ㆍDie Fernbedienung befindet sich im Paarung-Modus.
ㆍWenn die Anzeigeleuchte nicht mehr blinkt, ist die Verbindung erfolgreich hergestellt.
Paarung der Fernbedienung
10 cm
Kontrolllampe
Zur Kopplung gedrückt halten*
* Wenn die Paarung nicht erfolgreich ist, warten Sie,
bis die Anzeigeleuchte nicht mehr blinkt, und führen
Sie die oben genannten Schritte erneut aus.
21
Fokussierungseinstellungen
ㆍGehen Sie zu [Einstellungen] -- [Fokus].
ㆍWenn Sie [Auto] wählen, wird der Bildschirm automatisch
gelöscht.
ㆍWählen Sie [Handbuch] , drücken Sie die Aufwärts- und
Abwärtstaste der Navigationstaste der Fernbedienung, um
die Einstellung vorzunehmen, bis das Bild klar ist, und
beenden Sie dann den Vorgang.
Netzwerk-Einstellungen
ㆍGehen Sie zu [Einstellungen] -- [Netzwerk].
ㆍKabelgebundenes oder drahtloses Netzwerk auswählen.
Manueller Fokus
22

Einstellungen für die Schlussstein
ㆍGehen Sie zu [Einstellungen] -- [Schlussstein].
ㆍWählen Sie [Auto], wird das Modell automatisch korrigiert und
der Bildschirm wird automatisch korrigiert.
ㆍWählen Sie [Handbuch], um die Position der vier Punkte und
die Größe des Bildschirms anzupassen.
Eingänge
ㆍGehen Sie zu [Eingänge] -- HDMI/HOME/USB.
ㆍInhalte aus verschiedenen Signalquellen ansehen.
Handbuch Schlussstein
23
Bluetooth-Lautsprechermodus Bildschirm-Spiegelung
ㆍSie können das Bild Ihres Smartphones oder Tablets drahtlos
auf die Projektionsfläche übertragen.
ㆍBitte öffnen Sie die Screencasting-App, um weitere Informationen
darüber zu erhalten, wie Sie dies tun können.
Wenn die Bluetooth-Audio-App geöffnet und Ihr Smartphone oder
Tablet über Bluetooth mit dem Beamer[Emotn_PRJ] verbunden ist,
gibt der Beamer Musikinhalte von Ihrem Smartphone oder Tablet
wieder.
AirPods Not Connected
Not Connected
Emotn_PRJ Connected
HomePod mini
Bluetooth
24

Fehlerbehebung
1. Es gibt keine Tonausgabe
a. Stellen Sie sicher, dass die Stummschalttaste der Fernbedienung nicht gedrückt ist.
b. Stellen Sie sicher, dass die Beamer-Schnittstelle "LINE OUT, HDMI ARC" oder Bluetooth nicht mit einem externen Audiogerät verbunden ist.
2. Es gibt keine grafische Ausgabe
a. Drücken Sie den Betriebsschalter an der oberen Abdeckung des Beamers. Wenn das System eingeschaltet ist, erlischt die
Schlüssel-Anzeige.
b. Stellen Sie sicher, dass der Adapter über eine Ausgangsleistung verfügt.
3. Es gibt kein Netzwerk
a. Gehen Sie zu Einstellungen, bestätigen Sie den Netzwerk-Verbindung Status der Netzwerk-Optionen.
b. Bestätigen Sie, dass das Netzwerkkabel in die Beamer-Schnittstelle "LAN" normal eingesteckt ist.
c. Überprüfen Sie, ob die Router-Konfiguration funktioniert.
4. Das Bild ist verschwommen
a. Stellen Sie Fokus oder Keystone-Korrektur ein.
b. Der Projektion-Abstand liegt außerhalb des Bereichs .
c. Die Projektor-Linse ist nicht sauber.
5. Nicht rechteckiger Bildschirm
a. Stellen Sie den Beamer senkrecht zur Wand auf, wenn keine Keystone-Korrektur verwendet wird.
b. Verwenden Sie die Keystone-Korrektur Funktion, um den Bildschirm anzupassen.
25

6. Automatische Trapezkorrektur ist fehlgeschlagen
a. Stellen Sie sicher, dass die TOF nicht verdeckt oder verschmutzt ist.
b. Der optimale Abstand zur automatischen Keystone-Korrektur beträgt 1,5-2,5 m, horizontal links und rechts 20°.
7. Autofocus failed
a. Stellen Sie sicher, dass die TOF nicht verdeckt oder verschmutzt ist.
b. Der optimale Autofokus-Abstand beträgt 1,3-2,5m, horizontal links und rechts 20°.
8. Die Fernbedienung reagiert nicht
a. Stellen Sie sicher, dass die Bluetooth-Kommunikation der Fernbedienung erfolgreich gepaart hat. Nach erfolgreichem Paar blinkt die
Fernbedienung-Anzeige nicht, wenn die Taste gedrückt wird.
b. Wenn das Paar nicht erfolgreich gebildet hat, ist die Fernbedienung eine IR-Modus-Kommunikation. Die Fernbedienung-Anzeige blinkt,
wenn die Taste gedrückt wird.
c. Stellen Sie sicher, dass es zwischen dem Beamer und der Fernbedienung keine Behindern gibt.
d. Stellen Sie den Leistungspegel und die Installation-Polarität der Fernbedienung sicher.
9. Verbinden eines Bluetooth-Geräts
Gehen Sie zu Einstellungen, öffnen Sie Bluetooth-Optionen, überprüfen Sie den Bluetooth-Geräte Bestand und verbinden Sie das Gerät.
10. Anderes
Bitte kontaktieren Sie zu jeder Zeit uns.
suppor[email protected]
26

ㆍBitte schauen Sie nicht direkt mit den Augen in den Projektionsstrahl, da der starke Strahl Ihre Augen schädigen kann.
ᆞDie Kühlungsöffnungen des Geräts dürfen nicht blockiert oder verstopft werden, da dies die Wärmeableitung der internen Teile
beeinträchtigen und das Gerät beschädigen kann.
ᆞBitte halten Sie es von Feuchtigkeit, Sonnenlicht, hohen Temperaturen, niedrigem Druck und magnetischer Umgebung fern.
ㆍStellen Sie das Gerät nicht an einem Ort auf, an dem es übermäßig viel Staub und Schmutz ausgesetzt ist.
ㆍStellen Sie das Gerät auf eine flache und stabile Unterlage, nicht in einem Bereich, der zu Vibrationen neigt.
ㆍLassen Sie Kinder nicht unbeaufsichtigt mit dem Gerät hantieren.
ㆍStellen Sie keine schweren oder scharfkantigen Gegenstände auf dieses Gerät.
ᆞVermeiden Sie extreme Vibrationen, da sonst interne Komponenten beschädigt werden könnten.
ㆍBitte verwenden Sie den richtigen Batterietyp für die Fernbedienung
ㆍVerwenden Sie nur vom Hersteller angegebenes oder mitgeliefertes Zubehör (z. B. spezielles Adapter, Ständer usw.)
ㆍDemontieren Sie das Gerät nicht selbst. Nur autorisiertes Firmenpersonal kann das Gerät reparieren
ㆍStellen Sie das Gerät in einer Umgebung von 0°C-40°C auf.
ㆍBitte verwenden Sie den Kopfhörer nicht zu lang, da die Geräusche zu Hörschäden führen können.
ㆍDer Stecker ist das getrennte Gerät des Adapters.
ㆍWie bei jeder hellen Lichtquelle, schauen Sie nicht auf den direkten Strahl,
ㆍDer Adapter sollte in der Nähe des Geräts installiert werden und leicht zugänglich sein.
ᆞSchützen Sie das Netzkabel, damit niemand darauf tritt oder es anderweitig gequetscht wird, insbesondere an Steckern, an
Mehrfachsteckdosen und am Austrittspunkt des Kabels am Gerät.
ᆞTrennen Sie das Gerät bei Gewittern oder längerer Nichtverwendung vom Stromnetz.
ᆞWenn ein Netzstecker oder ein Gerätekoppler als Trennvorrichtung verwendet wird, bleibt die Trennvorrichtung einsatzbereit.
ᆞVor dem Herstellen oder Ändern von Verbindungen stellen Sie bitte sicher, dass alle Geräte vom Stromnetz getrennt sind.
ᆞBerühren Sie niemals das Netzkabel oder den Netzanschluss mit feuchten Händen.
Wichtige hinweise
27

We declare that this device is in compliance with the essential requirements and other relevant provisions of Directive 2014/53/EU.
Satisfies all the technical regulations applicable to the product within the scope of UK Radio Equipment Regulations (SI 2017/1206);
UK Electrical Equipment (Safety) Regulations (SI 2016/1101); and UK Electromagnetic Compatibility Regulations (SI 2016/1091).
This device operating frequency:2402-2480MHz(EIRP<20dBm),2412-2472MHz(EIRP<20dBm),5150~5250MHz(EIRP<23dBm),
5250~5350MHz(EIRP<20dBm),5470~5725MHz(EIRP<27dBm),5725~5850MHz(EIRP<13.98dBm).
FCC STATEMENT
This equipment has been tested and found to comply with the limits for a Class B digital device, pursuant to Part 15 of the FCC Rules.
These limits are designed to provide reasonable protection against harmful interference in a residential installation. This equipment
generates uses and can radiate radio frequency energy and, if not installed and used in accordance with the instructions, may cause
harmful interference to radio communications. However, there is no guarantee that interference will not occur in a particular installation.
If this equipment does cause harmful interference to radio or television reception, which can be determined by turning the equipment
off and on, the user is encouraged to try to correct the interference by one or more of the following measures:
-- Reorient or relocate the receiving antenna.
-- Increase the separation between the equipment and receiver.
-- Connect the equipment to an outlet on a circuit different from that to which the receiver is connected.
-- Consult the dealer or an experienced radio/TV technician for help.
Changes or modifications not expressly approved by the party responsible for compliance could void the user's authority to operate the
equipment.
28
IC STATEMENT
CAN ICES-3 (B)/NMB-3 (B)
This Class B digital apparatus complies with Canadian ICES-003.
Cet appareil numérique de classe B est conforme à la norme canadienne ICES-003.
This device contains licence-exempt transmitter(s)/receiver(s) that comply with Innovation, Science and Economic Development Canada’s
licence-exempt RSS(s). Operation is subject to the following two conditions:
(1) This device may not cause interference.
(2) This device must accept any interference, including interference that may cause.
undesired operation of the device
L’émetteur/récepteur exempt de licence contenu dans le présent appareil est conforme aux CNR d’Innovation, Sciences et Développement
économique Canada applicables aux appareils radio exempts de licence. L’exploitation est autorisée aux deux conditions suivantes :
1.L’appareil ne doit pas produire de brouillage;
2.L’appareil doit accepter tout brouillage radioélectrique subi, même si le brouillage est susceptible d’en compromettre le fonctionnement.
For projectors only
The distance between user and products should be no less than 20cm.
La distance entre l'utilisateur et le produit ne doit pas être inférieure à 20 cm.
5.2 GHz band is restricted to indoor use only.
La bande de 5.2 GHz est réservée à l'usage intérieur.
Manufactured under license from Dolby Laboratories. Dolby, Dolby Audio,and the double-D symbol are trademarks of Dolby Laboratories
Licensing Corporation.
29

Langue Contenu
Cher utilisateur ········································································31
Description de la taille de projection·······································32
Liste de Colisage·····································································33
Projecteur ················································································34
Télécommande········································································35
Appairage de la télécommande··············································36
Réglages du réseau································································37
Réglage de focalisation···························································37
La correction de la trapézoïdale ·············································38
Contributions ···········································································38
Mode Haut-Parleur Bluetooth··················································39
Miroir d'écran ··········································································39
Dépannage··············································································40
Précautions importantes ·························································42
Déclaration ··············································································43
English ···············································································
Deutsch ·············································································
Français ···········································································
Italiano ··············································································
Español ··············································································
日本語 ················································································
01-14
15-29
30-44
45-59
60-74
75-89

Veuillez lire attentivement le manuel du produit:
Nous vous remercions d'avoir acheté et utilisé nos produits.
Pour votre sécurité et votre intérêt, veuillez lire attentivement le manuel du produit avant de l'utiliser.
À propos de la description du produit:
Ce manuel est protégé par les droits d'auteur. Les marques et les noms mentionnés dans ce manuel appartiennent à leurs propriétaires
respectifs.
Toutes les instructions présentées sont uniquement à des fins d'illustration. Le produit réel peut varier en raison des améliorations
apportées au produit.
Nous ne serons pas responsable si vous ne respectez pas ce manuel ou les précautions relatives au produit et si vous provoquez des
blessures corporelles, des dommages matériels ou autres.
Cher utilisateur
* Nous nous réservons le droit d'interpréter et de modifier ce manuel.
31

Description de la taille de projection
* La taille de projection recommandée est de préférence de 100 pouces.
Taille
Écran
(Longeur*largeur:cm)
3.15m
2.65m
2.2m
1.67m
120 pouces
60 pouces
80 pouces
100 pouces
177*100
221*124
265*149
80 pouces
133*7560 pouces
100 pouces
120 pouces
32

Adaptateur d'alimentation
Cordon d'alimentation CA
Projecteur
Manuel d'utilisateur
Télécommande
Liste de Colisage
Veuillez vérifier si tous les objets sont complets dans l'emballage avant l'utilisation de l'appareil.
33
Projecteur
Apparence et description des interfaces.
Vue arrière
DC IN
Event (ne pas l'obstruer)
Bouton
marche/arrêt
Line out Support ajustable Socle du
support PTZ
USB2.0
HDMI
LAN
Vue avant
Vue de dessousVue de dessus
TOF
34

Télécommande
ㆍOuvrez le couvercle du compartiment aux piles de la télécommande.
ㆍMontez deux piles AAA. *
ㆍFermez le compartiment aux piles.
* Installez les piles à la polarité positive et négative correcte.
Bouton marche/arrêt
Activation/Désactivation du
projecteur
Muet
Coupez le son temporairement
Touche de retour
Retourner à la page précédente
Touche confirmation
Appuyez sur cette touche pour la sélection ou l'entrée.
Pause/continuer la lecture.
Page d'accueil
Ouvrir la page d'accueil
Menu
Accéder à plus d'options de réglage
pendant la lecture.
Touche raccourcie de focalisation
Appuyer brièvement : Fig.de focalisation manuelle pop-up
Appuyez en maintenant enfoncé: Focalisation automatique
App Bouton
Connectez-vous au
streaming vidéo
Touche de navigation
Voix +/-
Compartiment aux piles
35

ㆍPlacez la télécommande à moins de 10cm de l'appareil.
ㆍPour la première utilisation, suivez les instructions de démarrage: Appuyez en maintenez enfoncé sur la touche voix - et la touche droite de
navigation jusqu'à ce que l'indicateur clignote.
ㆍLa télécommande accède au mode d'appairage.
ㆍL'arrêt de clignotement signifie que la connexion est réussie.
Appairage de la télécommande
10 cm
Indicateur
Maintenez la pression pour l'appariement *
* En cas d'appairage échoué, attendez que l'indicateur
arrête le clignotement, suivez ensuite les étapes au-dessus
pour le refaire.
36
Réglage de focalisation
ㆍAccès à [Réglages] -- [Mise au point].
ㆍSélectionnez [Auto], l'image affichée devient automatiquement
claire.
ㆍSélectionnez [Manuel], appuyez sur les touches haut/bas de
la touche de navigation sur la télécommande pour le réglage,
arrêtez tandis que l'image soit claire.
Réglages du réseau
ㆍAccès à [Réglages] -- [Réseau].
ㆍSélectionnez le réseau filaire ou Wi-Fi.
Mise au point manuelle
37

La correction de la trapézoïdale
ㆍAccès à [Réglages] -- [Clé de voûte].
ㆍSélectionnez [Auto], l'image sera corrigée automatiquement.
ㆍSélectionnez [Manuel], réglez les positions des quatre points
ainsi que la taille de l'image.
Contributions
ㆍAccès à [Contributions] -- HDMI/HOME/USB.
ㆍConsulter le contenu de différentes sources du signal.
Manuel clé de voûte
38

Mode Haut-Parleur Bluetooth Miroir d'écran
ㆍVous pouvez projeter les images de Smartphone ou de tablette
à l'écran de projection.
ㆍOuvrez l'APP de projection pour consulter plus d'infos liées au
mode d'emploi.
Ouvrez l'App de l'haut-parleur Bluetooth, le projecteur[Emotn_PRJ]
jouera la musique de Smartphone ou de tablette après avoir
connecté la Smartphone ou la tablette au projecteur via Bluetooth.
AirPods Not Connected
Not Connected
Emotn_PRJ Connected
HomePod mini
Bluetooth
39

Dépannage
1. Il n'y a pas de son
a. Assurez-vous que la touche muet de la télécommande n’est pas appuyée.
b. Vérifiez que l'interface du projecteur "LINE OUT", "HDMI ARC" ou Bluetooth n'est pas connectée à un appareil audio externe.
2. Il n’y a pas d’image
a. Appuyez sur la touche marche/arrêt sur le boîtier du projecteur. Le voyant des touches sera éteint lorsque l’appareil est allumé.
b. Assurez-vous que l'adaptateur a une sortie d'alimentation.
3. Sans Réseau
a. Accédez aux réglages, confirmez que l’option du réseau est mise en état de connexion.
b. Assurez-vous que le câble d’internet est inséré correctement dans le port ‘LAN’ du projecteur.
c. Vérifiez si le réglage du routeur est correct.
4. Image Floue
a. Réglage de la mise au point ou correction de keystone.
b. La distance de projection hors de portée.
c. L’objectif du projecteur n’est pas propre.
5. Image non-rectangulaire
a. Placez le projecteur verticalement au coin mural, si la correction trapézoïdale n’est pas activée.
b. Utilisez la correction trapézoïdale afin d’ajuster l’image.
40

6. Échec de la correction trapézoïdale automatique
a. Assurez-vous que TOF n’est pas couvert ou sale.
b. La distance optimale de correction trapézoïdale automatique doit être 1.5-2.5m, horizontal ±20°.
7. Échec de Autofocus
a. Assurez-vous que TOF n’est pas couvert ou sale.
b. La distance optimale de autofocus doit être 1.3-2.5m, horizontal ±20°.
8. Aucune réaction à la télécommande
a. Assurez-vous que la télécommande est appariée avec succès via Bluetooth. Après l’appairage, le voyant de la télécommande ne clignote
plus tandis qu’on appuie sur les touches.
b. En cas d’échec d’appairage, la télécommande adopte le mode à infrarouge. Le voyant de la télécommande clignote tandis qu’on
appuie sur les touches.
c. Assurez-vous qu’il n’y a pas d’interférence et d’obstacles entre le projecteur et la télécommande.
d. Confirmez l’énergie et la polarité des piles de la télécommande.
9. Connexion de Bluetooth
Accédez aux réglages, ouvrez l’option Bluetooth et vérifiez la liste des appareils Bluetooth, ensuite connectez l’appareil.
10. Les autres
N'hésitez pas à nous contacter.
suppor[email protected]
41

ㆍVeuillez ne pas regarder directement le faisceau de projection avec vos yeux, car le faisceau puissant peut endommager vos yeux.
ㆍNe pas bloquer et obstruer les orifices de refroidissement de l'appareil, car cela pourrait affecter la dissipation de la chaleur des pièces
internes et endommager l'appareil.
ㆍVeuillez éviter l'humidité, l'exposition au soleil, les températures élevées, la basse pression et l'environnement magnétique.
ㆍNe pas placer l'appareil dans un endroit susceptible d'être exposé à la poussière et à la saleté excessives.
ㆍPlacer l'appareil sur une position plane et stable, pas dans une zone sujette aux vibrations.
ㆍNe pas laisser les enfants manipuler l'appareil sans surveillance.
ㆍNe pas placer d’objets lourds ou coupants sur cet appareil.
ㆍÉviter les vibrations extrêmes, car elles pourraient endommager les composants internes.
ㆍVeuillez utiliser le bon type de piles pour la télécommande.
ㆍN'utilisez que les accessoires spécifiés ou fournis par le fabricant (par exemple, l’adaptateur d'alimentation spécial, les supports, etc.).
ㆍVeuillez ne pas démonter l'appareil par vous-même, ne le faire réparer que par le personnel autorisé de la société.
ㆍPlacer l'appareil dans un environnement de 0°C-40°C pour son utilisation.
ㆍVeuillez ne pas utiliser l'oreillette pendant longtemps, un son trop fort de l'oreillette peut provoquer des lésions auditives.
ㆍLa fiche est le dispositif de déconnexion de l'adaptateur.
ㆍComme pour toute source de lumière vive, ne pas regarder directement le faisceau de lumière
ㆍL’adaptateur doit être monté à proximité de l'appareil à l'accès facile.
ㆍProtéger le cordon d'alimentation pour éviter que quelqu'un ne marche dessus ou ne le pince, particulièrement au niveau des fiches,
des prises de branchement et du point de sortie de l'appareil.
ㆍDébrancher l'appareil en cas d'orage ou lorsqu'il n'est pas utilisé pendant une longue période.
ㆍEn cas d’utilisation d’une fiche d'alimentation ou d’un coupleur d'appareils comme dispositif de déconnexion, ce dispositif doit rester
facilement accessible.
ㆍAvant de réaliser une connexion ou d'en modifier une, s'assurer que tous les appareils sont débranchés de la prise d'alimentation.
ㆍNe jamais toucher le cordon d'alimentation ou le connecteur d'alimentation avec les mains mouillées.
Précautions importantes
42

We declare that this device is in compliance with the essential requirements and other relevant provisions of Directive 2014/53/EU.
Satisfies all the technical regulations applicable to the product within the scope of UK Radio Equipment Regulations (SI 2017/1206);
UK Electrical Equipment (Safety) Regulations (SI 2016/1101); and UK Electromagnetic Compatibility Regulations (SI 2016/1091).
This device operating frequency:2402-2480MHz(EIRP<20dBm),2412-2472MHz(EIRP<20dBm),5150~5250MHz(EIRP<23dBm),
5250~5350MHz(EIRP<20dBm),5470~5725MHz(EIRP<27dBm),5725~5850MHz(EIRP<13.98dBm).
FCC STATEMENT
This equipment has been tested and found to comply with the limits for a Class B digital device, pursuant to Part 15 of the FCC Rules.
These limits are designed to provide reasonable protection against harmful interference in a residential installation. This equipment
generates uses and can radiate radio frequency energy and, if not installed and used in accordance with the instructions, may cause
harmful interference to radio communications. However, there is no guarantee that interference will not occur in a particular installation.
If this equipment does cause harmful interference to radio or television reception, which can be determined by turning the equipment
off and on, the user is encouraged to try to correct the interference by one or more of the following measures:
-- Reorient or relocate the receiving antenna.
-- Increase the separation between the equipment and receiver.
-- Connect the equipment to an outlet on a circuit different from that to which the receiver is connected.
-- Consult the dealer or an experienced radio/TV technician for help.
Changes or modifications not expressly approved by the party responsible for compliance could void the user's authority to operate the
equipment.
43

IC STATEMENT
CAN ICES-3 (B)/NMB-3 (B)
This Class B digital apparatus complies with Canadian ICES-003.
Cet appareil numérique de classe B est conforme à la norme canadienne ICES-003.
This device contains licence-exempt transmitter(s)/receiver(s) that comply with Innovation, Science and Economic Development Canada’s
licence-exempt RSS(s). Operation is subject to the following two conditions:
(1) This device may not cause interference.
(2) This device must accept any interference, including interference that may cause.
undesired operation of the device
L’émetteur/récepteur exempt de licence contenu dans le présent appareil est conforme aux CNR d’Innovation, Sciences et Développement
économique Canada applicables aux appareils radio exempts de licence. L’exploitation est autorisée aux deux conditions suivantes :
1.L’appareil ne doit pas produire de brouillage;
2.L’appareil doit accepter tout brouillage radioélectrique subi, même si le brouillage est susceptible d’en compromettre le fonctionnement.
For projectors only
The distance between user and products should be no less than 20cm.
La distance entre l'utilisateur et le produit ne doit pas être inférieure à 20 cm.
5.2 GHz band is restricted to indoor use only.
La bande de 5.2 GHz est réservée à l'usage intérieur.
Manufactured under license from Dolby Laboratories. Dolby, Dolby Audio,and the double-D symbol are trademarks of Dolby Laboratories
Licensing Corporation.
44

Lingua Indice
Gentile cliente ·········································································46
Descrizione della dimensione del proiettore ··························47
Contenuto dell’imballo·····························································48
Proiettore ·················································································49
Telecomando···········································································50
Associazione del telecomando ···············································51
Impostazioni della rete ····························································52
Impostazione focale ································································52
La correzione trapezoidale ·····················································53
Ingressi ···················································································53
Modalità di cassa Bluetooth····················································54
Specchiatura sullo schermo····················································54
Risoluzione del problema························································55
Precauzioni importanti ····························································57
Dichiarazione···········································································58
English ···············································································
Deutsch ·············································································
Français ············································································
Italiano ·············································································
Español ··············································································
日本語 ················································································
01-14
15-29
30-44
45-59
60-74
75-89

Si prega di leggere con attenzione questo manuale di istruzioni:
Grazie molto per acquistare e utilizzare il nostro prodotto.
Per la Sua sicurezza e il Suo comfort, si prega di leggere attentamente le istruzioni del prodotto prima di utilizzarlo.
Dichiarazione sulle istruzioni del prodotto:
I marchi e i nomi citati in questo manuale appartengono ai rispettivi titolari dei diritti.
In caso di discrepanza tra il contenuto del manuale e il prodotto reale, prevale il prodotto reale.
Se non si seguono le istruzioni o le precauzioni del prodotto e ciò provoca lesioni personali, danni alla proprietà o altre perdite,
non ci assume alcuna responsabilità.
Gentile cliente
* La nostra azienda riserva il diritto di spiegare e modificare il manuale.
46
Descrizione della dimensione del proiettore
* La migliore dimensione di proiezione consigliata è di 100 pollici.
Formato
Dimensione dell’immagine:
(Larghezza*altezza:cm)
3.15m
2.65m
2.2m
1.67m
120 pollici
60 pollici
80 pollici
100 pollici
177*100
221*124
265*149
80 pollici
133*7560 pollici
100 pollici
120 pollici
47
Adattatore d’alimentazione
Cavo d’alimentazione AC
Proiettore
Manuale d’istruzione dell’uso
Telecomando
Contenuto dell’imballo
Verificare che tutti gli articoli sono contenuti prima di utilizzare il dispositivo.
48

Proiettore
Panoramica e interfaccia.
Vista posteriore
DC IN
Foto di ventilazione
(non intasare)
Tasto
d’alimentazione
Line out Staffa regolabile Presa della
staffa PTZ
USB2.0
HDMI
LAN
Vista frontale
Vista dal bassoVista d’uccello a volo
TOF
49
Telecomando
ㆍAprire il coperchio del vano batterie del telecomando.
ㆍInstallare due batterie AAA. *
ㆍChiudere il coperchio del vano batterie.
* Si prega di installare le batterie nella corretta polarità.
Tasto d’alimentazione
Accendere/ spegnere il proiettore.
Muto
Taglia il suono temporalmente.
Tasto di ritorno
Ritornare alla pagina precedente.
Tasto di conferma
Premere per scelta od immissione.
Sospendere o continuare la riproduzione.
Tasto Home
aprire la pagina Home.
Tasto di menù
Accedere a più opzioni d’impostazione
durante la riproduzione.
Tasto di scorciatoia di focalizzazione
Pressione breve: spuntare il diagramma di focalizzazione manuale.
Pressione lunga: auto-focalizzazione.
App Pulsante
Connettiti allo streaming video.
Tasto di navigazione
Più/meno volume
Vano batterie
50

ㆍMettere il telecomando entro 10 cm dal dispositivo.
ㆍAl primo uso, seguire la guida dell'accensione: nel frattempo, tenere premuti il tasto di menù volume ed il testo destro della navigazione
fino al lampeggio dell’indicatore.
ㆍIl telecomando accede alla modalità d’associazione.
ㆍLa connessione è riuscita quando l’indicatore si smette di lampeggiare.
Associazione del telecomando
10 cm
Spia luminosa
Premere per l’accoppiamento *
* In caso di associazione fallita, rifare i passi soprastanti
dopo che l’indicatore si smetta di lampeggiare.
51

Impostazione focale
ㆍSeguire [Impostazioni] -- [Messa a fuoco].
ㆍScegliere [Automatica], l’immagine sarà più nitida.
ㆍScegliere [Manuale], regolare premendo sui tasti superiore,
inferiore di navigazione dal telecomando fino all’immagine nitida.
Impostazioni della rete
ㆍSeguire [Impostazioni] -- [Rete].
ㆍScegliere la rete via cavo o WiFi.
Messa a fuoco manuale
52

La correzione trapezoidale
ㆍSeguire [Impostazioni] -- [Chiave di volta].
ㆍScegliere [Automatica], il modo correggerà in automatico
l’immagine.
ㆍScegliere [Manuale] per regolare le posizioni dei quattro
punti e la grandezza dell’immagine.
Ingressi
ㆍSeguire [Ingressi] -- HDMI/HOME/USB.
ㆍVisionare diverse fonti di segnale.
Manuale chiave di volta
53
Modalità di cassa Bluetooth Specchiatura sullo schermo
ㆍE’ possibile proiettare mediante WiFI la schermata dello
smartphone od il tablet allo schermo.
ㆍSi prega di aprire l’applicativo della proiezione per capire più
metodi operativi.
Aprire l’applicativo dell’audio Bluetooth. Dopo la connessione BT
dello smartphone od il tablet al proiettore[Emotn_PRJ], l’ultimo
riproducerà la musica dal primo.
AirPods Not Connected
Not Connected
Emotn_PRJ Connected
HomePod mini
Bluetooth
54

Risoluzione del problema
1. Nessuna uscita audio
a. Confermare di non aver premuto il tasto muto sul telecomando.
b. Controllare il proiettore per le porte "LINE OUT, “HDMI ARC” od il Bluetooth per la connessione al dispositivo audio esterno.
2. Nessuna uscita grafica
a. Premere sul tasto d’alimentazione della copertura sul proiettore. In caso d’accensione, l’indicatore del tasto si spegnerà.
b. Assicurare l’uscita elettrica dall’adattatore.
3. Nessuna rete
a. Accedere all’impostazione, confermare lo stato di connessione di rete nell’opzione della rete.
b. Verificare il LAN della proiezione inserita del cavo di rete.
c. Controllare la configurazione del router.
4. Immagine sfocata
a. Regolare la messa a fuoco o la correzione trapezoidale.
b. Distanza di proiezione fuori la gamma.
c. Lente del proiettore sporca.
5. Immagine non rettangolare
a. Posizionare il proiettore in perpendicolare rispetto al muro od usare la funzione di chiave di volta.
b. Regolare l’immagine mediante la funzione di correzione trapezoidale.
55

6. Chiave di volta automatica fallita
a. Assicurare che TOP non è offuscato o sporcato.
b. La distanza ottimale per la correzione automatica trapezoidale è di 1,5-2,5 m, dal disilvello 20° tra sx e dx.
7. Messa a fuoco automatica fallita
a. Assicurare che TOP non è offuscato o sporcato.
b. La distanza ottimale per la fuoco automatica è di 1,5-2,5 m, dal dislivello di 20° tra sx e dx.
8. Telecomando non reagisce
a. Verificare che l'accoppiamento Bluetooth del telecomando sia riuscito. Quando l'accoppiamento è riuscito, l'indicatore del telecomando
smette di lampeggiare quando si preme il pulsante.
b. Se l'accoppiamento non riesce, il telecomando esegue la comunicazione a infrarossi. L'indicatore del telecomando lampeggia alla
pressione del tasto.
c. Assicurare l'assenza dell’interferenza, dell’ostacolo tra il proiettore ed il telecomando.
d. Verificare il telecomando per la carica e la polarità d’installazione.
9. Connettere il dispositivo Bluetooth
Accedere all’impostazione, aprire l’opzione Bluetooth e controllare la lista di dispositivi BT, connettere il dispositivo.
10. Altri
Non esitare a contattarci in qualsiasi momento.
suppor[email protected]
56

ㆍNon guardare direttamente con gli occhi il raggio di proiezione, poiché il raggio forte potrebbe danneggiarli.
ㆍNon ostruire né coprire i fori di dissipazione del calore del dispositivo per non pregiudicare la dissipazione del calore delle parti interne,
danneggiando il dispositivo.
ㆍTenerlo lontano da umidità, esposizione al sole, alta temperatura, bassa pressione e ambiente magnetico.
ㆍNon posizionare il dispositivo in un luogo che potrebbe essere esposto a polvere e sporcizie eccessive.
ㆍPosizionare il dispositivo in un luogo piatto e stabile, non collocarlo in un luogo soggetto a vibrazioni.
ㆍNon consentire a bambini di maneggiare il dispositivo senza supervisione.
ㆍNon collocare oggetti pesanti o appuntiti sul dispositivo.
ㆍEvitare vibrazioni estreme poiché potrebbero danneggiare le componenti interne.
ㆍUtilizzare batterie del tipo corretto per il telecomando.
ㆍUtilizzare solo gli allegati/accessori specificati o forniti dal produttore.(come adattatore, staffa, ecc.)
ㆍNon smontare il dispositivo senza autorizzazione, farlo riparare solo da personale autorizzato dell'azienda.
ㆍPosizionare e utilizzare il dispositivo in un ambiente di temperature tra 0 °C e 40 °C.
ㆍNon utilizzare gli auricolari per lungo tempo, il suono eccessivo degli auricolari potrebbe danneggiare l'udito.
ㆍLa spina è il dispositivo di disconnessione dell'adattatore.
ㆍCome con qualsiasi fonte di luce intense, non fissare il raggio in modo diretto.
ㆍL’adattatore viene installare nei pressi del dispositivo ed accessibile.
ㆍEvitare che il cavo di alimentazione venga calpestato o schiacciato, soprattutto in prossimità di spine, prese di derivazione e i fori da cui
tali spine o prese fuoriescono dal dispositivo.
ㆍScollegare questo dispositivo in caso di temporali o se rimane inutilizzato per un lungo periodo di tempo.
ㆍNel caso in cui la spina di alimentazione o un accoppiatore vengano utilizzati per scollegare il dispositivo, questo resta prontamente
azionabile.
ㆍPrima di effettuare o modificare i collegamenti, assicurarsi che tutti i dispositivi siano scollegati dalla presa di corrente.
ㆍNon toccare mai il cavo di alimentazione o il connettore di alimentazione con le mani bagnate.
Precauzioni importanti
57

We declare that this device is in compliance with the essential requirements and other relevant provisions of Directive 2014/53/EU.
Satisfies all the technical regulations applicable to the product within the scope of UK Radio Equipment Regulations (SI 2017/1206);
UK Electrical Equipment (Safety) Regulations (SI 2016/1101); and UK Electromagnetic Compatibility Regulations (SI 2016/1091).
This device operating frequency:2402-2480MHz(EIRP<20dBm),2412-2472MHz(EIRP<20dBm),5150~5250MHz(EIRP<23dBm),
5250~5350MHz(EIRP<20dBm),5470~5725MHz(EIRP<27dBm),5725~5850MHz(EIRP<13.98dBm).
FCC STATEMENT
This equipment has been tested and found to comply with the limits for a Class B digital device, pursuant to Part 15 of the FCC Rules.
These limits are designed to provide reasonable protection against harmful interference in a residential installation. This equipment
generates uses and can radiate radio frequency energy and, if not installed and used in accordance with the instructions, may cause
harmful interference to radio communications. However, there is no guarantee that interference will not occur in a particular installation.
If this equipment does cause harmful interference to radio or television reception, which can be determined by turning the equipment
off and on, the user is encouraged to try to correct the interference by one or more of the following measures:
-- Reorient or relocate the receiving antenna.
-- Increase the separation between the equipment and receiver.
-- Connect the equipment to an outlet on a circuit different from that to which the receiver is connected.
-- Consult the dealer or an experienced radio/TV technician for help.
Changes or modifications not expressly approved by the party responsible for compliance could void the user's authority to operate the
equipment.
58

IC STATEMENT
CAN ICES-3 (B)/NMB-3 (B)
This Class B digital apparatus complies with Canadian ICES-003.
Cet appareil numérique de classe B est conforme à la norme canadienne ICES-003.
This device contains licence-exempt transmitter(s)/receiver(s) that comply with Innovation, Science and Economic Development Canada’s
licence-exempt RSS(s). Operation is subject to the following two conditions:
(1) This device may not cause interference.
(2) This device must accept any interference, including interference that may cause.
undesired operation of the device
L’émetteur/récepteur exempt de licence contenu dans le présent appareil est conforme aux CNR d’Innovation, Sciences et Développement
économique Canada applicables aux appareils radio exempts de licence. L’exploitation est autorisée aux deux conditions suivantes :
1.L’appareil ne doit pas produire de brouillage;
2.L’appareil doit accepter tout brouillage radioélectrique subi, même si le brouillage est susceptible d’en compromettre le fonctionnement.
For projectors only
The distance between user and products should be no less than 20cm.
La distance entre l'utilisateur et le produit ne doit pas être inférieure à 20 cm.
5.2 GHz band is restricted to indoor use only.
La bande de 5.2 GHz est réservée à l'usage intérieur.
Manufactured under license from Dolby Laboratories. Dolby, Dolby Audio,and the double-D symbol are trademarks of Dolby Laboratories
Licensing Corporation.
59

Idioma Índice
Estimados clientes ··································································61
Descripción del tamaño de proyección··································62
Lista de empaque ···································································63
Proyector ·················································································64
Control remoto·········································································65
Emparejamiento por control remoto········································66
Configuración de red ······························································67
Configuración de enfoque·······················································67
La corrección trapezoidal(KETSTONE)··································· 68
Entradas ··················································································68
Modo de altavoz Bluetooth······················································69
Espejo de pantalla···································································69
Solución de problemas ···························································70
Precauciones importantes ······················································72
Declaración ·············································································73
English ···············································································
Deutsch ·············································································
Français ············································································
Italiano ··············································································
Español ·············································································
日本語 ················································································
01-14
15-29
30-44
45-59
60-74
75-89

Lea atentamente el Manual del Producto:
Gracias por comprar y utilizar los productos.
Por su seguridad e intereses, debe leer atentamente el Manual del Producto antes de usar este producto.
Sobre las instrucciones del producto:
Las marcas comerciales y los nombres mencionados en este Manual pertenecen a sus respectivos titulares.
En caso de disconformidad entre el contenido del Manual y el producto real, prevalecerá el producto real.
Si no sigue las instrucciones o precauciones del producto y causa lesiones personales, daños materiales u otras pérdidas,
no asumimos ninguna responsabilidad.
Estimados clientes
* Nos reservamos el derecho a interpretar y modificar las instrucciones.
61

Descripción del tamaño de proyección
* Se recomienda que el tamaño de proyección sea preferiblemente de 100 pulgadas.
Tamaño
Pantalla
(largo*ancho:cm)
3.15m
2.65m
2.2m
1.67m
120 pulgadas
60 pulgadas
80 pulgadas
100 pulgadas
177*100
221*124
265*149
80 pulgadas
133*7560 pulgadas
100 pulgadas
120 pulgadas
62

Adaptador de corriente
Cable de alimentación
Proyector
Manual de usuario
Control remoto
Lista de empaque
Antes de usar este producto, verifique que todos los artículos estén en la caja.
63

Proyector
Descripción general y de la interfaz.
Vista trasera
DC IN
orificios de ventilación
(no bloquear)
Botón
de encendido
Line out Soporte de apoyo ajustable Toma de
soporte PTZ
USB2.0
HDMI
LAN
Vista frontal
Vista inferiorVista superior
TOF
64

Control remoto
ㆍAbra la tapa del soporte de la batería del control remoto.
ㆍInstale 2 pilas AAA. *
ㆍPoner de nuevo la cubierta.
* Inserte pilas nuevas según la indicación de polaridad.
Potencia
Encienda / apague el proyector.
Mudo
Corta la temporalidad del sonido.
Regresar
Volver a la página anterior.
OK
Pulse para confirmar una selección o entrada.
Pausar / reanudar la reproducción.
Inicio
Acceda a la página de inicio.
Menú
Acceda a más opciones de
configuración durante el juego.
Atajo de enfoque
Presione: icono de enfoque manual emergente.
Mantenga presionado: enfoque automático.
Botones de aplicación
Conéctese a la transmisión de video.
Navegación
Bajar volumen/Subir volumen
Compartimento de la batería
65

ㆍPonga el control remoto a menos de 10 cm del proyector.
ㆍSi se utiliza por primera vez, siga las instrucciones del proyector en pantalla: Mantenga pulsado "Bajar volumen" y "Derecha"
simultáneamente hasta que la luz indicadora empiece a parpadear.
ㆍEsto significa que el control remoto entra en el modo de emparejamiento.
ㆍCuando la luz indicadora deja de parpadear, significa que la conexión se ha
realizado correctamente.
Emparejamiento por control remoto
10 cm
Luz indicadora
Mantenga presionado para emparejar *
* Si el emparejamiento no tiene éxito, repita los pasos anteriores
después del.
La luz indicadora del control remoto deja de parpadear.
66
Configuración de enfoque
ㆍEnter [Ajustes] -- [Enfoque].
ㆍSeleccione [Auto], la pantalla se borrará automáticamente.
ㆍSeleccione [Manual], presione el botón arriba / abajo del
control remoto De la tecla de navegación para ajustar el
enfoque según la pantalla mostrada.Cuando la pantalla
esté despejada, detenga la operación.
Configuración de red
ㆍEnter [Ajustes] -- [La red].
ㆍSeleccione la red de cable o Wi-Fi.
Enfoque manual
67
La corrección trapezoidal(KETSTONE)
ㆍEntrar en [Ajustes] -- [Piedra clave].
ㆍSi selecciona [Auto], la pantalla se corregirá automáticamente.
ㆍSeleccione [Manual], para ajustar los cuatro puntos y el tamaño
del marco.
Entradas
ㆍEntrar [Entradas] -- HDMI/HOME/USB.
ㆍObserve el contenido de las diferentes fuentes singulares.
Manual Piedra clave
68

Modo de altavoz Bluetooth Espejo de pantalla
ㆍPuede proyectar de forma inalámbrica la pantalla de su teléfono
inteligente o tableta sobre la superficie de proyección.
ㆍAbra la aplicación Screencast / Homeshare para obtener más
información sobre el método de operación.
Abra la APLICACIÓN del altavoz Bluetooth y use el teléfono
inteligente o la tableta para conectar el proyector[Emotn_PRJ]
por bluetooth, reproducirá el contenido de la música del teléfono
inteligente o la tableta.
AirPods Not Connected
Not Connected
Emotn_PRJ Connected
HomePod mini
Bluetooth
69

Solución de problemas
1. No hay sonido
a. Asegúrese de no presionar el botón "Silencio" del control remoto.
b. Asegúrese de que la interfaz del proyector "LINE OUT", "HDMI ARC" o Bluetooth no se conecta al dispositivo de audio externo.
2. No hay imagen
a. Presione el botón de encendido en la cubierta superior. Si se enciende, la luz indicadora del botón se apagará.
b. Asegúrese de que el adaptador de corriente tenga salida de potencia.
3. Sin red
a. Ingrese la configuración, verifique el estado de la conexión de red en la opción de Wifi.
b. Asegúrese de que el cable de red inserte normalmente la interfaz del proyector "LAN".
c. Asegúrese de que el router está configurado correctamente.
4. Imagen borrosa
a. Ajuste el anillo de enfoque o la corrección trapezoidal(Keystone).
b. El proyector y la pantalla deben estar a la distancia efectiva.
c. Lo lente del proyector no está limpia.
5. Imagen no rectangular
a. Coloque el proyector perpendicular a la pantalla / pared, si no puede utilizar la corrección trapezoidal(Keystone).
b. Utilice la corrección trapezoidal(Keystone) para ajustar la pantalla.
70

6. Error en corrección trapezoidal automática
a. Asegúrese de que el TOF en el panel frontal no esté bloqueado o sucio.
b. La mejor distancia de corrección automática de trapezoidal entre 1,5-2,5m, horizontal ± 20°.
7. Falló el enfoque automático
a. Asegúrese de que el TOF en el panel frontal no esté bloqueado o sucio.
b. La mejor distancia de enfoque automático es 1,3-2,5m, con un ángulo de± 20°.
8. El control remoto no responde
a. Asegúrese de que el control remoto esté emparejado correctamente a través de la comunicación Bluetooth. Si el emparejamiento se
realiza correctamente, la luz indicadora no parpadea cuando se presiona el botón.
b. Si el emparejamiento no se realiza correctamente, el control remoto en la comunicación por infrarrojos, la luz indicadora parpadea
cuando se presiona el botón.
c. Asegúrese de que no haya interferencias u obstrucciones entre el proyector y el control remoto.
d. Confirme la carga de la batería y la polaridad de instalación./ control remoto.
9. Conectar un dispositivo bluetooth
Entra en configuración, abra la opción Bluetooth para verificar la lista de dispositivos Bluetooth y conecte el dispositivo.
10. Otro
No dude en ponerse en contacto con nosotros.
suppor[email protected]
71

ㆍNo mire directamente al haz de proyección con los ojos, ya que el haz fuerte puede dañar sus ojos.
ㆍNo bloquee ni cubra los orificios de disipación de calor del dispositivo para no afectar la disipación de calor de las partes internas,
dañando así el dispositivo.
ㆍManténgalo alejado de la humedad, la exposición, la temperatura alta, la presión baja y el entorno magnético.
ㆍNo coloque el dispositivo en áreas susceptibles a un exceso de polvo y suciedad.
ㆍColoque el dispositivo en un lugar plano y estable, no lo coloque en un lugar propenso a vibraciones.
ㆍNo permita que los niños manipulen el dispositivo sin supervisión.
ㆍNo coloque nunca objetos pesados o afilados sobre el dispositivo.
ㆍEvite vibraciones extremas, ya que podrían dañar los componentes internos.
ㆍUtilice baterías con el tipo correcto para el control remoto.
ㆍUtilice únicamente los complementos / accesorios especificados o proporcionados por el fabricante (tales como el adaptador de
suministro exclusivo, el soporte, etc.).
ㆍNo desmonte el dispositivo sin permiso, el dispositivo solo puede ser reparado por personal autorizado por la empresa.
ㆍColoque y utilice el dispositivo en un entorno de 0 °C a 40 °C.
ㆍNo utilice los auriculares durante mucho tiempo, el sonido excesivo de los auriculares puede dañar su audición.
ㆍEl enchufe es el dispositivo de desconexión para el adaptador.
ㆍAl igual que con cualquier fuente brillante, no mire fijamente al haz directo
ㆍEl adaptador se instalará cerca del equipo y será de fácil acceso.
ㆍEvite pisar o doblar el cable de alimentación y preste especial atención a los enchufes, ladrones y puntos de salida del dispositivo.
ㆍDesconecte el dispositivo si hay las tormentas eléctricas o cuando no lo vaya a utilizar durante un periodo de tiempo prolongado.
ㆍCuando se utiliza un conector de alimentación o un adaptador como dispositivos de desconexión, el dispositivo de desconexión debe
estar operativo.
ㆍAntes de realizar o cambiar cualquier conexión, asegúrese de que todos los dispositivos estén desconectados de la toma de corriente.
ㆍNo toque nunca el cable de alimentación ni el conector de alimentación con las manos húmedas.
Precauciones importantes
72

We declare that this device is in compliance with the essential requirements and other relevant provisions of Directive 2014/53/EU.
Satisfies all the technical regulations applicable to the product within the scope of UK Radio Equipment Regulations (SI 2017/1206);
UK Electrical Equipment (Safety) Regulations (SI 2016/1101); and UK Electromagnetic Compatibility Regulations (SI 2016/1091).
This device operating frequency:2402-2480MHz(EIRP<20dBm),2412-2472MHz(EIRP<20dBm),5150~5250MHz(EIRP<23dBm),
5250~5350MHz(EIRP<20dBm),5470~5725MHz(EIRP<27dBm),5725~5850MHz(EIRP<13.98dBm).
FCC STATEMENT
This equipment has been tested and found to comply with the limits for a Class B digital device, pursuant to Part 15 of the FCC Rules.
These limits are designed to provide reasonable protection against harmful interference in a residential installation. This equipment
generates uses and can radiate radio frequency energy and, if not installed and used in accordance with the instructions, may cause
harmful interference to radio communications. However, there is no guarantee that interference will not occur in a particular installation.
If this equipment does cause harmful interference to radio or television reception, which can be determined by turning the equipment
off and on, the user is encouraged to try to correct the interference by one or more of the following measures:
-- Reorient or relocate the receiving antenna.
-- Increase the separation between the equipment and receiver.
-- Connect the equipment to an outlet on a circuit different from that to which the receiver is connected.
-- Consult the dealer or an experienced radio/TV technician for help.
Changes or modifications not expressly approved by the party responsible for compliance could void the user's authority to operate the
equipment.
73

IC STATEMENT
CAN ICES-3 (B)/NMB-3 (B)
This Class B digital apparatus complies with Canadian ICES-003.
Cet appareil numérique de classe B est conforme à la norme canadienne ICES-003.
This device contains licence-exempt transmitter(s)/receiver(s) that comply with Innovation, Science and Economic Development Canada’s
licence-exempt RSS(s). Operation is subject to the following two conditions:
(1) This device may not cause interference.
(2) This device must accept any interference, including interference that may cause.
undesired operation of the device
L’émetteur/récepteur exempt de licence contenu dans le présent appareil est conforme aux CNR d’Innovation, Sciences et Développement
économique Canada applicables aux appareils radio exempts de licence. L’exploitation est autorisée aux deux conditions suivantes :
1.L’appareil ne doit pas produire de brouillage;
2.L’appareil doit accepter tout brouillage radioélectrique subi, même si le brouillage est susceptible d’en compromettre le fonctionnement.
For projectors only
The distance between user and products should be no less than 20cm.
La distance entre l'utilisateur et le produit ne doit pas être inférieure à 20 cm.
5.2 GHz band is restricted to indoor use only.
La bande de 5.2 GHz est réservée à l'usage intérieur.
Manufactured under license from Dolby Laboratories. Dolby, Dolby Audio,and the double-D symbol are trademarks of Dolby Laboratories
Licensing Corporation.
74

English ···············································································
Deutsch ·············································································
Français ············································································
Italiano ··············································································
Español ··············································································
日本語 ················································································
01-14
15-29
30-44
45-59
60-74
75-89
言語 目次
お客様各位···············································································
投影サイズの説明······································································
パッケー ジ内 容··········································································
プロ ジェクター ··········································································
リモコン ····················································································
リモコンペ アリング ···································································
通信設定 ··················································································
フォーカス設定 ·········································································
台形補正設定 ···········································································
入力ソース ···············································································
Bluetooth スピーカーモード ·····················································
スクリーンミラーリング ·····························································
故 障 か な ?と 思 っ た ら ································································
重要な注意事項 ·······································································
声明 ·························································································
76
77
78
79
80
81
82
82
83
83
84
84
85
87
88

この度は、本製品をお買い求めいただき、ありがとうございます:
お客様の安全と利益のために、本製品を使用する前に、すべての指示をお読みください。このマニュアルで説明されていない変更または設定は行わ
ないでください。指示に従わなかったことが原因で怪我、データの損失、破損が発生しても、保証の対象になりません。
製品に関する説明:
本取扱説明書に記載されている商標や名称は、それぞれの権利者に帰属します。
取扱説明書の内容と実際の製品とが一致しない場合は、実際の製品が優先されます。
お客様各位
* 弊社は説明書の解釈や修正を行う権利を有します。
お客様が製品の指示や注意事項に従わず、人身事故や物的損害、その他の損失を引き起こした場合、弊社は一切責任を負いかねます。
76

3.15m
2.65m
2.2m
1.67m
120インチ
60インチ
80インチ
100インチ
177*100
221*124
265*149
80インチ
133*7560インチ
100インチ
120インチ
投影サイズの説明
* オススメ投影サイズ:100インチ。
投 影 サイズ
スクリーン
(横幅×縦幅単位:cm)
77

パッケージ内容
製品を使用する前に、付属品がすべて揃っていることを確認ください。
Emotn N1 プロジェクター リモコン
電源アダプタ AC電源ケーブル 取扱説明書
78

DC ジャック Line out
USB2.0ポ ート
HDMI 入力ポート
LAN
TOF
プロ ジェクター
外観・インタフェース概要
換気口(塞がないでください)
電源 ボタン 調整可能ブラケット P T Z ブラ ケットソケット
正面図 背面図 上面図 底面図
79

* 電池のプラスマイナス電極を正しく取り付けてください。
リモコン
・ 電池を交換するには、スライドして電池ケースを開き、プラスとマイナスのマーク (+ / - ) に合わせて新しい電池を挿入し、電池ケースを閉じます。
・ 電池のプラスとマイナス電極を正しく取り付けてください。
電池ケース
確認キー
確認選択を押すまたは入力
再生を一時停止または続行する
フォーカスショートカットキー
短押し:マニュアルフォーカス図をイジェクトする
長 押 し :オ ー ト フ ォ ー カ ス
メニューキー
再生中に、より多くの設定オプションに入る
ミュート
一時的に音を切り取る
ホームキー
ホームを開く
電源キー
ナビゲーションキー
プロジェクター電源のオン/オフ
Appボタン
ビデオストリーミングに接続する
リターンキー
音量プラス/マイナス
前のページに戻る
80
10 cm
インジケーター
押してペ アリングに 入ります *
* ペアリングが成功しなかった場合、LEDの点滅が停止した後、
上記の手順でペアリング登録を再度行なってください。
リモコンペアリング
・ リモコンをプロジェクターから10 cm以内に置きます。
・ 初めて使用する場合は、電源投入ウィザードの説明に従います。音量減少とナビゲーションキーの右ボタンを同時に長押して、LEDが点滅する
まで押します。
・ リ モ コ ン が ペ ア リン グモ ード に 入 りま す。
・ 接続が成功すると、LEDの点滅が停止します。
81

通信設定
・ 「 設 定 」 - 「 通 信 」 へ 。
・ 有線または無線通信を選択します。
フォーカス 設 定
・ 「 設 定 」 - 「 フ ォ ー カ ス 」 へ 。
・ 「自動」を選択すると、自動フォーカスが作動し、焦点が自動で調整
されます。
・ 「手動」を押すと、ナビゲーションキーンを使用して、焦点を手動で
調節することもできます。
手 動フォーカス
82

台形補正設定
・ 「 設 定 」 - 「 キ ー ス ト ー ン 」 へ 。
・ 「自動」を選択すると、画面が自動的に補正されます。
・ 「手動」を選択すると、4つのポイントの位置と画面のサイズを調節
することもできます。
入力ソース
・ 「入力ソース」 へ -- HDMI/HOME/USB。
・ 異なる入力のコンテンツを見る。
手動キーストーン
83

Bluetooth スピーカーモード
プロ ジェクター のブルートゥーススピーカー A P Pを開き、スマートフォ
ンやタブレットで Bluetooth を有効にし、接続デバイスとして
[Emotn_PRJ] を選択します。画面の指示に沿って、Bluetooth 接続を
完了するか、Bluetooth スピーカーモードを終了します。
スクリーンミラーリング
・ スマートフォンやタブレットの画 面を投影スクリーンにワイヤレスで
投影することができます。
・ プロジェクターの投影APPを開いて、より多くの操作方法を参考く
ださい。
AirPods Not Connected
Not Connected
Emotn_PRJ Connected
HomePod mini
Bluetooth
84

故障かな?と思ったら
1、音声が出ない・小さすぎる場合
a、リモコンミュートキーで音量を調整してください。
b、プロジェクター本体の「LINE OUT」/ 「HDMI ARC」、或いはBluetoothにケーブルを接続しているかを確認ください。
2、映像が表示されない場合
a、プロジェクター本体の電源ボタンを押すことを確認ください。電源が入っている場合、インジケーターが消灯します。
b、プロジェクター本体に電源ケーブルが正しく接続することを確認ください。
3、インターネット通信できない場合
a、設定 > [ インターネット接続 ] を選択し、インタネットの接続状態を確認ください。
b、プロジェクター本体の「LAN」ポートにネットワークケーブルを差し込んで接続状態を確認ください。
c、ルーターが正しく設定されているかを確認ください。
4、映像がぼやける、ピントが合わない場合
a、本体のフォーカスリングを回してピントを合わせます。投影角度を小さくして台形補正の調整値を小さくしてください。
b、投影距離の推奨範囲は1.67-3.15mです。
c、プロジェクターレンズが汚れているかを確認ください。或いは、寒い部屋から急に暖かい部屋に持ち込んだり、急激に暖房した時など、レンズの表
面が結露して映像がぼやけることもあります。結露してしまったときは、電源を切ってしばらくそのまま放置ください。
5、映像が歪る場合
a、プロジェクター本体を安定した平らな面に置いて、投影面にまっすぐに向けてください。
b、自動台形補正機能を使用して、投影画像を補正できます。
85

6、プロジェクター本体の動作が不安定になる場合
電源プラグをコンセントから抜いてください。そして約5分間待って再び電源プラグをコンセントに接続ください。
7、電源が入らない場合
a、電源プラグがコンセントから抜けていませんかを確認ください。
b、ランプカバーが正しく取り付けられていませんかを確認ください。
c、内部温度が高くなっていませんかを確認ください。内部温度が異常に高いと保護のため電源は入りません。しばらく待ってから電源を入れてください。
d、電源プラグをコンセントから抜いてください。そして約5分間待って再び電源プラグをコンセントに接続ください。
8、リモコンで操作できない場合
a、リモコンのバッテリー残量を確認ください。リモコンの電池は正確に挿入するかを確認ください。
b、プロジェクターから離れすぎていませんかを確認ください。(推奨距離:約10m)プロジェクター本体とリモコンの間に干渉や障害物がないかを確
認ください。
c、ブルートゥース通信のペアリングが成功するかを確認ください。ペアリング成功した場合、リモコンを押ししても、インジケーターも点滅しません。
ペアリング成功しない場合、リモコンを押すとき、インジケーターが点滅します。
9、ブルートゥースペアリングできない場 合
a、プロジェクター本体のBluetoothの設定を確認してみてください。もしオフになっているのであれば、オンにしてください。
b、プロジェクター本体のBluetooth設定に、Bluetooth機器の一覧が表示されるので、まずは全てのデバイス登録を解除ください。一度ペアリングの
解除を解除した後、ペアリングをやり直してください。
1 0 、そ の 他
お客様のご期待に沿えるよう尽力いたします。ご利用いただく中でご不明な点などございましたら、お気軽にお問い合わせください。
86

重要な注意事項
・ 強い光で目を痛める可能性があるので、投射ビームを直視しないでください。
・ 内部部品の放熱に影響を与え、装置の損傷を生じる原因になるので、装置の放熱孔を塞いだり、覆ったりしないでください。
・ 湿気、直射日光、高温、低圧、および磁気環境を避けてください。
・ ほこりや汚れの多い場所には置かないでください。
・ 平らで安定した場所に設置し、振動のある場所には置かないでください。
・ 本製品を大人による監視なしにお子様だけで使用することがないようにしてください。
・ 本製品や電源コードの上に重い物や尖った物を絶対に置かないでください。
・ 内部の部品を破損するおそれがあるため、激しい振動を避けてください。
・ リモコン電池は正しい種類の製品を使用してください。
・ 製造者が指定または提供する付属品/アクセサリー(専用電源アダプタ、ブラケットなど)しか使用しないでください。
・ 無断な機器分解はしないでください。当社授権スタッフのみに機器の修理を依頼してください。
・ 本製品を0℃~40℃の使用環境に使用してください。
・ イヤホンは長時間使用しないでください。イヤホンからの過度な音は聴力を損なう原因になります。
・ プラグは、アダプターの切断装置となります。
・ 他の明るい光源と同様に、直接見つめないでください
・ アダプタは設備の近くに設置し、容易に接近する必要があります。
・ プラグやコンセント付近や、本製品から電源コードが出る位置では、コードが踏まれたり挟まったりしないように保護してください。
・ 雷雨発生時や長期間使用しない場合は、本製品を電源から取り外してください。
・ 電源プラグまたは電源接続器を電源遮断装置として使用する場合、すぐに遮断操作ができる状態を維持してください。
・ 接続を行う前または変更する前に、すべての機器がコンセントから外されていることを確認してください。
・ 電源ケーブルや電源コネクターに濡れた手で触れないようにしてください。
87

We declare that this device is in compliance with the essential requirements and other relevant provisions of Directive 2014/53/EU.
Satisfies all the technical regulations applicable to the product within the scope of UK Radio Equipment Regulations (SI 2017/1206);
UK Electrical Equipment (Safety) Regulations (SI 2016/1101); and UK Electromagnetic Compatibility Regulations (SI 2016/1091).
This device operating frequency:2402-2480MHz(EIRP<20dBm),2412-2472MHz(EIRP<20dBm),5150~5250MHz(EIRP<23dBm),
5250~5350MHz(EIRP<20dBm),5470~5725MHz(EIRP<27dBm),5725~5850MHz(EIRP<13.98dBm).
FCC STATEMENT
This equipment has been tested and found to comply with the limits for a Class B digital device, pursuant to Part 15 of the FCC Rules.
These limits are designed to provide reasonable protection against harmful interference in a residential installation. This equipment
generates uses and can radiate radio frequency energy and, if not installed and used in accordance with the instructions, may cause
harmful interference to radio communications. However, there is no guarantee that interference will not occur in a particular installation.
If this equipment does cause harmful interference to radio or television reception, which can be determined by turning the equipment
off and on, the user is encouraged to try to correct the interference by one or more of the following measures:
-- Reorient or relocate the receiving antenna.
-- Increase the separation between the equipment and receiver.
-- Connect the equipment to an outlet on a circuit different from that to which the receiver is connected.
-- Consult the dealer or an experienced radio/TV technician for help.
Changes or modifications not expressly approved by the party responsible for compliance could void the user's authority to operate the
equipment.
88
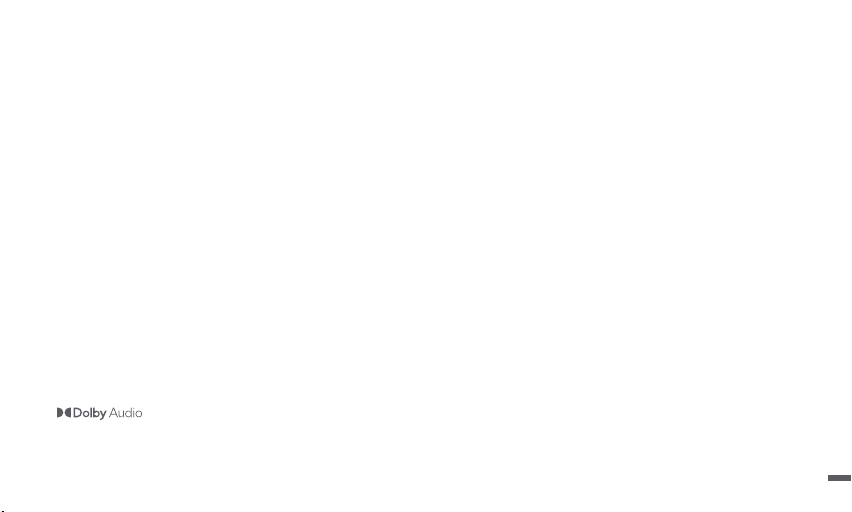
IC STATEMENT
CAN ICES-3 (B)/NMB-3 (B)
This Class B digital apparatus complies with Canadian ICES-003.
Cet appareil numérique de classe B est conforme à la norme canadienne ICES-003.
This device contains licence-exempt transmitter(s)/receiver(s) that comply with Innovation, Science and Economic Development Canada’s
licence-exempt RSS(s). Operation is subject to the following two conditions:
(1) This device may not cause interference.
(2) This device must accept any interference, including interference that may cause.
undesired operation of the device
L’émetteur/récepteur exempt de licence contenu dans le présent appareil est conforme aux CNR d’Innovation, Sciences et Développement
économique Canada applicables aux appareils radio exempts de licence. L’exploitation est autorisée aux deux conditions suivantes :
1.L’appareil ne doit pas produire de brouillage;
2.L’appareil doit accepter tout brouillage radioélectrique subi, même si le brouillage est susceptible d’en compromettre le fonctionnement.
For projectors only
The distance between user and products should be no less than 20cm.
La distance entre l'utilisateur et le produit ne doit pas être inférieure à 20 cm.
5.2 GHz band is restricted to indoor use only.
La bande de 5.2 GHz est réservée à l'usage intérieur.
Manufactured under license from Dolby Laboratories. Dolby, Dolby Audio,and the double-D symbol are trademarks of Dolby Laboratories
Licensing Corporation.
89

Smart Projector
Model:N1
Input:19V 6.32A ,120.08W
USB Output:5V 1A
Manufacturer:Shenzhen Dangs Science and Technology Co.,Ltd.
For FAQs and more information,please visit:
https://www.emotn.com
suppor[email protected]
