
User Manual

English ···············································································
España ··············································································
Français ·············································································
日本語 ················································································
繁體中文 ············································································
01-16
17-30
31-44
45-58
59-72
Language Contents
Dear Customer ········································································02
Projection Size Description ·····················································03
Packing List·············································································04
Projector ··················································································05
Remote Control········································································07
Remote Control Pairing ···························································08
Network Settings ·····································································09
Focus Settings·········································································09
Keystone Correction Settings··················································10
Bluetooth Speaker Mode·························································11
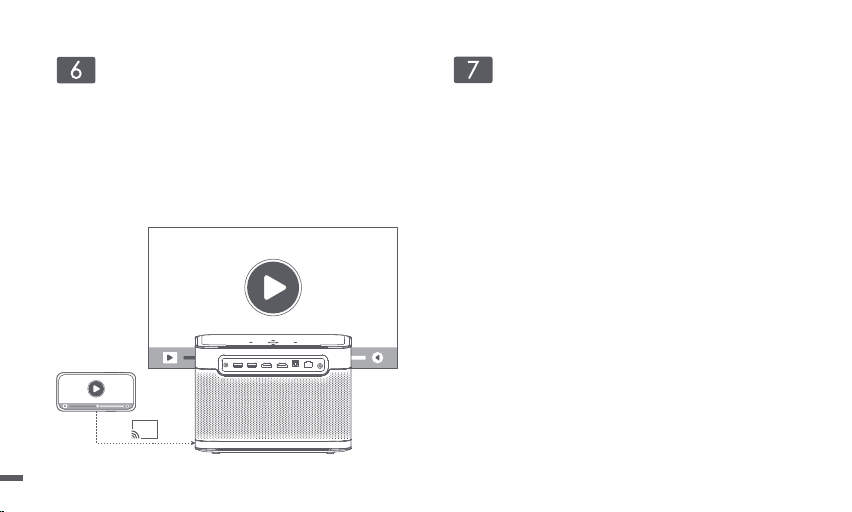
Screen Mirroring······································································12
More Settings ··········································································12
More Functions········································································12
Statement ················································································13
Important Precautions·····························································16

Please read the product instruction carefully:
Thank you for purchasing and using the products of Hangzhou Dangbei Network Technology Co., Ltd. (hereinafter referred to as “Dangbei”).
For your safety and interests, you should read the Product Instruction carefully before using this product.
About the product instruction:
The copyright of the instruction belongs to Dangbei.
Trademarks and names mentioned in the instruction belong to their respective right owners.
In case of inconformity between the content of the instructions and the actual product, the actual product shall prevail.
Dear Customer
* Dangbei reserves the right to interpret and modify the instructions.
If you fail to follow the product instructions or precautions, and cause any personal injury, property or other losses, Dangbei will not be liable.
02

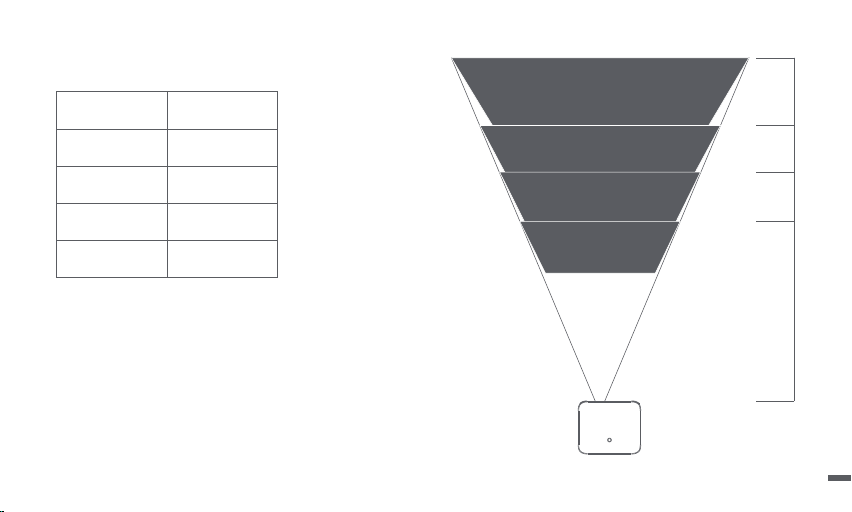
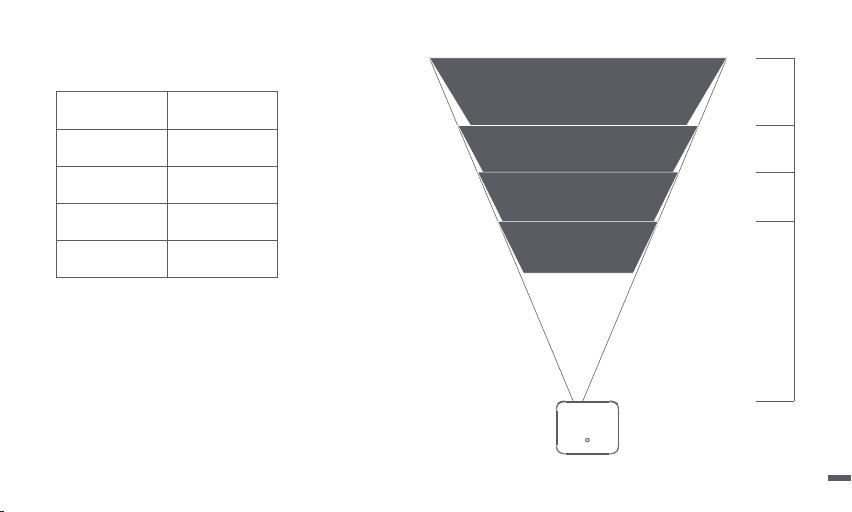
Projection Size Description
* It is recommended that the projection size of 100 inches is the best.
Size
Screen
(Length*Width:cm)
4.2m
3.37m
2.8m
2.2m
150 inches
80 inches
100 inches
120 inches
221*124
265*149
332*187
100 inches
177*10080 inches
120 inches
150 inches
03

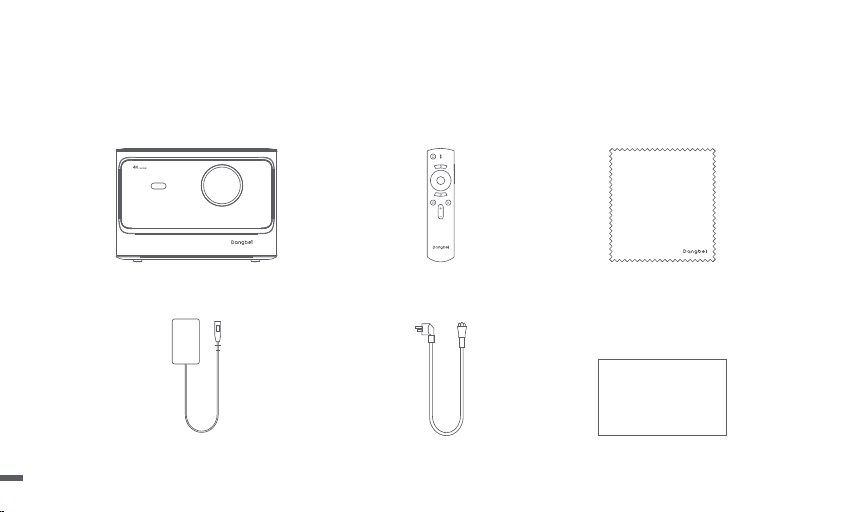
Adapter
AC Cable
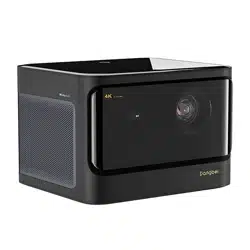
Projector
User Manual
Wipe clothRemote Control
Packing List
Before using the device,please check all things included.
04

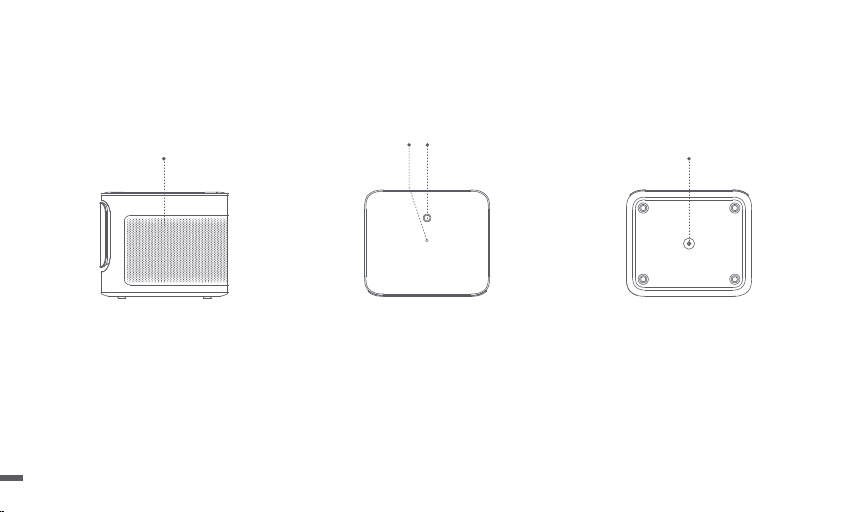
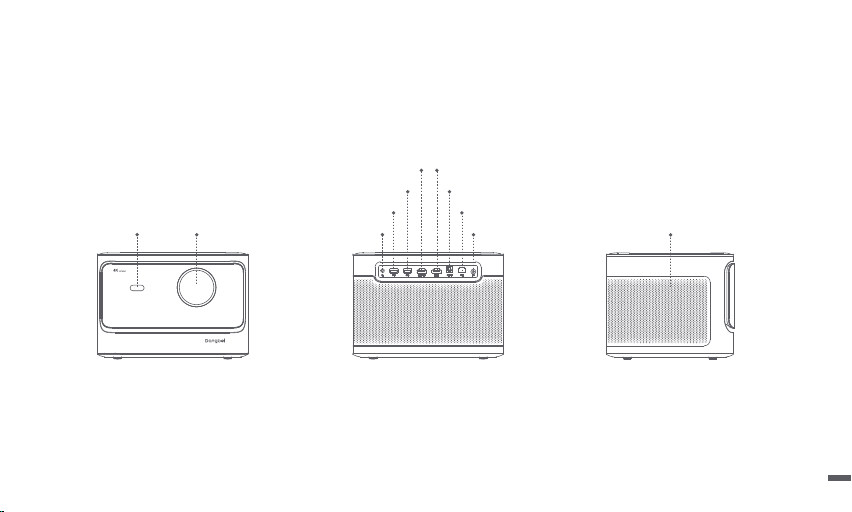
Projector
Overview and interface description.
Rear view
Audio DC IN
USB2.0
USB2.0 S/PDIF
LAN
HDMI (eARC) HDMI
Front view
LensTOF/Camera
Left View
Air Ventilation(Outlet)
do not block.
05
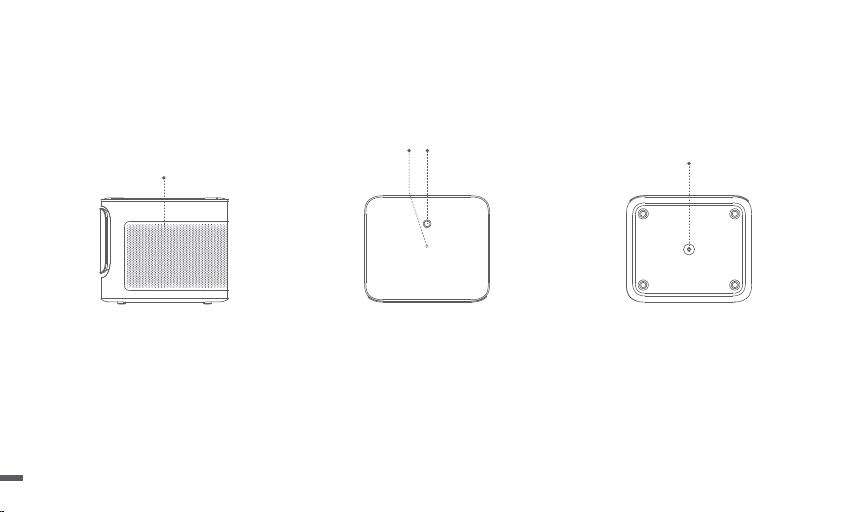
Right View
Air Ventilation(Inlet)
do not block.
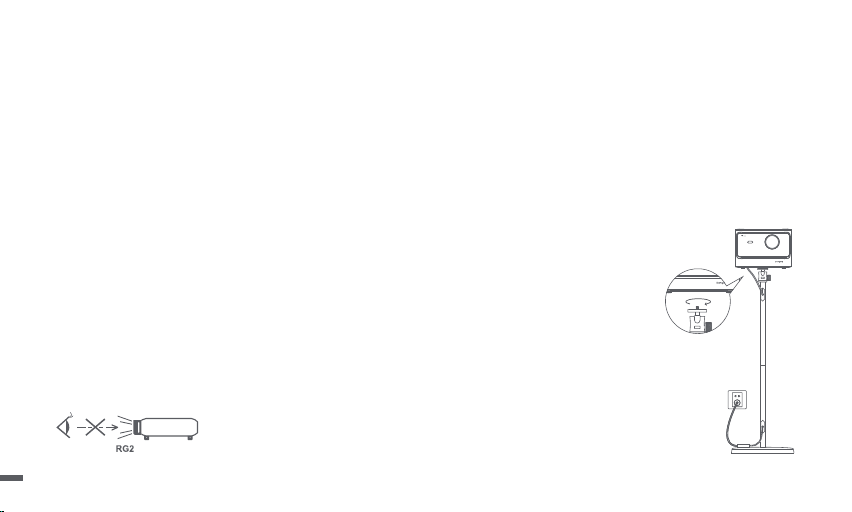
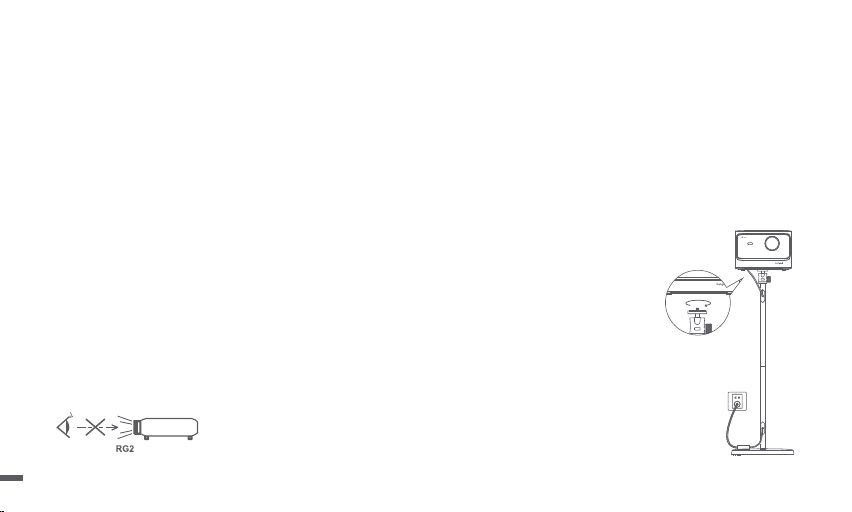
Bottom View
PTZ bracket socket
Top View
Power button(LED)*Light Sensor
(do not cover)
* LED Indication
Standby mode: LED 50% brightness.
Bluetooth mode:LED flashes slowly when it is waiting for pairing,after pairing is successful,the LED will 100% brightness.
06

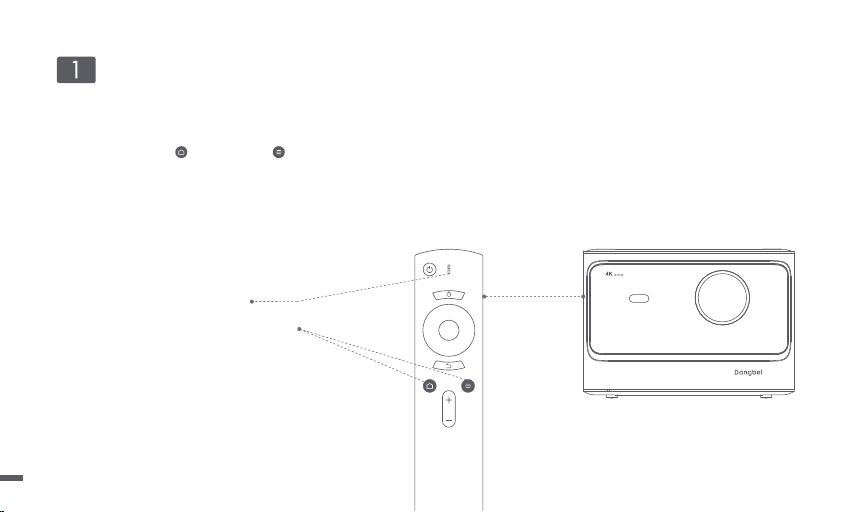
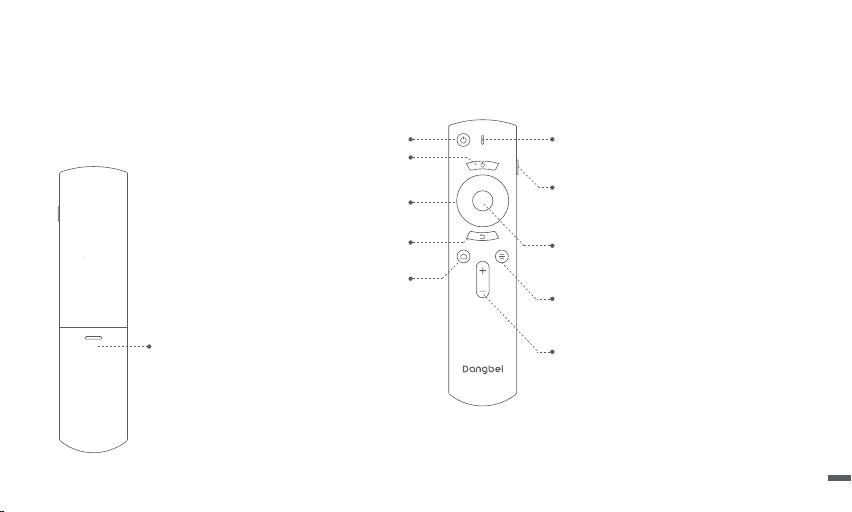
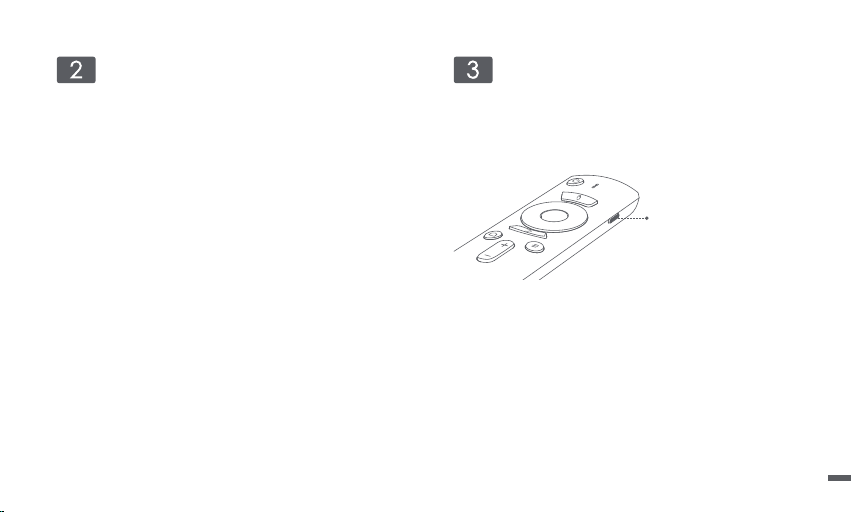
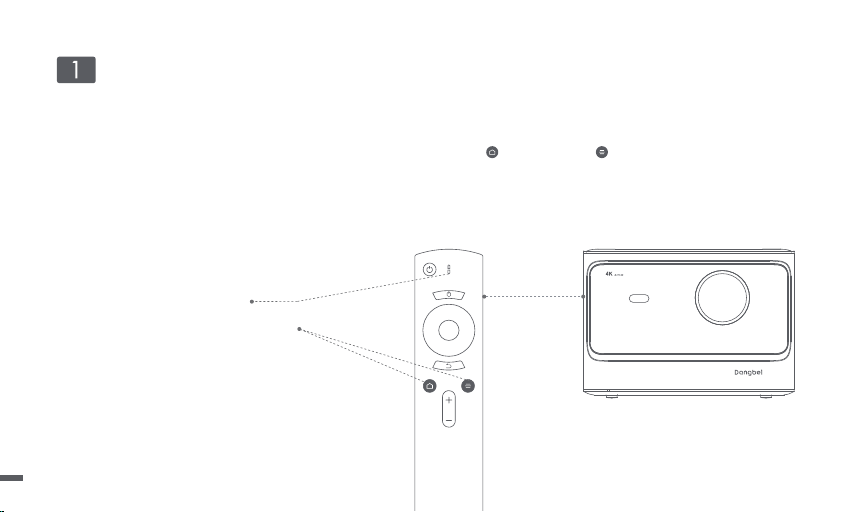
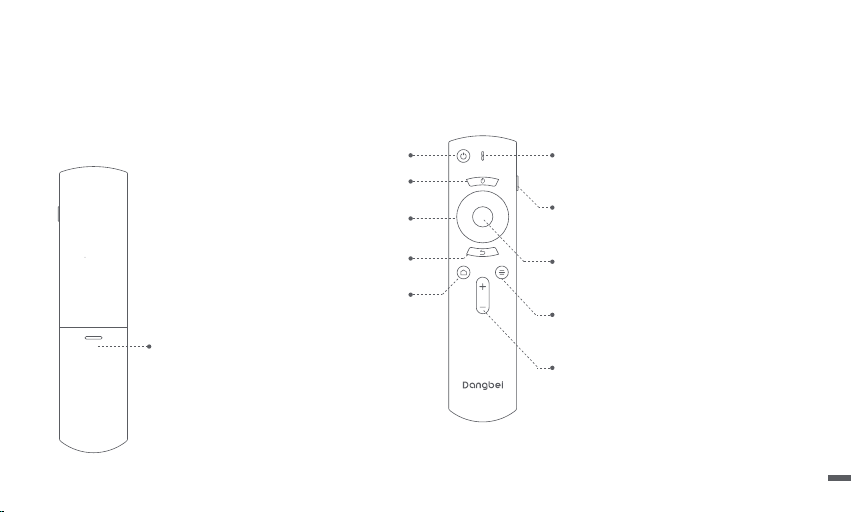
Remote Control
ㆍOpen the battery holder cover of the remote control.
ㆍInstall 2 AAA batteries. *
ㆍPut back the cover.
Battery Holder
Install 2 AAA batteries.
Menu key
Access more options during play
(available options depend upon the source).
Volume key
Volume up/down.
OK key
Press to confirm a selection or entry.
Pause/resume play.
Return key
Return to the previous page.
Navigation keys
Navigate menus or adjust the selected content.
Indicator light
When press key,it will be flashed.
Side key
Long press:automatic focus adjustment.
Short press:pop-up quick setting window.
Home key
Open the home page.
Mouse key
Long press to enter or exit mouse key mode.
Power key
* Please insert new batteries matching the polarity(+/-) as indicated.
07
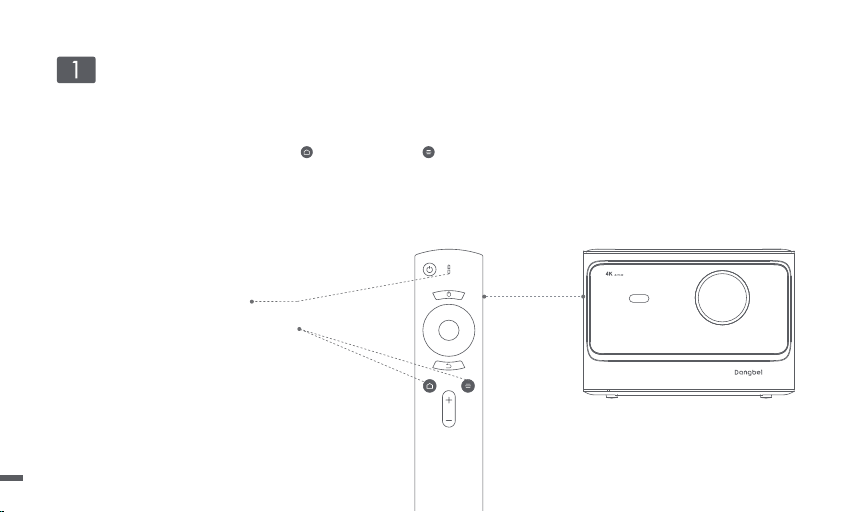
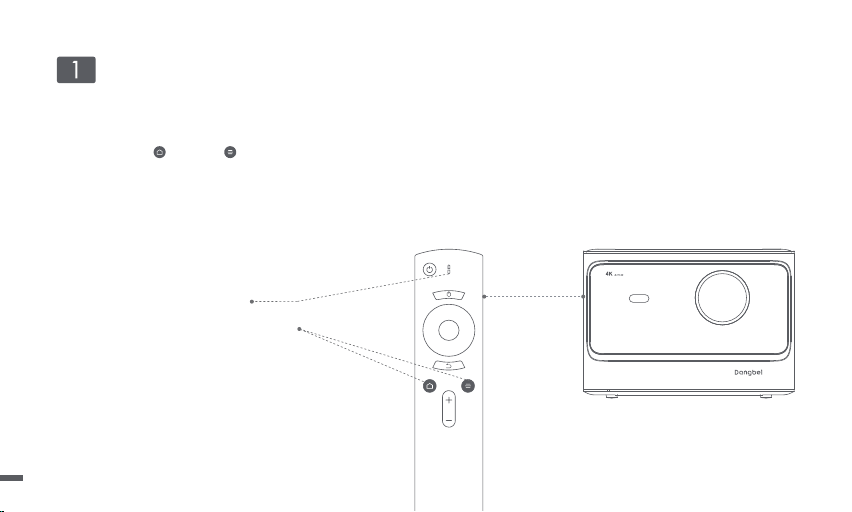
ㆍPlace the remote control within 10cm of the device.
ㆍPress the Home key and Menu key simultaneously until the indicator light begins flashing and a “Di” is heard.
ㆍThis means that the remote control enters the pairing mode.
ㆍWhen a "DiDi" is heard,the connection is successful.
Remote Control Pairing
10 cm
Indicator light
Hold to press for pairing *
* If pairing is unsuccessful,repeat the above steps after the
remote control indicator light stop flashing.
08

* The device supports both wired and wireless networks,
when both are connected,the system will optimally use
the wired network.
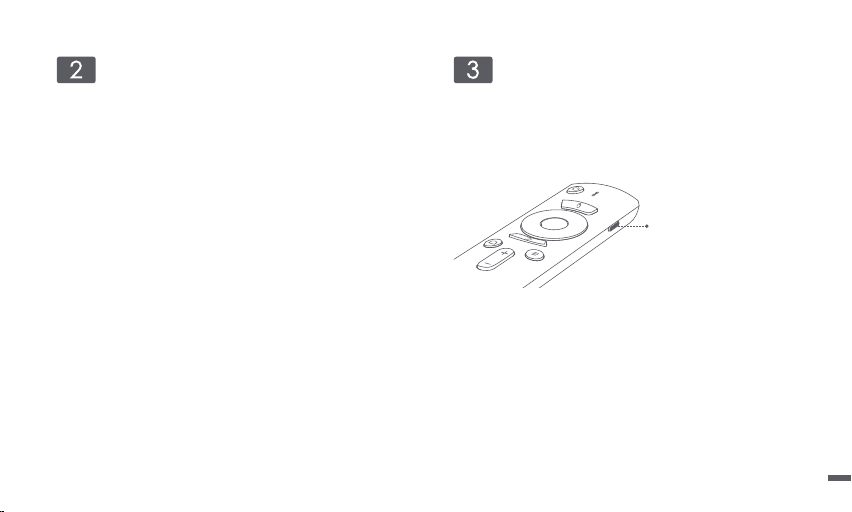
Hold to press the Side key
Focus Settings
Method 1:Hold to press the remote control side key,will automatic
focus adjustment.
Method 2:Into [Settings] - [Focus] - [Auto focus].
Method 3:Into [Settings] - [Focus] - [Manual focus].
Reference the screen picture,press the up/down of
the Navigation key to adjust the focus.When the screen
clear,stop operation.
Network Settings
Connect the Wired Network
ㆍPlug the network cable into the device LAN port(Please ensure
the network with the internet).
Connect the Wi-Fi Network
ㆍInto [Settings] - [Network].
ㆍSelect the wireless network,and enter the password.
09

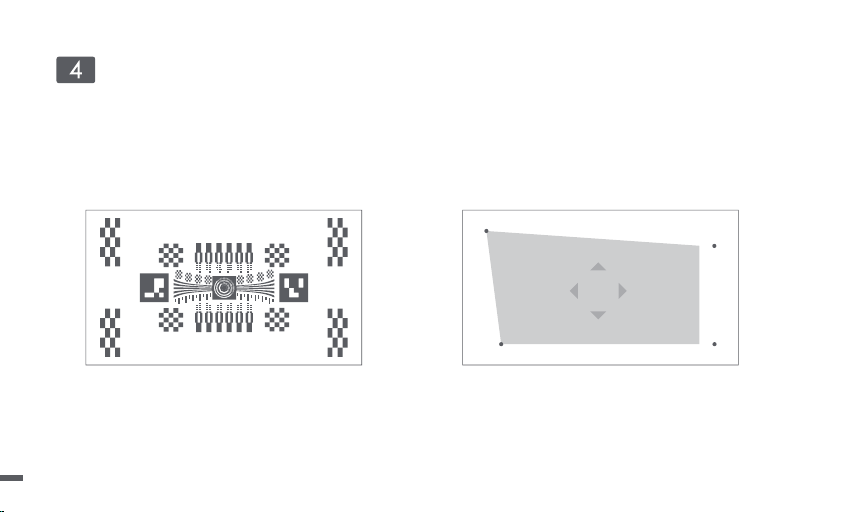
Keystone Correction Settings
ㆍInto [Settings] - [Keystone correction] - [Automatic correction] The automatic keystone correction function is enabled,the frame will be
adjusted automatically.
ㆍInto [Settings] - [Keystone correction] - [Manual correction] To adjust the four points and the size of the frame.
The device support automatic keystone correction,there
may be a slight deviation in the correction effect under
different usage scenarios, which can be further fine-tuned
by manual correction.
Manual correction
10

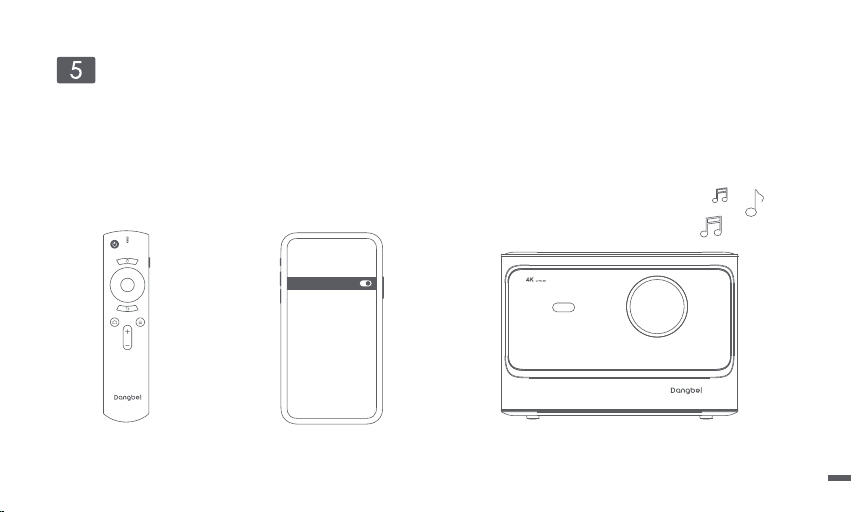
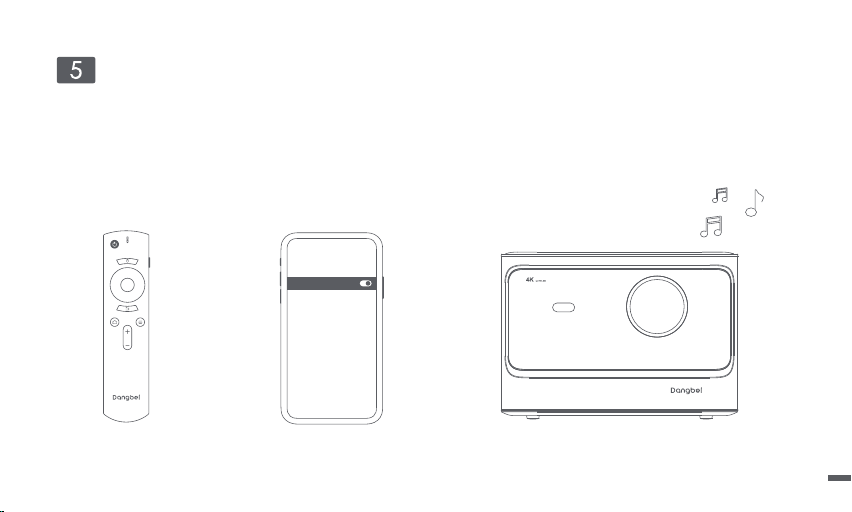
Bluetooth Speaker Mode
ㆍShort press the remote control [Power key],select Bluetooth Speaker mode.
ㆍBluetooth try to pair the device which name included "Dangebei Speaker".
ㆍWhen it is pairing successful, you can hear the beep "Bluetooth connection is successful".After that, you can enjoy the music.
ㆍShort press the remote control [Power key] again,exit the Bluetooth Speaker mode.
Short press the Power key
Connecting equipment
Dangbei F3 Not Connected
Dangbei Speaker
Dangbei F1
Dangbei D1
Not Connected
Not Connected
Bluetooth
Enjoy the music
11

Screen Mirroring
You can wirelessly cast the screen of your smartphone or tablet
onto the projection surface.
Please open the screencast APP to learn more about the
operation method.
More Settings
The device is displayed on any page, you can press the remote
control right Side key to set your device. To configure more
settings, go to check the completely settings page.
More Functions
Software update
On line upgrade: into [Settings] - [System] - [Software update].
12

FCC STATEMENT
This equipment has been tested and found to comply with the limits for a Class B digital device, pursuant to Part 15 of the FCC Rules.
These limits are designed to provide reasonable protection against harmful interference in a residential installation. This equipment
generates uses and can radiate radio frequency energy and, if not installed and used in accordance with the instructions, may cause
harmful interference to radio communications. However, there is no guarantee that interference will not occur in a particular installation.
If this equipment does cause harmful interference to radio or television reception, which can be determined by turning the equipment
off and on, the user is encouraged to try to correct the interference by one or more of the following measures:
-- Reorient or relocate the receiving antenna.
-- Increase the separation between the equipment and receiver.
-- Connect the equipment into an outlet on a circuit different from that to which the receiver is connected.
-- Consult the dealer or an experienced radio/TV technician for help.
This device complies with part 15 of the FCC Rules. Operation is subject to the following two conditions:
(1) This device may not cause harmful interference, and (2) this device must accept any interference received, including interference
that may cause undesired operation.
Changes or modifications not expressly approved by the party responsible for compliance could void the user's authority to operate the
equipment.
13

IC STATEMENT
CAN ICES-3 (B)/NMB-3 (B)
This Class B digital apparatus complies with Canadian ICES-003.
Cet appareil numérique de classe B est conforme à la norme canadienne ICES-003.
This device contains licence-exempt transmitter(s)/receiver(s) that comply with Innovation, Science and Economic Development Canada’s
licence-exempt RSS(s). Operation is subject to the following two conditions:
(1) This device may not cause interference.
(2) This device must accept any interference, including interference that may cause
undesired operation of the device
L’émetteur/récepteur exempt de licence contenu dans le présent appareil est conforme aux CNR d’Innovation, Sciences et Développement
économique Canada applicables aux appareils radio exempts de licence. L’exploitation est autorisée aux deux conditions suivantes :
1.L’appareil ne doit pas produire de brouillage;
2.L’appareil doit accepter tout brouillage radioélectrique subi, même si le brouillage est susceptible d’en compromettre le fonctionnement.
For projectors only
The distance between user and products should be no less than 20cm.
La distance entre l'utilisateur et le produit ne doit pas être inférieure à 20 cm.
5.2 GHz band is restricted to indoor use only.
La bande de 5.2 GHz est réservée à l'usage intérieur.
14

15
Manufactured under license from Dolby Laboratories. Dolby, Dolby Audio, and the double-D symbol are trademarks of Dolby Laboratories
Licensing Corporation.
For DTS patents, see http://patents.dts.com. Manufactured under license from DTS, Inc. (for companies headquartered in the U.S./Japan/
Taiwan) or under license from DTS Licensing Limited (for all other companies). DTS, DTS-HD Master Audio,DTS-HD, and the DTS-HD logo
are registered trademarks or trademarks of DTS, Inc. in the United States and other countries.© 2020 DTS, Inc. ALL RIGHTS RESERVED.
The Bluetooth® word mark and logos are registered trademarks owned by Bluetooth SIG,Inc. and any use of such marks by HANGZHOU
DANGBEI NETWORK TECHNOLOGY CO.,LTD is under license. Other trademarks and trade names are those of their respective owners.
HDMI High-Definition Multimedia Interface, and the HDMI Logo are trademarks or registered trademarks of HDMI Licensing
Administrator, Inc.
In order to protect your eyesight,it is still recommended avoiding watching for a long time.If you feel eye strain,it can be relieved by
looking into the distance or doing eye health exercises.
Excessive blue light of display products can cause eye fatigue,insomnia and other adverse reactions.This
product is a low blue TÜV Rheinland certified products,by reducing the blue light component technology,
can reduce eye fatigue and other adverse reactions to someextent.

ㆍDo not look directly at the projection beam with your eyes, because the strong beam may harm your eyes.
ㆍDo not block or cover the heat dissipation holes of the device to avoid affecting the heat dissipation of internal parts and damaging the
device.
ㆍDo not throw things to the device top cover, or knock the edge. It has the risk to broke the glass.
ㆍKeep away from humidity, exposure, high temperature, low pressure, and magnetic environment.
ㆍDo not place the device in areas susceptible to excessive dust and dirt.
ㆍPut the device to the flat and stable station, do not put it to the place prone to vibration
ㆍPlease use correct type of battery for the remote control.
ㆍOnly use attachments/accessories specified or provided by the manufacturer (such as the exclusive supply
adapter,bracket etc).
ㆍDo not disassemble the device personally, repair the device only staff authorized by the company.
ㆍPlace and use the device in an environment of 0°C-40℃.
ㆍDo not use the earphones for a long time. Excessive sound from the earphones can damage your hearing.
ㆍThe plug considered as disconnect device of adapter.
ㆍAs with any bright source, do not stare into the direct beam. RG2 IEC 62471 -5:2015
Important Precautions
16

Idioma Índice
Estimados clientes ··································································18
Descripción del tamaño de proyección··································19
Lista de encajonamiento ·························································20
Proyector ·················································································21
Control remoto·········································································23
Emparejamiento de control remoto·········································24
Ajustes de red ·········································································25
Ajustes de enfoque ·································································25
Ajustes de corrección trapezoidal ··········································26
Modo de altavoces Bluetooth··················································27
Duplicación de pantalla ··························································28
Más Ajustes·············································································28
Más funciones ·········································································28
Declaración ·············································································29
Precauciones importantes ······················································30
English ···············································································
España ··············································································
Français ·············································································
日本語 ················································································
繁體中文 ············································································
01-16
17-30
31-44
45-58
59-72

Lea atentamente el Manual del Producto:
Gracias por comprar y utilizar los productos de Hangzhou Dangbei Network Technology Co., Ltd. (en lo sucesivo, "Dangbei").
Por su seguridad e intereses, debe leer atentamente el Manual del Producto antes de usar este producto.
Sobre las instrucciones del producto:
Los derechos de autor de este Manual pertenecen a Dangbei.
Las marcas comerciales y los nombres mencionados en este Manual pertenecen a sus respectivos titulares.
En caso de disconformidad entre el contenido del Manual y el producto real, prevalecerá el producto real.
Estimados clientes
* Dangbei se reserva el derecho de interpretar y modificar las instrucciones.
Si no sigue las instrucciones o precauciones del producto y causa lesiones personales, daños materiales u otras pérdidas, Dangbei no
asumirá ninguna responsabilidad.
18
Descripción del tamaño de proyección
* Se recomienda que el tamaño de proyección sea preferiblemente de 100 pulgadas.
Tamaño
Pantalla
(largo * ancho: cm)
4.2m
3.37m
2.8m
2.2m
150 pulgadas
80 pulgadas
100 pulgadas
120 pulgadas
221*124
265*149
332*187
100 pulgadas
177*10080 pulgadas
120 pulgadas
150 pulgadas
19
Adaptador
Cable AC
Proyector
Manual del Producto
Paño de limpiezaControl remoto
Lista de encajonamiento
Verifique todos los elementos incluidos antes de usar el dispositivo.
20

Proyector
Descripción de apariencia e interfaz.
Vista trasera
Audio DC IN
USB2.0
USB2.0 S/PDIF
LAN
HDMI (eARC) HDMI
Vista delantera
Lente
TOF / Cámara
Vista izquierda
Salida de ventilación
(no la cubre)
21

* Luz indicadora
Modo de espera: Luz blanca, 50% de brillo.
Modo de altavoces Bluetooth: La luz parpadea se conecta correctamente cuando está esperando el emparejamiento, la luz blanca está
siempre encendida y tendrá un brillo del 100%.
Vista derecha
Entrada de ventilación
(no la cubre).
Vista inferior
Zócalo de soporte PTZ
Vista superior
Botón de encendido (LED) *Sensor sensible a la luz
(no lo cubre)
22
Control remoto
ㆍAbra la tapa de la caja de batería del control remoto.
ㆍInstale dos pilas AAA. *
ㆍCierre la tapa.
Soporte de batería
Instale 2 baterías AAA.
Tecla de menú
Accede a más opciones durante la reproducción
(las opciones disponibles dependen del recurso).
Tecla de volumen
Volumen +/-.
Tecla OK
Presione OK para seleccionar o ingresar.
Pausar / continuar la reproducción.
Tecla de retorno
Regresa a la página anterior.
Tecla de navegación
Navegue por el menú o ajuste el contenido seleccionado.
Luz indicadora
Se parpadea cuando presiona la tecla.
Tecla lateral
Pulsación larga: Ajuste automático del enfoque.
Pulsación breve: Salte la ventana de configuración
rápida.
Tecla de inicio
Abre la página de inicio.
Tecla de ratón
Pulsación larga para entrar o salir
del modo de tecla de ratón.
Botón de encendido
* Instale correctamente la polaridad positiva y negativa (+/-) de la batería.
23
ㆍColoque el control remoto a menos de 10 cm del dispositivo.
ㆍPresione simultáneamente la Tecla de inicio y la Tecla de menú hasta que la luz indicadora comience a parpadear y se escuche
un sonido “Di”.
ㆍEsto significa que el control remoto ingresa al modo de emparejamiento.
ㆍCuando escuche el sonido "DiDi", la conexión se realiza correctamente.
Emparejamiento de control remoto
10 cm
Luz indicadora
Mantenga presionado para emparejar *
* Si el emparejamiento no sea exitoso, repita los pasos anteriores
después de que la luz indicadora deje de parpadear.
24
* El dispositivo admite redes cableadas e inalámbricas, cuando
ambas están conectadas al mismo tiempo, el sistema utilizará
de manera óptima la red cableada.
Mantenga presionado
la tecla lateral.
Ajustes de enfoque
Método 1: Mantenga presionado la tecla lateral del control remoto
para enfocar el objeto automáticamente.
Método 2: Ingrese a [Ajustes] - [Enfoque] - [Enfoque automático].
Método 3: Ingrese a [Ajustes] - [Enfoque] - [Enfoque manual].
Presione las teclas arriba y debajo de la tecla de
navegación para ajustar el enfoque según la imagen
mostrada, y una vez que la imagen sea clara,
detenga la operación.
Ajustes de red
Conecte la red cableada
ㆍConecte el cable de red a la interfaz (asegúrese de que la red
esté conectada a Internet).
Conecte a la red Wi-Fi
ㆍIngrese a [Ajustes] - [Red].
ㆍSeleccione una red inalámbrica e ingrese la contraseña.
25

Ajustes de corrección trapezoidal
ㆍIngrese a [Ajustes] - [Corrección trapezoidal] - [Corrección automática] , Para realizar la corrección automática y la imagen se corregirá
automáticamente.
ㆍIngrese a [Ajustes] - [Corrección trapezoidal] - [Corrección manual] , Para ajustar las posiciones de los cuatro puntos y el tamaño de la
imagen.
El dispositivo acepta la corrección trapezoidal automática,
el efecto de corrección puede estar ligeramente desviado
en diferentes escenarios de uso, se puede ajustar aún más
mediante la corrección manual.
Corrección manual
26

Modo de altavoces Bluetooth
ㆍPresione brevemente el [Botón de encendido] del control remoto y seleccione [Altavoces Bluetooth].
ㆍBluetooth intente emparejar el dispositivo con "Dangbei Speaker" en el nombre.
ㆍCuando escuche el sonido "Bluetooth connection is successful", puede reproducir músicas.
ㆍPresione brevemente el [Botón de encendido] del control remoto, para salir del modo de altavoces Bluetooth.
Presione brevemente el
botón de encendido
Conecte el dispositivo
Dangbei F3 Not Connected
Dangbei Speaker
Dangbei F1
Dangbei D1
Not Connected
Not Connected
Bluetooth
Disfrute la música
27

Duplicación de pantalla
Puede proyectar de forma inalámbrica la imagen de la pantalla
de su teléfono inteligente o tableta en la pantalla de proyección.
Abra el programa de aplicación screencast para obtener más
información sobre el método de operación.
Más Ajustes
Puede presionar la tecla lateral derecha del control remoto para
configurar su dispositivo, mostrando cualquier página. Para
realizar más ajustes, vaya a la página de ajustes completa.
Más funciones
Actualización de software
Actualización en línea : Ingrese a [Ajustes] - [Sistema] -
[Actualización de software].
28

29
Manufactured under license from Dolby Laboratories. Dolby, Dolby Audio, and the double-D symbol are trademarks of Dolby Laboratories
Licensing Corporation.
For DTS patents, see http://patents.dts.com. Manufactured under license from DTS, Inc. (for companies headquartered in the U.S./Japan/
Taiwan) or under license from DTS Licensing Limited (for all other companies). DTS, DTS-HD Master Audio,DTS-HD, and the DTS-HD logo
are registered trademarks or trademarks of DTS, Inc. in the United States and other countries.© 2020 DTS, Inc. ALL RIGHTS RESERVED.
The Bluetooth® word mark and logos are registered trademarks owned by Bluetooth SIG,Inc. and any use of such marks by HANGZHOU
DANGBEI NETWORK TECHNOLOGY CO.,LTD is under license. Other trademarks and trade names are those of their respective owners.
HDMI High-Definition Multimedia Interface, and the HDMI Logo are trademarks or registered trademarks of HDMI Licensing
Administrator, Inc.
Para proteger su vista, se recomienda evitar mirar durante mucho tiempo.Si siente fatiga ocular, puede aliviarla mirando a lo lejos o
haciendo ejercicios de salud ocular.ejercicios.
La luz azul excesiva de los productos de exhibición puede causar fatiga ocular, insomnio y otras reacciones
adversas.Este producto tiene la certificación TÜV Rheinland en azul bajo.productos, reduciendo el componente
de luz azul tecnología, puede reducir la fatiga ocular y otros reacciones adversas en cierta medida.
ㆍNo mire directamente al haz de proyección con los ojos, ya que el haz fuerte puede dañar sus ojos.
ㆍNo bloquee ni cubra los orificios de disipación de calor del dispositivo para no afectar la disipación de calor de las partes internas,
dañando así el dispositivo.
ㆍNo arroje objetos sobre el vidrio en el superior del dispositivo (como control remoto, chécheres, etc.), ni golpee el borde del vidrio para
evitar daños en el vidrio.
ㆍManténgalo alejado de la humedad, la exposición, la temperatura alta, la presión baja y el entorno magnético.
ㆍNo coloque el dispositivo en áreas susceptibles a un exceso de polvo y suciedad.
ㆍColoque el dispositivo en un lugar plano y estable, no lo coloque en un lugar propenso a vibraciones.
ㆍUtilice baterías con el tipo correcto para el control remoto.
ㆍUtilice únicamente los complementos / accesorios especificados o proporcionados por el fabricante
(tales como el adaptador de suministro exclusivo, el soporte, etc.).
ㆍNo desmonte el dispositivo sin permiso, el dispositivo solo puede ser reparado por personal autorizado
por la empresa.
ㆍColoque y utilice el dispositivo en un entorno de 0 °C a 40 °C.
ㆍNo utilice los auriculares durante mucho tiempo, el sonido excesivo de los auriculares puede dañar su audición.
ㆍEl enchufe es el dispositivo de desconexión para el adaptador.
ㆍAl igual que con cualquier fuente brillante, no mire fijamente al haz directo. RG2 IEC 62471-5: 2015
Precauciones importantes
30

Langue Contenu
Cher utilisateur ········································································32
Description de la taille de la projection···································33
Liste de colisage ·····································································34
Projecteur ················································································35
Télécommande········································································37
Appariement des télécommandes··········································38
Paramètres de réseau·····························································39
Paramètres de mise au point ··················································39
Paramètres de correction trapézoïdale···································40
Mode haut-parleur Bluetooth ··················································41
Miroir d'écran ··········································································42
Autres Paramètres···································································42
Plus de fonctions·····································································42
Déclaration ··············································································43
Précautions importantes ·························································44
English ···············································································
España ··············································································
Français ·············································································
日本語 ················································································
繁體中文 ············································································
01-16
17-30
31-44
45-58
59-72

Veuillez lire attentivement le manuel du produit:
Nous vous remercions d'avoir acheté et utilisé les produits de Hangzhou Dangbei Network Technology Co., Ltd. (ci-après dénommée
"Dangbei")
Pour votre sécurité et votre bénéfice, veuillez lire attentivement le manuel du produit avant de l'utiliser.
À propos de la description du produit:
Ce manuel est protégé par les droits d'auteur de Dangbei.
Les marques et les noms mentionnés dans ce manuel appartiennent à leurs propriétaires respectifs.
En cas de divergence entre le contenu de ce manuel et le produit réel, le produit réel prévaut.
Cher utilisateur
* Dangbei se réserve le droit d'interpréter et de modifier ce manuel.
Dangbei ne sera pas responsable si vous ne respectez pas ce manuel ou les précautions relatives au produit et si vous provoquez des
blessures corporelles, des dommages matériels ou autres.
32

Description de la taille de projection
* La taille de projection recommandée est de préférence de 100 pouces.
Taille
Écran
(Longeur*largeur: cm)
4.2m
3.37m
2.8m
2.2m
150 pouces
80 pouces
100 pouces
120 pouces
221*124
265*149
332*187
100 pouces
177*10080 pouces
120 pouces
150 pouces
33

Adaptateur
Câble AC
Projecteur
Manuel d'utilisation
ChiffonTélécommande
Liste de colisage
Veuillez vérifier tous les éléments inclus avant d'utiliser l'appareil.
34

Projecteur
Description de l'apparence et de l'interface.
Vue arrière
Audio DC IN
USB2.0
USB2.0 S/PDIF
LAN
HDMI (eARC) HDMI
Vue en avant
Lens
TOF/Caméra
Vue de gauche
Sortie d'air (ne pas couvrir)
35

* Description des indicateurs
En veille : blanc 50 % de la luminosité.
Mode haut-parleur Bluetooth : blanc en attente d'appariement, blanc toujours allumée à 100% de luminosité après une connexion réussie.
Vue de droite
Entrée d'air (ne pas couvrir)
Vue du dessous
Prise de courant du
support de PTZ
Vue de dessus
Bouton d'alimentation (LED) *Capteur de lumière
(ne pas couvrir)
36

Télécommande
ㆍOuvrir le couvercle du compartiment à piles de la télécommande.
ㆍInstaller deux piles AAA.*
ㆍFermer le couvercle du compartiment à piles.
Porte-piles
Installer 2 piles AAA.
Bouton Menu
Accès à plus d'options pendant la lecture (les
options disponibles dépendent de la ressource)
Boutons de volume
Volume +/-
Bouton OK
Appuyer pour confirmer la sélection ou la saisie.
Pause/reprise de la lecture.
Bouton retour
Retourner à la page précédente.
Bouton de navigation
Naviguer dans le menu ou régler le contenu sélectionné.
Indicateur
Clignoter lorsque le bouton est appuyé.
Bouton latéral
Appuyer longtemps : mise au point automatique.
Appuyer courtement : faire apparaître la fenêtre des
paramètres rapides.
Bouton de la page d'accueil
Ouvrir la page d'accueil.
Bouton de la souris
Appuyer longtemps pour entrer ou sortir
du mode bouton de la souris.
Bouton d'alimentation
* Veuillez installer correctement les bornes positive et négative des piles.
37

ㆍPlacer la télécommande à moins de 10 cm de l'appareil.
ㆍAppuyer simultanément sur le Bouton de la page d'accueil et le Bouton menu jusqu'à ce que l'indicateur commence à clignoter et
que vous entendiez un son "Tic-tac".
ㆍCela signifie que la télécommande est en mode d'appariement.
ㆍLorsque vous entendez un son "Tic-tac", la connexion est réussie.
Appariement des télécommandes
10 cm
Indicateur
Maintenez la pression pour l'appariement *
* Si l'appariement ne réussit pas, veuillez attendre que l'indicateur
cesse de clignoter et suivez à nouveau les étapes ci-dessus.
38
* L'appareil supporte les réseaux filaires et sans fil, lorsque les
deux sont connectés en même temps, le système donnera la
préférence au réseau filaire pour l'utilisation.
Appuyer longtemps sur le
bouton latéral.
Paramètres de la mise au point
Méthode 1 : Appuyer longtemps sur le bouton latéral de la
télécommande pour régler l'autofocus.
Méthode 2 : Entrer dans [Paramètres] - [Mise au point]-[Mise au
point automatique ].
Méthode 3 : Entrer dans [Paramètres] - [Mise au point]-[Mise au
point manuelle].
Selon l'écran affiché, appuyer sur les boutons haut
et bas du bouton de navigation pour régler, et
arrêtez l'opération lorsque l'écran est clair.
Paramètres de réseau
Connexion au réseau câblé
ㆍPlonger le câble réseau dans le port réseau (veuillez vous
assurer que le réseau est connecté à Internet).
Connecter au réseau Wi-Fi
ㆍEntrer dans [Paramètres] - [Réseau].
ㆍSélectionner le réseau sans fil et saisissez le mot de passe.
39

Paramètres de correction trapézoïdale
ㆍEntrer dans [Paramètres] - [Correction trapézoïdale] - [Correction automatique]. Effectuer une correction automatique et l'écran sera
automatiquement corrigé.
ㆍEntrer dans [Paramètres]-[Correction trapézoïdale]-[Correction manuelle].pour régler la position des quatre points et la taille de l'écran.
L'appareil supporte la correction trapézoïdale automatique,
mais l'effet de correction peut être légèrement différent
selon les scénarios d'utilisation, et peut être affiné par
une correction manuelle.
Correction manuelle
40
Mode haut-parleur Bluetooth
ㆍAppuyer brièvement sur le [Bouton d'alimentation] de la télécommande pour sélectionner [Mode haut-parleur Bluetooth].
ㆍLe Bluetooth se connecte à l'appareil portant le nom de "Dangbei Speaker".
ㆍQuand vous entendez le bip "Bluetooth connection is successful", vous pouvez écouter de la musique.
ㆍAppuyer brièvement sur le [Bouton d'alimentation] de la télécommande pour quitter [Mode haut-parleur Bluetooth].
Appuyer brièvement sur
le bouton d'alimentation
Connecter l'appareil
Dangbei F3 Not Connected
Dangbei Speaker
Dangbei F1
Dangbei D1
Not Connected
Not Connected
Bluetooth
Apprécier la musique
41

Miroir d'écran
Vous pouvez diffuser sans fil l'écran de votre smartphone ou de
votre tablette sur l'écran de projection.
Veuillez ouvrir screencast APP pour en savoir plus sur la manière
d'opération.
Autres Paramètres
L'appareil affiche une page où vous pouvez configurer votre
appareil en appuyant sur le bouton latéral droit de la
télécommande. Pour configurer d'autres paramètres, accédez
à la page de paramètres complète.
Plus de fonctions
Mise à jour logicielle
Mise à niveau en ligne : Entrer dans [Paramètres] - [Système] -
[Mise à jour logicielle].
42

43
Manufactured under license from Dolby Laboratories. Dolby, Dolby Audio, and the double-D symbol are trademarks of Dolby Laboratories
Licensing Corporation.
For DTS patents, see http://patents.dts.com. Manufactured under license from DTS, Inc. (for companies headquartered in the U.S./Japan/
Taiwan) or under license from DTS Licensing Limited (for all other companies). DTS, DTS-HD Master Audio,DTS-HD, and the DTS-HD logo
are registered trademarks or trademarks of DTS, Inc. in the United States and other countries.© 2020 DTS, Inc. ALL RIGHTS RESERVED.
The Bluetooth® word mark and logos are registered trademarks owned by Bluetooth SIG,Inc. and any use of such marks by HANGZHOU
DANGBEI NETWORK TECHNOLOGY CO.,LTD is under license. Other trademarks and trade names are those of their respective owners.
HDMI High-Definition Multimedia Interface, and the HDMI Logo are trademarks or registered trademarks of HDMI Licensing
Administrator, Inc.
Afin de protéger votre vue, il est toujours recommandé d'éviter de regarder pendant longtemps.Si vous ressentez une fatigue oculaire,
elle peut être soulagée en regardant au loin ou en faisant de la santé oculaire des exercices.
Une lumière bleue excessive des produits d'affichage peut causer fatigue oculaire, insomnie et autres effets
indésirables.Ce produit est un bleu bas certifié TÜV Rheinland produits, en réduisant la composante de
lumière bleue la technologie, peut réduire la fatigue oculaire et d'autres effets indésirables dans une certaine
mesure.
ㆍVeuillez ne pas regarder directement le faisceau de projection avec vos yeux, car le faisceau puissant peut endommager vos yeux.
ㆍNe pas bloquer et obstruer les orifices de refroidissement de l'appareil, car cela pourrait affecter la dissipation de la chaleur des pièces
internes et endommager l'appareil.
ㆍNe pas jeter d'objets (ex : télécommande, objets divers, etc.) sur la vitre supérieure du produit, ne pas frapper sur le bord de la vitre
supérieure du produit pour éviter de casser le verre.
ㆍVeuillez éviter l'humidité, l'exposition au soleil, les températures élevées, la basse pression et l'environnement magnétique.
ㆍNe pas placer l'appareil dans un endroit susceptible d'être exposé à la poussière et à la saleté excessives.
ㆍPlacer l'appareil sur une position plane et stable, pas dans une zone sujette aux vibrations.
ㆍVeuillez utiliser le bon type de piles pour la télécommande.
ㆍN'utilisez que les accessoires spécifiés ou fournis par le fabricant (par exemple, l’adaptateur d'alimentation
spécial, les supports, etc.).
ㆍVeuillez ne pas démonter l'appareil par vous-même, ne le faire réparer que par le personnel autorisé de
la société.
ㆍPlacer l'appareil dans un environnement de 0°C-40°C pour son utilisation.
ㆍVeuillez ne pas utiliser l'oreillette pendant longtemps, un son trop fort de l'oreillette peut provoquer des lésions auditives.
ㆍLa fiche est le dispositif de déconnexion de l'adaptateur.
ㆍComme pour toute source de lumière vive, ne pas regarder directement le faisceau de lumière. RG2 IEC 62471-5:2015.
Précautions importantes
44

English ···············································································
España ··············································································
Français ·············································································
日本語 ················································································
繁體中文 ············································································
01-16
17-30
31-44
45-58
59-72
言語 目次
お客様各位 ··············································································
プロ ジェクター サイズの 説 明 ·····················································
パッキングリスト ·······································································
プロジェクター本体 ··································································
リモコン ···················································································
リモコンペ アリング ···································································
ネット ワ ー ク 設 定 ······································································
フォー カス 設 定 ·········································································
台形補正設定 ··········································································
ブルートゥーススピー カーモ ード ···············································
スクリーンミラーリング ·····························································
その他の設定 ···········································································
その他の機能 ···········································································
声明 ·························································································
重要な注意事項 ·······································································
46
47
48
49
51
52
53
53
54
55
56
56
56
57
58

製品の説明書をよくお読みください:
この度は、杭州当貝網絡科技有限公司(以下、「Dangbei」と称します)の製品をお買い求めいただき、ありがとうございます。お客様の安全と利益の
ために、本製品をご使用になる前に、製品取扱説明書をよくお読みください。
製品に関する説明:
本取扱説明書の著作権は、Dangbeiに帰属します。
本取扱説明書に記載されている商標や名称は、それぞれの権利者に帰属します。
取扱説明書の内容と実際の製品とが一致しない場合は、実際の製品が優先されます。
お客様各位
* Dangbeiは説明書の解釈や修正を行う権利を有します。
お客様が製品の指示や注意事項に従わず、人身事故や物的損害、その他の損失を引き起こした場合、Dangbeiは一切責任を負いかねます。
46

プロジェクターサイズの説明
* 最適な投影サイズは100インチをお薦めします。
サイズ
スクリーン
(長さ*幅:㎝)
4.2m
3.37m
2.8m
2.2m
150 inches
80 inches
100 inches
120 inches
221*124
265*149
332*187
100 inches
177*10080 inches
120 inches
150 inches
47

パッキングリスト
本装置をご使用になる前に、同梱物をご確認ください。
プロジェクター本体
アダプター ACケーブル 取扱説明書
リモコン 清潔布
48

プロ ジェクター 本 体
外観とインターフェース説明。
通気口(遮蔽禁止)
背面視
Audio DC IN
USB2.0
USB2.0 S/PDIF
LAN
HDMI (eARC) HDMI
前面視
Lens
TOF/Camera
左側視
49
* インジケーター説明
待機中 : LED50%点灯。
ブルートゥーススピーカーモード : マッチング中は呼吸パターン、接続完了後はLED100%点灯。
P T Z ブラ ケットソ ケット吸気口(遮蔽禁止) 光センサー(遮蔽禁止) 電源ボタン(LED)*
右側視 上面視 底面視
50

* 電池の正負極に注意して入れてください。
リモコン
・ リモコンの電池ケースカバーを開けます。
・ 単4電池を2本入れます。
・ カ バ ー を 閉 め ま す。
電池ケース
単4電池を2本入れます。
メニューボタン
再生中に詳細なオプションを表示します。
(使用可能なオプション数はソースによります)。
ボリュームボタン
ボリュー ム アップ / ダウン。
確 定 ボタン
選択や入力を確定します。
一時停止/再生継続。
リターンボタン
前の ペ ージに戻ります。
ナ ビゲ ー ション ボ タン
ナビメニューを開くかその内容を調整することができます。
インジケーター
ボタンを押すと点滅して表示ます。
側 面 ボタン
長押しー自動フォーカス調整。
短く押しークイック設定画面がポップアップします。
ホーム ボタン
ホームページを開きます。
マウスボタン
長 押 す と マ ウ ス キ ー モ ー ド に 入 る・閉 じ る こ と が で き ま す 。
電 源 ボタン
51
* ペアリングが失敗すると、インジケーターが完全に消えるまで待ち、
再び上記手順を繰り返してください。
リモコンのペアリング
・ リモコンを装置の10㎝以内に置いてください。
・ インジケーターが点滅し始め、 「ピ」 という音が聞こえるまで、同時にホームボタン とメニューボタン を押してください。
・ リモコンが既にペアリングモードに入ったことを表します。
・ 「 ピ 、ピ 」 と い う 音 が 聞 こ え る と 、ペ ア リ ン グ が 完 了 し ま す 。
10 cm
インジケーター
押してペ アリングに 入ります *
52

* 装置は有線とWi-Fiの二種ともに対応できますが、両者同時に接続し
た場合、有線ネットワークが優先されます。
ネットワ ーク設 定
Wi-Fiへの接続
・ 「 設 定 」 - 「 ネ ッ ト ワ ー ク 」に 入 り ま す 。
・ 無線Wi-Fiを選び、パスワードを入力します。
フォーカス 設 定
方法1:リモコンの側面ボタンを長押しすると、自動フォーカスが始
まります。
方法2:「設定」 - 「フォーカス」 - 「自動フォーカス」より行います。
方法3:「設定」 - 「フォーカス」- 「手動フォーカス」より行います。
画面の表示状況により、ナビゲーションボタンの上下ボタン
で調整し、画面がキレイに映ったら、操作を中止します。
有線ネットワークへの接続
・ ネットワークケーブルをLANポートに接続します。(ネットワークがイ
ンターネットに接続完了な状態)。
側面ボタンを長押しします。
53
本機は自動台形補正機能をサポートしていますが、使用
状況によっては補正効果に若干のずれが生じる場合が
あり、手動補正でさらに微調整することができます。
手動補正
台形補正設定
・ 「設定」 - 「台形補正」 - 「自動補正」 に入り、有効にすると、フレームが自動的に調整されます。
・ 「設定」 - 「台形補正」 - 「手動補正」 に入り、4つのポイントでフレームのサイズを調整します。
54

電源キーの短押し 装置の接続 音楽を楽しむ
ブルートゥーススピーカーモード
・ リモコンの 「電源ボタン」 を短押しして、ブルートゥーススピーカーモードを選択します。
・ 「Dangbei Speaker 」 という名の装置とのペアリングを試みます。
・ ペアリングが成功すると、 「Bluetooth connection is successful」 という音声メッセージが流れ、音楽再生が可能になります。
・ リモコンの 「電源ボタン」 をもう一度短く押すと、ブルートゥーススピーカーモードを終了します。
Dangbei F3 Not Connected
Dangbei Speaker
Dangbei F1
Dangbei D1
Not Connected
Not Connected
Bluetooth
55

スクリーンミラーリング
スマートフォンやタブレットの画面を、ワイヤレスでスクリーン画面 に
映し出すことができます。
操作方法については、 screencast APPよりご確認ください。
その他の設定
どのページからでもリモコンの右側ボタンで装置を設定できます。よ
り多くの設定については、完全な設定ページより行ってください。
その他の機能
ソフトウェア の 更 新
オンラインアップグレード : 「設定」 - 「システム」 - 「ソフトウェアの更
新」 より行ってください。
56

57
Manufactured under license from Dolby Laboratories. Dolby, Dolby Audio, and the double-D symbol are trademarks of Dolby Laboratories
Licensing Corporation.
For DTS patents, see http://patents.dts.com. Manufactured under license from DTS, Inc. (for companies headquartered in the U.S./Japan/
Taiwan) or under license from DTS Licensing Limited (for all other companies). DTS, DTS-HD Master Audio,DTS-HD, and the DTS-HD logo
are registered trademarks or trademarks of DTS, Inc. in the United States and other countries.© 2020 DTS, Inc. ALL RIGHTS RESERVED.
The Bluetooth® word mark and logos are registered trademarks owned by Bluetooth SIG,Inc. and any use of such marks by HANGZHOU
DANGBEI NETWORK TECHNOLOGY CO.,LTD is under license. Other trademarks and trade names are those of their respective owners.
HDMI High-Definition Multimedia Interface, and the HDMI Logo are trademarks or registered trademarks of HDMI Licensing
Administrator, Inc.
視力を保護するために、長時間見ないようにすることをお勧めします。目の疲れを感じたら、遠くを見たり、目の運動をしたりできます緩和する。
ディスプレイ製品の過度の青色光は、目の疲れ、不眠症などを引き起こす可能性があります。反応。この製品は、テュフラ
インランドのハードウェアレベルのローブルーライト認定製品です。認識モードは、短波の有害な青色光を減らし、目をあ
る程度明るくすることができます倦怠感およびその他の副作用。
備考:ハードウェアレベルの低青色光は、長波青色光源を使用して415~455nmの有害性を低減することですBlu-ray、表示効果が影響を受けないようにします。

重要な注意事項
・ 強い光で目を痛める可能性があるので、投射ビームを直視しないでください。
・ 内部部品の放熱に影響を与え、装置の損傷を生じる原因になるので、装置の放熱孔を塞いだり、覆ったりしないでください。
・ 製品のトップカバーに物を投げたり、端を叩いたりしないでください。ガラスが割れる可能性があります。
・ 湿気、直射日光、高温、低圧、および磁気環境を避けてください。
・ ほこりや汚れの多い場所には置かないでください。
・ 平らで安定した場所に設置し、振動のある場所には置かないでください。
・ リモコン電池は正しい種類の製品を使用してください。
・ 製造者が指定または提供する付属品/アクセサリー(専用電源アダプタ、ブラケットなど)しか使用しないでください。
・ 無断な機器分解はしないでください。当社授権スタッフのみに機器の修理を依頼してください。
・ 本製品を0℃~40℃の使用環境に使用してください。
・ イヤホンは長時間使用しないでください。イヤホンからの過度な音は聴力を損なう原因になります。
・ プラグは、アダプターの切断装置となります。
・ 他の明るい光源と同様に、直接見つめないでください。 RG2 IEC 62471 -5:2015
58

語言 目錄
親愛的用戶 ··············································································
投影尺寸說明 ··········································································
裝箱清單 ·················································································
投影儀 ·····················································································
遙控器 ·····················································································
遙控器配對 ··············································································
網絡設置 ·················································································
對焦設置 ·················································································
梯形校正設置 ··········································································
藍牙音箱模式 ··········································································
屏幕鏡像 ·················································································
更多設置 ·················································································
更多功能 ·················································································
聲明 ························································································
重要註意事項 ··········································································
60
61
62
63
65
66
67
67
68
69
70
70
70
71
72
English ···············································································
España ··············································································
Français ·············································································
日本語 ················································································
繁體中文 ············································································
01-16
17-30
31-44
45-58
59-72

請仔細閱讀產品說明書:
感謝您購買和使用杭州當貝網絡科技有限公司(以下簡稱“Dangbei”)的產品。
為了您的安全和利益,在使用本產品之前,請您仔細閱讀產品說明書。
關於產品說明:
本說明書版權歸Dangbei所有。
本說明中提及的商標和名稱屬於其各自的權利所有人。
本說明書內容與實際產品不一致時,以實際產品為準。
親愛的用戶
* Dangbei保留解釋和修改本說明的權利。
如果您未能遵守產品說明或預防措施,並造成任何人身傷害、財產或其他損失,Dangbei將不承擔任何責任。
60
投影尺寸說明
* 建議投影尺寸最佳為100 inches。
尺寸
屏幕
(長*寬:㎝)
4.2m
3.37m
2.8m
2.2m
150 inches
80 inches
100 inches
120 inches
221*124
265*149
332*187
100 inches
177*10080 inches
120 inches
150 inches
61

裝箱清單
在使用本設備之前,請清點裝箱的所有物品是否齊全。
投影儀
電源適配器 AC 電源線 使用說明書
遙控器 清潔布
62
投影儀
外觀和接口說明。
出風口(請勿遮擋)
後視圖
Audio DC IN
USB2.0
USB2.0 S/PDIF
LAN
HDMI (eARC) HDMI
前視圖
LensTOF/Camera
左視圖
63

* 指示燈說明
待機:白燈50%亮度。
藍牙音箱模式:待配對時呼吸燈,連接成功白燈常亮100%亮度。
雲臺支架插座進風口(請勿遮擋) 光敏傳感器(請勿遮擋) 電源按鈕(LED)*
右視圖 俯視圖 底視圖
64
* 請正確安裝電池正負極。
遙控器
・ 打開遙控器電池倉蓋。
・ 安裝兩節七號電池。
・ 合上電池倉蓋。
電池倉
安裝2節AAA電池。
菜單鍵
在播放過程中進入更多選項(可用選項取決於資源)。
音量鍵
音量加/減。
確定鍵
按確認選擇或輸入。
暫停/繼續播放。
返回鍵
返回上一頁。
導航鍵
導航菜單或調整所選內容。
指示燈
按鍵時閃爍。
側邊鍵
長按:自動對焦。
短按:彈出快速設置窗口。
主頁鍵
打開主頁。
鼠標鍵
長按可進入或退出鼠標鍵模式。
電源鍵
65
* 如果未配對成功,請等指示燈停止閃爍後,按上述步驟重新操作。
遙控器配對
・ 將遙控器放置在距離設備10厘米的範圍內。
・ 同時按下主頁鍵 和菜單鍵 ,直到指示燈開始閃爍並聽到“滴”聲。
・ 遙控器進入配對模式。
・ 當聽到“滴滴”聲時,連接成功。
10 cm
指示燈
長按進行配對 *
66

* 設備支持有線和無線網絡,兩者同時接入時,系統會優先選擇有線
網絡使用。
網絡設置
連接Wi-Fi網絡
・ 進入【設置】 - 【網絡】。
・ 選擇無線網絡,然後輸入密碼。
對焦設置
方法1:長按遙控器側邊鍵,將自動對焦。
方法2:進入【設置】 - 【對焦】 - 【自動對焦】。
方法3:進入【設置】 - 【對焦】 - 【手動對焦】
根據顯示畫面情況,按下導航鍵的上下鍵調整,畫面清晰後,
停止操作。
連接有線網絡
・ 將網線插入網線接口(請確保網線功能正常)。
長按側邊鍵。
67

設備支持自動梯形校正,在不同的使用場景下校正效果
可能會略有偏差,可以通過手動校正進一步微調。
手動校正
梯形校正設置
・ 進入【設置】 - 【梯形校正】 - 【自動校正】,進行自動校正,畫面會被自動校正。
・ 進入【設置】 - 【梯形校正】 - 【手動校正】,調整四個點的位置和畫面的大小。
68
短按電源鍵 連接設備 聆聽音樂
藍牙音箱模式
・ 短按遙控器【電源鍵】,選擇【藍牙音箱】。
・ 藍牙連接名稱含有“ Dangbei Speaker ”的設備。
・ 聽到提示音“藍牙連接成功”,即可播放音樂。
・ 短按遙控器【電源鍵】,退出【藍牙音箱】。
Dangbei F3 Not Connected
Dangbei Speaker
Dangbei F1
Dangbei D1
Not Connected
Not Connected
Bluetooth
69
屏幕鏡像
您可以將智能手機或者平板電腦屏幕畫面無線投屏到投影屏幕上。
請打開投屏 APP了解更多的操作方法。
更多設置
設備顯示任何頁面時,可以按遙控器右邊鍵來設置您的設備。要設
置更多設置,請轉到完整的設置頁面。
更多功能
軟件更新
在線升級:進入【設置】 - 【系統】 - 【軟件更新】。
70

71
Manufactured under license from Dolby Laboratories. Dolby, Dolby Audio, and the double-D symbol are trademarks of Dolby Laboratories
Licensing Corporation.
For DTS patents, see http://patents.dts.com. Manufactured under license from DTS, Inc. (for companies headquartered in the U.S./Japan/
Taiwan) or under license from DTS Licensing Limited (for all other companies). DTS, DTS-HD Master Audio,DTS-HD, and the DTS-HD logo
are registered trademarks or trademarks of DTS, Inc. in the United States and other countries.© 2020 DTS, Inc. ALL RIGHTS RESERVED.
The Bluetooth® word mark and logos are registered trademarks owned by Bluetooth SIG,Inc. and any use of such marks by HANGZHOU
DANGBEI NETWORK TECHNOLOGY CO.,LTD is under license. Other trademarks and trade names are those of their respective owners.
HDMI High-Definition Multimedia Interface, and the HDMI Logo are trademarks or registered trademarks of HDMI Licensing
Administrator, Inc.
為了保護您的視力,建議避免長時間觀看。如果您感到眼睛疲勞,可以通過看遠處或做眼保健操來緩解。
顯示類產品過多的藍光,會引起眼睛疲勞、失眠等不良反應。本產品為TÜV萊茵硬件級低藍光認證產品,在默認模式即
可減少短波有害藍光,能一定程度減輕眼睛疲勞等其他不良反應。
備註:硬件級低藍光是通過使用長波藍光光源,減少415-455nm的有害藍光,確保顯示效果不受影響。

重要註意事項
・ 請不要用眼睛直視投影光束,因為強烈的光束可能會傷害眼睛。
・ 請不要堵塞或遮擋裝置散熱孔,以免影響內部零件散熱而損壞裝置。
・ 請勿向產品頂部玻璃上投擲物品(如遙控器, 雜物等)請勿敲擊產品頂部玻璃邊緣,以免玻璃破損。
・ 請遠離潮濕、曝曬、高溫、低壓、磁力的環境。
・ 請勿將設備放置在易受過度灰塵和汙垢影響的區域。
・ 將設備放在平坦穩定的位置上,不要放在易振動的地方。
・ 請為遙控器使用正確類型的電池。
・ 僅使用製造商指定或提供的附件/配件(如專用電源適配器、支架等)。
・ 請勿自行拆卸設備,只能由公司授權的人員維修設備。
・ 將設備放置在0°C-40℃的環境中使用。
・ 請勿長時間使用耳機,耳機聲音過大會導致聽力損傷。
・ 插頭是適配器的斷開設備。
・ 與任何明亮光源一樣,不要凝視直射光束。RG2 IEC 62471-5:2015
72

For FAQs and more information,please visit:
mall.dangbei.com
suppor[email protected]
Product Name : Smart Projector
Model : DBX3 Pro
Input : 18.0V 10.0A
USB Output : 5V 0.5A
Manufacturer : Shenzhen Dangs Science and Technology Co., Ltd.