
Catalogue
Important Safety Considerations
Projector Description
Remote Control Button Function
Quick Start
Screen Adjustment
Connection
Screen Casting & Mirroring
Google Assistant
Projector Settings
Specification
FAQS
FCC Statement
ISED Warning
1
2
4
5
7
10
13
14
14
15
16
18
19
Power Cord *1
HDMI Cable *1
Remote Control *1
User Manual *1
Projector *1
Attentions:
Thank you for purchasing this series of video projectors.
Please read through this User's manual for proper use of this product.
Package Contents
1
2
3
4
5
6
7
8
Friendly Reminder:
Do not look directly into the lens while the projector is running, as strong light may damage
your eyes.
Do not block the air outlet to prevent the projector from cooling down because internal
electronics are damaged.
Keep the projector and accessories out of the reach of children.
Please make sure that the working environment of the projector is dry and ventilated.
To prevent electric shock, please keep the projector out of the rain and away from
moisture, it is recommended to switch off the projector after it has run for 6 hours non-stop.
Do not press hard on the projector, as it may damage the product.
Do not throw, hit, or shake the projector to avoid damaging the circuit board.
Any questions after receiving the projector, please contact us, we will quickly and correctly
solve your problem within 24 hours and give you a satisfactory answer.
Important Safety Considerations
- 1 -
- 2 -
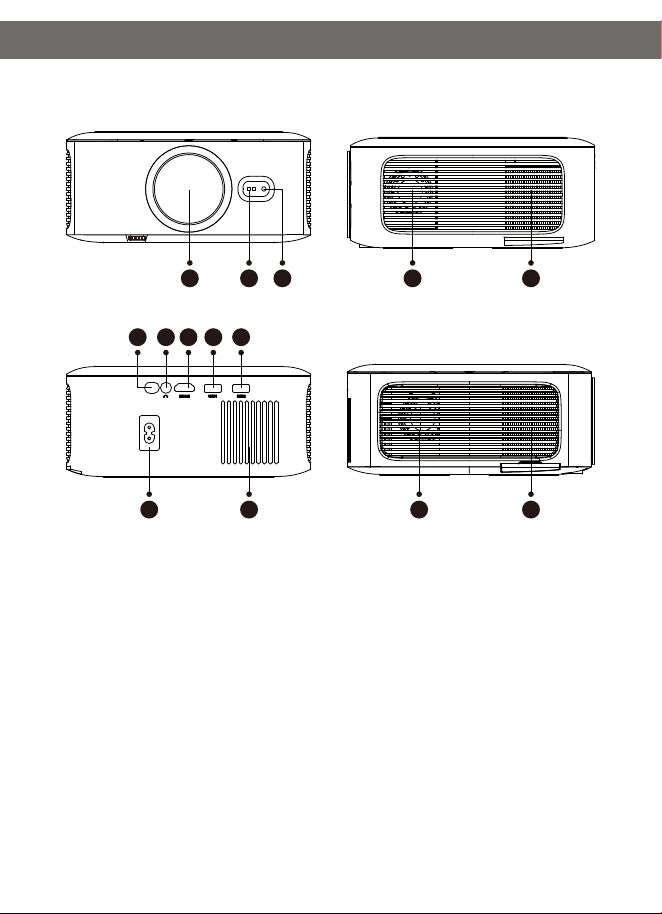
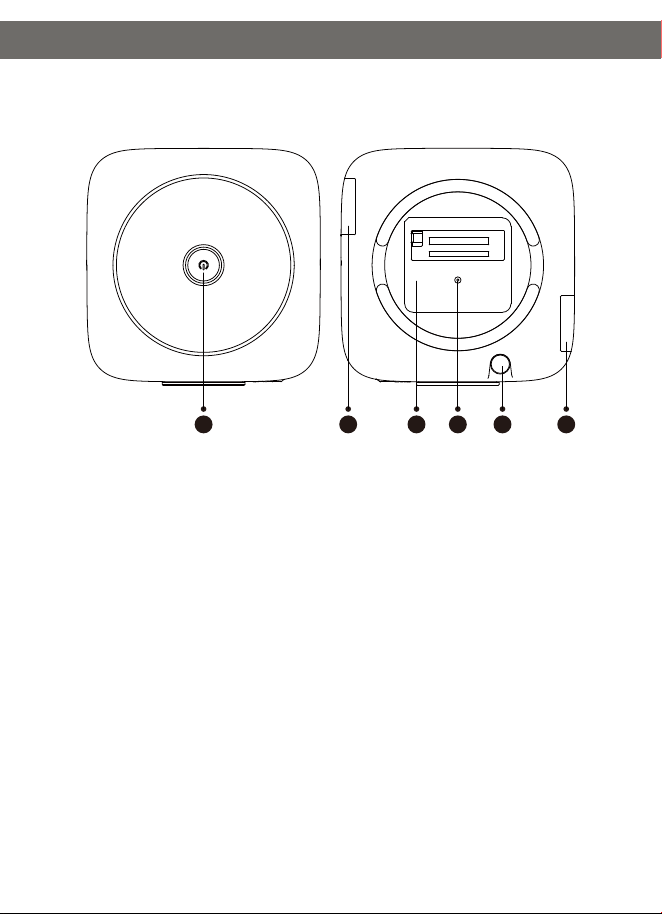
Projector Description
1. Lens
2. TOF camera
3. IR Receiver
4. IR Receiver
5. Headphone Jack
6. HDMI Port
7. USB Port
8. USB2 Port
9. Power Jack
10. Cooling Window
11. Speaker
12. Dust-Proof Net
13. Speaker
14. Dust-Proof Net
11 12
13 149 10
4 5 6 7 8
1 2 3
- 3 -
Projector Description
1. Power Key
2. Bottom Label
(Remove the Bottom Label
& Dust Cover to clean up the dust.)
Open the dust removal button, take out the
dust filter inside, and clean it regularly
(recommended once a month).
3. Hole for Stand(1/4 inch)
4. Height Adjustment
5. Dust Removal Button
Machine Feet
1 325 4 5
- 4 -
* Please install 2 AAA batteries (not included)
into the remote control before use.
**US only
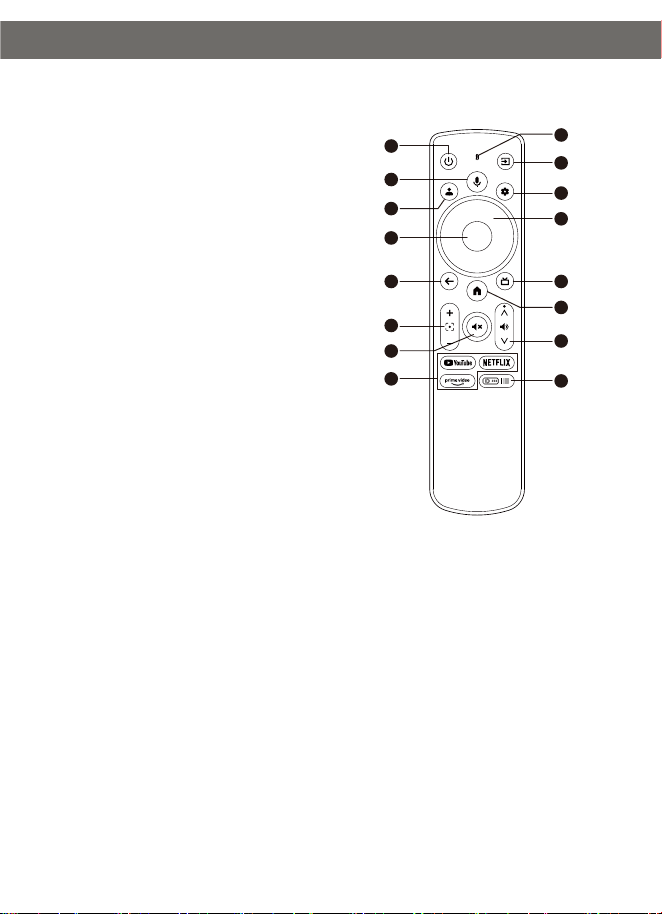
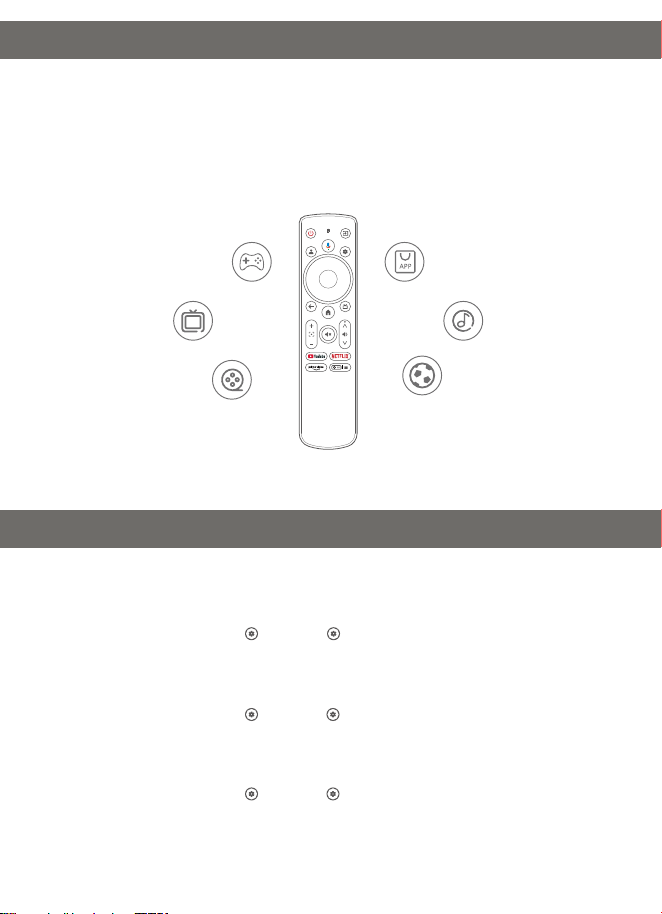
Remote Control Button Function
1. Power
Press to power on/switch to standby mode /
wake up /press and hold for 3s to power off
2. Google Assistant
Press and hold and talk
3. User Profile
Press to see profile page
4. OK
Confirm a selection/pause/resume
5. Back
Return to previous page
6. Pro Four Point
Trapezoid
7. Mute
8. ① YouTube
Open the YouTube app
② Netflix
Open the Netflix app
③ Prime Video
Open the Prime Video app
9. Indicator Light
10. Input Source
Press to choose from input sources
11. Settings
Press to access dashboard
12. Navigation
Control cursor on the screen
13. Live TV
Access live TV**
14.Home
Return to the home page
15. Volume +/-
16. Projector Setting
(Shortcut)
Access projector setting shortcut menu
1
2
3
4
5
6
7
8
9
10
11
12
13
14
15
16
- 5 -
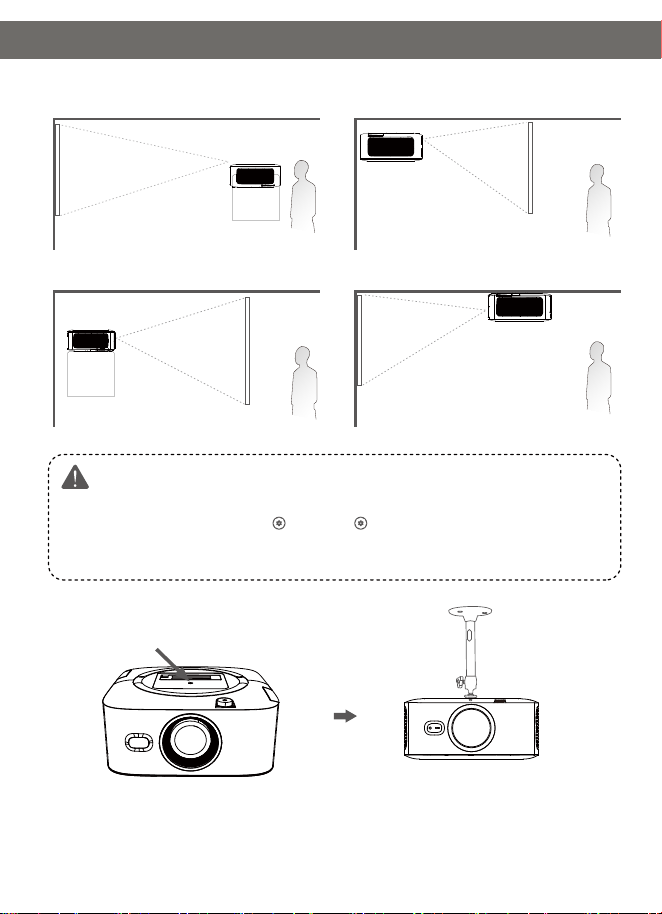
Projector Installation
Ceiling
Quick Start
Front Desktop
Rear Desktop
Rear Ceiling
Front Ceiling
Note:
Whichever installation option you select,please make sure.
*To go to Homepage > Dashboard > Settings > Projector > Advanced Settings >
Projection Mode to select the corresponding projection mode, so the images can be
projected correctly.
Tip: When ceiling mounting the projector, an additional mounting bracket is required.
This projector uses a single-hole mounting bracket, so it is important to confirm the
specifications before purchasing to avoid buying the wrong one.
- 6 -
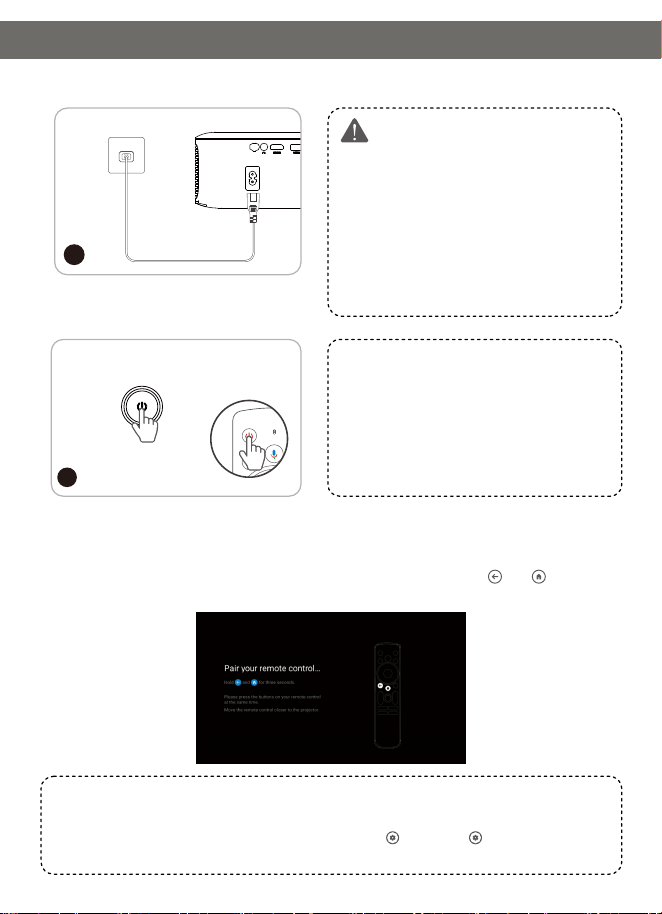
Take off the lens cover.
Connect the power adapter to an outlet.
Power On/Off
1
Quick Start
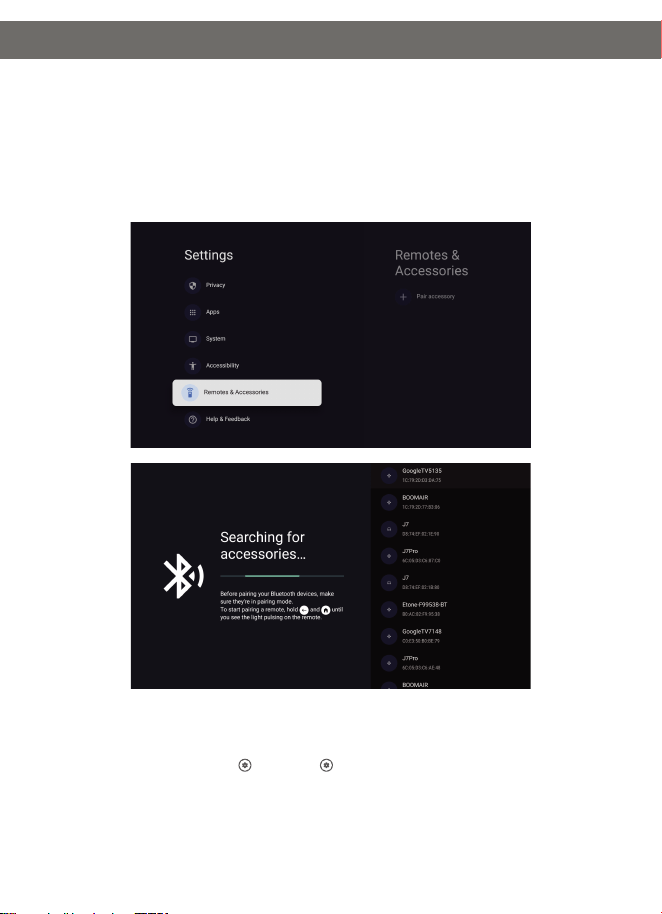
We recommended pairing the remote control with the projector via Bluetooth before use.
If you skip this, you can go to Homepage > Dashboard > Settings >
Remotes & Accessories to pair the remote control via Bluetooth later.
Tip:
Remote Control Pairing
Turn on the projector and wait for the pairing prompt on the screen. Bring the remote control
within 0.33 ft/0 cm of the projector, then simultaneously press and hold the and buttons.
Wait for the pairing to complete.
Note:
1.Please use the projector power button for
first boot. After start-up, complete the
remote control pairing for remote usage.
2.When you sign in to your Google
Account for the first time, it will take about
15 minutes to load the content and the
progress bar will show the loading status,
so please be patient.
1.Power on : When plug the power cord, the
power light will turn on. Wait for 5 seconds, then
press the power button,and the machine will
start running normally.
Standby mode: Press the power button to enter
standby mode in use.
Power off: Press the power button for 3 seconds
to shut down.
2

- 7 -
Screen Adjustment
Auto Focus
When the projector detects shaking/rapid movement, it will automatically adjust the image
quality. You can also trigger auto focus by going to Homepage > Dashboard > Settings >
Projector > Focus > Auto Focus.
Electric
/
Manual Focus
Press the Focus buttons on the remote, or go to Homepage > Dashboard > Settings >
Projector > Focus > Manual Focus and use the up & down buttons to sharpen the image focus
until the blurry image becomes clear.
Go to Homepage > Dashboard > Settings > Projector > Focus > Advanced,
you can enable/disable:
Auto Focus at Startup, allowing the projector to automatically adjust the focus upon
powering on.
Auto Focus When Moving, allowing the projector to automatically adjust the focus
when it is moved.
Tip:
- 8 -
Screen Adjustment
Go to Homepage > Dashboard > Settings > Projector >lmage Correction >
Advanced, you can enable/disable:
Auto Keystone at Startup, allowing the projector to automatically correct the
distortion upon powering on.
Auto Keystone When Moving, allowing the projector to automatically correct the
distortion when it is moved.
Tip:
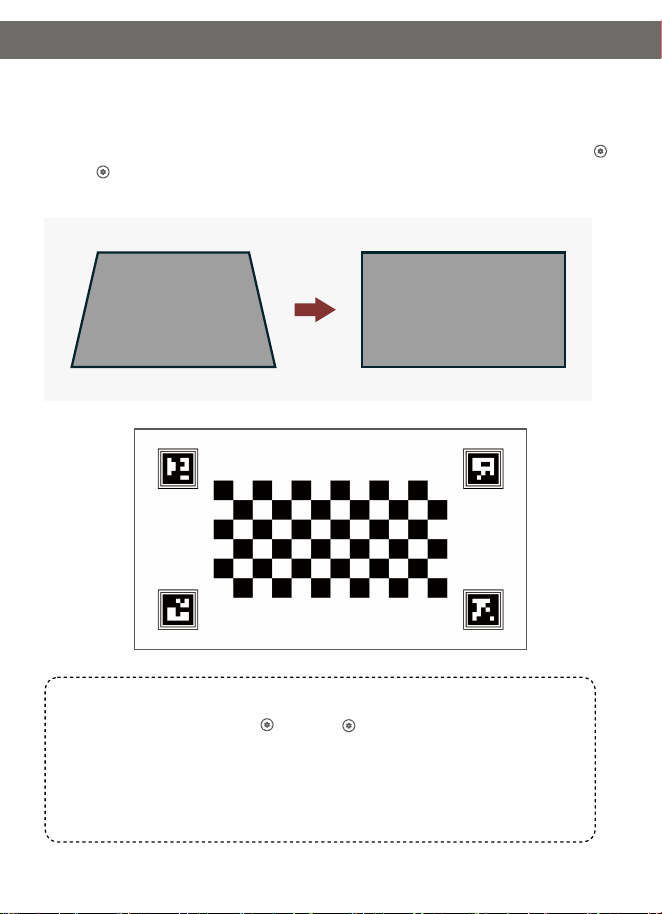
Auto Keystone Correction
When the projector detects shaking/rapid movement, it will automatically correct the keystone
distortion. You can also trigger auto keystone correction by going to
The optimal angle for automatic keystone correction is to keep it within 15°.
Homepage > Dashboard >
Settings > Projector > lmage Correction > Auto Keystone Correction.
- 9 -
Screen Adjustment
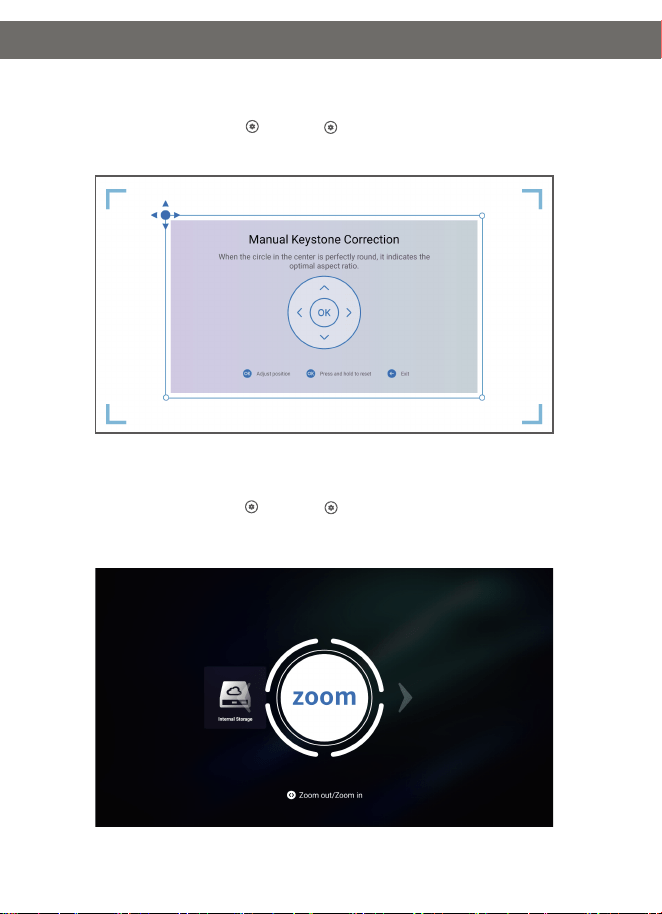
Screen Size Adjustment
Go to Homepage > Dashboard > Settings > Projector > Image Correction > Zoom & Shift
> Zoom to reduce or enlarge the image size.
Manual Keystone Correction
Go to Homepage > Dashboard > Settings > Projector > Image Correction > Manual
Keystone Correction to manually correct the Image shape by four points.
- 10 -
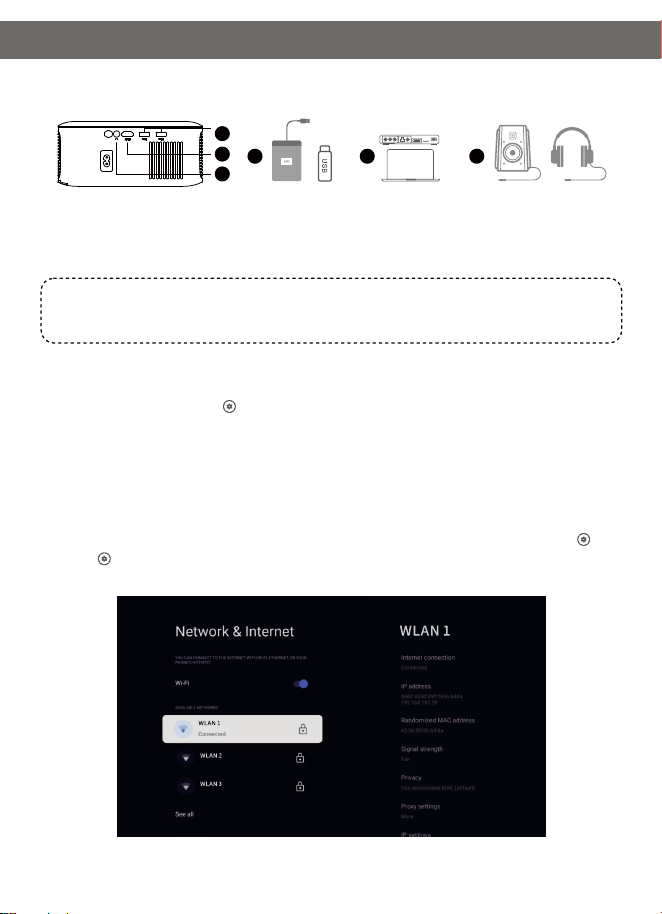
Connection
② HD Connection: Connect the device, Then press Input button on the remote control or go
to Homepage > Dashboard > Inputs and select HD.
③ Audio Connection: Support 3.5mm earphones and other cable sound devices. Not
required to select any input source.
Connect your device to the projector correctly, then select the right input source.
1 2 3
1
2
3
① USB Connection: Insert the disk. Then go to Homepage > Apps and select lMPlayer
under your Apps tab to locate and play the file.
For Basic TV, go to Homepage and select lMPlayer to locate and play the file.
Tip:
Wi-Fi Connection
You can connect your projector to your router's Wi-Fi by going to Homepage > Dashboard >
Settings > Network & Internet.
- 11 -
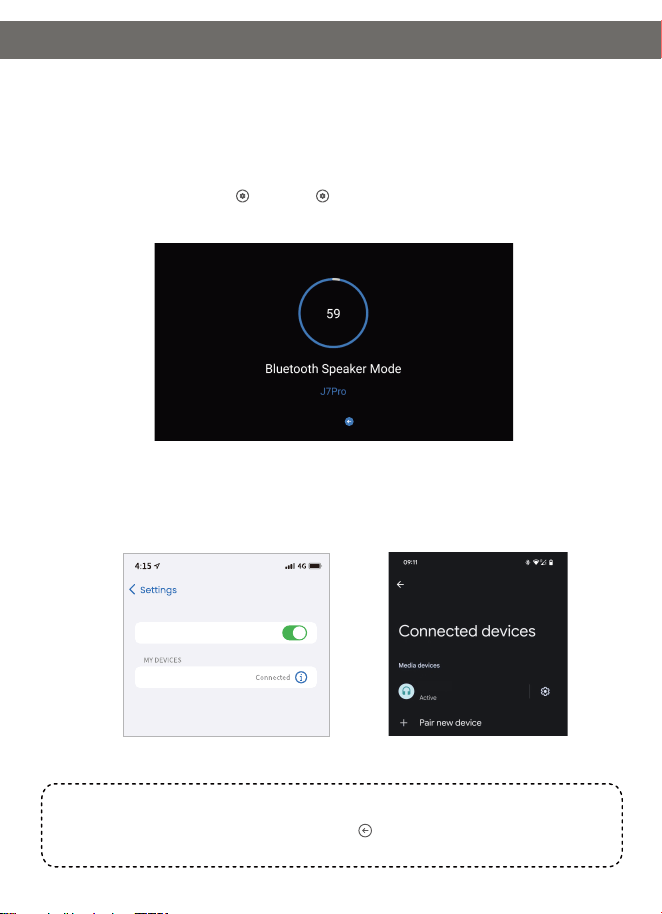
To exit the Bluetooth Speaker Mode, simply press button on the remote control for 2
seconds.
Tip:
Step 2:
Access your mobile device's Bluetooth settings and activate Bluetooth. Search for J7 Pro in
the available devices list to pair your mobile device with the projector.
J7 Pro
Bluetooth
Bluetooth
J7 Pro
Bluetooth Speaker Mode
You can use this projector as a Bluetooth speaker by connecting your mobile device to it
through a Bluetooth connection.
Step 1:
Go to Homepage >Dashboard > Settings > Projector > Bluetooth Speaker Mode to
make the projector ready for a Bluetooth connection.
Connection
Bluetooth speaker mode is being opened, please use your mobile phone to connect.
Press and hold the back button for 2 seconds to exit.
- 12 -
Bluetooth External Connection
You can connect your projector to other Bluetooth speaker devices.
Step 2:
Go to Homepage > Dashboard > Settings > Remotes & Accessories > Pair accessory
to scan and choose your external Bluetooth devices.
Step 1:
Turn on your external Bluetooth devices.
Connection
- 13 -
Screen Casting & Mirroring
You can wirelessly cast movies, games, music, and your screen from your iOS, macOS,
Android™, or Windows device to the projector, Please make sure that the projector and your
device are connected to the same wireless network.
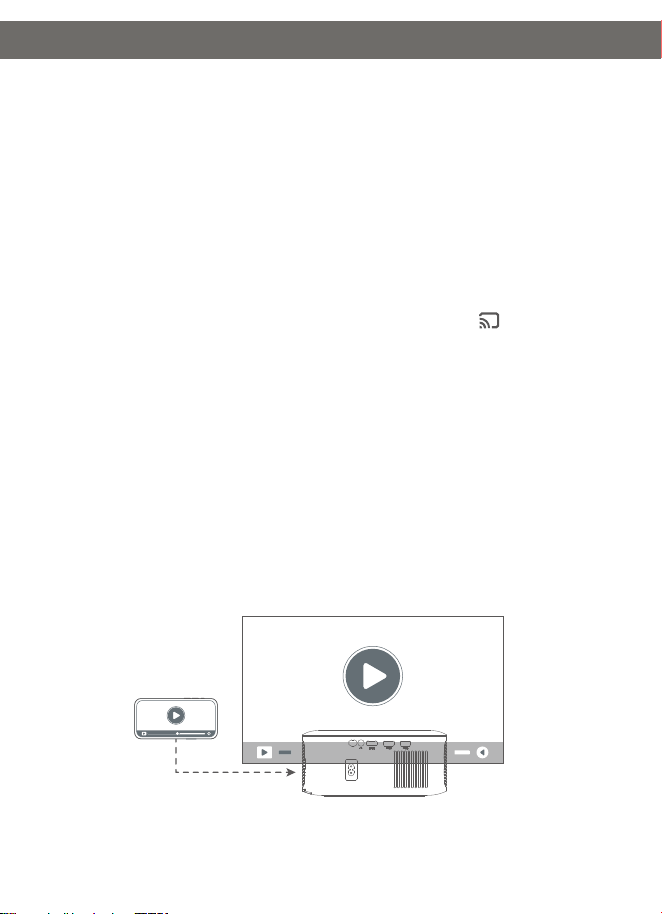
1. Google Cast
TM
To stream entertainment from your favorite apps on your phone, tablet, or laptop to your
projector follow the steps below:
1. Connect your device and the projector to the same wireless network.
2. Open a Google Cast-enabled app on your device.
3. Select the content that you would like to Cast, then tap the Cast icon .
4. Select “J7 Pro" to connect. The projector will display the content from your device.
* Due to copyright restrictions, certain content cannot be cast to the projector, You can
stream the content on the projector by installing same applications from the Apps tab.
Screen Casting & Mirroring
2. Screen Mirroring via AirScreen
To cast the device screen:
You can project the entire screen from your device to the projector.
① Ensure that both your device and the projector are connected to the same wireless
network.
② Search and install the AirScreen app on the projector.(AirCast /AirReceiver AirPlayCast
DLNA/ Miracast TV Receiver - Cast)
③ Open the AirScreen app and follow the on-screen instructions to complete the process.
Note: Due to system upgrades, the name of casting app may be updated. Please search for
apps with the keyword containing "AirPlay" in the Apps tab and try casting.
Google Assistant
Google Assistant
Your TV is more helpful than ever. Use your voice to find movies, streaming apps, play music and
control the TV. Ask Google Assistant to find a specific title. search by genre, or get personalized
recommendations. Even get answers on screen, control smart home devices, and more. Press
the Google Assistant button on the remote to get started.
- 14 -
MORE SETTINGS
1. Color Temperature
Go to Homepage > Dashboard > Settings > Display & Sounds > Picture > Color
Temperature to select from Standard, warm, Eye-care.
2. Reset
Go to Homepage > Dashboard > Settings > System > About > Reset to restore the
projector to factory settings.
3. System & Product Info
Go to Homepage > Dashboard > Settings > System > About to check system &
product information.
Projector Settings
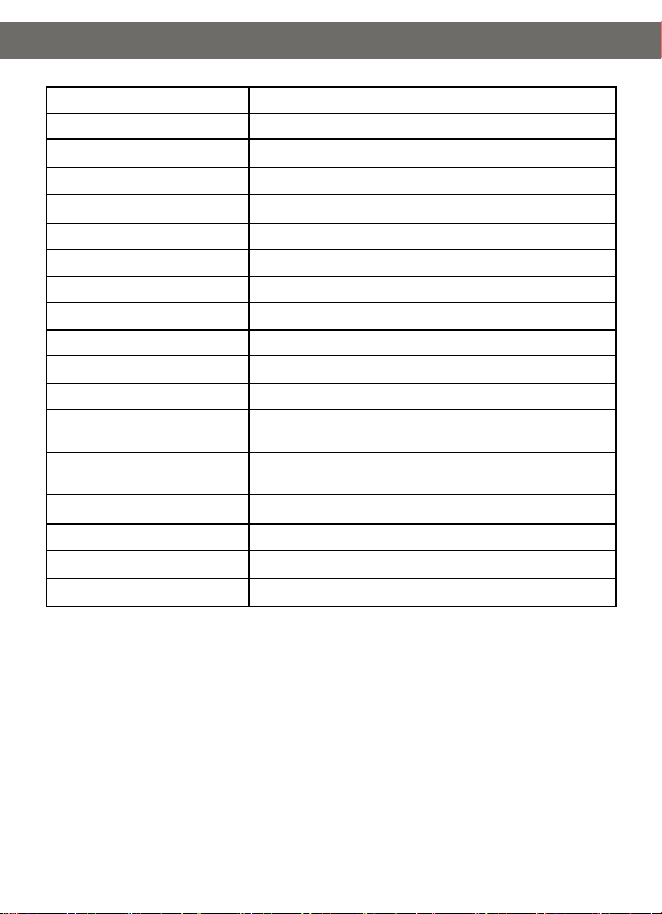
Specification
Model
Display Technology
Light Source
Resolution
Installation Type
Aspect Ratio
Focus
Keystone
Power Supply
Unit Dimension
Unit Net Weigh
Photo Format Supported
Audio Format Supported
Video Format Supported
Mounting Screws
Input Ports
Output Ports
Working Temperature
J7 Pro
LCD
LED
1920*1080P
Front / Rear / Ceiling
4:3 / 16:9
Auto / Manual
Auto / Manual
AC 100-240V, 50/60Hz
7.8*7.8*3.54 inch
2.45 lb
JPEG / BMP / GIF / PNG
MPEG-2/4 / H.264/H.265 / VP8 / HEVC / MP3 / AAC /
dd+(9630-B) / 3WAV / FLAC
MPEG-2/4 / MPEG_HD / HEVC / VC1 / AV1 / VP8 /
H.264 / HDR10 / MOV / MKV
M6,1/4"(ont included)
HDMI *1,USB*2
3.5mm headphone
0~35℃
- 15 -

Troubleshooting Guide
FAQs
1. The copyrighted content from Hulu, Netflix, and similar services can not be mirrored or
cast
* This projector offers a range of pre-installed streaming apps that are officially licensed. You can go
to the homepage > Apps, search for the app, and log in to your account to play the content. For
casting, refer to the "Screen Casting & Mirroring" section.
2. Fuzzy Image
* Adjust the focus or keystone correction of the projector.
* Make sure the projection distance is in the effective focal range of the projector.
* Remove the dust or dirt from the lens with a blower or soft-bristled brush.
3. Non-rectangular Image
* Place the projector perpendicular to the screen/wall if keystone correction function is not used.
* Use the keystone correction function to adjust image shape.
4. Automatic keystone correction failure
* Make sure the adjustment sensor on the front of the projector is not blocked or smudged.
* Move the projector until it is perpendicular to the projection surface and try again.
5. Autofocus failure
* Make sure the adjustment sensor on the front of the projector is not blocked or smudged.
* Move the projector back and forth until the projector is in recommended projection distance.
6. Remote control unresponsive
* Make sure the batteries are installed correctly and not drained.
* Remove any obstructions between your projector and remote control.
* Ensure the remote control is successfully paired with projector via Bluetooth.
* Make sure no button is pressed or stuck and check if the power indicator is still on. If yes, please
contact customer support or local service center.
7. Connect the Bluetooth devices
* Enter Homepage > Dashboard > Settings > Remotes & Accessories to check the
Bluetooth device list, and connect the device.
8. Others
* Please feel free to contact us at [email protected].
- 16 -
The terms HDMI, HDMI High-Definition Multimedia Interface, HDMI Trade dress and the
HDMI Logos are trademarks or registered trademarks of HDMI Licensing Administrator,
Inc.
Statement
Google TV is the name of this device's software experience and a trademark of Google
LLC. Google, Android, YouTube and Google Cast are trademarks of Google LLC.
Manufactured under license from Dolby Laboratories, Dolby, Dolby Audio, and the
double-D symbol are trademarks of Dolby Laboratories Licensing Corporation.
Netflix is a trademark of Netflix, Inc.
FAQs
- 17 -

FAQs
FCC Statement
Any Changes or modifications not expressly approved by the party responsible for
compliance could void the user's authority to operate the equipment. This device complies
with part 15 of the FCC Rules.
Operation is subject to the following two conditions:
(1) This device may not cause harmful interference, and
(2) This device must accept any interference received, including interference that may
cause undesired operation.
NOTE: This equipment has been tested and found to comply with the limits for a Class B
digital device, pursuant to part 15 of the FCC Rules. These limits are designed to provide
reasonable protection against harmful interference in a residential installation. This
equipment generates, uses and can radiate radio frequency energy and, if not installed and
used in accordance with the instructions, may cause harmful interference to radio
communications. However, there is no guarantee that interference will not occur in a
particular installation. If this equipment does cause harmful interference to radio or
television reception, which can be determined by turning the equipment off and on, the
user is encouraged to try to correct the interference by one or more of the following
measures.
——Reorient or relocate the receiving antenna.
——Increase the separation between the equipment and receiver.
——Connect the equipment into an outlet on a circuit different from that to which the
receiver is connected.
——Consult the dealer or an experienced radio/TV technician for help.
This equipment complies with FCC radiation exposure limits set forth for an uncontrolled
environment.
This equipment should be installed and operated with minimum distance 20cm between
the radiator & your body.
This transmitter must not be co-located or operating in conjunction with any other antenna
or transmitter.
FCC Statement
- 18 -

ISED Warning
This device complies with industry Canada licence-exempt RSS standard(s).
Operation is subject to the following two conditions:
(1)This device may not cause interference, and
(2) This device must accept any interference, including interference that may cause
undesired operation of the device.
Le présent appareil est conforme aux CNR d'lndustrie Canada applicables aux appareils
radio exempts de licence.
L'exploitation est autorisée aux deux conditions suivantes.
(1)l'appareil ne doit pas produire de brouillage, et
(2) l'utilisateur de l'appareil doit accepter tout brouillage radioélectriaue subi, même si le
brouillage est susceptible d'en compromettre le fonctionnement.
The device is compliance with RF exposure guidelines, users can obtain Canadian
information on RF exposure and compliance. The minimum distance from body to use the
device is 20cm.
L'appareil est conforme aux directives d'exposition aux RF, les utilisateurs peuvent obtenir
des informations canadiennes sur l'exposition aux RF et la conformite. La distance
minimale du corps pour utiliser lappareil est de 20cm.
This transmitter must not be co-located or operating in conjunction with any other antenna
or transmitter. Cet émetteur ne doit pas être colocalisé ou fonctionner en conjonction avec
une autre antenne ou un autre emetteur.
Operation of this device in the band 5150-5250 MHz is restricted to indoor use only.
Le fonctionnement de cet appareil dans la bande 5150-5250 MHz est limité à une
utilisation en interieur uniquement.
ISED Warning
- 19 -
Please scan the QR code to watch the
video for detailed steps.
TOP SERVICE:
Any questions about this item, please contact:
1-888-986-2646(US)