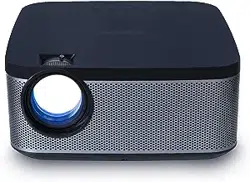

HD Pro Projector
Quick Start Guide
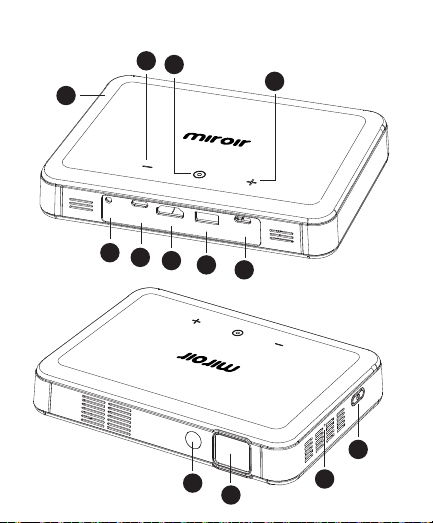
Your Miroir HD Pro Projector
USBAUDIO
HDMI
USB-C Charge
USB-C Video
A
B
B
C
D
E
F
G
H
USBAUDIO
HDMI
USB-C Charge
USB-C Video
I
J
K
L

Battery Indicator Lights - Lights flash in turn as the device
charges. The battery is fully charged when all the lights
illuminate and no longer flash.
Volume Controls - Increase/decrease the volume output of
the projector.
Mode Control - Press for auto focus and auto keystone
adjustments. Press and hold to turn ECO brightness
mode on or o.
Audio Out (3.5mm) - Optional) Connect an external
speaker or headphones.
USB-C Video Input - Connect the supplied USB-C video
cable to a device that supports USB-C video output.
HDMI Video Input - Connect an HDMI cable to a device
that supports HDMI video output.
USB Power Output - Connect a USB power cable to
provide power to a HDMI streaming stick or to charge a
smartphone battery. Cannot be used for video input.
USB-C Charge Input - Connect the supplied USB-C
charging cable and power adapter. Fully charge battery
before the first use (approx. 4-5 hours).
Auto Focus Sensor - IMPORTANT: Do not block sensor.
Keep sensor clean and free of debris.
Projection Lens
Reset Button - Press to reset projector.
Power Button - Press and hold for 3 seconds to power the
projector on or o. Briefly press to check battery life
on the projector. Battery life will be displayed by the
number of lit battery indicator lights.
A
B
C
D
E
F
G
H
I
J
K
L
USBAUDIO
HDMI
USB-C Charge
USB-C Video
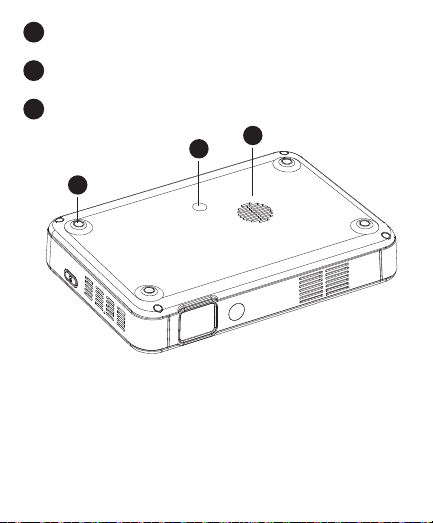
O
N
M
Rubber Foot Pads - Provides stability and proper airflow
to cooling vents.
Tripod Mount - Will fit a standard sized tripod screw.
Tripod not included.
Cooling Vent - IMPORTANT: Do not cover or block
airflow to the vent.
M
N
O
Learn More
To learn more about your Miroir HD Pro Projector and
its operations, to review specs, and find answers to
frequently asked questions,
please visit: www.miroirusa.com/M220
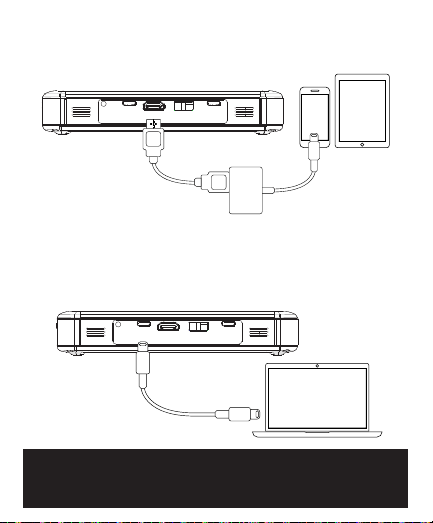
Connect Your MacBook Pro
and MacBook Using USB-C
To connect your Macbook to a Miroir projector, you will need a
USB-C Video Cable (included in the box).
Connect Your Device Using HDMI
To connect your Apple device to a Miroir projector, you will need
an Apple Digital AV Adapter (sold separately) and an HDMI cable
(included in the box).
USBAUDIO
HDMI
USB-C ChargeUSB-C Video
R
HDMI Cable
(Included)
Apple Lightning
Digital AV Adapter
(Sold separately)
USBAUDIO
HDMI
USB-C ChargeUSB-C Video
R
USB-C Video Cable
(Included)
IMPORTANT! Not all USB – C cables will support video.
The USB-C cable that comes with the projector will support
video and charging.

Troubleshooting
The image is not square
• Press the mode control. The projector should automatically
focus and adjust the vertical keystone of the image to the
best condition.
• Check that the projector’s lens is parallel to your projection
surface and that your projection surface is flat.
No sound
• Check the volume control on your source device to ensure
the volume is turned up.
• Check the volume control on the projector to ensure the
volume is turned up.
• If you are using an adapter, verify that the adapter
supports audio.
• Check that the HDMI cable is fully plugged into the
HDMI port.
Learn More
To learn more about your Miroir HD Pro Projector and
its operations, to review specs, and find answers to
frequently asked questions,
please visit: www.miroirusa.com/M220

Troubleshooting
No Signal Message
• Check that you are using the required cable and/or adapter.
• If you are using a digital AV adapter, check that the adapter is
an authentic Apple adapter and is compatible with your model
phone or tablet.
• If you are connecting via USB-C, check that you are using the
USB-C video cable that came with the projector – this cable is
labeled “USB-C Video Connector.” Some USB-C cables do not
support video.
• If you are connected to a laptop or computer, check your
computer display settings to ensure a multiple display option is
selected (such as “duplicate these displays”).
• Check that your source device supports HDMI video out or
USB-C video out.
Projector will not power on, or stay powered on
• Check the battery life of the projector by briefly pressing the
power button on the projector. If one or fewer lights illuminate,
charge the battery with the USB-C cable.
• Check that you are plugging the USB-C cable into the USB-C power
Input port and not the USB-C Video input port on the projector.
The image is blurry
• Press the mode control. The projector should automatically focus
and adjust the vertical keystone of the image to the best condition.
• Check that the surface you are projecting on is smooth and
non-reflective.
• Check that the auto focus sensor is clean and ensure that there is
no obstruction between the sensor and your projection surface.

© 2017 Miroir USA, LLC. All rights reserved. Miroir and the Miroir
logo are owned by Miroir USA, LLC. All other trademarks are the
property of their respective owners. Miroir USA, LLC assumes
no responsibility for any errors that may appear in this manual.
Information contained herein is subject to change without notice.