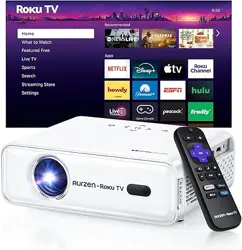

EMOTN H1 PROJECTOR
USER MANUAL
support@emotn.com

EMOTN H1 PROJECTOR
USER MANUAL
support@emotn.com

USER MANUAL

USER MANUAL

1
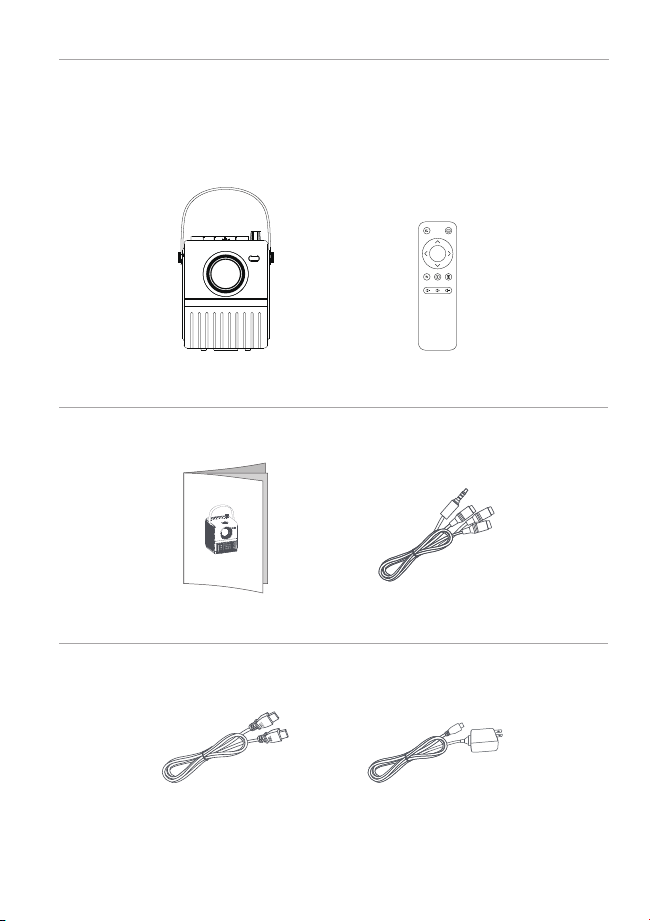
PACKING LIST
2
FUNCTION OVERVIEW
1 2
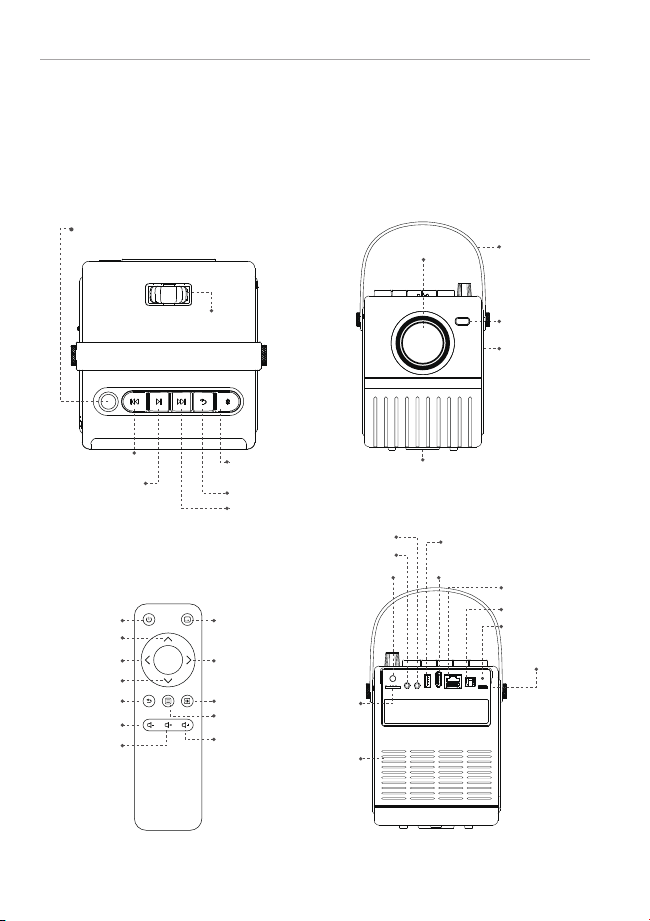
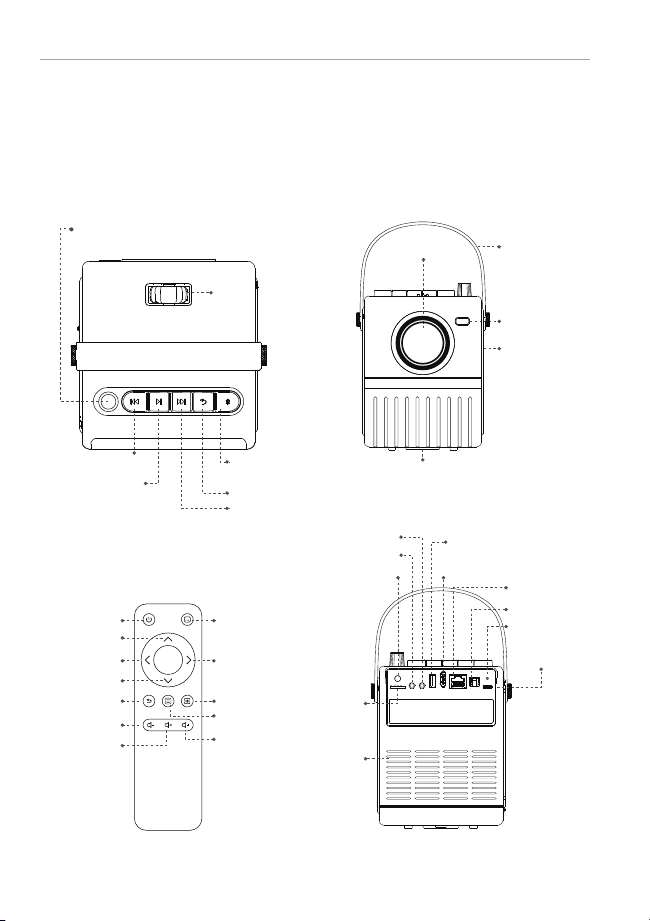
Projector Remote Controller
OK
Power Adapter
HDMI Cable
User Manual AV Cable
OK
Power
Up
Left
Down
Return
Volume Up
Volume Down
Mute
Menu
Source Switch
Right
Home
Knob:Turn on/off,
and volume adjust
Previous
Play/Pause
Focus
Next
Back
Bluetooth
Speaker Mode
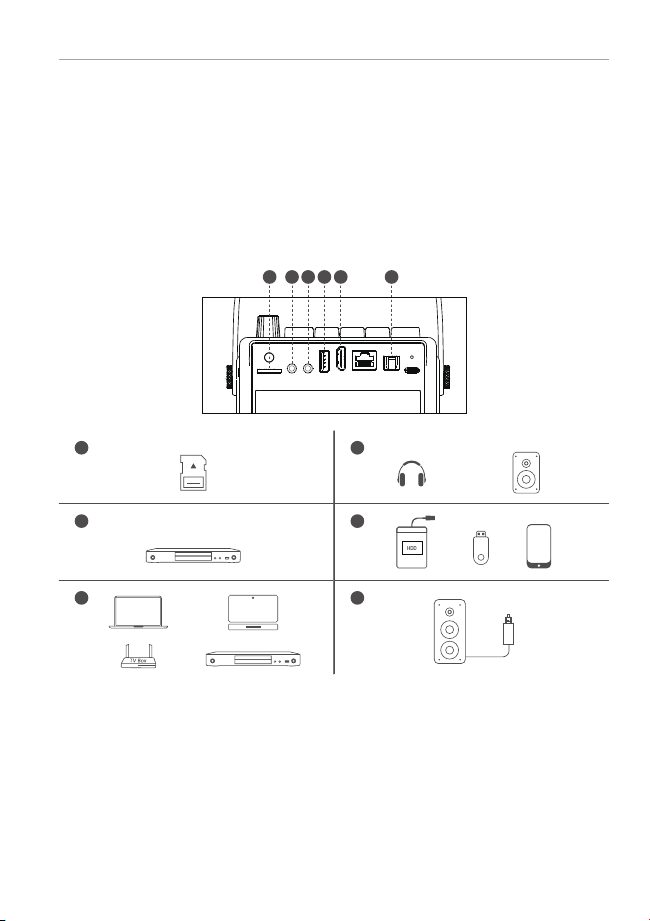
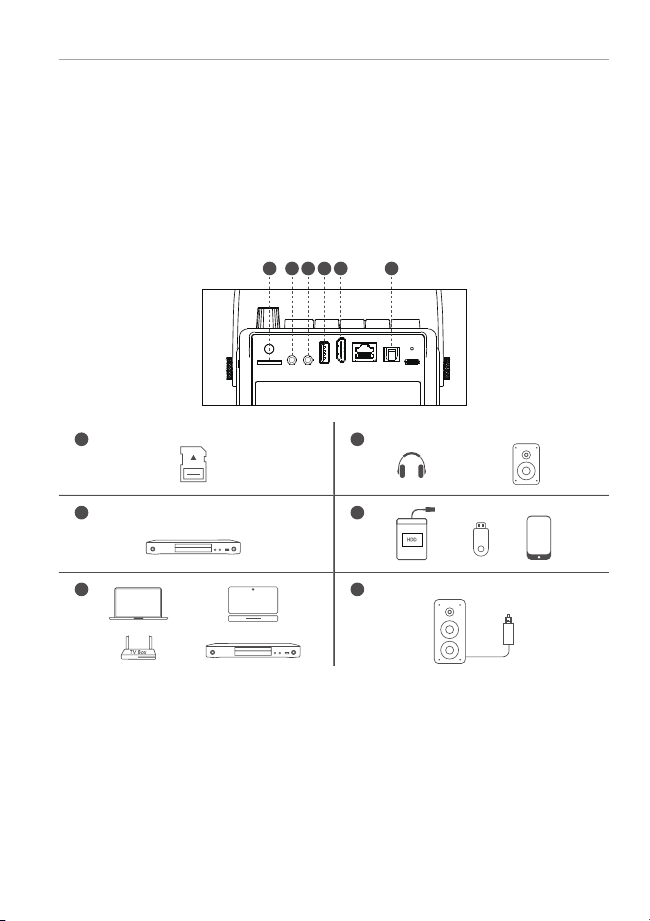
Micro SD
USB
HDMI In
LAN
S/P DIF Out
IR Receiver
Indicator Light
DC IN
AV In
Audio Out
Lens Portable belt
Status Light
Adjustable Kickstand
Stereo Speakers
Air Inlet
H1 PROJECTOR USER MANUAL H1 PROJECTOR USER MANUAL

1
PACKING LIST
2
FUNCTION OVERVIEW
1 2
Projector Remote Controller
OK
Power Adapter
HDMI Cable
User Manual AV Cable
OK
Power
Up
Left
Down
Return
Volume Up
Volume Down
Mute
Menu
Source Switch
Right
Home
Knob:Turn on/off,
and volume adjust
Previous
Play/Pause
Focus
Next
Back
Bluetooth
Speaker Mode
Micro SD
USB
HDMI In
LAN
S/P DIF Out
IR Receiver
Indicator Light
DC IN
AV In
Audio Out
Lens Portable belt
Status Light
Adjustable Kickstand
Stereo Speakers
Air Inlet
H1 PROJECTOR USER MANUAL H1 PROJECTOR USER MANUAL
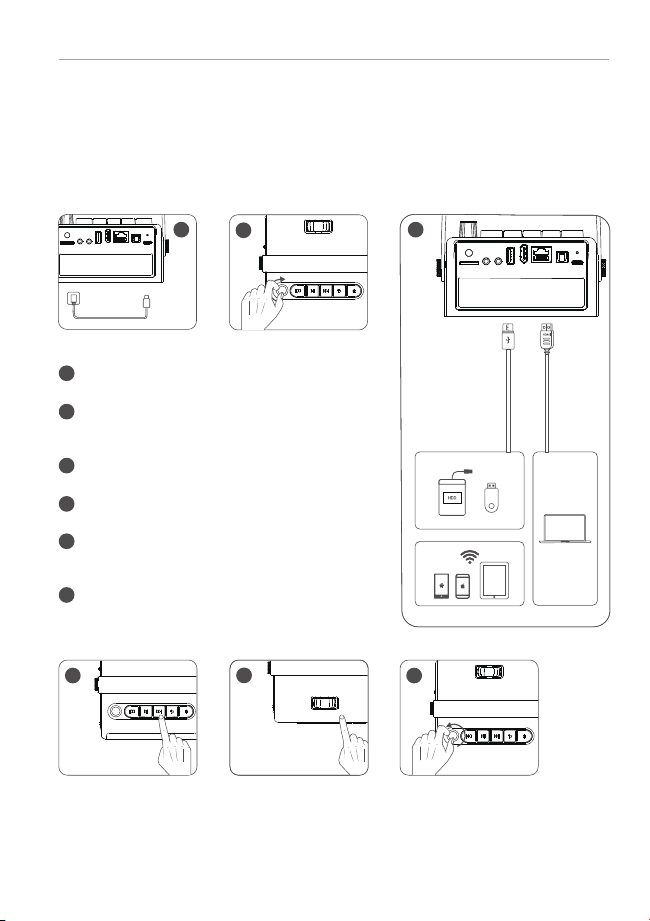
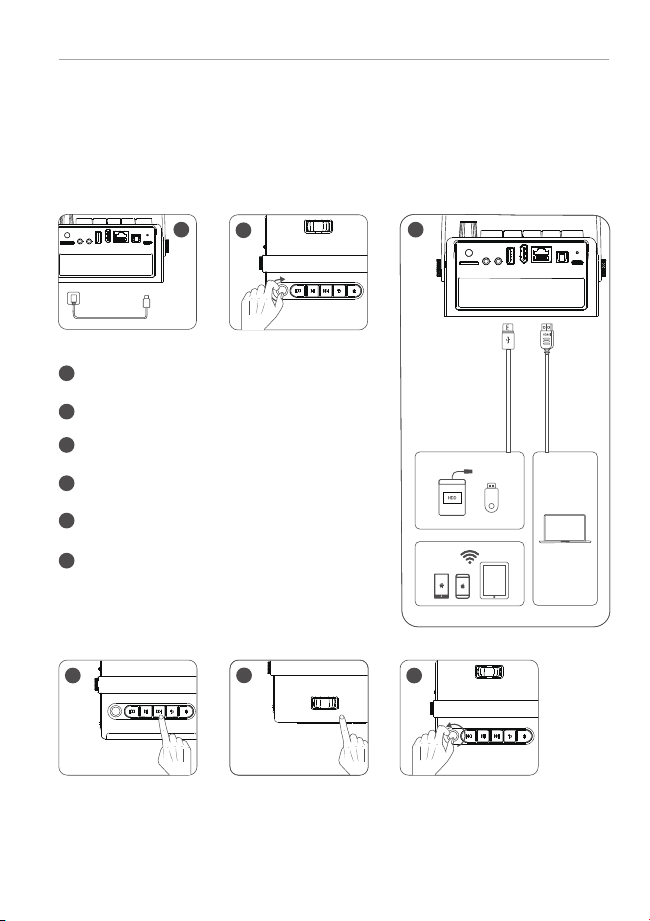
Connect the power cable to the projector.
Turn the knob clockwise to turn on the projector
and adjust the volume to increase.
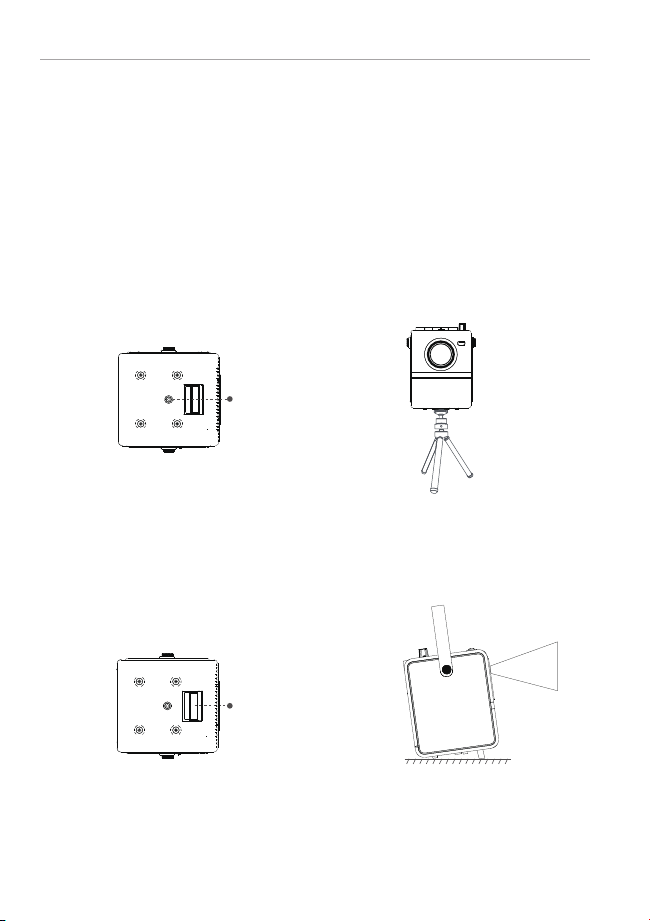
Kickstand Instructions
Tripod
Connect your device to the projector correctly.
Step1. Open the kickstand with your finger.
Step2. Put the projectior on a flat surface and turn on the projector.
A 1/4 threaded hole is reserved at the bottom of the projector to easily fit a 1/4 tripod.
Please fix the tripod firmly to prevent the projector from falling down.
Play the next song or video.
1
1
2
3
4
5
6
2
Turn the knob counterclockwise to reduce the
volume and turn off the projector.
Adjust the focus ring to get best image
performance.
5
4
3
3
QUICK START
4
INSTALLATION
3 4
6
Adjustable Kickstand
1/4 threaded hole
H1 PROJECTOR USER MANUAL H1 PROJECTOR USER MANUAL
Connect the power cable to the projector.
Turn the knob clockwise to turn on the projector
and adjust the volume to increase.
Kickstand Instructions
Tripod
Connect your device to the projector correctly.
Step1. Open the kickstand with your finger.
Step2. Put the projectior on a flat surface and turn on the projector.
A 1/4 threaded hole is reserved at the bottom of the projector to easily fit a 1/4 tripod.
Please fix the tripod firmly to prevent the projector from falling down.
Play the next song or video.
1
1
2
3
4
5
6
2
Turn the knob counterclockwise to reduce the
volume and turn off the projector.
Adjust the focus ring to get best image
performance.
5
4
3
3
QUICK START
4
INSTALLATION
3 4
6
Adjustable Kickstand
1/4 threaded hole
H1 PROJECTOR USER MANUAL H1 PROJECTOR USER MANUAL
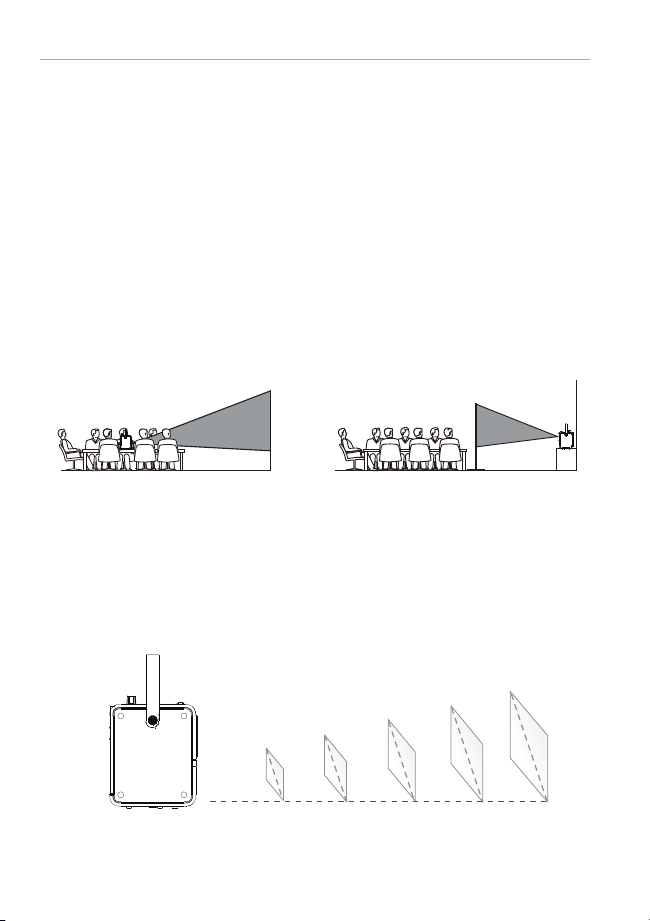
PROJECTION DISTANCE & SIZE
The projector can be used to project onto a wall or screen, on a table. When
projecting from the rear position, a special screen will be needed (not
included) to display the image. Be sure to aim the remote at the sensor on
the front or rear of the projector.
5
7
PROJECTION CONNECTION
1
Front Table Rear Table
1 2
2
3
5
4
6
7 8
*For reference only
60"
4.92ft
(1.5m)
9.84ft
(3m)
13.12ft
(4m)
16.4ft
(5.0m)
19.68ft
(6.0m)
120"
160"
200"
240"
A. Wired Connection
B. Bluetooth Speaker Connection
1. Enter "Bluetooth Speaker Mode" via projector Bluetooth button.The
Bluetooth name of the projector:H1_Speaker.
2. Open your devices Bluetooth settings, search and pair the projector.
3. You can reset Bluetooth connection via long press for 2 seconds of
projector Bluetooth button.
6
PLACING THE PROJECTOR
3 4 5 6
H1 PROJECTOR USER MANUAL H1 PROJECTOR USER MANUAL

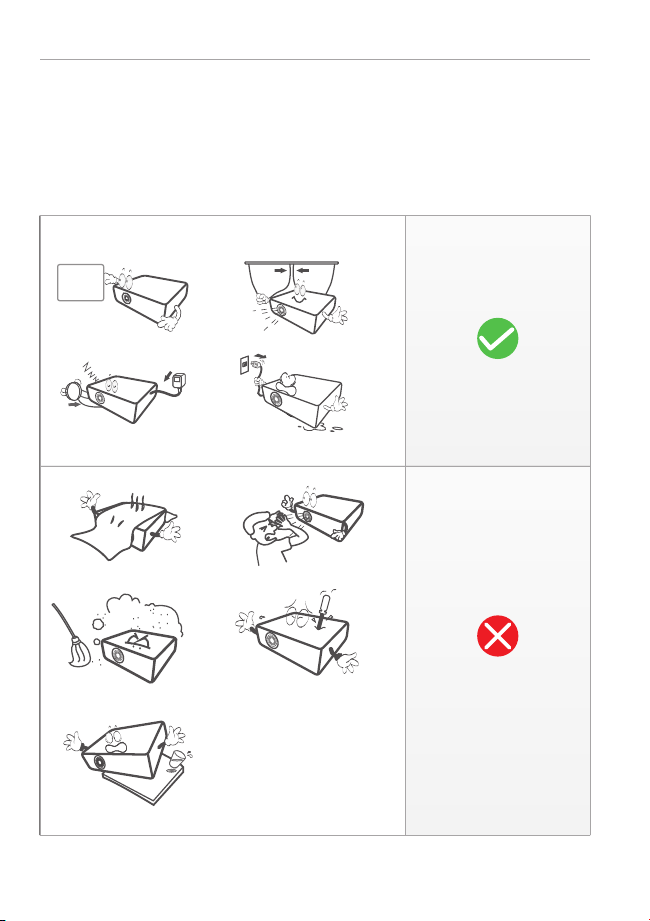
Recommended
Display Technology Light Source Native Resolution Projection Distance
LCD LED 1920x1080 1.0—6.0m
Projection Size Focus Keystone Aspect Ratio
Manual60-240inches Digital Correction
±45°
4:3 / 16:9
Installation Type Power Supply Lithium Polymer Battery Net Weight
DC 20V 28Wh 1.26KgFront/Rear
Speaker Ports
Bluetooth Speaker
Name
Integrated Watt
HDMI x1 / USB x1 / 20V
DC INx1 / AV In x1 / Audio
Out x1 / TF Card slot x1/
S/P DIF
3W×2 H1_Speaker 65W
Video Format
Supported
Photo Format
Supported
Audio Format
Supported
Text Format
Supported
TXT
8
SPECIFICATION
9
ATTENTION
9 10
NOT
Recommended
H1 PROJECTOR USER MANUAL H1 PROJECTOR USER MANUAL
.mpg/.avi/.ts/.mov/.mkv/.
dat/.mp4/.vob/.flv/.3g2/.
3gp/.swf/.m4v
.bmp/.gif/.jpg/.jpeg/.png
.aac/.flac/.m4a/.mp2/.
mp3/.ogg/.wav
Recommended
Display Technology Light Source Native Resolution Projection Distance
LCD LED 1920x1080 1.0—6.0m
Projection Size Focus Keystone Aspect Ratio
Manual60-240inches Digital Correction
±45°
4:3 / 16:9
Installation Type Power Supply Lithium Polymer Battery Net Weight
DC 20V 28Wh 1.26KgFront/Rear
Speaker Ports
Bluetooth Speaker
Name
Integrated Watt
HDMI x1 / USB x1 / 20V
DC INx1 / AV In x1 / Audio
Out x1 / TF Card slot x1/
S/P DIF
3W×2 H1_Speaker 65W
Video Format
Supported
Photo Format
Supported
Audio Format
Supported
Text Format
Supported
TXT
8
SPECIFICATION
9
ATTENTION
9 10
NOT
Recommended
H1 PROJECTOR USER MANUAL H1 PROJECTOR USER MANUAL
.mpg/.avi/.ts/.mov/.mkv/.
dat/.mp4/.vob/.flv/.3g2/.
3gp/.swf/.m4v
.bmp/.gif/.jpg/.jpeg/.png
.aac/.flac/.m4a/.mp2/.
mp3/.ogg/.wav

1. Blurry Image
a. Adjust focus ring or keystone.
b. Projector and screen/wall must be in effective distance.
2. Remote Control Unresponsive
a. Make sure remote control points at IR receiver directly.
b. Do not cover IR receiver window.
c. Check the battery.
3. USB/TF Unrecognized
a. Make sure your USB stick/TF card is not over 128GB.
4. No Sound
a. Turn off Dolby Audio in your device.
b. If a movie's audio number is "ac3" (Dolby Digital), then the sound may not be
played (this kind of movie is very rare).
5. The projector can't screen mirroring?
a. Firstly, please kindly check whether the projector selects the Screen Mirroring
input source and whether the device is connected to the projector WiFi.
b. Please make sure the device and projector connect to the same WiFi if the
projector features WiFi function.
c. Please unplug the power and re-apply it again if the Screen Mirroring input source
is selected and the WiFi is connected while the projector still can't screen mirroring.
d. Please reset the projector if it still can't work after unplugging the power.
e. Please feel free to contact us.
6. Fail to connect the "Bluetooth Speaker Mode"?
a. Please open the projector "Bluetooth Speaker Mode" and device Bluetooth setting.
b. Long press for 2 seconds of remote control or projector button to reset.
c. Please check if the device pair with the projector successfully.
d.If the projector still can't work when successfully paired, please restart the
projector and re-apply it again.
e. Please feel free to contact us.
11
TROUBLESHOOTING
11 12
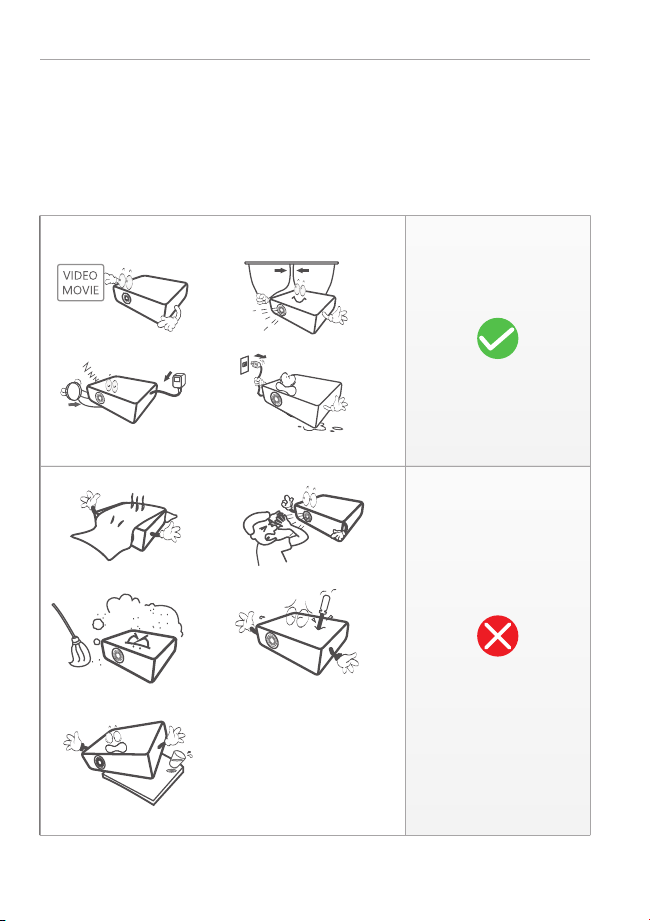
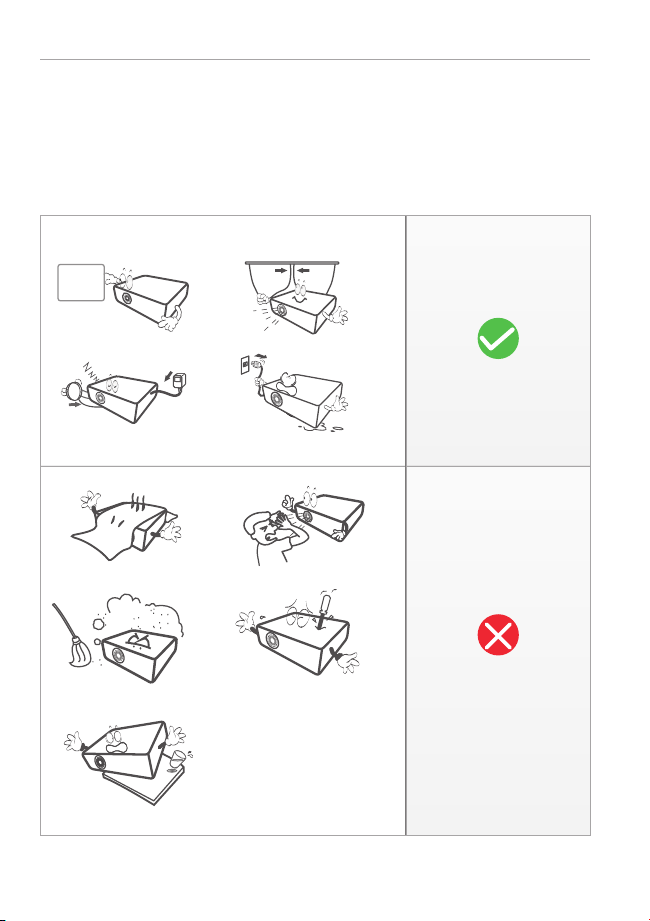
1. Do not look directly into the projector light.
2. Don't touch the projector lens.
3. Use of controls or adjustments or performance of procedures other
than those specified may result in hazardous radiation exposure.
4. Changes or modified to this unit not expressly approved by the party responsible for
compliance could void the user's authority to operate the equipment.
5. Use of this unit near fluorescent lighting may cause interference regarding use of the
remote. If the unit is displaying erratic behavior move away from any fluorescent
lighting, as it may be the cause.
6. Shock hazard - Please do not dismantle the projector without permission.
7. To reduce the risk of fire or electric shock, do not expose this
apparatus to rain, moisture, dripping, or splashing.
8. Objects fill with liquids, such as vases, shall not be placed on the apparatus.
10
WARNINGS AND PRECAUTIONS
H1 PROJECTOR USER MANUAL H1 PROJECTOR USER MANUAL

1. Blurry Image
a. Adjust focus ring or keystone.
b. Projector and screen/wall must be in effective distance.
2. Remote Control Unresponsive
a. Make sure remote control points at IR receiver directly.
b. Do not cover IR receiver window.
c. Check the battery.
3. USB/TF Unrecognized
a. Make sure your USB stick/TF card is not over 128GB.
4. No Sound
a. Turn off Dolby Audio in your device.
b. If a movie's audio number is "ac3" (Dolby Digital), then the sound may not be
played (this kind of movie is very rare).
5. The projector can't screen mirroring?
a. Firstly, please kindly check whether the projector selects the Screen Mirroring
input source and whether the device is connected to the projector WiFi.
b. Please make sure the device and projector connect to the same WiFi if the
projector features WiFi function.
c. Please unplug the power and re-apply it again if the Screen Mirroring input source
is selected and the WiFi is connected while the projector still can't screen mirroring.
d. Please reset the projector if it still can't work after unplugging the power.
e. Please feel free to contact us.
6. Fail to connect the "Bluetooth Speaker Mode"?
a. Please open the projector "Bluetooth Speaker Mode" and device Bluetooth setting.
b. Long press for 2 seconds of remote control or projector button to reset.
c. Please check if the device pair with the projector successfully.
d.If the projector still can't work when successfully paired, please restart the
projector and re-apply it again.
e. Please feel free to contact us.
11
TROUBLESHOOTING
11 12
1. Do not look directly into the projector light.
2. Don't touch the projector lens.
3. Use of controls or adjustments or performance of procedures other
than those specified may result in hazardous radiation exposure.
4. Changes or modified to this unit not expressly approved by the party responsible for
compliance could void the user's authority to operate the equipment.
5. Use of this unit near fluorescent lighting may cause interference regarding use of the
remote. If the unit is displaying erratic behavior move away from any fluorescent
lighting, as it may be the cause.
6. Shock hazard - Please do not dismantle the projector without permission.
7. To reduce the risk of fire or electric shock, do not expose this
apparatus to rain, moisture, dripping, or splashing.
8. Objects fill with liquids, such as vases, shall not be placed on the apparatus.
10
WARNINGS AND PRECAUTIONS
H1 PROJECTOR USER MANUAL H1 PROJECTOR USER MANUAL

12
NOTICE
13 14
Without the prior written permission of Super Creativity Limited or its subsidiaries (the
"Company"), no part of this Manual shall be used in any form or by any method,
including copying, transmitting, translating, storing in a retrieval system or translating
into any text or computer language by electronic, mechanical, optical, chemical,
handwritten or any such method.
If the user or a third party suffers any damage, loss, cost or expense as a result of
accident, improper use, or violation of the operating procedures of the machine, or any
modification, overhaul without authorization, or replacement of the product in any
form, or failure to strictly follow this Manual or the operating and maintenance manual
provided by the Company during operation and maintenance, the Company shall not be
held liable.
To the maximum extent permitted by law, this Manual and the Product described
(including its hardware, software, firmware, etc.) are provided "as is", which may have
some defects or errors.
The Company provides no warranty of any kind, express or implied, including but not
limited to merchantability, quality satisfaction, fitness for a particular purpose, nor shall
it indemnify any special, incidental, accidental or consequential damages arising from
the use of this Manual or the Product, including but not limited to loss of business profit,
system failure, loss of data or documents.
The description and images involved in this Manual may differ from actual products,
please refer to actual products.due to product version upgrade or other needs, the
Company reserves the right to update this Manual at any time.
This device complies with Part 15 of the FCC Rules. Operation is subject to the
following two conditions: (1) this device may not cause harmful interference, and
(2) this device must accept any interference received, including interference that
may cause undesired operation.
The terms HDMI and HDMI High-Definition Multimedia Interface, and
the HDMI Logo are trademarks or registered trademarks of HDMI
Licensing Administrator, Inc. in the United States and other countries.
FCC STATEMENT
H1 PROJECTOR USER MANUAL H1 PROJECTOR USER MANUAL

ユーザーマニュアル

ユーザーマニュアル

1
パッキングリスト
2
機能説明
17 18
プロ ジェクター リモコン
OK
アダプター
HDMIケーブル
ユーザーマニュアル AVケーブル
OK
電 源スイッチ
上
左
下
戻る
音量上げ
音量下げ
ミュート
メニュー
入力源切替
右
ホームページ
ボタン:オン/オフ、音量調整
フォー カス 調 整
再生/一時停止
フォー カス 調 整
次のコンテンツ
戻る
ブルートゥース
スピーカーモード
Micro SD
USB
HDMI In
LAN
S/P DIF Out
赤外線受信器
表示ランプ
DC IN
AV In
オーディオ出 力
レンズ ポータブル ベルト
ステ ータスライト
調整用スタンド
ステレオスピーカー
吸気口
H1プロジェクターユーザーマニュアル H1プロジェクターユーザーマニュアル

電源ケーブルをプロジェクター本体に接続します。
時計回りにつまみを回して電源を入れ、適宜に音量を
上げます。
スタンドの取付
三脚
使用する装置を正しくプロジェクターに接続します。
手順1:指でスタンドを取り出します。
手順2:プロジェクターを平面に置き、電源を入れます。
プロジェクターの底面には1/4ネジ穴あり、1/4三脚を簡単に取り付けることができます。
プロジェクターの落下を防ぐため、三脚をしっかりと固定してください。
次のコンテンツを再生します。
1
1
2
3
4
5
6
2
逆時計回りにつまみを回して電源を下げるかそのま
ま電 源を切ります。
視覚体験がベストな状態になるようにフォーカスを
調整します。
5
4
3
3
クイックスタート
4
取付方法
6
調整用スタンド
1/4ネジ穴あり
H1プロジェクターユーザーマニュアル H1プロジェクターユーザーマニュアル
19 20

投写距離とサイズ
本機は、壁やスクリーンへの投写、卓上への設置などに使用できます。背面から投写
する場合は、映像を表示するための専用スクリーン(別売)が必要になります。リモコ
ンは、必ずプロジェクターの前面または背面のセンサーに向けて使用してください。
5
7
投写接続
1
正面卓上 背面卓上
1 2
2
3
5
4
6
*参考のみ
A. 有線接続
B. ブルートゥーススピーカーとの接続
6
プロジェクターの設 置
3 4 5 6
1.リモコンやプロ ジェクターのブルートゥースボタンを押して、ブル ートゥーススピー
カーモードに入ります。プロジェクターID: H1_Speaker。
2.装置のブルートゥース設定より、プロジェクターを見つけてマッチングします。
3.リモコンやプロジェクターのブルートゥースボタンを2秒間長押しすると、プロジェ
クターのブルートゥースがリセットされます。
H1プロジェクターユーザーマニュアル H1プロジェクターユーザーマニュアル
60"
4.92ft
(1.5m)
9.84ft
(3m)
13.12ft
(4m)
16.4ft
(5.0m)
19.68ft
(6.0m)
120"
160"
200"
240"
21 22

投写距離とサイズ
本機は、壁やスクリーンへの投写、卓上への設置などに使用できます。背面から投写
する場合は、映像を表示するための専用スクリーン(別売)が必要になります。リモコ
ンは、必ずプロジェクターの前面または背面のセンサーに向けて使用してください。
5
7
投写接続
1
正面卓上 背面卓上
1 2
2
3
5
4
6
*参考のみ
A. 有線接続
B. ブルートゥーススピーカーとの接続
6
プロジェクターの設置
3 4 5 6
1.リモコンやプロ ジェクターのブルートゥースボタンを押して、ブル ートゥーススピー
カーモードに入ります。プロジェクターID: H1_Speaker。
2.装置のブルートゥース設定より、プロジェクターを見つけてマッチングします。
3.リモコンやプロジェクターのブルートゥースボタンを2秒間長押しすると、プロジェ
クターのブルートゥースがリセットされます。
H1プロジェクターユーザーマニュアル H1プロジェクターユーザーマニュアル
60"
4.92ft
(1.5m)
9.84ft
(3m)
13.12ft
(4m)
16.4ft
(5.0m)
19.68ft
(6.0m)
120"
160"
200"
240"
21 22

推奨
8
仕様
9
注意
不適切
表示技術 ラ イトソー ス ネイティブ解像度 投写距離
LCD LED
投写サイズ フォー カス キ ーストーン スクリーン比例
手動 手動補正
±45°
4:3 / 16:9
設置タイプ 給電 リチウム ポリマーバッテリ 純重量
DC 20V正 面・背 面
スピーカー 接続口
ブルートゥーススピーカー
名称
HDMI x1 / USB x1 / 20V
DC INx1 / AV In x1 / Audio
Out x1 / TF Card slot x1/
S/P DIF
3W×2 H1_Speaker
対応可能な動画形式 対応可能な画像形式 対応可能な音声形式 対応可能なテキスト形式
TXT
動画
映画
1.0—6.0m
60-240インチ
1.26Kg
65W
H1プロジェクターユーザーマニュアル H1プロジェクターユーザーマニュアル
23 24
28Wh
.mpg/.avi/.ts/.mov/.mkv/.
dat/.mp4/.vob/.flv/.3g2/.
3gp/.swf/.m4v
.aac/.flac/.m4a/.mp2/.
mp3/.ogg/.wav
1920x1080
.bmp/.gif/.jpg/.jpeg/.png

11
トラブル シュー ティング
10
警告と注意事項
1.プロジェクターのライトを直視しないでください。
2.レンズには触らないでください。
3.指定された方法以外で制御や調整を行ったり、手順を実行したりすると、危険な放射線被ばく
にさらされる可能性があります。
4.コンプライアンスに責任を持つ当事者が明示的に承認していない本機の変更や修正は、ユーザ
ーの機器操作権限を無効にする可能性があります。
5.本機を蛍光灯の近くで使用すると、リモコンの使用に支障をきたす可能性があります。本機の動
作が不安定な場合は、蛍光灯が原因である可能性があるので、蛍光灯の近くから離れてください。
6.感電の恐れがありますので、無断にプロジェクターを分解しないでください。
7.火災や感電の危険を避けるため、本機を雨や湿気、水滴、水しぶきのかかる場所に置かないでく
ださい。
8.花瓶など、液体の入ったものは本機の上に置いてはなりません。
1 .画 像 が ぼ や け ま す
a .フ ォ ー カ ス か キ ー ス ト ー ン を 調 整 し ま す 。
b.プロジェクターを壁やスクリーンから有効距離を取ります。
2.リモコンが反応しません
a.リモコンを直接赤外線受信器へ向けてください。
b.赤外線受信器を塞げないようにしてください。
c.バッテリをチェックしてください。
3.USB/TFカードが認識されません
a.USB/TFカードは128GB以内のものを使用してください。
4.音声が出ません
a.装置のDolby Audioをオフにしてください。
b.映画の音声番号が「ac3」(Dolby Digital)の場合は、音声が再生されないことがあります(こ
のような映画は非常にまれです)
5.プロジェクターがミラーリングできません?
a.まず、プロジェクターがスクリーンミラーリングの入力ソースを選択しているかどうか、また、デ
バイスがプロジェクターのWiFiに接続されているかどうかをご確認ください。
b.プロジェクターにWiFi機能が搭載されている場合は、機器とプロジェクターが同じWiFiに接
続 されていることを確 認してくだ さい 。
c.スクリーンミラーリング入力ソースが選択され、WiFiが接続されているにもかかわらず、プロ
ジェクターがスクリーンミラーリングできない場合は、一度電源プラグを抜いて、再度入れ直して
くだ さい 。
d.電源プラグを抜いても動作しない場合は、プロジェクターをリセットしてください。
e. お気軽にお問い合わせください。
6.「ブルートゥーススピーカーモード」の接続に失敗しました?
a. プロジェクターの「ブルートゥーススピーカーモード」を開き、デバイスのブルートゥース設定を
行ってくだ さい 。
b. リモコンまたはプロジェクターのボタンを2秒間長押しするとリセットされます。
c. デバイスとプロジェクターが正常にペアリングされているか確認してください。
d. ペアリングしてもプロジェクターが動作しない場合は、一度電源を抜いて再度電源を入れてく
ださい。
e. お気軽にお問い合わせください。
H1プロジェクターユーザーマニュアル H1プロジェクターユーザーマニュアル
25 26

12
声明
H1プロジェクターユーザーマニュアル H1プロジェクターユーザーマニュアル
27 28
Super Creativity Limitedまたはその子会社(以下、「当社」という)の書面による事前の許可が
なく、如何なる形若しくは方法でも本マニュアルを使用してはなりません。電子、機械、光学、化学
、手書き又は当該方法によって、検索システムに複製、伝送、翻訳、格納されたり、テキストやコン
ピュータ言語に翻訳されたりすることを含むものとします。
当社は、利用者や第三者が不慮の事故、誤用、本取扱説明書の違反、又は許可なしに本機器を
変更、修理したり、如何なる形で本製品の交換したり、若しくは操作およびメンテナンスに当たっ
て、本マニュアルまたは当社が提供する操作およびメンテナンスマニュアルに厳密に従わなかっ
たりすることにより損害、損失、費用、支出を被った場合、一切の責任を負いません。
法律で認められている最大限の範囲内において、本マニュアルおよび本マニュアルに記載されて
いる製品(そのハ ードウェア、ソフトウェア、ファームウェアなどを含む)は、「現状のまま」で提供さ
れるものであり、瑕疵や不具合が含まれている可能性があります。
当社は、如何なる形でも明示又は黙示的な保証を提供いたしません。適正販売性、品質満足度、
特定目的への適合性などを含むがこれらに限定されません。また、本マニュアルまたは製品の使
用に起因する特別損害、付帯損害、偶発的損害または間接損害を賠償いたしません。前述の損
害について、事業利益の損失、システム障害、データや文書の紛失による損害を含むがこれに限
定されません。
本マニュアルにおける説明や画像は、実際の製品とは異なる場合がありますので、実際の製品を
ご参照ください。また、当社は、製品のバージョンアップやその他の必要性に応じて、本マニュアル
を随時更新する権利を留保いたします。

MANUEL DE L'UTILISATEUR

MANUEL DE L'UTILISATEUR

1
LISTE D'EMBALLAGE
2
APERÇU DES FONCTIONS
31 32
Projecteur Télécommande
OK
Câble d'alimentation
Câble HDMI
Manuel de l'utilisateur Câble AV
OK
Alimentation
Haut
Gauche
Bas
Retour
Augmenter du
volume
Baisser du volume
Muet
Menu
Source d'entrée
Droite
Page d'accueil
Savoir: Allumer/Éteindre,
et régler le volume
Précédent
Lecture/Pause
Focus
Suivant
Retour
Mode haut-parleur
Bluetooth
Micro SD
USB
HDMI In
LAN
S/P DIF Out
Récepteur IR
Indicateur
lumineux
DC IN
AV In
Sortie audio
Objectif Ceinture portable
Voyant d'état
Béquille réglable
Haut-parleurs
stéréo
Récepteur IR
MANUEL D'UTILISATION DU PROJECTEUR H1 MANUEL D'UTILISATION DU PROJECTEUR H1

Connectez le câble d'alimentation au projecteur.
Tournez le bouton dans le sens des aiguilles
d'une montre pour allumer le projecteur et
réglez le volume à la hausse.
Instructions relatives à la béquille
Tripod
Connectez correctement votre appareil au
projecteur.
Étape 1. Ouvrez la béquille avec votre doigt.
Étape 2. Posez le projecteur sur une surface plane et allumez le projecteur.
Un trou fileté de 1/4 est réservé au bas du projecteur pour permettre l'installation d'un
trépied de 1/4. Veuillez fixer le trépied fermement pour éviter que le projecteur ne tombe.
Lancez la lecture de la chanson ou de la vidéo
suivante.
1
1
2
3
4
5
6
2
Tournez le bouton dans le sens inverse des
aiguilles d'une montre pour réduire le volume et
éteindre le projecteur.
Réglez la bague de mise au point pour obtenir
les meilleures performances d'image.
5
4
3
3
QUICK START
4
INSTALLATION
33 34
6
Béquille réglable
Un trou fileté de 1/4
MANUEL D'UTILISATION DU PROJECTEUR H1 MANUEL D'UTILISATION DU PROJECTEUR H1
DISTANCE ET TAILLE DE PROJECTION
Le projecteur peut être utilisé pour projeter sur un mur ou un écran, monté
sur une table. Lors de la projection depuis la position arrière, un écran
spécial sera nécessaire (non inclus) pour afficher l'image. Veillez à orienter
la télécommande vers le capteur situé à l'avant ou à l'arrière du projecteur.
5
7
CONNEXION DE LA PROJECTION
1
Table avant Table arrière
1 2
2
3
5
4
6
35 36
*Pour référence
uniquement
A. Connexion filaire
B. Connexion du haut-parleur Bluetooth
6
PLACING THE PROJECTOR
3 4 5 6
1. Entrez dans le "mode haut-parleur Bluetooth" via la télécommande ou le
Bluetooth bouton du projecteur. Le nom Bluetooth du projecteur : H1_Speaker.
2. Ouvrez les paramètres Bluetooth de vos appareils, recherchez et appairez le
projecteur.
3. Vous pouvez réinitialiser la connexion Bluetooth en appuyant longuement
pendant 2 secondes sur la télécommande ou le Bluetooth bouton du
projecteur.
MANUEL D'UTILISATION DU PROJECTEUR H1 MANUEL D'UTILISATION DU PROJECTEUR H1
60"
4.92ft
(1.5m)
9.84ft
(3m)
13.12ft
(4m)
16.4ft
(5.0m)
19.68ft
(6.0m)
120"
160"
200"
240"

8
SPÉCIFICATION
9
ATTENTION
37 38
Technologie d'affichage Source de lumière Résolution native Distance de projection
LCD LED
Taille de projection Mise au point Keystone Rapport d'aspect
Manuel Correction manuelle
±45°
4:3 / 16:9
Type d'installation Alimentation électrique
Batterie au
lithium-polymère
Poids net
DC 20V 28WhFront/Rear
Haut-parleur Ports
Nom du haut-parleur
Bluetooth
HDMI x1 / USB x1 / 20V
DC INx1 / AV In x1 / Audio
Out x1 / TF Card slot x1/
S/P DIF
3W×2 H1_Speaker
Format vidéo
pris en charge
Format photo
pris en charge
Format audio
supporté
Format texte
supporté
TXT
Recommandé
NON
recommandé
VIDÉO
FILM
1.0—6.0m
60-240inches
1.26Kg
65W
MANUEL D'UTILISATION DU PROJECTEUR H1 MANUEL D'UTILISATION DU PROJECTEUR H1
.mpg/.avi/.ts/.mov/.mkv/.
dat/.mp4/.vob/.flv/.3g2/.
3gp/.swf/.m4v
.aac/.flac/.m4a/.mp2/.
mp3/.ogg/.wav
1920x1080
.bmp/.gif/.jpg/.jpeg/.png

11
DÉPANNAGE
39 40
10
AVERTISSEMENTS ET PRÉCAUTIONS
1. Ne regardez pas directement dans la lumière du projecteur.
2. Ne pas toucher l'objectif du projecteur.
3. L'utilisation de commandes ou de réglages ou l'exécution de procédures autres que
celles spécifiées peut entraîner une exposition dangereuse aux radiations.
4. Les changements ou modified à cet appareil non expressément approuvés par la
partie responsable de la conformité peuvent annuler l'autorité de l'utilisateur à utiliser
l'équipement.
5. L'utilisation de cet appareil à proximité d'un éclairage fluorescent peut provoquer des
interférences concernant l'utilisation de la télécommande.Si l'appareil présente un
comportement erratique, éloignez-le de tout éclairage fluorescent, car il peut en être la
cause.
6. Risque de choc - Ne démontez pas le projecteur sans autorisation.
7. Pour réduire le risque de fire ou de choc électrique, n'exposez pas cet appareil à la
pluie, à l'humidité, aux gouttes ou aux éclaboussures.
8. Les objets fills avec des liquides, tels que des vases, ne doivent pas être placés sur
l'appareil.
1. image floue
a. Réglez la bague de mise au point ou le trapèze.
b. Le projecteur et l'écran/le mur doivent être à une distance effective.
2. la télécommande ne répond pas
a. S'assurer que la télécommande est dirigée directement vers le récepteur IR.
b. Ne pas couvrir la fenêtre du récepteur IR.
c. Vérifiez la batterie.
3. USB/TF non reconnu
a. Assurez-vous que votre clé USB/carte mémoire ne dépasse pas 128Go.
4. pas de son
a. Désactivez la fonction Dolby Audio de votre appareil.
b. Si le numéro audio d'un film est "ac3" (Dolby Digital), le son peut ne pas être lu (ce
type de film est très rare).
5. le projecteur ne peut pas faire de miroir d'écran ?
a. Tout d'abord, veuillez vérifier si le projecteur sélectionne la source d'entrée Screen
Mirroring et si l'appareil est connecté au projecteur WiFi.
b. Veuillez vous assurer que l'appareil et le projecteur se connectent au même WiFi si
le projecteur dispose de la fonction WiFi.
c.Veuillez débrancher l'alimentation et la réappliquer à nouveau si la source d'entrée
Screen Mirroring est sélectionnée et que le WiFi est connecté alors que le projecteur
ne peut toujours pas faire de miroir d'écran.
d. Veuillez réinitialiser le projecteur s'il ne peut toujours pas fonctionner après avoir
débranché l'alimentation.
e. N'hésitez pas à nous contacter.
6. vous ne parvenez pas à connecter le "mode haut-parleur Bluetooth" ?
a. Ouvrez le "Mode haut-parleur Bluetooth" du projecteur et le réglage Bluetooth du
périphérique.
b. Appuyez longuement pendant 2 secondes sur le bouton de la télécommande ou
du projecteur pour réinitialiser.
c. Vérifiez que l'appareil s'apparie bien avec le projecteur.
d. Si le projecteur ne peut pas fonctionner s'il est apparié, veuillez débrancher
l'alimentation et la réappliquer à nouveau.
e. N'hésitez pas à nous contacter.
MANUEL D'UTILISATION DU PROJECTEUR H1 MANUEL D'UTILISATION DU PROJECTEUR H1

12
AVIS
41 42
MANUEL D'UTILISATION DU PROJECTEUR H1 MANUEL D'UTILISATION DU PROJECTEUR H1
Sans l'autorisation écrite préalable de Super Creativity Limited ou de ses filiales
(ci-après dénommée "la Société"), aucune partie de ce manuel ne peut être utilisée
sous quelque forme ou par quelque moyen que ce soit, électronique, mécanique,
optique, chimique, manuscrit ou autre, y compris être reproduite, transmise, traduite,
stockée dans une système d'extraction ou traduit en tout texte ou langage informa-
tique.
La Société n'est pas responsable des dommages, pertes, coûts ou dépenses encourus
par l'utilisateur ou des tiers à la suite d'un accident, d'une mauvaise utilisation ou
d'une violation des instructions d'utilisation de la machine ou de modifications non
autorisées de la machine, de l'entretien ou du remplacement du produit sous quelque
forme que ce soit, ou du non-respect du présent manuel ou des manuels d'utilisation
et d'entretien fournis par la Société lors de son utilisation et de son entretien.
Dans toute la mesure permise par la loi, ce manuel et les produits décrits ici (y compris
leur matériel, logiciel, micrologiciel, etc.) sont fournis "tels quels" et peuvent contenir
des défauts ou des erreurs.
La société décline toute garantie de quelque nature que ce soit, expresse ou implicite, y
compris, mais sans s'y limiter, les garanties de qualité marchande, de qualité
satisfaisante, d'adéquation à un usage particulier, et ne sera pas responsable de tout
dommage spécial, accessoire, consécutif ou indirect découlant de l'utilisation de ce
manuel ou du produit, y compris, mais sans s'y limiter, les dommages découlant de la
perte de bénéfices commerciaux, de la défaillance du système, de la perte de données
ou de la documentation.
Les descriptions et les images présentées dans ce manuel peuvent différer du produit
réel, veuillez donc vous référer au produit réel.en outre, nous nous réservons le droit
de mettre à jour ce manuel à tout moment en raison de mises à niveau de la version du
produit ou d'autres besoins.

用戶手冊

用戶手冊
1
配件清單
2
功能概述
45 46
投影 遙控器
OK
電源適配器
HDMI线
說明書 AV線
OK
電源開關
上
左
下
返回
音量加
音量減
靜音
菜單
信號源切換
右
主頁
旋鈕:開/關,音量調節
上一首
播放/暫停
調焦
下一首
返回
藍牙音箱模式
Micro SD
USB
HDMI連接
LAN
S/P DIF Out
紅外接收器
指示燈
DC IN
AV連接
音頻輸出
鏡頭 便攜手提带
狀態指示燈
可調節支架
立躰聲揚聲器
進風口
H1投影機用戶手冊 H1投影機用戶手冊

1
配件清單
2
功能概述
45 46
投影 遙控器
OK
電源適配器
HDMI线
說明書 AV線
OK
電源開關
上
左
下
返回
音量加
音量減
靜音
菜單
信號源切換
右
主頁
旋鈕:開/關,音量調節
上一首
播放/暫停
調焦
下一首
返回
藍牙音箱模式
Micro SD
USB
HDMI連接
LAN
S/P DIF Out
紅外接收器
指示燈
DC IN
AV連接
音頻輸出
鏡頭 便攜手提带
狀態指示燈
可調節支架
立躰聲揚聲器
進風口
H1投影機用戶手冊 H1投影機用戶手冊
將電源線插入投影儀。
順時針旋鈕開機,並增加投影儀音量輸出。
支撐架安裝
三腳架
正確連接你的設備至投影儀。
步驟1:手指撥動支架彈出
步驟2:將投影儀放置在平面,並開機。
投影儀底部預留1/4螺紋孔,輕鬆適配1/4三腳架。注意固定牢靠三腳架,防止投影儀跌倒。
播放下一首歌曲\視頻。
1
1
2
3
4
5
6
2
逆時針調節旋鈕,減低投影音量,至關閉投影。
調節調焦環獲得最佳視覺體驗。
5
4
3
3
快速開始
4
安裝方式
47 48
6
可調節支架
1/4 螺紋孔
H1投影機用戶手冊 H1投影機用戶手冊

將電源線插入投影儀。
順時針旋鈕開機,並增加投影儀音量輸出。
支撐架安裝
三腳架
正確連接你的設備至投影儀。
步驟1:手指撥動支架彈出
步驟2:將投影儀放置在平面,並開機。
投影儀底部預留1/4螺紋孔,輕鬆適配1/4三腳架。注意固定牢靠三腳架,防止投影儀跌倒。
播放下一首歌曲\視頻。
1
1
2
3
4
5
6
2
逆時針調節旋鈕,減低投影音量,至關閉投影。
調節調焦環獲得最佳視覺體驗。
5
4
3
3
快速開始
4
安裝方式
47 48
6
可調節支架
1/4 螺紋孔
H1投影機用戶手冊 H1投影機用戶手冊

投影距離和尺寸
投影儀可以放到桌子上,投射到白牆或者屏幕上。當從後方位置投影時,需要一個
特殊的屏幕(配件不包含)來顯示圖像。務必將遙控器對準投影儀的正面或背面的
紅外接收器。
5
7
投影連接
1
正裝正投 正裝背投
1 2
2
3
5
4
6
49 50
*僅供參考
A. 有線連接
B. 藍牙音箱連接
1. 通過遙控器或投影儀按鍵板的藍牙按鈕,進入藍牙音箱模式。投影儀的藍牙名
稱:H1_Speaker。
2. 打開設備的藍牙設置,尋找並匹配投影儀。
3. 可以通過長按2秒遙控器或投影儀按鍵板的藍牙按鈕,重置投影儀的藍牙連接。
6
PLACING THE PROJECTOR
3 4 5 6
H1投影機用戶手冊 H1投影機用戶手冊
60"
4.92ft
(1.5m)
9.84ft
(3m)
13.12ft
(4m)
16.4ft
(5.0m)
19.68ft
(6.0m)
120"
160"
200"
240"

推薦
顯示技術 光源類型 物理分辨率 投影距離
LCD LED
投影尺寸 對焦 梯形校正 屏幕比例
手動 手動校正
±45°
4:3 / 16:9
安裝方式 電源供電 鋰聚合電池容量 淨重
DC 20V 28WhFront/Rear
喇叭 接口 藍牙音箱名稱 總功率
HDMI x1 / USB x1 / 20V
DC INx1 / AV In x1 / Audio
Out x1 / TF Card slot x1/
S/P DIF
3W×2 H1_Speaker
支持的視頻格式 支持的圖片格式 支持的音頻格式 支持的文檔格式
TXT
8
規格參數
9
注意
51 52
不推薦
視頻
電影
1.0—6.0m
60-240英寸
1920x1080
.bmp/.gif/.jpg/.jpeg/.png
1.26Kg
65W
H1投影機用戶手冊 H1投影機用戶手冊
.mpg/.avi/.ts/.mov/.mkv/.
dat/.mp4/.vob/.flv/.3g2/.
3gp/.swf/.m4v
.aac/.flac/.m4a/.mp2/.
mp3/.ogg/.wav

11
故障排除
53 54
1.不要直視投影機的燈光。
2.請勿觸摸投影機鏡頭。
3. 使用非指定的控製或調整或程序執行可能會導致危險的輻射暴露。
4. 未經合規責任方明確批准而對本設備進行更改或修改可能會使用戶操作設備的權限失效。
5.在熒光燈附近使用本機可能會干擾遙控器的使用。如果本機顯示不穩定的行為,請遠離任何熒
光燈,因為它可能是原因。
6.電擊危險 - 請不要擅自拆卸投影機。
7.為降低火災或觸電風險,請勿將本設備暴露在雨中、潮濕、滴水或濺水中。
8.裝滿液體的物品,如花瓶,不得放置在儀器上。
10
警告和注意事項
1. 圖像模糊
a. 調整對焦環或梯形校正。
b. 投影機與屏幕/牆壁必須保持有效距離。
2. 遙控器無反應
a. 確保遙控器直接指向紅外接收器。
b. 不要蓋住紅外接收器窗口。
c. 檢查電池。
3. USB/TF無法識別
a. 確保您的 U 盤/TF 卡不超過128GB。
4. 沒有聲音
a. 關閉設備中的Dolby Audio。
b.如果電影的音頻編號為“ac3”(Dolby Digital),則可能無法播放聲音(這種電影很少見)。
5. 投影機不能投屏?
a. 首先請檢查投影機是否選擇了 Screen Mirroring 輸入源以及設備是否連接到投影機 WiFi。
b. 如果投影機具有WiFi功能,請確保設備和投影機連接到同一個WiFi。
c. 如果選擇了 Screen Mirroring 輸入源並且連接了 WiFi,而投影機仍然無法進行屏幕鏡像,
請拔掉電源並重新連接。
d. 如果拔掉電源後仍不能工作,請重新設置投影機。
e. 請隨時與我們聯繫。
6. 無法連接“藍牙音箱模式”?
a. 請打開投影機“藍牙音箱模式”和設備藍牙設置。
b. 長按遙控器或投影儀按鈕 2 秒進行重置。
c. 請檢查設備是否與投影機配對成功。
d.如果配對後投影機不能工作,請拔掉電源重新接通。
e. 請隨時與我們聯繫。
H1投影機用戶手冊 H1投影機用戶手冊

12
聲明
55 56
H1投影機用戶手冊 H1投影機用戶手冊
未經 Super Creativity Limited 或其子公司(以下簡稱“本公司”)事先書面許可,不得以任何形
式或任何方法使用本手冊的任何部分,包括電子、機械、光學、化學、手寫或任何 該方法應被複
製、傳輸、翻譯、存儲在檢索系統中或翻譯成任何文本或計算機語言。
如果用戶或者協力廠商由於意外、使用不當、或者違反本機操作規程或未經授權對機器做出任
何修改、檢修、或者以任何形式更換本產品、或者操作和維修時未能嚴格遵循本手册或本公司
提供的操作和維修手冊而使其遭受任何損壞、損失、產生任何費用或開銷,本公司概不負責。
在法律允許的最大範圍內,本手册以及所描述的產品(包含其硬體、軟件、固件等)均“按照現狀
”提供,可能存在瑕疵或錯誤。
本公司不提供任何形式的明示或默示保證,包括但不限於適銷性、質量滿意度、適合特定目的
等保證,亦不對使用本手册或產品導致的任何特殊、附帶、偶然或間接的損害進行賠償,包括但
不限於商業利潤損失、系統故障、數據或檔案遺失產生的損失。
對本手册涉及的描述和影像,可能與實際產品存在差异,請以實物為准。此外,由於產品版本陞
級或其他需要,本公司保留隨時更新本手册的權利。