RD-838
User Manual
FULL HD 1080P
VIDEO PROJECTOR

Package Include......................................................................................... 1
Important Safeguards............................................................................... 2
Get to Know Your Projector...................................................................... 3-5
First Use ...................................................................................................... 6
Screen Mirroring
iOS Cast.................................................................................................. 7-8
Miracast.................................................................................................. 9
iOS Cable Cast........................................................................................ 10
DLNA....................................................................................................... 11
Network Setting..................................................................................... 12
Bluetooth Connection............................................................................... 13
Input Source
HDMI Connection................................................................................... 14
USB Connection..................................................................................... 14
AV Connection ....................................................................................... 15
Projector Installations
Standard Setting.................................................................................... 16
Installation Method ............................................................................... 17
Focus Adjustment.................................................................................. 18
Menu Settings ............................................................................................ 19
System Setting........................................................................................... 19
Troubleshooting ........................................................................................ 20
Specifications............................................................................................. 20
FCC Statement............................................................................................ 21
Contents
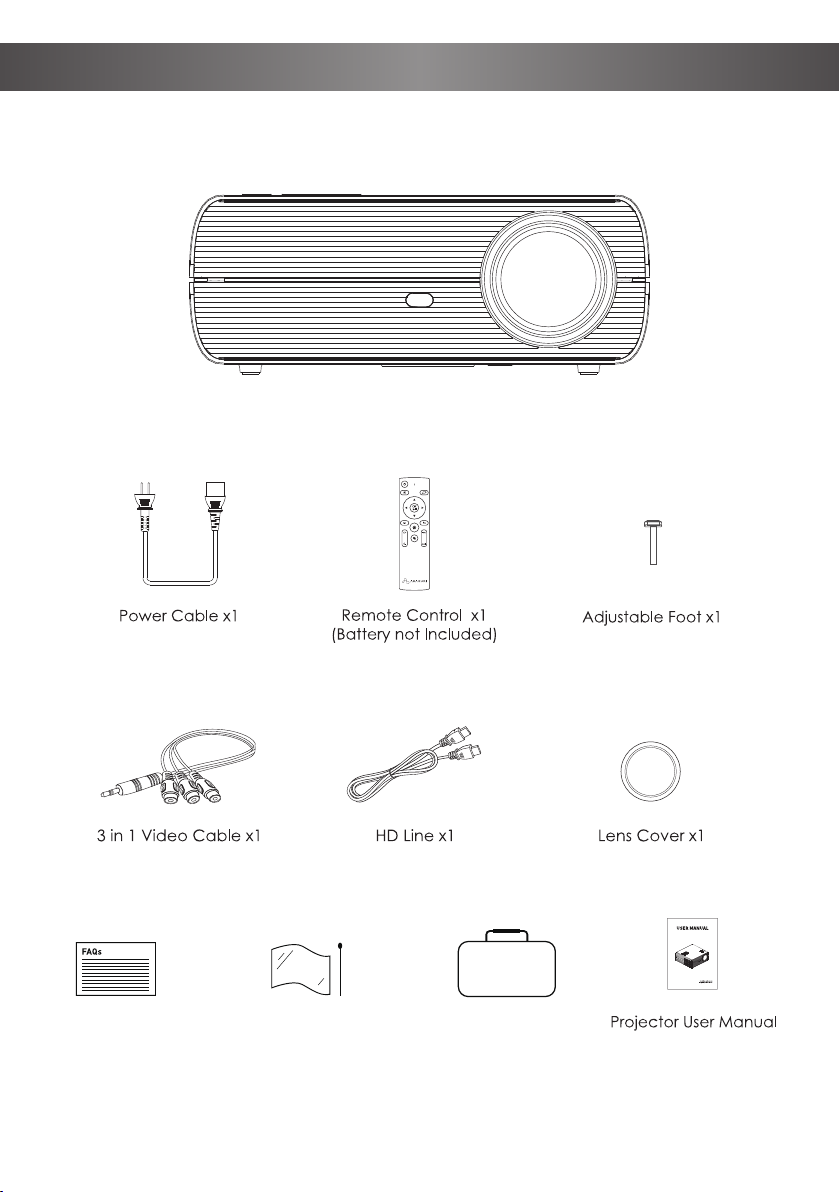
Package Include
Dust Removal Kit x1 Carrying Bag x1FAQ Card x1
1

2
Installation
Follow basic safety precautions when using your projector. Read all instructions.
• To get a better view, please use this projector while drawing the curtain or in a
dark room.
• Please use the projector carefully, dropping or crashing may damage parts or
result in blurred images and abnormal displaying.
Plug and Cord
• Be careful while using the power cord, avoid excessive bending; the damage of
power cable may cause electric shock and fire.
• It is better to unplug the power cord after it is powered off.
Cleaning
• Unplug the power cable first.
• Clean the shell regularly with a damp cloth, neutral detergent can be used.
• Please use a glasses cloth or lens paper, not to scratch the lens.
• Please clean projectors vents and speakers regularly with banister brushes, or the
ventilation will be blocked.
High temperature attention
• While projection or just finishing, the exhaust port nearby will be very
hot, if touch it, would get scalded.
• While projecting, please do not look at the lens directly, or it may hurt your eyes.
* Warm tips
• Do not disassemble the projector, if not, there will be a risk of electric shock, and
the disassembling affects the normal warranty.
• Please do not put any liquid or heavy stuff on the projector.
• To ensure the stability of heat dissipation, please open the height bracket in the
bottom of the projector before starting
Important Safeguards
3
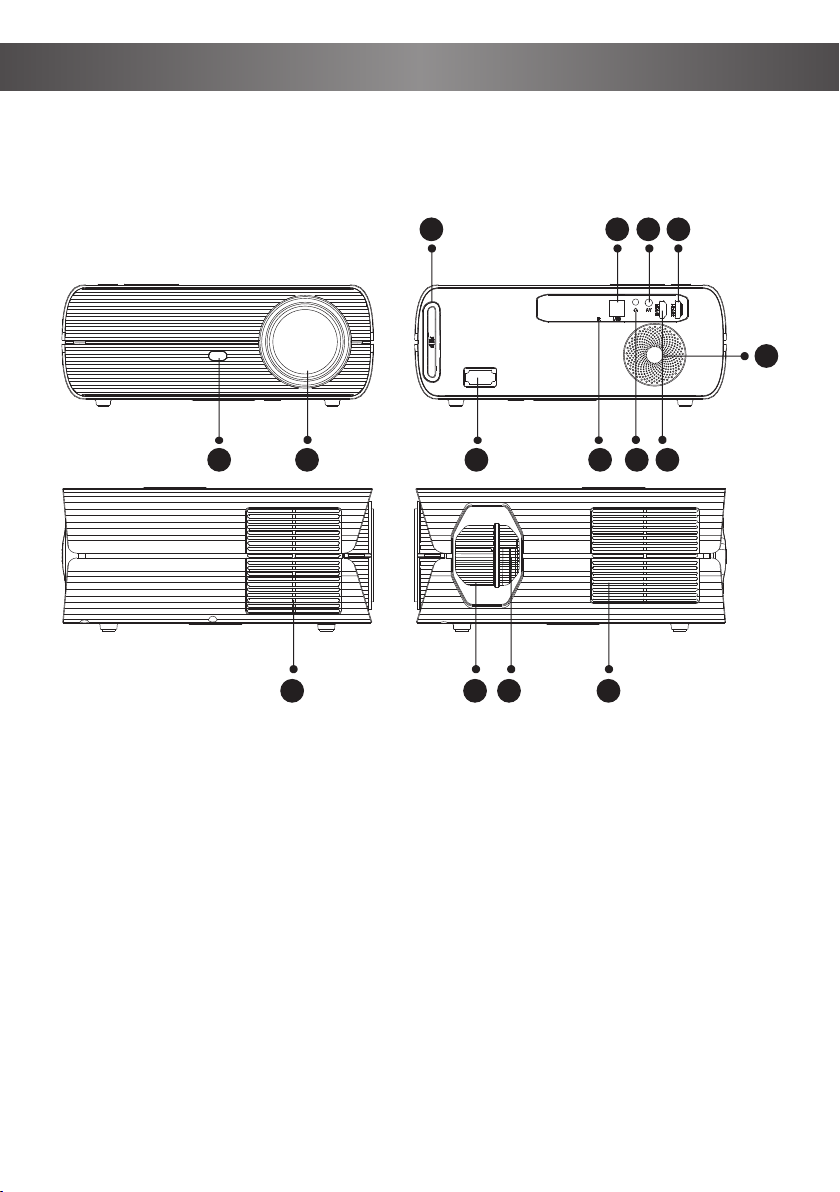
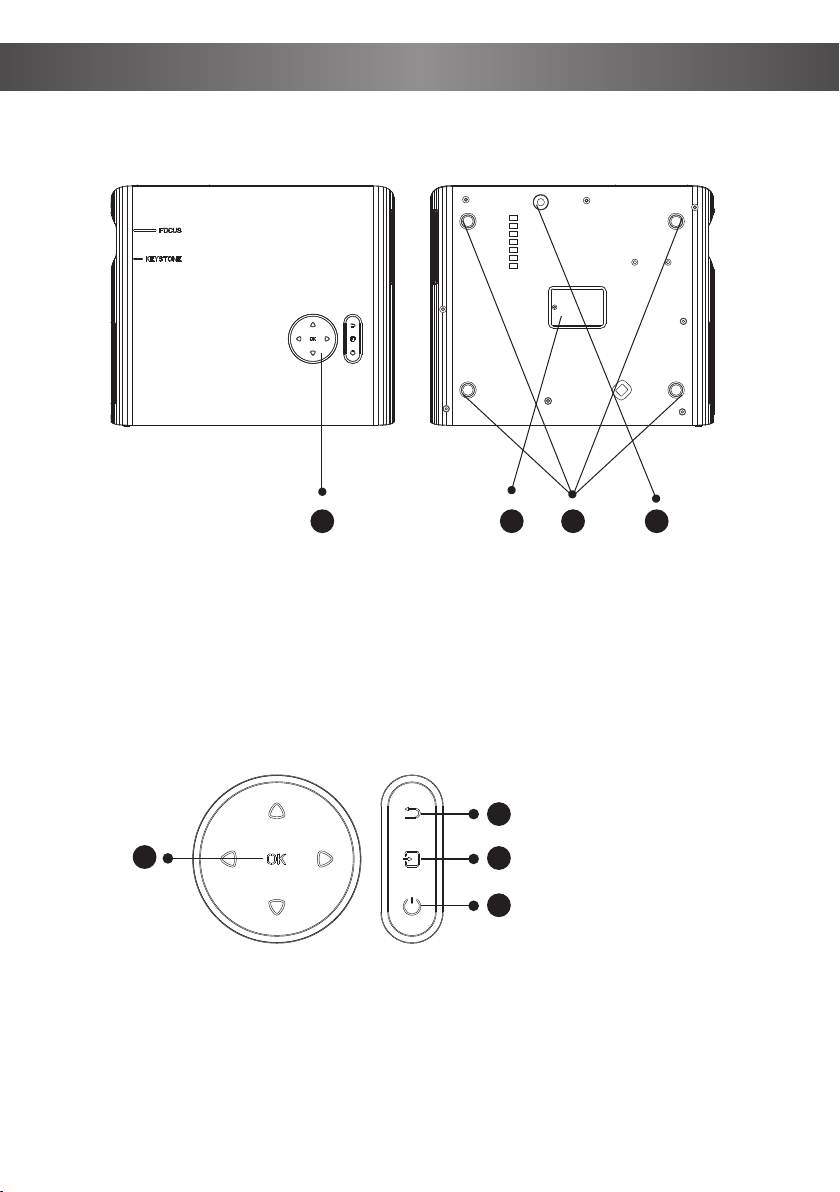
Getting to Know Your Projector
1 2 3 4 5 6
7 8 9 10
11
12 13 14 15
1. IR Remote Sensor
2. Projection Lens
3. AC Input
4. IR Remote Sensor
5. 3.5mm Jack Audio Output
6. HDMI1 Port
7. Removable Dust Cover
8. USB Port
9. AV Port
10. HDMI2 Port
11. Speaker
12. Air Outlet
13. Focus Ring
14. Keystone Ring
15. Air Outlet
Note: Lightly press the dust net, the dust net will pop up, just take out the dust net and clean it.
4
Getting to Know Your Projector
2
3
4
1
C DBA
A. Control Screen
B. Product Label
C. Projector Mounting Holes
D. Adjustable Tilt Foot
1. OK Key
2. Back
3. Source Key
4. Power On
5
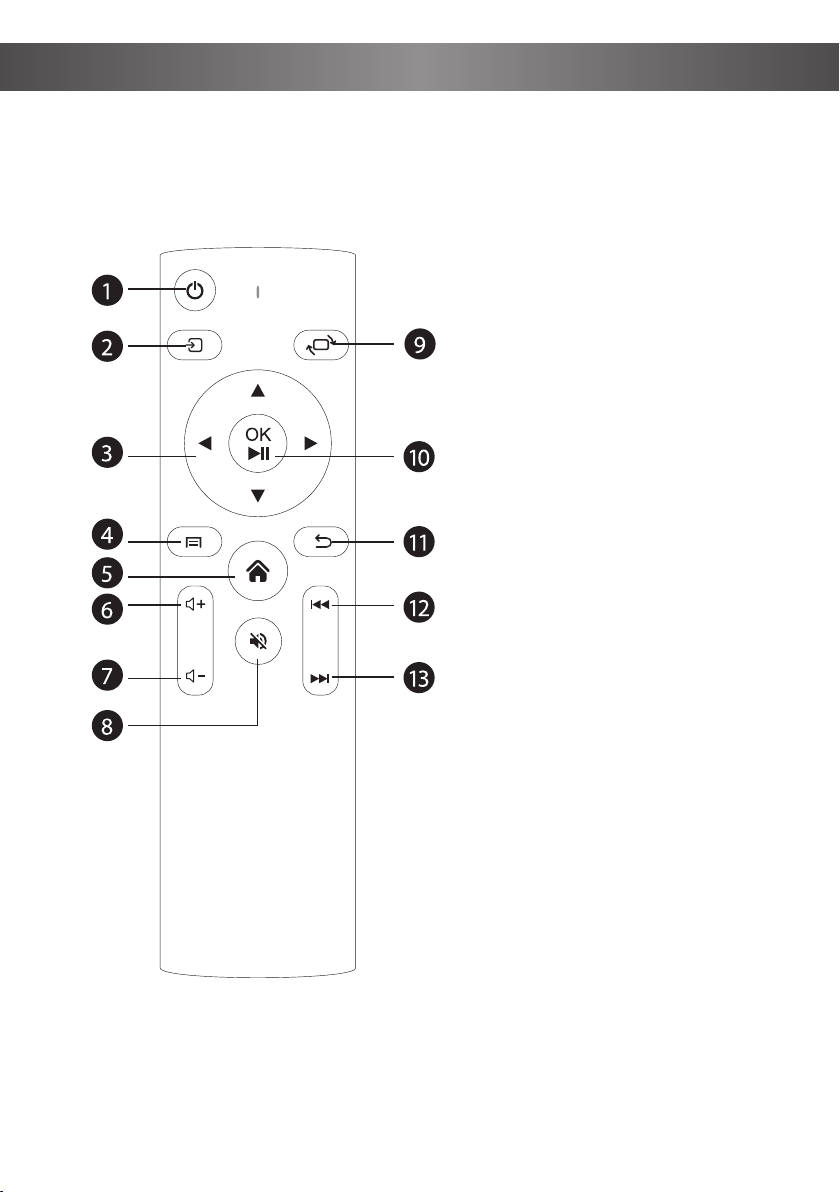
1. Power Button
2. Input Source
3. Left
4. Menu
5. Home
6. Volume+
7. Volume-
8. Mute
9. Filp
10. Play/Pause
11. Back
12. Fast Reverse
13. Fast Forward
Remote Control
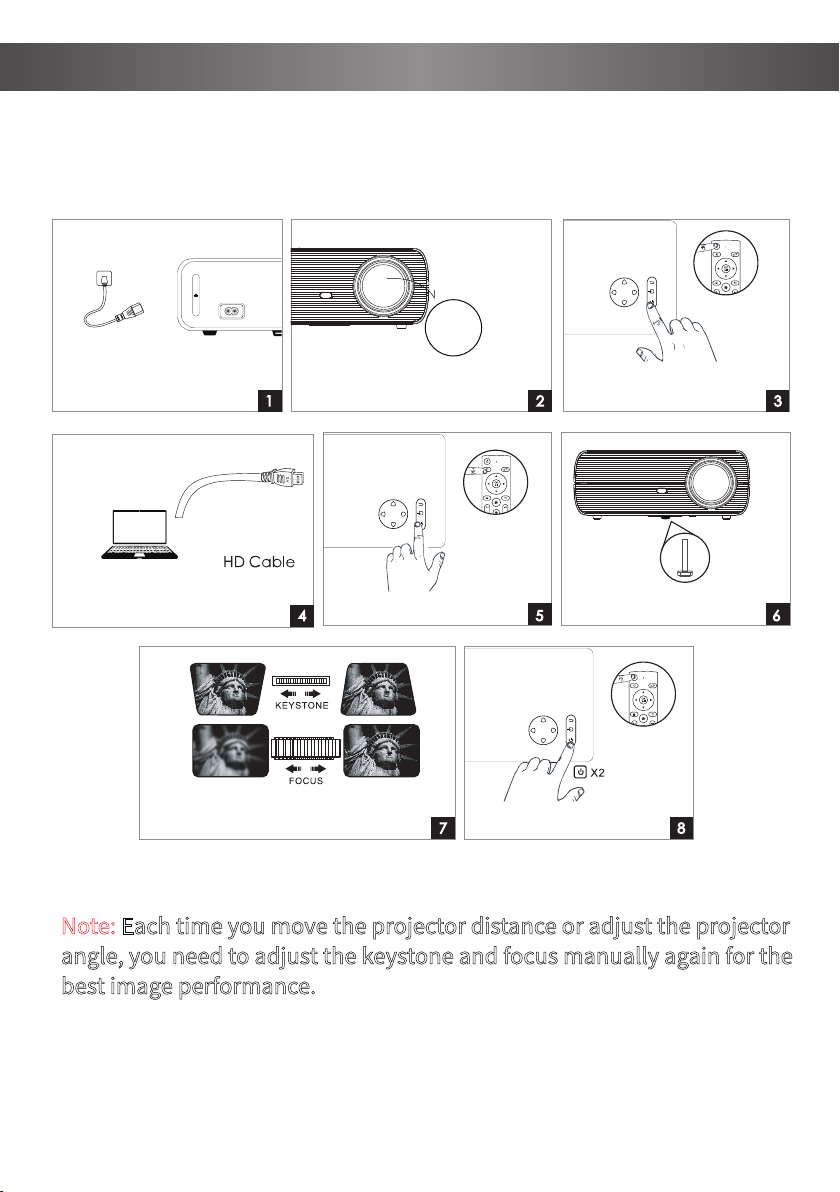
First Use
6
OK
OK
Connect projector to
HD port support device.
3
4 5
7 8
6
Take off the lens cover.
2
Note: Each time you move the projector distance or adjust the projector
angle, you need to adjust the keystone and focus manually again for the
best image performance.
OK
1
Plug the power cord tothe
projector.
Press power button to turnon
the projector.
Select the input source. Adjust here accordingly.
Adjust keystone and focus ring to
getthe best image performance.
Press the power button twice
to turn off the projector.
7
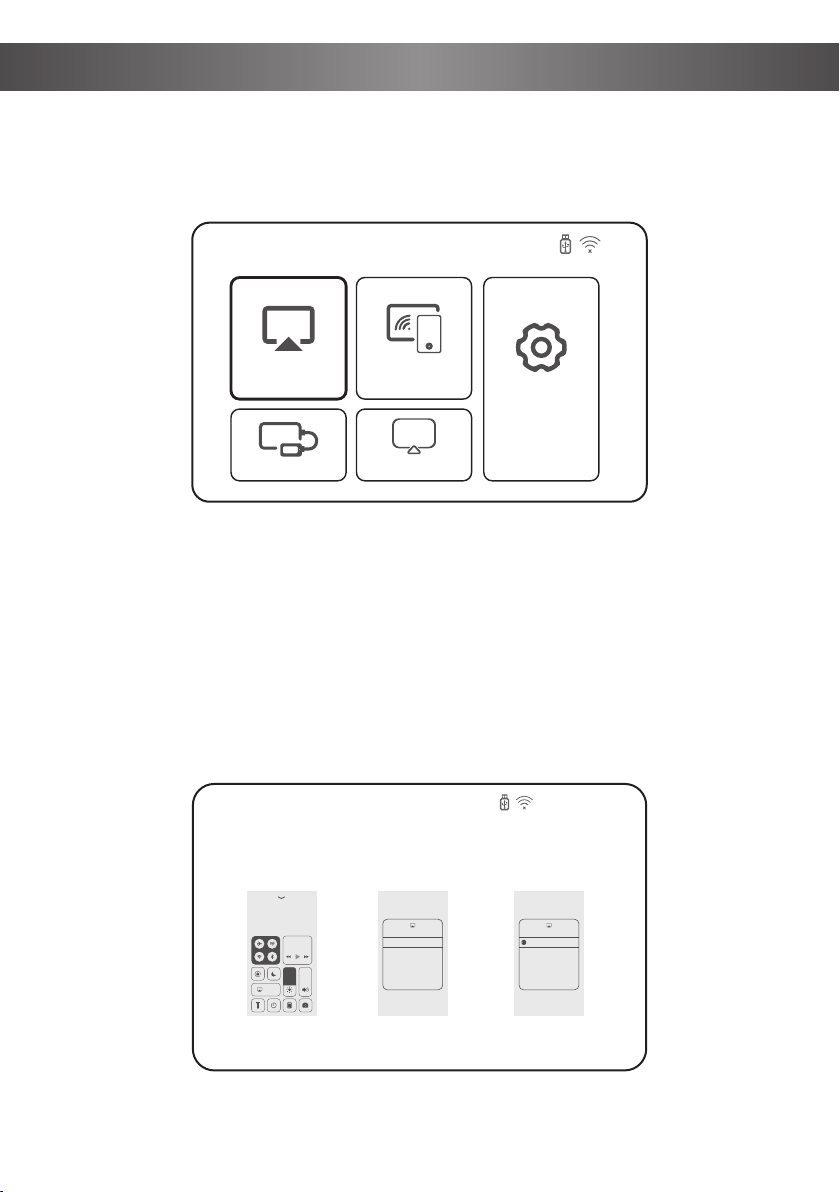
Screen Mirroring through Wireless Connection
Important:Before screen mirroring please selest "Screen Mirroring" to enter
interface.
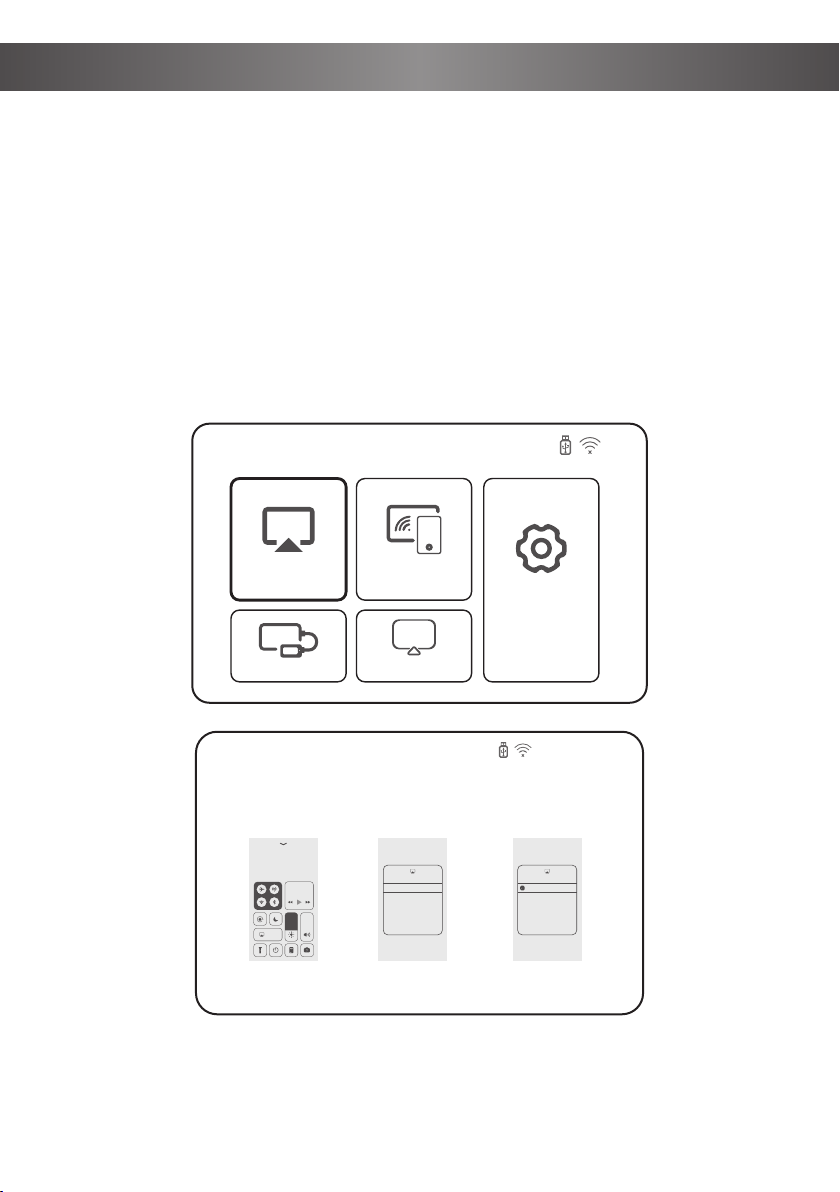
IOS Cast
* Streaming with cellular data
Step 1. Turn on the projector, select Screen Mirroring to enter the interface of IOS
Cast
Step 2. Go to the settings of your IOS mobile device and connect it to the WIFI of
NEWAP-XXXX.
Step 3. Activate Screen Mirroring on your IOS mobile device and search for the
projector.
Step 4. Select NEWAP-XXXX from the search results to connect.
Step 5. The display of your IOS mobile device will be projected to the wall/screen
via cellular after a successful connection.
SCREEN MIRRORING
iOS Cable Cast DLNA
iOS Cast Miracast
Settings
TV
Mirror your iPhone, iPad or iPod touch
Make sure that your iOS device is connected to the same network as your
projector, or connect iOS device with AP by Projector:
NEWAP-XXXX
1. On your iOS device, open
Control Center and tap screen
Mirroring.
2. Looking for devices that can
be mirrored on.
3. Select NETLINK-XXXX-(icast)
from the list.
Screen
Mirroring
Music
Screen Mirroring Screen Mirroring
ZY-XXXXLooking for Apple TV...
Note: The last 4 digits of the device name are randomly generated.
8
SCREEN MIRRORING
* Streaming with your home router's WiFi
Step 1. Turn on the projector, select Screen Mirroring to enter the interface of
Screen Mirroring
Step 2. Select Setting to enter the interface of WiFi Setting
Step 3. Connect the projector to your home router's WiFi
Step 4. Go to the settings of your IOS mobile device and connect your iOS device
to the same home router's WiFi
Step 5. Activate Screen Mirroring on your IOS mobile device and search for the
projector then select NEWAP-XXXX from the search results to connect.
Step 6. The display of your IOS mobile device will be projected to the wall/screen
via cellular after a successful connection
Mirror your iPhone, iPad or iPod touch
Make sure that your iOS device is connected to the same network as your
projector, or connect iOS device with AP by Projector:
NEWAP-XXXX
1. On your iOS device, open
Control Center and tap screen
Mirroring.
2. Looking for devices that can
be mirrored on.
3. Select NETLINK-XXXX-(icast)
from the list.
Screen
Mirroring
Music
Screen Mirroring Screen Mirroring
ZY-XXXXLooking for Apple TV...
Tips: If you'd like to connect to another router's WiFi, please repeat the steps
mentioned in the section of Streaming with your home router's WiFi.
Note: The last 4 digits of the device name are randomly generated.
iOS Cast Miracast
Settings
TV
9
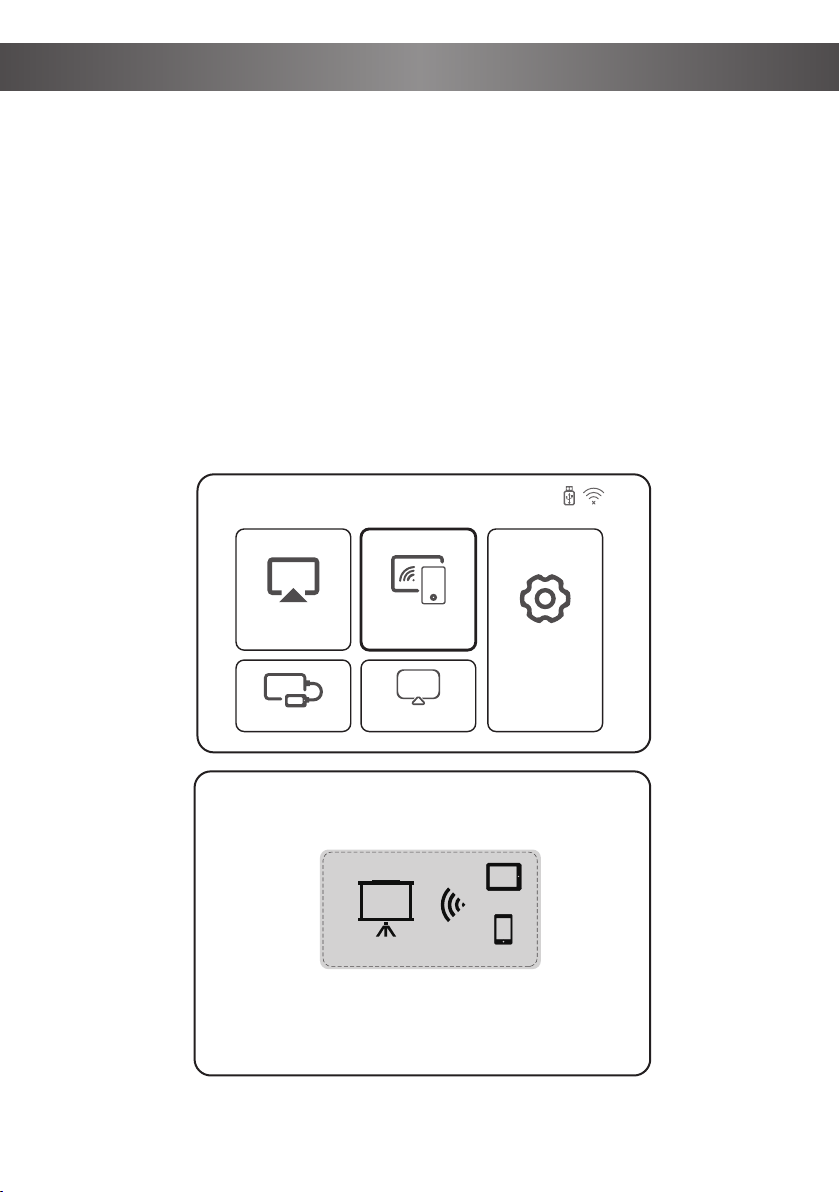
Miracast
Step 1. Turn on the projector, select Screen Mirroring to enter the interface of
Miracast
Step 2. Activate Wireless Display on your Android mobile device and search for the
projector.
Step 3. Select NEWAP-XXXX from the search results to connect.
Step 4. The display of your Android mobile device will be projected to the
wall/screen via cellular after a successful connection
SCREEN MIRRORING
Note: The last 4 digits of the device name are randomly generated.
iOS Cast Miracast
iOS Cable Cast DLNA
Settings
TV
1. On your Android Mobile/Pad, open the settings menu.
2. Access your display settings or screen-mirroring.
3. Select your Miracast receiver: NETLINK-XXXX
Miracast
To connect Android Mobile/Pad Device with Projetor Based on
WiFi-Display Techenology
Mobile
Projector
Pad
Waiting for connection...
Note: The projector and the Android device cannot be connected to different WiFi,
otherwise the corresponding projector device will not be found on the Android device.
Note: Different Android devices have different names and opening methods for the
Wireless Display function. For details, please refer to the manual of the Android device
you are using.
10
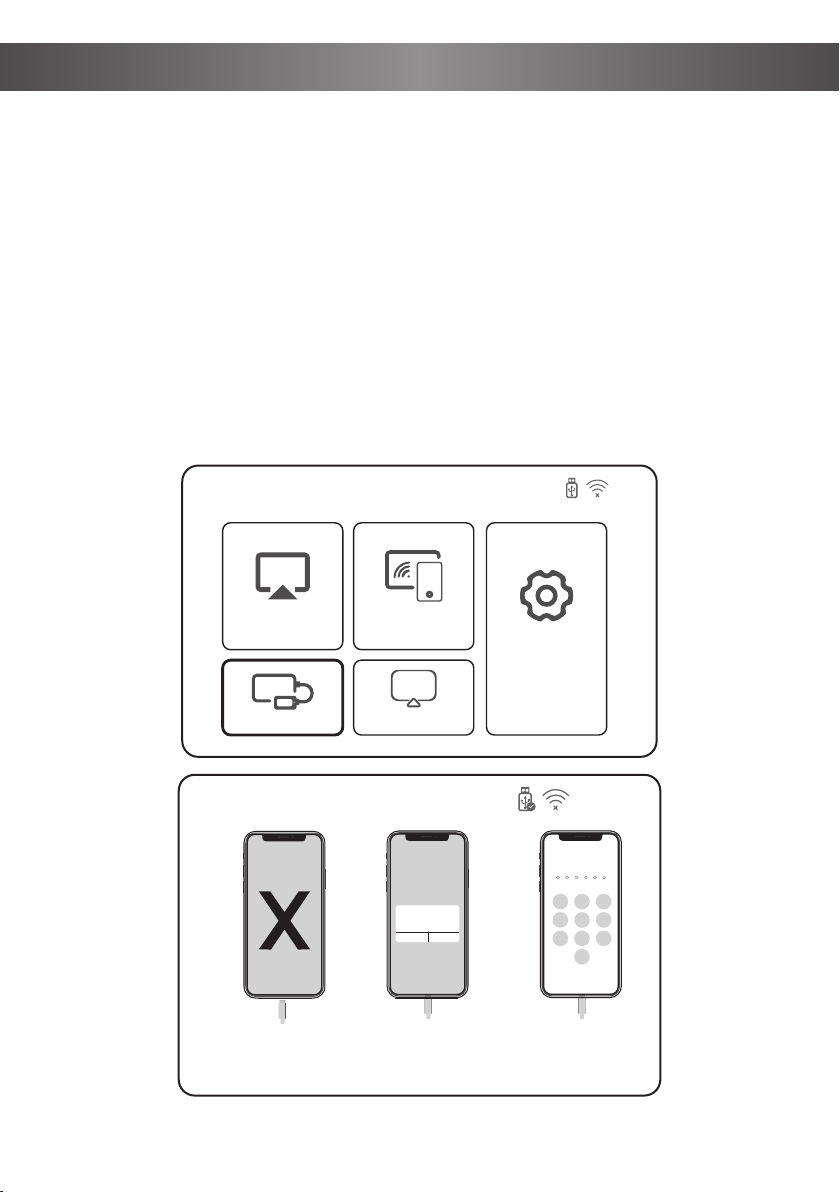
Step 1. Turn on the projector, select Screen Mirroring to enter the interface of IOS
Cable Cast
Step 2. Connect your IOS mobile device to the USB port of the projector with the
ORIGINAL lightning cable.
Step 3. Select Trust in the pop-up window of the iOS mobile device then enter your
iOS mobile device password.
Step 4. The display of your IOS mobile device will be projected to the wall/screen via
cellular after a successful connection
Note: If still cannot connect with projector afer clicking Trust, can try to use the
original data cable to reconnect.
iOS Cable Cast
SCREEN MIRRORING
iOS Cast Miracast
iOS Cable Cast DLNA
Settings
TV
1. Connect the lightning connector
to the phone. Connect the other end
to the projector
2. Click “Trust” the
window that pops up
on the phone.
3. Enter device password.
One more thing...
iPhone X
Trust This Computer?
Your settings and data will be
accessible from this computer when
connected wirelessly or using a cable.
Trust Don’t Trust
Enter Device Passcode to Trust
This Computer
Your settings and data will be accessible from this
computer when connected.
Cancel
1 2 3
4 5 6
7 8
0
9
ABC DEF
JKLGHI MNO
TUVPQRS WXYZ
iOS Cable Cast
11
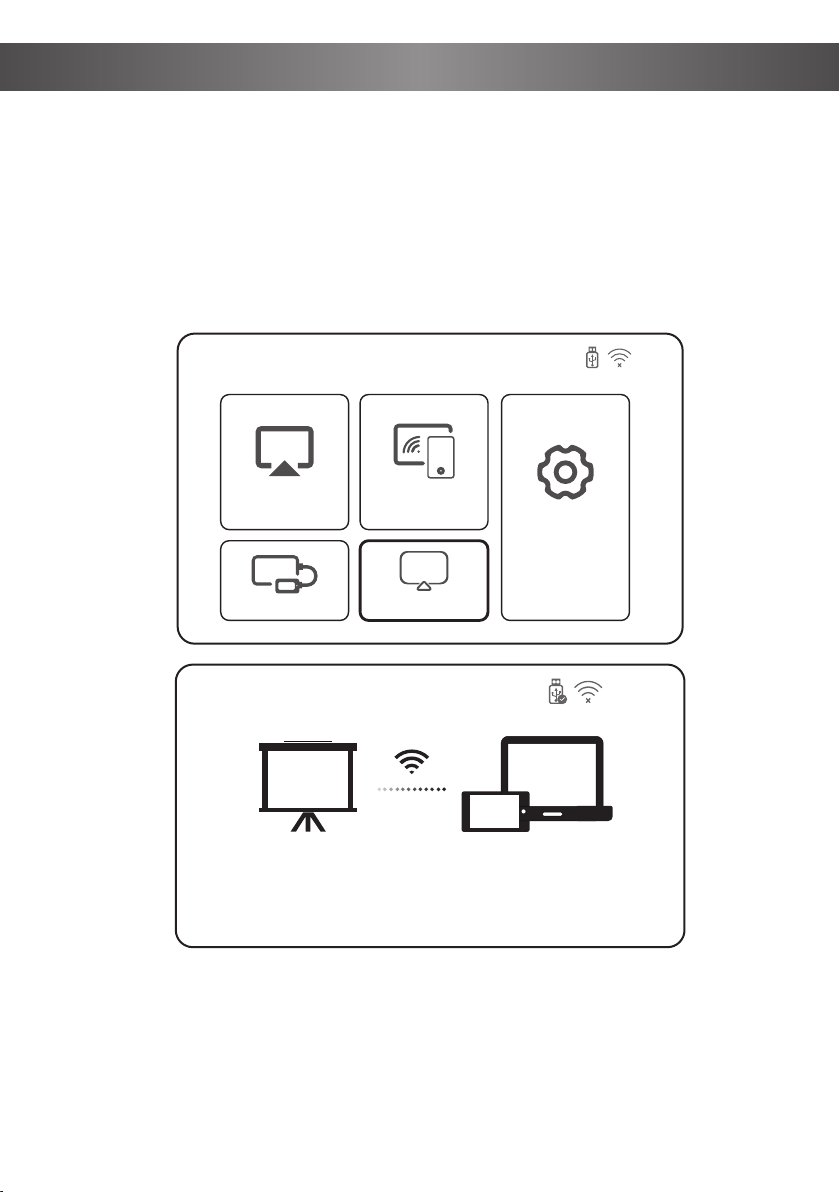
Step 1: Select Screen mirroring in the main interface, and then select DLNA;
Step2: Open the video player application.
Step3: Click the TV icon in the video player application, and then select the corre-
sponding projector device name.
DLNA
SCREEN MIRRORING
iOS Cast Miracast
iOS Cable Cast DLNA
Settings
TV
1. Open your video player software.
2. Click the TV icon and select the projection name.
Projector Name: NETLINK-XXXX-(dina)
Projector Mobile/Pad
DLNA
12
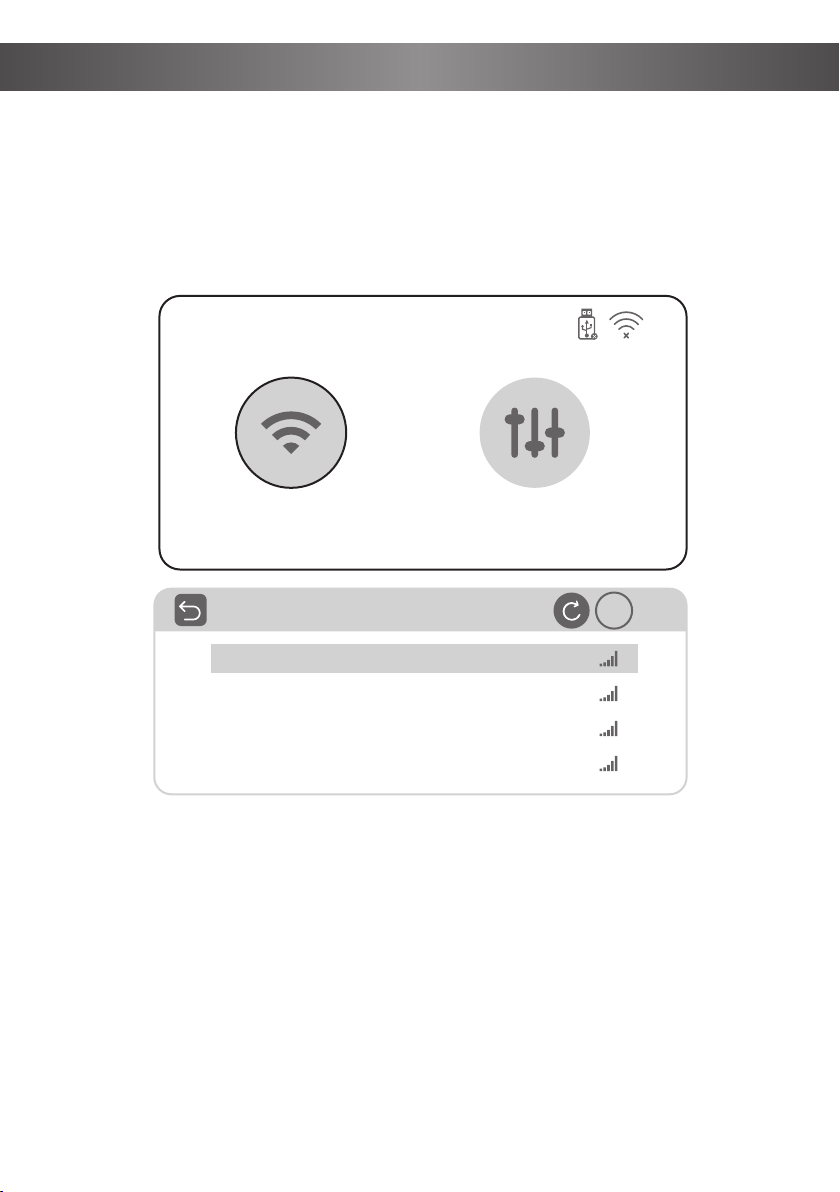
Step 1: Select Screen mirroring in the main interface, and then select Settings;
Step2: Select Network Setting.
Step3: Turn on the WiFi, find the WiFi you need to connect to, enter the password
through the virtual keyboard, and confirm the connection.
Network Setting
SCREEN MIRRORING
Network Setting System Setting
IP
TP
00
GZRIGAL-C
HUAWEI-3VUKT
13
Bluetooth Connection
Select "Setting" in the main interface, after entering the interface, select "Bluetooth"
in the "OPTION" option, turn on Bluetooth, search for the device, after the pairing is
successful, "Connected" will be displayed behind the device name.
Note:
1. Due to the different brands and chips of Bluetooth devices, LCD projectors
cannot be compatible with all Bluetooth devices. This projector only
supports the connection of Blue tooth Speaker/Earphone/Headphone/Air
pods/Earbuds and does not support the connection of other Bluetooth
devices (such asmobile phones/tablets/TVs,etc ).
2.Cannot connect Bluetooth is not quality problem. If you can't connect
Bluetooth,you can contact the support team.
Bluetooth Connection
OSD Language
Aspect Ratio
Projection Mode
Bluetooth
Factory Reset
Sofware Upgrade
Version
English
16:9
Desktop Front
ENTER
ENTER
OPTION
Bluetooth
Search device
BT-SPEAKER
Open
Search
Connected
14
HOME
Screen Mirroring
HDMI1
MOVIE MUSIC PHOTO TEXT
HDMI2 AV Setting
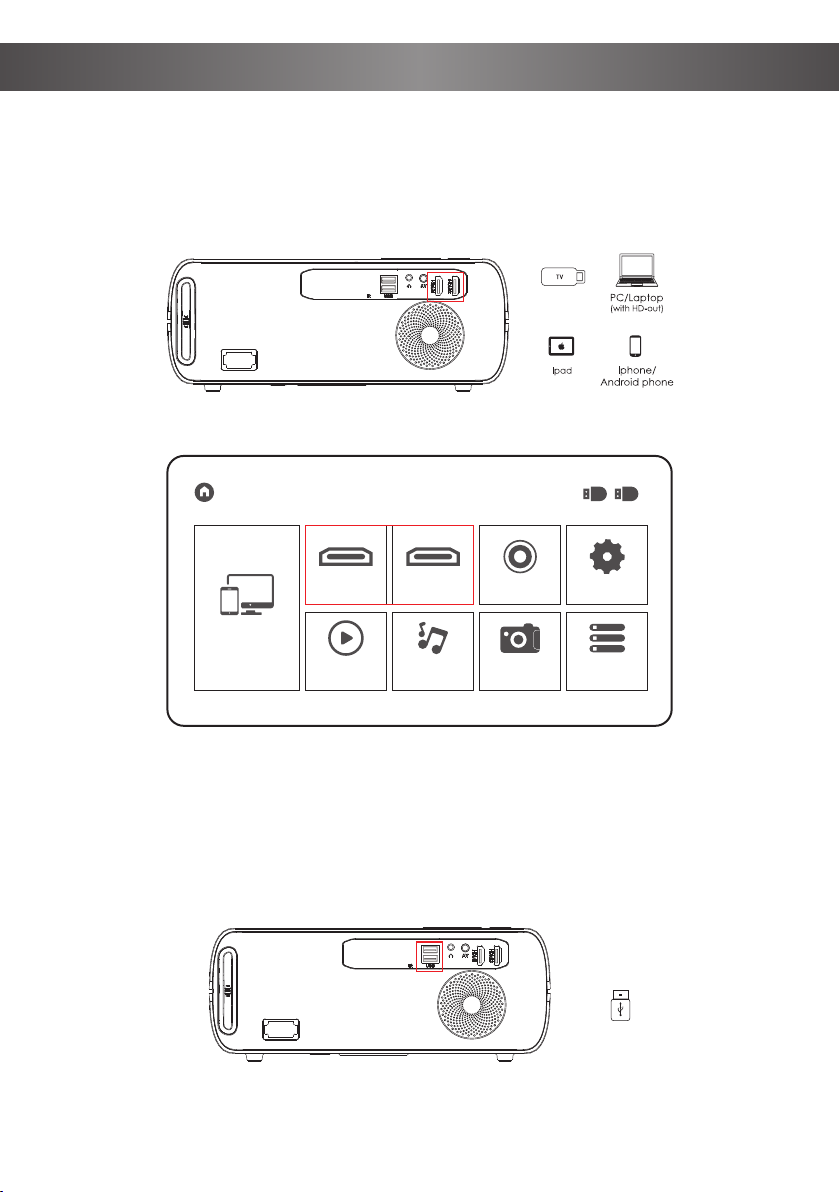
HDMI Connection
In the main interface, select the desired source connection.
Input Source
USB Connection
Insert the U disk, select "MOVIE", "MUSIC", "PHOTO" or "TEXT" in the main
interface, and find the file you need according to the path.
Fire stick/Roku/
Chromecast
USB
15
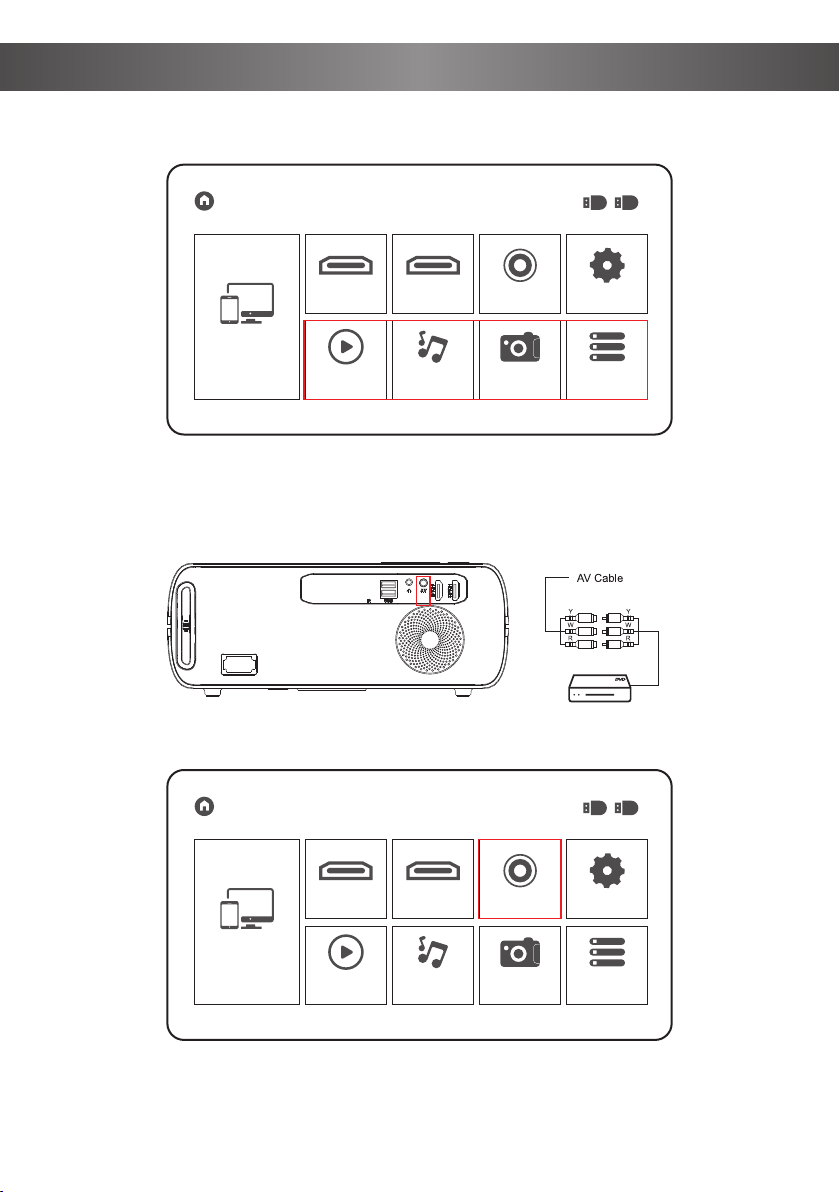
Input Source
AV Connection
HOME
Screen Mirroring
HDMI1
MOVIE MUSIC PHOTO TEXT
HDMI2 AV Setting
HOME
Screen Mirroring
HDMI1
MOVIE MUSIC PHOTO TEXT
HDMI2 AV Setting
16
Standard Setting (Front Projection)
Please refer to the following table to adjust your picture size and distance, (from the
lens to the screen).
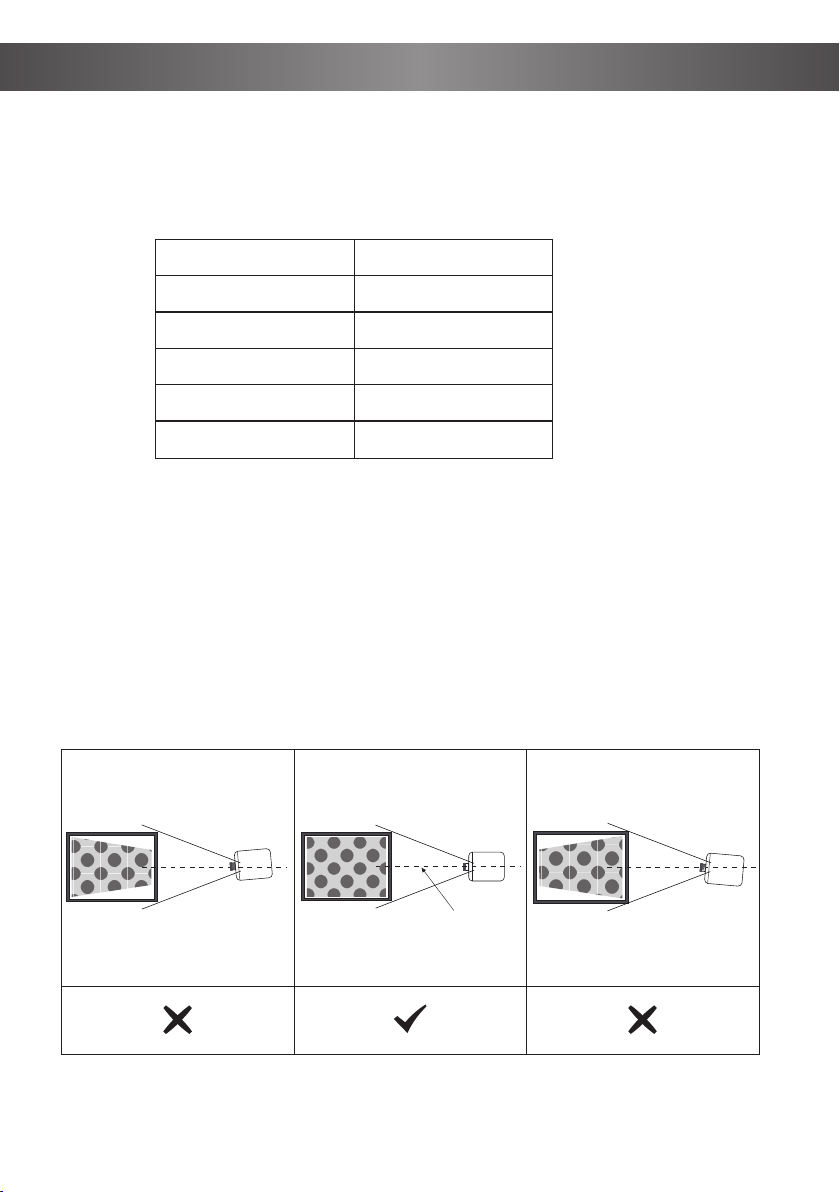
Warning:
Please check the diagram below for the trapezoid adjustment.
Aspect ratio
Screen size(inch)
Note: The above data is for reference only
50
70
100
120
5.57
7.8
10.82
13
Distance(ft)
16:9
Projector
Screen
Symmetry
Axis
Screen
Projector Installation
17
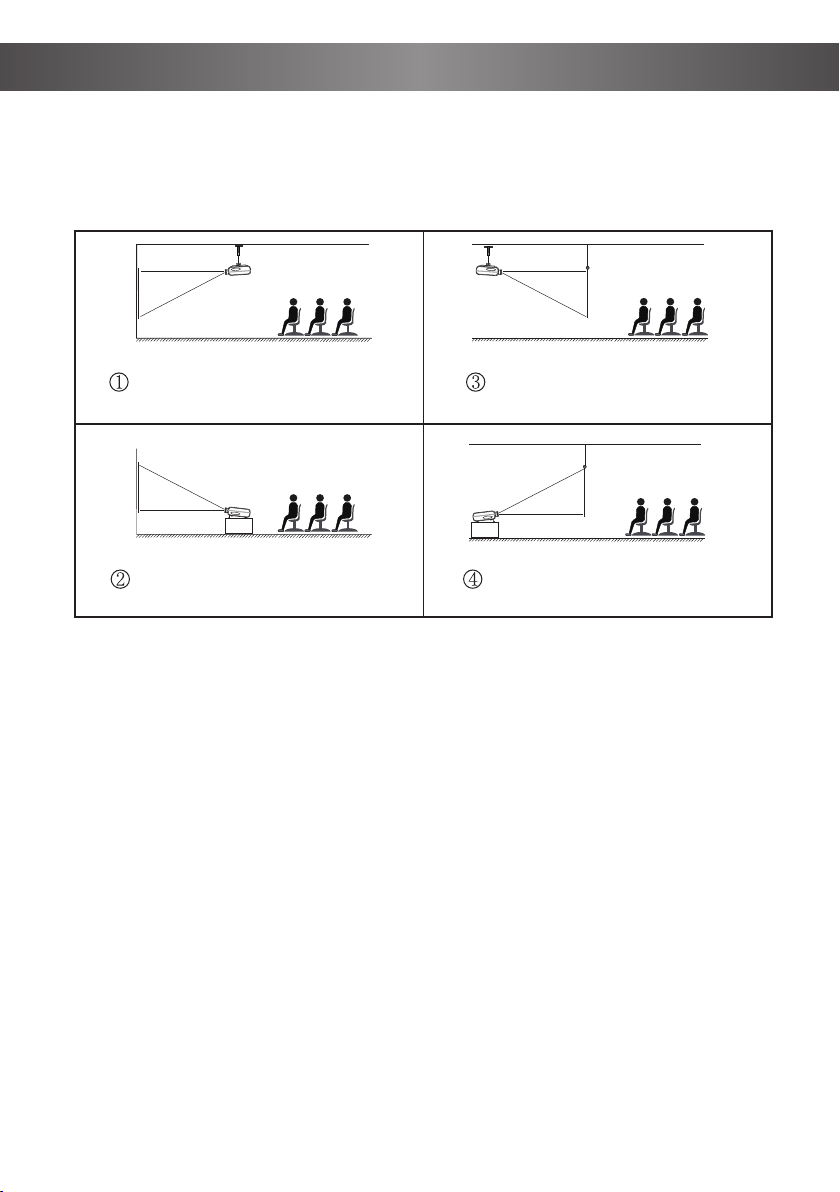
Installation Method
Contact a professional installer to mount this projector to a ceiling. Follow the
instructions below for the correct projector positions.
Warning:
1. The projector may be damaged beyond repair if it is incorrectly mounted on a
ceiling or on a surface.
2. The projector should only be used in an environment where the temperature
does not exceed the range of 5°C-35°C. Projector malfunction may occur if this is not
adhered to.
3. Malfunction may occur if the projector is subjected to dusty, wet, moist or smoky
conditions.
4. Poor ventilation could cause overheating which could lead to damage to the
projector as well as a life-threatening situation.
Projector Projector
Projector
Projector
Screen Screen
Screen
Screen
Front projection ceiling mount
Front projection table mount Rear projection table mount
Rear projection ceiling mount
Projector Installation
18
Focus adjustment
Turn the trackwheel clockwise to bring the trackwheel to the end, then slowly rotate
the trackwheel counterclockwise. At the same time, carefully observe the pixels on
the screen. When the image particles are the clearest (Subjected to the middle of
the image), the pixels on the screen are the best focus of the lens.
When the projector is connected to a power source, the projector enters standby
and the cover signal indicator is red.
Power on: Press the power key on the body or the power key on the remote control,
the indicator will turn blue and enter the working state.
Power off: In the working state, press the power key of the body or the power key on
the remote control, the indicator changes from blue to red, and the projector is
turned on.
Focus Adjustment
Turn the Projector ON/OFF
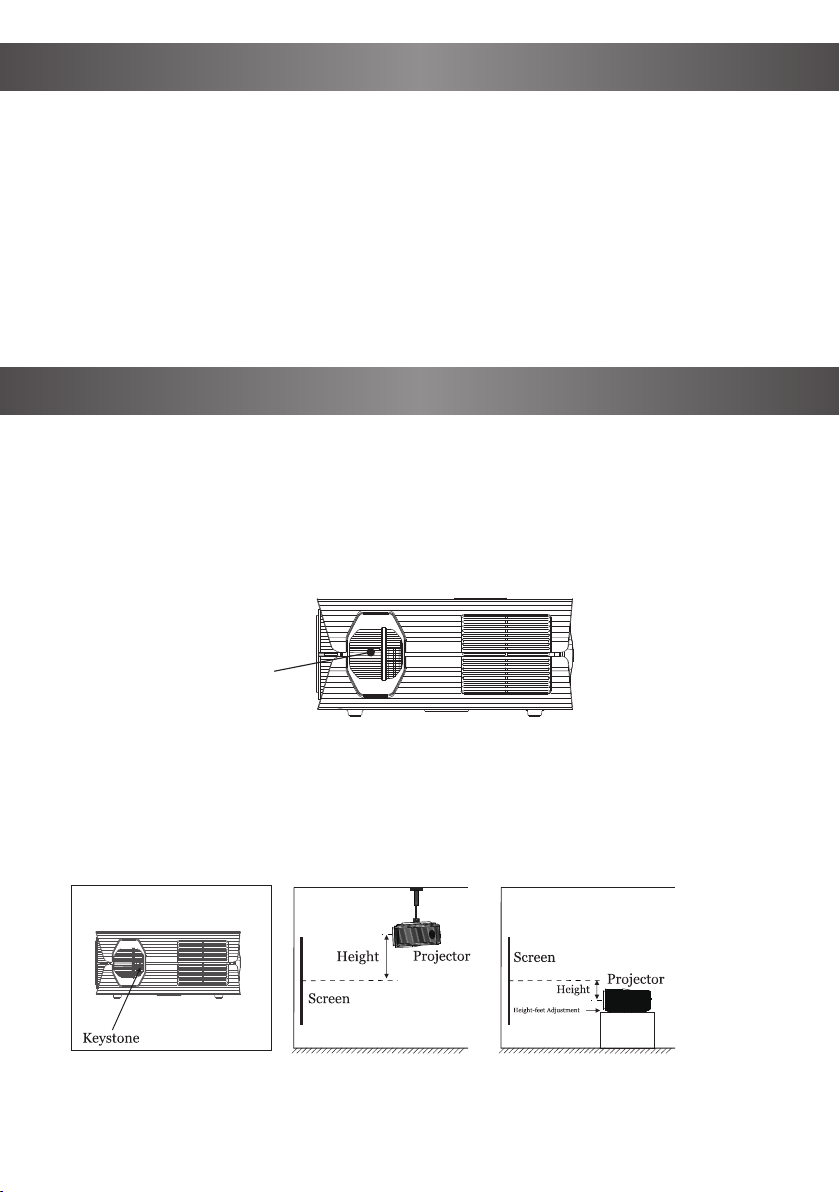
Keystone
If a projected picture has keystone distortion, please correct the image with keystone
adjustment. The image will become a trapezoid shape when the screen or projector
is not level. Please reposition the projector to improve its angle to the screen.
However, the circumference of the image may not be focused.
If you are unable to use the keystone correction function to correct the trapezoid
distortion, please lower the projector to the center of the screen vertically.
Focusing dial
Select the System Setting, you can check the Language and Software Version;
Version Upgrade: Local Update and Online Update;
Local Update: Insert the U Disk and follow the prompts to find the file upgraded
version.
Online Update: Connect to WiFi, upgrade the version according to the prompts
(Recommended to update from time to time)
Restore Factory Default: Choose carefully
System Setting
19
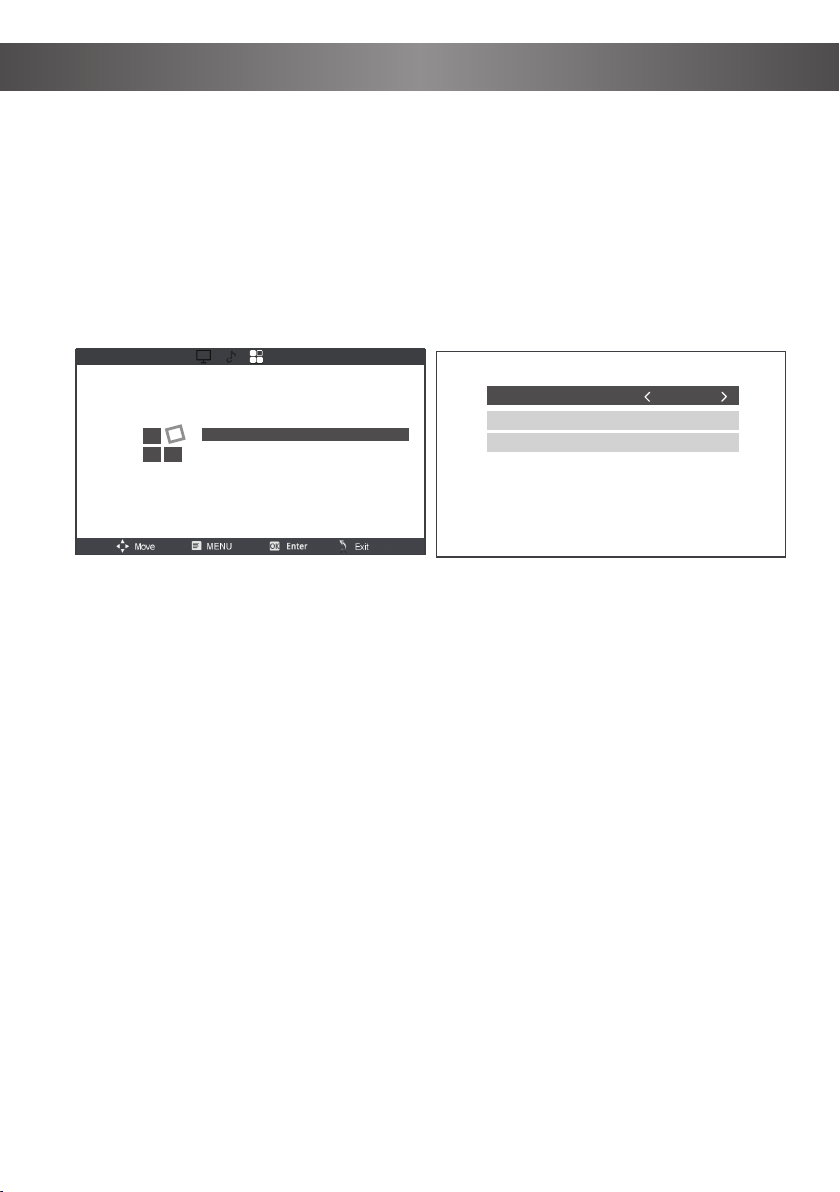
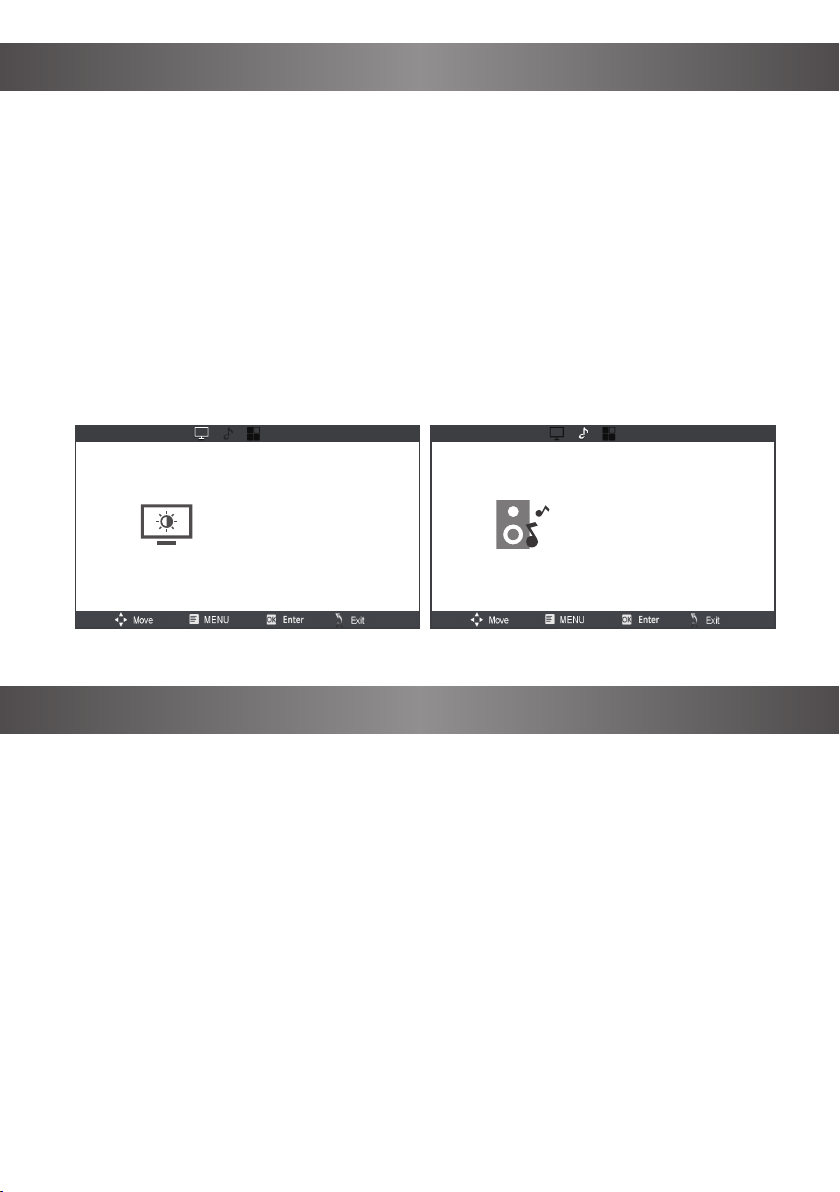
Menu Settings
In the main interface, select Setting, press the arrow key to enter the submenu, adjust
the parameters according to your requirements, and then press OK to confirm.
Submenu Settings
Picture: Picture Mode / Contrast / Brightness / Color / Tint / Sharpness / Focus / Color
Temperature / Noise Reduction.
Sound: Sound Mode / Treble/Bass.
Option: OSD Language / Aspect Ratio / Projection Mode / Bluetooth / Factory Reset /
Software Upgrade / Version.
Menu Settings
System Setting
Picture Mode
Contrast
Brightness
Color
Tint
Sharpness
Focus
Color Temperature
Noise Reduction
Standard
50
50
50
50
50
0
Medium
Middle
PICTUPE
Sound Mode
Treble
Bass
Standard
50
50
SOUND
20
Specifications
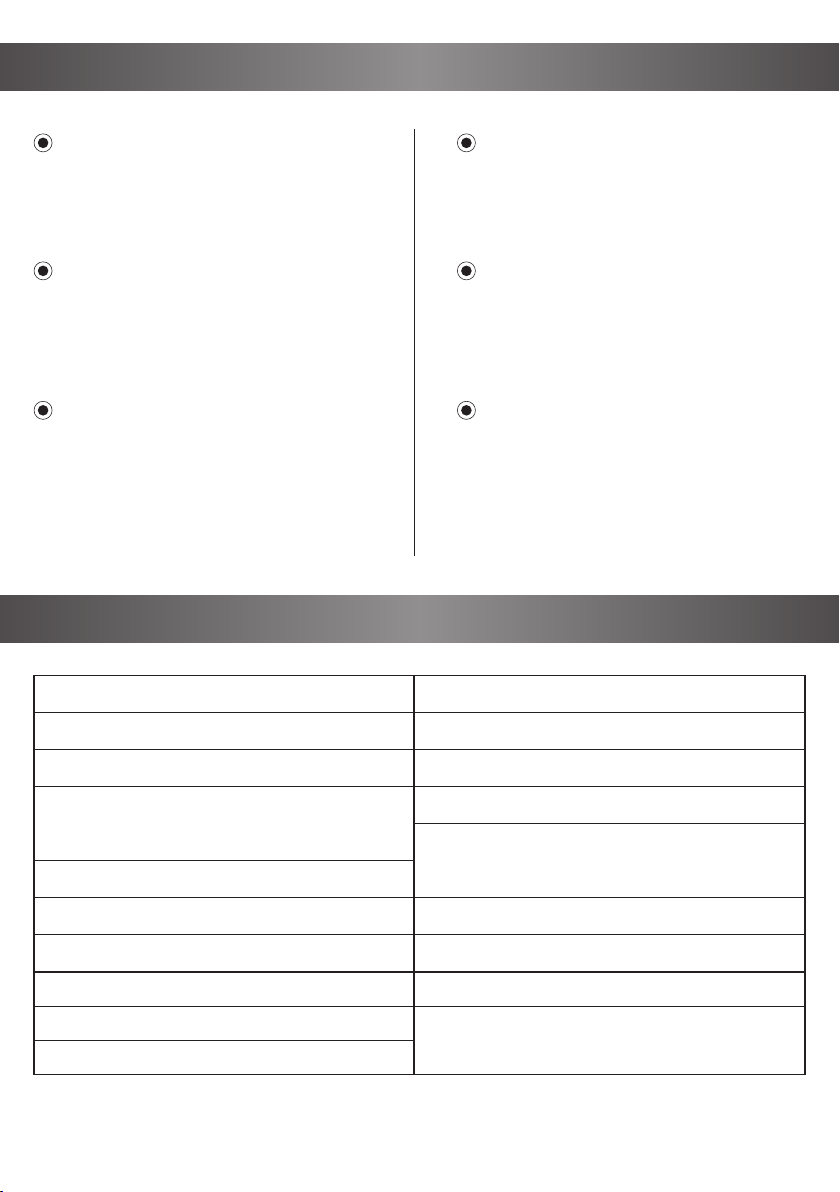
Troubleshooting
The connect from Hulu, Netflix, and similar
services can not be mirrored or cast.
Due to copyright restrictions of Hulu, Netflix, and
similar services, the contents MAY NOT be
mirrored or cast
What should i do if i want to watch
contents from Hulu,Netflix,and similar
services via the projector?
Please prepare a Fire Stick, Roku stick or
Chromecast (not included), and then connect it to
the projector via HDMI port to watch the contents.
No image.
1. The input source may not be correct.
2. No input signal.
3. The input cable is not connected.
4. If under PC mode, the PC output frequency is not
50-60Hz. Make sure that the PC output is connected
with the projector.
5. If use laptop, check the output signal is HDMI1 or
HDMI2
Auto-off.
1. The projector ventilation is blocked.
2. The voltage is not stable.
3. The projector has overheated- check that
the fan is not broken.
Blurry Image
1. TAdjust focus ring/keystone
2. Projector and screen/ wall must be effective
distance.
Remote Unresponsive
1. Make sure the remote pointsat the IR
receiver directly.
2. Do not cover IR receiver.
3. Try a new pair of AAA batteries.
Working Voltage: AC100-240V/50-60Hz
Projector Size: 10.23*9*4.33 inches
Unit Net Weight: 4.85 pounds
Image Format: JPG / JPEG / BMP / PNG
Video Format: MP4 / MKV / WMV / RMVB /RM /
AVI / FLV / TRP / VOB /3GP / DIVX / TP / TS / MPG /
M2TS / F4V / DAT
Audio Format: MP3 / AAC / WAV / FLAC / WMA / M4A
File Format: TXT
Fcous: Manual
Ports: HDMI In x2/USB2.0 port x2/Audio Outx1
/AV In x1
Projection Technology: 5” LCD TFT display
Native Resolution: 1920x1080
Max Resolution: Support 4K UHD
Projection mode: Front-Desktop / Rear-Desk-
top / Front-Ceiling / Rear-Ceiling
Zoom: 100%-75%
Aspect Ratio: 16:9 & 4:3
Lamp Type: LED lamp, 50,000 hours life
Image Size: 40-150 inch
Keystone: ±15°
Speaker: 5W Stereo Speakers

21
The terms HDMI and HDMI High-Denition Multimedia Interface, and the HDMI Logo are trademarks or registered trademarks of HDMI
Licensing Administrator, Inc. in the United States and other countries.
FCC Statement
FCC Statement
Any changes or modifications not expressly approved by the party responsible for
compliance could void the user's authority to operate the equipment.
This device compiles with part 15 of the FCC Rules. Operation is subject to the
flowing two conditions:
(1) This device may not cause harmful interference, and(2) this device must accept
any interference received, including interference that may cause undesired
operation.
NOTE: This equipment has been tested and found to comply with the limits for a
Class B digital device, pursuant to part 15 of the FCC Rules. These limits are
designed to provide reasonable
protection against harmful interference in a residential installation. This equip-
ment generates, uses and can radiate radio frequency energy and, if not installed
and used in accordance with the instructions, may cause harmful interference to
radio communications. However, there is no guarantee that interference will not
occur in a particular installation. If this equipment does cause harmful interference
to radio or television reception, which can be determined by turning the equip-
ment off and on, the user is encouraged to try to correct the interference by one or
more of the following measures:
-Reorient or relocate the receiving antenna.
-Increase the separation between the equipment and receiver.
-Connect the equipment into an outlet on a circuit different from that to which
the receiver is connected.
-Consult the dealer or an experienced radio/TV technician for help.
This equipment complies with FCC radiation exposure limits set forth for an
uncontrolled environment. This equipment should be installed and operated with
minimum distance 20cm between the radiator& your body.
This transmitter must not be co-located or operating in conjunction with any other
antenna or transmitter.

Brand: ASAKUKI
Product Name: Projector
Model No: RD-838
Voltage: AC 100-240V, 50/60Hz, 135W
FCC ID: 2AK43RD-828
Manufacture: Chongqing ChuangHong DianZi ShangWu YouXian Gongsi
Address: CN, 401120, chongqing, chongqing, bei bu xin qu, 1 zhuang
11-3, jin kai da dao 1228 hao, bei bu xin qu
MADE IN CHINA