Loading ...
Loading ...
Loading ...
6ninjakitchen.co.uk5
ninjakitchen.co.uk
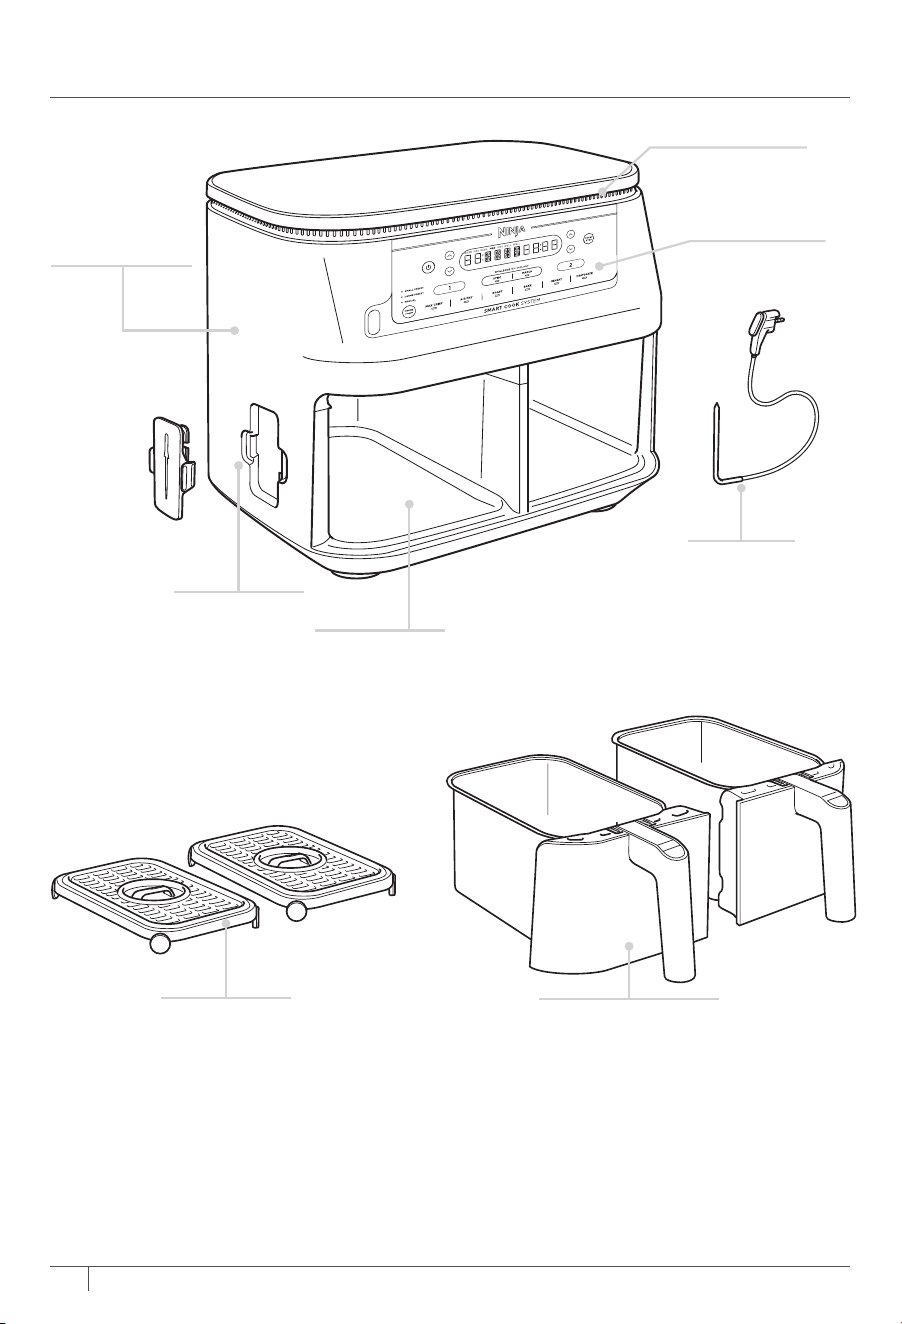
PARTS GETTING TO KNOW YOUR AIR FRYER
1 Remove and discard any packaging material and tape from the unit. Some stickers are
to be permanently kept on the unit, ONLY remove stickers with ‘peel here’.
2 Remove all accessories from the package and read this manual carefully. Please pay
particular attention to operational instructions, warnings and important safeguards to
avoid any injury or property damage.
3 Wash the drawers and crisper plates in hot, soapy water, then rinse and dry thoroughly.
The drawers and crisper plates are the ONLY dishwasher safe parts. However to extend
the life of the drawers we recommend hand-washing. NEVER clean the main unit or the
Probe in the dishwasher.
BEFORE FIRST USE
FUNCTION BUTTONS
MAX CRISP: Best for cooking smaller
quantities of frozen food such as chicken
nuggets and battered onion rings.
AIR FRY: Use this function to give your food
crispiness and crunch with little to no oil.
ROAST: Best for roasting joints of meat
and vegetables.
REHEAT: Revive leftovers by gently warming
them, leaving you with crispy results.
DEHYDRATE: Dehydrate meats, fruits and
vegetables for healthy snacks.
BAKE: Create decadent baked treats
and desserts.
OPERATING BUTTONS
1
Control the output for the drawer
on the left (Zone 1).
2
Control the output for the drawer
on the right (Zone 2).
LEFT arrows: Use the arrows on the
left-hand side of the display to select the
desired cook temperature or protein type.
RIGHT arrows: Use the arrows on the right-
hand side of the display to select cook time
or cook level.
SYNC button: Automatically syncs the
cook times to ensure both Zones finish at
the same time, even if if they have dierent
cook times.
MATCH button: Automatically matches
Zone 2 settings to those of Zone 1 to cook
a larger amount of the same food or cook
dierent foods using the same function,
temperature and time.
PROBE button: Use to select Small Preset,
Large Preset or Manual when using the
probe.
POWER button: The
button turns the
unit on and also shuts it o and stops all
cooking functions.
STANDBY MODE: After 10 minutes with no
interaction with the control panel, the unit
will enter standby mode. The
button will
be dimly lit.
HOLD MODE: Hold will appear on the
unit while in SYNC mode. One zone will
be cooking, while the other zone will be
holding until the times sync together.
When setting time, the digital display shows HH:MM.
To order additional or replacement parts and accessories, visit ninjakitchen.co.uk
or contact Customer Service at 0800 862 0453.
Control Panel
Air Intake Vent
Non-stick Drawers
(One for each Zone)
Digital Cooking
Probe
Main Unit
Non-stick
Crisper Plates
(One for each drawer)
Probe Storage
Air Outlet
(located on back)
Loading ...
Loading ...
Loading ...