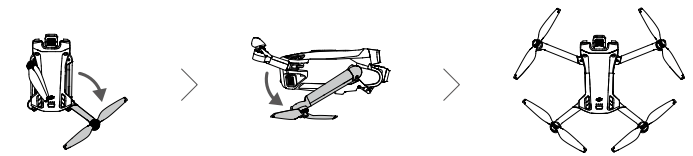
All aircraft arms are folded before the aircraft is packaged. Follow the steps below to unfold the aircraft.
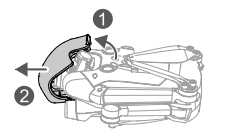
1. Remove the gimbal protector from the camera.
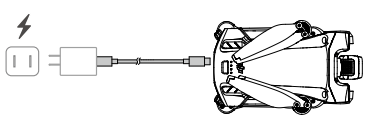
2. All Intelligent Flight Batteries are in hibernation mode before shipment to ensure safety. Connect the USB charger to the USB-C port on the aircraft to charge and activate the Intelligent Flight Batteries for the first time.
3. Unfold the rear arms, followed by the front arms, and then all of the propeller blades.
WARNING
It is recommended to use the DJI 30W USB-C Charger or other USB Power Delivery chargers.
The maximum charge voltage for the aircraft charging port is 12 V.
Make sure the gimbal protector is removed and all arms are unfolded before powering on the aircraft. Otherwise, it may affect the aircraft self-diagnostics.
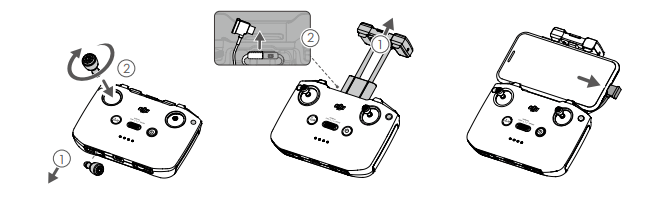
Attach the gimbal protector when the aircraft is not in use. Ensure all arms are folded before reattaching the gimbal protector. First rotate the camera to make it horizontal and forward-facing ① . While attaching the gimbal protector, ensure the camera fits into the protector first, then insert the latch on the upper part of the protector onto the opening on the aircraft ② , and insert the two locating pins into the holes at the bottom of the aircraft ③ .
Preparing the Remote Controller
Follow the steps below to prepare the DJI RC remote controller.
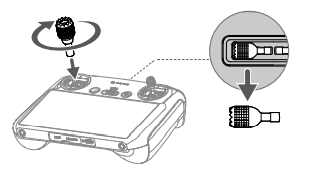
1. Remove the control sticks from the storage slots and mount them on the remote controller.
2. The remote controller needs to be activated before first use and an internet connection is required for activation. Press, and then press again and hold the power button to power on the remote controller. Follow the on-screen prompts to activate the remote controller.
Follow the steps below to prepare the DJI RC-N1 remote controller.
1. Remove the control sticks from the storage slots and mount them on the remote controller.
2. Pull out the mobile device holder. Choose the appropriate remote controller cable based on the port type of your mobile device (a Lightning connector cable, Micro USB cable, and USB-C cable are included in the packaging). Place your mobile device in the holder, then connect the end of the cable without the remote controller logo to your mobile device. Make sure your mobile device is securely in place.
Activating the DJI Mini 3 Pro Aircraft
DJI Mini 3 Pro requires activation before first use. After powering on the aircraft and remote controller, follow the on-screen prompts to activate DJI Mini 3 Pro using DJI Fly. An internet connection is required for activation.
Binding the Aircraft and Remote
Controller After activation, the aircraft is bound to the remote controller automatically. If automatic binding fails, follow the on-screen prompts on DJI Fly to bind the aircraft and remote controller for optimal warranty services.
Updating Firmware
A prompt will appear in DJI Fly when new firmware is available. Update the firmware whenever prompted to ensure optimal user experience.
Diagram
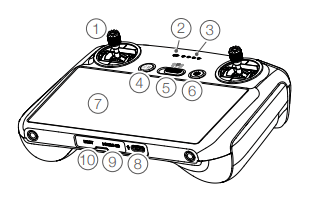
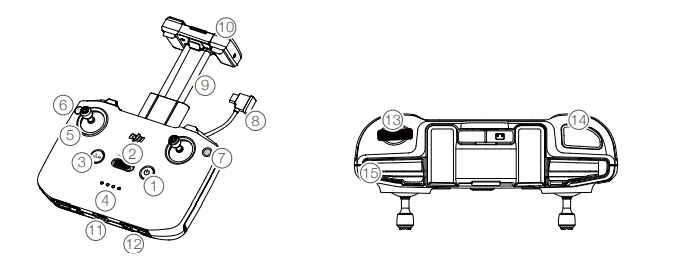
DJI RC Remote Controller
1. Control Sticks
Use the control sticks to control the movement of the aircraft. The control sticks are removable and easy to store. Set the flight control mode in DJI Fly.
2. Status LED
Indicates the status of the remote controller.
3. Battery Level LEDs
Displays the current battery level of the remote controller.
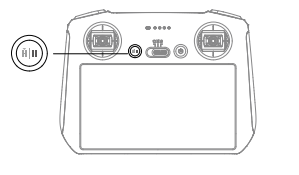
4. Flight Pause/Return to Home (RTH) Button
Press once to make the aircraft brake and hover in place (only when GNSS or Vision Systems are available). Press and hold to initiate RTH. Press again to cancel RTH.
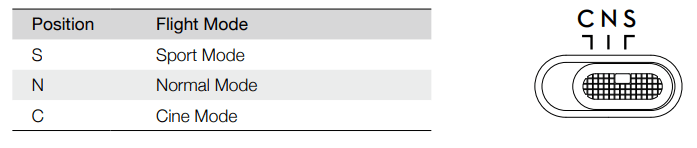
5. Flight Mode Switch
Switch between Cine, Normal, and Sport mode.
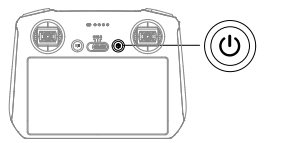
6. Power Button
Press once to check the current battery level. Press, and then press and hold to power the remote controller on or off. When the remote controller is powered on, press once to turn the touchscreen on or off.
7. Touchscreen
Touch the screen to operate the remote controller. Note that the touchscreen is not waterproof. Operate with caution.
8. USB-C Port
For charging and connecting the remote controller to your computer.
9. microSD Card Slot
For inserting a microSD card.
10. Host Port (USB-C) *
For connecting the DJI Cellular Module which needs to be purchased separately.
* To be supported later through firmware updates
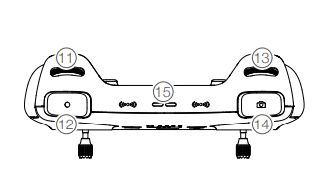
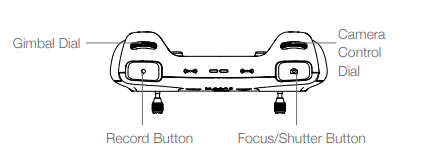
11. Gimbal Dial Controls the tilt of the camera. 12. Record Button Press once to start or stop recording. 13. Camera Control Dial For zoom control. 14. Focus/Shutter Button Press halfway down on the button to auto focus and press all the way down to take a photo.
15. Speaker
Outputs sound.
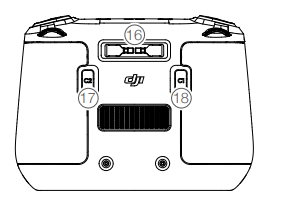
16. Control Sticks Storage Slot
For storing the control sticks.
17. Customizable C2 Button
Switch between recentering the gimbal and pointing the gimbal downward. The function can be set in DJI Fly.
18. Customizable C1 Button
Switch between recentering the gimbal and pointing the gimbal downward. The function can be set in DJI Fly
DJI RC-N1 Remote Controller
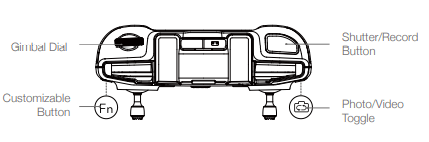
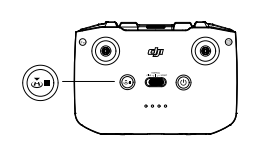
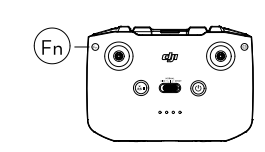
1. Power Button Press once to check the current battery level. Press, and then press and hold to power the remote controller on or off. 2. Flight Mode Switch Switch between Sport, Normal, and Cine mode. 3. Flight Pause/Return to Home (RTH) Button Press once to make the aircraft brake and hover in place (only when GNSS or Vision Systems are available). Press and hold to initiate RTH. Press again to cancel RTH. 4. Battery Level LEDs Displays the current battery level of the remote controller. 5. Control Sticks The control sticks are removable and easy to store. Set the flight control mode in DJI Fly. 6. Customizable Button The functions of the button can be set in DJI Fly. Press once to recenter the gimbal or point the gimbal downward (default settings). 7. Photo/Video Toggle Press once to switch between photo and video mode. 8. Remote Controller Cable Connect to a mobile device for video linking via the remote controller cable. Select the cable according to the port type on your mobile device. 9. Mobile Device Holder For mounting the mobile device securely on the remote controller. 10. Antennas Transmit aircraft control and wireless video signals. 11. USB-C Port For charging and connecting the remote controller to your computer. 12. Control Sticks Storage Slot For storing the control sticks. 13. Gimbal Dial Controls the tilt of the camera. Press and hold the customizable button to use the gimbal dial for zoom control. 14. Shutter/Record Button Press once to take photos or start or stop recording. 15. Mobile Device Slot For securing the mobile device.
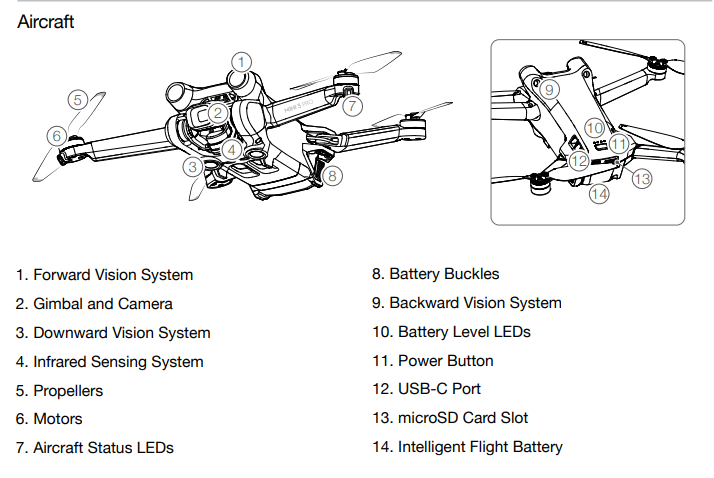
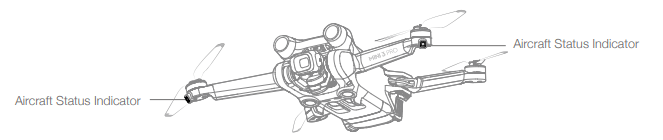
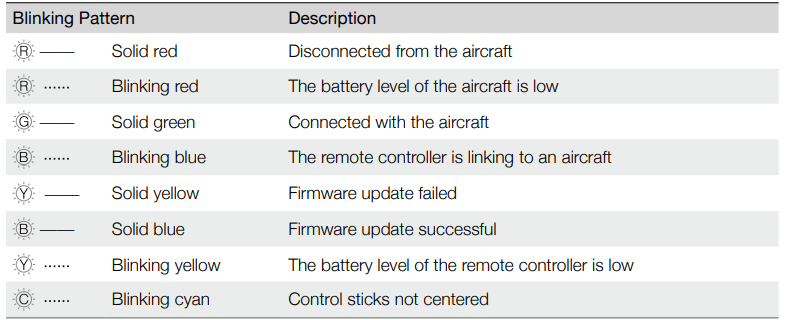
Aircraft Status Indicator
DJI Mini 3 Pro has two aircraft status indicators
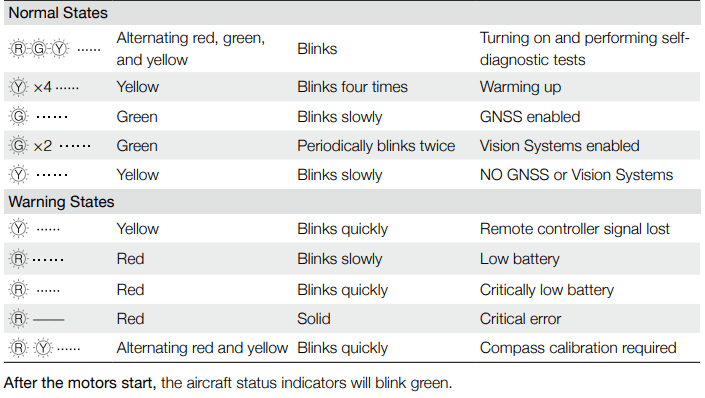
When the aircraft is powered on but the motors are not running, the aircraft status indicators will display the current status of the flight control system. Refer to the table below for more information about the aircraft status indicators.
Aircraft Status Indicator Descriptions
Remote Controller
DJI RC
When used with DJI Mini 3 Pro, DJI RC remote controller features OcuSync O3 video transmission, works at both 2.4 GHz and 5.8 GHz frequency bands. It is capable of selecting the best transmission channel automatically and can transmit 1080p 30fps HD live view from the aircraft to the remote controller at a distance of up to 12 km (7.5 mi) (compliant with FCC standards, and measured in a wide open area without interference). The DJI RC is also equipped with a 5.5-in touchscreen (1920×1080 pixel resolution) and a wide range of controls and customizable buttons, enabling users to easily control the aircraft and remotely change the aircraft settings. The built-in 5200 mAh battery with a power of 18.72 Wh provides the remote controller with a maximum operating time of four hours. The DJI RC comes with many other functions such as Wi-Fi connection, built-in GNSS (GPS+Beidou+Galileo), Bluetooth, built-in speakers, detachable control sticks, and microSD storage.
Using the Remote Controller
Powering On/Off
Press the power button once to check the current battery level.
Press once then press again and hold to power the remote controller on or off.
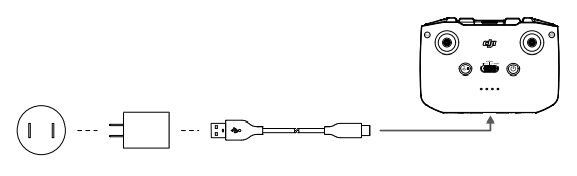
Charging the Battery
Use a USB-C cable to connect a USB charger to the USB-C port of the remote controller. The battery can be fully charged in about 1 hour and 30 minutes with a maximum charging power of 15 W (5V/3A).
Controlling the Gimbal and Camera
Focus/Shutter Button: Press halfway down to auto-focus and press all the way down to take a photo.
Record Button: Press once to start or stop recording.
Camera Control Dial: Adjust the zoom.
Gimbal Dial: Control the tilt of the gimbal.
Controlling the Aircraft
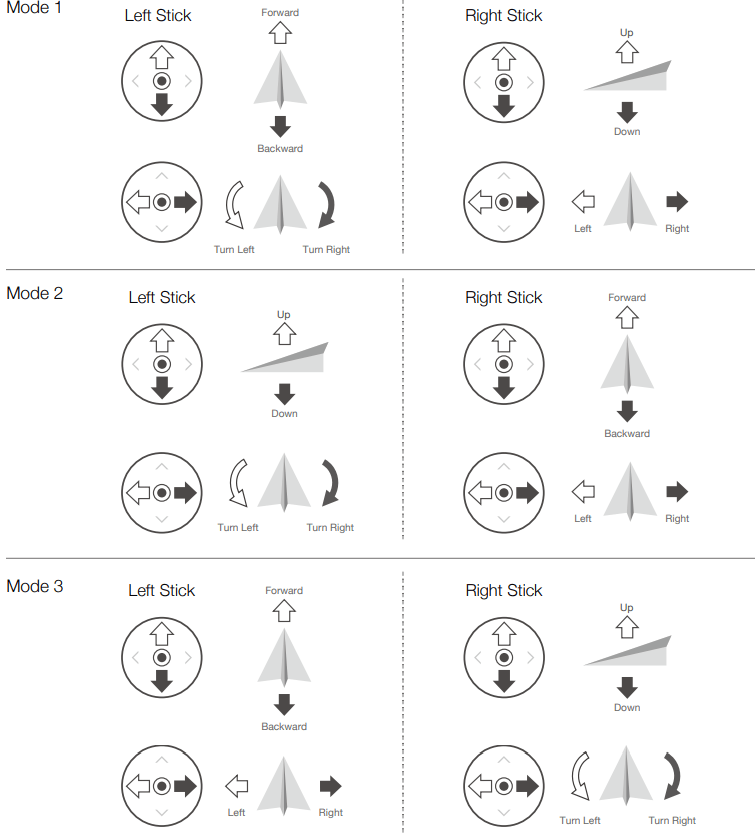
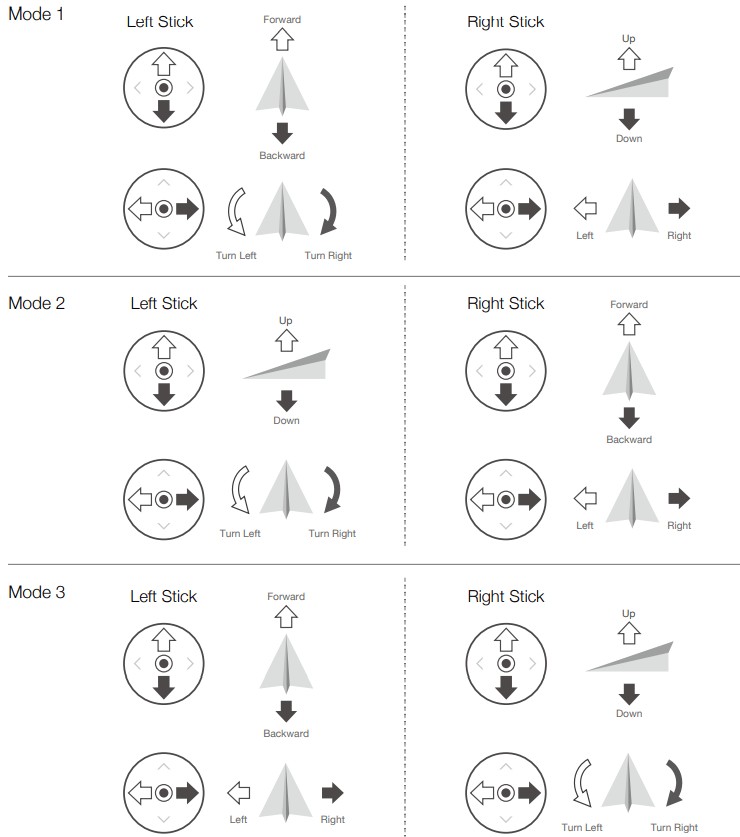
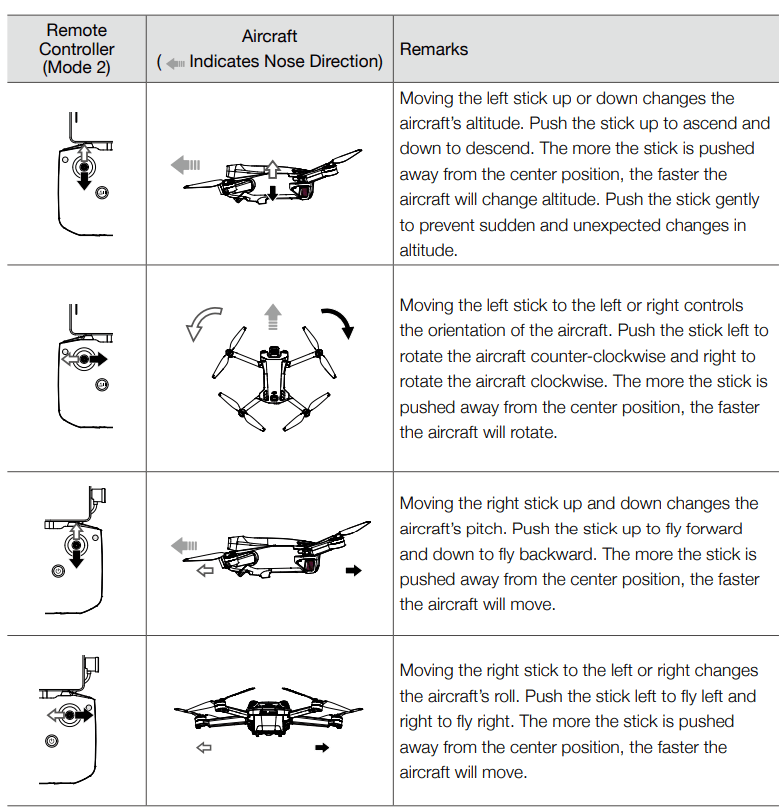
The control sticks control the aircraft’s orientation (pan), forward/backward movement (pitch), altitude (throttle), and left/right movement (roll). The control stick mode determines the function of each control stick movement. Three preprogrammed modes (Mode 1, Mode 2, and Mode 3) are available and custom modes can be configured in DJI Fly.
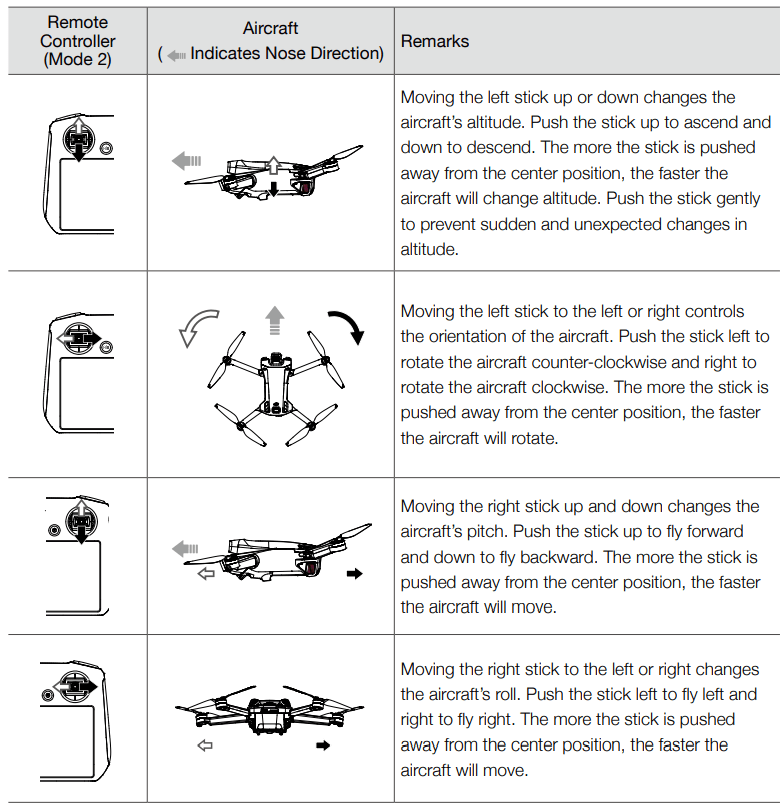
The default control mode of the remote controller is Mode 2. In this manual, Mode 2 is used as the example to illustrate how to use the control sticks.
Flight Mode Switch
Toggle the switch to select the desired flight mode.
Flight Pause/RTH Button
Press once to make the aircraft brake and hover in place. Press and hold the button until the remote controller beeps to start RTH, the aircraft will return to the last recorded Home Point. Press this button again to cancel RTH and to regain control of the aircraft.
Customizable Buttons
Go to System Settings in DJI Fly and select Control to set the functions of the customizable C1 and C2 buttons.
Status LED and Battery Level LEDs Description
Status LED
Battery Level LEDs
Remote Controller Alert
The remote controller beeps when there is an error or warning. Pay attention when prompts appear on the touch screen or in DJI Fly. Slide down from the top and select Mute to disable all alerts, or slide the volume bar to 0 to disable some alerts. The remote controller sounds an alert during RTH. The RTH alert cannot be cancelled. The remote controller sounds an alert when the battery level of the remote controller is low (6% to 10%). A low battery level alert can be cancelled by pressing the power button. The critical low battery level alert, which is triggered when the battery level is less than 5%, cannot be cancelled.
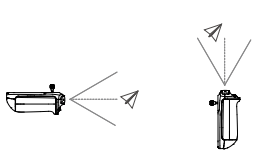
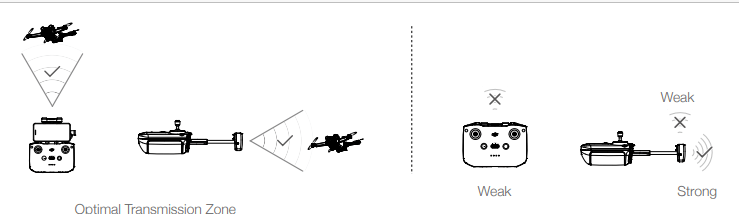
Optimal Transmission Zone
The signal between the aircraft and the remote controller is most reliable when the remote controller is positioned towards the aircraft as depicted below.
Linking the Remote Controller
The remote controller is already linked to the aircraft when purchased together as a combo. Otherwise, follow the steps below to link the remote controller and the aircraft after activation.
Power on the aircraft and the remote controller.
Launch DJI Fly.
In camera view, tap and select Control and then Pair to Aircraft (Link).
Press and hold the power button on the aircraft for more than four seconds. The aircraft will beep once when it is ready to link. After the linking is successful, the aircraft will beep twice and the battery level LEDs of the remote controller will appear on and solid.
Operating the Touchscreen
Operations
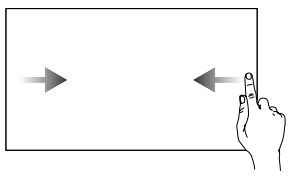
Slide from the left or right to the center of the screen to return to the previous screen.
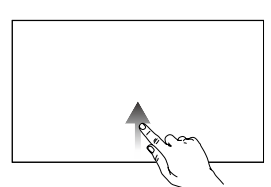
Slide up from the bottom of the screen to return to DJI Fly.
Slide down from the top of the screen to open the status bar when in DJI Fly. The status bar displays the time, Wi-Fi signal, battery level of the remote controller, etc.
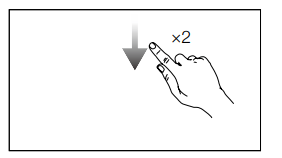
Slide down twice from the top of the screen to open Quick Settings when in DJI Fly.
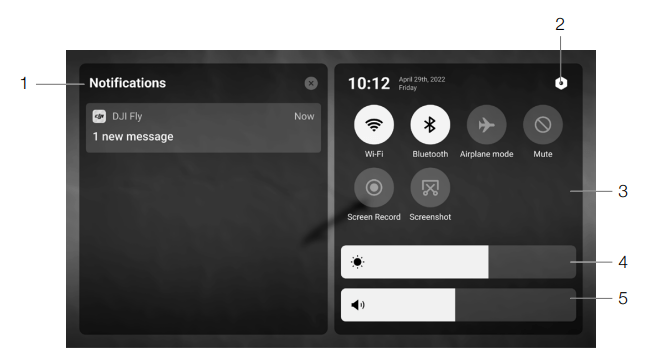
Quick Settings
1. Notifications Tap to check system notifications.
2. System Settings Tap to access system settings and configure the Bluetooth, volume, network, etc. You can also view the Guide to learn more about the controls and status LEDs.
3. Shortcuts
:Tap to enable or disable Wi-Fi. Hold to enter settings and then connect to or add a Wi-Fi network.
: Tap to enable or disable Bluetooth. Hold to enter settings and connect with nearby Bluetooth devices.
: Tap to enable Airplane mode. Wi-Fi and Bluetooth will be disabled.
: Tap to turn off system notifications and disable all alerts.
: Tap to start recording the screen.
: Tap to take a screenshot. The function will be available only after a microSD card is inserted into the microSD slot on the remote controller
4. Adjusting Brightness
Slide the bar to adjust the screen brightness.
5. Adjusting Volume
Slide the bar to adjust the volume.
Advanced Features
Calibrating the Compass
The compass may need to be calibrated after the remote controller is used in areas with electromagnetic interference. A warning prompt will appear if the compass of the remote controller requires calibration.
Tap the warning prompt to start calibrating. In other cases, follow the steps below to calibrate your remote controller.
Power on the remote controller, and enter Quick Settings.
Tap to enter system settings, scroll down and tap Compass.
Follow the on-screen instructions to calibrate the compass.
A prompt will be displayed when the calibration is successful.
DJI RC-N1
When used with DJI Mini 3 Pro, DJI RC-N1 features OcuSync O3 video transmission, works at both 2.4 GHz and 5.8 GHz frequency bands, is capable of selecting the best transmission channel automatically, and offers 1080p 30fps HD live view transmission from the aircraft to DJI Fly on a mobile device (depending on mobile device performance) at a maximum transmission range of 12 km (7.5 mi) (compliant with FCC standards, and measured in a wide open area without interference). Users can control the aircraft and change the settings easily within this range. The built-in battery has a capacity of 5200 mAh and power of 18.72 Wh that supports a maximum run time of six hours. The remote controller charges Android mobile devices automatically with a charging rate of 500 mA@5 V. Charging for iOS devices is disabled by default. To charge iOS devices, make sure that the charging function is enabled in DJI Fly each time the remote controller is powered on.
Powering On/Off
Press the power button once to check the current battery level. If the battery level is too low, recharge before use. Press once then press again and hold for two seconds to power the remote controller on or off.
Charging the Battery
Use a USB-C cable to connect a USB charger to the USB-C port of the remote controller.
Controlling the Gimbal and Camera
Shutter/Record Button: Press once to take a photo or to start or stop recording.
Photo/Video Toggle: Press once to switch between photo and video mode.
Gimbal Dial: For controlling the tilt of the gimbal. Press and hold the customizable button and then use the gimbal dial to zoom in or out.
Controlling the Aircraft
The control sticks control the aircraft’s orientation (pan), forward/backward movement (pitch), altitude (throttle), and left/right movement (roll). The control stick mode determines the function of each control stick movement. Three preprogrammed modes (Mode 1, Mode 2, and Mode 3) are available and custom modes can be configured in DJI Fly.
The default control mode of the remote controller is Mode 2. In this manual, Mode 2 is used as the example to illustrate how to use the control sticks.
Flight Mode Switch
Toggle the switch to select the desired flight mode.
Flight Pause/RTH Button
Press once to make the aircraft brake and hover in place. Press and hold the button until the remote controller beeps to start RTH. The aircraft will return to the last recorded Home Point. Press this button again to cancel RTH and to regain control of the aircraft.
Customizable Button
To customize the function of this button, go to System Settings in DJI Fly and select Control. Customizable functions include recentering the gimbal and toggling between the map and live view.
Remote Controller Alert
The remote controller sounds an alert during RTH. The RTH alert cannot be cancelled. The remote controller sounds an alert when the battery level of the remote controller is low (6% to 10%). A low battery level alert can be cancelled by pressing the power button. The critical low battery level alert, which is triggered when the battery level is less than 5%, cannot be cancelled.
Optimal Transmission Zone
The signal between the aircraft and the remote controller is most reliable when the remote controller is positioned towards the aircraft as depicted below.
Linking the Remote Controller
The remote controller is already linked to the aircraft when purchased together as a combo. Otherwise, follow the steps below to link the remote controller and the aircraft after activation.
Power on the aircraft and the remote controller.
Launch DJI Fly.
In camera view, tap and select Control and then Pair to Aircraft (Link).
Press and hold the power button of the aircraft for more than four seconds. The aircraft will beep once when it is ready to link. After the linking is successful, the aircraft will beep twice and the battery level LEDs of the remote controller will appear on and solid.
DJI Fly App
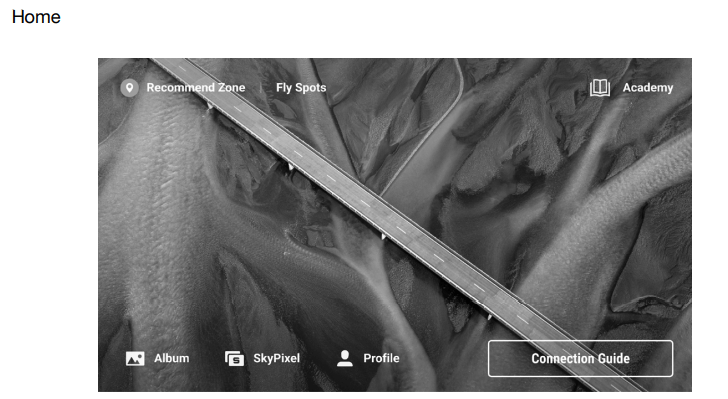
Home
Launch DJI Fly and enter the home screen.
Fly Spots
View or share suitable flight and shooting locations nearby, learn more about GEO Zones, and preview aerial photos of different locations taken by other users.
Academy
Tap the icon in the top right corner to enter Academy and view product tutorials, flight tips, flight safety notices, and manual documents.
Album
View photos and videos from DJI Fly and your mobile device. MasterShots and QuickShots videos can be viewed after downloading them to your mobile device and rendering. Tap Create and select
Templates or Pro. Templates provide an auto-edit feature for imported footage. Pro allows users to edit footage manually.
SkyPixel
Enter SkyPixel to view videos and photos shared by users.
Profile
View account information, flight records; visit the DJI forum, online store; access the Find My Drone feature, and other settings such as firmware updates, camera view, cached data, account privacy, and language.
Camera View
1. Flight Mode N: Displays the current flight mode. 2. System Status Bar In Flight: Indicates the aircraft flight status and displays various warning messages. Tap to view more information when a warning prompt appears. 3. Battery Information : Displays the current battery level and remaining flight time. 4. Video Downlink Signal Strength : Displays the video downlink signal strength between the aircraft and the remote controller. 5. Vision System Status : The upper part of the icon indicates the status of the Forward Vision System, and the lower part indicates the status of the Backward Vision System. The icon is white when the vision system is working normally and turns red when the vision system is unavailable. 6. GNSS Status : Displays the current GNSS signal strength. Tap to check the GNSS signal status. The Home Point can be updated when the icon is white, which indicates the GNSS signal is strong. 7. System Settings System settings provide information about safety, control, the camera, and transmission.
Safety
Flight Assistance: Forward and Backward vision systems are enabled after setting Obstacle
Avoidance to Bypass or Brake. The aircraft cannot sense obstacles if Obstacle Avoidance is disabled.
Radar Map Display: When enabled, the real-time obstacle detection radar map will be displayed.
Flight Protection: Tap to set the max altitude and the max distance for flights.
RTH: Tap to set the Return to Home Altitude and update the Home Point. Sensors: Tap to view the IMU and compass statuses and start calibration if necessary.
Battery: Tap to view battery information such as battery cell status, serial number, and number of times charged.
Unlock GEO Zone: Tap to view information about unlocking GEO Zones.
The Find My Drone feature uses the map to find the location of the aircraft on the ground.
Advanced Safety Settings include the behavior settings for the aircraft when remote controller signals are lost and stopping the propellers mid-flight during emergencies.
The behavior of the aircraft when remote controller signals are lost can be set to Return to Home, Descend, or Hover.
Emergency Only” indicates that the motors can only be stopped mid-flight in case of an emergency, such as a collision, a motor stalling, the aircraft rolling in the air, or the aircraft being out of control and ascending or descending quickly. “Anytime” indicates that the motors can be stopped mid-flight anytime once the user performs a combination stick command (CSC)
Control
Aircraft Settings: Set measurement units.
Subject Scanning: The aircraft will automatically detect subjects when Subject Scanning is enabled.
Gimbal Settings: Tap to set the gimbal mode, enter advanced settings, perform gimbal calibration, and recenter or tilt the gimbal down.
Remote Controller Settings: Tap to set the function of the customizable button, calibrate the remote controller, switch control stick modes (Mode 1, Mode 2, Mode 3, or custom mode), or set the advanced settings of the remote controller.
Beginner Flight Tutorial: View the flight tutorial.
Connect to the Aircraft: Tap to start linking when the aircraft is not linked to the remote controller.
Camera
Camera Parameter Settings: Displays different settings according to the shooting mode.
General Settings: Tap to view and set histogram, overexposure warning, peaking level, gridlines, and white balance.
Storage Location: Footage can be stored in the aircraft’s internal storage or on a microSD card.
Internal storage and microSD cards can be formatted. The footage downloaded to the aircraft’s internal storage or microSD card can be synced to the user’s mobile device, and the max video cache capacity settings can also be adjusted.
Reset Camera Settings: Tap to restore camera parameters to the default settings.
Transmission
A livestreaming platform can be selected to broadcast the camera view in real time.
The frequency band and channel mode can also be set in the transmission settings.
About
View device information, firmware information, app version, battery version, and more.
8. Shooting Modes Photo: Single, Burst Shooting, AEB, 48MP, or Timed Shot.
Video: Normal, Slow Motion. Digital zoom is supported in normal video mode.
MasterShots: Select a subject. The aircraft will record while executing different maneuvers in sequence and keeping the subject in the center of the frame. A short cinematic video will be generated afterward.
Hyperlapse: Choose from Free, Circle, Course Lock, and Waypoints.
Pano: Choose from Sphere, 180°, Wide Angle, and Vertical.
QuickShots: Choose from Dronie, Rocket, Circle, Helix, Boomerang, and Asteroid.
9. Landscape/Portrait Mode Switch
Tap to switch between Landscape and Portrait modes. The camera will rotate 90 degrees when switching to Portrait mode, for shooting portrait videos and photos. Portrait mode is only available in normal photo and video modes and is not supported when using MasterShots, QuickShots, Hyperlapse, Pano, or FocusTrack. 10. Zoom : The icon shows the zoom ratio. Tap to adjust the zoom ratio. Tap and hold the icon to expand the zoom bar and slide on the bar to adjust the zoom ratio. 11. Shutter/Record Button : Tap to take a photo or to start or stop recording a video. 12. Focus Button : Tap the icon to switch the focus mode. Tap and hold the icon to expand the focus bar and slide on the bar to focus the camera. 13. Playback : Tap to enter playback and preview photos and videos as soon as they are captured. 14. Camera Mode Switch : Choose between Auto and Pro modes when in photo mode. The parameters differ with each mode. 15. Shooting Parameters : Displays the current shootings parameters. Tap to access parameter settings. 16. microSD Card Information : Displays the remaining number of photos or video recording time on the current microSD card. Tap to view the available capacity of the microSD card. 17. Flight Telemetry H 150m : Vertical distance from the aircraft to the Home Point. D 80m : Horizontal distance from the aircraft to the Home Point. 3m/s : Vertical speed of the aircraft. 5.6m/s : Horizontal speed of the aircraft. 18. Map : Tap to switch to the Attitude Indicator, which displays information such as the orientation and tilt angle of the aircraft, as well as the locations of the remote controller and the Home Point
19. Auto Takeoff/Landing/RTH : Tap the icon. When the prompt appears, press and hold the button to initiate auto takeof ỏ landing
: Tap to initiate Smart RTH and have the aircraft return to the last recorded Home Point. 20. Back : Tap to return to the home screen. Tap and hold anywhere on the screen in the camera view until the gimbal adjustment bar appears. Slide on the bar to adjust the gimbal angle. Drag-select anywhere on the screen in the camera view to start FocusTrack. Tap on the screen to enable focus or spot metering. Focus or spot metering will display differently depending on the focus mode, exposure mode, and spot metering mode. After using spot metering, tap and hold on the screen to lock the exposure. To unlock the exposure, tap and hold on the screen again.
Flight
Flight Environment Requirements
Do not operate the aircraft in severe weather conditions including wind speeds exceeding 10.7 m/s, snow, rain, and fog.
Only fly in open areas. Tall buildings and large metal structures may affect the accuracy of the onboard compass and GNSS system. It is recommended to keep the aircraft at least 5 m away from structures.
Avoid obstacles, crowds, high-voltage power lines, trees, and bodies of water (recommended height is at least 3 m above water).
Minimize interference by avoiding areas with high levels of electromagnetism such as locations near power lines, base stations, electrical substations, and broadcasting towers.
The performance of the aircraft and its battery is limited when flying at high altitudes. Fly with caution. The maximum service ceiling above sea level of the aircraft is 4,000 m (13,123 ft) when flying with the Intelligent Flight Battery. If the Intelligent Flight Battery Plus is used, the maximum service ceiling above sea level drops to 3,000 m (9,843 ft). If a propeller guard is installed on the aircraft with the Intelligent Flight Battery, the maximum service ceiling above sea level becomes 1,500 m (4,921 ft).
GNSS cannot be used on the aircraft in the polar regions. Use the Vision Systems instead.
DO NOT take off from moving objects such as cars and ships.
Flight Limits
GEO (Geospatial Environment Online) System
DJI’s Geospatial Environment Online (GEO) System is a global information system that provides real-time information on flight safety and restriction updates and prevents UAVs from flying in restricted airspace. Under exceptional circumstances, restricted areas can be unlocked to allow flights in. Prior to that, the user must submit an unlocking request based on the current restriction level in the intended flight area. The GEO system may not fully comply with local laws and regulations. Users shall be responsible for their own flight safety and must consult with the local authorities on the relevant legal and regulatory requirements before requesting to unlock a flight in a restricted area. For more information about the GEO system, visit https://www.dji.com/flysafe.
Flight Limits
For safety reasons, flight limits are enabled by default to help users operate this aircraft safely. Users can set flight limits on height and distance. Altitude limits, distance limits, and GEO zones function concurrently to manage flight safety when GNSS is available. Only altitude can be limited when GNSS is unavailable.
Flight Altitude and Distance Limits
Maximum flight altitude restricts an aircraft’s flight altitude, while maximum flight distance restricts an aircraft’s flight radius around the Home Point. These limits can be set using the DJI Fly app for improved flight safety.
GEO Zones
DJI’s GEO System designates safe flight locations, provides risk levels and safety notices for individual flights, and offers information on restricted airspace. All restricted flight areas are referred to as GEO Zones, which are further divided into Restricted Zones, Authorization Zones, Warning Zones, Enhanced Warning Zones, and Altitude Zones. Users can view such information in real time in DJI Fly. GEO Zones are specific flight areas, including but not limited to airports, large event venues, locations where public emergencies have occurred (such as forest fires), nuclear power plants, prisons, government properties, and military facilities. By default, the GEO system limits flights into or takeoffs within zones that may cause safety or security concerns. A GEO Zone Map that contains comprehensive information on GEO Zones around the globe is available on the official DJI website
Pre-Flight Checklist
Make sure the remote controller, mobile device, and Intelligent Flight Battery are fully charged.
Make sure the Intelligent Flight Battery and the propellers are mounted securely.
Make sure the aircraft arms are unfolded.
Make sure the gimbal and camera are functioning normally.
Make sure that there is nothing obstructing the motors and that they are functioning normally.
Make sure that DJI Fly is successfully connected to the aircraft.
Make sure all camera lenses and sensors are clean.
Only use genuine DJI parts or parts certified by DJI. Unauthorized parts or parts from non-DJI certified manufacturers may cause the system to malfunction and compromise safety.
Auto Takeoff/Landing
Auto Takeoff
Use the Auto Takeoff function:
Launch DJI Fly and enter the camera view.
Complete all steps in the pre-flight checklist.
Tap . If conditions are safe for takeoff, press and hold the button to confirm.
The aircraft will take off and hover approximately 1.2 m (3.9 ft) above the ground.
Auto Landing
Use the Auto Landing function:
Tap . If conditions are safe for landing, press and hold the button to confirm.
Auto landing can be cancelled by tapping .
If the Downward Vision System is working normally, Landing Protection will be enabled.
Motors will stop automatically after landing.
Starting/Stopping the Motors
Starting the Motors
Perform the Combination Stick Command (CSC) as shown below to start the motors. Once the motors have started spinning, release both sticks simultaneously
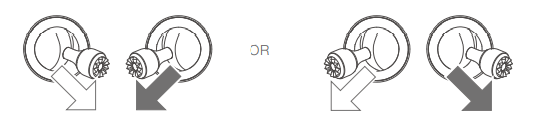
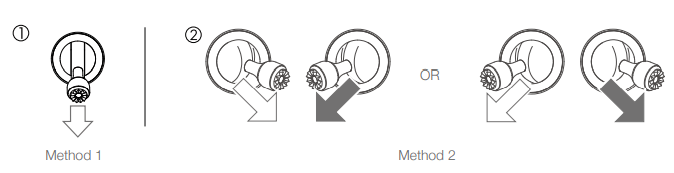
Stopping the Motors
The motors can be stopped in two ways:
Method 1: When the aircraft has landed, push the throttle stick down and hold. The motors will stop after three seconds.
Method 2: When the aircraft has landed, push the throttle stick down, and perform the same CSC used to start the motors. Release both sticks once the motors have stopped.
Stopping the Motors Mid-Flight
Stopping the motors mid-flight will cause the aircraft to crash. DO NOT stop the motors mid-flight unless you encounter an emergency situation, for example, if a collision has occurred, or if the aircraft is out of control and ascending or descending quickly, or the aircraft is rolling in the air. To stop the motors mid-flight, perform the same CSC used to start the motors. The default setting can be changed in DJI Fly.
Flight Test
Takeoff/Landing Procedures
Place the aircraft in an open, flat area with the rear of the aircraft facing towards you.
Power on the remote controller and the aircraft.
Launch DJI Fly and enter the camera view.
Wait for the aircraft self-diagnostics to complete. If DJI Fly does not show any irregular warning, you can start the motors.
Push the throttle stick up slowly to take off.
To land, hover over a level surface and gently push the throttle stick down to descend.
After landing, push the throttle down and hold. The motors will stop after three seconds.
Power off the Intelligent Flight Battery before the remote controller.
Video Suggestions and Tips
The pre-flight checklist is designed to help you fly safely and shoot videos during flight. Go through the full pre-flight checklist before each flight.
Select the desired gimbal operation mode in DJI Fly.
It is recommended to take photos or record videos when flying in Normal or Cine mode.
DO NOT fly in bad weather such as on rainy or windy days.
Choose the camera settings that best suit your needs.
Perform flight tests to establish flight routes and preview scenes.
Push the control sticks gently to ensure smooth and stable movement of the aircraft.


 :Tap to enable or disable Wi-Fi. Hold to enter settings and then connect to or add a Wi-Fi network.
  : Tap to enable or disable Bluetooth. Hold to enter settings and connect with nearby Bluetooth devices.
  : Tap to enable Airplane mode. Wi-Fi and Bluetooth will be disabled.
  : Tap to turn off system notifications and disable all alerts.
  : Tap to start recording the screen.
  : Tap to take a screenshot. The function will be available only after a microSD card is inserted into the microSD slot on the remote controller
 to enter system settings, scroll down and tap Compass.
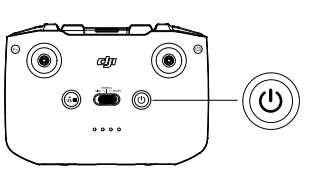

 and select Control and then Pair to Aircraft (Link).
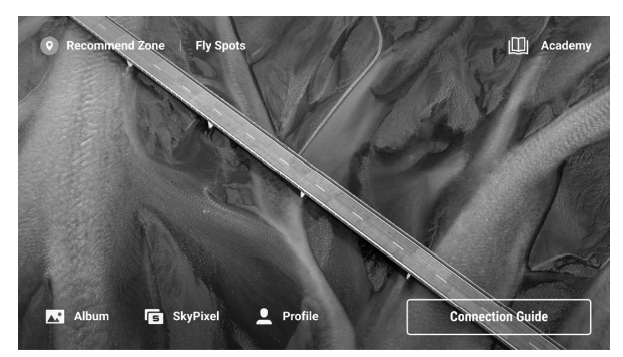

 : Displays the current battery level and remaining flight time.
 : Displays the video downlink signal strength between the aircraft and the remote controller.
 : The upper part of the icon indicates the status of the Forward Vision System, and the lower part indicates the status of the Backward Vision System. The icon is white when the vision system is working normally and turns red when the vision system is unavailable.
 : Displays the current GNSS signal strength. Tap to check the GNSS signal status. The Home Point can be updated when the icon is white, which indicates the GNSS signal is strong.
 Tap to switch between Landscape and Portrait modes. The camera will rotate 90 degrees when switching to Portrait mode, for shooting portrait videos and photos. Portrait mode is only available in normal photo and video modes and is not supported when using MasterShots, QuickShots, Hyperlapse, Pano, or FocusTrack.
 : The icon shows the zoom ratio. Tap to adjust the zoom ratio. Tap and hold the icon to expand the zoom bar and slide on the bar to adjust the zoom ratio.
 : Tap to take a photo or to start or stop recording a video.
 : Tap the icon to switch the focus mode. Tap and hold the icon to expand the focus bar and slide on the bar to focus the camera.
 : Tap to enter playback and preview photos and videos as soon as they are captured.
 : Choose between Auto and Pro modes when in photo mode. The parameters differ with each mode.
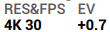 : Displays the current shootings parameters. Tap to access parameter settings.
 : Displays the remaining number of photos or video recording time on the current microSD card. Tap to view the available capacity of the microSD card.
 : Tap to switch to the Attitude Indicator, which displays information such as the orientation and tilt angle of the aircraft, as well as the locations of the remote controller and the Home Point
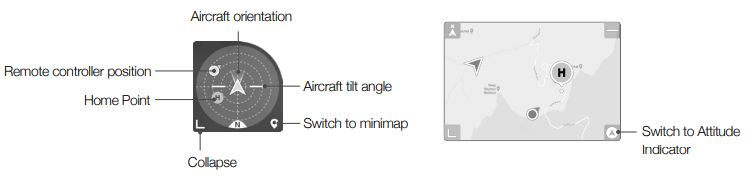
 : Tap the icon. When the prompt appears, press and hold the button to initiate auto takeof ỏ landing
 : Tap to initiate Smart RTH and have the aircraft return to the last recorded Home Point.
 : Tap to return to the home screen.
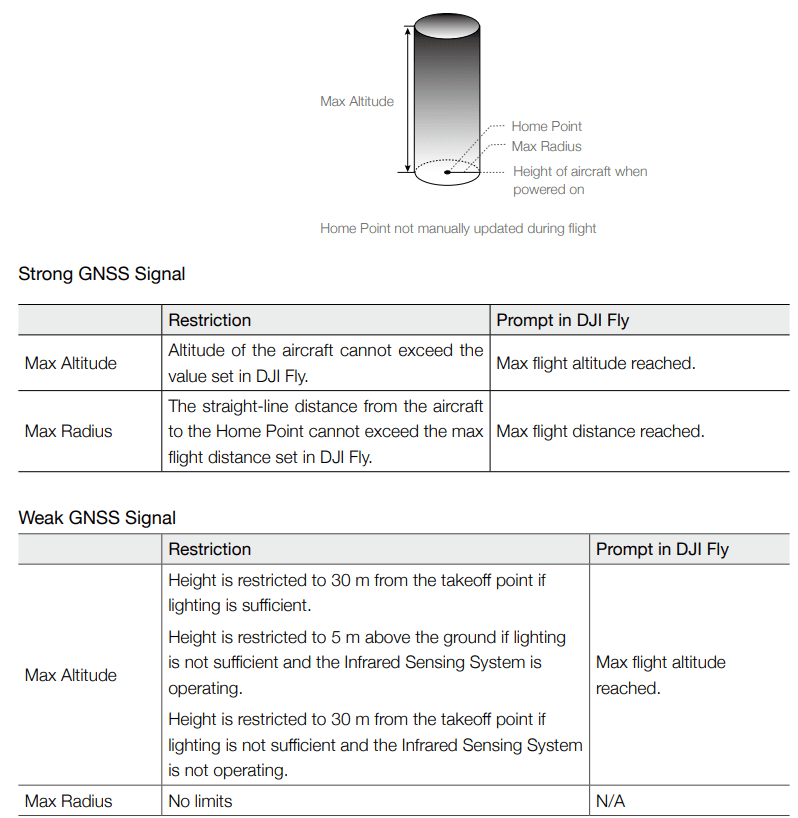
 . If conditions are safe for takeoff, press and hold the button to confirm.
 .
.