
Mini Pro Spherical Pot
IH Rice Cooker
www.tefal.com
EN
ZH
MS
VN
Hou
r
Min
ute
Quick
Cl
a
y
po
t
Baby
food
Soft
Soup
D
es
sert
St
eam
R
e
he
a
t
H
o
ur
Mi
nute
Quick
C
l
a
ypo
t
B
a
by
foo
d
Sof
t
Sou
p
De
s
se
r
t
Ste
a
m
Re
h
ea
t
MAX.
4 cups
H
our
Mi
n
ute
Q
uick
Cl
a
yp
ot
B
a
b
y
foo
d
Soft
Soup
De
s
s
ert
St
e
a
m
Reh
eat
4 cups
MAX.
1 2 3a 3b
4 5 6 7
8 9 10 11
12
13
16 17
14 15
Hour Min
u
t
e
Qui
ck
Claypo
t
B
aby
foo
d
Soft
S
o
up
D
esse
r
t
Steam
Reheat
1 5 6
7
12
9
2
3
4
10
13
8
14-15
11
4
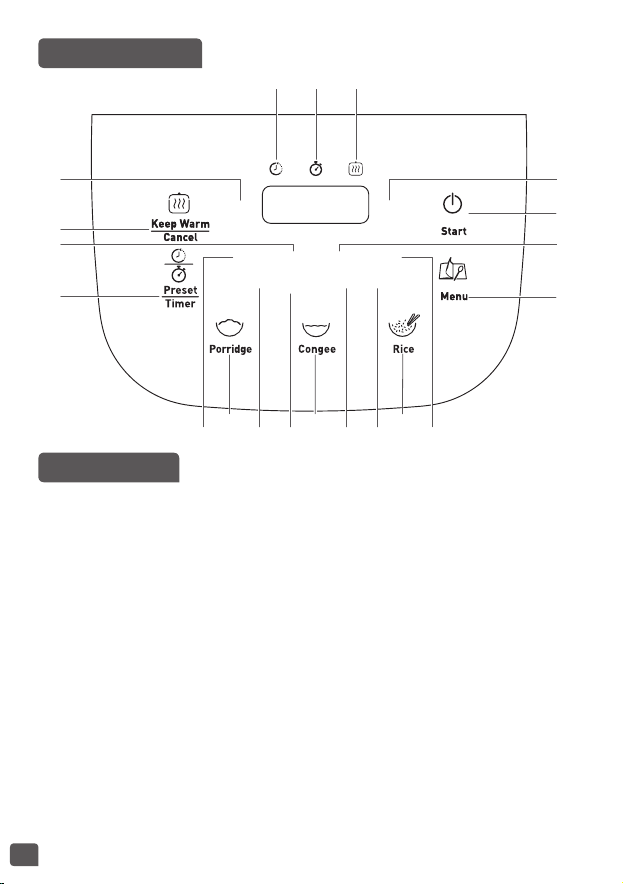
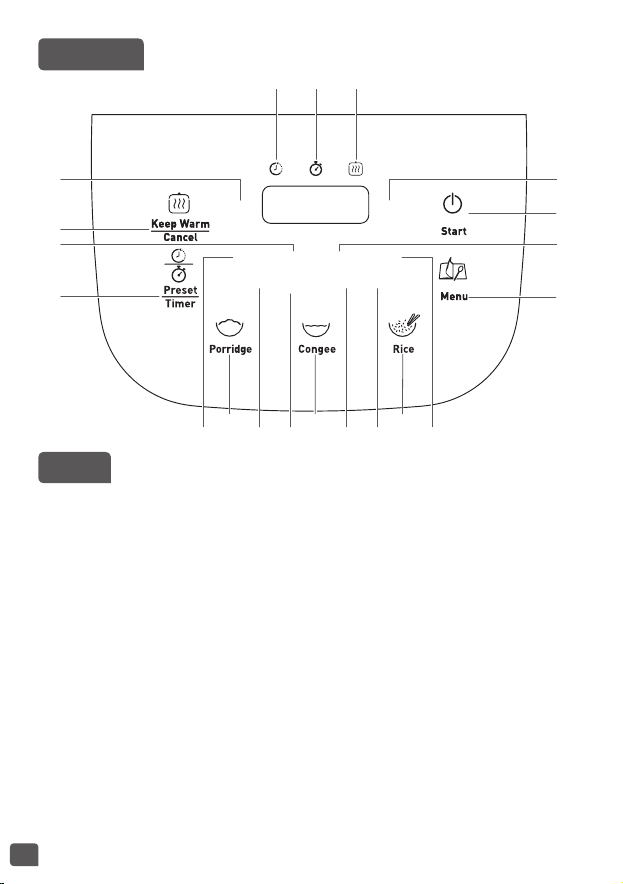
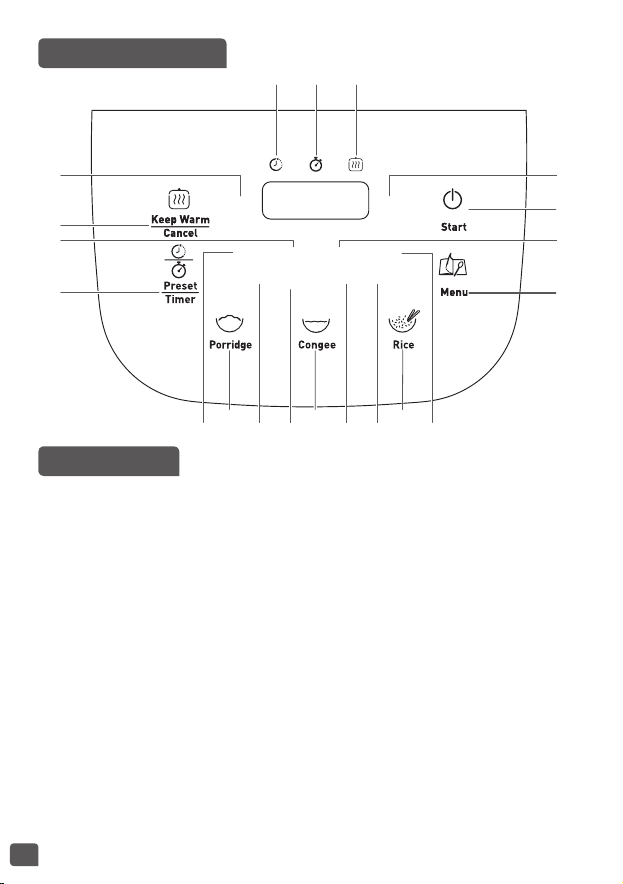
CONTROL PANEL
DESCRIPTION
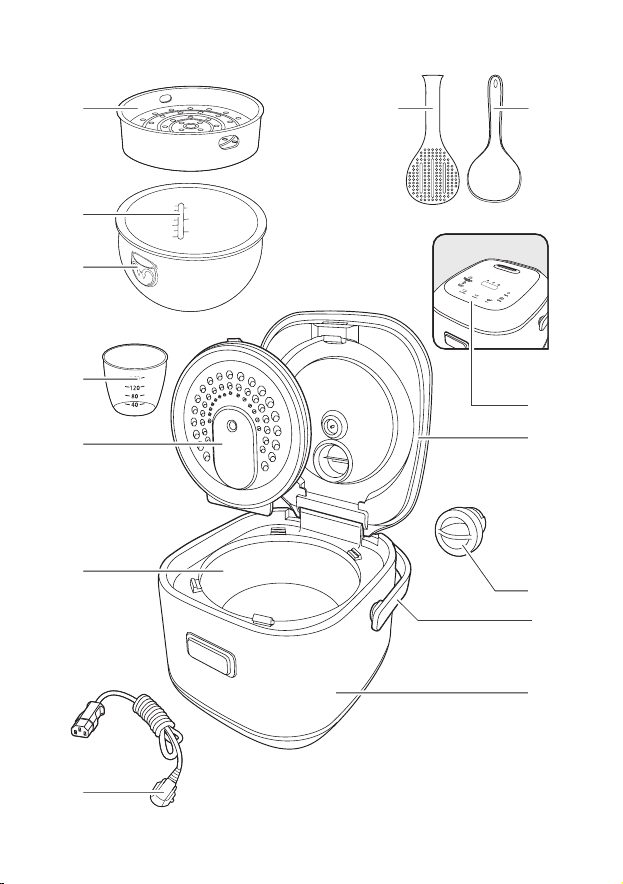
1 Steam basket
2 Graduation for water and rice
3 Removable pot
4 Measuring cup
5 Rice spatula
6 Soup spoon
7 Lid
8 Removable inner lid
9 Micro pressure valve
10 Lid opening button
11 Handle
12 Housing
13 Power cord
14 Control panel
a Keep warm / Cancel key
b Preset / Timer key
c Porridge key
d Congee key
e Rice key
f Menu key
g Start key
h Hour key
i Minute key
15 Function indicators
a Quick cooking function
b Claypot function
c Soft rice cooking function
d Baby food function
e Soup function
f Dessert function
g Steam function
h Reheat function
i Preset indicator
j Timer indicator
k Keep warm indicator
14b
14a
15c
14h
15i
14c
15a 15h15f15b 15d
15j 15k
14d
14f
14g
14i
15e
14e
15g
Hour Minute
Quick
Claypot
Baby
food
Soft
Soup
Dessert
Steam
Reheat

5
EN
IMPORTANT SAFEGUARDS
SAFETY INSTRUCTIONS
Read and follow the instructions for use. Keep
them safe.
• This appliance is not intended to be operated by
means of an external timer or a separate remote-
control system.
• This appliance can be used by children aged
from 8years and above if they have been given
supervision or instruction concerning use of the
appliance in a safe way and if they understand the
hazards involved.Cleaning and user maintenance
shall not be made by children unless they are
older than 8 years and supervised. Keep the
appliance and its cord out of reach of children
aged less than 8years.
• Appliances can be used by persons with reduced
physical, sensory or mental capabilities or lack
of experience and knowledge if they have been
given supervision or instruction concerning use of
the appliance in a safe way and understand the
hazards involved.
• Children shall not play with the appliance.
• This appliance is not intended for use by persons
(including children) with reduced physical, sensory

6
or mental capabilities, or lack of experience
and knowledge, unless they have been given
supervision or instruction concerning use of the
appliance by a person responsible for their safety.
• Children should be supervised to ensure that they
do not play with the appliance.
• As this appliance is for household use only, it is
not intended for use in the following applications
and the guarantee will not apply for:
– Staff kitchen areas in shops, offices and other
working environments
– Farm houses
– By clients in hotels, motels and other residential
type environments
– Bed and breakfast type environments
• If your appliance is fitted with a removable
power cord: if the power cord is damaged, it must
be replaced by a special cord or unit available
from a authorised service centre.
• If your appliance is fitted with fixed power
cord: a if the power supply cord is damage,
it must be replaced by the manufacturer, the
manufacturer’s after-sales service department
or similarly qualified person in order to avoid any
danger.

7
EN
• The appliance must not be immersed in water or
any other liquid.
• Use a damp cloth or sponge with diswashing liquid
to clean the accessories and parts in contact with
the aliments. Rince with a damp cloth or sponge.
Drying accessories and parts in contact with food
with a dry cloth.
• If the symbol is marked on the appliance, this
symbol means “Caution: surfaces may become
hot during use”.
• Caution: the surface of heating element is subject
to residual heat after use.
• Caution: risk of injury due to improper use of the
appliance.
• Caution: if your appliance has a removable power
cord, do not spill liquid on the connector.
• Always unplug the appliance:
– immediately after use
– when moving it
– prior to any cleaning or maintenance
– if it fails to function correctly
• Burns can occur by touching the hot surface of
the appliance, the hot water, steam or the food.
• During cooking, the appliance gives out heat and
steam. Keep face and hands away.

8
• Do not get face and hands close to the steam
outlet. Do not obstruct the steam outlet.
• For any problems or queries please contact our
Customer Relations Team or consult our web site.
• The appliance can be used up to an altitude of
4000m.
• For your safety, this appliance complies with the safety regulations and
directives in effect at the time of manufacture (Low-voltage Directive,
Electromagnetic Compatibility, Food Contact Materials Regulations,
Environment…).
• Check that the power supply voltage corresponds to that shown on the
appliance (alternating current).
• Given the diverse standards in effect, if the appliance is used in a country
other than that in which it is purchased, have it checked by an approved
service centre.
CONNECTING TO THE POWER SUPPLY
• Do not use the appliance if:
– the appliance or the cord is damaged
– the appliance has fallen or shows visible damage or does not work
properly
– In the event of the above, the appliance must be sent to an approved
Service Centre. Do not take the appliance apart yourself.
• Do not leave the cord hanging
• Always plug the appliance into an earthed socket.
• Do not use an extension lead. If you accept liability for doing so, only
use an extension lead which is in good condition, has an earthed plug
and is suited to the power of the appliance.
• Do not unplug the appliance by pulling on the cord.
USING
• Use a flat, stable, heat-resistant work surface away from any water
splashes.

9
EN
PROTECT THE ENVIRONMENT
• Your appliance has been designed to run for many years. However,
when you decide to replace it, remember to think about how you can
contribute to protecting the environment.
• Before discarding your appliance you should remove the battery from
the timer and dispose of it at a local civic waste collection centre
(according to model).
Environment protection first!
Your appliance contains valuable materials which can be recovered or
recycled.
Leave it at a local civic waste collection point.
• Do not allow the base of the appliance to come into contact with water
• Never try to operate the appliance when the pot is empty or without
the pot.
• The cooking function/knob must be allowed to operate freely. Do not
prevent or obstruct the function from automatically changing to the
keep warm function.
• Do not remove the pot while the appliance is working.
• Do not put the appliance directly onto a hot surface, or any other source
of heat or flame, as it will cause a failure or danger.
• The pot and the heating plate should be in direct contact. Ensure that
no food or liquid is inserted between the pot and heating plate.
• Do not place the appliance near a heat source or in a hot oven, as
serious damage could result.
• Do not put any food or water into the appliance until the pot is in place.
• Respect the levels indicated in the recipes.
• Should any part of your appliance catch fire, do not attempt to put it
out with water. To smother the flames use a damp teatowel.
• Any intervention should only be made by a service centre with original
spare parts.

10
BEFORE THE FIRST USE
Unpack the appliance
• Remove the appliance from the packaging and unpack all the accessories
and printed documents.
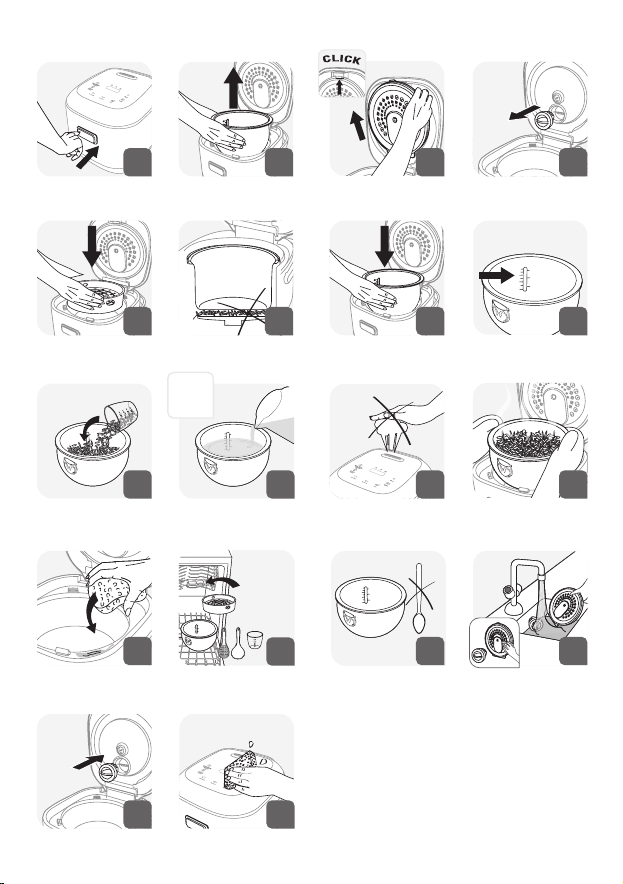
• Open the lid by pushing the opening button on the housing – Fig.1.
Read the Instructions and carefully follow the operation method.
Clean the appliance
• Remove the pot – Fig.2, the inner lid and the micro pressure valve –
Fig.3a and 3b.
• Clean the pot, the valve and the inner lid with a sponge and washing
up liquid.
• Wipe the outside of the appliance and the lid with a damp cloth.
• Dry off carefully.
• Put all the elements back in their original position. Install the inner lid
in the right positions on the top lid of machine. Then, put the inner
lid behind the 2 ribs and push it on the top until it’s fixed. Install the
detachable cord into the socket on the cooker base.
FOR THE APPLIANCE AND ALL FUNCTIONS
• Carefully wipe the outside of the pot (especially the bottom). Make sure
that there are no foreign residues or liquid underneath the pot and on
the heating element – Fig.5.
• Place the pot into the appliance, making sure that it is correctly
positioned – Fig.6.
• Make sure that the inner lid is correctly in position.
• Close the lid in place with a sound of “click”.
• Install the power cord into the socket of the rice cooker base and then
plug into the power outlet. The appliance will ring a long sound “beep”,
all the indicators on the control box will light up for an instant. The
<Quick> cooking function is set the default cooking program.
• Do not touch the heating element when the product is plugged or after
cooking. Do not carry the product in use or just after cooking.
• This appliance is only intended for indoor use.
11
EN
Never place your hand on the steam vent during cooking, as there is a
danger of burns – Fig.10.
After start the cooking, if you wish to change the selected cooking
menu because of an error, press “Keep Warm / Cancel” key and re-
choose the menu you want.
You can stop the cooking by pressing “Keep warm / Cancel”.
Only use the inner pot provided with the appliance.
Do not pour water or put ingredients in the appliance without the pot
inside.
The maximum quantity of water + ingredient should not exceed the
highest mark inside the pot - Fig.7.
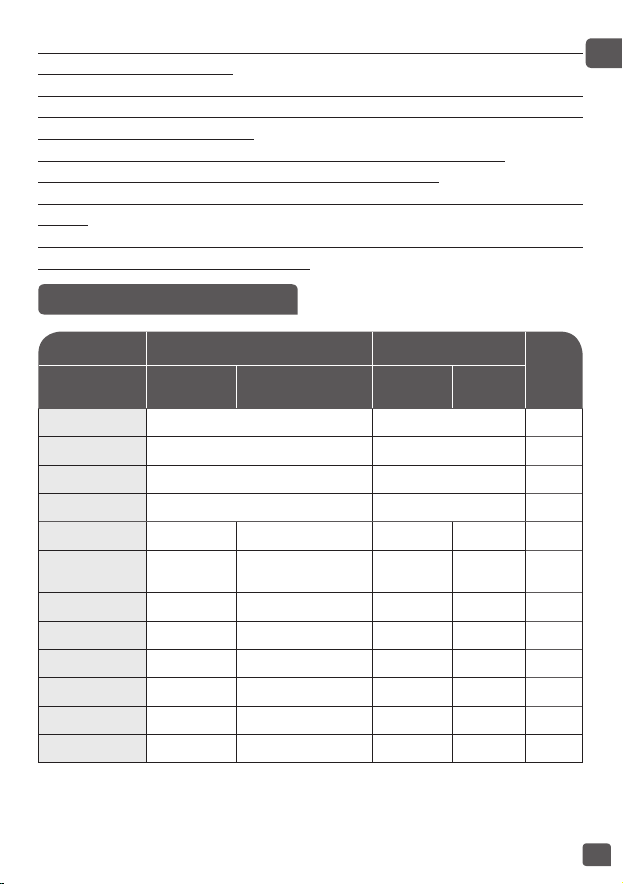
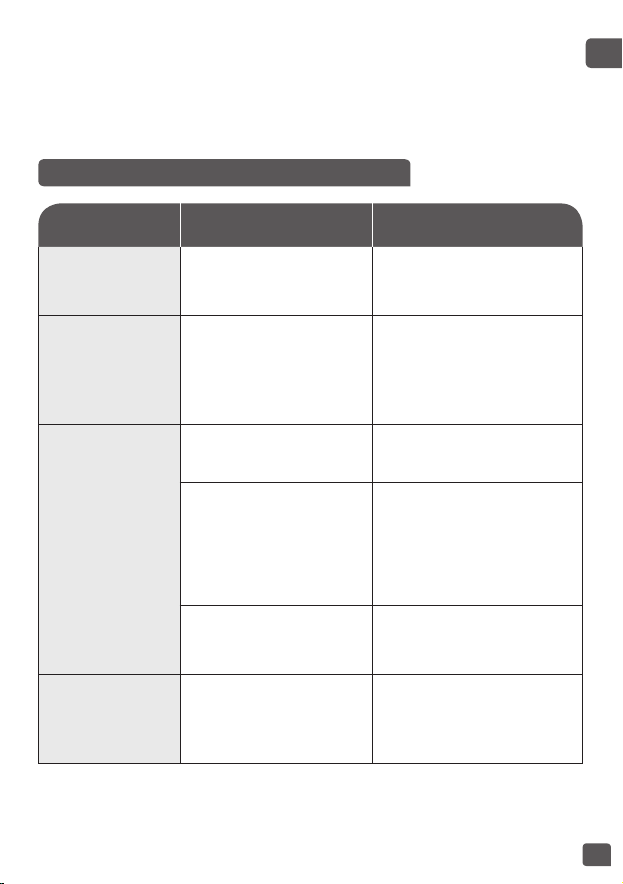
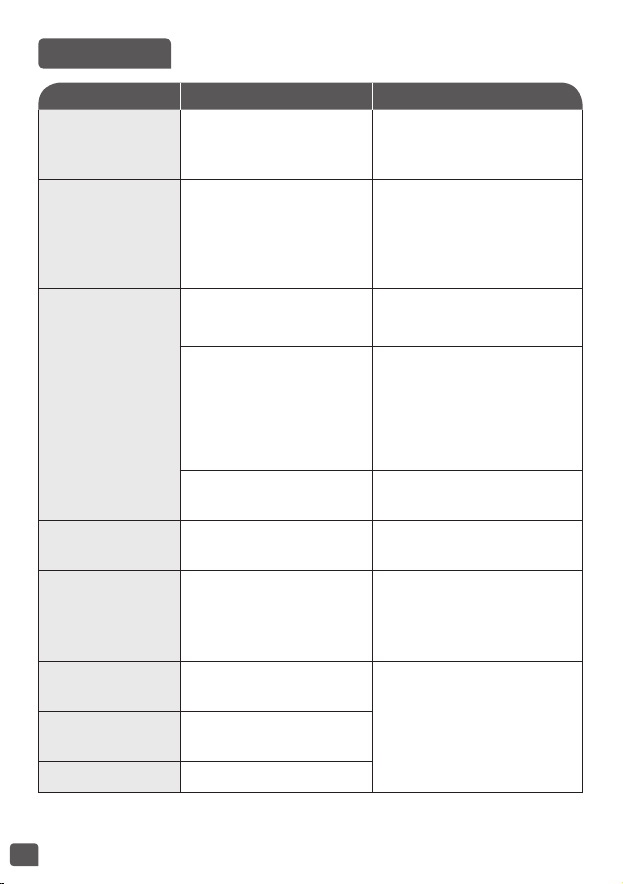
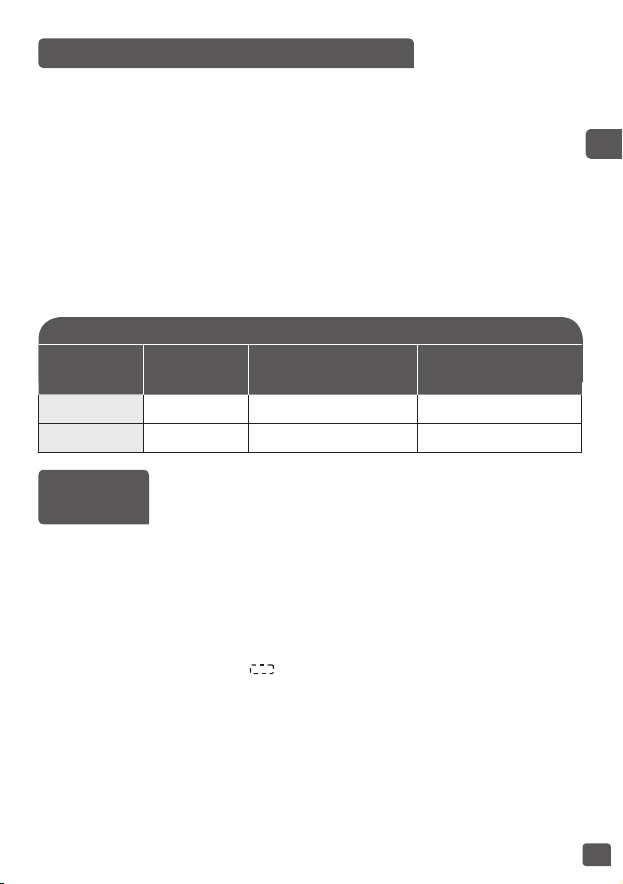
COOKING PROGRAM TABLE
Programmes Cooking time Temperature
Keep
warm
Default
time
Time setting
Default
temp.
Temp.
settings
Quick auto auto yes
Soft auto auto yes
Claypot auto auto yes
Rice auto auto yes
Baby food 2h 1h-2h30m 100°C / yes
Dessert 40m
Cake mix flour: 40m
Self-rising flour: 2h
120°C / yes
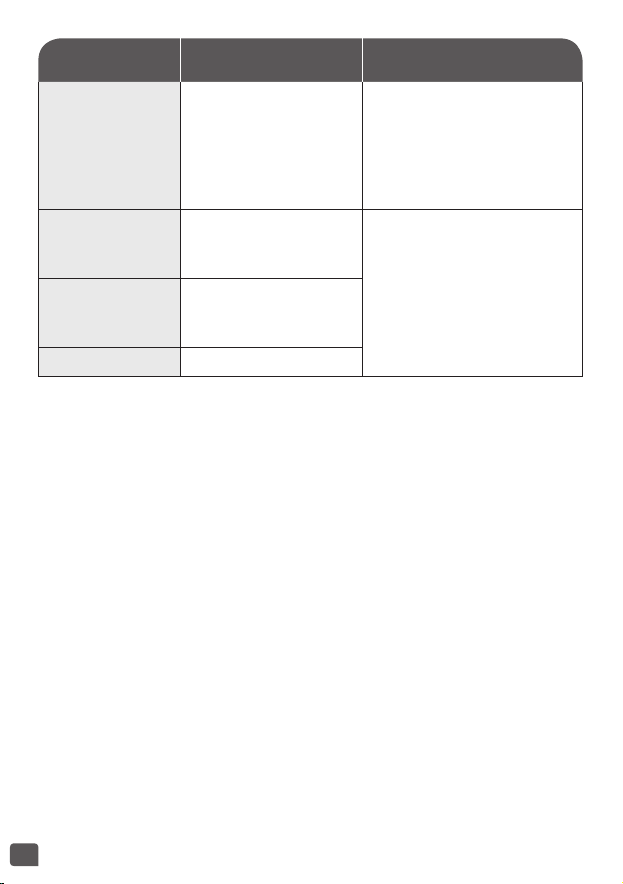
Steam 1h 30m-1h30m 100°C / yes
Soup 2h 1h30m-3h auto / yes
Reheat auto auto 80°C / yes
Porridge 1h 45m-1h10m auto / yes
Congee 1h30m 1h-2h auto / yes
Keep warm auto auto 73°C / yes
12
• Before cooking, measuring the rice with measuring cup and rinse it
except risotto rice.
• Put the rinsed rice well distributed around the whole surface of the pot.
Fill it with water to the corresponding water level (The graduations in
cups).
• When the rice is ready, when the “Keep Warm” indicator light is on, stir
the rice and then leave it in the rice cooker for a few minutes longer in
order to get perfect rice with separated grains.
This table below gives a guide to cook rice :
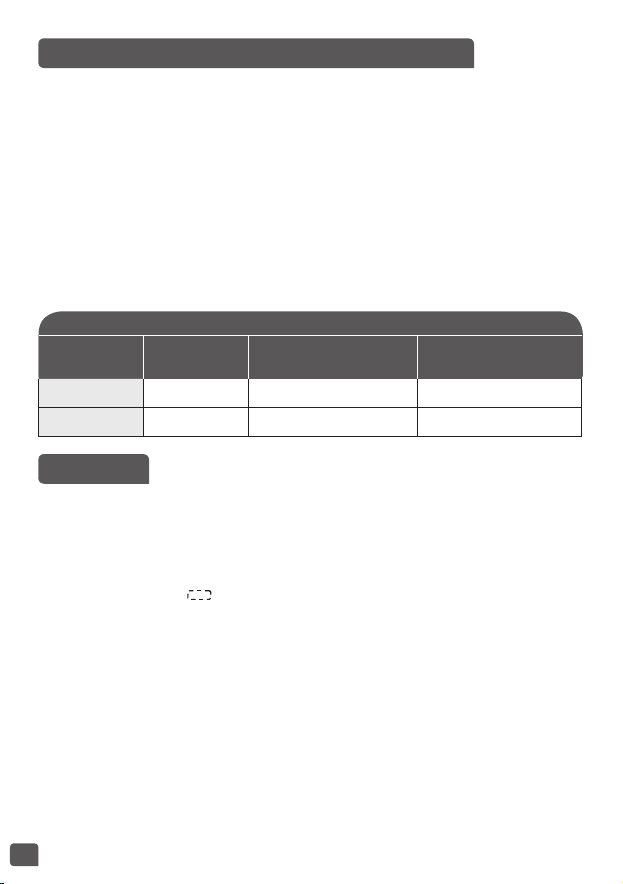
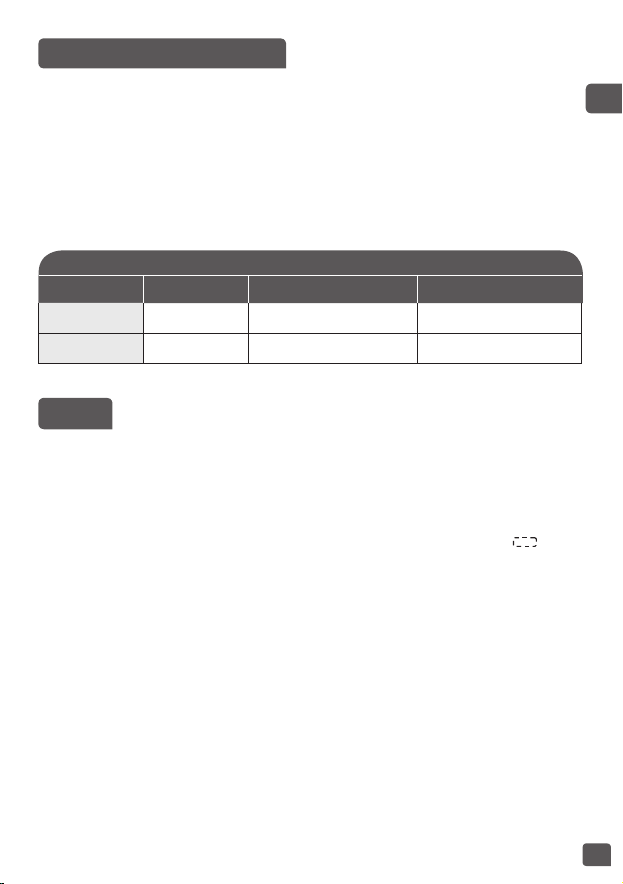
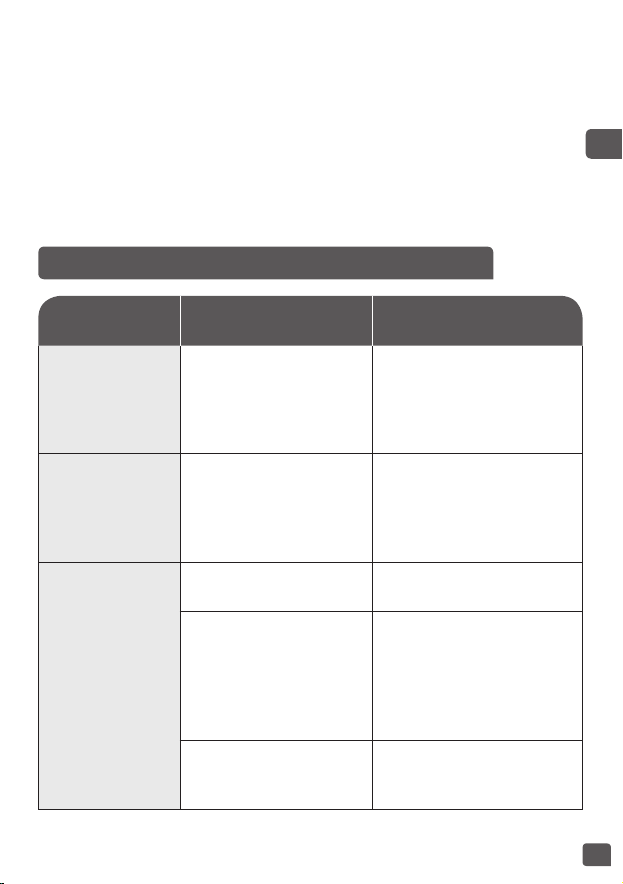
RECOMMENDATIONS FOR BEST RICE COOKING
COOKING GUIDE FOR WHITE RICE
Measuring
cups
Weight of rice
Water level in the pot
(+ rice)
Serves
2 300 g 2 cup mark 3-4 people
4 600 g 4 cup mark 5-6 people
• When the appliance is plugged, the rice cooker is on quick cooking
function. When you press Menu key, the rice cooker select Quick
Claypot Soft Baby food Soup Dessert Steam Reheat.
• The screen displays the default cooking time of each function (Rice
cooking displays “ ”), “Start” key light flickers.
MENU KEY

13
EN
• Place the appliance on a flat, stable, heat-resistant work surface away
from water splashes and any other sources of heat.
• Press <Rice> key ” to select rice cooking function.
• Pour the required quantity of rice into the pot using the measuring cup
provided – Fig.8. Then fill with cold water up to the corresponding “CUP”
mark printed in the pot – Fig.9.
• Close the lid.
Note: Always add the rice first otherwise you will have too much water.
• Press <Preset/Timer> key to active the time setting function and then
press <hour> and <minute> to change the preset time.
• Press <Start> key, the rice cooker enters into <Rice> cooking status, the
light of <Start> key lights up, the screen flickers “ ”.
• At the end of cooking, the buzzer will ring five “beep”, the rice cooker
will enter keep warm status with the <Keep Warm> indicator turning on
and the screen will start to count the time of keeping warm.
RICE COOKING FUNCTION
QUICK COOKING FUNCTION
• Press <Menu> key ” to select <Quick> cooking function.
• Press <Preset/Timer> key to active the time setting function and then
press <hour> and <minute> to change the preset time.
• Press <Start> key, the rice cooker enters into <Quick> cooking status,
the light of <Start> key lights up, the screen flickers “ ”.
• At the end of cooking, the buzzer will ring five “beep”, the rice cooker
will enter keep warm status with the <Keep Warm> indicator turning on
and the screen will start to count the time of keeping warm.
SOFT RICE COOKING FUNCTION
• Press <Menu> key to select <Soft> rice cooking function.
• Press <Preset/Timer> key to active the time setting function and then
press <hour> and <minute> to change the preset time.
• Press <Start> key, the rice cooker enters into <Soft> rice cooking status,
the light of <Start> key lights up, the screen flickers “ ”.

14
PORRIDGE FUNCTION
• Press <Porridge> key to select <Porridge> function. The screen displays
the default cooking time, the light of <Start> flickers.
• Press <Preset/Timer> key to active the time setting function and then
press <hour> and <minute> to change the time for preset or timer.
• Press <Start> key. The rice cooker enters into <Porridge> cooking status
with the light of <Start> key lighting up and the screen displaying the
remaining cooking time.
• At the end of cooking, the buzzer will ring five “beep”, the rice cooker
will enter keep warm status with the <Keep Warm> indicator turning on
and the screen will start to count the time of keeping warm.
CONGEE FUNCTION
• Press <Congee> key to select <Congee> function. The screen displays
the default cooking time, the light of <Start> flickers.
• Press <Preset/Timer> key to active the time setting function and then
press <hour> and <minute> to change the time for preset or timer.
• Press <Start> key. The rice cooker enters into <Congee> cooking status
with the light of <Start> key lighting up and the screen displaying the
remaining cooking time.
• At the end of cooking, the buzzer will ring five “beep”, the rice cooker
will enter keep warm status with the <Keep Warm> indicator turning on
and the screen will start to count the time of keeping warm.
CLAYPOT FUNCTION
• Press <Menu> key to select <Claypot> function.
• Press <Start> key, the rice cooker enters into <Claypot> rice cooking
status, the light of <Start> key lights up, the screen flickers “ ”.
• When the rice is ready, the buzzer will ring. Open the lip, add the
ingredients and press <Start> key to continue the cooking process.
• At the end of cooking, the buzzer will ring five “beep”, the rice cooker
will enter keep warm status with the <Keep Warm> indicator turning on
and the screen will start to count the time of keeping warm.
• At the end of cooking, the buzzer will ring five “beep”, the rice cooker
will enter keep warm status with the <Keep Warm> indicator turning on
and the screen will start to count the time of keeping warm.

15
EN
SOUP FUNCTION
• Press <Menu> key to select <Soup> function. The screen displays the
default cooking time, the light of <Start> flickers.
• Press <Preset/Timer> key to active the time setting function and then
press <hour> and <minute> to change the time for preset or timer.
• Press <Start> key. The rice cooker enters into <Soup> cooking status
with the light of <Start> key lighting up and the screen displaying the
remaining cooking time.
• At the end of cooking, the buzzer will ring five “beep”, the rice cooker
will enter keep warm status with the <Keep Warm> indicator turning on
and the screen will start to count the time of keeping warm.
BABY FOOD FUNCTION
• Press <Menu> key to select <Baby food> function. The screen displays
the default cooking time, the light of <Start> flickers.
• Press <Preset/Timer> key to active the time setting function and then
press <hour> and <minute> to change the time for preset or timer.
• Press <Start> key. The rice cooker enters into <Baby Food> cooking
status with the light of <Start> key lighting up and the screen displaying
the remaining cooking time.
• At the end of cooking, the buzzer will ring five “beep”, the rice cooker
will enter keep warm status with the <Keep Warm> indicator turning on
and the screen will start to count the time of keeping
DESSERT FUNCTION
• Press <Menu> key to select <Dessert> function. The screen displays the
default cooking time, the light of <Start> flickers.
• Note that you can change cooking time from pressing <Timer>key. 40
minutes for cake mix flour and 2 hours for self raising flour.
• Press <Start> key. The rice cooker enters into <Dessert> cooking status
with the light of <Start> key lighting up and the screen displaying the
remaining cooking time.
• At the end of cooking, the buzzer will ring five “beep”, the rice cooker
will enter keep warm status with the <Keep Warm> indicator turning on
and the screen will start to count the time of keeping warm.

16
REHEAT FUNCTION
• Press <Menu> key to select <Reheat> function. The screen displays the
default cooking time, the light of <Start> flickers.
• Press <Start> key. The rice cooker enters into <Reheat> cooking status
with the light of <Start> key lighting up and the screen displays “ ”.
• At the end of cooking, the buzzer will ring five “beep”, the rice cooker
will enter keep warm status with the <Keep Warm> indicator turning on
and the screen will start to count the time of keeping warm.
• Press < Keep warm/Cancel > key under standby status, the light of
<Keep warm/Cancel> indicator lights up, the screen shows “00:00” and
the screen will start to count the time of keeping warm.
• Press < Keep warm / Cancel > key under function setting or cooking
status will cancel all setting data and back to standby status.
Recommendation: in order to keep the food in good taste, please limit
the holding time within 12h.
KEEP WARM/CANCEL FUNCTION
STEAM FUNCTION
• Press <Menu> key to select <Steam> function. The screen displays the
default cooking time, the light of <Start> flickers red.
• Press <Preset/Timer> key to active the time setting function and then
press <hour> and <minute> to change the time for preset or timer.
• Press <Start> key. The rice cooker enters into <Steam> cooking status
with the light of <Start> key lighting up and the screen displaying the
remaining cooking time.
• At the end of cooking, the buzzer will ring five “beep”, the rice cooker
will enter keep warm status with the <Keep Warm> indicator turning on
and the screen will start to count the time of keeping warm.

17
EN
Preset:
• The preset time corresponds to the time for end of cooking.
• Available for all cooking functions, except <Claypot>, <Dessert> and
<Reheat> function.
• After selecting the desired cooking function, press the <Preset/ Timer>
key (the preset indicator will turn on), and then use < Hour > and
<Minute> key to adjust the time.
• When you have chosen the required preset time, press the <Start> key
to enter cooking status, the light of < Start> indicator lights up and
screen will display the number of time you have chosen and <Preset>
indicator lights up.
• The maximum preset time is 24 hours.
• If the preset time is shorter that the cooking time, cooking will start
immediately.
Timer:
• You can adjust the cooking time for <Baby food>, <Soup>, <Dessert>,
<Steam>, <Porridge> and <Congee> function.
• When you select a cooking function, the default cooking time will be
shown on the digital display, press the <Preset/ Timer> key (the timer
indicator will turn on), and then use <Hour> and < Minute > key to
adjust the time.
• When you have chosen the required preset time, press the <Start> key
to enter cooking status, the light of < Start > indicator lights up and
screen will display the number of time you have chosen and <Timer>
indicator lights up.
PRESET/ TIMER FUNCTION
• Open the lid – Fig.1.
• Glove must be used when manipulating the cooking pot and steam
basket – Fig.11.
• Serve the food using the spoon provided with your appliance and reclose
the lid.
• 24 hours is the maximum keeping warm time.
• Press <Keep warm / Cancel> to stop the keep warm status.
• Unplug the appliance.
ON COMPLETION OF COOKING

18
• To ensure the rice cooker is unplugged and completely cooled down
before cleaning and maintenance.
• It is strongly advised to clean the appliance after each use with a
sponge – Fig.12.
• The pot, cup, rice spatula and soup spoon are dishwasher safe - Fig.13.
Pot, steam basket
• Scouring powders and metal sponges are not recommended.
• If food has stuck to the bottom, you may put water in the pot to soak
for a while before washing.
• Dry the pot carefully.
Taking care of the pot
For the pot, carefully follow the instructions below:
• To ensure the maintenance of pot quality, it is recommended not to cut
food in it.
• Make sure you put the pot back into the rice cooker.
• Use the plastic spoon provided or a wooden spoon and not a metal type
so as to avoid damaging the pot surface – Fig.14.
• To avoid any risk of corrosion, do not pour vinegar into the pot.
• The color of the pot surface may change after using for the first time or
after longer use. This change in color is due to the action of steam and
water and does not have any effect on the use of the rice cooker, nor
is it dangerous for your health. It is perfectly safe to continue using it.
Cleaning the micro pressure valve
• When clean the micro-pressure valve, please remove it from the lid –
Fig.3b . After cleaning it – Fig.16 , please wipe dry it then put it back to
the lid of the rice cooker – Fig.17
Cleaning the inner lid
• Remove the inner lid. Clean it with a sponge and washing up liquid
-Fig.16. Then wipe dry and put it back behind the rib and push it on the
top until it’s fixed.
CLEANING AND MAINTENANCE
19
EN
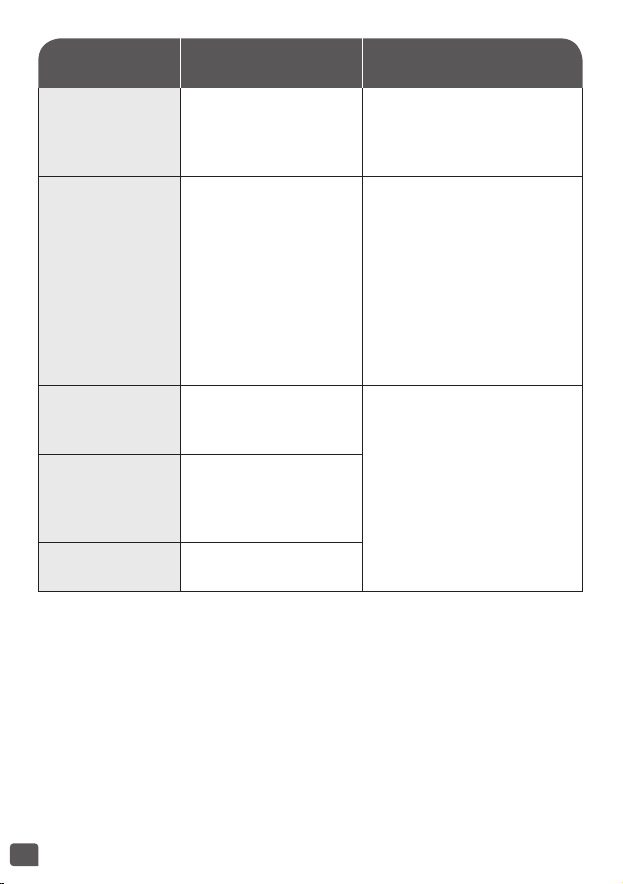
Malfunction
description
Causes Solutions
Any indicator
lamp off and no
heating.
Appliance not plugged.
Check the power cord is
plugged in the socket and
on the Mains.
Any indicator
lamp off and
heating.
Problem of the
connection of the
indicator lamp or
indicator lamp is
damaged.
Send to authorized
service center for repair.
Steam leakage
during using
Lid is badly closed.
Open and close again
the lid.
Micro pressure valve
not well positioned or
uncomplete.
Stop the cooking (unplug
the product) and check
the valve is complete
(2parts locked together)
and well positioned.
Lid or micro pressure
valve gasket is
damaged.
Send to authorized
service center for repair.
Rice half cooked
or overtime
cooking.
Too much or not
enough water
compared to rice
quantity.
Refer to table for water
quantity.
TECHNICAL TROUBLESHOOTING GUIDE
Cleaning and care of the other parts of the appliance
• Clean the outside of the rice cooker – Fig.18, the inside of the lid and
the cord with a damp cloth and wipe dry. Do not use abrasive products.
• Do not use water to clean the interior of the appliance body as it could
damage the heat sensor.
20
Malfunction
description
Causes
Solutions
Automatic
warm-keeping
fails (product
stay in cooking
position, or no
heating).
Send to the authorized
service center for repair.
E0
The sensor on the top
open circuit or short
circuit.
Send to the authorized
service center for repair.
E1
The sensor on the
bottom open or short
circuit.
E5 No bowl detection
Remark: If inner pot is deformed, do not use it anymore and get a
replacement from the authorized service center for repair.

21
EN
TEFAL/T-FAL* INTERNATIONAL LIMITED GUARANTEE
: www.tefal.com
This product is repairable by TEFAL/T-FAL*, during and after the guarantee period.
Accessories, consumables and end-user replaceable parts can be purchased, if locally available, as described on the
TEFAL/T-FAL internet site www.tefal.com
The Guarantee**: TEFAL/T-FAL guarantees this product against any manufacturing defect in materials or workmanship during
the guarantee period within those countries*** as stated in the attached country list, starting from the initial date of purchase
or delivery date.
The international manufacturer’s guarantee covers all costs related to restoring the proven defective product so that it
conforms to its original specifications, through the repair or replacement of any defective part and the necessary labour. At
TEFAL/T-FAL’s choice, a replacement product may be provided instead of repairing a defective product. TEFAL/T-FAL’s sole
obligation and your exclusive resolution under this guarantee are limited to such repair or replacement.
Conditions & Exclusions: TEFAL/T-FAL shall not be obliged to repair or replace any product which is not accompanied by a valid
proof of purchase. The product can be taken directly in person or must be adequately packaged and returned, by recorded
delivery (or equivalent method of postage), to a TEFAL/T-FAL authorised service centre. Full address details for each country’s
authorised service centres are listed on TEFAL/T-FAL website (www.tefal.com) or by calling the appropriate consumer service
centre set out in the attached country list. In order to offer the best possible after-sales service and constantly improve
customer satisfaction, TEFAL/T-FAL may send a satisfaction survey to all customers who have had their product repaired or
exchanged in a TEFAL/T-FAL authorised service centre.
This guarantee applies only for products purchased and used for domestic purposes and will not cover any damage which
occurs as a result of misuse, negligence, failure to follow TEFAL/T-FAL instructions, or a modification or unauthorised repair of
the product, faulty packaging by the owner or mishandling by any carrier. It also does not cover normal wear and tear,
maintenance or replacement of consumable parts, or the following:
- damages or poor results specifically due to wrong voltage or frequency as stamped on the product ID or specification
- using the wrong type of water or consumable
- mechanical damages, overloading
- ingress of water, dust or insects into the product (excluding appliances with features specifically designed for insects)
- scaling (any de-scaling must be carried out according to the instructions for use)
- damage as a result of lightning or power surges
- damage to any glass or porcelain ware in the product
- accidents including fire, flood, etc
- professional or commercial use
Consumer Statutory Rights: This international TEFAL/T-FAL guarantee does not affect the Statutory Rights a consumer may
have or those rights that cannot be excluded or limited, nor rights against the retailer from which the consumer purchased
the product. This guarantee gives a consumer specific legal rights, and the consumer may also have other legal rights which
vary from State to State or Country to Country. The consumer may assert any such rights at his sole discretion.
***Where a product purchased in a listed country and then used in another listed country, the international TEFAL/T-FAL
guarantee duration is the one in the country of usage, even if the product was purchased in a listed country with different
guarantee duration. The repair process may require a longer time if the product is not locally sold by TEFAL/T-FAL. If the product
is not repairable in the new country, the international TEFAL/T-FAL guarantee is limited to a replacement by a similar or
alternative product at similar cost, where possible.
*TEFAL household appliances appear under the T-FAL brand in some territories like America and Japan. TEFAL/T-FAL are
registered trademarks of Groupe SEB.
Please keep this document for your reference should you wish to make a claim under the guarantee.
**For Australia only: Our goods come with guarantees that cannot be excluded under the Australian Consumer Law. You are
entitled to a replacement or refund for a major failure and compensation for any other reasonably foreseeable loss or damage.
You are also entitled to have the goods repaired or replaced if the goods fail to be of acceptable quality and the failure does not
amount to a major failure.
**For India Only: Your Tefal product is guaranteed for 2 years. The guarantee covers exclusively the repair of a defective
product, but at TEFAL’s choice, a replacement product may be provided instead of repairing a defective product. It is mandatory
that the consumer, to have his product repaired, has to log a service request on the dedicated Smartphone application TEFAL
SERVICE APP or by calling TEFAL Consumer Care Center at 1860-200-1232, Opening hours Mon-Sat 09 AM to 06 PM. Products
returned by Post will not be covered by the guarantee. As a proof of purchase consumer needs to provide both this stamped
guarantee card and cash memo.
22
控制板面
描述
1 蒸盤
2 水量及米量刻度
3 可拆式內膽
4 量杯
5 飯勺
6 湯勺
7 蓋
8 可拆式內蓋
9 微壓閥
10 開蓋按鈕
11 手挽
12 外殼
13 電源線
14 控制板
a 「Keep warm/Cancel」
保溫/取消鍵
b 「Preset/Timer」預設/
計時鍵
c 「Porridge」稀飯鍵
d 「Congee」煲粥鍵
e 「Rice」煮飯鍵
f 「Menu」選單鍵
g 「Start」開始鍵
h 「Hour」時鍵
i 「Minute」分鍵
15 功能指示燈
a 「Quick」快煮功能
b 「Claypot」煲仔飯功能
c 「Soft」軟身飯功能
d 「Baby food」嬰兒餐
功能
e 「Soup」煲湯功能
f 「Dessert」甜品功能
g 「Steam」蒸煮功能
h 「Reheat」翻熱功能
i 「Preset」預設指示燈
j 「Timer」計時指示燈
k 「Keep warm」保溫指
示燈
14b
14a
15c
14h
15i
14c
15a 15h15f15b 15d
15j 15k
14d
14f
14g
14i
15e
14e
15g
Hour Minute
Quick
Claypot
Baby
food
Soft
Soup
Dessert
Steam
Reheat

23
ZH
重要建議
安全指示
請閱讀並遵循本使用說明書,並妥善保存。
• 請閱讀本說明書並妥善保存。
• 本產品不得使用外部定時器或獨立遙控系統操
作。
• 此電器用品可由8歲或以上兒童使用,但必須在
成人監督下,或兒童曾受指導,知道如何安全使
用本產品,亦明白當中所牽涉的風險。清潔及
保養工作不應由兒童進行,除非他們已年滿8歲
或以上,並有成人監督。請將本產品及相連電
線放置於8歲以下兒童不能觸及的地方。
• 此產品亦可由身體、感官或心智障礙,或經驗
及知識不足之人士使用,但必須在使用時獲指
導,確保他們知道如何安全使用本產品,並明白
當中的風險。
• 兒童不可將本產品當作玩具。
• 該電器產品不適合以下人士使用(包括兒童):身
體、感官或心智障礙的人士,缺乏相關經驗或
知識的人士,除非他們在負責其安全的人士給予
指導或監督下使用。
• 應照看好兒童, 確保他們不玩耍該電器產品。
• 本產品設計僅供家庭使用,並非為以下用途而
設,且不會得到保養:
– 商店,辦公室或其他工作環境的員工廚房範
圍;
24
– 農舍;
– 酒店、汽車旅館及其他住宿性質環境的客戶
使用;
– 供住宿及早餐的旅館。
• 如果電器產品配備可拆卸電源線:如果電源線
損壞,必須到授權服務中心更換其提供的電源
線。
• 如果電器產品配備固定電源線:如果電器產品
的電源線損壞,為了您的安全,必須由授權服務
中心或合資格的人士進行更換。
• 切勿將產品浸入水中。
• 請使用微濕的抹布或海棉及洗潔精,清潔配件及
與食物有接觸的零件,再用濕布或海棉沖洗。用
乾布抹乾配件及與食物有接觸的零件。
• 若電器上印有 標記, 表示「小心:使用時表面
可能變熱」。
• 小心:加熱配件表面在使用後可能仍然燙熱。
• 小心:不正確使用產品可能導致損傷。
• 小心:若產品的電源線可拔除,切勿弄濕連接
器。
• 以下情況下, 請務必斷開該電器產品的電源:
– 使用後,
– 移動時,
– 保養或清潔前,
– 不能正常運作時。
• 接觸產品的發熱部位、熱水、蒸汽及食物,可

25
ZH
• 能會被燙傷。
• 在烹調期間,產品會產生高溫和蒸汽。請將手和
臉部遠離蒸汽孔。請勿陼塞蒸汽出口。
• 如有任何問題,請聯繫售後服務部或瀏覽我們的
網站。
• 此產品最高可於海拔 4000公尺使用。
• 該電器產品符合所有相關的安全法規,包括低電壓指令、電磁相容性
法規、食品接觸材料立法及環境立法。
• 檢查產品銘牌上的電壓與供電電壓相符(交流電)。
• 如果您在購買地以外的國家使用本產品, 請先將產品送交到當地的授
權服務中心進行檢查。
接通電源
• 下列情況下請勿使用產品:
–產品或電源線受損。
–產品意外墜落, 造成損傷或不正常運作。
–在這些情況下,為了您的安全,必須將該電器產品送往授權服務中
心。切勿自行拆除該電器產品。
• 請勿讓電源線隨意懸垂。
• 務必確保該產品接在接地插座上。
• 請勿使用延長線。如果您自己承擔責任, 請只使用完好的及與該產品
功率相符的接地延長線。
• 不要拉扯電源線來拔取電源插頭。

26
保護環境
• 該電器產品能夠持續使用多年。但當您決定更換時, 請記住, 您可以
幫助保護環境。
• 在丟棄電器產品前, 應拆除計時器的電池並將其棄置於廢物收集站或
授權服務中心(根據型號)。
• 授權服務中心接受廢舊電器產品後,能夠依照環保法規對其進行處
理。
請關愛我們的環境!
您的電器產品包含可回收或可循環再用的寶貴材料。
請將其置於當地的廢物收集站。
使用時
• 請在平穩和耐熱的工作表面使用, 並避免被水濺濕。
• 在內鍋未放入主機中或內鍋為空的時候, 請勿啟動操作。
• 必須讓烹調功能/汽閥自由運作。請勿阻礙其切換至自動保溫功能。
• 當電器運作時, 請勿拿出內鍋。
• 請勿將產品直接放在燙熱的表面上、或其他熱源或火源上, 否則產品
會受到損壞或發生故障, 甚至發生危險。
• 內鍋應與加熱盤直接接觸。任何異物放在該兩者之間都將可能導致
故障。
• 請勿將產品放置於熱源附近或置於焗爐內, 以防對其造成嚴重損害。
• 在內鍋未放入主機中前, 請勿放任何食物或水在主機裡。
• 根據內鍋的刻度來調節米、水比例。
• 一旦產品某部份著火, 請勿直接用水撲滅, 您可以用一塊濕布蓋住著
火部位來滅火。
• 所有對產品作出之改動必須由授權服務中心進行, 並使用原裝配件。
• 本產品只能作為家用。任何專業性用途、不當使用或未遵照本說明
書使用引起的故障, 本公司均不負任何責任, 此等故障損壞不在保養
範圍內。

27
ZH
初次使用前
拆開包裝
• 拆開包裝,取出電飯煲,並取出所有配件及印刷品。
• 按下煲外的開蓋按鈕,打開煲蓋– 圖1.
小心閱讀以下指引,並按照所示方法操作。
清洗電飯煲
• 拆出內膽 - 圖2,內蓋及微壓閥 – 圖3a及3b。
• 用海綿及梘液清洗內膽、微壓閥及內蓋。
• 用濕布擦拭機身表面及蓋。
• 小心擦乾。
• 將所有組件放回原位。將內蓋裝在電飯煲頂蓋正確的位置。然後將
內蓋放在兩個勾位後,並向下按直至固定為止。將可拆式電線插入
電飯煲底座插頭。
本裝置之事項以及所有功能
• 小心擦拭內膽外面部分(特別是底部)。確定內膽底下或發熱元件上
無任何殘餘食材或液體– 圖5。
• 將內膽放進電飯煲,確定位置妥當– 圖6。
• 確定內蓋已放置妥當。
• 關上煲蓋,確定電飯煲有發出一下「咔」聲。
• 將電源線插入電飯煲底座插頭;將另一端插上電源。電飯煲會發出
一聲長「嗶」,控制面板上所有指示燈會隨即亮起。預設烹調程式
為 「Quick」快煮模式。
• 插上電源或烹調完成後,請勿觸摸電飯煲發熱元件。請勿在烹調進
行期間或剛好結束時拿起電飯煲。
• 本產品只適合室內使用。
切勿在烹調期間將手放近蒸汽排放口,以免燙傷 - 圖10。
如想修正出錯的烹調功能,請按「Keep warm/Cancel 」保溫/取消
鍵,然後重新選擇所需功能。
按「Keep warm/Cancel」保溫/取消鍵可停止烹調。
只可使用隨電飯煲提供的內膽。
未裝置內膽前請勿將水或食材放進電飯煲內。
米和水的總量最多不應超過內膽內側最高水位線 - 圖7。

28
烹調程式表
程式
烹調時間 溫度
保溫
預設時間 時間設定 預設溫度 溫度設定
「Quick」
快煮
自動 自動 有
「Soft」軟身 自動 自動 有
「Claypot」
煲仔飯
自動 自動 有
「Rice」煮飯 自動 自動 有
「Baby
food」嬰兒餐
2小時
1小時至2小時30
分鐘
100°C / 有
「Dessert」
甜品
40分鐘
低筋麵粉﹕40分鐘
自發麵粉﹕2小時
120°C / 有
「Steam」
蒸煮
1小時
30分鐘至1小時30
分鐘
100°C / 有
「Soup」煲湯 2小時
1小時30分鐘至
3小時
自動 / 有
「Reheat」
翻熱
自動 自動 80°C / 有
「Porridge」
稀飯
1小時
45分鐘至1小時10
分鐘
自動 / 有
「Congee」
煲粥
1小時30
分鐘
1小時至2小時 自動 / 有
「Keep
warm」保溫
自動 自動 73°C / 有
29
ZH
• 除意大利飯外,煮飯前請先用量杯量米,然後洗米。
• 將洗好的米均勻地鋪滿整個內膽表面。依照量杯數加水至相應高度
(內膽有相應刻度)。
• 飯煮好後,「Keep Warm」保溫指示燈會亮起,為令飯粒分明,請
攪拌並讓飯留在鍋中數分鐘。
煮飯建議表:
達至最佳煮飯效果的建議
白米烹調指南
量杯數 白米重量 內膽中的水位(連米) 享用人數
2
300克 2杯刻度 3-4人
4
600克 4杯刻度 5-6人
• 當插上電源,電飯煲會進入快煮模式。 當按「Menu」選單鍵,電
飯煲會進入「Quick」快煮 「Claypot」煲仔飯 「Soft」軟身
「Baby food」嬰兒餐 「Soup」煲湯 「Dessert」甜品
「Steam」蒸煮 「Reheat」翻熱。
• 螢幕會顯示每項功能的預設烹調時間(煮飯則會顯示「 」),
「Start」開始燈閃爍。
選單鍵

30
• 將產品放在穩固防熱的平坦工作面上,並遠離熱源及避免水濺。
• 按「Rice」煮飯鍵開始煮飯功能。
• 用電飯煲附送的量杯將所需的米倒入內膽中– 圖8。然後將凍水加至
內膽相應的水位– 圖9。
• 關蓋。
注意:煮飯時要先放米再放水,否則水量會太多。
• 按「Preset/Timer」預設/計時鍵啟動時間設定功能,然後按
「Hour」時及「Minute」分更改預設時間。
• 按「Start」開始鍵,電飯煲進入「Rice」煮飯狀態,「Start」開始
鍵會亮起,螢幕會閃出「 」。
• 烹調完畢,會發出五下「嗶」聲;電飯煲進入保溫狀態,「Keep
Warm」保溫指示燈會亮起,螢幕開始計算保溫時間。
煮飯功能
快煮功能
• 按「Menu」選單鍵選擇「Quick」快煮功能。
• 按「Preset/Timer」預設/計時鍵啟動時間設定功能,然後按
「Hour」時及「Minute」分更改預設時間。
• 按「Start」開始鍵,電飯煲進入「Quick」快煮狀態,「Start」開
始鍵會亮起,螢幕會閃出「 」。
• 烹調完畢,發出五下「嗶」聲;電飯煲進入保溫狀態, 「Keep
Warm」保溫指示燈會亮起,螢幕開始計算保溫時間。
軟身飯烹調功能
• 按「Menu」選單鍵選擇「Soft」軟身飯功能。
• 按「Preset/Timer」預設/計時鍵啟動時間設定功能,然後按
「Hour」時及「Minute」分更改預設時間。
• 按「Start」開始鍵,電飯煲進入「Soft」軟身飯狀態,「Start」開
始鍵會亮起,螢幕會閃出「 」。
• 烹調完畢,發出五下「嗶」聲;電飯煲進入保溫狀態, 「Keep
Warm」保溫指示燈會亮起,螢幕開始計算保溫時間。

31
ZH
稀飯功能
• 按「Porridge」稀飯鍵選取「Porridge」稀飯功能。螢幕顯示預設
烹調時間;「Start」開始燈閃爍。
• 按「Preset/Timer」預設/計時鍵啟動時間設定功能,然後按
「Hour」時及「Minute」分更改預設或計時的時間。
• 按「Start」開始鍵。電飯煲進入「Porridge」稀飯狀態,「Start」
開始鍵會亮起,螢幕會顯示剩餘的烹調時間。
• 烹調完畢,發出五下「嗶」聲;電飯煲進入保溫狀態,「Keep
Warm」保溫指示燈會亮起,螢幕開始計算保溫時間。
煲粥功能
• 按「Congee 」煲粥鍵 選擇「Congee」煲粥功能。螢幕顯示預設
烹調時間;「Start」開始燈閃爍。
• 按「Preset/Timer」預設/計時鍵啟動時間設定功能,然後按
「Hour」時及「Minute」分更改預設或計時的時間。
• 按「Start」開始鍵。電飯煲進入「Congee」煲粥狀態,「Start」
開始鍵會亮起, 螢幕會顯示剩餘的烹調時間。
• 烹調完畢,發出五下「嗶」聲;電飯煲進入保溫狀態,「Keep
Warm」保溫指示燈會亮起,螢幕開始計算保溫時間。
煲仔飯功能
• 按「Menu」選單鍵選擇「Claypot」煲仔飯功能。
• 按「Start」開始鍵,電飯煲進入「Claypot」煲仔飯狀態,
「Start」開始鍵會亮起,螢幕會閃出「 」。
• 飯煮好時,電飯煲會發出提示聲。打開煲蓋,加入材料並按
「Start」開始鍵繼續烹調過程。
• 烹調完畢,發出五下「嗶」聲;電飯煲進入保溫狀態, 「Keep
Warm」保溫指示燈會亮起,螢幕開始計算保溫時間。

32
煲湯功能
• 按「Menu」選單鍵選取「Soup」煲湯功能。螢幕顯示預設烹調時
間;「Start」開始燈閃爍。
• 按「Preset/Timer」預設/計時鍵啟動時間設定功能,然後按
「Hour」時及「Minute」分更改預設或計時的時間。
• 按「Start」開始鍵。電飯煲進入「Soup」煲湯狀態,「Start」開
始鍵會亮起,螢幕會顯示剩餘的烹調時間。
• 烹調完畢,發出五下「嗶」聲;電飯煲進入保溫狀態,「Keep
Warm」保溫指示燈會亮起,螢幕開始計算保溫時間。
嬰兒餐功能
• 按「Menu」選單鍵選取「Baby Food」嬰兒餐功能。螢幕顯示預
設烹調時間;「Start」開始燈閃爍。
• 按「Preset/Timer」預設/計時鍵啟動時間設定功能,然後按
「Hour」時及「Minute」分更改預設或計時的時間。
• 按「Start」開始鍵。電飯煲進入「Baby food」嬰兒餐狀態,
「Start」開始鍵會亮起,螢幕會顯示剩餘的烹調時間。
• 烹調完畢,發出五下「嗶」聲;電飯煲進入保溫狀態,「Keep
Warm」保溫指示燈會亮起,螢幕開始計算保溫時間。
甜品功能
• 按「Menu」選單鍵選擇「Dessert」甜品功能。螢幕顯示預設烹調
時間;「Start」開始燈閃爍。
• 按「Timer」計時器鍵可更改烹調時間。低筋麵粉應選擇40分鐘;
自發麵粉應選擇2小時。
• 按「Start」開始鍵。電飯煲進入「Dessert」甜品狀態,「Start」
開始鍵會亮起, 螢幕會顯示剩餘的烹調時間。
• 烹調完畢,發出五下「嗶」聲;電飯煲進入保溫狀態,Keep Warm
保溫指示燈會亮起,螢幕開始計算保溫時間。

33
ZH
翻熱功能
• 按「Menu」選單鍵選擇「Reheat」翻熱功能。螢幕顯示預設烹調
時間;「Start」開始燈閃爍。
• 按「Start」開始鍵。電飯煲進入「Reheat」翻熱狀態,「Start」
開始鍵會亮起,螢幕會顯示剩餘的烹調時間「 」。
• 烹調完畢,發出五下「嗶」聲;電飯煲進入保溫狀態,「Keep
Warm」保溫指示燈會亮起,螢幕開始計算保溫時間。
• 在待機狀態下按「Keep warm/Cancel」保溫/取消鍵, 該燈會亮
起,螢幕會顯示「00:00」並開始計算保溫時間。
• 在功能設定或烹調狀態按「Keep warm/Cancel」保溫/取消鍵,所
有設定會消取並回到待機狀態。
建議:為保持食物美味可口,請將保溫時間控制在十二個小時以內。
保溫/取消功能
蒸煮功能
• 按「Menu」選單鍵選取「Steam」蒸煮功能。螢幕顯示預設烹調
時間;紅色「Start」開始燈閃爍。
• 按「Preset/Timer」預設/計時鍵啟動時間設定功能,然後按
「Hour」時及「Minute」分更改預設或計時的時間。
• 按「Start」開始鍵。電飯煲進入「Steam」蒸煮狀態,「Start」開
始鍵會亮起,螢幕會顯示剩餘的烹調時間。
• 烹調完畢,發出五下「嗶」聲;電飯煲進入保溫狀態,「Keep
Warm」保溫指示燈會亮起,螢幕開始計算保溫時間。

34
預設﹕
• 烹調將在預設時間後結束。
• 適用於「Claypot」煲仔飯、「Dessert」甜品、「Reheat」翻熱以
外的所有烹調功能。
• 選好要用的烹調功能後,按「Preset/timer」預設/計時鍵(
「Preset」預設指示燈會亮起),然後按「hour」時/「minute」分
鍵調校計時器。
• 當選好所需的預設時間後,按「Start」開始鍵以進入烹調狀態。
「Start」開始指示燈會亮起,螢幕會顯示所選時間,且「Preset」
預設指示燈會亮起。
• 最長預設時間為24小時。
• 如預設時間比烹調時間短,烹調會立刻開始。
計時﹕
• 「Baby food」嬰兒餐、「Soup」煲湯、「Dessert」甜品、
「Steam」蒸煮、「Porridge」稀飯、「Congee」煲粥功能中可
調校烹調時間。
• 選好要用的烹調功能後,預設時間會在螢幕顯示。按「Preset/
timer」預設/計時鍵(「Timer」計時器指示燈會亮起),然後按
「hour」時/「minute」分鍵調校計時器。
• 當選好所需的預設時間後,按「Start」開始鍵進入烹調狀態。
「Start」開始指示燈會亮起,螢幕會顯示所選時間,且「Timer」
計時指示燈會亮起。
預設/計時功能
• 打開煲蓋– 圖1。
• 取放內膽及蒸盤時必須使用隔熱手套–圖11。
• 使用附送的膠勺提取食物,然後再關蓋。
• 最長保溫時間為24小時。
• 按「Keep warm/Cancel」保溫/取消鍵結束保溫狀態。
• 拔除電器插頭。
烹調完畢時

35
ZH
• 清潔與保養電飯煲前,請確定電源已拔除,而且電飯煲已徹底冷
卻。
• 建議每次使用後都用海綿清潔 –圖12。
• 內膽、量杯、飯勺、湯匙均可放入洗碗機清洗 - 圖13。
內膽及蒸盤
• 不建議使用砂粉及鋼絲刷。
• 如有食物黏在鍋底,可在清洗前先浸水一段時間。
• 小心擦乾內膽。
小心處置內膽
請按照以下指示小心清洗內膽:
• 為保養內膽的材質,建議避免在裏面切食物。
• 確保將內膽放回電飯煲內。
• 使用附送的膠匙或木匙,盡量避免使用金屬器具,以免損壞內膽表
面 – 圖14。
• 為防止腐蝕,請勿將醋加入內膽中。
• 初次使用或多次使用後,內膽表面的顏色可能會產生變化。這是由
蒸汽及水所造成,不會影響電飯煲的使用,亦不會對人體有害。可
放心繼續使用。
清理微壓閥
• 如要清埋微壓閥,請先將其從煲蓋拆出 - 圖3b。清理後 - 圖16,請
擦乾並裝回電飯煲蓋上 - 圖17。
清潔內蓋
• 拆出內蓋用海綿及洗潔精清理 - 圖16。然後擦乾,裝回勾位後,並
向下按直至固定為止。
電飯煲其他配件的清洗及保養
• 用濕布擦拭電飯煲 外部– 圖18、煲蓋內側及電源線,然後擦乾。切
勿使用腐蝕性或具磨損性的清潔產品。
• 切勿用水清洗電飯煲內部,以免損壞熱力感應器。
清潔及維修
36
異常情況描述 原因 解決方法
有指示燈未亮
而且不加熱。
電飯煲未插上電源。
檢查電飯煲電源線是否
已插上底座插頭以及電
源。
有指示燈未亮
但加熱。
顯示燈有連接問題或
顯示燈損壞。
送交授權服務中心維
修。
使用時洩漏蒸
汽。
未妥善關蓋。 打開蓋再蓋上。
微壓閥未放好或不完
整。
停止烹調(拔除電源線)並
檢查閥是否完整(兩部分
互相緊鎖)和安放妥當。
蓋或微壓閥墊片損
壞。
送交授權服務中心維
修。
飯半熟或烹調
時間過長。
相對於米量放水太多
或太少。
參閱使用水量表。
自動保溫失靈(
電飯煲停留在
烹調狀態,或
不加熱)
送交授權服務中心維
修。
E0
頂部的感應器斷路或
短路。
送交授權服務中心維
修。
E1
底部的感應器斷路或
短路。
E5
未能偵測到內膽
技術疑難排解
註﹕如內膽變形,切勿使用,請到授權服務中心替換維修。
37
ZH
TEFAL/T-FAL* 國際有限保用證
中
文繁體/Chinese Traditional
www.tefal.com
在保用期內及後,TEFAL/T-FAL* 會為您提供產品的維修服務
附件,耗材 及 用戶可更換的零件, 可於當地購買(如有售),詳細請瀏覽 TEFAL/T-FAL
internet 網站 www.tefal.com
保
用證
TEFAL/T-FAL 根據所附國家列表中所載之國家***及保用期, 在保用期內(自產品購買日
或購買交易日後之產品交付日起計)提供產品因任何材料或工藝缺陷的保用。
此生產商國際
保用證涵蓋已被證實為缺陷產品相關的修復費用, 包括通過維修或更換任何缺陷零件以及必
要的人力, 以使產品符合原本的規格。TEFAL/T-FAL 有權選擇更換產品而不維 修缺陷的產品
。本保用證下 TEFAL/T-FAL 的唯一責任及您專享的解決方法只限於維修或更換產品。
條
款及免責
TEFAL/T-FAL 不會維修或更換未能出示有效購買證明的產品。客戶可親自將產品直接送交
TEFAL/T-FAL 授權的售後服務中心,或必須妥善包裝並以掛號形式(或其他同等郵遞方式)
送交至 TEFAL/T-FAL 授權的售後服務中心。各國獲授權的售後服務中心之詳細地址請見
TEFAL/T-FAL 網址,或可致電國家列表中合適的客戶服務中心查詢。為提供 最好的售後服務
並繼續增進客戶的滿意, TEFAL/T-FAL 可能向曾經由 TEFAL/T-FAL 授權服務中心維修或更換其
產品的客戶發出滿意程度的調查。
本保用證只適用於已被購買的產品並以家用為目的, 本保用證亦不包括任何因錯誤使用、疏
忽、未有遵從 TEFAL/T-FAL 使用說明、或更改或未經授權而維修產品所產生的損壞, 或產
品
持有人的包裝不當或運送途中的處理不當所引起的損壞。保用證亦不包括正常的磨損及耗損、
耗材的維護或更換,及以下情況:
• 使用不適當的水或耗材
• 機件故障,負荷過重
• 未遵從產品規格或產品上的指示,使用錯誤電壓或頻率而引起的損壞或不良結果
• 產品內入水、灰塵或昆蟲 (不包括專用於捕捉或驅趕昆蟲的電器)
• 生銹(如需去銹,必須根據使用說明進行)
• 產品上任何玻璃或瓷器的損壞
• 火災、水災等意外
• 專業或商業用途
• 閃電,功率驟變造成的損壞
消
費者法定權利
TEFAL/T-FAL 國際保用證並不影響消費者法定權利,這些權利不被排除或局限,亦不影響消費
者對購自該產品的零售商的消費者權利。本保用證給予消費者特定合法權益,而消費者在不
同州份或國 家,或可享有其他合法權利。消費者可根據個人判斷維護任何有關權利。
* TEFAL 家電在一些地區如美洲及日本以 T-FAL 品牌出現. TEFAL/T-FAL 為 SEB 集團的註冊商標。
***倘產品購自國家列表內其中一個列舉的國家,而在另一個列舉的國家使用, TEFAL/T-FAL 國
際保用證保用期按照使用產品時所在的國家, 即使有別於購買該產品時所在列舉國家的保 用
期。 倘產品不是購自當地的 TEFAL/T-FAL,可能需要較長的維修時間。倘在使用產品的國家
中不能修復該產品,TEFAL/T-FAL 國際保用證只限於更換同類產品或相近價錢的其他產品 (如
適用) 。
請保留此文件,供閣下提出保用要求時參考.
38
PANEL KAWALAN
PERIHALAN
1 Bakul kukus
2 Penanda untuk air dan nasi
3 Periuk boleh tanggal
4 Cawan penyukat
5 Senduk nasi
6 Senduk sup
7 Tudung
8 Tudung dalaman mudah alih
9 Injap tekanan mikro
10 Butang pembuka tudung
11 Pemegang
12 Perumah
13 Kord kuasa
14 Panel kawalan
a Kekunci Keep warm (Kekal
panas) / Cancel (Batal)
b Kekunci Preset (Praset)/
Timer (Pemasa)
c Kekunci Porridge (Bubur)
d Kekunci Congee (Bubur Nasi)
e Kekunci Rice (Nasi)
f Kekunci Menu
g Kekunci Start (Mula)
h Kekunci Hour (Jam)
i Kekunci Minute (Minit)
15 Penunjuk fungsi
a Fungsi memasak Quick
(Segera)
b Fungsi Claypot (Periuk
tanah)
c Fungsi memasak beras Soft
(Lembut)
d Fungsi Baby food
(Makanan bayi)
e Fungsi Soup (Sup)
f Fungsi Dessert (Pencuci mulut)
g Fungsi Steam (Kukus)
h Fungsi Reheat (Panas
semula)
i Penunjuk praset
j Penunjuk pemasa
k Penunjuk kekal panas
14b
14a
15c
14h
15i
14c
15a 15h15f15b 15d
15j 15k
14d
14f
14g
14i
15e
14e
15g
Hour Minute
Quick
Claypot
Baby
food
Soft
Soup
Dessert
Steam
Reheat

39
MS
KESELAMATAN PENTING
ARAHAN KESELAMATAN
Baca dan ikuti arahan untuk kegunaan. Simpan
dengan selamat.
• Alat perkakas ini tidak dimaksudkan untuk
dikendalikan menggunakan pemasa luaran atau
sistem kawalan jauh yang berasingan.
• Alat perkakas ini boleh digunakan oleh kanak-
kanak berusia 8 tahun ke atas jika mereka diberi
penyeliaan atau arahan berkenaan penggunaan
alat perkakas dengan cara yang selamat
dan jika mereka faham akan bahaya yang
terlibat. Penyelenggaraan pembersihan dan
penggunaan tidak boleh dilakukan oleh kanak-
kanak kecuali mereka berumur 8 tahun ke atas
dan diselia. Simpan alat perkakas dan kordnya
jauh daripada jangkauan kanak-kanak berumur
kurang daripada 8 tahun.
• Alat perkakas boleh digunakan oleh seseorang
yang kurang upaya secara fizikal, sensori atau
keupayaan mental atau kurang berpengalaman
jika mereka telah diberi pengawasan atau arahan
berkenaan penggunaan alat perkakas dengan
cara yang selamat dan jika mereka memahami
bahaya yang mungkin berlaku.

40
• Kanak-kanak tidak patut bermain dengan alat
perkakas.
• Alat perkakas ini tidak dimaksudkan untuk
digunakan oleh orang (termasuk kanak-kanak)
yang kurang upaya dari segi fizikal, deria
atau mental, atau kurang berpengalaman
dan pengetahuan, kecuali jika mereka telah
diberi pengawasan atau arahan berkenaan
penggunaan alat perkakas ini oleh orang yang
bertanggungjawab atas keselamatan mereka.
• Kanak-kanak harus diselia bagi memastikan
mereka tidak bermain dengan alat perkakas ini.
• Kerana alat perkakas ini hanya untuk digunakan
dalam rumah sahaja, ia tidak bertujuan untuk
digunakan dalam aplikasi berikut dan jaminan
tidak diguna pakai:
– Kawasan dapur kakitangan di kedai, pejabat
dan lain-lain persekitaran bekerja
– Rumah ladang
– Oleh pelanggan di hotel, motel dan lain-lain
jenis kediaman
– Persekitaran untuk tempat menginap
• Jika alat perkakas anda dilengkapi kod kuasa
boleh tanggal: Jika kabel kuasa rosak, ia mesti
diganti dengan kabel khas atau unit sedia ada
daripada pusat perkhidmatan diiktiraf.

41
MS
• Jika alat perkakas anda dilengkapi kod kuasa
tetap: jika kod bekalan kuasa rosak, ia mesti
digantikan oleh pengilang, jabatan khidmat
selepas jualan pengilang atau individu yang
mempunyai kelayakan yang sama untuk
mengelak sebarang bahaya.
• Alat perkakas tidak patut direndam dalam air
atau sebarang cecair lain.
• Guna kain lembap atau span dengan sedikit
cecair pembersih untuk membersihkan aksesori
dan bahagian yang bersentuhan dengan
makanan. Bilas dengan kain lembap atau span.
Mengeringkan aksesori dan bahagian yang
bersentuhan yang makan menggunakan kain
kering.
• Jika terdapat simbol bertanda pada
alat perkakas, simbol ini bermaksud “ Awas:
permukaan mungkin panas ketika digunakan ”.
• Awas: permukaan elemen pemanasan tertakluk
pada sisa haba selepas digunakan.
• Awas: terdapat risiko disebabkan oleh
penggunaan alat perkakas.
• Awas: jika alat perkakas anda mempunyai kord
kuasa boleh tanggal, jangan tumpahkan cecair
pada penyambung.

42
• Selalu cabut alat perkakas daripada soket:
– selepas digunakan
– apabila menggerakkannya
– sebelum membasuh atau penyelenggaraan
– jika ia gagal untuk berfungsi dengan betul
• Lecur mungkin berlaku dengan memegang
permukaan panas pada alat perkakas, air panas,
stim atau makanan.
• Ketika memasak, alat perkakas akan
mengeluarkan haba dan wap. Jauhi dari muka
dan tangan.
• Elakkan muka dan tangan berdekatan dengan
saluran keluar stim. Jangan menghalang saluran
keluar wap.
• Untuk sebarang masalah atau pertanyaan sila
hubungi Pasukan Hubungan Pelanggan atau
rujuk kepada laman web kami.
• Alat perkakas boleh digunakan sehingga altitud
4000m.
• Untuk keselamatan anda, alat perkakas ini mematuhi peraturan
keselamatan dan arahan yang berkuatkuasa ketika dikilang (Arahan
Voltan-rendah, Kesesuaian Elektromagnet, Peraturan Bahan Sentuhan
Makanan, Persekitaran...).
• Pastikan bahawa voltan sumber kuasa adalah bersesuaian dengan
yang tertera pada alat perkakas (arus ulang-alik).
• Disebabkan terdapat pelbagai tahap standard, jika alat perkakas
digunakan di negara selain tempat ia dibeli, semak dengan pusat
perkhidmatan yang diperakui.

43
MS
SAMBUNG KEPADA SUMBER KUASA
• Jangan gunakan alat perkakas jika:
– alat perkakas atau kord rosak
– alat perkakas telah jatuh atau menunjukkan kerosakan atau tidak
berfungsi dengan baik
– Jika berlaku perkara di atas, alat perkakas harus dihantar ke Pusat
Perkhidmatan yang diperakui. Jangan buka alat perkakas sendiri.
• Jangan biar kord tergantung
• Selalu pasang alat perkakas ke dalam soket bumi.
• Jangan gunakan wayar penyambung. Jika anda menerima
tanggungjawab untuk berbuat demikian, hanya gunakan wayar
penyambung yang dalam keadaan berfungsi, mempunyai palam yang
dibumikan dan sesuai dengan kuasa alat perkakas.
• Jangan cabut alat perkakas dengan menarik kord.
PENGGUNAAN
• Guna permukaan yang rata, penebat haba yang jauh dari percikan air.
• Jangan biarkan tapak alat perkakas bersentuhan dengan air
• Jangan cuba menggunakan alat perkakas apabila periuk kosong atau
tanpa periuk.
• Fungsi/tombol memasak harus dibenarkan untuk beroperasi dengan
bebas. Jangan mencegah atau menghalang fungsi daripada bertukar
secara automatik kepada fungsi kekal panas.
• Jangan keluarkan periuk ketika alat perkakas sedang berfungsi.
• Jangan letak alat perkakas terus kepada permukaan panas atau lain-
lain sumber haba atau api, ia boleh menyebabkan kegagalan atau
bahaya.
• Periuk dan plat pemanasan sepatutnya bersentuhan secara langsung.
Sebarang objek atau makanan disisipkan di antara dua bahagian ini
boleh mengganggu operasi yang betul.
• Jangan letak alat perkakas berdekatan sumber haba atau di dalam
ketuhar panas, kerana ia boleh menyebabkan kerosakan yang teruk.
• Jangan letak sebarang makanan atau air ke dalam alat perkakas
sehingga periuk diletakkan dengan betul.
• Ikuti tahap yang ditunjukkan dalam resipi.
• Jika sebarang bahagian alat perkakas anda terbakar, jangan cuba
padamkan dengan air. Untuk mengurangkan api gunakan tuala basah.

44
LINDUNGI ALAM SEKITAR
• Alat perkakas anda telah direka untuk penggunaan selama beberapa
tahun. Tetapi, apabila anda ingin menggantinya, jangan lupa tentang
cara anda boleh menyumbang dalam melindungi alam sekitar.
• Sebelum membuang alat perkakas anda keluarkan bateri daripada
pemasa dan lupuskan di pusat pengumpulan buangan sivik tempatan
(mengikut model).
Utamakan perlindungan alam sekitar!
Perkakas anda mengandungi bahan bernilai yang boleh didapatkan
semula atau dikitar semula.
Biarkan ia di pusat kutipan sivik tempatan.
• Sebarang campur tangan sepatutnya dibuat hanya oleh pusat
perkhidmatan dengan alat ganti asal.

45
MS
SEBELUM PENGGUNAAN PERTAMA
Keluarkan alat perkakas daripada pembungkusan
• Keluarkan alat perkakas daripada pembungkusan dan keluarkan semua
aksesori dan dokumen bercetak.
• Buka tudung dengan menekan butang pembuka di permukaan – Rajah
1.
Baca Arahan dan berhati-hati mengikut kaedah operasi.
Bersihkan alat perkakas
• Keluarkan periuk – Rajah 2, tudung dalaman dan injap tekanan mikro
– Rajah 3a dan 3b.
• Bersihkan periuk, injap dan tudung dalaman dengan span dan cecair
basuhan.
• Lap luaran perkakasan dan tudung dengan kain lembap.
• Keringkan dengan teliti.
• Letakkan semua elemen balik kepada tempat asalnya. Pasang tudung
dalaman di kedudukan yang betul di bahagian atas tudung mesin.
Kemudian, masukkan tudung dalaman di belakang 2 rusuk dan tekan
di bahagian atas sehingga ia tetap. Pasang kord boleh tanggal kepada
soket pada tapak pemasak.
UNTUK ALAT PERKAKAS DAN SEMUA FUNGSI
• Berhati-hati apabila mengelap bahagian luar periuk (terutama
bahagian bawah). Pastikan tiada sisa asing atau cecair di bawah periuk
dan pada elemen pemanas – Rajah 5.
• Masukkan periuk ke dalam perkakasan, pastikan berada pada
kedudukan yang betul – Rajah 6.
• Pastikan tudung dalaman berada pada kedudukan yang betul.
• Tutup tudung di tempatnya dengan bunyi "klik".
• Pasangkan kord kuasa ke dalam soket tapak pemasak nasi dan
kemudian masukkan palam ke dalam salur keluar kuasa. Perkakasan
akan berdering dengan bunyi “bip” yang panjang, semua penunjuk
pada kotak kawalan akan menyala dengan segera. Fungsi memasak
<Quick(Segera) > ditetapkan pada program memasak lalai.
• Jangan sentuh elemen pemanas apabila produk dipasang atau selepas
memasak. Jangan angkat produk semasa penggunaan atau baru lepas
memasak.

46
• Alat perkakas ini hanya untuk kegunaan dalaman.
Jangan letakkan tangan anda pada lubang kukus semasa memasak,
bahaya melecur – Rajah 10.
Selepas memasak, jika anda hendak menukar pilihan menu masakan
kerana terdapat kesilapan, tekan kekunci “Keep Warm (Kekal Panas)/
Cancel (Batal)” dan pilih-semula menu yang anda mahu.
Anda boleh menghentikan proses memasak dengan menekan “Keep
warm (Kekal panas) / Cancel (Batal)”.
Hanya gunakan periuk dalaman yang disediakan dengan alat
perkakas.
Jangan tuang air atau masukkan bahan-bahan ke dalam perkakasan
tanpa periuk dimasukkan.
Kuantiti maksimum air + bahan tidak boleh melebihi penanda
tertinggi di dalam periuk - Rajah 7.
JADUAL PROGRAM MASAKAN
Program
Masa memasak Suhu
Kekal
panas
Masa
lalai
Tetapan masa
Suhu
lalai
Tetapan
suhu
Segera auto auto ya
Lembut auto auto ya
Periuk Tanah auto auto ya
Nasi auto auto ya
Makanan bayi 2j 1j-2j30m 100°C / ya
Pencuci mulut 40m
Tepung campuran
kek: 40m
Tepung naik
sendiri: 2j
120°C / ya
Kukus 1j 30m-1j30m 100°C / ya
Sup 2j 1j30m-3j auto / ya
Panas semula auto auto 80°C / ya
Bubur 1j 45m-1j10m auto / ya
Bubur Nasi 1j30m 1j-2j auto / ya
Kekal panas auto auto 73°C / ya
47
MS
• Sebelum memasak, sukat beras dengan cawan penyukat dan bilas
kecuali beras risoto.
• Letak beras yang telah dibilas dengan meratakan sebaiknya di seluruh
permukaan periuk. Isikan dengan air sehingga paras air yang sepadan
(Penanda dalam cawan).
• Apabila nasi sudah sedia, lampu penunjuk "Keep Warm (Kekal Panas)"
menyala, kacau nasi dan kemudian biarkan ia di dalam pemasak nasi
beberapa minit untuk mendapatkan nasi sempurna dengan butiran
yang berasingan.
Jadual di bawah ini memberikan panduan untuk memasak nasi :
SYOR UNTUK MEMASAK NASI TERBAIK
PANDUAN MEMASAK UNTUK BERAS PUTIH
Cawan
penyukat
Berat beras
Paras air dalam
periuk (+ beras)
Hidangan
2 300 g Penanda 2 cawan 3-4 orang
4 600 g Penanda 4 cawan 5-6 orang
• Apabila palam alat perkakas dipasang, pemasak nasi berada pada
fungsi memasak quick (segera). Apabila anda menekan kekunci Menu,
pemasak nasi memilih Quick (Segera) Claypot (Periuk tanah)
Soft (Lembut) Baby food (Makanan bayi) Soup (Sup) Dessert
(Pencuci mulut) Steam (Kukus) Reheat (Panas semula).
• Skrin memaparkan masa memasak lalai untuk setiap fungsi memasak
Rice (Nasi) memaparkan “ ”), lampu kekunci “Start (Mula)” berkelip.
KEKUNCI
MENU

48
• Letak perkakasan secara rata, stabil, permukaan tahan kepanasan jauh
dari percikan air dan sumber-sumber haba yang lain.
• Tekan kekunci < Rice (Nasi) > untuk memilih fungsi memasak nasi.
• Tuang kuantiti beras yang diperlukan ke dalam periuk menggunakan
cawan penyukat yang disediakan – Rajah .8. Kemudian isi dengan air
sejuk sehingga penanda "CAWAN" di dalam periuk – Rajah 9.
• Tutup tudung.
Nota: Sentiasa menambah beras dahulu, jika tidak anda akan terlebih
air.
• Tekan kekunci < Preset (Praset)/Timer (Pemasa) > untuk mengaktifkan
fungsi tetapan masa dan kemudian tekan < hour (jam) > dan < minute
(minit) > untuk menukar masa praset.
• Tekan kekunci < Start (Mula) >, pemasak nasi memasuki status
memasak <Rice (Nasi)>, lampu kekunci <Start (Mula)> menyala, skrin
berkelip “ ”.
• Pada penghujung masak, pembaz akan berbunyi “bip” lima kali,
pemasak nasi akan memasuki status panas dengan penunjuk <Keep
Warm (Kekal Panas) > menyala dan skrin akan mula mengira masa
mengekalkan panas.
FUNGSI MEMASAK NASI
FUNGSI QUICK COOKING
(MASAK SEGERA)
• Tekan kekunci < Menu > ” untuk memilih fungsi memasak < Quick
(Segera)>.
• Tekan kekunci < Preset (Praset)/Timer (Pemasa) > untuk mengaktifkan
fungsi tetapan masa dan kemudian tekan < hour (jam) > dan < minute
(minit) > untuk menukar masa praset.
• Tekan kekunci < Start (Mula) >, pemasak nasi memasuki status
memasak <Quick (Segera)>, lampu kekunci <Start (Mula)> menyala,
skrin berkelip “ ”.
• Pada penghujung masak, pembaz akan berbunyi “bip” lima kali,
pemasak nasi akan memasuki status panas dengan penunjuk <Keep
Warm (Kekal Panas) > menyala dan skrin akan mula mengira masa
mengekalkan panas.

49
MS
FUNGSI CONGEE (BUBUR NASI)
• Tekan kekunci < Congee (Bubur Nasi) > untuk memilih fungsi < Congee
(Bubur Nasi) >. Skrin memaparkan masa memasak lalai, lampu < Start
(Mula) > berkelip.
• Tekan kekunci < Preset (Praset)/Timer (Pemasa) > untuk mengaktifkan
fungsi tetapan masa dan kemudian tekan < hour (jam) > dan < minute
(minit) > untuk menukar masa untuk praset atau pemasa.
• Tekan kekunci < Start (Mula) >. Pemasak nasi memasuki status
memasak < Congee (Bubur Nasi) > dengan lampu < Start (Mula) >
menyala dan skrin memaparkan masa memasak yang tinggal.
FUNGSI CLAYPOT (PERIUK TANAH)
• Tekan kekunci <Menu> untuk memilih fungsi <Claypot (Periuk tanah)>.
• Tekan kekunci < Start (Mula) >, pemasak nasi memasuki status
memasak <Claypot (Periuk tanah) >, lampu kekunci <Start (Mula) >
menyala, skrin berkelip “ ”.
• Apabila nasi sudah sedia, pembaz akan berdering. Buka tudung,
tambah bahan dan tekan kekunci <Start (Mula)> untuk meneruskan
proses memasak.
• Pada penghujung masak, pembaz akan berbunyi “bip” lima kali,
pemasak nasi akan memasuki status panas dengan penunjuk <Keep
Warm (Kekal Panas) > menyala dan skrin akan mula mengira masa
mengekalkan panas.
FUNGSI MEMASAK BERAS LEMBUT
• Tekan kekunci < Menu > untuk memilih fungsi memasak nasi < Soft
(Lembut)>.
• Tekan kekunci < Preset (Praset)/Timer (Pemasa) > untuk mengaktifkan
fungsi tetapan masa dan kemudian tekan < hour (jam) > dan < minute
(minit) > untuk menukar masa praset.
• Tekan kekunci <Start (Mula)>, pemasak nasi memasuki status memasak
nasi <Soft (Lembut)>, lampu kekunci <Start (Mula)> menyala, skrin
berkelip “ ”.
• Pada penghujung masak, pembaz akan berbunyi “bip” lima kali,
pemasak nasi akan memasuki status panas dengan penunjuk <Keep
Warm (Kekal Panas) > menyala dan skrin akan mula mengira masa
mengekalkan panas.

50
FUNGSI PORRIDGE (BUBUR)
• Tekan kekunci < Porridge (Bubur) > untuk memilih fungsi < Porridge
(Bubur) >. Skrin memaparkan masa memasak lalai, lampu < Start
(Mula) > berkelip.
• Tekan kekunci < Preset (Praset)/Timer (Pemasa) > untuk mengaktifkan
fungsi tetapan masa dan kemudian tekan < hour (jam) > dan < minute
(minit) > untuk menukar masa untuk praset atau pemasa.
• Tekan kekunci < Start (Mula) >. Pemasak nasi memasuki status
memasak < Porridge (Bubur) > dengan lampu < Start (Mula) > menyala
dan skrin memaparkan masa memasak yang tinggal.
• Pada penghujung masak, pembaz akan berbunyi “bip” lima kali,
pemasak nasi akan memasuki status panas dengan penunjuk <Keep
Warm (Kekal Panas) > menyala dan skrin akan mula mengira masa
mengekalkan panas.
• Pada penghujung masak, pembaz akan berbunyi “bip” lima kali,
pemasak nasi akan memasuki status panas dengan penunjuk <Keep
Warm (Kekal Panas) > menyala dan skrin akan mula mengira masa
mengekalkan panas.
FUNGSI MAKANAN BAYI
• Tekan kekunci <Menu> untuk memilih fungsi <Baby food (Makanan
bayi)>. Skrin memaparkan masa memasak lalai, lampu < Start (Mula)
> berkelip.
• Tekan kekunci < Preset (Praset)/Timer (Pemasa) > untuk mengaktifkan
fungsi tetapan masa dan kemudian tekan < hour (jam) > dan < minute
(minit) > untuk menukar masa untuk praset atau pemasa.
• Tekan kekunci < Start (Mula) >. Pemasak nasi memasuki status
memasak <Baby Food (Makanan Bayi)> dengan lampu kekunci <Start
(Mula)> menyala dan skrin memaparkan masa memasak yang tinggal.
• Pada penghujung masak, pembaz akan berbunyi “bip” lima kali,
pemasak nasi akan memasuki status panas dengan penunjuk <Keep
Warm (Kekal Panas) > menyala dan skrin akan mula mengira masa
mengekalkan panas

51
MS
FUNGSI SOUP
• Tekan kekunci < Menu > untuk memilih fungsi < Soup (Sup) >. Skrin
memaparkan masa memasak lalai, lampu < Start (Mula) > berkelip.
• Tekan kekunci < Preset (Praset)/Timer (Pemasa) > untuk mengaktifkan
fungsi tetapan masa dan kemudian tekan < hour (jam) > dan < minute
(minit) > untuk menukar masa untuk praset atau pemasa.
• Tekan kekunci < Start (Mula) >. Pemasak nasi memasuki status
memasak < Soup (Sup) > dengan lampu < Start (Mula) > menyala dan
skrin memaparkan masa memasak yang tinggal.
• Pada penghujung masak, pembaz akan berbunyi “bip” lima kali,
pemasak nasi akan memasuki status panas dengan penunjuk <Keep
Warm (Kekal Panas) > menyala dan skrin akan mula mengira masa
mengekalkan panas.
FUNGSI DESSERT
• Tekan kekunci < Menu > untuk memilih fungsi < Dessert (Pencuci
mulut) >. Skrin memaparkan masa memasak lalai, lampu < Start
(Mula)> berkelip.
• Ambil perhatian bahawa anda boleh mengubah masa memasak
dengan menekan kekunci < Timer (Pemasa) >. 40 minit untuk tepung
campuran kek dan 2 jam untuk tepung naik sendiri.
• Tekan kekunci <Start (Mula)>. Pemasak nasi memasuki status memasak
< Dessert (Pencuci Mulut)> dengan lampu < Start (Mula) >menyala dan
skrin memaparkan masa memasak yang tinggal.
• Pada penghujung masak, pembaz akan berbunyi “bip” lima kali,
pemasak nasi akan memasuki status panas dengan penunjuk <Keep
Warm (Kekal Panas) > menyala dan skrin akan mula mengira masa
mengekalkan panas.
FUNGSI KUKUS
• Tekan kekunci <Menu> untuk memilih fungsi <Steam (Kukus)>. Skrin
memaparkan masa memasak lalai, lampu < Start (Mula) > berkelip
merah.
• Tekan kekunci < Preset (Praset)/Timer (Pemasa) > untuk mengaktifkan
fungsi tetapan masa dan kemudian tekan < hour (jam) > dan < minute
(minit) > untuk menukar masa untuk praset atau pemasa.

52
FUNGSI PANAS SEMULA
• Tekan kekunci < Menu > untuk memilih fungsi < Reheat (Panas
semula) >. Skrin memaparkan masa memasak lalai, lampu < Start
(Mula)> berkelip.
• Tekan kekunci <Start (Mula)>. Pemasak nasi memasuki status memasak
< Reheat (Panas semula) > dengan lampu kekunci < Start (Mula)>
menyala dan skrin memaparkan “ ”.
• Pada penghujung masak, pembaz akan berbunyi “bip” lima kali,
pemasak nasi akan memasuki status panas dengan penunjuk <Keep
Warm (Kekal Panas) > menyala dan skrin akan mula mengira masa
mengekalkan panas.
• Tekan kekunci <Keep warm (Kekal Panas)/Cancel (Batal)> di bawah
status tunggu sedia, lampu penunjuk < Keep warm (Kekal panas)/
Cancel (Batal) > menyala, skrin menunjukkan “00:00” dan skrin akan
mula mengira masa mengekalkan panas.
• Tekan kekunci < Keep warm (Kekal panas) / Cancel (Batal) > di bawah
tetapan fungsi atau status memasak akan membatalkan semua data
tetapan dan kembali kepada status tunggu sedia.
Pengesyoran: untuk mendapatkan rasa makanan yang segar, sila
hadkan masa menyimpan dalam tempoh 12 jam.
FUNGSI KEKAL PANAS/BATAL
• Tekan kekunci < Start (Mula) >. Pemasak nasi memasuki status
memasak < Steam (Kukus) > dengan lampu < Start (Mula) > menyala
dan skrin memaparkan masa memasak yang tinggal.
• Pada penghujung masak, pembaz akan berbunyi “bip” lima kali,
pemasak nasi akan memasuki status panas dengan penunjuk <Keep
Warm (Kekal Panas) > menyala dan skrin akan mula mengira masa
mengekalkan panas.

53
MS
Praset:
• Masa praset sepadan dengan masa untuk penghujung memasak.
• Tersedia untuk semua fungsi, kecuali fungsi <Claypot(Periuk tanah)>,
<Dessert(Pencuci mulut) > dan <Reheat(Panas semula >.
• Selepas memilih fungsi memasak yang dikehendaki, tekan kekunci <
Preset (Praset) / Timer (Pemasa) > (penunjuk praset akan menyala) dan
kemudian gunakan kekunci < Hour (Jam) > dan < Minute (Minit) > untuk
melaraskan masa.
• Apabila anda telah memilih masa praset yang ditetapkan, tekan kekunci
< Start (Mula)> untuk memasuki mod memasak, lampu penunjuk
<Start (Mula)> menyala dan skrin akan memaparkan nombor masa
yang telah anda pilih dan penunjuk <Preset (Praset> menyala.
• Masa praset maksimum ialah 24 jam.
• Jika masa praset lebih singkat daripada masa memasak, proses
memasak akan bermula dengan segera.
Pemasa:
• Anda boleh melaraskan masa memasak untuk fungsi < Baby
food (Makanan bayi)>, < Soup (Sup) >, < Dessert (Pencuci mulut) >,
<Steam(Kukus) >, <Porridge (Bubur)> dan <Congee(Bubur nasi) >.
• Apabila anda memilih fungsi memasak, masa memasak lalai akan
ditunjukkan pada paparan digital, tekan kekunci < Preset (Praset)/
Timer (Pemasa) > (penunjuk pemasa akan menyala) dan kemudian
gunakan < Hour (Jam) > dan < Minute (Minit) > untuk melaraskan masa.
• Apabila anda telah memilih masa praset yang ditetapkan, tekan kekunci
< Start (Mula) > untuk memasuki mod memasak, lampu penunjuk
<Start (Mula) > menyala dan skrin akan memaparkan nombor masa
yang telah anda pilih dan penunjuk <Preset (Praset> menyala.
FUNGSI PRASET/ PEMASA
• Buka tudung – Rajah 1.
• Sarung tangan mesti digunakan apabila mengeluarkan periuk memasak
dan bakul kukus – Rajah 11.
• Hidang makanan menggunakan senduk yang disediakan bersama
perkakasan anda dan tutup semula tudung.
• 24 jam adalah masa mengekalkan hangat maksimum.
• Tekan < Keep warm (Kekal panas)/Cancel (Batal) > untuk menghentikan
status kekal panas.
• Tanggalkan palam perkakas.
SETELAH SELESAI MEMASAK

54
• Untuk memastikan periuk pemasak nasi telah dicabut palam dan
disejukkan sebelum pembersihan dan penyelenggaraan.
• Amat dinasihatkan agar membersihkan alat perkakas setiap kali
selepas digunakan menggunakan span – Rajah 12.
• Periuk, cawan, senduk nasi dan senduk sup selamat digunakan di dalam
mesin pencuci pinggan - Rajah 13.
Periuk, bakul kukus
• Serbuk kasar dan span logam tidak digalakkan.
• Jika makanan melekat pada bahagian bawah, anda perlu masukkan air
ke dalam periuk untuk rendaman sebelum membasuh.
• Keringkan periuk dengan teliti.
Penjagaan periuk
Untuk periuk, ikut arahan di bawah dengan teliti:
• Untuk memastikan penyelenggaraan kualiti periuk, dicadangkan tidak
memotong makanan di dalamnya.
• Pastikan anda memasukkan kembali periuk ke dalam pemasak nasi.
• Guna senduk plastik yang disediakan atau senduk kayu dan bukan jenis
logam untuk mengelakkan kerosakan pada permukaan periuk – Rajah
14.
• Untuk mengelak sebarang risiko berkarat, jangan masukkan cuka ke
dalam periuk.
• Warna permukaan periuk mungkin bertukar selepas menggunakan
kali pertama atau selepas penggunaan lama. Pertukaran warna
ini disebabkan oleh tindakan wap dan air serta tidak memberi
sebarang kesan ke atas penggunaan periuk pemasak nasi, juga
tidak membahayakan kesihatan. Benar-benar selamat untuk terus
menggunakannya.
Pembersihan injap tekanan mikro
• Apabila membersihkan injap tekanan mikro, sila tanggalkan ia
daripada tudung – rajah 3b. Selepas membersihkannya – Rajah 16 ,
sila lap sehingga kering dan kemudian letakkan semula pada tudung
pemasak nasi – Rajah 17
Membersihkan tudung dalaman
• Keluarkan penutup dalaman. Bersihkan ia dengan span dan cecair
PEMBERSIHAN DAN
PENYELENGGARAAN
55
MS
Perihalan
pincang tugas
Punca Penyelesaian
Sebarang
penunjuk lampu
tidak menyala
dan tiada
pemanasan.
Perkakasan tidak
dipasang.
Periksa kord kuasa
dipasang pada soket dan
sesalur.
Sebarang
penunjuk lampu
tidak menyala
dan tiada
pemanasan.
Masalah sambungan
penunjuk lampu atau
penunjuk lampu rosak.
Hantar ke pusat servis
untuk diperbaiki.
Kebocoran
wap semasa
penggunaan
Tudung tidak ditutup
dengan betul.
Buka dan tutup tudung
sekali lagi.
Injap tekanan mikro
tidak pada kedudukan
baik atau tidak
lengkap.
Hentikan memasak
(cabut palam produk)
dan periksa injap lengkap
(2 bahagian terkunci
bersama) dan berada
pada kedudukan baik.
Tudung atau gasket
injap tekanan mikro
rosak.
Hantar ke pusat servis
untuk diperbaiki.
PANDUAN PENYELESAIAN MASALAH TEKNIKAL
pencuci -Rajah 16. Kemudian lap sehingga kering dan letakkan semula
di belakang rusuk dan tekan pada bahagian atas sehingga ia tetap.
Pembersihan dan penjagaan bahagian perkakas yang
lain
• Bersihkan luaran pemasak nasi – Rajah 18, bahagian dalam tudung
dan kord dengan kain lembap dan lap kering. Jangan guna produk yang
kasar.
• Jangan gunakan air untuk membersih bahagian dalam badan perkakas
kerana ia boleh merosakkan sensor haba.
56
Perihalan
pincang tugas
Punca Penyelesaian
Nasi separuh
masak atau
terlebih masak.
Terlebih atau
terkurang air
berbanding dengan
kuantiti beras.
Rujuk jadual kuantiti air.
Kegagalan
mengekalkan
hangat
automatik
(produk
terus dalam
kedudukan
memasak,
atau tidak
memanas).
Hantar ke pusat
perkhidmatan diiktiraf
untuk dibaiki.
E0
Sensor di bahagian
atas litar terbuka
atau litar pintas.
Hantar ke pusat
perkhidmatan diiktiraf
untuk dibaiki.
E1
Sensor pada
bahagian bawah
terbuka atau litar
pintas.
E5
Mangkuk tidak
dikesan
Catatan: Jika periuk dalaman cacat, jangan guna dan dapatkan
penggantian dari pusat perkhidmatan diiktiraf untuk dibaiki.

57
MS
TEFAL/T-FAL* INTERNATIONAL LIMITED GUARANTEE
: www.tefal.com
This product is repairable by TEFAL/T-FAL*, during and after the guarantee period.
Accessories, consumables and end-user replaceable parts can be purchased, if locally available, as described on the
TEFAL/T-FAL internet site www.tefal.com
The Guarantee**: TEFAL/T-FAL guarantees this product against any manufacturing defect in materials or workmanship during
the guarantee period within those countries*** as stated in the attached country list, starting from the initial date of purchase
or delivery date.
The international manufacturer’s guarantee covers all costs related to restoring the proven defective product so that it
conforms to its original specifications, through the repair or replacement of any defective part and the necessary labour. At
TEFAL/T-FAL’s choice, a replacement product may be provided instead of repairing a defective product. TEFAL/T-FAL’s sole
obligation and your exclusive resolution under this guarantee are limited to such repair or replacement.
Conditions & Exclusions: TEFAL/T-FAL shall not be obliged to repair or replace any product which is not accompanied by a valid
proof of purchase. The product can be taken directly in person or must be adequately packaged and returned, by recorded
delivery (or equivalent method of postage), to a TEFAL/T-FAL authorised service centre. Full address details for each country’s
authorised service centres are listed on TEFAL/T-FAL website (www.tefal.com) or by calling the appropriate consumer service
centre set out in the attached country list. In order to offer the best possible after-sales service and constantly improve
customer satisfaction, TEFAL/T-FAL may send a satisfaction survey to all customers who have had their product repaired or
exchanged in a TEFAL/T-FAL authorised service centre.
This guarantee applies only for products purchased and used for domestic purposes and will not cover any damage which
occurs as a result of misuse, negligence, failure to follow TEFAL/T-FAL instructions, or a modification or unauthorised repair of
the product, faulty packaging by the owner or mishandling by any carrier. It also does not cover normal wear and tear,
maintenance or replacement of consumable parts, or the following:
- damages or poor results specifically due to wrong voltage or frequency as stamped on the product ID or specification
- using the wrong type of water or consumable
- mechanical damages, overloading
- ingress of water, dust or insects into the product (excluding appliances with features specifically designed for insects)
- scaling (any de-scaling must be carried out according to the instructions for use)
- damage as a result of lightning or power surges
- damage to any glass or porcelain ware in the product
- accidents including fire, flood, etc
- professional or commercial use
Consumer Statutory Rights: This international TEFAL/T-FAL guarantee does not affect the Statutory Rights a consumer may
have or those rights that cannot be excluded or limited, nor rights against the retailer from which the consumer purchased
the product. This guarantee gives a consumer specific legal rights, and the consumer may also have other legal rights which
vary from State to State or Country to Country. The consumer may assert any such rights at his sole discretion.
***Where a product purchased in a listed country and then used in another listed country, the international TEFAL/T-FAL
guarantee duration is the one in the country of usage, even if the product was purchased in a listed country with different
guarantee duration. The repair process may require a longer time if the product is not locally sold by TEFAL/T-FAL. If the product
is not repairable in the new country, the international TEFAL/T-FAL guarantee is limited to a replacement by a similar or
alternative product at similar cost, where possible.
*TEFAL household appliances appear under the T-FAL brand in some territories like America and Japan. TEFAL/T-FAL are
registered trademarks of Groupe SEB.
Please keep this document for your reference should you wish to make a claim under the guarantee.
**For Australia only: Our goods come with guarantees that cannot be excluded under the Australian Consumer Law. You are
entitled to a replacement or refund for a major failure and compensation for any other reasonably foreseeable loss or damage.
You are also entitled to have the goods repaired or replaced if the goods fail to be of acceptable quality and the failure does not
amount to a major failure.
**For India Only: Your Tefal product is guaranteed for 2 years. The guarantee covers exclusively the repair of a defective
product, but at TEFAL’s choice, a replacement product may be provided instead of repairing a defective product. It is mandatory
that the consumer, to have his product repaired, has to log a service request on the dedicated Smartphone application TEFAL
SERVICE APP or by calling TEFAL Consumer Care Center at 1860-200-1232, Opening hours Mon-Sat 09 AM to 06 PM. Products
returned by Post will not be covered by the guarantee. As a proof of purchase consumer needs to provide both this stamped
guarantee card and cash memo.
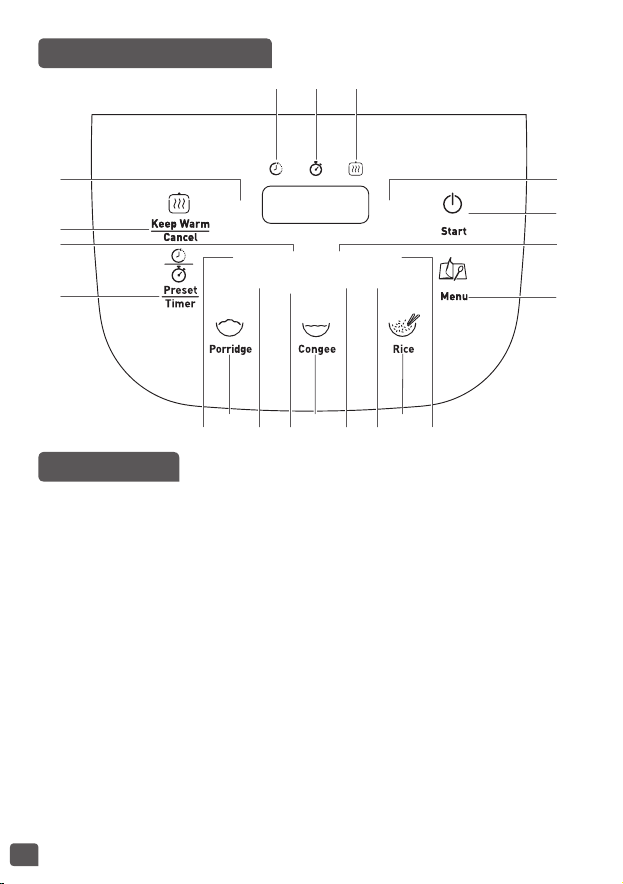
58
BNG ĐIU KHIN
MÔ T
1 Xửng hấp
2 Thang chia độ cho nước và
gạo
3 Nồi có thể tháo ra
4 Gáo đo
5 Vá múc cơm
6 Thìa súp
7 Nắp
8 Nắp trong có thể tháo ra
9 Van áp suất micro
10 Nút mở nắp
11 Tay cầm
12 Vỏ
13 Dây nguồn
14 Bảng điều khiển
a Phím Giữ Ấm / Hủy
b Phím Cài Đặt Sẵn / Hẹn
Giờ
c Phím Cháo Đặc
d Phím Cháo Lỏng
e Phím Cơm
f Phím Trình Đơn
g Phím Khởi Động
h Phím Giờ
i Phím Phút
15 Chỉ báo chức năng
a Chức năng nấu nhanh
b Chức năng niêu
c Chức năng nấu cơm
mềm
d Chức năng thức ăn em
bé
e Chức năng súp
f Chức năng tráng miệng
g Chức năng hấp
h Chức năng hâm lại
i Chỉ báo cái đặt lại
j Chỉ báo hẹn giờ
k Chỉ báo giữ ấm
14b
14a
15c
14h
15i
14c
15a 15h15f15b 15d
15j 15k
14d
14f
14g
14i
15e
14e
15g
Hour Minute
Quick
Claypot
Baby
food
Soft
Soup
Dessert
Steam
Reheat

59
VN
BIỆN PHÁP BO VỆ QUAN TRỌNG
HƯỚNG DẪN V AN TOÀN
Đọc và thực hiện theo các hướng dẫn sử
dụng này. Cất chúng đi.
• Thiết bị này không được thiết kế để được vận
hành bằng thiết bị hẹn giờ bên ngoài hay một
hệ thống điều khiển từ xa riêng biệt.
• Thiết bị này có thể được sử dụng bởi trẻ em
từ 8 tuổi trở lên nếu họ đã được giám sát
hoặc hướng dẫn về cách sử dụng thiết bị một
cách an toàn và hiểu được những nguy hiểm
liên quan. Trẻ em không được vệ sinh và bảo
dưỡng trừ khi các em trên 8 tuổi và có giám
sát. Để thiết bị này và dây điện của nó xa tầm
với của trẻ em dưới 8 tuổi.
• Thiết bị này có thể được sử dụng bởi người
có khả năng thể lực, giác quan hoặc tâm thần
suy giảm hoặc thiếu kinh nghiệm và kiến thức
nếu họ đã được giám sát hoặc hướng dẫn về
cách sử dụng thiết bị một cách an toàn và hiểu
được những nguy hiểm liên quan.
• Trẻ em không được chơi đùa với thiết bị này.
• Thiết bị này không được thiết kế để sử dụng
bởi các cá nhân (kể cả trẻ em) có khuyết tật về
thể chất, cảm giác hoặc thần kinh, hoặc thiếu
kinh nghiệm và kiến thức, trừ khi họ được
giám sát hoặc chỉ dẫn sử dụng thiết bị bởi một
người chịu trách nhiệm về sự an toàn của họ.

60
• Trẻ em phải được giám sát để đảm bảo chúng
không nghịch phá thiết bị này.
• Vì thiết bị này chỉ dành cho mục đích gia dụng,
nên nó không được thiết kế để sử dụng trong
các ứng dụng sau đây và bảo hành sẽ không
áp dụng đối với:
– Khu vực nhà bếp nhân viên ở các cửa hàng,
văn phòng và các môi trường làm việc khác
– Trang trại
– Khách hàng trong khách sạn, nhà nghỉ và
các môi trường dạng dân cư khác
– Môi trường dạng phòng ngủ và ăn sáng
• Nếu thiết bị của bạn được lắp dây nguồn
có thể tháo ra: nếu dây nguồn bị hỏng, nó
phải được thay bằng một dây đặc biệt hoặc
dây được cung cấp bởi trung tâm bảo trì ủy
quyền.
• Nếu thiết bị của bạn được lắp dây nguồn
cố định: nếu dây nguồn bị hỏng, nó phải được
thay bởi hãng sản xuất, phòng dịch vụ hậu
mãi của hãng sản xuất hoặc người có năng
lực tương tự để tránh bất kỳ nguy hiểm nào.
• Không được nhúng thiết bị này vào nước hoặc
bất kỳ chất lỏng nào.
• Sử dụng một tấm vải hoặc miếng xốp ẩm với
nước rửa chén để vệ sinh các phụ kiện và bộ
phận có tiếp xúc với đồ ăn. Vệ sinh bằng một
tấm vải hoặc miếng xốp ẩm. Lau khô các phụ
kiện và bộ phận có tiếp xúc với đồ ăn bằng

61
VN
một tấm vải khô.
• Nếu biểu tượng được đánh dấu trên thiết
bị, biểu tượng này có nghĩa là “ Thận trọng:
các bề mặt có thể nóng lên trong quá trình sử
dụng ”.
• Thận trọng: bề mặt của bộ gia nhiệt có thể còn
nhiệt tồn dư sau khi sử dụng.
• Thận trọng: nguy cơ bị thương do sử dụng
thiết bị không đúng cách.
• Thận trọng: nếu thiết bị của bạn có dây nguồn
có thể tháo ra, không được đổ chất lỏng lên
đầu nối.
• Luôn rút phích cắm của thiết bị:
– ngay sau khi sử dụng
– khi di chuyển thiết bị
– trước khi vệ sinh hoặc bảo dưỡng
– nếu nó không hoạt động chính xác
• Có thể bị bỏng khi chạm vào bề mặt nóng của
thiết bị, nước nóng, hơi nước hoặc đồ ăn.
• Trong khi nấu, thiết bị phát ra nhiệt và hơi
nước. Để mặt và bàn tay tránh xa thiết bị.
• Không được để mặt và bàn tay gần lỗ thoát
hơi nước. Không được làm tắc lỗ thoát hơi
nước.
• Nếu có bất kỳ vấn đề hay thắc mắc nào, vui
lòng liên hệ với Đội Ngũ Quan Hệ với Khách
Hàng của chúng tôi hoặc tham khảo trang web
của chúng tôi.

62
• Có thể sử dụng thiết bị này ở độ cao lên đến
4000 m.
• Vì sự an toàn của bạn, thiết bị này tuân thủ các quy định và chỉ thị
về an toàn có hiệu lực tại thời điểm sản xuất (Chỉ Thị về Điện Áp
Thấp, Tính Tương Thích Điện Từ, Các Quy Định về Vật Liệu Tiếp
Xúc Với Thực Phẩm, Môi Trường...).
• Đảm bảo rằng điện nguồn tương ứng với điện áp được cho biết trên
thiết bị (dòng điện xoay chiều).
• Dựa trên các chuẩn hiện hành khác nhau, nếu sử dụng thiết bị này
ở một quốc gia khác với quốc gia nơi mua, hãy nhờ trung tâm bảo
trì được phép tiến hành kiểm tra.
KẾT NỐI BỘ NGUỒN
• Không được sử dụng thiết bị nếu:
– thiết bị hoặc dây điện bị hỏng
– thiết bị đã bị rơi hoặc có dấu hiệu hư hỏng hoặc không hoạt động
chính xác
– Trong trường hợp bên trên, phải gửi thiết bị đến Trung Tâm Bảo
Trình được phép. Không được tự tháo rời thiết bị.
• Không được để dây điện treo
• Luôn cắm phích cắm của thiết bị vào một ổ cắm có nối đất.
• Không được sử dụng đầu dây nối dài. Nếu bạn chấp nhận trách
nhiệm pháp lý khi làm như thế, chỉ sử dụng đầu dây nối dài ở điều
kiện tốt, có phích cắm nối đất và thích hợp với công suất của thiết
bị.
• Không được rút phích của thiết bị bằng cách kéo dây điện.
SỬ DỤNG
• Sử dụng một bề mặt bằng phẳng, ổn định, chống nhiệt, cách xa bất
kỳ nguồn nước bắn nào.
• Không được để đế của thiết bị tiếp xúc với nước
• Không bao giờ được vận hành thiết bị khi nồi còn trống hoặc không
có nồi.
• Chức năng/núm nấu phải có thể vận hành tự do. Không được cản

63
VN
hoặc làm tắc chức năng tự động chuyển sang chức năng giữ ấm.
• Không được tháo nồi trong khi thiết bị đang hoạt động.
• Không được đặt thiết bị trực tiếp lên một bề mặt nóng, hoặc bất kỳ
nguồn nhiệt hay lửa nào, vì nó sẽ gây ra sự cố hoặc nguy hiểm.
• Nồi và tấm gia nhiệt phải tiếp xúc trực tiếp. Bất kỳ đồ vật hay đồ ăn
nào được đưa vào giữa 2 bộ phận này sẽ ảnh hưởng đến sự vận
hành chính xác.
• Không được đặt thiết bị gần một nguồn nhiệt hoặc trong một cái lò
nóng, vì có thể xảy ra hư hỏng nghiêm trọng.
• Không được cho bất kỳ thức ăn hay nước nào vào thiết bị cho đến
khi nồi được gắn vào.
• Tuân thủ các mức được cho biết trong công thức nấu ăn.
• Nếu bất kỳ bộ phận nào của thiết bị bị cháy, không được tìm cách
dập lửa bằng nước. Để dập lửa hãy sử dụng một tấm vải ẩm.
• Bất kỳ sự can thiệp nào cũng chỉ được thực hiện bởi trung tâm bảo
trì với bộ phận dự phòng chính hãng.
BO VỆ MÔI TRƯỜNG
• Thiết bị của bạn được thiết kế để vận hành trong nhiều năm. Tuy
nhiên, khi bạn quyết định thay thiết bị, hãy nhớ suy nghĩ về việc bạn
có thể góp phần bảo vệ môi trường bằng cách nào.
• Trước khi thải bỏ thiết bị của bạn, bạn nên tháo pin ra khỏi bộ
hẹn giờ và tiêu hủy nó tại trung tâm thu gom rác thải dân dụng địa
phương (tùy theo mẫu).
Bảo vệ môi trường là trên hết!
Thiết bị của bạn có các vật liệu có giá trị có thể được phục hồi
hoặc tái chế.
Hãy bỏ nó lại một điểm thu gom rác thải dân dụng địa phương.

64
TRƯỚC KHI SỬ DỤNG LẦN ĐẦU
Tháo bao bì của thiết bị
• Tháo thiết bị ra khỏi bao bì và tháo bao bì tất cả các phụ kiện và
tài liệu in.
• Mở nắp bằng cách nhấn nút mở trên vỏ – Hình 1.
Đọc Hướng Dẫn và cẩn thận thực hiện theo phương thức vận
hành.
Vệ sinh thiết bị
• Tháo nồi – Hình 2, nắp trong và van áp suất micro – Hình 3a và 3b.
• Vệ sinh nồi, van và nắp trong bằng một miếng xốp và nước rửa
chén.
• Lau bên ngoài thiết bị và nắp bằng một tấm vải ẩm.
• Lau khô cẩn thận.
• Đặt tất cả các bộ phận trở lại vị trí ban đầu của chúng. Lắp nắp
trong vào đúng vị trí trên nắp trên của thiết bị. Sau đó, đặt nắp trong
phía sau 2 cái gọng và đẩy nó lên đỉnh cho đến khi cố định. Lắp dây
có thể tháo rời vào ổ cắm trên đế nồi.
ĐỐI VỚI THIẾT BỊ VÀ TẤT C CÁC CHỨC NĂNG
• Cẩn thận lau bên ngoài nồi (nhất là đáy). Đảm bảo rằng không có
cặn hoặc chất lỏng bên dưới nồi và trên bộ phận gia nhiệt – Hình 5.
• Đặt nồi vào thiết bị, đảm bảo rằng nó được đặt đúng vị trí – Hình 6.
• Đảm bảo rằng nắp trong nằm đúng vị trí.
• Đóng nắp với một tiếng "cách".
• Lắp dây điện vào ổ cắm của đế nồi cơm và sau đó cắm vào ổ cắm
điện. Thiết bị sẽ phát ra một tiếng “bíp” dài, tất cả các chỉ báo trên
hộp điều khiển sẽ sáng lên một lúc. Chức năng nấu < Nhanh >
được cài đặt thành chương trình nấu mặc định.
• Không được chạm vào bộ phận gia nhiệt khi sản phẩm được cắm
điện hoặc sau khi nấu. Không được di chuyển thiết bị đang sử dụng
hoặc ngay sau khi nấu.
• Thiết bị này chỉ dành cho mục đích sử dụng trong nhà.
Không bao giờ đặt tay bạn lên lỗ thông hơi trong khi nấu, vì có
nguy hiểm bỏng – Hình 10.
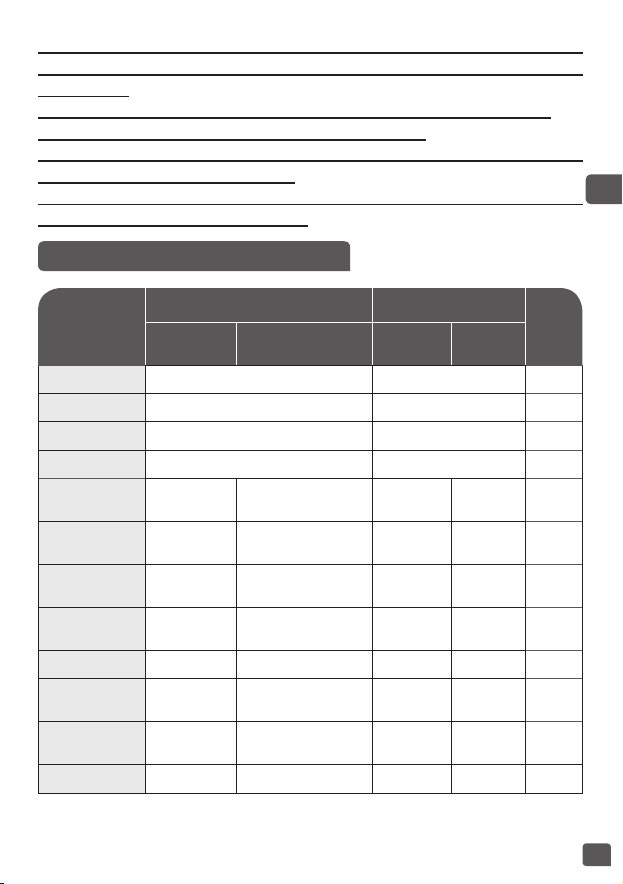
65
VN
Sau khi bắt đầu nấu, nếu bạn muốn thay đổi trình đơn nấu đã
chọn vì có lỗi, nhấn phím "Giữ Ấm / Hủy" và chọn lại trình đơn
bạn muốn.
Bạn có thể dừng nấu bằng cách nhấn phím “Giữ Ấm / Hủy”.
Chỉ sử dụng nồi trong được bán kèm thiết bị.
Không được rót nước hoặc bỏ các thành phần nếu ăn vào thiết
bị mà không có nồi bên trong.
Lượng nước + thành phần tối đa không được vượt quá vạch
cao nhất bên trong nồi - Hình 7.
BNG CHƯƠNG TRÌNH NẤU
Các chương
trình
Thời gian nấu Nhiệt độ
Giữ
ấm
Thời gian
mặc định
Thiết lập thời
gian
Nhiệt độ
mặc định
Thiết lập
nhiệt độ
Nhanh tự động tự động có
Mềm tự động tự động có
Niêu tự động tự động có
Cơm tự động tự động có
Thức ăn em
bé
2 giờ
1 giờ - 2 giờ 30
phút
100°C / có
Tráng miệng 40m
Bột trộn bánh: 40m
Bột nổi: 2 giờ
120°C / có
Hấp 1 giờ
30 phút - 1 giờ 30
phút
100°C / có
Súp 2 giờ
1 giờ 30 phút - 3
giờ
tự động / có
Hâm lại tự động tự động 80°C / có
Cháo đặc 1 giờ
45 phút - 1 giờ 10
phút
tự động / có
Cháo
1 giờ 30
phút
1 giờ - 2 giờ tự động / có
Giữ ấm tự động tự động 73°C / có

66
• Trước khi nấu, đo gạo bằng gáo đo và vo gạo trừ gạo risotto.
• Phân bố đều gạo đã vo quanh toàn bộ bề mặt của nồi. Rót nước
đến mức nước tương ứng (thang chia độ bằng gáo).
• Khi gạo đã sẵn sàng, khi đèn chỉ báo "Giữ Ấm" sáng lên, khuấy
gạo lên và sau đó để nó trong nồi cơm lâu hơn vài phút để có hạt
cơm tơi.
Bảng bên dưới cung cấp hướng dẫn cách nấu cơm:
CÁC KHUYẾN CÁO Đ NẤU CƠM HIỆU QU NHẤT
HƯỚNG DẪN NẤU CƠM TRẮNG
Gáo đo
Trọng lượng
gạo
Mức nước trong nồi
(+ gạo)
Khẩu phần
2 300 g Vạch 2 gáo 3-4 người
4 600 g Vạch 4 gáo 5-6 người
• Khi thiết bị được cắm điện, nồi cơm ở chức năng nấu nhanh. Khi
bạn nhấn phím Trình Đơn, nồi cơm sẽ chọn các chế độ Nhanh
Niêu Mềm Thức ăn em bé Súp Tráng miệng Hấp
Hâm lại.
• Màn hình hiển thị thời gian nấu mặc định của từng chức năng (Nấu
cơm hiển thị “ ”), đèn phím “Khởi Động” sẽ nhấp nháy.
PHÍM TRÌNH ĐƠN

67
VN
• Đặt thiết bị lên một bề mặt làm việc bằng phẳng, ổn định, chống
nhiệt, cách xa nước bắn và bất kỳ nguồn nhiệt nào khác.
• Nhấn phím < Cơm > ” để chọn chức năng nấu cơm.
• Đổ lượng gạo cần thiết vào nồi dùng gáo đo kèm theo – Hình 8. Sau
đó rót nước lạnh lên đến vạch “CUP” trong nồi – Hình 9.
• Đóng nắp.
Lưu ý: Luôn thêm gạo trước tiên trừ phi bạn sẽ có quá nhiều
nước.
• Nhấn phím < Cài Đặt Sẵn/Hẹn Giờ > để kích hoạt chức năng cài
đặt giờ và sau đó nhấn phím < giờ > và < phút > để thay đổi thời
gian cài đặt sẵn.
• Nhấn phím < Khởi Động >, nồi cơm sẽ chuyển sang trạng thái nấu
< Cơm >, đèn phím < Khởi Động > sáng lên, màn hình nhấp nháy
“ ”.
• Khi nấu xong, chuông báo sẽ phát ra 5 tiếng “bíp”, nồi cơm sẽ
chuyển sang trạng thái giữ ấm với chỉ báo < Giữ Ấm > bật lên và
màn hình sẽ bắt đầu đếm thời gian giữ ấm.
CHỨC NĂNG NẤU CƠM
CHỨC NĂNG NẤU NHANH
• Nhấn phím < Trình Đơn > để chọn chức năng nấu < Nhanh >.
• Nhấn phím < Cài Đặt Sẵn/Hẹn Giờ > để kích hoạt chức năng cài
đặt giờ và sau đó nhấn phím < giờ > và < phút > để thay đổi thời
gian cài đặt sẵn.
• Nhấn phím < Khởi Động >, nồi cơm sẽ chuyển sang trạng thái nấu
< Nhanh >, đèn của phím < Khởi Động > sáng lên, màn hình nhấp
nháy “ ”.
• Khi nấu xong, chuông báo sẽ phát ra 5 tiếng “bíp”, nồi cơm sẽ
chuyển sang trạng thái giữ ấm với chỉ báo < Giữ Ấm > bật lên và
màn hình sẽ bắt đầu đếm thời gian giữ ấm.
CHỨC NĂNG NẤU CƠM MM
• Nhấn phím < Trình Đơn > để chọn chức năng nấu cơm < Mềm >.
• Nhấn phím < Cài Đặt Sẵn/Hẹn Giờ > để kích hoạt chức năng cài

68
đặt giờ và sau đó nhấn phím < giờ > và < phút > để thay đổi thời
gian cài đặt sẵn.
• Nhấn phím < Khởi Động >, nồi cơm sẽ chuyển sang trạng thái nấu
cơm < Mềm >, đèn của phím < Khởi Động > sáng lên, màn hình
nhấp nháy “ ”.
• Khi nấu xong, chuông báo sẽ phát ra 5 tiếng “bíp”, nồi cơm sẽ
chuyển sang trạng thái giữ ấm với chỉ báo < Giữ Ấm > bật lên và
màn hình sẽ bắt đầu đếm thời gian giữ ấm.
CHỨC NĂNG NẤU CHÁO LỎNG
• Nhấn phím < Cháo Lỏng > để chọn chức năng < Cháo Lỏng >. Màn
hình hiển thị thời gian nấu mặc định, đèn < Khởi Động > nhấp nháy.
• Nhấn phím < Cài Đặt Sẵn/Hẹn Giờ > để kích hoạt chức năng cài đặt
giờ và sau đó nhấn phím < giờ > và < phút > để thay đổi thời gian
cài đặt sẵn hoặc hẹn giờ.
• Nhấn phím < Khởi Động >. Nồi cơm chuyển sang trạng thái nấu
< Cháo Lỏng > với đèn của phím < Khởi Động > sáng lên và màn
hình hiển thị thời gian nấu còn lại.
• Khi nấu xong, chuông báo sẽ phát ra 5 tiếng “bíp”, nồi cơm sẽ
chuyển sang trạng thái giữ ấm với chỉ báo < Giữ Ấm > bật lên và
màn hình sẽ bắt đầu đếm thời gian giữ ấm.
CHỨC NĂNG NIÊU
• Nhấn phím < Trình Đơn > để chọn chức năng < Niêu >.
• Nhấn phím < Khởi Động >, nồi cơm sẽ chuyển sang trạng thái nấu
cơm < Niêu >, đèn của phím < Khởi Động > sáng lên, màn hình
nhấp nháy “ ”.
• Khi cơm đã sẵn sàng, chuông báo sẽ phát ra. Mở nắp, thêm thành
phần và nhấn phím < Khởi Động > để tiếp tục quy trình nấu.
• Khi nấu xong, chuông báo sẽ phát ra 5 tiếng “bíp”, nồi cơm sẽ
chuyển sang trạng thái giữ ấm với chỉ báo < Giữ Ấm > bật lên và
màn hình sẽ bắt đầu đếm thời gian giữ ấm.

69
VN
CHỨC NĂNG CHÁO ĐẶC
• Nhấn phím < Cháo Đặc > để chọn chức năng < Cháo Đặc >. Màn
hình hiển thị thời gian nấu mặc định, đèn < Khởi Động > nhấp nháy.
• Nhấn phím < Cài Đặt Sẵn/Hẹn Giờ > để kích hoạt chức năng cài đặt
giờ và sau đó nhấn phím < giờ > và < phút > để thay đổi thời gian
cài đặt sẵn hoặc hẹn giờ.
• Nhấn phím < Khởi Động >. Nồi cơm chuyển sang trạng thái nấu
< Cháo Đặc > với đèn của phím < Khởi Động > sáng lên và màn
hình hiển thị thời gian nấu còn lại.
• Khi nấu xong, chuông báo sẽ phát ra 5 tiếng “bíp”, nồi cơm sẽ
chuyển sang trạng thái giữ ấm với chỉ báo < Giữ Ấm > bật lên và
màn hình sẽ bắt đầu đếm thời gian giữ ấm.
CHỨC NĂNG SÚP
• Nhấn phím < Trình Đơn > để chọn chức năng < Súp >. Màn hình
hiển thị thời gian nấu mặc định, đèn < Khởi Động > nhấp nháy.
• Nhấn phím < Cài Đặt Sẵn/Hẹn Giờ > để kích hoạt chức năng cài đặt
giờ và sau đó nhấn phím < giờ > và < phút > để thay đổi thời gian
cài đặt sẵn hoặc hẹn giờ.
CHỨC NĂNG THỨC
ĂN EM BÉ
• Nhấn phím < Trình Đơn > để chọn chức năng < Thức Ăn Em Bé >.
Màn hình hiển thị thời gian nấu mặc định, đèn < Khởi Động > nhấp
nháy.
• Nhấn phím < Cài Đặt Sẵn/Hẹn Giờ > để kích hoạt chức năng cài đặt
giờ và sau đó nhấn phím < giờ > và < phút > để thay đổi thời gian
cài đặt sẵn hoặc hẹn giờ.
• Nhấn phím < Khởi Động >. Nồi cơm chuyển sang trạng thái nấu
< Thức Ăn Em Bé > với đèn của phím < Khởi Động > sáng lên và
màn hình hiển thị thời gian nấu còn lại.
• Khi nấu xong, chuông báo sẽ phát ra 5 tiếng “bíp”, nồi cơm sẽ
chuyển sang trạng thái giữ ấm với chỉ báo < Giữ Ấm > bật lên và
màn hình sẽ bắt đầu đếm thời gian giữ ấm

70
CHỨC NĂNG TRÁNG MIỆNG
• Nhấn phím < Trình Đơn > để chọn chức năng < Tráng Miệng >. Màn
hình hiển thị thời gian nấu mặc định, đèn < Khởi Động > nhấp nháy.
• Lưu ý rằng bạn có thể thay đổi thời gian nấu bằng cách nhấn phím
< Hẹn GIờ >. 40 phút cho bột trộn bánh và 2 giờ cho bột nổi.
• Nhấn phím < Khởi Động >. Nồi cơm chuyển sang trạng thái nấu
< Tráng Miệng > với đèn của phím < Khởi Động > sáng lên và màn
hình hiển thị thời gian nấu còn lại.
• Khi nấu xong, chuông báo sẽ phát ra 5 tiếng “bíp”, nồi cơm sẽ
chuyển sang trạng thái giữ ấm với chỉ báo < Giữ Ấm > bật lên và
màn hình sẽ bắt đầu đếm thời gian giữ ấm.
• Nhấn phím < Khởi Động >. Nồi cơm chuyển sang trạng thái nấu
< Súp > với đèn của phím < Khởi Động > sáng lên và màn hình hiển
thị thời gian nấu còn lại.
• Khi nấu xong, chuông báo sẽ phát ra 5 tiếng “bíp”, nồi cơm sẽ
chuyển sang trạng thái giữ ấm với chỉ báo < Giữ Ấm > bật lên và
màn hình sẽ bắt đầu đếm thời gian giữ ấm.
CHỨC NĂNG HẤP
• Nhấn phím <Trình Đơn > để chọn chức năng < Hấp >. Màn hình
hiển thị thời gian nấu mặc định, đèn < Khởi Động > nhấp nháy màu
đỏ.
• Nhấn phím < Cài Đặt Sẵn/Hẹn Giờ > để kích hoạt chức năng cài đặt
giờ và sau đó nhấn phím < giờ > và < phút > để thay đổi thời gian
cài đặt sẵn hoặc hẹn giờ.
• Nhấn phím < Khởi Động >. Nồi cơm chuyển sang trạng thái nấu
< Hấp > với đèn của phím < Khởi Động > sáng lên và màn hình hiển
thị thời gian nấu còn lại.
• Khi nấu xong, chuông báo sẽ phát ra 5 tiếng “bíp”, nồi cơm sẽ
chuyển sang trạng thái giữ ấm với chỉ báo < Giữ Ấm > bật lên và
màn hình sẽ bắt đầu đếm thời gian giữ ấm.
71
VN
CHỨC NĂNG HÂM LẠI
• Nhấn phím < Trình Đơn > để chọn chức năng < Hâm Lại >. Màn
hình hiển thị thời gian nấu mặc định, đèn < Khởi Động > nhấp nháy.
• Nhấn phím < Khởi Động >. Nồi cơm chuyển sang trạng thái nấu
< Hâm Lại > với đèn của phím < Khởi Động > sáng lên và màn hình
hiển thị “ ”.
• Khi nấu xong, chuông báo sẽ phát ra 5 tiếng “bíp”, nồi cơm sẽ
chuyển sang trạng thái giữ ấm với chỉ báo < Giữ Ấm > bật lên và
màn hình sẽ bắt đầu đếm thời gian giữ ấm.
• Nhấn phím < Giữ Ấm/Hủy > ở chế độ chờ, đèn của chỉ báo < Giữ
Ấm/Hủy > sáng lên, màn hình hiển thị “00:00” và màn hình sẽ bắt
đầu đếm thời gian giữ ấm.
• Nhấn phím < Giữ Ấm / Hủy > ở thiết lập chức năng hoặc trạng thái
nấu sẽ hủy mọi dữ liệu thiết lập và trở lại trạng thái chờ.
Khuyến cáo: để duy trì thức ăn có vị ngon, hãy giới hạn thời
gian nấu trong vòng 12 giờ.
PHÍM GIỮ ẤM / HỦY

72
Cài đặt sẵn:
• Thời gian cài đặt sẵn tương ứng với thời gian để kết thúc nấu ăn.
• Khả dụng đối với tất cả các chức năng nấu, trừ chức năng < Niêu >,
< Tráng Miệng > và < Hâm Lại >.
• Sau khi chọn chức năng nấu mong muốn, nhấn phím < Cài Đặt Sẵn
/ Hẹn Giờ > (chỉ báo cài đặt sẵn sẽ sáng), và sau đó sử dụng phím
< Giờ > và < Phút > để điều chỉnh giờ.
• Khi bạn đã chọn giờ cài đặt sẵn cần thiết, nhấn phím < Khởi Động >
để chuyển sang trạng thái nấu, đèn chỉ báo < Khởi Động > sẽ sáng
lên và màn hình sẽ hiển thị con số thời gian bạn đã chọn và chỉ báo
< Cài Đặt Sẵn > sẽ sáng lên.
• Thời gian cài đặt sẵn tối đa là 24 giờ.
• Nếu thời gian cài đặt sẵn ngắn hơn thời gian nấu, quá trình nấu sẽ
bắt đầu ngay lập tức.
Đồng hồ hẹn giờ:
• Bạn có thể cài đặt thời gian nấu cho chức năng < Thức Ăn Trẻ
Em >, < Súp >, < Tráng Miệng >, < Hấp >, < Cháo Đặc > và < Cháo
Lỏng >.
• Khi bạn chọn một chức năng nấu, thời gian nấu mặc định sẽ được
hiển thị trên màn hình hiển thị kỹ thuật số, nhấn phím < Cài Đặt Sẵn
/ Hẹn Giờ > (chỉ báo hẹn giờ sẽ bật), và sau đó sử dụng phím < Giờ
> và < Phút > để điều chỉnh giờ.
• Khi bạn đã chọn giờ cài đặt sẵn cần thiết, nhấn phím < Khởi Động >
để chuyển sang trạng thái nấu, đèn chỉ báo < Khởi Động > sẽ sáng
lên và màn hình sẽ hiển thị con số thời gian bạn đã chọn và chỉ báo
< Hẹn Giờ > sẽ sáng lên.
CHỨC NĂNG CÀI ĐẶT SẴN / HẸN GIỜ
• Mở nắp – Hình 1.
• Phải đeo găng tay khi xử lý nồi cơm và xửng hấp – Hình 11.
• Phục vụ thức ăn bằng thìa bán kèm thiết bị và đóng lại nắp.
• Thời gian giữ ấm tối đa là 24 giờ.
• Nhấn < Giữ Ấm / Hủy > để dừng trạng thái giữ ấm.
• Rút phích cắm của thiết bị.
KHI NẤU XONG

73
VN
• Để đảm bảo nồi cơm đã được rút phích cắm và nguội hẳn trước khi
vệ sinh và bảo dưỡng.
• Bạn nên vệ sinh thiết bị sau mỗi lần sử dụng bằng một miếng xốp
– Hình 12.
• Nồi, gáo, vá múc cơm và thìa súp có thể rửa bằng máy rửa chén
- Hình 13.
Nồi, xửng hấp
• Không nên dùng bột tẩy và miếng bùi nhùi bằng kim loại.
• Nếu thức ăn bám vào đáy, bạn có thể rót nước vào nồi để ngâm
một lúc trước khi rửa.
• Lau khô nồi một cách cẩn thận.
Chăm sóc nồi.
Với nồi, hãy thực hiện cẩn thận theo các hướng dẫn bên dưới:
• Để đảm bảo duy trì chất lượng nồi, bạn không nên cắt thức ăn trong
nồi.
• Đảm bảo bạn đặt nồi trở lại nồi cơm.
• Sử dụng thìa nhựa bán kèm hoặc thìa gỗ và không dùng thìa kim
loại để tránh làm hỏng bề mặt nồi – Hình 14.
• Để tránh nguy cơ mài mòn, không được rót giấm vào nồi.
• Màu của bề mặt nồi có thể thay đổi sau khi sử dụng lần đầu hoặc
sau khi sử dụng trong thời gian dài hơn. Sự đổi màu này là do tác
động của hơi nước và nước và không ảnh hưởng gì đến việc sử
dụng nồi cơm, cũng không gây nguy hiểm cho sức khỏe của bạn.
Có thể tiếp tục sử dụng thiết bị một cách hoàn toàn an toàn.
Vệ sinh van áp suất micro
• Khi vệ sinh van áp suất micro, hãy tháo nó ra khỏi nắp – Hình 3b.
Sau khi vệ sinh – Hình 16, hãy lau khô sau đó đặt trở lại nắp của
nồi cơm – Hình 17
Vệ sinh nắp trong
• Tháo nắp trong. Vệ sinh bằng một miếng xốp và nước rửa chén
- Hình 16. Sau đó, lau khô và đặt nó phía sau gọng và đẩy nó lên
đỉnh cho đến khi cố định.
VỆ SINH VÀ BO DƯỠNG
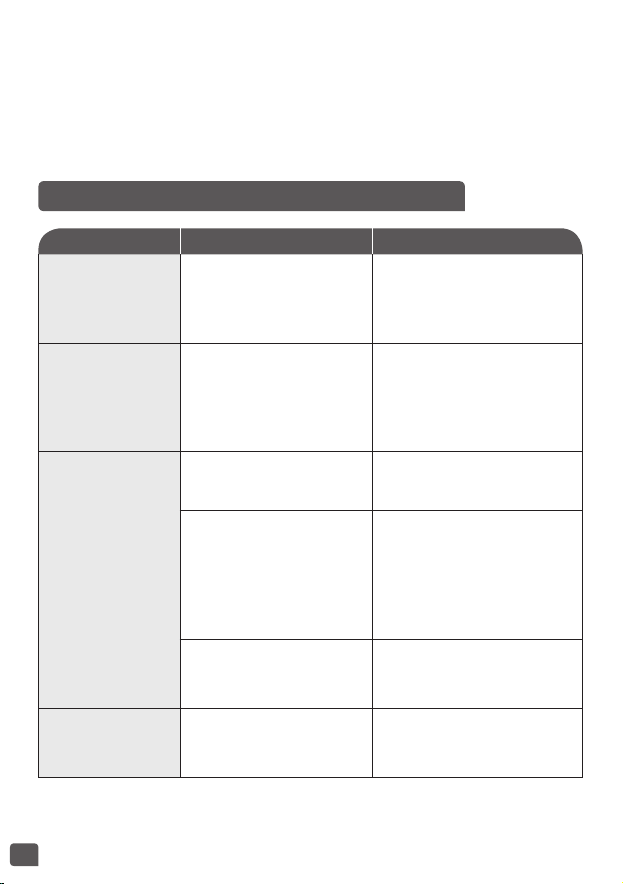
74
Mô tả sự cố Nguyên nhân Giải pháp
Bất kỳ chỉ
báo nào tắt
và không gia
nhiệt.
Chưa cắm điện cho
thiết bị.
Kiểm tra dây nguồn
xem đã cắm vào ổ cắm
và đã kết nối với lưới
điện chưa.
Bất kỳ chỉ báo
nào tắt và có
gia nhiệt.
Vấn đề với kết nối
của đèn chỉ báo hoặc
đèn chỉ báo bị hỏng.
Gửi đến trung tâm bảo
trì ủy quyền để sửa
chữa.
Rò rỉ hơi nước
trong quá trình
sử dụng
Nắp đóng không chặt. Mở và đóng lại nắp.
Van áp suất micro
không nằm đúng vị
trí hoặc không hoàn
chỉnh.
Dừng nấu (rút phích
cắm của sản phẩm) và
kiểm tra van xem có
hoàn chỉnh không (2
phần khóa vào nhau) và
nằm đúng vị trí không.
Nắm hoặc vòng đệm
van áp suất micro bị
hỏng.
Gửi đến trung tâm bảo
trì ủy quyền để sửa
chữa.
Cơm bị sượng
hoặc nấu quá
lâu.
Quá nhiều hoặc quá
ít so với lượng gạo.
Tham khảo bảng để
biết lượng gạo.
HƯỚNG DẪN XỬ LÝ SỰ CỐ KỸ THUẬT
Vệ sinh và chăm sóc các bộ phận khác của thiết bị
• Vệ sinh bên ngoài nồi cơm – Hình 18, bên trong nắp và dây điện
bằng một tấm vải ẩm và lau khô. Không được sử dụng các sản
phẩm mài mòn.
• Không được sử dụng nước để vệ sinh bên trong thân thiết bị vì nó
có thể làm hỏng cảm biến nhiệt.

75
VN
Mô tả sự cố Nguyên nhân Giải pháp
Không tự động
giữ ấm (sản
phẩm ở vị
trí nấu, hoặc
không gia
nhiệt).
Gửi đến trung tâm bảo trì
ủy quyền để sửa chữa.
E0
Cảm biến trên mạch
mở trên cùng hoặc
bị đoản mạch.
Gửi đến trung tâm bảo trì
ủy quyền để sửa chữa.
E1
Cảm biến trên mạch
mở dưới cùng hoặc
bị đoản mạch.
E5 Không phát hiện nồi
Nhận xét: Nếu nồi trong bị biến dạng, không được sử dụng nữa
và yêu cầu bộ phận thay thế từ trung tâm bảo trì ủy quyền để
sửa.

76
TEFAL/T-FAL* INTERNATIONAL LIMITED GUARANTEE
: www.tefal.com
Sản phẩm này được TEFAL/T-FAL sửa chữa trong và sau thời gian bảo hành.
Có thể mua các phụ kiện, hàng tiêu dùng và vật tư có thể thay thế nếu có sẵn tại các quốc gia như mô tả trên trang web của
TEFAL/T-FAL www.tefal.com
Bảo hành :
TEFAL/T-FAL đảm bảo sản phẩm này không có bất kỳ khuyết điểm sản xuất hoặc tay nghề trong thời gian bảo hành tại các quốc gia
*** như đã nêu trong danh sách quốc gia ở trang cuối của hướng dẫn sử dụng, bắt đầu từ ngày đầu tiên mua hàng hoặc từ ngày
nhận hàng.
Việc bảo hành của các nhà sản xuất quốc tế bao gồm tất cả chi phí liên quan đến việc sửa lại sản phẩm được chứng minh lỗi để phù
hợp với thông số kỹ thuật ban đầu, qua việc sửa chữa hoặc thay thế bất kỳ phần nào khiếm khuyết và công việc cần thiết. TEFAL/T-
FAL có thể thay thế sản phẩm tương đương hay cao hơn thay vì sửa chữa sản phẩm. Dưới chế độ bảo hành này, TEFAL/T-FAL sẽ giới
hạn sửa chữa hoặc thay thế sản phẩm mới của khách hàng.
Điều kiện bảo hành & Ngoại trừ
TEFAL/T-FAL sẽ không có nghĩa vụ sửa chữa hoặc thay thế bất kỳ sản phẩm mà không kèm theo chứng minh mua hợp lệ. Sản phẩm
có thể được trực tiếp mang theo người hoặc phải được đóng gói đúng và gửi trả về, xác nhận báo phát (hoặc hình thức tương
đương của bưu chính), cho trung tâm dịch vụ ủy quyền của TEFAL/T-FAL. Chi tiết địa chỉ của các trung tâm dịch vụ ủy quyền ở từng
quốc gia được liệt kê trên trang web của TEFAL/T- FAL hoặc điện thoại đến trung tâm dịch vụ khách hàng theo Danh mục Quốc gia
đính kèm.
Để cung cấp dịch vụ hậu mãi tốt nhất và không ngừng nâng cao sự hài lòng của khách hàng, TEFAL / T-FAL * có thể sẽ khảo sát sự
hài lòng của khách hàng đã sử dụng dịch vụ hậu mãi của các trung tâm dịch vụ ủy quyền TEFAL / T-FAL *.
Bảo hành này chỉ áp dụng cho các sản phẩm đã mua và sử dụng cho mục đích gia dụng và sẽ không bao gồm bất kỳ thiệt hại nào
có thể xảy ra do kết quả của việc sử dụng sai, bất cẩn, không thao tác theo hướng dẫn của TEFAL/T-FAL, hoặc sửa đổi trái phép hoặc
sửa chữa sản phẩm, bao bì bị lỗi do chủ sở hữu hoặc do hãng vận chuyển xử lý sai. Không bao gồm hao mòn thông thường, bảo
dưỡng hoặc thay thế các bộ phận tiêu thụ, hoặc như sau:
– Sử dụng nguồn nước không phù hợp hoặc tiêu hao
– Cặn bẩn (bất kỳ cặn bẩn phải được thực hiện theo hướng dẫn sử dụng)
– Thiệt hại đến bất kỳ bộ phận thủy tinh hoặc sứ
– Thiệt hại về cơ học, quá tải điện áp.
– Tai nạn bao gồm hỏa hoạn, lũ lụt, sét đánh.v.v
– Sử dụng chuyên dụng hoặc thương mại
– Thiệt hại hoặc kết quả xấu đặc biệt do điện áp sai hoặc tần số sai so với nhãn ghi trên mã nhận diện sản phẩm hoặc đặc tính kỹ
thuật.
– Nước, bụi bẩn và côn trùng xâm nhập vào bên trong sản phẩm (trừ các thiết bị có các tính năng được thiết kế đặc biệt cho côn
trùng)
Quyền lợi hợp pháp của người tiêu dùng
Bảo hành sản phẩm TEFAL/T-FAL quốc tế không ảnh hưởng đến quyền lợi pháp định, người tiêu dùng có thể có những quyền
không thể loại trừ hoặc hạn chế, có quyền khiếu nại nhà bán lẻ nơi người tiêu dùng mua sản phẩm. Bảo hành này cho người tiêu
dùng quyền lợi hợp pháp riêng biệt, và người tiêu dùng cũng có thể có quyền hợp pháp khác biệt từ Bang này đến Bang khác hoặc
Quốc Gia này đến Quốc gia khác. Người tiêu dùng có thể đòi quyền lợi đó dựa trên quyết định của mình.
* Thiết bị gia dụng TEFAL xuất hiện dưới thương hiệu T-FAL ở một số vùng lãnh thổ như Mỹ và Nhật Bản. TEFAL / T-FAL là thương
hiệu đã đăng ký của Groupe SEB.
*** Trong trường hợp sản phẩm được mua ở một quốc gia được liệt kê trong danh sách và sau đó được sử dụng tại một quốc gia
khác được liệt kê, thì thời hạn bảo hành của TEFAL/T-FAL quốc tế căn cứ vào thời hạn quy định tại quốc gia khách hàng sử dụng
sản phẩm, ngay cả khi sản phẩm đã được mua tại một quốc gia được liệt kê trong danh sách với thời hạn bảo hành khác nhau. Quy
trình sửa chữa có thể sẽ lâu hơn nếu sản phẩm không được TEFAL/T-FAL bán tại quốc gia đó. Nếu sản phẩm không thể sửa chữa tại
quốc gia mới, thì TEFAL/T-FAL quốc tế sẽ hạn chế việc thay thế sản phẩm bằng một sản phẩm tương tự hoặc thay thế bằng một sản
phẩm có chi phí tương đương, nếu có thể.
Hãy giữ tài liệu này để tham khảo và xuất trình khi bạn có yêu cầu bảo hành sản phẩm

EN p. 4 – 21
p. 22 – 37
p. 38 – 57
p. 58 – 76
9100027647 - 02
EN
ZH
MS
VN