Loading ...
Loading ...
Loading ...
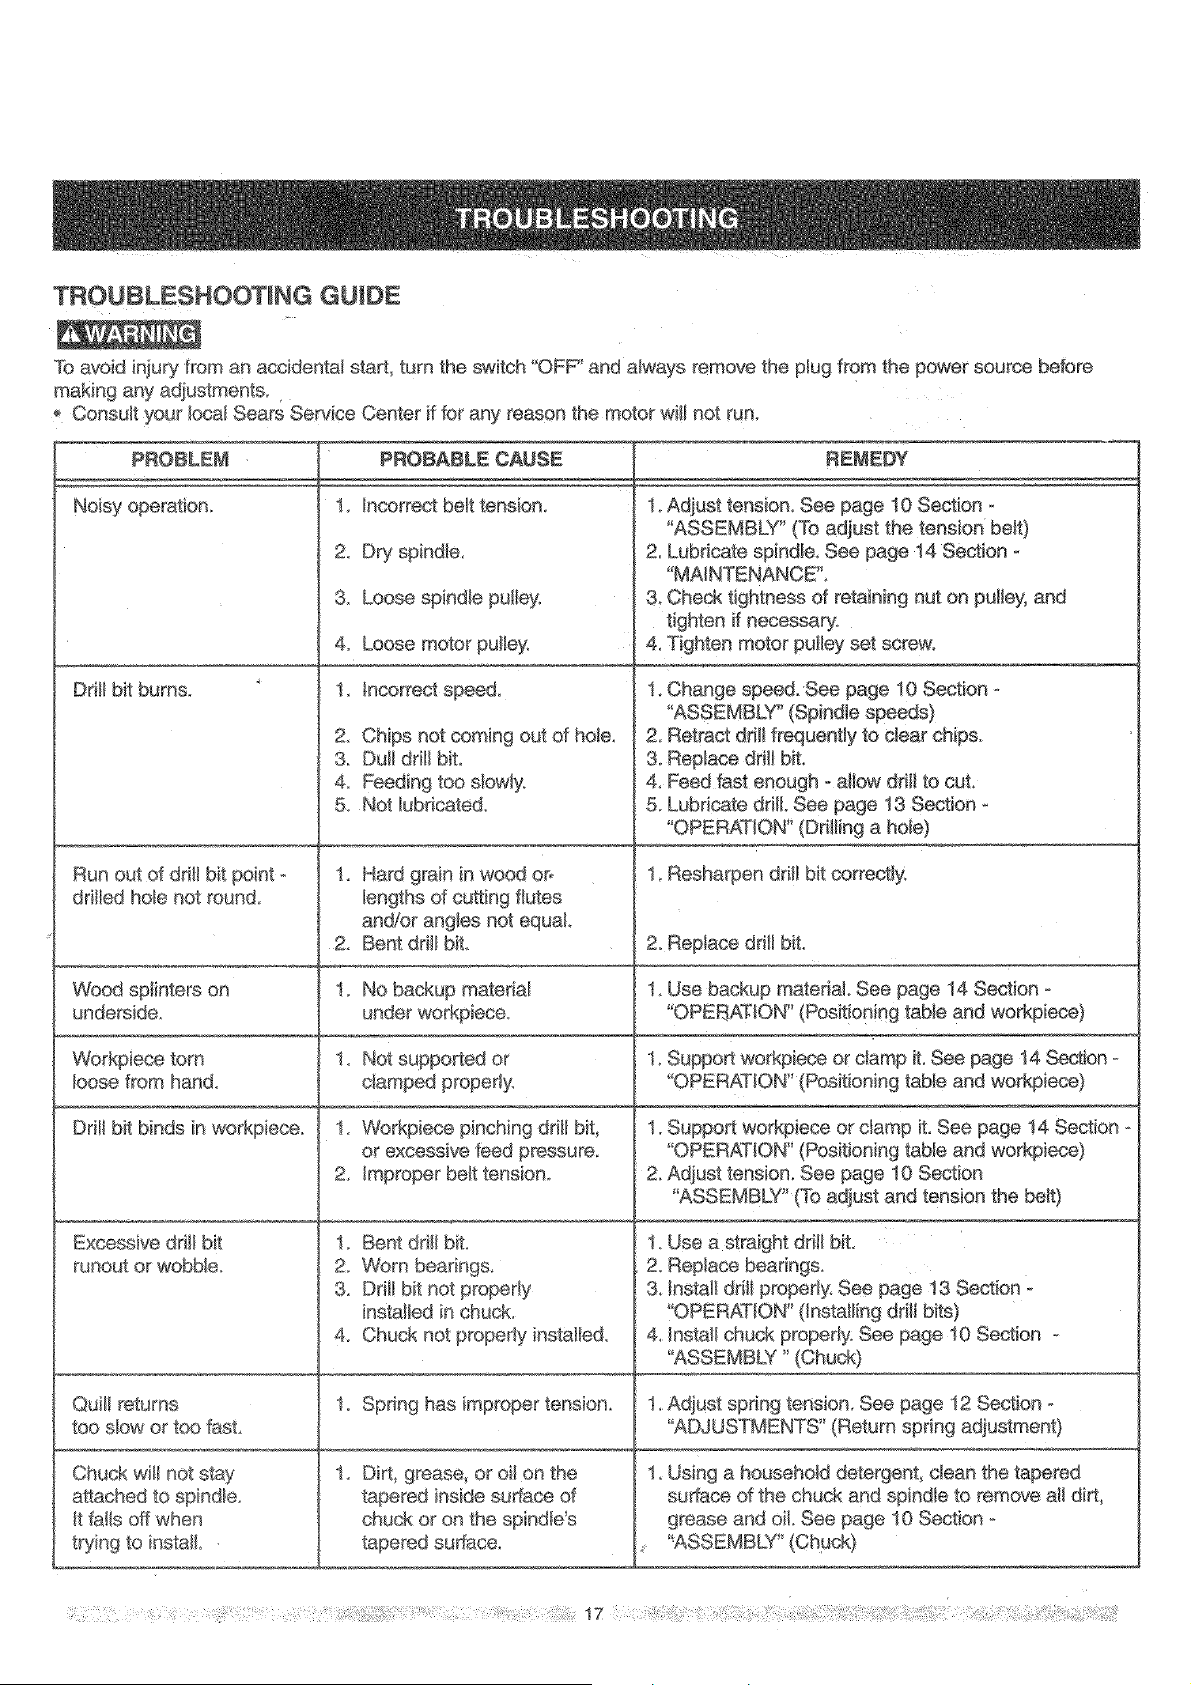
TROUBLESHOOT# G GUIDE
To avoid injury from an a_idental staA, turn the switch "OFF' and a_ways remove the ptug from the power source before
making any ad}ustment&
ConsuJt your bcal Sears Service Center if for any reason the motor wil_not run_
DdH bit burns.
PROBLEM
dritbd hob not round
Wo_ sp_inters on
underside,
/_se from hand.
Drill bit bfnds in workpiece
Excessive ddH bit
runout or wobble
Quill returns
too s_owor too fasL
REMEDY
Chuck will not stay
a_ached to spindle
It falb off when
tq/ing to install..
PROBABLE CAUSE
t_ hc_rrect be_ttension.
2 Dry spindle,
& Loose spindJe puJtey.
4o Loose motor pu_Jey.
1. hcorrect speed.
2. Chips not coming out d ho{e,
3. Dull driil bit.
4. Feeding too slowJy.
5. Not _ubdcated,
Hard grain in wood oro
lengths d cu_ing flutes
2. Bent ddll b_[
1. No backup material
t, Not supported or
I. Workpiece pinching drill bit,
or excessive feed pressure,
2_ _mproper belt tension,
1_ Bent drill bit.
2. Worn bearing&
3. Drill bit not property
installed in chuck.
4. Chuck not propedy insta_bd.
t. Spring has improper tension
Dirt_ grease, or oil on the
tapered inside sudace d
chuck or on the spindWs
tapered sudace,
I Adjust tension. See page I0 Section -
"ASSEMBLY" (To adjust the tension bett)
2, Lubricate spindle, See page 14 Section -
"MA_NTBNANCE'L
3, Check tightness d retaining nut on pulley, and
tighten if necessaK>_
4. Tighten motor pulley set screw,
1_Change speed.See page 10 Section
"ASSEMBLY" (Spindle speeds)
2, Retract drift frequently to c_earchips.
3, Replace drill bit.
4, Feed fast enough oalbw dfilJ to cut,
5_Lubricate dritL See page 13 Section
"OPERATION '_(Drilling a hole)
1, Resharpen drill bit correctly.
2. Replace drill bk,
t, Use backup matedaL See page 14 Section
"OP£BATION" (Posit!oning table and workpiece)
1. Suppo£ workpiece or clamp it. See page 14 S_tion
"OPERATION" (Positioning table and workpiece)
1. Support workpiece or damp it. See page 14 Section -
'gPERATION" (Positioning table and workpiece)
2, Adjust tension. See page 10 Section
_ASSEMBL¥" (Tb adjust and tension the belt)
1. Use a straight ddtl bR,
2. Replace bearing&
& hsta_t drill proper_y, See page 18 Section -
"OPERATION" (installing drill bits)
4, Ins_l chuck proper_y.See page 10 Section -
I, Adjust spring tension_ See page 12 Section -
_%DJUSTMENTS" (Return spring adjustment)
1_Using a household detergent, clean the tapered
surface d the chuck and spindb to remove all dirt,
grease and oil See page 10 Section
Loading ...
Loading ...
Loading ...