Loading ...
Loading ...
Loading ...
24
Operation & Installation Manual
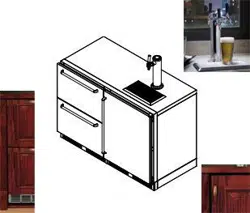
Signature Series Beer Dispensers (HP15, HP24 and HP48 models)
Handle Installation
CAUTION
Handle mounting on wood overlay door should be mounted on
overlay panel only (not the door) to avoid damage to the factory
door.
1. Handle must be attached to overlay before mounting overlay
onto door. Mark rear of wood overlay planel with handle
fastening locations.
2. Drill through wood overlay panel at marked locations taking
care not to damage the wood overlay panel.
3. Countersink screw heads so screw heads are ush with back-
side of panel. Attach handle to overlay panel.
CAUTION
Proper wood working materials and equipment should be used
to avoid damage or errors in workmanship.
1. With the unit secured in position, open the door and make
sure panel’s pre-drilled holes align with door frame holes.
2. Loosely attach four corners of the overlay panel to the door
using #10 x 1” wood screws, installed through the door frame
from the rear.
3. Check for overall wood overlay panel t, position and func-
tion. Make minor adjustments as necessary. When panel is
properly aligned, tighten mounting screws securely. Install
the rest of the mounting screws and tighten securely.
CAUTION
Do not over-tighten wood overlay attachment screws as this
may damage the factory supplied door frame.
Wood Overlay Panel Installation
Scan the QR code to the right with
your smart phone to watch a How-To
video on how to install Wood Overlay
panels onto Perlick doors, otherwise,
follow the instructions below.
OPERATION
General
The unit is equipped with a state-of-the-art refrigeration system.
The variable speed compressor automatically changes speed
based on system conditions and load. The cabinet is equipped with
an adjustable digital temperature controller and LED display.
Freezer units are frost-free models, meaning the evaporator coil
automatically defrosts on demand at predetermined intervals.
The controller also has a manual defrost soft button on the
front panel signied by a melting snowake. If depressed it will
automatically put the system into a defrost cycle.
Interior Light
The unit is equipped with an interior light that illuminates when
the door is open. The cabinet also comes standard with a manual
light switch located next to the light for displaying your products
through a glass door.
Always ensure that the manual switch is in the o position before
closing a solid wood or stainless door. If manual light switch is
left on for an extended period of time it may increase the cabinet
temperature, especially at the top and cause the refrigeration
system to run longer.
Loading Product
IMPORTANT NOTE: Before storing perishables, allow unit to run
for a minimum of 24 hours to allow temperature stabilization after
start-up.
When loading items into the unit, do not block internal louvers and
fan guard openings or performance will be decreased.
LIGHT BULB REPLACEMENT
To replace a defective or burnt out light bulb, unscrew the bulb
counterclockwise and replace with an identical 15-watt bulb or
smaller (Perlick replacement bulb number 67026).
Loading ...
Loading ...
Loading ...