Register
your product
www.kaercher.com/welcome
86450400-A 05/09/22
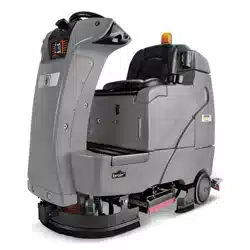
KIRA B100 R
English 02
2 8.645-040.0 Operator Manual KIRA B100 R
Machine Data Label / Overview
Overview
The KIRA B100 R is a battery powered, stand-on, hard floor scrubber intended for commercial use. The appliance applies a
cleaning solution onto a hard floor, scrubs the floor with brushes or pads, and then vacuums the soiled water back into the
recovery tank. The machine is a commercial floor scrubber capable of manual and autonomous (self-driving) mode
operation.Attributions
BrainOS is the name of the Brain Corporation artificial intelligence (AI) and autonomous navigation software that powers the
autonomous operating capabilities of the machine. Use of autonomous operation requires a subscription to Brain Corporation
Autonomy Services.
Warranty Registration
Thank you for purchasing a Kärcher North America product. Warranty registration is quick
and easy. Your registration will allow us to serve you better over the lifetime of the product.
To register your product go to :
http://warranty.karcherna.com
For customer assistance:
1-800-444-7654
Model: 1.006-720.0 KIRA B100 R

3
Table of Contents
Machine Data Label / Overview . . . . . . . . . . . . . . . .2
Table of Contents . . . . . . . . . . . . . . . . . . . . . . . . . . .3
How To Use This Manual . . . . . . . . . . . . . . . . . . . . . 4
Safety
Safety Precautions . . . . . . . . . . . . . . . . . . . . . . . . . . 5
IMPORTANT SAFETY INSTRUCTIONS . . . . . . . . . 6
HAZARD INTENSITY LEVEL . . . . . . . . . . . . . . . . . .9
Operations
Machine Components . . . . . . . . . . . . . . . . . . . . . . . 10
Machine Components 2 . . . . . . . . . . . . . . . . . . . . .11
Machine Components 3 . . . . . . . . . . . . . . . . . . . . .12
Control Panel . . . . . . . . . . . . . . . . . . . . . . . . . . . . . 13
Machine Set Up & Installation . . . . . . . . . . . . . . . .14
Uncrating Machine . . . . . . . . . . . . . . . . . . . . . . . . . 14
Machine Set Up . . . . . . . . . . . . . . . . . . . . . . . . . . .14
Installing Brushes Or Pads . . . . . . . . . . . . . . . . . . . 14
Mounting The Squeegee Assembly . . . . . . . . . . . .15
Filling The Solution Tank . . . . . . . . . . . . . . . . . . . . 15
Filling The Detergent Bottle . . . . . . . . . . . . . . . . . .15
Machine Operation . . . . . . . . . . . . . . . . . . . . . . . . . 15
Pre-operation Check . . . . . . . . . . . . . . . . . . . . . . . . 15
Operating The Machine . . . . . . . . . . . . . . . . . . . . .15
Brake Device. . . . . . . . . . . . . . . . . . . . . . . . . . . . . .16
Emergency Stop Button . . . . . . . . . . . . . . . . . . . . . 16
While Operating The Machine . . . . . . . . . . . . . . . .16
Electric Parking Brake Engagement . . . . . . . . . . . . 17
Emergency Stop/Brake Switch . . . . . . . . . . . . . . . .17
Tank Draining. . . . . . . . . . . . . . . . . . . . . . . . . . . . . . 18
Draining The Recovery Tank . . . . . . . . . . . . . . . . . 18
Draining The Solution Tank . . . . . . . . . . . . . . . . . . 18
Battery Charging . . . . . . . . . . . . . . . . . . . . . . . . . . . 18
External Charger. . . . . . . . . . . . . . . . . . . . . . . . . . .18
Maintenance
Preventative Maintenance . . . . . . . . . . . . . . . . . . . 19
Daily Maintenance . . . . . . . . . . . . . . . . . . . . . . . . . 19
Monthly Maintenance . . . . . . . . . . . . . . . . . . . . . . . 19
Motor Maintenance . . . . . . . . . . . . . . . . . . . . . . . . . 19
Battery Maintenance . . . . . . . . . . . . . . . . . . . . . . . . 19
Machine Storage. . . . . . . . . . . . . . . . . . . . . . . . . . .19
Technical Specifications . . . . . . . . . . . . . . . . . . . . .20
8.645-040.0 Operator Manual KIRA B100 R
4
How To Use This Manual
This manual contains the following sections:
• How to Use This Manual
•Safety
• Operations
• Maintenance
• Suggested Spare Parts
The HOW TO USE THIS MANUAL section will tell you
how to find important information for ordering correct
repair parts.
Parts may be ordered from authorized dealers. When
placing an order for parts, the machine model and
machine serial number are important. Refer to the
MACHINE DATA box which is filled out during the
installation of your machine. The MACHINE DATA box
is located on the inside of the front cover of this manual.
The model and serial number of your machine are
located on the back of the machine.
The SAFETY section contains important information
regarding hazardous or unsafe practices of the
machine. Levels of hazards are identified that could
result in product damage, personal injury, or severe
injury resulting in death.
The OPERATIONS section is to familiarize the operator
with the operation and function of the machine.
The MAINTENANCE section contains preventive
maintenance to keep the machine and its components
in good working condition. They are listed in this
general order:
• Daily Maintenance
• Monthly Maintenance
• Motor Maintenance
• Battery Maintenance
• Machine Storage
• Fault Codes & Solutions
NOTE: The manual part number is located on the
lower right corner of the front cover.
PROTECT THE ENVIRONMENT
Please dispose of packaging materials,
old machine components, such as
batteries, hazardous fluids, including
anti-freeze and oil, in an
environmentally safe way according to
local waste disposal regulations.
Always remember to recycle.
Model:
Date of Purchase:
Serial Number:
Dealer:
Address:
Phone Number:
Sales Representative:
8.645-040.0 Operator Manual KIRA B100 R
5
Safety
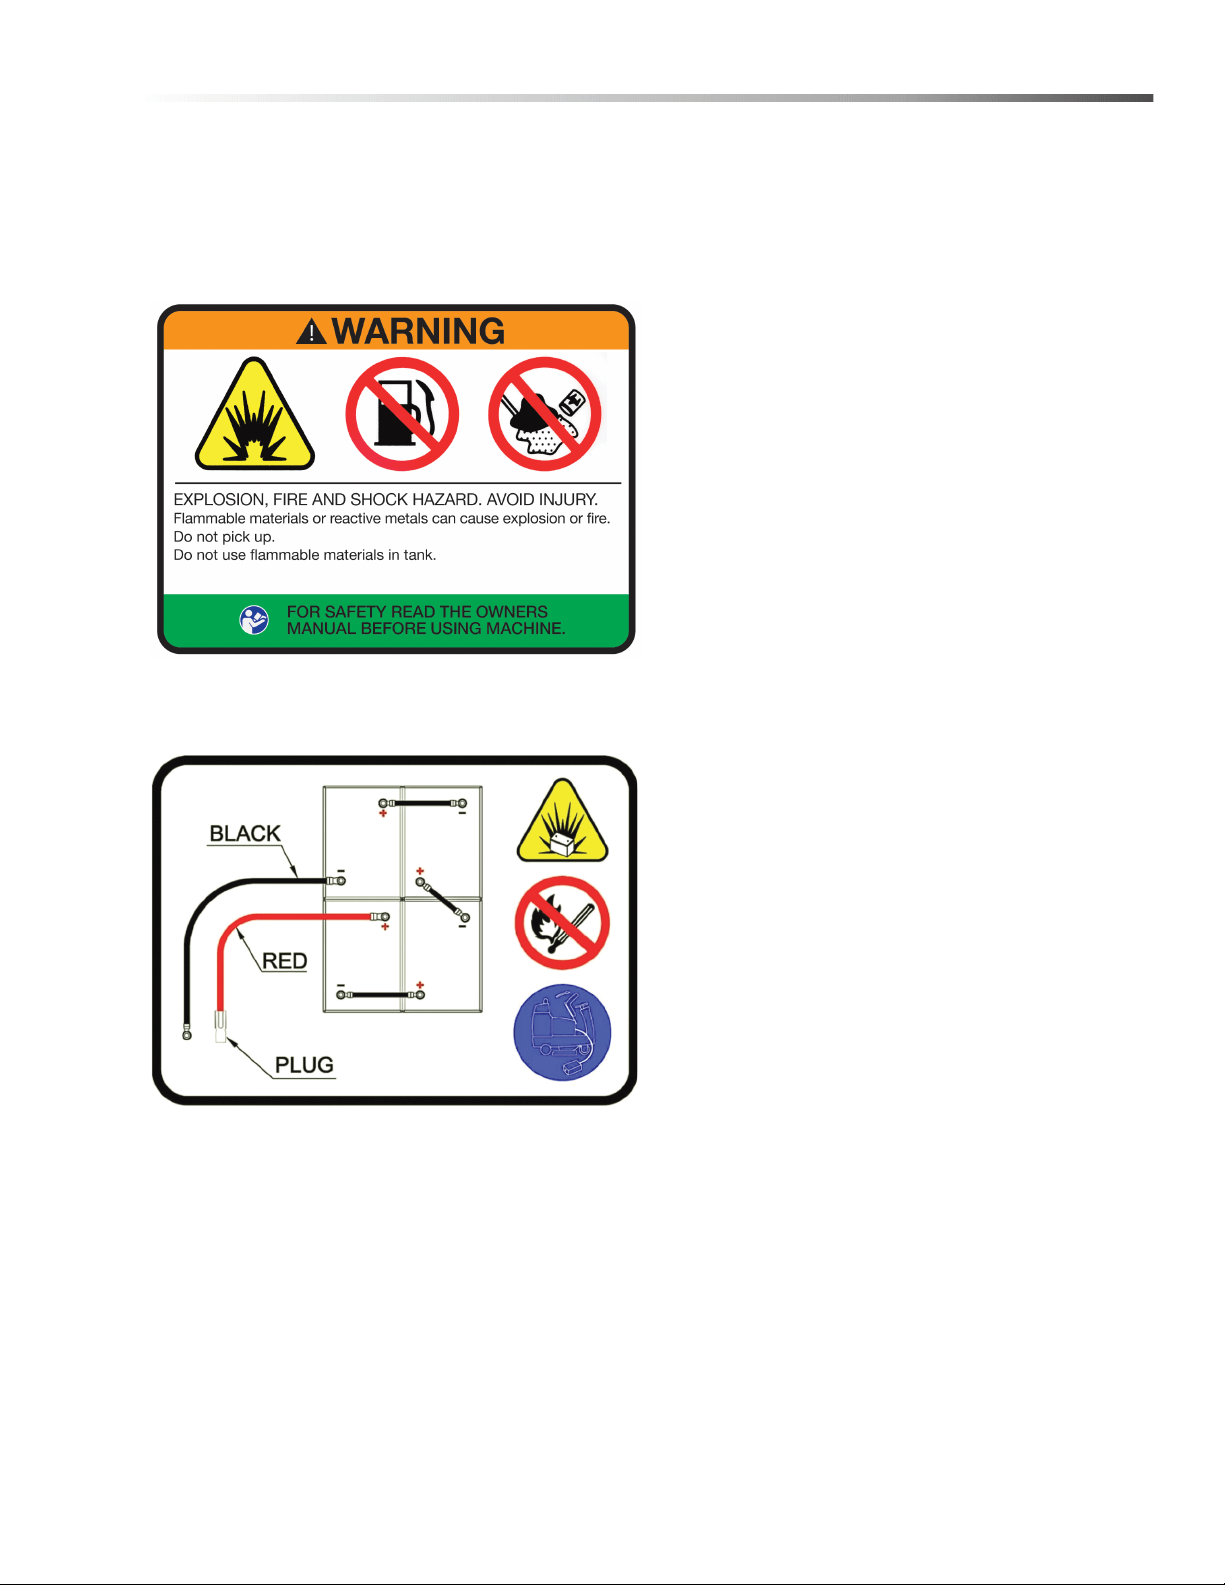
Safety Precautions
• Batteries emit flammable hydrogen gas.
• Explosion or fire can result.
• Keep sparks and open flame away.
If at any time the labels become illegible, promptly replace them.
Figure 1: Explosion, fire, and shock hazard label, located in front of the operator seat
Figure 2: Battery safety label, located under the operator seat

6
Safety
IMPORTANT SAFETY INSTRUCTIONS
When using this machine, basic precaution
must always be followed, including the following:
READ ALL INSTRUCTIONS BEFORE USING THIS MACHINE.
To reduce the risk of fire, electric shock, or injury:
GENERAL SAFETY
Operators must be thoroughly trained on the use of the machine.
Operators must read and understand this document before operating or maintaining the machine.
Train all personnel who are assigned to operate the machine. The machine is not intended for users with reduced
physical, sensory, or mental capabilities, nor use by untrained operators.
Report any damage or faulty operation immediately. Do not use the machine if it is damaged in any way.
Avoid moving parts.
Do not allow children to play on or with the machine.
Do not use the machine in a manner other than what is described in this document.
Do not clean the machine with a pressure washer.
Only plug the external charger into an outlet with an appropriate electrical rating: 100 to 240 VAC, 50/60 Hz, 8 A. In
North America, the standard grounded outlet emits 120 VAC, which is the designated electrical rating.
Because arcing could result, do not disconnect the off-board charger DC cord from the machine charging recep-
tacle when the charger is operating. If battery charging must be interrupted, disconnect the battery charger AC
power supply cord first.
Do not pull on the battery charger cord to unplug. Grasp the plug at the outlet and pull.
Only use approved batteries and chargers. Use of unapproved parts could impair safety and potentially damage the
machine or cause a fire.
ENVIRONMENTAL SAFETY
The machine is not designed or intended for use in environments requiring fail-safe performance, including but not
limited to any application in which failure of the machine could lead directly to death, personal injury, or severe
physical or property damage.
Do not use on soil, grass, artificial turf, or carpeted surfaces.
Indoor use only.
Do not use on public paths or roads.
Only use the machine to clean flat, hard surfaces with little to no inclines (up to 2% incline when operating in manual
operation; 0% incline when operating in autonomous operation).
All drops, stairs, escalators, moving platforms, or cliffs near the machine must be guarded by a physical barrier
when operating in autonomous operation.
Do not use temporary elevated platforms—such as ladders or scaffolds—near the machine during operation.
Do not leave electrical cords or low-profile items—such as items with a height of less than 7 in (18 cm) from the
ground—in the machine area of operation.
The operating and storage temperature is 35°F to 100°F (2°C to 38°C).
8.645-040.0 Operator Manual KIRA B100 R

7
Safety
Store indoors in a dry environment.
Park and store the machine on a level surface.
Some objects could be difficult for the machine to detect, such as reflective black surfaces, other highly polished or
reflective surfaces, or plexiglass. Avoid cleaning in autonomous operation in areas where these objects are
present.
Avoid using the machine in proximity to other products that are sensitive to electromagnetic noise.
Do not use in low-traction environments where ice or oil are present.
Avoid use in environments where stopping could result in a safety risk, such as blocking an emergency exit or
access to medical equipment.
Avoid use in environments with inconsistent (excessively bumpy) terrain texture or many floor transitions.
Dispose of packaging materials, used batteries, and fluids in an environmentally safe way according to local waste
disposal regulations. Remember to recycle.
OPERATIONAL SAFETY
Keep hands and feet clear of moving parts while the machine is in operation.
Locate and make sure all safety devices—such as the operator seat sensor, yellow safety straps, and Emergency
Stop buttons—are in place and fully functional.
All doors and covers must be positioned as indicated in this document before using the machine.
Keep all third parties—especially children and animals—at least 3 ft (0.9 m) away from the machine during opera-
tion.
The operator is responsible for supervising and monitoring safe operation of the machine.
Do not ride the machine when it is operating in autonomous operation.
Do not attempt to hold the steering wheel when operating in autonomous operation. It could move rapidly and unex-
pectedly and cause injury.
The wheels and tires must remain in contact with the floor at all times. Avoid abrupt maneuvers while operating the
machine in manual mode.
Do not operate the machine near flammable materials, such as solvents, thinners, fuels, grain dust, and so on.
Electric motors and components can cause an explosion when operated near explosive materials or vapors.
Do not use the machine to pick up hazardous substances.
Do not leave the machine unattended without turning the ignition key off and removing the key. When operating the
machine in autonomous operation, remove the ignition key to prevent unauthorized use.
Prevent unauthorized use of the machine by storing it with the ignition key removed.
Do not charge batteries when open flames or sparks are present. Do not smoke.
If the battery charger or power supply cord is damaged, replace it. Do not use damaged parts.
MAINTENANCE AND SERVICE SAFETY
Repairs and specified maintenance tasks must only be performed by authorized personnel.
Only use approved replacement parts. Use of unapproved parts could impair safety and potentially damage the
machine.
Read all instructions before performing any service or maintenance functions.
8.645-040.0 Operator Manual KIRA B100 R

8
Safety
Take precautions to prevent hair, jewelry, or loose clothing from becoming caught in moving parts.
Only work on the machine when it is parked on a level surface and appropriately stabilized with safety blocks or
support stands, if necessary.
Do not lay tools or metal objects on top of the batteries.
SCRUBBER SAFETY
Place wet floor signs in areas where the machine is operating. See the Autonomy Services Agreement and the End
User License Agreement (EULA) for further uses and restrictions.
Use caution when moving the machine in or out of areas below freezing temperatures. Frozen water in the tanks or
hoses could damage the machine.
Use the correct personal protective equipment—as recommended by the cleaning chemical safety data sheet—
when adding cleaning chemicals or draining fluids.
Observe the legal directives and local regulations for disposal of cleaning chemicals or detergents.
In the event of accidental contact or spill of cleaning chemicals or detergents, follow the guidelines provided by the
manufacturer.
Only use brushes or pads provided with the machine or those specified by Brain Corporation or ICE. Use of unau-
thorized brushes or pads could impair safety and potentially damage the machine.
•Do not use flammable cleaning agents.
•Drain all tanks and hoses prior to storing the machine.
READ AND SAVE THESE INSTRUCTIONS
8.645-040.0 Operator Manual KIRA B100 R

9
Safety
The following symbols are used throughout this guide as indicated in their descriptions:
HAZARD INTENSITY LEVEL
There are three levels of hazard intensity identified by signal words -WARNING and CAUTION and FOR SAFETY.
The level of hazard intensity is determined by the following definitions:
WARNING - Hazards or unsafe practices which COULD result in severe personal injury or death.
CAUTION - Hazards or unsafe practices which could result in minor personal injury or product or property damage.
FOR SAFETY: To Identify actions which must be followed for safe operation of equipment.
Report machine damage or faulty operation immediately. Do not use the machine if it is not in proper operating
condition. Following is information that signals some potentially dangerous conditions to the operator or the equip-
ment. Read this information carefully. Know when these conditions can exist. Locate all safety devices on the
machine. Please take the necessary steps to train the machine operating personnel.
FOR SAFETY:
DO NOT OPERATE MACHINE:
Unless Trained and Authorized.
Unless Operation Guide is Read and understood.
In Flammable or Explosive areas.
In areas with possible falling objects.
WHEN SERVICING MACHINE:
Avoid moving parts. Do not wear loose clothing; jackets, shirts, or sleeves when working on the machine. Use
Kärcher North America approved replacement parts.
Batteries emit hydrogen gas. Explosion or fire can result. Keep sparks and open flame away. Keep battery
compartment open during charging. Keep sparks and flames away from the batteries. Do not smoke
around batteries.
Disconnect batteries before working on machine. Only qualified personnel should work inside machine.
Always wear eye protection and protective clothing when working on or near batteries. Avoid skin contact
with the acid contained in the batteries.
Never allow metal to lie across battery tops.
Flammable materials can cause an explosion or fire. Do not use flammable materials in tanks.
Flammable materials or reactive metals can cause explosion or fire. Do not pick up.
8.645-040.0 Operator Manual KIRA B100 R
10
Operations
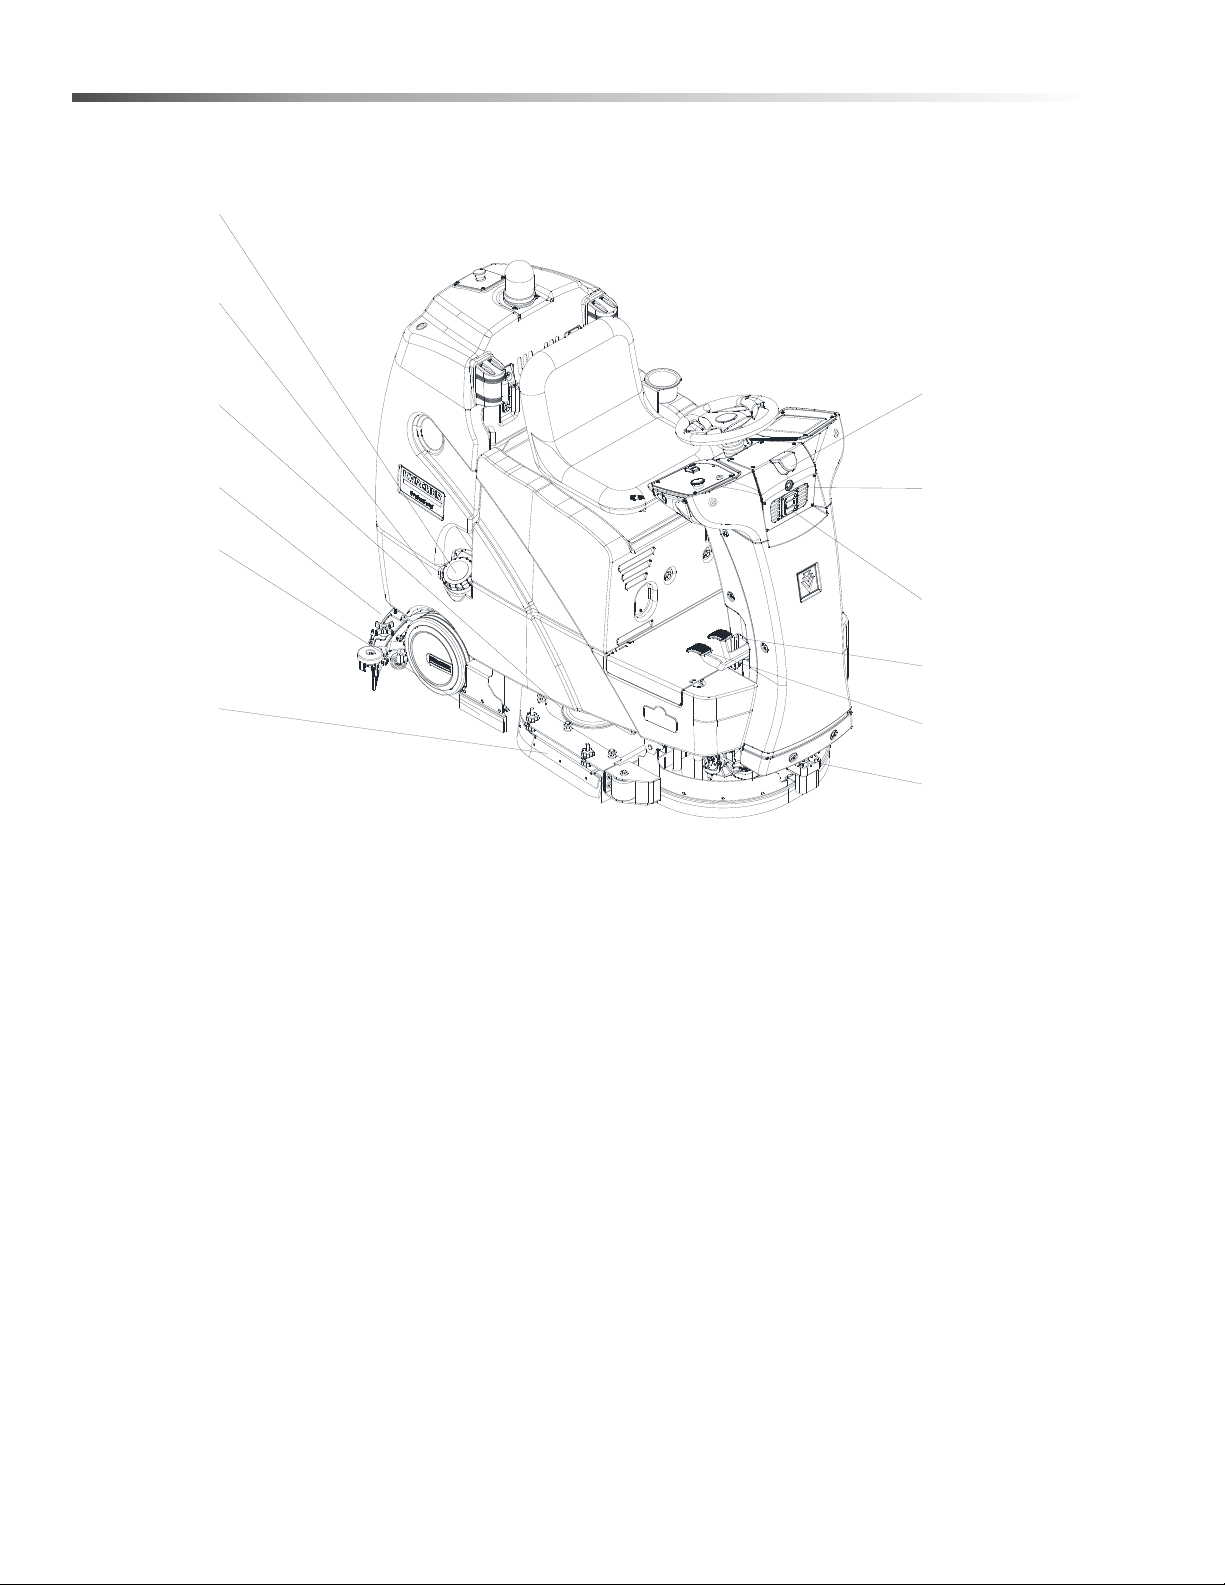
Machine Components
1. Hose Fill Clean Water Port
2. Clean Water Tank
3. Scrub Deck
4. Rear Squeegee
5. Side Perimeter Skirt
6. Side Squeegee
7. Lower LIDAR Sensor
8. Accelerator Pedal
9. Brake Pedal
10.Front 3d Camera
11. Front 2d Camera
12.Upper LIDAR Sensor
8.645-040.0 Operator Manual KIRA B100 R
1
2
3
4
5
6
7
8
9
10
11
12
11
Operations
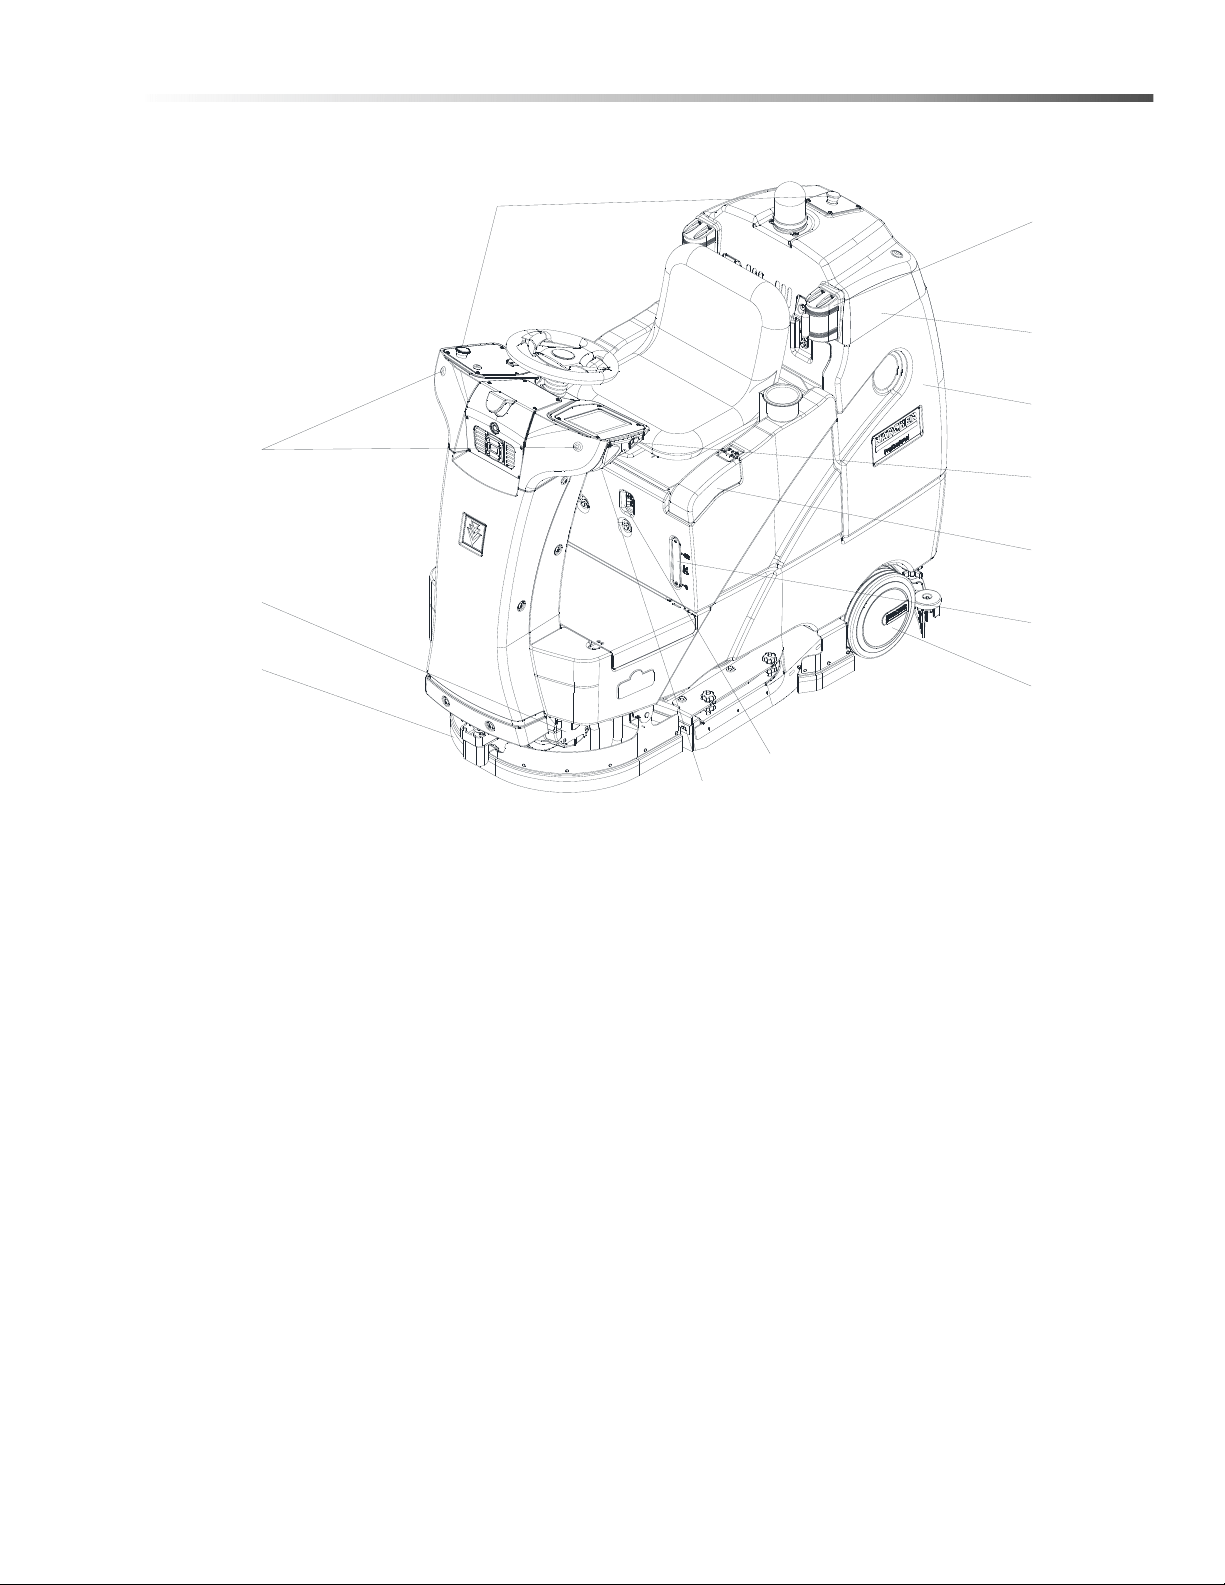
Machine Components 2
13.Emergency Stop Button
14.Side 3d Camera
15.Side 2d Camera
16.Battery Charger Receptacle
17.Front Drive Wheel
18.Front Perimeter Skirt
19.10-inch Wheels
20.Solution Level View Window
21.Solution Port
22.Recovery Tank
23.Recovery Tank Cover
24.Retractable Safety Straps
25.Front Signal Lights
13
19
20
21
22
23
24
16
17
18
14
25
15
8.645-040.0 Operator Manual KIRA B100 R
12
Operations
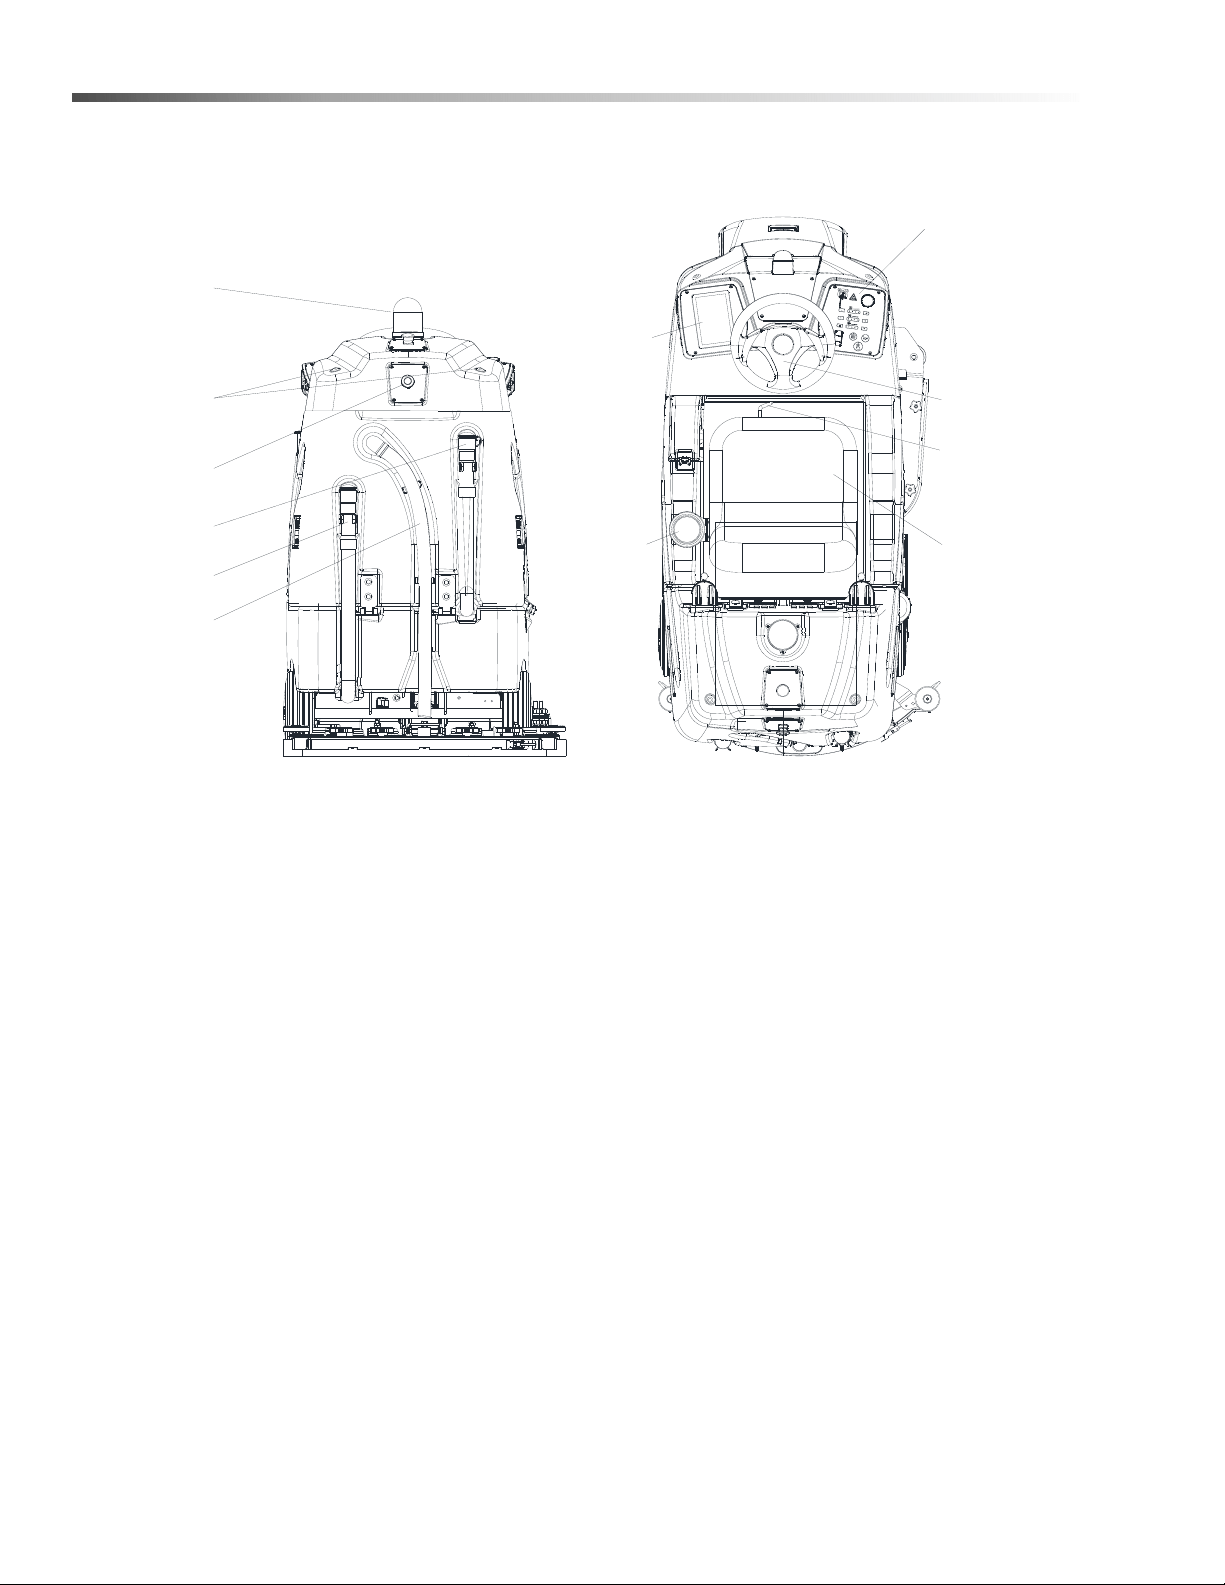
Machine Components 3
26.Warning Light
27.Rear Signal Light
28.Start/pause Button
29.Recovery Tank Drain Hose
30.Clean Water Tank Drain Hose
31.Vacuum Hose
32.User Interface (UI) Screen
33.Cup Holder
34.Seat
35.Seat Adjustment Handle
36.Steering Wheel
37.Control Panel
8.645-040.0 Operator Manual KIRA B100 R
26
27
28
29
30
32
33
34
35
36
31
37
13
Operations
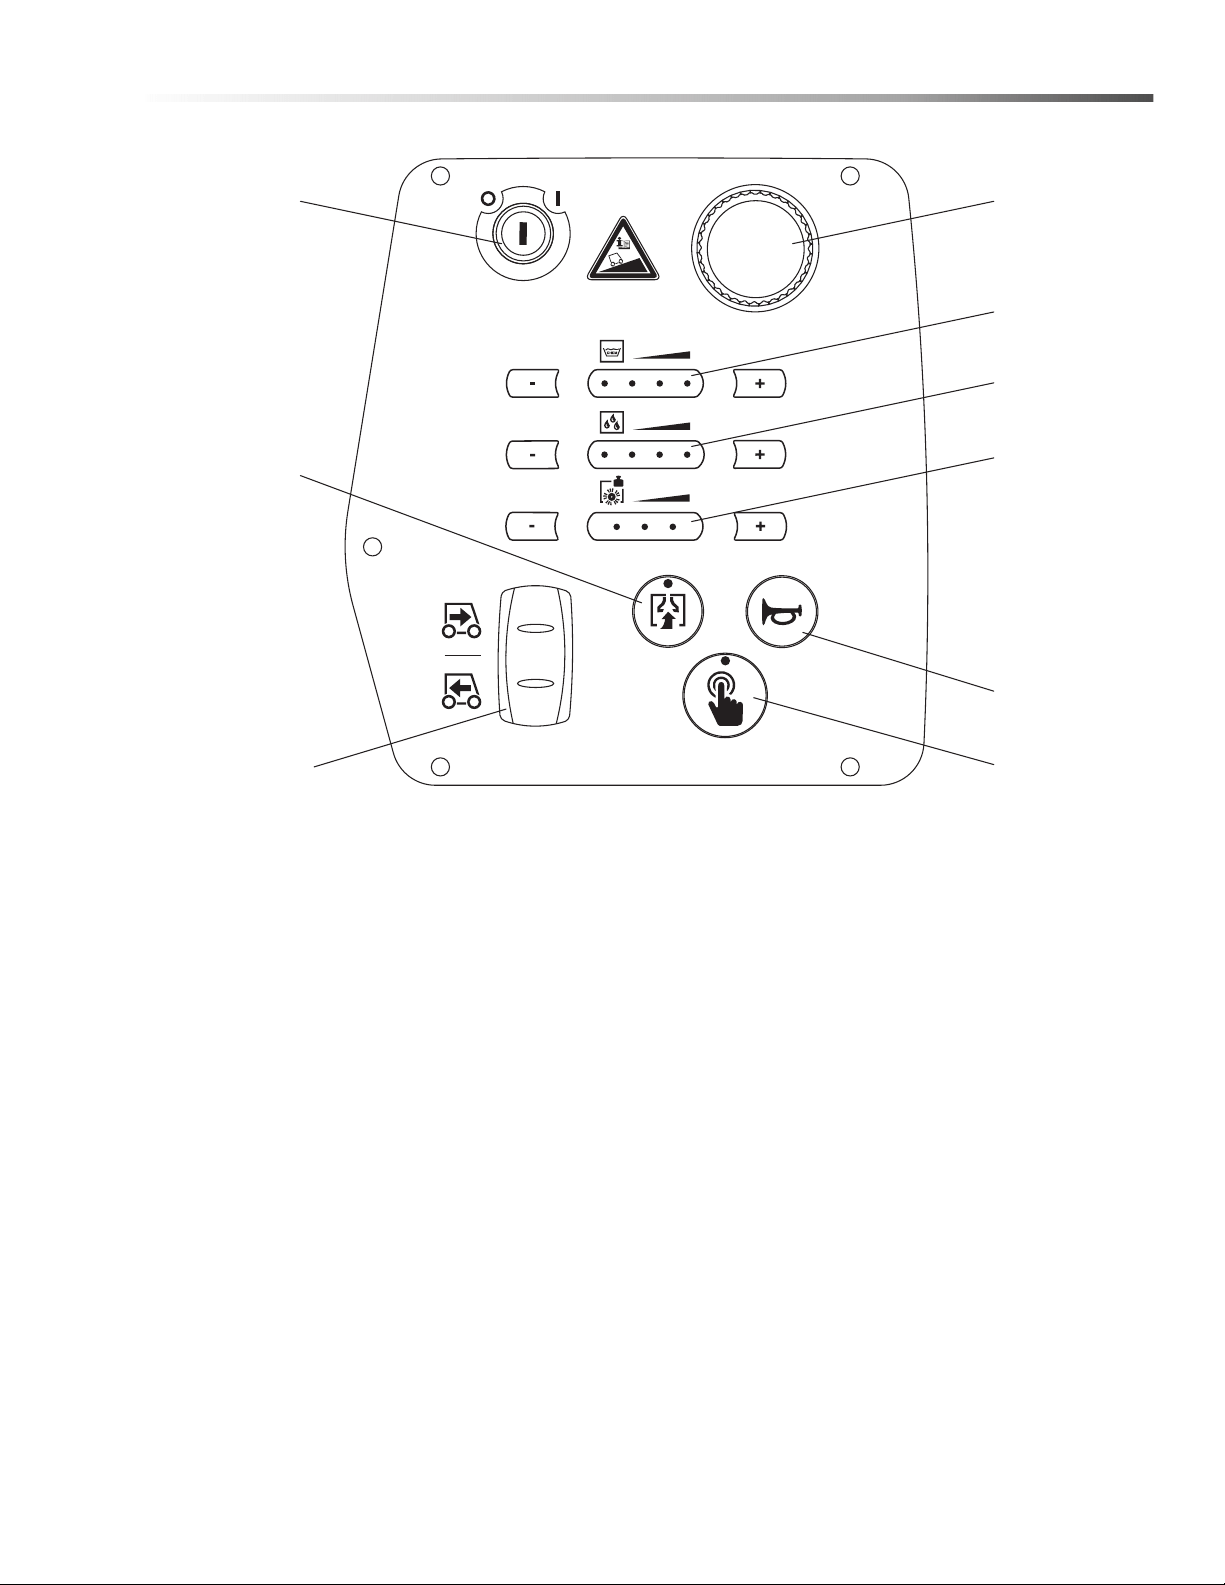
Control Panel
38.Ignition Key Switch
39.Directional Switch
40.Vacuum Button
41.One-touch Button
42.Horn Button
43.Brush Pressure Control
44.Water Flow Control
45.Solution Flow Control
46.Emergency Stop Button
2
%
38
40
39 41
42
43
44
45
46
8.645-040.0 Operator Manual KIRA B100 R
14
Operations
Machine Set Up & Installation
Uncrating Machine
Be sure and check packing carton for any damage.
Immediately report any damage to carrier. Check the
contents of package to ensure that the following items
are included:
• Machine
• 4-6V Batteries
• Squeegee assembly
• 2-Pad drivers
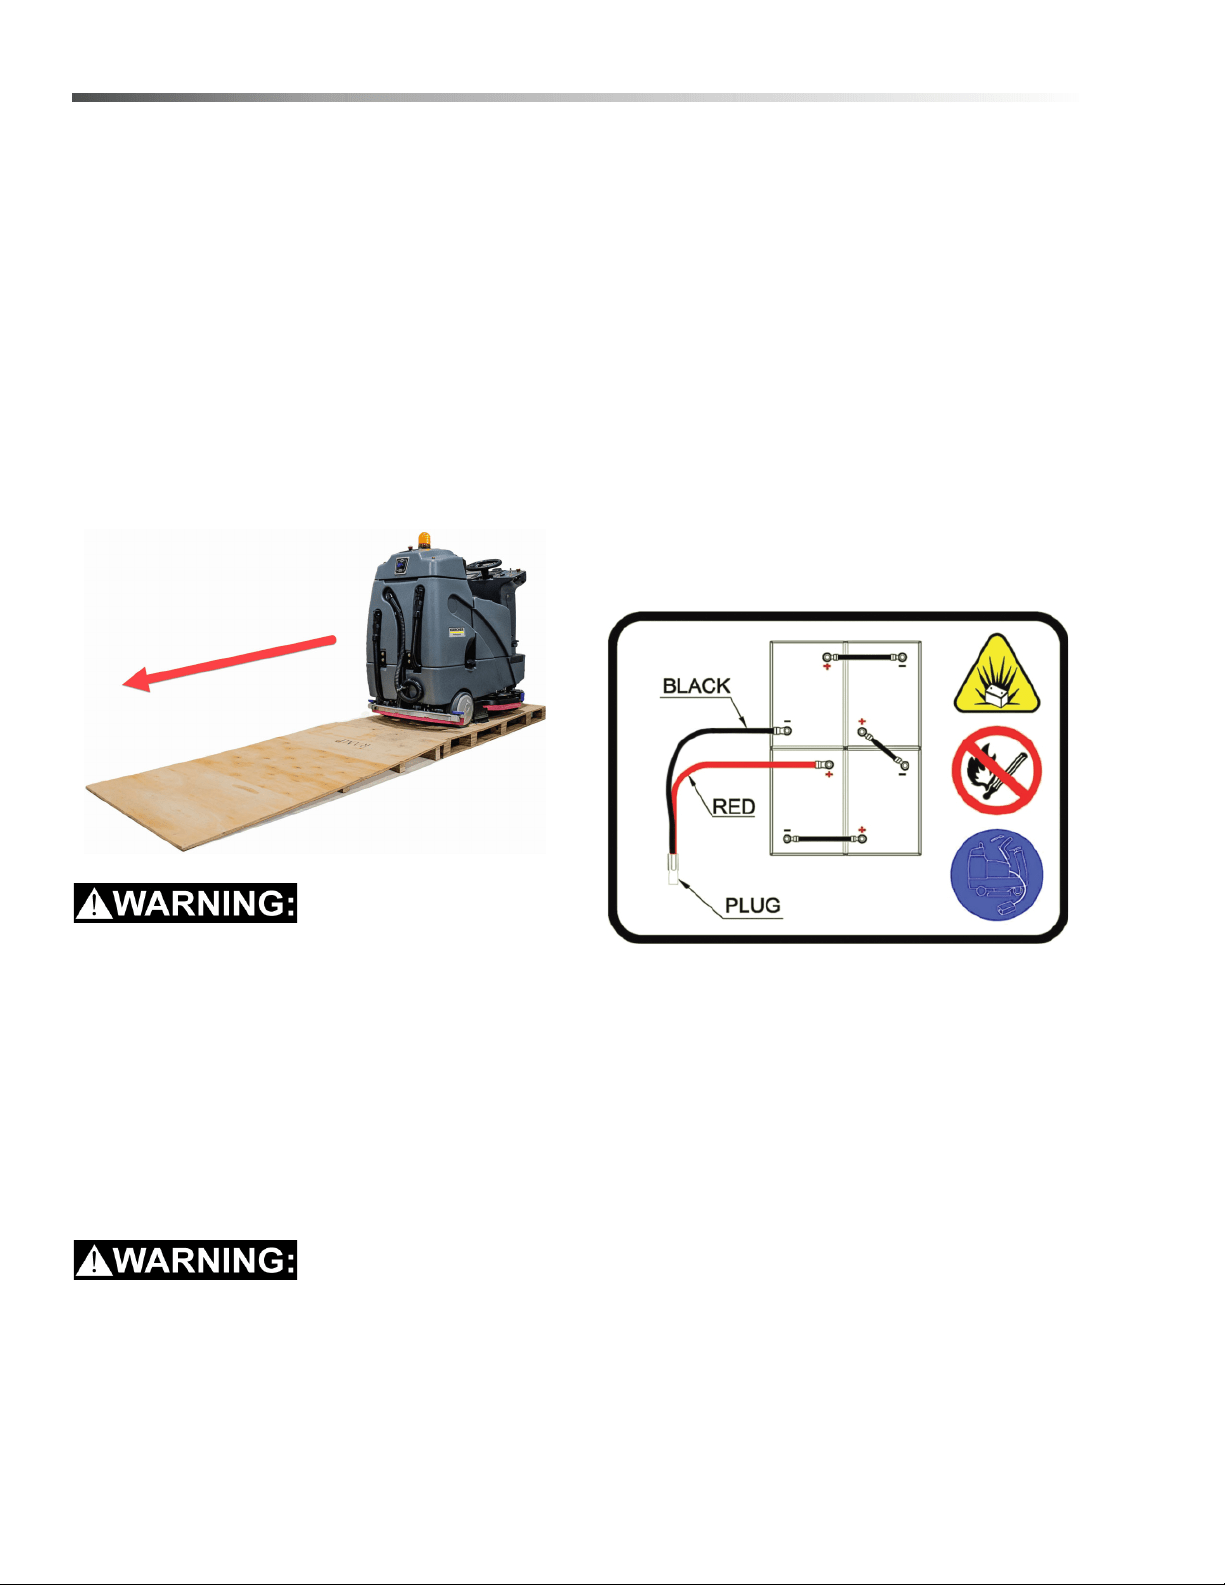
1. Uncrate the wooden box, place the top board on
the edge of pallet, lie in the front of the machine, as
below shown.
Do not operate machine unless you have read &
understood this manual.
2. Install batteries.
3. Turn on the Main power key switch, make sure the
Squeegee assembly and the Scrub head assembly
are off the floor.
4. Sit in the Operator seat, hold the steering wheel,
press the accelerator pedal and drive the machine
slowly down from the slope.
Installing Batteries
Batteries emit hydrogen gas. Explosion or fire can
result from hydrogen gas. Keep sparks and open
flames away! Keep battery compartment open
when charging.
Recommended battery spec:
4-6V, 260AH@20HR deep cycle batteries.
Max. battery dimensions
300mm (L) X 180mm (W) X 290mm (H)
1. Turn the Main power key switch off.
2. Remove the Operator seat & the Battery box.
3. Carefully place the batteries into the compartment
as shown in the figure below. Place the battery
brace at the rear of the batteries.
NOTE: Do not drop the batteries into the
compartment!
4. Connect battery cables to posts in numbered order
as shown in drawing below.
NOTE: RED to POSITIVE and BLACK to
NEGATIVE.
5. Reinstall the Operator seat and the Battery box.
Machine Set Up
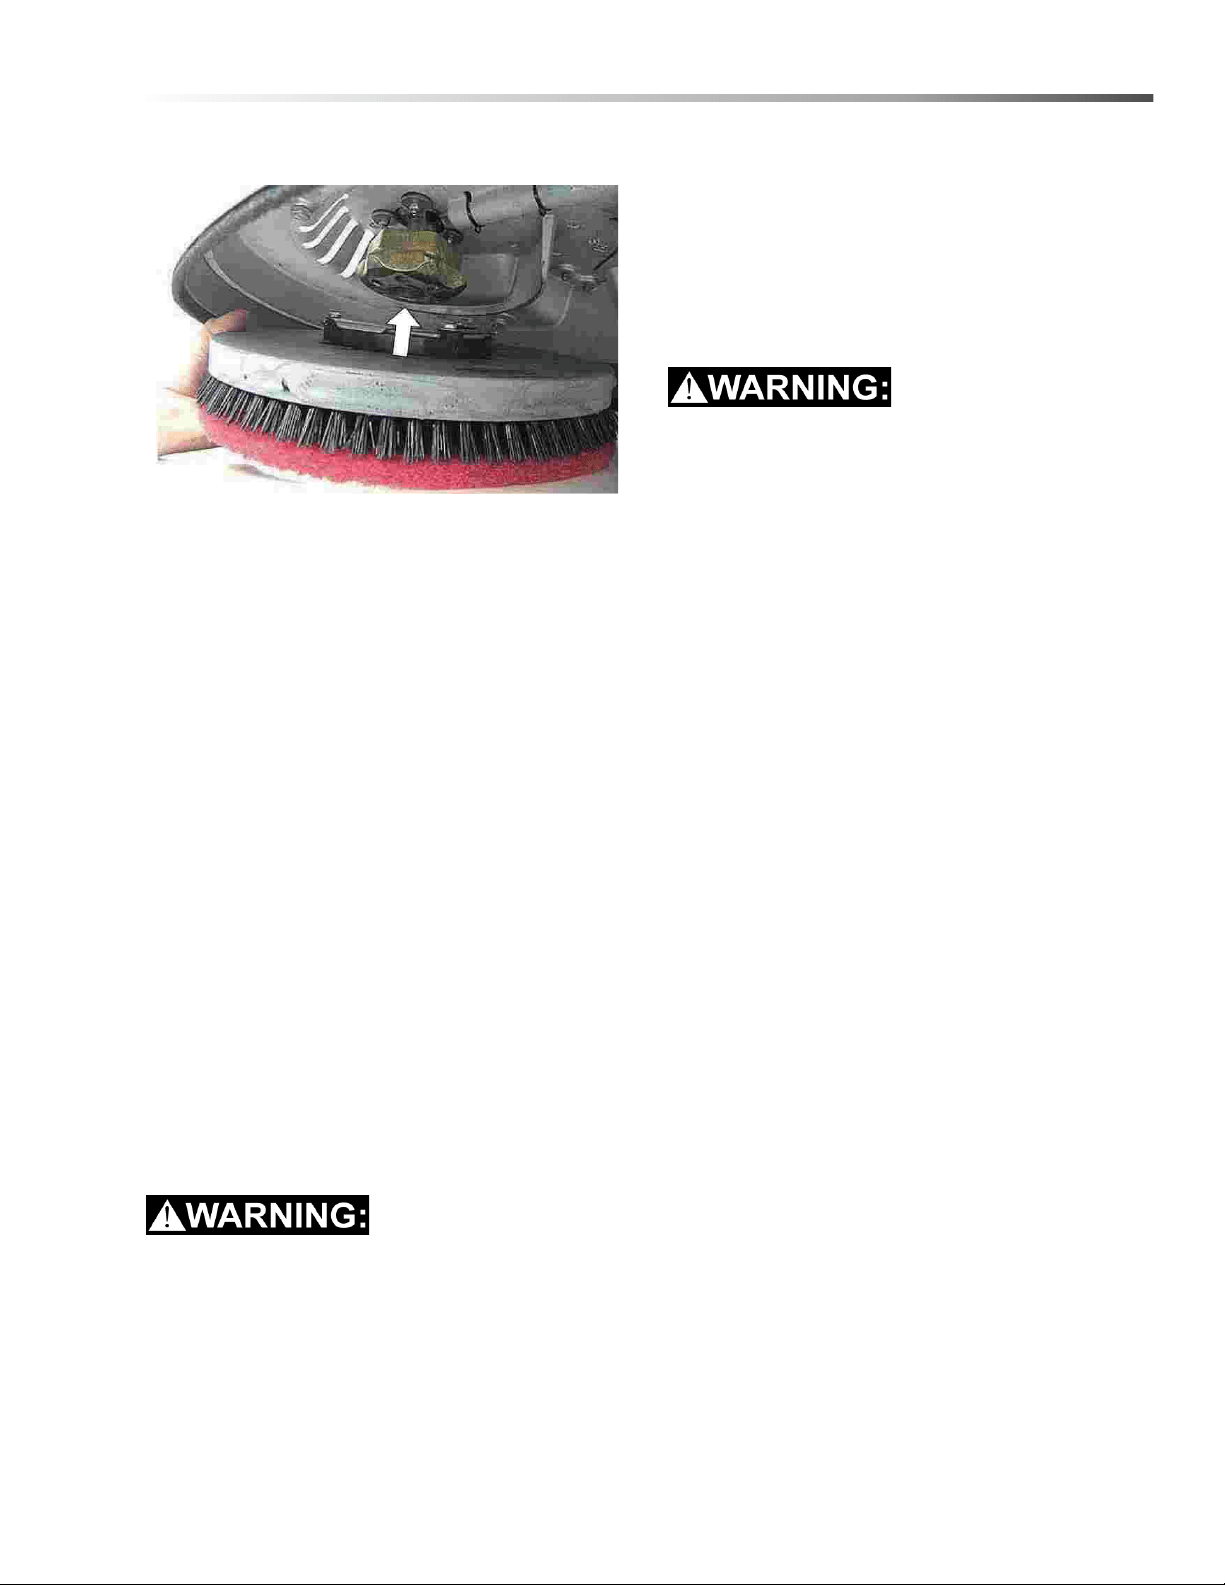
Installing Brushes Or Pads
1. Turn off the 1-Step switch and raise the Scrub
head assembly off of the floor, then stop machine
on the level surface, remove the key and ensure
the machine is turned off.
2. If using the pad driver, first attach the appropriate
pad to the pad driver surface.
8.645-040.0 Operator Manual KIRA B100 R
15
Operations
3. Align the pad driver or brush under the motor hub
and push it upward to engage.
4. To remove the pad driver or brush, raise the scrub
head and remove the side squeegee assembly,
push the edge of brush downward.
Mounting The Squeegee Assembly
1. Turn off the 1-Step switch and raise the squeegee
assembly off the floor.
2. Mount the squeegee assembly to the squeegee
pivot bracket. make sure the knobs are completely
seated into the slots before securing knobs.
3. Connect the Vacuum hose to the squeegee
assembly. Loop the hose by using the hose clip
provided.
4. Check the squeegee blades for proper adjustment.
Filling The Solution Tank
The machine is equipped with a hose fill-port at the side
of the machine, and a bucket fill port located under the
recovery tank.
NOTE: Before accessing the bucket fill-port make
sure that the recovery tank is empty. When filling
the solution tank with a bucket, make sure that
the bucket is clean. Do not use the same bucket
for filling and draining the machine.
Do not put any flammable materials into the
solution tank. This can cause an explosion or a fire.
Filling The Detergent Bottle
The machine is equipped with a 6 liter detergent bottle.
Open the cap and when filling, watch the liquid level on
the detergent level watching window.
The ratio of water and detergent is 0~5%, you can
adjust this ratio via pressing the detergent dosage
adjusting buttons.
NOTE: Only use recommended cleaning
chemicals. Contact your janitorial supply
distributor for recommendations on proper
chemicals.
Machine Operation
Do not operate machine unless you have read and
understand this manual.
Pre-operation Check
1. Check the tank cover seals for damage.
2. Drain the recovery tank, check the vacuum fan inlet
filter, clean them if necessary.
3. Check the vacuum hose for debris or blockage.
4. Check the squeegees for damage, wear and for
deflection adjustment.
5. Check whether pad/brush is installed properly.
6. Check the brakes and steering for proper
operation.
Operating The Machine
1. Sit in the Operator seat, adjusting the seat to
comfortable place by pushing the seat adjustment
handle.
NOTE: The machine will not travel unless the
operator is sitting in the operator seat.
2. Turn on the machine.
Check the LED display screen, if there are fault
codes and the fault indicator is blinking, please do
not operate the machine unless the faults have
been eliminated (please see FAULT CODES AND
ELIMINATE section).
3. Select the preferred settings by pressing the Brush
pressure adjusting buttons, solution flow adjusting
buttons, and detergent dosage adjusting buttons.
NOTE: Use the minimal pressure and flow
possible.
4. Turn on the 1-Step switch, the scrub head
assembly and the squeegee assembly will lower
down automatically, all the presetting functions will
turn on.
8.645-040.0 Operator Manual KIRA B100 R

16
Operations
5. The machine can scrub in both forward and
backward, place the directional switch in the
forward direction is to move forward, backward is
to move backward. The horn will sound and the
squeegee will raise automatically (the vacuum
motor will turn off after a short delay) when driving
the machine backwards. This is to prevent
damaging the squeegee.
NOTE: Go slow when driving the machine
backwards.
6. Press the accelerator pedal, the machine will start
scrubbing, the speed can be adjusted by
controlling the force of your foot stepping on the
accelerator pedal. Light is slow, heavy is fast.
NOTE: Go slow on inclines and slippery surfaces.
7. To stop scrubbing, turn off the 1-Step switch, the
scrub head will raise automatically, the squeegee
will also raise after a short delay (the vacuum
indicator flashing), please keep moving until the
dirty water is picked up, and then release the
accelerator pedal and stop scrubbing.
8. Turn off the machine.
Brake Device
The machine is driven by the front drive wheel that is
equipped with a brake device. When you release the
accelerator pedal, the machine will stop moving, and
the park brake will engage after a short delay.
The machine is equipped with a Brake pedal that can
be used to control the machine if quicker stopping is
needed or if operating on an incline.
Emergency Stop Button
The machine is equipped with an emergency stop
button, please push it in an emergency. This will shut
off all power to the machine and it will brake
immediately.
To restart the machine, please reset the emergency
stop button, and turn off the main power key switch,
then turn on key switch.
NOTE: Please hold the steering wheel then push
the emergency stop.
While Operating The Machine
Fire or explosion hazard. Do not pick up flammable
materials or reactive metals.
1. Go slow on inclines and slippery surfaces, go slow
when turning and reversing. Do not operate the
machine on inclines that exceed 2%.
2. Drive machine in as straight of a path as possible.
Avoid turning the Steering wheel too sharply when
the machine is in motion. avoid sudden turns
except emergencies.
3. Do not keep the machine in the same position with
pad / brush spinning, keep the machine moving to
prevent damage to floor finish.
4. If the squeegee assembly leaves streaks on the
floor, raise the squeegee off the floor and wipe the
blades down with a damp cloth. Pre-sweep the
area to prevent leaving streaks on the floor.
5. To obtain the optimum cleaning performance, you
can adjust the brush pressure, solution flow, and
detergent dosage as needed. If the machine is not
picking up the water properly, please stop
scrubbing and check the squeegee blade. Adjust
or replace if necessary.
6. If the dirty water path exceeds the width of
squeegee, please adjust the side squeegee
assembly.
7. Pour a recommended defoamer into the recovery
tank if excessive foam appears.
The foam does not activate water level switch,
excessive foam may result in vacuum motor
damage.
8. Press the horn button to alert if necessary.
9. If there is a fault code F10 (Batt low) on the LED
display screen, the machine will stop scrubbing
and alarm, please drive the machine to the
charger.
10. If there is a fault code F08 (Rec Tank Full) on the
LED display screen, the vacuum motor will stop
working and alarm. Please drain the water from the
machine recovery tank.
If there is a fault code F09 (Soln Tank Empty) on
the LED display screen, the detergent system will
8.645-040.0 Operator Manual KIRA B100 R
17
Operations
stop working and alarm. Please fill the solution
tank.
11. If there are other fault codes on the LED display
screen, please turn off the machine. Eliminate the
fault (please see FAULT CODES AND ELIMINATE
section), then restart machine.
12. For heavily soiled areas, please use DOUBLE
SCRUBBING mode.
The first time: Turn on the 1-step switch, then
press the vacuum motor switch. It’s indicator will
turn off and the squeegee will raise automatically,
then will start to scrub the areas without picking up
water.
The second time: turn on the vacuum motor switch,
the squeegee will lower down automatically, and
then start to scrub and pick up water.
13. If you only want to pick up water and don’t need to
scrub, turn on the vacuum motor switch (squeegee
will lower down) and turn off the 1-step switch (if it
is ON). The scrub head will raise and then the
vacuum will start.
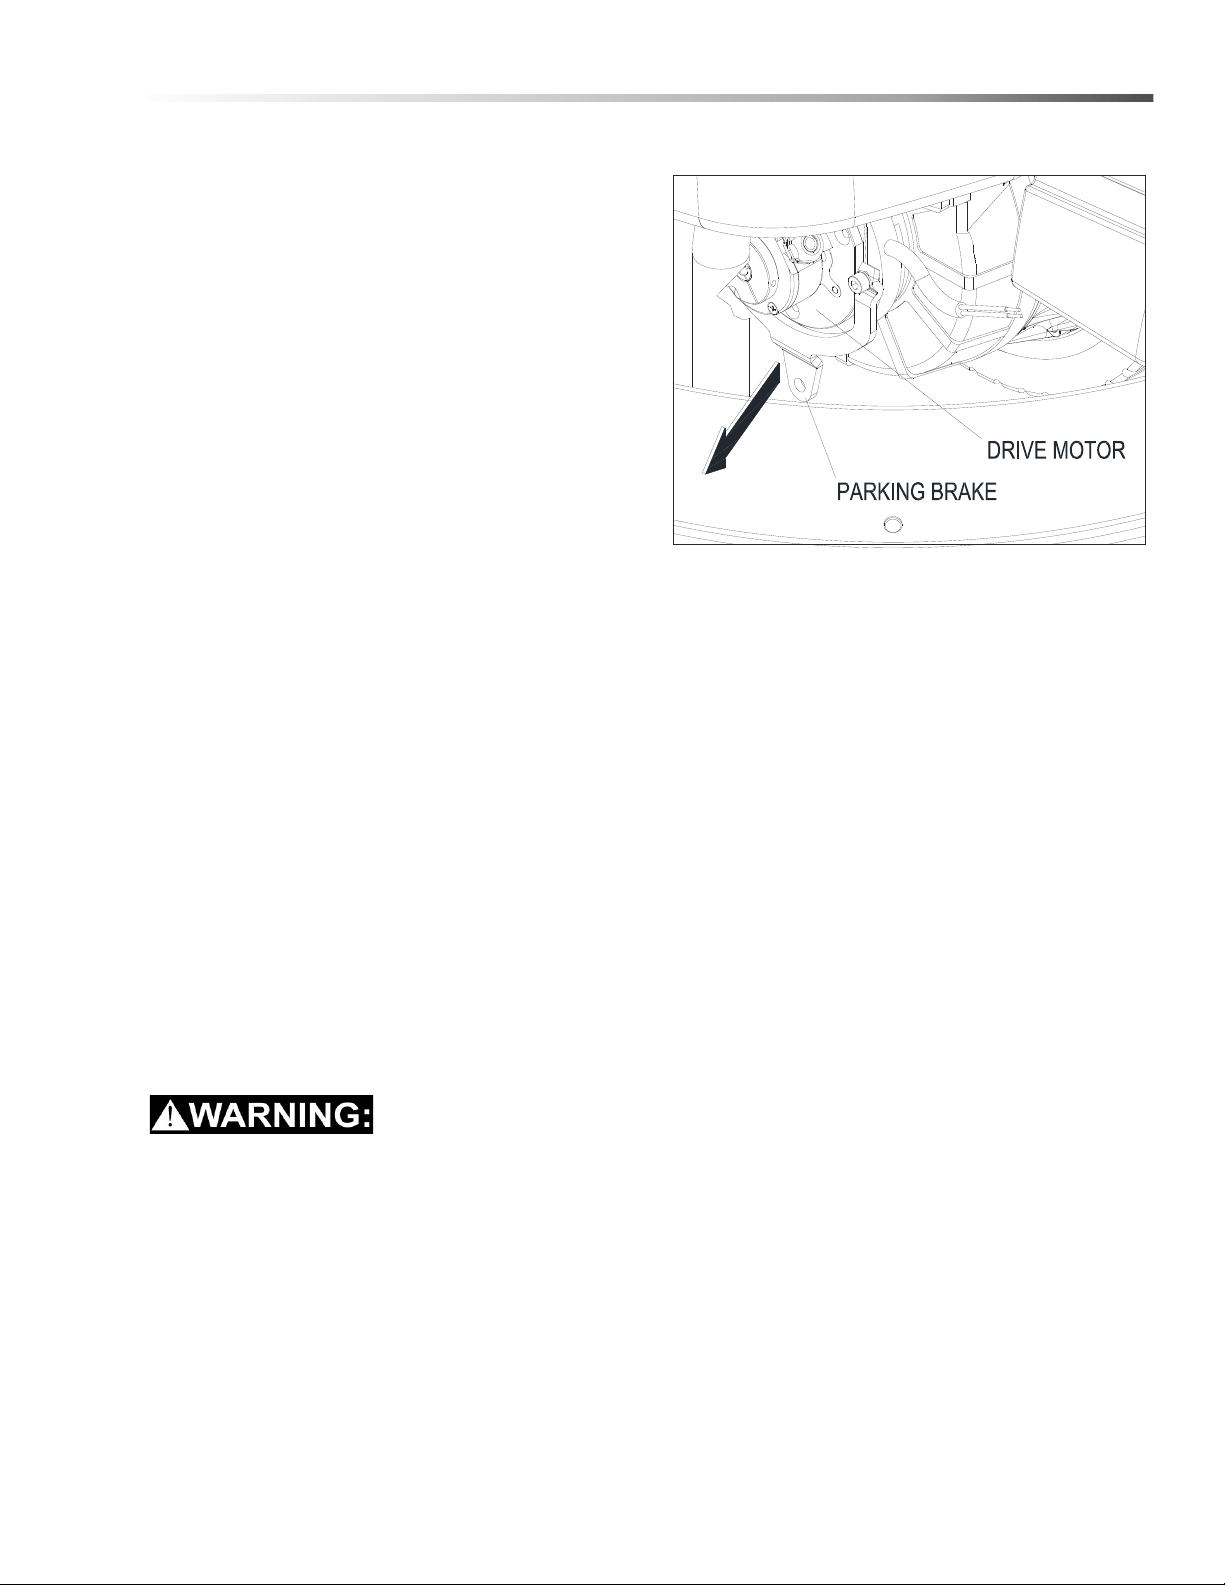
Electric Parking Brake Engagement
FOR SAFETY: Before leaving or servicing machine,
stop on a level surface, turn off machine and
remove key.
Electric Brake Engagement
This machine is equipped with an electric parking
brake.
The brake automatically engages and keeps the
machine from moving whenever the operator steps off
the platform or when emergency stop is engaged.
The brake has a mechanical over-ride that can be
engaged so machine can be pushed or towed (slowly).
Do not operate machine with brake disengaged.
To disengage brake:
1. Pull lever away from brake housing.
2. Insert material to hold brake lever in place.
Emergency Stop/Brake Switch
This safety feature is designed to cut all power to the
machine at any time and apply parking brake.
To shut the machine power off, push the emergency
stop switch. This will also engage the parking brake
and cause the machine to stop immediately.
Excessive emergency stop usage can cause
premature brake wear; use only when necessary. To
reset the machine, rotate the switch clockwise.
8.645-040.0 Operator Manual KIRA B100 R

18
Operations
Tank Draining
Draining The Recovery Tank
Any time scrubbing is completed, or when refilling the
solution tank, the recovery tank should be drained and
cleaned.
‘
If the recovery tank is not drained when the
solution tank has been refilled, foam or water may
enter the float shut-off screen and cause damage to
the vacuum motor.
1. While holding the recovery tank drain hose
upward, remove the cap and lower hose to drain.
2. Open the Recovery tank cover and rinse out the
tank. Use a rag to remove any excess dirt. Clean
the vacuum fan inlet filter located in the recovery
tank.
Draining The Solution Tank
Any time scrubbing operation is completed, the solution
tank should be drained and cleaned.
1. While holding the solution tank drain hose upward,
remove the cap and lower hose to drain.
2. Rinse the solution tank with clean water after every
use. This will help prevent chemical buildup and
clogging of the solution lines.
Battery Charging
‘
Fire or explosion hazard. Batteries emit hydrogen
gas. Keep sparks and open flame away. Keep
battery compartment propped open when charging.
External Charger
Use a 24V 50A DC charger which will automatically
shut off when the batteries are fully charged.
1. Stop the machine in a clean, well ventilated area
next to the charger.
2. Turn “OFF” machine.
FOR SAFETY: Before leaving or servicing machine;
stop on level surface, turn off machine and remove
key.
3. Lift seat.
FOR SAFETY: When charging, connect the charger
to the batteries before connecting the charger to
the AC wall outlet. Never connect the charger to the
AC wall outlet first. Hazardous sparks may result.
4. Plug the charger connector into the battery
connector. Connect the charger AC plug to a wall
outlet. The charger gauge should indicate that the
batteries are charging.
5. When the batteries are fully charged, disconnect
the charger from the AC wall outlet, then discon-
nect the charger from the batteries.
6. Lower seat.
8.645-040.0 Operator Manual KIRA B100 R

19
Maintenance
Preventative Maintenance
‘
Before performing any maintenance on the
machine, be sure that the power is turned off, or the
batteries are disconnected!
‘
Repairs are to be completed by an authorized
service center only. Any repairs completed by
unauthorized persons will void the warranty.
Daily Maintenance
1. Remove pad driver/ brush and clean with approved
cleaner.
2. Drain recovery and solution tanks completely and
rinse out with clean water. Visually check the
recovery tank for debris and clean out as
necessary.
3. Raise the squeegee assembly off the floor and
wipe it down with a damp towel. Be sure to store
the squeegee in the up position.
4. Remove the vacuum fan inlet filter and rinse it out
with clean water.
5. Clean machine with an approved cleaner and a
damp towel.
6. Recharge the batteries.
7. Check the condition of the squeegee blade wiping
edge, rotate blade if worn.
Monthly Maintenance
1. Clean the battery tops to prevent corrosion.
2. Check for loose battery cable connections.
3. Inspect and clean the recovery tank cover seal.
Replace it if damaged.
4. Check the machine for loose nuts and bolts.
5. Check the machine for leaks.
Motor Maintenance
1. Contact your local distributor for any motor
maintenance.
2. Motor should have the brushes checked every 250
hours. Brushed should be replaced when they are
worn to a length of 10mm or less.
Battery Maintenance
‘
Batteries emit hydrogen gas and an explosion or
fire can result. Keep sparks and fire away from
batteries at all times.
‘
Whenever servicing batteries, be sure to wear
protective gloves. Avoid contact with battery acid
at all times.
NOTE: For the best machine performance, keep
batteries charged at all times. Do not let them sit
in a discharged condition.
1. Always follow the battery charging directions as
outlined in the BATTERY CHARGING section of
this manual.
2. Keep battery tops and terminals free from
corrosion. A strong solution of baking soda and
water is the best way to keep the batteries
corrosion free. DO NOT ALLOW THE BAKING
SODA / WATER SOLUTION TO ENTER THE
BATTERY CELLS.
3. Use a wire brush with the baking soda solution to
properly clean the battery posts and connections.
4. Check battery connections for wear and loose
terminals. replace if necessary.
Machine Storage
1. Always store the machine indoors.
2. Always store the machine in a dry area.
3. Always store the machine in its upright position.
4. Always store the machine with the pad driver/
brush raised off the floor
5. Always store the machine with the squeegee
assembly raised off the floor.
6. If storing in an area which may reach freezing
temperatures, be sure to drain all fluids from the
machine prior to storage. Any damage caused by
freezing temperatures will not be covered by the
warranty.
7. Drain the recovery tank.
8. Drain the solution tank of all fluid.
8.645-040.0 Operator Manual KIRA B100 R

20
Maintenance
Technical Specifications
ITEM DIMENSION/CAPACITY
Nominal power 2100W
Rated Voltage 24V DC
Rated Amperage 90 Amps
Batteries 4 x 6V, 240AH@20Hr
Battery - Dimensions 24” L x 14” W x 14” H
Run time per charge 3~3.5 Hours
Scrub Brush Motors - Disk Machine 2 X .6 HP (450 W)
Vacuum Motor(s) 0.6 hp / 0.45KW
Maximum flow rate of vacuum motor 31.7 L/min(66.5 CFM)
Maximum suction of vacuum motor 70 in. H2O / 1780 mm. H2O
Drive Wheel 1.1 hp / 0.8 KW
Brush Motor (2) 0.6 hp / 0.45KW, 210 RPM
Weight empty without batteries 618 lbs / 280 Kg
Weight with batteries 880 lbs / 400 Kg
Solution Flow 0 ~ 0.7 Gal / Min - 0 ~ 2.7 L / Min
Solution Control
Variable – four levels of solution flow rate, selected by operator
on control panel
Solution capacity 29 Gal / 110 L
Recovery capacity 29 Gal / 110 L
Scrub brush diameter - Disk Machine 26 inch (2x 13inch)
Scrub brush/pad pressure 80 lbs / 35 Kg - 120 lbs / 55 Kg - 165 lbs / 75 Kg
Scrub brush speed - Disk Machine 210 RPM
Tires 10 inch, Solid scrubber compound rear
Foundation Pressure 95.6 psi (659 Kpa)
Maximum Speed 6.5 Km/h
Travel Speed (Transport) 4 Mile/h / 6.5 Km/h
Frame Construction Powder coated steel
Brake
Electric parking brake sets automatically whenever operator
leaves seat, or when either emergency stop button is pressed
Minimum aisle u-turn width 71 in / 1,800 mm
Maximum rated climb and descent angle
Autonomous Mode: 0 deg/0% - Manual Mode: 1 deg/2%
Sound Pressure Level 68 dB(A)
Decibel rating at operator's ear, indoors 68 dB(A)
Vibration Hands (ISO 5349) 1.07 m/sec² Uncertainty .5 m/sec²
Vibration Body (ISO 5349) 0.37 m/sec² Uncertainty .5 m/sec²
8.645-040.0 Operator Manual KIRA B100 R
21
Maintenance
Technical Specifications
This appliance is not intended for use by persons (including children) with reduced physical, sensory or mental
capabilities, or lack of experience and knowledge, unless they have been given supervision or instruction
concerning use of the appliance by a person responsible for their safety. Children should be supervised to ensure
that they do not play with the appliance.
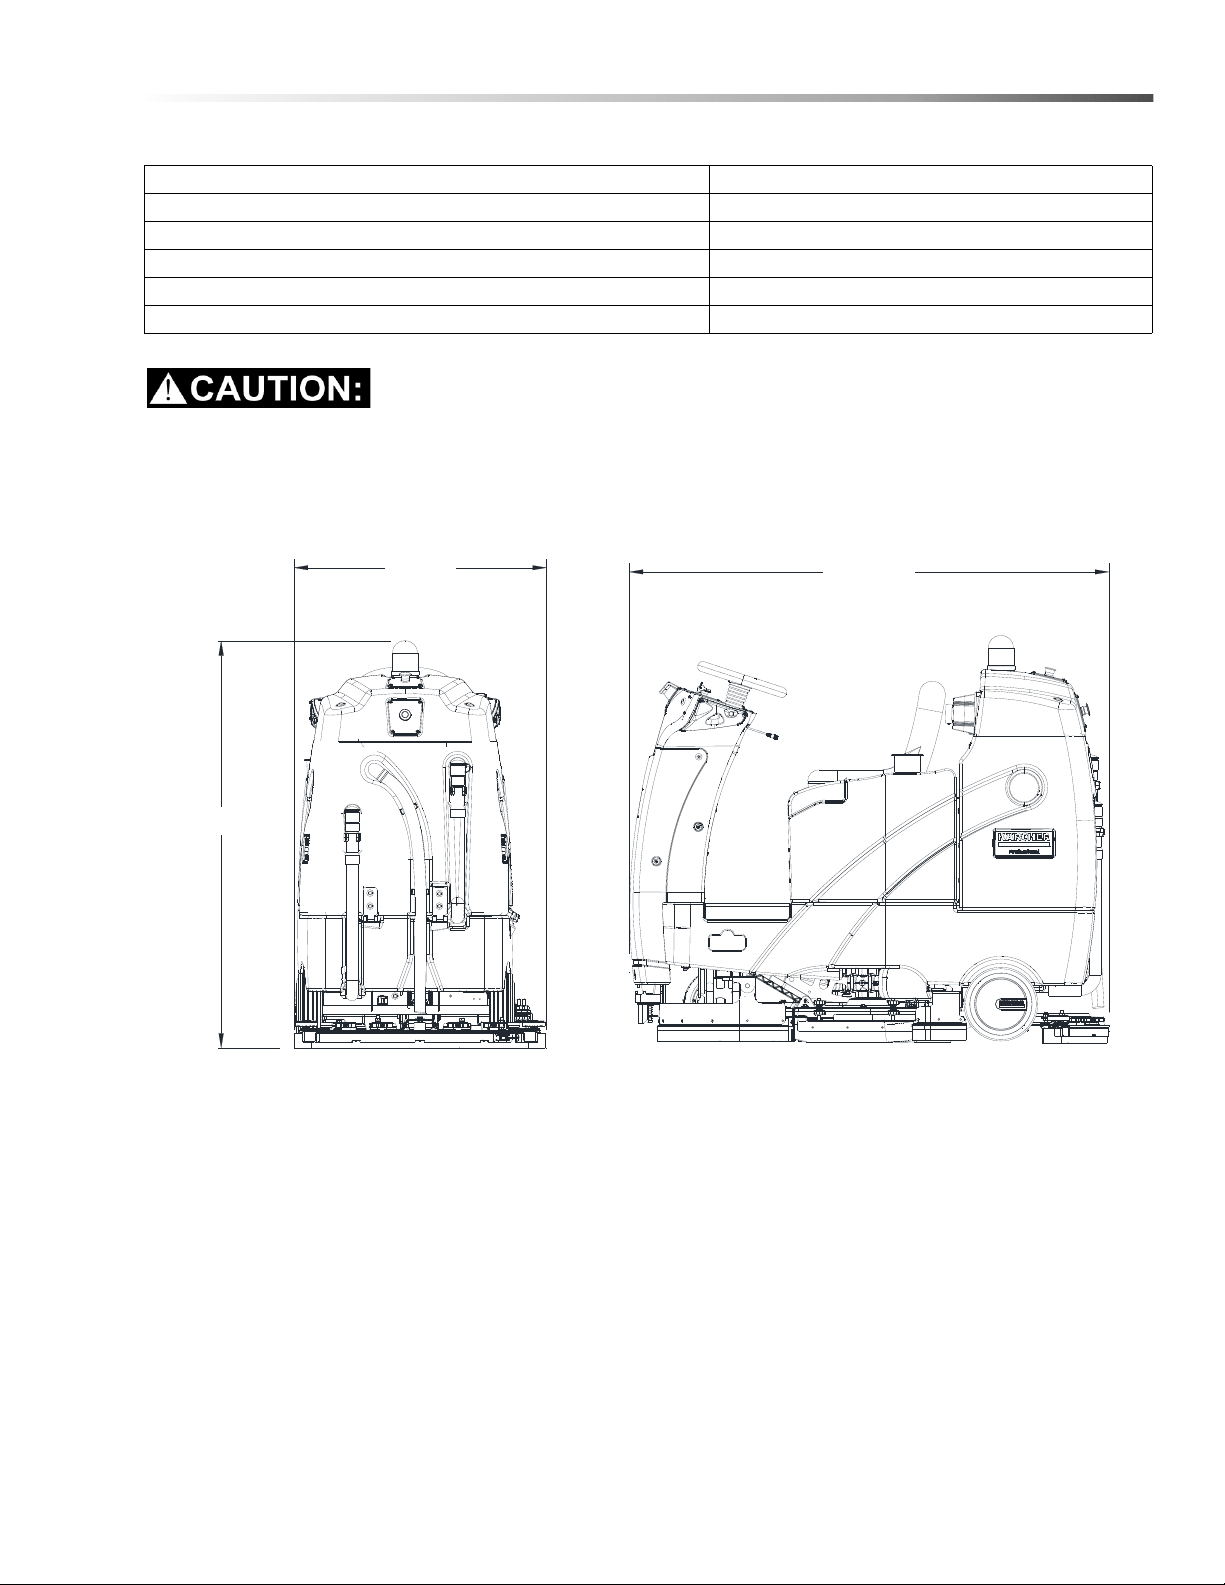
ITEM MEASURE
Height 56.7 in / 1,440 mm
Length 61.6 in / 1,565 mm
Width (Machine With Scrub Head) 32 in / 815 mm
Width of squeegee 33.8 in / 860 mm
Width of scrub path 26 in / 650 mm ( 2 x 13 inch)
HEIGHT
WIDTH
LENGTH
8.645-040.0 Operator Manual KIRA B100 R
Registrieren Sie Ihr Prudukt und Sie von vielen Vorteilen.
Register your product and benefit from many advantages.
Enregistrez votre produit et bénéficiez de nombreux avantages.
Registre su producto y aproveche de muchas ventajas.
Bewerten Sie Ihr Produkt und sagen Sie uns Ihre Meinung.
Rate your product and tell us your opinion.
Évaluez votre produit et donnez-nous votre opinion.
Reseña su producto y díganos su opinión.
www.kaercher.com/welcome
www.kaercher.com/dealersearch
Kärcher North America
6398 N Kärcher Way
Aurora, CO 80019
Phone: +1 800 444-7654
DANKE!
THANK YOU!
MERCI!
GRACIAS!
!
