the possibilities
Thankyoufor purchasingtnls SamsungproaucI.
Toreceivemore completeservice,
p_easeregisteryour proauc_a_
www.samsung.com/register
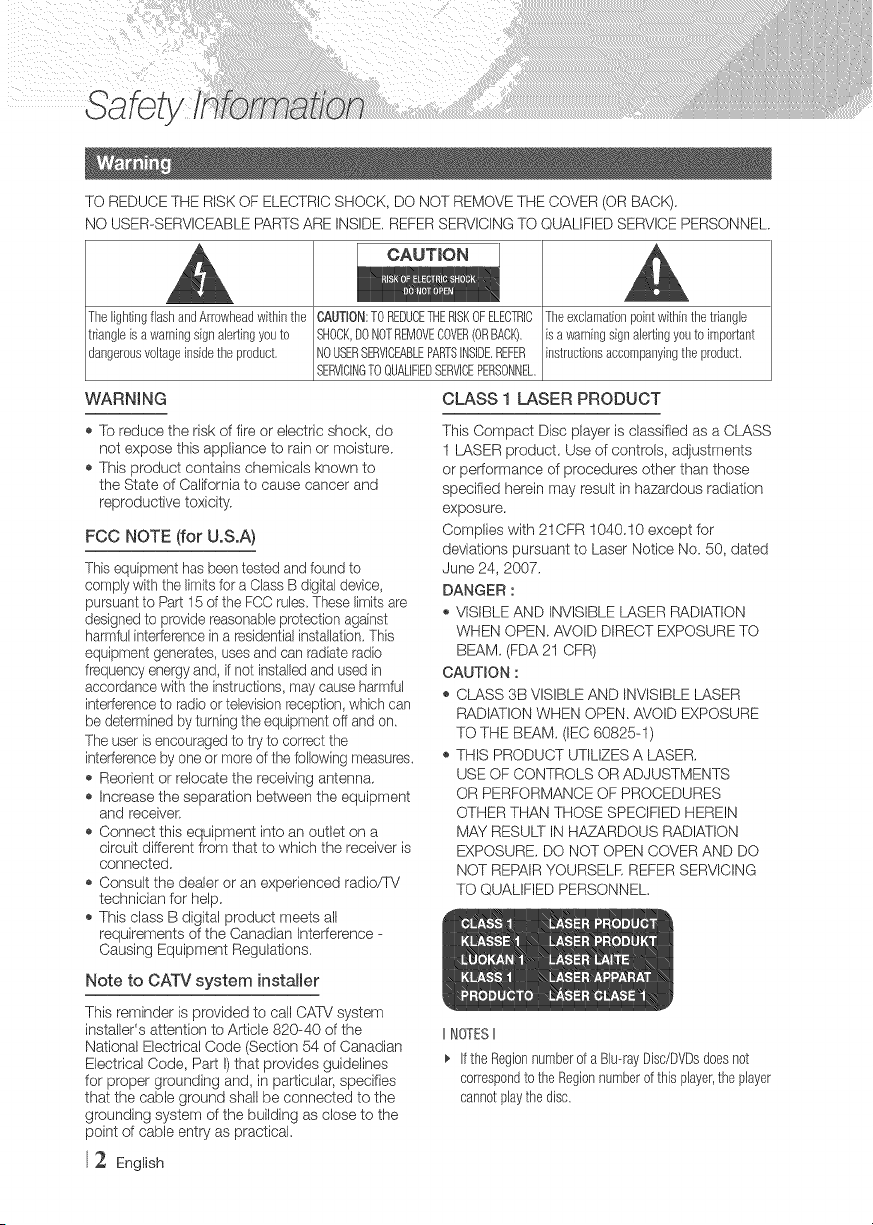
TO REDUCE THE RISKOF ELECTRIC SHOCK, DO NOT REMOVETHE COVER (OR BACK).
NO USER-SERVICEABLE PARTSARE INSIDE. REFER SERVICINGTO QUALIFIED SERVICE PERSONNEL.
CAUTmON
Thelighting flash andArrowheadwithin the CAUTRON:TOREDUCETHERISKOFELECTRIC
triangle is a warningsign alertingyouto SHOCK,DONOTREMOVECOVER(ORBACK).
dangerousvoltage insidethe product. NOUSERSERVICEABLEPARTSINSIDEREFER
SERVICINGTOQUALIFIEDSERVICEPERSONNEL
WARNI NG
Theexclamationpoint within the triangle
Esa warningsign alertingyou to important
instructionsaccompanyingthe product.
CLASS 1 LASER PRODUCT
,_ To reduce the risk of fire or electric shock, do
not expose this appliance to rain or moisture.
,_ This product contains chemicals known to
the State of California to cause cancer and
reproductive toxicity.
FCC NOTE (for U.S.A)
This equipment has beentested and found to
comply with the limits for a Class B digital device,
pursuant to Part 15 of the FCC rules These limits are
designed to provide reasonableprotection against
harmful interferencein a residentialinstallation.This
equipment generates, usesand can radiate radio
frequency energyand, if not installedand used in
accordance with the instructions, may cause harmful
interferenceto radio or televisionreception,which can
be determined by turning the equipment off and on
The user isencouraged to try to correct the
interference by one or more of the following measures.
,b Reorient or relocate the receiving antenna.
,b Increase the separation between the equipment
and receiver:
,_ Connect this equipment into an outlet on a
circuit different from that to which the receiver is
connected.
,_ Consult the dealer or an experienced radio/TV
technician for help.
,_ This class B digital product meets all
requirements of the Canadian Interference -
Causing Equipment Regulations.
Note to CATV system installer
This reminder is provided to call CATV system
installer's attention to Article 820-40 of the
National Electrical Code (Section 54 of Canadian
Electrical Code, Part I)that provides guidelines
for proper grounding and, in particular, specifies
that the cable ground shall be connected to the
grounding system of the building as close to the
point of cable entry as practical.
2 English
This Compact Disc player is classified as a CLASS
I LASER product. Use of controls, adjustments
or performance of procedures other than those
specified herein may result in hazardous radiation
exposure.
Complies with 21CFR 1040.10 except for
deviations pursuant to Laser Notice No. 50, dated
June 24, 2007.
DANGER :
,, VISIBLE AND INVISIBLE LASER RADIATION
WHEN OPEN. AVOID DIRECT EXPOSURE TO
BEAM. (FDA 21 CFR)
CAUTmON:
_, CLASS 3B VISIBLE AND INVISIBLE LASER
RADIATION WHEN OPEN. AVOID EXPOSURE
TO THE BEAM. (IEC 60825-I)
_, THIS PRODUCT UTILIZES A LASER.
USE OF CONTROLS OR ADJUSTMENTS
OR PERFORMANCE OF PROCEDURES
OTHER THAN THOSE SPECIFIED HEREIN
MAY RESULT IN HAZARDOUS RADIATION
EXPOSURE. DO NOT OPEN COVER AND DO
NOT REPAIRYOURSELE REFER SERVICING
TO QUALIFIED PERSONNEL.
IINOTESII
_, If the Regionnumberof a BJu--rayDisc/DVDsdoesnot
correspondto theRegionnumberofthis player,theplayer
cannotplaythe disc.
13.
important Safety hstructions 14.
Read these operating instructions carefully before
using the unit. Follow all the safety instructions
listed below.
Keep these operating instructions handy for future
reference.
1. Read these instructions.
2. Keep these instructions.
3. Heed allwarnings.
4. Follow all instructions.
5. Do not use this apparatus near water.
6. Clean only with a dry cloth.
7. Do not block any ventilation openings, Install
in accordance with the manufacturer's
instructions,
8. Do not install near any heat sources such
as radiators, heat registers, stoves, or other
apparatus (including AV receivers) that
produce heat.
9. Do not defeat the safety purpose of the
polarized or grounding-type plug. A polarized
plug has two blades with one wider than the
other: A grounding type plug has two blades
and a third grounding prong, The wide blade
or the third prong are provided for your safety.
If the provided plug does not fit into your
outlet, consult an electrician for replacement
of the obsolete outlet.
10. Protect the power cord from being walked on
or pinched particularly at plugs, convenience
receptacles, and the point where it exits the
apparatus.
11. Only use attachments/accessories specified
by the manufacturer:
12. Use only with the cart,
stand, tripod, bracket,
or table specified by the
manufacturer, or sold with
the apparatus, When a cart
is used, use caution when
moving the cart/apparatus combination to
avoid injury from tip-over.
Unplug this apparatus during lightning storms
or when unused for long periods of time.
Refer all servicing to qualified service
personnel, Servicing is required when the
apparatus has been damaged in any way,
such as when the power-supply cord or plug
is damaged, liquid has been spilled or objects
have fallen into the apparatus, the apparatus
has been exposed to rain or moisture, does
not operate normally, or has been dropped.
,_ Holding Discs
- Fingerprints or scratches on
a disc may reduce sound and
picture quality or cause skipping.
- Avoid touching the surface of a disc where
data has been recorded,
- Hold the disc by the edges so that fingerprints
will not get on the surface.
- Do not stick paper or tape on the disc.
,_ Cleaning Discs
- If you get fingerprints or dirt on a
disc, clean it with a mild detergent
diluted in water and wipe with a
soft cloth.
- When cleaning, wipe gently from the inside to
the outside of the disc,
,_ Disc Storage
Do not keep in direct sunlight.
Keep in a cool ventilated area.
Keep in a clean protection jacket and store
vertically.
,_ Do not expose this apparatus to dripping or
splashing. Do not put objects filled with liquids,
such as vases on the apparatus.
,_ To turn this apparatus off completely, you must
pull the power plug out of the wall socket.
Consequently, the power plug must be easily
and readily accessible at all times.
o
Oo
5"
6"
6
English 3
o Do not plug multiple electric devices into the
same wall socket. Overloading a socket can
cause it to overheat, resulting in a fire.
Bdore connecting other components to this
player, be sure to turn them off.
If you move your player suddenly from a cold
place to a warm place, condensation may occur
on the operating parts and lens and cause
abnormal disc playback. If this occurs, unplug
the player, wait for two hours, and then connect
the plug to the power outlet.
Then, insert the disc, and try to play back again.
o If the product makes an abnormal noise or
produces a burning smell or smoke, turn off
the power switch immediately and disconnect
the power plug from the wall outlet. Then,
contact the nearest customer service center for
technical assistance. Do not use the product.
Using the product as it is may cause a fire or an
electric shock.
t CAUT_0NSt
Donotdisposeof batteriesin a fire.
Donotshortcircuit,disassembleor overheatthe
batteries.
Dangerof explosionif batteryis incorrectlyreplaced.
Replaceonlywiththesameor equivalenttype.
IMPORTANT HEALTH AND SAFETY
INFORMATION FOR 3D PICTURES.
Read and understand the following safety
information before using the 3D function.
Some viewers may experience discomfort while
viewing 3D TV such as dizziness, nausea, and
headaches.
If you experience any such symptom, stop
viewing 3D TV, remove the 3D Active Glasses,
and rest.
Watching 3D images for an extended period of
time may cause eye strain. If you feel eye strain,
stop viewing 3D T\,{ remove your 3D Active
Glasses, and rest.
A responsible adult should frequently check on
children who are using the 3D function.
If there are any reports of tired eyes, headaches,
dizziness, or nausea, have the child stop viewing
3D TV and rest.
4 English
,, Do not use the 3D Active Glasses for other
purposes (Such as general eyeglasses,
sunglasses, protective goggles, etc.).
,, De not use the 3D function or 3D Active Glasses
while walking or moving around. Using the 3D
function or 3D Active Glasses while moving
around may cause you to bump into objects,
trip, and/or fall, and cause serious inju%
,, If you want to enjoy 3D content, connect a 3D
device (3D compliant AV receiver or TV)to the
player's HDMI OUT port using a high-speed
HDMI cable. Put on 3D glasses before playing
the 3D content.
,, The player outputs 3D signals only through
HDM! cable connected to the HDMI OUT port.
,, As the video resolution in 3D play mode is fixed
according to the resolution of the original 3D
video, you can not change the resolution to your
preference.
,, Some functions such as BD Wise, screen size
adjustment, and resolution adjustment may not
operate properly in 3D play mode.
,, You must use a high-speed HDMI cable for
proper output of the 3D signal.
,, Stay at least three times the width of the screen
from the TV when watching 3D images. For
example, if you have a 46-inch screen, stay 138
inches (I 1.5 feet) from the screen.
,, Place the 3D video screen at eye level for the
best 3D picture.
,, When the player is connected to some 3D
devices, the 3D effect may not function properly.
,, This player does not convert 2D content into
3D.
,, "Blu-ray 3D" and "Blu-ray 3D" logo are
trademarks of the Blu-ray Disc Association.
© 2013 Samsung Electronics Co,Ltd.
All rights reserved; No part or whole of this user's
manual may be reproduced or copied without the
prior written permission of Samsung Electronics
Co,Ltd.
2 Warning
3 Precautions
3 ImportantSafetyInstructions
3 DiscStorage&Management
3 HandlingCautions
4 Ushgthe3Dfunction
4 Copyright
7 DiscandFormatCompatibility
7 Disctypesandcontentsyourplayercan
play
7 Disctypesyourplayercannotplay
8 RegionCode
8 LogosofDiscstheplayercanplay
9 SupportedFormats
12 Accessories
13 FrontPaneJ
13 RearPanel
14 RemoteControl
14 TouroftheRemoteControl
15 ConnectingtoaTV
16 ConnectingtoanAudioSystem
16 Method1ConnectingtoanHDMI
supportedAVreceiver
16 Method2ConnectingtoanAVreceiver
withDobyDigitalorDTSdecoder
17 ConnectingtoaNetworkRouter
17 WiredNetwork
17 WirelessNetwork
18 ThemnitialSettingsProcedure
18 TheHomeScreen
19 AccessingtheSettingsScreen
19 ButtonsontheRemoteControlUsedfor
theSettingsMenu
20 SettingsMenuFunctions
26 Networksandthehternet
26 ConfiguringYourNetworkConnection
29 Wi-FiDirect
30 UpgradingSoftware
30 UpdateNow
31 AutoUpdate
32 PlayingCommercialDiscs
32 PlayingFilesonaUSBDevice
33 PlayingaDiscwithUserRecorded
Content
34 UsingtheAJRshareNetworkFunction
34 ToDownloadtheAiishareSoftware
34 ToDownloadtheAiishareSoftware
35 RayingContentLocatedonYourPCor
AilshareDevicethroughtheBiu--rayDisc
Player
35 ControllingthePlaybackofContent
Locatedon'YourPCwith'YourSmart
Phone
36 ControlJJngVideoPlayback
36 ButtonsontheRemoteControlusedfor
VideoPlayback
36 UsingtheToolsMenu
38 UsingtheView&OptionsMenus
o
o
@
English
39 ControllingMusicPRayback
39 ButtonsontheRemoteControlusedfor
MusicPlayback
39 UsingtheView&OptionsMenus
40 RepeatingTracksonanAudioCD
40 ShufflingTracksonanAudioCD
40 CreatingaPlaylistfromanAudioCD
41 Ripping
41 PBayingPhotoContents
41 UsingtheToolsMenu
42 UsingtheView&OptionsMenus
43 UsingtheSendFuncqon
44 LoggingmntoYourSamsungAccount
44 BeforeUsingMovies&TVShowsor
Apps
45 UsingMovies&TVShows
46 UsingApps
46 TheAppsScreenataGlance
46 DownloadingApplications
47 StartinganApplication
47 UsingtheMoreAppsScreen
47 SortingtheApps
47 UsingtheOptionsMenuFunctions
50 UpdateApps
51 ScreenMirroring
51 UsingtheWebBrowser
51 LinkBrowsingandPointerBrowsing
52 TheControlPanelataGlance
53 UsingtheSettingMenu
54 LinkingYourmnternetServiceAccounts
tothePlayer
55 BD-LmVETM
56 Compliance and Compatibility Notice
57 Copy Protection
57 Network Service Disclaimer
58 License
59 Additional mnformation
59 Notes
61 Resolution according to the contents type
62 Digital Output Selection
63 TrouMeshooting
65 Repairs
66 Specifications
6 English
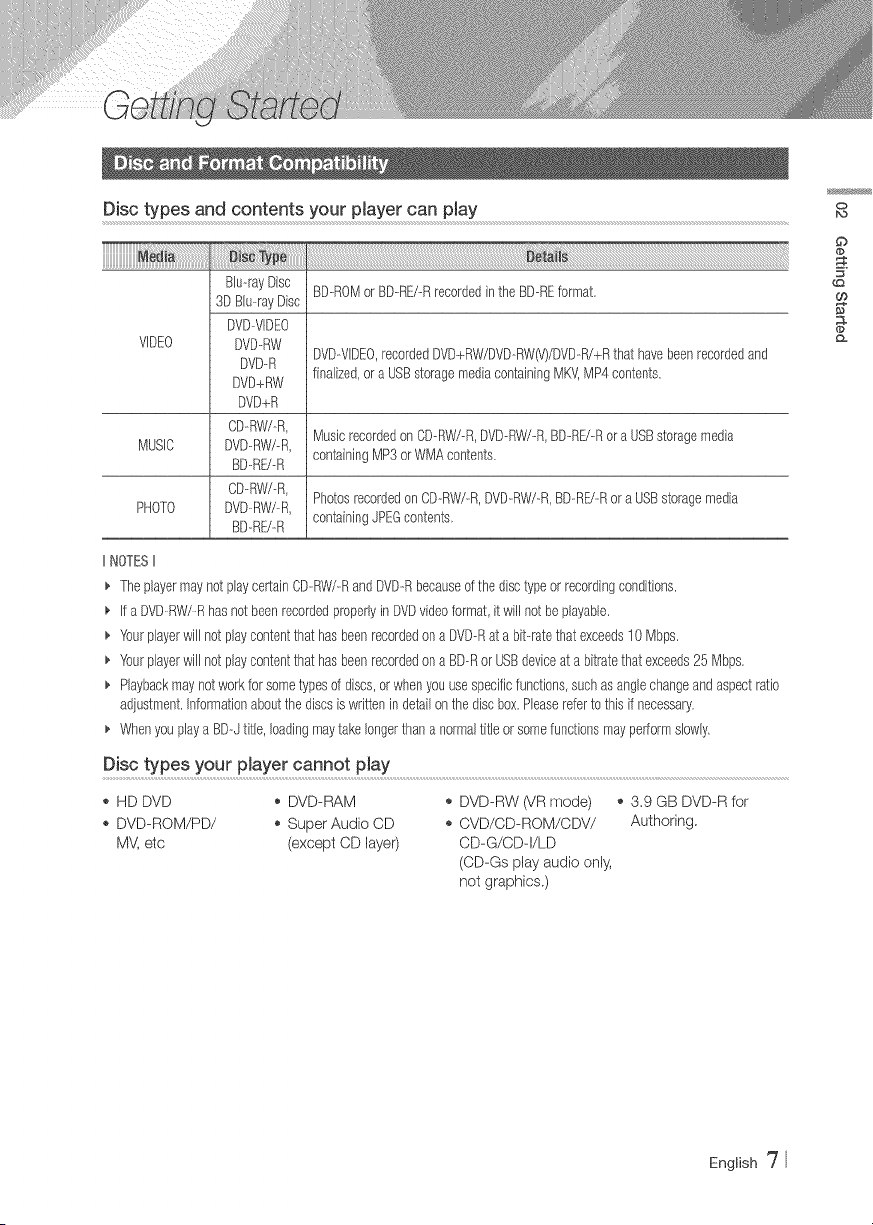
Disc types and contents your pmayer can pmay
_i Ty_::::::::::::
VIDEO
BD-ROMorBD-RE/-RrecordedintheBD-REformat.
Blu--rayDisc
3DBlu--rayDisc
DVD--VlDEO
DVD--RW
DVD--R
DVD+RW
DVD+R
CD-RW/-R,
DVD-RW/-R,
BD-RU-R
CD._RW/._R,
DVD._RW/._R,
BD-RE/-R
DVD--VIDEO,recordedDVD+RW/DVD.-RW(V)/DVD-R/+Rthat havebeenrecordedand
finalized,or a USBstoragemediacontainingMKV,MP4contents.
MusicrecordedonCD--RW/--R,DVD--RW/-R,BDRE/-Rora USBstoragemedia
MUSIC
containingMP3or WMAcontents.
PhotosrecordedonCD-_RW/-R,DVD-RW/-R,BD-_RE/-Ror a USBstoragemedia
PHOTO
containingJPEGcontents,
IINOTESII
_, TheplayermaynotplaycertainCD-RW/-RandDVD-Rbecauseof thedisctypeorrecordingconditions.
_, If a DVDRW/R hasnot beenrecordedproperlyinDVDvideoformat,itwill notbe playable.
_, Yourplayerwill notplaycontentthat hasbeenrecordedona DVD--Rat a bit--ratethat exceeds10 Mbps.
_, Yourplayerwill notplaycontentthat hasbeenrecordedona BD--Ror USBdeviceat a bitratethat exceeds25 Mbps,
_, Playbackmaynotworkforsometypesof discs,orwhenyouusespecificfunctions,suchasanglechangeandaspectratio
adjustment,Informationaboutthediscsis writtenin detailonthe discbox,Pleasereferto this if necessary,
_, Whenyouplaya BD--Jtitle, loadingmaytakelongerthana normaltitleorsomefunctionsmayperformslowly,
Disc types your p_ayer cannot pJay
,_ HD DVD o DVD-RAM
,_ DVD-ROM/PD/ o Super Audio CD
MV, etc (except CD layer)
o DVD-RW (VR mode) ,_ 3.9 GB DVD-R for
o CVD/CD-ROM/CDV/ Authoring,
CD-G/CD-I/LD
(CD-Gs play audio only,
not graphics.)
O
bo
English _7
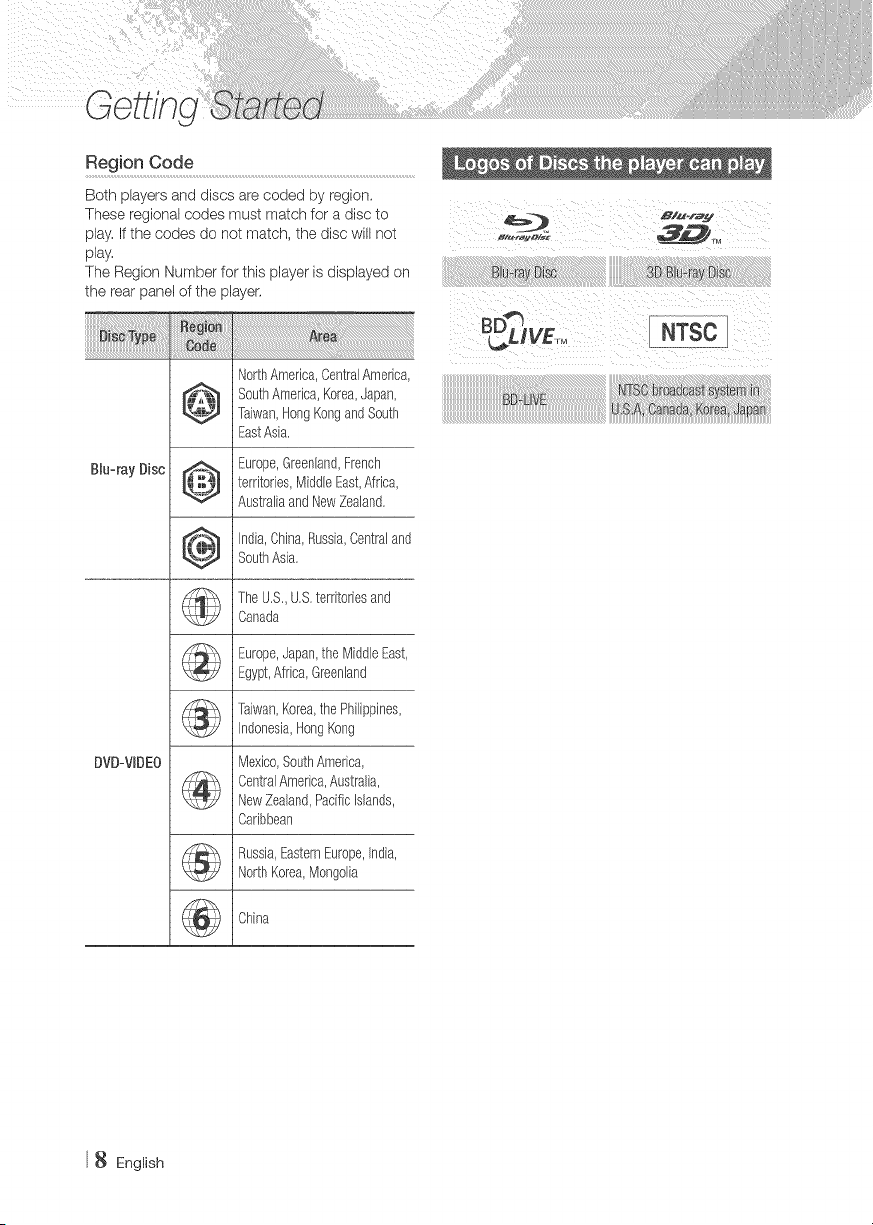
Both players and discs are coded by region.
These regional codes must match for a disc to
play. If the codes do not match, the disc will not
play.
The Region Number for this player is displayed on
the rea_ panel of the player,
B_u-rayDisc
DVD:VBDEO
NorthAmedca,CentralAmerica,
_][_ SouthAmerica,Korea,Japan,
_ Taiwan,HongKongandSouth
EastAsia,
EuropeGreenland,Frenctl
_.t_ / territories,MiddleEast,Africa,
_t._ AustraliaandNewZealand.
_ India,China,Russia,Centraland
_l_J SouthAsia,
k4_
TheU,S,,U,S,territoriesand
Canada
Europe,Japan,the MiddleEast,
Egypt,Africa,Greenland
Taiwan,Korea,the Philippines,
Indonesia,Ho% Kong
Mexico,SouthAmerica,
CentralAmerica,Australia,
NewZealand,Pacificislands,
Caribbean
Russia,EasternEurope,india,
NorthKorea,Mongolia
China
'E :L ........................................
English
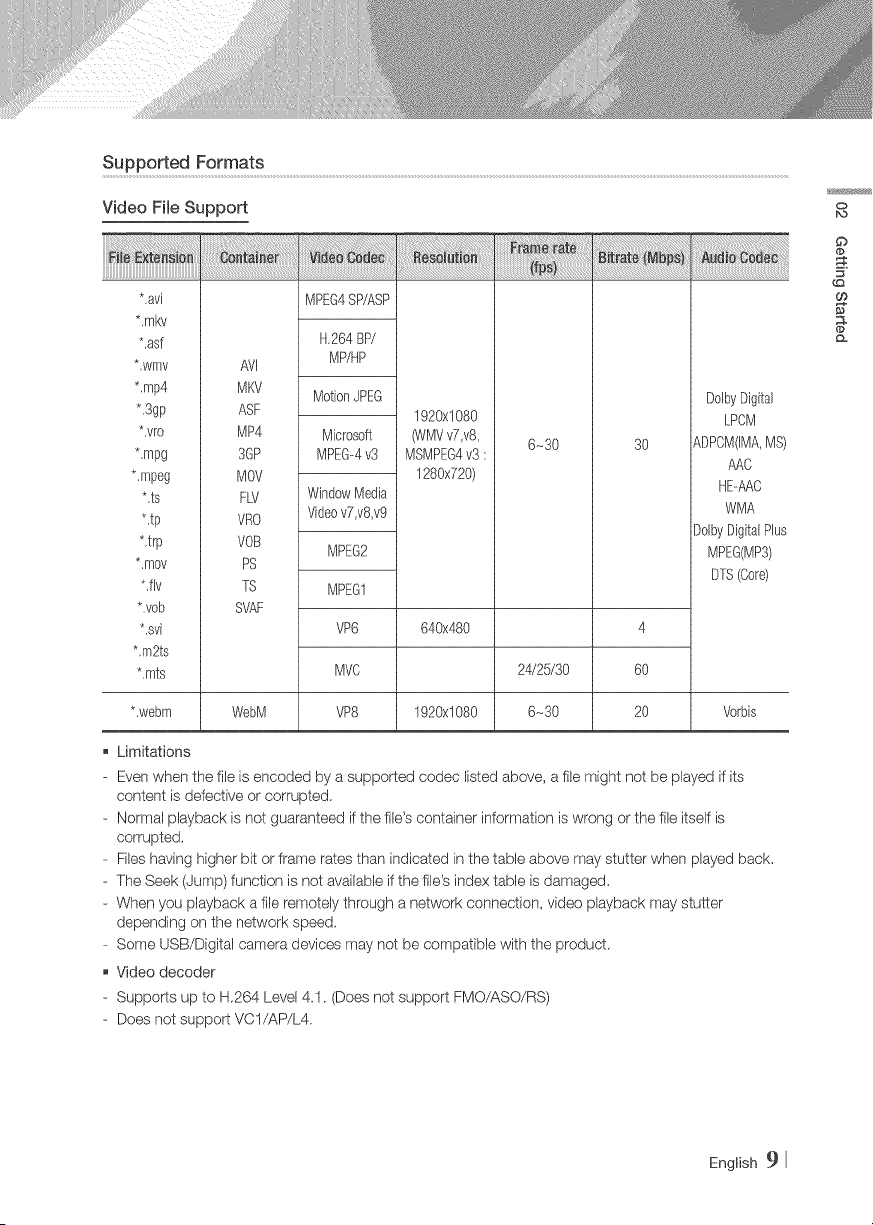
SupportedFormats
Video File Support
**avi
*,mkv
**asf
*,wrfw
*,mp4
*.3gp
**vro
*.mpg
*.mpeg
*,ts
**tp
*,trp
*,mov
*.fly
*,vob
*,svi
*,m2ts
*.rots
AVJ
MKV
ASF
MP4
3@
MOV
FW
VRO
rOB
PS
7S
SVAF
1920xl080
ONMVv7,v8,
MSMPEG4v3 :
1280x720)
MPEG4SP/ASP
H,264BP/
MP/HP
MotionJPEG
Microsoft
MPEG-4v3
WindowMedia
Videov7,v8,v9
MPEG2
MPEG1
VP6
MVC
VP8
640x480
6_30 3O
24/25/30
6_30
DolbyDigital
LPCM
ADPOM(IMA,MS)
AAC
HE#7\C
WMA
DolbyDigitalPlus
MPEG(MP3)
DTS(Core)
4
6O
2O**webm WebM 1920xl080 Vorbis
Limitations
- Even when the file is encoded by a supported codec Ibted above, a file might not be played if its
content is defective or corrupted,
- Normal playback is not guaranteed if the file's container information is wrong or the fib itself is
corrupted,
- Files having higher bit or frame rates than indicated in the table above may stutter when played back,
- The Seek (Jump) function is not available if the file's index table is damaged,
- When you playback a file remotely through a network connection, video playback may stutter
depending on the network speed.
- Some USB/Digital camera devices may not be compatible with the product,
Video decoder
- Supports up to H,264 Level 4.1. (Does not support FMO/ASO/RS)
- Does not support VCI/AP/L4.
0
bo
£
t_
English 9
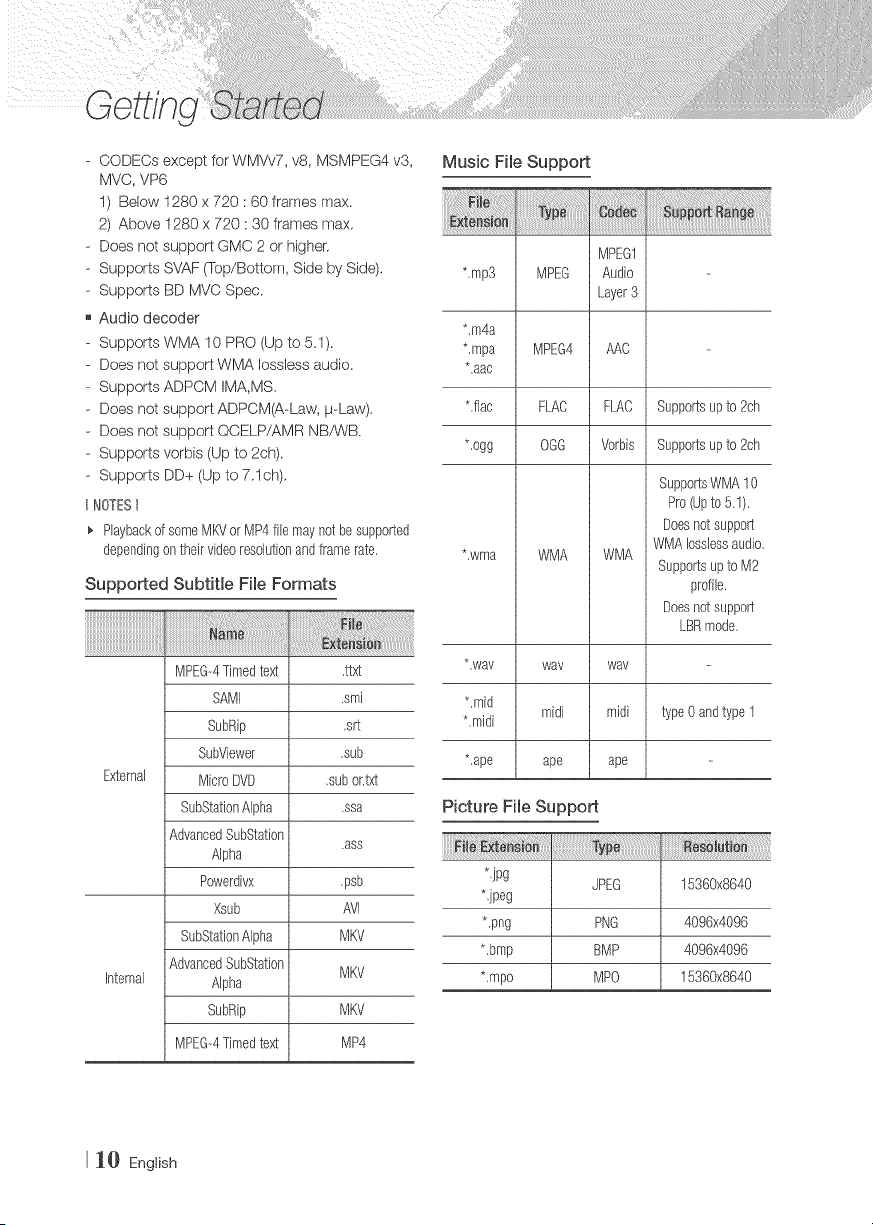
- CODECs except for WMVv7, v8, MSMPEG4 v3,
MVC, VP6
I) Below 1280 x 720 : 60 frames max.
2) Above 1280 x 720 : 30 frames max,
- Does not support GMC 2 or higher,
- Supports SVAF (Top/Bottom, Side by Side),
- Supports BD MVC Spec.
Audio decoder
Supports WMA 10 PRO (Up to 5.1).
Does not support WMA Iossless audio.
Supports ADPCM IMA,MS,
Does not support ADPCM(A-Law, p-Law).
Does not support QCELP/AMR NBP_A_/B.
Supports verbis (Up to 2ch).
Supports DD+ (Up to 7.1ch),
INOTES I
Playbackof someMKVor MP4file mayriotbe supported
dependingon theirvideoresolutionandframerate,
Supported Subtitle File Formats
MPEG--4Timedtext ,ttxt
SAMI .smi
SubRip ,srt
SubViewer ,sub
External MicroDVD ,subor.txt
SubStationAlpha .ssa
AdvancedSubStation
,ass
Alpha
Powerdivx ,psb
Xsub AVl
SubStationAlpha MKV
AdvancedSubStation
MKV
Internal Alpha
SubRip MKV
MPEG-4Timedtext MP4
Music File Support
MPEG1
*,mp3 MPEG Audio
Layer3
*.m4a
*,mpa MPEG4 AAC
*.aac
Lilac FI.AC FLAC Supportsup to 2ch
*.ogg OGG Vorbis Supportsup to 2ch
*,wma WMA WMA
SupportsWMA10
Pro(Upto 5.1).
Doesnotsupport
WMAIosslessaudio,
Supportsupto M2
profile,
Doesnotsupport
LBRmode,
*,way way way
*.mid
midi midi
*,midi
typeOandtype1
*,ape ape ape
Picture File Support
*,jpg
JPEG 15360x8640
*jpeg
*.png PNG 4096x4096
*,bmp BMP 4096x4096
*,mpo MPO 15360x8640
J_} English
Notes on the USB connection
,, Your player supports USB storage media, MP3
players, digital cameras, and USB card readers.
,, Some USB/digital camera devices may not be
compatible with the player.
,, Your player supports the FATI 6, FAT32, end
NTFS files systems.
o Connect USB devices directly to the player's
USB port. Connecting through a USB cable
may cause compatibility problems.
,_ Inserting more than one memory device into
a multPcard reader may cause the reader to
operate improperly.
* The player does not support the PTP protocol.
,, Do not disconnect a USB device during a
"loading" process.
o The bigger the image resolution, the longer the
image takes to display.
o This player cannot play MP3 files with DRM
(Digital Rights Management) downloaded from
commercial sites.
o Your player only supports video that is under
30fps (frame rate).
o Your player only supports USB Mass Storage
Class (MSC) devices such as thumb drives and
USB HDD. (HUB is not supported.)
,, Certain USB HDD Devices, multi-card readers
and thumb drives may not be compatible with
this playen
,, if some USB devices require excessive power,
they may be limited by the circuit safety device.
,_ If playback from a USB HDD is unstable, provide
additional power by plugging the HDD into a
wall socket.
If the problem continues, contact the USB HDD
rrlanufacturen
SAMSUNG is not responsible for any data file
damage or data loss.
Your player does not support NTFS compressed,
sparse, or encrypted files.
- You can repair or format a USB device on
your Desktop PC. (MS-Windows OS only)
AVCHD (Advanced Video Codec High
Definition)
,_ This player can play back AVCHD format discs.
These discs are normally recorded and used in
camcorders.
,_The AVCHD format is a high definition digital
video camera format.
,_ The MPEG-4 AVC/H.264 format compresses
images with greater efficiency' than the
conventional image compressing format.
,_ Some AVOHD discs use the "x.v.Color" format.
This player can play back AVCHD discs that use
"x.v.Color" format.
,_ "x.v.Oelor" is a trademark of Sony Corporation.
,_ "AVCHD" and the AVCHD logo are trademarks
of Matsushita Electronic Industrial Co., Ltd. and
Sony Corporation.
NOTESt
_, SomeAVCHDformatdiscsmaynotplay,dependingon
therecordingconditions,
AVCHDformatdiscsneedto befinalized,
_, "x,v.Color"offersa widercolorrangethannormalDVD
camcorderdiscs,
O
English ]]
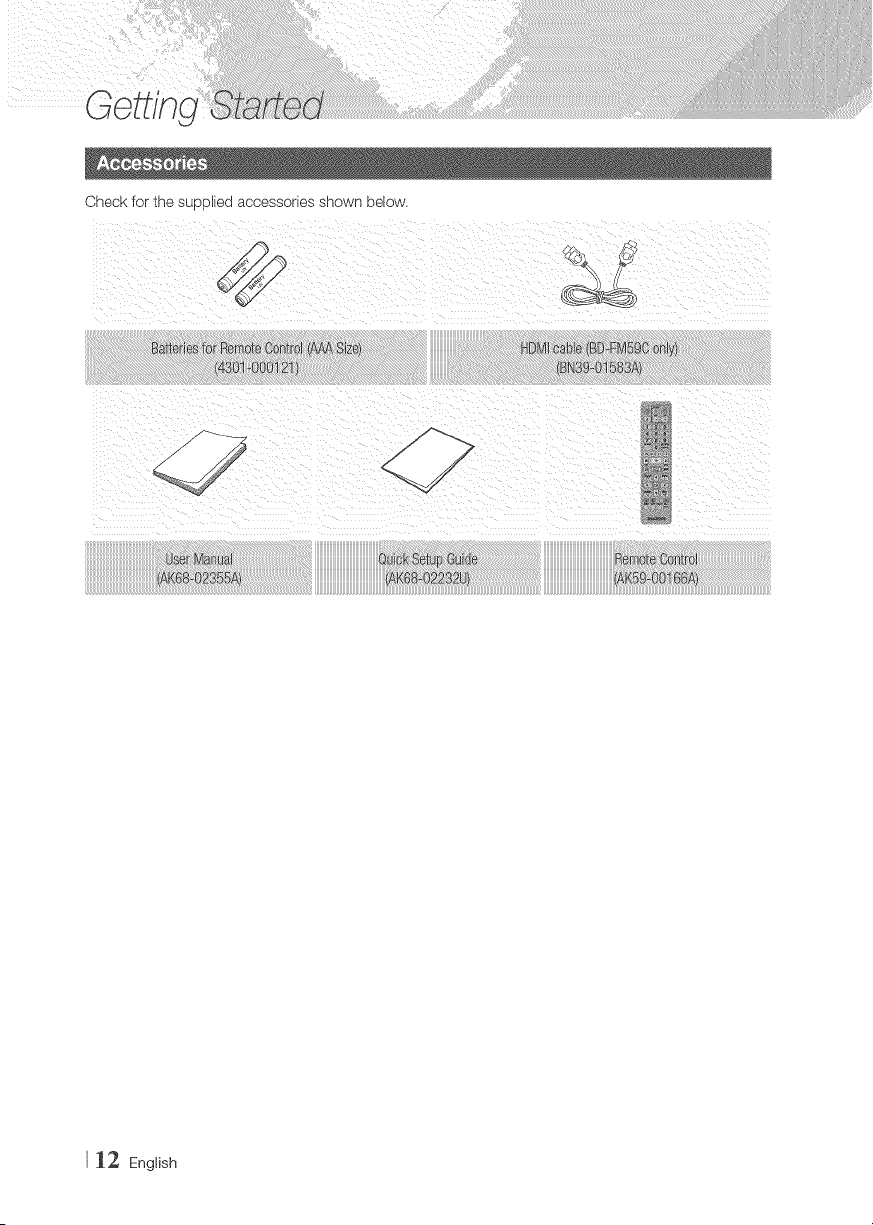
Check for the supplied accessories shown below.
112 English
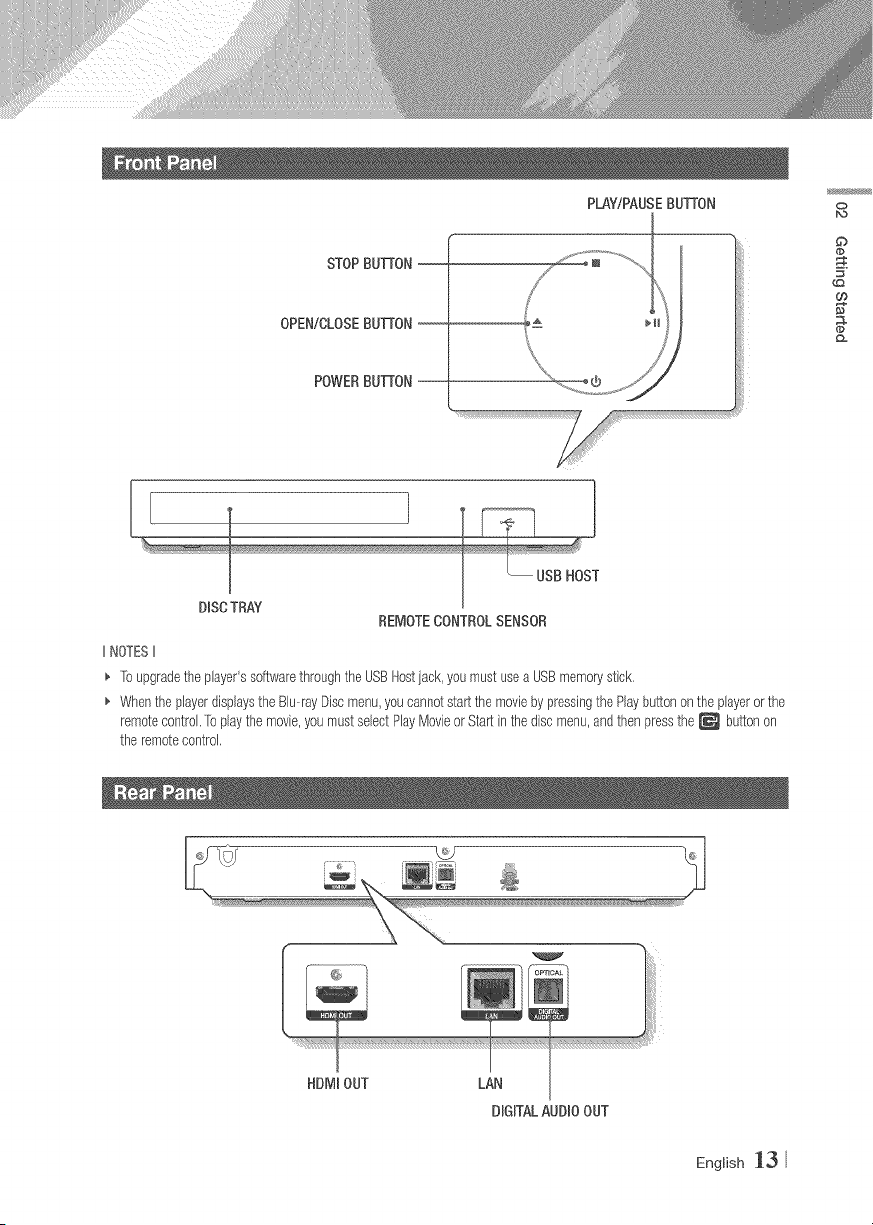
STOPBIJTrON--
OPEN/CLOSEBUTFON--
POWERBUTFON--
PLAY/PAUSEBUTFON 0
G)
o:
[
DISC TRAY
REMOTECONTROLSENSOR
IINOTESII
_' Toupgradethe player'ssoftwarethroughtheUSBHostjack,you mustusea USBmemorystick,
_, Whenthe playerdisplaystheBlu--rayDiscmenu,youcannotstartthe moviebypressingthePlaybuttononthe playerorthe
remotecontrol,Toplaythe movie,youmustselectPlayMovieor Startinthediscmenu,andthenpressthe _ buttonon
theremotecontrol,
HDMIOUT LAN
DIGITALAUDIOOUT
English _3
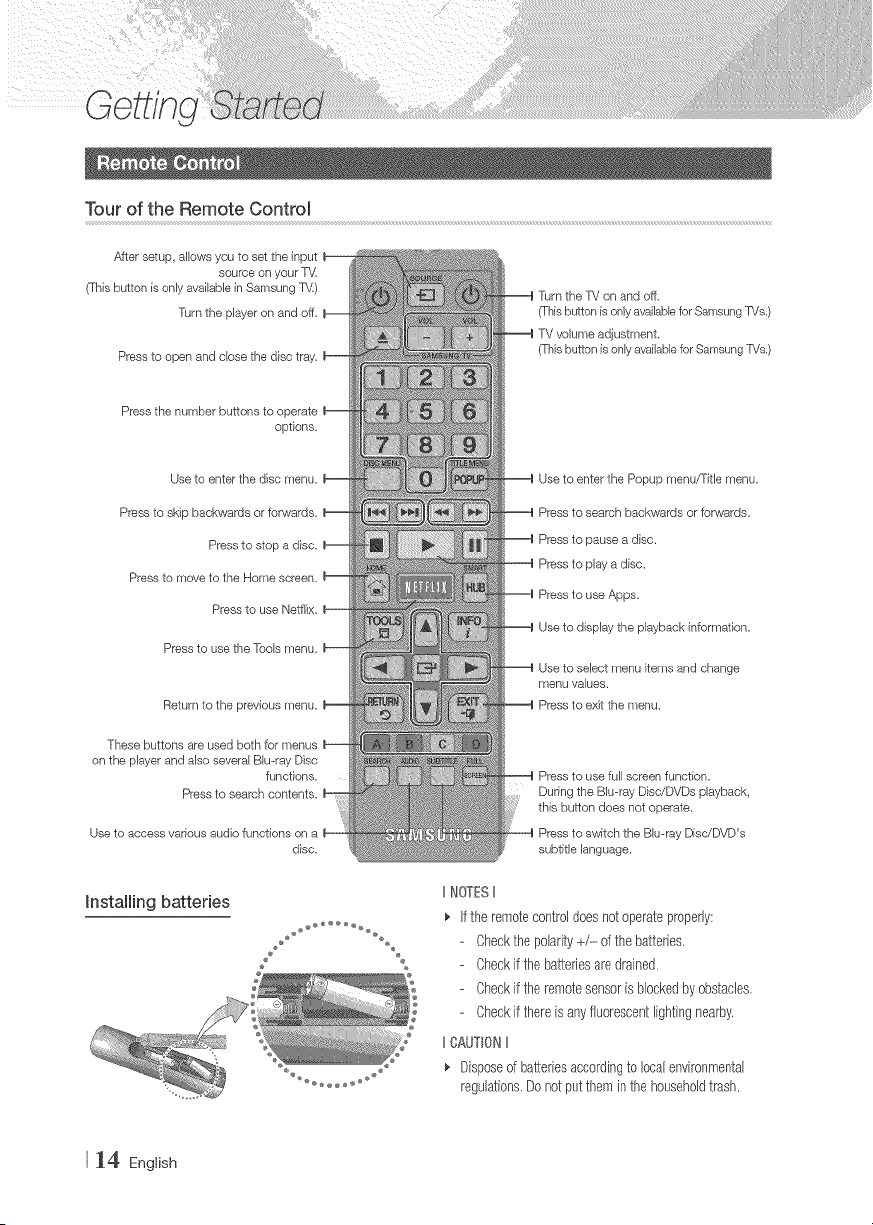
Tour of the Remote ControJ
After setup, allows you to set the input
source on your T',,4
(This button is only available in Samsung TV)
Turn the player on and off,
Press to open and close the disc tray,
Press the number buttons to operate
options,
Use to enter the disc menu,
Press to skip backwards or fonJvards,
Press to stop a disc,
Press to move to the Home screen,
Press to use Netfiix,
Press to use the Tools menu,
Return to the previous menu,
These buttons are used both for menus
on the player and also several Blu-ray Disc
functions,
Press to search contents,
Useto access vadous audio functions on a
disc,
Turn the T'd on and off,
(This button is only available for Samsung _Js,)
T'd volume adjustment,
(7}_isbutton is only available for Samsung P/s,)
Use to enter the Popup menu/Fitle menu,
Press to search backwards or forwards,
Press to pause a disc,
Press to play a disc,
Press to use Apps,
Use to display the playback information,
Use to select menu items and change
menu values,
Press to exit the menu,
Press to use full screen function,
Dur#ng the Blu-ray Disc/DVDs playback,
this button does not operate,
Press to switch the Bluwray DisdDVD's
subtitle language,
hstalling batteries
2 %
IINOTESII
If the remotecontroldoesnotoperateproperly:
Checkthe polarity+/-----d the batteries,
Checkifthe batteriesaredrained.
Checkifthe remotesensoris blockedbyobstacles,
Checkifthereisanyfluorescentlightingnearby,
IICAUT_0NII
Disposeof batteriesaccordingto localenvironmental
regulations,Donotput themin thehouseholdtrash.
_4 English
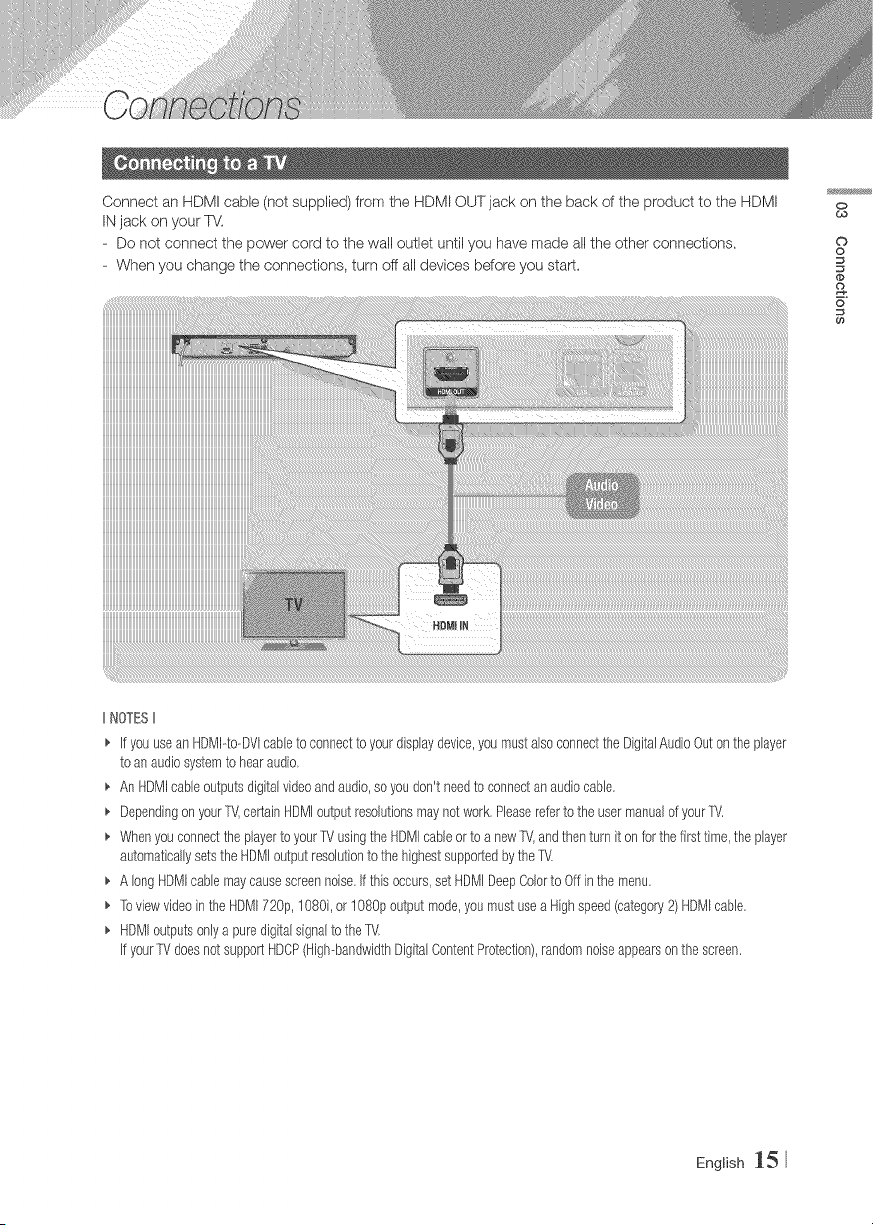
Connect an HDMI cable (not supplbd) from the HDMI OUT jack on the back of the product to the HDMI
IN jack on your TV.
- Do not connect the power cord to the wall outlet until you have made all the other connections,
- When you change the connections, turn off all devices before you start,
0
¢0
©
o
o
6
IINOTESII
_' if youuse anHDMPto--DVIcabb to connecttoyourdisplaydevice,youmustalsoconnectthe DigitalAudioOutonthe player
to anaudiosystemto hearaudio,
_, AnHDMIcableoutputsdigitalvideoandaudio,soyoudon't needto connectanaudiocabb,
_, Dependingon your1_',certainHDMJoutputresoJutionsmaynotwork.Phasereferto the usermanuaJof yourTV,
_, Whenyouconnectthe playertoyourTVusingtheHDMIcabb or to a new1_',andthenturn it onfor the firsttime,the player
automaticallysetstheHDMJoutputresoJutionto the highestsupportedbythe TV,
_, A longHDMIcabb maycausescreennoise,if thisoccurs,setHDMJDeepCobrto Offinthe menu.
_, ToviewvideointheHDM172@,1080i,or 1080poutputmode,youmustusea Highspeed(category2) HDMIcabb,
_, HDMJoutputsonlya puredigitalsignalto theTV,
if your1_'doesnotsupportHDCP(High--bandwidthDigitalContentProtection),randomnoiseappearsonthe screen.
English _5
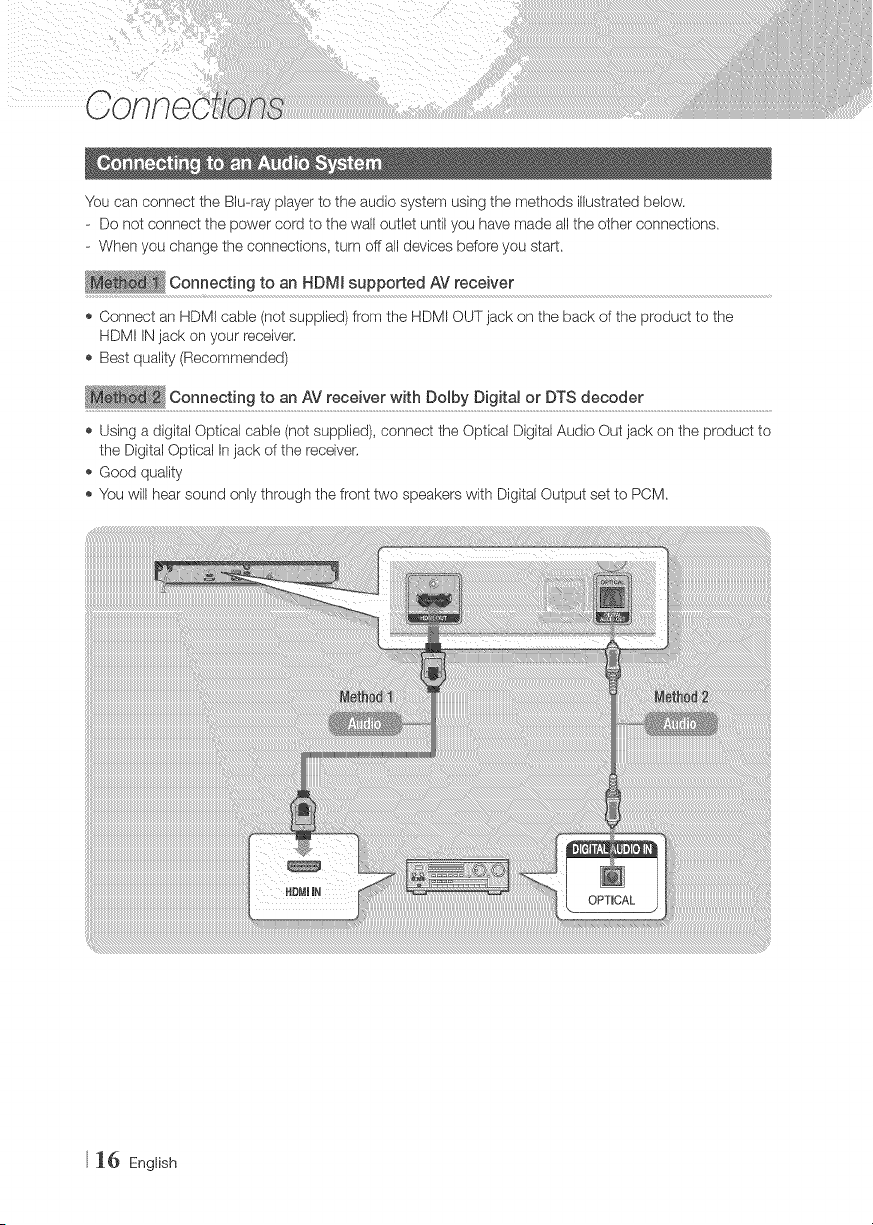
You can connect the Blu-ray player to the audio system using the methods illustrated below.
- Do not connect the power cord to the wall outlet until you have made all the other connections.
- When you change the connections, turn off all devices be.fore you start.
Connecting to an HDMI supported AV receiver
Connect an HDM! cable (not supplied) from the HDMI OUT jack on the back of the product to the
HDMI IN jack on your receiver.
Best quality (Recommended)
C°n"eCt!n t° _ AV,'ett!ve,,,!thDo!bDjg!ta o DTSdt°°de,".......................................................................................
Using a digital Optical cable (not supplied), connect the Optical Digital Audio Out jack on the product to
the Digital Optical In jack of the receiver.
Good quality
You will hear sound only through the front two speakers with Digital Output set to PCM.
_6 English
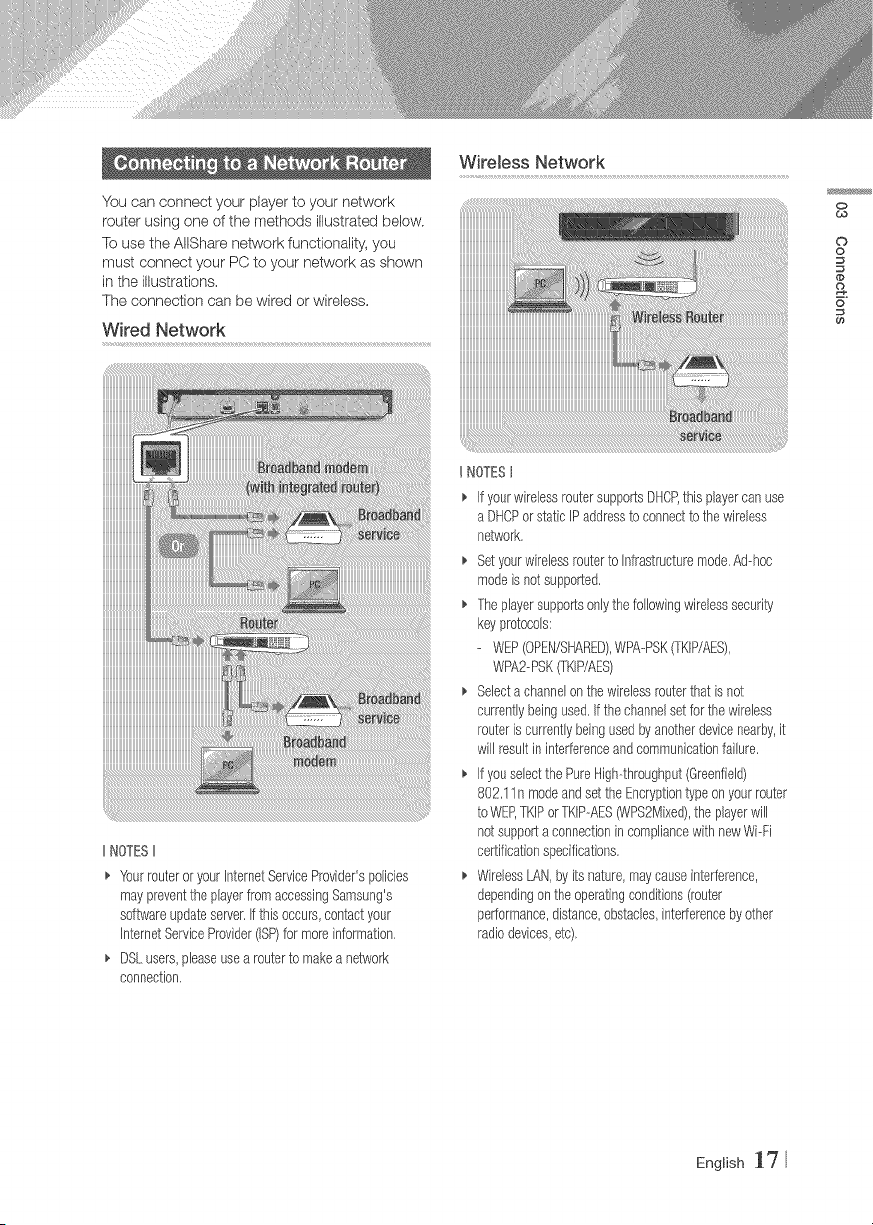
W!re!ess Networ k
You can connect your player to your network
router using one of the methods illustrated below,
To use the AlIShare network functionality, you
must connect your PC to your network as shown
in the illustrations,
The connection can be wired or wireless,
Wired Network
0
¢0
o
o
(#
2.
6
IINOTESII
_. YourrouteroryourInternetServiceProvider'spolicies
maypreventtheplayerfromaccessingSamsung's
softwareupdateserver.Ifthis occurs,contactyour
JnternetServiceProvider(ISP)for moreinformation,
DSLusers,pleaseusea routerto makea network
connection,
UNOTESt
IfyourwirelessroutersupportsDHCP,this playercanuse
a DHCPorstaticIPaddressto connectto thewireless
network,
Setyourwirelessrouterto Infrastructuremode.Ad-hoc
modeis notsupported,
Theplayersupportsonlythefollowingwirelesssecurity
keyprotocols:
- WEP(OPEN/SHARED),WPA-PSK(TKIP/AES),
WPA2-PSK(TKIP/AES)
Selecta channelonthewirelessrouterthatis not
currentlybeingused,Ifthe channelsetfor thewireless
routeris currentlybeingusedbyanotherdevicenearby,it
will resultininterferenceandcommunicationfailure.
Ifyouselectthe PureHigh-throughput(Greenfield)
802,11n modeandset the Encryptiontypeon yourrouter
to WEP,TKIPorTKIP-AES_PS2Mixed),theplayerwill
notsupporta connectionincompliancewithnewWi-Fi
certificationspecifications,
WirelessLAN,byits nature,maycauseinterference,
dependingon theoperatingconditions(router
performance,distance,obstacles,interferencebyother
radiodevices,etc),
English 17
After you have connected the player to your %4
turn on the TV and player. When you turn on the
player the first time, the player's Initial Settings
screen appears on the TV. The Initial Setting
procedure,etsyousettheOnScreenOlsp,ay
(OSD) and menu languages, the aspect ratio
(screen size), the network type, and connect
the player to your network. For complete Initial
Settings instructions, see the Quick Setup Guide.
t NOTESII
_, IfyouskipNetworkSetupduringthe InitialSettings
procedure,youcanconfigureyournetworksettingslater.
See"ConfiguringYourNetworkConnection"on pages
26-29 for instructions.
_, Ifyouwantto displaythe InitialSettingsscreenagainand
makechanges,selectSettings> System> Setupin
the Homescreenor selecttheResetoption.(Seepages
22or 25)
Ifyouwantto useanAnynet+(HDMhCE©function,
pleasefollowthe instructionsbelow.
1) Connectthe playerto anAnynet+(HDMI-CEC)--
compliantSamsungTVusingHDMICable.
2) SettheAnynet+(HDMPCE©featureto Oninboththe
T_'andtheplayer.
3) SettheX/to the InitialSettingsProcedure.
iiiiiiiiiiiiiiiiiiiiiii_
i!iiiiiiiiiiiiiiiiiiiiiiJ{_
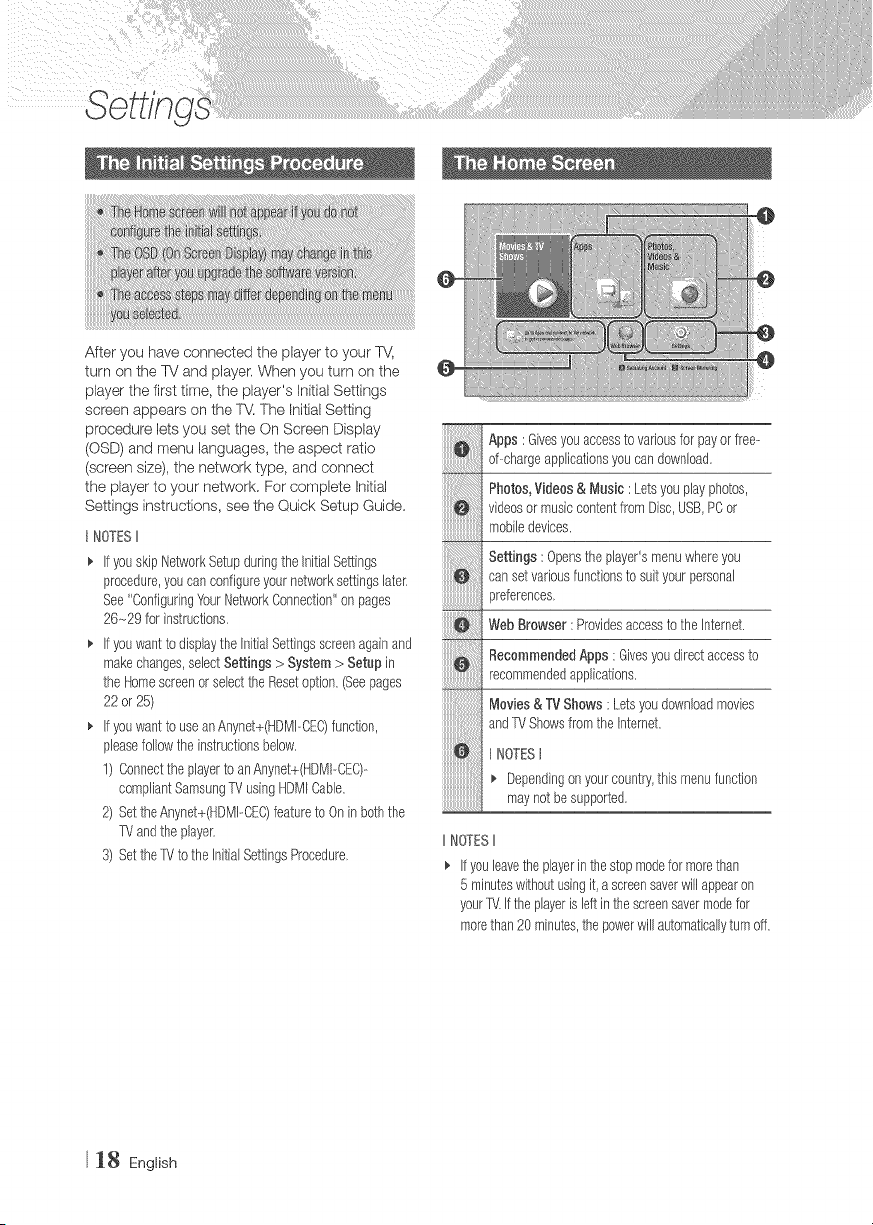
Apps : Givesyouaccesstovariousfor payorfree-
d--chargeapplicationsyoucandownload.
Photos,Videos& Music : Letsyouplayphotos,
videosor musiccontentfromDisc,USB,PCor
mobiledevices.
Settings: Opensthe player'smenuwhereyou
cansetvariousfunctionsto suityourpersonal
}references.
WebBrowser: Providesaccessto theInternet.
RecommendedApps : GNesyou directaccessto
recommendedapplications,
Nlovies& TV Shows: Letsyoudownloadmovies
andTVShowsfromthe Internet.
NOTESt
Dependingonyourcountry,this menufunction
maynot besupported,
IINOTESII
_, If youleave'[heplayerin tile stopmodefor morethan
5 minuteswithoutusingit,a screensaverwillappearon
yourTV.If theplayeris leftinthescreensavermodefor
morethan20 minutes,thepowerwill automaticallyturn off.
18 English
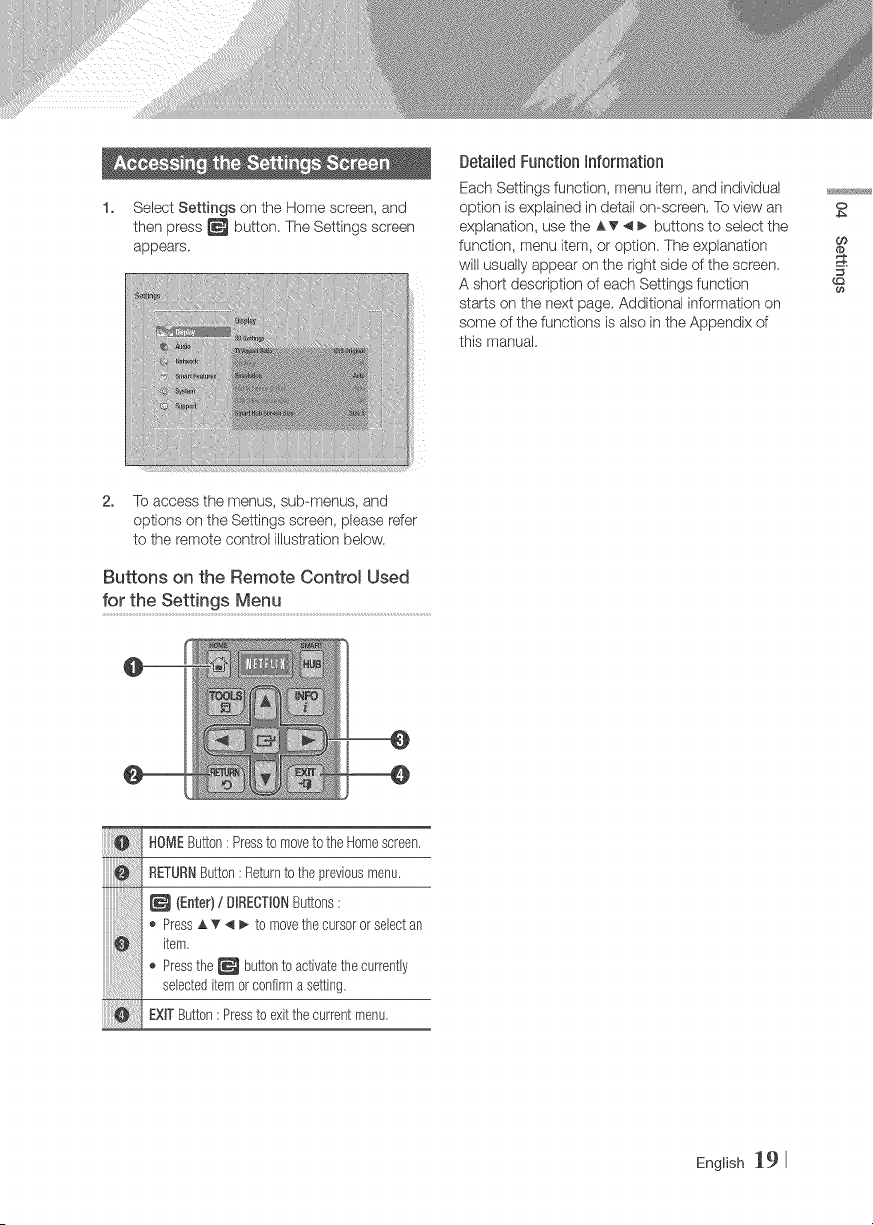
1. Select Settings on the Home screen, and
then press _ button. The Settings screen
appears.
Detailed Function Information
Each Settings function, menu item, and individual
option is explained in detail on-screen, To view an
explanation, use the AT _ _ buttons to select the
function, menu item, or option. The explanation
will usually appear on the right side of the screen.
A short description of each Settings function
starts on the next page, Additional information on
some of the functions is also in the Appendix of
this manual.
O
CO
2. To access the menus, sub-menus, and
options on the Settings screen, please refer
to the remote control illustration below.
Buttons on the Remote Control Used
for the Settings Menu
HOMEButton: Pressto moveto theHomescreen,
RETURNButton: Returnto thepreviousmenu.
(Enter)/ BF_EOTIONButtons:
,_ Press_ _' 4 I_ to movethe cursoror selectan
item,
,_ Pressthe_ buttonto activatethecurrently
selecteditemor confirma setting.
EXFButton:Presstoexitthecurrentmenu,
English _9
iiiiiiiiiiiiiiiiiiiiiiiiiiiiiiiiiiiiiiiiiiiiiiiiiiiiii ii ! !iiiiiiiiiiiiiiiiiiiiiiiiiiiiiiiiiiiiiiiiiiiiiiiiiiiiii ii i i ! i! B! ! !! !! !! !! !! i i!
iii
________________________________________________________________________________________________
iiiiiiiiiiiiiiiiiiiiiill_%1%1%1%1%1%1%1111111
iiiiiiiiiiiiiiiiiiiiiiilJJ_%_
JJJJJJJJJJJJJJJJJJJJJJJJJhu__
iiiiiiiiiiiiiiiiiiiiiiiiiiiiiill_i_i_i_i_i_i_i_i_i_i_i_i_i_i_i_i_i_i_i_i_i_i_i_i_i_i_i_i_i_i_i_i_i_i_i_i_i_i_i_i_i_i_i_i_i_i_i_i_i_i_i_i_i_i_i_i_
iiiiiiiiiiiiiiiiiiiiiiiiiiiiiiiiiiill
iiiiiiiiiiiiiiiiiiiiiiiiiiiiiiiiiiiiiiiiii%1%1%1%1%1%:
iiiiiiiiiiiiiiiiiiiiiiiiiiiiiiiiiiiiiiiiiiiiiill%:%:%:%:%:
iiiiiiiiiiiiiiiiiiiiiiiiiiiiiiiiiiiiiiiiiiiiiiiiiiill
iiiiiiiiiiiiiiiiiiiiiiiiiiiiiiiiiiiiiiiiiiiiiiii
iiiiiiiiiiiiiiiiiiiiiiiiiiiiiiiiiiiiiiiiiiiiiiiiiiiiiiiiiiiiiiii
iiiiiiiiiiiiiiiiiiiiiiiiiiiiiiiiiiiiiiiiiiiiiiiiiiiiiiiiiiiiiiiiiiiii_iiiililililililililililililililililil
iiiiiiiiiiiiiiiiiiiiiiiiiiiiiiiiiiiiiiiiiiiiiiiiiiiiiiiiiiiiiiiiiiiii k! ii ii ii ii ii ii ii ii ii ii ii ii ii ii ii i
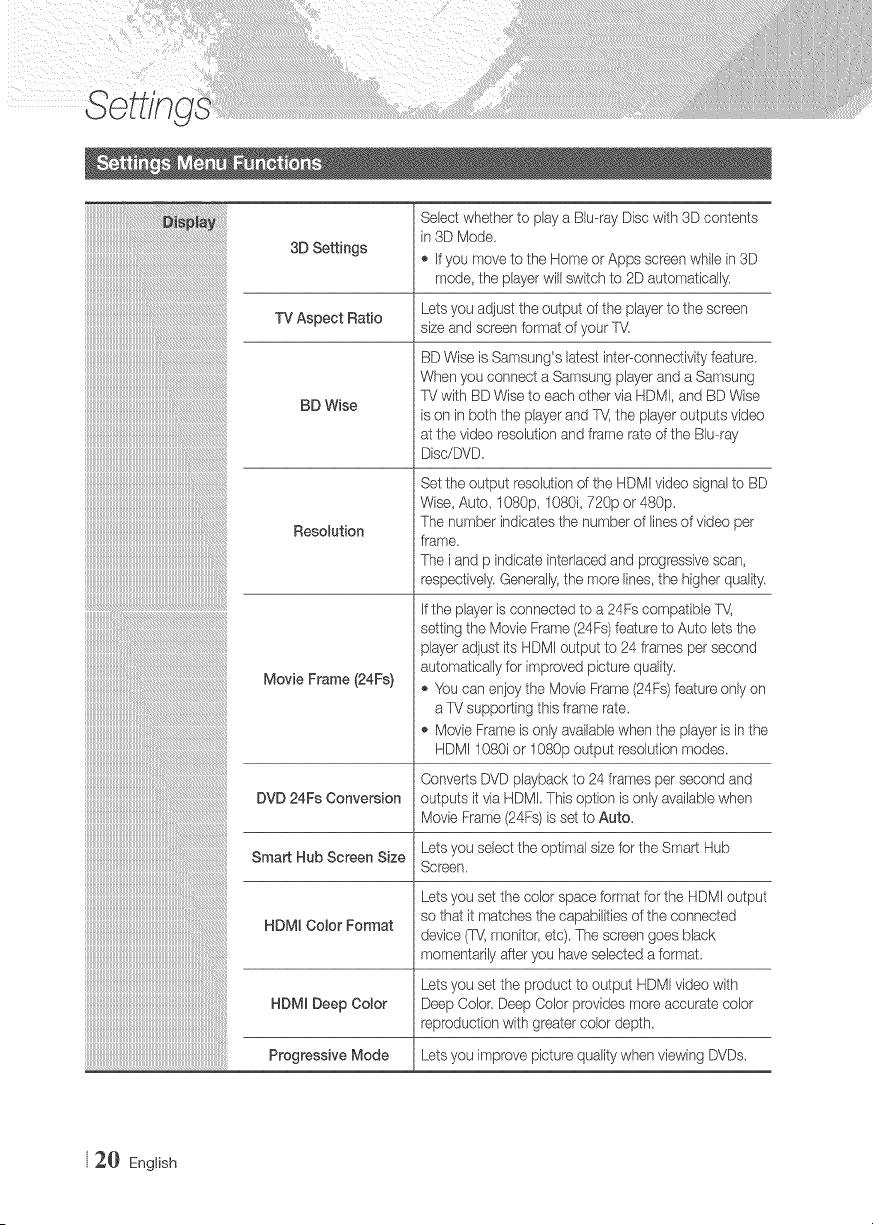
3D Settings
Select whether to play a Blu-ray Disc with 3D contents
in 3D Mode,
,_ If you move to the Home or Apps screen while in 3D
mode, the player will switch to 2D automatically.
Lets you adjust the output of the player to the screen
TV Aspect Ratio size and screen format of your TV.
BD Wise
Resolution
Movie Frame (24Fs)
DVD 24Fs Conversion
Smart Hub Screen Size
HDMJ Color Format
HDMJ Deep Color
Progressive Mode
BD Wise is Samsung's latest inter--connectivityfeature
When you connect a Samsung player and a Samsung
TV with BD Wise to each other via HDMI, and BD Wise
is on in both the player and TV,the player outputs video
at the video resolution and frame rate of the Biu-ray
Disc/DVD,
Set the output resolutionof the HDMI video signal to BD
Wise, Auto, I OS0p,1080i, 720p or 480p.
The number indicates the number of linesof video per
frame,
The i and p indicate interlaced and progressive scan,
respedively. Generally,the more lines, the higher quality,
if the playeris connected to a 24Fs compatible %/,
setting the Movie Frame (24Fs)feature to Auto lets the
player adjust its HDMi output to 24 frames per second
automatically for irr_provedpicture quality.
,_ You can enjoy the Movie Frame (24Fs) feature only on
a TV supporting this frame rate.
,_ Movie Frame is only availablewhen the player is in the
HDM11080i or 1080p output resolution modes.
Converts DVD playback to 24 frames per second and
outputs it via HDMi, This option is only available when
Movie Frame(24Fs) is set to Auto,
Lets you select the optimal size for the Smart Hub
Screen.
Lets you set the color space format forthe HDMI output
so that it rnatches the capabilities of the connected
device (TV,monitor, etc), The screen goes black
momentarily after you haveselected a format.
Lets you set the product to output HDMI video with
Deep Color, Deep Color provides more accurate color
reproduction with greater color depth,
Lets you improve picture quality when viewing DVDs.
2_} English
iiiiiiiiiiiiiiiiiiiiiiiiiiiiiiiiiiiiiiiiiiiiiiiiiiiiiiiiiiiiiiiiiiiiiiiiiiiiiiiiiiiiiiiiiiiiiiiiiiiiiiiiiiiiiiiiiiiiiii ! ! i @J
lllllllllllllllllllllllllllllllllllllllllllllllllllllllllllllllllllllllllllllllllllllllllllllllllli
lllllllllllllllllllllllllllllllllllllllllllllllllllllllllllllllllllllllllllllllllllllllllllllllllli
lllllllllllllllllllllllllllllllllllllllllllllllllllllllllllllllllllllllllllllllllllllllllllllllllli
iiiiiiiiiiiiiiiiiiiiiiiiiiiiiiiiiiiiiiiiiiiiiiiiiiiiiiiiiiiiiiiiiiiiiiiiiiiiiiiiiiiiiiiiiiiiiiiiiii
iiiiiiiiiiiiiiiiiiiiiiiiiiiiiiiiiiiiiiiiiiiiiiiiiiiiiiiiiiiiiiiiiiiiiiiiiiiiiiiiiiiiiiiiiiiiiiiiiii
iiiiiiiiiiiiiiiiiiiiiiiiiiiiiiiiiiiiiiiiiiiiiiiiiiiiiiiiiiiiiiiiiiiiiiiiiiiiiiiiiiiiiiiiiiiiiiiiiii
iiiiiiiiiiiiiiiiiiiiiiiiiiiiiiiiiiiiiiiiiiiiiiiiiiiiiiiiiiiiiiiiiiiiiiiiiiiiiiiiiiiiiiiiiiiiiiiiiii
iiiiiiiiiiiiiiiiiiiiiiiiiiiiiiiiiiiiiiiiiiiiiiiiiiiiiiiiiiiiiiiiiiiiiiiiiiiiiiiiiiiiiiiiiiiiiiiiiii
iiiiiiiiiiiiiiiiiiiiiiiiiiiiiiiiiiiiiiiiiiiiiiiiiiiiiiiiiiiiiiiiiiiiiiiiiiiiiiiiiiiiiiiiiiiiiiiiiii
iiiiiiiiiiiiiiiiiiiiiiiiiiiiiiiiiiiiiiiiiiiiiiiiiiiiiiiiiiiiiiiiiiiiiiiiiiiiiiiiiiiiiiiiiiiiiiiiiii
iiiiiiiiiiiiiiiiiiiiiiiiiiiiiiiiiiiiiiiiiiiiiiiiiiiiiiiiiiiiiiiiiiiiiiiiiiiiiiiiiiiiiiiiiiiiiiiiiii
iiiiiiiiiiiiiiiiiiiiiiiiiiiiiiiiiiiiiiiiiiiiiiiiiiiiiiiiiiiiiiiiiiiiiiiiiiiiiiiiiiiiiiiiiiiiiiiiiii
iiiiiiiiiiiiiiiiiiiiiiiiiiiiiiiiiiiiiiiiiiiiiiiiiiiiiiiiiiiiiiiiiiiiiiiiiiiiiiiiiiiiiiiiiiiiiiiiiii
iiiiiiiiiiiiiiiiiiiiiiiiiiiiiiiiiiiiiiiiiiiiiiiiiiiiiiiiiiiiiiiiiiiiiiiiiiiiiiiiiiiiiiiiiiiiiiiiiii
iiiiiiiiiiiiiiiiiiiiiiiiiiiiiiiiiiiiiiiiiiiiiiiiiiiiiiiiiiiiiiiiiiiiiiiiiiiiiiiiiiiiiiiiiiiiiiiiiii
iiiiiiiiiiiiiiiiiiiiiiiiiiiiiiiiiiiiiiiiiiiiiiiiiiiiiiiiiiiiiiiiiiiiiiiiiiiiiiiiiiiiiiiiiiiiiiiiiii
iiiiiiiiiiiiiiiiiiiiiiiiiiiiiiiiiiiiiiiiiiiiiiiiiiiiiiiiiiiiiiiiiiiiiiiiiiiiiiiiiiiiiiiiiiiiiiiiiii
iiiiiiiiiiiiiiiiiiiiiiiiiiiiiiiiiiiiiiiiiiiiiiiiiiiiiiiiiiiiiiiiiiiiiiiiiiiiiiiiiiiiiiiiiiiiiiiiiii
iiiiiiiiiiiiiiiiiiiiiiiiiiiiiiiiiiiiiiiiiiiiiiiiiiiiiiiiiiiiiiiiiiiiiiiiiiiiiiiiiiiiiiiiiiiiiiiiiii
iiiiiiiiiiiiiiiiiiiiiiiiiiiiiiiiiiiiiiiiiiiiiiiiiiiiiiiiiiiiiiiiiiiiiiiiiiiiiiiiiiiiiiiiiiiiiiiiiii
iiiiiiiiiiiiiiiiiiiiiiiiiiiiiiiiiiiiiiiiiiiiiiiiiiiiiiiiiiiiiiiiiiiiiiiiiiiiiiiiiiiiiiiiiiiiiiiiiii
iiiiiiiiiiiiiiiiiiiiiiiiiiiiiiiiiiiiiiiiiiiiiiiiiiiiiiiiiiiiiiiiiiiiiiiiiiiiiiiiiiiiiiiiiiiiiiiiiii
iiiiiiiiiiiiiiiiiiiiiiiiiiiiiiiiiiiiiiiiiiiiiiiiiiiiiiiiiiiiiiiiiiiiiiiiiiiiiiiiiiiiiiiiiiiiiiiiiii
iiiiiiiiiiiiiiiiiiiiiiiiiiiiiiiiiiiiiiiiiiiiiiiiiiiiiiiiiiiiiiiiiiiiiiiiiiiiiiiiiiiiiiiiiiiiiiiiiii
iiiiiiiiiiiiiiiiiiiiiiiiiiiiiiiiiiiiiiiiiiiiiiiiiiiiiiiiiiiiiiiiiiiiiiiiiiiiiiiiiiiiiiiiiiiiiiiiiii
iiiiiiiiiiiiiiiiiiiiiiiiiiiiiiiiiiiiiiiiiiiiiiiiiiiiiiiiiiiiiiiiiiiiiiiiiiiiiiiiiiiiiiiiiiiiiiiiiii
iiiiiiiiiiiiiiiiiiiiiiiiiiiiiiiiiiiiiiiiiiiiiiiiiiiiiiiiiiiiiiiiiiiiiiiiiiiiiiiiiiiiiiiiiiiiiiiiiii
iiiiiiiiiiiiiiiiiiiiiiiiiiiiiiiiiiiiiiiiiiiiiiiiiiiiiiiiiiiiiiiiiiiiiiiiiiiiiiiiiiiiiiiiiiiiiiiiiii
iiiiiiiiiiiiiiiiiiiiiiiiiiiiiiiiiiiiiiiiiiiiiiiiiiiiiiiiiiiiiiiiiiiiiiiiiiiiiiiiiiiiiiiiiiiiiiiiiii
iiiiiiiiiiiiiiiiiiiiiiiiiiiiiiiiiiiiiiiiiiiiiiiiiiiiiiiiiiiiiiiiiiiiiiiiiiiiiiiiiiiiiiiiiiiiiiiiiii
iiiiiiiiiiiiiiiiiiiiiiiiiiiiiiiiiiiiiiiiiiiiiiiiiiiiiiiiiiiiiiiiiiiiiiiiiiiiiiiiiiiiiiiiiiiiiiiiiii
iiiiiiiiiiiiiiiiiiiiiiiiiiiiiiiiiiiiiiiiiiiiiiiiiiiiiiiiiiiiiiiiiiiiiiiiiiiiiiiiiiiiiiiiiiiiiiiiiii
iiiiiiiiiiiiiiiiiiiiiiiiiiiiiiiiiiiiiiiiiiiiiiiiiiiiiiiiiiiiiiiiiiiiiiiiiiiiiiiiiiiiiiiiiiiiiiiiiii
iiiiiiiiiiiiiiiiiiiiiiiiiiiiiiiiiiiiiiiiiiiiiiiiiiiiiiiiiiiiiiiiiiiiiiiiiiiiiiiiiiiiiiiiiiiiiiiiiii
iiiiiiiiiiiiiiiiiiiiiiiiiiiiiiiiiiiiiiiiiiiiiiiiiiiiiiiiiiiiiiiiiiiiiiiiiiiiiiiiiiiiiiiiiiiiiiiiiii
iiiiiiiiiiiiiiiiiiiiiiiiiiiiiiiiiiiiiiiiiiiiiiiiiiiiiiiiiiiiiiiiiiiiiiiiiiiiiiiiiiiiiiiiiiiiiiiiiii
iiiiiiiiiiiiiiiiiiiiiiiiiiiiiiiiiiiiiiiiiiiiiiiiiiiiiiiiiiiiiiiiiiiiiiiiiiiiiiiiiiiiiiiiiiiiiiiiiii
iiiiiiiiiiiiiiiiiiiiiiiiiiiiiiiiiiiiiiiiiiiiiiiiiiiiiiiiiiiiiiiiiiiiiiiiiiiiiiiiiiiiiiiiiiiiiiiiiii
iiiiiiiiiiiiiiiiiiiiiiiiiiiiiiiiiiiiiiiiiiiiiiiiiiiiiiiiiiiiiiiiiiiiiiiiiiiiiiiiiiiiiiiiiiiiiiiiiii
iiiiiiiiiiiiiiiiiiiiiiiiiiiiiiiiiiiiiiiiiiiiiiiiiiiiiiiiiiiiiiiiiiiiiiiiiiiiiiiiiiiiiiiiiiiiiiiiiii
iiiiiiiiiiiiiiiiiiiiiiiiiiiiiiiiiiiiiiiiiiiiiiiiiiiiiiiiiiiiiiiiiiiiiiiiiiiiiiiiiiiiiiiiiiiiiiiiiii
iiiiiiiiiiiiiiiiiiiiiiiiiiiiiiiiiiiiiiiiiiiiiiiiiiiiiiiiiiiiiiiiiiiiiiiiiiiiiiiiiiiiiiiiiiiiiiiiii_
iiiiiiiiiiiiiiiiiiiiiiiiiiiiiiiiiiiiiiiiiiiiiiiiiiiiiiiiiiiiiiiiiiiiiiiiiiiiiiiiiiiiiiiiiiiiiiiiiii
iiiiiiiiiiiiiiiiiiiiiiiiiiiiiiiiiiiiiiiiiiiiiiiiiiiiiiiiiiiiiiiiiiiiiiiiiiiiiiiiiiiiiiiiiiiiiiiiiii
iiiiiiiiiiiiiiiiiiiiiiiiiiiiiiiiiiiiiiiiiiiiiiiiiiiiiiiiiiiiiiiiiiiiiiiiiiiiiiiiiiiiiiiiiiiiiiiiiii
iiiiiiiiiiiiiiiiiiiiiiiiiiiiiiiiiiiiiiiiiiiiiiiiiiiiiiiiiiiiiiiiiiiiiiiiiiiiiiiiiiiiiiiiiiiiiiiiiii
iiiiiiiiiiiiiiiiiiiiiiiiiiiiiiiiiiiiiiiiiiiiiiiiiiiiiiiiiiiiiiiiiiiiiiiiiiiiiiiiiiiiiiiiiiiiiiiiiii
iiiiiiiiiiiiiiiiiiiiiiiiiiiiiiiiiiiiiiiiiiiiiiiiiiiiiiiiiiiiiiiiiiiiiiiiiiiiiiiiiiiiiiiiiiiiiiiiiii
iiiiiiiiiiiiiiiiiiiiiiiiiiiiiiiiiiiiiiiiiiiiiiiiiiiiiiiiiiiiiiiiiiiiiiiiiiiiiiiiiiiiiiiiiiiiiiiiiii
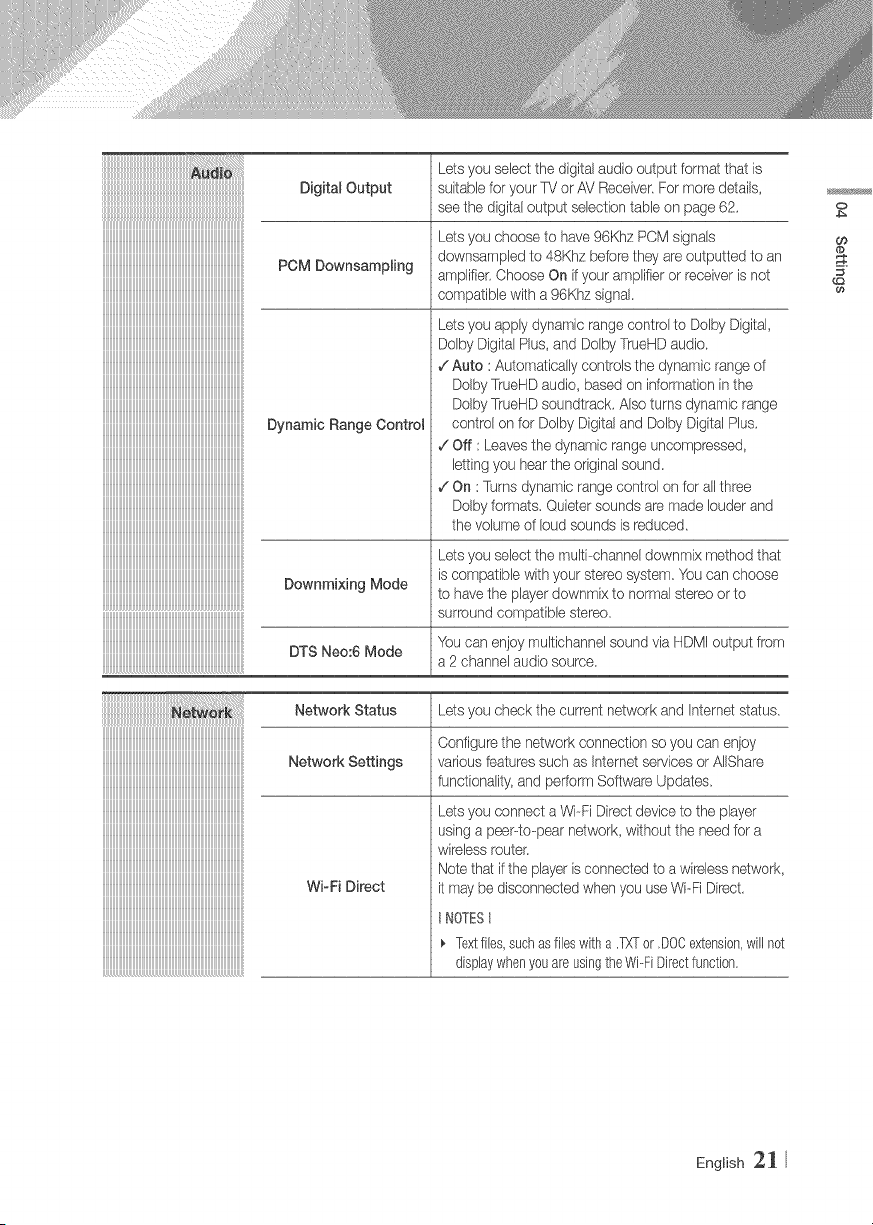
Lets you select the digital audio output format that is
Digital Output suitable for your TV or AV Receiver.For n/ore details,
seethe digital output selection table on page 62,
Lets you choose to have 96Khz PCM signals
POM DownsampHng downsampled to 48Khz before they are outputted to an
arT_plifbr,Choose On ifyour amplifier or receiver is not
compatibb with a 96Khz signak
Dynamic Range Contro_
Downmixing Mode
DTS Neo:6 Mode
Lets you apply dynamic range control to Dolby Digital,
Dolby DigitalPlus, and Dolby TrueHD audio.
,/Auto : Automatically controls the dynan/ic range of
Dolby TrueHDaudio based on information in the
Doiby TrueHDsoundtrack, Also turns dynan/ic range
control on for Dolby Digitaland Dolby Digital Plus,
,/Off : Leavesthe dynamic range uncompressed,
letting you hear the original sound
,/On : Turns dynamic range control on for all three
Dolby formats. Quieter sounds are made louder and
the volume of loud sounds is reduced
Lets you select the multi--channeldownmix method that
is compatible with your stereo system, You can choose
to have the player downn/ix to normal stereo or to
surround compatibb stereo,
You can enjoy muitichannel sound via HDMI output from
a 2 channel audio source.
iiiiiiiiiiiiiiiiiiiiiiiiiiiiiiiiiiiiiiiiiiiiiiiiiiiiiiiiiiiiiiiiiiiiiiiiiiiiiiiiiiiiiiiiiiiiiiiiiii
iiiiiiiiiiiiiiiiiiiiiiiiiiiiiiiiiiiiiiiiiiiiiiiiiiiiiiiiiiiiiiiiiiiiiiiiiiiiiiiiiiiiiiiiiiiiiiiiiii
iiiiiiiiiiiiiiiiiiiiiiiiiiiiiiiiiiiiiiiiiiiiiiiiiiiiiiiiiiiiiiiiiiiiiiiiiiiiiiiiiiiiiiiiiiiiiiiiiii
iiiiiiiiiiiiiiiiiiiiiiiiiiiiiiiiiiiiiiiiiiiiiiiiiiiiiiiiiiiiiiiiiiiiiiiiiiiiiiiiiiiiiiiiiiiiiiiiiii
iiiiiiiiiiiiiiiiiiiiiiiiiiiiiiiiiiiiiiiiiiiiiiiiiiiiiiiiiiiiiiiiiiiiiiiiiiiiiiiiiiiiiiiiiiiiiiiiiii
iiiiiiiiiiiiiiiiiiiiiiiiiiiiiiiiiiiiiiiiiiiiiiiiiiiiiiiiiiiiiiiiiiiiiiiiiiiiiiiiiiiiiiiiiiiiiiiiiii
iiiiiiiiiiiiiiiiiiiiiiiiiiiiiiiiiiiiiiiiiiiiiiiiiiiiiiiiiiiiiiiiiiiiiiiiiiiiiiiiiiiiiiiiiiiiiiiiiii
iiiiiiiiiiiiiiiiiiiiiiiiiiiiiiiiiiiiiiiiiiiiiiiiiiiiiiiiiiiiiiiiiiiiiiiiiiiiiiiiiiiiiiiiiiiiiiiiiii
iiiiiiiiiiiiiiiiiiiiiiiiiiiiiiiiiiiiiiiiiiiiiiiiiiiiiiiiiiiiiiiiiiiiiiiiiiiiiiiiiiiiiiiiiiiiiiiiiii
iiiiiiiiiiiiiiiiiiiiiiiiiiiiiiiiiiiiiiiiiiiiiiiiiiiiiiiiiiiiiiiiiiiiiiiiiiiiiiiiiiiiiiiiiiiiiiiiiii
iiiiiiiiiiiiiiiiiiiiiiiiiiiiiiiiiiiiiiiiiiiiiiiiiiiiiiiiiiiiiiiiiiiiiiiiiiiiiiiiiiiiiiiiiiiiiiiiiii
iiiiiiiiiiiiiiiiiiiiiiiiiiiiiiiiiiiiiiiiiiiiiiiiiiiiiiiiiiiiiiiiiiiiiiiiiiiiiiiiiiiiiiiiiiiiiiiiiii
iiiiiiiiiiiiiiiiiiiiiiiiiiiiiiiiiiiiiiiiiiiiiiiiiiiiiiiiiiiiiiiiiiiiiiiiiiiiiiiiiiiiiiiiiiiiiiiiiii
iiiiiiiiiiiiiiiiiiiiiiiiiiiiiiiiiiiiiiiiiiiiiiiiiiiiiiiiiiiiiiiiiiiiiiiiiiiiiiiiiiiiiiiiiiiiiiiiii_
Network Status Lets you check the current network and Internet status
Configurethe network connection so you can enjoy
Network Settings variousfeatures such as Internet sewices or AlIShare
functionality, and perform Software Updates
Wi-Fi Direct
Lets you connect a Wi--FiDirect deviceto the player
using a peep-to@earnetwork, without the need for a
wireless router,
Note that if the player is connected to a wirelessnetwork,
it may be disconnected when you use Wi-Fi Direct,
}'@TESt
Textfiles,suchasfileswitha .TXTor ,DOCextension,will not
displaywhenyou areusingtheWi-FiDirectfunction,
0
@
English 2_
iiiiiiiiiiiiiiiiiiiiiiiiiiiiiiiiiiiiiiiiiiiiiiiiiiiiiiiiiiiiiiiiiiiiiiiiiiiiiiiiii_iiiiiiiiiiiiii
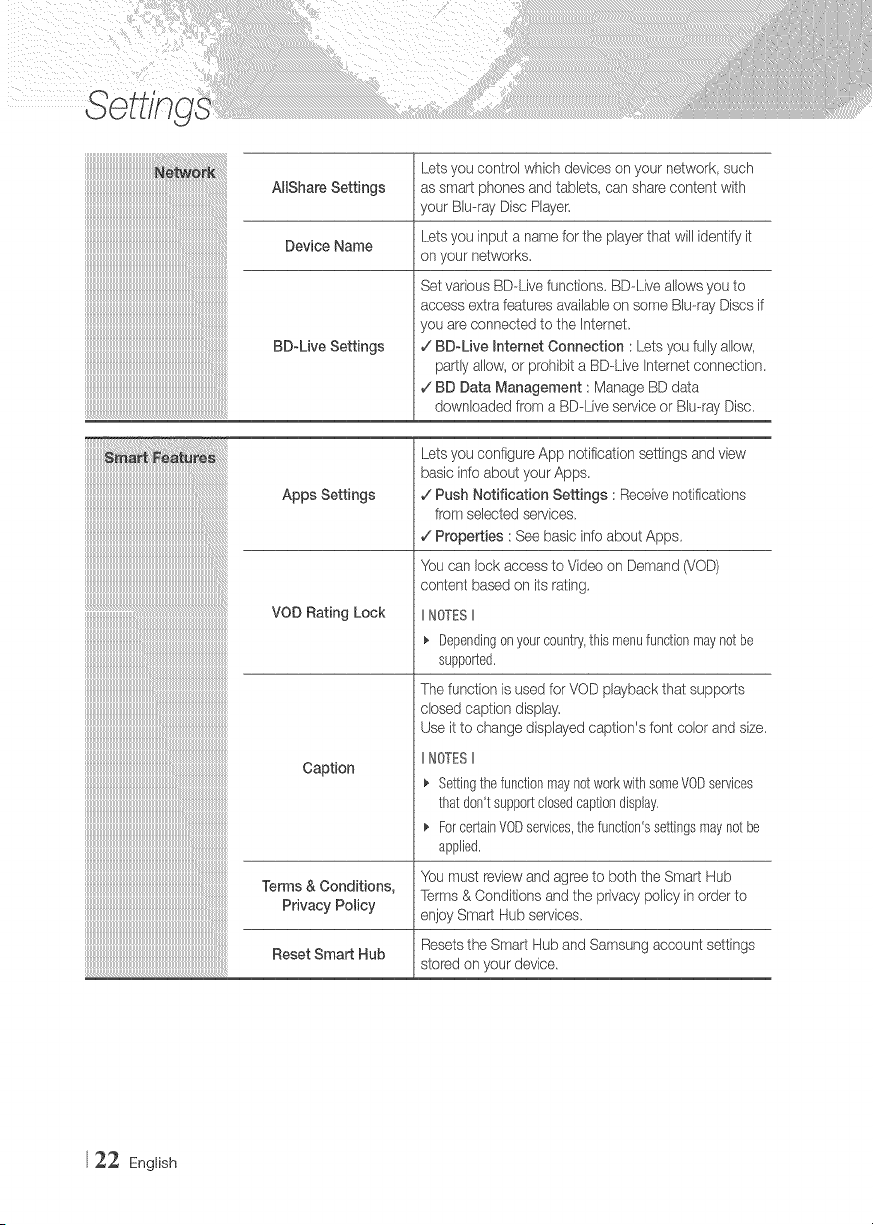
Lets you control which devices on your network, such
AHShare Settings as smart phones and tablets, can share content with
your Blu-ray Disc Player.
Device Name Lets you input a name for the player that will identifyit
on your networks.
BD-Live Settings
Set various BD--Livefunctions. BD--Liveallows you to
access extra features availableon some Blu-ray Discsif
you are connected to the Internet.
v_BD_Live Intemet Connection : Lets you fully allow,
partly allow, or prohibit a BD-Live Internet connection.
v_BD Data Management : Manage BD data
downloaded from a BD-Live service or Blu-ray Disc.
iiiiiiiiiiiiiiiiiiiiiiiiiiiiiiiiiiiiiiiiiiiiiiiiiiiii_iiiiiiiiiiiiiiiiiiiiiiiiiiiiiiiiiiiiiiiiiii
iiiiiiiiiiiiiiiiiiiiiiiiiiiiiiiiiiiiiiiiiiiiiiiiiiiiiiiiiiiii_iiiiiiiiiiiiiiiiiiiiiiiiiiiiiiiiiii
iiiiiiiiiiiiiiiiiiiiiiiiiiiiiiiiiiiiiiiiiiiiiiiiiiiiiiiiiiiiiiiiiiiii_iiiiiiiiiiiiiiiiiiiiiiiiiii
iiiiiiiiiiiiiiiiiiiiiiiiiiiiiiiiiiiiiiiiiiiiiiiiiiiiiiiiiiiiiiiiiiiiiiiiiiii_iiiiiiiiiiiiiiiiiii
Apps Settings
VOD Rating Lock
Caption
Terms & Conditions
Privacy Policy
Reset Smart Hub
Lets you configure App notification settings and view
basic infoabout your Apps.
v_Push Notification Settings : Receivenotifications
from selected services.
¢' Properties : See basic info about Apps.
'YOucan lock access to Video on Demand (VOD)
content based on its rating.
IINOTESII
_' Dependingonyourcountry,this menufunctionmaynotbe
supported.
The function is used for VOD playback that supports
dosed caption display.
Use it to change displayed caption's font color and size
II['_OTESII
_' Settingthefunctionmay notworkwithsomeVODservices
thatdon't supportdosedcaptiondisplay,
ForcertainVODservices,the function'ssettingsmaynotbe
applied.
You must review and agree to both the Smart Hub
Terms & Conditions and the privacy policy in order to
enjoy Smart Hub services
Resets the Smart Hub and Samsung account settings
stored on your device.
22 English
iiiiiiiiiiiiiiiiiiiiiiiiiiiiiiiiiiiiiiiiiiiiiiiiiiiiiiiiiiiiiiiiiiiiiiiiiiiiiiiiiiiiiiiiiiiiiiiiiiiiiii i i ! i i!!i!!ii!i!!i !i! i!!
llllllllllllllllllllllllllllllllllllllllllllllllllllllllllllllllllllllllllllllllllllllllllllllllll_
iiiiiiiiiiiiiiiiiiiiiiiiiiiiiiiiiiiiiiiiiiiiiiiiiiiiiiiiiiiiiiiiiiiiiiiiiiiiiiiiiiiiiiiiiiiiiiiiiii
iiiiiiiiiiiiiiiiiiiiiiiiiiiiiiiiiiiiiiiiiiiiiiiiiiiiiiiiiiiiiiiiiiiiiiiiiiiiiiiiiiiiiiiiiiiiiiiiiii
iiiiiiiiiiiiiiiiiiiiiiiiiiiiiiiiiiiiiiiiiiiiiiiiiiiiiiiiiiiiiiiiiiiiiiiiiiiiiiiiiiiiiiiiiiiiiiiiiii
iiiiiiiiiiiiiiiiiiiiiiiiiiiiiiiiiiiiiiiiiiiiiiiiiiiiiiiiiiiiiiiiiiiiiiiiiiiiiiiiiiiiiiiiiiiiiiiiiii
iiiiiiiiiiiiiiiiiiiiiiiiiiiiiiiiiiiiiiiiiiiiiiiiiiiiiiiiiiiiiiiiiiiiiiiiiiiiiiiiiiiiiiiiiiiiiiiiiii
iiiiiiiiiiiiiiiiiiiiiiiiiiiiiiiiiiiiiiiiiiiiiiiiiiiiiiiiiiiiiiiiiiiiiiiiiiiiiiiiiiiiiiiiiiiiiiiiiii
iiiiiiiiiiiiiiiiiiiiiiiiiiiiiiiiiiiiiiiiiiiiiiiiiiiiiiiiiiiiiiiiiiiiiiiiiiiiiiiiiiiiiiiiiiiiiiiiiii
iiiiiiiiiiiiiiiiiiiiiiiiiiiiiiiiiiiiiiiiiiiiiiiiiiiiiiiiiiiiiiiiiiiiiiiiiiiiiiiiiiiiiiiiiiiiiiiiiii
iiiiiiiiiiiiiiiiiiiiiiiiiiiiiiiiiiiiiiiiiiiiiiiiiiiiiiiiiiiiiiiiiiiiiiiiiiiiiiiiiiiiiiiiiiiiiiiiiii
iiiiiiiiiiiiiiiiiiiiiiiiiiiiiiiiiiiiiiiiiiiiiiiiiiiiiiiiiiiiiiiiiiiiiiiiiiiiiiiiiiiiiiiiiiiiiiiiiii
iiiiiiiiiiiiiiiiiiiiiiiiiiiiiiiiiiiiiiiiiiiiiiiiiiiiiiiiiiiiiiiiiiiiiiiiiiiiiiiiiiiiiiiiiiiiiiiiiii
iiiiiiiiiiiiiiiiiiiiiiiiiiiiiiiiiiiiiiiiiiiiiiiiiiiiiiiiiiiiiiiiiiiiiiiiiiiiiiiiiiiiiiiiiiiiiiiiiii
iiiiiiiiiiiiiiiiiiiiiiiiiiiiiiiiiiiiiiiiiiiiiiiiiiiiiiiiiiiiiiiiiiiiiiiiiiiiiiiiiiiiiiiiiiiiiiiiiii
iiiiiiiiiiiiiiiiiiiiiiiiiiiiiiiiiiiiiiiiiiiiiiiiiiiiiiiiiiiiiiiiiiiiiiiiiiiiiiiiiiiiiiiiiiiiiiiiiii
iiiiiiiiiiiiiiiiiiiiiiiiiiiiiiiiiiiiiiiiiiiiiiiiiiiiiiiiiiiiiiiiiiiiiiiiiiiiiiiiiiiiiiiiiiiiiiiiiii
iiiiiiiiiiiiiiiiiiiiiiiiiiiiiiiiiiiiiiiiiiiiiiiiiiiiiiiiiiiiiiiiiiiiiiiiiiiiiiiiiiiiiiiiiiiiiiiiiii
iiiiiiiiiiiiiiiiiiiiiiiiiiiiiiiiiiiiiiiiiiiiiiiiiiiiiiiiiiiiiiiiiiiiiiiiiiiiiiiiiiiiiiiiiiiiiiiiiii
iiiiiiiiiiiiiiiiiiiiiiiiiiiiiiiiiiiiiiiiiiiiiiiiiiiiiiiiiiiiiiiiiiiiiiiiiiiiiiiiiiiiiiiiiiiiiiiiiii
iiiiiiiiiiiiiiiiiiiiiiiiiiiiiiiiiiiiiiiiiiiiiiiiiiiiiiiiiiiiiiiiiiiiiiiiiiiiiiiiiiiiiiiiiiiiiiiiiii
iiiiiiiiiiiiiiiiiiiiiiiiiiiiiiiiiiiiiiiiiiiiiiiiiiiiiiiiiiiiiiiiiiiiiiiiiiiiiiiiiiiiiiiiiiiiiiiiiii
iiiiiiiiiiiiiiiiiiiiiiiiiiiiiiiiiiiiiiiiiiiiiiiiiiiiiiiiiiiiiiiiiiiiiiiiiiiiiiiiiiiiiiiiiiiiiiiiiii
iiiiiiiiiiiiiiiiiiiiiiiiiiiiiiiiiiiiiiiiiiiiiiiiiiiiiiiiiiiiiiiiiiiiiiiiiiiiiiiiiiiiiiiiiiiiiiiiiii
iiiiiiiiiiiiiiiiiiiiiiiiiiiiiiiiiiiiiiiiiiiiiiiiiiiiiiiiiiiiiiiiiiiiiiiiiiiiiiiiiiiiiiiiiiiiiiiiiii
iiiiiiiiiiiiiiiiiiiiiiiiiiiiiiiiiiiiiiiiiiiiiiiiiiiiiiiiiiiiiiiiiiiiiiiiiiiiiiiiiiiiiiiiiiiiiiiiiii
iiiiiiiiiiiiiiiiiiiiiiiiiiiiiiiiiiiiiiiiiiiiiiiiiiiiiiiiiiiiiiiiiiiiiiiiiiiiiiiiiiiiiiiiiiiiiiiiiii
iiiiiiiiiiiiiiiiiiiiiiiiiiiiiiiiiiiiiiiiiiiiiiiiiiiiiiiiiiiiiiiiiiiiiiiiiiiiiiiiiiiiiiiiiiiiiiiiiii
iiiiiiiiiiiiiiiiiiiiiiiiiiiiiiiiiiiiiiiiiiiiiiiiiiiiiiiiiiiiiiiiiiiiiiiiiiiiiiiiiiiiiiiiiiiiiiiiiii
iiiiiiiiiiiiiiiiiiiiiiiiiiiiiiiiiiiiiiiiiiiiiiiiiiiiiiiiiiiiiiiiiiiiiiiiiiiiiiiiiiiiiiiiiiiiiiiiii_
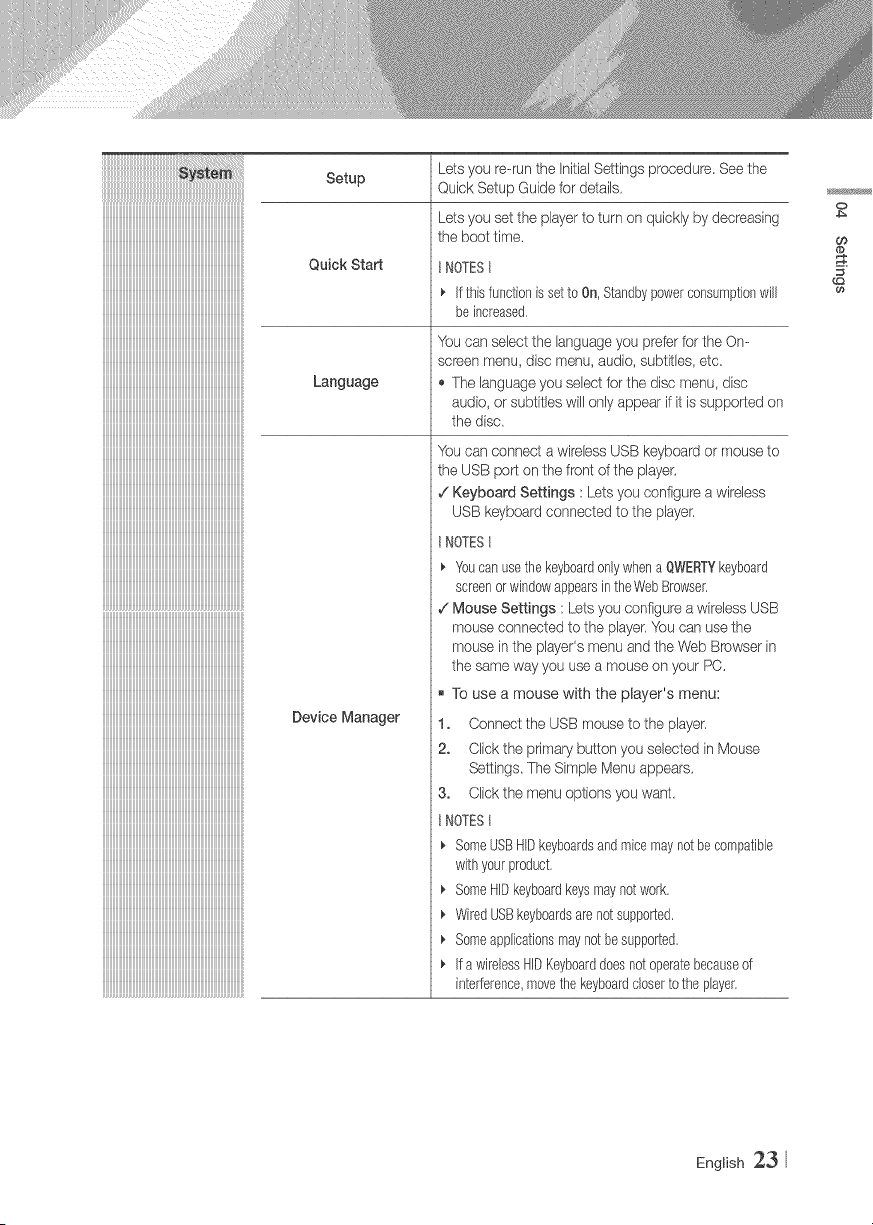
Lets you re--runthe InitialSettings procedure Seethe
Setup Qubk Setup Guide for details.
Quick Start
Language
Device Manager
Lets you set the player to turn on quickly by decreasing
the boot time.
NOTES I
_'IfthisfunctionissettoOn,Standbypowerconsumptionwill
beincreased.
You can select the languageyou prefer for the On--
screen menu, disc menu, audio, subtitles, etc.
The languageyou select for the disc menu, disc
audio, or subtitles will only appear if it is supported on
the disc.
You can connect a wirebss USB keyboard or mouse to
the USB port on the front of the player.
/ Keyboard Settings : Lets you configure a wireless
USB keyboard connected to the player.
NOTESt
Youcan usethekeyboardonlywhena QWERTYkeyboard
screenorwindowappearsin theWebBrowser.
,/Mouse Settings : Lets you configure a wireless USB
mouse connected to the player.You can use the
mouse in the player's menu and the Web Browser in
the same way you use a mouse on your PC.
To use a mouse with the player's menu:
1. Connect the USB mouseto the player.
2o Click the primary button you selected in Mouse
Settings. The Simple Menu appears.
3. Click the menu options you want.
NOTES 1
_, SomeUSBHIDkeyboardsandrnbe maynotbe compatible
withyourproduct.
SomeHIDkeyboardkeysmaynotwork.
WiredUSBkeyboardsarenotsupported.
Someapplicationsmaynotbesupported.
If a wirelessHIDKeyboarddoesnotoperatebecauseof
interference,movethe keyboardcloserto theplayer.
O
English 23
!i!i!i!i!i!i!i!i!i!i!i!i!i!i!i!i!i!i[! i i!iiiiiiiiiiiiiiiiiiiiiiiiiiiiiiiiiiiiiiiiiiiiiiiiiiiiiiiiiiiiiiiiiiiiiiiiiiiiiiiiiiiiiiiiiiii!@ i i i i i i i i
!!!!!!!!!!!!!!!!!!!!!!!!!!:............................................................................................................................................_
Security
GeneraJ
Anynet+ (HDMFCEC)
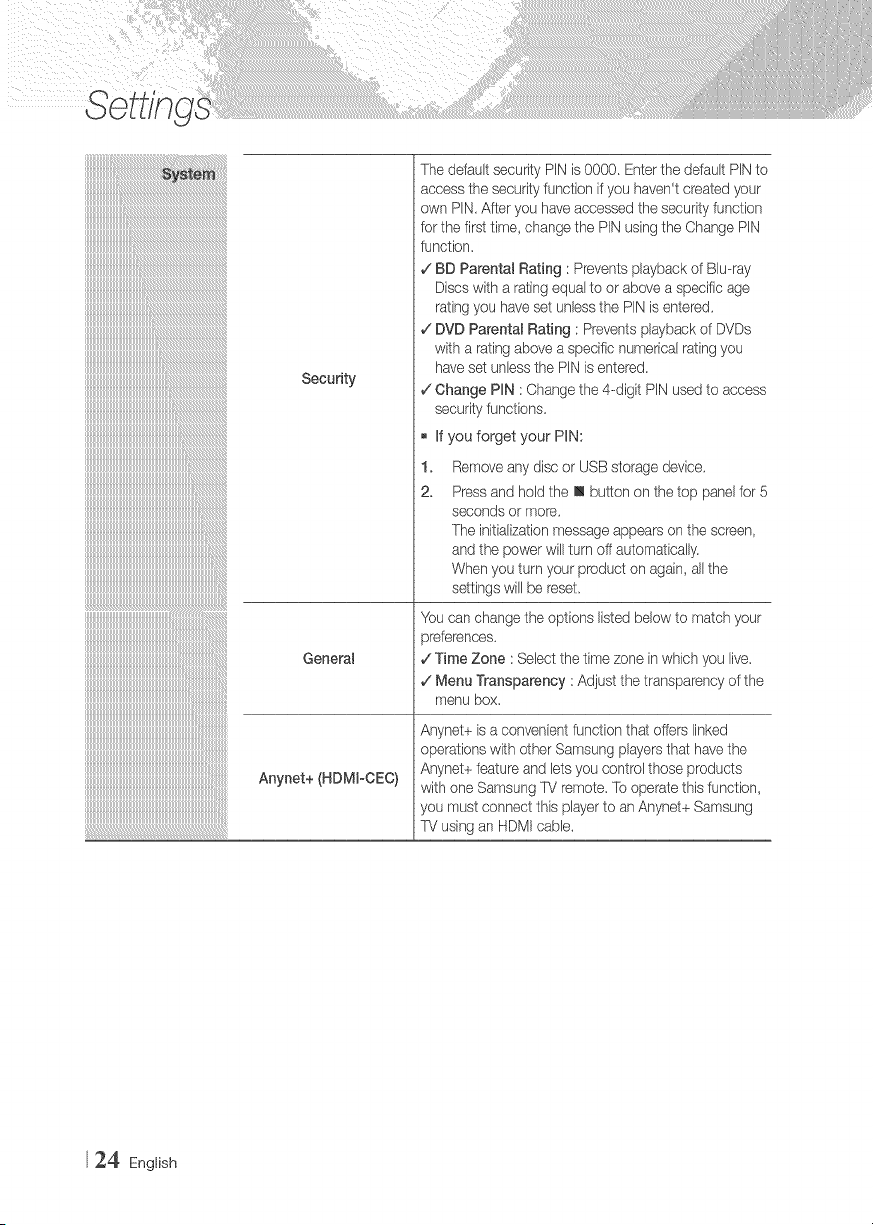
The default security PIN is 0000. Enter the default PINto
access the securityfunction if you haven't created your
own PIN.After you have accessed the security function
for the first time, change the PIN using the Change PIN
function.
¢ BD Parental Rating : Prevents playback of Blu-ray
Discs with a rating equal to or above a specific age
rating you have set unlessthe PINis entered.
v_DVD Parental Rating : Prevents playback of DVDs
with a rating above a specific numerical rating you
have set unless the PiN is entered.
v_Change PIN :Change the 4-digit PiN used to access
security functions.
if you forget your PiN:
1.
2.
Remove any disc or USB storage device.
Press and hold the m button on the top panel for 5
seconds or more.
The initializationmessage appears on the screen,
and the power wiil turn off automatically.
When you turn your product on again, all the
settings will be reset.
You can change the options listed below to match your
oreferences.
7Time Zone : Select the time zone inwhich you live.
¢ Menu Transparency : Adjust the transparency of the
menu box.
Anynet+ is a convenient func/donthat offers linked
operations with other Samsung players that have the
Anynet+ feature and lets you control those produc/_s
with one Sarnsung TV remote. Tooperate this function,
you must connect this player to an Anynet+ Sarr/sung
TV using an HDMI cable.
24 English

iiiiiiiiiiiiiiiiiiiiiiiiiiiiiiiiiiiiiiiiiiiiiiiii
uuuuuuuuuuuuuuuuuuuuuuuuuuuuuuuuuuuuuuuuuuuuuuuuh_
!!!!!!!!!!!!!!!!!!!!!!!!!!!!!!!!!!!!!!!!!!!!!!!!!!!!!!!!!!!!!!!!!!!!!!!!!!!!!!!!!!!!!!!!!!!!!!!!!
__F
!!!!!!!!!!!!!!!!!!!!!!!!!!!!!!!!!!!!!!!!!!!!!!!!!!!!!!!!!!!!!!!!!!!!!!!!!!!!!!!!!!!!!!!!!!!!!!!!!_
__L_
!!!!!!!!!!!!!!!!!!!!!!!!!!!!!!!!!!!!!!!!!!!!!!!!!!!!!!!!!!!!!!!!!!!!!!!!!!!!!!!!!!!!!!!!!!!!!!!!!
__F
!!!!!!!!!!!!!!!!!!!!!!!!!!!!!!!!!!!!!!!!!!!!!!!!!!!!!!!!!!!!!!!!!!!!!!!!!!!!!!!!!!!!!!!!!!!!!!!!!_
__L_
!!!!!!!!!!!!!!!!!!!!!!!!!!!!!!!!!!!!!!!!!!!!!!!!!!!!!!!!!!!!!!!!!!!!!!!!!!!!!!!!!!!!!!!!!!!!!!!!!
__F
!!!!!!!!!!!!!!!!!!!!!!!!!!!!!!!!!!!!!!!!!!!!!!!!!!!!!!!!!!!!!!!!!!!!!!!!!!!!!!!!!!!!!!!!!!!!!!!!!_
iiiiiiiiiiiiiiiiiiiiiiiiiiiiiiiiiiiiiiiiiiiiiiiiiiiiiiiiiiiiiiiiiiiiiiiiiiiiiiiiiiiiiiiiiiiiiiiiiii
iiiiiiiiiiiiiiiiiiiiiiiiiiiiiiiiiiiiiiiiiiiiiiiiiiiiiiiiiiiiiiiiiiiiiiiiiiiiiiiiiiiiiiiiiiiiiiiiiii
iiiiiiiiiiiiiiiiiiiiiiiiiiiiiiiiiiiiiiiiiiiiiiiiiiiiiiiiiiiiiiiiiiiiiiiiiiiiiiiiiiiiiiiiiiiiiiiiiii
iiiiiiiiiiiiiiiiiiiiiiiiiiiiiiiiiiiiiiiiiiiiiiiiiiiiiiiiiiiiiiiiiiiiiiiiiiiiiiiiiiiiiiiiiiiiiiiiiii
iiiiiiiiiiiiiiiiiiiiiiiiiiiiiiiiiiiiiiiiiiiiiiiiiiiiiiiiiiiiiiiiiiiiiiiiiiiiiiiiiiiiiiiiiiiiiiiiiii
iiiiiiiiiiiiiiiiiiiiiiiiiiiiiiiiiiiiiiiiiiiiiiiiiiiiiiiiiiiiiiiiiiiiiiiiiiiiiiiiiiiiiiiiiiiiiiiiiii
iiiiiiiiiiiiiiiiiiiiiiiiiiiiiiiiiiiiiiiiiiiiiiiiiiiiiiiiiiiiiiiiiiiiiiiiiiiiiiiiiiiiiiiiiiiiiiiiiii
iiiiiiiiiiiiiiiiiiiiiiiiiiiiiiiiiiiiiiiiiiiiiiiiiiiiiiiiiiiiiiiiiiiiiiiiiiiiiiiiiiiiiiiiiiiiiiiiiii
iiiiiiiiiiiiiiiiiiiiiiiiiiiiiiiiiiiiiiiiiiiiiiiiiiiiiiiiiiiiiiiiiiiiiiiiiiiiiiiiiiiiiiiiiiiiiiiiiii
iiiiiiiiiiiiiiiiiiiiiiiiiiiiiiiiiiiiiiiiiiiiiiiiiiiiiiiiiiiiiiiiiiiiiiiiiiiiiiiiiiiiiiiiiiiiiiiiiii
iiiiiiiiiiiiiiiiiiiiiiiiiiiiiiiiiiiiiiiiiiiiiiiiiiiiiiiiiiiiiiiiiiiiiiiiiiiiiiiiiiiiiiiiiiiiiiiiiii
iiiiiiiiiiiiiiiiiiiiiiiiiiiiiiiiiiiiiiiiiiiiiiiiiiiiiiiiiiiiiiiiiiiiiiiiiiiiiiiiiiiiiiiiiiiiiiiiiii
iiiiiiiiiiiiiiiiiiiiiiiiiiiiiiiiiiiiiiiiiiiiiiiiiiiiiiiiiiiiiiiiiiiiiiiiiiiiiiiiiiiiiiiiiiiiiiiiiii
iiiiiiiiiiiiiiiiiiiiiiiiiiiiiiiiiiiiiiiiiiiiiiiiiiiiiiiiiiiiiiiiiiiiiiiiiiiiiiiiiiiiiiiiiiiiiiiiiii
iiiiiiiiiiiiiiiiiiiiiiiiiiiiiiiiiiiiiiiiiiiiiiiiiiiiiiiiiiiiiiiiiiiiiiiiiiiiiiiiiiiiiiiiiiiiiiiiiii
iiiiiiiiiiiiiiiiiiiiiiiiiiiiiiiiiiiiiiiiiiiiiiiiiiiiiiiiiiiiiiiiiiiiiiiiiiiiiiiiiiiiiiiiiiiiiiiiiii
iiiiiiiiiiiiiiiiiiiiiiiiiiiiiiiiiiiiiiiiiiiiiiiiiiiiiiiiiiiiiiiiiiiiiiiiiiiiiiiiiiiiiiiiiiiiiiiiiii
iiiiiiiiiiiiiiiiiiiiiiiiiiiiiiiiiiiiiiiiiiiiiiiiiiiiiiiiiiiiiiiiiiiiiiiiiiiiiiiiiiiiiiiiiiiiiiiiiii
iiiiiiiiiiiiiiiiiiiiiiiiiiiiiiiiiiiiiiiiiiiiiiiiiiiiiiiiiiiiiiiiiiiiiiiiiiiiiiiiiiiiiiiiiiiiiiiiiii
iiiiiiiiiiiiiiiiiiiiiiiiiiiiiiiiiiiiiiiiiiiiiiiiiiiiiiiiiiiiiiiiiiiiiiiiiiiiiiiiiiiiiiiiiiiiiiiiiii
iiiiiiiiiiiiiiiiiiiiiiiiiiiiiiiiiiiiiiiiiiiiiiiiiiiiiiiiiiiiiiiiiiiiiiiiiiiiiiiiiiiiiiiiiiiiiiiiii_
Remote Management
Software Update
Contact Samsung
Reset
When activated, lets Samsung Call Center agents
diagnose and fix problems with the product remotely.
Requires an active Internet connection.
NOTESt
_' RemoteManagementservicemightnot beavailablein some
countries,
Contactyournearestservicecenterfor yourPINcodeandtell
thecodeto the personincharge,it enablesremotediagnosis
ofthe productandrequiredmeasures.
For more information about the Software Update
function, see "Upgrading Software" on pages 30-31.
Providescontact information for assistance with your
player.
Resets all settings to their default settings except for the
network and Smart Hub settings, and then launches the
Setup function.
The default security PiN is OOO0.
0
CO
@
English 25
When you connect this player to a network,
you can use network based applications and
functions such as Smart Hub and BD-LIVE,
and upgrade the player's software through the
network connection, For more information about
accessing and using Internet serqces, see the
Network Serdces chapter of this manual on pages
44-55, Instructions for configuring the network
connection start below,
Configuring Your Network Connection
Before you begin, contact your ISP to find out
if your IP address is static or dynamic. If it is
dynamic, and you have a wired or wireless
network, we recommend using the Automatic
configuration procedures described below.
If you are connecting to a wired network, connect
the player to your router using a LAN cable before
you start the configuration procedure.
If you are connecting to a wireless network,
disconnect any wired network connection before
you begin,
To begin configuring your network connection,
follow these steps:
Wired Network
a Wired - Automatic
1,
2.
3.
4.
5.
In the Home screen, select Settings, and
then press the _ button,
Select Network, and then press the
button,
Select Network Settings, and then press the
button.
Select Wired in the Network Settings screen,
and then press the _ button.
Select Connect button, and then press the
button. The product detects the wired
connection, verifies the network connection
and then connects to the network,
a Wired - Manual
If you have a static IP address or the Automatic
procedure does not work, you'll need to set the
Network Settings values manually.
Follow Steps I and 2 in Wired Network, and then
follow these steps:
1. Select Network Status. The player searches
for a network, and then displays the
connection failed message.
2. On the bottom of the screen, select mP
Settings, and then press the _ button.
The IP Settings screen appears.
3. Select the IP Setting field, and then press the
button.
4. Select Enter manually in the IP Setting field,
and then press the _ button.
5. Select a value to enter (IP Address, for
example), and then press the _ button.
Use the number keypad on your remote
control to enter the numbers for the value.
You can also enter numbers using the AT
buttons. Use the _ _ buttons on the remote
control to move from entry field to entry field
within a value, When done with one value,
press the _ button.
6. Press the A or _' button to move to another
value, and then enter the numbers for that
value following the instructions in Step 5.
7. Repeat Steps 5 and 6 until you have filled in
all values.
IINOTESII
Youcan getthe NetworkvaluesfromyourInternet
provider,
8. When finished entering all the values, select
OK, and then press the _ button. The
player verifies the network connection and
then connects to the network,
26 English
Wireless Network
You can setup a wireless network connection in
four ways:
- Wireless Automatic
- Wireless Manual
- WPS(PBC)
- WPS(PIN)
When you configure the wireless network
connection, any wireless network devices currently
connected through the player or, if applicable,
the player's current wired connection, will be
disconnected.
a Wireless - Automatic
1,
2.
3.
4.
In the Home screen, select Settings, and
then press the _ button.
Select Network, and then press the
button.
Select Network Settings, and then press the
button.
Select Wireless in the Network Settings
screen, and then press the _ button. The
player searches for and then displays a list of
the available networks.
iiii_
iiii_
5. Select the desired network, and then press
the _ button.
6. On the Security screen, enter your network's
Security Code or Pass Phrase.
Enter numbers directly using the number
buttons on your remote control. Enter letters
by selecting a letter with an arrow button, and
then pressing _ button.
IINOTESt
Toviewthepasswordasyouenterit, usethearrow
buttonsto selectShowPasswordonthe rightside,and
thenpress_ button.
7. When done, select Done and then press the
button. The player verifies the network
connection and then connects to the
network.
8. When verification is complete, select OK, and
then press the _ button.
IINOTESt
Youshouldbeableto findthe SecurityCodeor Pass
Phraseononeof thesetupscreensyouusedto setup
yourrouteror modem,
Wireless - Manual
If you have a static IP address or the Automatic
procedure does not work, you'll need to set the
Network Settings values manually.
1. Follow the directions in Wireless - Automatic
through Step 5.
2. The player searches for a network, and then
displays the connection failed message.
3. On the bottom of the screen, select mP
Settings, and then press the _ button.
The IP Settings screen appears.
4. Select the IP Setting field, and then press the
button.
5. Select Enter manuaIRy in the IP Setting field,
and then press the _ button.
O
CO
@
English 27
6. Selectavaluetoenter(RPAddress,for
exampb),andthenpress_ button.Use
thenumberkeypadonyourremotecontrol
toenterthenumbersforthevalue.Youcan
alsoenternumbersusingtheATbuttons.
Usethe4 _buttonsontheremotecontrol
tomovefromentryfieldtoentryfieldwithina
value.Whendonewithonevalue,pressthe
_ button,
7. Press the A or T button to move to another
value, and then enter the numbers for that
value following the instructions in Step 6.
8. Repeat Steps 6 and 7 until you have filled in
all values.
t NOTESII
Youcangetthe Networkvaluesfrom yourInternet
provider,
9. When finished, select OK, and then press the
button. The Security Screen appears.
10. On the Security screen, enter your network's
Security Code or Pass Phrase. Enter
numbers directly using the number buttons
on your remote control. Enter letters by
selecting a letter with the AT _ _ buttons,
and then pressing the _ button.
11. When finished, select Done at the right of the
screen, and then press the _ button.
The player verifies the network connection
and then connects to the network.
12. After the player verifies the network, select
OK, and then press the _ button.
WPS(PBC)
1. In the Home screen, select Settings, and
then press the _ button.
2. Select Network, and then press the
button.
3. Select Network Settings, and then press the
button.
4. Select Wireless in the Network Settings
screen, and then press the _ button.
5. Press the A button on your remote, and then
press the _ button to select the WPS(PBC).
6. Press the _ button on your remote. The
"Press the PBC button" message appears.
7. Press the WPS(PBC) button on your router
within two minutes. Your player automatically
acquires all the network settings values it
needs and connects to your network.
The Network Status screen appears. The
player connects to the network after the
network connection is verified.
u WPS(PJN)
Before you begin, open the router's setup menu
on your PC and access the screen with the WPS
PiN entry field.
1. In the Home screen, select Settings, and
then press the _ button.
2. Select Network, and then press the
button.
3. Select Network Settings, and then press the
button.
4. Select Wireless in the Network Settings
screen, and then press the _ button.
The player searches for and then displays a
list of the available networks.
5. Select the desired network, and then press
the _ button.
6. Select the WPS(PIN), and then press the
button. The PIN pop-up appears.
7. Enter the PIN into the WPS PIN entry field in
the router's Set Up screen and then save the
the screen.
IINOTESII
_, Contactthe manufacturerof the routerfor instructions
explaininghowto accesstheroute'sSetUpscreensor
referto the router'suser'smanual,
_, ForWPSconnection,setyourwirelessrouter'ssecurity
encryptiontoAES,SettingtoWEPsecurityencryption
doesnotsupportWPSconnection,
28 English
WJoFiDirect
The Wi-Fi Direct function allows you to connect
Wi-Fi Direct devices to the player and each other
using a peepto-peer network, without a wireless
router,
IINOTESII
_, SomeWhFiDirectdevicesmaynot supporttheAIIShare
functionif connectedviaWi-FiDirect,if this isthe case,
it is advisableto changethe networkconnectionmethod
betweendevices.
_, Bluetoothtransmissionscan interferewiththeWhFi
Directsignal.BeforeyouusetheWhFiDirectfunction,
westronglyrecommendthatyouturnoff theBluetooth
functionof anyactivemobiledevice,
1. Turn on the Wi-Fi direct device and activate
its Wi-Fi Direct function.
2. In the Home screen, select Settings, and
then press the _ button.
3. Select Network, and then press the
button.
4. Select WioR Direct, and then press the
button.
The Wi-Fi Direct devices that you can
connect appear.
5. You have three ways to complete the Wi-Fi
connection:
,_ Through the Wi-Fi device.
,_ Through the player using PBC.
,_ Through the player using a PIN.
Each is covered below.
Throughthe WFFi Device
1,
On the Wi-Fi device, follow the procedure on
the device for connecting to another Wi-Fi
Direct device. See the device's user manual
for instructions.
2. When you have completed the procedure,
you should see a pop-up on your TV screen
saying that a device that supports Wi-Fi
Direct has requested to connect. Select OK,
and then press the _ button to accept.
3. The Connecting pop-up appears, followed
by the Connected pop-up. When it closes,
you should see the device listed on the Wi-Fi
Direct screen as connected.
Through the Player UsingPBC
1. Select the Wi-Fi Direct device you want to
connect to this player; and then press the
button. The PBC/PIN pop up appears.
2. Select PBC, and then press the _ button.
The PBC pop-up appears.
3. Press the PBC button on the Wi-Fi Direct
device within 2 minutes.
4. The Connecting pop-up appears, followed
by the Connected pop-up. When it closes,
you should see the device listed on the Wi-Fi
Direct screen as connected.
Through the Player Usinga PmN
1. Select the Wi-Fi Direct device you want to
connect to this player; and then press the
button. The PBC/PIN pop up appears.
2. Select PmN,and then press the _ button.
The PIN pop-up appears.
3. Note the PIN code in the pop-up, and then
enter it into the appropriate field in the Wi-Fi
Direct device you want to connect.
4. The Connecting pop-up appears, followed
by the Connected pop-up. When it closes,
you should see the device listed on the Wi-Fi
Direct screen as connected.
IINOTESt
_' Thecurrentwiredorwirelessnetworkconnectionwill be
disconnectedwhenyouusetheWi--FiDirectfunction,
_, Textfiles,suchasfileswitha .TXTor ,DOCextension,will
notdisplaywhenyouareusingtheWi--FiDirectfunction.
0
CO
d_
English 29
The Software Update menu allows you to
upgrade the player's software for performance
improvements or additional service&
1. In the Home screen, select the Settings, and
then press the _ button.
2. Select Support, and then press the
button.
3. Select Software Update, and then press the
button.
4. To download update software and update
now, select Update Now, and then press the
button. See Update New on this page for
details,
5. To let the product download update software
automatically when availabb, select Auto
Update, and then press the _ button. See
Auto Update on page 31 for details.
INOTES II
_' Theupgradeis completewhentheplayerturnsoff,and
thenturnson againbyitself.
_, SamsungElectronicsshalltakesnolegalresponsibility
forplayermalfunctioncausedbyanunstableJnternet
connectionor consumernegligenceduringa software
Update.
_, Ifyouwantto cancelthe upgradewhilethe upgrade
softwareis downloading,pressthe _ button.
_, Whena systemupgradeis in progress,"UPDA/TE"is
displayedon thefrontpanel.
Update Now
You can use Update Now to update the software
through your network connection or by using a
USB flash drive. The network instructions are
below. The USB flash drive instructions are on the
next page.
1. Select Update Now, and then press the
button.
The Update now pop-up appears.
2. The product searches on line for the latest
software version
3. If it finds a new version, the Update Request
pop-up appears.
4. Select OK. The product upgrades the
software, turns off, and then turns on
automatically
5. If you do not select OK or Cancel in one
minute, the product stores the new upgrade
software. You can upgrade the software later
using Auto Update.
6. If you select Cancel, the product cancels the
upgrade
IINOTESII
_, Whenthe systemupgradeis done,checkthesoftware
detailsin theProductinformationsectionofthe Contact
Samsungscreen,
Donotturn offthe playerduringtheSoftwareUpdate,It
maycausetheplayerto malfunction.
3_ English
Auto Update
You can set the Auto Update function so that the
player downloads new upgrade software when it
is in Auto Update mode.
In Auto Update mode, the player is off, but its
Internet connection is active. This aflows the player
to download upgrade software automatically,
when you are not using it
1. Press the aT buttons to select Auto
Update, and then press the _ button
2. Select On or Off.
If you select On, the player will automatically
download new upgrade software when it is
in Auto Update mode with the power off. If it
downloads new upgrade software, the player
will ask you if you want to install it when you
turn the player on
IINOTESII
TousetheAutoUpdateModeUpgradefunction,your
playermustbe connectedto the Internet.
< By USB >
1. Visit ,¢¢ww.samsung.com.
2. Click SUPPORT on the top right of the page.
3. Enter the product's model number into the
search field. As you enter the model number,
a drop down will display products that match
the model number.
4. Left click your product's model number in the
drop down list.
5. On the page that appears, scroll down to and
then click Firmware Manuals & Downloads.
6. Click Firmware in the center of the page.
7. Click the ZmPbutton in the Filecolumn on the
right side of the page.
8. Click Send in the first pop-up that appears.
Click OK in the second pop-up to download
and save the firmware file to your PC.
9. Unzip the zip archive to your computer. You
should have a single folder with the same
name as the zip file.
10. Copy the folder to a USB flash drive.
11. Make sure no disc is inserted in the product,
and then insert the USB flash drive into the
USB port of the product.
12. In the product's menu, go to Settings >
Support > Software Update,
13. Select Update Now.
14. The product searches for the software on the
USB drive. When it finds the software, the
Update Request pop-up appears.
15. Select OK. The product upgrades the
software, turns off, and then turns on
automatically.
IINOTESt
Thereshouldbe nodiscinthe playerwhenyouupgrade
the softwareusingtheUSBjack,
Whenthesystemupgradeis done,checkthesoftware
detailsinthe Productinformationsectionof theContact
Samsungscreen.
Donotturnoff the playerduringthe.SoftwareUpdate.
it maycausethe playerto malfunction,
SoftwareUpdatesusingtheUSBjackmustbe performed
witha USBflashmemorystickonly,
O
4_
O_
English 3_
Your Blu-ray Disc Player can play content located
on Blu-ray/DVD/CD discs, USB devices, PCs,
smart phones, tablets, and on the Web.
To play content located on your PC or on mobile
devices, you must connect them and this product
to your network. To play content on your PC, you
must also install AIIshare network software on your
PC.
t NOTESII
_. Youcanplaycontentsoil yourPCusingotherprograms
compatiblewithAIIsharenetworksoftware,however,we
recommendthatyouuseAIIsharenetworksoftware,
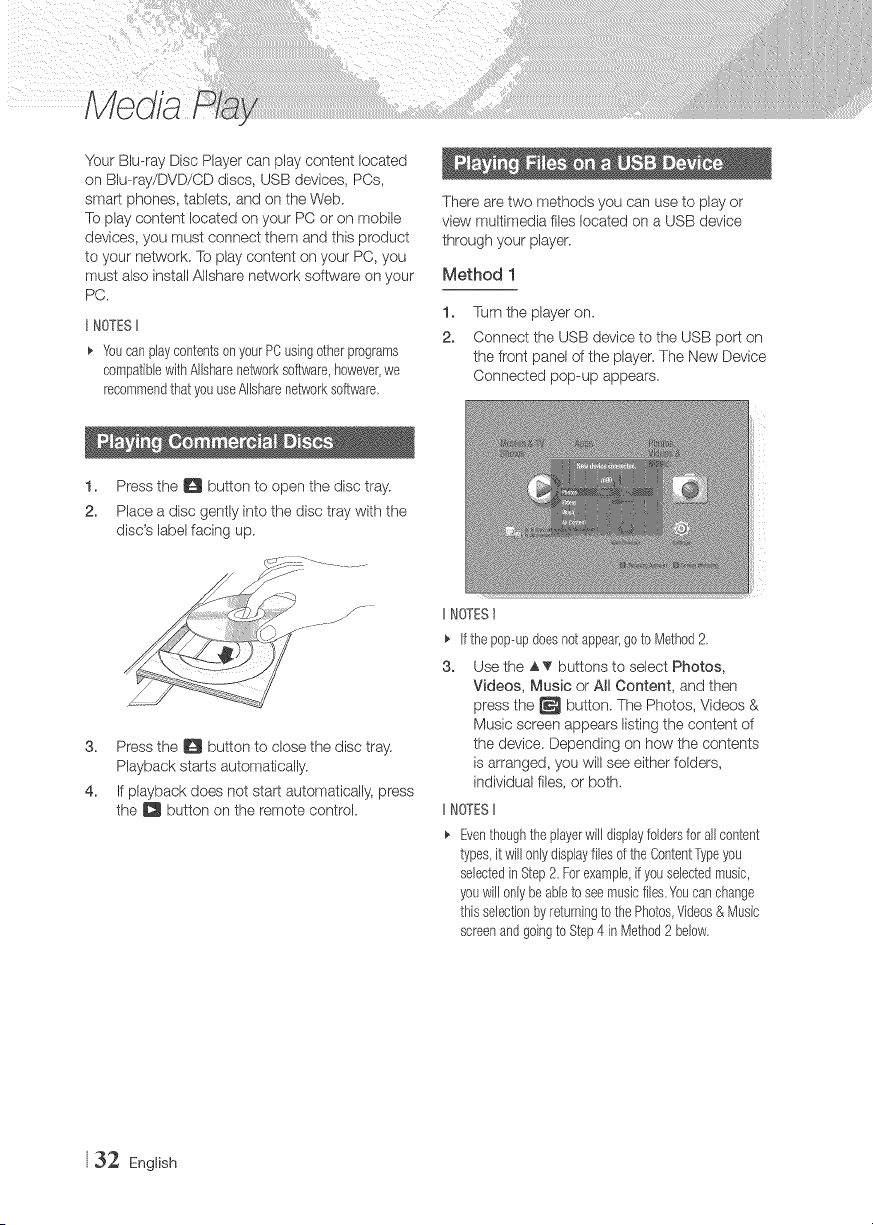
1. Press the D button to open the disc tray.
2. Place a disc gently into the disc tray with the
disc's label facing up.
3. Press the O button to close the disc tray.
Playback starts automatically.
4. If playback does not start automatically, press
the Q button on the remote control
There are two methods you can use to play or
view multimedia files located on a USB device
through your player.
Method 1
1,
2.
Turn the player on.
Connect the USB device to the USB port on
the front panel of the player. The New Device
Connected pop-up appears.
IINOTESI
_' If thepop--updoesnotappear,goto Method2,
8. Use the A.'_ buttons to select Photos,
Videos, Music or All Content, and then
press the _ button. The Photos, Videos &
Music screen appears listing the content of
the device. Depending on how the contents
is arranged, you will see either folders,
individual files, or both.
IINOTESII
Eventhoughthe playerwill displayfoldersfor all content
types,it will onlydisplayfilesof theContentTypeyou
selectedinStep2, Forexample,if youselectedmusic,
youwill onlybeableto seemusicfiles.Youcanchange
thisselectionbyreturningto thePhotos,Videos& Music
screenandgoingto Step4 inMethod2 below.
32 English

4. If necessary, use the the _' _ _ buttons
to select a folder, and then press the
button.
5. Select a file to view or play, and then press
the _ button,
6. Press the RETURN button to exit a folder
or the EXmTbutton to return to the Home
screen.
7. Go to pages 36-43 for instructions that
explain how to control playback of videos,
music, and pictures on a USB device.
Method 2
1. Turn the player on,
2. Connect the USB device to the USB port on
the front panel of the player:
3. Select Photos, Videos & Music on the
Home screen, and then press the _ button.
4. Select Photos, Videos, Music or AH
Content, and then press the _ button.
IINOTESII
B!enthoughtheplayerwill displayfoldersfor all content
types,itwill onlydisplayfilesofthe ContentTypeyou
selectedinStep2, Forexample,if youselectedmusic,
youwifl onlybeabb to seemusicfiles.Youcanchange
thisselectionbyreturningto thePhotos,Videos& Music
screenandrepeatingStep4.
5. Use the _I _ buttons to select the desired
devbe and then press the _ button.
Depending on how the contents are
arranged, you will see either folders, individual
flies, or both,
6. If necessary, use the AT _ _ buttons to
select a folder, and then press the _ button.
7. Use the A T _ _ buttons to select a file to
view or play, and then press the _ button,
8. Press the RETURN button to exit a folder or
the EXmTbutton to return to Home screen.
9. Go to pages 36-43 for instructions that
explain how to control playback of videos,
music, and pictures on a USB device.
IINOTESt
_' ifyouinset1:a discwhenplayinga USBdevice,thedevice
modechangesto "Disc"automaticaJly.
You can play multimedia flies you have recorded
on Blu-ray, DVD, or CD discs.
1. Place a user recorded disc into the disc
tray with the disc's label facing up, and then
close the tray. The Device Connected pop-up
appears.
2. Use the A T buttons to select the type of
content you want to view or play - Photos,
Videos, Music, or AH Content - and then
press the _ button.
IINOTESt
_' Eventhoughthe playerwilldisplayfoldersfor all content
types,it willonlydisplayfibs of the ContentTypeyou
selectedinStep2. Forexampb,ifyou sebctedmusic,
youwillonlybeableto seemusicfiles.Youcanchange
this selectionbyreturningto the Photos,Videos& Music
screenandrepeatingStep2.
3. A screen appears listing the contents of the
disc. Depending on how the contents are
arranged, you will see either folders, individual
files, or both.
4. If necessary, use the A T _ _ buttons to
select a folder, and then press the _ button.
o
English 33
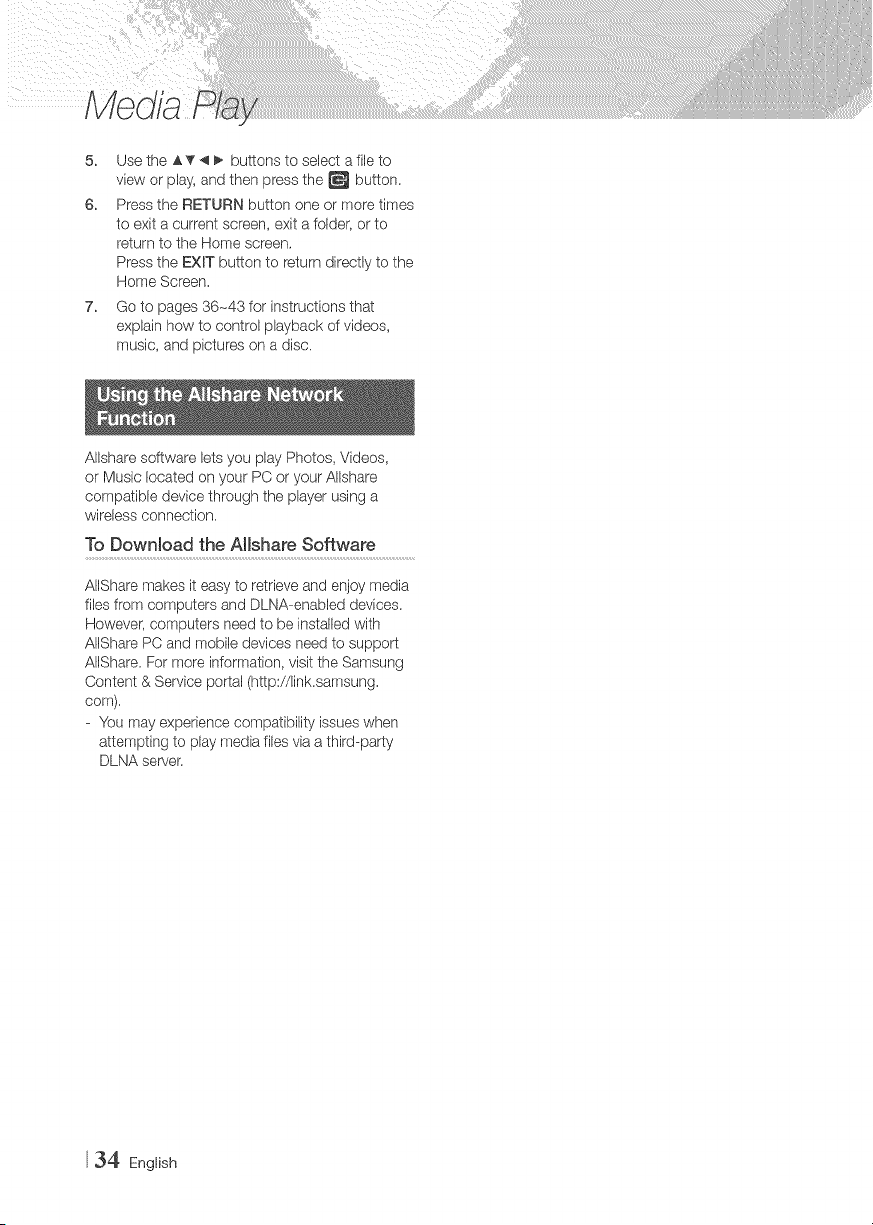
5. Use the AT _ _ buttons to select a file to
vbw or play, and then press the _ button.
6. Press the RETURN button one or more times
to exit a current screen, exit a folder, or to
return to the Home screen.
Press the EXmTbutton to return directly to the
Home Screen.
7. Go to pages 36-43 for instructions that
explain how to control playback of videos,
music, and pbtures on a disc.
AlIshare software lets you play Photos, Videos,
or Music located on your PC or your AlIshare
compatible device through the player using a
wireless connection,
To Download the AHshare Software
AlIShare makes it easy to retrieve and enjoy media
files from computers and DLNA-enabbd devices.
However, computers need to be installed with
AIIShare PC and mobib devices need to support
AIIShare. For more information, visit the Samsung
Content & Service portal (http://link.samsung.
COFrl),
- You may experience compatibility issues when
attempting to play media files via a third-party
DLNA server.
34 English
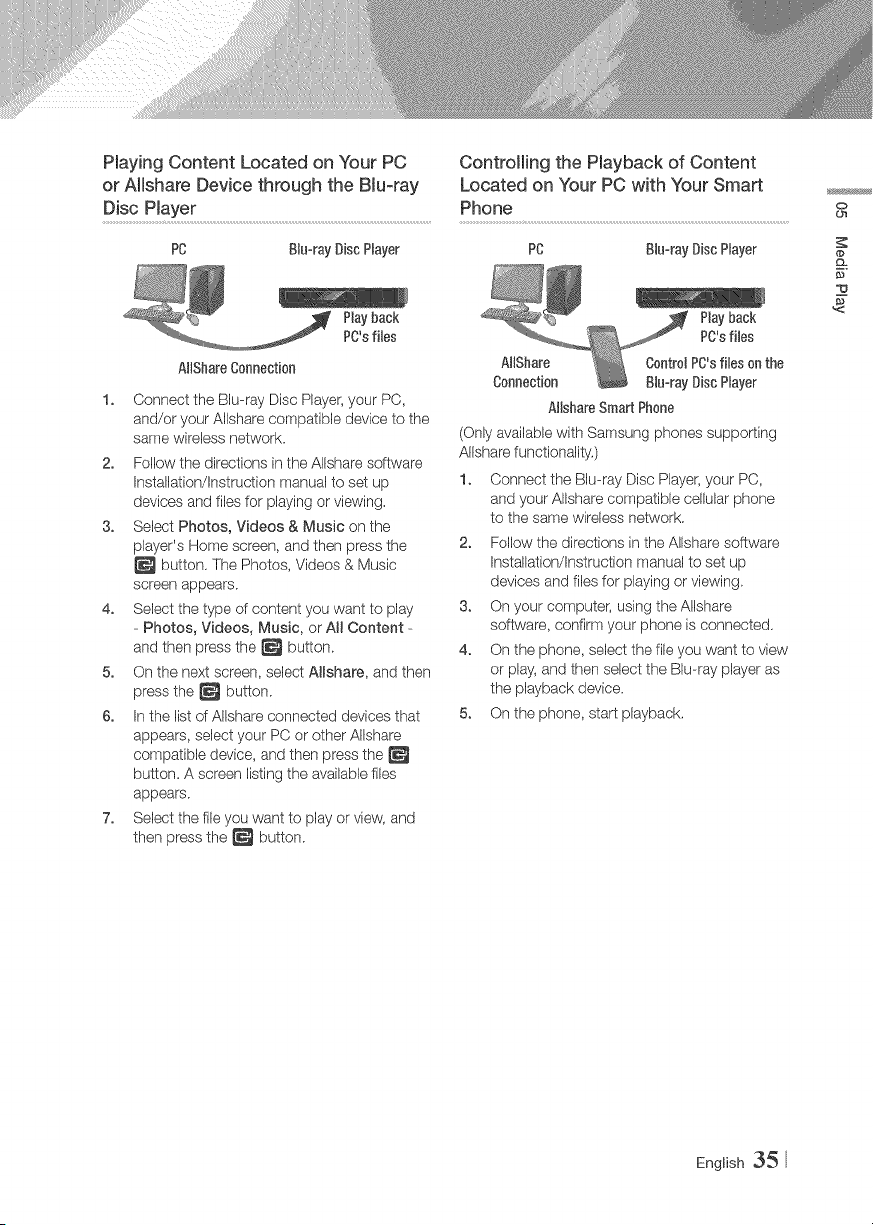
Playing Content Located on Your PC Controlling the Playback of Content
or Mshare Device through the BJuoray Located on Your PC with Your Smart
Disc Hayer Phone
PC BJuorayDisc PRayer PC BJuorayDiscPRayer
Hay back
PO'sflies
AHSbareConnection
1. Connect the Blu-ray Disc Player_your PC,
and/or your Allshare compatible device to the
same wireless network.
2. Fellow the directions in the Allshare software
Instalbtion/Instruction manual to set up
devices and files for playing or viewing.
3. Select Photos, Videos & Music on the
player's Home screen, and then press the
button. The Photos, Videos & Music
screen appears.
4. Select the type of content you want to pby
- Photos, Videos, Music, or AH Content -
and then press the _ button.
5. On the next screen, select Mshare, and then
press the _ button.
6. In the list of Allshare connected devices that
appears, select your PC or other AIbhare
compatible device, and then press the
button. A screen listing the available files
appears.
7. Select the file you want to play or view, and
then press the _ button.
Pby back
PO'sflies
AHSbare Contr01PC'sflieson the
Connection BJuorayDiscPRayer
AHsbareSmart Phone
(Only available with Samsung phones supporting
AIIshare functionality.)
1. Connect the Blu-ray Disc Player} your PC,
and your AIbhare cornpatibb cellular phone
to the same wireless network.
2. Follow the directions in the AIIshare software
Instalbtion/Instruction manual to set up
devices and files for playing or viewing.
3. On your computer, using the AIbhare
software, confirm your phone is connected.
4. On the phone, select the file you want to view
or play, and then select the Blu-ray player as
the playback device.
5. On the phone, start playback.
o
English 35
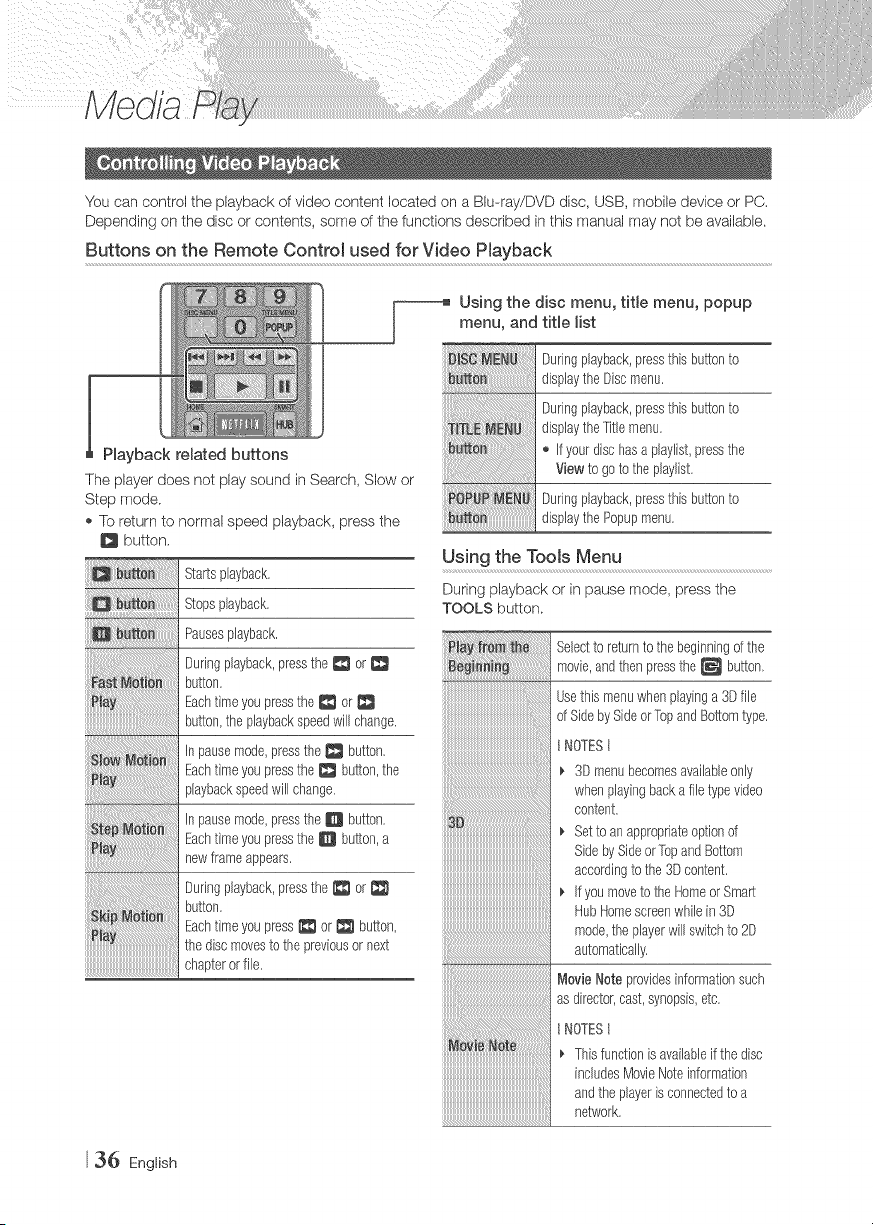
You can control the playback of video content located on a Blu-ray/DVD disc, USB, mobile device or PC,
Depending on the disc or contents, some of the functions described in this manual may not be available.
Buttons on the Remote Control used for Video Playback
_ sing the disc menu, title menu, popup
menu, and title list
Duringplayback,pressthisbuttonto
displaythe Discmenu.
Playback related buttons
The player does not play sound in Search, Slow or
Step mode.
To return to normal speed playback, press the
Q button,
Startsplayback.
Stopsplayback.
Pausesplayback.
Duringplayback,pressthe _ or
button.
Eachtimeyoupressthe _ or
button,the playbackspeedwill change.
In pausemode,pressthe _ button.
Eachtimeyoupressthe _ button,the
playbackspeedwill change.
In pausemode,pressthe D button.
Eachtimeyoupressthe O button,a
newframeappears.
Duringplayback,pressthe _ or
button.
Eachtimeyoupress_ or _ button,
thediscmovesto the previousor next
chapterorfile.
Duringplayback,pressthisbuttonto
displaytheTitlemenu.
If yourdischasa playlist,pressthe
Viewto goto theplaylist.
Duringplayback,pressthisbuttonto
displaythe Popupmenu.
Using the Tools Menu
During playback or in pause mode, press the
TOOLS button.
Seledto returnto thebeginningof the
movie,andthenpressthe _ button.
Usethismenuwhenplayinga 3Dfile
of SidebySideorTopandBottomtype.
}'_OTESt
3D menubecomesavailableonly
whenplayingbacka file typevideo
content.
Setto anappropriateoptionof
SidebySideorTopandBottom
accordingto the 3Dcontent.
If youmoveto theHomeor Smart
HubHomescreenwhilein3D
mode,theplayerwillswitchto 2D
automatically.
Movie Noteprovidesinformationsuch
asdirector,cast,synopsis,etc.
}'_OTESt
Thisfunctionis availableif thedisc
includesMovieNoteinformation
andtheplayerisconnectedto a
network.
36 English
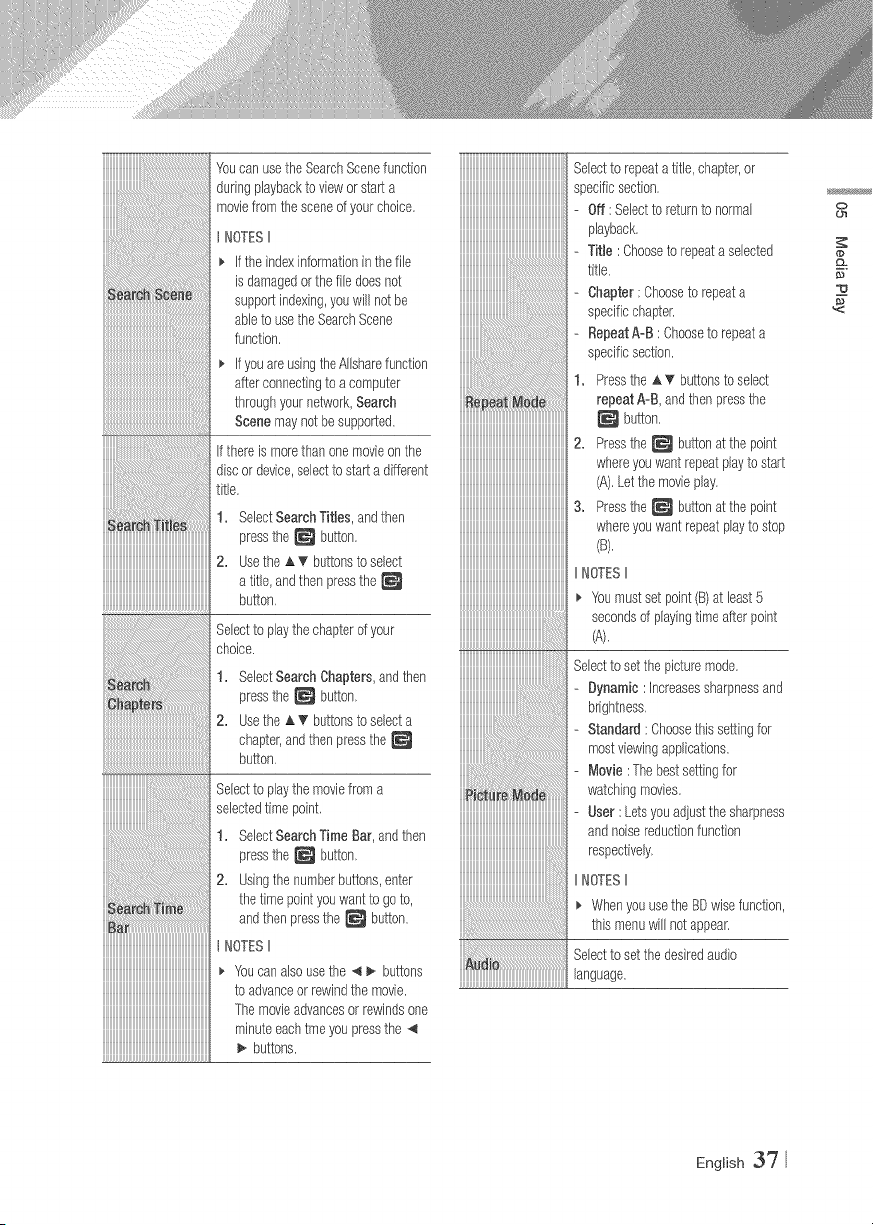
Youcan usethe SearchScenefunction
duringplaybackto viewor starta
moviefromthesceneof yourchoice,
NOTESII
If the indexinformationinthefile
is damagedorthe filedoesnot
supportindexing,youwill notbe
ableto usethe SearchScene
function,
If youare usingtheAIIsharefunction
afterconnectingto a computer
throughyournetwork,Search
Scenemaynot besupported,
If thereis morethanonemovieon the
discor device,selectto starta different
title,
SelectSearchTitles, andthen
pressthe _ button,
Usethe ,_ _ buttonsto select
a title, andthenpressthe
button,
Selectto playthechapterof your
choice.
1. SelectSearchChapters,andthen
pressthe _ button,
2. Usethe _, _' buttonsto selecta
chapter,andthenpressthe
button,
Selectto playthemoviefroma
selectedtime point,
1. SelectSearchTime Bar,andthen
pressthe _ button,
2. Usingthe numberbuttons,enter
thetimepointyouwantto goto,
andthenpressthe _ button.
iiiiiiiiiiiiiiiiiiiiiiiiiiiiiiiiiiiiiiiiiiiiiiiiiiiiiiiiiiiiiiiiiiiiiiiii,oTEs,
iiiiiiiiiiiiiiiiiiiiiiiiiiiiiiiiiiiiiiiiiiiiiiiiiiiiiiiiiiiiiiiiiiiiiiiii_' Youcanalsousethe_ buttons
iiiiiiiiiiiiiiiiiiiiiiiiiiiiiiiiiiiiiiiiiiiiiiiiiiiiiiiiiiiiiiiiiiiiiiiiitoadvanceorrewindthemovie.
iiiiiiiiiiiiiiiiiiiiiiiiiiiiiiiiiiiiiiiiiiiiiiiiiiiiiiiiiiiiiiiiiiiiiiiii1-hemovieadvancesorrewindsone
iiiiiiiiiiiiiiiiiiiiiiiiiiiiiiiiiiiiiiiiiiiiiiiiiiiiiiiiiiiiiiiiiiiiiiiiiminuteeachtmeyoupressthe
iiiiiiiiiiiiiiiiiiiiiiiiiiiiiiiiiiiiiiiiiiiiiiiiiiiiiiiiiiiiiiiiiiiiiiiii_ buttons.
iiiiiiiiiiiiiiiiiiiiiiiiiiiiiiiiiiiiiiiiiiiiiiiiiiiiiiiiiiiiiiiiiiiiiiiiiSelecttorepeatatitb, chapter,or
iiiiiiiiiiiiiiiiiiiiiiiiiiiiiiiiiiiiiiiiiiiiiiiiiiiiiiiiiiiiiiiiiiiiiiiiispecificsection,
iiiiiiiiiiiiiiiiiiiiiiiiiiiiiiiiiiiiiiiiiiiiiiiiiiiiiiiiiiiiiiiiiiiiiiiii.... Off:Sebcttoreturntonormal
iiiiiiiiiiiiiiiiiiiiiiiiiiiiiiiiiiiiiiiiiiiiiiiiiiiiiiiiiiiiiiiiiiiiiiiiip ayback,
iiiiiiiiiiiiiiiiiiiiiiiiiiiiiiiiiiiiiiiiiiiiiiiiiiiiiiiiiiiiiiiiiiiiiiiii'- Titb : Choosetorepeatasebcted
'_ili
1,
iiiiiiiiiiiiiiiiiiiiiiiiiiiiiiiiiiiiiiiiiiiiiiiiiiiiiiiiiiiiiiiiiiiiiiiii
iiiiiiiiiiiiiiiiiiiiiiiiiiiiiiiiiiiiiiiiiiiiiiiiiiiiiiiiiiiiiiiiiiiiiiiii2.
iiiiiiiiiiiiiiiiiiiiiiiiiiiiiiiiiiiiiiiiiiiiiiiiiiiiiiiiiiiiiiiiiiiiiiiii
iiiiiiiiiiiiiiiiiiiiiiiiiiiiiiiiiiiiiiiiiiiiiiiiiiiiiiiiiiiiiiiiiiiiiiiii
iiiiiiiiiiiiiiiiiiiiiiiiiiiiiiiiiiiiiiiiiiiiiiiiiiiiiiiiiiiiiiiiiiiiiiiii
iiiiiiiiiiiiiiiiiiiiiiiiiiiiiiiiiiiiiiiiiiiiiiiiiiiiiiiiiiiiiiiiiiiiiiiii
iiiiiiiiiiiiiiiiiiiiiiiiiiiiiiiiiiiiiiiiiiiiiiiiiiiiiiiiiiiiiiiiiiiiiiiii
title.
Chapter: Chooseto repeata
specificchapter,
RepeatAoB : Chooseto repeata
specificsection.
Pressthe ,_ buttonsto select
repeatA-B,andthenpressthe
button,
Pressthe_ buttonat the point
whereyouwantrepeatplayto start
(A),Letthe movbplay.
Pressthe_ buttonat the point
whereyouwantrepeatplayto stop
(B),
,NoTEs,
_' Youmustsetpoint(B)at least5
secondsof playingtimeafterpoint
Selectto setthe picturemode.
Dynamic:increasessharpnessand
brightness,
Standard: Choosethis settingfor
mostviewingapplications.
Movie: Thebestsettingfor
watchingmovies.
iiiiiiiiiiiiiiiiiiiiiiiiiiiiiiiiiiiiiiiiiiiiiiiiiiiiiiiiiiiiiiiiiiiiiiiii'-User:Letsyouadjustthesharpness
iiiiiiiiiiiiiiiiiiiiiiiiiiiiiiiiiiiiiiiiiiiiiiiiiiiiiiiiiiiiiiiiiiiiiiiiiandnoisereductionfunction
iiiiiiiiiiiiiiiiiiiiiiiiiiiiiiiiiiiiiiiiiiiiiiiiiiiiiiiiiiiirespectively,
iiiiiiiiiiiiiiiiiiiiiiiiiiiiiiiiiiiiiiiiiiiiiiiiiiiiiiiiiiii,NoTes,
Whenyouusethe BDwisefunction
this menuwill notappear.
Selecttosetthedesiredaudio
iiiiiiiiiiiiiiiiiiiiiiiiiiiiiiiiiiiiiiiiiiiiiiiiiiiiiiiiiiiiiiiiiiiiiiiiilanguage.
o
c_
..g
English 3?
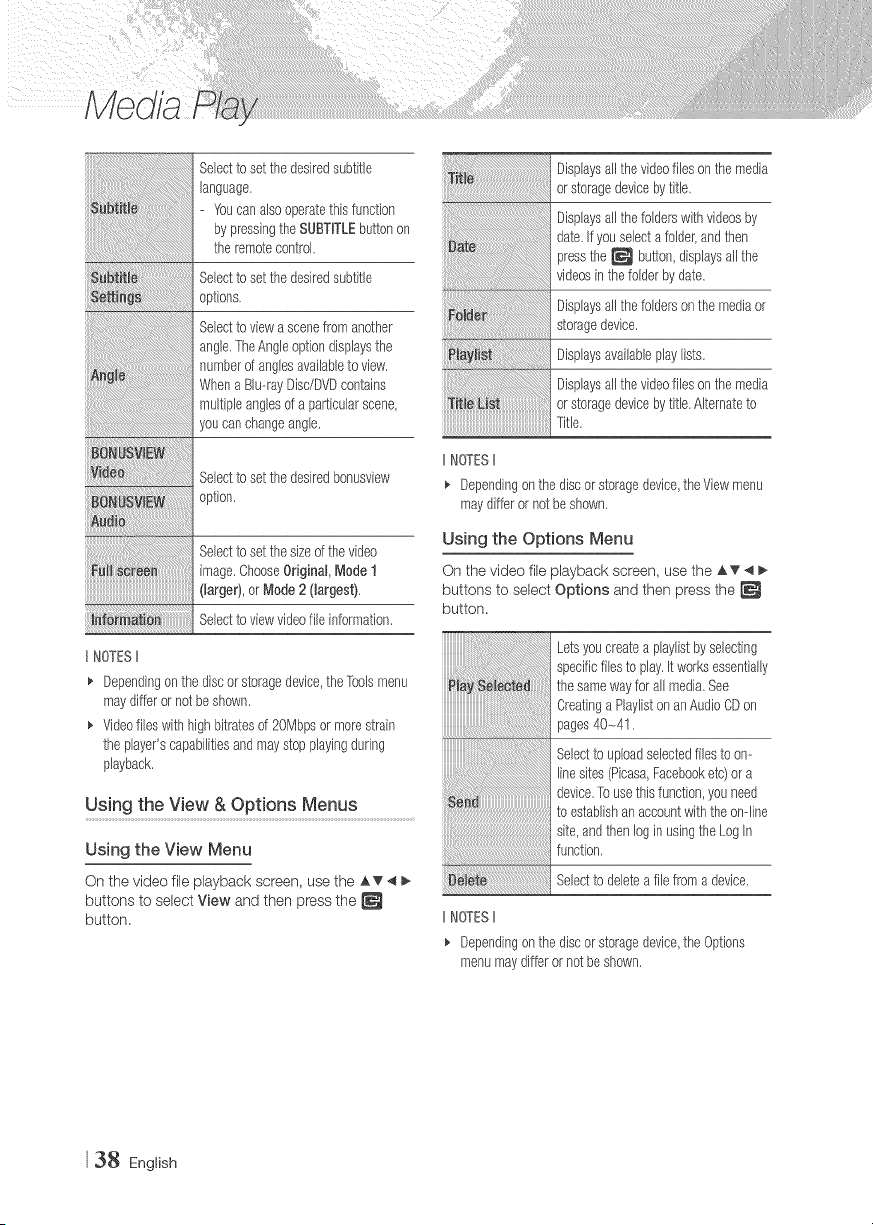
Selectto setthe desiredsubtitle
language.
- Youcan alsooperatethisfunction
bypressingthe SUBTRTLEbuttonon
theremotecontrol.
Selectto setthe desiredsubtitle
options.
Selectto viewa scenefromanother
angle.TheAngleoptiondisplaysthe
numberof anglesavailableto view.
Whena Blu--rayDisc/DVDcontains
multipleanglesof a particularscene,
youcanchangeangle.
Selectto setthe desiredbonusview
option.
Selectto setthe sizeof thevideo
image.ChooseOriginal,Mode1
(larger),or Mode2 (largest),
Seled to viewvideofile information.
t NOTESII
_' Dependingonthe discor storagedevice,theToolsmenu
maydifferor not beshown.
_, Videofileswith highbitratesd 20Mbpsor morestrain
the player'scapabilitiesandmaystop playingduring
playback.
Using the View & Options Menus
Using the View Menu
On the video file playback screen, use the AT 4
buttons to select View and then press the
button.
i_iii_@_!_i!_!_!_i!_i_i_!i_!i_!i_!i_i{iiiiiiiiiiiiiiiiiiiiiiiiiiiiiiiiiiiiiiiiiiiiiiiiiiiiiiiiiiiiiiiiiiiiiiiiiiiiiiiiiiiiiiiiiiiiiiiiiiiiiiiiiiiiiiiiiiiiiiii_!_!!iiiiiiiiii
i ....
Displaysall thevideofileson themedia
orstoragedevicebytitle.
Displaysall thefolderswithvideosby
date.If youselecta folder,andthen
pressthe _ button,displaysall the
videosinthe folderbydate.
Displaysall thefoldersonthe mediaor
storagedevice.
Displaysavailableplaylists.
Displaysall thevideofileson themedia
orstoragedevicebytitle.Alternateto
Title.
IINOTESII
_, Dependingonthediscor storagedevice,theViewmenu
maydifferor notbeshown.
Using the Options Menu
On the video file playback screen, use the AT 4
buttons to select Options and then press the
button.
Letsyoucreatea playlistbysebcting
specificfilesto play.it worksessentially
thesamewayfor all media.See
Creatinga PJayJistonanAudioCDon
pages40-41.
Selectto uploadselectedfilesto on--
linesites(Picasa,Facebooketc)ora
device,Tousethisfunction,youneed
to establishanaccountwiththeondine
site,andthenlogin usingthe LogIn
function,
Selectto deletea file froma device.
IINOTESII
_' Dependingonthediscor storagedevice,the Options
menumaydifferornotbeshown.
38 English
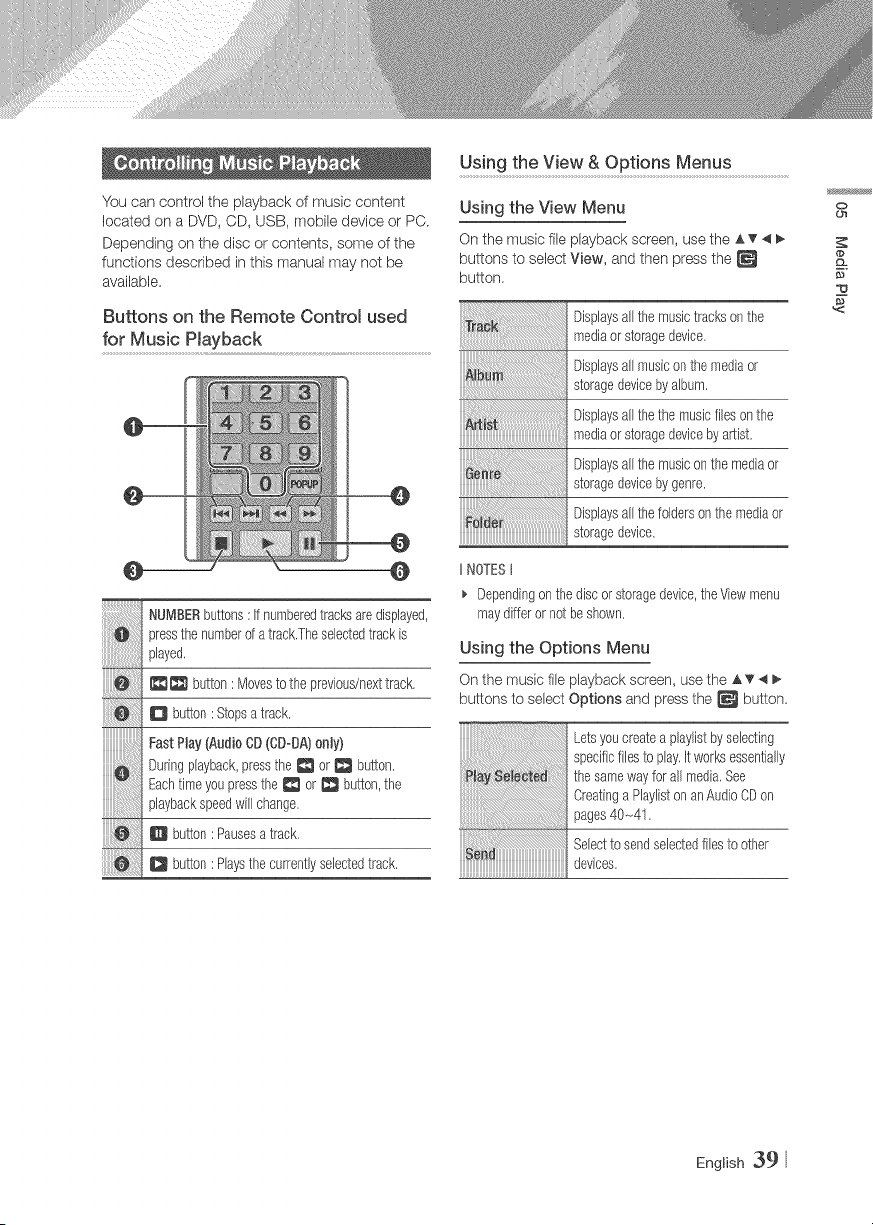
Us!ng the V!ew & OPt!ons Menus.......................................
You can control the playback of music content
located on a DVD, CD, USB, mobile device or PC.
Depending on the disc or contents, some of the
functions described in this manual may not be
available,
Buttons on the Remote ControJ used
for Music PJayback
NUMBERbuttons:If numberedtracksare displayed,
pressthenumberof a track.Theselectedtrackis
played.
_ button: Movestothe previous/nexttrack.
D button: Stopsa track.
iiiiiiiiiiiiiiiiiiiiiiiii
FactPlay(AudioCD(CDoBA)only)
Dorhgplayback,presstheor botton
Eachtimeyoupressthe _ or _ button,the
playbackspeedwill change,
Q button: Pausesa track.
D button:Playsthecurrentlyselectedtrack.
Using the View Menu
On the music file playback screen, use the AT 4
buttons to select View, and then press the
button.
Displaysallthe musictracksonthe
mediaorstoragedevice.
Displaysall musicon themediaor
storagedevicebyalbum.
Displaysallthe themusicfilesonthe
mediaorstoragedevicebyartist.
Displaysallthe musiconthe mediaor
storagedevicebygenre.
Displaysallthe foldersonthe mediaor
storagedevice.
IINOTESt
Dependingonthe discor storagedevice,theViewmenu
maydifferor notbeshown.
Using the Options Menu
On the music file playback screen, use the A _ 4 _,
buttons to select Options and press the _ button.
Letsyoucreatea playlistbyselecting
specificfilesto play.It worksessentially
thesamewayfor all media.See
Creatinga Playliston anAudioCDon
pages40-41.
Selectto sendselectedfilesto other
devices.
o
(#
English 39

The RippingfunctionconvertsCD
audioto themp3formatandsavesthe
convertedflieson a USBdeviceorthe
mobiledeviceconnededtothe player.
SeeRippingon page41.
Seledto seethe(Contents)information.
Seled to managethetextencoding
options,
Seled to deletea filefrom thedevice.
t NOTES II
_. Dependingonthe discorstoragedevice,theOptions
menumaydifferor not heshown.
Repeating Tracks on an Audio CD
You can set the product to repeat tracks on an
audio CD (CD-DA/MP3).
1. On the Playback screen, use the AT 4 I_
buttons to select _ in the lower left corner
of the screen, and then press the _ button.
2. Use the &T to select the repeat mode you
want - Off, One Song, or All - and then
press the _ button.
Shuffling Tracks on an Audio CD
You can set the product to play tracks on an audio
CD (CD-DA/MP3) at random.
1. On the Playback screen, use the A T _11_
buttons to select _ in the lower left corner
of the screen, and then press the _ button.
2. Use the AT to set the Shuffle mode On or
Off, and then press the _ button.
Creating a Playlist from an Audio CD
1. With the Playback screen displayed, select
the Options button, and then press the
button. The Options menu appears.
2. Use the A _ buttons to select Play Selected,
and then press the _ button. The Selection
Play screen appears.
3. Use the A'_ buttons to select a track, and
then press the _ button. A check appears
to the left of the track.
4. Repeat Step 3 to select and check additional
tracks.
5. To remove a track from the list, move to the
track, and then press the _ button again.
The check on the track is removed.
6. When done, press the AT button to select
Play, and then press the _ button. The
Music Playback screen reappears listing only
the tracks you checked. The selected tracks
play automatically.
IINOTESII
_' Youcancreatea playJistwithupto 99 tracksonAudio
CDs(CD--DA),
_' If youhavecreateda playlist,PlaySelectedisreplaced
byEdit Playlist onthe Optionsmenu,
_, Onthe SelectionPlayscreen,youcanalsochooseSelect
All, ClearAll, andCancel
4_} English
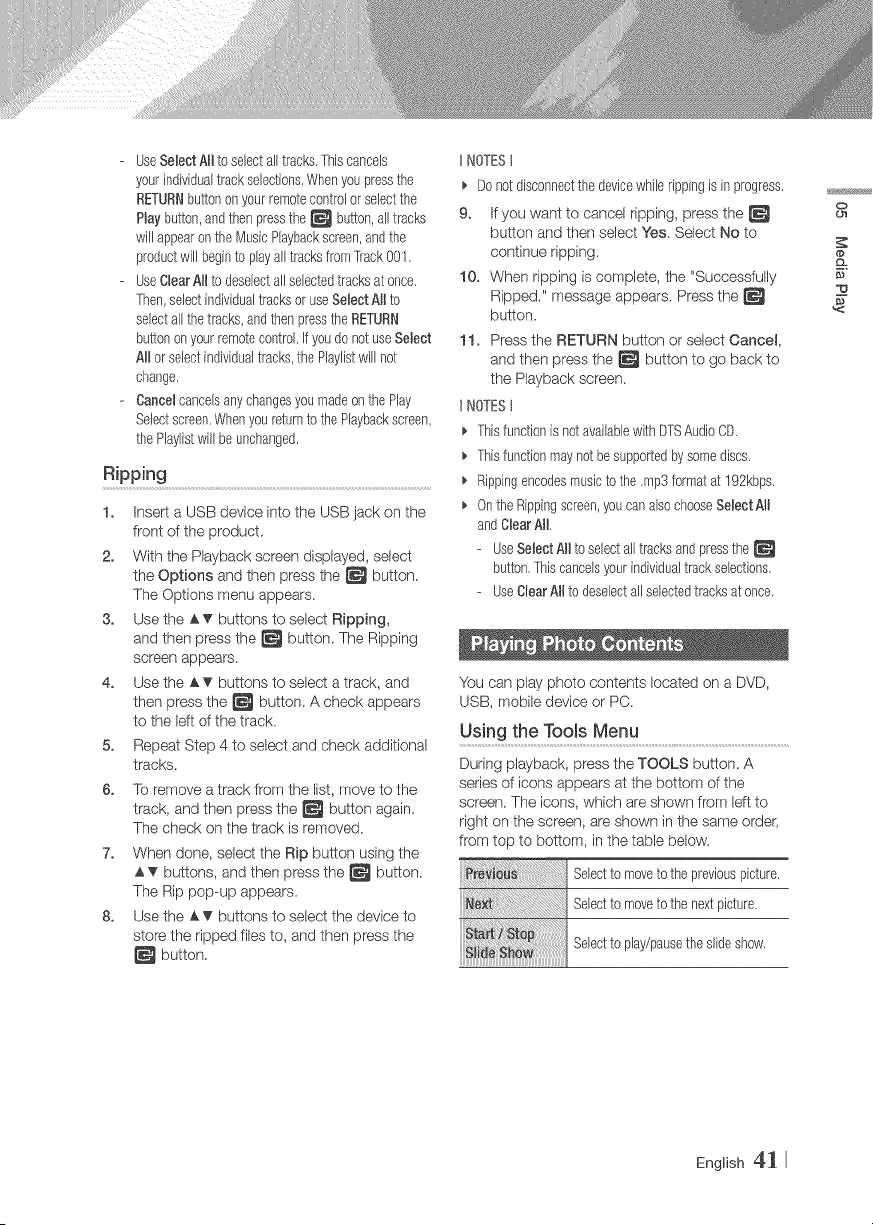
- UseSeBectAll to selectall tracks,Thiscancels
yourindividualtrackselections.Whenyoupressthe
RETURNbuttononyourremotecontrolorselectthe
Hay button,andthenpressthe _ button,all tracks
willappearonthe MusicPlaybackscreen,andthe
productwill beginto playalltracksfrom'[rack001.
- UseClearAIIto deselectall selectedtracksat once,
Then,selectindividualtracksor useSelectAtlto
selectall thetracks,andthenpresstheRETURN
buttononyourremotecontrol,if youdo notuseSelect
AHorselectindividualtracks,the Playlistwill not
change,
- Cancelcancelsany changesyoumadeon thePlay
Selectscreen.Whenyoureturnto thePlaybackscreen,
thePlaylistwifl be unchanged,
Ripping
1. Insert a USB device into the USB jack on the
front of the product.
2. With the Playback screen displayed, select
the Options and then press the _ button.
The Options menu appears.
3. Use the _'_ buttons to select Ripping,
and then press the _ button. The Ripping
screen appears.
4. Use the A.T buttons to select a track, and
then press the _ button. A check appears
to the left of the track.
5. Repeat Step 4 to select and check additional
tracks.
6. To remove a track from the list, move to the
track, and then press the _ button again.
The check on the track is removed.
7. When done, select the Rip button using the
A.T buttons, and then press the _ button.
The Rip pop-up appears.
8. Use the A.T buttons to select the device to
store the ripped files to, and then press the
button.
IINOTESt
_, Donotdisconnectthe devicewhilerippingis in progress.
9. If you want to cancel ripping, press the
button and then select Yes. Select No to
continue ripping.
10. When ripping is complete, the "Successfully
Ripped." message appears. Press the
button.
11. Press the RETURN button or select Cancel,
and then press the _ button to go back to
the Playback screen.
I NOTESt
Thisfunctionis notavailablewith DTSAudioCD.
_, Thisfunctionmaynotbesupportedbysomediscs,
_, Rippingencodesmusicto the .mp3formatat 192kbps,
_, OntheRippingscreen,you canalsochooseSeBectAH
andCBearAll,
- UseSelectAHto seied alltracksandpressthe
button,Thiscancelsyourindividualtrackselections,
- UseClearAHto deselectall selectedtracksat once,
You can play photo contents located on a DVD,
USB, mobile device or PC.
Using the Tools Menu
During playback, press the TOOLS button. A
series of icons appears at the bottom of the
screen. The icons, which are shown from left to
right on the screen, are shown in the same order,
from top to bottom, in the table below.
Selectto moveto thepreviouspicture,
Selectto moveto thenextpicture,
Selectto play/pausethe slideshow,
o
..g
English 41
SelecttheSlideShowsettings,
Selectto enlargethe currentpicture.
(Enlargeup to4 times)
Selectto rotatethepicture.(Thiswill
rotatethepictureeitherclockwiseor
counterclockwise.)
Selectto listento musicwhileviewing
a slideshow.
Selectthepicturemode- Dynamic,
Standard,Movie,or User- ordisplay
informationaboutthe currentpicture,
t NOTESt
_, Dependingonthe discorstoragedevice,the'Foolsmenu
maydifferor not beshown.
_, 1-oenablethebackgroundmusicfunction,thephotofilemust
be inthesamestoragemediaasthemusicfile.
However,thesoundqualitycanbea%ctedbythebitrateof
theMP3file,thesizeof thephoto,andtheencodingmethod.
_, Youcan'tenlargethe subtitleandPGgraphicin thefull
screenmode,
Using the View & Options Menus
Using the View Menu
On a file screen containing photo files, select the
View and press the _ button,
Displaysall thephotofilesonthe media
orstoragedevicebytitle,
Groupsall thethe photofilesonthe
mediaor storagedevicebydate.Clicka
groupto seethe photosinthatgroup,
Displaysall thefoldersonthe mediaor
storagedevice.
t NOTESt
_' Dependingonthe discorstoragedevice,theViewmenu
maydifferor not beshown.
Using the Options Menu
On a file screen containing photo files, select the
Options and press the _ button,
Startsthe slideshow.Showsallthe
fliesinthe currentfolder,oneafter
another,If youwantto createa slide
showwitha selectedgroupofphotos,
seePlaySelectedbelow.
Letsyoucreatea phyfist byselecting
specificphotosto see,It works
essentiallythesamefor all media,
SeeCreatinga PlaylistfromanAudio
CDon pages40-41 for instructions,
Selectto uploadselectedfilesto an
ondinesite (Picasa,Facebooketc)ora
device,[o usethisfunction,youneed
to establishanaccountwiththeondine
site,andthenlogin usingthe LogIn
function,SeeUsingthe SendFunction
on page43.
Selectto deletethe afile fromthe
device,
IINOTESII
_, Dependingonthediscor storagedevice,the Options
menumaydifferornotbeshown,
42 English
Using the Send Function
You can upload flies to an on-line site (Picasa,
Facebook etc) or a device.
1. With the Photo Playback screen displayed,
select the Options button, and then press
the _ button. The Options menu appears.
2. Use the A T buttons to select Send, and
then press the _ button. The Selection
screen appears.
3. Use the A T buttons to select a picture, and
then press the _ button. A check appears
to the Idt of the picture.
4. Repeat Step 3 to select and check additional
pictures.
5. To remove a picture from the list, move to the
picture, and then press the _ button again.
The check on the picture is removed.
6. When done, press the AT button to select
Send, and then press the _ button.
The Send pop-up appears listing the on-line
sites (Picassa, Facebook, etc.) or devices
that you can send the photos to.
7. Select a destination, and then press the
button.
8. If you are sending the photos to an on-line
site, the site starts. Log in and follow the
directions on the screen.
IINOTESII
_' Tosendphotosto an on-4inesiteyoumusthavean
accountwiththatsite.
o
c_
..g
English 43
You can enjoy various network serqces such as
streanling video or online apps by connecting the
player to your networL
Before you access Movies & TV Shows or Apps,
we suggest you log in to your Samsung account.
t NOTESII
_. Ifyoudonot havea Samsungaccount,followthe
directionsin theQuickStarl;upGuideto createone.
To log in to your Samsung account, follow these
steps:
1. With the Home screen displayed, press the
RED (A) button. The Log In screen appears.
2. Select the Enlail field, and then press the
button. The keyboard pop-up appears.
3. Using the keyboard, enter your e-mail
address. When finished, select the Done
button, and then press the _ button. The
Log In screen re-appears.
4. Select the Password field, and then press the
button. The keyboard pop-up appears.
5. Using the keyboard, enter your password.
When finished, select the Done button, and
then press the _ button. The Log In screen
re-appears.
6. To make the log in process easier next time,
select Sign me in automatically, and then
press the _ button.
7. Select Log h, and then press the _ button.
The player logs you in to your account. Your
account e-mail is displayed on the bottom left
of the screen.
IINOTESII
If youselectedSign me in automatbally, thenexttime
youlogin,the playerwill automaticallyenteryoure-mail
andpassword.All youneedto do is seledLog in.
If youre-mailaddressandpasswordarenotdisplayed
whenthe LogIn screenappears,selectthe buttonwith
thedownpointingarrowheadnextto theEmailfield,and
thenpressthe _ button.A dropdownlistof all your
registeredaccountswill appear.Selectyouraccount,
andthenpressthe_ button.Theplayerwillfill in the
e-mailandpasswordfields.
If youpresstheRED(A)buttonafteryouhavelogged
in,the MyAccountpop-upappears.Onthe pop-up,you
canselectLogout,Changeaccountinformation, Link
ServiceAccounts,RemoveAccountsfrom the Device,
andDeactivateAccount,
Torentmoviesandpurchasefor--payapps,youmusthave
a creditcardregisteredin youraccount,if youhaven't
registereda card,selectChangeaccount information,
Onthe ChangeAccountinformationpage,select
RegisterCard,pressthe _ button,andthenfollowthe
directionsonthescreen,
If you haven't set up Smart Hub, when you use
Movies & TV Show or Apps for the first time, the
player will ask you to perform the Smart Hub set
up procedure.
44 English
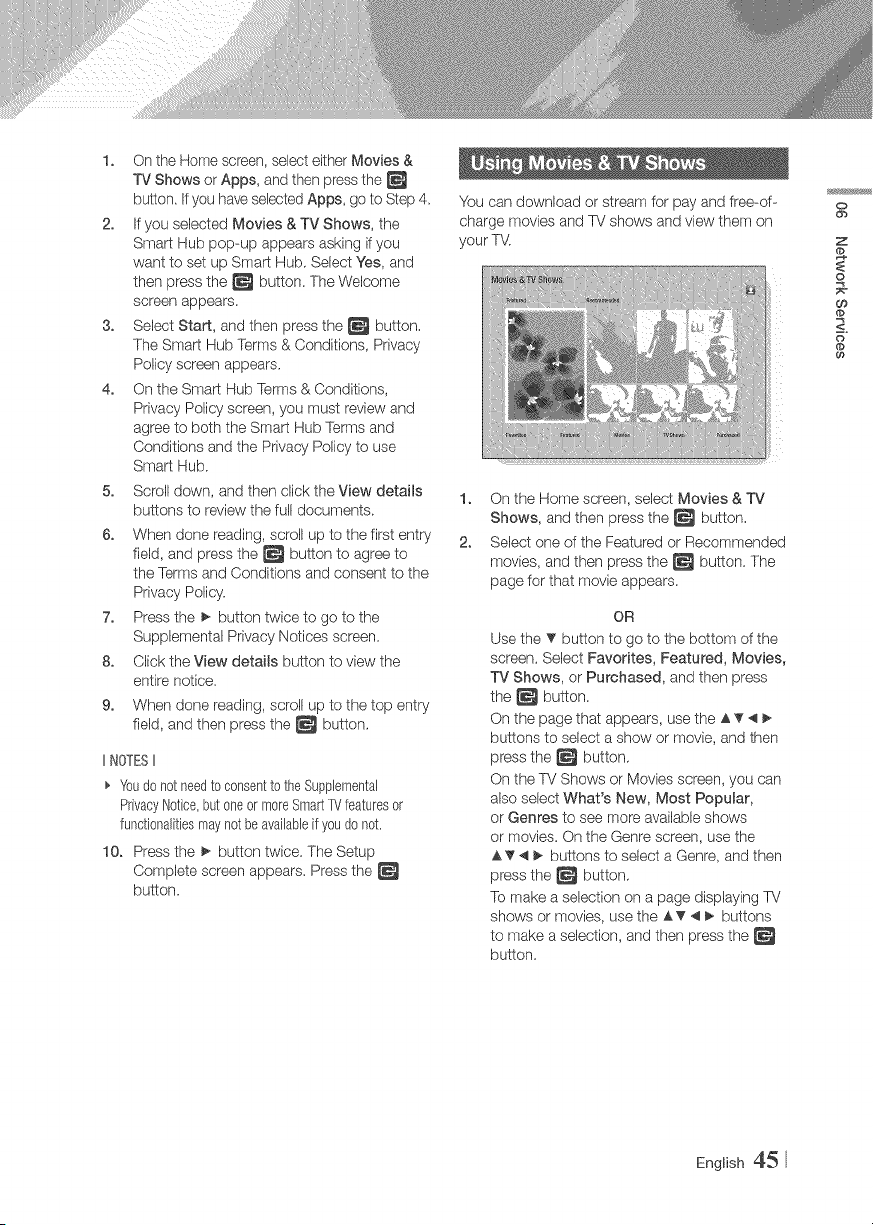
1. On the Home screen, select either Movies &
TV Shows or Apps, and then press the
button. If you have selectedApps, go to Step 4.
2. If you selected Movies & TV Shows, the
Smart Hub pop-up appears asking if you
want to set up Smart Hub, Select Yes, and
then press the _ button. The Welcome
screen appears.
3. Select Start, and then press the _ button.
The Smart Hub Terms & Conditions, Privacy
Policy screen appears.
4. On the Smart Hub Terms & Conditions,
Privacy Policy screen, you must review and
agree to both the Smart Hub Terms and
Conditions and the Privacy Policy to use
Smart Hub.
5. Scroll down, and then click the View details
buttons to review the full documents.
6. When done reading, scroll up to the first entry
field, and press the _ button to agree to
the Terms and Conditions and consent to the
Privacy Policy.
7. Press the _ button twice to go to the
Supplemental Privacy Notices screen.
8. Click the View details button to view the
entire notice.
9. When done reading, scroll up to the top entry
field, and then press the _ button.
IINOTESII
_' Youdo notneedto consentto theSupplemental
PrivacyNotice,butoneor moreSmad:IV featuresor
functionaJitiesmaynotbeavaiJableif youdo not.
10. Press the _ button twice. The Setup
Complete screen appears. Press the
button.
You can download or stream for pay and free-of-
charge movies and TV shows and view them on
your T\,t
1. On the Home screen, select Movies & TV
Shows, and then press the _ button,
2. Select one of the Featured or Recommended
movies, and then press the _ button. The
page for that movie appears.
OR
Use the T button to go to the bottom of the
screen, Select Favorites, Featured, Movies,
TV Shows, or Purchased, and then press
the _ button.
On the page that appears, use the A T _ I_
buttons to select a show or movie, and then
press the _ button,
On the TV Shows or Movies screen, you can
also select What's New, Most Popular,
or Genres to see more available shows
or movies. On the Genre screen, use the
A T _ _ buttons to select a Genre, and then
press the _ button,
To make a selection on a page displaying TV
shows or movies, use the A T _ _ buttons
to make a selection, and then press the
button.
O
ob
Z
o
O9
<:
o
dp
English 45
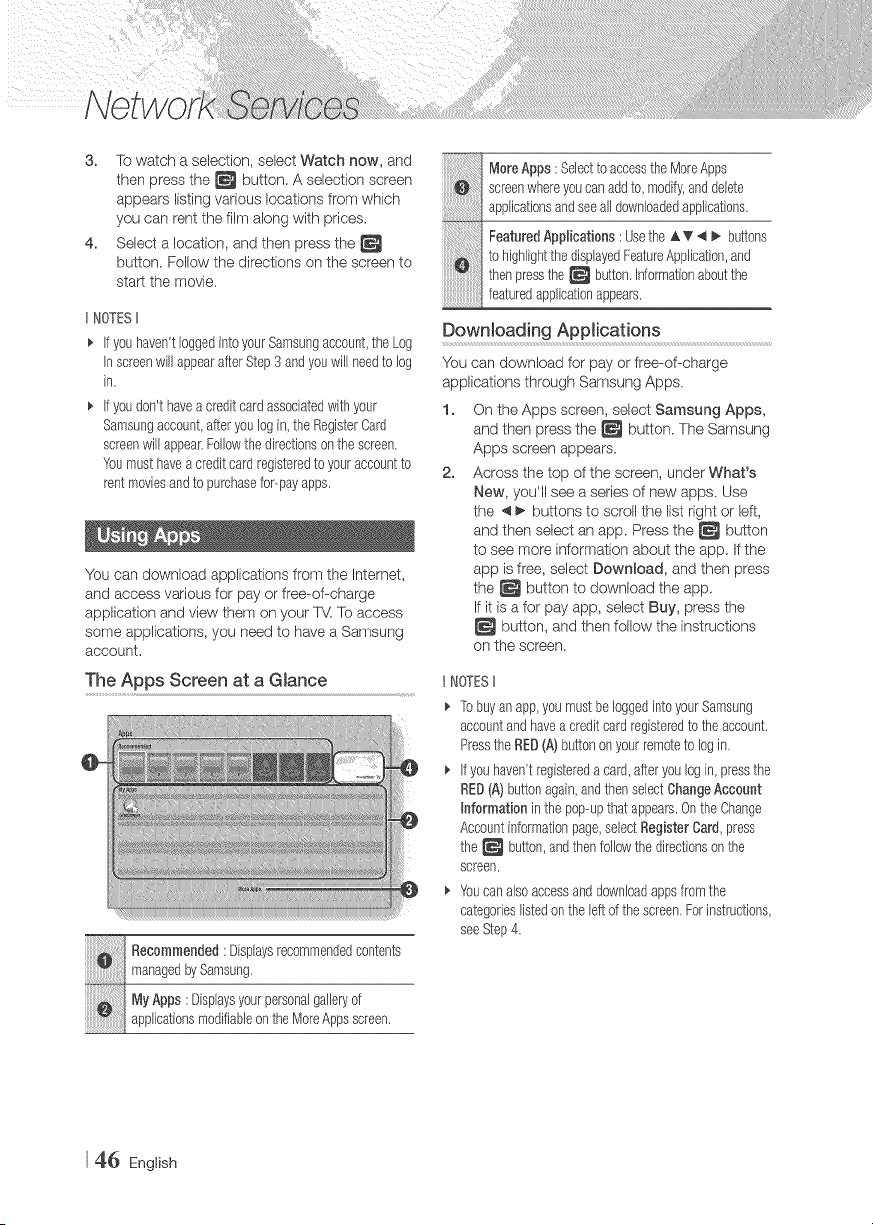
3. Towatch a selection, select Watch now, and
then press the _ button. A selection screen
appears listing various locations from which
you can rent the film along with prices.
4. Select a location, and then press the
button. Follow the directions on the screen to
start the movie.
t NOTESII
Ifyouhaven'tloggedintoyourSamsungaccount,theLog
InscreenwillappearafterStep3 andyouwill needto log
in,
Ifyoudon'thavea creditcardassociatedwithyour
Samsungaccount,afteryoulogin,the RegisterCard
screenwill appear,Followthedirectionsonthe screen.
Youmusthavea creditcardregisteredto youraccountto
rentmoviesandto purchasefor-payapps.
You can download applications from the Internet,
and access various for pay or free-of-charge
application and view them on your _ To access
some applications, you need to have a Samsung
account.
The Apps Screen at a Glance
ii i!i!iiiiiiii! Recommended:Displaysrecommendedcontents
managedbySamsung,
PayApps : Displaysyourpersonalgalleryof
applicationsmodifiableon theMoreAppsscreen,
ii!ii!iiiiiiiiiiiiiiiiiiiiili!iiiiiiiiiiiiiiiii
iiiii ii'ii i!i iiiiiiiiiiiiii!iMoreApp :SelecttoaccesstheMoreApps
screenwhereyoucanaddto, modify,anddelete
applicationsandseealldownloadedapplications.
FeaturedAppHcations: Usethe A T _I _ buttons
to highlightthedisplayedFeatureApplication,and
thenpressthe _ button,informationaboutthe
featuredapplicationappears.
Downloading Applications
You can download for pay or free-of-charge
applications through Samsung Apps.
1. On the Apps screen, select Samsung Apps,
and then press the _ button. The Samsung
Apps screen appears.
2. Across the top of the screen, under What's
New, you'll see a series of new apps. Use
the 4 _ buttons to scroll the list right or left,
and then select an app. Press the _ button
to see more information about the app, If the
app is free, select Download, and then press
the _ button to download the app,
If it is a for pay app, select Buy, press the
button, and then follow the instructions
on the screen.
I NOTESII
Tobuyan app,youmustbeloggedintoyourSamsung
accountandhavea creditcardregisteredto the account.
Pressthe RED(A)buttononyourremoteto login,
if youhaven'tregistereda card,afteryoulogin,pressthe
RED(A) buttonagain,andthenselectChangeAccount
Informationin thepop-upthatappears,OntheChange
Accountinformationpage,selectRegisterCard,press
the _ button,andthenfollowthe directionson the
screen,
Youcan alsoaccessanddownloadappsfromthe
categorieslistedon theleftof thescreen,Forinstructions,
seeStep4.
46 English
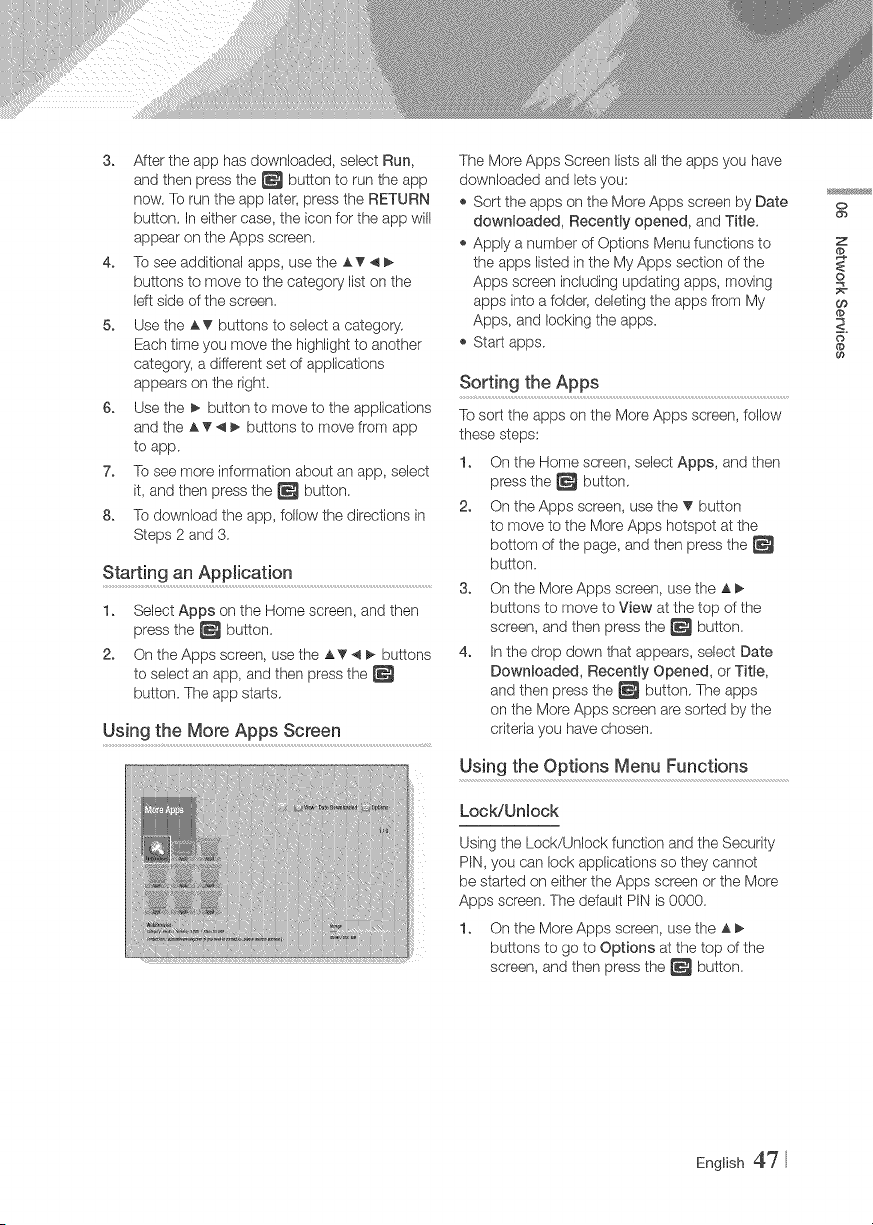
3. After the app has downloaded, select Run,
and then press the _ button to run the app
new. To run the app later, press the RETURN
button. In either case, the icon for the app will
appear on the Apps screen.
4. To see additional apps, use the AT 4
buttons to move to the category list on the
left side of the screen.
5. Use the AT buttons to select a category.
Each time you move the highlight to another
category, a different set of applications
appears on the right.
6. Use the _ button to move to the applications
and the AT _ _ buttons to move from app
to app.
7. To see more information about an app, select
it, and then press the _ button.
8. To download the app, follow the directions in
Steps 2 and 3.
Starting an Application
1. Select Apps on the Home screen, and then
press the _ button.
2. On the Apps screen, usethe A?'4_ buttons
to select an app, and then press the
button. The app starts.
Using the More Apps Screen
The More Apps Screen lists all the apps you have
downloaded and lets you:
,_ Sort the apps on the More Apps screen by Date
downloaded, Recently opened, and Title.
,_ Apply a number of Options Menu functions to
the apps listed in the My Apps section of the
Apps screen including updating apps, moving
apps into a folder; deleting the apps frorn My
Apps, and locking the apps.
,_ Start apps.
Sorting the Apps
To sort the apps on the More Apps screen, follow
these steps:
1. On the Home screen, select Apps, and then
press the _ button.
2. On the Apps screen, use the _' button
to move to the More Apps hotspot at the
bottom of the page, and then press the
button.
3. On the More Apps screen, use the A _.
buttons to move to View at the top of the
screen, and then press the _ button.
4. In the drop down that appears, select Date
DownRoaded, Recently Opened, or Title,
and then press the _ button. The apps
on the More Apps screen are sorted by the
criteria you have chosen.
Using the Options Menu Functions
LocWUnlock
Using the Lock/Unlock function and the Security
PIN, you can lock applications so they cannot
be started on either the Apps screen or the More
Apps screen. The default PIN is 0000.
1. On the More Apps screen, use the A
buttons to go to Options at the top of the
screen, and then press the _ button.
o
ob
Z
@
o
Oo
<:
@
English 47
2. Select LocWUnlock, and then press the
button,
3. When the Lock service appears, enter the
PIN using the number buttons on your remote
control,
4. To lock an application, select the application,
and then press the _ button. A lock
appears on the app. Repeat to lock other,
individual apps.
5. To unlock a locked app, select the
application, and then press the _ button.
6. To lock all the apps at once, use the A
buttons to select the Lock All button, and
then press the _ button,
7. To unlock all the locked apps at once, use the
A _ buttons to select the Unlock AH button
and then press the _ button.
8. Press the RETURN button twice to return to
the Apps screen. Locked apps will display a
lock on the upper right side.
Edit My Apps
Edit My Apps lets you add apps to and delete
apps from My Apps. It also lets you change the
position of an app in My Apps.
Add an Appto MyApps
1.
2,
3.
On the More Apps screen, use the A
buttons to go to Options at the top of the
screen, and then press the _ button.
Select Edit My Apps, and then press the
button. The Edit My Apps screen appears.
Select a full color app from the top row of
apps, and then press the _ button, The
full color app icon appears in the My Apps
area below and the app icon in the top row is
grayed out.
t NOTESII
Grayedoutappsare alreadyin MyApps.
4. When you return to the Apps screen, the app
will appear in the My Apps area.
Delete an App from My Apps
1. On the More Apps screen, use the A
buttons to go to Options at the top of the
screen, and then press the _ button.
2. Select Edit My Apps, and then press the
button. The Edit My Apps screen appears.
3. Select the app you want to delete from My
Apps, press the _ button, and then press
the A button in the direction of the X. The
Remove from My Apps pop-up appears.
4. Select Yes, and then press the _ button.
5. When you return to the Apps screen, the app
will have been removed from the My Apps
area.
Move an App in My Apps
1. On the More Apps screen, use the A
buttons to go to Options at the top of the
screen, and then press the _ button.
2. Select Edit My Apps, and then press the
button. The Edit My Apps screen appears.
3. Select the app you want to move in My Apps,
press the _ button, and then press the
AT _ _ button to move the app icon in the
direction of one of the arrows (<, >, A, etc.)
that appears around the app icon. The app
icon moves in the direction you have chosen.
4. After you have placed the app icon where
you want, press the _ button.
5. When you return to the Apps screen, the
app will be positioned in the location you had
selected.
48 English
Create Folder
Create Folder lets you create a folder on the More
Apps screen into which you can put apps.
1. On the More Apps screen, use the _l_
buttons to go to Options at the top of the
screen, and then press the _ button.
2. Select Create Folder, and then press the
button. The Set Folder Name pop-up
appears.
8. Press the _ button. The keyboard appears.
4. Select the Char button on the right side,
and then press the _ button to remove
Folder I from the entry field. Then, using the
keyboard, enter the name you want to apply
to the folder:
5. When finished, select the Done button on the
right side, and then press the _ button.
The pop-up reappears.
6. Select OK, and then press the _ button.
The new folder appears in the list of apps on
the left side of the screen.
Move to Folder
Move to Folder lets you move apps to the folder of
your choice.
1. On the More Apps screen, use the A
buttons to go to Options at the top of the
screen, and then press the _ button.
2. Select Move to Folder, and then press
the _ button. The Move to Folder screen
appears.
8. UsetheA_'_ buttons to move to an app,
and then press the _ button to select the
app. A check appears in the upper left corner
of the app.
4. To deselect an app, press the _ button.
The check disappears.
5. Repeat Step 3 to select additional apps.
IINOTESt
_' Tosebct allthe downloadedapps,selectSelectAIIat the
top rightofthe screen,andthenpressthe _ button,To
desebctallthe apps,selectDeselectAll at the topright
of the screen,andthenpressthe _ button,
6. When done, select Select foRder at the top
of the screen, and then press the _ button.
The Select folder pop-up appears.
7. In the Select folder pop-up, use the AT
buttons to select the folder you want to move
the apps you selected to and then press the
button.
8. The Apps Moved pop up appears. Press the
button.
9. To open a folder, usetheAT4_ buttonsto
highlight the folder, and then press the
button.
Rename Folder
Rename Folder lets you rename an existing folder:
1. On the More Apps screen, use the A
buttons to go to Options at the top of the
screen, and then press the _ button.
2. Select Rename Folder, and then press
the _ button. The Rename Folder screen
appears, and a folder is highlighted.
3. User the AT 4 _ buttons to highlight a
folder of your choice, and then press the
button. The Rename pop-up appears.
4. Press the _ button. The keyboard appears.
5. Enter the new name for the folder: When
finished, select Done on the right side, and
then press the _ button. The Rename pop-
up reappears dbplaying the new name.
6. Select OK, and then press the _ button.
The folder is renamed.
7. Select CRoseon the right side of the screen,
and then press the _ button.
o
ob
Z
o
Oo
<:
English 49
Delete
Delete lets you delete apps and folders from the
My Apps screen, If there are apps in a folder,
both the folder and the apps are deleted together,
Delete removes apps permanently. If you decide
you want to use an app you deleted, you win need
to download it again,
1. On the More Apps screen, use the _ I_
buttons to go to Options at the top of the
screen, and then press the _ button,
2. Select Delete, and then press the _ button.
The Delete screen appears.
3. Use the A_' _ _ buttons to move to an app,
or folder and then press the _ button to
select. A check appears in the upper left
corner of the app or folder you selected.
4. To desebct an app, press the _ button.
The check disappears.
5. Repeat Step 3 to select additional apps or
folders.
t NOTESII
Toselectallthe downloadedapps,selectSebct All atthe
top rightof the screen,andthenpressthe _ button,lb
@selectallthe apps,selectDesebctAJlat thetop right
of thescreen,andthenpressthe _ button.
6. After you have made all your selections,
select Debte at the top of the screen, and
then press the _ button. The Delete pop-
up appears.
7. Select Yes, and then press the _ button.
All the apps you selected are deleted.
t NOTESII
Youcannotimmediatelydeletea lockedapporfolder,
Ifyouselecta lockedapporfolderto delete,whenyou
performStep7, the LockServicepop--upappears,Enter
the SecurityPINintothe pop-up,andthenpressthe
button.Thelockwill bereleasedandthe appor folderwill
bedeleted.
Update Apps
When the application require to update to the
latest version, select Apps and then select More
Apps. On the More Apps screen, select Update
Apps, and then select application from the list.
The application starts updating to the latest
version. However, Update Apps appears on the
screen only when the update is required.
5_} English
The Screen Mirroring function lets you view the
screen of your smart phone or android tablet on
the TV you have connected to the Blu-ray player:
1. With the Blu-ray's Home screen displayed,
press the BLUE (D) button on the remote.
The Screen Mirroring pop-up appears.
2. Launch AIIShare Cast on your device.
8. On your device, find the name of the Blu-ray
player in the list of available devices and then
select it.
4. The TV will display a PIN. Enter the PIN into
your devbe.
5. The TV displays a connecting message (for
example, Connecting to Android 92gb_.) and
then displays the connected message.
6. In a few moments, the screen of your device
appears on the TV screen.
7. To stop Screen Mirroring, press the EXIT
or RETURN button on the remote control,
or disable Screen Mirroring function of your
smart phone.
IINOTESII
_' Youcanconnectto a devicethatsupportsAlIShareCast,
Notethatconnectingto sucha devicemaynotbe fully
supporteddependingon themanufacturer,Forfurther
informationon mobileconnectionsupport,referto the
manufacturer'swebsite,
_, Whenyouare usingtheScreenMirroringfunction,video
stutteringor audiodropoutsmayoccur,dependingon
yourenvironment,
_, Bluetoothtransmissionscan interferewiththe Screen
Mirroringsignal.BeforeusingtheScreenMirroring
function,we stronglyrecommendthatyouturn off the
Bluetoothfunctionon yoursmartphoneorsmartdevice
(tablet,etc,),
You can access the Internet using the Web
Browser application.
Select Web Browser on the Home screen, and
then press the _ button.
IINOTESt
_' WhenyouruntheWebBrowserwiththepbyerconnected
byHDMIto a BDWisecompatibbW --andBDWiseison
- thebrowseris maximizedto fill thescreenandtheTV's
resolutionis setto the optimalresolutionautomatically.
_, TheWebBrowseris notcompatibbwithJava
applications,
_, ifyouattemptto downloada fib, andthefib cannotbe
saved,an errormessagewill appear,
_, B-commerce(purchasingproductsonline)is not
supported,
_, ActiveXis notsupported,
_, Accessmaybeblockedto somewebsitesor to web
browsersoperatedbycertainbusinesses.
Link Browsing and Pointer Browsing
The Web Browser provides two types of browsing,
Pointer Browsing and Link Browsing. When you
launch the browser for the first time, Pointer
Browsing is active. If you are using a mouse to
navigate in the Web Browser, we recommend
leaving Pointer Browsing active. If you are using
your remote to navigate in the Web Browser, we
recommend that you replace Pointer Browsing
with Link Browsing. Link Browsing moves a
highlight from one link to the next in the Web
Browser and is much faster than Pointer Browsing
if you are using your remote.
To activate Link Browsing, follow these steps:
1. UsetheAT4_ buttons on your remote to
move the pointer to the Link Browser icon on
the top right of the screen. The Link Browser
icon is the third icon from the right.
The pointer will be in the correct position
if the icon turns blue and the words "Link
Browsing" appear on the screen.
2. Press the _ button. Link Browsing is
activated and will remain active whenever you
bring up the Web Browser.
o
ob
Z
£
o
Oo
<:
English 5_
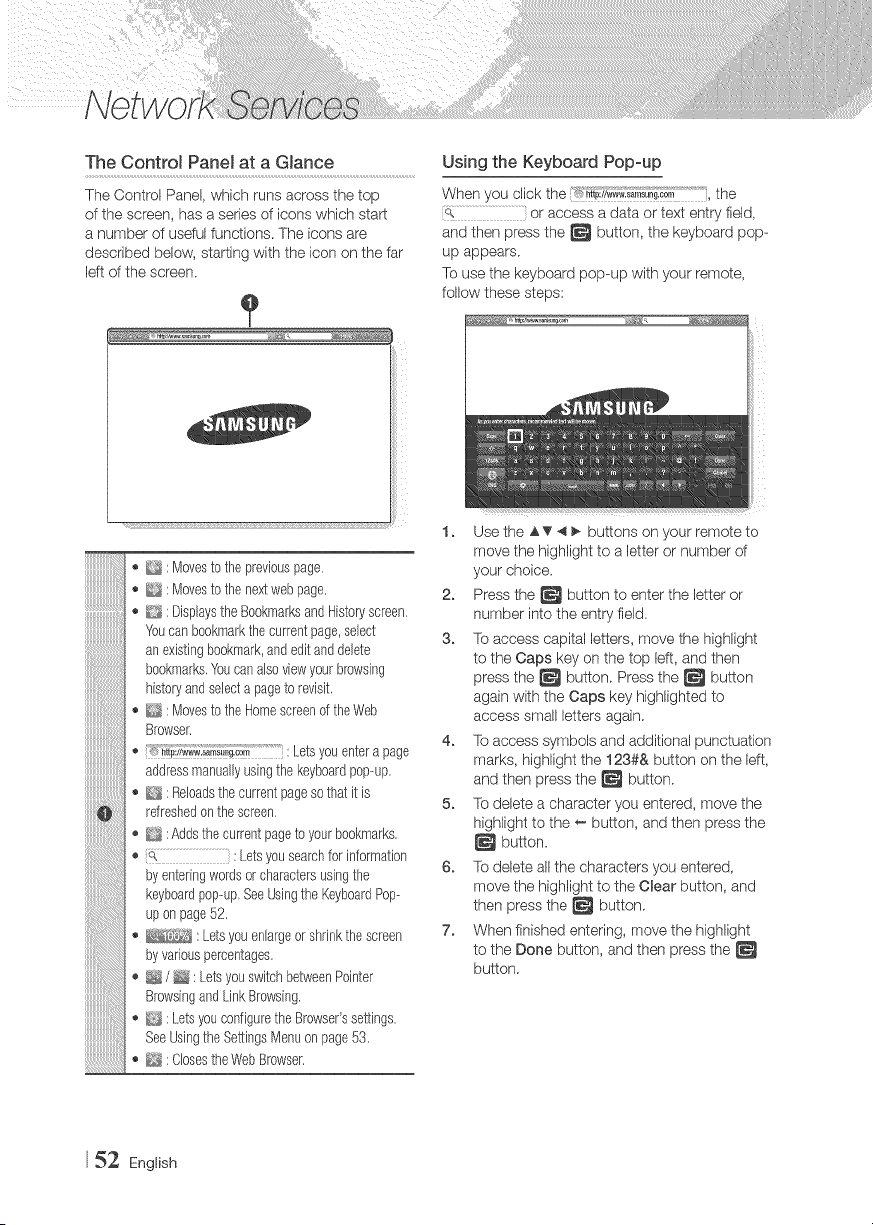
The Control Panel at a GJance
The Control Panel, which runs across the top
of the screen, has a series of icons which start
a number of useful functions. The icons are
described below, starting with the icon on the far
left of the screen.
iiiiiiiiiiiiiiiiiiiiiiiiiiiiiiiiiiii'i_ii_!,!,!,!_!_!
iiiiiiiiiiiiiiiiiiU_ii_i_i_i
iiiiiiiiiiiiiiiiiiiiiii_i
iiiiiiiiiiiiiiiiiiiii....
iiiiiiiiiiiiiiiiiiiiiiii
iiiiiiiiiiiiiiii,
!!!!!!!!!!!!!!!!
!!!!!!!!!!!!!!!!ii
iiiiiiiiiiiiiiiiii
!!!!!!!!!!!!!!!!!!iii
iiiiiiiiiiiiiiiiiiiii
D : Movesto thepreviouspage,
_ : Movesto thenextwebpage,
D : DisplaystheBookmarksandHistoryscreen,
Youcanbookmarkthecurrentpage,select
an existingbookmark,andeditanddelete
bookmarks,Youcanalsoviewyourbrowsing
historyandselecta pageto revisit,
_ : Movesto theHomescreenof theWeb
Browser,
_;_p:ii{_;_,;_:_i_,s,_;a;rnLetsyouentera page
addressmanuallyusingthekeyboardpop-up,
_ : Reloadsthecurrentpagesothatit is
refreshedonthe screen,
:Addsthecurrentpageto yourbookmarks,
(Q..................................................: Letsyousearchfor information
byenteringwordsor charactersusingthe
keyboardpop-up,SeeUsingthe KeyboardPop-
upon page52,
: Letsyou enlargeor shrinkthescreen
byvariouspercentages.
_ / _ : LetsyouswitchbetweenPointer
BrowsingandLinkBrowsing,
_{_ : LetsyouconfiguretheBrowser'ssettings,
SeeUsingthe SettingsMenuon page53,
_, ClosestheWebBrowser,
Using the Keyboard Popoup
When you click the _ _://_.s._su_._o_ i,the
o................................................or access a data or text entry field,
and then press the _ button, the keyboard pop-
up appears.
To use the keyboard pop-up with your remote,
follow these steps:
1. Usethe &_'4_ buttons on your remote to
move the highlight to a letter or number of
your choice.
2. Press the _ button to enter the letter or
number into the entry field.
3. To access capital letters, move the highlight
to the Caps key on the top left, and then
press the _ button. Press the _ button
again with the Caps key highlighted to
access small letters again.
4. To access symbols and additional punctuation
marks, highlight the 123#& button on the left,
and then press the _ button.
5. To delete a character you entered, move the
highlight to the _- button, and then press the
button.
6. To delete all the characters you entered,
move the highlight to the Clear button, and
then press the _ button.
7. When finished entering, move the highlight
to the Done button, and then press the
button.
52 English
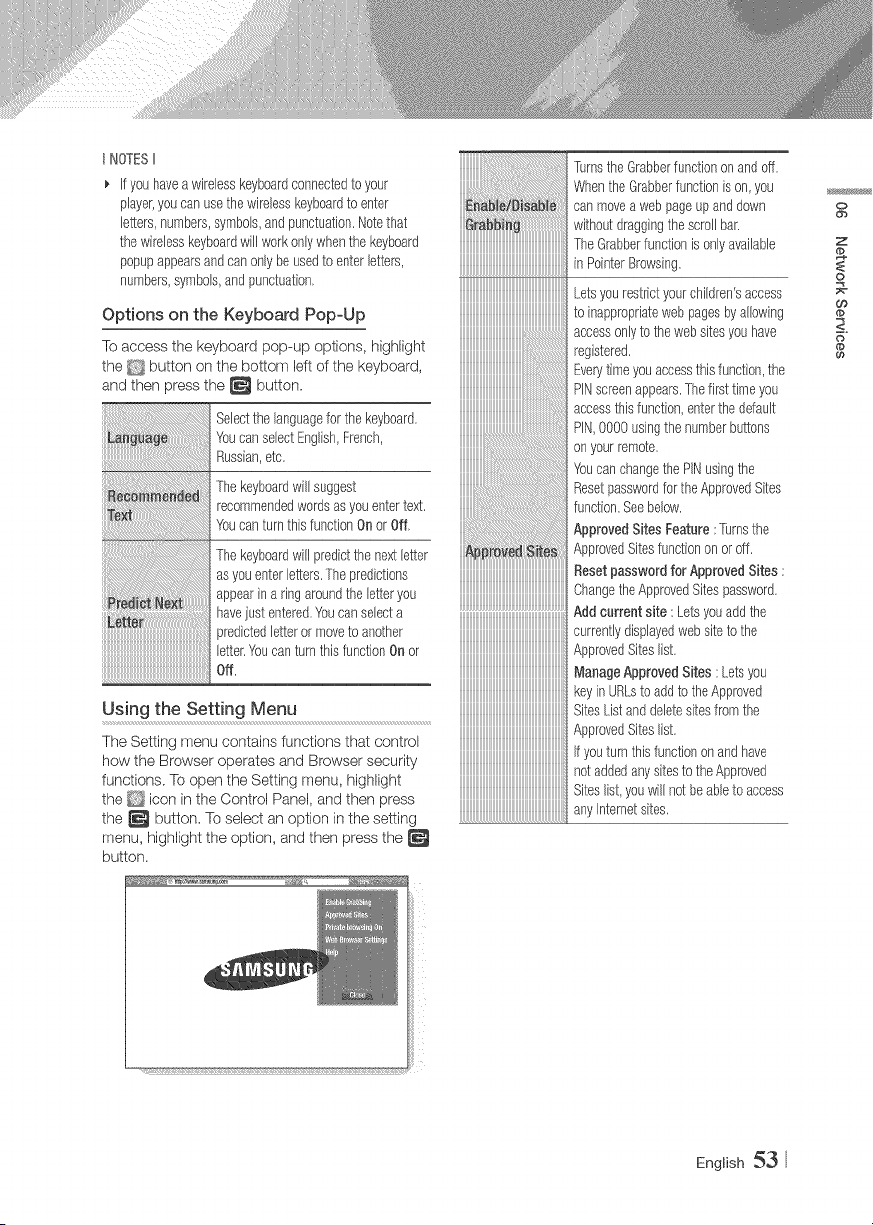
t NOTESII
_, If youhavea wirelesskeyboardconnectedto your
player,youcanusethewirelesskeyboardto enter
letters,numbers,symbols,andpunctuation.Notethat
thewirelesskeyboardwillworkonlywhenthe keyboard
pop@appearsandcanonlybeusedto enterletters,
numbers,symbols,andpunctuation,
Options on the Keyboard PopoUp
To access the keyboard pop-up options, highlight
the _ button on the bottom left of the keyboard,
and then press the _ button,
Selectthe Bnguageforthekeyboard,
YoucanselectEnglish,rcench,
Russian,etc,
Thekeyboardwillsuggest
recommendedwordsasyou entertext,
Youcan turnthis functionOnor Off,
Thekeyboardwill predictthe nextbtter
asyouenterletters,Thepredictions
appearina ringaroundthebtter you
havejust entered.Youcanselecta
xedictedletteror moveto another
letter.Youcanturnthis functionOnor
Off,
Using the Setting Menu
The Setting menu contains functions that control
how the Browser operates and Browser security
functions, To open the Setting menu, highlight
the icon in the Control Panel, and then press
the _ button, To select an option in the setting
menu, highlight the option, and then press the
button,
h
TurnstheGrabberfunctiononandoff,
.......... WhentheGrabberfunctionis on,you
canmovea web pageupariddown
withoutdraggngthe scrollbar,
TheGrabberfunctionis onlyavailabb
" inPointerBrowsing.
iiiiiiiiiiiiiiiiiiiiiiiiiiiiiiiiiiiiiiiiiiiiiiiiiiiiiiiiiiiiiiiiiiiiiiiii
Letsyourestrictyourchildren'saccess
toinappropriatewebpagesbyallowing
'"'"'"'"'"'"'"'"'"'"'"'"'"'"".............................accessonlyto the websitesyouhave
registered,
Everytimeyouaccessthisfunction,the
PINscreenappears,Thefirsttimeyou
accessthisfunction,enterthedefault
PIN,0000 usingthenumberbuttons
onyourremote,
Youcan changethe PINusingthe
Resetpasswordfor theApprovedSites
function.Seebelow.
ApprovedSitesFeature: ]brns the
ApprovedSitesfunctionor,oroff,
ResetpasswordforApprovedSites:
ChangetheApprovedSitespassword,
Add current site: Letsyouaddthe
currentlydispByedwebsiteto the
ApprovedSiteslist.
ManageApprovedSites: Letsyou
keyinUahsto addto theApproved
SitesListanddeletesitesfromthe
ApprovedSiteslist.
Ityouturnthisfunctiononandhave
notaddedany sites1:otheApproved
Siteslist,youwillnot beable1:oaccess
anyInternetsites,
o
ob
Z
@
o
Oo
<:
@
English 53
EnableordisablethePrivacymode.
WhenthePrivacymodeisenabled,
thebrowserdoesnotretaintheURLs
ofsitesyouvisit.Ifyouwanttoenable
Privacymode,select0K,
IfthePrivacymodeisrunning,the
"Stop"iconappearsinfrontoftheURL
atthetopofthescreen,]b disable
Privacymode,selectit againwhen
Privacymodeis enabled,
Set as homepage: Youcan set the
Browser'shomepage,
PopoupBlock :TbrnsthePopupBlock
on andoff,
Ad Bbck : Youcandeterminewhether
to blockadvertisementsandselectthe
URLsfor whichadvertisementsare
blocked,
General:"Youcan deletepersonal
informationsuchaswebsitehistory
and browsingdata(cookies,etc.),and
resetallweb browsersettingsto their
factorydefaults.
Encoding:YoucansettheEncoding
settingfor web pagesto Automaticor
selecttheencodingformatmanually
from a list,
Pointer: Youcansetthespeedof the
cursorwhenthe cursoris setto Pointer
andturn SmartCursorOn andOff,
Browserinformation : Displays
the versionnumberandcopyright
informationfor theWebBrowser.
Providesbasicinformationaboutthe
operationd theWebBrowser.
t NOTESII
_, Dependingonthe website,someof theWebBrowser
Settingfunctionsmaynot beactivated.Functionsthatare
notactivatedare greyedoutandcannotbe used,
The Link Service Accounts function lets you link
your player to your accounts with Internet services
such as Pandora so that the player can leg you
in to the service automatically when you start the
app for that service.
To create a service account link, follow these
steps:
1. On the Home screen, press the RED (A)
button on your remote to log in to your
Samsung Account.
2. After you have logged in, press the RED (A)
button on your remote again.
3. Select Link Service Accounts in the My
Account pop-up, and then press the
button.
4. On the Link Service Accounts screen, select
the service you want to link to the player, and
then press the _ button.
5. Select Register, and then press the
button.
6. In the ID and Password screen, enter the ID
you use to log in to the service you selected
using the pop-up keyboard. When finished,
select Done, and then press the _ button.
7. Repeat the same process for the password.
When finished select Done, and then press
the _ button.
8. Select OK, and then press the _ button.
54 English

Once the player is connected to your network, you
can enjoy various movie-related service contents
available on BD-LIVE compliant discs.
1. Attach a USB flash memory drive to the
USB jack on the front of the player, and then
check its remaining memory. The memory
device must have at bast I GB of free space
to accommodate the BD-LIVE services.
2. Select Settings on the Home screen, and
then press the _ button.
3. Select Network, and then press the
button.
4. Select BD-Live Settings, and then press the
button.
5. Select BD Data Management, and then
press the _ button.
6. Select Select Device, and then press the
button.
7. Select USB device, and then press the
button.
8. Insert a Blu-ray Disc that supports BD-LIVE.
9. Select an item from the list of BD-LIVE service
contents provided by the disc manufacturer:
IINOTESI
ThewayyouuseBD--LIVEandtheprovidedcontentsmay
differ,dependingonthe discmanufacturer.
o
ob
Z
o
O9
<:
English 55
NOT ALL discs are compatible
o Subject to the restrictions described below and those noted throughout this Manual, including the Disc
Type and Characteristics section of this user manual, disc types that can be played are: pre-recorded
commercial BD-ROM, DVD-VIDEO, and Audio CD (CD-DA); BD-RE/-R, DVD-RW/-R; and CD-RW/-R,
o Discs other than the above cannot and/or are not intended to be played by this player. And some of
the above discs may net play due to one or more reasons provided below,
Samsung cannot assure that this player will play every disc bearing the BD-ROM, BD-RE/-R,
DVD-VlDEO, DVD-RW/-R, DVD+RW/+R and CD-RW/-R Iogos, and this player may not respond to
all operating commands or operate all features of every disc, These and other disc compatibility and
player operation issues with new and existing format discs are possible because:
- Blu-ray is a new and evolving format and this player may not operate all features of Blu-ray Discs
because some features may be optional, additional features may have been added to the Blu-ray
Disc format after the production of this player, and certain available features may be subject to
delayed availability;
- not all new and existing disc format versions are supported by this player;
- new and existing disc formats may be revised, changed, updated, improved and/or supplemented;
- some discs are produced in a manner that allows specific or limited operation and feature during
playback;
- some features may be optional, additional features may have been added after the production of this
player or certain available features may be subject to delayed availability;
-sorne discs bearing the BD-ROM, BD-RE/-R, DVD-VDEO, DVD-RW/-R, DVD÷RW/÷R and
CD-RW/-R Iogos may still be non-standardized discs;
- some discs may not be played depending on their physical state or recording conditions;
- problems and errors can occur during the creation of Blu-ray Disc, DVD software and/or the
manufacture of discs;
- this player operates differently than a standard DVD player or other AV equipment; and/or
- for reasons noted throughout this user manual and for other reason(s) discovered and posted by
SAMSUNG customer care center:
If you encounter disc compatibility or player operation problems, please contact SAMSUNG customer
care center.
You may also contact SAMSUNG customer care center for possible updates on this player,
For additional information on playback restrictions and disc compatibility, refer to the Precautions,
Before Reading the user manual, Disc Types and Characteristics, and Before Playing sections of this
user manual,
For Blu-ray Disc Player progressive scan output : CONSUMERS SHOULD NOTE THAT NOT
ALL HIGH DEFINITION TELEVISION SETS ARE FULLY COMPATIBLE WITH THIS PRODUCT AND
MAY CAUSE ARTIFACTS TO BE DISPLAYED IN THE PICTURE, IN CASE OF PROGRESSIVE SCAN
PICTURE PROBLEMS, IT IS RECOMMENDED THAT THE USER SWITCH THE CONNECTION TO
THE 'STANDARD DEFINITION' OUTPUT, IFTHERE ARE QUESTIONS REGARDING OUR TV SET
COMPATIBILITY WITH THIS PRODUCT, PLEASE CONTACT OUR CUSTOMER SERVICE CENTER,
56 English
,_ Because AACS (Advanced Access Content System) is approved as content protection system for
Blu-ray Disc format, similar to use of CSS (Content Scramble System) for DVD format, certain
restrictions are imposed on playback, analog signal output, etc., of AACS protected contents.
The operation of this product and restrictions on this product may vary depending on your time of
purchase as those restrictions may be adopted and/or changed by AACS after the production of this
product. Furthermore, BD-ROM Mark and BD+ are additionally used as content protection system for
Blu-ray Disc format, which imposes certain restrictions including playback restrictions for BD-ROM
Mark and/or BD+ protected contents. To obtain additional information on AACS, BD-ROM Mark, BD+,
or this product, please contact SAMSUNG customer care center.
,_ Many Blu-ray Dbc/DVDs are encoded with copy protection. Because of this, you should only connect
your Player directly to your TV, not to a VCR. Connecting to a VCR results in a distorted picture from
copy@rotected Blu-ray Disc/DVDs.
,_ Under the U.S. Copyright laws and Copyright bws of other countries, unauthorized recording, use,
display, distribution, or revision of television programs, videotapes, Blu-ray Discs, DVDs, and other
materiab may subject you to civil and/or criminal liability.
,_ Cinavia Notice : This product uses Cinavia technology to limit the use of unauthorized copies of
some commercially-produced film and videos and their soundtracks. When a prohibited use of
an unauthorized copy is detected, a message will be displayed and playback or copying will be
interrupted.
More information about Cinavia technology is provided at the Cinavia Online Consumer Information
Center at http://w'ccw, cinavia.com. To request additional information about Cinavia by mail, send a
postcard with your rnailing address to: Cinavia Consumer Information Center, RO. Box 86851, San
Diego, CA, 92138, USA.
This product incorporates proprbtary technology under license from Verance Corporation and is
protected by U,S, Patent 7,369,677 and other U,S. and worldwide patents issued and pending as well
as copyright and trade secret protection for certain aspects of such technology, Cinavia is a trademark
of Verance Corporation. Copyright 2004-2010 Verance Corporation. All rights reserved by Verance.
Reverse engineering or disassembly is prohibited.
All content and services accessible through this device belong to third parties and are protected by
copyright, patent, trademark and/or other intellectual property laws. Such content and servbes are
provided solely for your personal noncommercial use. You may not use any content or services in a
manner that has not been authorized by the content owner or service provider: Without limiting the
foregoing, unless expressly authorized by the applicable content owner or servbe provider, you may
not modify, copy, republish, upload, post, transmit, translate, sell, create derivative works, exploit, or
distribute in any manner or medium any content or services displayed through this device.
o
>
mo
x
English 57

THIRD PARTY CONTENT AND SERVICES ARE PROVIDED "AS IS." SAMSUNG DOES NOT WARRANT
CONTENT OR SERVICES SO PROVIDED, EITHER EXPRESSLY OR IMPLIEDLY,FOR ANY PURPOSE.
SAMSUNG EXPRESSLYDISCLAIMS ANY IMPLIED WARRANTIES, INCLUDING BUT NOT LIMITED
TO, WARRANTIES OF MERCHANTABILITY OR FITNESS FOR A PARTICULAR PURPOSE. SAMSUNG
DOES NOT GUARANTEE THE ACCURACY, VALIDITY, TIMELINESS, LEGALITY, OR COMPLETENESS
OF ANY CONTENT OR SERVICE MADE AVAILABLE THROUGH THIS DEVICE AND UNDER NO
CIRCUMSTANCES, INCLUDING NEGLIGENCE, SHALL SAMSUNG BE LIABLE, WHETHER IN
CONTRACT OR TORT, FOR ANY DIRECT, INDIRECT, INCIDENTAL, SPECIAL OR CONSEQUENTIAL
DAMAGES, ATTORNEY FEES, EXPENSES, OR ANY OTHER DAMAGES ARISING OUT OF,OR IN
CONNECTION WITH, ANY INFORMATION CONTAINED IN, OR AS A RESULT OF THE USE OF ANY
CONTENT OR SERVICE BY YOU OR ANY THIRD PARTY,EVEN IFADVISED OF THE POSSIBILITY OF
SUCH DAMAGES.
Third party services may be terminated or interrupted at any time, and Samsung makes no representation
or warranty that any content or service will remain available for any period of time. Content and services
are transmitted by third parties by means of networks and transmbsien facilities over which Samsung
has no control. Without limiting the generality of this disclaimer} Samsung expressly disclaims any
responsibility or liabifity for any interruption or suspension of any content or service made available
through this device.
Samsung is neither responsible nor liable for customer service related to the content and services.
Any question or request for service relating to the content or services should be made directly to the
respective content and service providers.
* Manufactured under license from Delby Laboratories. Dolby and the doubb-D symbol
are registered trademarks of Dolby Laboratories.
Manufactured under licenseunder U.S. Patent Nes: 5,956,674; 5,974,380;
6,226,616; 6,487,535; 7,212,872; 7,333,929; 7,392,195; 7,272,567 & other U.S.
and worldwide patents issued & pending. DTS-HD, the Symbol, & DTS-HD and the
Symbol together are registered trademarks & DTS-HD Master Audio is a trademark of
DTS, Inc. Product includes software. @ DTS, Inc. All Rights Reserved.
Master Audio
The terms HDMI and HDMI High-Definition Multimedia Interface, and the HDMI H__
Logo are trademarks or registered trademarks of HDMI Licensing LLC in the United
States and other countries.
Oracle and Java are registered trademarks of Oracle and/or its affiliates. Other names
may be trademarks of their respective owners.
Java"
POWERED
* Open Source License Notice
- In the case of using open source software, Open Source Licenses are available on the product
rTlenu.
* BB-ray DiscTM, Blu-ray TM and the Iogos are trademarks of the Blu-ray Disc Association.
58 English
Notes
3D Settings
Forsome3D discs,tostop a movieduring3D playback,pressthe D (STOP)buttononce.The
moviestopsandthe3D modeoptionis de-activated,
Tochangea 3Doptionselectionwhenyouareplayinga 3D movb,pressthe D (STOP)button
once,TheHomeScreenmenuappears,PresstheD (STOP)buttonagain,thenselect3D
Settingsinthe BB--raymenu.
,, Dependingonthecontentandthe positionof thepictureon your17/screen,youmayseevertical
blackbarsontheleftside,rightside,or bothsides.
TVAspectRatio
,, Dependingonthedisctype,someaspectratiosmaynotbeavailable,
,, If youselectanaspectratioandoptionthatis differentthantheaspectratioof yourTVscreen,
the picturemightappearto be distorted.
,, if youselectthe 16:9Original,yourTVmaydisplay4:3 Pillarbox(blackbarsonsidesof picture).
BDWise(SanlsungPlayersonly)
WhenBDWiseis on,theResolutionsettingautomaticallydefaultsto BDWiseandBDWise
appearsinthe Resolutionmenu.
If the playeris connectedto a devicethat doesnotsupportBDWise,youcannotusethe BD
Wisefunction,
,, Forproperoperationof BDWise,setthe BDWiseoptionof boththeplayerandtheTVto On.
DigitalOutput
,, Besureto selectthecorrectDigitalOutputoryouwill hearnosoundorjust loudnoise,
If the HDMidevice(AVreceiver,7'_0is notcompatiblewithcompressedformats(DolbyDigital,
DTS),theaudiosignaloutputsasPCM.
,, RegularDVDsdo nothaveBONUSVIEWaudioandNavigationSoundEffects,
,, SomeBlu4ayDiscsdonot haveBONUSVIEWaudioandNavigationSoundEffects,
,, ThisDigitalOutputsetupdoesnotaffecttheHDMIaudiooutputto yourTV,
it affectstheopticalandHDMIaudiooutputwhenyourplayeris connectedto anAVreceiver.
,, If you playMPEGaudiosoundtracks,theaudiosignaloutputsasPCMregardbssof yourDigital
Outputselections(PCMorBitstream).
POMDownsampfing
,, B!enwhenPCMDownsamplingis set to Off,somediscswill onlyoutputdownsampbdaudio
throughtheopticaldigitaloutput,
,_ HDMi
- if yourTVis notcompatiblewithcompressedmulti-channelformats(DolbyDigital,DTS),the
playermayoutputPCM2chdownmixedaudioeventhoughyouselectedBitstream(either
Reencodedor Unprocessed)inthesetupmenu,
- If yourTVis notcompatiblewithPCMsamplingratesover48kHz,the playermayoutput
48kHz.
o
>
x
English 59
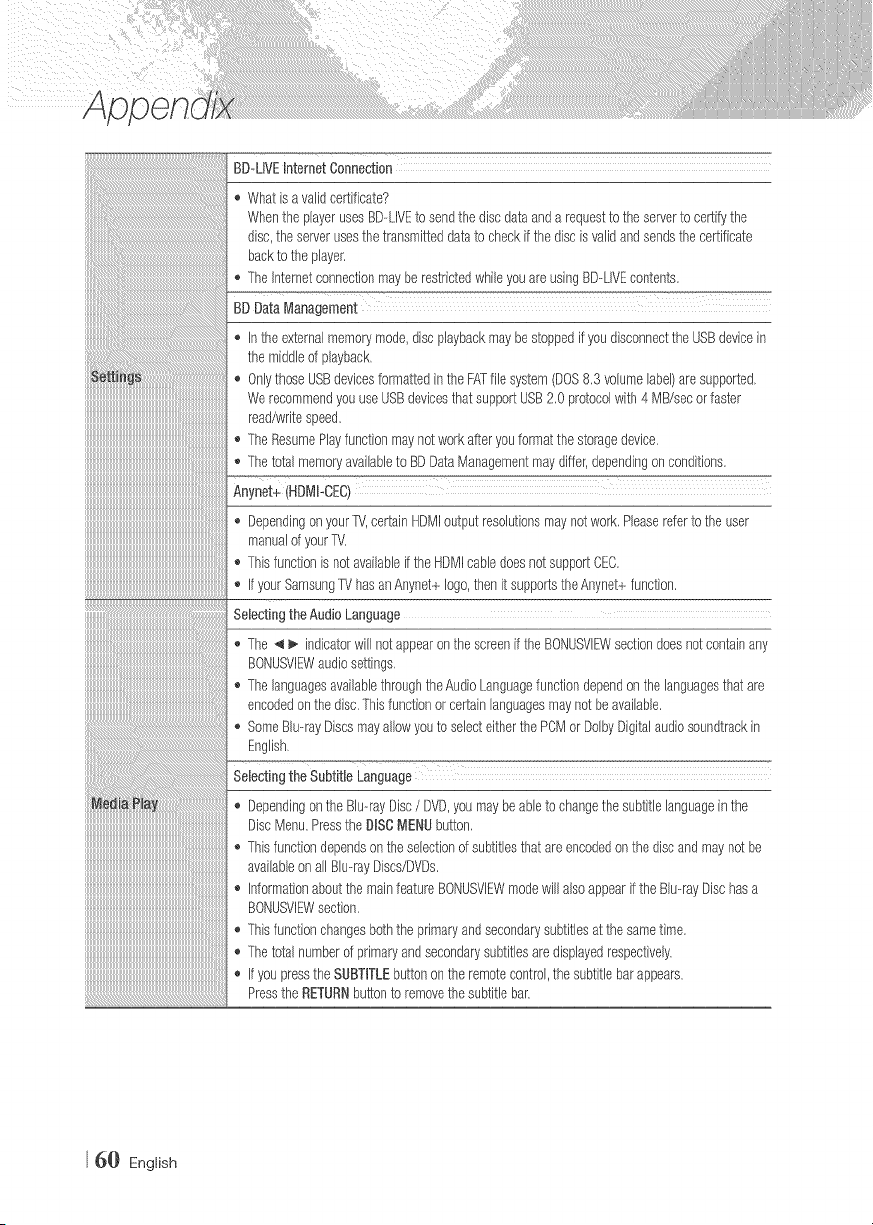
_###############################################_
BD-LIVEInternetConnection
,, Whatisa validcertificate?
WhentheplayerusesBD-LIVEto sendthediscdataanda requestto theserverto certifythe
disc,theserverusesthetransmitteddatato checkifthe discisvalidandsendsthecertificate
backto the player.
,, The Internetconnectionmayberestrictedwhileyouare usingBD--LIVEcontents.
BDDataManagement
,, inthe externalmemorymode,discplaybackmaybestoppedif youdisconnecttheUSBdevicein
the middleof playback.
_, OnlythoseUSBdevicesformattedinthe FATfile system(DOS8.3 volumelabel)aresupported.
WerecommendyouuseUSBdevicesthat supportUSB2.0 protocolwith4 Iv1B/secorfaster
read/writespeed.
,_The ResumePlayfunctionmaynotworkafteryouformatthestoragedevice.
,, Thetotal memoryavailableto BDDataManagementmaydiffer,dependingon conditions.
Anynet+(HDMI-CEC)
,, DependingonyourTV,certainHDIvlloutputresolutionsmaynotwork.Pleasereferto the user
manualof your1V.
,, Thisfunctionis notavailableifthe HDMIcabledoesnotsupportCEC.
,_ ifyourSamsungTV hasanAnynet+logo,thenit supportstheAnynet+function.
SelectingtheAudioLanguage
,_The _ _. indicatorwill notappearonthe screenif theBONUSVIEWsectiondoesnotcontainany
BONUSVIEWaudiosettings.
,, The languagesavailablethroughtheAudioLanguagefunctiondependonthe languagesthatare
encodedon thedisc.Thisfunctionorcertainlanguagesmaynot beavailable.
,, SomeBlu--rayDiscsmayallowyouto selecteitherthe PCNIor DolbyDigitalaudiosoundtrackin
English.
Selectingthe SubtitleLanguage
,, Dependingonthe Blu--rayDisc/ DVD,youmaybeableto changethe subtitlelanguageinthe
DiscMenu.Pressthe DISCMENUbutton.
,, Thisfunctiondependsontheselectionof subtitlesthatare encodedon thediscandmaynotbe
availableonallBlu--rayDiscs/DVDs.
,, InformationaboutthemainfeatureBONUSVIEWmodewill alsoappearifthe Blu--rayDischasa
BONUSVIEWsection.
,_Thisfunctionchangesboththe primaryandsecondarysubtitlesat thesametime.
,, Thetotal numberof primaryandsecondarysubtitlesaredisplayedrespectively.
,, ifyou pressthe SUBTITLEbuttononthe remotecontrol,the subtitlebarappears.
Pressthe RETURNbuttonto removethe subtitlebar.
6_} English
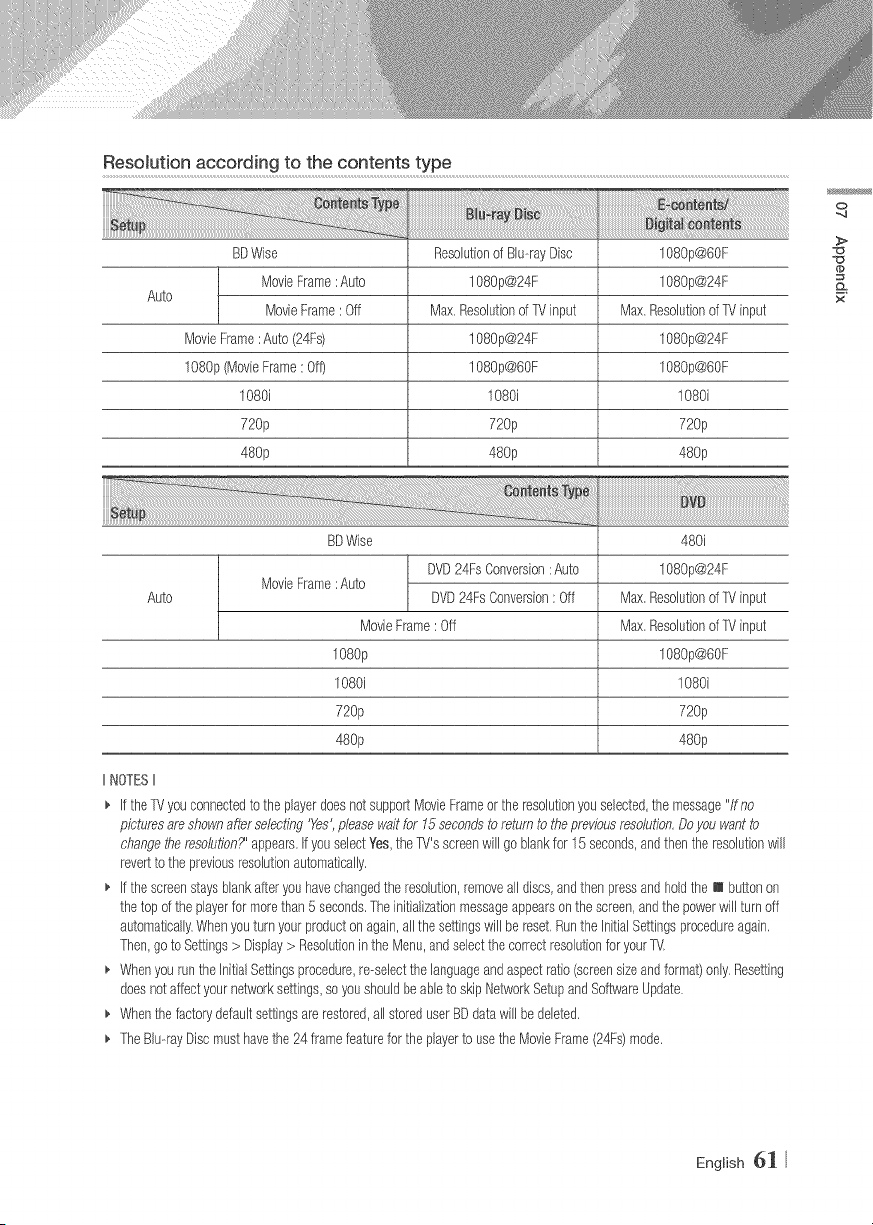
Resolution according to the contents type
Auto
BDWise
MovieFrame:Auto
MovieFrame: Off
MovieFrame:Auto (24Fs)
1080p(MovbFrame:Off)
1080i
720p
480p
Resolutionof Blu--rayDisc
1080p@24F
Max,Resolutionof TVinput
1080p@24F
1080p@60F
1080i
720p
480p
1080p@60F
1080p@24F
Max,Resolutionof TVinput
1080p@24F
1080p@60F
1080i
720p
480p
o
>
x
Auto
BDWise
DVD24FsConversion: Auto
MovieFrame:Auto
DVD24FsConversion:Off
MovieFrame: Off
108Op
108Oi
720p
480p
480i
1080p@24F
Max,Resolutionof TVinput
Max,Resolutionof TVinput
1080p@60F
1080i
720p
480p
IINOTESII
_, If theTVyouconnectedto the playerdoesnot supportMovieFrameor '[heresolutionyouselected,the message"/fno
picturesare showna@rselecting'Yes',pleasewaitfor 15secondsto returnto thepreviousresolution,Doyouwantto
changetoeresolution?'appears,ifyouselectYes,theTV'sscreenwill goblankfor 15seconds,andthenthe resolutionwill
revertto thepreviousresolutionautomatically.
_, if thescreenstaysblankafteryouhavechangedtheresolution,removeall discs,andthenpressandholdthe m buttonon
thetopof the playerfor morethan5 seconds,Theinitializationmessageappearsonthe screen,andthepowerwill turnoff
automatically.Whenyouturn yourproducton again,all thesettingswillbe reset,RuntheInitialSettingsprocedureagain,
Then,goto Settings> Display> Resolutioninthe Menu,andselectthecorrectresolutionfor yourTM.
_, WhenyouruntheInitialSettingsprocedure,remeiectthe languageandaspectratio(screensizeandformat)only.Resetting
doesnotaffectyournetworksettings,soyoushouldbeableto skipNetworkSetupandSo%rareUpdate.
_, Whenthefactorydefaultsettingsare restored,all storeduserBDdatawill be deleted,
_, TheBlumayDiscmusthavethe24 framefeaturefor the playerto usetheMovieFrame(24Fs)mode,
English 61
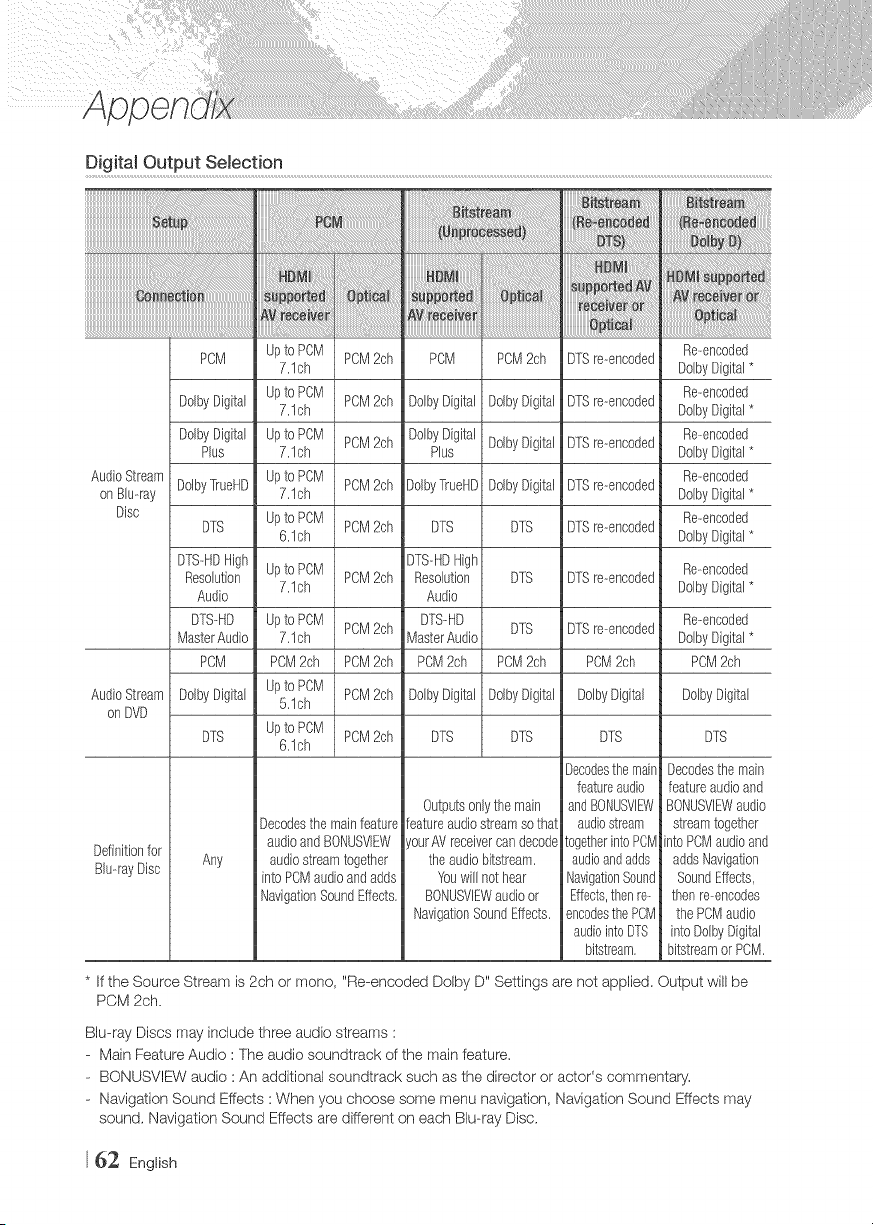
DigitaJ Output SeJection
lllllllllllllllllllllllllllllllllllllllllllllllllllllllliilililililililililililililililililililililililililililililililililill_l_ii_!!_!!_!!_!!_!!_!!_!!_!!_!!_!!_!!_!!_!!_!!_!!_!!_!!_ii!i
PCM
AudioStream
onBlu-ray
Disc
AudioStream
onDVD
Definitionfor
BlumayDisc
Upto PCM PCM2ch POM PCM2ch DTSre-encoded Re-encoded
7.1ch DolbyDigital*
DolbyDigital Upto PCM PCM2ch DolbyDigital DolbyDigital DTSre-encoded Re-encoded
7.1ch DolbyDigital*
DolbyDigital Upto PCM PCM2ch DolbyDigital DolbyDigital DTSre-encoded Re-encoded
Plus 7.1ch Plus DolbyDigital*
DolbyTiueHD Upto PCM Re-encoded
7.1ch PCM2ch DolbyTrueHDDolbyDigital DTSre-encoded DolbyDigital*
DTS Upto PCM PCM2ch DTS DTS DTSre-encoded Re-encoded
6.1ch DolbyDigital*
DTS-HDHigh DTS-HDHigh
Resolution Upto PCM PCM2ch Resolution DTS DTSre-encoded Re-encoded
7.1ch DolbyDigital*
Audio Audio
DTS-HD Upto PCM PCM2ch DTS-HD DTS DTSre-encoded Re-encoded
MasterAudio 7.1ch MasterAudio DolbyDigital*
PCM PCM2ch PCM2ch PCM2ch PCM2ch PCM2ch PCM2ch
DolbyDigital Upto PCM PCM2ch DolbyDigital DolbyDigital DolbyDigital DolbyDigital
5.1ch
DTS Upto POM PCM2ch DTS DTS DTS DTS
6.1ch
Any
Decodesthe mainfeature
audioandBONUSVIEW
audiostreamtogether
intoPCMaudioandadds
NavigationSoundEffects.
Outputsonlythe main
featureaudiostreamsothat
ourAVreceivercandecode
theaudiobitstream.
Youwill nothear
BONUSVIEWaudioor
NavigationSoundEffects.
Decodesthemain
featureaudio
andBONUSVlE_/
audiostream
togetherintoPCM
audioandadds
NavigationSound
Effects,thenre-
encodesthePCM
audiointoDTS
bitstream.
Decodesthe main
featureaudioand
BONUSVIEWaudio
streamtogether
intoPCMaudioand
addsNavigation
SoundEffects,
thenre-encodes
thePCMaudio
intoDolbyDigital
bitstreamor PCM.
* If the Source Stream is 2ch or mono, "Re-encoded Dolby D" Settings are not applied. Output will be
PCM 2ch.
Blu-ray Discs may include three audio streams :
- Main Feature Audio : The audio soundtrack of the main feature.
- BONUSVlEW audio : An additional soundtrack such as the director or actor's commentary,
- Navigation Sound Effects : When you choose some menu navigation, Navigation Sound Effects may
sound, Navigation Sound Effects are different on each Blu-ray Disc.
62 English
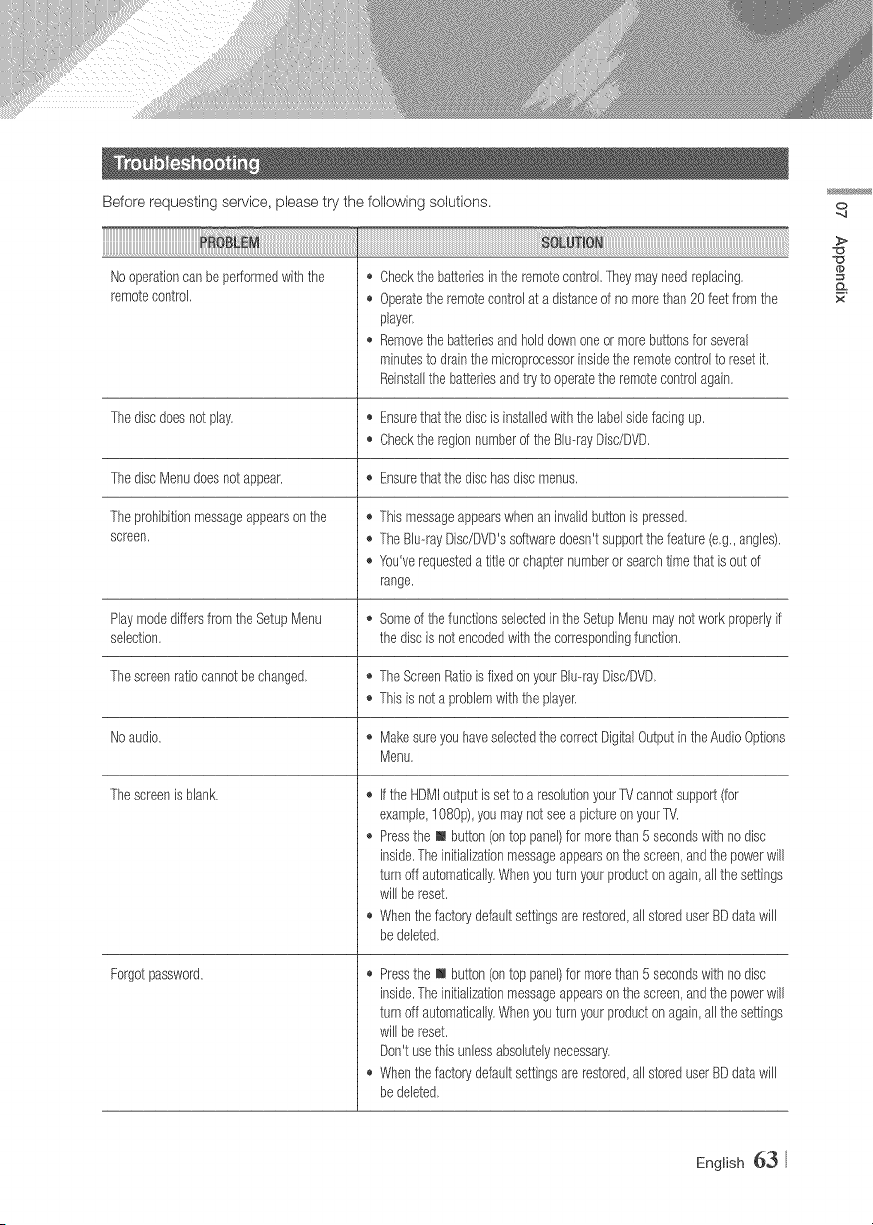
Before requesting service, please try the following solutions,
Nooperationcan beperformedwiththe o
remotecontrol, ,_
o
Thediscdoesnot play, o Ensurethatthediscis installedwiththe labelsidefacingup,
Checkthe regionnumberof the Blu--rayDisc/DVD,
ThediscMenudoesnotappear. ,_ Ensurethatthedischasdiscmenus,
Theprohibitionmessageappearson the _,Thismessageappearswhenan invalidbuttonis pressed,
screen, _,The Blu--rayDisc/DVD'ssdtwaredoesn'tsupportthefeature(e,g.,angles).
_,You'verequesteda title or chapternumberor searchtimethat is outof
range.
Playmodediffersfromthe SetupMenu _, Someof thefunctionsselectedintheSetupMenumaynotworkproperlyif
selection, the discis notencodedwiththe correspondingfunction,
Thescreenratiocannotbe changed, _,TheScreenRatioisfixedonyourBlu--rayDisc/DVD,
,_This is nota problemwiththeplayer.
Noaudio. ,, Makesureyouhaveselectedthe correctDigitalOutputintheAudioOptions
Menu,
Thescreenis blank.
Forgotpassword.
Checkthe batteriesinthe remotecontrol,Theymayneedreplacing,
Operatetheremotecontrolat a distanceof no morethan20 feetfromthe
player.
Removethebatteriesandholddownoneor morebuttonsforseveral
minutesto drainthe microprocessorinsidethe remotecontrolto resetit.
Reinstallthe batteriesandtry to operatetheremotecontrolagain.
_, Ifthe HDMIoutputis setto a resolutionyour[V cannotsupport(for
example,1080p),you maynotseea pictureonyourTV.
_, Pressthe m button(ontop panel)for morethan5 secondswith nodisc
inside.The initializationmessageappearsonthescreen,andthe powerwill
turnoff automatically,Whenyouturn yourproductonagain,all thesettings
willbe reset.
o Whenthefactorydefaultsettingsare restored,all storeduserBDdatawill
bedeleted,
,_ Pressthe m button(ontop panel)for morethan5 secondswith nodisc
inside.The initializationmessageappearsonthescreen,andthe powerwill
turnoff automatically,Whenyouturn yourproductonagain,all thesettings
willbe reset.
Don'tusethis unlessabsolutelynecessary,
,b Whenthefactorydefaultsettingsare restored,all storeduserBDdatawill
bedeleted,
o
>
x
English 63
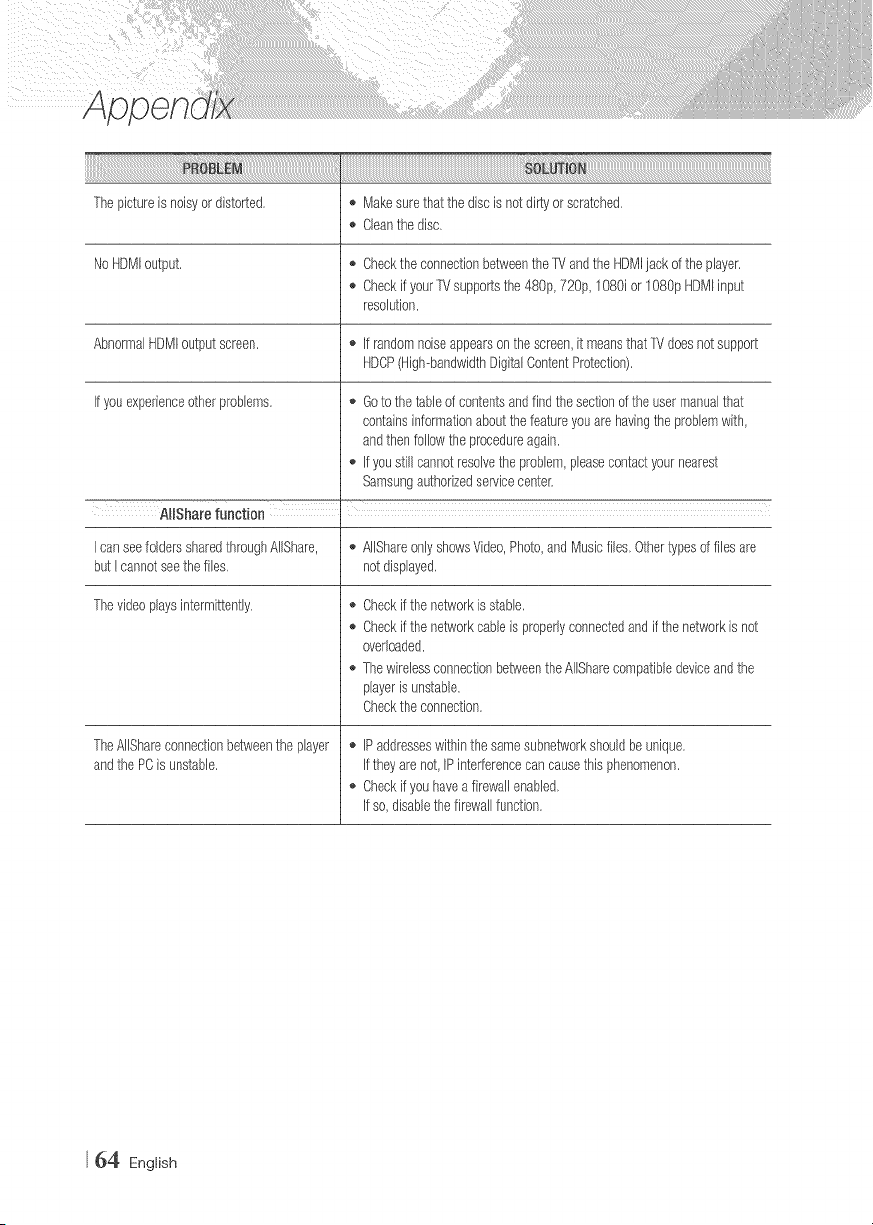
The pictureis noisyor distorted,
NoHDMIoutput,
AbnormalHDMIoutputscreen.
Ifyouexperienceotherproblems,
® Makesurethatthe discis notdirtyorscratched.
,, Cleanthe disc,
_, Checkthe connectionbetweenthe TVandthe HDMIjack ofthe player.
_, Checkif yourTMsupportsthe480p,720p,1080ior 1080pHDMIinput
resolution.
,_ If randomnoiseappearsonthe screen,it meansthatTVdoesnotsupport
HDCP(High-bandwidthDigitalContentProtection),
,_ Goto thetableof contentsandfindthe sectionof theusermanualthat
containsinformationaboutthe featureyouarehavingthe problemwith,
andthenfollowtheprocedureagain.
,, If youstillcannotresolvetheproblem,pleasecontadyournearest
SamsungauthorizedsepJicecenter,
AlIShare function
I canseefolderssharedthroughAlIShare, ® AIIShareonlyshowsVideo,Photo,andMusicfiles,Othertypesoffilesare
butI cannotseethe files, not displayed,
Thevideoplaysintermittently.
TheAlIShareconnectionbetweentheplayer
andthe PCis unstable.
_, Checkif thenetworkisstable,
_, Checkif thenetworkcableis properlyconnectedandifthe networkis not
overloaded.
_, ThewirelessconnectionbetweentheAIISharecompatibledeviceandthe
playeris unstable.
Checkthe connection.
_, IPaddresseswithinthesamesubnetworkshouldbe unique.
If theyarenot,IPinterferencecancausethis phenomenon,
,_ Checkifyouhavea firewallenabled,
If so,disablethe firewallfunction.
64 English
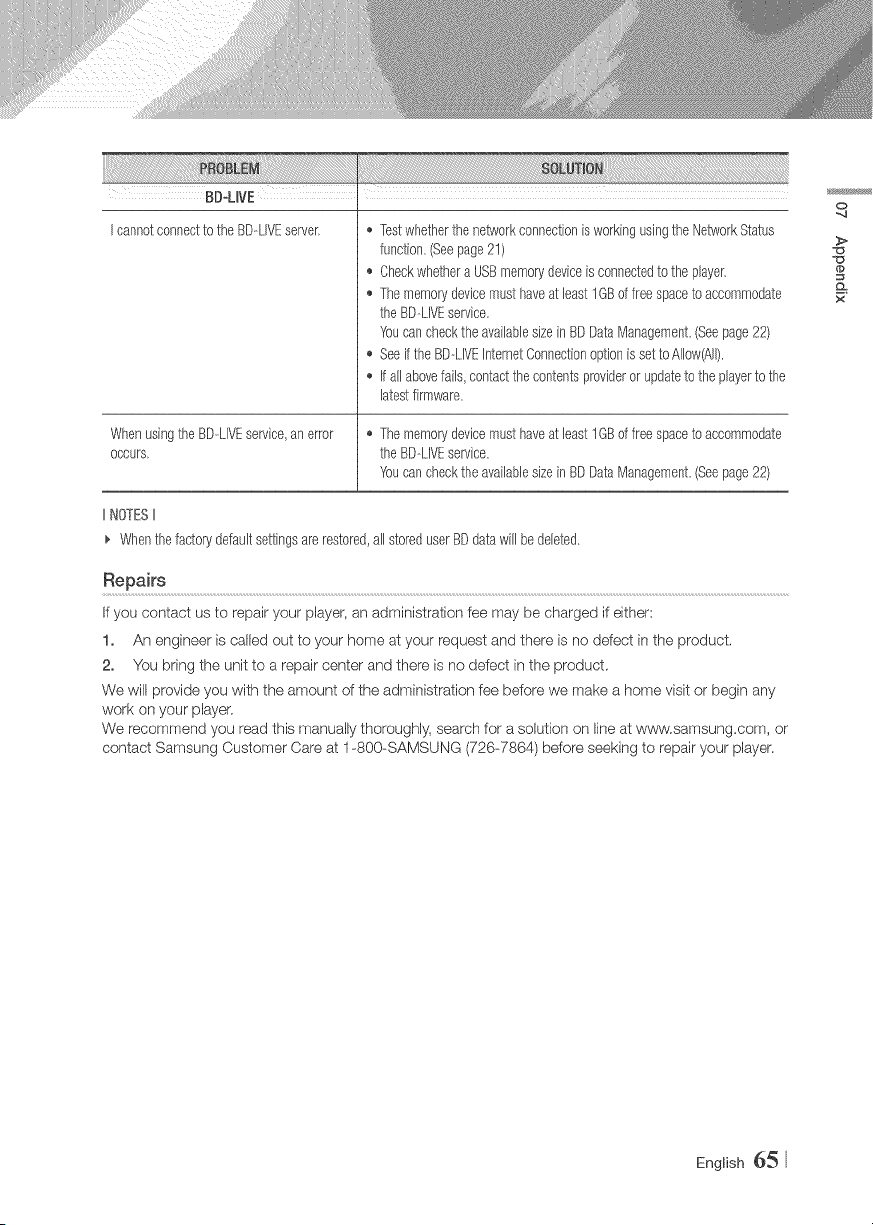
BD-UVE
I cannotconnectto the BD-LIVEserver> o TestwhetherthenetworkconnectionisworkingusingtheNetworkStatus
function.(Seepage21)
,_ Checkwhethera USBmemorydeviceis connectedto the player,
o Thememorydevicemust haveat least1GBoffree spaceto accommodate
theBD--LIVEservice.
Youcan checktheavailablesizein BDDataManagement,(Seepage22)
,_ Seeifthe BD--LIVEInternetConnectionoptionis setto Allow(All),
o If all abovefalls,contactthecontentsprovideror updateto theplayerto the
latestfirmware.
WhenusingtheBD-LIVEservice,an error o Thememorydevicemust haveat least1GBoffree spaceto accommodate
occurs> theBD--LIVEservice.
Youcan checktheavailablesizein BDDataManagement,(Seepage22)
IINOTESII
_, Whenthefactorydefaultsettingsare restored,all storeduserBDdatawill be deleted,
Repairs
If you contact us to repair your player, an administration fee rnay be charged if either:
1. An engineer is called out to your home at your request and there is no defect in the product.
2. You bring the unit to a repair center and there is no defect in the product.
We will provide you with the amount of the administration fee before we make a home visit or begin any
work on your player.
We recommend you read this manually thoroughly, search for a solution on line at w,c_pw.samsung.com,or
contact Samsung Customer Care at 1-800-SAMSUNG (726-7864) be.fore seeking to repair your player.
o
>
x
English 65
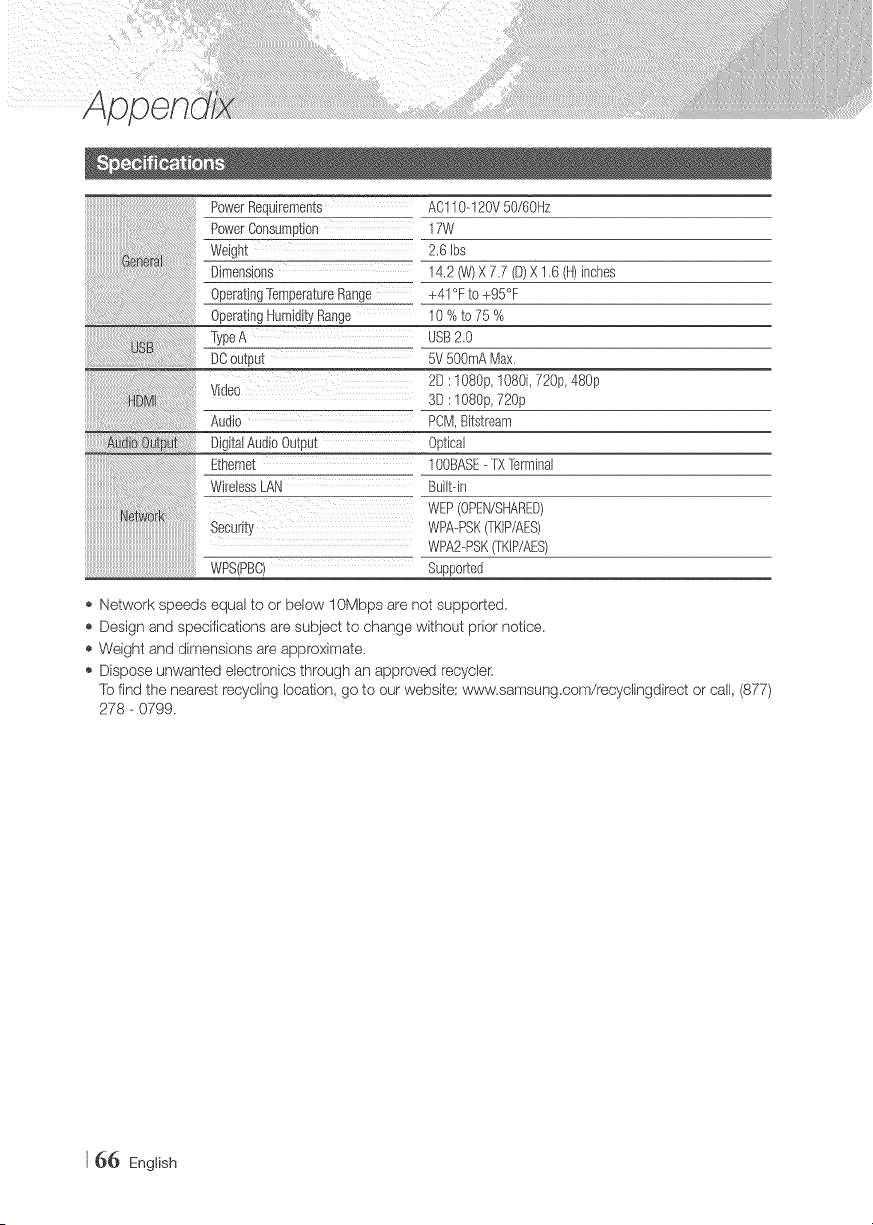
iiiiiiiiiiiiiiiiiiiiiiiiiiiiiiiiiiiiiiiiiiiiiiiiiii_!_ii_!!_ii_i_i_ii_ii_!_i_!!_!!_!!_!!_!!_!!_!!_!!_!!_!!_!!_!!_!!i!_i!!_ilililili
PowerRequirements AC110-120V50/60Hz
PowerConsumption 17W
__ 2,6 Ibs
14,2 (W)X 7.7 (D)X 1,6 (It)inches
+41% to +95%
10%to75%
TypeA USB2,0
DOoutput 5V5OOmAMax,
2D : 1080p,1080i, 720p,480p
Video
3D :108@, 720p
Audio PCM,Bitstream
DigitalAudioOutput Optical
Ethemet 1@BASE- TXTbrminal
Built@
WEP(OPEN/SHARED)
Security WPA--PSK(TKIP/AES)
WPA2-PSK(TKIP/AES)
WPS(PBC) Supporbd
o Network speeds equal to or below 10Mbps are not supported,
o Design and specifications are subject to change without prior notice,
o Weight and dimensions are approximate,
o Dispose unwanted electronics through an approved recycleK
To find the nearest recycling location, go to our website; '¢¢ww,sarosung,com/recyclingdirect or call, (877)
278 - 0799,
66 English
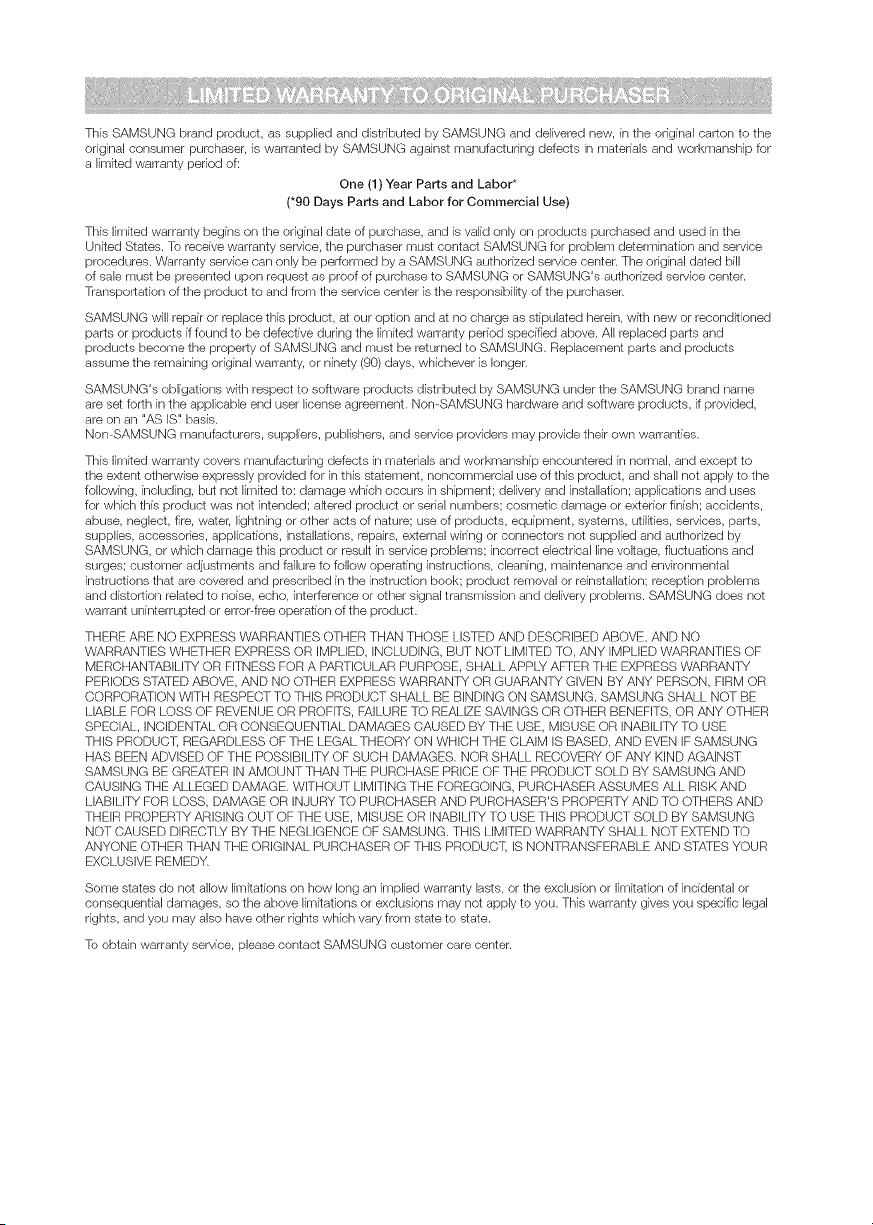
This SAMSUNG brand product, as supplied and distributed by SAMSUNG and deliver÷d new, in the original carton to the
original consumer purchaser, is warranted by SAMSUNG against manufacturing defects in materials and workmanship for
a limited warranty period of:
One (1) Year Parts and Labor*
(*90 Days Parts and Labor for Commercial Use)
This limited warranty begins on the original date of purchase, and is valid only on products purchased and used in the
United States. To receive warranty service, the purchaser must contact SAMSUNG for problem determination and service
procedures. Warranty service can only be performed by a SAMSUNG authorized service center. The original dated bill
of sale must be presented upon request as proof of purchase to SAMSUNG or SAMSUNG's authorized service center.
Transportation of the product to and from the service center is the respondbirty of the purchaser.
SAMSUNG will repair or replace this product, at our option and at no charge as stipulated herein, with new or reconditioned
parts or products ff found to be defective during the limited warranty period specified above. All replaced parts and
products become the property of SAMSUNG and must be returned to SAMSUNG. Replacement parts and products
assume the remaining original warranty, or ninety (90) days, whichever is longer.
SAMSUNG's obligations Wth respect to software products distributed by SAMSUNG under the SAMSUNG brand name
are set forth in the applicable end user license agreement. Non-SAMSUNG hardware and software products, if provided,
are on an "AS IS" basis.
NomSAMSUNG manufacturers, suppliers, publishers, and service providers may provide their own warranties.
This limited warranty covers manufacturing defects in materials and workmanship encountered in normal, and except to
the extent otherwise expressly provided for in this statement, noncommercial use of this product, and shall not apply to the
following, including, but not limited to: damage which occurs in shipment; delivery and installation; applications and uses
for which this product was not intended; altered product or serial numbers; cosmetic damage or exterior finish; accidents,
abuse, neglect, fir÷, water; lightning or other acts of nature; use of products, eqdpment, systems, utirties, services, parts,
supplies, accessories, applications, installations, repairs, external wiring or connectors not supplied and authorized by
SAMSUNG, or which damage this product or result in service problems; incorrect electrical line voltage, fluctuations and
surges; customer adjustments and failure to follow operating instructions, cleaning, maintenance and environmental
instructions that are covered and prescribed in the instruction book; product removal or reinstallation; reception probbrns
and distortion related to noise, echo, interference or other signal transmission and delivery probbms. SAMSUNG does not
warrant uninterrupted or error-free operation of the product.
THERE ARE NO EXPRESS WARRANTIES OTHER THAN THOSE LISTED AND DESCRIBED ABOVE, AND NO
WARRANTIES WHETHER EXPRESS OR iMPLiED, INCLUDING, BUT NOT LIMITED TO, ANY IMPLIED WARRANTIES OF
MERCHANTABILITY OR FITNESS FOR A PARTICULAR PURPOSE, SHALL APPLY AFTER THE EXPRESS WARRANTY
PERIODS STATED ABOVE, AND NO OTHER EXPRESS WARRANTY OR GUARANTY GIVEN BY ANY PERSON, FIRM OR
CORPORATION WITH RESPECT TO THIS PRODUCT SHALL BE BINDING ON SAMSUNG. SAMSUNG SHALL NOT BE
LIABLE FOR LOSS OF REVENUE OR PROFITS, FAILURE TO REALIZE SAVINGS OR OTHER BENEFITS, OR ANY OTHER
SPECIAL, INCIDENTAL OR CONSEQUENTIAL DAMAGES CAUSED BY THE USE, MISUSE OR INABILITY TO USE
THIS PRODUCT, REGARDLESS OF THE LEGAL THEORY ON WHICH THE CLAIM IS BASED, AND EVEN IF SAMSUNG
HAS BEEN ADVISED OF THE POSSIBILITY OF SUCH DAMAGES. NOR SHALL RECOVERY OF ANY KIND AGAINST
SAMSUNG BE GREATER IN AMOUNT THAN THE PURCHASE PRICE OF THE PRODUCT SOLD BY SAMSUNG AND
CAUSING THE ALLEGED DAMAGE. WITHOUT LIMITING THE FOREGOING, PURCHASER ASSUMES ALL RISK AND
LIABILITY FOR LOSS, DAMAGE OR INJURY TO PURCHASER AND PURCHASER'S PROPERTY AND TO OTHERS AND
THEIR PROPERTY ARISING OUT OF THE USE, MISUSE OR INABILITY TO USE THIS PRODUCT SOLD BY SAMSUNG
NOT CAUSED DIRECTLY BY THE NEGLIGENCE OF SAMSUNG. THIS LIMITED WARRANTY SHALL NOT EXTEND TO
ANYONE OTHER THAN THE ORIGINAL PURCHASER OF THIS PRODUCT, IS NONTRANSFERABLE AND STATES YOUR
EXCLUSIVE REMEDY.
Some states do not allow limitations on how long an implied warranty lasts, or the exclusion or limitation of inddental or
consequential damages, so the above limitations or exclusions may not apply to you. This warranty gives you specific legal
rights, and you may abe have other rights which vary from state to state.
To obtain warranty service, please contact SAMSUNG customer care center.
QUESTIONS OR COMMENTS?
Area CALL OR VISIT US ONLINE AT WRITE
1-800-SAMSUNG Samsung Electronics America, inc.
IN THE US (726-7864) www.samsung.corn/us 85 Challenger Road Ridgefield Park,
NJ 07660
I IIIIIIIIIUlIIIIIIlUllIII
AK68-02355A-04