A
B
W
F
Parts in the box
Latch
“B” is not included. If needed,
please contact Kwikset to order
a drive-in latch for your lock.
Exterior
Assembly
Strike Adapter
ring
C D
E
Keys
Mounting
Plate
SmartKey
Tool
G
H
03809 46780
N
Q
S
P
Fasteners
48654 27526 64109
Interior
Assembly
K L M
T
U V
A
N or P
(2x)
NP
S
Q
A
A
B
B
B
A
B
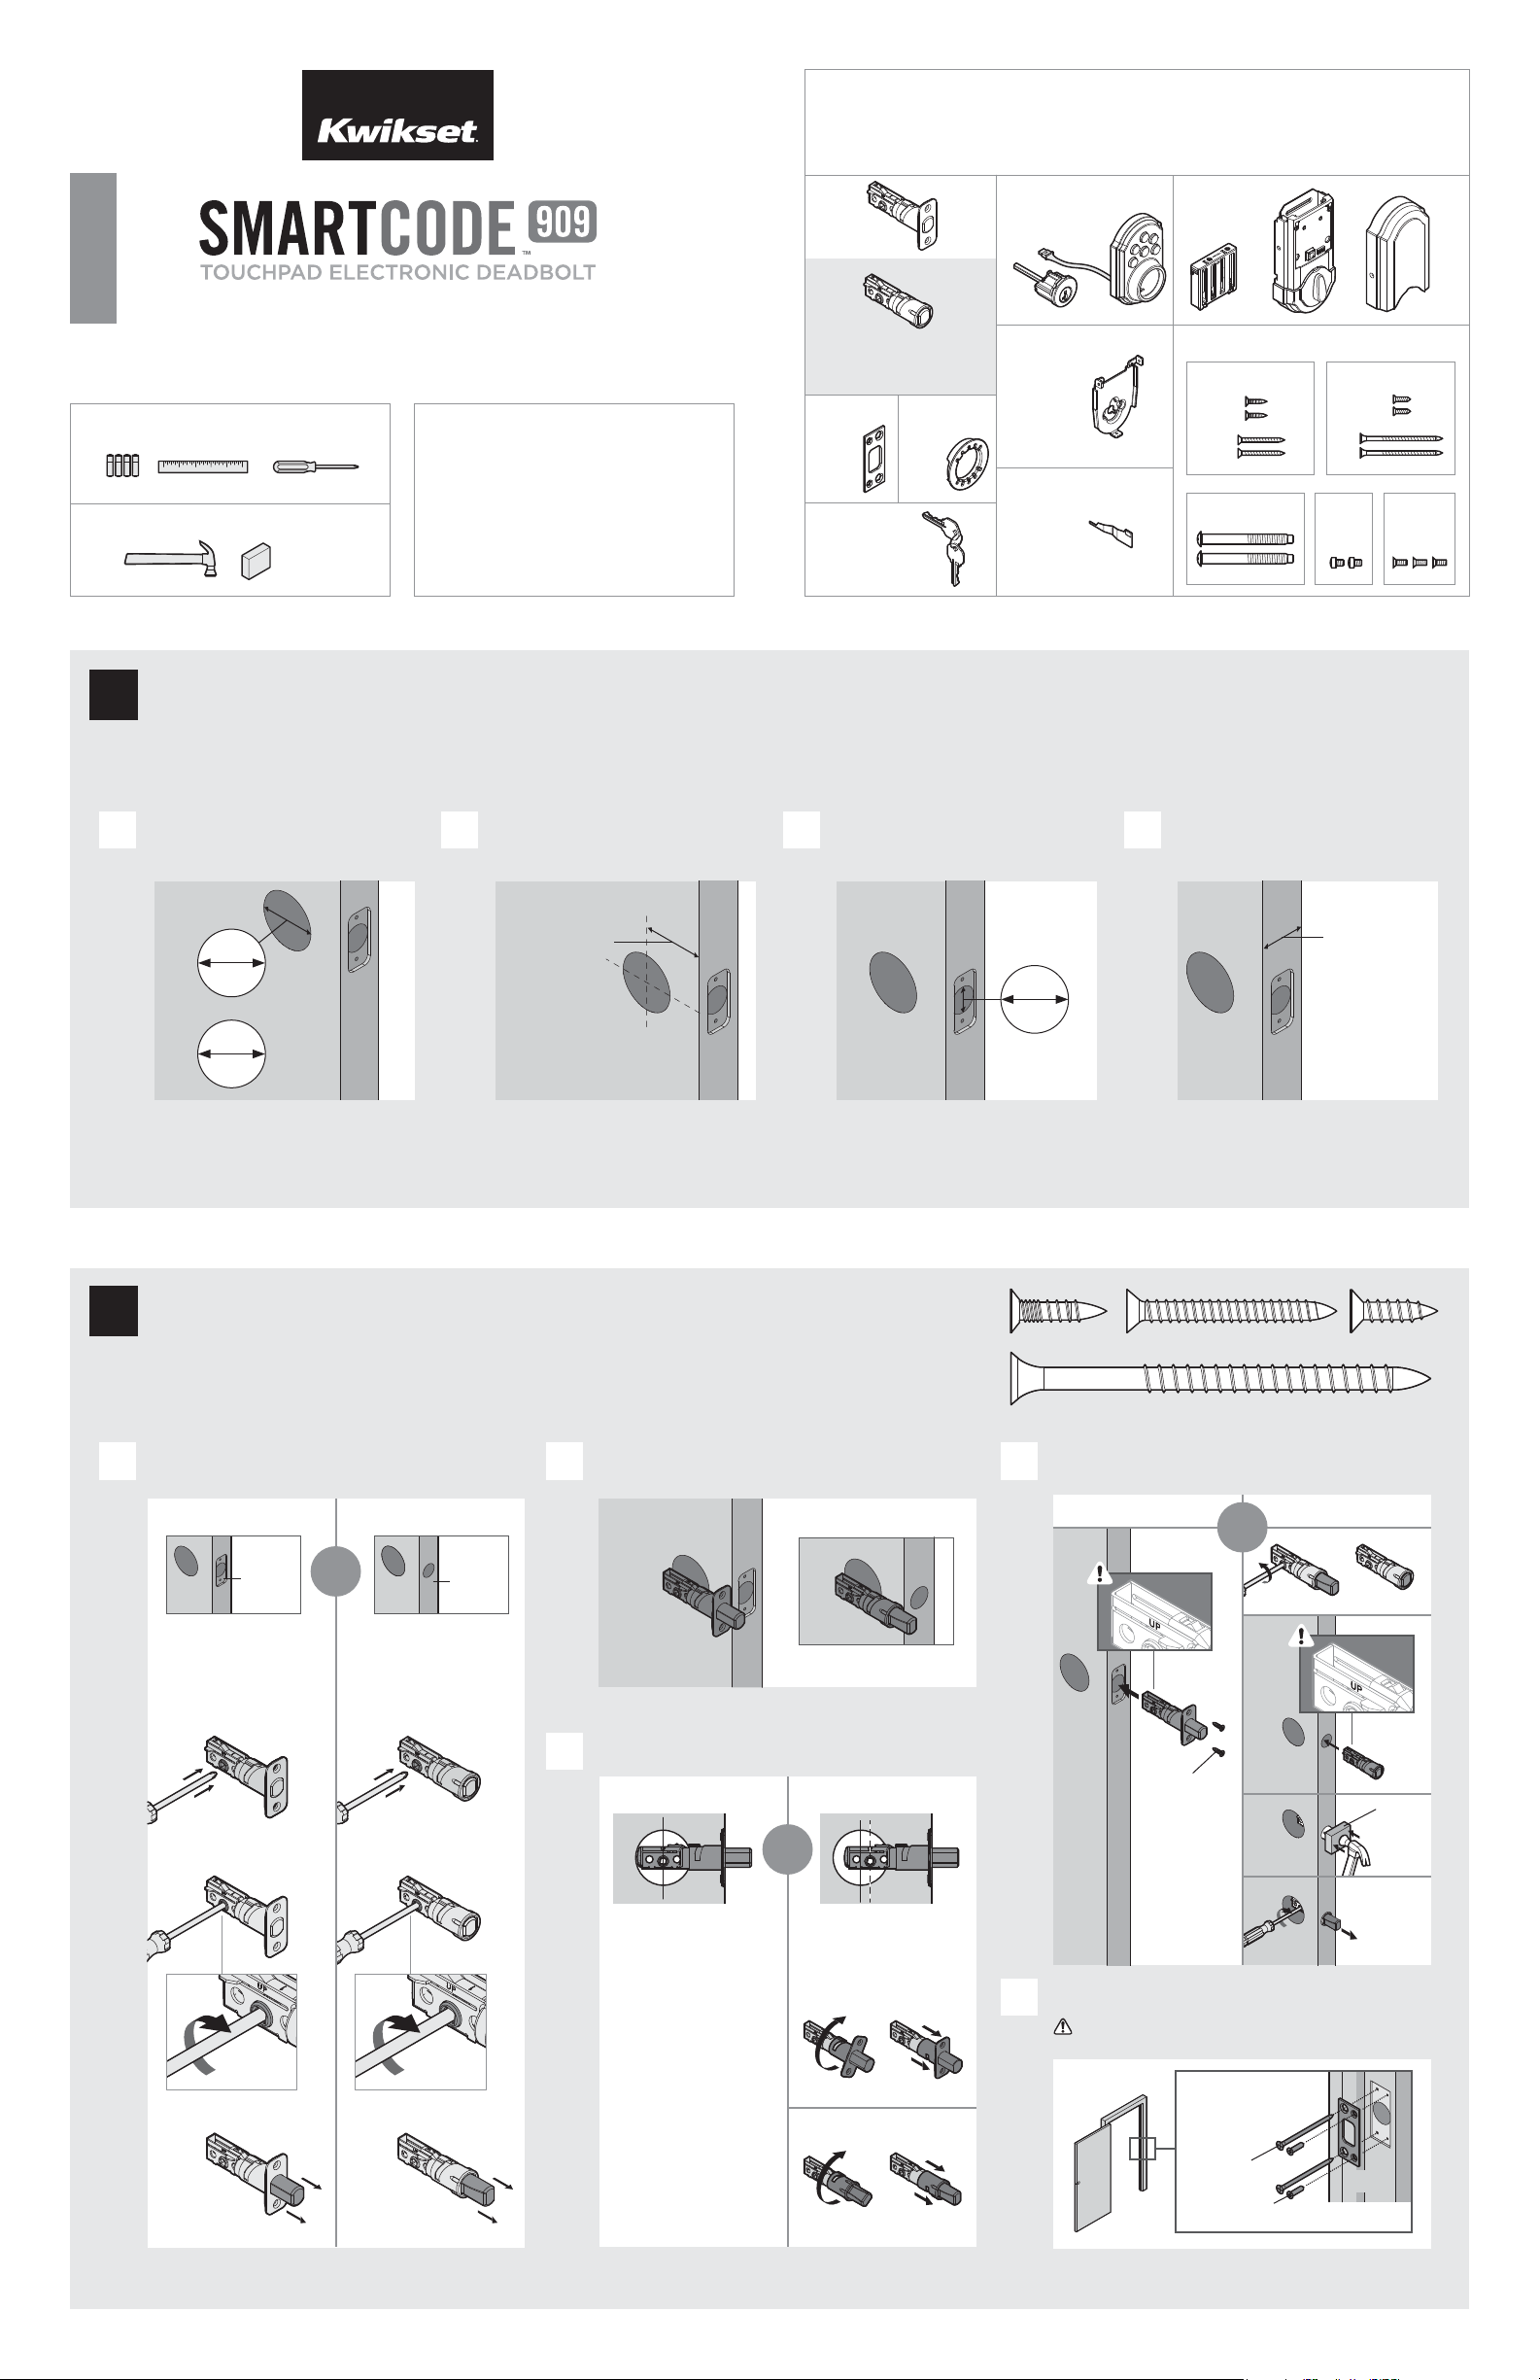
If drilling a new door, use the supplied template and the complete
door drilling instructions available at www.kwikset.com/doorprep.
Note: Additional door preparation may be
required for doors with 11/2" (38 mm) holes.
Consult the deadbolt drilling instructions at
www.kwikset.com/doorprep.
or
backset
Measure to conirm that the hole in
the door is either 21/8" (54 mm) or
11/2" (38 mm).
Measure to conirm that the backset is
either 23/8" or 23/4" (60 or 70 mm).
23/8" or 23/4"
60 or 70 mm
13/8" – 13/4"*
35 – 44 mm*
Measure to conirm that the hole in
the door edge is 1" (25 mm).
Measure to conirm that the door is
between 13/8" and 13/4"* (35 mm
and 44 mm*) thick.
A
A B
C
D
B C D
Is the door edge chiseled?
Are the latch holes centered in the door hole?
Which latch are you installing?Hold the latch in front of the door hole, with the latch
face lush against the door edge.
21/8"
54 mm
11/2"
38 mm
1"
25 mm
YES
YES
NO
NO
Use latch “A”. If the
latch bolt is not already
extended, extend the
latch bolt as shown.
No adjustment is required.
Proceed to next step.
Rotate latch face as
shown to extend latch.
wood
block
actual
size
Use latch “B” (not
included). If the latch
bolt is not already
extended, extend the
latch bolt as shown.
Latch “A” Latch “B”
S (2x)
C
Q (2x)
Longer screws
install closest to
the door jamb.
door frame
E
Install strike on the door frame.
Make sure the hole in the door frame is drilled a
minimum of 1" (25 mm) deep.
or
chiseled
not
chiseled
or
or
1
Prepare the door and check dimensions
2
Install the latch and strike
*Service kits for 21/4" (57 mm) thick doors
are available through Kwikset.
1 / 4
62888 / 01
Installation and User Guide
Kwikset
1-800-327-5625
www.kwikset.com
ENGLISH
Required tools
Ruler4 AA Batteries
Hammer Wood block
Phillips head screwdriver
Additional Tools (depending on application)
21/8"
54 mm
11/2"
38 mm
actual
size
T
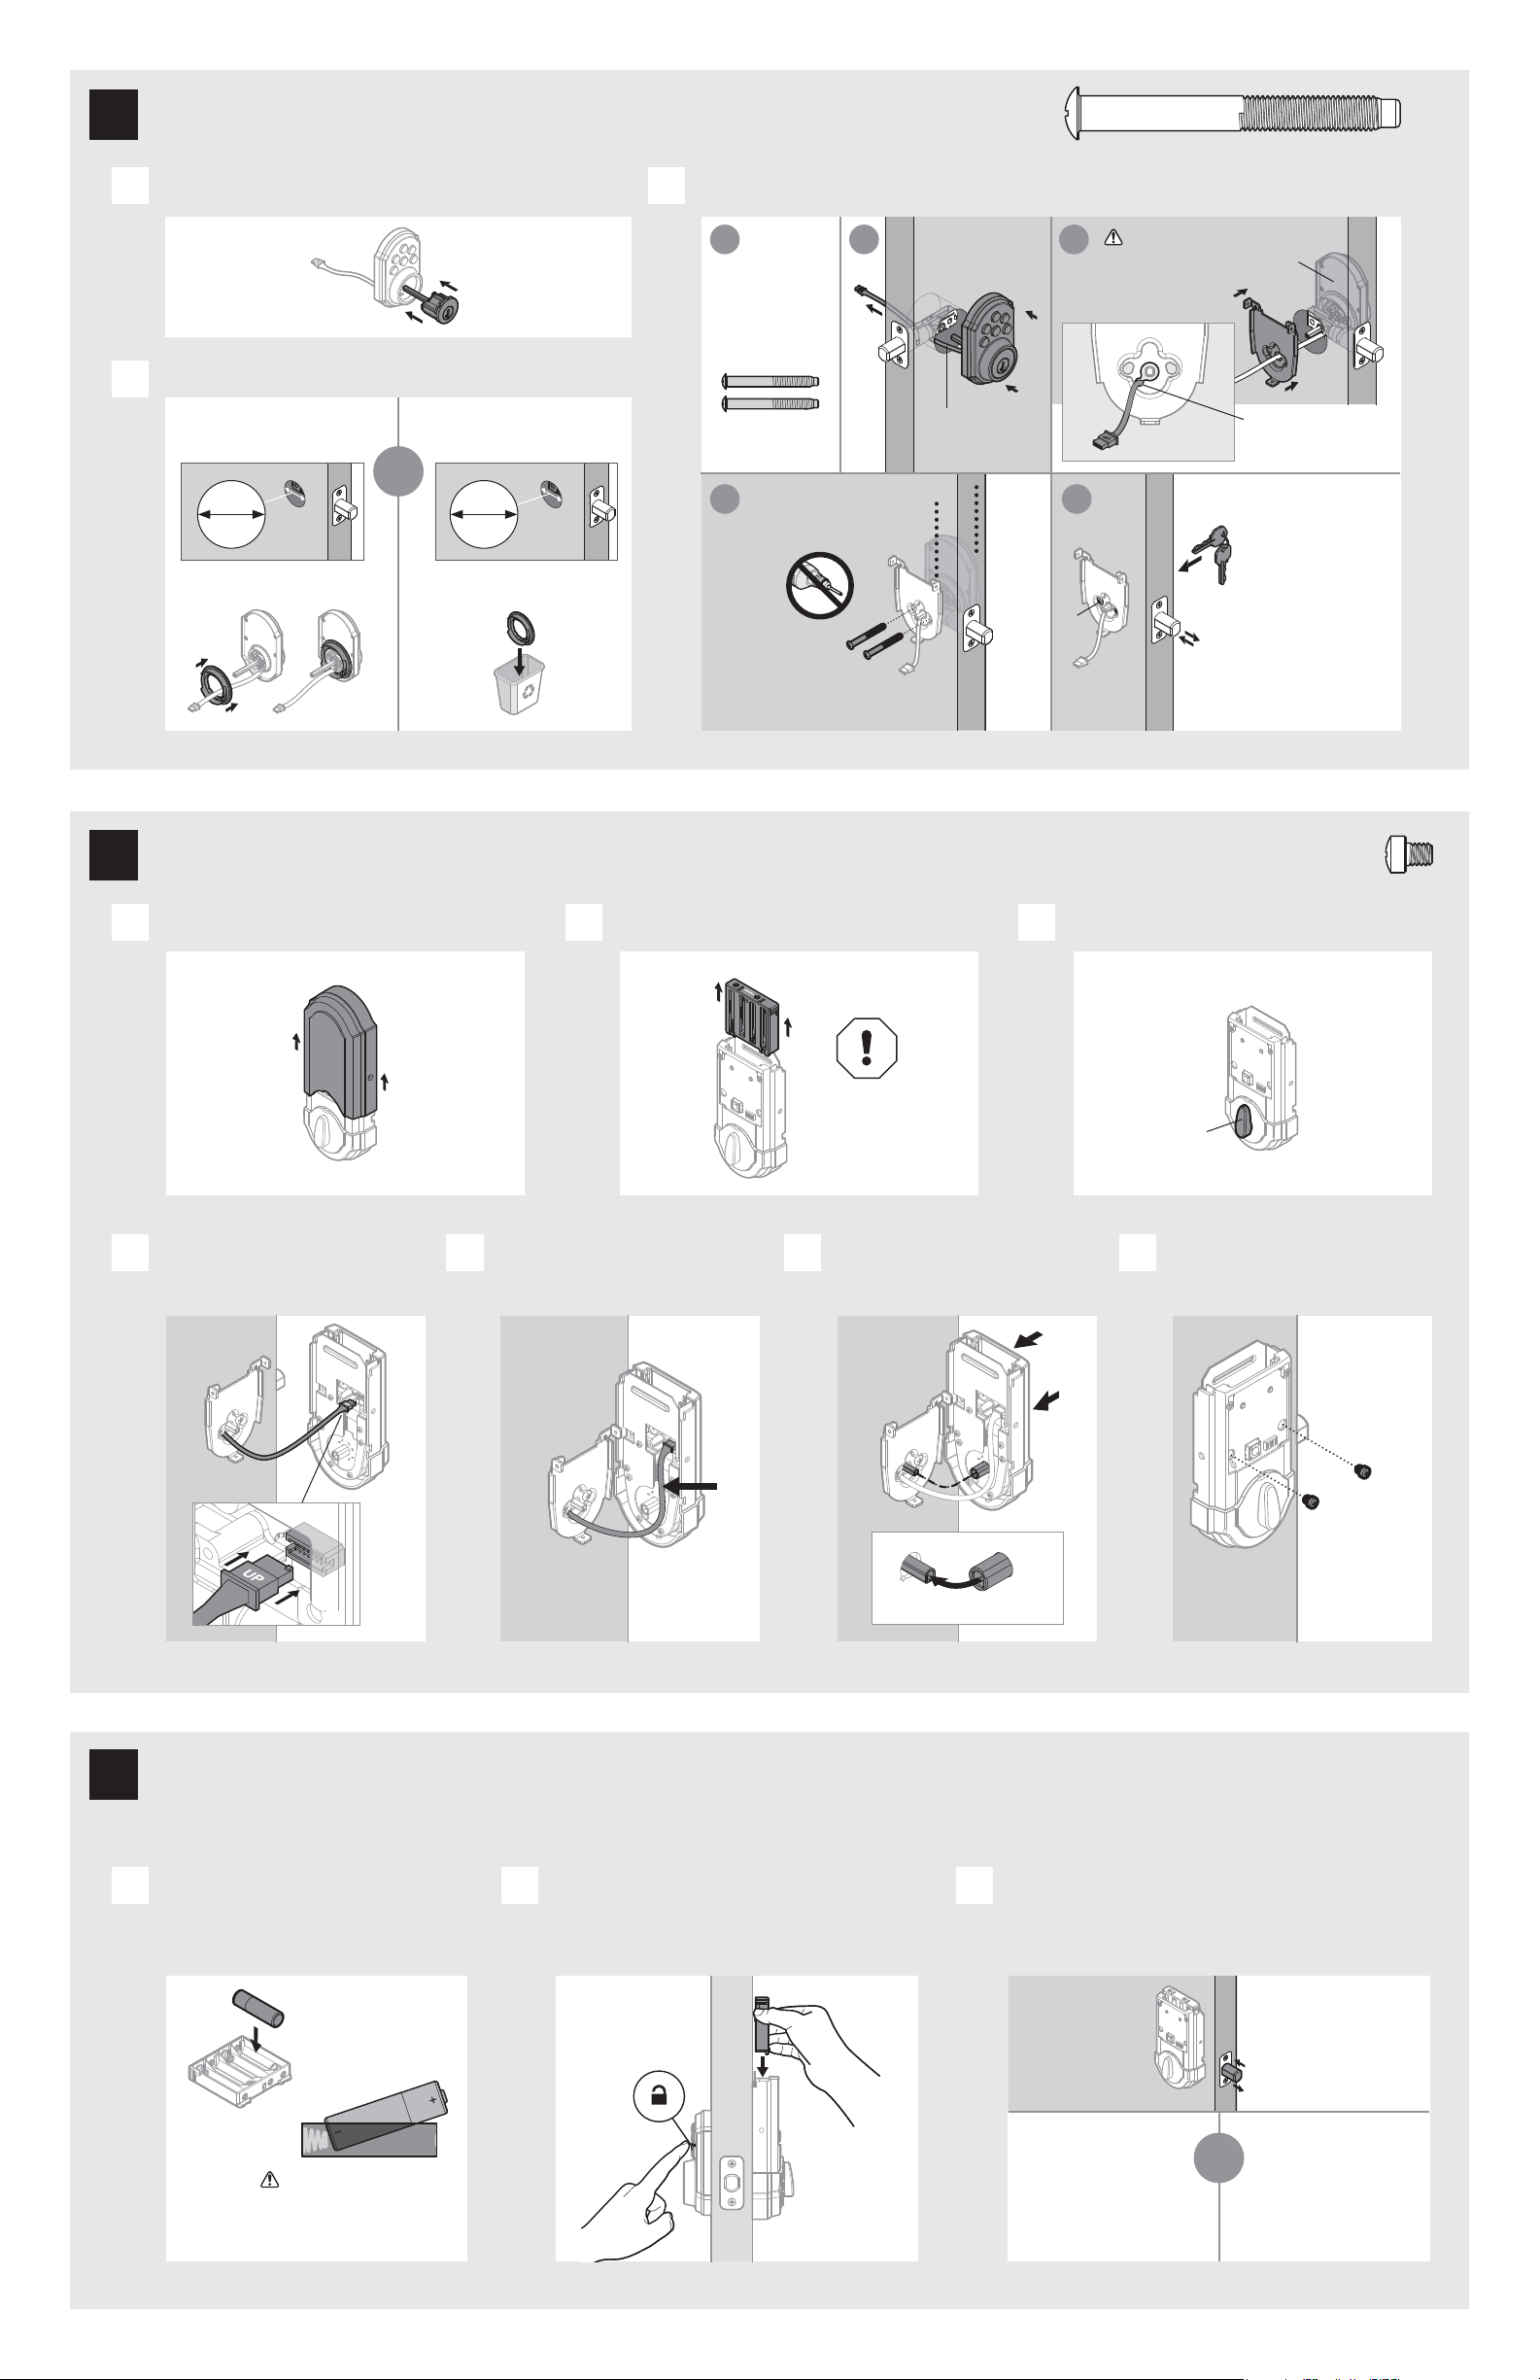
What is the diameter of the hole in the door?
Install exterior keypad and mounting plate.Insert cylinder into keypad.
A
B
C
Diameter is 21/8"
(54 mm)
Diameter is 11/2"
(38 mm)
or
“D” is required for installation.
Install “D” on “F”.
“D” is not needed for
installation. Discard “D”.
Cable goes
underneath latch.
Locate screws
and keep them
within reach.
Support exterior assembly
during mounting plate installation.
Route cable through
center hole, then push
cable into side hole.
Insert key and
test latch. If latch
does not extend or
retract smoothly,
adjust screws (T).
Remove key when
inished and make
sure the latch bolt
is fully extended.
Keep parallel to
edge of door.
Tighten
screws evenly.
a
d
b
c
e
D
D
F
F
T
G
T (2x)
W
F
T
E
Install the exterior keypad
Remove battery cover. Remove battery pack. Make sure the turnpiece is in the vertical position.
A B C
vertical
M
L
K
L
Do not install
batteries
until step 5.
Note: Turnpiece
may not rotate
smoothly until
after step 5.
Connect cable. Ensure tight cable
connection.
Lay cable lat against the interior
housing.
Push turnpiece shaft onto
torque blade.
Secure interior assembly with
supplied screws.
D E F G
turnpiece
shaft
torque
blade
L
U (2x)
actual
size
U
Install the interior assembly
YES NO
or
Door handing process
was successful! Proceed
to next step after latch
bolt stops moving.
Remove battery
pack, wait 15 seconds,
then attempt the
process again.
This step will teach your lock the orientation of your door and is crucial to lock operation.
Install 4 AA batteries in battery pack. Press and HOLD the Lock button
while installing battery pack.
Hold button until the latch bolt
starts moving on its own.
Did the latch bolt retract and extend on its
own when the battery pack was installed?
A B C
Ensure correct polarity.
For best results, use
new, non-rechargeable
Alkaline batteries only.
K
Install the batteries and perform the door handing process
2 / 4
3
4
5
1x
green
3x
red
3 / 4
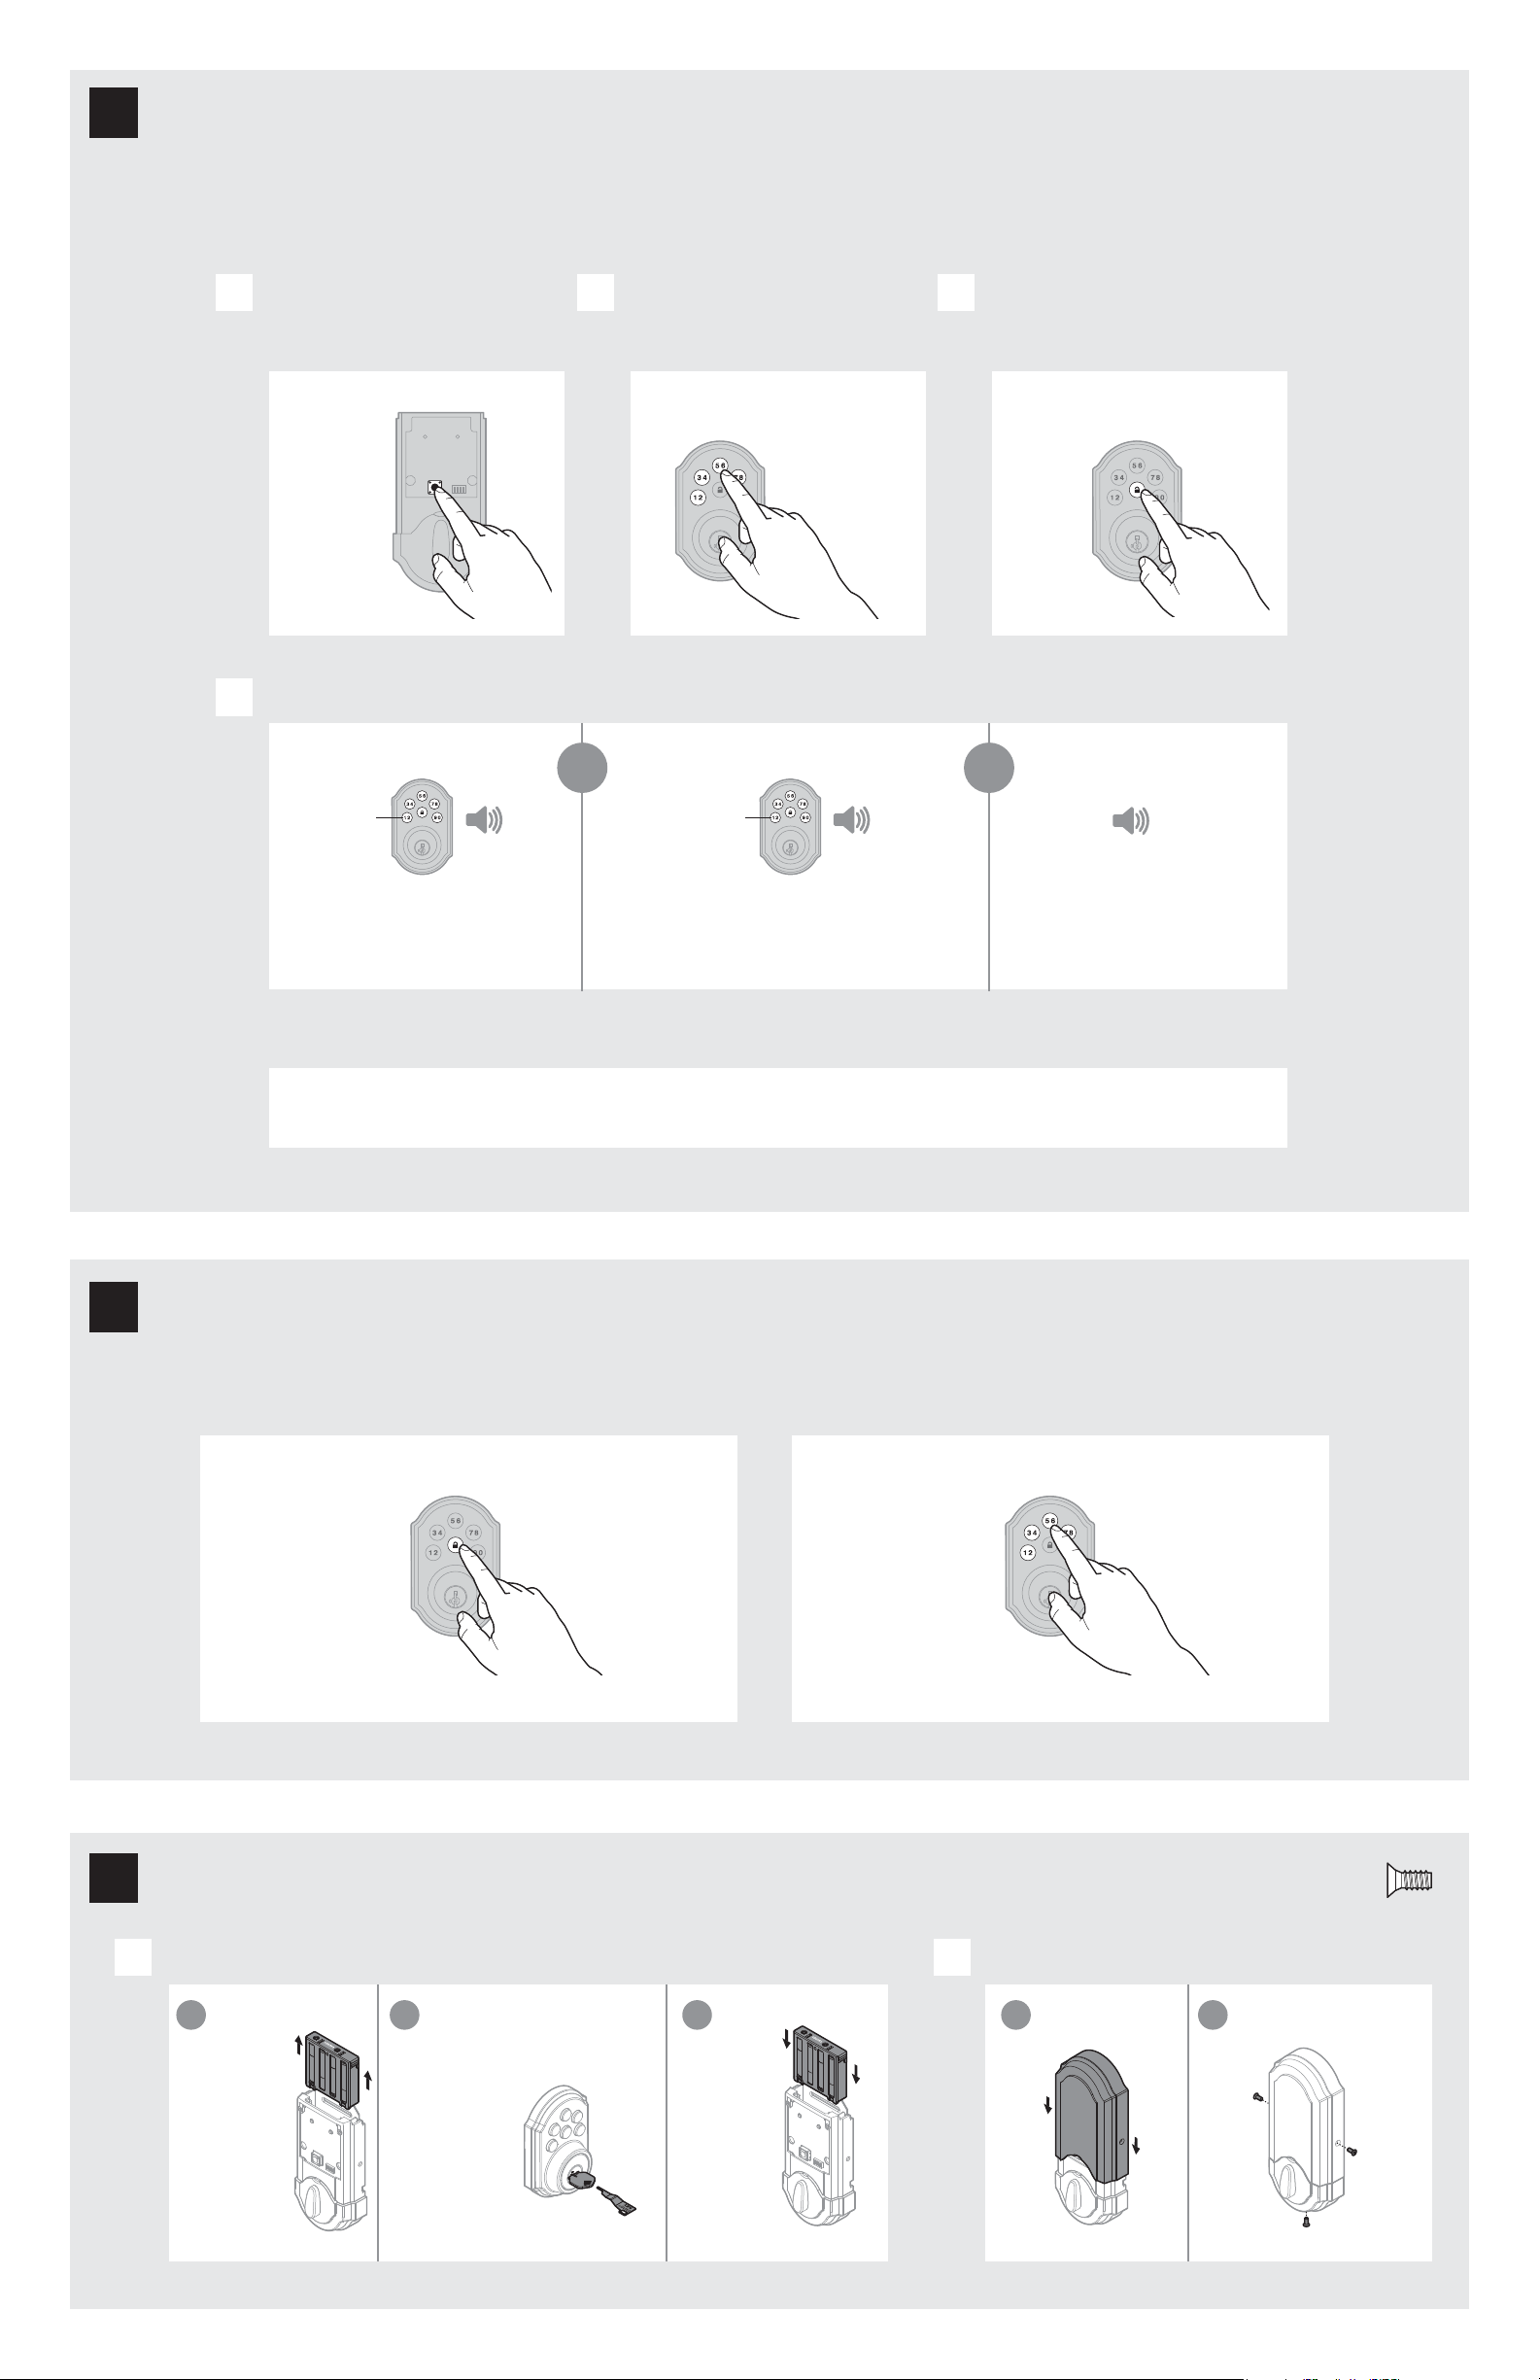
Conirm that the code(s) added in previous step can unlock the door.
Make sure the door is open. Press
the Program button the number of
times that corresponds to the user
code position being programmed.
Locking the Door Unlocking the Door
Enter user code. A total of 8 user
codes may be programmed.
Press Lock button once.
A B C
What lights and sounds does the lock produce?
D
Each user code
must be a unique
code between 4
and 8 digits.
Example: If
programming
the third code,
press the button
three times.
Programming was successful. Programming was unsuccessful.
Make sure the user code is not a duplicate and that it is
between 4 and 8 digits during your next attempt.
Press Lock button once. Enter user code.
Programming Timeout
If no button is pressed for ive seconds, the system will time
out and you will need to restart the procedure.
*Beeping sound will only be heard if switch #3 (on the lock interior) is in the on positon. See “Switches and Status LED Colors” on page 4.
Mastercode
For enhanced security, a mastercode may be used when adding and deleting user codes. For more information about the mastercode, download the Programming
and Troubleshooting Guide on the SmartCode 909 page at www.kwikset.com.
2x
One green lash with one beep* Three red lashes with three beeps* Two beeps*
or or
Programming time out.
Make sure not to pause for more
than 5 seconds during programming.
Tip: You can press the
Lock button before
entering your user
code to light up the
keypad at night.
Re-key the lock (if needed). Install the battery cover.
A B
IMPORTANT:
Remove
battery
pack before
re-keying.
K
K
M
H
V (3x)
a a
b b
c
Re-key the lock
to work with your
existing key. See the
supplied SmartKey
Re-key instructions
for more
information.
Reinstall
battery
pack.
actual
size
V
Re-key the lock (if needed) and install the battery cover
6
7
8
Add user codes (8 max)
Test the lock (review normal operation)
Alert Reason Solution
Keypad lashes red 1 time
with 1 beep*
Door jammed while
attempting to lock.
Manually re-lock door. If needed,
reposition strike.
Keypad lashes red 3 times
with 3 beeps*
Unsuccessful programming.
Attempt programming procedure
again.
One incorrect code entered. Re-enter code.
No user code programmed. Program at least one user code.
Keypad lashes red 10
times with 10 beeps*
Low battery. Replace batteries.
Lock beeps 2 times.
Programming timeout.
Attempt programming procedure
again, making sure not to pause for
more than 5 seconds.
Keypad lashes red 3 times.
Keypad lashes red 6 times
with 6 beeps*.
Keypad lashes red 15 times
with 15 beeps*
Three incorrect codes entered
within one minute.
Re-enter code after 60 second keypad
lockout.
*Beeping sound will only be heard if switch #3 is on.
© 2015 Spectrum Brands, Inc.
1. Read all instructions in their entirety.
2. Familiarize yourself with all warning and caution statements.
3. Remind all family members of safety precautions.
4. Protect your user codes and mastercode.
5. Dispose of used batteries according to local laws and regulations.
CAUTION: Prevent unauthorized entry. Since anyone with access to the back panel
can change the user codes, you must restrict access to the back panel and routinely
check the user codes to ensure they have not been altered without your knowledge.
The use of a mastercode can help protect your system’s settings.
WARNING: This Manufacturer advises that no lock can provide complete security
by itself. This lock may be defeated by forcible or technical means, or evaded by
entry elsewhere on the property. No lock can substitute for caution, awareness of
your environment, and common sense. Builder’s hardware is available in multiple
performance grades to suit the application. In order to enhance security and reduce
risk, you should consult a qualiied locksmith or other security professional.
Important Safeguards
4 / 4
SmartCode at a Glance
Deleting a user code
In order to delete a user code, you must override the code by adding a di erent user code in the same
position. For example, if you want to delete the third code, add a di erent user code in position three.
Test the old user code to make sure it can no longer unlock the door.
If you cannot remember the user code position, you may wish to perform a factory reset to delete all
codes associated with the lock.
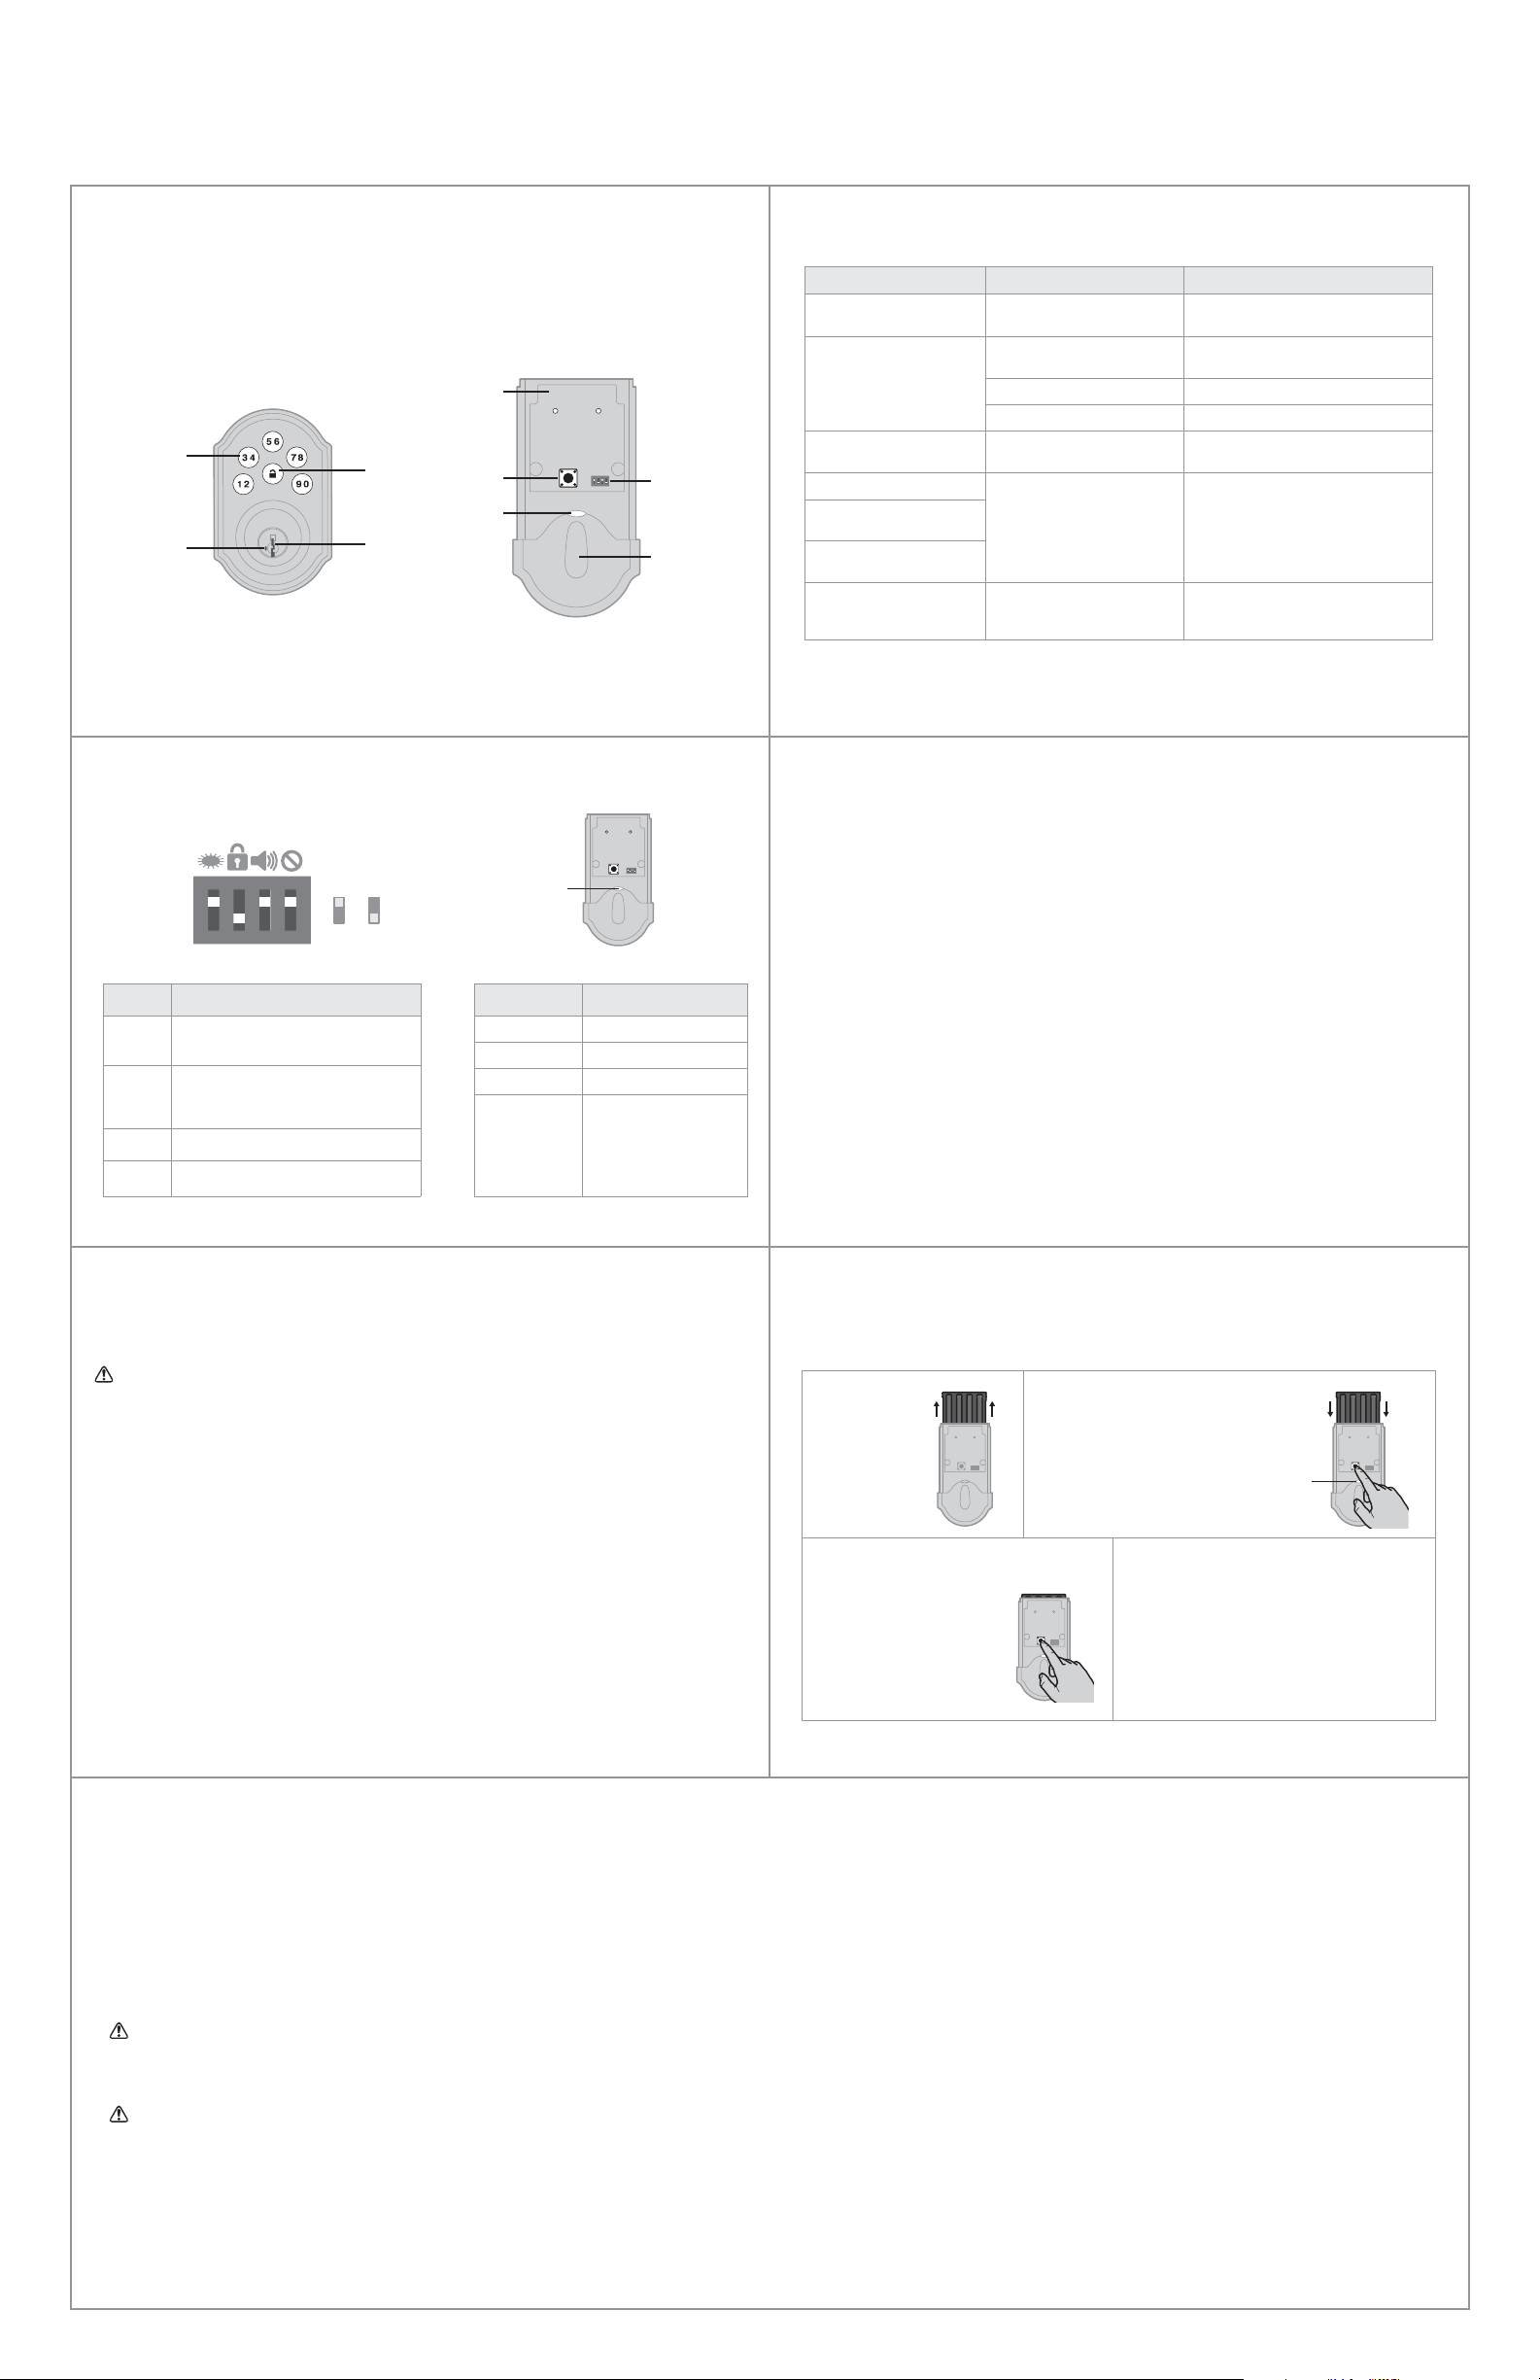
Reference Guide
Exterior
Back
panel
Program
button
Status
LED
Switches
Turnpiece
Interior (cover removed)
Switches and Status LED colors Troubleshooting
Switch Function
1
Door lock status LED blinks every 6
seconds
2
Lock automatically re-locks door 30
seconds after unlocking. Disabled if no
codes are programmed.
3 Audio
4 Not used
Color Lock Status
Blinking green Unlocked
Blinking amber Locked
Blinking red Low battery
Solid red
Door handing process
did not work properly.
See the online
Programing and
Troubleshooting Guide.
1 2 3 4
On
Switches
Status
LED
O
System Alerts
Factory Reset
A factory reset will delete all codes associated with the lock.
Status
LED
1 Remove
battery pack.
2 Press and HOLD the Program
button while reinserting
the battery pack.
Keep holding the button for 30
seconds until the lock beeps
and the status LED lashes red.
Keypad
Lock
button
Keyway
SmartKey
tool hole
3 Press the Program button
once more. When the LED
lashes green and you
hear one beep, the lock
has been reset.
4 Perform the door handing process again
to teach the lock the orientation of the
door, and add user codes to your lock.
A complete SmartCode 909 Programming and
Troubleshooting Guide is available at www.kwikset.com.
3
REMOVE LEVER AND COVER FROM LEVER ASSEMBLY
ENLEVEZ LE LEVIER ET LE COUVREZ DE L’ASSEMBLEE DE LEVIER
QUITE LA MANIJA Y CUBRALA DE UNIDAD DE LA MANIJA
REMOVA A MAÇANETA E A TAMPA DO CONJUNTO DA MAÇANETA.
将水平把手和盖板从把手组中拆下
將水平把手和蓋板從把手組中拆下
1
2
B
A
C
1
1
2
2
3
3
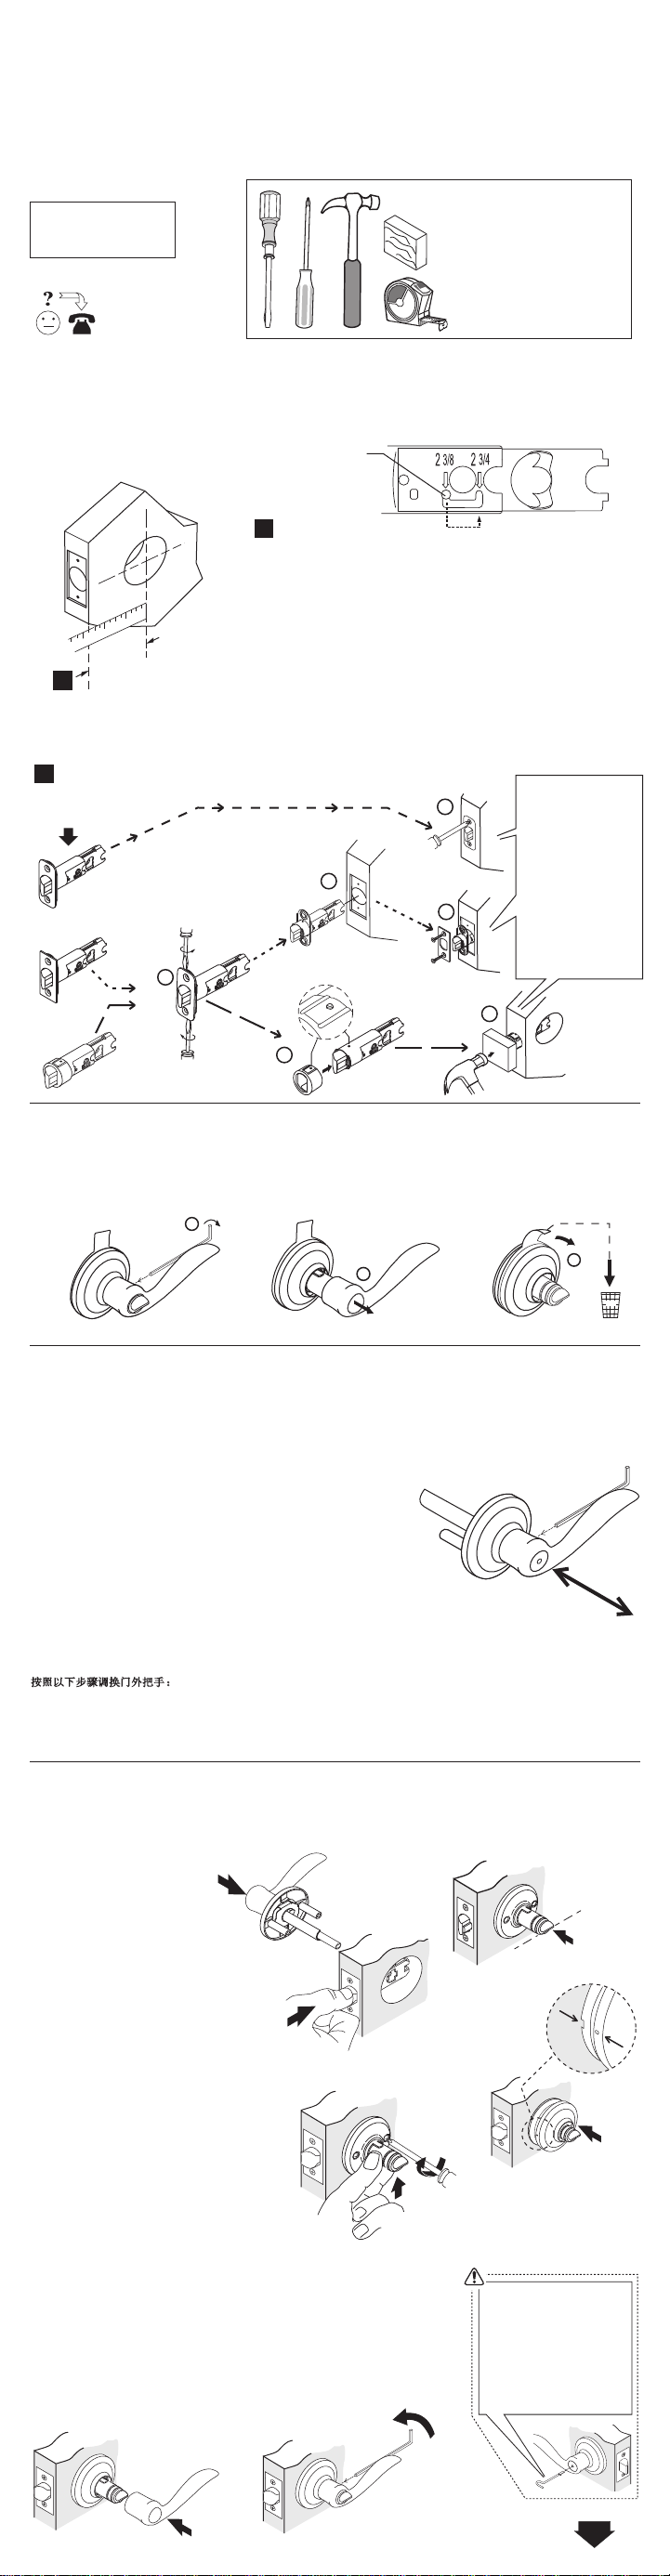
PREPARE LATCH AND INSTALL
PRÉPAREZ LE VERROU ET INSTALLEZ-LE
PREPÁRESE EL PASADOR E INSTÁLELO
PREPARE O TRINCO E INSTALE
准备并安装锁栓
準備並安裝鎖栓
Pin
Goupille
Clavija
Pino
弹簧销
彈簧銷
If backset of door measured 2-3/4" (70mm), adjust latch as follows: Grasp the spring pin and
move it to the 2-3/4" slot.
Si l’écartementde la porte mesuré est de 2-3/4" (70 mm), régler le verrou comme suit : Se
saisir de la goupille-ressort et
déplacer la goupille-ressort à l'encoche de 2-3/4" (70mm)
Si la distancia al centro de la puerta que se midió es de 2-3/4” (70 mm), ajuste el pasador de la
siguiente manera. Agarre la clavija del resorte y mueva la clavija del resorte hasta la ranura de
2-3/4" (70mm)..
Caso seja necessária uma distância de 2-3/4 pol. (70 mm) do buraco da chave, ajuste o
trinco da seguinte maneira: egue o pino de mola e mova-o para a ranhura de 2-3/4 pol. (70
mm).
若锁心距离为 2-3/4 (70mm),请按照以下步骤调整锁栓: 抓住弹簧销,
将它移到 2-3/4" 槽中。
若鎖心距離為 2-3/4 (70mm),請依以下步驟調整鎖栓:
抓住彈簧銷,將它移到 2-3/4" 槽中。
Make sure that slant of latch bolt
faces in the direction that the door
closes.
Assurez-vous que le biseau du
pêne est orienté du côté de la
fermeture de la porte.
Asegúrese de colocar el chaflán
del pestillo del pasador en la
dirección de cierre de la puerta.
Assegure-se de que a
chanfradura do ferrolho do trinco
esteja voltada para o lado de
fechamento da porta.
确认锁舌的斜面应朝着门关
上的方向。
確認鎖舌的斜面應朝門關上
的方向。
OPTIONS
OPTIONS
OPCIONES
OPÇÕES
各种安装方式
各種安裝方式
MEASURE
MESURER
MEDIR
MEDIR
测量方法
措施
Keep handy for emergency unlocking.
將開鎖針備妥,
以備緊急開鎖之用。
mantenha à mão para destravar em
caso de emergência.
将开锁针放在手边,
以备紧急开锁之用。
Mantenga cerca, para abrir en casos
de emergencia.
Ayez commode en cas de
déverrouillage d'ugence.
2-3/8" (60mm)
or ou ó
ou 门 門
2-3/4" (70mm)
Switch lever on exterior assembly as follows.
1. Insert wrench into set screw hole and loosen set screw.
2. Remove lever, replace with other lever and retighten set screw.
Échangez le levier, de l'assemblée extérieure comme suit.
1. Insérez l'outil dans le trou de vis de réglage et détachez la vis
de réglage 2. Enlevez le levier, le remplacez avec l'autre levier et
serrez la vis de réglage.
Intercambie la manija de la unidad exterior,según lo demostrado.
1. Inserte la llave en el agujero del tornillo de presión y afloje el tornillo
de presión. 2. Quite la manija, substitúyala por la otra manija apriete el tornillo de presión.
Mude a maçaneta do conjunto exterior conforme mostrado.
1. Insira a ferramenta no orifício do parafuso de fixação e afrouxe-o.
2. Retire a maçaneta, substitua-a pela outra e reaperte o parafuso de fixação.
按照以下步骤调换门外把手:
1. 把扳手插进固定螺丝孔,松开螺丝。 2. 将把手拆下,换上另一只把手,然后重新拧上固定螺丝
。
依照以下步驟調換門外把手:
1. 把扳手插進止付螺絲孔,鬆開螺絲。2. 將把手拆下,換上另一支把手,然後重新鎖上止付螺絲
。
INSTALL EXTERIOR & INTERIOR ASSEMBLIES
INSTALLEZ ASSEMBIES EXTÉRIEUR ET INTÉRIEUR
INSTALE ASSEMBIES EXTERIOR Y INTERIOR
INSTALE OS CONJUNTOS EXTERIOR E INTERIOR
安装门内及门外把手
安裝門內及門外把手
4
Push latch to insert lever.
Appuyez sur le pêne pour insérer le levier.
Presione el pestillo para insertar la manija.
Empurre o ferrolho para inserir a maçaneta.
压入锁栓,装上把手
壓入鎖栓,裝上把手
Snap on cover.
Installez la couverture.
Instale la cubierta.
Instale a cobertura.
放上蓋板並卡緊
。
放上蓋板並卡緊。
Tighten set screw to secure lever.
Apriete el tornillo de presión, para asegurar la manija.
Serrez la vis de réglage, pour fixer le levier.
Aperte o parafuso de fixação para prender a maçaneta.
拉紧固定螺钉。
拉緊固定螺釘
。
Install lever.
Installez le levier.
Instale la manija.
Instale a maçaneta.
装上把手
。
裝上把手。
3
4
7
Continued
1
2
Push up on assembly until exterior lever is level,
while tightening mounting screws.
Soulevez de l'assemblée jusqu'à ce que le levier
extérieur soit niveau, tandis que serrant des vis
de support.
Empuje hacia arriba en el montaje hasta que la
manija exterior es nivel, mientras que apretando
los tornillos de montaje.
Empurre o conjunto para cima até que a maçaneta
exterior esteja nivelada, enquanto aperta os parafusos
de montagem.
将锁组提高,使门外把手保持水平,同时将固定螺丝拧
。
將鎖組提高,讓門外把手成水平,同時將固定螺絲鎖緊。
2
3
TRASH
1
FOR LEFT HAND DOORS - ONLY
POUR DES PORTES DE MAIN GAUCHE - SEULEMENT
PARA LAS PUERTAS DE LA MANO IZQUIERDA - SOLAMENTE
PARA PORTAS DE MÃO ESQUERDA APENAS
仅适用于在门左边安装
僅適用於在門左邊安裝
IMPORTANT INSTALLATION INSTRUCTIONS
INSTRUCTIONS D'INSTALLATION IMPORTANTES
IMPORTANTES INSTRUCCIONES DE INSTALACIÓN
INSTRUÇÕES IMPORTANTES DE INSTALAÇÃO
重要安装指南
重要安裝指示
Required tools
Outils nécessaires
Herramientas requeridas
Ferramentas necessárias
所需工具
需要的工具
1-800-327-5625
USA and CANADA
www.kwikset.com
LEVER - PRIVACY & PASSAGE
WITH 6-WAY LATCH
44594 / 01 CP
6
5
1
3
4 5
2-3/8" 60mm
2-3/4" 70mm
2-1/4"
(
57mm
)
1-3/4"
(
44mm
)
1-3/8"
(
35mm
)
2
Select desired backset
Choisissez l'écartement désiré
Seleccione la distancia al centro deseado
Marque os orifícios na porta
在门上画出钻孔记号
在門上畫出鑽孔記號
6
1"
25mm
1"
(25mm)
1"
25 mm
1"
(25mm)
2-3/8" (60mm)
or ou ó
ou 门 門
2-3/4" (70mm)
BACKSET
ÉCARTEMENT
DISTANCIA AL CENTRO
DISTÂNCIA DE BROCA
后置距离
鎖心距離
À l'aide d'une mèche-scie pour trou de 2-1/8" (54 mm) de diamètre, percez à partir d'un côté jusqu'à
ce que les dents de la scie apparaissent de l'autre côté puis, pour éviter d'avoir des échardes,
finissez à partir de l'autre côté.
Usando una broca con sierra para orificio de 2-1/8" (54mm) de diámetro, taladre de unlado hasta que
la punta de la brocasalga al otro lado, luego complete el orificio del otro lado para prevenir astillas.
Usando uma broca de serra para orifícios de 2-1/8 pol. (54 mm), perfure de um lado até que a ponta
da broca saia do outro lado. Então, conclua o orifício do outro lado para evitar lascas.
用直径为2-1/8" (54mm)的孔钻从门的一边钻入,为防门板破裂,钻头将穿
透时从另一面完成钻孔。
Using a 2-1/8" (54mm) diameter hole saw,
drill from one side until the point of drill just
breaks through, then complete hole from the
other side to prevent splintering.
Drill hole 5/8" (16mm) deep.
Percez un trou de 5/8" (16 mm) de profondeur.
Perfore un orificio de 5/8" (16mm) de profundidad.
Faça um orifício de 5/8 pol. (16 mm) de profundidade.
孔深 5/8" (16mm)。
鑽一個深 5/8" (16mm)。
Chisel out area until face plate sits flush and drill 3/32" (2mm)
diameter pilot holes for screws. Repeat for strike plate.
Creusez l'emplacement au ciseau à bois jusqu'à ce que la plaque
de recouvrement s'y encastre et soit de niveau avec l'épaisseur
ouchamp de la porte. Percez des trous de guidage de 3/32" (2
mm) de diamètre pour les vis. Répétez l'opération pour la gâche
Corte el área con el cincel hasta que la placa frontal se asiente al
ras y luego perfore orificios guía de 3/32" (2mm) de diámetro para
los tornillos. Repita para la placa del recibidor.
Selecione a distância desejada do buraco da chave.
凿出凹槽,直到固定板可以完全嵌入为止,然后再钻出直径
3/32" (2mm) 的定位孔,供拧入螺丝用。以同样方式凿出挡板
凹槽。
鑿出凹槽,直到固定板可以完全嵌入為止,然後再鑽出直徑
3/32" (2mm) 的導孔,供鎖螺絲之用。以同樣方式鑿出擋板凹
槽
。
WARNING: This Manufacturer advises that no lock can provide complete security by itself. This lock may be defeated by forcible or
technical means, or evaded by entry elsewhere on the property. No lock can substitute for caution, awareness of your environment, and
common sense. Builder’s hardware is available in multiple performance grades to suit the application. In order to enhance security and reduce
risk, you should consult a qualified locksmith or other security professional.
AVERTISSEMENT: Le fabricant tient à vous aviser qu'aucun verrou ne peut à lui seul offrir une sécurité complète. Ce verrou peut être
mis hors d'état par la force ou des moyens techniques ou être évité par l’utilisation d’une autre entrée sur la propriété. Aucun verrou ne peut
remplacer la surveillance de votre environnement et le bon sens. La quincaillerie pour le constructeur est offerte selon différents grades de
performance pour différentes applications. Afin d'augmenter la sécurité et de réduire le risque, vous devriez consulter un serrurier qualifié ou un
autre professionnel de la sécurité.
ADVERTENCIA: Este Fabricante hace saber que no hay cerrojos que puedan proporcionar completa seguridad por sí mismos. Puede
hacerse que falle este cerrojo forzándolo o utilizando medios técnicos, o puede evadirse entrando por otra parte de la propiedad. No hay
cerrojos que puedan hacer de sustitutos para la precaución, el estar al tanto del entorno, y el sentido común. Pueden obtenerse piezas de
ferretería de constructor con diversos grados de rendimiento para ajustarse a la aplicación. Para realzar la seguridad y reducir los riesgos,
debe consultar con un cerrajero capacitado u otro profesional de seguridad.
AVISO: O fabricante adverte que nenhuma fechadura oferece, por si só, segurança completa. Esta fechadura pode ser aberta por
arrombamento ou meios técnicos, ou evitada por meio de outro ponto de entrada na propriedade. Nenhuma fechadura é capaz de substituir a
cautela, a conscientização do ambiente e o bom senso. Ferragens para construtores estão disponíveis em vários níveis de desempenho para
atender à aplicação específica. Para aumentar a segurança e reduzir o risco, consulte um serralheiro ou outro profissional em segurança
qualificado.
警告: 本制造商要提醒您,没有任何锁能绝对保证安全。外人可能用暴力或技术手法使该锁失效,或是从建筑物
的其它地方入侵。不管是哪一种锁,都不能取代谨慎、常识以及对周围环境保持警惕。制造商的产品有多种不同的功能
等级,能适合不同的需要。为了巩固安全,降低风险,您应该咨询合格的锁匠或其它专业保安人员的意见。
警告: 製造商要提醒您,沒有任何鎖能保證絕對的安全。外人可能用暴力或技術手法使這個鎖失效,或是從建築
物的其他地方入侵。不管是哪一種鎖,都不能取代謹慎、對周遭環境保持警覺以及常識。製造商的產品有多種不同的功
能等級,能適合不同的需要。為了鞏固安全,降低風險,您應該諮詢合格鎖匠或其他專業保全業者的意見。
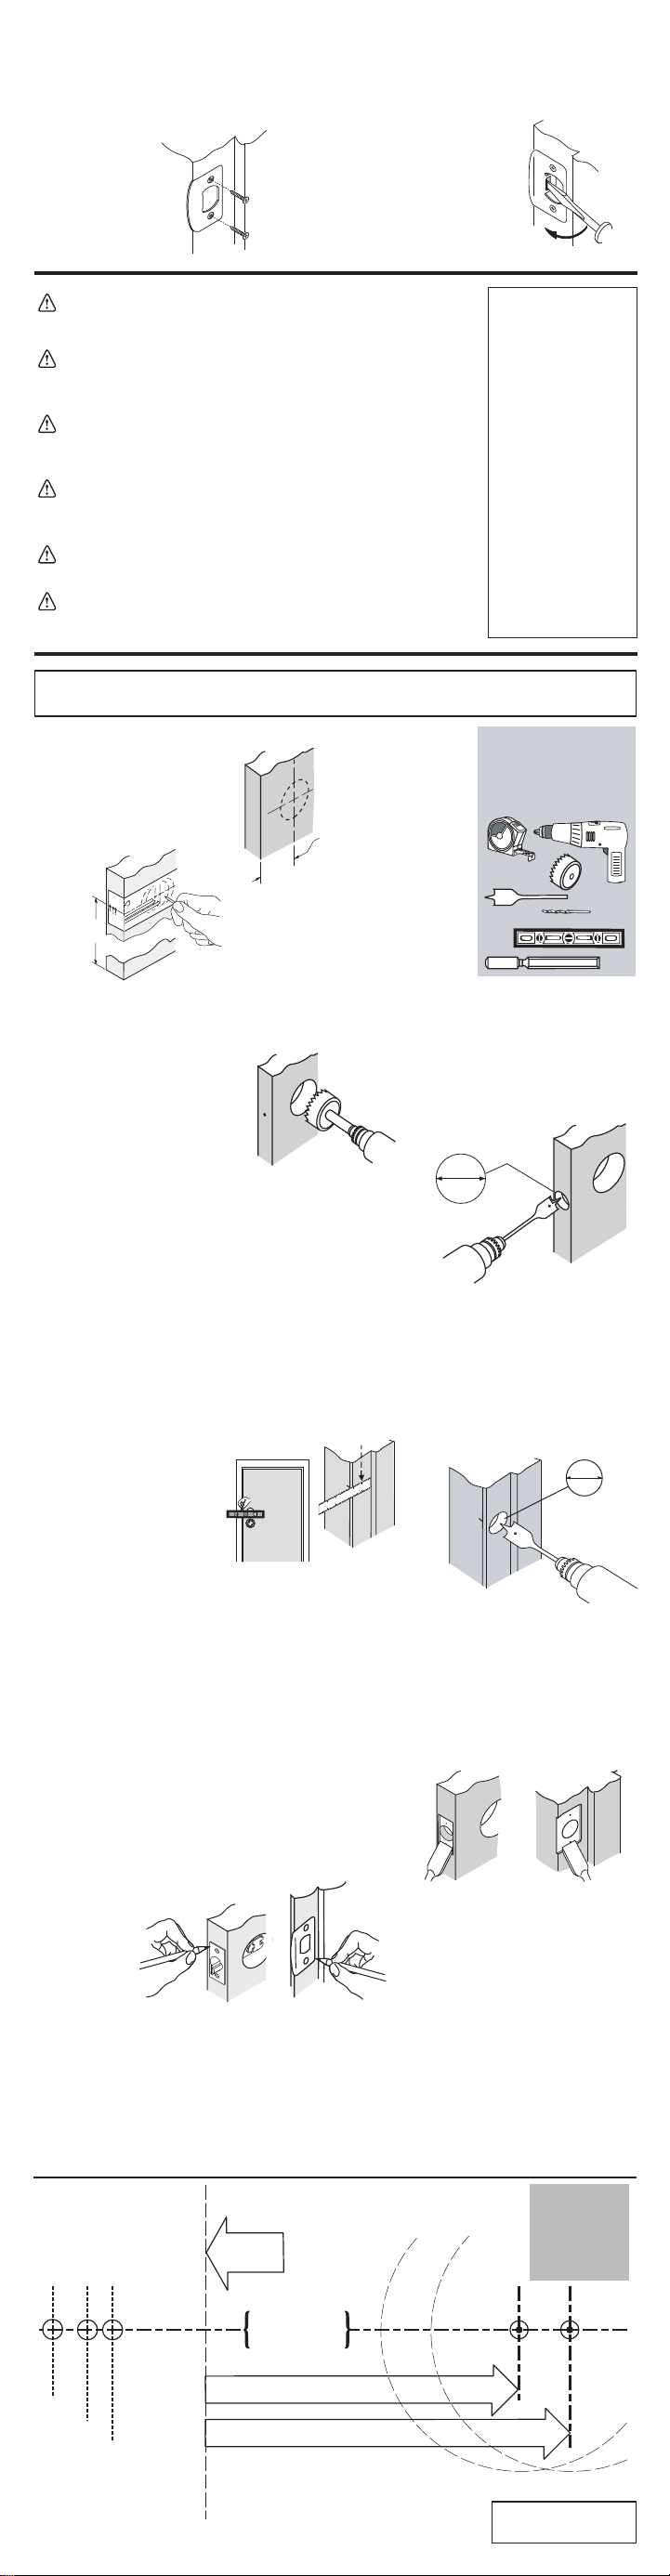
BACKSET
ÉCARTEMENT
DISTANCIA AL CENTRO
DISTÂNCIA DE BROCA
后置距离
鎖心距離
Centerline
Ligne médiane
Linea central
Linea central
中心线
中心線
FOLD OVER
PLIER
DOBLE
DOBRAR
折叠
摺線
• FACE • FACE • FRENTE • FRENTE •
门正面
•
門面
• EDGE • CHAMP • BORDE
• BORDA •
门边
•
門邊
TEMPLATE
GABARIT
PLANTILLA
GABARITO
安装模板
紙 規
Drill Hole in Door Face
Percez un trou dans la face avant de la porte
Perfore el orificio en la cara de la puerta
Faça um orifício na face da porta
在门面上钻孔
在門面鑽孔
Drill Hole in Door Edge
Percez un trou dans le rebord de la porte
Perfore el orificio en el canto de la puerta
Faça um orifício na borda da porta
在门边钻孔
在門的側面鑽孔
Mark Hole for Strike Plate
Marquez le Trou pour la Gâche
Marque el Orificio para la Placa del Recibidor
Marque o orifício para a testa da fechadura
为锁扣面板做画线
畫出擋板鑽孔的位置
Drill Strike Hole
Percez le Trou pour la Gâche
Perfore el Orificio del Recibidor
Faça o orifício da testa da fechadura
钻锁扣盒孔
鑽擋板孔
Face and Strike Plate Cutouts
Découpes pour La Plaque de Recouvrement et La Gâche
Aberturas de la Placa Frontal y del Recibidor
Recortes da placa frontal e da testa da fechadura
面板及锁扣面板槽
鑿出鎖栓固定板和擋板的凹槽
Mark Holes on Door
Marquez les Trous sur la Porte
Marque los Orificios en la Puerta
Marque os orifícios na porta
在门上为孔画线
在門上畫 出鑽孔記號
用一支直徑 2-1/8" (54mm) 的挖孔鋸從門的一面鑽孔,直到鑽頭尖部剛好
穿透門板為止,然後從另一面往回挖,以避免孔邊碎裂。
DOOR DRILLING • PERÇAGE DE LA PORTE • PERFORACÍON DE PUERTAS
• FUROS PERFURANDO •
在门上钻孔
•
在門上鑽孔
Privacy & Passage Lever
44594 / 01
CP
For assistance or warranty
information,
USA and CANADA:
Call
1-800-327-5625
or visit www.kwikset.com
Pour de l'aide ou des
informations sur la garantie,
USA et CANADA:
veuillez appeler le
1-800-327-5625
ou visiter www.kwikset.com
Si desea ayuda o información
sobre la garantía,
USA y CANADA:
llame al 1-800-327-5625
o visite www.kwikset.com
Para assistência ou informações
sobre garantia,
EUA e CANADA:
Ligue para 1-800-327-5625
ou visite o site www.kwikset.com
如有疑问,请联络当地经销商或
当地百得分公司
如有疑問,請聯絡當地經銷商或
當地百得分公司
38"
(965mm)
C
L
Extend mark across jamb to door stop. Locate center of
strike hole by measuring back from door stop, 1/2 the
thickness of door.
Continuez la marque sur le chambranle jusqu'à la porte.
Trouvez le centre du trou pour la gâche en mesurant sur
e champ de la porte à la moitié de l'épaisseur de celle-ci.
Extienda la marca a través del marco hasta el parador de la puerta. Ubique el centro del orificio del
recibidor marcando desde el parador la mitad del espesor de la puerta.
Continue a marca ao longo do marco até o batente. Localize o centro do orifício da testa da fechadura
medindo, a partir do batente, a metade da espessura da porta.
延伸标记, 越过门柱到达门止, 从门止往回量, 至门板厚度的1/2为扣
板孔。
將記號從門柱延長至門擋。從門擋往回量,在門板 1/2 厚度的地方做記號
,作為鑽孔的中心點。
1"
25mm
3/32"
(2mm)
Required tools:
Outils nécessaires:
Herramientas requeridas:
Ferramentas necessárias
所需工具
需要的工具
Align latch face plate on door edge and draw outline.
Repeat for strike plate on door jamb.
Alignez la plaque de
recouvrement entourant le
pene sur le bord de la
porte et tracez le pourtour.
Répétez I'opération pour
I'emplacement de la
gâche sur le chambranele de la porte.
Alinee la placa frontal del pasador en el borde de la puerta y marque su silueta. Haga lo mismo
con la placa del recibidor en el marco de la puerta.
Alinhe a placa frontal do ferrolho na borda da porta e marque o seu contorno. Faça o mesmo com
a testa da fechadura e o marco da porta.
将插销面板放在门边画出边沿线, 在门柱上同样画出锁扣面板线条。
將固定板貼緊門邊,描出輪廓 同樣地,在門柱上畫出擋板輪廓。
Copyright © 2010 Kwikset Corporation
5
INSTALL STRIKE
INSTALLEZ LA GÂCHE
INSTALE LA PLACA DEL RECIBIDOR
INSTALE A TESTA DA FECHADURA
安装挡板
安裝擋板
Adjust tang as needed.
Ajustez la languette autant que de besoin.
Ajuste la langüeta.
Ajuste a lingüeta conforme necessário.
根据需要调整卡舌
視需要調整卡榫