Loading ...
Loading ...
Loading ...
i o
nstalhng Your Refrigerator
These instructions were provided to aid you in tile installation of your unit. Amana cannot be responsible fbr improper installation
How do I measure an
opening to insure
proper fit?
A V," of air space should be provided
for the top and back of tile unit to allow
for proper air circulation. When
installing your unit, measure carefiAly.
Subflooring or floor coverings (i.e.
carpet, tile, wood floors, rugs) n'my
make your opening smaller than
anticipated.
Some clearance may be gained by using
the le\ cling procedure under How to
Leve[ }b_lr R@'igerator.
tMPORTAN_ If Unitis to be
installed into a recess where top Of
unit is completely covered, Use
dimensions from floor to top of
binge cap to Verify proper
clearance.
How to Transport Your Unit
Follow these tips when moving the unit to final location:
NEVER transport unit on its side If an upright position is not possible, lay unit on its back.
Allow unit to sit upright for approximately 30 minutes prior to plugging unit in to assure oil
remm to the compressor, Plugging unit in immediately may cause damage to internal parts.
Use an appliance dolly when moving unit ALWAYS t_/ck unit from its side NEVER flora its
f?ont or back.
Protect outside finish of unit during transport by wrapping cabinet in blankets or inserting
padding between the unit and dolly.
Secure unit to dolly firn'dy widL straps Thread straps through handles when possible. DO NOT
overtighten. Overtightening restraints may
dent or damage outside finish.
Now to Se|eet the Best Location
Observe these points when choosing the final location [br your unit:
DO NOT install refrigerator near oven, radiator, or other heat source. If not possible, shield unit
with cabinet material.
DO NOT install where temperature falls below 55°F (13°C) Malflmction may occur at this
temperature
Make sure floor is level, If floor is not level, shim rear wheels of unit with a piece of plywood
or other shim material
To assure proper door closure, x erify that the unit is leveled with a %" tilt to the back.
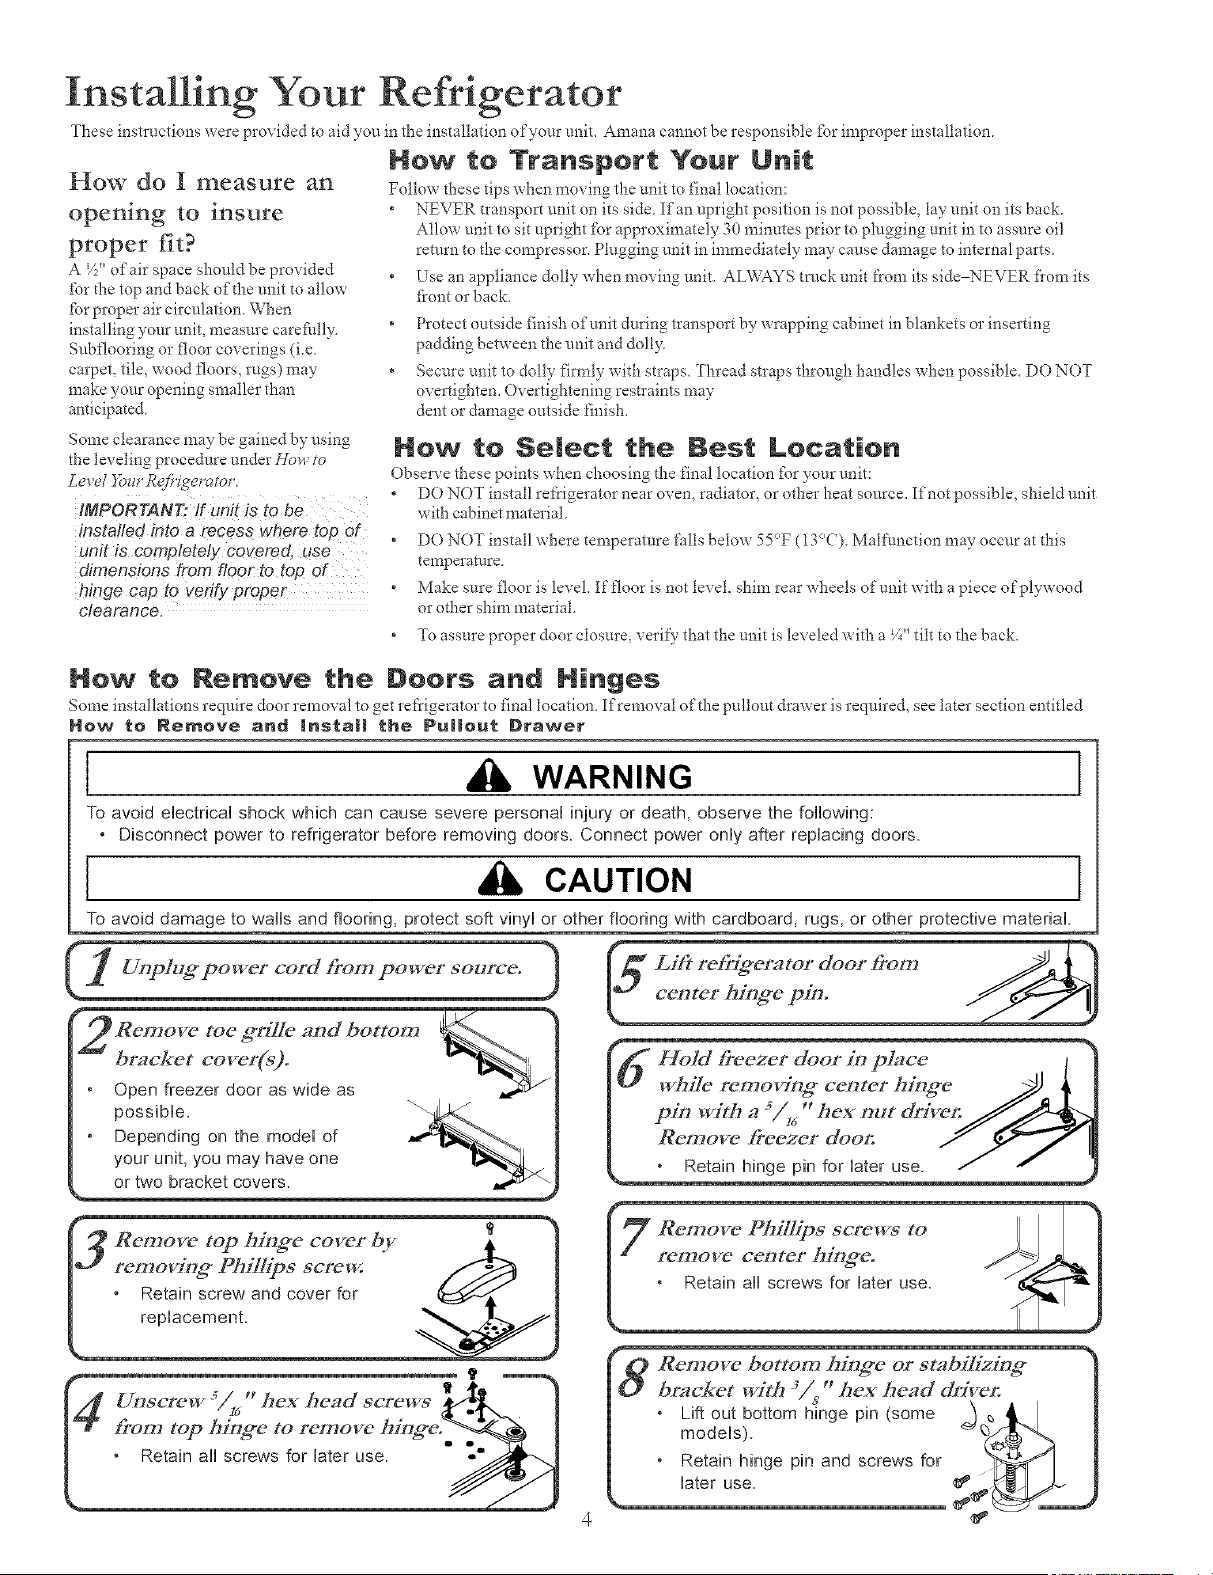
How to Remove the Doers and Ninges
Some installations reqniIe door removal to get refrigerator to final location Ifremo\ al of the pullout drawer is required, see later section entitled
Now te Remove and Inata|| the Pu||out Drawer
I WARNING I
To avoid electrical shock which can cause severe personal injury or death, observe the following:
• Disconnect power to refrigerator before removing doors. Connect power only after replacing doors.
I CAUTION I
To avoid damage to wals and flooring, protect soft vinyl or other flooring with cardboard, rugs, or other protective material.
toe ffrilIe and botton_
bracket cover(s)°
Open freezer door as wide as
possible.
Depending on the model of
your unit, you may have one
or two bracket covers.
==,,,,o, ,÷o], JA.
c,o,,,>io=cyo.
freezer door in place I h
rerr, cc=terhi. .e i !
witha54,"he==,tdri e,.
ow, ee=erdoo II
' Remove top hing*e cover by
removing_ Phillips screw.
Retain screw and cover for
replacement.
Remove bottom hinge or stabilizing*
bracket with 3in, _ hex head &'iven
* Lift out bottom hinge pin (some __
models). _ q
* Retain hinge pin and screws for
later use.
Loading ...
Loading ...
Loading ...