@@IIWIF'II"WIIIIWIll IWII_% W@II"
Ordering parts and accessories?
Questions about your features?
Ptease contact us with yore"model and serial numbe*:
Consumer A_il"s Depal"tment
Amana Appliances
2800 - 220th Tl"ail
Amana, Iowa 52204
Ph# 1(800)843o0304 in USA.
1(866)587-2002 au Canada
Intemet: http:ii www amana.com
Keep instructions for future reference.
Keep this manua! and your sales receipt together in a safe
31ace in case _ arranty sel-vice is required.
Part No. 12642702
Printed in U.S.A. 01/02
maintenanceinformation.
Compmeteregistrationcardandpromptlyreturn.Ifregistrationcardismissing,
calltheConsumerAffairsDepartment.
WarrantyservicemustbeperformedbyanauthorizedservicerAmanaalso
recommendscontactinganauthorizedservicerifserviceisrequiredafterwarranty
expiresTolocateanauthorizedservicer,call1-800-NAT-LSVC(1-800-628-5782),
orcall1{319)622-5511ifoutsidetheUSA Youmayalsocontactusonthewebat
www.amana.com.
WhencontactingAmana,pleaseprovidethefollowinginformation.Product
informationisontheserialplate,locatedonceilingoffreshfoodsection.
ModelNumber
'P'Number
Serial Number
Purchase Date
Dealer Name
Dealer Address
Dealer Phone
Amana offers long°term set_'ice
protection for this new refi-igerator.
Asure TM Extended Service Plan is
specially designed to supplement
Amaaa's smmg waranty. This plan
covers parts, labor, and travel charges_
Call 1(800)528-2682, or contact us at
_w'_oamana.com _br more in_brmation.
Before Calling Service :
][fsomething seems unusual, please
check "Trouble Shooting" section,
which is designed m help you solve
problems be_bre calling service.
This book is intended to show the
variety of t}atures that are available in
the product line. If yore retiigerator
does not have all the options that arc
ShOWn, rnany of these options may be
purchased by contacting the Consumer
Affairs Department. See contact
in*brmation on the cover of your
nlanLtal_
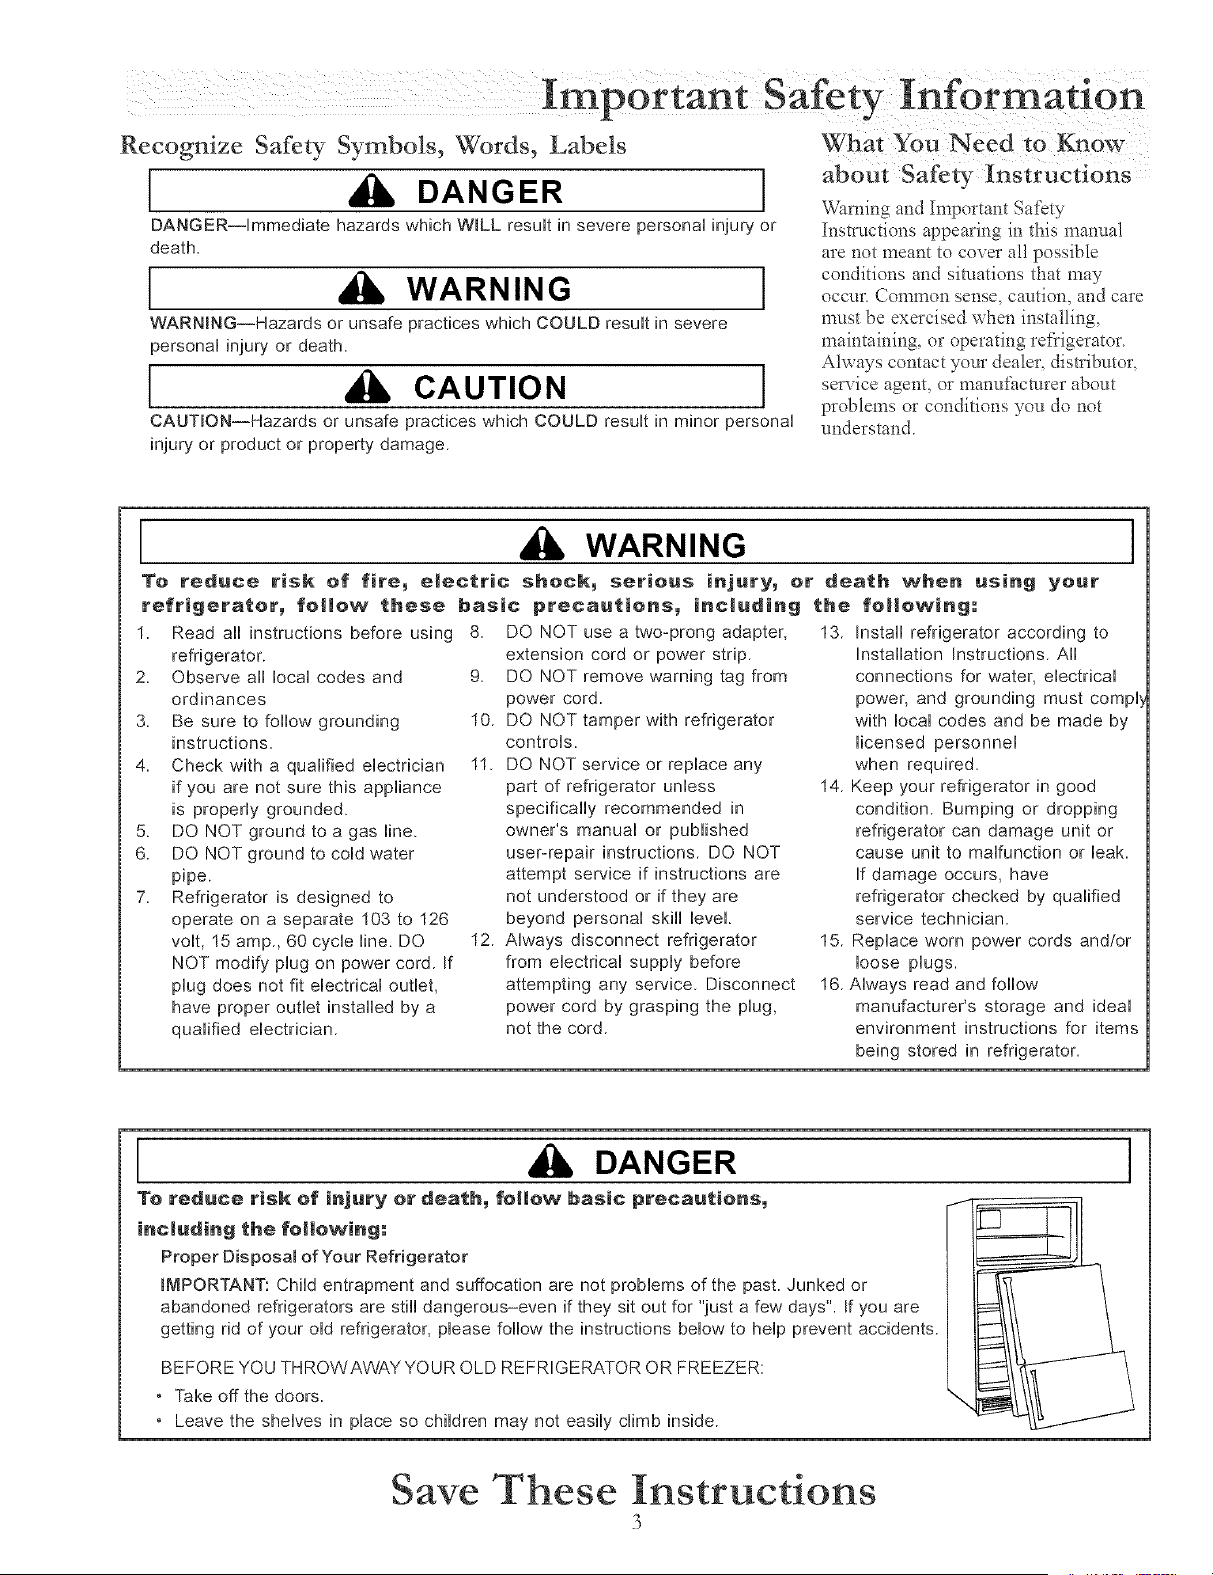
Recognize Safety Symbols, Words, Labels
[ DANGER ]
DANGER--rmmediate hazards which WiLL resuff in severe personN injury or
death
[ WARNING ]
WARNmNG--Hazards or unsafe practices which COULD resuff in severe
personN injury or death
[ CAUTION ]
CAUTION--Hazards or unsafe practices which COULD resuff in minor personN
injury or product or property damage
about Safety Instructions
Warning and Important Sat'cry
Instractions appearing in this manual
are not meant to cover all possible
conditions and situations that may
occur. Common sense, caution, and care
mast be exercised when installing,
maintaining, or operating refl'igeraor.
Always contact your dealer, distributor,
service agent, or manufi_cmrer about
problems or conditions you do not
undersmn&
WARNING
To reduce risk of fire_ electric sheck_ serious injury_ or death when using yeur
refrigerator_ follow these basic precautions_ including the following;
1. Read aii instructions before using
refrigerator.
2 Observe all local codes and
ordinances
3 Be sure to follow grounding
instructions
4 Check with a qualified electrician
if you are not sure this appliance
is properly grounded.
5. DO NOT ground to a gas line.
6 DO NOT ground to cold water
pipe.
7. Refrigerator is designed to
operate on a separate 103 to 126
volt, 15 amp, 60 cycle line. DO
NOT modify plug on power cord If
plug does not fit electrical outlet,
have proper outlet installed by a
qualified electrician
8. DO NOT use a two-prong adapter,
extension cord or power strip.
9. DO NOT remove warning tag from
power cord.
10. DO NOT tamper with refrigerator
controls.
11. DO NOT service or replace any
part of refrigerator unless
specifically recommended in
owner's manual or published
user-repair instructions. DO NOT
attempt service if instructions are
not understood or if they are
beyond personal skill level.
12. Always disconnect refrigerator
from electrical supply before
attempting any service. Disconnect
power cord by grasping the plug,
not the cord.
I
13. Install refrigerator according to
Installation Instructions. Aii
connections for water, electrical
power, and grounding must compl
with local codes and be made by
licensed personnel
when required.
14 Keep your refrigerator in good
condition. Bumping or dropping
refrigerator can damage unit or
cause unit to malfunction or leak
If damage occurs, have
refrigerator checked by qualified
service technician.
15. Replace worn power cords and!or
loose plugs.
16. Always read and follow
manufacturer's storage and ideal
environment instructions for items
being stored in refrigerator.
DANGER
To reduce risk of injury or death_ follow basic precautions_
inc|uding the fol|owing:
Proper Disposal of Your Refrigerator
IMPORTANT: Child entrapment and suffocation are not problems of the past. Junked or
abandoned refrigerators are still dangerous-even if they sit out for "just a few days". If you are
getting rid of your old refrigerator, please follow the instructions below to help prevent accidents.
BEFORE YOU THROWAWAY YOUR OLD REFRIGERATOR OR FREEZER:
• Take off the doors.
• Leave the shelves in place so children may not easily climb inside.
I
Save These Instructions
3
i o
nstalhng Your Refrigerator
These instructions were provided to aid you in tile installation of your unit. Amana cannot be responsible fbr improper installation
How do I measure an
opening to insure
proper fit?
A V," of air space should be provided
for the top and back of tile unit to allow
for proper air circulation. When
installing your unit, measure carefiAly.
Subflooring or floor coverings (i.e.
carpet, tile, wood floors, rugs) n'my
make your opening smaller than
anticipated.
Some clearance may be gained by using
the le\ cling procedure under How to
Leve[ }b_lr R@'igerator.
tMPORTAN_ If Unitis to be
installed into a recess where top Of
unit is completely covered, Use
dimensions from floor to top of
binge cap to Verify proper
clearance.
How to Transport Your Unit
Follow these tips when moving the unit to final location:
NEVER transport unit on its side If an upright position is not possible, lay unit on its back.
Allow unit to sit upright for approximately 30 minutes prior to plugging unit in to assure oil
remm to the compressor, Plugging unit in immediately may cause damage to internal parts.
Use an appliance dolly when moving unit ALWAYS t_/ck unit from its side NEVER flora its
f?ont or back.
Protect outside finish of unit during transport by wrapping cabinet in blankets or inserting
padding between the unit and dolly.
Secure unit to dolly firn'dy widL straps Thread straps through handles when possible. DO NOT
overtighten. Overtightening restraints may
dent or damage outside finish.
Now to Se|eet the Best Location
Observe these points when choosing the final location [br your unit:
DO NOT install refrigerator near oven, radiator, or other heat source. If not possible, shield unit
with cabinet material.
DO NOT install where temperature falls below 55°F (13°C) Malflmction may occur at this
temperature
Make sure floor is level, If floor is not level, shim rear wheels of unit with a piece of plywood
or other shim material
To assure proper door closure, x erify that the unit is leveled with a %" tilt to the back.
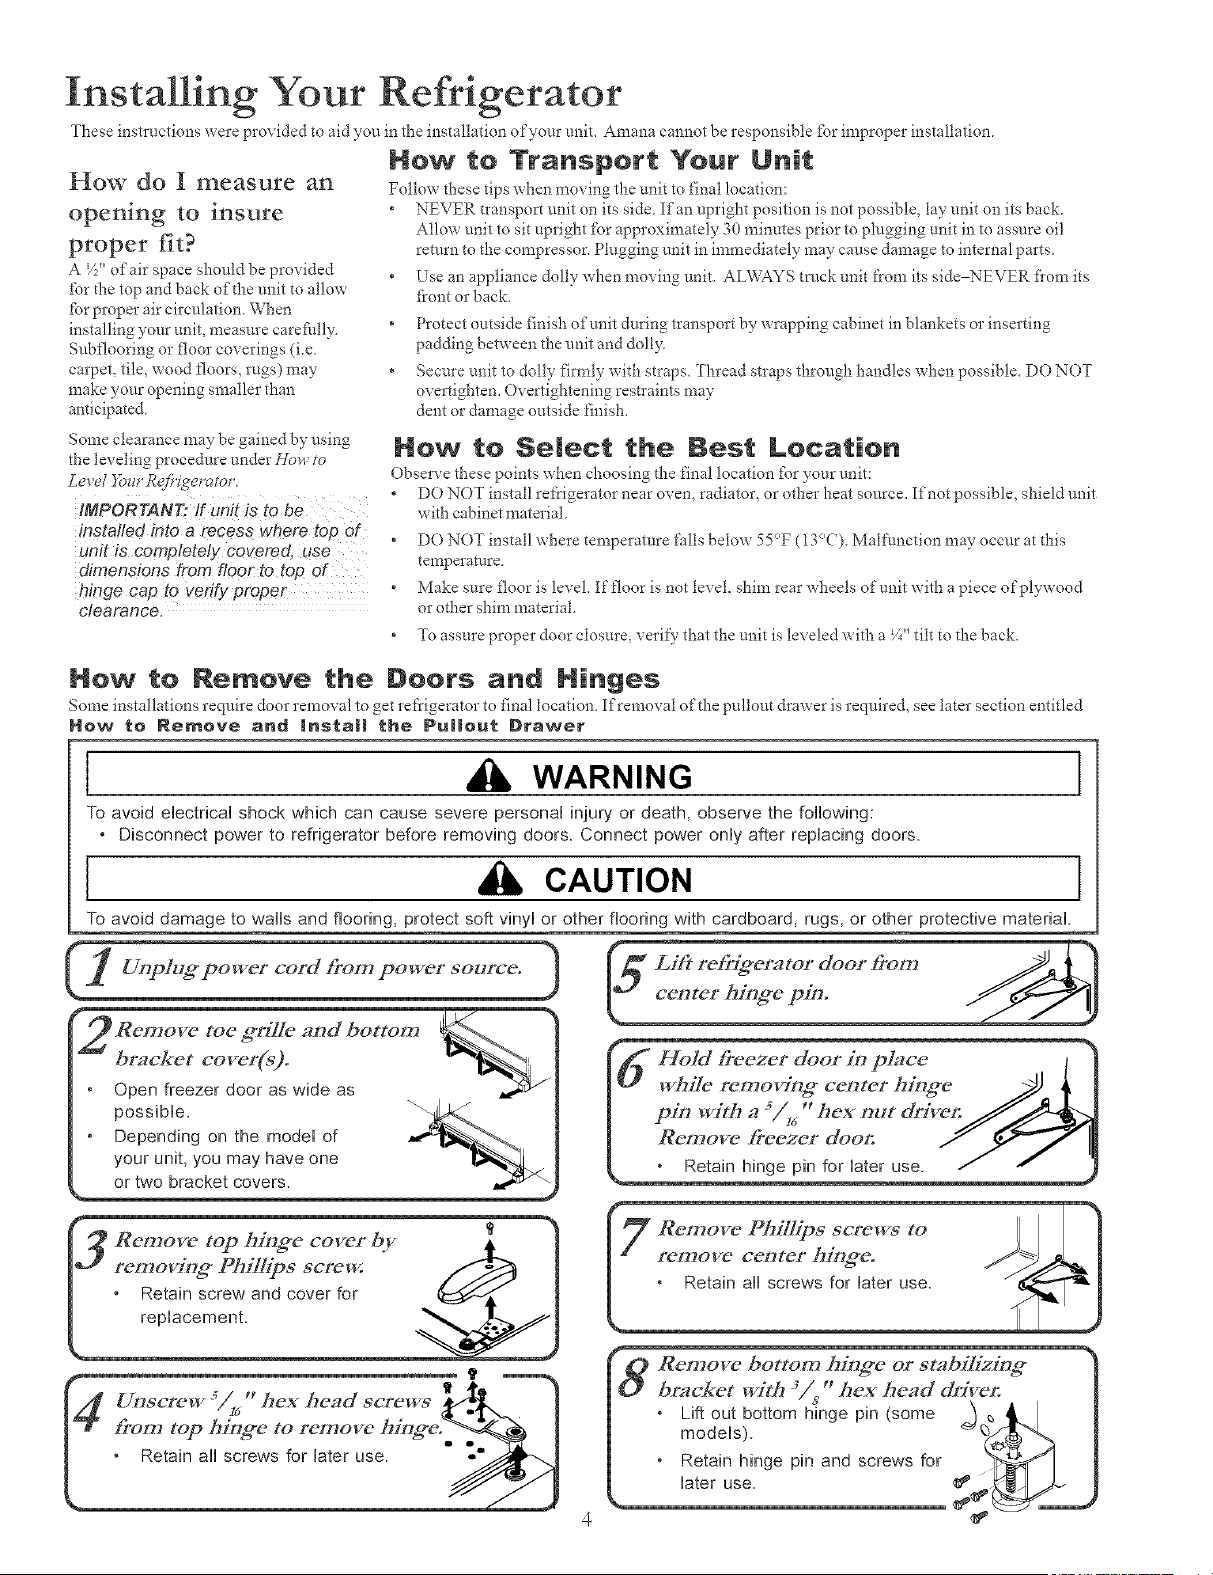
How to Remove the Doers and Ninges
Some installations reqniIe door removal to get refrigerator to final location Ifremo\ al of the pullout drawer is required, see later section entitled
Now te Remove and Inata|| the Pu||out Drawer
I WARNING I
To avoid electrical shock which can cause severe personal injury or death, observe the following:
• Disconnect power to refrigerator before removing doors. Connect power only after replacing doors.
I CAUTION I
To avoid damage to wals and flooring, protect soft vinyl or other flooring with cardboard, rugs, or other protective material.
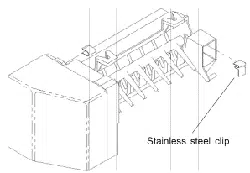
toe ffrilIe and botton_
bracket cover(s)°
Open freezer door as wide as
possible.
Depending on the model of
your unit, you may have one
or two bracket covers.
==,,,,o, ,÷o], JA.
c,o,,,>io=cyo.
freezer door in place I h
rerr, cc=terhi. .e i !
witha54,"he==,tdri e,.
ow, ee=erdoo II
' Remove top hing*e cover by
removing_ Phillips screw.
Retain screw and cover for
replacement.
Remove bottom hinge or stabilizing*
bracket with 3in, _ hex head &'iven
* Lift out bottom hinge pin (some __
models). _ q
* Retain hinge pin and screws for
later use.
i o
nstallmg Your Refrigerator
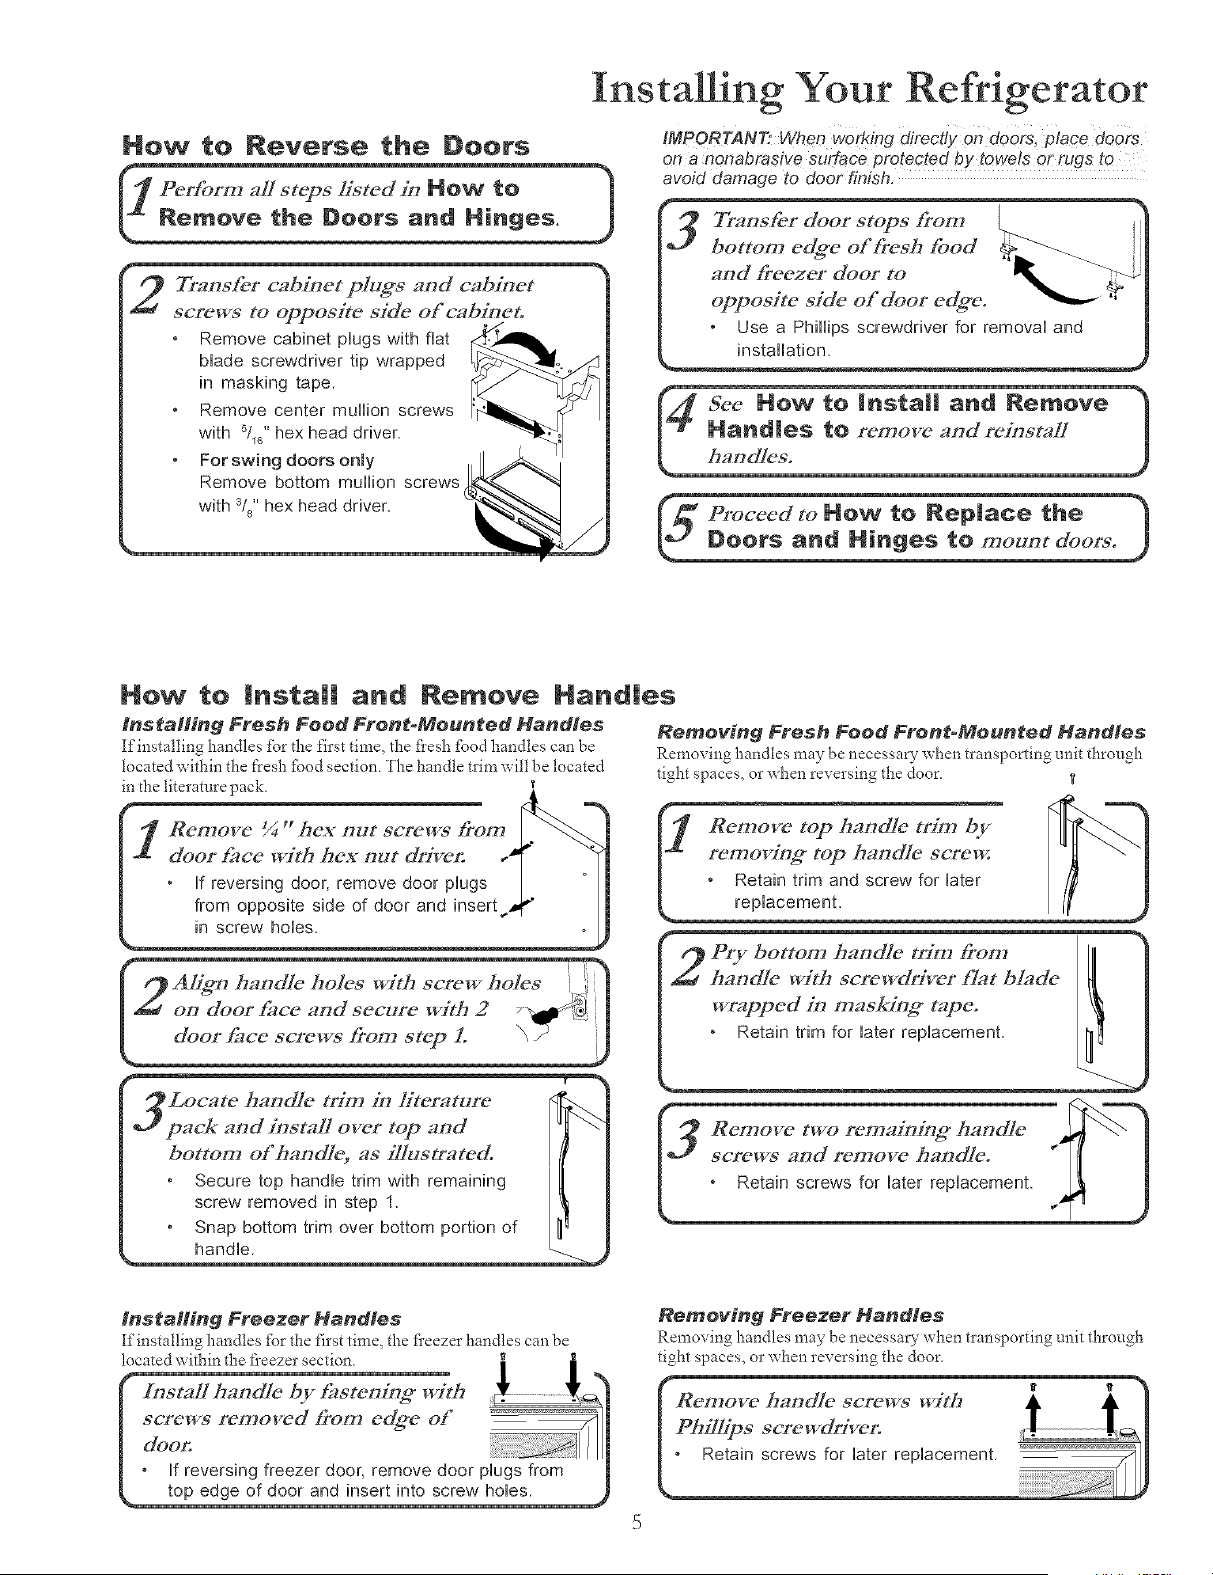
How to Reverse the Doors
rform aZ/steps listed in NOW to 1
move the Doors and Hinges. J
Transfer cabinet plugs anti cabinet
screws to opposite side of cabineto
Remove cabinet plugs with flat
Made screwdriver tip wrapped
in masking tape.
Remove center mullion screws
with Sl_" hex head driver.
For swing doors only
Remove bottom mullion screws
with si8"hex head driver.
IMPORTAN_ When working directly on doors, place doOrS
on a nonabrasive surface protected by towels or rugs to
avoid damage to door finish.
Transfer door stops from
bottom edffe of _'esh food
and _eezer door to
opposite side of door edffe.
Use a Phillips screwdriver for removal and
installation.
roceed to MOW to Rep|ace the )
oors and P|inge$ to mount doers. )
Now to
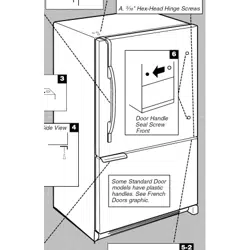
tnstaH#_g Fresh Food Front-Mounted Handles
If installing handles tbr the first time, the flesh £)od handles can be
located within the t'resh fbod section. The handle trim will be located
in the literature pack.
Insta|| and Nemove Nand|es
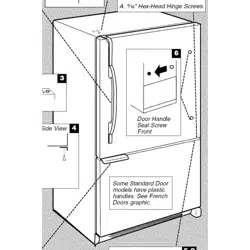
Refrlove 1//44_ hCX 17U[ screp/s _ron_
door _lce with hex out driver:
If reversing door, remove door plugs
in screw holes.
Removing Fresh Food Front-Mounted Handles
Remo\ ing handles may be necessary when transporting unit through
tight spaces, or when rex ersing the door _,
- s<
and/c B_m by
].L removinff top boodle screw. "_ _"
] ,Retain trim and screw for later /l[
replacemenL /_'
I2 Aligm haodle holes with screw holes
oo door _,ce a.d sec,,re with 2 _} ]
doo__"om step L \ /
Locate handle trim/17 Iitetvtmre
pack and install over top and
botton_ of haodlL5 as i[]ustrated
Secure top handle trim with remaining
screw removed in step 1
Snap bottom trim over bottom portion of t
handle
(,_ Re,,,o_"tworemaio,%;*ha.d_'_-,_--"]
screwsaod removeha_d!e. " [ ]
" Retainscrewsforiaterrepiacement _ J
installing Freezer Handtee
[finstalling handles tbr the first time, the fl'eezer handles can be
located within the fl'eezer section.
top edge of door and insert into screw hobs.
Removing Freezer Handles
Remo\'ing handles may be necessary _hen transporting t;nit through
tight spaces, or when reversing the door,
i o
nstallmg Your Refrigerator
How to Insta|| and Remove Hand|es _,,,/,_,,_+
Installing Fresh Food Side_Meunted Handles Removing Fresh Food Side-Mounted Handles
If installing hal_dles for the first time, the flesh food handles Removi_g hanctles may be necessa7 when transporting unit
can be located on the back of the refrigerator, through tight spaces, or when reversing the door.
inataHing Freezer Handles
Ifi_stallii_g hai_dIes fi)_the fi_*stdin< the fleeze_ ha_dles car_
be Ideated (:mthe back of the ret_igerator.
I nsgaI1 handle by t2tstening with
T-15 Torx _'* screws removed
from edg*e of doon
* Torx®is a registered trademark of Textron Inc.
Removing Freezer Handles
Remevi_g ha_dIes may be i_ecessary _ her_tm_sporti_-_grefit
th_ough tight spaces.
teer-isror,+"',crew,+o.',t%"._-'..I
installing and Removing Stainless Steel Front _Moun_ed Handles
Toavoid risk of serious personal injury from sharp edges, do not remov
front-mounted stainless steel handles from unit.
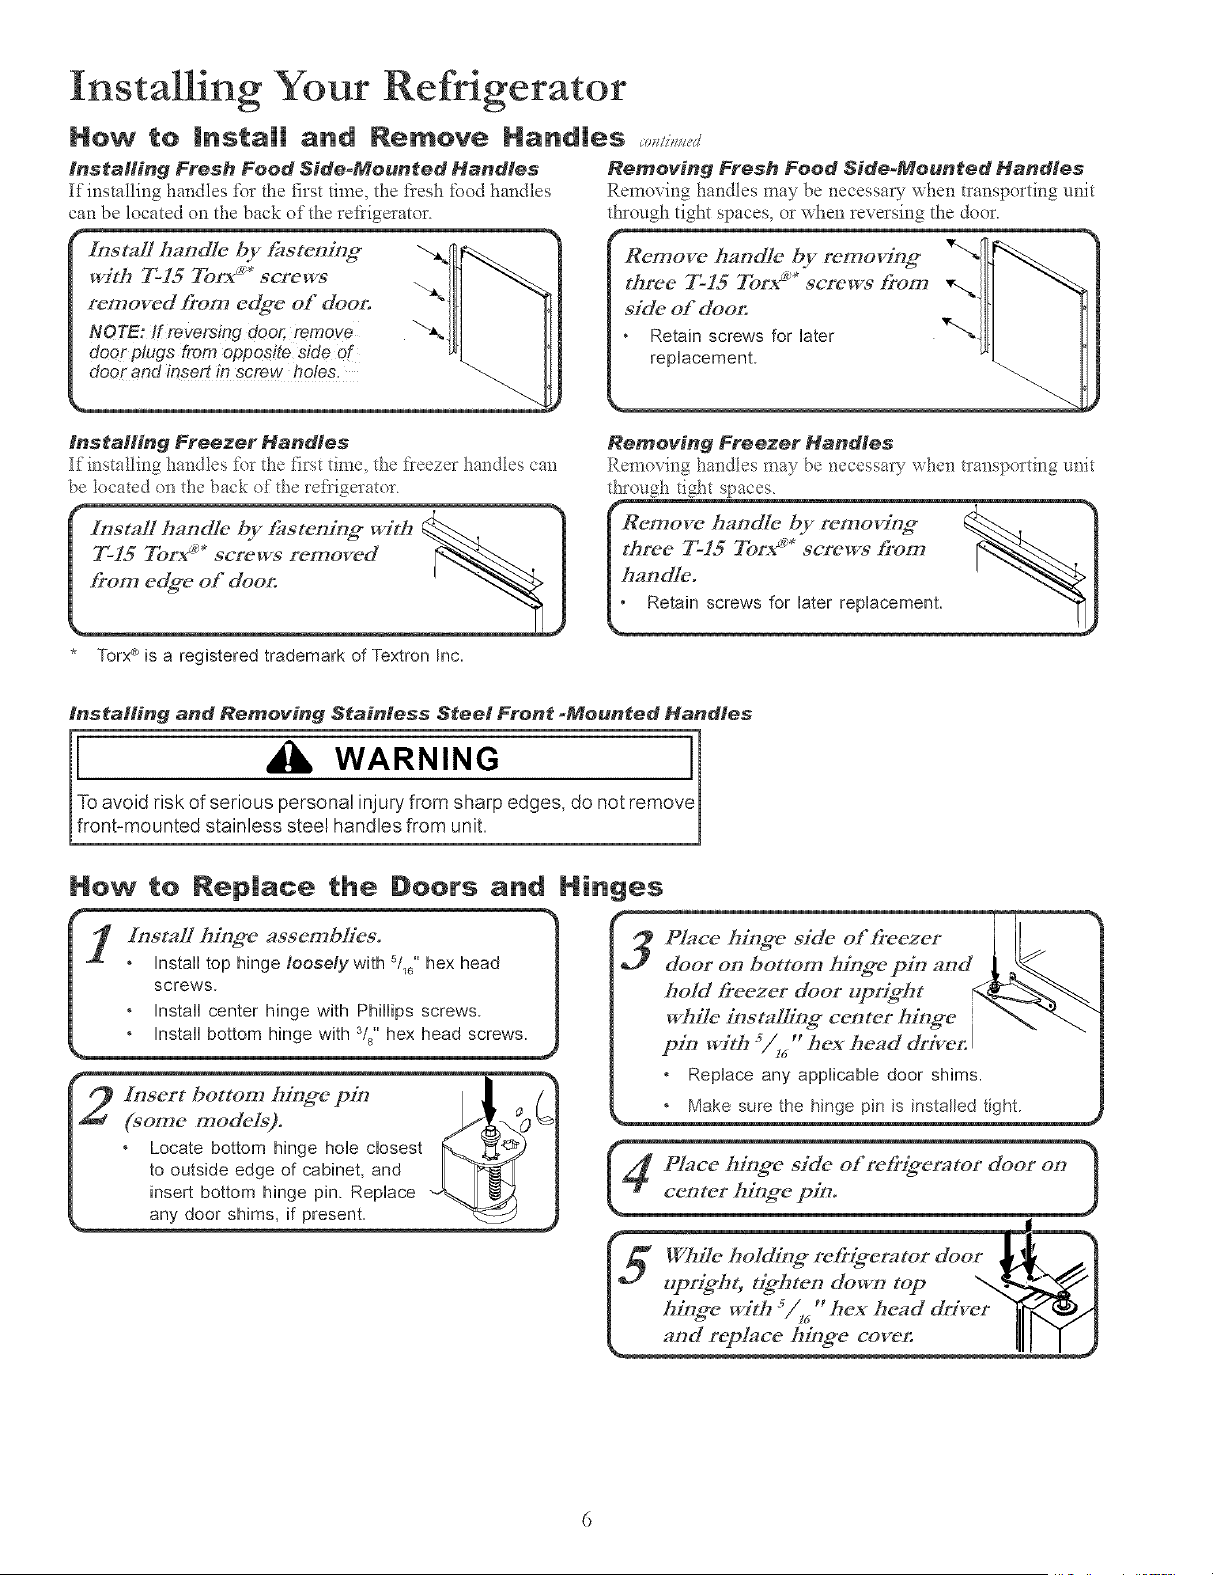
H_w te Rep|aee the Doors a_d Hinges
@ Insert bottom hir_#e p_ I _ /
#o,.e.,ode+_. p{<ov
* Locate bottom hinge hole closest _%___._
to outside edge of cabinet, and _-.l
insert bottom hinge pin. Replace ""_----.1
any door sh_ms,_fpresent. '_
4P/ace M;ng*e skle of re&ig*erator door on
center hing_e pin.
I"1 '_m'%®ht"tg*hte_ do_ top "<._!
I ++_.e_+,h%,."he_headd,+er _...+/_
i o o
nstalhng Your Refrigerator
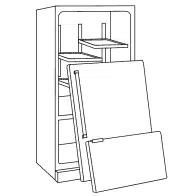
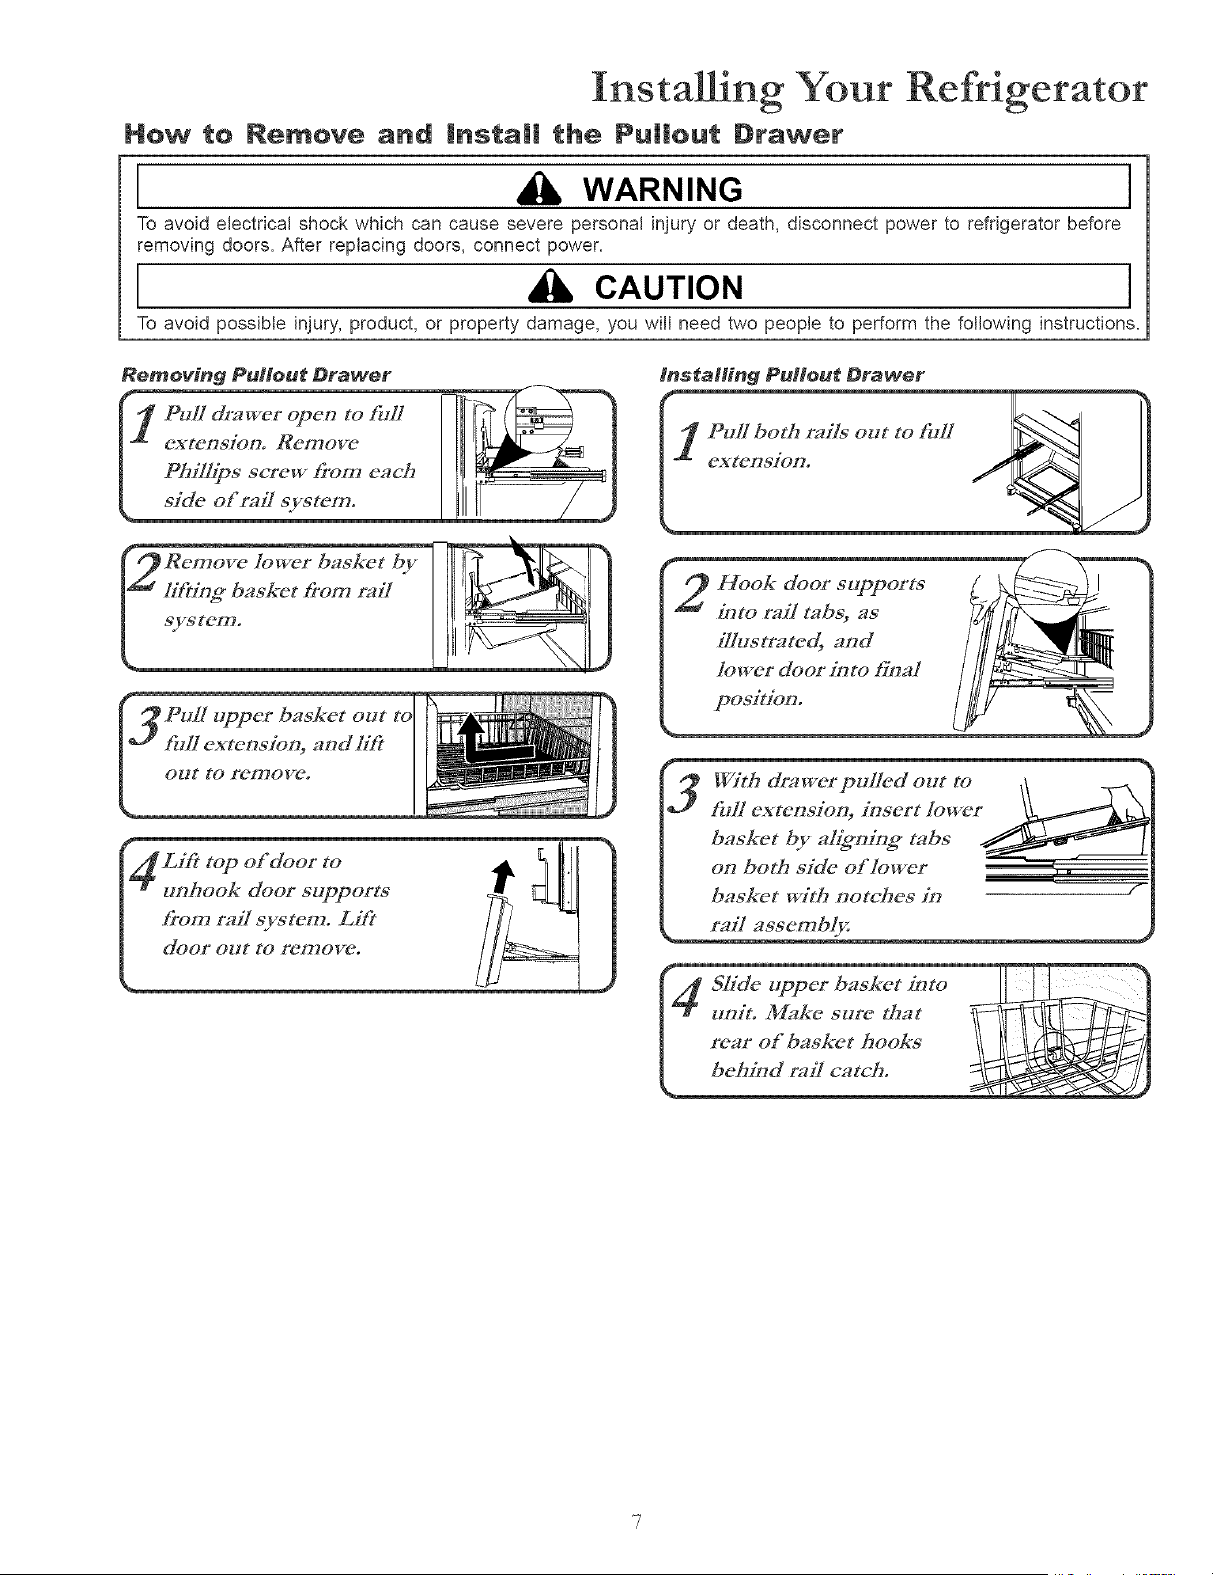
How to Remove and Instal! the Pu|lout Drawer
_, WARNING [
To avoid electrical shock which can cause severe personal injury or death, disconnect power to refrigerator before
removing doors. After replacing doors, connect power.
,a CAur,ON I
To avoid possible injury, product, or property damage, you will need two people to perform the following instructions.
_4 Lift t°p °f d°°: t° _]_ _ I"
unhook door supports __m
fro,',,:aU system. Lift ]_ _¢-
¢-
With d:awerpul/ed out to ,_\\ Z\
fullextension,insert/owet_jk_ -
basket by aHg*ni.g,* tabs
on both side of lower ', .
baskct wit_ notches in
! t,n:t.M.k.sttr.th.t_tI_L]_
nstallmg Your Refrigerator
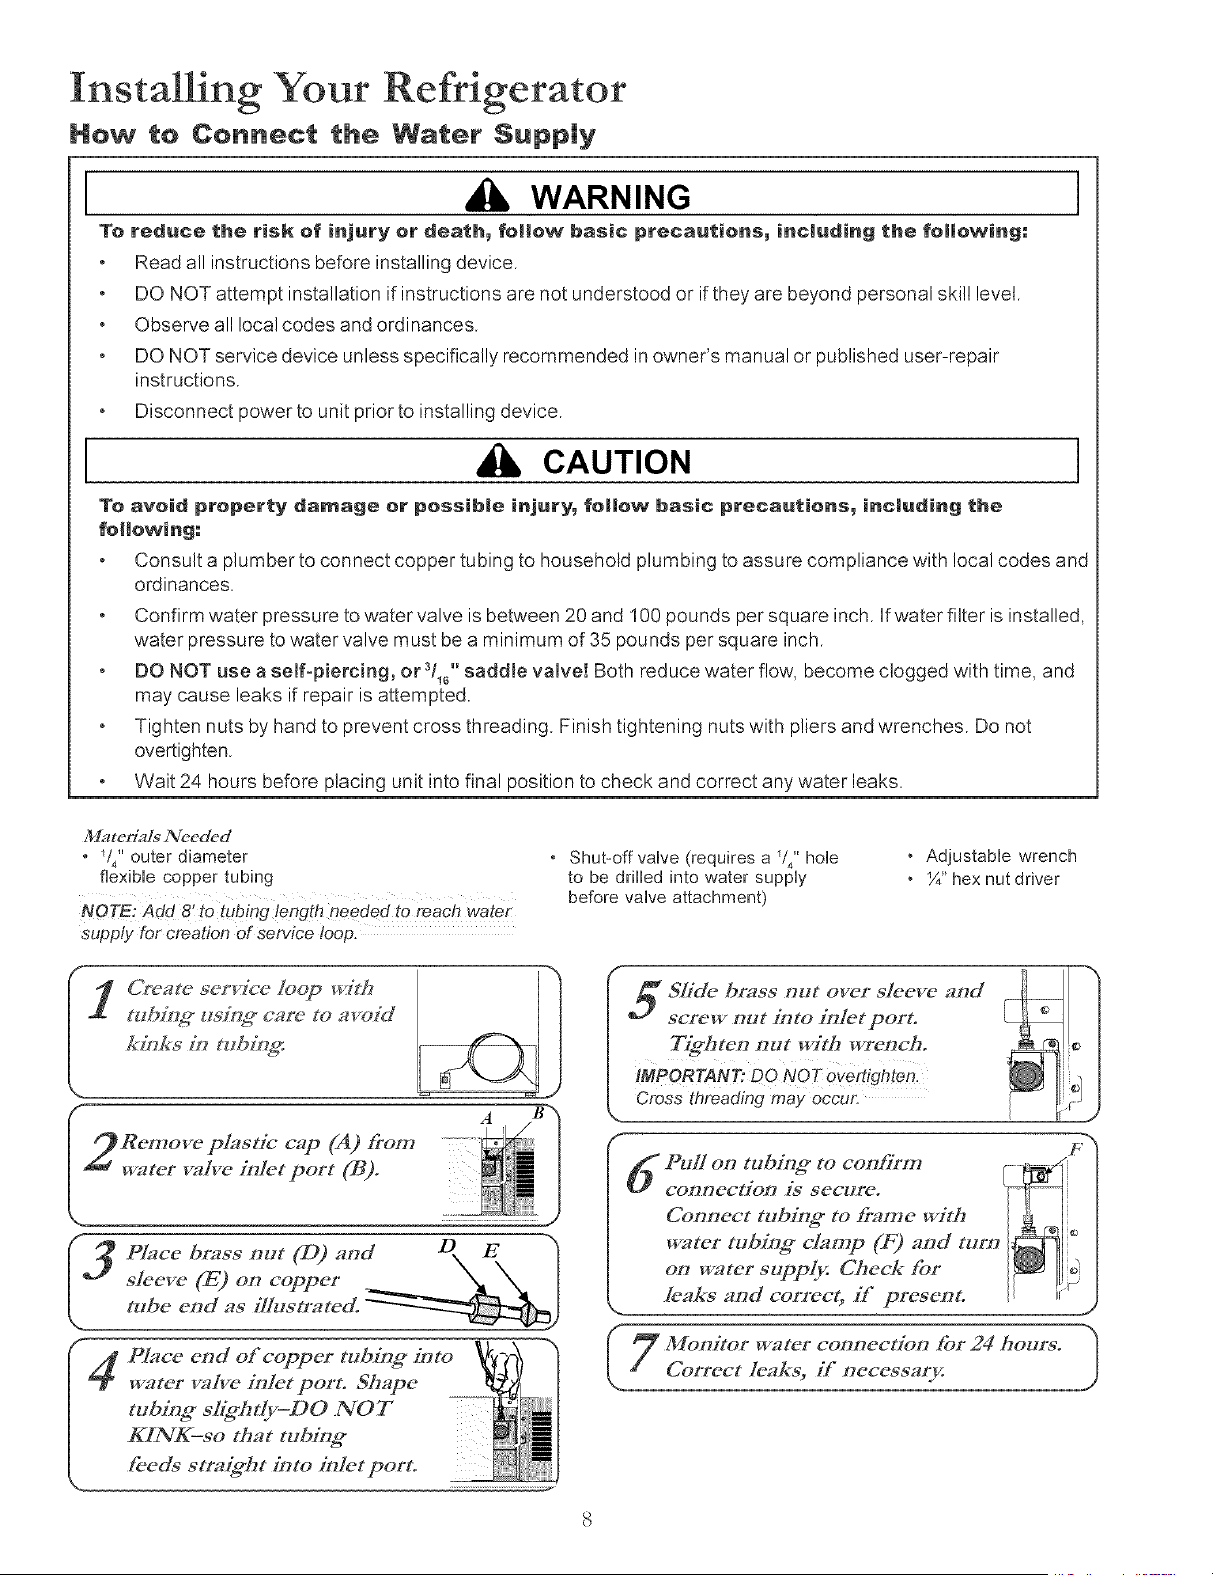
How to Connect the Water $upp|y
WARNING I
To reduce the risk of injury or death_ follow basic precautians_ including the fallowing:
Read all instructionsbefore installing device.
DO NOT attempt installation if instructions are not understood or if they are beyond personal skill level.
Obsewe all local codes and ordinances.
DO NOT service device unless specifically recommended in owner's manual or published user-repair
instructions.
Disconnect power to unit prior to installing device.
CAUTION I
To avoid property damage er possible injury_ follow basic precautions_ including the
following:
Consult a plumber to connect copper tubing to household plumbing to assure compliance with local codes and
ordinances.
Confirm water pressure to water valve is between 20 and 100 pounds per square inch. Ifwater filter is installed,
water pressure to water valve must be a minimum of 35 pounds per square inch.
DO NOT use a self-piercing, or a/_,, saddle valve! Both reduce water flow, become clogged with time, and
may cause leaks if repair is attempted.
Tighten nuts by hand to prevent cross threading. Finish tightening nuts with pliers and wrenches. Do not
overtighten.
Wait 24 hours before placing unit into final position to check and correct any water leaks.
M_ltedals ZVceded
* V4" outer diameter
flexible copper tubing
NOTE: Add 8: lo tubing length needed to reach water
supply for creation of service loop.
• Shut-off valve (requires a _14" hole
to be drilled into water supply
before valve attachment)
• Adjustable wrench
• _¼"hex nut driver
SIMe brass out over sic'eve and
screw aut into in[et porto
iMPORTANT; DO RIOT Overtighten.
Cross threading may occur,
F
PuN on tubin# to confinz_
coanection is secure.
Coaaect tubing* to frame with
water tubing* clamp (F) aad turn
on water supp_v. Check fat
leaks and correct_ # present.
_ U Monitor water connection for 24 bogaw. -_
Co!.rec,:ea s,i:5ce:s r 2
nstalling Your Refrigerator
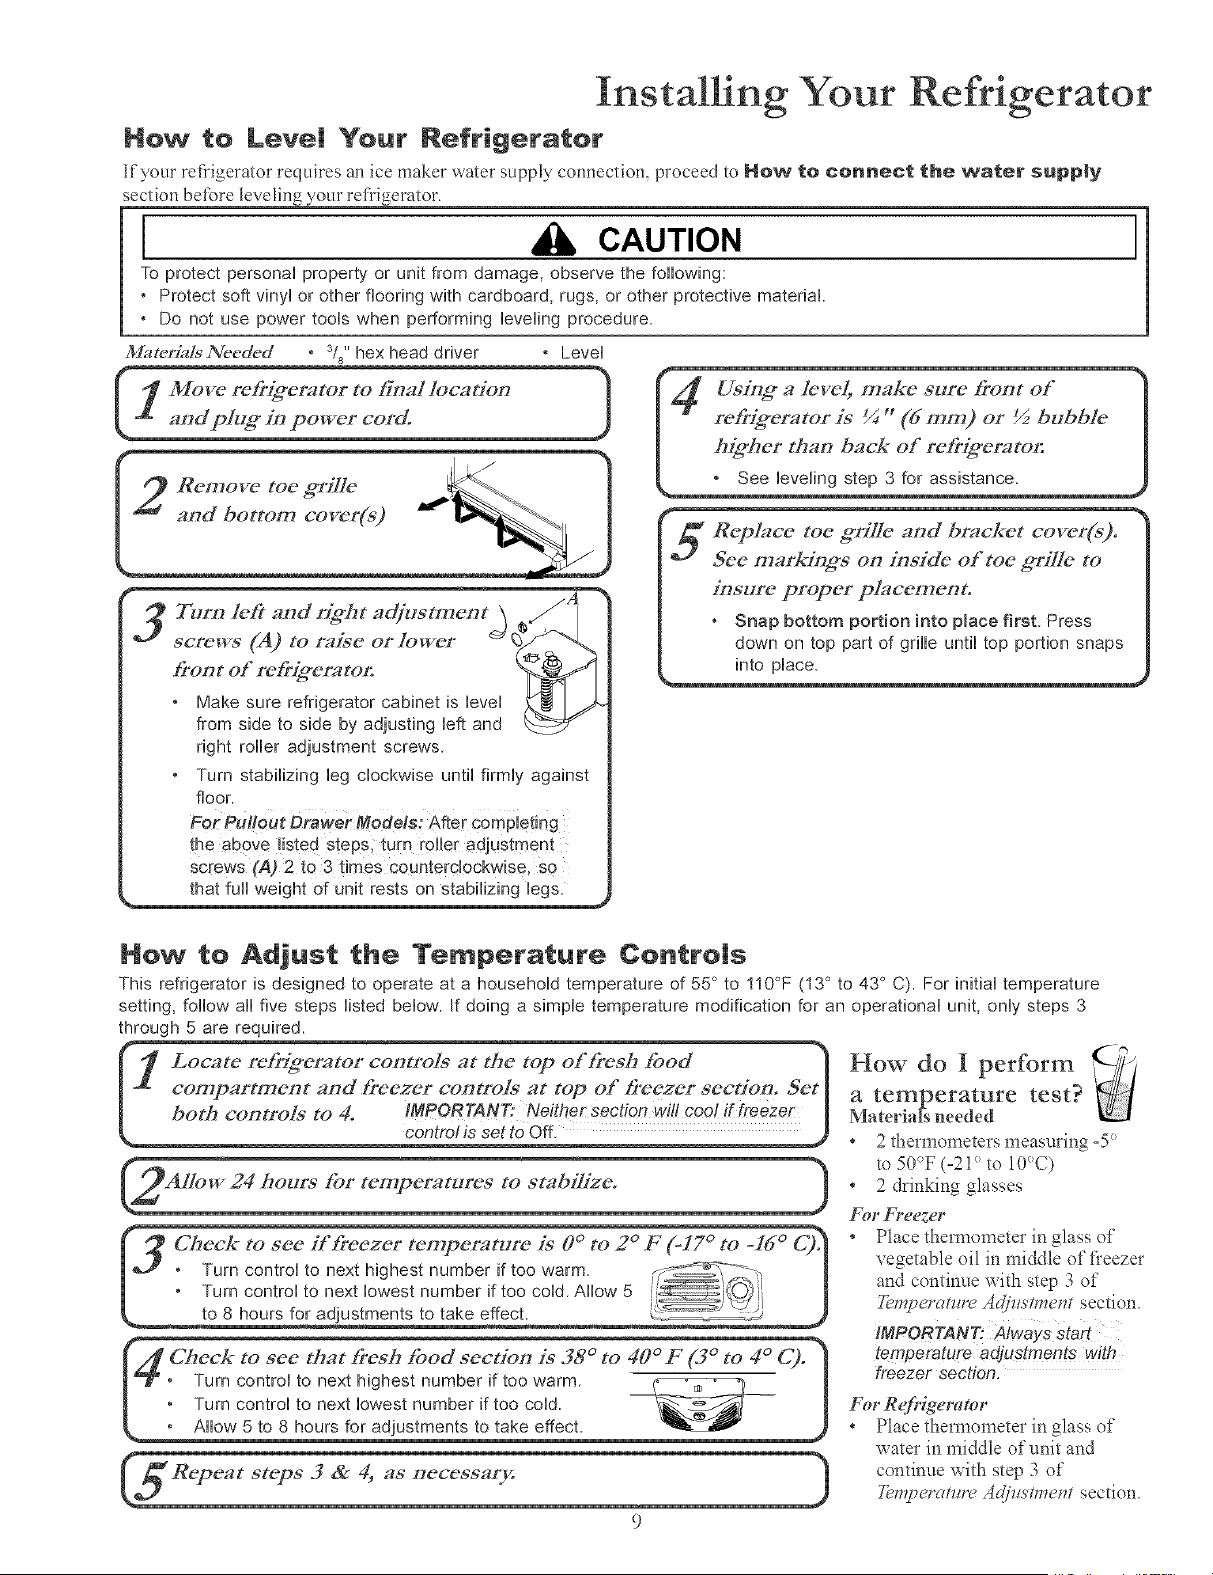
How to Level Your Refrigerator
If your refi'igerator requires an ice maker water supply connection, proceed to How to connect the water supp|y
section before leveling your refrigerator.
I A CAUT,ON I
To protect personN property or unit from damage, observe the following:
* Protect soft vinyUor other flooring with cardboard, rugs, or other protective matefiN
* Do not use power tooUswhen performing UeveUing)rocedure
M_redalsNecded * sis"hex head driver * Level
[rout of re[r[g*erato_
* Make sure refrigerator cabinet is level _
from side to side by adjusting left and
right roller adjustment screws
, Turn stabilizing leg clockwise until firmly against
floor.
the above listed steps; turn roller adjustment
screws (A) 2 to 3 times ceunterc!0ckwise, so
that full weight of unit rests on stabilizing legs.
Using a level, mM_e sure #'ont of '_
%
refdgerator is _ " (dram) or ½ bubble
h@her tl, an back of re#_emto,: [
Z Reph, ce toe grille and br_,c'kct coverCs).
See markings on inside of toe griIIe to [
[,sure proper pl_,cement. I
Snap bottom portion into place first. Press [
down on top part of grille until top portion snaps
Hew to Adjust 1:he Temperature Contre|s
This refrigerator is designed to operate at a household temperature of 55° to 110°F (13° to 43° C). For initial temperature
setting, follow all five steps listed below. If doing a simple temperature modification for an operational unit, only steps 3
through 5 are required.
(i Locate :,:dg_er_tor cootro/s at the o:b'esh food )
top
[ compartment andb'eeze: controls at top Of #'eezer section. Seth
_ontrcl is set to Off
to 8 hours for adjustments to take effect.
: Turn control to next highest number if too warm _ |
Turn control to next lowest number if too cold. \___ |
* Allow 5 to 8 hours for adiustments to take effect.
How do I perform
a temperature test?
MateHagneeded
* 2thermometers measuring-5 °
m 50°F (-2i ° to !0°C)
* 2 drinking glasses
For Freezer
* Place thermometer in glass of
vegetable oil in middle of fieezer
and continue with step 3 of
YempeJ'atm'e Adjztsn:_em section.
IMPORTANT: Always start
temperature adjustments with
freezer section,
For RefrQerator
* Place them_ometer in glass of
water in middle of unit and
continue with step 3 of
Yempe_'am*'eA@tstmem section.
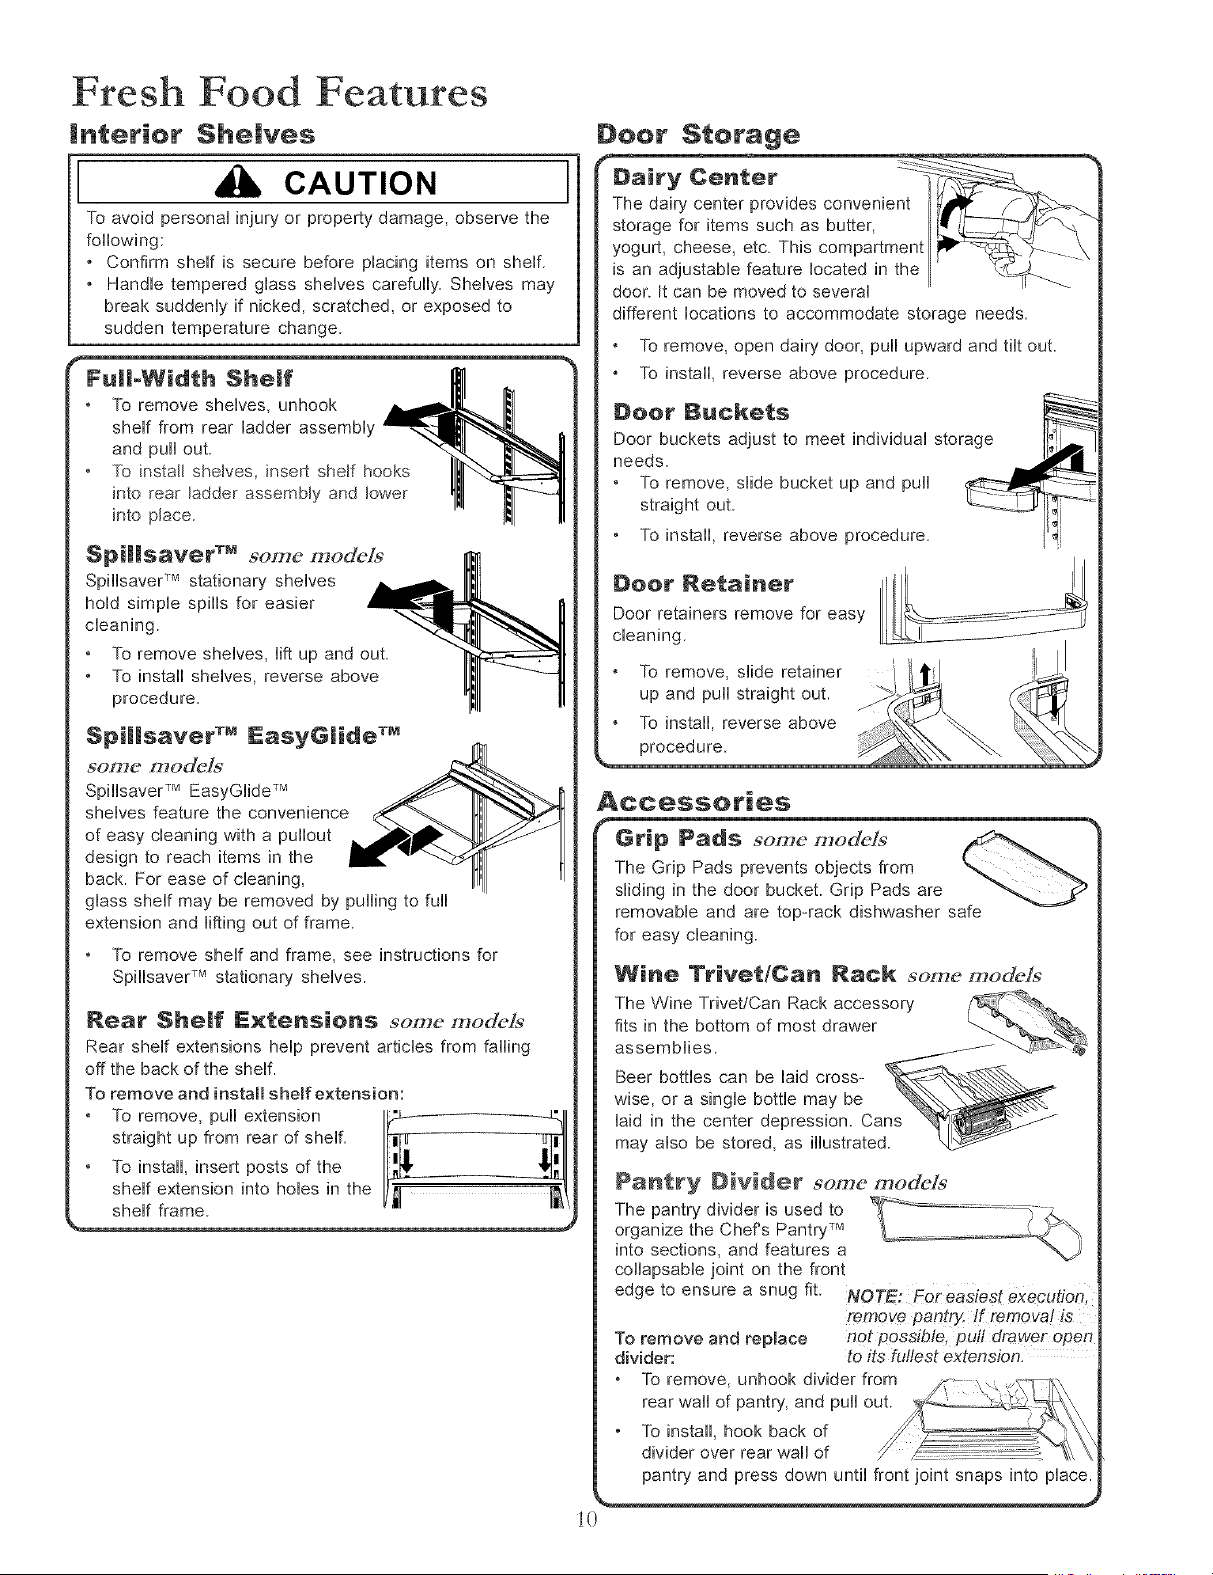
Fresh Food Features
|nterior Shelves
CAUTION
To avoid personal injury or property damage, observe the
following
• Confirm shelf is secure before placing items on shelf
• Handle tempered glass shelves carefully Shelves may
break suddenly if nicked, scratched, or exposed to
sudden temperature change.
I
To remove shelves, unhook ,_,
shelf from rear ladder assembly _,_'_ll'"-._
and pull out. "_1!. L_'_'_ IJ
To osta,she,yes, osertshe,fhooksI1 1
Spilisaver TM some models
Spillsaver TM stationary shelves
hold simple spills for easier
cleaning
To remove shelves, lift up and out
To install shelves, reverse above
procedure
Spi|lsaver TM EasyGiide TM
some modeJs
Spillsaver TM EasyGlide TM
shelves feature the convenience
of easy cleaning with a pullout
design to reach items in the
back. For ease of cleaning,
glass shelf may be removed by pulling to full
extension and lifting out of frame
To remove shelf and frame, see instructions for
SpillsaveU Mstationary shelves
Rear She|f Exten$i@n$ some model_"
Rear shelf extensions help prevent articles from falling
off the back of the shelf.
To remove and install shelf extension:
straight up from rear of shelf
To install, insert posts of the
shelf extension into holes in the
shelf frame
Deer $terage
door. It can be moved to severn
different locations to accommodate storage needs.
To remove, open dairy door, pull upward and tilt out
To install, reverse above procedure
Door Buckets
Door buckets adjust to meet individual storage 1[__
needs.
• To remove, slide bucket up and pull
straight out. _-_--_Y [Ii
• To install, reverse above procedure. [_
Door Netainer
Door retainers remove for easy
cleaning.
To remove, slide retainer
up and puii straight out.
To install, reverse above
procedure
Accessories
Grip Pad$ some mode]s
The Grip Pads prevents objects from
sliding in the door bucket Grip Pads are
removable and are top-rack dishwasher safe
for easy cleaning
Wine TrivetlCan Rack some models
Pantry Divider some models
The pantry divider is used to
organize the Chef's Pantry TM
into sections, and features a
collapsable joint on the front
edge to ensure a snug fit.
remove pantry. If removal is
To remove and replace not possible, pul! drawer open
divider: to its fullest extension.
To remove, unhook divider from
rear wall of pantry, and pull out.
To install, hook back of
divider over rear wall of
pantry and press down until front joint snaps into place.
i0
Fresh Food Features
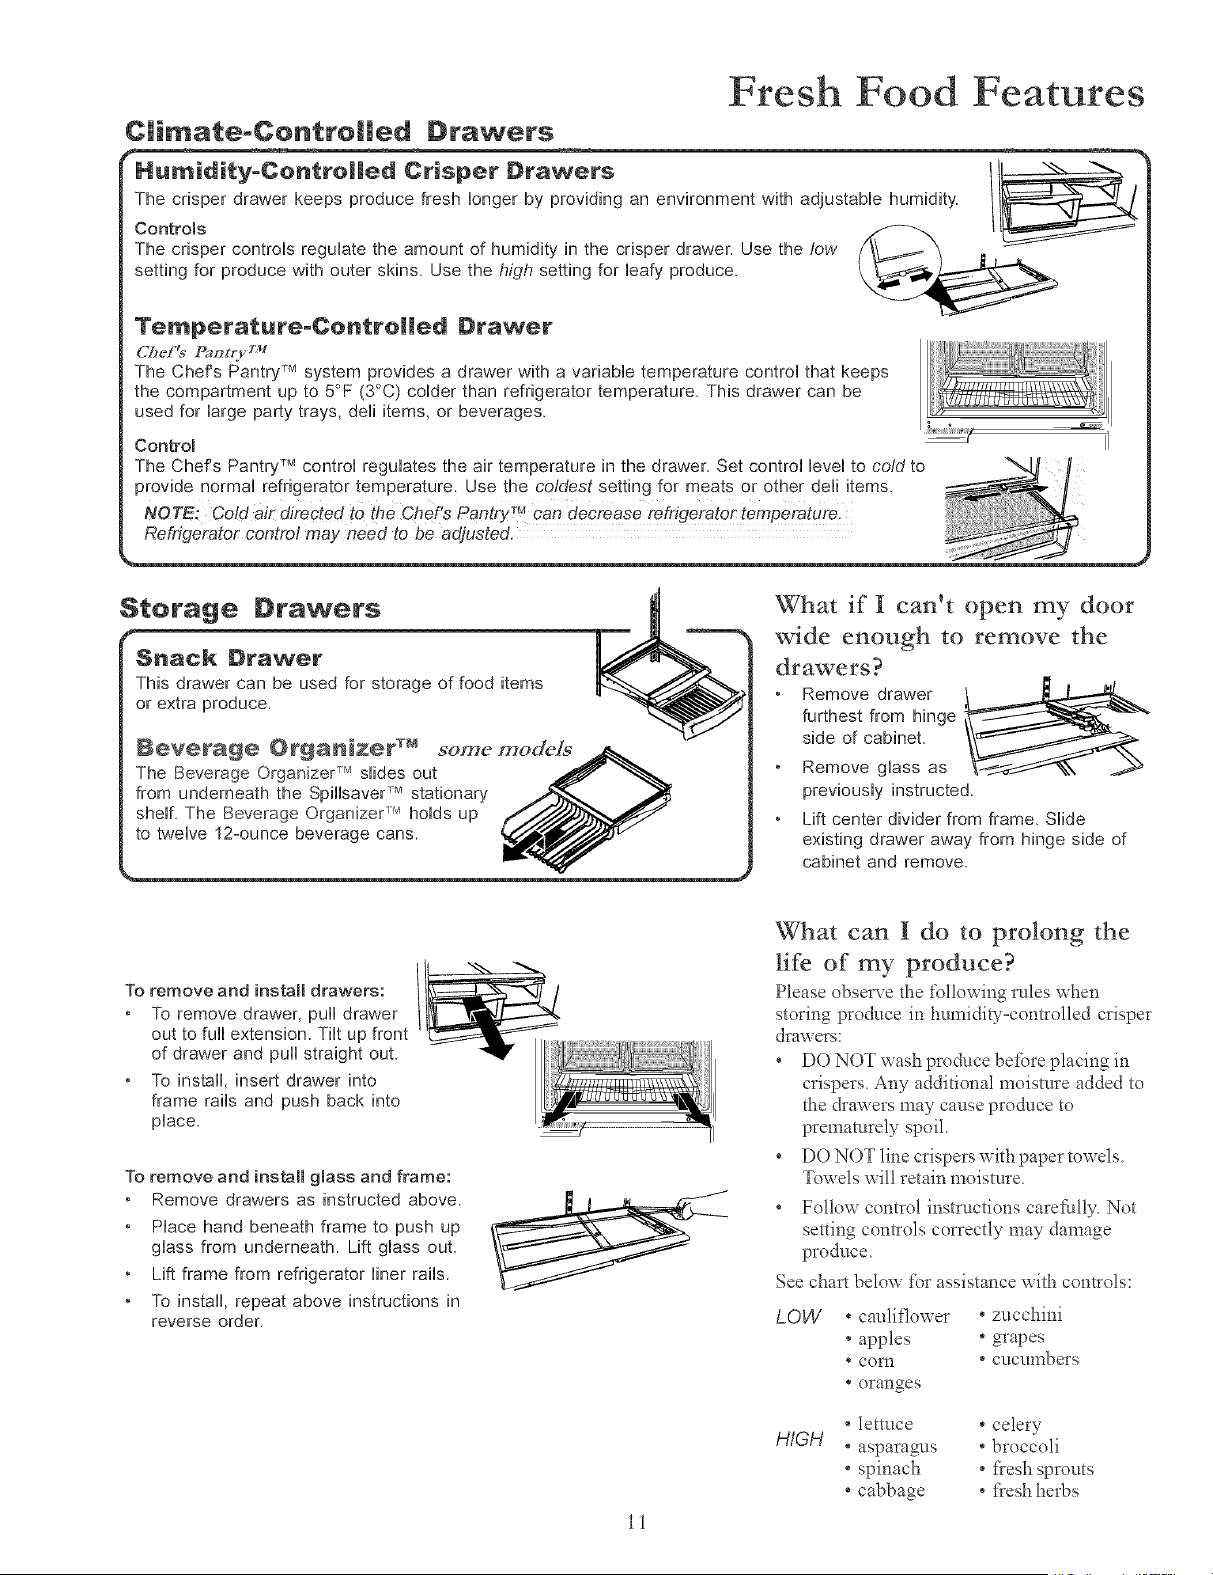
C|imate-Contro||ed Drawers
F====_
HUl_lJl_l_=_on_roHe_ Drtsper Drawers /t_
The crisper drawer keeps produce fresh longer by providing an environment with adjustable humidity.
Controls
The crisper controUs reguUate the amount of humidity in the crisper drawer. Use the low
setting for produce with outer skins. Use the high setting for bafy produce.
Temperatare-CeatreRea Drawer
(2#el9 [Sm t_ +_+++
The Chef's Pantry TM system provides a drawer with a variable temperature control that keeps
the compartment up to 5°F (30C) colder than refrigerator temperature. This drawer can be
used for large party trays, dell items, or beverages.
Controm
The Chef's Pantry TM control regulates the air temperature in the drawer. Set control level to cold to
provide normal refrigerator temperature. Use the coldest setting for meats or other dell items
Refrigerator control may need to be adjusted.
$terage Drawers
Snack Drawer
This drawer can be used for storage of food items
or extra produce,
Beverage Organiz÷r TM some models
The Beverage Organizer TMslides out
from underneath the SpilBaver TM stationary
shelf. The Beverage Organizer r_ holds up
to twelve 12-ounce beverage cans.
What if I can+t open my door
wide enough to remove the
drawers?
Remove drawer
furthest from hinge
side of cabinet
Remove glass as
previously instructed
Lift center divider from frame. Slide
existing drawer away from hinge side of
cabinet and remove
To remove and install drawers:
+ To remove drawer, pull drawer
out to full extension. Tilt up front
of drawer and pull straight out.
+ To install, insert drawer into
frame rails and push back into
place.
To remove and install gmass and frame:
Remove drawers as instructed above.
Place hand beneath frame to push up
glass from underneath. Lift glass out.
Lift frame from refrigerator liner rails.
• To install, repeat above instructions in
reverse order.
ii
What can I do to prolong the
life of my produce?
Please observe the following rules when
storing produce in humidly-controlled crisper
drawers
+ DO NOT wash produce be+bre placing in
crispers+ Any additional moisture added to
the drawers may cause produce to
prematurely spoil
+ DO NOT line crispers with paper towels+
Towels will retain moisture+
+ Follow control instructions carel:ully. Not
setting controls correctly may damage
produce+
See chart below for assistance with controls:
LOW
° cauliflo_xer ° zucchini
+ apples + grapes
* corn * cucumbers
+ oranges
HIGH
+lettuce +celery
+asparagms +broccoli
+ spinach + fresh sprouts
+cabbage + fresh herbs
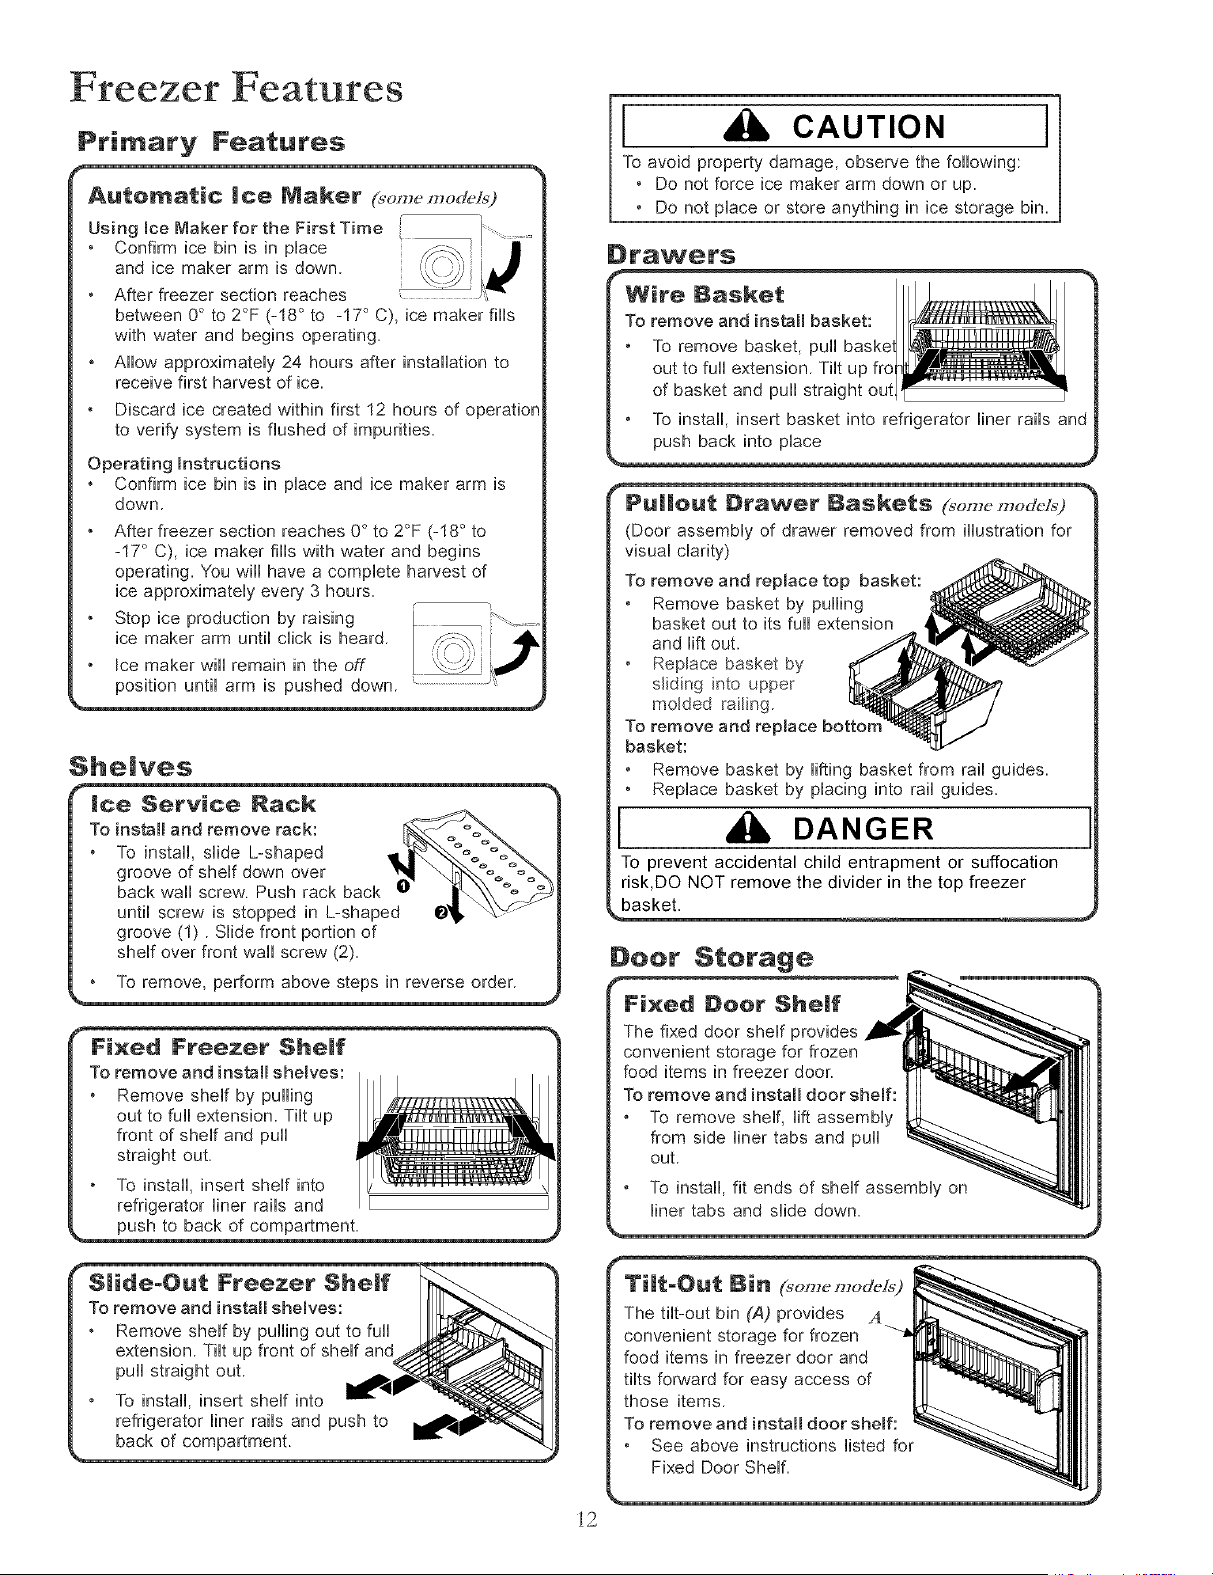
Freezer Features
Primary Features
i etween 0° to 2°F (-18 ° to -17° C), ice maker fills
with water and begins operating.
• AHow approximateUy 24 hours after installation to
receive first harvest of ice.
• Discard ice created within first 12 hours of operation
to verify system is flushed of impurities.
Operating hstructions
• Confirm ice bin is in pUaceand ice maker arm is
down. o o o
• After freezer section reaches 0 to 2 F (-18 to
-17 C), ice maker fills with water and begins
operating. "Youwill have a complete harvest of
ice approximately every 3 hours. , !.
• Stop ice production by raising L _ - .....
ice maker arm until click is heard. / _%, J
/ Joe maker will remain ,n the off [ x:-W iJ
She|yes
ice, Service Naek
To install and remove rack:
To install, sUide L-shaped
groove of sheUfdown over
back wall screw. Push rack back
until screw is stopped in L-shaped
groove (1). Slide front portion of
shelf over front wall screw (2).
To remove, perform above steps in reverse order.
I CAUTION I
To avoid property damage, observe the following:
• Do not force ice maker arm down or up.
• Do not place or store anything in ice storage bin.
D_'awe_'s
Wire Basket
To remove and install basket:
To remove basket, pull
out to full extension. Tilt up fro
of basket and pull straight out
To install, insert basket into refrigerator liner rails and
push back into place
Drawer gaskets (_,on,_,modc/_9
(Door assembly of drawer removed from illustration for
visual clarity)
To remove and replace top basket:
Remove basket by pulling
basket out to its full extension
and lift out.
Replace basket by
sliding into upper
molded railing_
To remove and replace botton
basket:
Remove basket by lifting basket from rail guides.
Replace basket by placing into rail guides.
I DANGER
To prevent accidental child entrapment or suffocation
risk,DO NOT remove the divider in the top freezer
basket.
Deer Sterage
i2
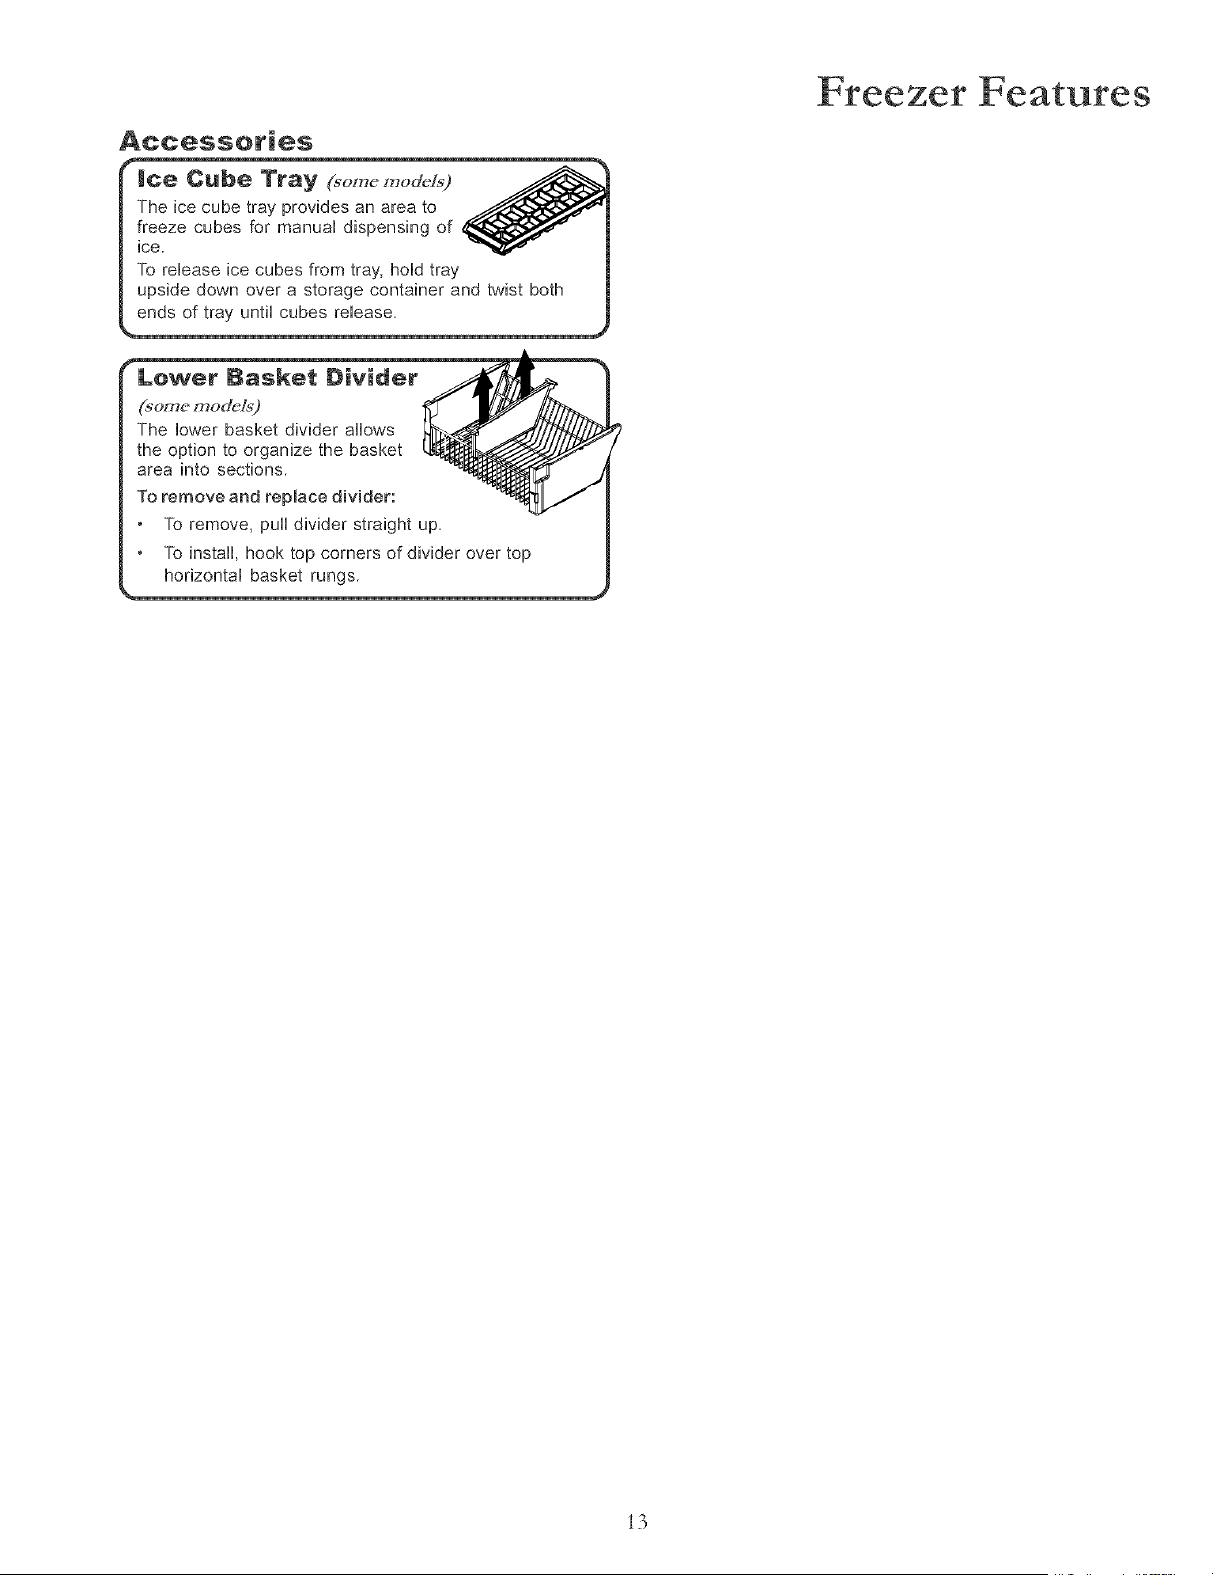
Accessories
Freezer Features
the option to organize the basket
area into sections.
To remove and replace divider:
Lower Basket Divider _ "_
(some model_')
The lower basket divider allows
To remove, pu_ divider straight up.
To install, hook top corners of divider over top
horizontal basket rungs
i3

Hints and Care
What cleaners does
Amana recommend for
my stainless steel
product?
Amana has a cleaner available _br
purchase (Part # 31960801) tl_rough ore
Consumer Af[hirs division.
For this, or a list of other recommended
cleaning products, please contact us at
Amana Consumer A_hirs using the
in£_rmation on the cover of yore Owner's
Manual.
How do I remove an odor
from my refrigerator._z > ._//(
Ren oveallfood
2. Disconnect reflqgerator. "--,_,Tw"
3. Clean the following items
using the appropriate instructions in
Hou' to Clean _,ur Unit :
° Wkdls, floor, and ceiling of cabinet
interior.
° Drawers, shelves, and gaskets
according to the instructions in this
section.
4. Pay special attention to clean all
crevices by completing the %llowing
steps:
° Dilute mild detergent and brash
solution into crevices using a plastic
bristle br'tmh.
° Let stand for 5 minutes.
° Rinse surfi_ceswith warm water_Dry
sur_hces with a soft, clean cloth.
5. Wash and d® all bottles, containers, and
jars. Discard spoiled or expired items.
6. Wrap or store odor=causing *\_odsin
tightly-sealed containers to prevent
reoccurring odors.
7. Connect power to reflqgerator and retnm
lbod m unit.
8. After 24 hours, check if odor has been
eliminated.
If odor is still present,..
1.Remove drawers and place on top shelf
ofrefiigerator.
2. Pack rcfiigerator and fleezer sections
including doors with crumpled sheets
of black and white newspaper.
3. Place charcoal briquettes randomly on
crumpled newspaper in both fieezer and
reSigerator compartments.
4. Close doors and let stand 24 48 horns.
5. Repeat steps 5 through 7.
Now to Clean Your Unit
[ WARNING ]
To avoid electrical shock which can cause severe personal injury or death,
disconnect power to refrigerator before cleaning After cleaning, connect power
CAUTION I
To avoid personal injury or property damage:
* Read and follow manufacturer's directions for all cleaning products
* Do not place buckets, shelves, or accessories in dishwasher Cracking or
warping of accessories may result
AREA
Textured Doors
and Exterior
Cabinet Interior
Stainless Steel Doors
and Exterior
IMPORTANT:
Damage to stainless stool
finish duo to improper use
of cleaning products or
non-recommended
products is not covered
under any warranty
Door Gaskets
Condenser Coil Remove
toe grille to acces_
Condenser Fan Outlet
Grille
See back of r@igerator
Accessories Shelve_,
brackets, drawers, etc'
DO NOT USE
• Abrasive or harsh cleaners
• Ammonia
• Chlorinebleach
• Concentrated detergents or
solvents
• Metal or plastic-textured
scouring pads
• Abrasive or harsh cleaners
• Ammonia
• Chlorinebleach
• Concentrated detergents or
solvents
• Metal or plastic-textured
scouring pads
• Vinegar-based product
• Citrus-based cleaners
• Abrasive or harsh cleaners
• Metal or plastic-textured
scouring pads
N/A
A Dishwasher
DO...
• Use 4 tablespoons (60
milliliters) of baking soda
dissolved in 1 quart (t
liter) warm soapy water.
• Rinse surfaces with clean
warm water and dry
immediately to avoid
water spots
• Use warm, soapy water
and a soft, clean cloth or
sponge.
• Rinse surfaces with clean
warm water and dry
immediately to avoid
water spots
• Use a vacuum cleaner
hose nozzle
• Use a vacuum cleaner
hose nozzle with brush
attachment.
• Follow removal and
installation instructions
from appropriate feature
section.
• Allow items to adjust to
room temperature.
• Dilute mild detergent and
use a soft clean cloth or
sponge for cleaning.
• Use a plastic bristle brush
to get into crevices
• Rinse surfaces with clean
warm mater.
• Dry glass and clear items
immediately to avoid
spots.
i4
and Care
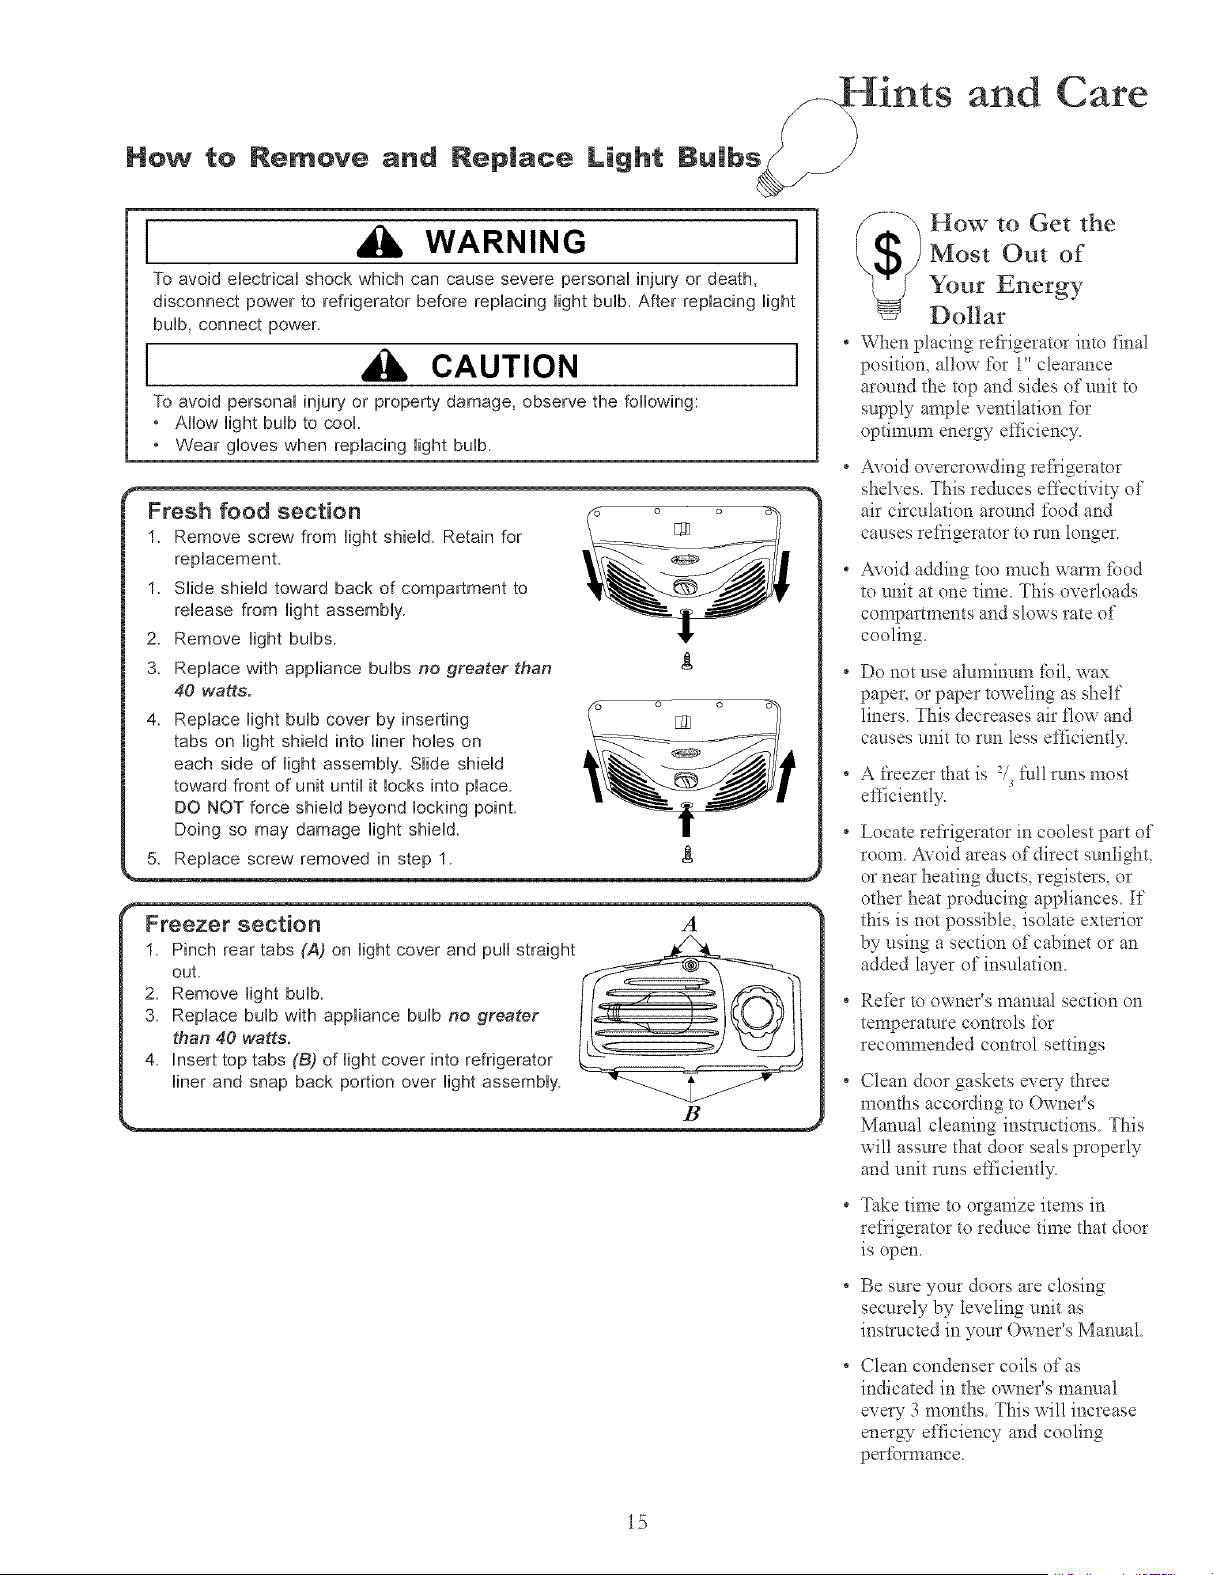
How to Remove and Replace Light Bulbs
I WARNING I
To avoid eHectricaHshock which can cause severe personai injury or death,
disconnect power to refrigerator before repiacing Hightbuib. After repiacing Hight
bulb, connect power.
I CAUTION I
To avoid personai injury or property damage, observe the following:
* Ailow Hightbuib to cooi
* Wear gioves when repiacing Hightbuib
f" Fresh food section o o "_
1. Remove screw from light shield. Retain for _ _ _ /
replacement . _ / /
1 Siide shieHd toward back of compartment to .'---__O _ |
release from light assembly _1_ _ /
2 Remove light bulbs !1" |
3. Replace with appliance bulbs no greater than _ |
40 watts. _- _ i
4. Replace light bulb cover by inserting E_ |
tabs on light shield into liner hobs on _ _ _ |
j
each side of light assembly. Slide shield -__ |
toward front of unit until it locks into place .'---._O _ |
DO NOT force shield beyond locking point _1_ _ /
Doing so may damage light shield II /
5_,eplacescrew removed in step 1 _
I Freezer section a
1. Pinch rear tabs (A) on light cover and pull straight
out.
2_ Remove light bulb. _'_/_11
3. Replace bulb with appliance bulb no greater ] [_ )_/ Jl
than 40 watts.
4. Insert top tabs (B) of light cover into refrigerator _
liner and snap back portion over light assembly
B .,
How to Get the
Most Out of
Your Energy
Dollar
* When placing refrigerator into final
position, allow for i" clearance
around the mp and sides of unit m
supply ample ventilation for
optimtm_ energy efticiency.
° Avoid overcrowding leffigemtor
shelves. This reduces effectivity of
air circulation around _bod and
causes retiigerator to run longer.
° Avoid adding too much warm £_od
to unit at one time. This overloads
compartments and slows rate of
cooling.
° Do not use aluminum £_il, wax
paper, or paper toweling as shelf
liners. This decreases air flow and
causes unit to run less e_iciently.
* A _}eezer that is 2,/s_:ullruns most
etl]ciently.
* Locate re*i'igerator in coolest part of
room. Avoid areas of direct sunlight,
or near heating ducts, registers, or
other heat producing appliances. If
this is not possible, isolate exterior
by using a section of cabinet or an
added layer of insulation.
• Refer to owner's manual section on
ternperamre controls for
recommended control settings
° Clean door gaskets every three
months according to Owner's
Mannal cleaning instructions. This
will assure that door seals properly
and unit runs et_]ciently.
* Take time to organize items in
refrigerator to reduce time that door
is open.
* Be sure your doors are closing
securely by leveling unit as
instructed in your Owner's Manual
* Clean condenser coils of as
indicated in the owner's manual
every 3 months. This will increase
energ_ e[_ciency and cooling
per_brmance.
i5
NOISE _))_
Trouble Shooting
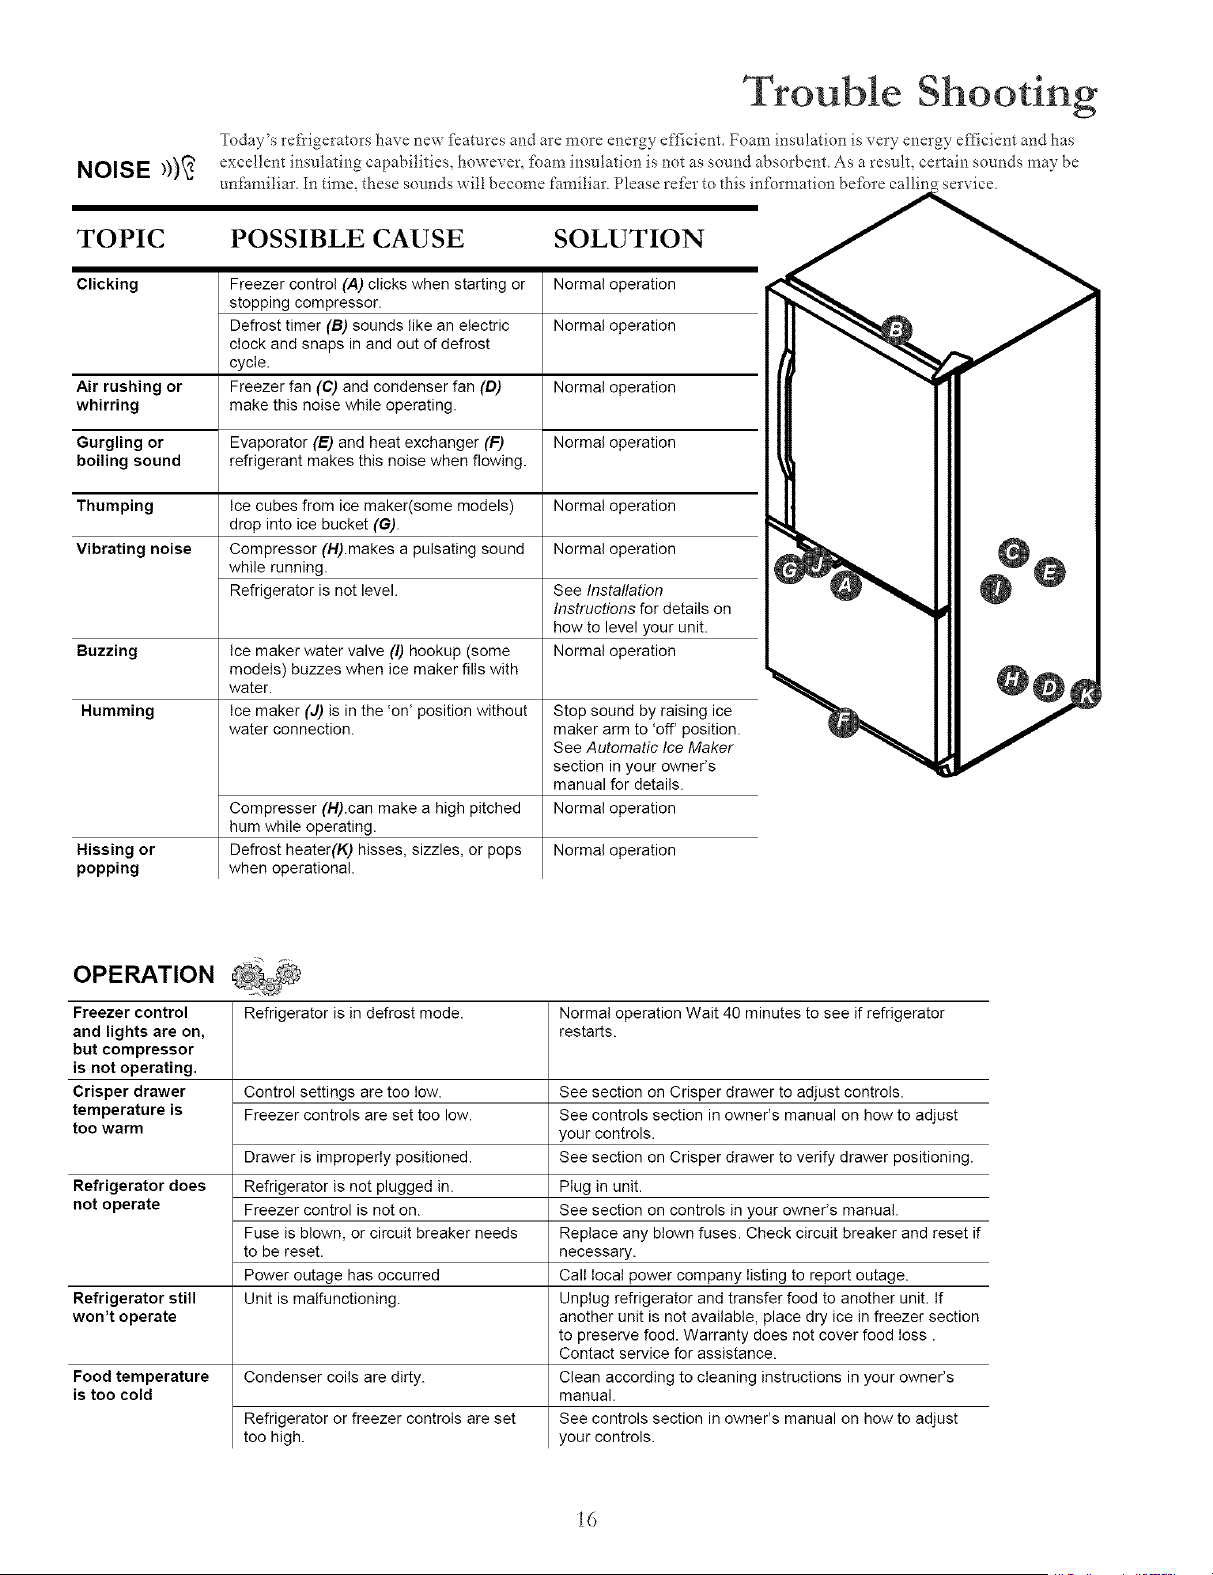
Today's refrigerators have new fkatures and are more energy efficient. Foam insulation is very energy eflicient and has
excellent insulating capabilities, however, _bam insulation is not as sound absorbent. As a result, certain sounds may be
unfamiliar. In time, these sounds will become familiar. Please refer to this infbrmation befbre callin service.
TOPIC POSSIBLE CAUSE SOLUTION
Clicking Freezer control (A) clicks when starting or Normal operation
stopping compressor.
Defrost timer (B) sounds like an electric Normal operation
clock and snaps in and out of defrost
cycle.
Air rushing or Freezer fan (C) and condenser fan (D) Normal operation
whirring make this noise while operating.
Gurgling or Evaporator (E) and heat exchanger (F) Normal operation
boiling sound refrigerant makes this noise when flowing.
Thumping Ice cubes from ice maker(some models) Normal operation
drop into ice bucket (G).
Vibrating noise Compressor (H).makes a pulsating sound Normal operation
while running.
Refrigerator is not level. See Installation
Instructions for details on
hew to level your unit.
Buzzing Ice maker water valve (I) hookup (some Normal operation
models) buzzes when ice maker fills with
water.
Humming Ice maker (J) is in the 'on' position without Stop sound by raising ice
water connection, maker arm to 'off' position.
See Automatic Ice Maker
section in your owner's
manual for details.
Compresser (H).can make a high pitched Normal operation
hum while operating.
Hissing or Defrost heater(K) hisses, sizzles, or pops Normal operation
popping when operational.
OPERATION
Freezer control Refrigerator is in defrost mode. Normal operation Wait 40 minutes to see if refrigerator
and lights are on, restarts.
but compressor
is not operating.
Crisper drawer Control settings are too low. See section on Crisper drawer to adjust controls.
temperature is Freezer controls are set too low. See controls section in owner's manual on how to adjust
too warm your controls.
Drawer is improperly positioned. See section on Crisper drawer to verify drawer positioning.
Refrigerator does Refrigerator is not plugged in.
not operate Freezer control is not on.
Fuse is blown, or circuit breaker needs
to be reset.
Power outage has occurred
Refrigerator still Unit is malfunctioning.
won't operate
Food temperature
is too cold
Condenser coils are dirty.
Refrigerator or freezer controls are set
too high.
Plug in unit.
See section on controls in your owner's manual.
Replace any blown fuses. Check circuit breaker and reset if
necessary.
Call local power company listing to report outage.
Unplug refrigerator and transfer food to another unit. If
another unit is not available, place dry ice in freezer section
to preserve food. Warranty does not cover food loss.
Contact service for assistance.
Clean according to cleaning instructions in your owner's
manual.
See controls section in owner's manual on how to adjust
your controls.
i6
Trouble Shooting
TOPIC POSSIBLE CAUSE SOLUTION
Food temperature
appears too warm
Refrigerator has an odor
Water droplets form on
outside of refrigerator
Water droplets form on
inside of refrigerator
Door is not closing properly.
Controls need to be adjusted.
Condenser coils are dirty.
Rear air grille is blocked.
Door has been opened frequently, or
has been opened for long periods of
time.
Food has recently been added.
Compartment is dirty or has odor-
causing food.
Check gaskets for proper seal.
Humidity levels are high.
Controls require adjustment
Humidity levels are high or door has
been opened frequently.
Check gaskets for proper seal.
Refrigerator is not level. See How to Level Your Refrigerator for
details on how to level your unit.
Check gaskets for proper sea!. Clean, if necessary, according to
cleaning instructions in owner's manual.
Check for internal obstructions that are keeping door from
closing properly (i.e. improperly closed drawers, ice buckets,
oversized or improperly stored containers or foodstuffs, etc.).
Refrigerator or ice maker Normal operation
make unfamiliar sounds or
seems too loud
Crisper drawers do not Contents of drawer, or positioning of Reposition food items and containers to avoid interference with
close freely items in the surrounding compartment the drawers.
could be obstructing drawer
Drawer is not in proper position
Refrigerator is not level.
Drawer channels are dirty or need
treatment.
Doors have been opened frequently or
have been opened for long periods of
time.
See the controls section in your for assistance in how to adjust
your controls.
Clean according to cleaning instructions in your owner's manual.
Check the positioning of food items in refrigerator to make sure
grille is not blocked. Rear air grilles are located under crisper
drawers.
Reduce time door is open. Organize food items efficiently to
assure door is open for as short a time as possible.
Allow interior environment to adjust for period the door has been
open.
Allow time for recently-added food to reach refrigerator or
freezer temperature.
Refer to Hints and Care in this owner's manual for odor removal
instructions.
Clean, if necessary, according to cleaning instructions in
owner's manual.
Normal during times of high humidity.
See the controls section in your Owner's Manual for assistance
in how to adjust your controls.
See the controls section in your Owner's Manual for assistance
in how to adjust your controls.
Reduce time door is open. Organize food items efficiently to
assure door is open for as short a time as possible.
Clean, if necessary, according to cleaning instructions in
owner's manual.
Refer to noise section of troubleshooting guide in owneCs
manual.
Refrigerator runs too
frequently
See section Crisper drawer section for proper placement.
See How to Level Your Refrigerator for details on how to level
your unit.
Clean drawer channels with warm, soapy water. Rinse and dry
thoroughly.
Apply a thin layer d petroleum jelly to drawer channels.
Reduce time door is open. Organize food items efficiently to
assure door is open for as short a time as possible.
Allow interior environment to adjust for period the door has been
open.
Normal operationHumidity or heat in surrounding area is
high.
Food has recently been added. Allow time for recently-added food to reach refrigerator or
freezer temperature.
Unit is exposed to heat by Evaluate your unit's environment. Unit may need to be moved to
environment or by appliances nearby, run more efficiently.
Condenser coils are dirty. Clean according to cleaning instructions in your owner's
manual.
i7
Trouble Shooting
OPERATION (continued)
TOPIC POSSIBLE CAUSE SOLUTION
Refrigerator runs too Controls need to be adjusted.
frequently (continued)
Door is not closing properly.
ICE
See controls section in your Owner's Manual for assistance
in how to adjust your controls.
Refrigerator is not level. See How to Level Your
Refrigerator for details on how to level your unit.
Check gaskets for proper seal. Clean, if necessary,
according to cleaning instructions in owner's manual.
Check for internal obstructions that are keeping door from
closing properly (i.e. improperly closed drawers, ice
buckets, oversized or improperly stored containers or
foodstuffs, etc.).
Unit is leaking water Plastic tubing was used to complete water
connection.
Amana recommends using copper tubing for installation.
Plastic is less durable and can cause leakage. Amana is
not responsible for property damage due to improper
installation or water connection.
Ice forms in inlet tube to ice Improper water valve was installed. Check water connection procedure in your Installation
maker Instructions. Self-piercing and 3/_6"saddle valves cause low
water pressure and may clog the line over time. Amana is
not responsible for property damage due to improper
installation or water connection.
Water pressure is low. Water pressure must be between 20 to 100 pounds per
square inch to function properly. A minimum pressure of 35
pounds per square inch is recommended for units with
water filters.
Water flow is slower than Freezer temperature is too high. See the controls section in your owner's manual for
normal assistance on how to adjust your controls. Freezer is
recommended to be between 0 to 2°F (-18 to -!7°C).
Water pressure is low. Water pressure must be between 20 to 100 pounds per
square inch to function properly. A minimum pressure of 35
pounds per square inch is recommended for units with
water filters.
Improper water valve was installed. Check water connection procedure in your Installation
3
Instructions. Self-piercing and /_0"saddle valves cause low
water pressure and may clog the line over time. Amana is
not responsible for property damage due to improper
installation or water connection.
i8
Amana Refrigerator Warranty
First Year
Amana will replace, free of charge, any part which is defective due to workmanship or materials
Second through Fifth Year
Amana will replace free of charge, any sealed system component (compressor, condenser, evaporator, drier and
interconnecting tubing) and repair any food compartment liner (exclusive of door liner) which is defective due to
workmanship or materials.
Warranty Limitatiens
Begins at date of original purchase.
Excludes original and replacement water or air filter
cartridges (if equipped with the filtration system).
Original and replacement cartridges are warranted
for 30 days, parts only, against defects of material
or workmanship.
Service must be performed by an authorized Amana
technician.
Damage due to shipping and handling is not covered
by this warranty.
Warranty msVeid If
Repairs resulting from the fo!lowing:
• Serial plate is defaced.
• Product is used on a commercial, rental, or
leased basis.
• Product has defect or damage due to product
accident, alteration, connection to an improper
electrical supply, fire, flood, lightning, or other
conditions beyond the control of Amana.
• Product is improperly installed or used.
Owner's Respensibi|ity
Provide proof of purchase (sales receipt).
Provide normal care and maintenance. Replace
owner replaceable items where directions appear in
Owner's Manual.
Make product reasonably accessible for service.
Pay premium service costs for service outside
technician's normal business hours.
Pay for service calls related to product installation
and usage.
Amana Appliances Factory Service
1-800-628-5782 inside USA
For more information,
Amana Appliances Consumer Services
Amana Appliances
2800 220th Trail
Amana, Iowa 52204
1-800-843-0304 inside USA
!-866-587-2002 au Canada
www.amana.com
IN NO EVENT SHALLAMANABE LIABLE FOR INCIDENTAL OR CONSEQUENTIAL DAMAGES.
This warranty gives you specific legal rights, and you may have others which vary from state to state. For example, some states
do not allow the exclusion or limitation of incidental or consequential damages, so this exclusion may not apply to you.
Part No. 12642702
Printed in U_S.A. 12/01 19

Part No. 12642702 © Maytag Appliances Sales Co. 2002
Printed in U.S.A. 02/02