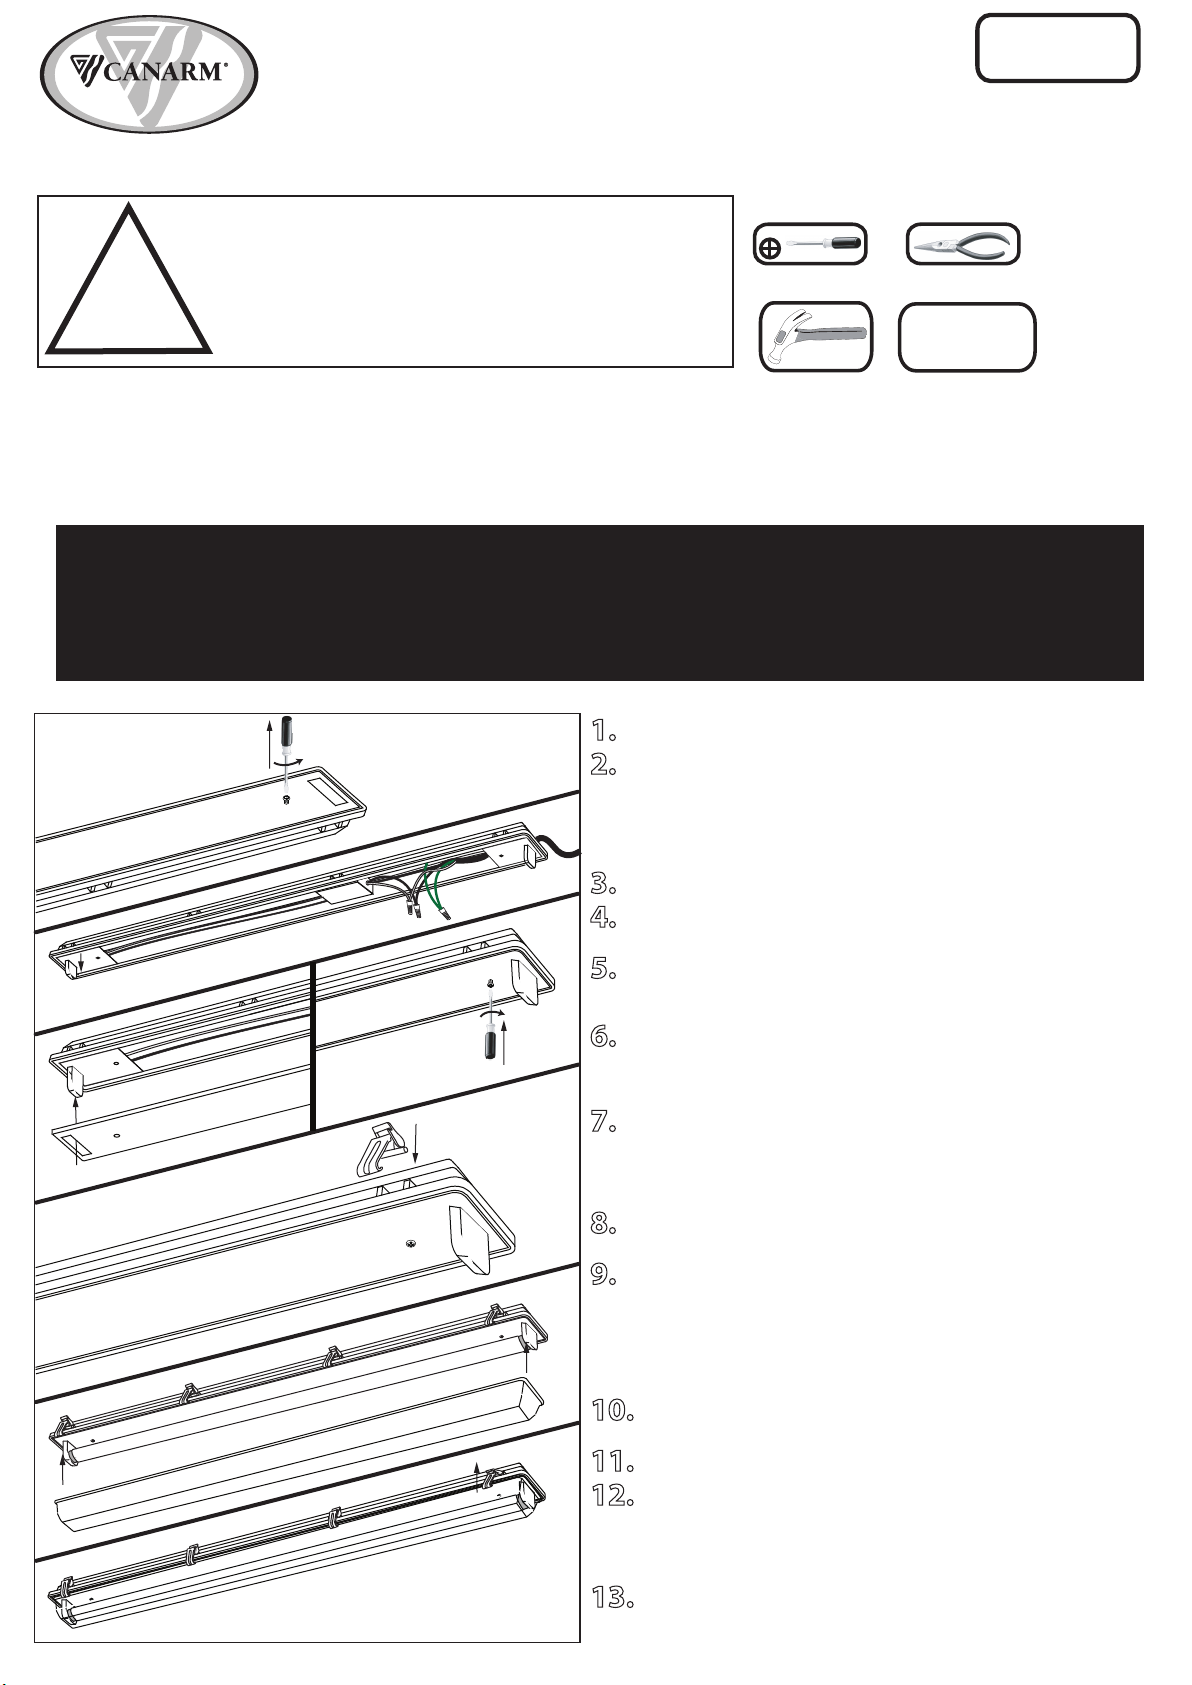
1. Release the polycarbonate diffuser cover from fixture.
2. Remove wiring cover held in place by 2 or 3 screws. Choose desired
power entry location keeping in mind end holes are supplied for end
connections and are capped with hole plugs. Note: Metal casing can be
disassembled from the polycarbonate housing by loosing the 2 nuts if top
power entry opening is selected. Top power entry openings will also need
to be drilled in the polycarbonate housing.
3. Remove the appropriate knockout for power supply entry.
4. Top power entry opening only- Re-attached the metal casing to the
polycarbonate housing if needed (after drilling).
5. To locate and hold fixture assembly up to ceiling or wall with power
supply knockout located over entryway for power supply wires. Mark and
drill the locations of the mounting holes on the fixture and ceiling or wall.
6. Take the fixture down and punch a small hole into the ceiling at each
location using a nail or an awl to see if there is a wood joist. Attach to
surface using fasteners and sealing washers (not provided) appropriate to
ceiling materials.
7. If wood joist is available, use suitable wood screws and washers (not
provided) to mount the polycarbonate housing to the ceiling or wall.
Where there is no joist to screw into, use toggle bolt (not included) of
suitable length to mount the polycarbonate housing to the ceiling or wall.
Ensure the housing is securely mounted.
8. Feed the black and white supply wires, and the ground (bare copper or
green) wire into the fixture through the open knockout hole.
9. This fixture must be grounded. Use UL or CSA approved wire
connectors to make all electrical connections. Connect ground (bare
copper or green) supply wire to the green ground wire in the fixture.
Connect the white wire from the fixture to the white supply wire and
connect the black wire from the fixture to the black supply wire from the
electrical source. Make sure no bare wires are exposed outside the wire
connectors.
10. Snap the lamp holders in slotted openings as shown. See wiring
diagram on ballast to ensure the lamp holders sit at the correct position.
11. Re-attach the wiring cover.
12. Install appropriate lamp (s) by inserting lamp pins into lamp holders.
Rotate into place to seat lamp for proper connection. Mount polycarbonate
diffuser onto polycarbonate housing, secure by rotating latches around
edge of housing and capturing diffuser with rounded lip, snap latch closed.
6 or 8 latches total.
13. WHEN YOU REPLACE BALLAST, PLEASE PROCESS FROM STEP 12
TO 8. AFTER THAT PLEASE REPEAT THE NORMAL PROCESS FROM STEP
8 TO 12.
INSTALLATION: NOTE: Product May Not Look Exactly As Shown In Figures.
Imported By: CANARM LTD., 2157 Parkedale Ave., Brockville, Ontario, K6V 5V6, Tel: (613) 342-5424, Fax: (613) 342-8437
FL-22ES
09/10
FLUORESCENT
LIGHTING
Star-headed
Screwdriver
Wiring supplies
as required by
electrical code
Pliers
Hammer
QUESTIONS OR CONCERNS, CONTACT CANARM AT:
1-800-265-1833 (English) 1-800-567-2513 (French) Monday through Friday 8:00 AM to 5:00 PM E.S.T.
TOOLS AND MATERIALS REQUIRED:
L
I
G
H
T
I
N
G
&
F
A
N
S
E
C
L
A
I
R
A
G
E
S
&
V
E
N
T
I
L
A
T
E
U
R
S
!
INSTRUCTIONS PERTAINING TO RISK OF FIRE OR INJURY TO PERSONS
READ ALL INSTRUCTIONS
IMPORTANT SAFETY
INSTRUCTIONS
SAVE THESE INSTRUCTIONS
SAFETY PRECAUTIONS:
1. TURN OFF ELECTRICAL POWER BEFORE STARTING INSTALLATION OF LIGHT FIXTURE.
2. THIS PRODUCT MUST BE INSTALLED IN ACCORDANCE WITH THE APPLICABLE INSTALLATION CODE BY A
PERSON FAMILIAR WITH THE CONSTRUCTION AND OPERATION OF THE PRODUCT AND THE HAZARDS
INVOLVED.
3. THIS FIXTURE IS DESIGNED FOR 120 VOLT CIRCUIT. IF UNSURE ABOUT WIRING, CONSULT AN ELECTRICIAN.
WARNING: DO NOT CONNECT FIXTURE TO DIMMER CIRCUIT.
4. THIS FIXTURE MUST BE GROUNDED PROPERLY. CONNECT THE GROUND WIRE (BARE COPPER OR GREEN) TO
THE AC SUPPLY GROUND WIRE (BARE COPPER OR GREEN) OR GROUND SCREW IN THE ELECTRICAL OUTLET
BOX. IF GROUND WIRE IS NOT AVAILABLE IN YOUR AC SUPPLY WIRE SYSTEM, PLEASE CONSULT A QUALIFIED
ELECTRICIAN BEFORE PROCEEDING THE ELECTRICAL CONNECTION.
5. USE ONLY ENERGY STAR APPROVED BALLAST (WITH LAMP SOCKETS) MANUFACTURED BY CSA FILE
NUMBER 226237 AND MARKETED BY CANARM LIMITED. THIS BALLAST IS REPLACEABLE BY A
QUALIFIED ELECTRICIAN WITHOUT CUTTING OF THE WIRES.
