INSTALLATION:
LW-1
08/17
1
TOOLS AND MATERIALS REQUIRED:
Phillips
Screwdriver
Pliers
!
INSTRUCTIONS PERTAINING TO RISK OF FIRE OR INJURY TO PERSONS
READ ALL INSTRUCTIONS
IMPORTANT SAFETY
INSTRUCTIONS
SAVE THESE INSTRUCTIONS
QUESTIONS OR CONCERNS CONTACT AT:
1-800-265-1833 (English) / 1-800-567-2513 (French)
Monday through Friday 8:00 AM to 5:00 PM E.S.T.
Wiring supplies
as required by
local electrical
code
LED WRAP- FIXTURE
SAFETY PRECAUTIONS:
1. THIS FIXTURE IS DESIGNED FOR 120 VOLT CIRCUIT. IF UNSURE ABOUT WIRING, CONSULT AN
ELECTRICIAN.
2. TURN OFF ELECTRICAL POWER BEFORE STARTING INSTALLATION OF LIGHT FIXTURE.
3. THIS PRODUCT MUST BE INSTALLED IN ACCORDANCE WITH THE APPLICABLE INSTALLATION CODE
BY A PERSON FAMILIAR WITH THE CONSTRUCTION AND OPERATION OF THE PRODUCT AND THE
HAZARDS INVOLVED.
4. DO NOT CONNECT FIXTURE TO DIMMER CIRCUIT.
5. THIS FIXTURE MUST BE GROUNDED PROPERLY. CONNECT THE GROUND WIRE (BARE COPPER OR
GREEN) TO THE AC SUPPLY GROUND WIRE (BARE COPPER OR GREEN) OR GROUND SCREW IN THE
ELECTRICAL OUTLET BOX. IF GROUND WIRE IS NOT AVAILABLE IN YOUR AC SUPPLY WIRE SYSTEM,
PLEASE CONSULT A QUALIFIED ELECTRICIAN BEFORE PROCEEDING THE ELECTRICAL CONNECTION.
WARNING
NOTE: To clean the fixture, turn off the power, wait for it to cool, and wipe the fixture with a clean,
soft cloth.
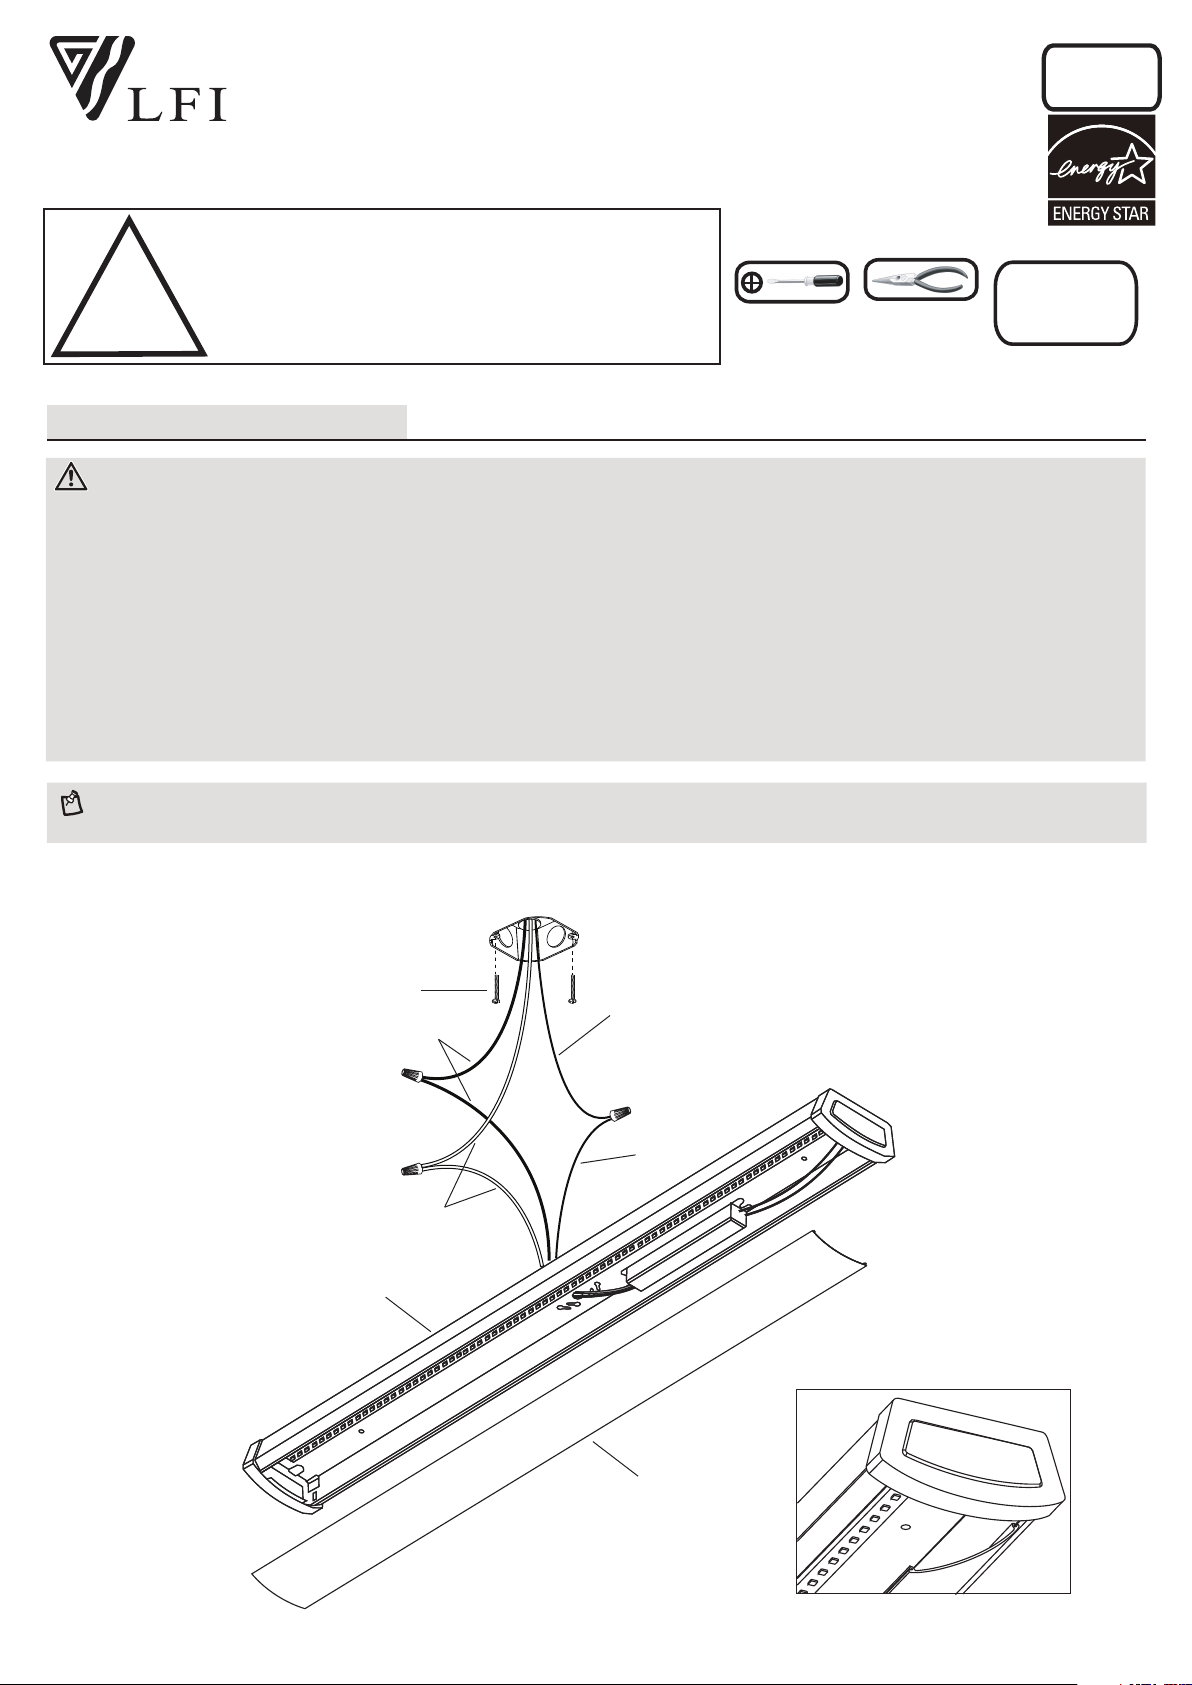
White
Black
House supply
Ground wire
Fixture
Ground wire
Mounting
screw
Acrylic lens
Housing

Tel: (613) 342-5424, Fax: (800) 263-4598
2
1. Gently squeeze one end of the lens to release from housing. Be careful not to crack the lens.
2. Secure the mounting screws (only screwing on halfway) to electrical box.
ATTENTION: Branch circuit conductors must be rated 194°F (90°C). Consult a qualified electrician before
installing.
3. Connect the ground wire (bare copper or green) from your fixture to the ground wire (bare copper or green) or
ground screw in the electrical box. Connect the black wire from the fixture to the black wire in the electrical box and
connect the white wire from the fixture to the white wire in the electrical box.
4. Once connections of wires are completed, carefully tuck wires and wire nuts into the electrical box making sure
no bare wire (on the black and white) is visible at the wire nuts.
5. Attach the fixture to the mounting screws, turn fixture clockwise, and tighten screws.
6. Insert lens slot onto the edge on one side of the housing. Squeeze lens carefully to sit on the other side of the
housing. Continue this action down to the end of the lens until it sits fully into the housing.
INSTALLATION:
1
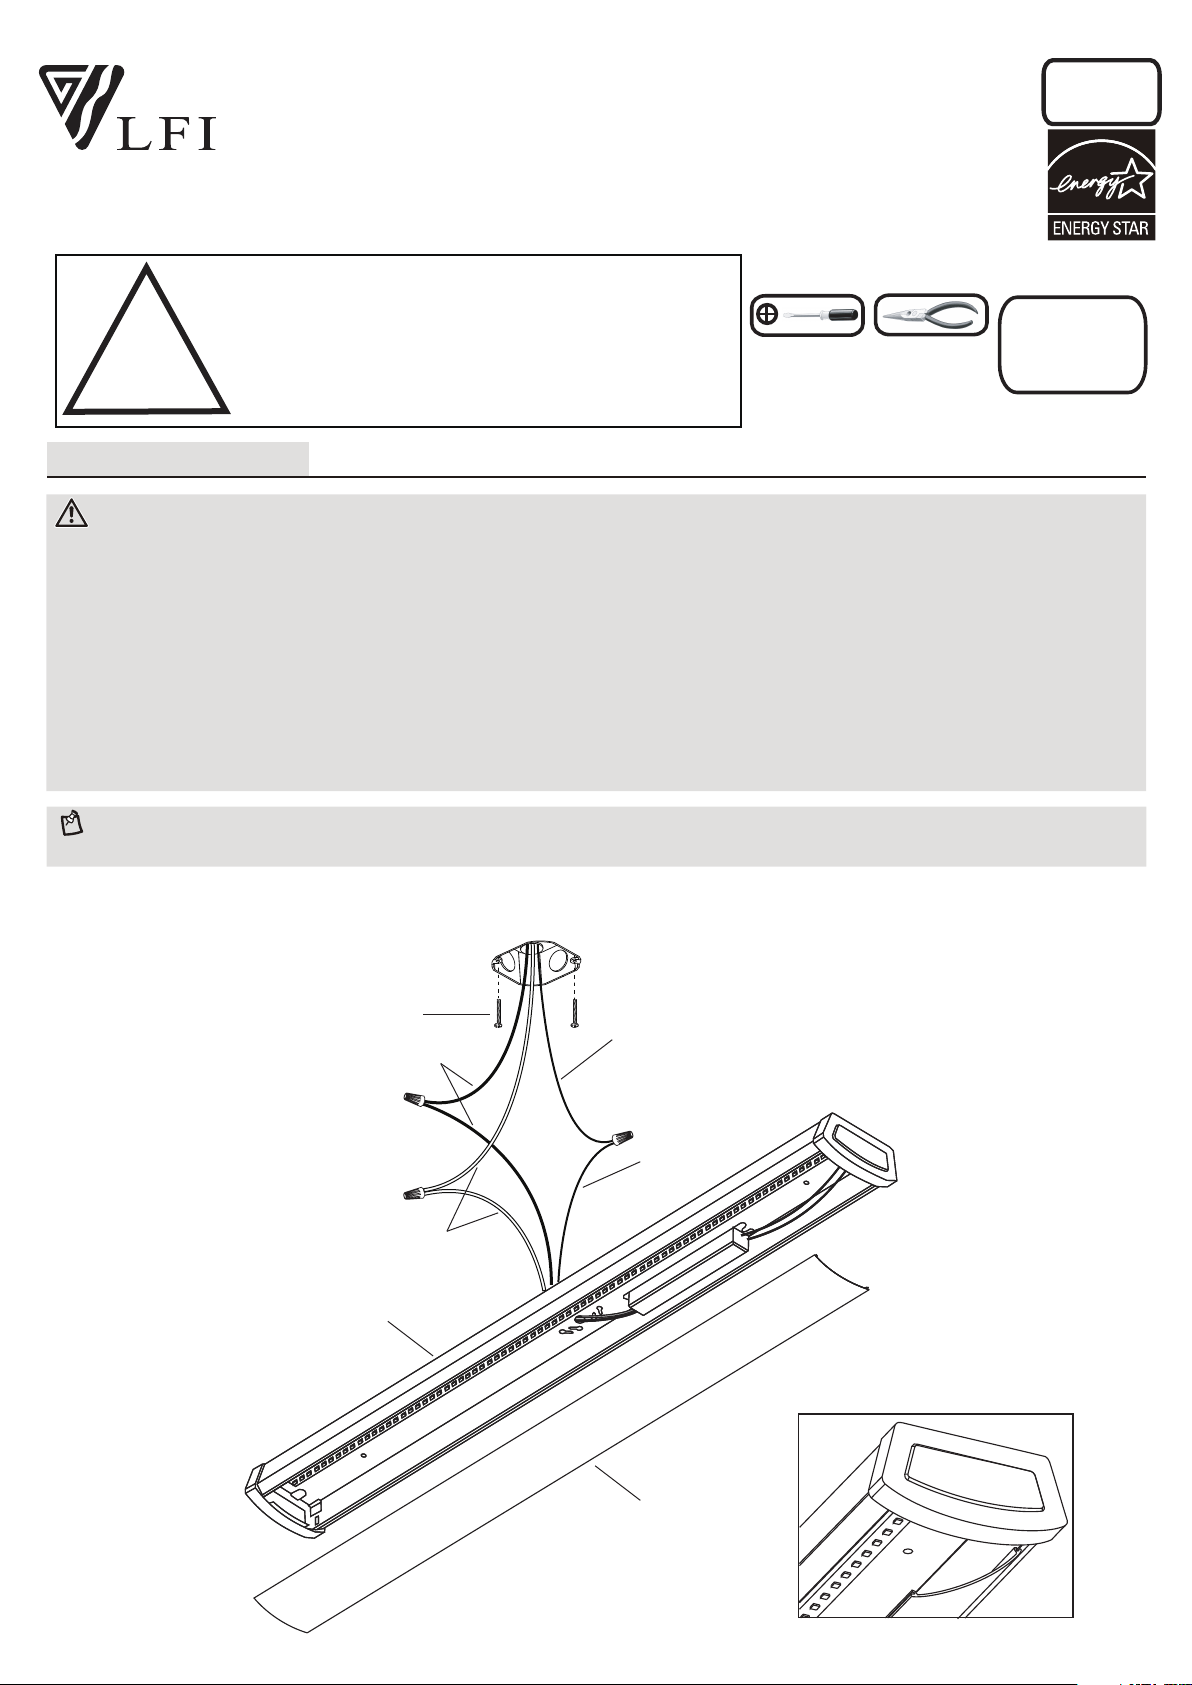
Vis de montage
Lentille en acrylique
Fixture
Phillips
Screwdriver
Pliers
QUESTIONS OU INFORMATION COMMUNIQUE AVE AU:
1-800-265-1833 (Anglais) / 1-800-567-2513 (Français)
Du lundi au vendredi entre 8:00H et 17:00H H.N.E.
!
INSTRUCTIONS CONCERNANT LE RISQUE
D’INCENDIES OU LES DOMMAGES CORPORELS
LISEZ TOUTES LES INSTRUCTIONS
INSTRUCTIONS DE SÛRETÉ
IMPORTANTES
GARDEZ CES INSTRUCTIONS
OUTILS ET MATERIAUX REQUIS:
Fournitures
électriques telles
que prescrites par
les normes
locales
LW-1
08/17
1. CE LUMINAIRE EST A UTILISER SUR UN CIRCUIT DE 120 VOLTS. SI VOUS NE CONNAISSEZ PAS LE
TENSION DE VOTRE CIRCUIT, VEUILLEZ CONSULTER UN ELECTRICIAN QUALIFIE.
2. FERMEZ LE COURANT AU DISJONCTEUR AVANT DE DEBUTER L’INSTALLATION DE LA FIXTURE.
3. CE PRODUIT DOIT ÊTRE INSTALLÉ SELON LE CODE D’INSTALLATION PERTINENT, PAR UNE PERSONNE
QUI CONNAIT BIEN LE PRODUIT ET SON FONCTIONNEMENT AINSI QUE LES RISQUES INHÉRENTS.
4. N’UTILISEZ PAS REDUCTEUR D’INTENSITE SUR LA LUMIERE.
5. CE LUMINAIRE DOIT ÊTRE MISE À TERRE CORRECTEMENT. BRANCHEZ LE FIL DE LA MISE À TERRE
(CUIVRE OU VERT) AU FIL DE LA MISE À TERRE DU COURANT (CUIVRE OU VERT) OU VIS DE MISE À
TERRE DANS LA BOÎTE ÉLECTRIQUE. SI UNE MISE À TERRE N’EST PAS DISPONIBLE DANS VOTRE
SYSTÈME DE FILAGE, VEUILLEZ CONSULTER UN ÉLECTRICIEN QUALIFIÉ AVANT DE PROCÉDER AUX
RACCORDEMENTS.
ATTENTION
MISE EN GARDE:
N.B.: Pour nettoyer le luminaire, éteignez-le, attendez qu’il soit froid, puis nettoyez-le avec linge
propre et doux.
LUMIÈRE
ENVELOPPANTE DEL
Blanc
Noir
Fil de mise
à terre de
la maison
Fil de terre
sur le
luminaire

PH: (450) 665-2535, FX: (450) 665-0910
2
1. Pressez doucement l'extrémité de la lentille pour libérer du boîtier de la fixture..Soyez prudent de ne pas
endommager la lentille.
2. Posez les vis de montage de la fixture (en ne vissant qu'à moitié) dans la boîte électrique.
MISE EN GARDE: Les conducteurs de circuit doivent être pour résister à 194 °F (90 °C). Consultez un électricien
qualifié avant de procéder à l'installation.
3. Branchez le fil de la mise aterre (cuivre nu ou vert) de votre montage au fil de la mise a terre (cuivre nu ou vert) ou
vis de la mise a terre dans la boite electrique. Posez le fil noir de la fixture au fil noir dans la boite électrique et posez
le fil blanc de la fixture au fil blanc dans la boite.
4. Une fois les connexions terminées, poussez soigneusement les fils et les marrettes dans la boîte électrique en
vous assurant qu'aucun fil dénudé (sur les fils noirs et blancs) est visible des marrettes.
5. Posez la fixture au vis de montage, tournez dans les sens des aiguilles et serrez les vis.
6. Insérer la fente de la lentille sur le bord sur un côté du boîtier. Écraser la lentille légèrement afin qu’elle repose sur
le côté opposé du boîtier. Continuer cette action sur tout le long de la lentille jusqu’à ce qu’elle soit entièrement en
place dans le boîtier.

