Loading ...
Loading ...
Loading ...

assembly and alignment
e. Set miter indicator on 0° position as shown.
6.
7.
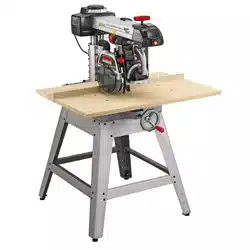
Position the rip (guide) fence, spacer board and rear
table board behind the front table board as shown.
Install the "wo table clamps in the holes provided for
them at the rear of the table mounting support
channels, and tighten them securely.
NOTE: The life of your saw table will be lengthened
considerably if you will cover the front table with a
fitted piece of 1/=inch plywood. This should be tacked
in place for easy replacement. Use of such a cover will
allow you to do all cutting into the cover, rather than
your table top. WASHER
REAR
SPACER
FRONT TABLE
CLAMP
RiP FENCE
STEP FOUR
SQUARING SAW BLADE TO (WORK) TABLE
NOTE: If alignment procedure step one was not performed,
this adjustment can not be accomplished.
1. Place a framing square on the table with the short leg
against the saw blade. Do not allow the square to rest
against a "set-out" tooth; it must rest flat against the
blade side.
2. If the saw blade is square with the table top (no visible
gap appears between the saw blade and square) and no
adjustment is required. Set bevel indicator to 0°
reading. If the square does not touch the saw blade as
shown (with square leg held firm against the table top),
perform the following adjustments:
RIP FENCE
SQUARE
o BEVEL INDICATOR
SOL ARE ___
J
TABLE WRONG
J
WRONG
Y \-K
1
RIGHT
16
Loading ...
Loading ...
Loading ...