
VQT4U56
until
2013/02/16
Operating Instructions
Thank you for purchasing this product.
Please read these instructions carefully before using this product,
and save this manual for future use.
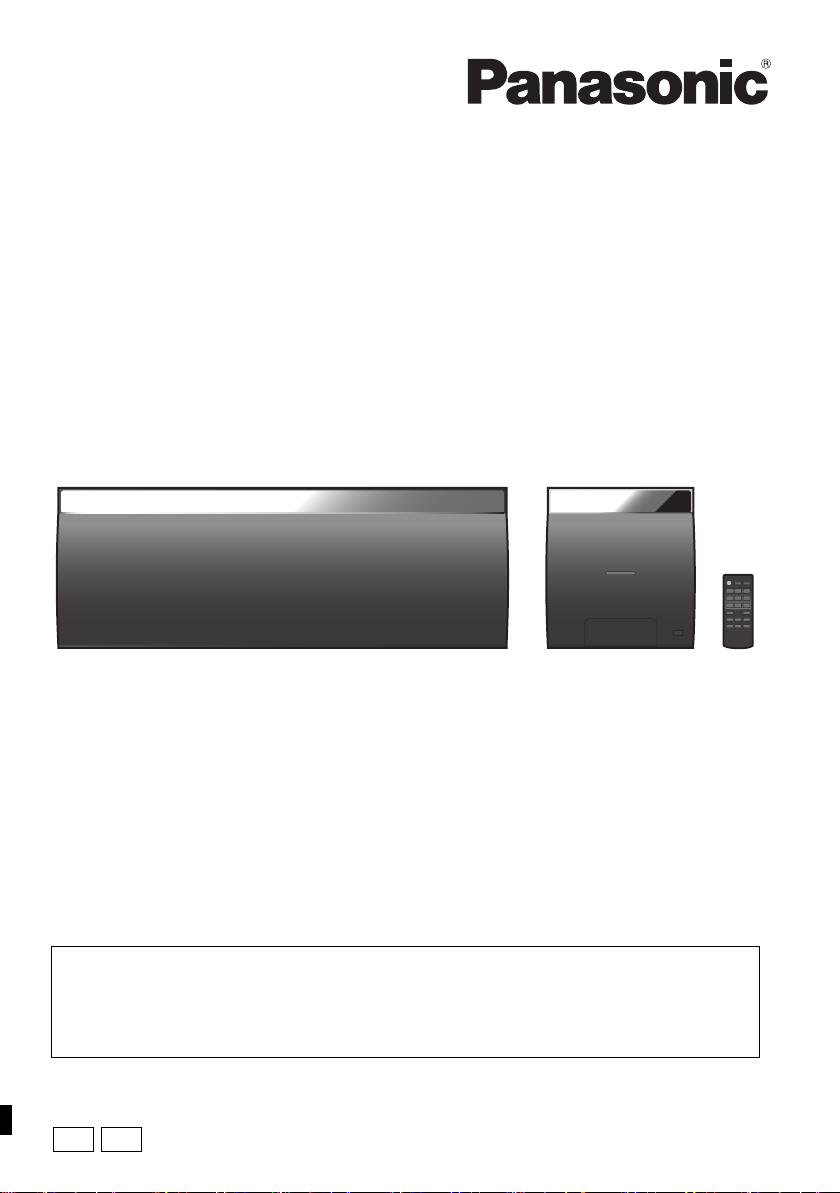
Wireless Speaker System
Model No. SC-NE5DB
Included Installation Instructions (l 3, 28, 29)
The installation work should be done by a qualified installation specialist.
Before commencing work, carefully read these installation instructions and the operating
instructions to ensure that installation is performed correctly.
(Please keep these instructions. You may need them when maintaining or moving this system.)
Model number suffix “EB” denotes UK model.
EB
GN
SC-NE5DB~VQT4U56.book 1 ページ 2013年1月21日 月曜日 午後6時18分
2
VQT4U56
Table of contents
Safety precautions............................................ 3
Caution for AC Mains Lead.............................. 3
Supplied items .................................................. 4
Unit and media care.......................................... 4
Playable media.................................................. 5
Control reference guide ................................... 6
Connections ...................................................... 8
Inserting media ................................................. 9
Network settings............................................. 10
Using AirPlay with this system’s speakers
......... 14
Playing back music files on the DLNA server
..... 15
Bluetooth
®
operations .................................... 16
About Bluetooth
®
............................................ 17
Media playback operations............................ 17
Listening to DAB/DAB+.................................. 19
Listening to FM radio ..................................... 21
Sound adjustment .......................................... 22
Clock and Timer.............................................. 22
Others .............................................................. 23
Troubleshooting.............................................. 25
Attaching the speaker unit to a wall (optional)
.... 28
Specifications ................................................. 30
Limited Warranty (ONLY FOR AUSTRALIA)
........ 31
About descriptions in these operating
instructions
≥ Pages to be referred to are indicated as “l ±±”
≥ Unless otherwise indicated, operations are described
using the remote control.
“Made for iPod”, “Made for iPhone”, and “Made for iPad” mean
that an electronic accessory has been designed to connect
specifically to iPod, iPhone, or iPad, respectively, and has been
certified by the developer to meet Apple performance standards.
Apple is not responsible for the operation of this device or its
compliance with safety and regulatory standards.
Please note that the use of this accessory with iPod, iPhone, or
iPad may affect wireless performance.
AirPlay, the AirPlay logo, iPad, iPhone, iPod, iPod classic, iPod
nano, and iPod touch are trademarks of Apple Inc., registered in
the U.S. and other countries.
Android
TM
, Google Play
TM
, Google Chrome
TM
browser are
trademarks or registered trademarks of Google Inc.
The Wi-Fi CERTIFIED Logo is a certification mark of the Wi-Fi
Alliance.
The Wi-Fi Protected Setup Mark is a mark of the Wi-Fi Alliance.
“Wi-Fi”, “Wi-Fi Protected Setup”, “WPA” and “WPA2” are marks
or registered marks of the Wi-Fi Alliance.
MPEG Layer-3 audio coding technology licensed from
Fraunhofer IIS and Thomson.
The Bluetooth
®
word mark and logos are owned by the
Bluetooth SIG, Inc. and any use of such marks by Panasonic
Corporation is under license.
Other trademarks and trade names are those of their respective
owners.
Windows is a trademark or a registered trademark of Microsoft
Corporation in the United States and other countries.
[For]the]United]Kingdom[and[Ireland]
Declaration of Conformity (DoC)
Hereby, “Panasonic Corporation” declares that this product
is in compliance with the essential requirements and other
relevant provisions of Directive 1999/5/EC.
Customers can download a copy of the original DoC to our
R&TTE products from our DoC server:
http://www.doc.panasonic.de
Contact to Authorised Representative: Panasonic
Marketing Europe GmbH,
Panasonic Testing Centre, Winsbergring 15, 22525
Hamburg, Germany
This product is intended for general consumer. (Category 3)
This product on purpose to connect to access point of
2.4 GHz WLAN.
Gaeilge
Dearbhú Comhréireachta (DoC)
Leis seo, dearbhaíonn “Panasonic Corporation” go bhfuil an
táirge seo i gcomhréir le riachtanais riachtanacha agus
forálacha ábhartha eile den Treoir 1999/5/EC.
Féadfaidh custaiméirí coip dár nDearbhú Comhréireachta (DoC)
bunaidh dár dtáirgí R&TTE ónár bhfreastalaí um Dhearbhú
Comhréireachta (DoC):
http://www.doc.panasonic.de
Mionsonraí Teagmhála Ionadaí Údaraithe: Panasonic Marketing
Europe GmbH,
Panasonic Testing Centre, Winsbergring 15, 22525 Hamburg,
An Ghearmáin
Tá an táirge seo ceaptha don ghnáth-thomhaltóir. (Catagóir 3)
Tá an táirge seo ceaptha chun nascadh le pointe rochtana de
2,4 GHz WLAN.
SC-NE5DB~VQT4U56.book 2 ページ 2013年1月21日 月曜日 午後6時18分
3
VQT4U56
Safety precautions
Unit
≥ To reduce the risk of fire, electric shock or product damage,
– Do not expose this unit to rain, moisture, dripping or
splashing.
– Do not place objects filled with liquids, such as vases, on
this unit.
– Use only the recommended accessories.
– Do not remove covers.
– Do not repair this unit by yourself. Refer servicing to
qualified service personnel.
– Do not let metal objects fall inside this unit.
– Do not place heavy items on this unit.
AC mains lead
≥ To reduce the risk of fire, electric shock or product damage,
– Ensure that the power supply voltage corresponds to the
voltage printed on this unit.
– Insert the mains plug fully into the socket outlet.
– Do not pull, bend, or place heavy items on the lead.
– Do not handle the plug with wet hands.
– Hold onto the mains plug body when disconnecting the plug.
– Do not use a damaged mains plug or socket outlet.
≥ The mains plug is the disconnecting device. Install this unit
so that the mains plug can be unplugged from the socket
outlet immediately.
Button-type battery (Lithium battery)
≥ Risk of fire, explosion and burns. Do not recharge,
disassemble, heat above 60
o
C or incinerate.
≥ Keep the Button-Type battery out of the reach of children.
Never put Button-Type battery in mouth. If swallowed call
your doctor.
Unit
≥ This unit utilizes a laser. Use of controls or adjustments or
performance of procedures other than those specified herein
may result in hazardous radiation exposure.
≥ Do not place sources of naked flames, such as lighted
candles, on this unit.
≥ This unit may receive radio interference caused by mobile
telephones during use. If such interference occurs, please
increase separation between this unit and the mobile
telephone.
≥ This unit is intended for use in moderate climates.
Placement
≥ Place this unit on an even surface.
≥ To reduce the risk of fire, electric shock or product damage,
– Do not install or place this unit in a bookcase, built-in
cabinet or in another confined space. Ensure this unit is
well ventilated.
– Do not obstruct this unit’s ventilation openings with
newspapers, tablecloths, curtains, and similar items.
– Do not expose this unit to direct sunlight, high
temperatures, high humidity, and excessive vibration.
Button-type battery (Lithium battery)
≥ Danger of explosion if battery is incorrectly replaced.
Replace only with the type recommended by the
manufacturer.
≥ Insert with poles aligned.
≥ Mishandling of batteries can cause electrolyte leakage and
may cause a fire.
– Remove the battery if you do not intend to use the remote
control for a long period of time. Store in a cool, dark place.
– Do not heat or expose to flame.
– Do not leave the battery(ies) in a car exposed to direct sunlight
for a long period of time with doors and windows closed.
≥
When disposing the batteries, please contact your local authorities
or dealer and ask for the correct method of disposal.
Caution for AC Mains Lead
(For the AC mains plug of three pins)
For your safety, please read the following text carefully.
This appliance is supplied with a moulded three pin
mains plug for your safety and convenience.
A 5-ampere fuse is fitted in this plug.
Should the fuse need to be replaced please ensure
that the replacement fuse has a rating of 5-ampere and
that it is approved by ASTA or BSI to BS1362.
Check for the ASTA mark Ï or the BSI mark Ì on the
body of the fuse.
If the plug contains a removable fuse cover you must
ensure that it is refitted when the fuse is replaced.
If you lose the fuse cover the plug must not be used
until a replacement cover is obtained.
A replacement fuse cover can be purchased from your
local dealer.
Before use
Remove the connector cover.
How to replace the fuse
The location of the fuse differ according to the type of
AC mains plug (figures A and B). Confirm the AC
mains plug fitted and follow the instructions below.
Illustrations may differ from actual AC mains plug.
1. Open the fuse cover with a screwdriver.
2. Replace the fuse and close or attach the fuse cover.
WARNING
CAUTION
Product Identification Marking is located on the bottoms of
the CD unit and the speaker unit.
(Bottom of product)
Figure A Figure B
Fuse cover
Figure A
Fuse
(5 ampere)
Figure B
Fuse
(5 ampere)
SC-NE5DB~VQT4U56.book 3 ページ 2013年1月21日 月曜日 午後6時18分
4
VQT4U56
Supplied items
∏ 1 CD unit (SL-NE5DB)
∏ 1 Speaker unit (SB-NE5DB)
Check the supplied accessories before using this system.
Unit and media care
Pull out the AC mains lead from the outlet before
maintenance.
∫ Clean this system with a soft, dry cloth
≥ When dirt is heavy, wring a cloth moistened in water tightly to
wipe the dirt, and then wipe it with a dry cloth.
≥ Never use alcohol, paint thinner or benzine to clean this
system.
≥ Before using chemically treated cloth, carefully read the
instructions that came with the cloth.
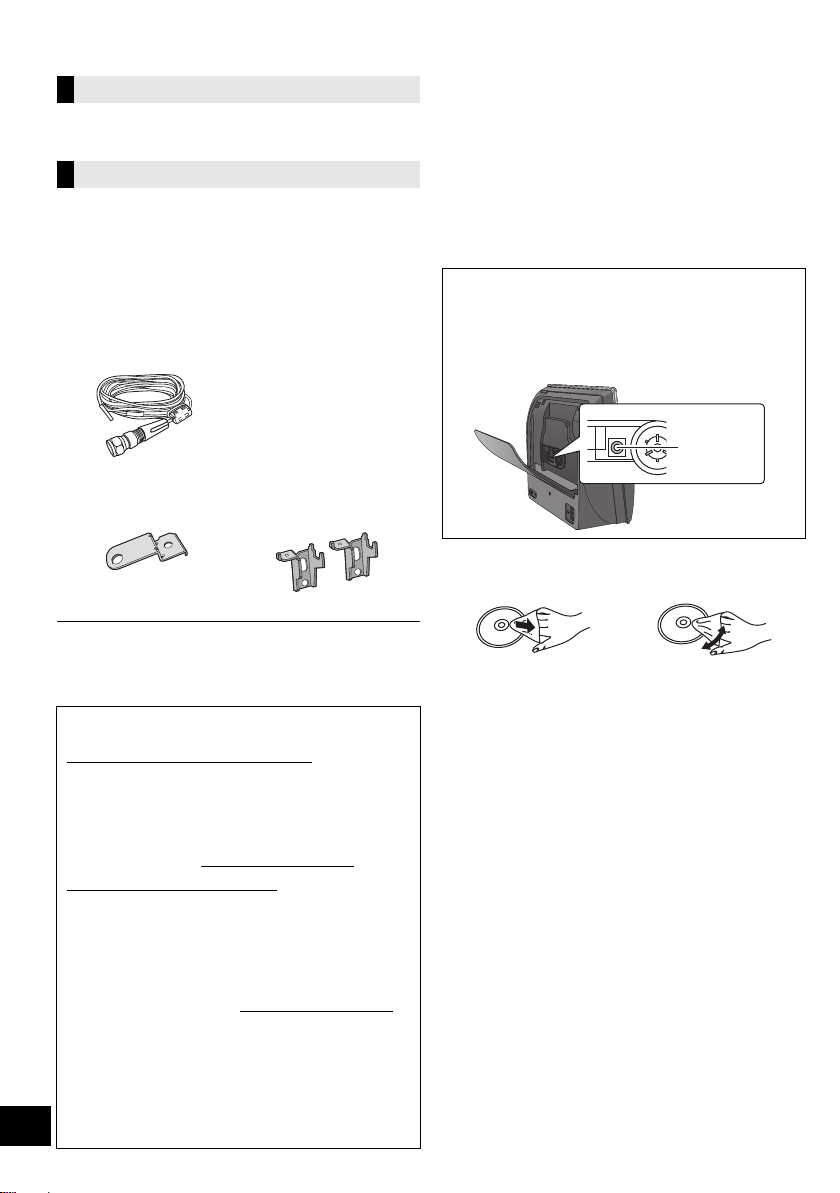
∫ Maintenance of the lens
∫ Clean discs
Wipe with a damp cloth and then wipe dry.
∫ Disc handling precautions
≥ Handle discs by the edges to avoid inadvertent scratches or
fingerprints on the disc.
≥ Do not attach labels or stickers to discs.
≥ Do not use record cleaning sprays, benzine, thinner, static
electricity prevention liquids or any other solvent.
≥ Do not use the following discs:
– Discs with exposed adhesive from removed stickers or
labels (rented discs etc.).
– Discs that are badly warped or cracked.
– Irregularly shaped discs, such as heart shapes.
∫ To dispose or transfer this system
This system may keep the user settings information
internally. If you discard this system either by disposal
or transfer, then follow the procedure to return all the
settings to the factory presets to delete the user
settings. (l 25, “To return all settings to the factory
preset”)
≥ The operation history may be recorded in the
memory of this system.
This system (SC-NE5DB)
Accessories
∏ 1 Remote control (with a battery)
(N2QAYC000090)
∏
[For]the]United]Kingdom[and[Ireland]
2 AC mains lead (K2CT2YY00097)
∏
[For[Australia[and[New[Zealand]
2 AC mains lead (K2CJ2YY00093)
∏ 1 DAB antenna (RFA3425)
Wall mounting accessories
∏ 1 Safety holder
(RGQ0660-K)
∏ 1 Screw
(XTB3+8JFJK-J)
∏ 2
Wall mount brackets
(RMQX1082-S)
≥ Do not use AC mains lead with other equipment.
≥ Product numbers provided in these operating instructions are
correct as of January 2013. These may be subject to change.
[For]the]United]Kingdom[and[Ireland]customers]
Sales and Support Information
Customer Communications Centre
≥For customers within the UK: 0844 844 3899
≥For customers within Ireland: 01 289 8333
≥Monday–Friday 9:00 am – 5:00 pm
(Excluding public holidays).
≥For further support on your product, please
visit our website: www.panasonic.co.uk
Direct Sales at Panasonic UK
≥
Order accessory and consumable items for
your product with ease and confidence by
phoning our Customer Communications Centre
Monday–Friday 9:00 am – 5:00 pm
(Excluding public holidays).
≥Or go on line through our Internet Accessory
ordering application at www.pas-europe.com
.
≥Most major credit and debit cards accepted.
≥
All enquiries transactions and distribution
facilities are provided directly by Panasonic UK.
≥It couldn’t be simpler!
≥
Also available through our Internet is direct
shopping for a wide range of finished products.
Take a browse on our website for further details.
≥ Clean the lens regularly to prevent malfunctions. Use a
blower to remove dust and a cotton swab if it is extremely
dirty.
≥ You cannot use a CD type lens cleaner.
≥ Do not leave the door open for prolonged periods of time.
This will cause the lens to get dirty.
≥ Be careful not to touch the lens with your fingers.
DO DO NOT
Lens
SC-NE5DB~VQT4U56.book 4 ページ 2013年1月21日 月曜日 午後6時18分
5
VQT4U56
Playable media
Compatible with “IPOD_DOCK” connection
(Using Lightning connector)
Compatible with “IPOD_PORT” connection
[Using dedicated USB cable (not supplied)]
(as of January 2013)
≥ Compatibility depends on the software version. Update your
iPod/iPhone/iPad to the latest software before using it with
this system.
≥ Please be aware that Panasonic accepts no responsibility for
the loss of data and/or information.
≥ A disc with the CD Logo.
≥ This system can play back discs that conform to the CD-DA
format.
≥ This system may not be able to play some discs due to the
condition of the recording.
(as of January 2013)
≥ This system does not guarantee connection with all USB
devices.
≥ FAT12, FAT16 and FAT32 file systems are supported.
≥ This system supports USB 2.0 full speed.
≥ This system can support USB devices of up to 32 GB.
≥ Supported format: Files with the extension “.mp3” or “.MP3”.
≥ Compatible compression rate: Between 64 kbps and
320 kbps (stereo).
≥ Depending on how you create the MP3 files, they may not
play in the order you numbered them or may not play at all.
Creating MP3 files on a CD-R/RW
≥ Maximum number of tracks and albums: 999 tracks and 254
albums (Excluding Root folder).
≥ Disc formats: ISO9660 level 1 and level 2 (except for
extended formats).
≥ If the disc includes both MP3 and normal audio data
(CD-DA), this system plays the type recorded in the inner
part of the disc.
≥ This system cannot play files recorded using packet write.
Creating MP3 files on a USB device
≥ Maximum number of tracks and albums: 2500 tracks and 254
albums (Excluding Root folder).
≥ Only one memory card will be selected when connecting a
multiport USB card reader, typically the first memory card
inserted.
Compatible iPod/iPhone/iPad
iPod touch (5th generation)
iPod nano (7th generation)
iPhone 5
iPod touch
1st, 2nd, 3rd, 4th, and 5th generation
iPod nano
2nd, 3rd, 4th, 5th, 6th, and 7th generation
iPhone 5 / iPhone 4S / iPhone 4 /
iPhone 3GS / iPhone 3G / iPhone
iPad
(3rd, and 4th generation) / iPad 2 / iPad
iPad mini
Compatible CD
Compatible AirPlay devices
iOS 4.3.3 or later
iPod touch
3rd, 4th, and 5th generation
iPhone 5 / iPhone 4S / iPhone 4 / iPhone 3GS
iPad
(3rd, and 4th generation) / iPad 2 / iPad
iPad mini
iTunes 10.2.2 or later (Mac / PC)
Compatible USB devices
Compatible MP3 files
SC-NE5DB~VQT4U56.book 5 ページ 2013年1月21日 月曜日 午後6時18分
6
VQT4U56
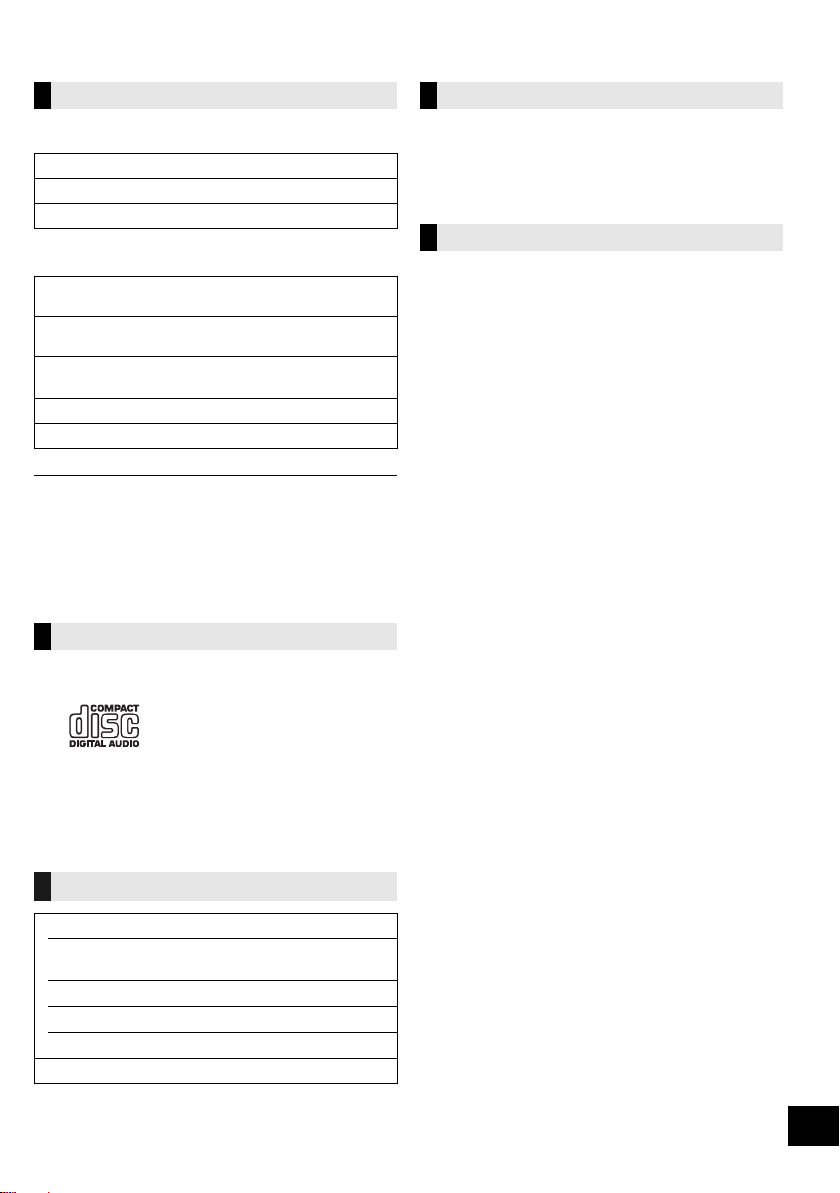
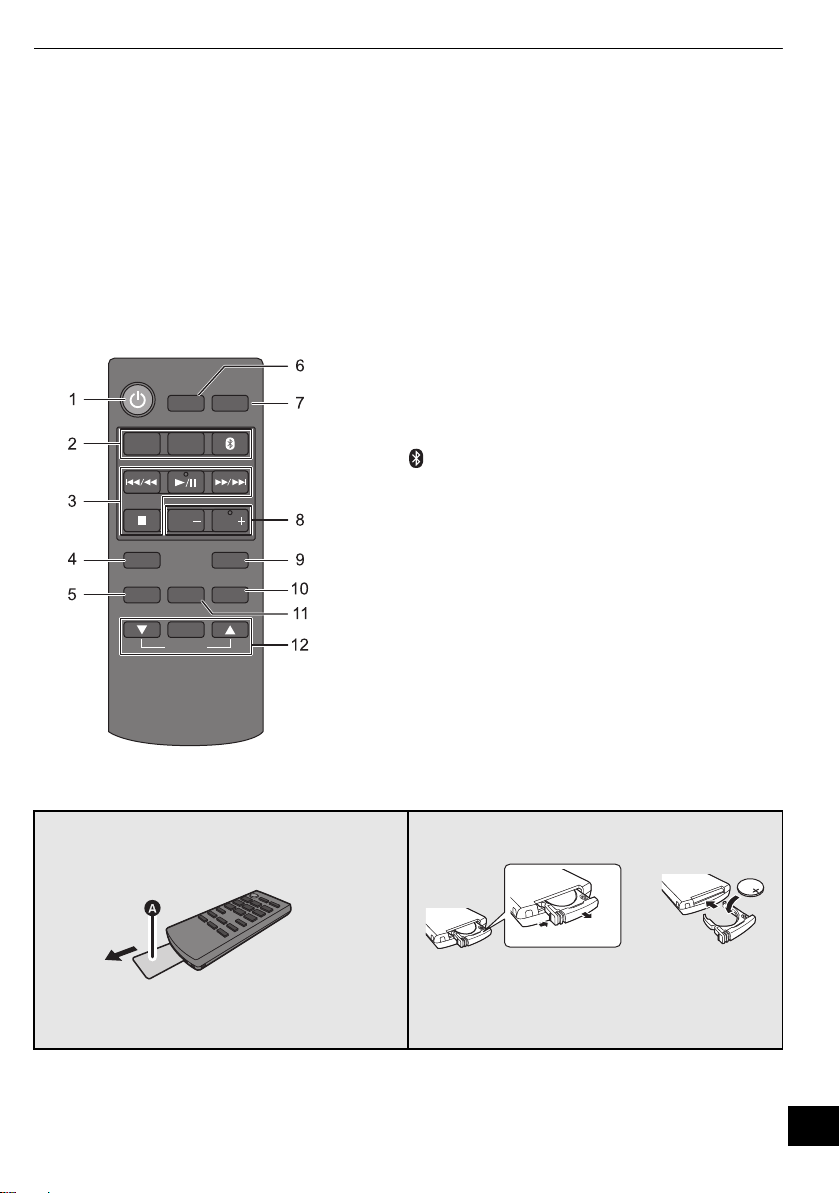
Control reference guide
This system consists of the CD unit and the speaker unit. The both units are wirelessly connected when
turned on.
∫ CD unit
∫ Speaker unit
1 Standby/on switch (Í/I)
Press to switch the unit from on to standby mode
or vice versa.
In standby mode, the unit is still consuming a small
amount of power.
≥ The CD unit and the speaker unit operate
simultaneously. Press either standby/on switch
to turn both units on or to standby mode.
Refer to page 25 when the units do not turn on
simultaneously.
2 Select the audio source
“CD”
---------.
“DAB/DAB+”
----------.
“FM”
----------.
“BLUETOOTH”
^
“IPOD_PORT” / “USB”
(
“IPOD_DOCK”
(
“AUX”
(b
3 Basic playback control buttons
4 iPod port for iPod/iPhone/iPad and USB devices
(l 5, 9)
5 Adjust the volume (0 (min) to 50 (max))
6 Network setup button (l 11)
7 Standby/on indicator
While this system is turned on:
The indicator lights in green when the CD unit and
the speaker unit are connected successfully, blinks
in green when they are connecting, and lights in
red when they fail to connect.
8 Display
9 Open the CD lid
10 Dock for iPod/iPhone with Lightning connector
(l 9)
11 Remote control signal sensor
Distance:
Within approx. 7 m directly in front.
≥ To avoid interference, please do not put any objects in
front of signal sensor.
12 WPS pairing button (l 10)
13 Wi-Fi
®
status indicator
8
9
11
10
Side view
− VOLUME +
2512
11
13
8
Top view
SC-NE5DB~VQT4U56.book 6 ページ 2013年1月21日 月曜日 午後6時18分
7
VQT4U56
≥The CD unit’s display turns off if the CD unit is left unused for more than 3 minutes and the audio selector is set
to an option other than
“CD”, “IPOD_DOCK”, or “IPOD_PORT”. To turn the display on, press any button on
the CD unit, or select
“CD”, “IPOD_DOCK”, or “IPOD_PORT” as an audio source.
≥Placing the CD unit and the speaker unit:
– Keep a minimum distance of 1 cm between the CD unit and the speaker unit when placing them.
– The distance between the CD unit and the speaker unit should be a maximum of 10 m. The range can decrease depending on
the environment, obstacles or interference.
– This system may not function properly and troubles such as noise and sound jumps may arise due to radio wave interference
if this system is located too close to the devices that use the 2.4 GHz band.
– This system may not function properly if radio waves from a nearby broadcasting station, etc. is too strong.
– Do not use this system near equipment or in an environment that is sensitive to radio frequency interference (example:
airports, hospitals, laboratories, etc).
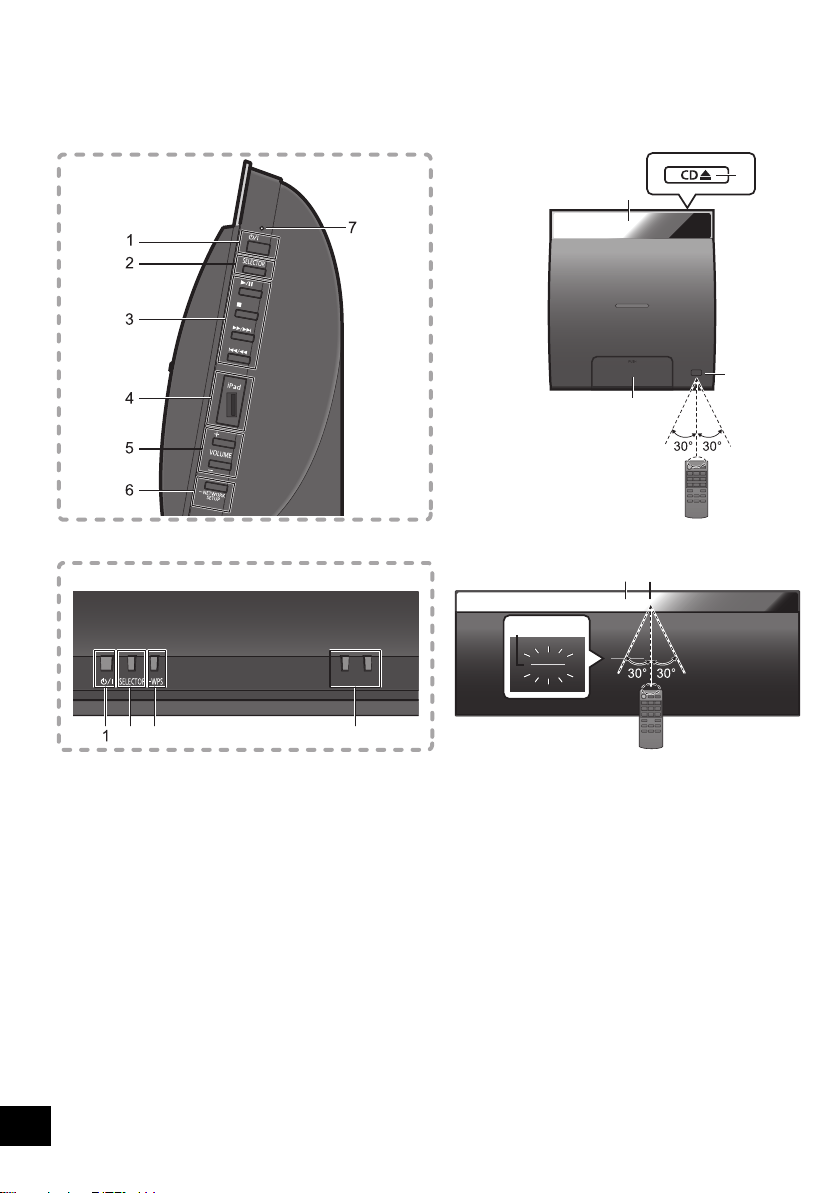
∫ Remote control
1 Turn this system on or off
2 Select the audio source
[iPod/USB] :
“IPOD_DOCK”
,.
“IPOD_PORT” / “USB”
[CD/RADIO] : “CD” -.“DAB/DAB+” -. “FM”
^---------------------------------------b
[ , AUX] : “BLUETOOTH” ,. “AUX”
3
Basic playback control buttons
4 Enter setup menu
5 Enter the iPod/iPhone menu /
Change displayed information
6 Set the sleep timer
7 Change the brightness of the display panel
≥ Press to dim the display panel.
Press again to cancel.
8 Adjust the volume (0 (min) to 50 (max))
9 Mute the sound
Mutes the sound. Press again to cancel. “MUTE” is also
cancelled when the volume is adjusted or this system is
turned off.
10 Enter playback menu
11 Enter sound menu
12 Selection/OK
∫ Before using for the first time
Remove the insulation sheet A.
∫ To replace a button-type battery
Battery type: CR2025 (Lithium battery)
≥ Set the button-type battery with its (i) mark
facing upward.
≥ Keep the button-type battery out of reach of
children to prevent swallowing.
SLEEP
DIMMER
AUX
MUTE
PLAY MENU
SOUND
OK
ALBUM
iPod MENU
DISPLAY
SETUP
VOLVOL
iPod/
USB
CD/
RADIO
SC-NE5DB~VQT4U56.book 7 ページ 2013年1月21日 月曜日 午後6時18分
8
VQT4U56
Connections
1 Connect the DAB indoor antenna (supplied) to the
speaker unit.
2 Connect the AC mains lead after all other
connections are completed.
≥ After connecting the AC mains lead to the mains socket, wait
for more than 15 seconds to turn on the Standby/on switch.
≥ When this system is turned on, the CD unit and the speaker
unit are connected wirelessly.
≥ When this system is turned on for the first time after
purchase, a message prompting you to connect a Bluetooth
®
device (“PAIRING”) is displayed. (l 16)
≥ This system consumes a small amount of AC power (l 30)
even when turned off.
≥ In the interest of power conservation, if you will not be using
this system for an extended period of time, unplug it from the
household mains socket.
≥ These speakers do not have magnetic shielding. Do not
place them near a television, personal computer or other
devices easily influenced by magnetism.
≥ Tape the antenna to a wall or column in a position with the
least amount of interference. (Use a DAB outdoor antenna if
radio reception is poor.)
1 Plug the audio cable (not supplied) into the AUX
jack.
Plug type: ‰3.5 mm stereo
2 Press [ , AUX] to select “AUX” and start playback
on the connected device.
To select the sound input level of the
external device
1 While in AUX mode, press [PLAY MENU] to select
“INPUT LEVEL” and then press [OK].
2 Press [3, 4] to select “NORMAL” or “HIGH”.
≥ The default setting is “NORMAL”.
≥ Switch the equalizer off or turn the volume of the external
device down to reduce the input signal. High level of input
signal will distort the sound.
≥ For details, refer to the instruction manual of the other
equipment.
≥ The cables and the devices are not supplied.
If the CD unit and the speaker unit are not wirelessly
connected, or the output sound is interrupted, connect
the both units with two audio cables (plug type:
‰3.5 mm stereo, not supplied) as illustrated below.
≥ We recommend you use cables of less than 5 m.
≥ If the cables are connected, the displays show
“WIRED MODE” and this system starts wired
communication. This system automatically connects
wirelessly when the cables are disconnected.
Basic connection
[For]the]United]Kingdom[and[Ireland]
READ THE CAUTION FOR THE AC MAINS
LEAD ON PAGE 3 BEFORE CONNECTION.
Adhesive tape (not supplied)
DAB indoor antenna
(supplied)
Be sure to tighten the
nut securely.
To a household
mains socket
AC mains lead
(supplied)
Connect an external music device
(for AUX mode)
Connect the CD unit and the
speaker unit with cables (optional)
Audio cable
(not supplied)
Audio cable (not supplied)
SC-NE5DB~VQT4U56.book 8 ページ 2013年1月21日 月曜日 午後6時18分
9
VQT4U56
Inserting media
≥ Make sure that the unit does not fall when inserting or
removing media.
≥ When moving this unit, be sure to remove all media and turn
this unit to standby mode.
*1: Refer to “Playable media” for compatible models. (l 5)
*2: When using the “IPOD_PORT” connection, do not connect
the following models to this unit:
– iPod classic, iPod [4th (colour display), and 5th (video)
generation], iPod nano (1st generation)
Unexpected behaviour may occur.
*3: When using the “IPOD_DOCK” connection:
≥ Be sure to remove the iPod/iPhone from its case.
≥ Make sure that the iPod/iPhone is fully inserted and its
back is resting against the cushion pad.
≥ Make sure to hold the dock when removing the iPod/
iPhone.
*4: Use the “IPOD_PORT” connection to charge the iPad.
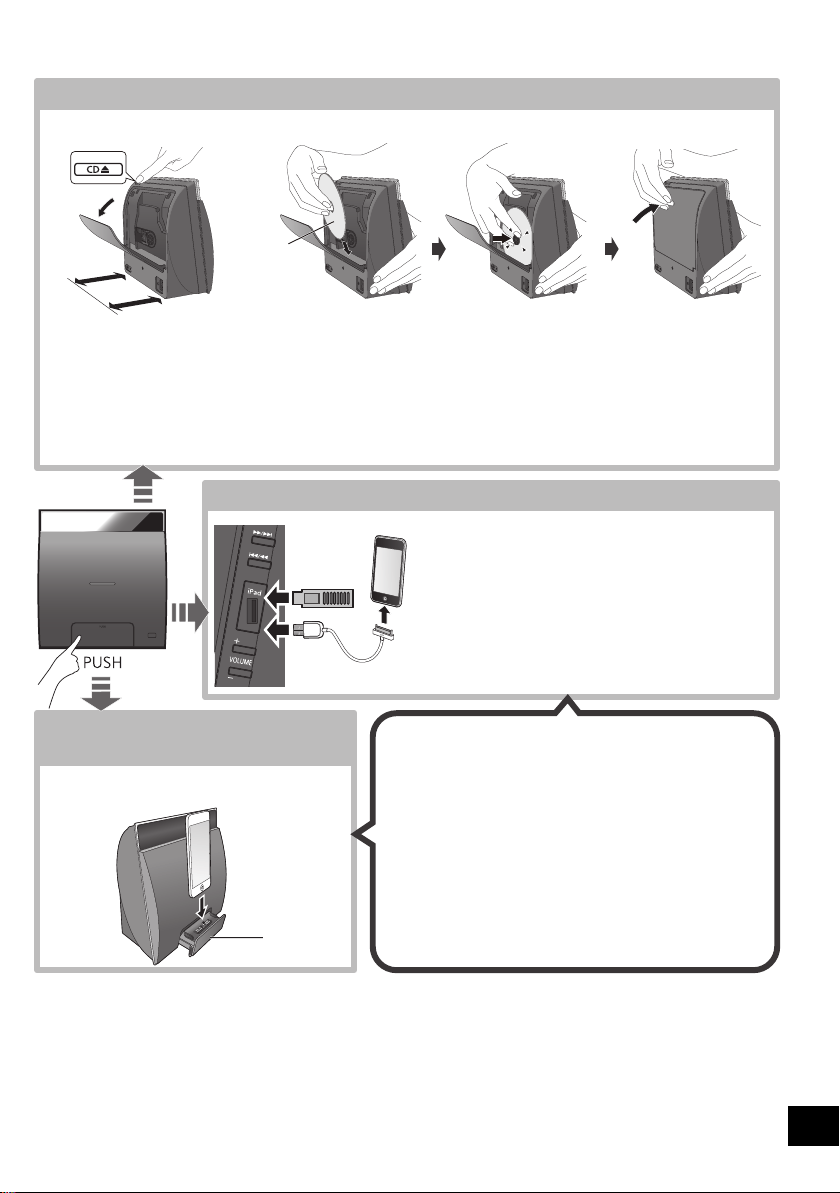
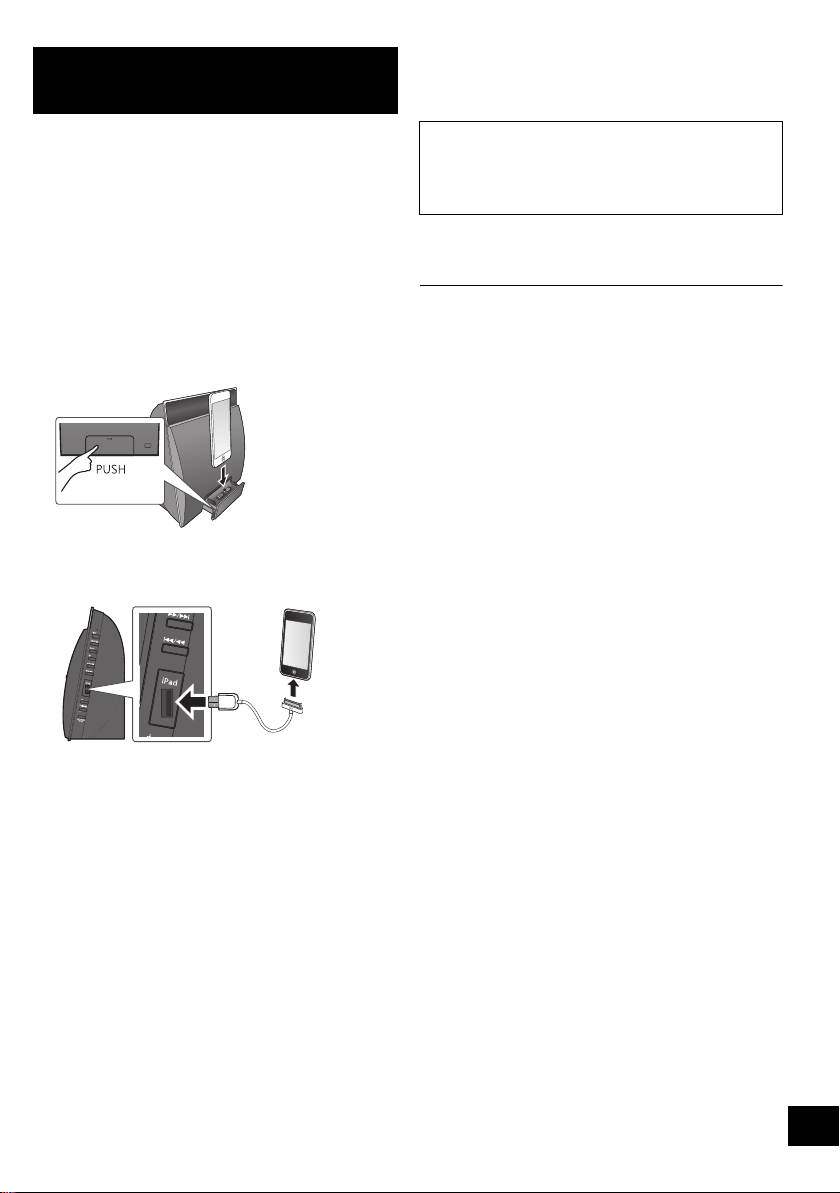
1 Press [CD <] to open the lid on the back of the CD unit.
≥ Leave a space more than 10 cm behind the unit.
≥ Do not place any objects behind the unit.
2 While holding the unit, push the centre of the CD until it clicks into place, and then close the CD lid.
≥ Be careful not to scratch the CD.
≥ Make sure you place the centre of the CD onto the CD spindle of the unit.
Note: Remove the CD only after it stops rotating.
Connect an iPod/iPhone/iPad
*1, 2
or USB device
∫ Charging an iPod/iPhone/iPad
*4
Charging starts when an iPod*
2
/iPhone/iPad is
connected to this unit.
≥ During standby mode, charging will not start from the USB
cable connection, however it will start as usual from the
Lightning connector.
– To charge from the USB cable connection, start the charging
before turning this unit to standby mode.
≥ Check the iPod/iPhone/iPad to see if the battery is fully
charged. (Once fully recharged, additional recharging will not
occur.)
≥ If this unit is switched to standby mode “IPOD CHARGING” is
shown on the unit’s display.
Connect an iPod/iPhone with
Lightning connector
*
1
Inserting a disc
Select “IPOD_PORT” as the source.
≥ When connecting an iPod/iPhone/iPad, use the dedicated
USB cable (not supplied).
≥ “USB” is displayed when a compatible USB device is
inserted.
≥ Insert the USB device directly. Do not use any USB
extension cable.
≥ Before removing the USB device, select a source other than
“USB”.
*3
Select “CD” as the source.
Select “IPOD_DOCK” as the source.
10 cm
The label side
SC-NE5DB~VQT4U56.book 9 ページ 2013年1月21日 月曜日 午後6時18分
10
VQT4U56
Network settings
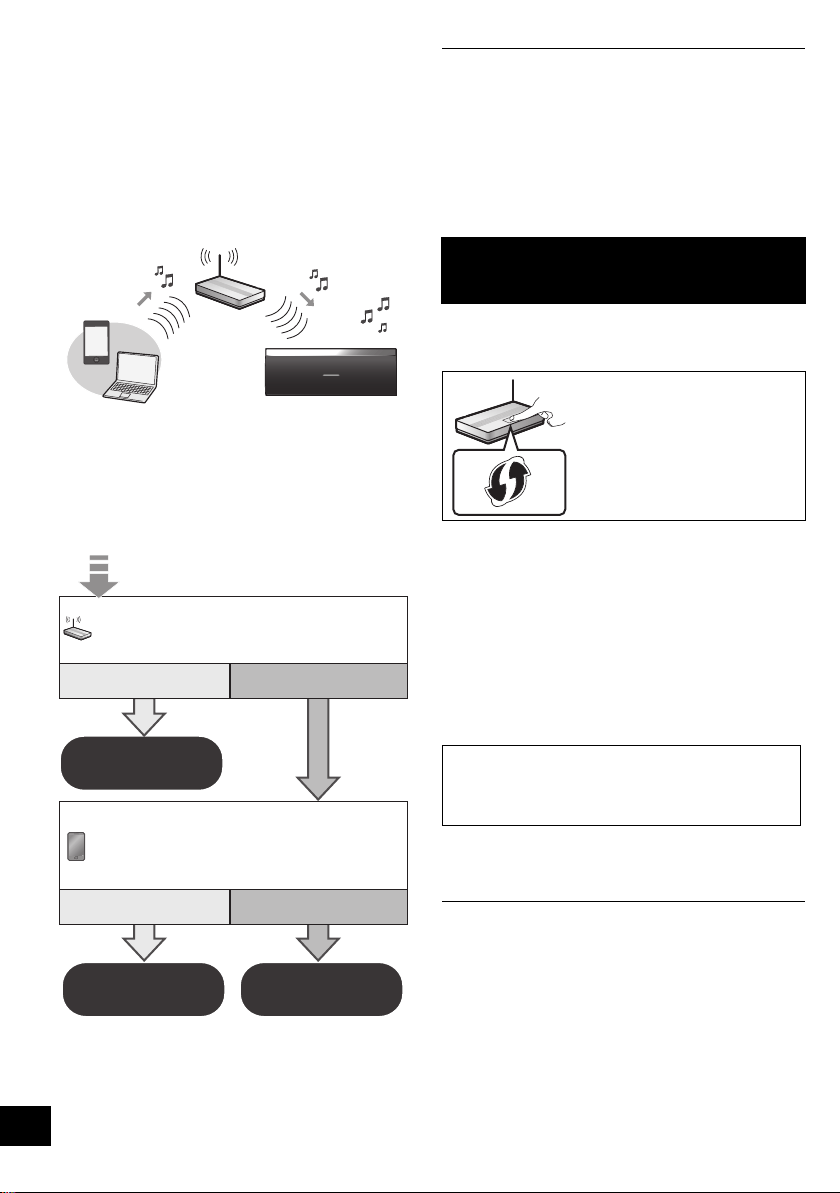
You can wirelessly stream music from an iOS device
(iPhone, iPod, iPad), an Android device or a Mac/PC to
this system’s speakers by using the
AirPlay or DLNA
feature.
To use these features, this system must join the
same
2.4 GHz wireless network as the AirPlay
compatible device (l 5
) or the DLNA compatible
device.
≥ It is also possible to use AirPlay without a wireless network
router. (l 14, “Directly streaming to this system (AirPlay)”)
Preparation
≥ Place this system close to the wireless network
router.
1 Turn this system on.
2 Follow the chart below to choose the network
setting method.
≥ If you want to perform wireless setting with your
Mac/PC, or you want to apply the advanced
setting, try “Method 4” on page 12.
≥ To cancel this setting in the middle, press [Í] to turn off this
system.
≥ Simultaneous use with other 2.4 GHz devices, such as
microwaves, cordless telephones, etc., may result in
connection interruptions.
≥ For up to date compatibility information on your wireless
network router refer to
http://panasonic.jp/support/global/cs/
(This site is in English only.)
∫ Using the WPS Push Button
Configuration (PBC)
1 Press and hold [s WPS] on the speaker unit.
{. “WPS” flashes on the display.
(The Wi-Fi status indicator blinks blue.)
≥ Complete step 2 within 2 mins.
2 After “WPS” is indicated, press the WPS button on
the wireless network router.
3 The settings are completed when “SUCCESS” is
displayed and the Wi-Fi status indicator stops
blinking and lights in blue.
4 Press [OK] on the remote control to exit the
setting.
≥ To use the WPS PIN code, refer to the notes on page 13.
Does your wireless network router
support WPS?
Yes
l right,
“Method 1”
l 11,
“Method 2”
l 12,
“Method 3”
No / Do not know
Yes No
Are you using an
iPod touch/iPhone/iPad?
Is the iOS version 5.0 or later?
Method 1
If your wireless network router supports WPS
(Wi-Fi Protected Setup
TM
).
The WPS identifier mark
WPS Push Button
Configuration (PBC)
compatible wireless network
router may have this mark.
“FAIL” may be displayed if the connection was not
made within the set time limit. Try the setting again.
If “FAIL” is still displayed, try other methods on page
11
or 12.
SC-NE5DB~VQT4U56.book 10 ページ 2013年1月21日 月曜日 午後6時18分
11
VQT4U56
With this method you will share the wireless
network settings of your iPod touch/iPhone/iPad
with this system.
≥ The following explanations are based on an iPhone.
1 Disconnect any devices connected to the CD unit.
2 Connect the iPhone to your home wireless
network.
3 Connect the iPhone to the CD unit.
Choose one of the following connections.
“IPOD_DOCK” connection compatible iPod touch/
iPhone:
iPod touch/iPhone/iPad with iOS 5.0 or later:
Connect to the iPod port on the side of the CD unit
with a dedicated USB cable.
4 Unlock your iPhone and then press and hold
[sNETWORK SETUP] on the CD unit for more
than 3 seconds.
≥ If “NOT SUPPORTED” or “SET WI-FI” is displayed,
check that the iPhone is connected to the wireless
network and try again from step 1.
5 A message will pop-up on your iPhone. Allow the
iPhone to share the wireless network settings.
*1
{. The Wi-Fi status indicator blinks.
6 The settings are completed when “SUCCESS” is
displayed and the Wi-Fi status indicator stops
blinking and lights in blue.
7 Press [OK] on the remote control to exit the
settings.
*1: Depending on the network environment or the wireless
network router settings, it may take more than 10 mins.
to complete the settings.
Method 2
If you're using an iPod touch/iPhone/iPad.
(iOS version 5.0 or later.)
If “FAIL” is displayed press [OK] and try the setting
again. If “FAIL” is still displayed, try other methods on
page 10 or 12.
≥ If the iPhone was disconnected midway through, try again
without disconnecting it.
SC-NE5DB~VQT4U56.book 11 ページ 2013年1月21日 月曜日 午後6時18分
12
VQT4U56
You can make the wireless network settings with the
app, “Panasonic Stereo System Network Setup” (for
free).
If you’re using an Android device, download the app at
the Google Play Store. If you’re using an
iPod touch/
iPhone/iPad
, download it at the App Store.
Preparation
≥ Connect your smartphone to your home wireless
network.
≥ Check the password for your home wireless network.
1 Press [SETUP] on the remote control repeatedly
to select “NET SETUP” and then press [OK].
{. “SETTING” is indicated on the display.
(The Wi-Fi status indicator blinks purple.)
2 Start “Panasonic Stereo System Network
Setup” on your smartphone and follow the
indications.
∫ Note for the iOS version
After step 2
1 Enter the password for the home wireless network
to which the iOS device is connected.
2 When a message instructing you to connect the
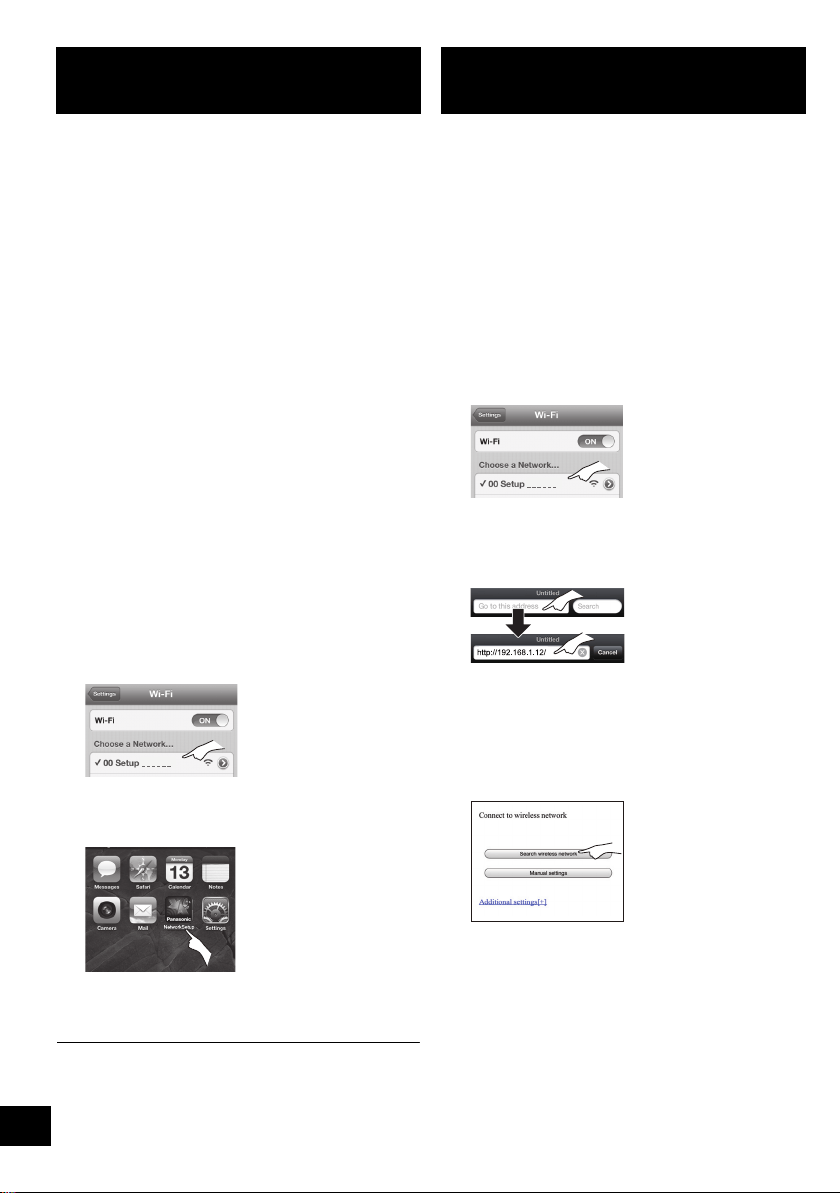
iOS device to this system is displayed, press the
home button to close the app.
3 On the Wi-Fi network selection screen in
“Settings”, select “00 Setup _ _ _ _ _ _”.
≥ “ _ ” stands for a digit that is unique to each set.
4 When a message indicating the completion of the
connection to this system is displayed, restart the
app.
5 When a message indicating the completion of the
Wi-Fi setup of this system is displayed, close the
app, and then check the operation of AirPlay, etc.
≥ “Panasonic Stereo System Network Setup” for Mac OS is
also available at the App Store.
With this method, you will access this system’s
wireless network settings from the Internet browser of
your compatible device.
≥ The following explanations are based on an iPhone.
1 Press [SETUP] on the remote control repeatedly
to select “NET SETUP” and then press [OK].
{. “SETTING” is indicated on the display.
(The Wi-Fi status indicator blinks purple.)
2 After “SETTING” is indicated, connect your
compatible device to this system’s wireless
network named “00 Setup _ _ _ _ _ _”.
≥ “ _ ” stands for a digit that is unique to each set.
≥ Make sure that DHCP is enabled for the network setting
on your compatible device.
3 Start the Internet browser on your compatible
device and type “http://192.168.1.12/” into the
URL address field and display the page.
{. This system’s setup window is displayed.
≥ Examples of Internet browsers
iOS device/Mac : Safari
Android device : Google Chrome browser
PC : Windows Internet Explorer
4 Select “Search wireless network”.
Method 3
Setting the network connection with the smartphone
app.
Method 4
Setting the network connection from an Internet
browser.
SC-NE5DB~VQT4U56.book 12 ページ 2013年1月21日 月曜日 午後6時18分
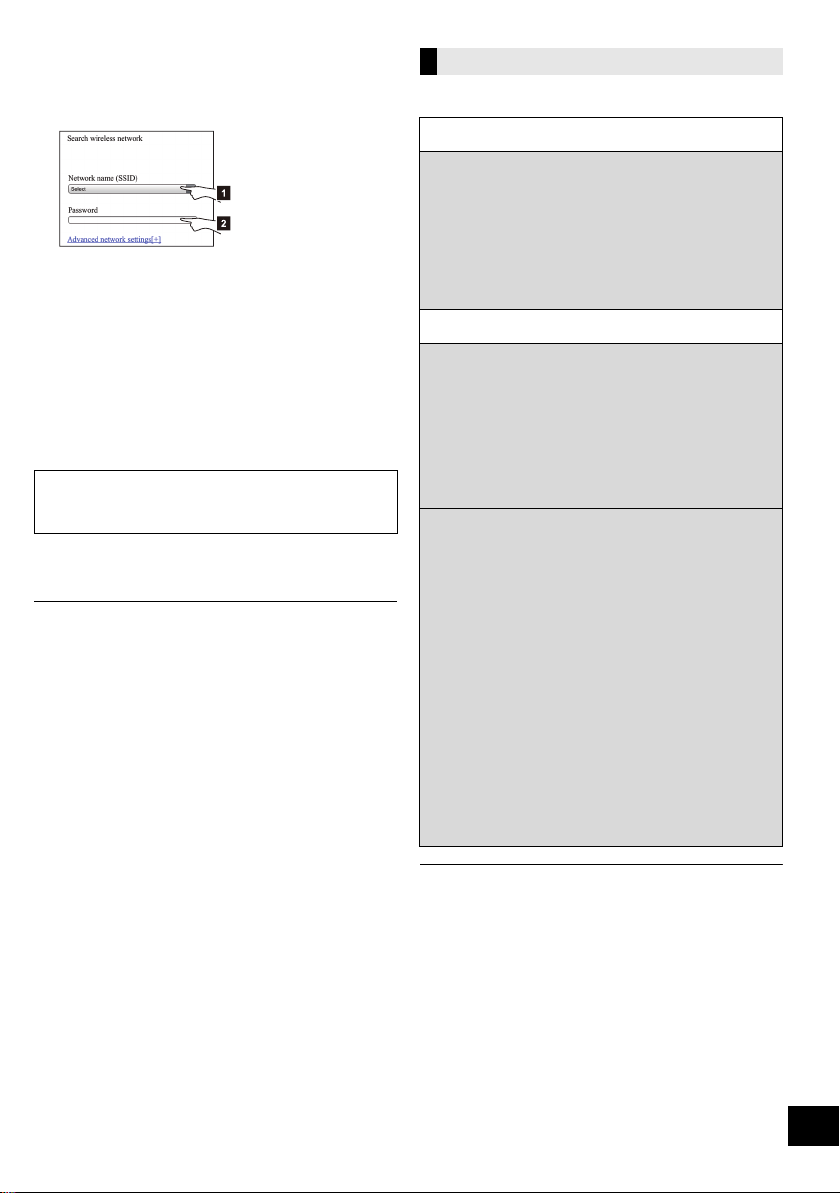
13
VQT4U56
5 Select and input the details.
≥ Check your home wireless network name (Network
name (SSID)) and password for this network. This can
often be found on the wireless network router itself.
6 Select “JOIN” to apply the settings.
≥ In the pop-up screen, select “OK” to continue.
– Select “Cancel” to return to the setup window.
7 The settings are completed when “SUCCESS” is
displayed and the Wi-Fi status indicator stops
blinking and lights in blue.
8 Make sure to connect your compatible device back
to your home wireless network.
*1: If you have set your wireless network to be invisible,
select “BACK” and refer to “Alternative settings”.
≥ The below settings are the alternative or additional
settings for “Method 4”.
(l 12)
≥ Enable Java and Cookies in your browser settings.
≥ This system can also be set using the WPS PIN code.
Replace step 2 of “Method 1” with the following steps.
(Before starting, refer to the wireless network router’s
operating instructions for details on how to enter the PIN
code.)
1 While “WPS” is flashing press and hold [s WPS] again
to display the 8 digit PIN code.
{. Wi-Fi status indicator blinks purple.
2 Enter the PIN code into the wireless network router.
[1] Select your home wireless network name.*
1
[2] Type the password.
If “FAIL” is displayed press [OK], check the wireless
network password and other settings and start again
from step 1.
Advanced network settings
Alternative settings
Instead of steps 4 and 5
Select “Manual settings”.
1 Type your home wireless network name into
the “Network name (SSID)” field.
2 Select the encryption method from the
“Security system” drop down list.
3 Type the password into the “Password” field
and then select “JOIN”.
Additional settings
If your home wireless network has been
configured to use specific IP Addresses, Subnet
Mask, Default Gateway, Primary DNS, etc.
Before step 6
Select “Advanced network settings”.
{. Input the required addresses into each field and select
“JOIN”.
≥ To change the settings back to DHCP, select “ON”
from the “DHCP” drop down list.
If you want to change the name of this system
that is displayed as the AirPlay speakers or DLNA
renderer.
Before step 4
Select “Additional settings”.
1 Select “Edit STEREO SYSTEM name”.
2 Type a new name into the
“STEREO SYSTEM name” field.
{. Only ASCII characters can be used.
3 Select “OK”.
4 If this system is already connected to your home
wireless network:
jSelect “Additional settings”, and then select
“Exit“.
If this system is not connected to your home
wireless network:
jContinue to step 4 of “Method 4”.
SC-NE5DB~VQT4U56.book 13 ページ 2013年1月21日 月曜日 午後6時18分
14
VQT4U56
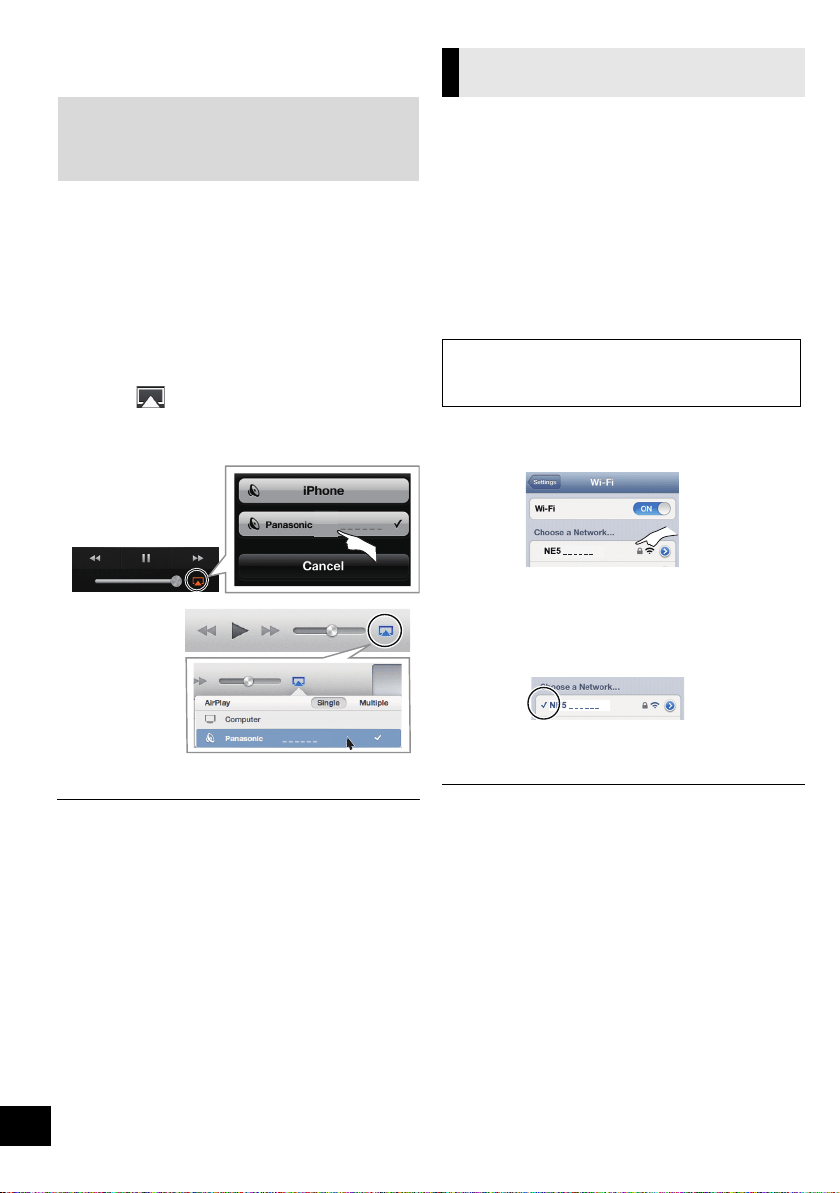
Using AirPlay with this
system’s speakers
1 Turn this system on.
≥ Check that the Wi-Fi status indicator lights in
blue.
≥ If it doesn’t light in blue, check the wireless
network settings. (l 10)
2 iOS device: Start the “Music” (or iPod) app.
Mac/PC: Start “iTunes”.
≥ If the Music app on your iOS device is used, select the
audio file you want to play.
3 Select “Panasonic NE5 _ _ _ _ _ _”*
1, 2
from the
AirPlay icon.
{. Check the volume settings before starting the playback.
(When AirPlay is used for the first time, the volume may
be output at the maximum setting.)
4 Start play.
≥ The playback will start with a slight delay.
≥ This system can be set to turn on automatically when this
system is selected as the output speakers. (l 24)
≥ Playback of other audio sources will stop and AirPlay output
will have priority.
≥ Volume changes on the iOS device or iTunes will be applied
to this system. (Refer to the iTunes Help for the required
settings in iTunes.)
≥ With some iOS and iTunes versions, it may not be possible
to restart the AirPlay playback if the selector is changed
(e.g., “CD”) or this system is turned off, during the AirPlay
playback.
In this case, select a different device from the AirPlay icon of
the Music App or iTunes and then re-select this system as
the output speakers.
≥ AirPlay will not work when playing back videos on iTunes.
*1: “ _ ” stands for a digit that is unique to each set.
*2: The name that is displayed for this system can be changed
from the “Edit STEREO SYSTEM name” settings.
(l 13, “Advanced network settings”)
With this function set to “ON”, you can stream music
from the iOS device or Mac / PC (iTunes 10.2.2 or
later) to this system without the need of a wireless
network router.
≥ Previous network settings will be deleted when this
function is set to “ON”.
≥ The following explanations are based on an iPhone.
1 Press [SETUP] repeatedly to select
“D.CONNECT”.
2 Press [3, 4] to select “ON” and then press [OK].
3 Press [3, 4] to select “OK? YES” and then press
[OK].
4 Connect your iPhone to this system’s wireless
network named “NE5 _ _ _ _ _ _”*
2
.
5 Enter the password that is indicated on this
system’s display.
6 Once the iPhone is connected to this system’s
wireless network, the setup is competed.
7 Continue to step 2 of “Using AirPlay with this
system’s speakers”.
≥ This setting is reset to “OFF” when other network settings are
performed. (l 10)
≥ When “D.CONNECT” is set to “ON”, this system will not be
connected to the Internet. It is not possible to update the
software or check the Wi-Fi signal strength.
≥ When AirPlay is not being used, disconnect the AirPlay
compatible device from this network.
≥ When using a computer on this network, make sure that all
the shared files are encrypted.
≥ This feature is only compatible with the “Open System”
authentication method. It is not compatible with “Shared Key”
authentication method.
*1: “ _ ” stands for a digit.
*2: “ _ ” stands for a digit that is unique to each set.
Preparation
≥ Complete the network settings. (l 10)
≥ Connect the iOS device or Mac/PC to the same
home wireless network as this system.
NE5
e.g., iPhone iOS 6.0.1
NE5
e.g., iTunes 11.0
Directly streaming to this system
(AirPlay)
“PW _ _ _ _ _”*
1
is displayed.
The 5 digits after “PW” is the password for this
network.
SC-NE5DB~VQT4U56.book 14 ページ 2013年1月21日 月曜日 午後6時18分
15
VQT4U56
The first time “D.CONNECT” is set to “ON”, a
password for this system’s wireless network is
randomly created and memorised in this system.
≥ This password is memorised until it is changed.
1 While “D.CONNECT” is set to “ON”:
Press [SETUP] repeatedly to select
“D.CONNECT”.
2 Press [3, 4] to select “ON” and then press [OK].
3 The current password is displayed.
≥ The 5 digits after “PW” is the password for this
network.
4 Press any button to exit.
1 While “D.CONNECT” is set to “OFF”:
Press [SETUP] repeatedly to select
“D.CONNECT”.
2 Press [3, 4] to select “CHANGE PW” and then
press [OK].
3 Press [3, 4] to select “OK? YES” and then press
[OK].
4 The new password is displayed.
≥ The 5 digits after “PW” is the new password for
this network.
5 Press any button to exit.
∫ Note about changing the password
After changing this system’s wireless network
password, if you are not prompted to change the
password on the other devices, the following changes
are required.
iOS device (iPod touch/iPhone/iPad)
*
1
:
≥ Before choosing this system’s network,
1 Select [ ] located beside this system’s wireless
network name.
2 Select “Forget this Network” and then select
“Forget”.
3 Select this system’s wireless network and enter
the new password.
Mac/PC:
≥ If the computer has memorised the old password, be
sure to change the memorised password for this
system’s wireless network to the new one.
≥ Refer to the devices’s operating instructions for details.
*1:
Steps are based on iOS 6.0.1.
Playing back music files on the
DLNA server
You can share music files stored in the DLNA Certified
media server (PC with Windows 7 installed,
smartphone, etc.) connected to your home wireless
network, and enjoy the contents with this system’s
speaker.
1 Turn this system on.
≥ Check that the Wi-Fi status indicator lights in
blue.
≥ If it doesn’t light in blue, check the wireless
network settings. (l 10)
2 Operate the DMC compatible device and connect
to this system.
≥ The device name of this system will be
displayed as “Panasonic NE5 _ _ _ _ _ _”*
1, 2
.
≥ For details on how to use DMC compatible
devices, refer to the operating instructions of the
devices or the software.
∫ Support format of DLNA client
File formats that are not supported by your DLNA
server cannot be played.
≥ Depending on the contents and the connected equipment,
playback may not be possible.
*1: “ _ ” stands for a digit that is unique to each set.
*2: The name that is displayed for this system can be changed
from the “Edit STEREO SYSTEM name” settings.
(l 13, “Advanced network settings”)
Display the password
Change the password
Preparation
≥ Complete the network settings. (l 10)
≥ Connect your device with DMC (Digital Media
Controller) compatible software installed to the
same home wireless network as this system.
≥ Add the contents and folder to the libraries of the
Windows Media
®
Player or the smartphone, etc.
– Playlist of Windows Media
®
Player can play back only
the contents that are stored in the libraries.
Audio codec Example of file extension
MP3 .mp3
WAV .wav
SC-NE5DB~VQT4U56.book 15 ページ 2013年1月21日 月曜日 午後6時18分
16
VQT4U56
Bluetooth
®
operations
By using the Bluetooth
®
connection, you can listen to the sound from the Bluetooth
®
audio device from this
system wirelessly.
≥Refer to the operating instructions of the Bluetooth
®
device for details.
Preparation
≥ Turn on the Bluetooth
®
feature of the device and
place the device near the speaker unit.
≥ If this system is already connected to a Bluetooth
®
device, disconnect it.
1 Press [ , AUX] to select “BLUETOOTH”.
≥ If “PAIRING” is indicated on the display, go to step 3.
2 Press [PLAY MENU] to select “NEW DEV.” and
then press [OK].
{. “PAIRING” is indicated on the display.
3 Select “SC-NE5” from the Bluetooth
®
device’s
Bluetooth
®
menu.
4 Start play on the Bluetooth
®
device.
≥ If prompted for the passkey, input “0000”.
≥ You can register up to 8 devices with this system. If a 9th
device is paired, the device that has not been used for the
longest time will be replaced.
Preparation
≥ Turn on the Bluetooth
®
feature of the device and
place the device near the speaker unit.
≥ If this system is already connected to a Bluetooth
®
device, disconnect it.
1 Press [ , AUX] to select “BLUETOOTH”.
{. “READY” is indicated on the display.
2 Select “SC-NE5” from the Bluetooth
®
device’s
Bluetooth
®
menu.
{. The name of the connected device is indicated on the
display for 2 seconds.
3 Start play on the Bluetooth
®
device.
≥ This system can only be connected to one device at a time.
≥ When “BLUETOOTH” is selected as the source, this system
will automatically try and connect to the last connected
Bluetooth
®
device.
≥ The Bluetooth
®
device will be disconnected if a different
audio source (e.g., [CD]) is selected.
You can change the transmission speed to prioritize
transmission quality or sound quality.
Preparation
≥ Press [ , AUX] to select “BLUETOOTH”.
≥ If a Bluetooth
®
device is already connected,
disconnect it.
1 Press [PLAY MENU] repeatedly to select
“LINK MODE”.
2 Press [3, 4] to select the mode and then press
[OK].
MODE 1: Emphasis on connectivity
MODE 2: Emphasis on sound quality
≥ The default setting is “MODE 1”.
If the sound input level of the Bluetooth
®
transmission is too low, change the input level
setting.
Preparation
≥ Connect a Bluetooth
®
device.
1 Press [PLAY MENU] repeatedly to select “INPUT
LEVEL”.
2 Press [3, 4] to select the level and then press
[OK].
“LEVEL 0”
,. “LEVEL i1” ,. “LEVEL i2”
^-------------------------------------------------J
≥ Select “LEVEL 0” if the sound is distorted.
≥ The default setting is “LEVEL 0”.
1 While a Bluetooth
®
device is connected:
Press [PLAY MENU] to select “DISCONNECT?”.
2 Press [3, 4] to select “OK? YES” and then press
[OK].
Pairing Bluetooth
®
devices
Connecting a paired Bluetooth
®
device
Bluetooth
®
transmission mode
Bluetooth
®
input level
Disconnecting a Bluetooth
®
device
SC-NE5DB~VQT4U56.book 16 ページ 2013年1月21日 月曜日 午後6時18分
17
VQT4U56
About Bluetooth
®
∫ Frequency band used
≥ This system uses the 2.4 GHz frequency band.
∫ Certification of this device
≥ This system conforms to frequency restrictions and
has received certification based on frequency laws.
Thus, a wireless permit is not necessary.
≥ The actions below are punishable by law in some
countries:
– Taking apart or modifying this system.
– Removing specification indications.
∫ Restrictions of use
≥ Wireless transmission and/or usage with all
Bluetooth
®
equipped devices is not guaranteed.
≥ All devices must conform to standards set by
Bluetooth SIG, Inc.
≥ Depending on the specifications and settings of a
device, it can fail to connect or some operations can
be different.
≥ This system supports Bluetooth
®
security features.
But depending on the operating environment and/or
settings, this security is possibly not sufficient.
Transmit data wirelessly to this system with caution.
≥ This system cannot transmit data to a Bluetooth
®
device.
∫ Range of use
≥ Use this device at a maximum range of 10 m.
The range can decrease depending on the
environment, obstacles or interference.
∫ Interference from other devices
≥ This system may not function properly and troubles
such as noise and sound jumps may arise due to
radio wave interference if this system is located too
close to other Bluetooth
®
devices or the devices that
use the 2.4 GHz band.
≥ This system may not function properly if radio waves
from a nearby broadcasting station, etc. is too
strong.
∫ Intended usage
≥ This system is for normal, general use only.
≥ Do not use this system near an equipment or in an
environment that is sensitive to radio frequency
interference (example: airports, hospitals,
laboratories, etc).
Media playback operations
The following marks indicate the availability of the
feature.
Preparation
≥ Turn this system on.
≥ Insert the media (l 9) or connect the Bluetooth
®
(l 16) / AirPlay (l 14) compatible device.
≥
Press [CD/RADIO], [iPod/USB] or
[ , AUX]
to select
the audio source.
≥ When using iPod/iPhone/iPad, the operation may vary
among those models.
[CD], [USB] To display information
Press [DISPLAY, iPod MENU] repeatedly.
Panasonic bears no responsibility for data and/
or information that is compromised during a
wireless transmission.
[CD] : CD audio in CD-DA format and a CD
that contains MP3 files (l 5)
[iPod] : Compatible iPod/iPhone/iPad (l 5)
[USB] : USB devices containing MP3 files
(l 5)
[AirPlay] : When connected to an AirPlay
compatible device. (l 14)
[Bluetooth] :
Connected Bluetooth
®
device
(l 16
)
Basic play
(
[CD], [iPod], [USB], [AirPlay], [Bluetooth])
Play Press [1/;].
Stop Press [∫].
≥ [USB]: The position is memorised
and “RESUME” is displayed.
Pause Press [1/;].
Press again to restart play.
Skip Press [:/6] or [5/9]
to skip track.
[CD], [USB] Press [3] or [4] to
skip the MP3 album.
Search
(Except [AirPlay])
During play or pause
Press and hold [:/6] or
[5/9].
≥ Point the remote control at the
CD unit to operate.
≥ [iPod] : Backwards search is only
within the current track.
SC-NE5DB~VQT4U56.book 17 ページ 2013年1月21日 月曜日 午後6時18分
18
VQT4U56
≥ To use this system’s remote control with a Bluetooth
®
device,
the Bluetooth
®
device must support AVRCP (Audio Video
Remote Control Profile).
Depending on the device or the status of the device, some
operations may not work.
≥ Maximum number of displayable characters: approx. 30
≥ This system supports ver. 1.0, 1.1 and 2.3 ID3 tags. Text data
that is not supported will not be displayed or shown
differently.
≥ Album and track indication for MP3 files.
∫ [iPod] To navigate through the iPod/
iPhone menu
≥ Open the Music App to use this feature with iPod touch/
iPhone.
–[3, 4] : To navigate menu items.
– [OK] : To go to the next menu.
– [DISPLAY, iPod MENU] : To return to the previous
menu.
≥ Depending on the model (e.g., iPod nano 7th generation,
etc.), it may be necessary to select the album, artist, etc. on
the iPod/iPhone.
Select the playback mode.
1 Press [PLAY MENU] to select “REPEAT”,
“RANDOM” / “SHUFFLE” or “PLAYMODE”.
2 Press [3, 4] to select the setting and then press
[OK].
≥ When using an iPod/iPhone/iPad or Bluetooth
®
device, use
the setting on the device, if available.
≥ During random play, you cannot skip to the previous track.
≥ [CD] : The mode is cancelled when you open the door for
discs.
[AirPlay] : The applied settings will remain until it is changed.
*1: [AirPlay] : Perform the settings during playback.
“A _ _ _”: MP3 album number.
“T _ _ _”: MP3 track number.
≥ “ _ ” stands for the album or track number.
“”:
This indication is also used to refer to an
album.
“”:
This indication is also used to refer to a
track.
Playback modes
(
[CD], [USB], [AirPlay]*
1
)
REPEAT
[CD] [USB]
OFF Select to cancel repeat playback.
1-TRACK Only plays the selected track.
≥ “1, , `” is displayed.
(Skip to the desired track.)
ALL All tracks are repeated.
≥ “`” is displayed.
[AirPlay]
Refer to the connected device to verify the
selected setting.
[CD] [USB] RANDOM
ON Plays the contents randomly.
≥ “RND” is displayed.
≥ “RND” will not be displayed when
“1-TRACK” is selected.
OFF Random playback is turned off.
[AirPlay] SHUFFLE
Refer to the connected device to verify the selected
setting.
[CD] (MP3) [USB] PLAYMODE
ALL Play all MP3 tracks.
1-ALBUM Only plays the selected MP3 album.
≥ “1, ” is displayed.
SC-NE5DB~VQT4U56.book 18 ページ 2013年1月21日 月曜日 午後6時18分
19
VQT4U56
Listening to DAB/DAB+
Preparation
≥ Make sure that the DAB antenna is connected. (l 8)
≥ Turn this system on.
To listen to DAB/DAB+ broadcasts, the available
stations need to be memorised in this system.
≥ This system will automatically start the “DAB AUTO
SCAN” and memorise the stations that are available
in your region if the memory is empty.
Press [CD/RADIO] repeatedly to select “DAB/DAB+”.
≥ “SCAN FAILED” is displayed when the auto scan is
unsuccessful. Locate the position with the best reception
(l 20, “To verify or improve the signal reception quality”) and
then re-scan DAB/DAB+ stations.
∫ To re-scan DAB/DAB+ stations
When new stations are added or when the antenna
has been moved, reperform the auto scan.
1 Press [PLAY MENU] repeatedly to select
“AUTOSCAN” and then press [OK].
2 While “START ?” is flashing, press [OK].
When updating the memory with the auto scan, preset stations
will be erased. Preset them again (l right).
Preparation*
1
1 Press [CD/RADIO] repeatedly to select “DAB/
DAB+”.
2 Press [PLAY MENU] repeatedly to select
“TUNEMODE” and then press [OK].
3 Press [3, 4] to select “STATION” and then press
[OK].
1 Press [CD/RADIO] repeatedly to select “DAB/
DAB+”.
2 Press [:/6] or [5/9] to select the
station.
You can preset up to 20 DAB/DAB+ stations.
Preparation
≥ Press [CD/RADIO] repeatedly to select “DAB/
DAB+”.
1 While listening to a DAB broadcast
Press [OK].
2 Press [3, 4] to select the desired preset channel
number and then press [OK].
≥ You cannot preset stations when the station is not
broadcasting or when the secondary service is selected.
≥ The station occupying a channel is erased if another station
is preset in that channel.
∫ Listening to preset DAB/DAB+ stations
Preparation*
1
1 Press [CD/RADIO] repeatedly to select “DAB/
DAB+”.
2 Press [PLAY MENU] repeatedly to select
“TUNEMODE” and then press [OK].
3 Press [3, 4] to select “PRESET” and then press
[OK].
1 Press [CD/RADIO] repeatedly to select “DAB/
DAB+”.
2 Press [:/6] or [5/9] to select the
station.
≥ To select by preset, make sure that stations have already
been preset manually.
≥ To add additional preset stations, select the station using the
method mentioned in “Listening to the memorised stations”
(l left).
Some DAB/DAB+ stations provide a secondary service
as well as the primary service. If the station you are
listening to is providing secondary service, “ ” will be
displayed.
1 While “ ” is displayed.
Press [PLAY MENU] repeatedly to select
“DAB SECONDARY” and then press [OK].
2 Press [3, 4] to select the secondary service and
press [OK].
The setting will go back to primary service when changes are
made (e.g. the station is changed).
*1: The “TUNEMODE” setting is memorised until it is changed.
Memorising stations
Listening to the memorised stations
Presetting DAB/DAB+ stations
Listening to the secondary service
SC-NE5DB~VQT4U56.book 19 ページ 2013年1月21日 月曜日 午後6時18分
20
VQT4U56
Press [DISPLAY, iPod MENU] to change the display.
The information will scroll through the display.
Each time you press the button:
If the DAB broadcast includes time information, this
system’s clock will be automatically updated.
1 Press [PLAY MENU] repeatedly to select “AUTO
CLOCK ADJ” and then press [OK].
2 Press [3, 4] to select “ON ADJUST” and then
press [OK].
Select “OFF ADJUST” to turn the automatic clock adjustment
function off.
To check the signal reception quality, at least 1
frequency block needs to be successfully memorised.
≥ If “SCAN FAILED” is displayed after “DAB/DAB+” is
selected or after an auto scan, proceed to “Manually
tuning 1 frequency block” (l below)
≥ If stations have already been memorised to this
system, proceed to “Checking the DAB/DAB+ signal
reception quality” (l right)
∫ Manually tuning 1 frequency block
Use this function to scan 1 frequency block after
adjusting the position of the DAB antenna.
Preparation
Note down a frequency block that can be received in
your region (e.g., 12B 225.648 MHz).
1 While “SCAN FAILED” is displayed.
Adjust the position of the DAB antenna.
2 Press [PLAY MENU] repeatedly to select
“MANUAL SCAN” and then press [OK].
3 Press [3, 4] to select the frequency block that is
receivable in your region and then press [OK].
≥ If broadcasting stations are memorised, proceed to
“To re-scan DAB/DAB+ stations” to memorise stations on
other frequency blocks. (l 19)
≥ If “SCAN FAILED” is still displayed, repeat steps 1 to 3 until a
station is memorised. If the situation does not improve, try
using an outdoor DAB antenna or consult your dealer.
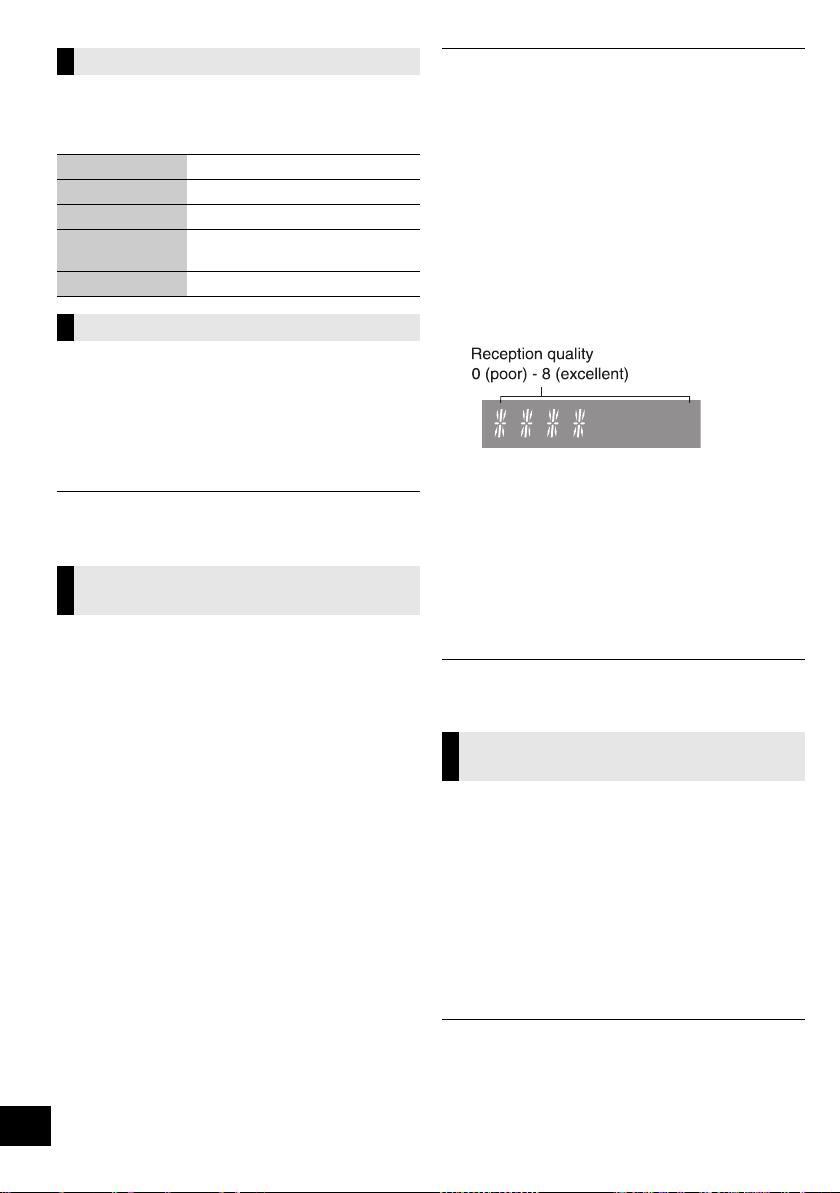
∫ Checking the DAB/DAB+ signal
reception quality
1 While listening to the DAB broadcast:
Press [PLAY MENU] repeatedly to select “SIGNAL
QUALITY” and then press [OK].
≥ The current frequency block is displayed and
then the reception quality is indicated.
2 If the signal reception quality is poor, move the
antenna to a position where the reception
quality improves.
3 To continue checking the quality of other
frequency blocks
Press [3, 4] again and select the desired
frequency.
4 Press [OK] to exit.
If the antenna has been adjusted, perform auto scanning and
update the station memory. (l 19)
Only the frequencies currently used in the UK as of
January 2013 on BAND III are Auto scanned
(“LOCAL”, factory setting).
Select “ALL BAND III” when you want to store stations
on other frequencies to memory.
1 Press [PLAY MENU] repeatedly to select “SCAN
MODE”.
2 Press [3, 4] to select “ALL BAND III” or “LOCAL”
and then press [OK].
≥ The “DAB AUTO SCAN” begins automatically.
≥ The DAB preset channels are erased when the
“SCANMODE” is changed.
≥ If the play timer has been set and DAB/DAB+ is the music
source, the timer switches off. (l 22)
Display
Dynamic label: Information about the broadcast
PTY display: Programme type
Ensemble label: The name of the ensemble
Frequency
display:
The frequency block and
frequency is displayed.
Time display Current time
Automatic clock adjustment
To verify or improve the signal
reception quality
Changing the Auto scan frequency
range
SC-NE5DB~VQT4U56.book 20 ページ 2013年1月21日 月曜日 午後6時18分

21
VQT4U56
Listening to FM radio
You can preset up to 30 channels.
Preparation
≥ Make sure that the antenna is connected. (l 8)
≥ Turn this system on.
≥ Press [CD/RADIO] repeatedly to select “FM”.
A station previously stored is overwritten when another station
is stored in the same channel preset.
1 Press [PLAY MENU] to select “A.PRESET”.
2 Press [3, 4] to select “LOWEST” or “CURRENT”
and then press [OK].
LOWEST:
To begin auto preset with the lowest frequency
(FM 87.50).
CURRENT:
To begin auto preset with the current frequency.*
* To change the frequency, refer to “Manual tuning and
presetting”.
The tuner starts to preset all the stations it can receive
into the channels in ascending order.
Preparation
1 Press [PLAY MENU] repeatedly to select
“TUNEMODE”.
2 Press [3, 4] to select “PRESET” and then press
[OK].
Press [:/6] or [5/9] to select the channel.
∫ Manual tuning and presetting
Select a radio broadcast.
1 Press [PLAY MENU] repeatedly to select
“TUNEMODE”.
2 Press [3, 4] to select “MANUAL” and then press
[OK].
3 Press [:/6] or [5/9] to tune to the
required station.
≥ To start automatic tuning, press and hold [:/6],
[5/9] until the frequency starts scrolling. Tuning
stops when a station is found.
To preset the channel
4 While listening to the radio broadcast
Press [OK].
5 Press [3, 4] to select the channel and then press
[OK].
∫ To improve FM sound quality
1 While receiving FM broadcasts, press
[PLAY MENU] repeatedly to select “FM MODE”.
2 Press [3, 4] to select “MONO” and then press
[OK].
≥ This setting can be preset and memorised. To do so,
continue to step 4 of “Manual tuning and presetting”.
≥ Select “STEREO” in step 2 to return to stereo broadcasts.
≥ “MONO” is cancelled if the frequency is changed.
≥ If “MONO” is selected, regardless of the type of signal this
system is receiving, “FM MONO” is displayed. (l below)
∫ To display the current FM signal status
While receiving FM broadcast, press [DISPLAY,
iPod MENU].
≥ “STEREO” is displayed when this system tunes to a stereo
broadcast.
Presetting stations automatically
Listening to a preset channel
“FM ST”: The FM signal is in stereo.
“FM”: The FM signal is in monaural.
≥ “FM” is also displayed even if this system is not tuned to
a station.
SC-NE5DB~VQT4U56.book 21 ページ 2013年1月21日 月曜日 午後6時18分
22
VQT4U56
Sound adjustment
The following sound effects can be added to the audio
output.
1 Press [SOUND] repeatedly to select the effect.
2 Press [3, 4] to select the setting and then press
[OK].
≥ You may experience a reduction in sound quality when these
effects are used with some sources. If this occurs, turn the
sound effects off.
Clock and Timer
To make this setting, point the remote control at
the speaker unit.
This is a 24-hour clock.
1 Press [SETUP] to select “CLOCK”.
2 Press [3, 4] to set the time and then press [OK].
≥ To display the clock, press [SETUP] to select “CLOCK” and
then press [OK] once. The time is displayed for 10 seconds.
(During standby, press [DISPLAY, iPod MENU] once.)
≥ The clock is reset when there is a power failure or when the
AC mains lead is removed.
≥ Reset the clock regularly to maintain accuracy.
You can set the timer so this system turns on at a
certain time every day.
Preparation
Set the clock (l left).
∫ Setting the timer
1 Press [SETUP] repeatedly to select “TIMER ADJ”.
2 Press [3, 4] to set the starting time
(“ON TIME”) and then press [OK].
3 Press [3, 4] to set the finishing time
(“OFF TIME”) and then press [OK].
∫ Turn the timer on
1 Select the music source*
1
and set the desired
volume.
2 Press [SETUP] repeatedly to select “TIMER SET”.
3 Press [3, 4] to select “SET” and then press [OK].
≥ “F” is displayed.
≥ To turn the timer off, select “OFF”.
4 Press [Í] to turn this system off.
≥ To display the timer settings, press [SETUP] repeatedly to
select “TIMER ADJ” and then press [OK] once.
The music source and volume will also be displayed if the
timer is turned on.
≥ During standby, if the timer is turned on, press [DISPLAY,
iPod MENU] twice to display the settings.
≥ This system can be used as normal after the timer is set,
however:
– Turn this system to standby mode before the timer start
time.
– Even if the audio source or the volume is changed, the
timer will still use the audio source and volume that was
set when the timer was turned on.
≥ If this system is having a wireless communication problem at
the set time, an electronic sound may go off instead of the
set music source. Turn this system off to stop the electronic
sound.
*1: “CD”, “DAB/DAB+”, “FM”, “AUX”, “IPOD_DOCK” and
“IPOD_PORT” / “USB” can be set as the music source.
The sleep timer can turn this system off after a set
time.
1 Press [SLEEP] repeatedly to set the time (in
minutes) and then press [OK].
“SLEEP 30” -. “SLEEP 60” -. “SLEEP 90” -. “SLEEP 120”
^------------------------ OFF (Cancel) (------------------------b
≥ The remaining time is indicated on this system’s display
except when other operations are performed.
≥ The play timer and sleep timer can be used together. The
sleep timer always has priority.
Direct-Vocal
Surround
(
D.SURROUND
)
“LEVEL 1”, “LEVEL 2” or “OFF”.
≥ The factory preset is “OFF”.
Preset EQ
(PRESET EQ)
“HEAVY” (heavy), “SOFT” (soft),
“CLEAR” (clear), “VOCAL”
(vocal) or “FLAT” (flat/off).
≥ The factory preset is “HEAVY”.
Bass (BASS) or
Treble (TREBLE)
Adjust the level (j4 to i4).
Dynamic Bass
(D.BASS)
“ON D.BASS” or
“OFF D.BASS”.
≥ The factory preset is
“ON D.BASS”.
Setting the clock
Play timer
Sleep timer
SC-NE5DB~VQT4U56.book 22 ページ 2013年1月21日 月曜日 午後6時18分

23
VQT4U56
Others
As a factory preset, this system will always turn off
automatically if there is no sound output and no
operation for approx. 30 minutes.
To cancel this function
1 Press [SETUP] repeatedly to select “AUTO OFF”.
2 Press [3, 4] to select “OFF” and then press [OK].
≥ To turn automatic standby on, select “ON” in step 2.
≥ This setting cannot be selected when “DAB/DAB+” or “FM” is
the source.
≥ When connected to a Bluetooth
®
device, the automatic
standby function does not work.
When other Panasonic equipment responds to the
supplied remote control, change the remote control
code.
1 Press [ , AUX] to select “AUX”.
2 While pressing and holding [SELECTOR] on the
speaker unit, press and hold [CD/RADIO] on the
remote control until this system's displays show
“REMOTE 2”.
3 Press and hold [OK] and [CD/RADIO] on the
remote control for at least 4 seconds.
To change the mode back to “REMOTE 1”, repeat the steps
above but replace the button pressed on the remote control
from [CD/RADIO] to [ , AUX].
Occasionally, Panasonic may release updated
software for this system that may add or improve the
way a feature operates. These updates are available
free of charge.
The CD unit and the speaker unit need to be updated
separately.
Preparation
≥ Turn this system on.
≥ Connect this system to the wireless network. (l 10)
– Make sure that the wireless network is connected to the
Internet.
– If “D.CONNECT” is set to “ON”, change the setting to
“OFF” and connect this system to a wireless network that
is connected to the Internet.
∫ Updating the CD unit
1 Download the latest firmware from the following
website and burn it to a CD-R to update the
firmware.
http://panasonic.jp/support/global/cs/
(This site is in English only.)
2 Insert the CD-R to the CD unit.
3 Press [CD/RADIO] repeatedly to select “CD”.
4 Press [3, 4] to select “UPDATE? Y” and then
press [OK] to start the update.
≥ Select “UPDATE? N” to cancel the update.
{. After the update has finished, “SUCCESS” is displayed.
5 Disconnect the AC mains lead and reconnect it
after 3 minutes.
∫ Updating the speaker unit
1 Press [SETUP] repeatedly to select
“SW UPDATE” and then press [OK].
2 Press [3, 4] to select “UPDATE? Y” and then
press [OK] to start the update.
≥ Select “UPDATE? N” to cancel the update.
{. After the update has finished, “SUCCESS” is displayed.
3 Disconnect the AC mains lead and reconnect it
after 3 minutes.
≥ If there are no updates, “NO NEED” is displayed.
≥ Downloading will require several minutes. It may take
longer or may not work properly depending on the
connection environment.
∫ Checking the software version
1 Press [SETUP] repeatedly to select “SW VER.” and then
press [OK].
{. The version of the installed software is displayed.
2 Press [OK] to exit.
Automatic standby
Changing the remote control code
Software update
DO NOT DISCONNECT the AC mains lead while
one of the following messages is displayed.
– “LINKING”, “UPDATING” or “%”
(“ ” stands for a number.)
≥ During the update process, no other operations can be
performed.
SC-NE5DB~VQT4U56.book 23 ページ 2013年1月21日 月曜日 午後6時18分

24
VQT4U56
To change the wireless communication quality
between the CD unit and the speaker unit. If the units
are not wirelessly connected, or output sound is
interrupted, select “C.MODE1” in step 2.
1 Press [SETUP] repeatedly to select “COM.MODE”
and then press [OK].
2 Press [3, 4] to select “C.MODE1” or “C.MODE2”
and then press [OK].
≥ [CD] [iPod] [USB] : Stop play before switching communication
modes. If you switch modes while this system is playing,
sound output will be lost during the switching process.
To check the Wi-Fi signal strength where this system is
located.
Preparation
Connect this system to the wireless network. (l 10)
1 Press [SETUP] repeatedly to select “SIG.LEVEL”
and then press [OK].
≥ This system’s displays show “LEVEL ”.
(“ ” stands for a number.)
2 Press [OK] to exit this display mode.
≥ It is recommended to have a signal strength of “3”. Change
the position or angle of your wireless network router or this
system if the indication is “2” or “1” and see if the connection
improves.
≥ If “LEVEL 0” is displayed, this system cannot establish a link
with the wireless network router. (l 27)
≥ This function does not work when “D.CONNECT” is set to
“ON”.
This system can turn on automatically from standby
mode when this system is selected as the AirPlay
speakers.
Preparation
Connect this system to the wireless network. (l 10)
1 Press [SETUP] repeatedly to select “NET STNBY”
and then press [OK].
2 Press [3, 4] to select “ON” and then press [OK].
≥ To cancel this function, select “OFF” in step 2.
≥ The factory preset is “OFF”. If this function is set to “ON” the
standby power consumption will increase.
Display the name for the connected wireless network
(SSID).
1 Press and hold [s WPS] on the speaker unit and
[OK] on the remote control until this system's
displays show the SSID.
2 Press [OK] to exit.
≥ If “NOCONNECT” is displayed this system is not connected
to a wireless network.
≥ All letters are displayed as capital letters, and characters that
cannot be displayed are replaced with “
¢”.
To check this system’s IP address or the Wi-Fi MAC
address.
1 Press and hold [s WPS] on the speaker unit and
[4] on the remote control until this system’s
displays show the IP address.
{. The IP address is partially displayed.
≥ To display the MAC address on this system, repeat the
steps above by replacing [4] with [3].
2 Press [3, 4] on the remote control to show the
rest of the IP address.
≥ To exit the setting, wait 20 sec.
≥ The “ – ” displayed on the top or bottom left of the display
indicate the first and last units respectively.
Changing the communication mode
C.MODE1 : Priority is given to connectivity
(229 bps)
C.MODE2 : Priority is given to sound quality
(384 bps, default setting)
Wi-Fi signal strength
Network standby
Wireless network name (SSID)
IP/MAC Address
SC-NE5DB~VQT4U56.book 24 ページ 2013年1月21日 月曜日 午後6時18分
25
VQT4U56
Troubleshooting
Before requesting service, make the following checks.
If you are in doubt about some of the check points, or if
the solutions indicated in the following guide do not
solve the problem, consult your dealer for instructions.
Do you have the latest software installed?
≥ Occasionally, Panasonic may release updated software for
this system that may add or improve the way a feature
operates. (l 23)
The CD unit and the speaker unit are not wirelessly
connected.
The sound is interrupted.
The standby/on indicator on the side of the CD unit
lights red.
The display shows “NOCONNECT” or
“CANNOT ACCEPT”.
This system has a wireless communication problem,
follow the instructions below.
1 Check that the AC mains leads are connected to
the both units.
2 If the devices which use 2.4 GHz are being used
near this system, turn them off temporarily.
3 Move the both units closer together.
A wireless connection will be automatically
established.
≥ If a wireless connection is not established, set the
communication mode to "C.MODE1". (l 24)
≥ If the problem persists, connect the units with
cables. (l 8)
Only the speaker unit’s display turns on
≥ Press any button on the CD unit, or select “CD”,
“IPOD_DOCK”, or “IPOD_PORT” as an audio source.
Humming heard during play.
≥ An AC mains lead or fluorescent light is near the cords. Keep
other appliances and cords away from this system’s cables.
MP3 cannot be read.
≥ You may not be able to play MP3 if you have copied a
multi-session disc that has no data between sessions.
≥ When creating a multi-session disc, it is necessary to close
the session.
≥ The amount of data on the disc is too small. Set the amount
of data to above 5 MB.
Pairing cannot be done.
≥ Check the Bluetooth
®
device condition.
The device cannot be connected.
≥ The pairing of the device was unsuccessful or the registration
has been replaced. Try pairing the device again.
≥ This system might be connected to a different device.
Disconnect the other device and try pairing the device again.
The device is connected but audio cannot be heard
through the speaker unit.
≥ For some built-in Bluetooth
®
devices, you have to set the
audio output to “SC-NE5” manually. Read the operating
instructions for the device for details.
The sound is interrupted.
≥ The device is out of the 10 m communication range. Bring
the Bluetooth
®
device closer to this system.
≥ Remove any obstacle between this system and the device.
≥ Other devices that use the 2.4 GHz frequency band (wireless
router, microwaves, cordless phones, etc.) are interfering.
Bring the Bluetooth
®
device closer to the speaker unit and
distance it from the other devices.
≥ Select “MODE 1” for stable communication. (l 16).
Incorrect display or play will not start.
≥ Make sure that the disc is compatible with this system. (l 5)
≥ There is moisture on the lens. Wait for about an hour and
then try again.
No response when [1/;] is pressed.
≥ Disconnect the USB device and then reconnect it.
Alternatively, turn this system off and on again.
The USB drive or its contents cannot be read.
≥ The USB drive format or its contents is/are not compatible
with this system (l 5).
≥ The USB host function of this product may not work with
some USB devices.
Slow operation of the USB flash drive.
≥ Large file size or high memory USB flash drive takes longer
time to read.
The elapsed time displayed is different from the
actual play time.
≥ Copy the data to another USB device or backup the data and
reformat the USB device.
To return all settings to the factory preset
When the following situations occur, reset the
memory of both the CD unit and the speaker unit:
≥ There is no response when buttons are pressed.
≥ You want to clear and reset the memory contents.
1 Disconnect the AC mains lead. (Wait for at least
3 minutes before proceeding to step 2.)
2 While pressing and holding down [Í/I] on the
unit, reconnect the AC mains lead.
≥ Keep holding down [Í/I] until “--------” appears
on the display.
3 Release [Í/I].
All the settings are returned to the factory preset. You will
need to reset the memory items.
Common problems
Bluetooth
®
Disc operations
USB operations
SC-NE5DB~VQT4U56.book 25 ページ 2013年1月21日 月曜日 午後6時18分

26
VQT4U56
DAB/DAB+ reception is poor.
≥ Keep the antenna away from computers, televisions, other
cables and cords.
≥ Use an outdoor antenna (l 8).
A beat sound or noise is heard while receiving
radio broadcast.
≥ Confirm the DAB antenna is properly connected. (l 8)
≥ Adjust the position of the antenna.
≥ Try to keep a certain amount of distance between the
antenna and AC mains lead.
≥ Try using outdoor antenna if there are buildings or mountains
nearby.
≥ Switch the television or other audio player off or separate it
from this system.
≥ Keep this system away from mobile phones if the
interference is apparent.
Cannot charge or operate.
≥ Have you selected the appropriate selector?
Press [iPod/USB] to select either “IPOD_DOCK” or
“IPOD_PORT”.
≥ Check that the iPod/iPhone/iPad is connected properly.
(l 9)
≥ The battery of the iPod/iPhone/iPad is depleted. Charge the
iPod/iPhone/iPad, and then operate again.
≥ Connect the iPod/iPhone/iPad again or try to restart the iPod/
iPhone/iPad.
≥ When this system is in standby mode, charging will not start
when using the “IPOD_PORT” connection. Turn this system
on and make sure the charging has started before switching
this system to standby mode.
≥ Charging an iPod/iPhone/iPad whose battery is depleted:
– When using the “IPOD_PORT” connection, turn this
system on. Do not turn this system off until the iPod/
iPhone/iPad becomes operational.
– When using the “IPOD_DOCK” connection,
“CHECKING CONNECTION” will be displayed until the
iPod/iPhone/iPad becomes operational, but this system
will have begun charging.
Cannot connect to the network.
≥ Confirm the network connection and settings. (l 10)
≥ Your wireless network might be set to be invisible. In this
case select “Manual settings” in “Method 4”. (l 13)
≥ This system cannot join a wireless network using WEP
security settings with the WPS methods (“Method 1”). Use
“Method 4” to join the wireless network. (l 12)
≥ Make sure that the multicast function on the wireless network
router is set to on (enabled).
≥ When “D.CONNECT” is used, if the password for
“D.CONNECT” has been changed connect the other device
to this system using the new password. (l 14)
Cannot connect to this system.
≥ Display the wireless network name that this system is
connected to and make sure that the device is connected to
the same network. (l 10, 24)
≥ If “NET STNBY” is set to “OFF”, the AirPlay compatible
device cannot be connected when this system is off.
≥ Turn off the Wi-Fi setting on the AirPlay compatible device,
set “NET STNBY” to “OFF” (l 24) and then turn this system
off and on. Reconnect the compatible device to the Wi-Fi
network and then select this system as the AirPlay speakers
again.
My wireless network router is WPS PBC
compatible, but the pairing does not work.
≥ If the network is set to be invisible, the push button
configuration does not work. In this case, either make the
wireless network visible while you set up the network for this
system or use “Method 2”, “Method 3” or “Method 4”.
(l 11, 12)
Playback does not start.
The sound is interrupted.
≥ Simultaneous use with other 2.4 GHz devices, such as
microwaves, cordless telephones, etc., may result in
connection interruptions.
Increase the distance between this system and these
devices.
≥ Do not place this system inside a metal cabinet, for it might
block the Wi-Fi signal.
≥ Place this system closer to the wireless network router.
≥ If “D.CONNECT” is set to “ON”, place the AirPlay compatible
device closer to the speaker unit.
≥ If several wireless devices are simultaneously using the
same wireless network as this system, try turning off the
other devices or reducing their wireless network usage.
≥ If the playback stops, check the playback status on the iOS
device or iTunes.
≥ If play does not start (even though the Wi-Fi status indicator
lights in blue and the AirPlay icon is displayed), restart
the wireless network router, turn the Wi-Fi connection on the
iOS device or Mac/PC off and on, and then make sure that
your home wireless network is selected.
≥ If the AirPlay icon is not displayed even if Wi-Fi status
indicator lights in blue, try restarting the wireless network
router.
≥ With some iOS and iTunes versions, it may not be possible
to restart the AirPlay playback if the selector is changed
(e.g., “CD”) or this system is turned off, during the AirPlay
playback.
In this case, select a different device from the AirPlay icon of
the Music App or iTunes and then re-select this system as
the output speakers. (l 14)
The remote control doesn’t work properly.
≥ The remote control and this system are using a different
code. (l 27, “REMOTE ”)
≥ Is the battery depleted or is the battery inserted incorrectly?
(l 7)
The following messages or service numbers may
appear on this system’s displays.
“--:--”
≥ You plugged the AC mains lead in for the first time or there
was a power failure recently. Set the time (l 22).
“ADJUST CLOCK”
≥ Clock is not set. Adjust the clock accordingly.
“ADJUST TIMER”
≥ Play timer is not set. Adjust the play timer accordingly.
“AUTO OFF”
≥ This system has been left unused for about 30 minutes and
will shut down within a minute. Press any button to cancel it.
Radio
iPod/iPhone/iPad operations
AirPlay operations
Remote control
Messages
SC-NE5DB~VQT4U56.book 26 ページ 2013年1月21日 月曜日 午後6時18分
27
VQT4U56
“CANNOT ACCEPT”
≥ The remote control cannot be operated due to a wireless
communication problem between the CD unit and the
speaker unit. (l 25)
“CANNOT SET”
≥ Select an audio source other than “AIRPLAY” or
“BLUETOOTH”.
“CHECKING CONNECTION”
≥ This system is checking the connected iPod/iPhone/iPad.
≥ If this display keeps appearing, make sure that the battery of
the iPod/iPhone/iPad is not depleted and that the iPod/
iPhone/iPad is turned on and connected correctly (l 9).
“DL ERROR”
≥ The software download has failed. Press any button to exit.
Please try again later.
≥ The server cannot be found. Press any button to exit. Make
sure that the wireless network is connected to the Internet.
“ERROR”
≥ Incorrect operation is performed. Read the instructions and
try again.
“F ” (“ ” stands for a number.)
≥ There is a problem with this system.
Note down the displayed number, disconnect the AC mains
lead and consult your dealer.
“FAIL”
≥ Updating or setting has failed. Read the instructions and try
again.
“IPOD_DOCK OVER CURRENT ERROR”
“IPOD_PORT OVER CURRENT ERROR”
≥ The iPod/iPhone/iPad is drawing too much power. Remove
the iPod/iPhone/iPad and turn this system off and on again.
≥ The USB device is drawing too much power. Switch to “CD”
mode, remove the USB and turn this system off.
“LEVEL 0”
≥ There is no link between this system and the wireless
network router.
Try the following operations:
– Check that the wireless network router is turned on.
– Turn this system off and on again.
– Reset the wireless network settings. (l 10)
If the problem persists, consult your dealer.
“LEVEL j”
≥ When “D.CONNECT” is set to “ON” the Wi-Fi signal strength
cannot be checked. To check the Wi-Fi signal strength from
the wireless network router, set “D.CONNECT” to “OFF”.
(l 14)
“LINKING”
≥ This system is communicating with the wireless network
router to complete the network settings.
Depending on the wireless network router this process may
take a few minutes. Try moving this system closer to the
wireless network router.
“NOCONNECT”
≥ This system cannot connect to the network.
Check the network connection. (l 10)
≥ This system has a wireless communication problem between
the CD unit and the speaker unit. (l 25)
“NODEVICE”
≥ The iPod/iPhone/iPad device is not inserted correctly. Read
the instructions and try again (l 9).
≥ The battery of the iPod/iPhone/iPad is depleted. Charge the
iPod/iPhone/iPad and turn it on before connecting.
≥ The USB device is not inserted. Check the connection.
“NO DISC”
≥ Insert the disc to be played (l 9).
“NO MEMORY”
≥ There are no preset DAB/DAB+ stations to select. Preset
some channels. (l 19)
“NO PLAY”
≥ A CD that is not in CD-DA or MP3 format is inserted. It
cannot be played.
≥ If there are more than 255 albums or folders (audio and
non-audio), some of the MP3 files in these albums may not
be read and played. Transfer these music albums to another
USB. Alternatively, reformat the USB device and save these
music albums prior to saving the other non-audio folders.
“NO SIGNAL”
≥ This station cannot be received. Check your antenna (l 8).
“NOT SUPPORTED”
≥ You have inserted an iPod/iPhone/iPad that cannot be
played (l 5).
≥ If the iPod/iPhone/iPad is compatible, turn it on and connect
it correctly.
≥ The connected iPod touch/iPhone/iPad is not connected to a
wireless network. Connect it to a wireless network and try
again. (l 10)
“READING”
≥ This system is checking the CD information. After this display
has disappeared, start operating.
“REMOTE ” (“ ” stands for a number.)
≥ The remote control and this system are using different codes.
Change the code on the remote control.
– When “REMOTE 1” is displayed, press and hold [OK] and
[ , AUX]
for more than 4 seconds.
– When “REMOTE 2” is displayed, press and hold [OK] and
[CD/RADIO] for more than 4 seconds.
“SCAN FAILED”
≥ Stations are not receivable. Check your antenna and try Auto
scanning (l 19).
If “SCAN FAILED” is still displayed find the best signal
reception with the “MANUAL” tuning function. (l 20)
“SET WI-FI”
≥ The connected iPod touch/iPhone/iPad is not connected to a
wireless network. Connect it to a wireless network and try
again. (l 10)
SC-NE5DB~VQT4U56.book 27 ページ 2013年1月21日 月曜日 午後6時18分
28
VQT4U56
Attaching the speaker unit to a wall (optional)
The speaker unit can be wall mounted using the supplied wall mount brackets, etc. Make sure that the
screw used and the wall are strong enough to support the weight of at least 33 kg.
The screws and other items are not supplied as the type and size will vary with each installation.
≥Refer to step 2 of “Wall mount instructions” for details about the required screws.
≥Be sure to attach the fall prevention cord as a secondary safety measure.
∫ Supplied accessories
≥ 1 Safety holder
≥ 1 Screw
≥ 2 Wall mount brackets
∫ Additionally required accessories
(commercially available)
≥ 4 Wall mount bracket fixing screws
≥ 1 Safety holder fixing screw
≥ 1 Fall prevention cord
*
≥ 1 Screw eye
* Use a cord that is capable of supporting over 33 kg (with a
diameter of about 1.5 mm).
1 Measure and mark the position of the wall mount
brackets (Both sides).
{. Use figures below to identify the screwing positions.
The position to attach the wall mount brackets
Space required
Installation accessories
≥ Keep the safety holder out of reach of children to
prevent swallowing.
≥ Keep the screws out of reach of children to prevent
swallowing.
≥ Keep the wall mount brackets out of reach of children
to prevent swallowing.
Safety precautions
Professional installation is required.
The installation should never be done by any
other than a qualified installation specialist.
PANASONIC DISCLAIMS ANY PROPERTY
DAMAGE AND/OR SERIOUS INJURY,
INCLUDING DEATH RESULTING FROM
IMPROPER INSTALLATION OR INCORRECT
HANDLING.
≥ Be sure to install this unit as indicated within
these operating instructions.
Wall mount instructions
Before installation, turn the unit off and disconnect the
AC mains lead from the mains socket.
252 mm
12.5 mm
300 mm
319 mm
770 mm
83 mm
252 mm
82 mm
169 mm
570 mm
67 mm
122 mm
SC-NE5DB~VQT4U56.book 28 ページ 2013年1月21日 月曜日 午後6時18分
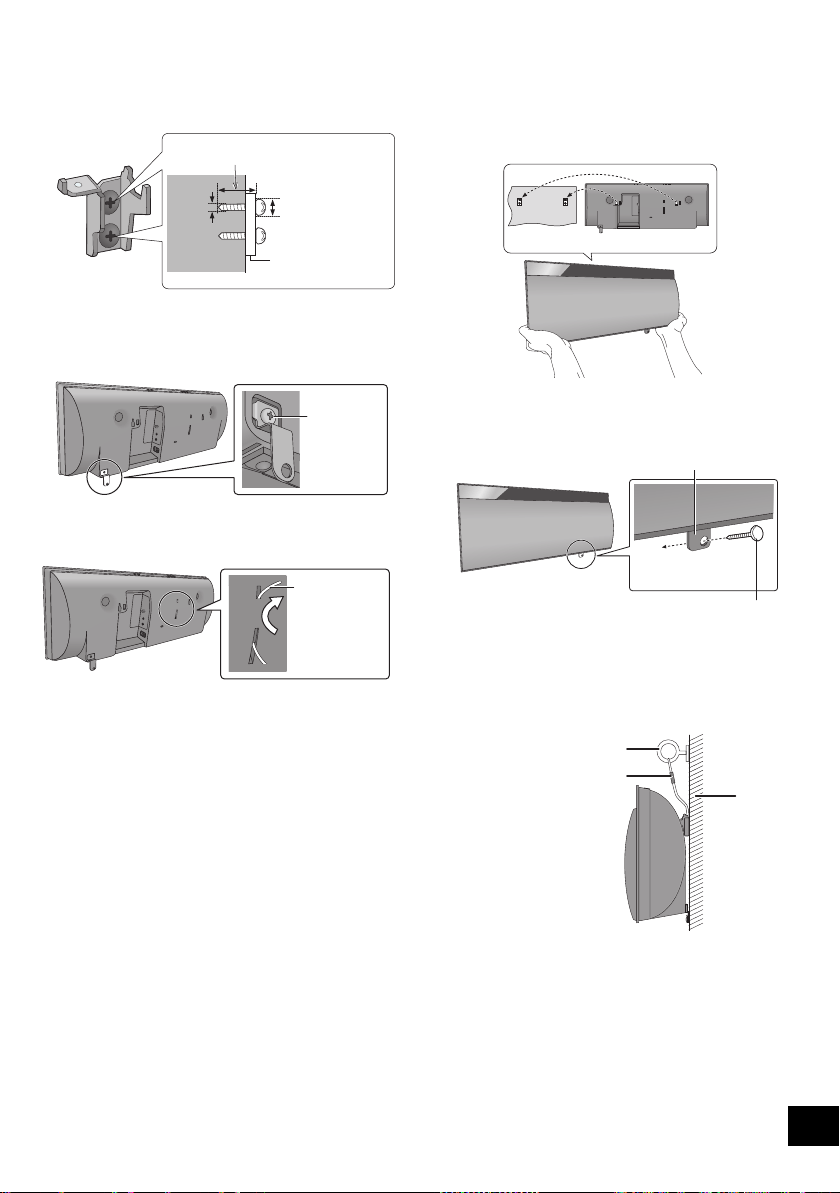
29
VQT4U56
2 Attach the wall mount bracket to the wall with
2 screws (not supplied). (Both sides)
≥ Use a level to ensure both wall mount brackets are
level.
3 Fix the safety holder onto the unit with the screw
(supplied).
{. Screw tightening torque: 50 N0cm to 70 N0cm.
4 Attach the fall prevention cord (not supplied) to this
unit.
5 Hook the unit securely onto the wall mount
brackets with both hands.
≥ Connect the antenna and the AC mains lead to the unit
before hanging the unit onto the wall. (l 8)
≥ After hanging the unit, release your hands carefully to
confirm the unit sits securely on the wall.
6 Drive the safety holder fixing screw (not supplied)
to secure the safety holder onto the wall.
≥ Refer to step 2 for requirements before screwing.
7 Attach the fall prevention cord (not supplied) to the
wall.
≥ Make sure that the slack of the cord is minimal.
At least 30 mm
‰7.5 mm to
‰9.4 mm
‰4 mm
Wall mount bracket
Screw
(supplied)
Cord
(not supplied)
Wall
Safety holder fixing screw
(not supplied)
Safety holder
Fixed to the wall
Cord (not supplied)
Screw eye (not supplied)
Wall
SC-NE5DB~VQT4U56.book 29 ページ 2013年1月21日 月曜日 午後6時18分

30
VQT4U56
Specifications
∫ GENERAL
∫ AMPLIFIER SECTION
∫ TUNER SECTION
∫ DAB SECTION
∫ TERMINALS SECTION
∫ DISC SECTION
∫ SPEAKER SECTION
∫ Wi-Fi/ AirPlay SECTION
∫ BLUETOOTH SECTION
*1: When the iPod/iPhone/iPad is not charging.
*2: Prospective communication distance
Measurement environment:
Temperature 25 oC / Height 1 m
Measure in “MODE 1”
≥ Specifications are subject to change without notice.
Mass and dimensions are approximate.
≥ Total harmonic distortion is measured by a digital spectrum
analyzer.
Power consumption
CD unit 23 W
Speaker unit 14 W
Power consumption in standby mode*
1
CD unit Approx. 0.3 W
Speaker unit Approx. 0.3 W
Power consumption in standby mode*
1
(When “NET STNBY” is “ON”)
Speaker unit Approx. 4.0 W
Power supply AC220Vto240V,50Hz
Dimensions (WkHkD)
CD unit
192 mmk206 mmk93 mm
Speaker unit
570 mmk206 mmk100 mm
Mass
CD unit Approx. 0.9 kg
Speaker unit Approx. 2.8 kg
Operating temperature range 0 oC to r40 oC
Operating humidity range
35 % to 80 % RH (no condensation)
RMS Output Power Stereo mode
Front Ch (both ch driven)
20 W per channel (6 ≠), 1 kHz, 10 % THD
Total RMS Stereo mode power 40 W
Frequency Modulation (FM)
Preset Memory FM 30 stations
Frequency range
87.50 MHz to 108.00 MHz (50 kHz step)
Antenna terminals 75 ≠ (unbalanced)
DAB memories 20 channels
Frequency Band (Wavelength)
Band III (UK Only) 10B (211.648 MHz)
11B to 12D (218.640 MHz to 229.072 MHz)
Band III (Europe/Australia)
5A to 13F (174.928 MHz to 239.200 MHz)
Australia
9A to 9C (202.928 MHz to 206.352 MHz)
Sensitivity *BER 4x10
-4
Min Requirement s98 dBm
DAB External Antenna
Terminal F - Connector
(75 ≠)
iPod Port
USB Standard USB 2.0 full speed
Media file format support MP3 (¢.mp3)
USB device file system FAT12, FAT16, FAT32
iPod port power
DC OUT 5V2.1AMAX
Lightning Connector DC OUT 5V1.0AMAX
AUX Terminal Stereo, ‰3.5 mm jack
Disc played (8 cm or 12 cm)
CD, CD-R/RW (CD-DA, MP3)
Pick up
Wavelength 790 nm (CD)
Laser power CLASS 1
Audio output (Disc)
Number of channels 2 ch (FL, FR)
Type
2 way, 2 speaker system (Bass reflex)
Speaker unit(s)
1. Woofer 8cmk1 per channel
2. Tweeter 2.5 cm k1 per channel
Impedance 6 ≠
Output sound pressure 83.5 dB/W (1 m)
Frequency range
52 Hz to 25 kHz (s16 dB), 75 Hz to 22 kHz (s10 dB)
Wi-Fi
WLAN Standards IEEE802.11b/g
Frequency range 2.4 GHz band
Security WEP (64 bit/128 bit),
WPA
TM
, WPA2
TM
WPS version Version 2.0 (WEP not support)
Version Bluetooth
®
Ver.2.1 +EDR
Output Class 2(2.5mW)
Communication distance About 10 m*
2
Communication method 2.4 GHz band FH-SS
Correspondence profile A2DP / AVRCP
SC-NE5DB~VQT4U56.book 30 ページ 2013年1月21日 月曜日 午後6時18分

31
VQT4U56
Limited Warranty (ONLY FOR AUSTRALIA)
Panasonic Warranty
1. The product is warranted for 12 months from the date of purchase. Subject to the conditions of this warranty Panasonic or its
Authorised Service Centre will perform necessary service on the product without charge for parts or labour, if in the opinion of
Panasonic, the product is found to be faulty within the warranty period.
2. This warranty only applies to Panasonic products purchased in Australia and sold by Panasonic Australia or its Authorised
Distributors or Dealers and only where the products are used and serviced within Australia or it's territories. Warranty cover only
applies to service carried out by a Panasonic Authorised Service Centre and only if valid proof of purchase is presented when
warranty service is requested.
3. This warranty only applies if the product has been installed and used in accordance with the manufacturer’s recommendations (as
noted in the operating instructions) under normal use and reasonable care (in the opinion of Panasonic). The warranty covers normal
domestic use only and does not cover damage, malfunction or failure resulting from use of incorrect voltages, incorrect installation,
accident, misuse, neglect, build-up of dirt or dust, abuse, maladjustment of customer controls, mains supply problems, thunderstorm
activity, infestation by insects or vermin, tampering or repair by unauthorised persons (including unauthorised alterations),
introduction of sand, humidity or liquids, commercial use such as hotel, office, restaurant, or other business or rental use of the
product, exposure to abnormally corrosive conditions or any foreign object or matter having entered the product.
5. Some products may be supplied with Ethernet connection hardware. The warranty is limited on such products and will not cover
6. To claim warranty service, when required, you should:
7. The warranties hereby conferred do not extend to, and exclude, any costs associated with the installation, de-installation or
re-installation of a product, including costs related to the mounting, de-mounting or remounting of any screen, (and any other
ancillary activities), delivery, handling, freighting, transportation or insurance of the product or any part thereof or replacement of and
do not extend to, and exclude, any damage or loss occurring by reason of, during, associated with, or related to such installation,
de-installation, re-installation or transit.
Panasonic Authorised Service Centres are located in major metropolitan areas and most regional centres of Australia, however,
coverage will vary dependant on product. For advice on exact Authorised Service Centre locations for your product, please telephone
our Customer Care Centre on 132600 or visit our website and use the Service Centre Locator.
In addition to your rights under this warranty, Panasonic products come with consumer guarantees that cannot be excluded under the
Australian Consumer Law. If there is a major failure with the product, you can reject the product and elect to have a refund or to have
the product replaced or if you wish you may elect to keep the goods and be compensated for the drop in value of the goods. You are
also entitled to have the product repaired or replaced if the product fails to be of acceptable quality and the failure does not amount to a
major failure.
If there is a major failure in regard to the product which cannot be remedied then you must notify us within a reasonable period by
contacting the Panasonic Customer Care Centre. If the failure in the product is not a major failure then Panasonic may choose to repair
or replace the product and will do so in a reasonable period of time from receiving notice from you.
If you require assistance regarding warranty conditions or any other enquiries, please visit the
Panasonic Australia
website www.panasonic.com.au or contact by phone on 132 600
If phoning in, please ensure you have your operating instructions available.
(a) Internet and or DLNA connection / setup related problems
(b) Access fees and or charges incurred for internet connection
(c) The use of incompatible software or software not specifically stipulated in the product operations manual;
and
(d) Any indirect or consequential costs associated with the incorrect use or misuse of the hardware, its connection to the internet or
any other device.
4. This warranty does not cover the following items unless the fault or defect existed at the time of purchase:
(a) Cabinet Part(s) (e) DVD, Blu-ray or Recordable Discs
(b) Video or Audio Tapes (f) Video / Audio Heads from wear and tear in normal use
(c) SD cards or USB devices (g) Information stored on Hard Disk Drive, USB stick or SD card
(d) User replaceable Batteries (h) DTV reception issues caused by TV Aerial / Cabling / Wall socket(s)
etc
Telephone Panasonic’s Customer Care Centre on 132600 or visit our website referred to below and use the Service Centre
Locator for the name/address of the nearest Authorised Service Centre.
Send or take the product to a Panasonic Authorised Service Centre together with your proof of purchase receipt as a proof of
purchase date. Please note that freight and insurance to and / or from your nearest Authorised Service Centre must be arranged
by you.
Note that home or pick-up/delivery service is available for the following products in the major metropolitan areas of Australia or the
normal operating areas of the nearest Authorised Service Centres:
Plasma/LCD televisions / displays (screen size greater than 103 cm)
THIS WARRANTY CARD AND THE PURCHASE DOCKET (OR SIMILAR PROOF OF PURCHASE)
SHOULD BE RETAINED BY THE CUSTOMER AT ALL TIMES
Panasonic Australia Pty. Limited
ACN 001 592 187 ABN 83 001 592 187
1 Innovation Road, Macquarie Park NSW 2113
PRO-031-F11 Issue: 4.0 01-01-2011
SC-NE5DB~VQT4U56.book 31 ページ 2013年1月21日 月曜日 午後6時18分
Information for Users on Collection and Disposal of Old Equipment and used Batteries
These symbols on the products, packaging, and/or accompanying documents mean
that used electrical and electronic products and batteries should not be mixed with
general household waste.
For proper treatment, recovery and recycling of old products and used batteries,
please take them to applicable collection points, in accordance with your national
legislation and the Directives 2002/96/EC and 2006/66/EC.
By disposing of these products and batteries correctly, you will help to save valuable
resources and prevent any potential negative effects on human health and the
environment which could otherwise arise from inappropriate waste handling.
For more information about collection and recycling of old products and batteries,
please contact your local municipality, your waste disposal service or the point of sale
where you purchased the items.
Penalties may be applicable for incorrect disposal of this waste, in accordance with
national legislation.
For business users in the European Union
If you wish to discard electrical and electronic equipment, please contact your dealer
or supplier for further information.
[Information on Disposal in other Countries outside the European Union]
These symbols are only valid in the European Union. If you wish to discard these
items, please contact your local authorities or dealer and ask for the correct method
of disposal.
Note for the battery symbol (bottom two symbol examples):
This symbol might be used in combination with a chemical symbol. In this case it
complies with the requirement set by the Directive for the chemical involved.
Cd
EU
Pursuant to the applicable EU legislation
Panasonic Marketing Europe GmbH
Panasonic Testing Centre
Winsbergring 15, 22525 Hamburg, Germany
Panasonic Corporation
Web Site: http://panasonic.net
p
C Panasonic Corporation 2013
VQT4U56
F0113SS0
EU
SC-NE5DB~VQT4U56.book 28 ページ 2013年1月21日 月曜日 午後6時18分
