Loading ...
Loading ...
Loading ...
PREPARING YOUR SAW FOR USE
A. GETTING READY'
1. READ YOUROPERATOR'SMANUAL
CAREFULLY.
YourOperator's Manualhasbeendevelopedtohelp
youprepareyoursawforuseandtounderstandits
safe operation.It is important that you read your
manual completelytobecomefamiliarwiththe saw
beforeyoubegin assemb}y.
.............. ,,,,, ,i
2. HAVETHE FOLLOWING AVAILABLE:
a. Protectivegloves.
b. Approved, market fuel container
c. Onegallon regular unleaded gasoline
d, 8oz. (1/2 pt.), 2-cycle, engine oil
e. Bar and Chain Lubricant.
f. BarM|usting Tool providedw_lhyoursaw.One
end ofthetoolserws asawrench;theothercanbe
usedas ascrewdriver.
L,
.11111
B,
, ,,,,. ,,,,,,,,,,,i
.._ ii ii "H ,.... HH,.HH I. I
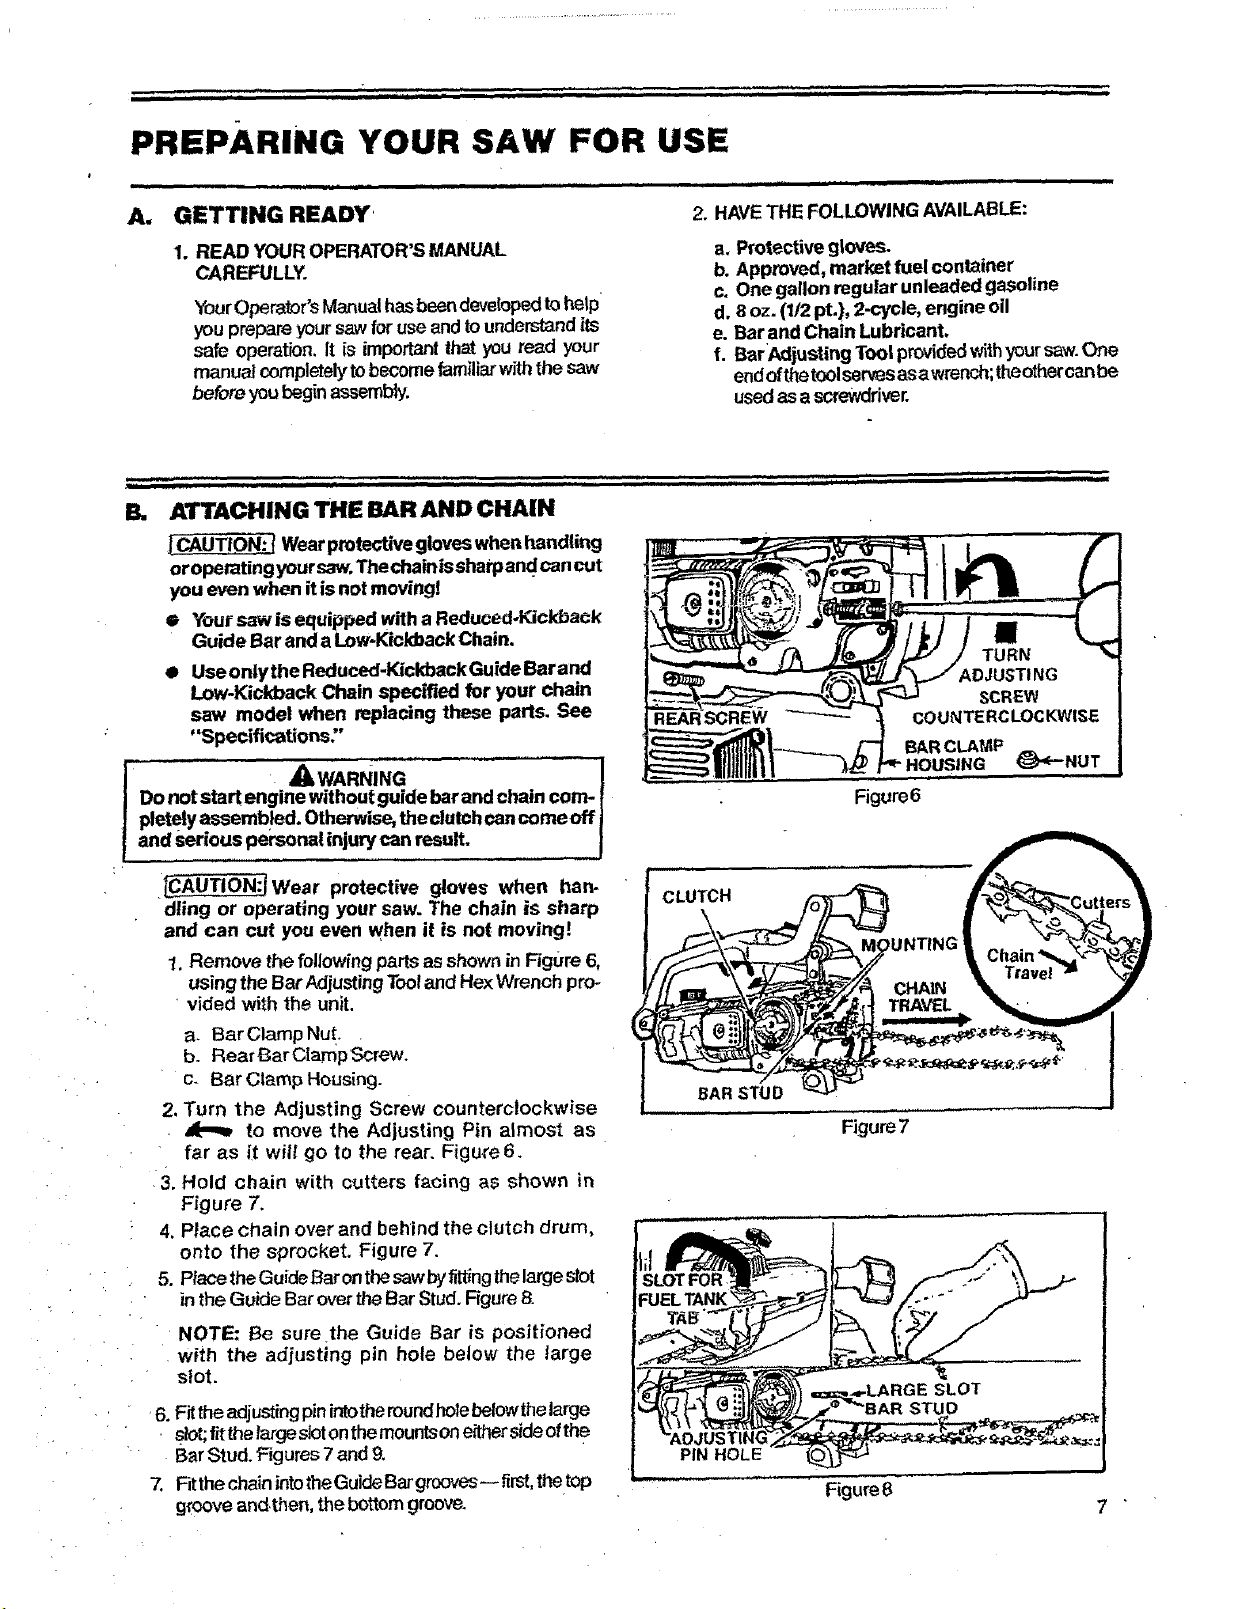
ATTACHING THE BAR AND CHAIN
__CAUTION:t Wearprotectivegloveswhen handling
oropemting yoursaw.The ¢hainissharpand cancut
you even when it isnot moving!
• Yoursaw is equipped with a Reduced.Kickback
Guide Bar and a Low-KickbackChain.
• Use only the Reduced-Kickback Guide Barand
Low-Kickback Chain specified for your chain
saw model when replacing these parts. See
"Specifications"
,_WARNING
Do not start engine without guide bar and chain com-
pletelyassembled. Otherwise,theclutch cancomeoff
and Serious personal injury can result.
._AUTION:I Wear protective gloves when han-
dling or operating your saw. The chain is sharp
and can cut you even when it is not moving!
1. Remove thefollowing partsas shownin Figure 6,
using theBar AdjustingTooland HexWrench pro-
vided with the unit.
a. Bar Clamp Nut.
b. Rear Bar Clamp Screw.
c- Bar Clamp Housing.
2. Turn the Adjusting Screw counterclockwise
to move the Adjusting Pin almost as
far as it will go to the rear. Figure 6.
•3. Hold chain with cutters facing as shown in
Figure 7.
4. Place chain over and behind the clutch drum,
onto the sprocket. Figure 7.
5. Placethe Guide Bar onthesawbyfittingthelarge stot
in the Guide Bar overthe Bar Stud.Figure 8.
NOTE: Be sure the Guide Bar is positioned
with the adjusting pin hole below the large
slot.
•6. Fittheadjusting pin intotheround holebelowthelarge
stot;fit thefar_ sJotonthemountson e_d'tersideofthe
BarStud. Figures7 and 9.
7. Fitthe chainintotheGuideBar grooves-- first,thetop
grooveandthen, the bottom groove.
.11, ,,,,,,,,,,, , ,, i ii i H
!1
TURN
ADJUSTING
SCREW
SCREW
| /-.-HOUSZ G -NUT
Figure6
CLUTCH
BARSTUD
Figure7
STU
Figure 8
Loading ...
Loading ...
Loading ...