Loading ...
Loading ...
Loading ...
goes through a living space it must be enclosed, and that enclosure must conform to clearance standards for the prefabri-
cated chimney. Your chimney must pass through your roof and extend above the roof line in accordance with code stan-
dards. Please refer to height requirements on Page 2.
Prefabricated Chimney Configurations
The diagrams below represent the most common and acceptable installations using prefabricated chimney pipe. The
necessary components are listed and shown in their appropriate locations. These components are Class A listed to U.L.
103HT (tested to 2100 degrees F.) Only components listed to UL 103HT can be used to install your wood stove.
Installation instructions are described below as examples only. More detailed instructions are available through
Woodstock Soapstone or the pipe manufacturer. ALWAYS FOLLOW THE SPECIFIC MANUFACTURER’S
INSTALLATION INSTRUCTIONS.
Installation 1- Flat ceiling through the roof
First, determine where the stove will be placed. Pay close attention to all required
clearances for the stove and connector pipe. Next, use a plumb line to locate the fin-
ish ceiling support in the ceiling above. Cut the appropriate sized hole in the ceiling
and frame in the necessary supports to secure the ceiling support. Install the pipe
adapter onto the first section of chimney pipe, and lower them into the ceiling sup-
port. Use an insulation shield in the attic to keep any insulation away from the pipe.
If the attic is a living space the chimney pipe must be fully enclosed. As the pipe
extends through the roof, install the appropriate flashing and storm collar to keep the
weather out. As the height of the chimney increases to meet code, it may be neces-
sary to install a roof brace (typically recommended at 5’ intervals). All chimneys
should have the appropriate cap installed at the top to reduce wind and weather
related downdrafts as well as deter any animals from building nests. The connector
pipe should extend from the flue collar of the stove to the pipe adapter at the ceiling
support. The male (crimped) end should always point down toward the stove. Be sure that each joint has enough overlap
for a secure connection. All connections should be fastened with screws, including at the flue collar and pipe adapter.
(Please refer to the manufacturers full set of installation instructions)
Installation 2- Pitched/Cathedral Ceiling through the roof
Determine where the stove will be placed. Be sure all clearance requirements are satisfied. Choose the appropriate
support for your installation (support box or roof support). Use a plumb line to
locate the support in the ceiling above. Cut the appropriate sized hole in the ceiling
and install the necessary framing to secure the support. Install the support accord-
ing to its specific instructions. Be sure that the support hangs down below the ceil-
ing far enough to maintain proper clearance for the connector pipe (steeper slopes
require more chimney pipe below the ceiling). Install the pipe adapter to the first
section of chimney pipe and lower it into the support box (or connect it to the bot-
tom of the roof support). As the pipe extends through the roof, install the appropri-
ate roof flashing and storm collar. Install the proper chimney pipe lengths to meet
code and recommended chimney height. It may be necessary to install a roof brace
for stability. Always install the appropriate cap to the top of the chimney. Double
wall connector pipe is recommended for installations that have 8’ or more from the
stove to the chimney. Be sure that all joints in the connector pipe are secure and fas-
tened with screws, including at the flue collar and chimney pipe adapter. (Please
refer to the manufacturers full set of installation instructions)
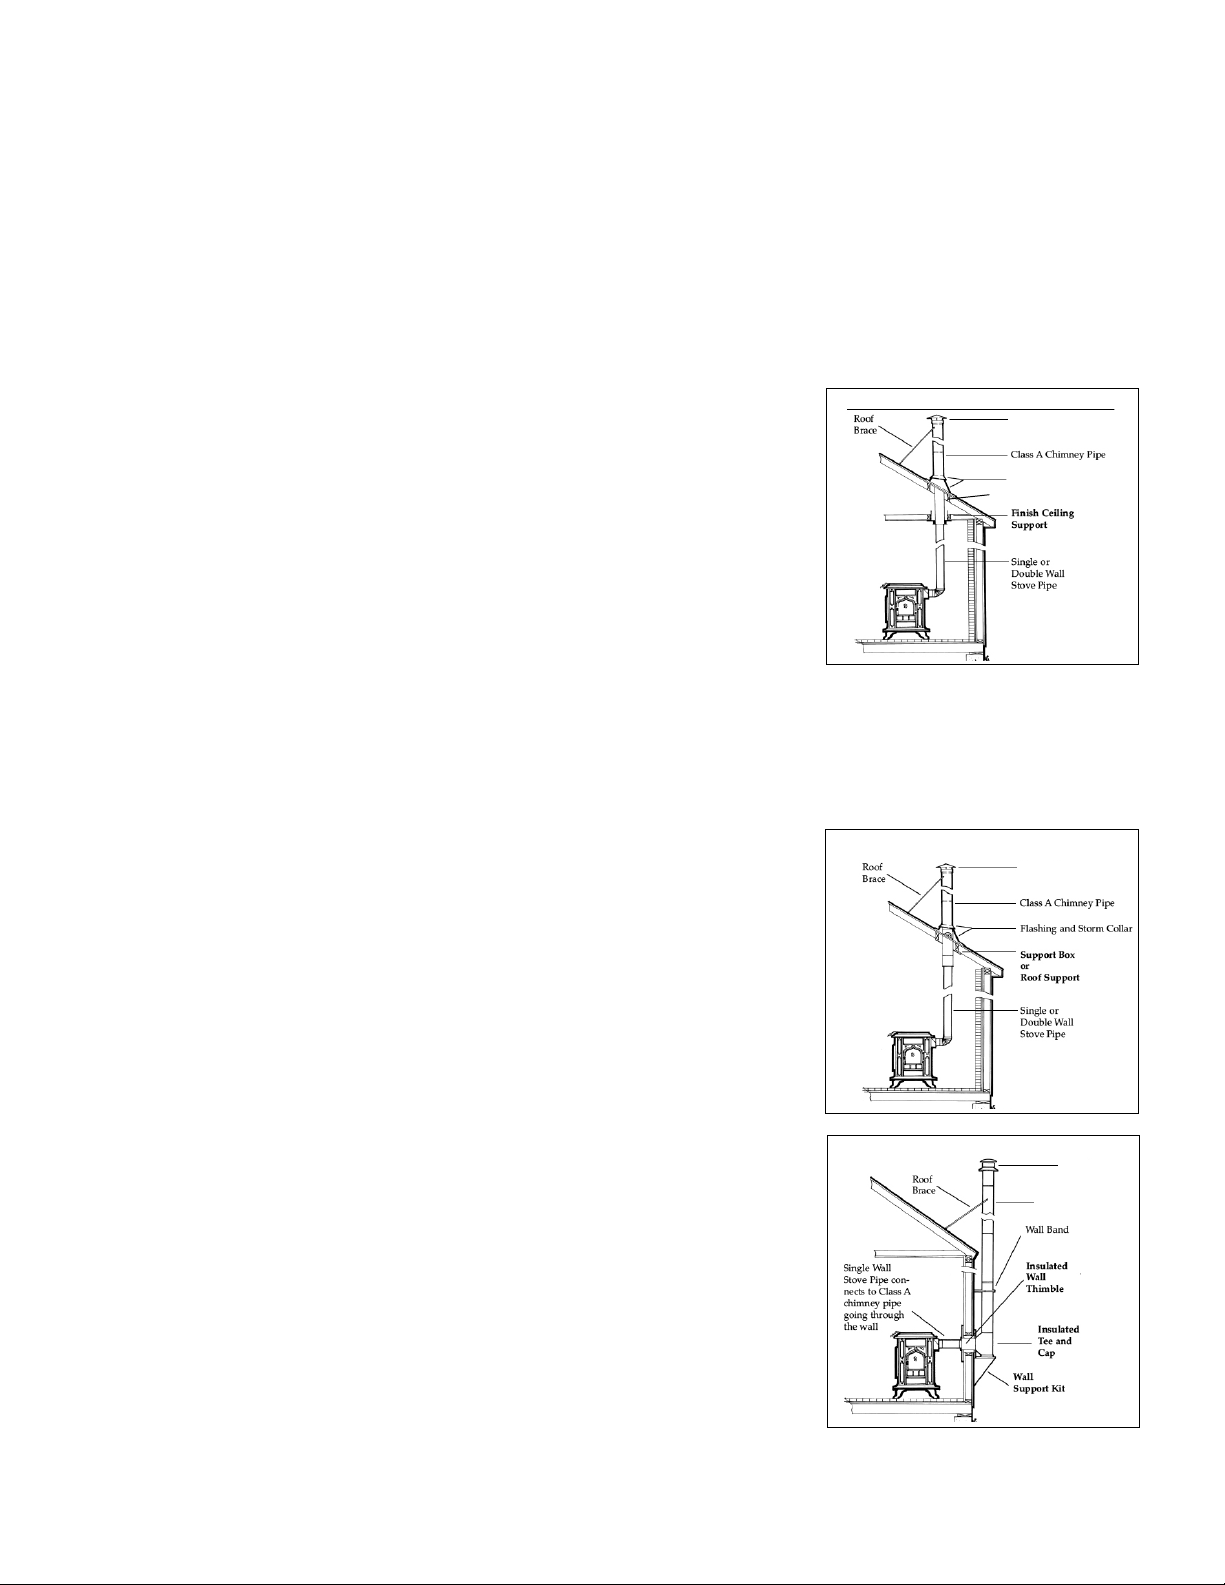
Installation 3- Through the wall
This installation requires the use of an insulated wall thimble to penetrate a com-
bustible wall. Typically a 9”-12” chimney pipe and pipe adapter will pass through
the thimble and make the connection between the interior connector pipe and an
insulated tee with a clean out on the outside of the bulding. The tee and chimney
rising up from it rest on a wall support designed to bear the weight of the chimney.
Install lateral supports as specified as the chimney rises along the exterior wall. The
appropriate flashing and storm collar should be installed if the chimney penetrates
an eave or overhang. An offset of 15 or 30 degrees may also be used to go around an
overhang. As the chimney extends above the roof to meet code recommended
heights it may be necessary to install a roof brace. (Please refer to the manufacturers
full set of installation instructions).
Installation 1- Flat ceiling through the roof
Installation 2
Pitched/Cathedral Ceiling through the roof.
Class A
Chimney Pipe
Installation 3- Through the Wall
Attic Insulation Shield
4
Chimney Cap
Chimney Cap
Chimney Cap
Flashing & Storm Collar
Loading ...
Loading ...
Loading ...