Loading ...
Loading ...
Loading ...
13.Pullthemeltedendsthroughathick,cleanragwhile
theRopeisstillhottoobtainsmooth,pointedends,
14_InsertoneendoftheRopethroughtheHandleand
securewithaknot,.
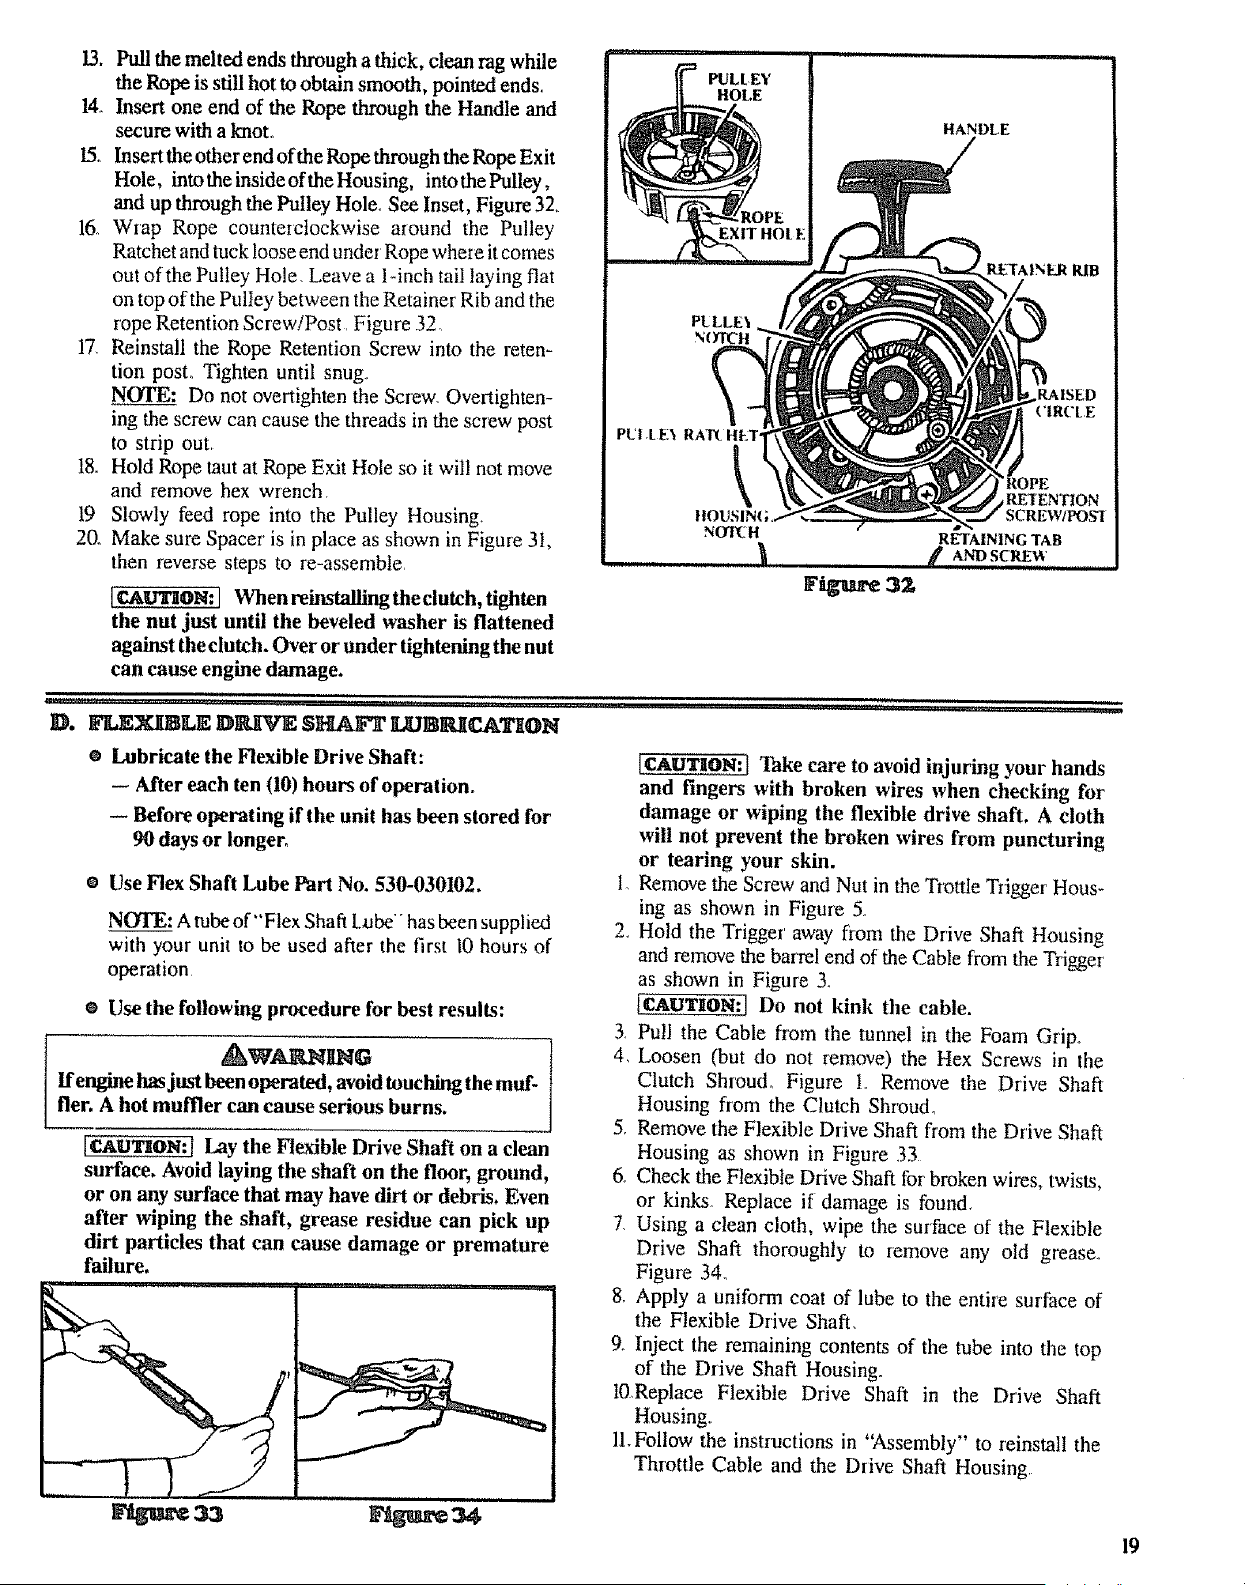
15,.InserttheotherendoftheRopethroughtheRopeExit
Hole,intotheinsideoftheHousing,intothePulley,
andupthroughthePulleyHole,SeeInset,Figure32,
16 WrapRopecounterclockwisearoundthePulley
RatchetandtucklooseendunderRopewhereitcomes
outofthePulleyHole,Leave a l-inch tail laying flat
on top of the Pulley between the Retainer Rib and the
rope Retention Screw!Post Figure .32
!7 Reinstall the Rope Retention Screw into the reten-
tion post, Tighten until snug.
NOTE: Do not overtighten the Screw, Overtighten-
ing the screw can cause the threads in the screw post
to strip out_
18. Hold Rope taut at Rope Exit Hole so it will not move
and remove hex wrench.
t9 Slowly feed rope into the Pulley Housing
20, Make sure Spacer is in place as shown in Figure 3t,
then reverse steps to re-assemble
F_tu.e 3:_
[CAOTION:] When reinstalling theclutch, tighten
the nut just until the beveled washer is flattened
against the clutch. Over or under tightening the nut
can cause engine damage.
-=-.,--: , ..... '_' ....... . ., , i,,_ ....... ,....... _i '
D. FLE_LE D1_VE S_FI' L_CA_ON
Lubricate the Flexible Drive Shaft:
-- After each ten (10) hours of operation.
-- Before operating iftbe unit has been stored for
90 days or longer_
e Use Flex Shaft Lube Part No. 530-030102.
NOTE: Atube of"Ftex Shaft Labe'" has been supplied
with your unit to be used after the first 10 hours of
operation
O Use the following procedure for best results:
t_W_D_G 1
Ifengine has just been operated, avoid touching the muf-
tier. A hot muffler can cause serious burns.
[_U_OH:] Lay the Flexible Drive Shaft on a clean
surface. Avoid laying the shaft on the floor, ground,
or on any surface that may have dirt or debris. Even
after wiping the shaft, grease residue can pick up
dirt particles that can cause damage or premature
failure.
lCAUTION: [ 'Ihke care to avoid injuring your hands
and fingers with broken wires when checking for
damage or wiping the flexible drive shaft. A cloth
will not prevent the broken wires from puncturing
or tearing your skin.
In Remove the Screw and Nut in the Trottle Trigger Hous-
ing as shown in Figure 5o
2., Hold the Trigger' away from the Drive Shaft Housing
and remove the barrel end of the Cable from the Trigger'
as shown in Figure 3.
[CAU'rltON:] Do not Idnk the cable.
3 Pull the Cable from the tunnel in the Foam Grip
4, Loosen (but do not remove) the Hex Screws in the
Clutch Shroud° Figure 1.. Remove the Drive Shaft
Housing fiom the Clutch Shroud°
5. Remove the Flexible Drive Shaft from the Drive Shaft
Housing as shown in Figure 33
6. Check the Flexible Drive Shaft for' broken wires, twists,
or kinks, Replace if damage is found,
7, Using a clean cloth, wipe the surface of the Flexible
Drive Shaft thoroughly to remove any old grease.
Figure 34.
8_ Apply a uniform coat of lube to the entire surface of
the Flexible Drive Shaft,
9_ Inject the remaining contents of the tube into the top
of the Drive Shaft Housing.
10Replace Flexible Drive Shaft in the Drive Shaft
Housing_
ll.Follow the instructions in 'W_ssembty" to reinstall the
Throttle Cable and the Drive Shaft Housing
19
Loading ...
Loading ...
Loading ...