Loading ...
Loading ...
Loading ...
9. SETTING THE BENCH DRILL
- 8 - - 17 -
5. HEALTH AND SAFETY INFORMATION
Have this tool repaired by a qualified person. This tool is designed to confirm to the relevant
international and local standards and as such should be maintained and repaired by someone
qualified; using only original parts supplied by the manufacturer: This will ensure the tool remains
safe to use.
5.2 SPECIFIC SAFETY INSTRUCTION FOR DRILL PRESSES USE
ADDITIONAL SAFETY INSTRUCTIONS FOR FLOOR DRILLS
MECHANICAL HAZARDS:
1. Crushing
When setting/changing a tool or maintaining the machine avoid crushing injuries sustained
between fixed and moving elements of the machine.
2. Cutting or Severing
At all times the workpiece shall be clamped as manual support will lead to injury.
3. Entanglement
Switch off the machine for maintenance, workpiece loading/unloading, swarf/chip removal,
cutting/lubrication fluid application as contact with rotating spindle or tool will cause
entanglement and possibly lead to injury and entrapment.
4. Impact
Ensure the workpiece is securely clamped at all times to avoid sudden movement (rotation) or
ejection causing injury. Ensure any special tools associated with tool exchange, i.e. chuck key
are removed prior to attempting to start the machine.
5. Stabbing, Cutting or Puncture Wounds
Take care when handling the tools and avoid contact with swarf and burrs created during
drilling as they are extremely sharp.
ELECTRICAL HAZARDS:
1. Contact with Live parts
During commissioning, maintenance and trouble shooting operations do not remove, open or
expose any electrical, terminal and control boxes due to the danger of electrocution. If the main
cable is damaged, unplug the machine immediately and have the cable replaced before
continuing.
AUDIBLE HAZARDS:
1. Hearing Loss
Wear ear defenders during operation to avoid damage to hearing, however ensure this does
not interfere with speech communications or audible warnings.
MATERIAL HAZARDS:
1. Contact and Inhalation
Wear personal protective equipment to avoid contact from harmful fluids, gases or dust thrown
or created during the drilling process.
2. Fire or Explosion
Do not drill or drill in the vicinity of flammable or combustible materials.
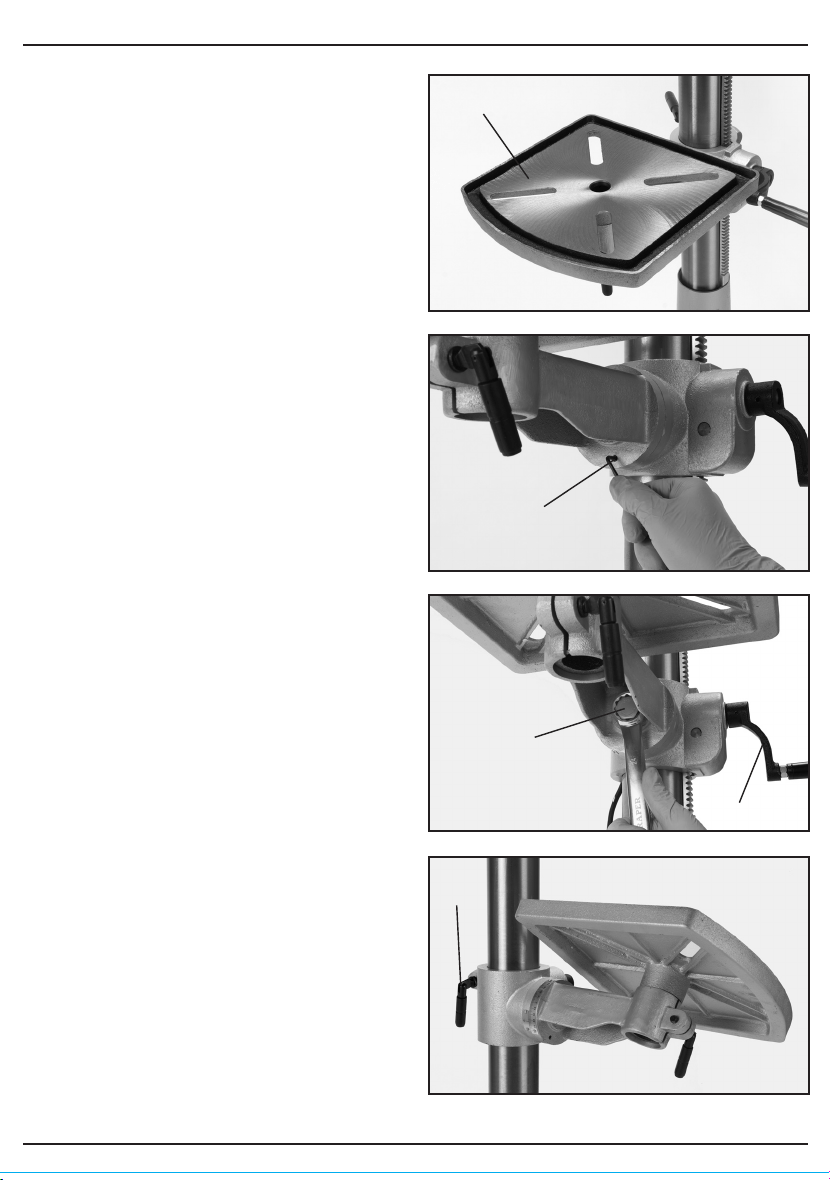
9.4 WORK TABLE ADJUSTMENT -
Figs. 16-19
For versatility, the work table can be
raised or lowered, tilted ±45° or rotated 360°
around the column.
To tilt the table, tighten nut & clockwise
until the locating pin can be removed from the
casting. Store in a safe location. Loosen the
24mm bolt %.
Adjust the table’s degree of tilt and re-secure
with locking bolt %. Use the scale as a
guide. Alternatively use a protractor off the
table to the drill bit for more accuracy.
When the table is back in a level position
insert the location pin for the factory setting.
Move the nut along the thread until the end of
the thread is protected by the nut, allowing
use of a small hammer to tap the pin in place.
To raise/lower the table working height,
loosen locking handle and turn the
height adjustment crank handle to raise
or lower the table. Alternatively while locking
handle is loose the table can be rotated
180° to further increase the distance between
the chuck and workpiece. When the
adjustments are complete re-secure locking
handle .
The slots in the work table and base can
accommodate locking bolts to secure a small
vice enabling safe clamping of the workpiece.
CAUTION: A drill bit snagging on a piece of
work will violently grab the piece of material,
whipping it round and is likely to result in
personal injury. Always ensure the workpiece
is securely clamped.
FIG.16
FIG.17
FIG.18
%
FIG.19
&
Loading ...
Loading ...
Loading ...