
1
To prevent possible SERIOUS INJURY or DEATH from electrocution:
• Be sure power is NOT connected BEFORE installing the receiver.
To prevent possible SERIOUS INJURY or DEATH from a moving gate
or garage door:
• ALWAYS keep remote controls out of reach of children. NEVER
permit children to operate, or play with remote control transmitters.
• Activate gate or door ONLY when it can be seen clearly, is properly
adjusted, and there are no obstructions to door travel.
• ALWAYS keep gate or garage door in sight until completely closed.
NEVER permit anyone to cross path of moving gate or door.
WARNING
CAUTION
WARNING
WARNING
To prevent possible SERIOUS INJURY or DEATH, the use of
CONSTANT OPERATION on residential openers is PROHIBITED.
When a receiver is used to activate a commercial door opener, a
reversing edge MUST be installed on the bottom of the door. Failure to
install a reversing edge under these circumstances may result in
SERIOUS INJURY or DEATH to persons trapped beneath the door.
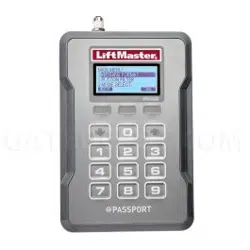
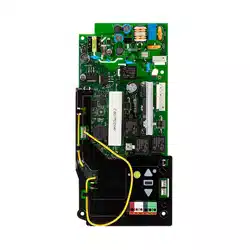
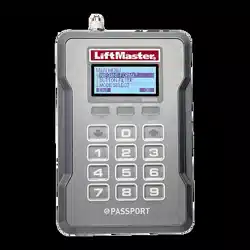
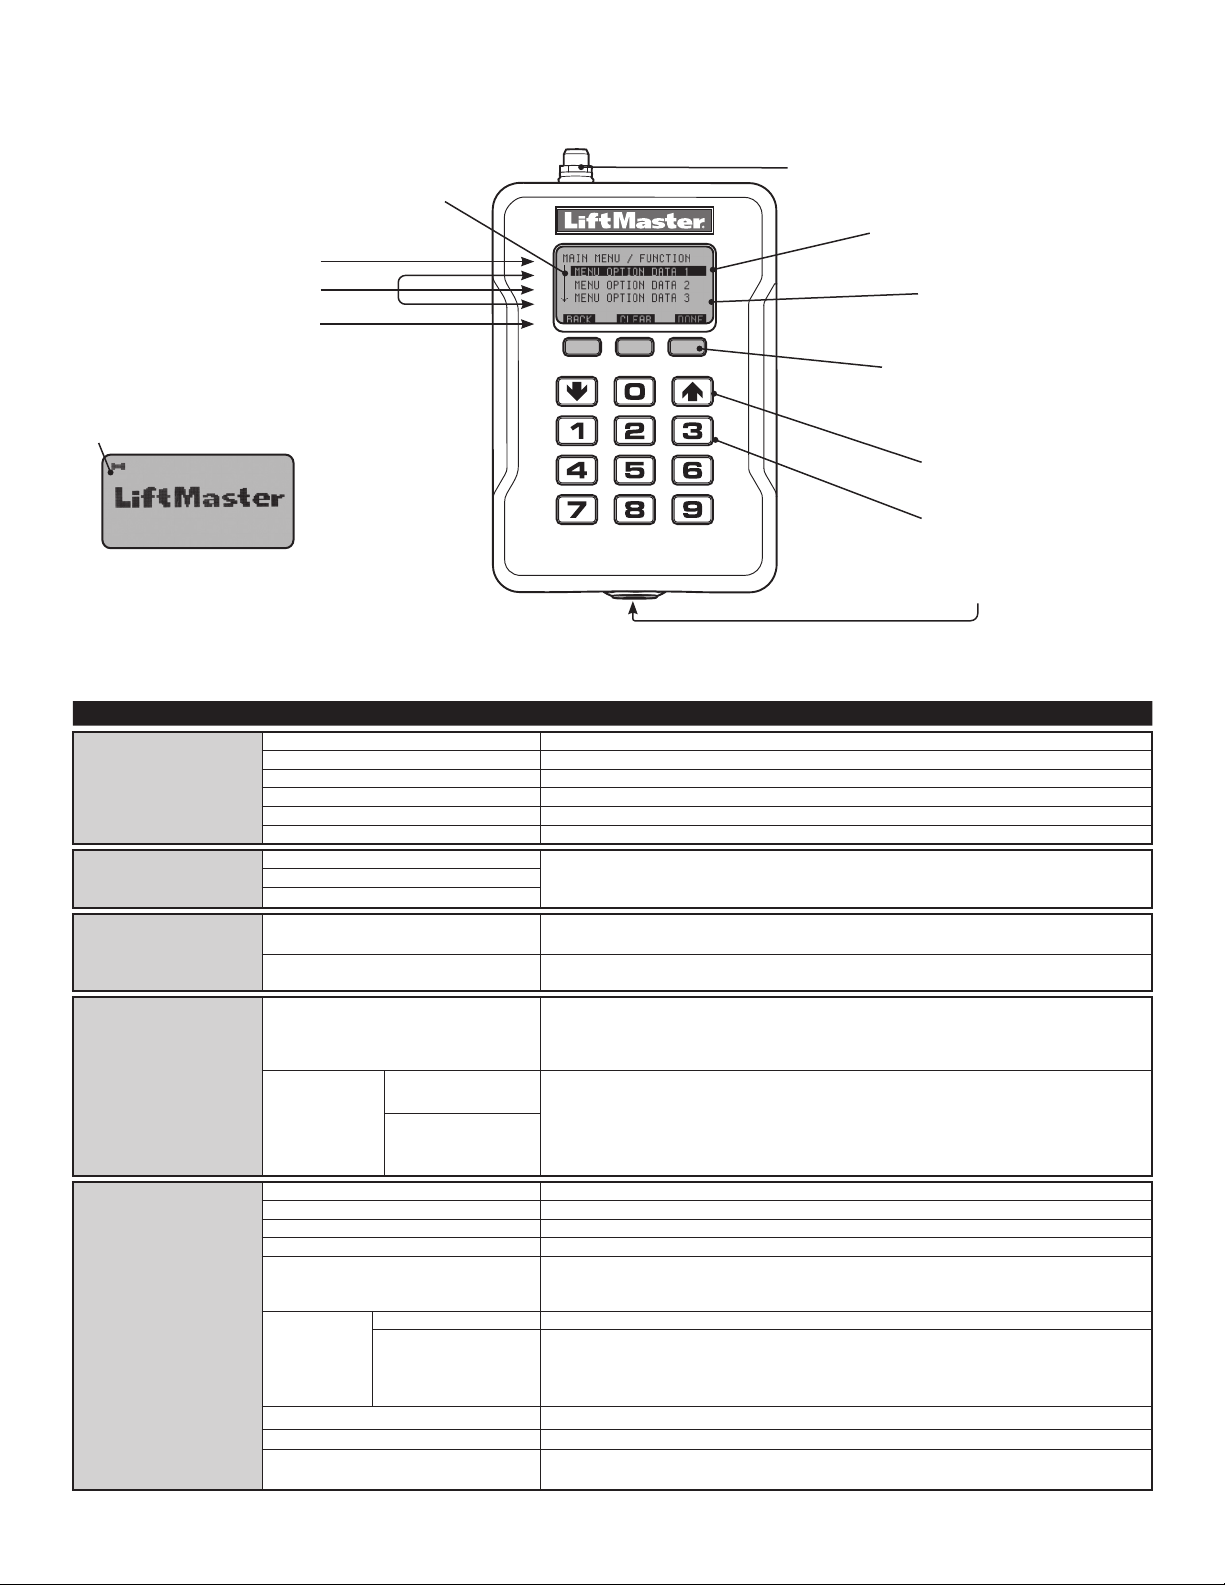
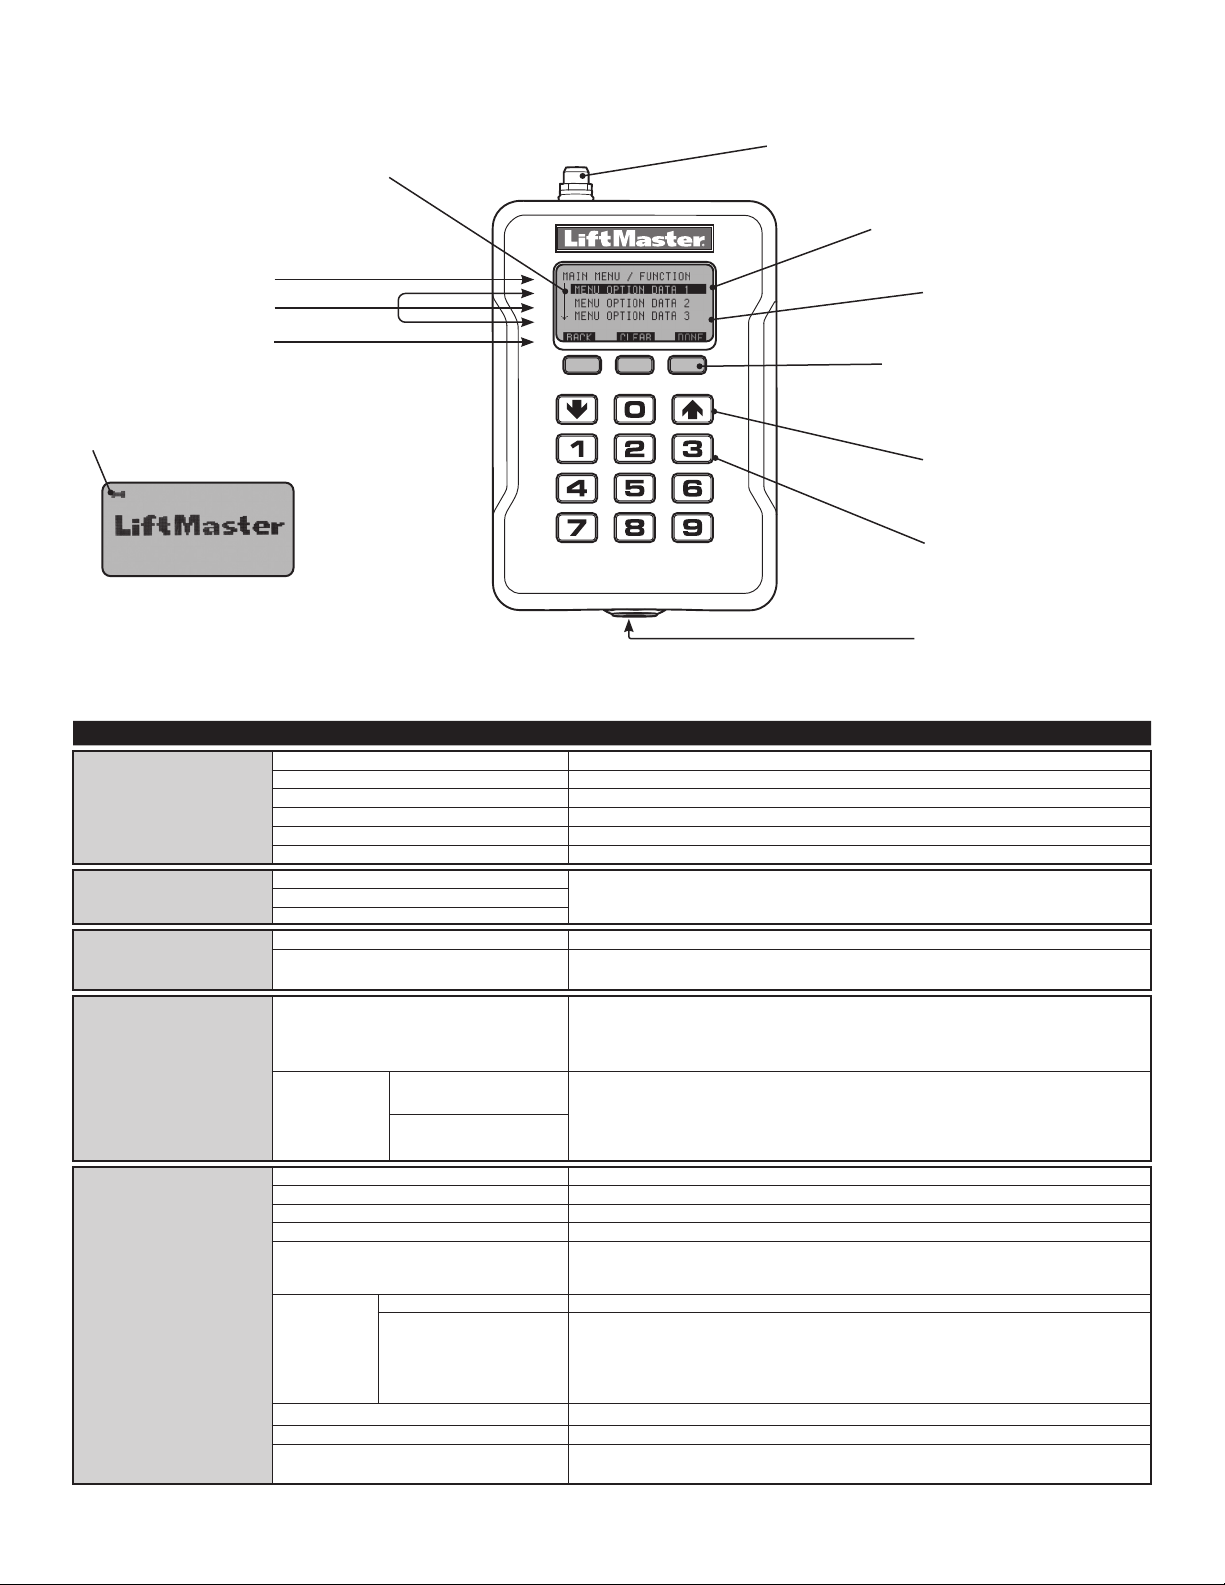
PASSPORT WIEGAND RECEIVER
MODEL PPWR
APPLICATION
The Passport Wiegand Receiver is a Security+ 2.0
®
receiver with a
Wiegand output. The PPWR is compatible with Security+ 2.0
®
Passport
MAX and Passport Lite remote controls and access systems utilizing 26
Bit, 30 Bit, 31 Bit, 34 Bit (even or odd), and 50 Bit Wiegand code formats.
The receiver has two modes of operation (see Choose a Mode,
page 3):
• Pass Through Mode (Default) - passes all received remote control
signals to the access system host controller.
• Advanced Mode - provides an additional layer of security in areas
where other remote controls may be operating. The receiver only
passes signals from a remote control with a previously programmed
facility code. All other signals are blocked.
This receiver is compatible with HomeLink
®
. Refer to instructions
included with your HomeLink
®
unit for compatibility and programming.
The receiver is rated for outdoor use (IP44).
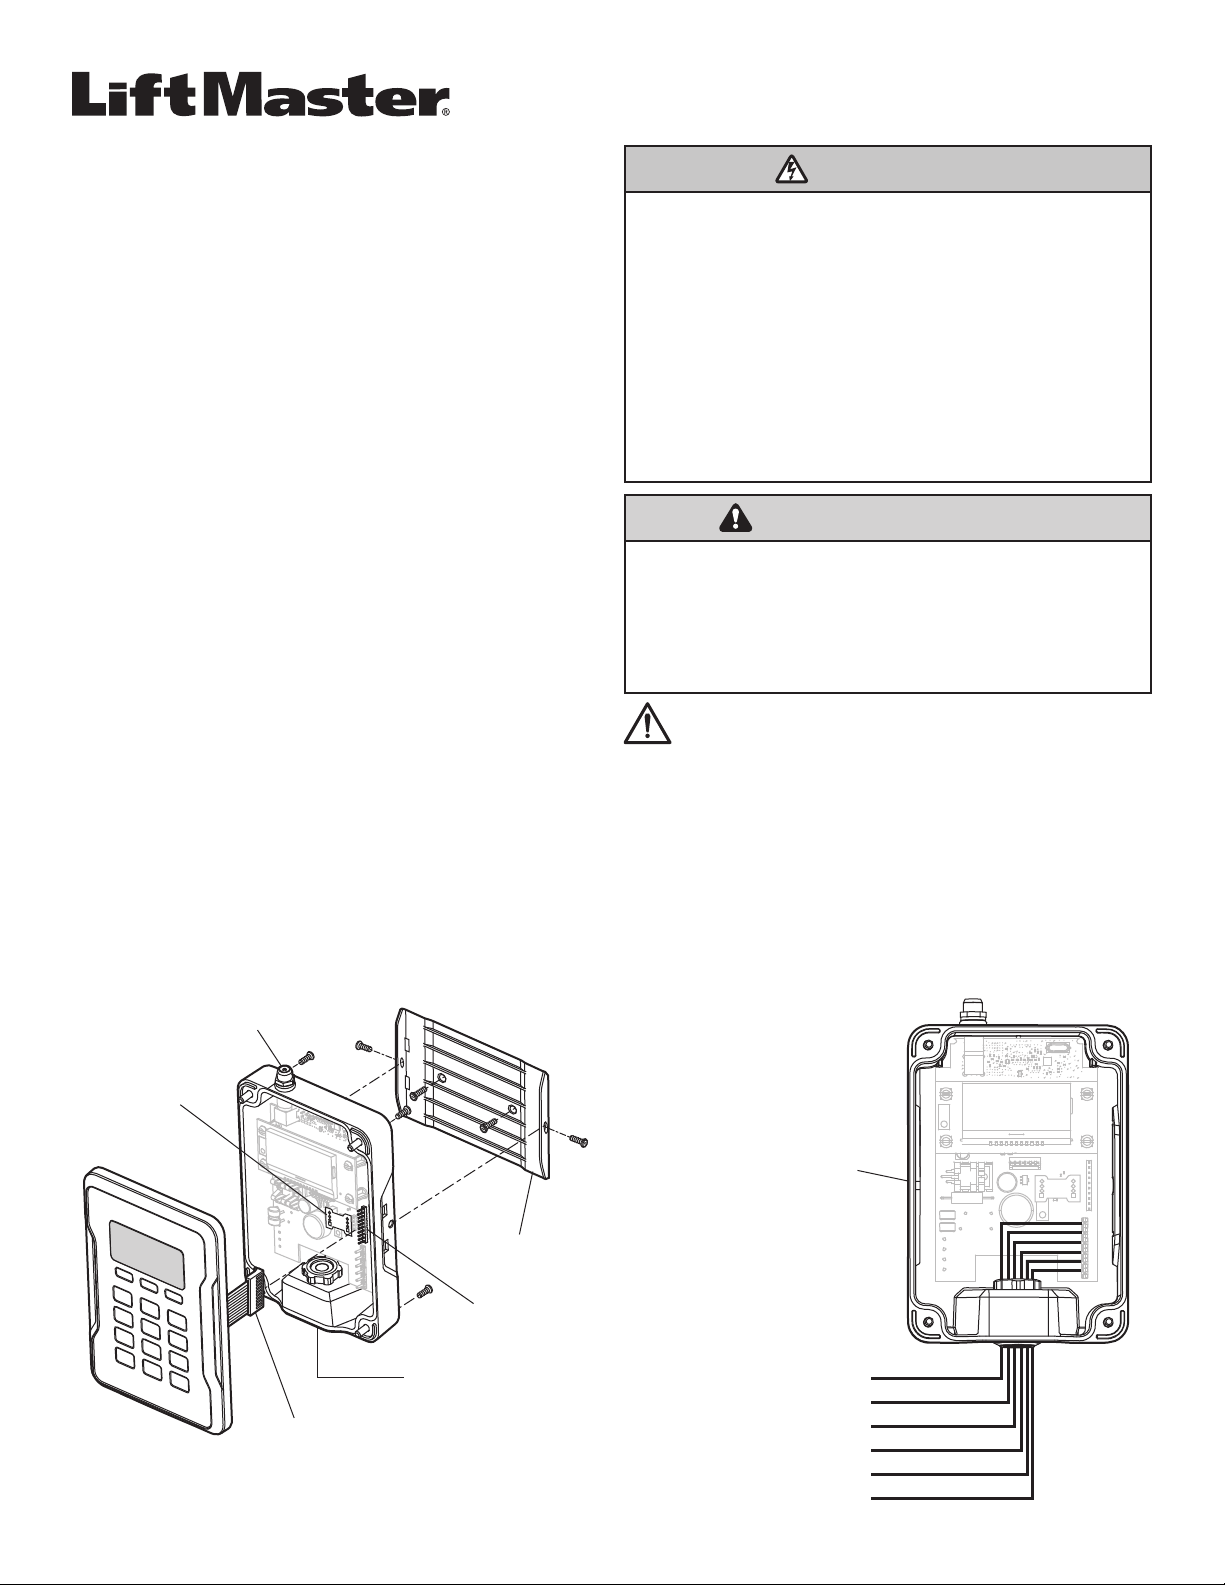
INSTALLATION
1. Select a convenient location near the access system host controller
within “line of sight” of the intended transmitting location.
NOTE: Do not mount the receiver in direct sunlight. Avoid mounting
the receiver in a metal enclosure or near other wireless receiving or
transmitting devices. If mounted in a metal enclosure, a remote
antenna must be used. If using multiple receivers, maximize the
distance between the two to avoid interference.
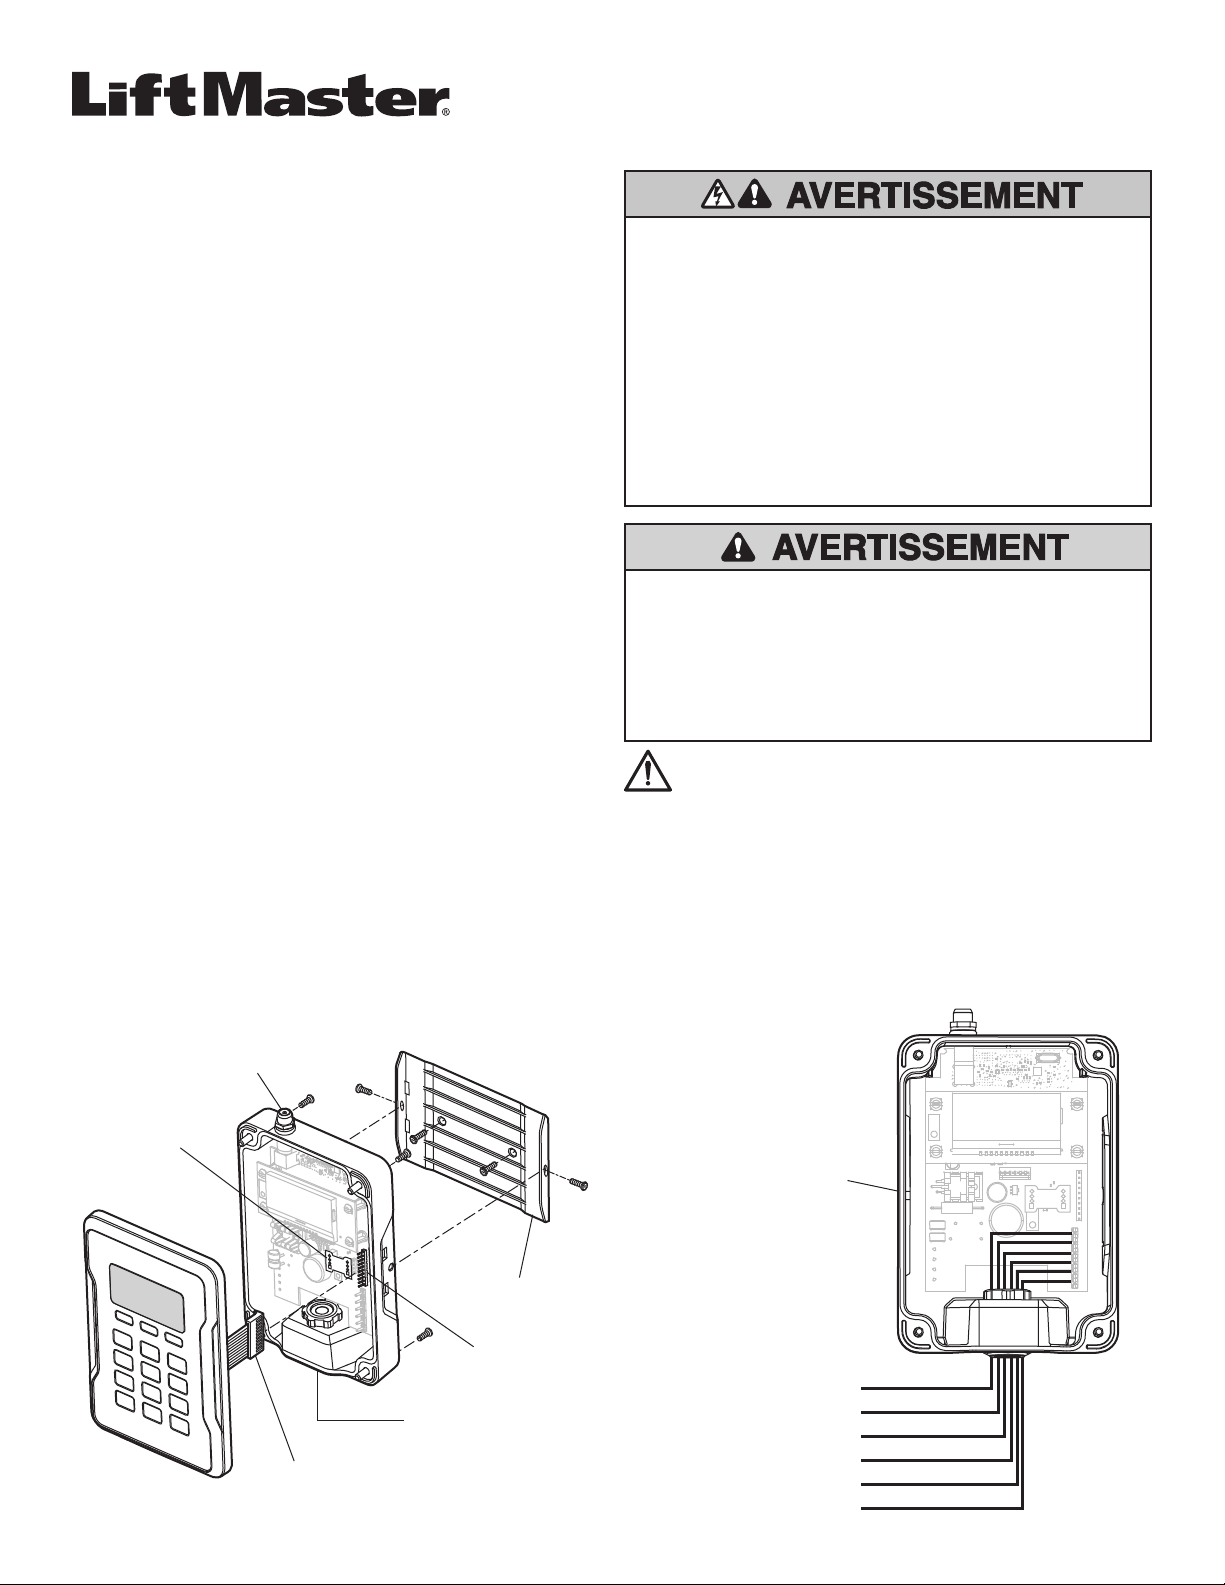
2. Mount the bracket to the desired surface with appropriate hardware
(not provided)(Figure 1).
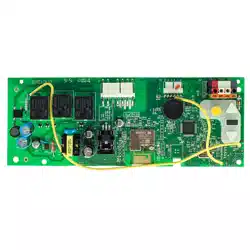
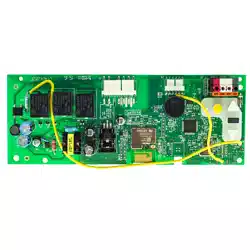
3. Remove the 4 #8 screws on the back of the receiver and remove the
faceplate. Unplug the keypad connector from the control board.
NOTE: Be careful not to damage the keypad cable while removing the
faceplate.
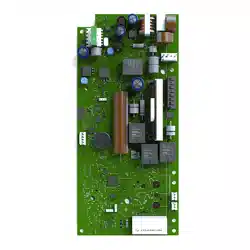
4. Make wiring connections (Figure 2). Refer to your access system
host owner’s manual for more specific information.
5. Reconnect the keypad connector to the board (labeled J9).
6. Secure the faceplate with the 4 #8 screws previously removed.
7. Install the antenna (provided).
Figure 1
Mounting Bracket
Antenna
Connector
Backup Memory
Module
Figure 2
Data 1 (to host)
Data 0 (to host)
12-24 VDC (+ Power Input)
- Power Input (Ground)
Shield
LED (from host Optional)
Watertight Connector
J9
Keypad Connector
Receiver Without
Faceplate
NOTE: Use the optional 86LM or 86LMT antenna extension kit
(see page 4) to mount the remote antenna as high and far from
metallic objects as possible for best radio range.
8. Snap receiver onto the mounting bracket and secure with the
#8 screws provided.
9. Tighten the watertight connector to secure and seal the wiring.
WARNING: This product can expose you to chemicals including
lead, which are known to the State of California to cause cancer
or birth defects or other reproductive harm. For more information
go to www.P65Warnings.ca.gov
2
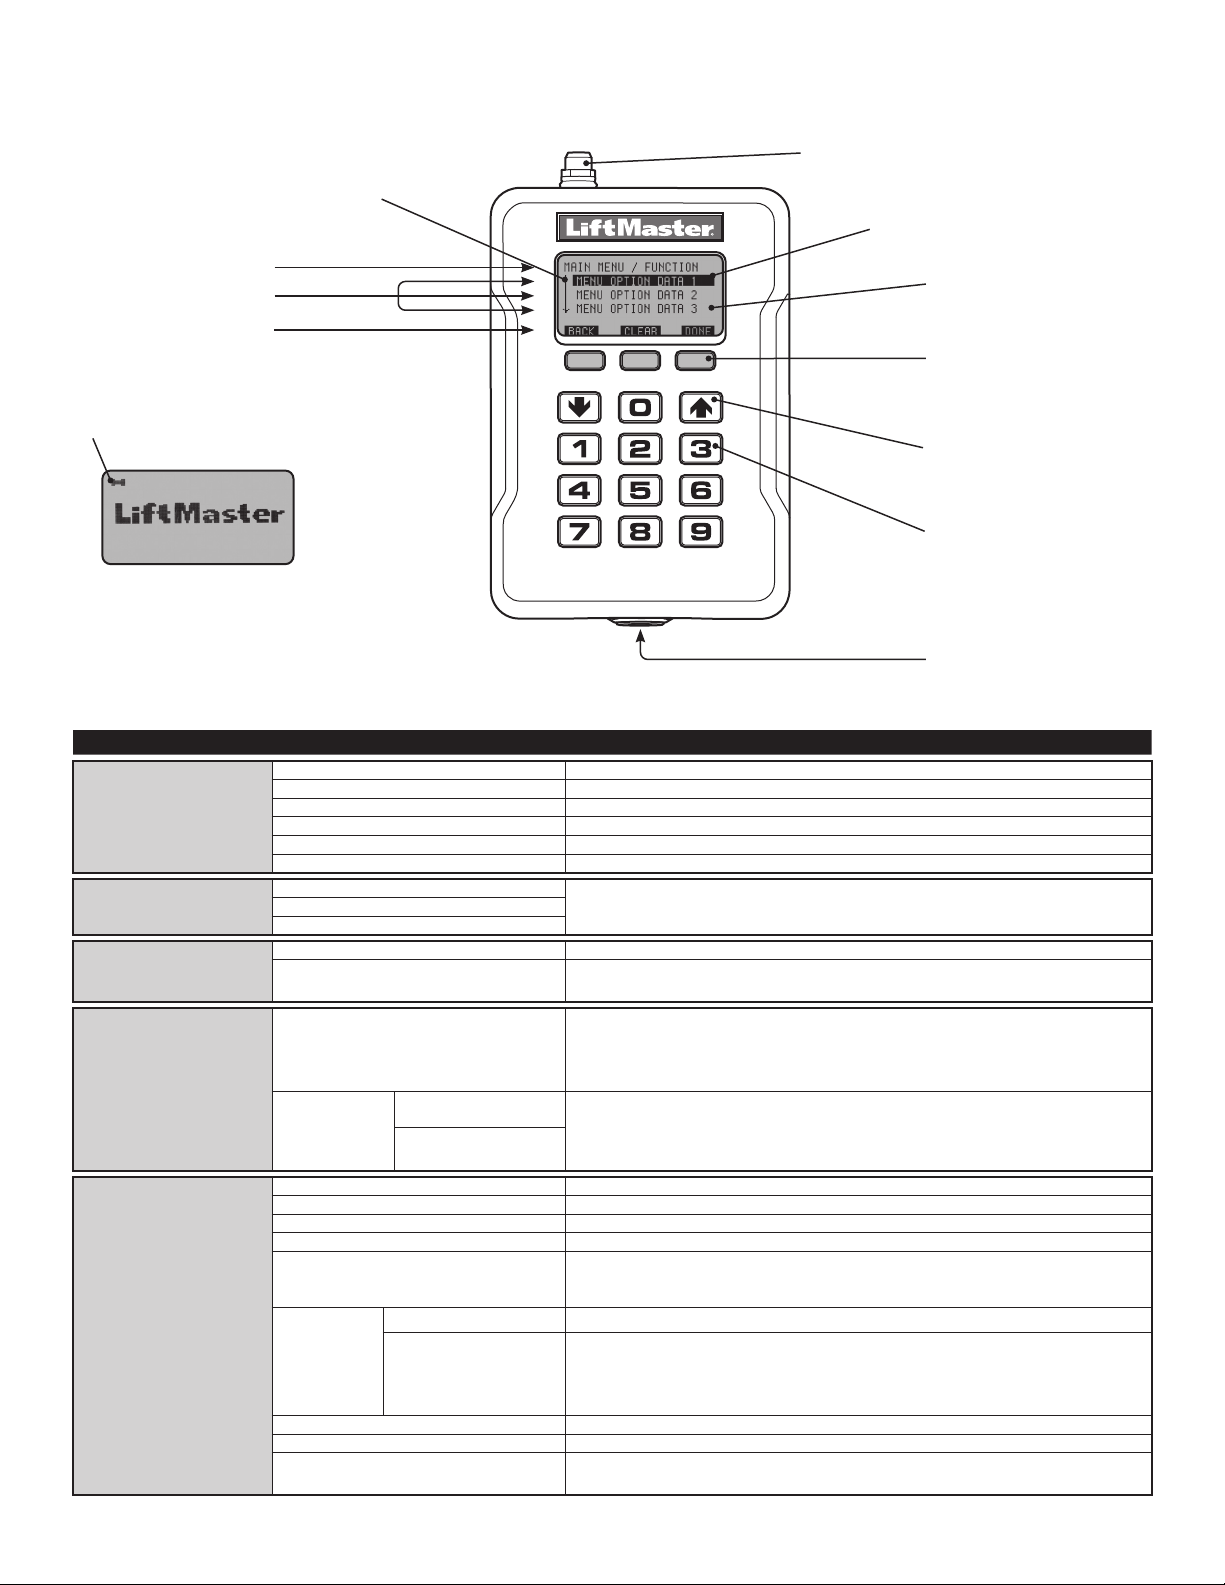
Antenna Connection
For the direct antenna or the
antenna extension kit.
“SOFT” Keys
Soft key functions are defined by
the label on line 5 of the display.
The functions change according
to the menu selection.
LCD Screen
System programming and status
display.
Down/Up Keys
For navigation in the menus.
Numeric Keypad
Numeric data is entered
through the numeric keypad.
Insert wiring
USER INTERFACE
The PPWR user interface consists of a 22 character by 5 line LCD display, 3 “soft keys”, Down/Up arrows and a numeric keypad.
Line 1:
Menu and function mode.
Lines 2, 3, and 4:
Menu selections and data.
Line 5:
Soft key function modes.
Scroll Indicator
If more than 3 options exist, a scroll indicator appears on the
left margin of lines 2, 3, and 4. The scroll indicator shows the
relative position within the list.
Menu/Data selection shown
in inverse font.
Backup memory module indicator
(LiftMaster
®
logo screen only)
MAIN MENU COMMAND DESCRIPTION
WIEGAND FORMAT
26 BIT (DEFAULT) 26 Bit Wiegand output code.
30 BIT 30 Bit Wiegand output code.
31 BIT 31 Bit Wiegand output code.
34 BIT EVEN 34 Bit EVEN Wiegand output code.
34 BIT ODD 34 Bit ODD Wiegand output code.
50 BIT 50 Bit Wiegand output code.
BUTTON FILTER
BUTTON 1 IS ON Used when multiple receivers are within range of each other. Button filter selects which
button the PPWR receiver responds to. Used in areas where of overlapping receiver
coverage. Default setting is: Button 1,2,3 ON.
BUTTON 2 IS ON
BUTTON 3 IS ON
MODE SELECT
PASS THRU (DEFAULT) Passes all received remote control signals to the access system host controller.
ADVANCED Receiver only passes signals from a remote control with a previously programmed facility
code. All other remote control facility codes are blocked.
SECURITY TABLE
If ADVANCED MODE is
turned off this option is
disabled and will appear
as NOT AVAILABLE FOR
PASS THRU MODE
PROGRAM Learn a facility code from any remote control in a batch that the PPWR will respond to.
Also used to resolve any conflicts in code translation.
NOTE: Once Advanced Mode is enabled, Facility Codes of all remote controls to be used
on site must be added to the Security Table.
LIST CHANGE FC OUT Displays a list of all programmed facility codes showing facility code conflicts and facility
code changes. Options to delete or resolve facility code conflicts. Security Table can hold
up to 64 entries. MAX FC and FC IN > FC OUT entries can be configured to translate FC IN
to a specified FC OUT. Each FC IN can only have one FC OUT.
DELETE
SETTINGS
PIN Change the 6-digit PIN number for the receiver.
DEALER INFO Display and edit the dealer 10-digit phone number.
FIRMWARE VERSION Displays the current firmware version.
BEEP Turn the audible feedback on or off.
MEMORY
This function creates a complete backup of programmed remote controls, and Security
Table settings. The backup may be restored to a replacement PPWR or used to copy the
configuration into other PPWR
DUPLICATE MEMORY
Creates a memory backup. A memory module must be installed.
RESTORE MEMORY Restores a memory backup from a memory module. An indicator appears on the
LiftMaster
®
logo screen if a backup memory module is installed.
NOTE: Content of memory module will over-write any information already stored in the
receiver memory. Remove memory module after backing up for safe keeping.
CONTRAST Press Down or Up arrows to adjust LCD contrast.
LANGUAGE Sets language: English (Default), Spanish, and French.
FACTORY DEFAULT Reset receiver settings to factory default. NOTE: If a PIN is set and lost the Reset Pin
function must be used to unlock the PPWR unit.
PROGRAMMING COMMANDS
The table below describes the commands used to program the receiver.

3
PROGRAMMING
The PPWR receiver has the ability to learn a combination of credentialed
remote control transmitters. See page 4 for a complete list of
compatible accessories. After 30 seconds of inactivity, the receiver times
out and the LiftMaster
®
logo is displayed. Select “UNLOCK” and enter the
master PIN to continue.
1 INITIAL PIN SET UP:
The PIN restricts access to authorized administrators only. If you omit
this step, anyone will be able to program the receiver. Upon initial power
up, the system firmware revision is displayed for 5 seconds followed
by the LiftMaster
®
logo. When a key is pressed, “CREATE PIN?”
is displayed.
1. Press “YES” to create PIN.
2. If the PIN is lost you may request a reset code by pressing "RESET."
You will be provided with a 5 digit serial number. Login to partner
portal and go to https://partner.liftmaster.com/utility.
Enter the Serial Number to retrieve the master code.
Once master code is retrieved, come back to the RESET option, and
after obtaining the serial number press Next.
Enter the master code from the partner portal.
Enter the new PIN.
Re-Enter the new PIN. You will hear a beep from the unit when the
PIN has been successfully programmed.
Note: Resetting the PIN does not clear data or settings on the PPWR.
3. Enter a 6-digit PIN, and press “YES”; enter the 6-digit PIN a second
time and press “YES” to program the PIN. If you make a mistake,
press “CLEAR” to change your entry. To exit the enter PIN screen,
select “BACK”.
4. When your 6-digit PIN is programmed correctly, the LCD display
reads “KEYPAD UNLOCKED”. Select “OK” to continue to the Main
Menu. After 30 seconds of inactivity, the receiver times out and
the LiftMaster
®
logo is displayed. Select “UNLOCK” and enter PIN
to continue.
2 CHOOSE A MODE
The receiver has two modes of operation:
Pass Through Mode (Default)
Passes all received remote control credentials to the access control
system. Credential Facility Code and Identification codes are passed
through without filtering or translation. No pre-configuration is necessary
for normal operation. Pass through mode is most commonly used.
Advanced Mode
Advanced mode provides an additional level of security where sites may
have overlapping radio coverage such as large multi-building apartment
or industrial complexes. The advanced mode establishes filtered
reception, only allowing Facility Codes programmed in the Security Table
to pass to the access control system. Transmissions from ALL remote
controls not programmed are ignored. When using Advanced Mode any
new remote control Facility Codes introduced to the site must be added
to the Security Table.
An additional feature of the advanced mode allows a 1 to 1 facility code
translation. This feature allows installers and site managers the flexibility
to program stock remote controls to the sites using a unique facility
code.
NOTE: Facility code translation is limited to a 1-“FC IN” to 1-“FC OUT” or
“One to One”. This in effect eliminates the ability to ignore source facility
code and have a single/fixed facility code output.
Use case examples:
1. Building complex A entrance within 100’ of Building complex B
entrance. Remote controls from each is creating nuisance access
denied transactions on the access controllers. Each PPWR can be set
to receive only remote controls with specific facility codes.
2. An apartment complex is using HID proximity credential devices
programmed to facility code 22 and would like to add PPWR
transmitters. The access control system only supports the use of one
facility code. The PPWR advanced mode can be set to translate one
source facility code “FC IN” to the desired target facility code “FC
OUT”. A specific remote control facility code is then translated to the
desired target facility code output.
To choose Mode of operation
1. Select “MODE SELECT” from the main menu. Press “OK”.
2. System responds with message showing current mode setting “PASS
THRU SET” or “ADVANCED SET”.
3. Press “EDIT”.
4. Select the mode that you want to use and press “YES”.
5. System responds with “WARNING THIS WILL ERASE MEMORY
PROCEED?”. Press “YES”.
6. System responds with “WARNING ARE YOU SURE?”. Press “YES”.
7. System responds with “UPDATING PLEASE WAIT”. DO NOT
disconnect power while updating.
8. System responds with a confirmation message that the selected
mode is saved.
9. If you chose PASS THROUGH MODE, press “OK”. No further setup is
required.
10. If you chose ADVANCED MODE, press “NEXT” to proceed to the
SECURITY TABLE menu.
To program Security Table
The Security Table can hold up to 64 unique facility codes. If a facility
code is already programmed it cannot be added again.
1. Select “PROGRAM” from the Security Table menu. Press “OK”
2. System responds with “PRESS BUTTON ON DEVICE OR TYPE IN
MAX FC”
3. Press a button on remote control or enter the FC # from the remote
control’s MAX FC ### (found on remote control id label) using the
keypad. Press “OK”
4. System responds with “MAX FC - ## SAVED”. Press “OK”
To edit Security Table, or set facility code translation
1. Select “LIST” from the Security Table menu. Press “OK”
2. System responds with “LIST: # of 64 | MAX FC - ## |
FC IN -> FC OUT | ## -> ##”
3. Use “Down” and “Up” to scroll through Security Table. Press “Edit”
to select an entry to edit.
4. System responds with “MAX FC - ## | CHANGE FC OUT |
DELETE”
5. Select “CHANGE FC OUT” from the menu. Press “OK”
6. System responds with "CHANGE FC OUT | ASSIGN FC OUT |
AUTO SEARCH FC OUT?"
7. Select "ASSIGN FC OUT" from the menu. Press "OK".
8. System responds with “CHANGE FC OUT | ENTER NEW FC OUT - #”
9. Enter FC number with valid range for bit format selected (example: 26
bit format, valid FC range is 1 – 255). Press “OK”
10. System responds with "CHANGE FC OUT | MAX FC - ## |
FC OUT - ### | SAVED".
11. Press “OK”
12. Press “HOME”
NOTE: If a different mode is selected after a site has been in operation,
remote controls may initially require multiple button presses to work as
the rolling code “re-syncs” to the system.

4
FOR TECHNICAL SUPPORT DIAL OUR TOLL FREE NUMBER:
1-800-528-2806
NOTICE: To comply with FCC and/or Industry Canada (IC) rules, adjustment or modifications
of this receiver are prohibited. THERE ARE NO USER SERVICEABLE PARTS.
This device complies with Part 15 of the FCC rules and IC RSS-210. Operation is subject to
the following two conditions: (1) this device may not cause harmful interference, and (2) this
device must accept any interference received, including interference that may cause
undesired operation.
SPECIFICATIONS
System Capacity (Pass Through and Advanced).............................. 12,000 devices
Supply Voltage ....................................................... 12 -24 dc
Operating Current ..................................................... 250 mA Maximum
Stand By Current...................................................... 30 mA Maximum
Surge Suppression .................................................... 6.0kV Min
Operating Temperature Range ........................................... -40°C to +65°C @ 50% Rh, (-40°F to +149°F @ 50% Rh)
Storage and Shipping Temperature Range .................................. -40°C to +85°C @ 50% Rh
Compatible Code Format................................................ Security+ 2.0
®
Wiegand Data format .................................................. 26 Bit, 30 Bit, 31 Bit, 34 Bit (Even or Odd), and 50 Bit
Wiegand Output ...................................................... 5 Vdc, Open Collector
REPAIR PARTS
Straight Antenna ........................... K76-36681
Mounting Bracket .......................... K13-36651-2
COMPATIBLE ACCESSORIES
Remote Controls:
Passport MAX............ PPV3M, PPK3M, PPK3PHM
Passport Lite............. PPLV1-X, PPLK1-X, PPLK1PH-X
(X refers to 10 or 100 packs)
Antenna Extension Kits:
15' Extension Kits ......... 86LM
25' Extension Kits ......... 86LMT
Transformer:
12-24 Vdc ............... 95LM, 002A1699-1
ONE YEAR LIMITED WARRANTY
LiftMaster warrants to the first consumer purchaser of this product that it
is free from defect in materials and/or workmanship for a period of 1 year
from the date of purchase.
DIAGNOSTICS
The PPWR receiver was designed to emit a series of audible beeps
dependent on programming and error conditions. The table below lists all
of the event conditions and related audible beep notifications. Audible
notifications may be disabled in the “BEEP SETTINGS” menu.
EVENT BEEP
Key press Single
Successful add/change Double
Successful delete Triple
Master PIN entry error Long
Programming error Long
Generic success Double
Generic error Long
5
RECEPTEUR POUR TÉLÉCOMMANDES
PASSPORT À TECHNOLOGIE WIEGAND
MODÈLE PPWR
APPLICATION
Le récepteur Passport Wiegand est un récepteur Security+ 2.0
®
avec sortie
Wiegand. Le modèle PPWR est compatible avec les télécommandes
Security+ 2.0
®
Passport MAX et Passport Lite, de même qu’avec les systèmes
d’accès des formats de code Wiegand de 26 bits, 30 bits, 31 bits, 34 bits (pairs ou
impairs) et 50 bits. Le récepteur est muni de deux modes d'opération (voir
Sélection d'un mode à la page 7) :
• Mode d'écriture directe (Paramètre par défaut) – transmet tous les signaux
reçus de la télécommande à la centrale de contrôle d'accès.
• Mode étendu – ajoute un niveau de sécurité dans les endroits où d'autres
télécommandes peuvent être en fonction. Le récepteur ne transmet que les
signaux reçus d'une télécommande préprogrammée avec un code
d'installation. Tous les autres signaux sont bloqués.
Ce récepteur est compatible avec HomeLink
®
. Se reporter aux instructions incluses
avec votre unité HomeLink
®
pour la compatibilité et la programmation. Le
récepteur est homologué pour un usage extérieur (IP44).
INSTALLATION
1. Choisissez un endroit approprié près de la centrale de contrôle d'accès à
l'intérieur d'un « rayon » qui permettra au récepteur de capter les signaux
transmis.
REMARQUE : Ne pas installer le récepteur dans un endroit où il sera en
contact avec la lumière directe. Évitez d'installer le récepteur dans une
enceinte métallique ou près de tout autre dispositif de transmission sans fi.
S’il est monté dans une enceinte en métal, une antenne de télécommande doit
être utilisée. En cas d’utilisation de plusieurs récepteurs, maximiser la distance
entre les deux afin d’éviter toute interférence.
2. Installez le support de fixation sur la surface désirée au moyen de la
quincaillerie appropriée (non comprise) (Figure 1).
3. Retirez les quatre vis no 8 à l'arrière du récepteur, ainsi que le panneau
frontal. Débranchez le connecteur du clavier numérique du tableau de
commande.
REMARQUE : Prenez soin de ne pas endommager le câble du clavier
numérique lorsque vous retirez le panneau frontal.
4. Effectuez les branchements (Figure 2). Consultez le manuel d'instructions
pour de plus amples renseignements.
5. Rebranchez le connecteur du clavier au tableau de commande (marqué J9).
6. Fixez le panneau frontal avec les quatre vis no 8 déjà retirées.
7. Installez l'antenne (fournie).
Figure 1
Support de fixation
Connecteur d'antenne
Module de
sauvegarde de
la mémoire
Figure 2
Data 1 (vers la centrale)
Data 0 (vers la centrale)
12-24 V c.c. (+ Énergie à l'arrivée)
- Entrée alimentation (terre)
DEL (de la centrale facultatif)
Connecteur étanche à l'eau
J9
Connecteur du clavier numérique
Récepteur sans
panneau frontal
Pour prévenir d'éventuelles BLESSURES GRAVES, voire MORTELLES suite à
une électrocution :
• S'assurer que l'alimentation est COUPÉE AVANT d'installer le récepteur.
Pour prévenir d'éventuelles BLESSURES GRAVES ou LA MORT dues à un
portail ou une porte de garage en mouvement :
• Garder EN TOUT TEMPS les télécommandes hors de portée des enfants. NE
JAMAIS Permettre à un enfant d’utiliser ou de jouer avec des émetteurs de
télécommande.
• Actionner la barrière ou la porte UNIQUEMENT lorsqu’elle est clairement
visible, correctement ajustée et libre de toute entrave lorsqu’elle est en
mouvement.
• Garder EN TOUT TEMPS la barrière ou la porte dans votre champ visuel
jusqu’à la fermeture complète. NE JAMAIS permettre à quiconque de
franchir le chemin du mouvement d’une barrière ou d’une porte.
ATTENTIONATTENTION
AVERTISSEMENTAVERTISSEMENT
AVERTISSEMENTAVERTISSEMENT
AVERTISSEMENTAVERTISSEMENT
Pour prévenir d'éventuelles BLESSURES GRAVES ou LA MORT, une
UTILISATION CONSTANTE des ouvre-portes ou barrières résidentielles est
INTERDITE.
Quand un récepteur est utilisé pour activer un ouvre-porte commercial, une
arête de renvoi DOIT être installeé au bas de la porte. Si vous n’installez pas
d’arête de renvoi dans ces circonstances, il s’en suit des risques de
BLESSURES GRAVES ou MORTELLES pour les personnes piégées sous
la porte.
ATTENTIONATTENTION
AVERTISSEMENTAVERTISSEMENT
AVERTISSEMENTAVERTISSEMENT
AVERTISSEMENTAVERTISSEMENT
Commun
REMARQUE : Utilisez la trousse de rallonge d'antenne facultative 86LM ou
86LMT (voir p. 8) pour installer l'antenne le plus haut possible et aussi
loin que possible d'objets métalliques afin d'assurer la meilleure portée
d'émission.
8. Placez le récepteur sur le support de fixation et maintenez en place au moyen
des vis no 8 fournies.
9. Resserrez le connecteur étanche à l'eau pour sécuriser et sceller le câblage.
AVERTISSEMENT : Ce produit peut vous exposer à des produits
chimiques comme le plomb, reconnu par l’État de la Californie comme
cause de cancers, d’anomalies congénitales et d’autres problèmes liés à la
reproduction. Pour plus d’informations, visitez www.P65Warnings.ca.gov
6
INTERFACE UTILISATEUR
L'interface utilisateur du PPWR est muni d'un écran LCD de 22 caractères par 5 lignes, de 3 touches programmables, de flèches Vers le Bas/Vers le haut et
d'un clavier numérique.
Indicateur de module de sauvegarde de la mémoire
(écran du logo LiftMaster
®
uniquement).
MENU PRINCIPAL COMMANDE DESCRIPTION
FORMATS WIEGAND
26 BITS (PAR DÉFAUT)
Code de sortie Wiegand à 26 bits.
30 BITS
Code de sortie Wiegand à 30 bits.
31 BITS
Code de sortie Wiegand à 31 bits.
34 BITS PAIR
Code de sortie Wiegand à 34 bits PAIR
34 BITS IMPAIR
Code de sortie Wiegand à 34 bits IMPAIR
50 BITS
Code de sortie Wiegand à 50 bits
FILTRE DES BOUTONS
BOUTON 1 EST EN FONCTION
Utilisé lorsque des récepteurs multiples se trouvent dans la même portée de transmission. Le bouton de
filtre sélectionne le bouton auquel le récepteur PPWR répondra. Utilisé dans les zones de chevauchement
de la couverture du récepteur. Le paramètre par défaut est : Bouton 1,2,3 ON.
BOUTON 2 EST EN FONCTION
BOUTON 3 EST EN FONCTION
SÉLECTION DU MODE
MODE D'ÉCRITURE DIRECTE
(PAR DÉFAUT)
Transmet tous les signaux télécommandés reçus à la centrale de contrôle d'accès.
MODE ÉTENDU
Ne transmet que les signaux reçus d'une télécommande préprogrammée avec un code d'installation. Tous
les autres codes d’installation de la télécommande sont bloqués.
TABLEAU DE SÉCURITÉ
Cette option n'est pas
disponible si LE MODE
ÉTENDU est désactivé. Le
message suivant sera
alors affiché : « NON
DISPONIBLE POUR LE
MODE D'ÉCRITURE
DIRECTE »
PROGRAMMATION
Peut mémoriser un code d'installation à partir de n'importe quelle télécommande faisant partie d'un lot et
qui sera reconnue par le PPWS. Également utilisé pour résoudre tout conflit dans les codes de traduction.
REMARQUE : Une fois le mode avancé activé, les codes d’installation de toutes les télécommandes qui
seront utilisées sur le site doivent être ajoutées au tableau de sécurité.
LISTE CHANGER LE CODE
D'INSTALLATION
Affiche une liste des codes d'installation préprogrammés conflictuels ainsi que les changements effectués
aux codes d'installation. Possibilité de supprimer ou de résoudre les conflits de codes d'installation. Le
tableau de sécurité peut prendre en charge jusqu’à 64 entrées. Les entrées MAX FC (codes d’installation
max.) et FC IN > FC OUT (signal d’entrée de code d’installation > signal de sortie de code d’installation)
peuvent être configurées de manière à traduire FC IN à un FC OUT précisé. Chaque FC IN ne peut avoir
qu’un seul FC OUT.
SUPPRIMER
RÉGLAGES
NIP
Permet de changer le NIP à 6 chiffres du récepteur.
RENSEIGNEMENTS SUR LE MARCHAND
Affiche et permet l'édition du numéro de téléphone à 10 chiffres du marchand.
VERSION DU COUPE-FEU
Affiche la version courante du coupe-feu.
BEEP
Active ou désactive les confirmations sonores.
MÉMOIRE
La fonction crée une sauvegarde complète des télécommandes programmées et des paramètres du tableau
de sécurité. La sauvegarde peut être restaurée à un PPWR de rechange ou utilisé pour copier la
configuration dans un autre PPWR.
MÉMOIRE DOUBLE
Crée une sauvegarde de la mémoire. Un module mémoire doit être installé.
RESTITUIR MEMORIA
Réinitialise la sauvegarde de la mémoire à partir d'un module mémoire. Un indicateur lumineux s'affiche
sur l'écran du logo LiftMaster
®
si un module mémoire est installé.
REMARQUE : Le contenu du module mémoire effacera toute information déjà enregistrée dans la mémoire
du récepteur. Retirer le module de mémoire après la sauvegarde pour le garder en lieu sûr.
CONTRASTE
La regulación del contraste de la pantalla de LCD se realiza con las flechas ascendente y descendente.
LANGUE
Permet de régler la langue : anglais (par défaut), espagnol ou français.
RÉGLAGES D'USINE
Rétablit les paramètres du récepteur selon les réglages d'usine. REMARQUE : Si un NIP a été établi et
perdu, la fonction Reset PIN (Récupération du NIP) doit être utilisée pour déverrouiller l’unité PPWR.
COMMANDES DE PROGRAMMATION
Le tableau suivant décrit les commandes utilisées pour programmer le récepteur.
Prise d'antenne
Pour l’antenne directe ou le nécessaire
d’extension d’antenne.
Touches fonctions
Les fonctions des touches fonctions sont
définies par l’étiquette sur la ligne 5 de
l’affichage. Les fonctions changent selon
la sélection de menu.
Écran LCD
Programmation et affichage de
l’état du système de l’écran LCD.
Touches Haut/Bas
Pour naviguer dans les menus.
Clavier numérique
Les données numériques sont saisies
sur le clavier numérique.
Ligne 1:
Menu et mode fonctions.
Lignes 2, 3 et 4:
Sélections de menus et données.
Ligne 5:
Modes de fonction des touches fonctions.
Indicateur de défilement
Si plus de 3 options sont disponibles, un indicateur de défilement
apparaît dans la marge gauche des lignes 2, 3 et 4. Cet indicateur
affiche la position relative dans la liste.
Toute sélection de menu ou de données
s’affiche en caractères inversés.
Insérer le câblage.

7
PROGRAMMATION
Le récepteur PPWR a la capacité d’apprendre une combinaison d’émetteurs de
télécommande de légitimation. Consultez la page 8 pour obtenir une liste
complète des accessoires compatibles. Après 30 secondes d'inactivité, le logo
LiftMaster
®
s'affiche. Sélectionnez « DÉVERROUILLER » et entrez le NIP illimité
pour continuer.
Configuration initiale du NIP :
Le NIP limite l’accès uniquement aux administrateurs autorisés. Si vous omettez
cette étape, n’importe qui sera en mesure de programmer le récepteur. Lors de la
mise sous tension initiale, la version du micrologiciel du système s’affichera
pendant 5 secondes, suivie du logo LiftMaster
®
. Quand vous appuyez sur une
touche, le message « CREATE PIN? » (Créer NIP?)
1. Appuyer sur « YES » (Oui) pour créer le code NIP. Si vous perdez le code NIP,
vous pouvez demander un code de réinitialisation en appuyant sur « RESET »
(Réinitialiser).
2. Si le code NIP est perdu, vous pouvez demander un code de réinitialisation en
appuyant sur « RESET » (réinitialisation) Vous recevrez un numéro de série à 5
chiffres. Connectez-vous au portail des partenaires et allez sur https://partner.
liftmaster.com/utility. Entrez le numéro de série pour récupérer le code maître.
Une fois le code maître récupéré, revenez à l’option RESET (réinitialisation), et
après avoir obtenu le numéro de série, appuyez sur Next (Suivant).
Entrez le code maître du portail partenaire.
Entrez le nouveau code NIP
Entrez à nouveau le nouveau code NIP. L’appareil émet un bip lorsque le code
NIP a été programmé avec succès.
Remarque : La réinitialisation du code NIP n’efface ni les données ni les
paramètres du PPWR.
3. Taper un NIP à 6 chiffres, et appuyer sur « YES » ; taper le NIP à 6 chiffres une
deuxième fois et appuyer sur « YES » pour programmer le NIP. Si vous faites
une erreur, appuyez sur « CLEAR » (Effacer) pour changer votre saisie. Pour
quitter l’écran de saisie du NIP, sélectionner « BACK » (Retour).
4. Une fois que votre NIP à 6 chiffres a été correctement programmé, l’affichage
LCD affichera le message « KEYPAD UNLOCKED » (Clavier déverrouillé).
Sélectionner « OK » pour continuer jusqu’au Menu principal. Au bout de 30
secondes d’inactivité, le récepteur se coupera automatiquement et le logo de
LiftMaster
®
s’affichera. Choisir « UNLOCK » (Déverrouiller) et saisir le NIP pour
continuer.
2 SÉLECTION D'UN MODE
Le récepteur est muni de deux modes de fonctionnement :
Mode de passage direct (par défaut)
Passe tous les justificatifs d’identité de télécommande reçus au système de
commande d’accès. Les codes d’installation de légitimation et d’identification
passent sans filtre ni traduction. Aucune configuration préalable n’est nécessaire
pour un fonctionnement normal. Il s’agit d’un mode de fonctionnement par défaut.
Le mode de passage direct est le plus couramment utilisé.
Mode avancé
Le mode avancé fourni un niveau de sécurité supplémentaire là où un
chevauchement de la couverture radio peut survenir, par exemple dans des
complexes résidentiels ou industriels composés de plusieurs bâtiments. Le mode
avancé établit une réception filtrée, permettant uniquement aux codes d’installation
programmés dans le tableau de sécurité de passer au système de commande
d’accès. Les transmissions de TOUTES les télécommandes non programmées sont
ignorées. Lors de l’utilisation du mode avancé, tout nouveau code d’installation de
télécommande introduit sur le site doit être ajouté au tableau de sécurité.
Une fonction supplémentaire du mode avancé permet la traduction d’un code
d’installation « 1 pour 1 ». Cette fonction offre aux installateurs et directeurs
d’installation la souplesse de programmer des télécommandes du commerce aux
sites en n’utilisant qu’un seul code d’installation.
REMARQUE : La traduction du code d’installation se limite à un « FC IN » pour un
« FC-OUT » ou « 1 pour 1 ». Cela élimine la capacité d’ignorer le code d’installation
source et d’avoir un seul signal/fixe de sortie de code d'installation.
Par exemple :
1. L’entrée du bâtiment du complexe A se trouve à 30 mètres de celle du
bâtiment du complexe B. Les télécommandes de chaque entrée créent le refus
des transactions d’accès sur les contrôleurs d’accès. Chaque PPWR peut être
configuré pour ne recevoir que les télécommandes programmées avec des
codes d’installation particuliers.
2. Un ensemble d’habitations collectives utilise des dispositifs de justificatif de
proximité à interface humaine (HID) programmés au code d’installation 22 et
voudrait ajouter des émetteurs PPWR. Le système de commande d’accès ne
prend en charge que l’utilisation d’un seul code d’installation. Le mode avancé
du PPWR peut être configuré de manière à traduire un code d’installation
source « FC IN » au code d’installation cible « FC OUT » désiré. Un code
d’installation de télécommande particulier est alors traduit par le signal de
sortie du code d'installation cible désiré.
Pour choisir le mode de fonctionnement
1. Sélectionner « MODE SELECT » (SÉLECTIONNER LE MODE) dans le menu
principal. Appuyer sur « OK ».
2. Le système répond par un message montrant le paramètre actuel du mode «
PASS THRU SET » (PASSAGE LIBRE) ou « ADVANCED SET » (AVANCÉ).
3. Appuyer sur « EDIT » (MODIFIER).
4. Sélectionner le mode désiré et appuyer sur « YES » (OUI).
5. Le système répond par le message « WARNING THIS WILL ERASE MEMORY
PROCEED? » (AVERTISSEMENT CELA EFFACERA LA MÉMOIRE CONTINUER?
». Appuyer sur « YES » (OUI).
6. Le système répond par « WARNING ARE YOU SURE? » (AVERTISSEMENT
ÊTES-VOUS CERTAIN? ». Appuyer sur « YES » (OUI).
7. Le système répond par « UPDATING PLEASE WAIT » (MISE À JOUR
PATIENTER). NE PAS mettre hors fonction pendant la mise à jour.
8. Le système répond par un message confirmant que le mode sélectionné a été
enregistré.
9. Si PASS THROUGH MODE est choisi, appuyer sur « OK ». Aucune autre étape
n’est nécessaire.
10. Si le mode ADVANCED MODE est choisi, appuyer sur « NEXT » (SUIVANT)
pour passer au menu SECURITY TABLE (TABLEAU DE SÉCURITÉ).
Pour programmer le tableau de sécurité
Le tableau de sécurité peut prendre en charge jusqu’à 64 codes d’installation
uniques. Si un code d’installation est déjà programmé, il ne peut pas être ajouté de
nouveau.
1. Sélectionner « PROGRAM » (PROGRAMMER) dans le menu du tableau de
sécurité. Appuyer sur « OK ».
2. Le système répond par « PRESS BUTTON ON DEVICE OU TYPE IN MAX FC »
(APPUYER SUR LE BOUTON DU DISPOSITIF OU TAPER MAX FC).
3. Appuyer sur un bouton de la télécommande ou saisir au clavier le numéro de
code d'installation du nombre maximal de codes d’installation (MAX FC###
qui se trouve sur l’étiquette d’identification de la télécommande). Appuyer sur
« OK ».
4. Le système répond par « MAX FC - ## SAVED » (FC MAX - ## ENREGISTRÉ).
Appuyer sur « OK ».
Pour modifier le tableau de sécurité ou configurer la traduction du code
d’installation
1. Sélectionner « LIST » (LISTE) dans le menu du tableau de sécurité. Appuyer
sur « OK ».
2. Le système répond par « LIST: # of 64 | MAX FC - ## |
FC IN -> FC OUT | ## -> ## ».
3. Se servir des touches fléchées vers le bas ou le haut pour défiler dans le
tableau de sécurité. Appuyer sur « Edit » (Modifier) pour sélectionner une
entrée à modifier.
4. Le système répond par « MAX FC - ## | CHANGE FC OUT | DELETE » (FC MAX
- ## | CHANGER FC OUT | SUPPRIMER).
5. Sélectionner « CHANGE FC OUT » (CHANGER FC OUT) dans le menu. Appuyer
sur « OK ».
6. Le système répond par « CHANGE FC OUT | ASSIGN FC OUT | AUTO SEARCH
FC OUT? » (CHANGER FC OUT | ATTRIBUER FC OUT | RECHERCHE
AUTOMATIQUE FC OUT?).
7. Sélectionner « ASSIGN FC OUT » (ATTRIBUER FC OUT) dans le menu.
Appuyer sur « OK ».
8. Le système répond par « CHANGER FC OUT | ENTER NEW FC OUT - # »
(CHANGER FC OUT | SAISIR NOUVEAU FC OUT - #).
9. Saisir le numéro de code d’installation dans la plage valide pour le format de
bits sélectionné (par exemple : pour le format de 26 bits, la plage FC valide est
de 1 à 255). Appuyer sur « OK ».
10. Le système répond par « CHANGE FC OUT | MAX FC ## | FC OUT - ### |
SAVED» (CHANGER FC OUT | MAX FC OUT - ## | FC OUT - ### |
ENREGISTRÉ).
11. Appuyer sur « OK ».
12. Appuyer sur « HOME » (ACCUEIL).
REMARQUE : Si un autre mode est sélectionné après la mise en service d’un site,
il faudra peut-être appuyer plusieurs fois sur le bouton des télécommandes avant
qu’elles fonctionnent, car le code roulant devra se « resynchroniser » au système.
8
SPÉCIFICATIONS
Capacité du système (mode d'écriture directe ou mode étendu) . . . . . . . . . . . . . . . . . . . . . . . . . 12 000 dispositifs
Tension d'alimentation . . . . . . . . . . . . . . . . . . . . . . . . . . . . . . . . . . . . . . . . . . . . . . . . . . . . . . . . . 12-24 c. c.
Courant de fonctionnement . . . . . . . . . . . . . . . . . . . . . . . . . . . . . . . . . . . . . . . . . . . . . . . . . . . . . 250 mA max.
Courant d'attente. . . . . . . . . . . . . . . . . . . . . . . . . . . . . . . . . . . . . . . . . . . . . . . . . . . . . . . . . . . . . . 30 mA, máx.
Suppresseur de tension . . . . . . . . . . . . . . . . . . . . . . . . . . . . . . . . . . . . . . . . . . . . . . . . . . . . . . . . 6.0 KV, mín.
Intervalles de températures de fonctionnement . . . . . . . . . . . . . . . . . . . . . . . . . . . . . . . . . . . . . . -40 °C à +65 °C @ 50 % Rh, (-40 °F à +149 °F @ 50 % Rh)
Intervalles de températures pendant le remisage et l'expédition . . . . . . . .. . . . . . . . . . . . . . . . . . -40° C à +85 °C @ 50 % Rh
Format du code. . . . . . . . . . . . . . . . . . . . . . . . . . . . . . . . . . . . . . . . . . . . . . . . . . . . . . . . . . . . . . . Security+ 2.0
®
Format des données Wiegand . . . . . . . . . . . . . . . . . . . . . . . . . . . . . . . . . . . . . . . . . . . . . . . . . . . 26 bits, 30 bits, 31 bits, 34 bits (pair ou impair) et 50 bits
Sortie Wiegand. . . . . . . . . . . . . . . . . . . . . . . . . . . . . . . . . . . . . . . . . . . . . . . . . . . . . . . . . . . . . . . 5 V c.c. Collecteur ouvert
PIÈCES DE REMPLACEMENT
Antenne droite ................................. K76-36681
Support de fixation ............................. K13-36651-2
ACCESSOIRES COMPATIBLES
Télécommandes :
Passport MAX ............... PPV3M, PPK3M, PPK3PHM
Passport Lite ................ PPLV1-X, PPLK1-X, PPLK1PH-X
(X se rapport à des paquets de
10 ou 100)
Trousses de rallonge d'antenne :
Rallonge de 15 pi ............. 86LM
Rallonge de 25 pi ............. 86LMT
Transformateur :
12-24 V c.c. ............. 95LM, 002A1699-1
GARANTIE LIMITÉE D’UN AN
LiftMaster garantit à l’acheteur initial que le produit est exempt de tout défaut de
matériaux ou de fabrication pendant une période d’un an à compter de la date
d’achat.
POUR L’ASSISTANCE TECHNIQUE, APPELER LE NUMÉRO SANS
FRAIS SUIVANT :
1-800-528-2806
AVIS : Conformément aux règlements de la FCC et d’Industrie Canada, il est interdit de modifier ce
récepteur ou ses réglages d’origine. CET APPAREIL NE COMPORTE AUCUNE PIÈCE POUVANT ÊTRE
RÉPARÉE PAR L’UTILISATEUR.
Cet appareil est conforme à la partie 15 des règlements de la FCC et à la norme RSS-210 d’Industrie
Canada. Son utilisation est subordonnée aux deux conditions suivantes : (1) l’appareil ne doit pas
causer d’interférences nuisibles et (2) l’appareil doit accepter toute interférence reçue, y compris
celles qui pourraient un fonctionnement indésirable.
DIAGNOSTIQUES
Le récepteur PPWR a été conçu pour émettre une série de bips selon la
programmation établie ou les erreurs qui surviennent. Le tableau ci-dessous
indique la notification sonore associée à un type d'évènement particulier. Les
notifications sonores peuvent être désactivées à partir du menu « RÉGLABE
DES BIPS ».
ÉVÈNEMENT BIP
Pression d'une touche Unique
Ajout ou changement réussi Double
Suppression réussie Triple
Erreur d'entrée du NIP illimité Long
Erreur de programmation Long
Succès générique Double
Erreur générique Long
9
RECEPTOR WIEGAND PASSPORT
MODELO PPWR
APLICACIÓN
El receptor Wiegand Passport es un receptor con protocolo Security+ 2.0
®
con
salida Wiegand. El PPWR es compatible con los controles remotos Security+ 2.0
®
Passport MAX y Passport Lite, y con sistemas de control de entrada con formato
Wiegand de 26 Bit, 30 Bit, 31 Bit, 34 Bit (par o impar) y 50 Bit. El receptor tiene
dos modos de operación (véase Elección de un modo en la página 11):
• Modo pasante (Preasignado) - Pasa todas las señales de control remoto al
controlador anfitrión del sistema de acceso.
• Modo avanzado - Presenta un nivel más de seguridad donde hayan otros
controles remotos en uso. El receptor sólo pasa señales de un control remoto
programado con un código de instalación y bloquea las demás señales.
Este receptor es compatible con HomeLink
®
. Consulte las instrucciones incluidas
con la unidad HomeLink
®
para determinar la compatibilidad y ver los pasos de
programación. El receptor es apto para uso a la intemperie (IP44).
INSTALACIÓN
1. Ubique la unidad cerca del controlador del sistema de acceso, en la línea
directa de alcance del lugar de transmisión.
NOTA: No instalar bajo la luz solar directa, en un gabinete metálico ni cerca de
otros dispositivos inalámbricos receptores o transmisores. Si se instala en una
caja metálica es necesario usar una antena. Si utiliza dos receptores, dejar la
máxima distancia posible entre ellos para evitar la interferencia.
2. Monte la base con los accesorios de fijación que corresponda (no se
suministran con la unidad) (Figura 1).
3. Quite los 4 tornillos N° 8 del receptor y quite la tapa. Desenchufe el conector
del teclado de la tarjeta de control.
NOTA: Tome precauciones para no dañar el cable del teclado al quitar la tapa.
4. Efectúe las conexiones (Figura 2). Consulte el manual del sistema de acceso en
uso para obtener más detalles.
5. Enchufe el conector del teclado a la tarjeta (rotulado como J9).
6. Fije la tapa con los 4 tornillos N° 8 que quitara anteriormente.
7. Instale la antena suministrada.
Figura 1
Base de montaje
Conector de antena
Módulo de memoria
de reserva
Figura 2
Datos 1 (al anfitrión)
Datos 0 (al anfitrión)
12-24 VCC (+ Entrada de alimentación)
- Alimentación de energía (Tierra)
Pantalla
LED (del anfitrión opcional)
Conector hermético
J9
Conector de teclado
Receptor sin tapa
Para evitar posibles LESIONES GRAVES o INCLUSO LA MUERTE por
electrocución:
• ANTES de instalar el receptor, asegúrese de que la energía eléctrica NO esté
conectada.
Para evitar posibles LESIONES GRAVES o INCLUSO LA MUERTE causada por
la puerta en movimiento:
• SIEMPRE conserve los controles remotos lejos del alcance de los niños.
NUNCA permita que los niños hagan funcionar o jueguen con los
transmisores del control remoto.
• SOLO active la puerta cuando pueda verla claramente, esté correctamente
ajustada y no haya ninguna obstrucción en su recorrido.
• SIEMPRE mantenga la puerta de garaje a la vista hasta que esté
completamente cerrada. NUNCA permita que alguien cruce por debajo de
una puerta de garaje mientras se está cerrando.
ADVERTENCIA
PRECAUCIÓN
ADVERTENCIA
ADVERTENCIA
ADVERTENCIA
Para evitar posibles LESIONES GRAVES o INCLUSO LA MUERTE, se PROHÍBE
el FUNCIONAMIENTO CONSTANTE en abre-puertas residenciales.
Cuando se utiliza un receptor para activar un abre-puertas comercial, DEBE
instalarse un borde de inversión de movimiento en la parte inferior de la puerta.
No instalar un borde de inversión de movimiento bajo estas circunstancias,
puede ocasionar LESIONES GRAVES o INCLUSO LA MUERTE a las personas
atrapadas debajo de la puerta.
ADVERTENCIA
PRECAUCIÓN
ADVERTENCIA
ADVERTENCIA
ADVERTENCIA
NOTA: Utilice la extensión opcional de antena 86LM u 86LMT (véase
página12) para que la antena quede tan alta y alejada como sea posible de
objetos metálicos para mejorar el alcance.
8. Monte el receptor en la base y fíjelo con los tornillos N° 8 suministrados.
9. Ajuste el conector hermético para fijar y sellar los cables.
ADVERTENCIA: Este producto puede exponerle a productos químicos
(incluido el plomo), que a consideración del estado de California causan
cáncer, defectos congénitos u otros daños reproductivos. Para más
información, visite www.P65Warnings.ca.gov
10
INTERFAZ DE USUARIO
El PPWR tiene una pantalla de LCD de 5 líneas y 22 caracteres, 3 teclas de función, flechas ascendente/descendente y un teclado numérico.
Indicador del módulo de memoria de reserva
(sólo en pantalla del logotipo de LiftMaster
®
).
MENÚ PRINCIPAL COMANDO DESCRIPCIÓN
FORMATO WIEGAND
26 BIT BIT (PREASIGNADO)
Código Wiegand de 26 Bit.
30 BIT
Código Wiegand de 30 Bit.
31 BIT
Código Wiegand de 31 Bit.
34 BIT PAR
Código Wiegand de 34 Bit PAR.
34 BIT IMPAR
Código Wiegand de 34 Bit IMPAR.
50 BIT
Código Wiegand de 50 Bit.
BOTÓN DE FILTRO
BOTÓN 1 ENCENDIDO
Cuando hay varios receptores dentro del alcance de cada uno. El filtro de botones selecciona a qué
botón responderá el receptor PPWR. Se usa en lugares adonde hay sobreposición de cobertura de
receptores. Botón preasignado: Botón 1,2,3 ON.
BOTÓN 2 ENCENDIDO
BOTÓN 3 ENCENDIDO
SELECCIÓN DE MODO
PASANTE (PREASIGNADO)
Pasa todas las señales del control remoto al controlador del anfitrión del sistema.
AVANZADO
El receptor pasa señales de un control remoto con un código de instalación programado. Los demás
códigos de control remoto de la instalación quedarán bloqueados.
TABLA DE SEGURIDAD
Si EL MODO AVANZADO
está desactivado, esta
opción queda cancelada y
aparece como NO
DISPONIBLE PARA MODO
PASANTE
PROGRAMA
Para aprender un código de instalación de cualquier control remoto en un grupo al que responderá el
PPWR. También se usa para resolver conflictos de traducción de códigos. NOTA: Con el Modo
Avanzado activado, los Códigos de la Instalación para todos los controles remotos en uso deben
agregarse a la Tabla de Seguridad.
LISTA
CAMBIO CÓDIGO DE
INSTALACIÓN
Muestra una lista de los códigos de instalación programados, indicando los conflictos y cambios de
códigos de instalación. Presenta opciones para borrar o resolver conflictos de códigos de instalación.
La Tabla de Seguridad puede recibir hasta 64 entradas. Las entradas MAX FC y FC IN > FC OUT
pueden configurarse para transformar una entrada FC IN en una salida FC OUT. Cada entrada FC IN
puede tener correspondencia con una sola salida FC OUT.
ELIMINAR
PARÁMETROS
TERMINAL
Cambia el número de identificación de 6 dígitos del receptor.
DATOS DEL DISTRIBUIDOR
Para mostrar o cambiar el número de teléfono del distribuidor.
VERSIÓN DEL FIRMWARE
Muestra la versión actual del firmware.
BEEP
Activa y desactiva la señal sonora de confirmación.
MEMORIA
Esta función genera una reserva completa de datos de los controles remotos programados y de los
parámetros de la Tabla de Seguridad. La copia de reserva puede restituirse a una unidad PPWR de
repuesto o copiarse a la configuración de otra unidad PPWR.
DUPLICADO DE MEMORIA
Crea una memoria de reserva. Necesita un módulo de memoria.
RESTITUIR MEMORIA
Restituye la memoria grabada en un módulo de memoria. Si hay un módulo instalado, así quedará
indicado en la pantalla del logotipo de LiftMaster
®
.
NOTA: El traspaso desde el módulo reemplazará todos los datos que se encuentren almacenados en
la memoria del receptor. Después de hacer la copia de seguridad, quitar el módulo de memoria para
guardarlo en un lugar seguro.
CONTRASTE
La regulación del contraste de la pantalla de LCD se realiza con las flechas ascendente y descendente.
IDIOMA
Define el idioma: Inglés (preasignado), español y francés.
PREASIGNADO DE FÁBRICA
Reinstala los parámetros del receptor con los valores de fábrica. NOTA: Si se utilizara un PIN de
seguridad y se perdiera, usar la función Restituir PIN para desbloquear la unidad PPWR.
COMANDOS DE PROGRAMACIÓN
En la siguiente tabla se indican los comandos de programación del receptor.
Línea 1:
Modo de menú y función.
Líneas 2, 3 y 4:
Selecciones y datos del menú.
Línea 5:
Modos de función de teclas
programables.
Indicador de desplazamiento
Si existen más de 3 opciones, aparecerá el
indicador de desplazamiento en el margen
izquierdo de las líneas 2, 3 y 4. El indicador
de desplazamiento muestra la posición
relativa dentro de la lista.
Conexión de la antena
Para la antena directa o el juego de
extensión de la antena.
Insertar el cableado
La selección del Menú y datos se muestra
con caracteres invertidos.
Pantalla del LCD
Pantalla de programación y estado del
Sistema de la pantalla del LCD.
Teclas “PROGRAMABLES”
Las funciones de las teclas programables
están definidas por la etiqueta en la línea 5 de
la pantalla. Las funciones cambian de
acuerdo con la selección del menú.
Teclas hacia arriba/abajo
Para la navegación en los menús.
Teclado numérico
Se ingresan datos numéricos a través
del teclado numérico.

11
PROGRAMACIÓN
El receptor PPWR puede aprender una combinación de transmisores de control
remoto con credenciales. En la página 4 se presenta una lista completa de los
accesorios compatibles. Después de 30 segundos de inactividad, el receptor entra
en estado pasivo y aparece el logotipo de LiftMaster
®
. Para continuar, debe
seleccionar Desbloqueo (UNLOCK) y usar la identificación personal (PIN) para
reactivarlo.
1 PROGRAMACIÓN INICIAL DEL PIN:
El PIN restringe el acceso para que puedan acceder solo los administradores
autorizados. Si omite este paso, cualquier persona podrá programar el receptor. Al
encenderlo por primera vez, se mostrará la revisión del firmware del sistema por 5
segundos, seguido por el logotipo de LiftMaster
®
. Al presionar una tecla,
aparecerá la opción “¿CREAR PIN?”
1. Presione “SÍ” para crear un PIN. Si se pierde el PIN, podrá solicitar un código
presionando “REINICIAR”.
2. Si perdió el PIN, puede solicitar un código de reinicio presionando "RESET". Se
le proporcionará un número de serie de 5 dígitos. Inicie al portal del socio e
ingrese a https://partner.liftmaster.com/utility. Ingrese el número de serie para
recuperar el código maestro.
Una vez recuperado el código maestro, vuelva a la opción RESET, y después de
obtener el número de serie presione Next.
Ingrese el código maestro del portal del socio.
Ingrese el nuevo PIN.
Vuelva a ingresar el nuevo PIN. Oirá un pitido de la unidad cuando se haya
programado el PIN con éxito.
Nota: Reiniciar el PIn no borra los datos o configuraciones del PPWR.
3. Ingrese un PIN de 6 dígitos y presione “SÍ”; ingrese el PIN de 6 dígitos por
segunda vez y presione “SÍ” para programar el PIN. Si comete un error,
presione “LIMPIAR” para cambiar los datos que ingresó. Para salir de la
pantalla para ingresar el PIN, seleccione “ATRÁS”.
4. Cuando su PIN de 6 dígitos esté programado correctamente, se leerá en la
pantalla del LCD: “TECLADO DESBLOQUEADO”. Seleccione “ACEPTAR” para
continuar e ir al Menú principal. Después de 30 segundos de inactividad, se
suspende el funcionamiento del receptor y se muestra ellogotipo de
LiftMaster
®
. Seleccione “DESBLOQUEAR” e ingrese el PIN para continuar.
2 ELECCIÓN DE UN MODO
El receptor tiene dos modos de operación:
Modo de Paso directo (preasignado)
Transfiere todas las credenciales de controles remotos al sistema de control de
entrada. El código de credenciales de la instalación y los códigos de identificación
se transfieren sin filtros ni conversión. No es necesario preconfigurar para
funcionamiento normal. Este es el modo preasignado de funcionamiento. El modo
de paso directo es el más utilizado.
Modo avanzado
El modo avanzado ofrece un nivel más de seguridad en lugares adonde hay
superposición de cobertura de radiofrecuencia tales como edificios de
departamentos y complejos industriales. El modo avanzado establece recepción
filtrada para dejar pasar únicamente los códigos de la instalación programados en
la Tabla de Seguridad hacia el sistema de control de entrada. Las transmisiones de
TODOS los controles remotos no programados en el sistema serán ignoradas. Al
usar Modo Avanzado, todo código de control remoto nuevo debe ser agregado a la
Tabla de Seguridad.
Una función del modo avanzado facilita el traspaso de códigos de una instalación a
otra. Esta función brinda a los técnicos de instalación y encargados de la
propiedad la flexibilidad de programar los controles remotos con un código único
utilizado en esa instalación.
NOTA: La conversión de códigos de la instalación está limitada a 1-“FC IN” a 1-“FC
OUT” o “One to One” (Uno a uno). Esto elimina la posibilidad de ignorar el código
de la instalación para generar un sólo código de salida fijo.
Ejemplos de aplicación:
1. Entrada al edificio A dentro de 100 pies de distancia de la entrada al edificio B.
Los controles remotos de cada entrada crean interferencia en la autorización
de entrada de los otros controladores de entrada. Cada unidad PPWR puede
programarse para recibir solamente señales de controles remotos con ciertos
códigos de instalación.
2. Un edificio de departamentos que utilice detectores de proximidad
programados para el código 22 de instalación y deseen agregar transmisores
PPWR. El sistema de control de entrada es compatible únicamente con un
código de instalación. El modo avanzado de la unidad PPWR puede
programarse para convertir un código de instalación de entrada “FC IN” al
código de salida deseado “FC OUT”. En tal caso, un código específico de
control remoto de una instalación puede convertirse en una salida elegida para
dicha instalación.
Para elegir el Modo de funcionamiento
1. Seleccionar “MODE SELECT” en el menú principal. Pulsar “OK”.
2. El sistema responderá con un mensaje indicando que el modo actual es “PASS
THRU SET” (paso directo) o “ADVANCED SET” (modo avanzado).
3. Pulsar “EDIT”.
4. Seleccionar el modo que desea utilizar y pulsar “YES”.
5. El sistema responderá con el mensaje “WARNING THIS WILL ERASE
MEMORY PROCEED?” (ESTO BORRARÁ LA MEMORIA. ¿PROCEDER
IGUALMENTE?). Pulsar “YES”.
6. El sistema responderá con el mensaje “WARNING ARE YOU SURE?”
(CONFIRME QUE ESTÁ SEGURO). Pulsar “YES”.
7. El sistema responderá con el mensaje “UPDATING PLEASE WAIT”
(ACTUALIZACIÓN EN CURSO). NO desconectar la alimentación eléctrica
durante la actualización.
8. El sistema responderá con un mensaje de confirmación de que el modo
seleccionado se ha guardado en memoria.
9. Si usted eligiera PASS THROUGH MODE (MODO DE PASO DIRECTO), pulse
“OK”. No es necesario hacer nada más.
10. Si usted eligiera ADVANCED MODE (MODO AVANZADO), pulse “NEXT”
(SIGUIENTE) para continuar con el menú de la TABLA DE SEGURIDAD.
Para programar la Tabla de Seguridad
La Tabla de Seguridad puede aceptar hasta 64 códigos individuales de instalación.
Si un código de instalación ya estuviera programado, no podrá agregarse por
segunda vez.
1. Seleccionar “PROGRAM” en el menú de la Tabla de Seguridad. Pulsar “OK”.
2. El sistema responderá con el mensaje “PRESS BUTTON ON DEVICE OR TYPE
IN MAX FC” (PULSAR BOTÓN O ESCRIBIR EL MAX FC).
3. Pulsar un botón en el control remoto o escribir con el teclado el número FC
que se encuentra en el control remoto como MAX FC ###. Pulsar “OK”.
4. El sistema responderá con el mensaje “MAX FC - ## SAVED” (CÓDIGO
GUARDADO). Pulsar “OK”.
Para modificar la Tabla de Seguridad o convertir el código de la instalación
1. Seleccionar “LIST” en el menú de la Tabla de Seguridad. Pulsar “OK”.
2. El sistema responderá con el mensaje “LIST: # of 64 | MAX FC - ## |
FC IN -> FC OUT | ## -> ##”.
3. Múevase hacia arriba o hacia abajo en la Tabla de Seguridad. Pulse “Edit” para
elegir la entrada a modificar.
4. El sistema responderá con el mensaje “MAX FC - ## | CHANGE FC OUT |
DELETE”.
5. Seleccionar “CHANGE FC OUT” (CAMBIAR SALIDA) en el menú. Pulsar “OK”.
6. El sistema responderá con el mensaje “CHANGE FC OUT | ASSIGN FC OUT |
AUTO SEARCH FC OUT?”.
7. Seleccionar “ASSIGN FC OUT” en el menú. Pulsar “OK”.
8. El sistema responderá con el mensaje “CHANGE FC OUT |
ENTER NEW FC OUT - #”.
9. Especificar el número FC para el formato de bit que corresponda (por ejemplo:
para el formato de 26 bit, el rango de FC sería 1 – 255). Pulsar “OK”.
10. El sistema responderá con el mensaje “CHANGE FC OUT | MAX FC - ## | FC
OUT - ### | SAVED”.
11. Pulsar “OK”.
12. Pulsar “HOME”.
NOTA: Si se hubiera seleccionado un modo diferente después de que un sitio
estuviera en funcionamiento, los controles remotos podrían responder con la
necesidad de pulsar varias veces un botón para que el código dinámico se
sincronice con el sistema.
ESPECIFICACIONES TÉCNICAS
Capacidad del sistema (modos pasante y avanzado) .................................. 12000 dispositivos
Voltaje de alimentación......................................................... 12 -24 CC
Corriente nominal ............................................................. 250 mA, máximo
Corriente pasiva ............................................................. 30 mA, máximo
Supresión de picos ........................................................... 6.0 KV, mínimo
Rango de temperatura de servicio ................................................ 40 °C a +65 °C al 50% humedad relativa, (-40 °F a +149 °F al 50%
humedad relativa)
Rango de temperatura de almacenamiento y transporte................................ -40 °C a +85 °C al 50% humedad relativa
Formato del código ........................................................... Security+ 2.0
®
Formato de datos Wiegand ...................................................... 26 Bit, 30 Bit, 31 Bit, 34 Bit (par o impar), y 50 Bit
Salida Wiegand .............................................................. 5 Vcc; colector abierto
REPUESTOS
Antena recta ................................... K76-36681
Base de montaje ................................ K13-36651-2
ACCESORIOS COMPATIBLES
Controles remotos:
Passport MAX ............... PPV3M, PPK3M, PPK3PHM
Passport Lite ................ PPLV1-X, PPLK1-X, PPLK1PH-X
(X se refiere a paquetes de 10 o
100)
Juegos de extensión de antena:
Juegos de 15 pies de extensión .. 86LM
Juegos de 25 pies de extensión .. 86LMT
Transformador:
12-24 Vcc ............... 95LM, 002A1699-1
UN AÑO DE GARANTÍA LIMITADA
LiftMaster garantiza al primer comprador minorista de este producto, que el
mismo está libre de defectos de materiales y de mano de obra por un período de
un año a partir de la fecha de compra.
PARA OBTENER ASISTENCIA TÉCNICA, LLAME A NUESTRO
NÚMERO GRATUITO:
1-800-528-2806
AVISO: La modificación de este receptor está prohibida por la FCC y/o las normas canadienses IC.
NO HAY PIEZAS REPARABLES POR EL USUARIO.
Este dispositivo cumple con la Parte 15 de las normas de la FCC y de las normas canadienses IC
RSS-210. El uso está condicionado a lo siguiente: (1) Este dispositivo no debe causar interferencia
y (2) este dispositivo debe se apto para recibir interferencia, aunque la misma pueda afectar su
funcionamiento.
© 2021, LiftMaster
All Rights Reserved
Touts droits réservés
114-5679-000 Todos los derechos reservados
DIAGNÓSTICO
El receptor PPWR emitirá una serie de señales sonoras que responden a la
programación y condiciones de error. En la siguiente tabla se indican las condiciones
y las correspondientes señales sonoras. Pueden cancelarse en el menú titulado
“BEEP SETTINGS” (Programación de señales sonoras).
EVENTO SEÑAL
Pulsar tecla Simple
Agregar/cambiar finalizado Doble
Eliminar finalizado Triple
PIN maestro erróneo Larga
Error de programación Larga
Finalización genérica Doble
Error genérico Larga