
THANK YOU
We appreciate the trust and condence you have placed in Paramount through the purchase of this Outdoor Heater. We strive to continually create
quality products designed to enhance your home. Visit us online to see our full line of products available for your home improvement needs. Thank
you for choosing Paramount!
USE AND CARE GUIDE
ELECTRIC FIREPLACE INSTRUCTION MANUAL
Questions, problems, missing parts? Before returning to the store, please contact customer service at
customercare@jrhome.com or call 1-800-561-5550 7 a.m. - 4 p.m., PST, Monday – Friday
1-800-561-5550
WWW.JRHOME.COM
Model # EF-WM410 &
EF-WM411
Item #W914-36F &
W914-48FT

2
IMPORTANT SAFETY INSTRUCTIONS
SAVE THESE INSTRUCTIONS FOR FUTURE USE
WHEN USING ELECTRICAL APPLIANCES, BASIC PRECAUTIONS SHOULD
ALWAYS BE FOLLOWED TO REDUCE THE RISK OF FIRE, ELECTRIC
SHOCK, AND INJURY TO PERSONS, INCLUDING THE FOLLOWING:
Read all instructions before using this heater. Failure to follow these
important safety instructions may cause re, electric shock or
damage. Following proper safety and operating instructions is the
responsibility of the owner.
1. Grounding (If necessary) - this heater is for use on 120 volts. DO
NOT attempt to modify the plug in any way or use adaptors to
defeat the purpose of the grounding feature.
2. This heater is hot when in use. To avoid burns, do not let skin
come in direct contact with hot surfaces. The grill directly in front
of the heater outlet becomes hot during heater operation.
3. CAUTION: Extreme caution is necessary when any heater is used
by or near children or those with disabilities. Never leave the
heater operating unattended.
4. Do not operate any heater with a damaged cord or plug or after
the heater malfunctions, has been dropped or damaged in any
manner. Take heater to authorized service facility for examination,
electrical or mechanical adjustment or repair.
5. Under no circumstance should this electric heater be modied.
Parts having to be removed for servicing must be replaced by a
certied repair center prior to operating this electric heater again.
6. Do not use outdoors or anywhere it can get wet. This heater is not
intended for use in bathrooms, laundry areas and similar indoor
locations. Never locate heater where it may fall into a bathtub or
in the vicinity of water.
7. Do not run cord under carpeting. Do not cover cord with throw
rugs, runners, or similar coverings. Arrange cord away from
trafc area and where it will not be tripped over.
8. To disconnect heater, turn off all controls, then remove plug from
outlet.
9. Connect to property grounded outlets only.
10. Do not insert or allow foreign objects to enter any ventilation or
exhaust opening as this may cause an electric shock or re, or
damage the heater.
11. To prevent a possible re, do not block air intakes or exhaust
in any manner. Do not use on soft surfaces, like a bed, where
openings may become blocked.
12. CAUTION: A heater has hot and arcing or sparking parts inside. Do
not use it in areas where gasoline, propane, paint, or ammable
liquids are used or stored or where the unit will be exposed to
ammable vapors. The heater should not be used as a drying rack
for clothing. Do not hand any decorations on the heater.
13. Do not modify this heater. Use this heater only as described in this
manual. Any other use not recommended by the manufacturer may
cause re, electric shock, or injury to persons.
14. Avoid the use of an extension cord because the extension cord
may overheat and cause a risk of re. However, if you have to use
an extension cord, the cord shall be No.16AWG minimum size and
rated not less than 1875 watts, and 3-wire cord with grounding
type plug and cord connector.
15. Do not plug this product into a receptacle controlled by a wall
switch or dimmer.
16. Always use a certied electrician should new circuits or outlets be
required.
17. Always disconnect power before performing any cleaning,
maintenance or relocation of the heater.
18. For off-season storage, keep in a dry place, free from excessive
vibration damage.
NOTE: Procedures and techniques that are considered important
enough to emphasize.
CAUTION: Procedures and techniques, which, if not carefully
followed, will result in damage to the equipment or personal property or
may cause personal injury.
WARNING: Procedures and techniques, which, if not carefully
followed, will expose the user to the risk of serious injury, illness or
death.
WARNING:
This heater and parts become hot when in use. The area directly around
and under the heater must be clear and free of any obstructions.
DO NOT ALLOW CHILDREN TO OPERATE THIS HEATER.
KEEP
CHILDREN AND PETS AWAY FROM HEATER AND
CONTROLS
Table of Contents
Table of Contents ...................................2
Safety Information ..................................2
Pre-Installation .....................................3
Planning Installation ...............................3
Electrical Parameters
Package/Hardware List .............................3
Package Contents .................................3
Installation ...................................... 4-8
Wall mount .....................................4-7
Free Standing (Stand Brackets) .......................8
Installing Media (Step 6 & 7) ....................... 6-8
Operation. . . . . . . . . . . . . . . . . . . . . . . . . . . . . . . . . . . . . . . 9-10
Maintenance, Care & Cleaning ........................10
Troubleshooting ...................................11
Warranty ......................................11-12
3 JRHOME.COM
Please contact customercare@jrhome.com or 1-800-561-5550 for further assistance.
Pre-Installation-Package and Hardware Contents
PLANNING INSTALLATION
Before beginning assembly, be sure to empty contents of carton and make sure all parts are present. Place all parts on a soft, level surface for
assembly. If any parts are missing, please contact Customer Service between 8 a.m. - 7 p.m., EST, Monday – Friday, 9 a.m. – 6 p.m., EST, Saturday.
Estimated Assembly Time: Varies depending upon type .
A Phillips head screwdriver or Electric Drill with Phillips Head Bit is required for installation. (not included)
ELECTRICAL PARAMETER
□ Power supply: 120V AC
□ Frequency: 60Hz
□ Power: 1500W
WARNING: If the supply cord is damaged, it must be
replaced by the manufacturer, its service agent or similarly
qualied persons in order to avoid a hazard..
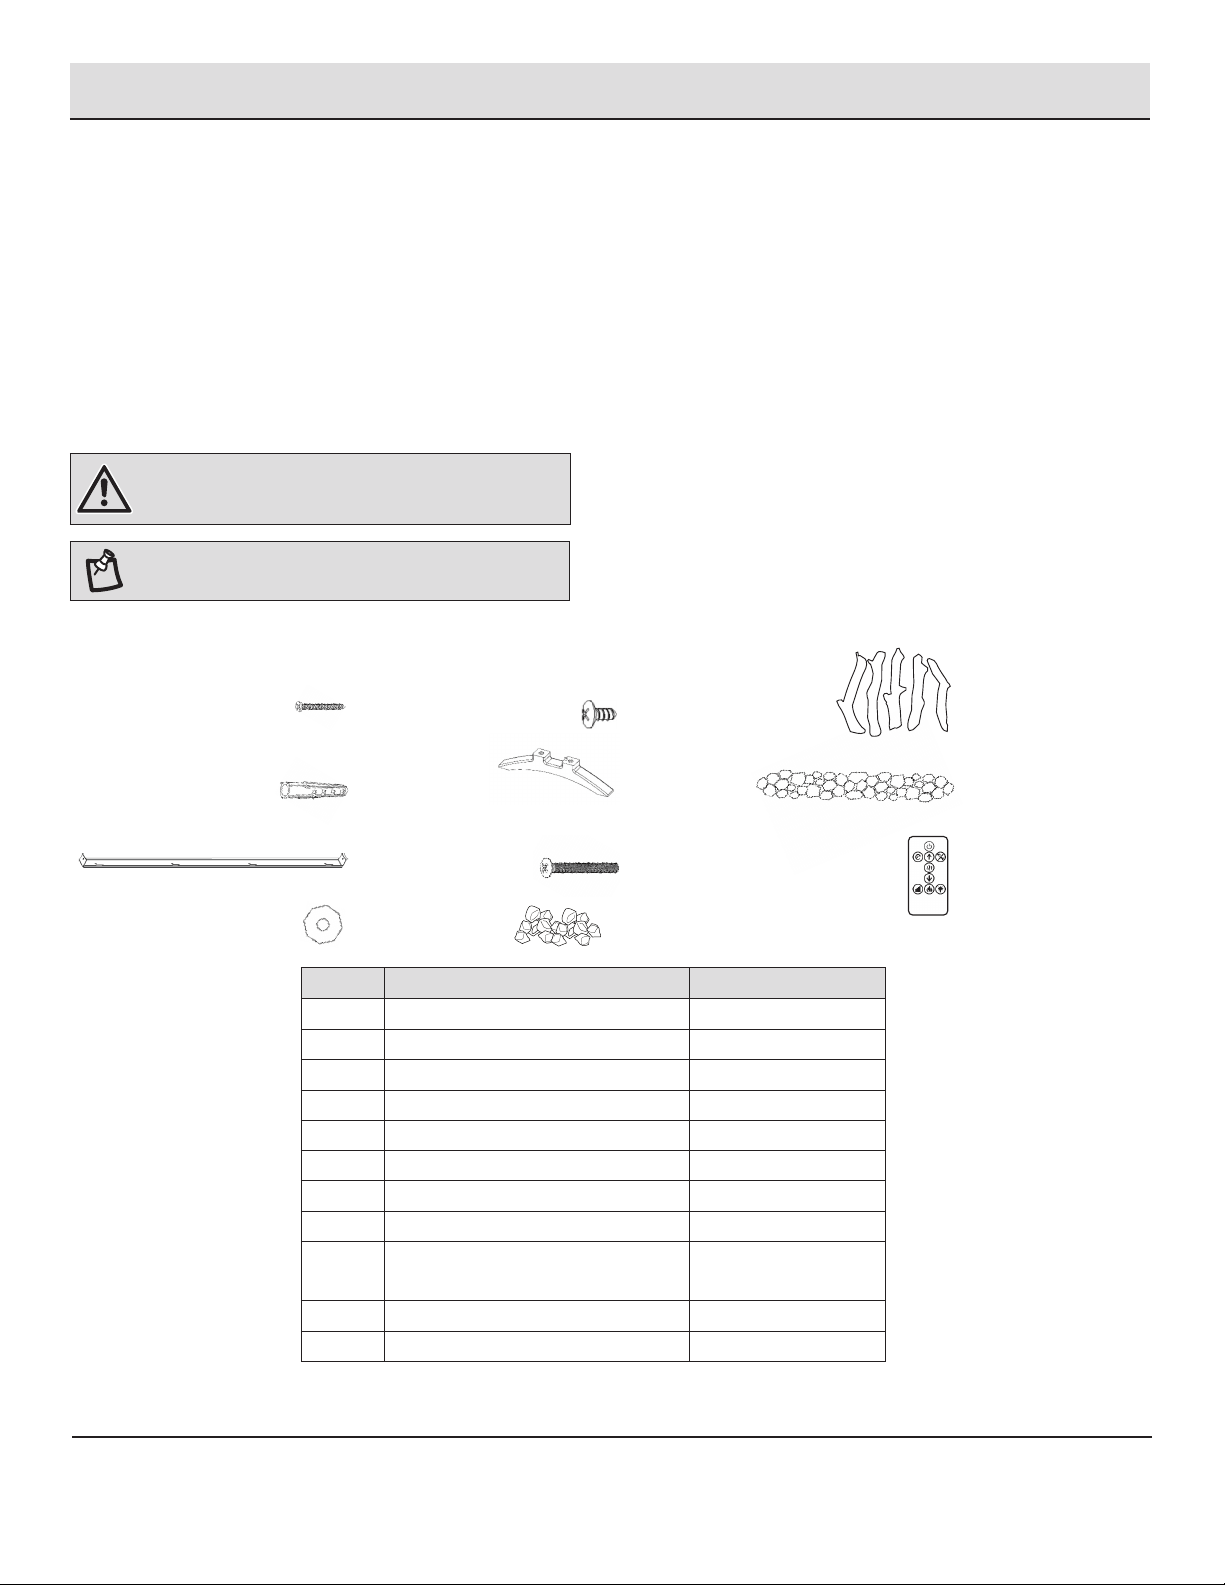
NOTE: Hardware not shown to actual size.
PACKAGE/HARDWARE CONTENTS
Part Description Quantity
A Anchor Screw 4
B Drywall Anchor 4
C Bracket 1
D Washer 4
E Small Screw 3
F Stand Bracket 2
G Bolt 4
H Crystals 1 Bag
I Decorative Logs (36”)
Decorative Logs (48”)
6
9
J Stones 1 Bag
K Remote Control 1
________A
________B
________C
________D
________E
________K
________H
________F
________G
________J
________I
4
Installation- Wall Mount
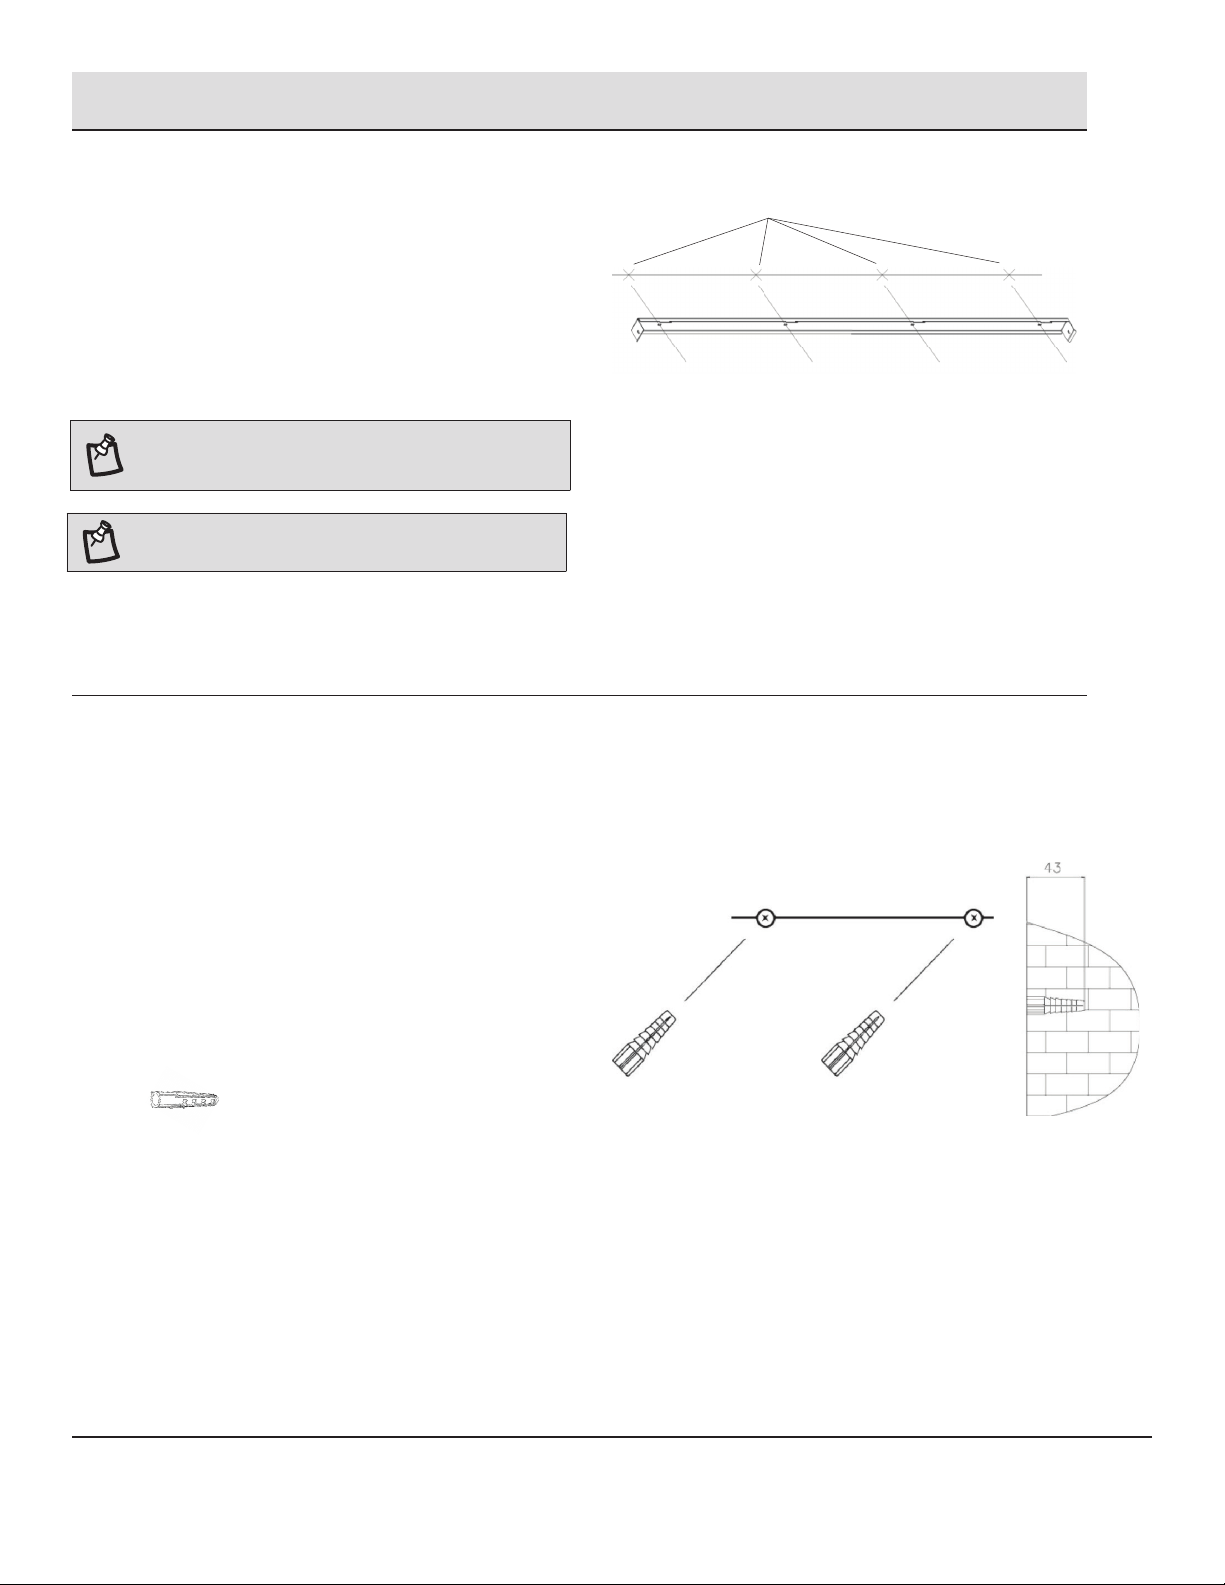
1
Wall location preparation
□ Select the wall location where you want to hang your
replace.
□ Draw a horizontal line using a level (Figure F)
□ Using the mounting bracket as a guide, mark 4 drill holes
for the 4 anchors (for drywall) or 4 screws (for wood studs).
2
Pre-drill screw
□ Drill 4 holes 8 mm (5/16in) in diameter and 43 mm (1.7in)
deep on the marked locations.
□ For holes that do not hit a stud, use the supplied wall
anchor. Install the wall anchors into the holes and gently
tap them into place with a hammer until the ange of the
wall anchor is ush with the wall surface. See Figure G.
Figure G
Anchor/Screw locations
NOTE: The holes are for mounting the replace. Insure
the horizontal line is level so the heater can be mounted
properly.
Figure F
________B X 4 (or as required)
NOTE: Please maintain at least 36 inches between the air
outlet on the replace and the ceiling.
5 JRHOME.COM
Please contact customercare@jrhome.com or 1-800-561-5550 for further assistance.
Installation- Wall Mount (continued)
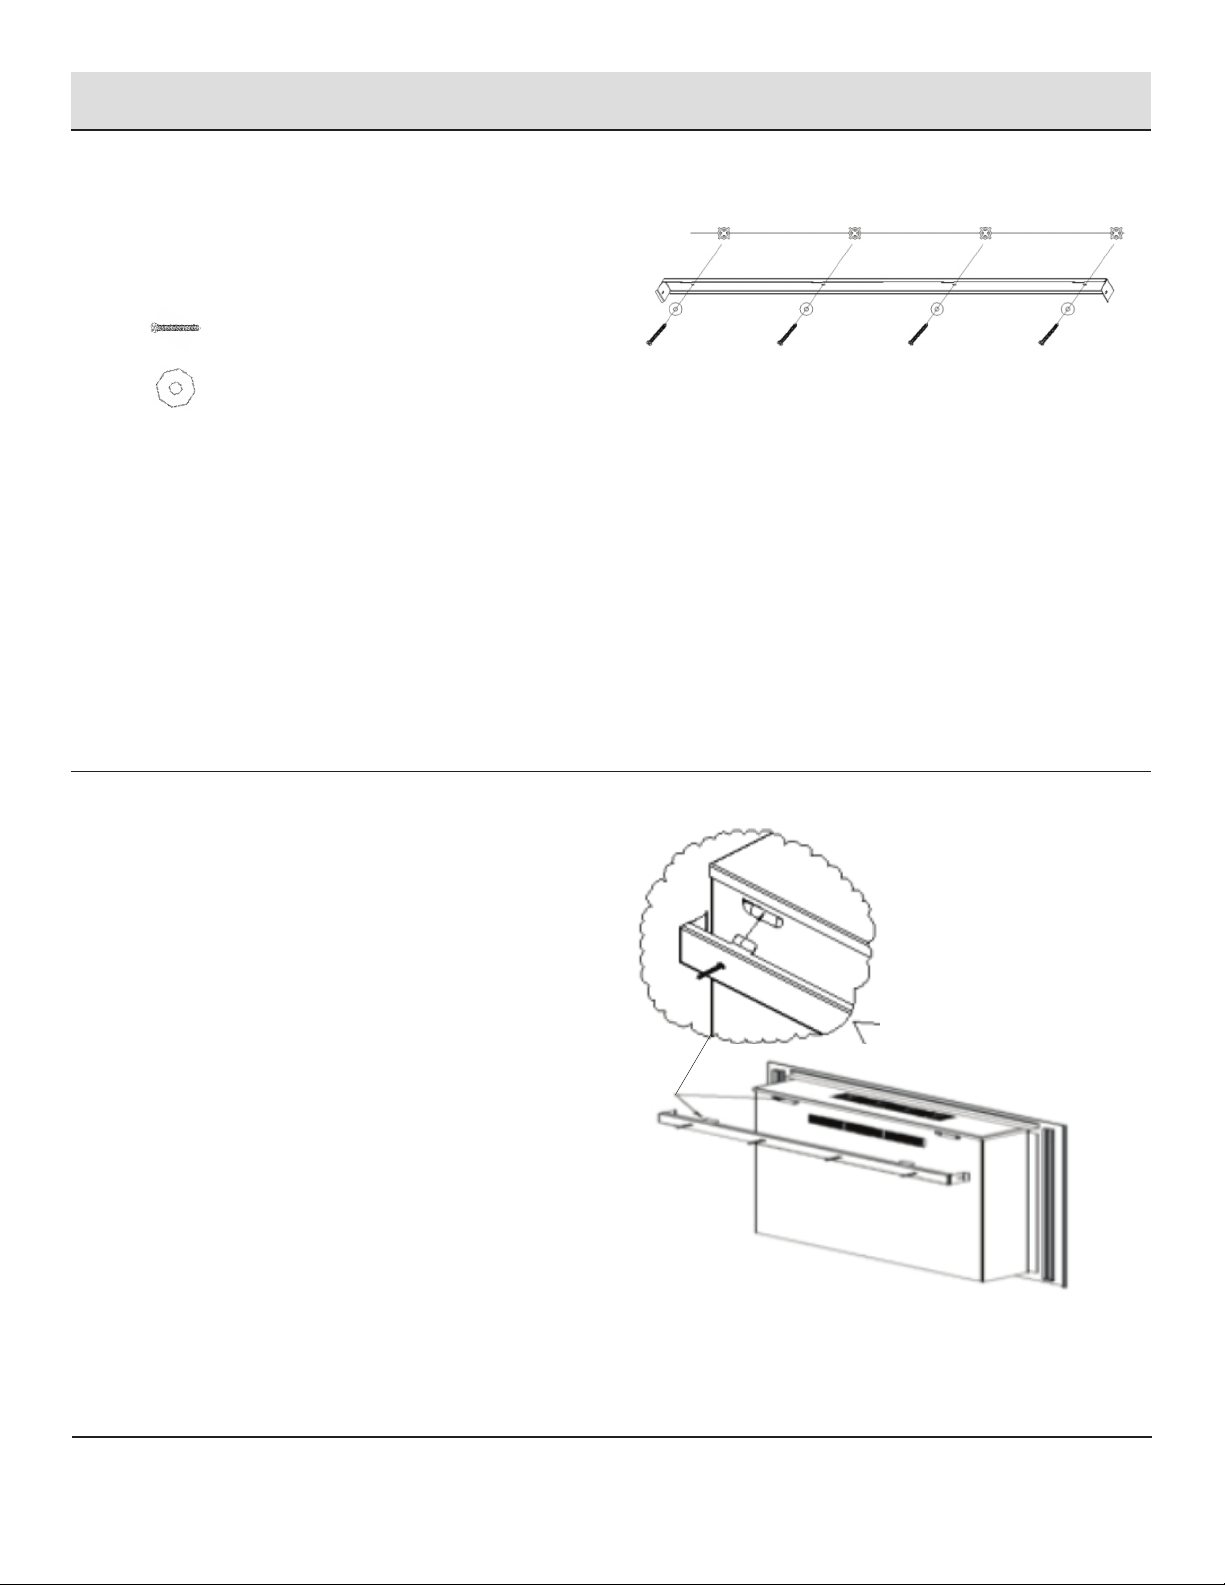
3
Attach the bracket
□ Secure the mounting bracket to the wall anchors using the
4 anchor screws and 4 washers as shown in Figure H
4
Mounting the replace
□ Mount the replace on the wall using the keyhole slots of
the metal bracket at the back of the heater. See Figure I
□ Make sure that the mounting bracket is completely
engaged into the metal bracket at the back of the heater.
Figure I
Figure H
________A X 4
________D X 4
6
Figure J
________E X 2
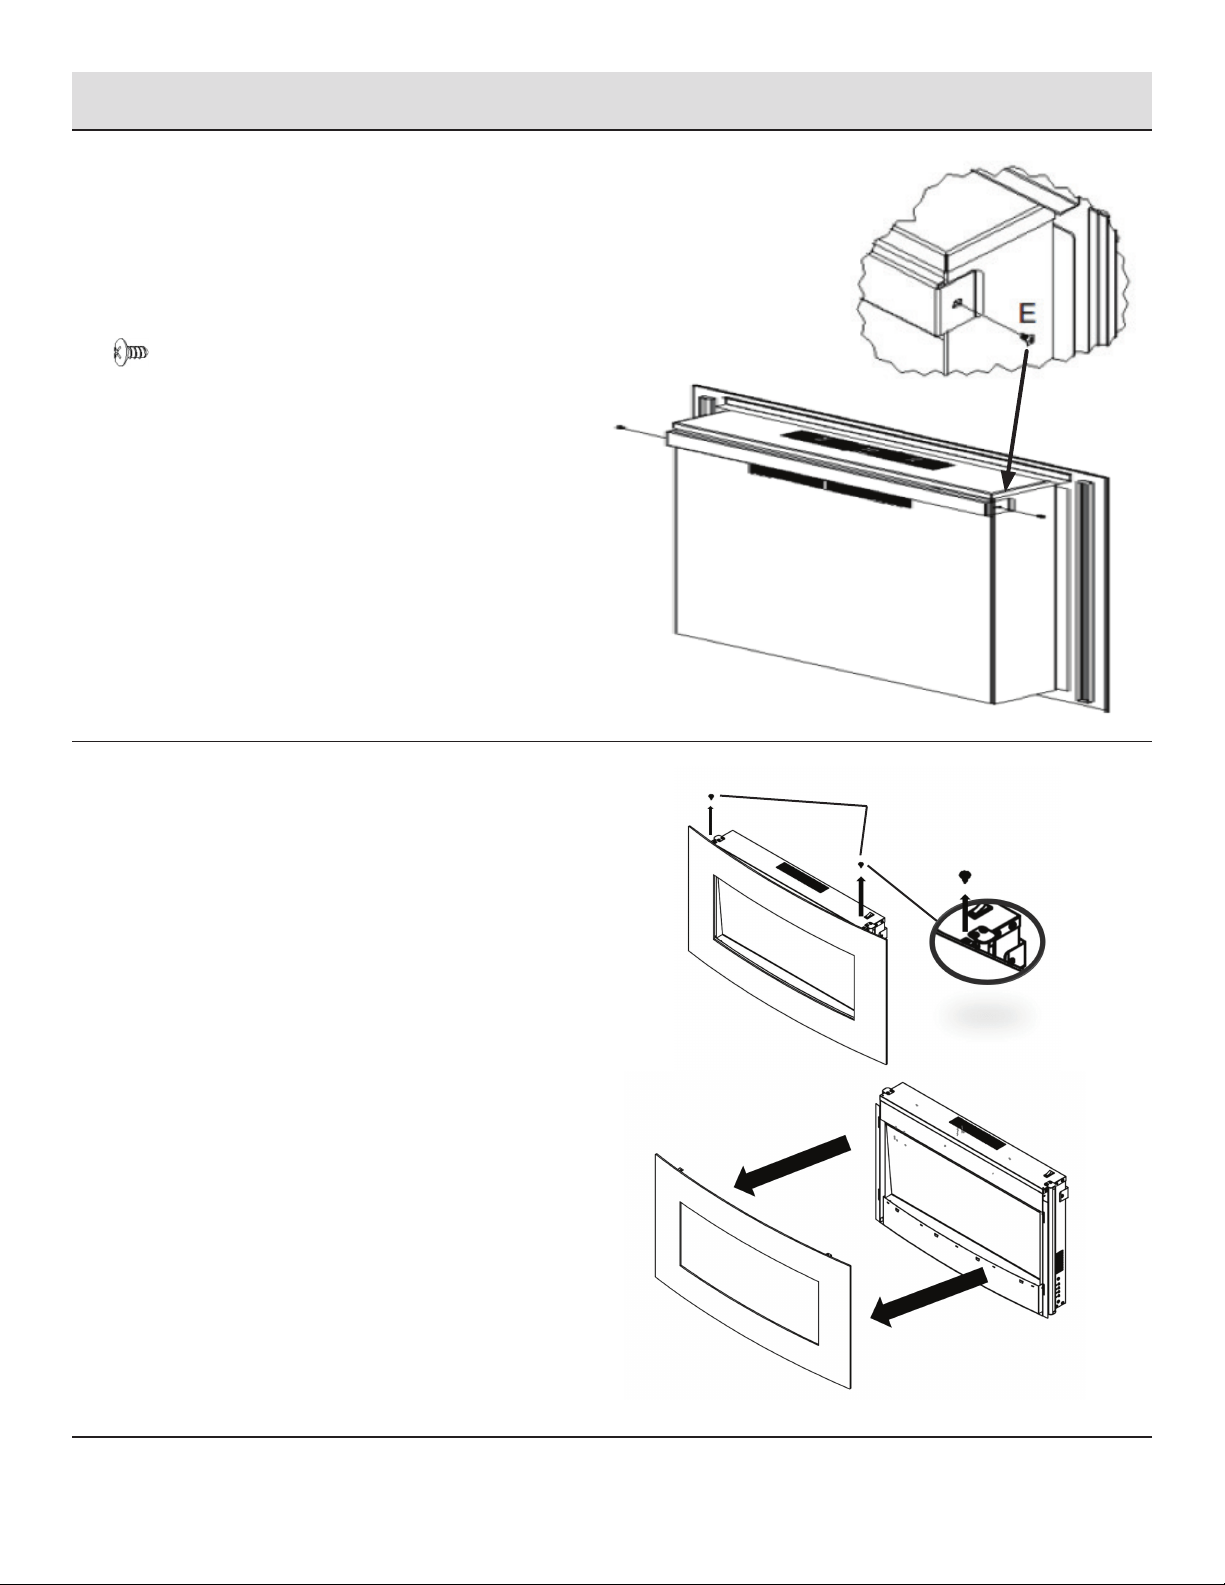
Installation- Wall Mount (continued)
5
Secure mounting bracket
□ Secure the mounting bracket to the heater using 2 mounting
screws. See Figure J.
6
Remove the front cover
□ Remove the two fastening screws.
□ Remove the front cover by pulling it outward (See Figure A)
Figure A
Figure B
Fastening Screws
7 JRHOME.COM
Please contact customercare@jrhome.com or 1-800-561-5550 for further assistance.
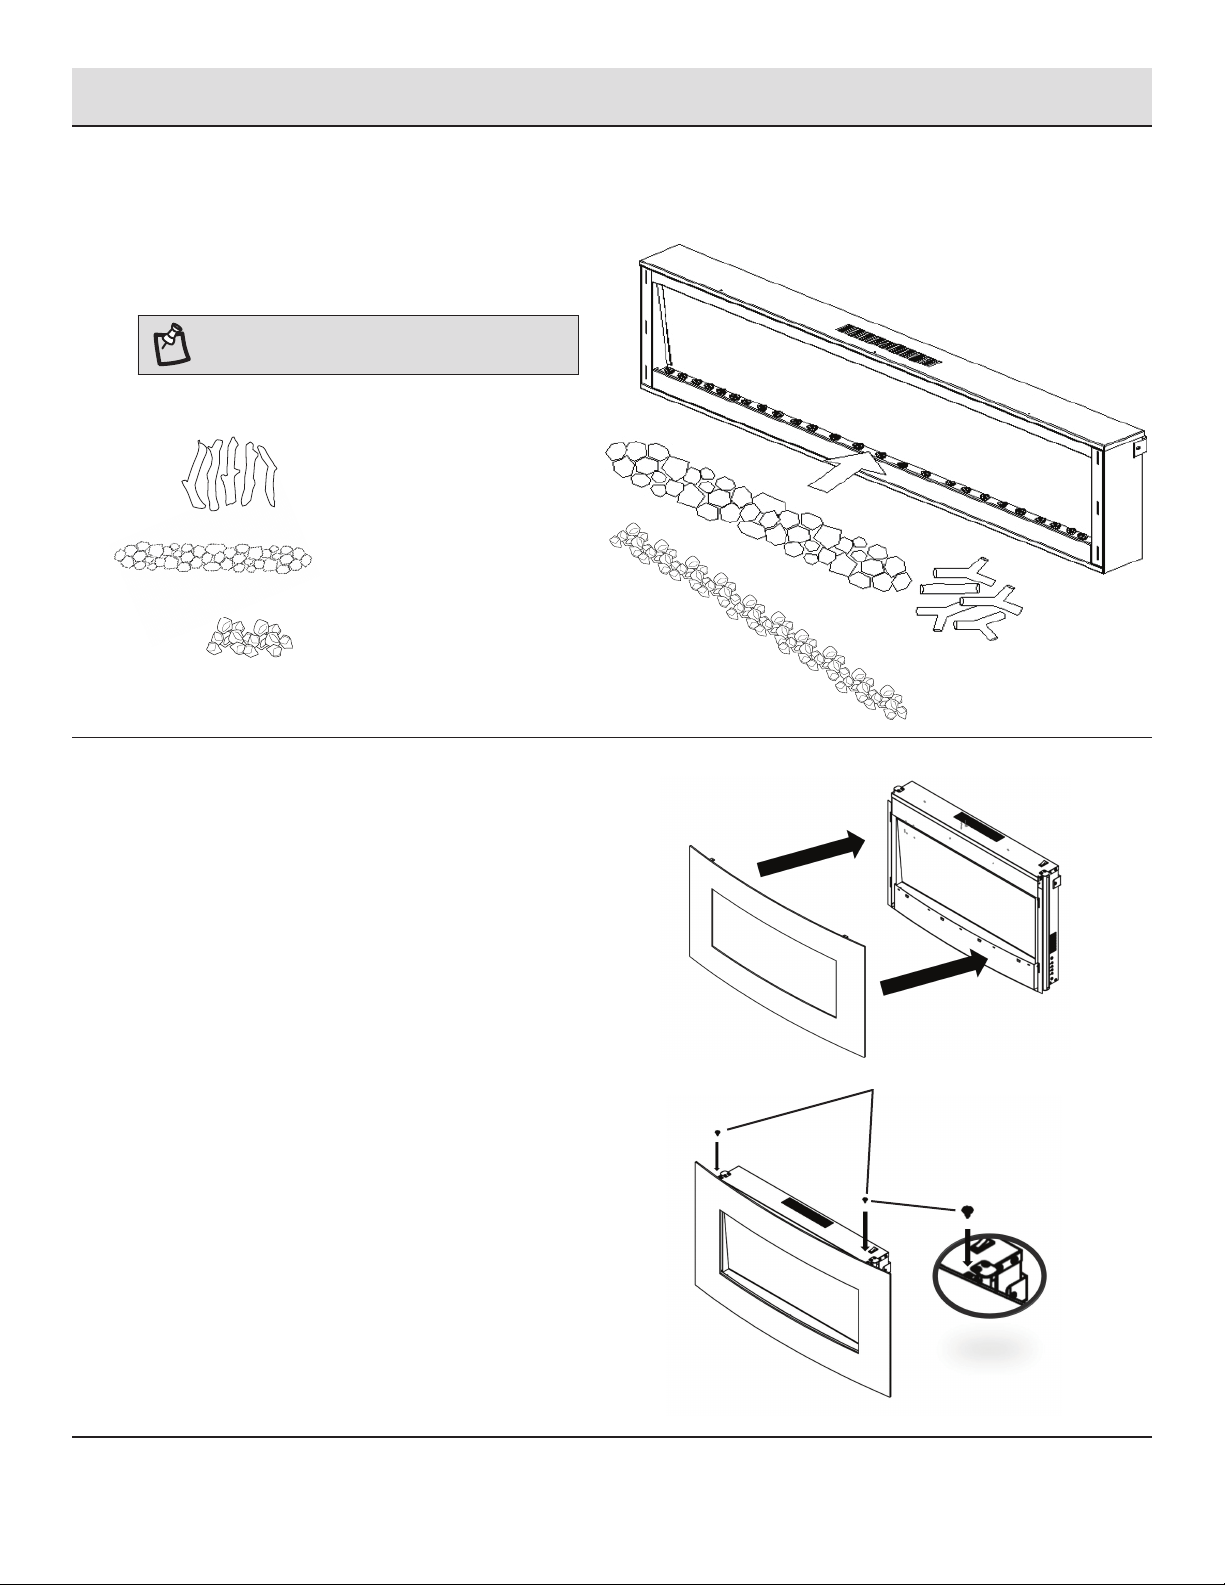
Installation- Wall Mount (continued)
7
Place Decorative Media
□ Put the decorative log, stones & crystals into the heater.
(Figure 1)
□ Media may be combined or displayed individually.
NOTE: This Step applies for all installations.
8
Replace the front cover
□ Repalce the front cover moving it back into place (Figure D)
□ Reattach the two fastening screws. (See Figure E)
Mounting Screws
________H
________I
________J
FIGURE C
Figure D
Figure E
8
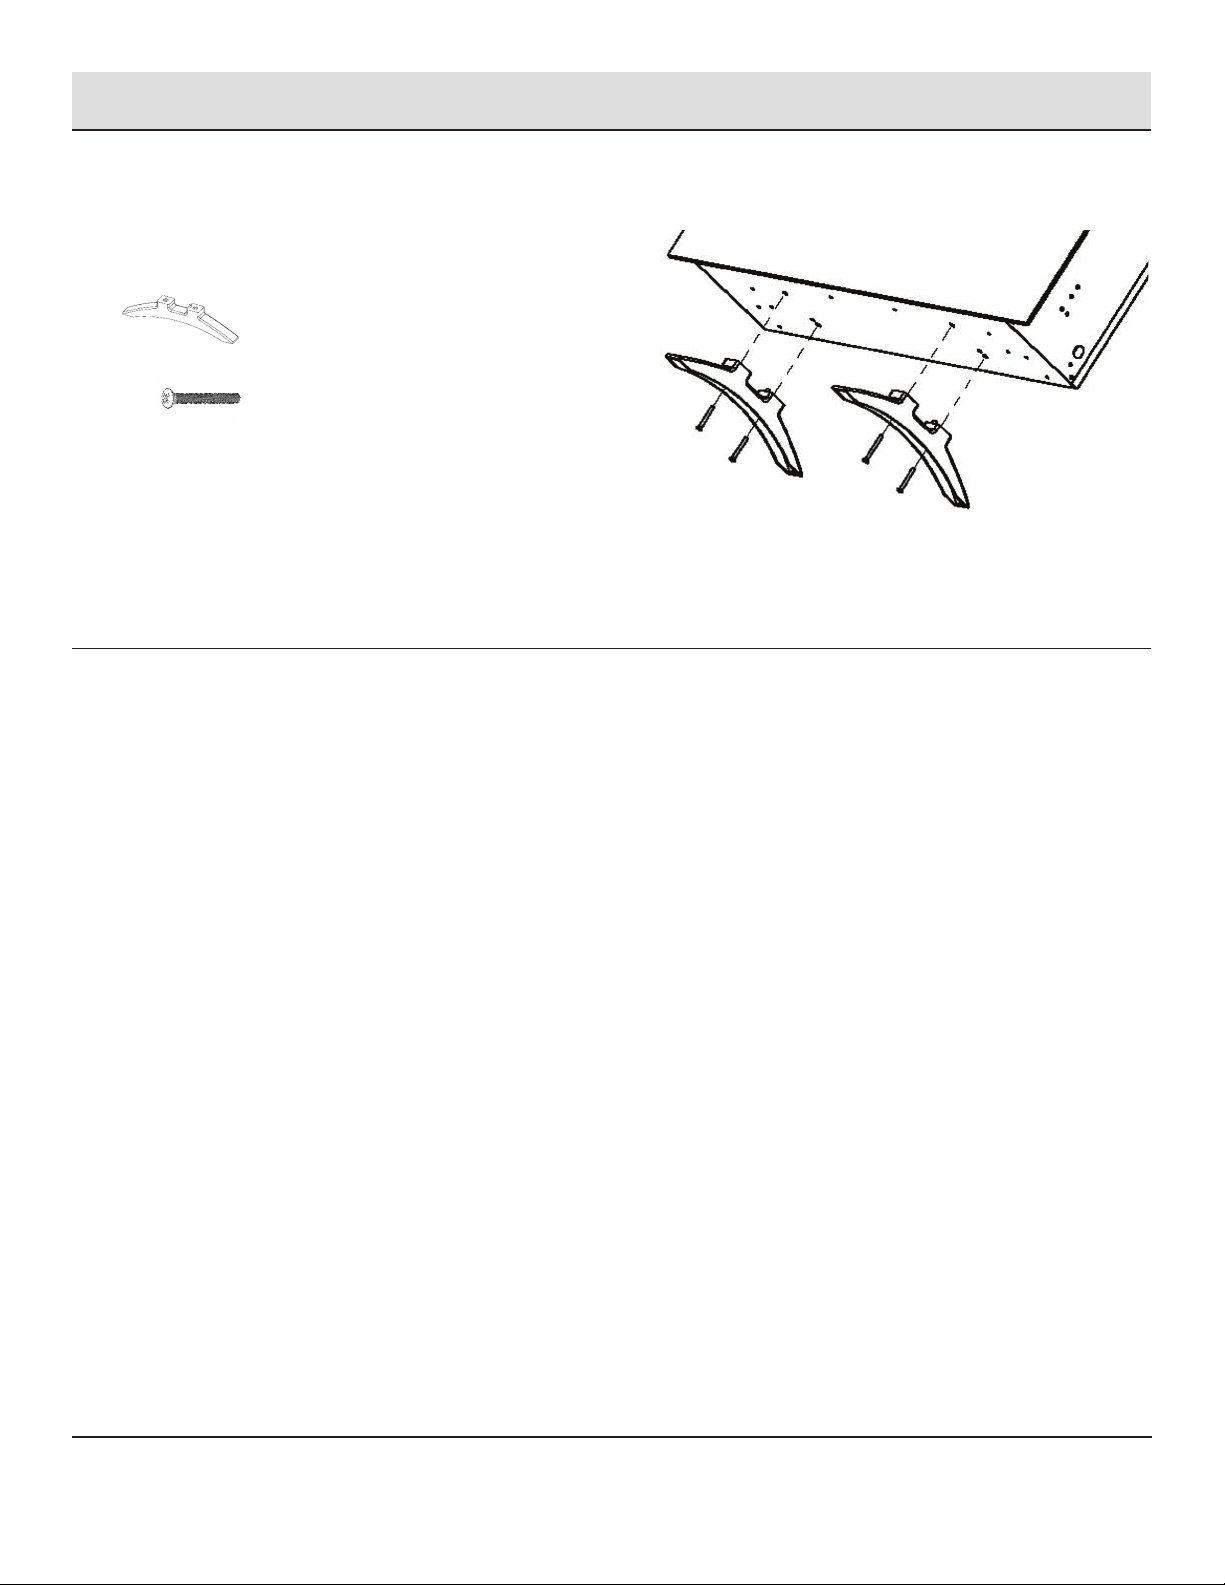
Installation- Stand Brackets
1
Attach stands
□ Fix the bracket by installing four G screws (See Fig. L)
________G
________F
Figure Ll
9 JRHOME.COM
Please contact customercare@jrhome.com or 1-800-561-5550 for further assistance.
Operation
1
Pre-Operation
C
AUTION: Do not attempt to operate this appliance until you
have read and understand all Safety Information in this manual
and all assembly is complete and leak tests have been performed
.
After reading all the instructions, make sure that all the replace
controls are in the OFF position. Plug the replace into a 15A/120V
outlet.
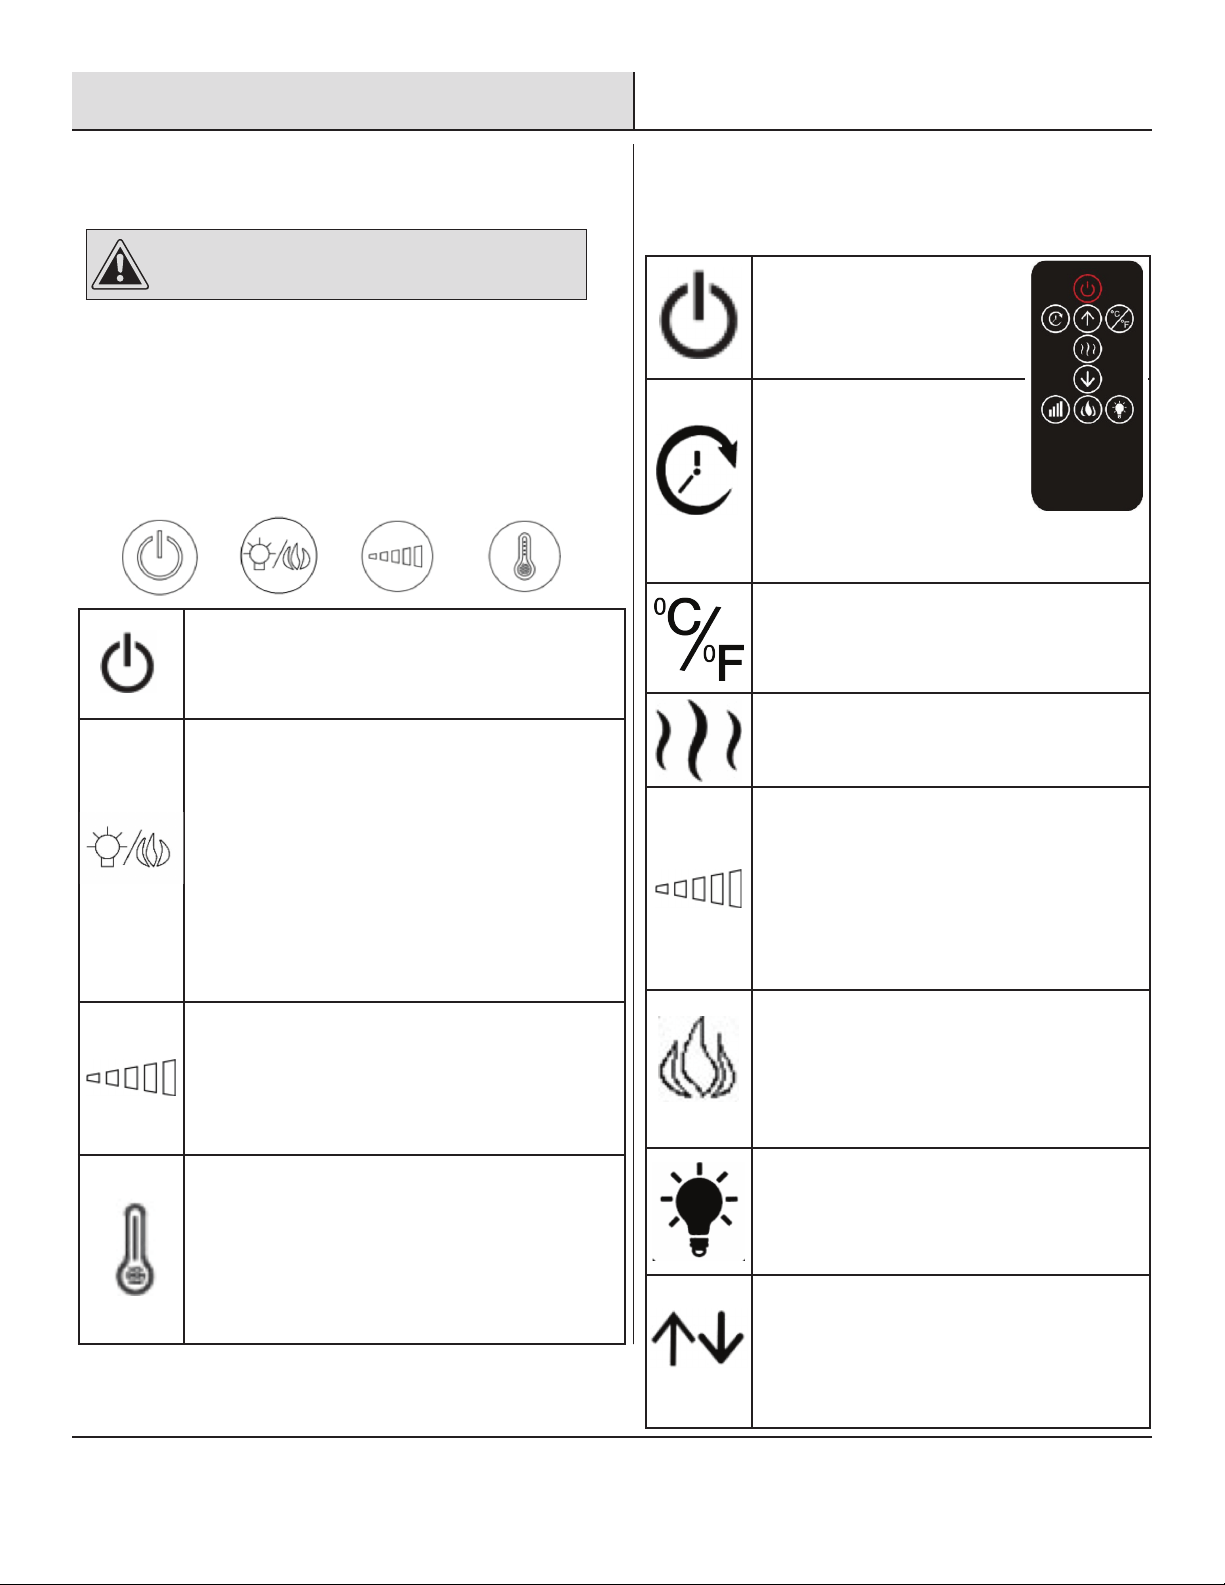
2
Operating Fireplace Controls
The controls are located at the right of the heater outlet.
3
Operation By Remote
Control
□
Press this button to turn ON the
replace and the fan will
continue to work for 60 seconds
without heat.
Press this button for timer
function. The letters ‘0H’ to ‘8H’
will appear on the LED screen.
‘0H’ means there is no set running
time and heater will run contin-
uously. The letters ‘1H’ to ‘8H’
mean the number of hours that the heater will
operate before shutting off.
Press this button to toggle between the two
temperature scales. The corresponding Celsius
(C) or Fahrenheit (F) LED indicates the current
setting.
For heat function - Press this button to turn on
the heat function.
Press again to turn off.
Press this button to change ame intensity.
Press again to decrease the ame intensity.
There are 6 light intensities for your selec-
tion. The ame optics will go lower under the
sequence of 6,5,4,3,2 and 1.
Pressing the button again will stop the ame
effect.
Press this button to change ame effect. The
unit will beep. By default, the ame color is yel-
low. Press again to change ame color. There
are ten groups of ame colors. Including four
primary colors: yellow, blue, green and red and
six different combinations of mixed colors.
Press to change backlight effect. There are
seven types of backlight effect, consisting of
blue, green, red, purple, yellow, white and
cyan. Press this button until the desired color is
set.
Press up or down button to the desired tem-
perature. When desired ambient temperature
is reached, the heater will automatically stop
heating. When the ambient temperature drops
below the desired temperature 2°C, the heater
will resume heating.
Press this button to turn ON the replace. Press again
to turn off the replace and the fan will continue to
work for 60 seconds without heat.
Press this button to change the ame effect. By
default, the ame color is yellow.
Press again to change ame color. There are ten
groups of ame colors including four primary colors:
yellow, blue, green and red and six different combina-
tions of mixed primary colors.
Hold the button 3 seconds and longer, the background
light will turn on and change its colors : Blue, green,
red ,purple, yellow ,white and cyan. Long press to
change one color at a time.
Press this button to change ame intensity. Press
again to decrease the ame intensity. There are 6
light intensities for your selection. The ame optics
will go lower under the sequence of 6,5,4,3,2 and 1.
Pressing the button again will stop the ame effect.
Press this button to set the desired temperature.
When desired ambient temperature is reached, the
heater will automatically stop heating.
When the ambient temperature drops below the
desired temperature 2°C, the heater will resume
heating.
10
Operation - (continued)
4
Operation with The DEMO Switch
Press the I /O switch to turn on/turn off the power for
heating system.When the switch is turned off, you still can
control the ame and background light, but the power for
heating system. If you want to open the heating function, pls
make sure the switch is turned on.
5
Remote Control Battery Replacement:
□ Replace with a CR2025 battery and follow the diagram at the
back of remote handset to install the new battery.
Maintenance, Care & Cleaning
1
Maintenance:
□ WARNING: Completely disconnect power before attempting any
maintenance or cleaning, to reduce the risk of re or electric
shock. Maintenance should only be performed by a certied
technician.
2
Cleaning:
□ Before cleaning any parts of the replace make sure to rst
turn off the controls and then unplug the unit from power
source.
□ CAUTION: Wait until the unit has completely cooled before
attempting any cleaning.
□ Cleaning Glass Panel: Remove dust with clean dry cloth.
Remove ngerprints and other marks from glass door by using
a clean damp cloth. Do not use abrasive cleaners or spray
liquids on glass door surfaces.
□ Metal and metal painted parts should be cleaned with clean
damp cloth only. Do not use abrasive cleaners or spray liquids
on these surfaces.
3
Anti-frost function
□ The replace has anti-frost function.
□ When the room temperature is below 32
0
F/0
0
C the start-up
time will be delayed by several minutes
11 JRHOME.COM
Please contact customercare@jrhome.com or 1-800-561-5550 for further assistance.
Troubleshooting
PROBLEM POSSIBLE CAUSE CORRECTIVE ACTION
Fireplace doesn’t work. Fireplace inner components are overheating or the
home circuit breaker has tripped.
Reset switch by turning master switch off and
waiting for 5mins, then turning it back on.
Flame is not moving. Wiring may be loose or the ame motor may be
defective
Call customer service for instructions.
Dim or poorly visible ame
or crystals aren’t glowing.
LED lights are burnt out or the wiring is loose. Call customer service for instructions.
Flame sputters. Flame motor is defective. Call customer service for instructions.
Remote control does not
work.
Low battery. Master switch is in “OFF” position. Change the battery for remote control. Check to
make sure the master switch is turned on.
Circuit breaker trips or fuse
blows when the unit is on.
Improper circuit current rating. Turn off electrical equipment sharing the circuit.
Call customer service for instructions.
Heater does not provide
heat when turned on.
Thermal switch has been tripped. Circuit breaker
has been tripped.
Turn the unit off and unplug the unit for 5mins. Plug
back in and turn on the unit.
Turn off circuit breaker that supplies electricity to
the unit, wait 5 minutes, then ip circuit breaker
back on
Appliance turns off and will
not turn on.
Appliance has overheated and its safety device has
caused the thermal switch to disconnect.
House circuit breaker has tripped
Unplug the appliance, allow to cool for 15mins, then
plug back in.
Reset the house circuit breaker.
Review & Warranty Extension
Follow us on:
JR HOME
COLLECTION
Extend Your Warranty By Leaving A Review
We want your opinion about your purchase...and we want you to tell everyone about it!
Just leave a review for the product on the retailers website where you made your purchase, or
at www.jrhome.com, and ll in the online warranty at https://www.jrhome.com/
warranty-registration to receive a complimentary extra year of warranty protection.
www.jrhome.com #paramount
12
Warranty
IMPORTANT
For questions, concerns or problems with our product please
email our customer service department:
DATED PROOF OF PURCHASE REQUIRED FOR WARRANTY SERVICE
WARRANTY
This product is inspected, tested and carefully packaged to minimize
the chance of damage during shipment. If a part (excluding light
bulbs, glass and fuses*) within one year from the date of purchase
proves to be defective in material or fabrication under normal use,
the part will be repaired or replaced. The Company’s obligation under
the warranty is to replace or repair defective parts at our discretion.
Any expenses or damage resulting from the installation, removal or
transportation of the product will be the responsibility of the owner
and are not covered by this warranty. The owner assumes all other
risks arising from the use or misuse of the product. The warranty will
be void if the product damage or failure is deemed by the Company
to be caused by accident, alteration, misuse, abuse, incorrect
installation or removal, or connection to an incorrect power source
by the owner. The Company neither assumes, nor authorizes any
person or entity to assume for it any obligation or liability associated
with its products. Light bulbs and fuses are not covered under this
warranty. If you have any questions regarding the warranty or
service, please contact us at [email protected].
Customer Service :
JR Home Products
Unit 306 - 19100 Airport Way, Pitt Meadows, BC V3Y 0E2
Toll Free : 1-800-561-5550
E-mail : [email protected]
Warranty Registration Information Form / Formulaire d’enregistrement de la garantie
Registration can be completed online at
www.jrhome.com or by mailing this form.
Name / Nom :
Street / Adresse :
City / Ville :
Province / Province :
Postal Code / Code postal :
Daytime Phone # / No téléphone jour :
Evening Phone # / No téléphone soir :
E-Mail Address / Courriel :
Product/Produit :
Place of Purchase / Lieu de l’achat :
Date of Purchase / Date de l’achat :
Model # / No de modèle :
Serial # / Numéro de série :
You MUST register your product to receive
warranty service.
For warranty service, contact J&R Home
Products at the address, phone numbers listed
below within 30 days of purchase. Be sure to
have your sales receipt and original date of
purchase. All warranty service will be
coordinated by
J&R Home Products service center.
Vous DEVEZ enregistrer votre produit pour vous
prévaloir de la garantie.
Afin de faire valoir la garantie, communiquez
avec J&R Home Products à l’adresse et aux
numéros indiqués ci-dessous dans les 30 jours
suivant la date d’achat. Ayez en main votre reçu
et la date d’achat. Toutes les demandes liées
aux garanties seront traitées par le centre de
service de J&R Home Products.
Please mail to / Veuillez poster le tout à : Parts & Service Department, J&R Home Products Ltd. Unit 306 - 19100 Airport Way, Pitt Meadows, BC V3Y 0E2
You MUST register your product within 30 days of
purchase to receive warranty service.
Si vous éprouvez si vous avez des questions ou des
préoccupations, prière de faire parvenir un courriel à notre service à la clientèle
UNE PREUVE D’ACHAT DATÉE EST REQUISE POUR SE PRÉVALOIR DE LA GARANTIE.
AVERTISSEMENT
soigneusement
des verres,
s
demeurent
service,
contacter le service à la clientèle à : [email protected].
Service à la clientèle:
JR Home Products
Unit 306 - 19100 Airport Way, Pitt Meadows BC V3Y 0E2 Numéro
sans frais: 1-800-561-5550
Courriel: [email protected]
Vous DEVEZ enregistrer votre produit dans les 30 jours suivant l'achat
pour bénéficier du service de garantie.
L’enregistrement sera complet une fois que vous aurez posté ce
formulaire ou que vous serez inscrit en ligne.
120920

Questions, problems, missing parts? Before returning to the store, please contact customer service at
customercare@jrhome.com or call 1-800-561-5550 7 a.m. - 4 p.m., PST, Monday – Friday
JRHOME.COM
Retain this manual for future use.
