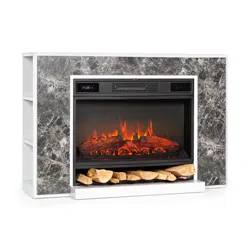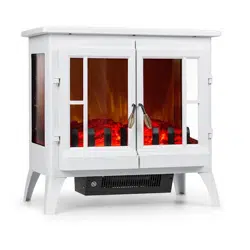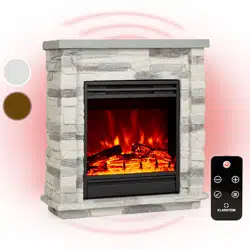
VULSINI
Elektrischer Kamin
Fireplace Heater
Cheminée électrique
Camino elettrico
Chimenea eléctrica
Hinweis: Dieses Produkt ist nur für gut isolierte Räume
oder für den gelegentlichen Gebrauch geeignet.
Note: This product is only suitable for well insulated
spaces or occasional use.
Advertencia: Este producto está indicado únicamente en
lugares abrigados o para una utilización punctual.
Remarque : Ce produit ne peut être utilisé que dans
des locaux bien isolés ou de manière occasionnelle.
Nota: Questo prodotto è adatto solo per spazi
ben isolati o uso occasionale.
www.klarstein.com
10035037 10035038 10035039
10035040

3
DE
Sehr geehrter Kunde,
wir gratulieren Ihnen zum Erwerb Ihres Gerätes. Lesen Sie
die folgenden Hinweise sorgfältig durch und befolgen Sie
diese, um möglichen Schäden vorzubeugen. Für Schäden,
die durch Missachtung der Hinweise und unsachgemäßen
Gebrauch entstehen, übernehmen wir keine Haftung. Scannen
Sie den folgenden QR-Code, um Zugriff auf die aktuellste
Bedienungsanleitung und weitere Informationen rund um das
Produkt zu erhalten.
INHALTSVERZEICHNIS
Sicherheitshinweise4
Geräteübersicht5
Displayanzeigen6
Inbetriebnahme und Bedienung7
Fehlerbehebung11
Hinweise zur Entsorgung14
Hersteller14
Installation Vulsini Dawn15
Installation Vulsini Nightfall24
Installation Vulsini Hideaway32
TECHNISCHE DATEN
Artikelnummer 10035037 10035038
Artikelname Vulsini Vulsini Dawn
Stromversorgung 220-240 V ~ 50 Hz
Leistung 1700-1900 W
Artikelnummer 10035039 10035040
Artikelname Vulsini Nightfall Vulsini Hideawy
Stromversorgung 220-240 V ~ 50 Hz
Leistung 1700-1900 W
English 39
Español 75
Français 111
Italiano 147
4
DE
SICHERHEITSHINWEISE
• Prüfen Sie vor der Benutzung die Angabe zur Spannung auf dem Typenschild und
schließen Sie das Gerät nur an Steckdosen an, die der Nennspannung des Geräts
entsprechen.
• Falls das Netzkabel beschädigt ist, lassen Sie es von einer ausgebildeten Fachkraft ersetzen.
• Stellen Sie den Kamin nicht direkt unter der Steckdose auf.
• Halten Sie einen Meter Abstand zu brennbaren Materialien wie Möbeln,
Vorhängen oder Ähnlichem.
• Benutzen Sie das Gerät außerhalb der Reichweite von Kindern. Kinder dürfen das
Gerät nur unter Aufsicht bedienen.
• Das Gerät ist nicht für den kommerziellen Gebrauch, sondern nur für Gebrauch im
Haushalt und in ähnlichen Umgebungen vorgesehen.
• Benutzen Sie das Gerät nicht wenn es Fehlfunktionen aufweist oder in irgendeiner
Form beschädigt wurde.
• Reparaturen dürfen nur von ausgebildeten Fachkräften durchgeführt werden.
• Falsch oder eigenständig ausgeführte Reparaturen stellen ein Verletzungsrisiko dar.
• Verlegen Sie das Netzkabel nicht unter Teppichen oder Läufern.
• Achten Sie darauf, dass das Netzkabel nicht über scharfe Kanten oder heiße
Ober ächen verläuft.
• Decken Sie den Kamin nicht ab, um Überhitzen zu vermieden.
• Benutzen Sie das Gerät nicht mit einem externen Timer, einer ferngesteuerten Steckdose
oder einem anderen Gerät, das den Kamin automatisch ein- und ausschaltet.
• Tauchen Sie das Gerät nicht in Wasser oder andere Flüssigkeiten.
• Benutzen Sie das Gerät nicht in der Nähe von Badewannen, Duschen oder
Swimmingpools.
• Benutzen Sie das Gerät nicht im Freien.
• Benutzen Sie das Gerät nicht mit nassen Händen.
• Benutzen Sie das Gerät nicht auf oder in der Nähe heißer Ober ächen.
• Benutzen Sie das Gerät nicht mit beschädigtem Netzkabel.
• Ziehen Sie vor der Reinigung den Stecker aus der Steckdose und lassen Sie das
Gerät vollständig abkühlen.
• Benutzen Sie zur Reinigung keine Scheuermittel.
• Verwenden Sie nur Zubehör, das vom Hersteller ausdrücklich dafür zugelassen ist.
• Kinder ab 8 Jahren, psychisch, sensorisch und körperlich eingeschränkte Menschen
dürfen das Gerät nur benutzen, wenn sie vorher von einer für sie verantwortlichen
Aufsichtsperson ausführlich mit den Funktionen und den Sicherheitsvorkehrungen
vertraut gemacht wurden und die damit verbundenen Risiken verstehen.
• Achten Sie darauf, dass Kinder nicht mit dem Gerät spielen.
VORSICHT
Verbrennungsgefahr! Einige Geräteteile können sehr heiß werden.
Achten Sie darauf, dass Sie oder Ihre Kinder sich nicht daran
verbrennen.

5
DE
GERÄTEÜBERSICHT
Vorderansicht
Hinweis:
• Das Gerät kann sowohl mit der im Lieferumfang enthaltenen Fernbedienung als
auch mit dem Bedienfeld, welches sich auf der rechten oberen Seite des Gerät
bendet, verwendet werden.
• Das Gerät verfügt über einen Netzschalter, über welchen die Stromzufuhr reguliert
wird. Der Netzschalter muss sich in der Position „On“ (an) benden, damit das
Gerät verwendet werden kann.
• Wenn Sie das Gerät zum ersten Mal einschalten muss sofort die Zeit eingestellt
werden. Andernfalls wird die Zeit lediglich als „00:00“ angezeigt und der
wöchentliche Timer ist nicht verfügbar.
Display Bedienfeld

6
DE
Rückansicht
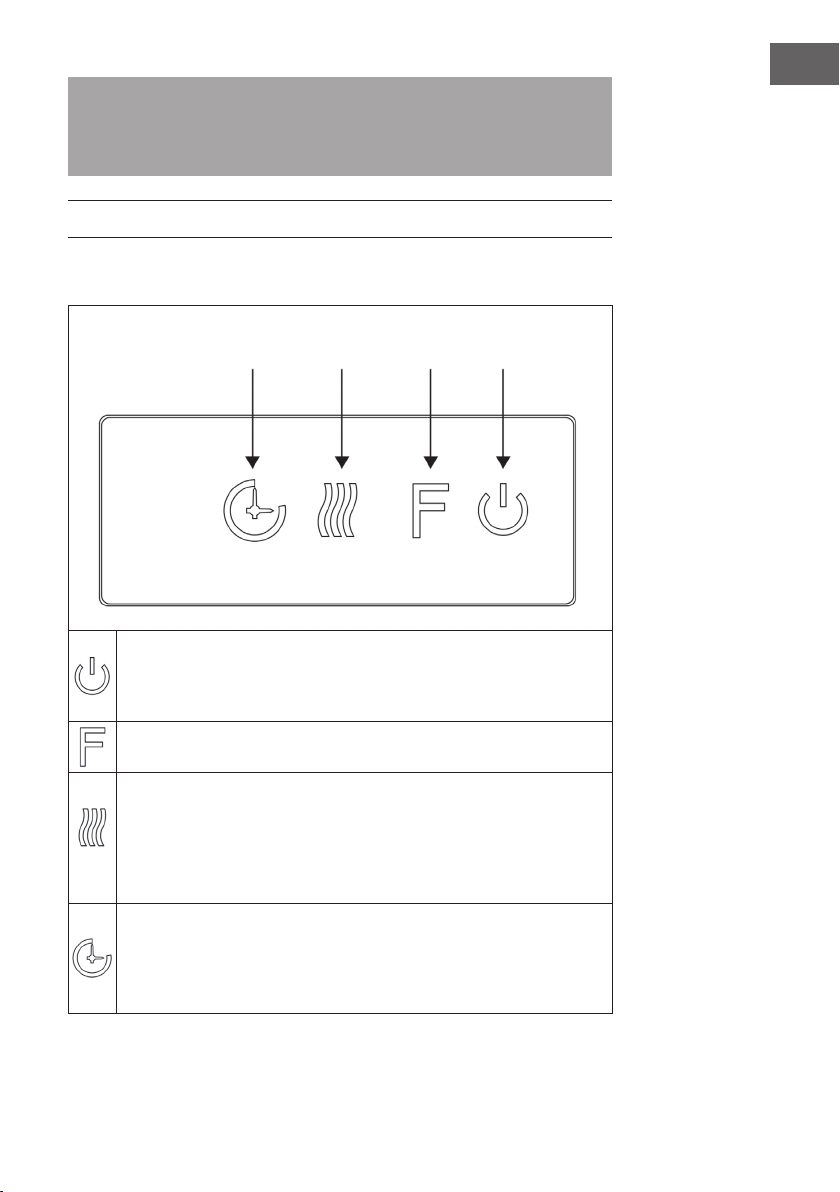
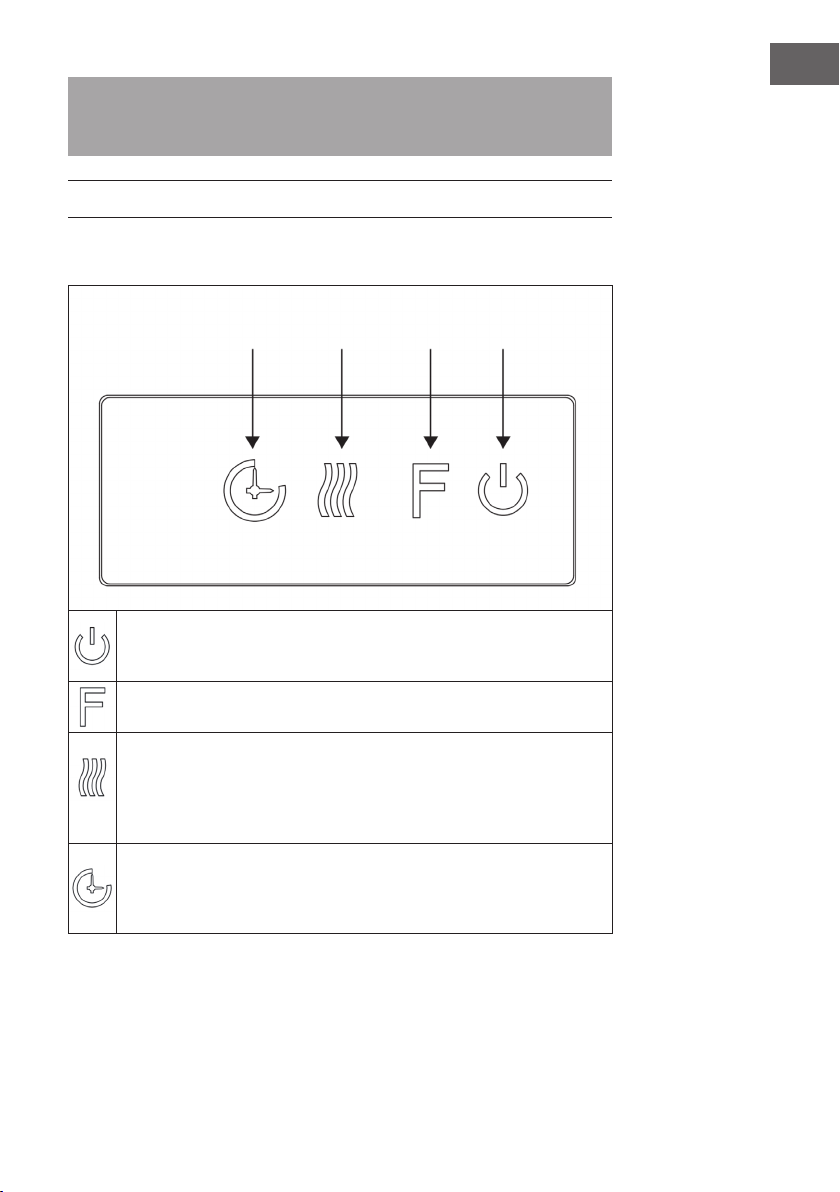
DISPLAYANZEIGEN
Hauptschalter
Timeranzeige
Temperatur
Timer-Startzeit
WochentagTimer-EndzeitAuto-Modus
Hintergrundeleuchtung
Holz-Knistern
Zeit
Timermodus
Heizanzeige
F°/ C° Flammenanzeige
7
DE
Hinweis: Wenn Sie den Kamin einschalten, leuchtet die Zeit auf. Nach 60 Sekunden
geht der Kamin automatisch aus. Sie können ihn mit einer beliebigen Taste wieder
einschalten. Die Hintergrundbeleuchtung und die Funktion „Holz-Knistern“ sind bei
diesem Modell nicht verfügbar.
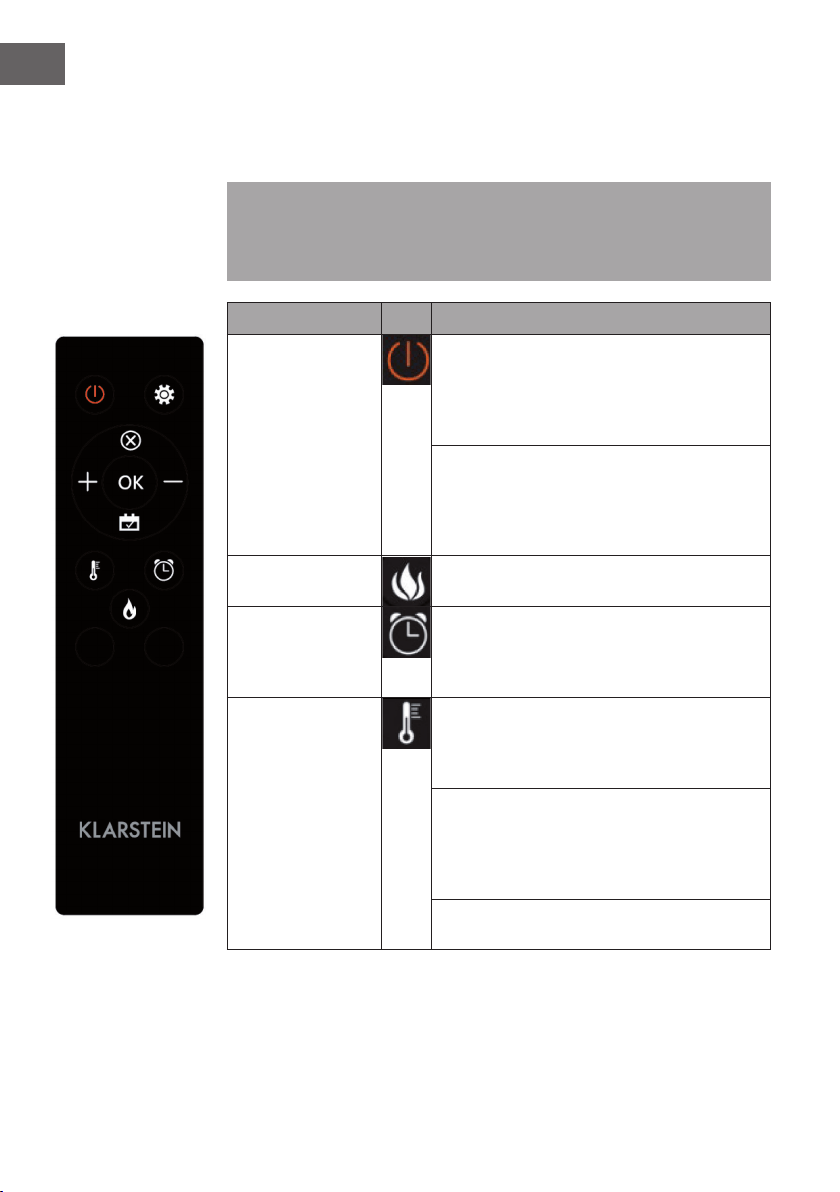
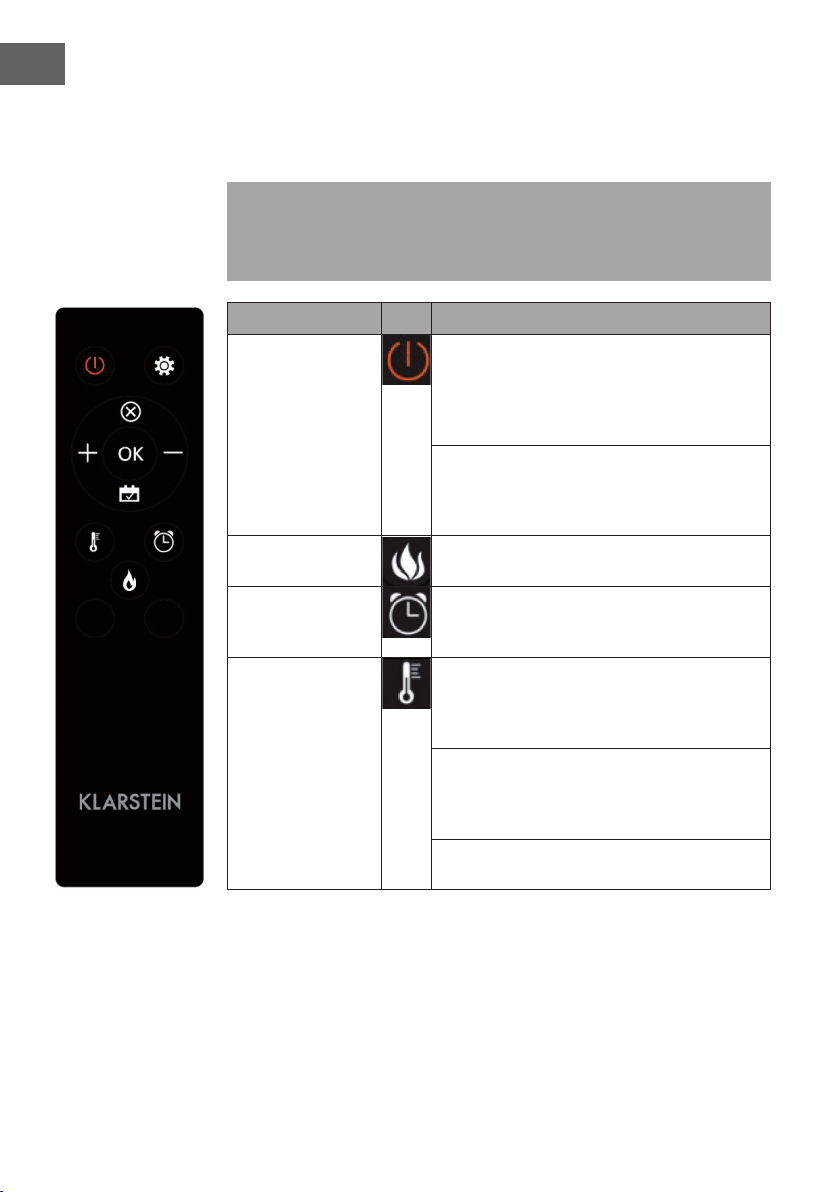
INBETRIEBNAHME UND BEDIENUNG
Manuelle Bedienung
Drücken Sie diese Taste, um das Gerät ein-/ auszuschalten oder halten Sie
diese Taste 10 Sekunden gedrückt, um die Kindersicherung zu aktivieren/
deaktivieren. Sobald die Kindersicherung aktiviert wurde, wird die
Heizfunktion abgeschaltet aber die Flamme bleibt an.
Drücken Sie diese Taste mehrfach, um „L1“, „L2“, „L3“, „L4“ oder „OFF“
(aus) auszuwählen (4 Helligkeitsstufen, die ausgewählt werden können).
Drücken Sie diese Taste mehrfach, um die folgenden Funktionen einzustellen:
Raumtemperatur zwischen 17 °C und 27 °C (62 °F – 82 °F) > Heizung
kontinuierlich AN > Heizung AUS. Nach der Einstellung blinkt die von Ihnen
eingestellte Temperatur 5 Mal auf dem Bildschirm auf und wird anschließend
gespeichert. Halten Sie die Taste 5 Sekunden lang gedrückt, um zwischen
Fahrenheit und Celsius zu wechseln.
Drücken Sie diese Taste mehrfach, um die Betriebszeit des Geräts einzustellen.
Sie können die Betriebszeit auf 1 > 2 > 3 > 4 > 5 > 6 > 7 > 8 > 9 > OFF >1 (…)
festlegen. Es ist nicht möglich den wöchentlichen Timer manuell zu bedienen.
Wenn der wöchentliche Timer aktiviert wurde, ist der normale Timer nicht
verfügbar.
Timer Heizfunktion Flamme Ein/Aus
8
DE
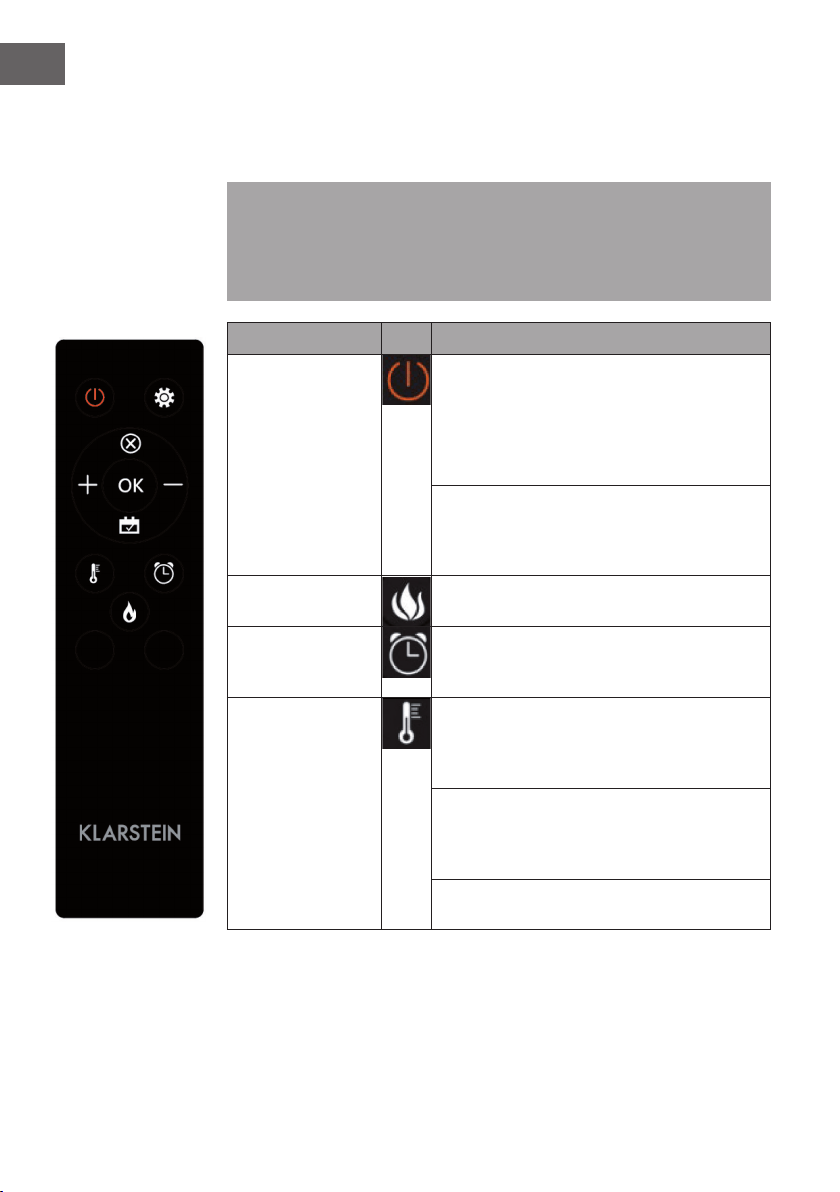
Verwendung der Fernbedienung
Stellen Sie vor der Verwendung der Fernbedienung sicher, dass der Netzstecker des
Geräts eingesteckt ist und dass sich der Netzschalter in der Position „ON“ bendet.
Hinweis: Stellen Sie bei der Verwendung der Fernbedienung sicher, dass Sie die
Fernbedienung auf den Bildschirm des Geräts ausrichten, wenn Sie eine der Tasten
drücken. Ein Piepton ertönt. Bei der Signalübertragung vom Transmitter zum Receiver
kann es eine leichte Verzögerung geben. Drücken Sie die jeweilige Taste während
der Bedienung innerhalb von 2 Sekunden nicht mehr als einmal.
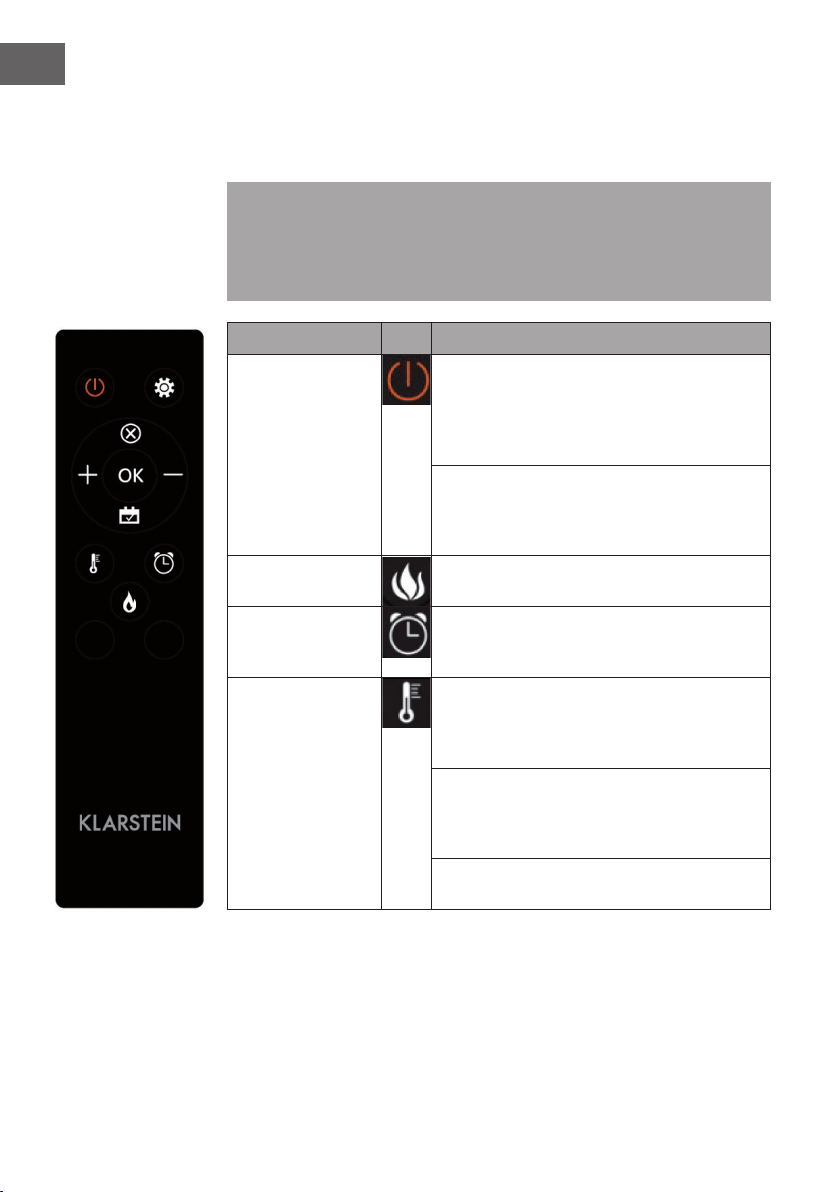
Funktion Beschreibung
Ein-/Ausschalten
Drücken Sie diese Taste, um das Gerät ein-/
auszuschalten. Drücken Sie diese Taste einmal, um
das Gerät und die Flammeneffekte einzuschalten.
Wenn Sie diese Taste erneut drücken, werden das
Gerät und die Flammeneffekte ausgeschaltet und
das Gerät bendet sich im Standbymodus.
Halten Sie die Taste 10 Sekunden lang gedrückt,
um die Kindersicherung zu aktivieren/deaktivieren.
Sobald die Kindersicherung aktiv ist, geht die
Heizung aus aber der Flammeneffekt bleibt an.
Flamme Es können vier Helligkeitsstufen ausgewählt werden
(L1-L4).
Timer
Drücken Sie die Timertaste, um eine der folgenden
Timereinstellungen auszuwählen: 1 > 2 > 3 > 4 > 5
> 6 > 7 > 8 > 9 > OFF > 1
Heizfunktion Drücken Sie diese Taste mehrfach, um die folgenden
Funktionen einzustellen: Raumtemperatur zwischen
17 °C und 27 °C (62 °F – 82 °F) > Heizung
kontinuierlich AN > Heizung AUS.
Halten Sie die Taste 10 Sekunden lang gedrückt,
um die Kindersicherung zu aktivieren/deaktivieren.
Sobald die Kindersicherung aktiv ist, geht die
Heizung aus aber der Flammeneffekt bleibt an.
Halten Sie die Taste 5 Sekunden lang gedrückt, um
zwischen Fahrenheit und Celsius zu wechseln.

9
DE
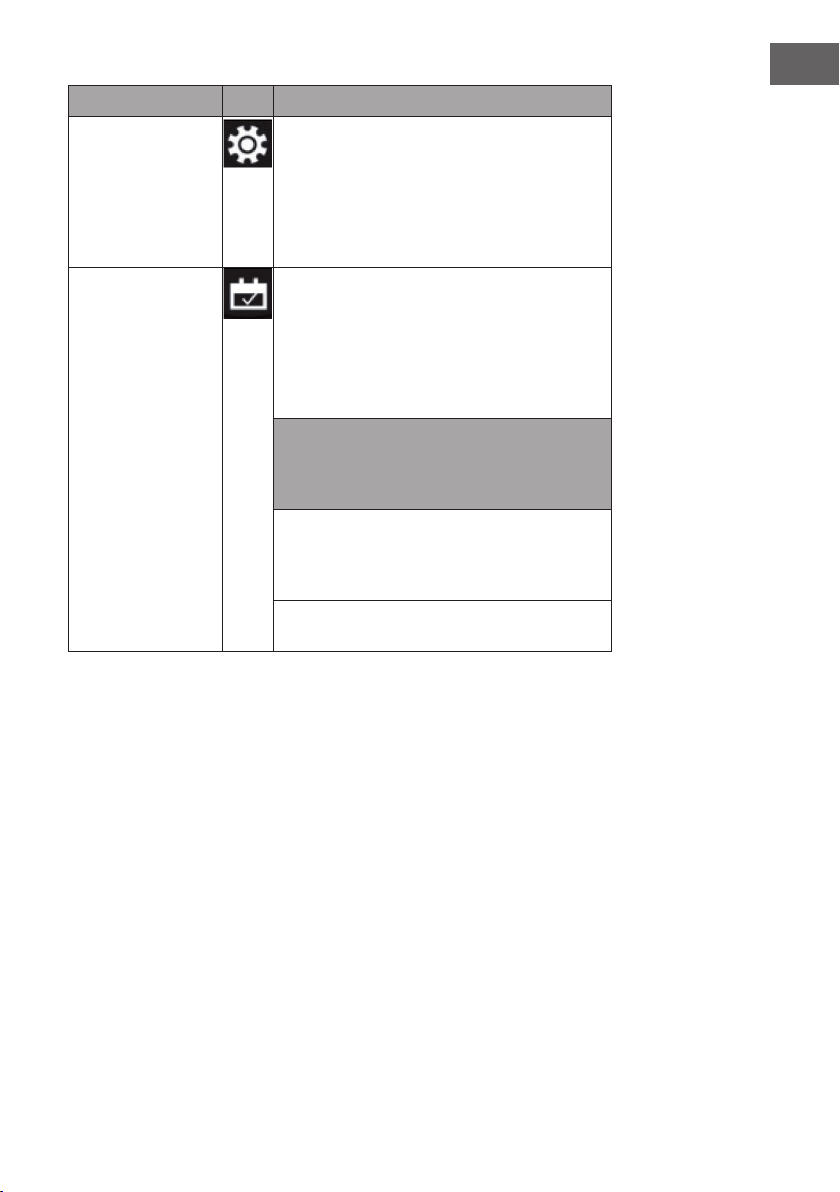
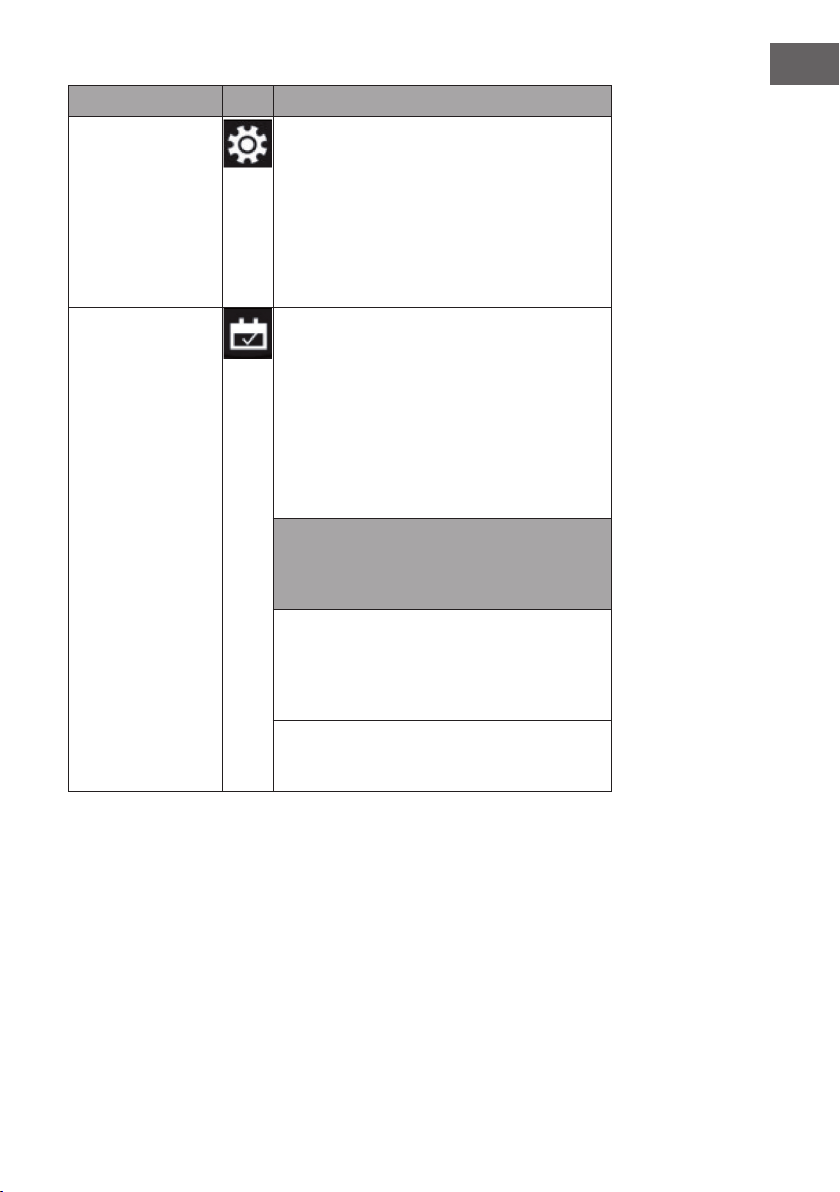
Funktion Beschreibung
Einstellung
Wenn das Gerät eingeschaltet ist oder sich
im Standby-Zustand bendet, halten Sie das
Einstellungssymbol auf der Fernbedienung 3
Sekunden lang gedrückt oder drücken Sie die
Timer-Taste auf dem Bedienfeld im Standby-Zustand
3 Sekunden lang. Die Anzeige [00:00] blinkt.
Stellen Sie zuerst die aktuelle Uhrzeit ein. Drücken
Sie die Taste [+] auf der Fernbedienung, um die
Stunde einzustellen und die Taste [-], um die Minute
einzustellen.
Wöchentlicher Timer Nachdem Sie die aktuelle Uhrzeit eingestellt haben,
drücken Sie erneut das Einstellungssymbol, um den
Wochentimer zu aktivieren, und drücken Sie dann
das Kalendersymbol, um Sonntag bis Samstag
auszuwählen. Das gewählte Datum leuchtet auf.
Drücken Sie dann das Einstellungssymbol, um
nacheinander die Ausschalt- und Einschaltzeit
einzustellen, und drücken Sie dann direkt die
OK-Taste, um die Einstellungen des Wochentimers
abzuschließen.
Hinweis: Die aktuelle Uhrzeit muss nach dem
ersten Ein- oder Ausschalten eingestellt werden,
sonst bleibt die Uhr im Zustand „00:00“ und die
Timerfunktion kann nicht verwendet werden.
Die Uhr leuchtet automatisch auf, wenn die
Stromversorgung eingeschaltet wird. Die Uhr
schaltet das Display im Standby-Zustand nach
60 Sekunden automatisch aus. Drücken Sie eine
beliebige Funktionstaste, um die Uhr dann wieder
anzuzeigen.
Wenn Sie sich nicht in den Einstellungen benden,
drücken Sie direkt auf das Kalendersymbol, um die
Einstellung des Wöchentlichen Timers auszuwählen.

10
DE
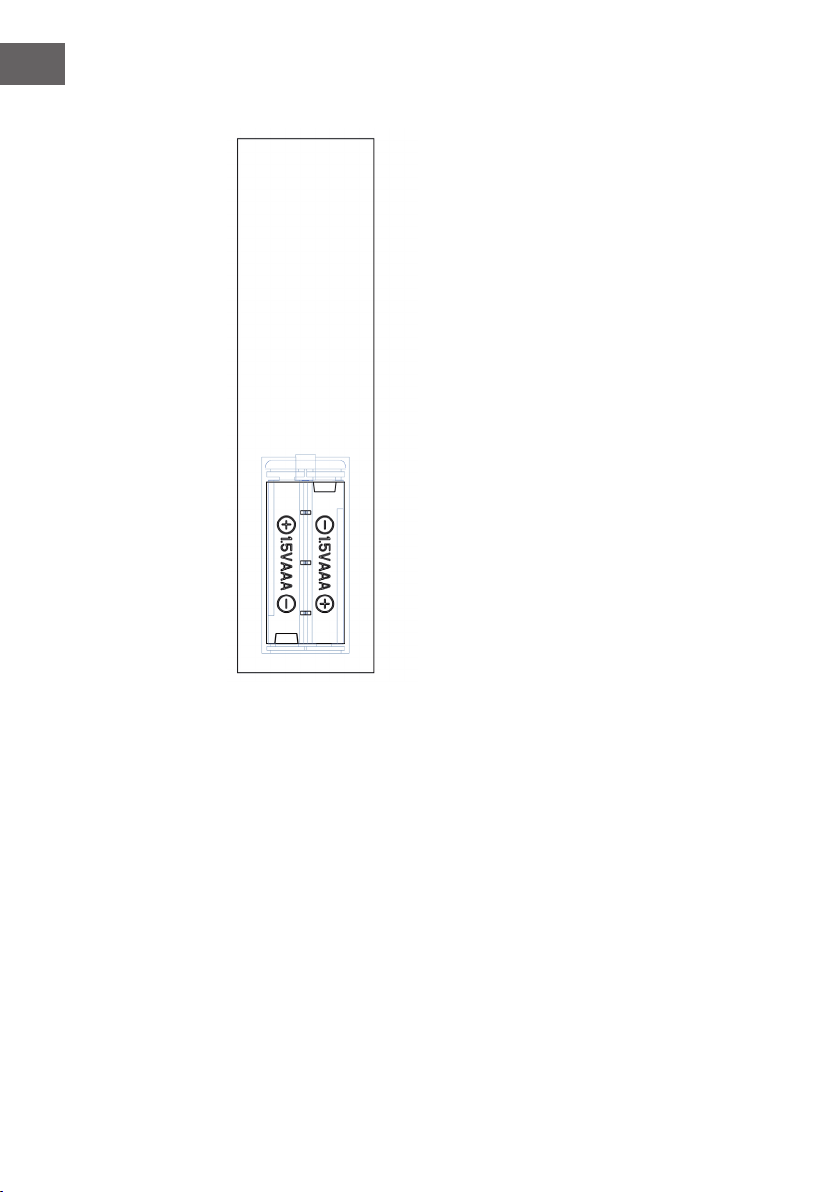
Wichtige Hinweise zum Batteriewechsel
• Alte und neue Batterien dürfen nicht gemischt
werden.
• Verwenden Sie nur Standard AAA-Batterien.
Achten Sie darauf, dass Kinder die Batterien nicht
verschlucken.
• Nicht-auadbare Batterien dürfen nicht wieder
aufgeladen werden.
• Setzen Sie die Batterien mit korrekter Polarität ein
(siehe Abbildung).
• Entfernen Sie leere Batterien umgehend aus der
Fernbedienung.
• Kaufen Sie immer die richtige Größe und
Sorte von Batterien, die für den beabsichtigten
Gebrauch am besten geeignet sind.
• Ersetzen Sie alle Batterien eines Satzes
gleichzeitig.
• Reinigen Sie die Batteriekontakte und auch die
des Gerätes vor dem Einsetzen der Batterie.
• Entsorgen Sie verbrauchte Batterien umgehend,
wie im Kapitel „Entsorgung“ angegeben.
11
DE
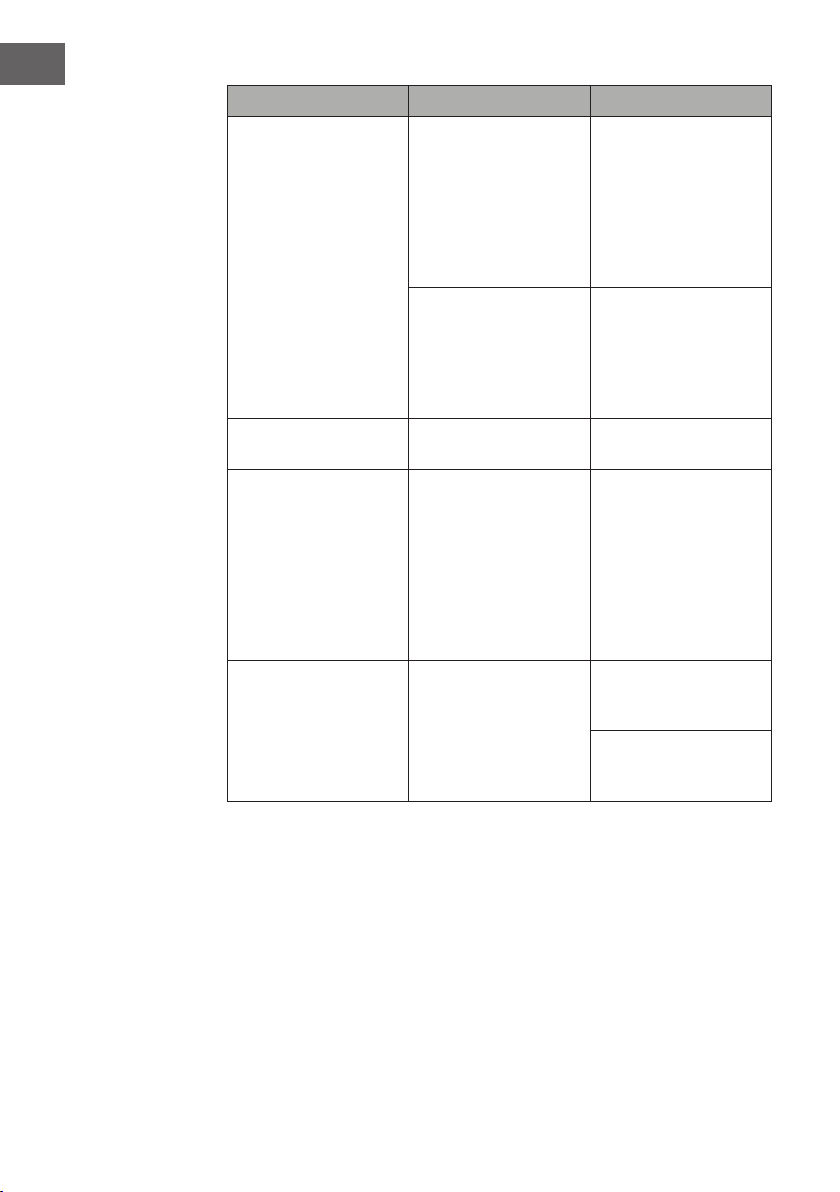
FEHLERBEHEBUNG
Problem Mögliche Ursache Lösungsansatz
Auf dem Bildschirm wird
„EE“ angezeigt.
Kurzschluss. Kontaktieren Sie den
Kundendienst, damit
der Thermostatsensor
ausgetauscht wird
Auf dem Bildschirm wird
„88“ angezeigt.
Es wird keine warme Luft
ausgeblasen und der
Ventilator funktioniert
nicht.
Bringen Sie den
Netzschalter in die
Position „off“ und warten
Sie mindestens 10
Minuten. Bringen Sie den
Netzschalter anschließend
wieder in die Position
„on“.
Der Bildschirm zeigt „OP“
an.
Die offene
Fensterwarnung (wenn die
Umgebungs-temperatur
innerhalb von 10 Minuten
um 4 °C/ 8°F oder mehr
fällt und die Temperatur
innerhalb von 42 Minuten
nicht steigt) wird aktiviert
und das Gerät schaltet
sich automatisch aus.
Untersuchen Sie das Gerät
und stellen Sie sicher, dass
die Luftein- und –auslässe
nicht blockiert sind, da
dies zu einem Überhitzen
des Geräts führen könnte.
Ziehen Sie für 30 Minuten
den Netzstecker aus
der Steckdose, damit
das Gerät abkühlen
kann. Stecken Sie den
Netzstecker anschließend
wieder in die Steckdose
und schalten Sie das
Gerät ein. Sollte das
Problem weiterhin
bestehen, wenden Sie sich
an den Kundendienst.
Kein Strom, die
Holzscheite glühen nicht.
Der Netzstecker ist nicht
eingesteckt.
Stellen Sie sicher, dass
der Netzstecker des
Geräts in eine 220 – 240
V Steckdose eingesteckt
wurde. Drücken Sie
mehrfach die Ein-/
Ausschalttaste und stellen
Sie sicher, dass sich
der Netzschalter in der
Position „on“ bendet.

12
DE
Problem Mögliche Ursache Lösungsansatz
Es wird keine warme Luft
ausgeblasen.
Abkühlzyklus Der normale Betrieb wird
vor dem Ausschalten für
einige Minuten fortgesetzt.
Die Zeit hängt von der
aktuellen Temperatur ab.
Während dieser Zeit wird
kalte Luft ausgeblasen.
Die Thermostateinstellung
verhindert, dass die
Heizfunktion aktiviert
werden kann.
Passen Sie die
Temperatureinstellung so
an, dass das Thermostat
höher eingestellt ist als die
aktuelle Raumtemperatur.
Die Holzscheite glühen
aber es gibt keinen
Flammeneffekt.
Der Flammeneffekt ist
deaktiviert.
Drücken Sie mehrfach die
Flammentaste.
Der Flammemeffekt
funktioniert aber die
Heizfunktion funktioniert
nicht, das Glutbett leuchtet
auf, wenn die Heiztaste
gedrückt wird.
Die Heizfunktion ist
deaktiviert
Halten Sie, wenn das
Gerät eingeschaltet ist,
die Taste Ein/Aus 10
Sekunden lang gedrückt.
Sobald die Heizfunktion
wieder aktiviert wurde
leuchtet das Glutbett
mehrfach auf.
Die Heizfunktion
funktioniert nicht.
Der Sicherheitsschalter
wurde aktiviert.
Schalten Sie den
Netzschalter aus, warten
Sie 15 Minuten und
schalten Sie diesen wieder
ein.
Überprüfen Sie die
Sicherung. Falls diese
kaputt ist, muss die
Sicherung ersetzt werden.
13
DE
Problem Mögliche Ursache Lösungsansatz
Die Fernbedienung
funktioniert nicht, wenn
Tasten gedrückt werden.
Keine Batterien. Ersetzen Sie die Batterien
Schlechte
Signalübertragung.
Achten Sie darauf, dass
die Entfernung zwischen
Transmitter und Receiver
nicht zu groß ist.
Drücken Sie die Tasten der
Fernbedienung mit einer
gleichmäßigen Bewegung
und sanftem Druck.
Wiederholtes Drücken der
Tasten in schneller Folge
kann zu Fehlfunktionen
des Senders führen.
Entfernung zu groß. Bedienen Sie die
Fernbedienung in
einem Abstand von
weniger als 20 Fuß von
der Vorderseite des
Geräts; richten Sie die
Fernbedienung auf das
Bedienfeld.

14
DE
HINWEISE ZUR ENTSORGUNG
Wenn es in Ihrem Land eine gesetzliche Regelung zur
Entsorgung von elektrischen und elektronischen Geräten
gibt, weist dieses Symbol auf dem Produkt oder auf der
Verpackung darauf hin, dass dieses Produkt nicht im
Hausmüll entsorgt werden darf. Stattdessen muss es zu
einer Sammelstelle für das Recycling von elektrischen
und elektronischen Geräten gebracht werden. Durch
regelkonforme Entsorgung schützen Sie die Umwelt und die
Gesundheit Ihrer Mitmenschen vor negativen Konsequenzen.
Informationen zum Recycling und zur Entsorgung dieses
Produkts, erhalten Sie von Ihrer örtlichen Verwaltung oder
Ihrem Hausmüllentsorgungsdienst.
Dieses Produkt enthält Batterien. Wenn es in Ihrem Land
eine gesetzliche Regelung zur Entsorgung von Batterien
gibt, dürfen die Batterien nicht im Hausmüll entsorgt werden.
Informieren Sie sich über die örtlichen Bestimmungen zur
Entsorgung von Batterien. Durch regelkonforme Entsorgung
schützen Sie die Umwelt und die Gesundheit Ihrer
Mitmenschen vor negativen Konsequenzen.
HERSTELLER & IMPORTEUR (UK)
Hersteller:
Chal-Tec GmbH, Wallstraße 16, 10179 Berlin, Deutschland.
Importeur für Großbritannien:
Chal-Tec UK limited
Unit 6 Riverside Business Centre
Brighton Road
Shoreham-by-Sea
BN43 6RE
United Kingdom

15
DE
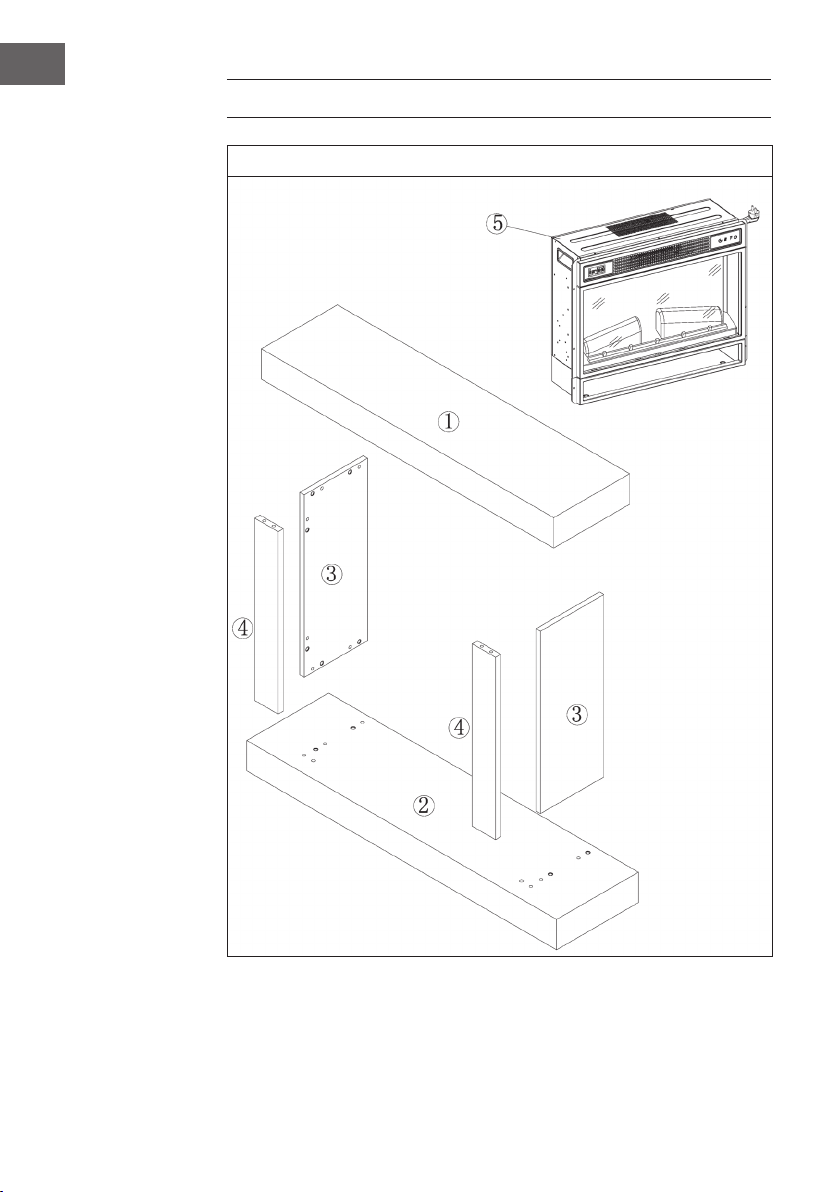
INSTALLATION VULSINI DAWN
Übersicht
16
DE
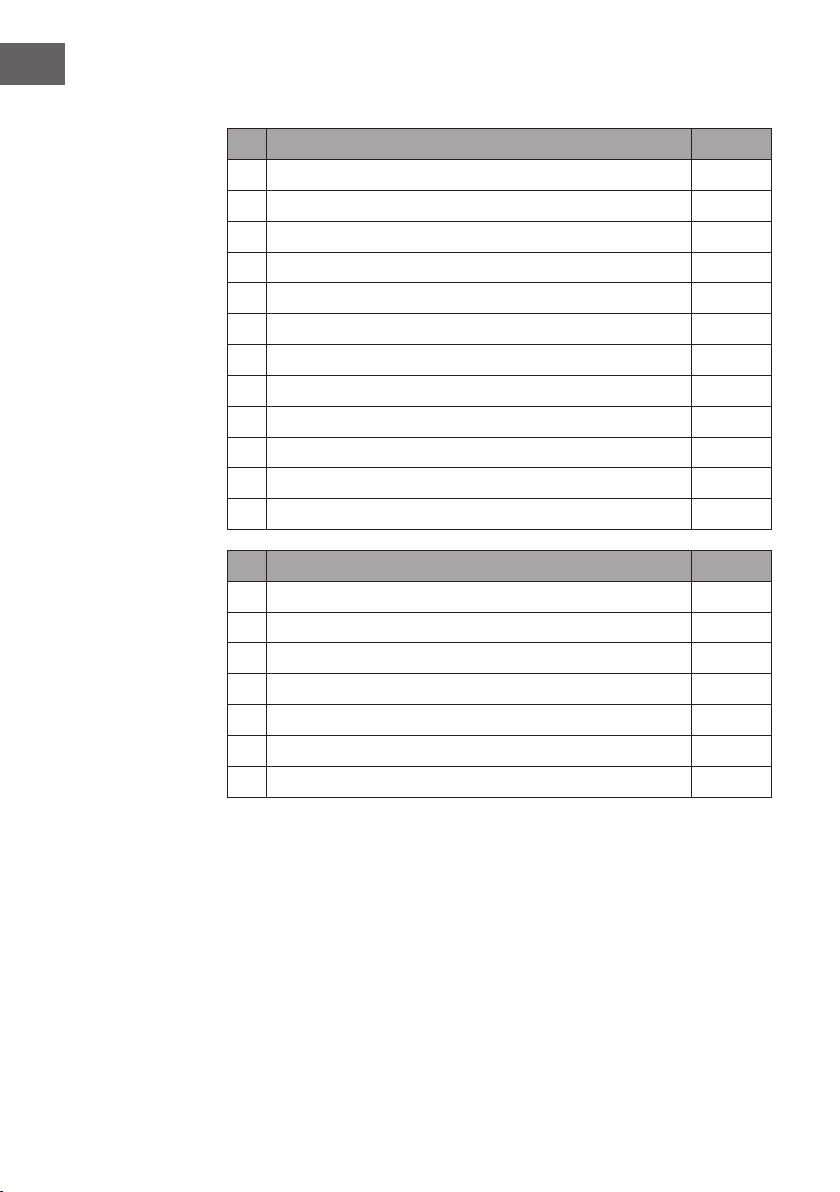
Teileliste
Nr. Beschreibung Stk.
1 Obere Platte 1
2 Untere Platte 1
3 Linke Seitenplatte 1
4 Rechte Seitenplatte 1
5 Oberes kleines Brett 1
6 Linke Frontplatte 1
7 Rechte Frontplatte 1
8 Linker Fuß 1
9 Rechter Fuß 1
10 Linkes kleines Brett 1
11 Rechtes kleines Brett 4
12 Elektrischer Kamin 1
Nr. Beschreibung Stk.
A Kreuzschlitzschraube 38 + 1
B Metallklemme 19
C Dübel 16
D Schraube 10
E Platte mit 2 Schrauben 4
F M4*12 Gewindeschneidschraube 8
G Antikippvorrichtung 1
17
DE
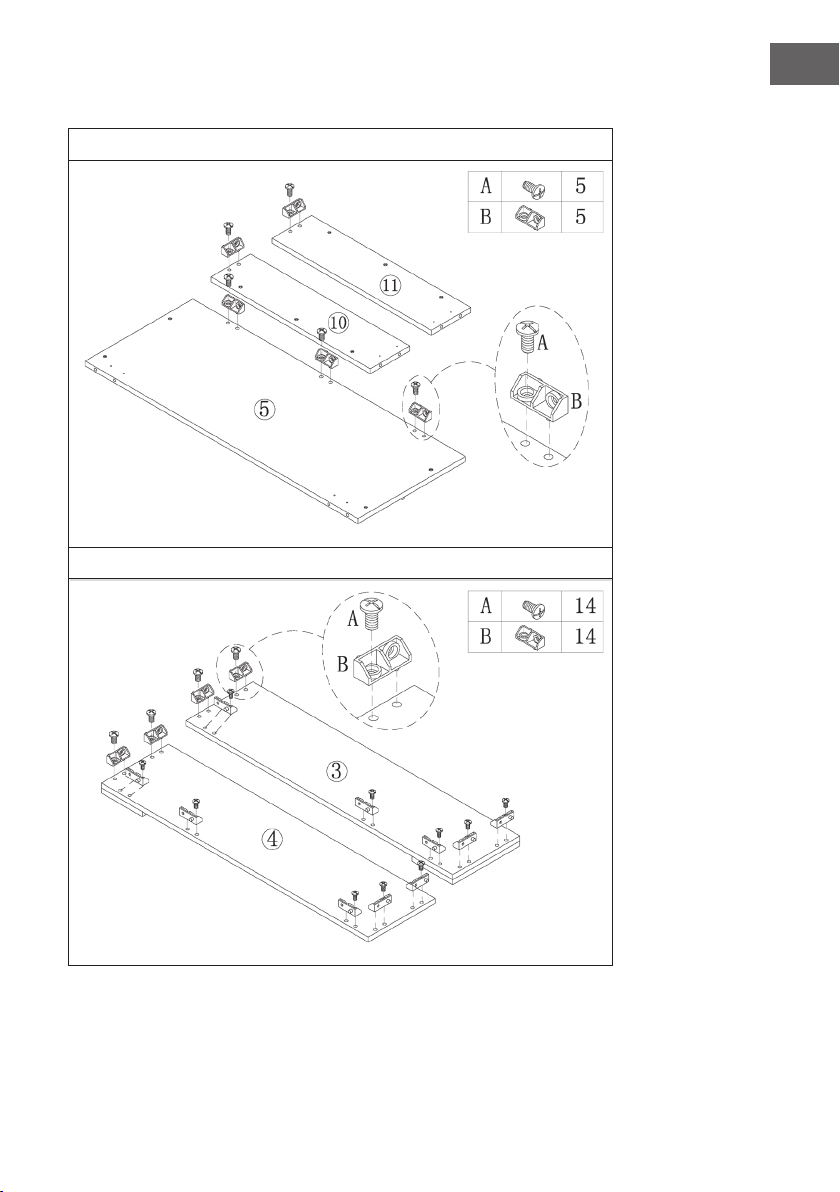
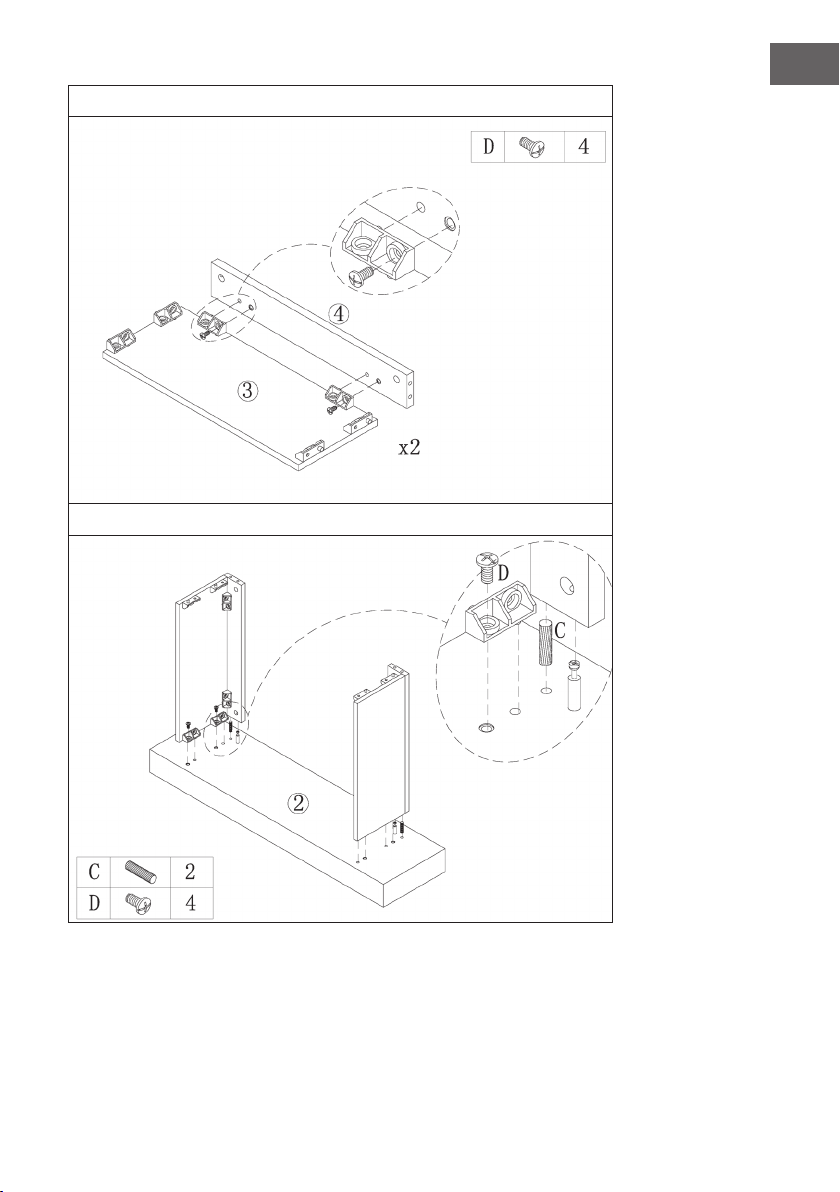
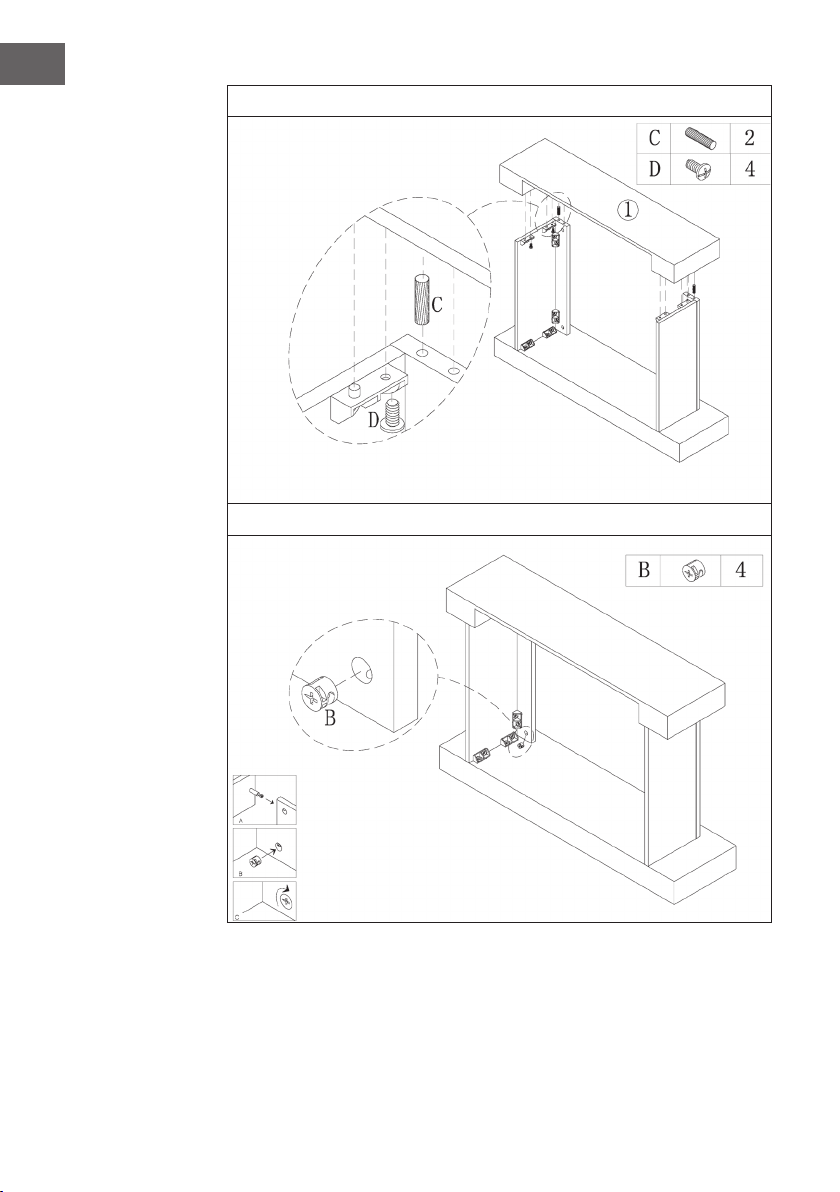
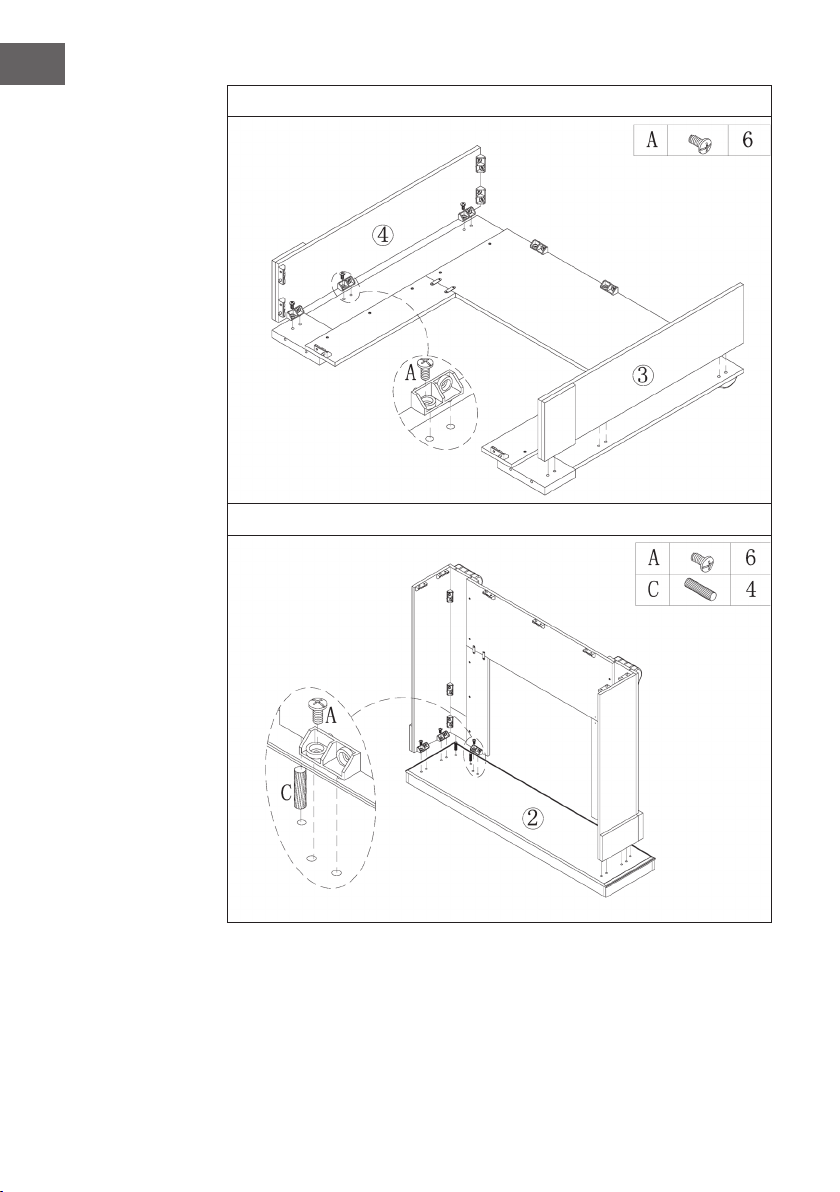
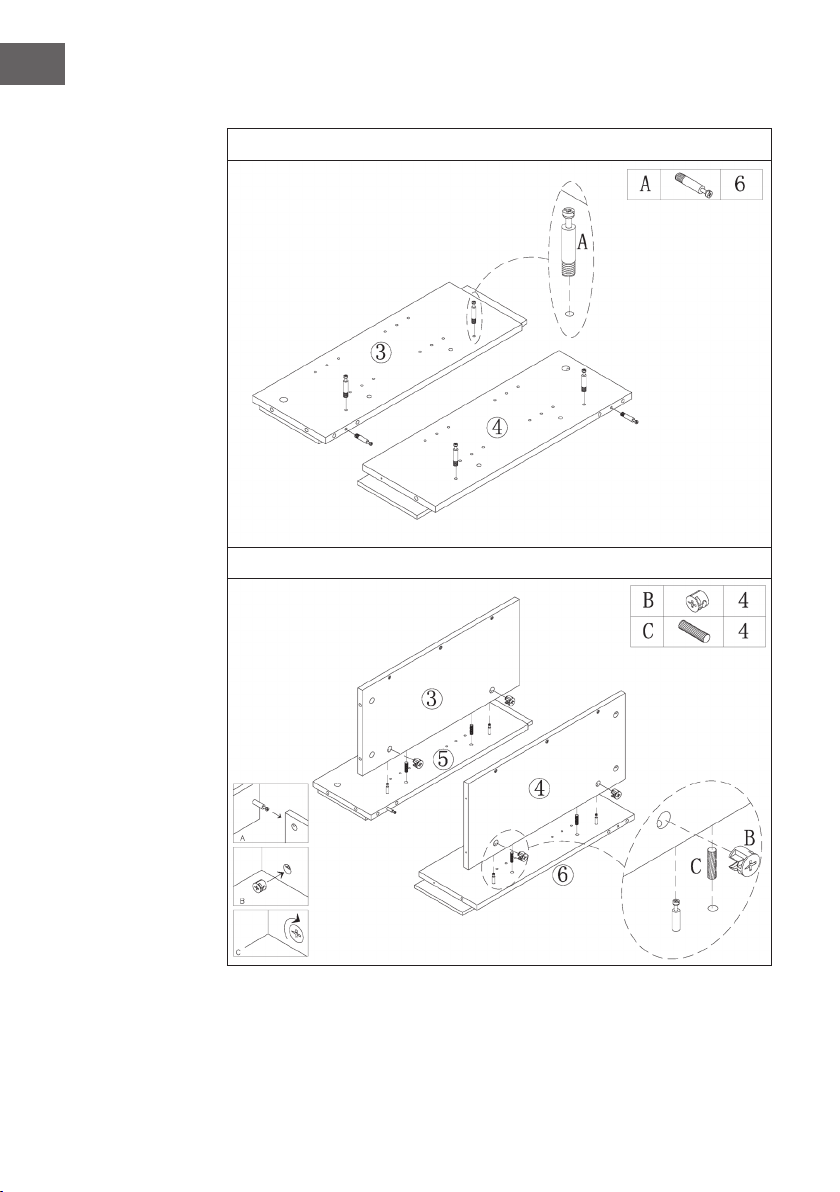
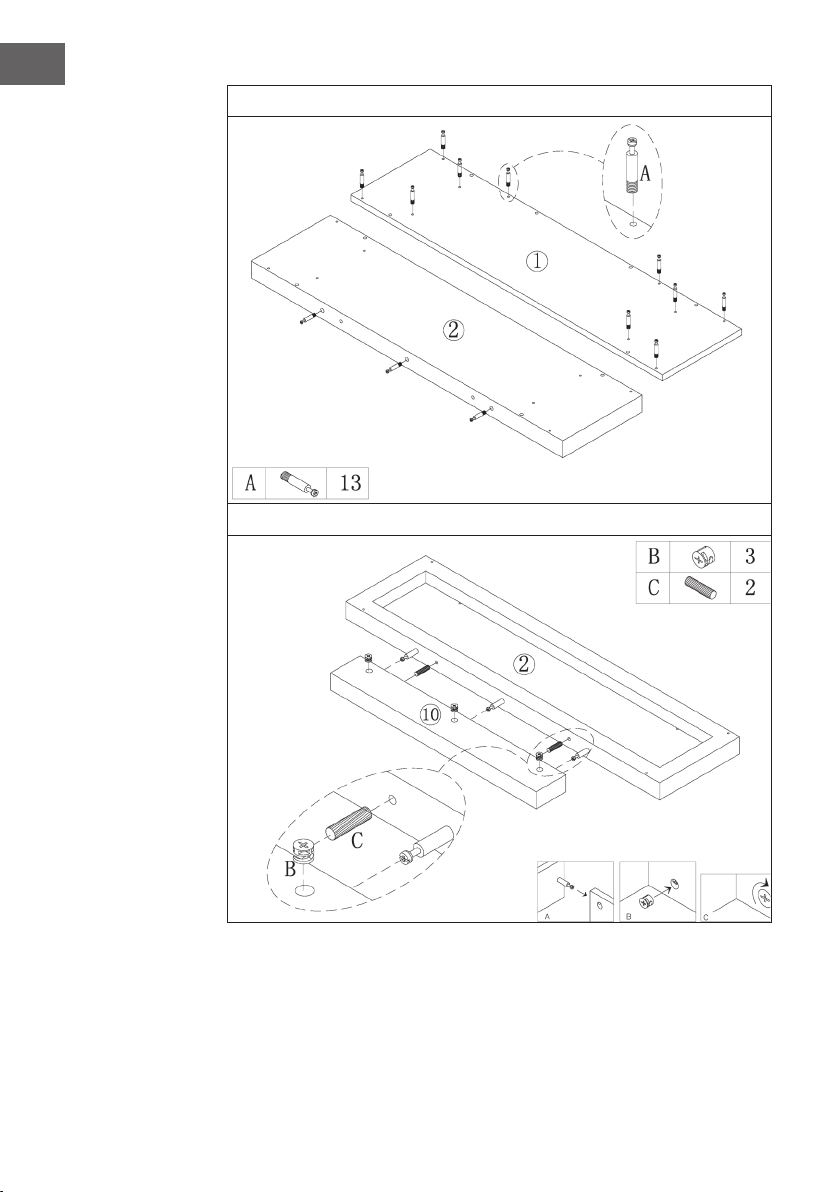
Zusammenbau
1
2

18
DE
3
4
19
DE
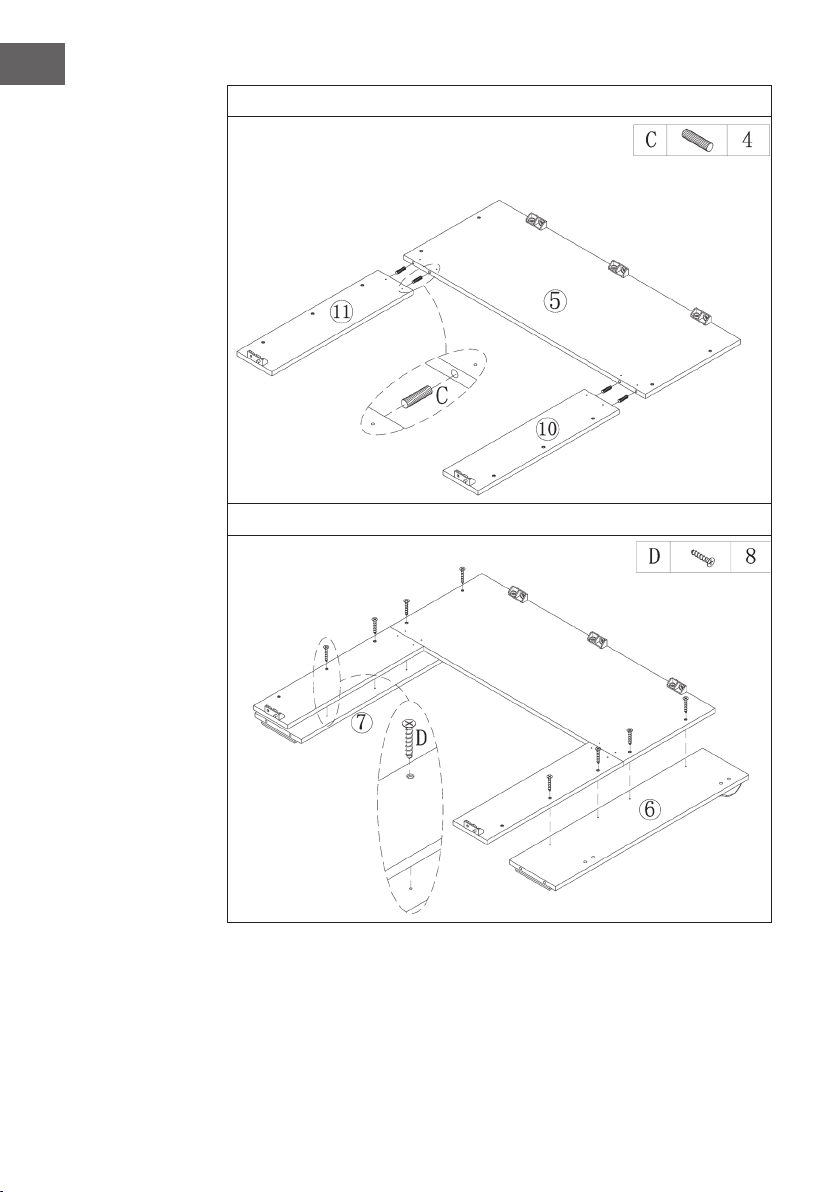
5
6

20
DE
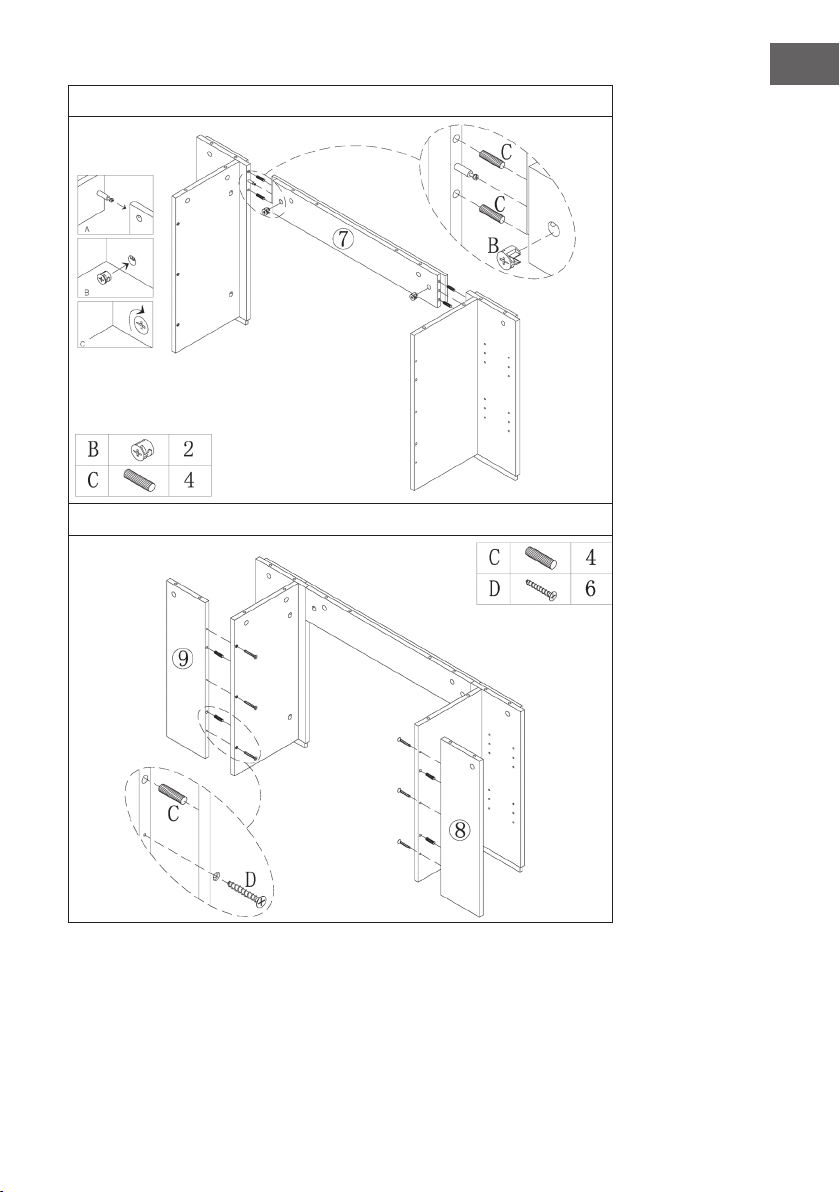
7
8

21
DE
9

22
DE
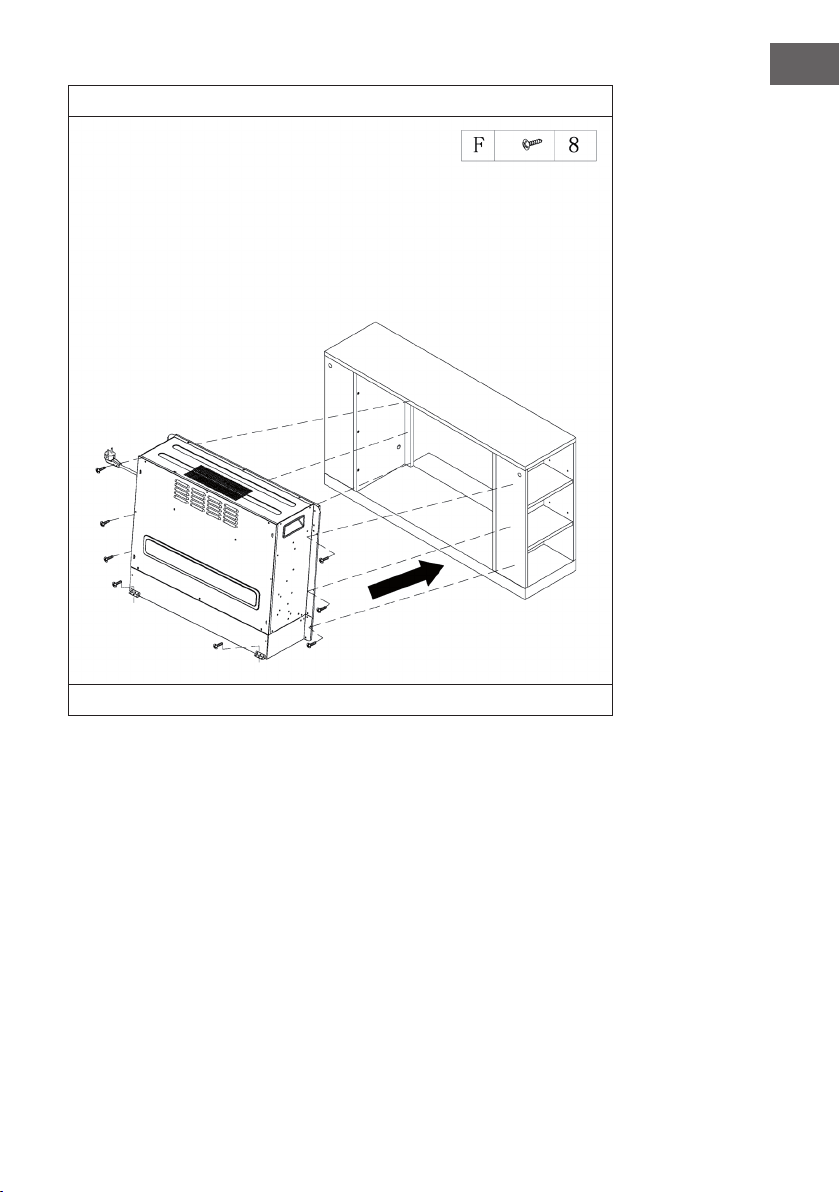
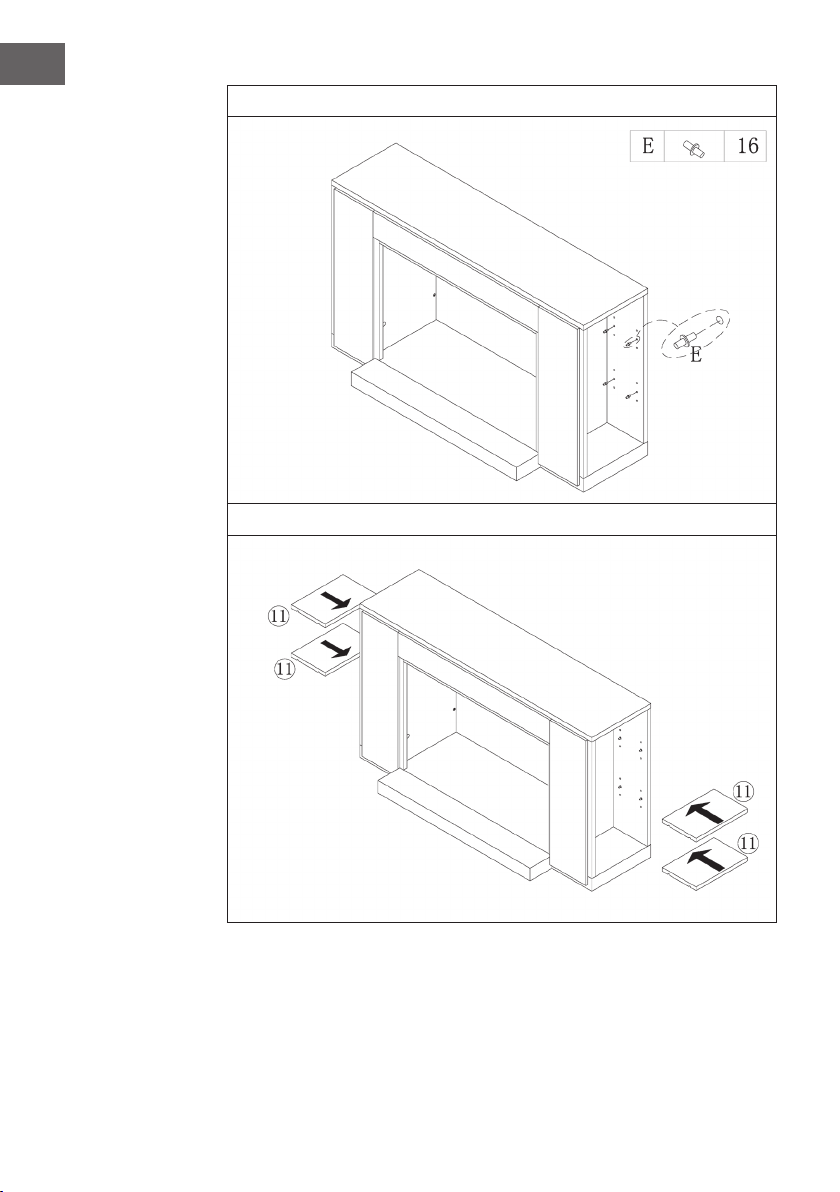
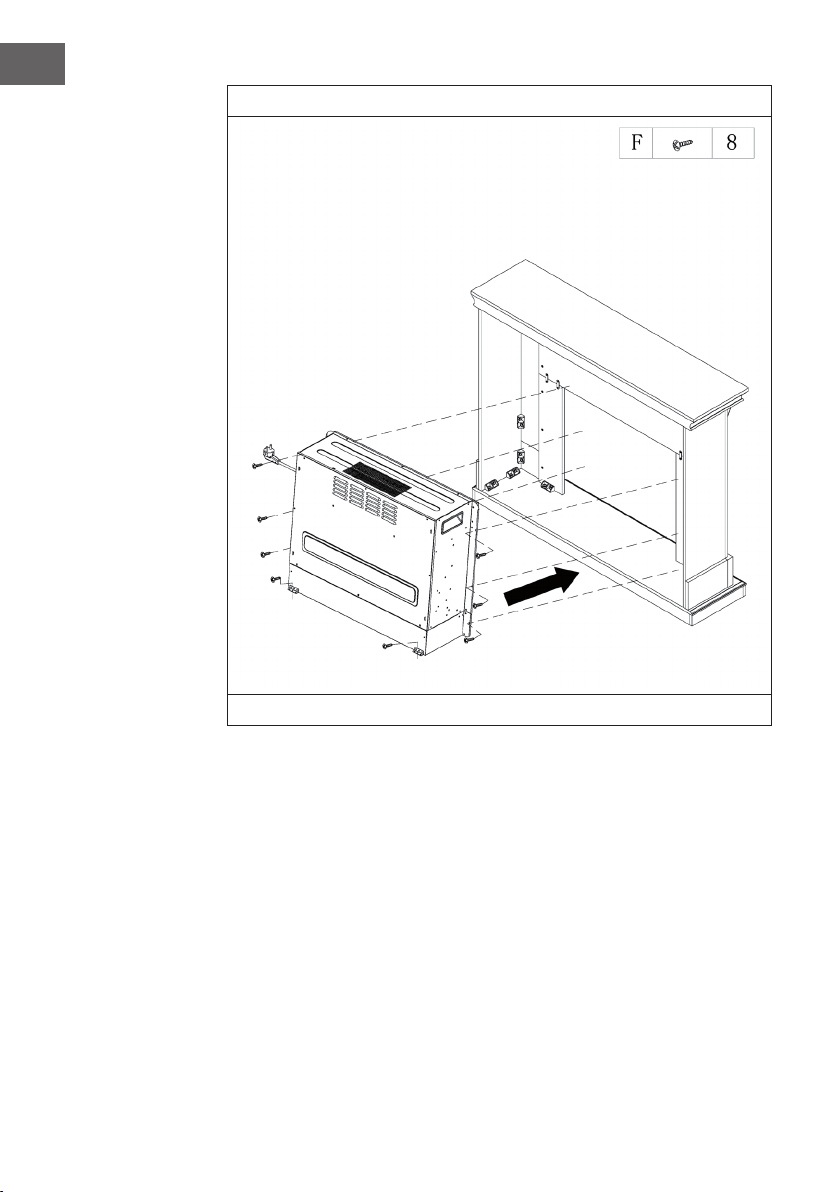
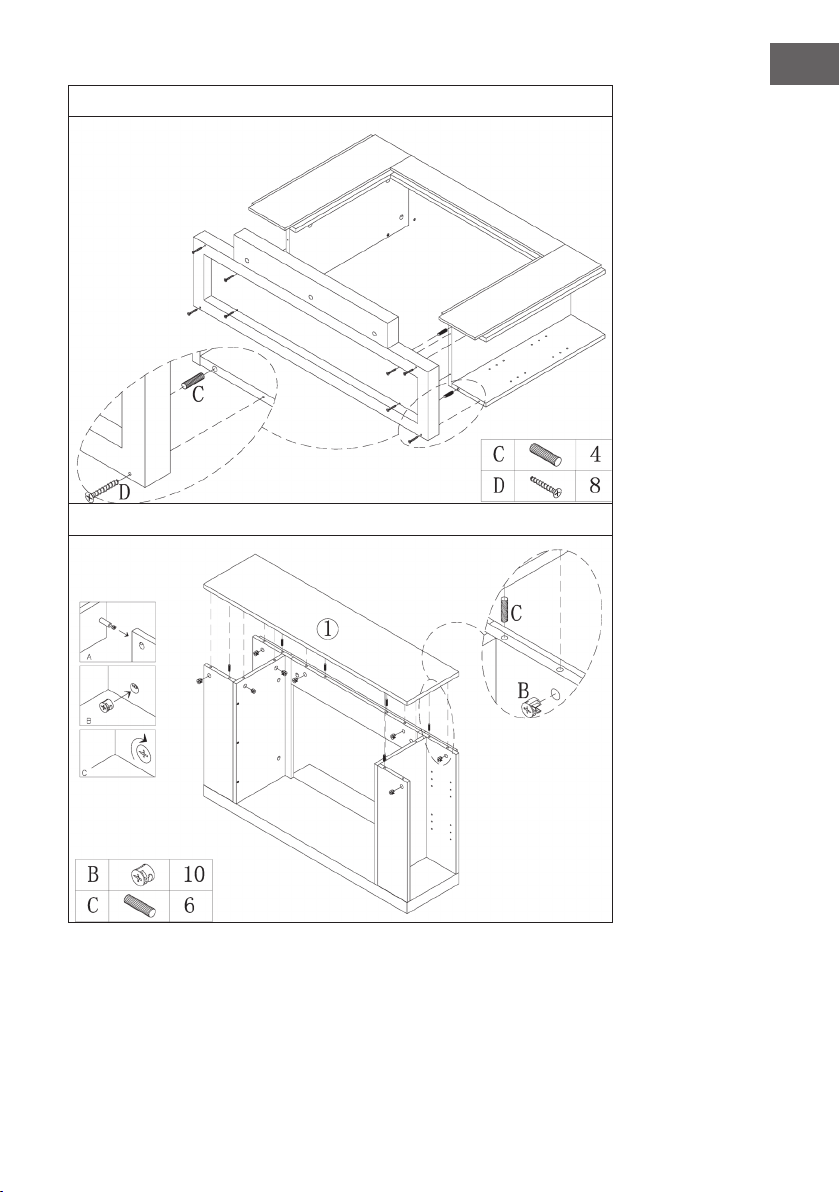
10
Schieben Sie den Elektrischen Kamin in das Gehäuse und befestigen Sie ihn mit den
M4*12 Schrauben.

23
DE
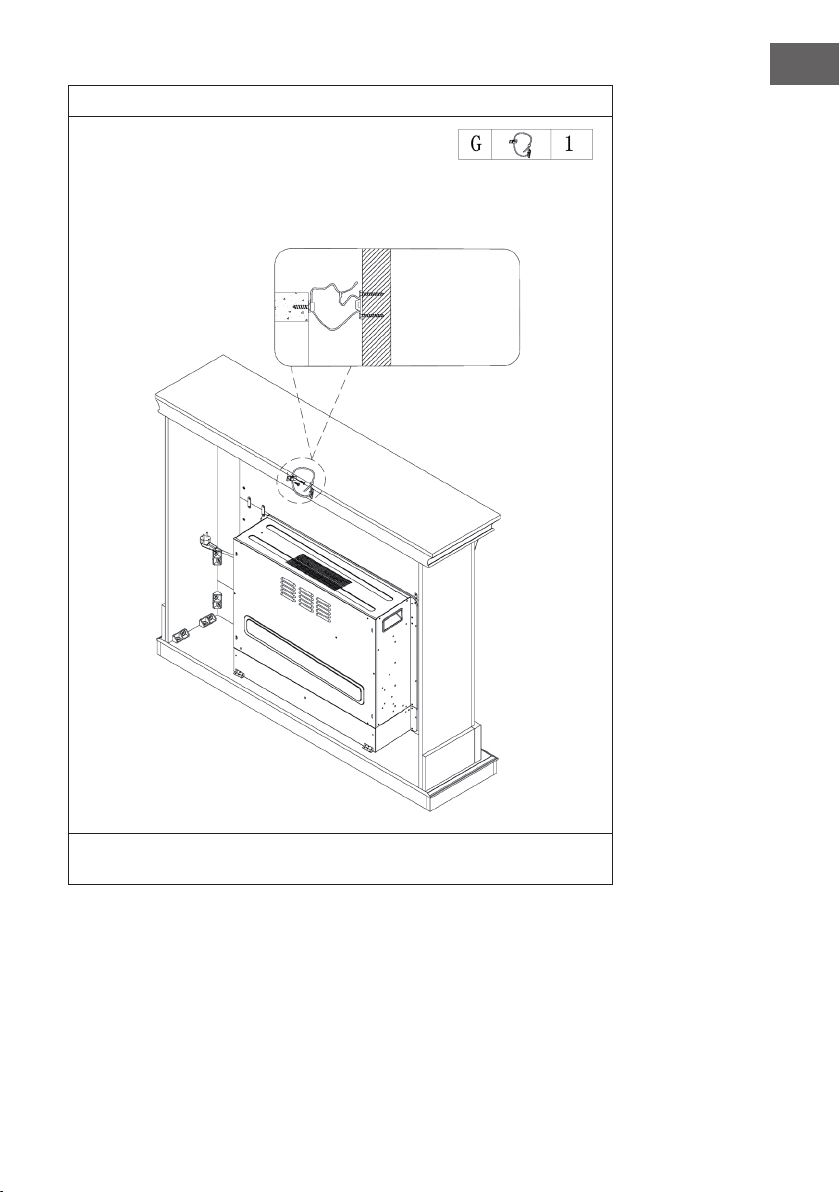
11
Eine Seite des Seils wird mit einer Schraube an der Wand befestigt, die andere Seite
des Seils wird auf dem Kaminsims befestigt und dann das Seil enger gezogen.
Mauer
24
DE
INSTALLATION VULSINI NIGHTFALL
Übersicht
25
DE
Teileliste
Nr. Beschreibung Stk.
1 Obere Platte 1
2 Untere Platte 1
3 Linke Seitenplatte 1
4 Rechte Seitenplatte 1
5 Linke Frontplatte 1
6 Rechte Frontplatte 1
7 Obere Frontplatte 1
8 Linke Rückplatte 1
9 Rechte Rückplatte 1
10 Fußleiste 1
11 Einstebbares Regal 4
12 Elektrischer Kamin 1
Nr. Beschreibung Stk.
A Metallbolzen 19 + 1
B Metallnocke 19 + 1
C Dübel 24 + 1
D Schraube 14
E Regalstift 16 + 1
F M4*12 Gewindeschneidschraube

26
DE
Zusammenbau
1
2
27
DE
3
4

28
DE
5
6

29
DE
7
8

30
DE
9
10

31
DE
11
Schieben Sie den Elektrischen Kamin in das Gehäuse und befestigen Sie ihn mit den
M4*12 Schrauben.

32
DE
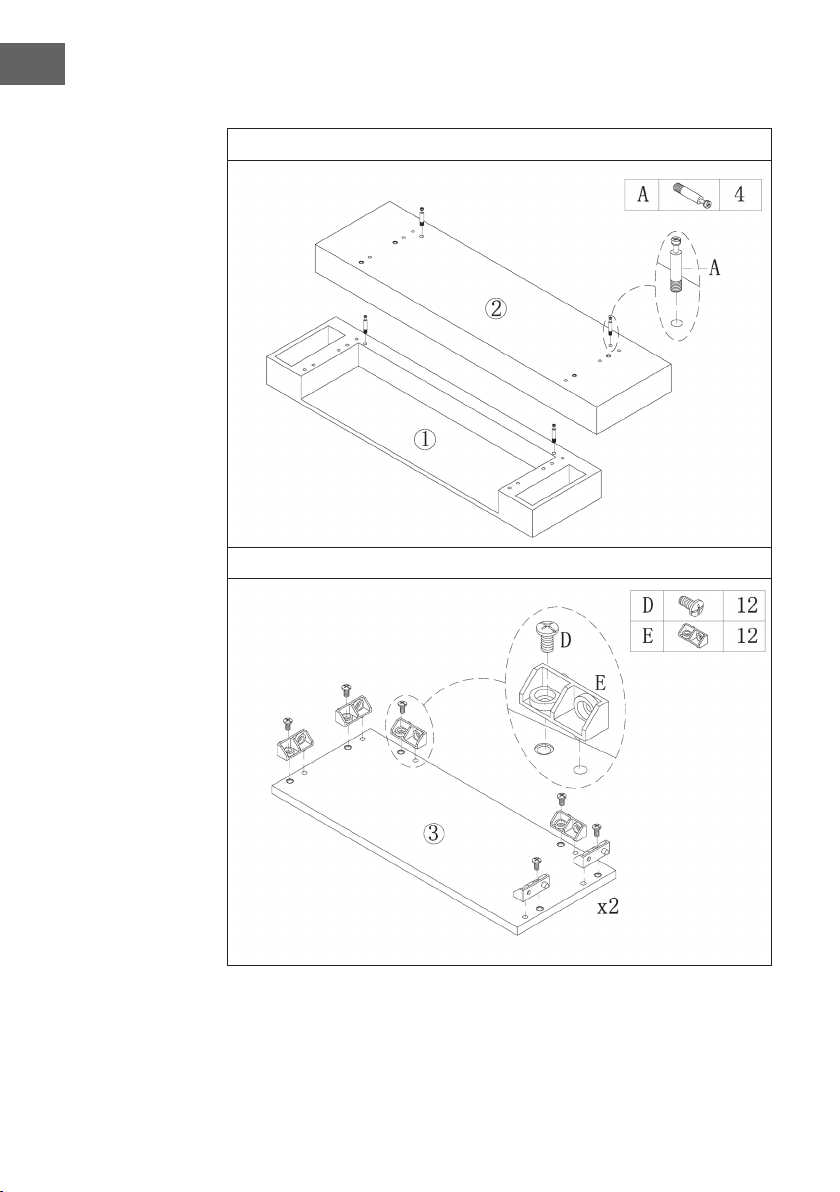
INSTALLATION VULSINI HIDEAWAY
Übersicht

33
DE
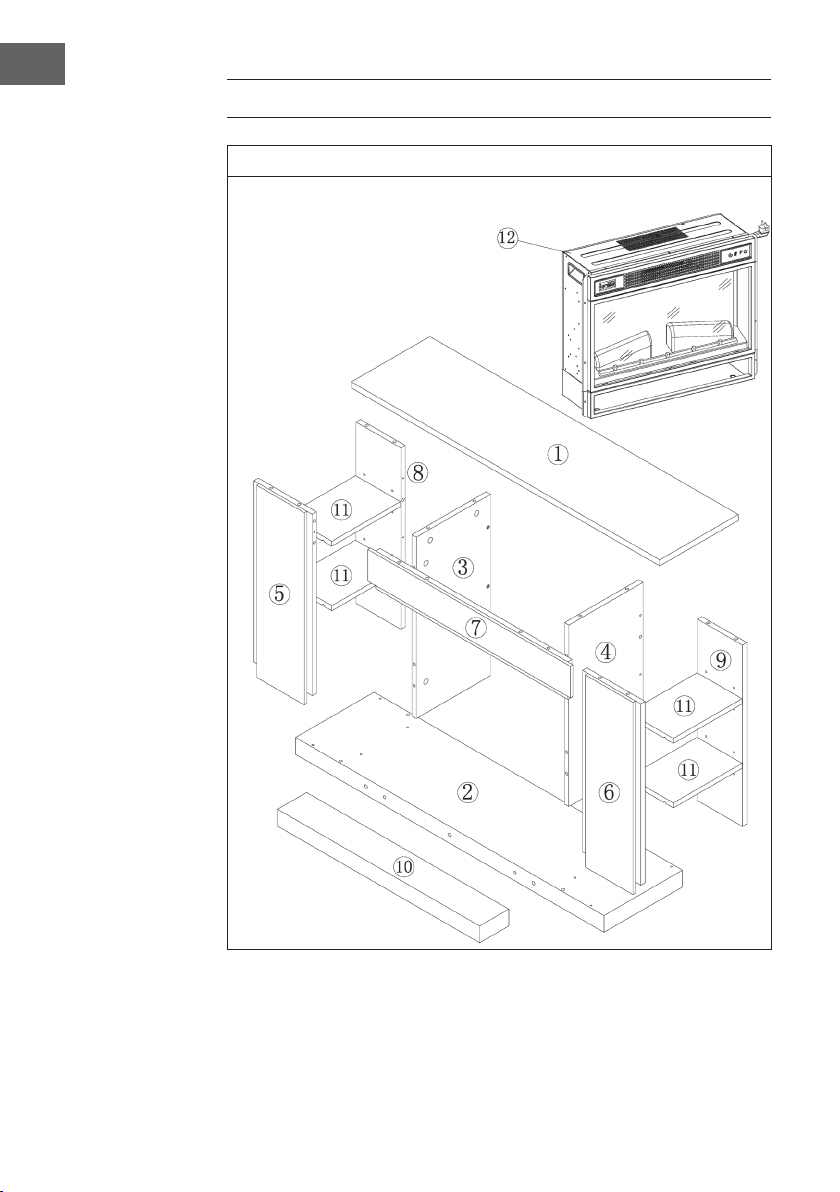
Teileliste
Nr. Beschreibung Stk.
1 Obere Platte 1
2 Untere Platte 1
3 Seitenplatte 2
4 Frontplatte 2
5 Elektrischer Kamin 1
Nr. Beschreibung Stk.
A Metallbolzen 4
B Metallklemme 4
C Dübel 4
D Schraube 24
E Verbindungsstück 12
F M4*12 Gewindeschneidschraube 8

34
DE
Zusammenbau
1
2
35
DE
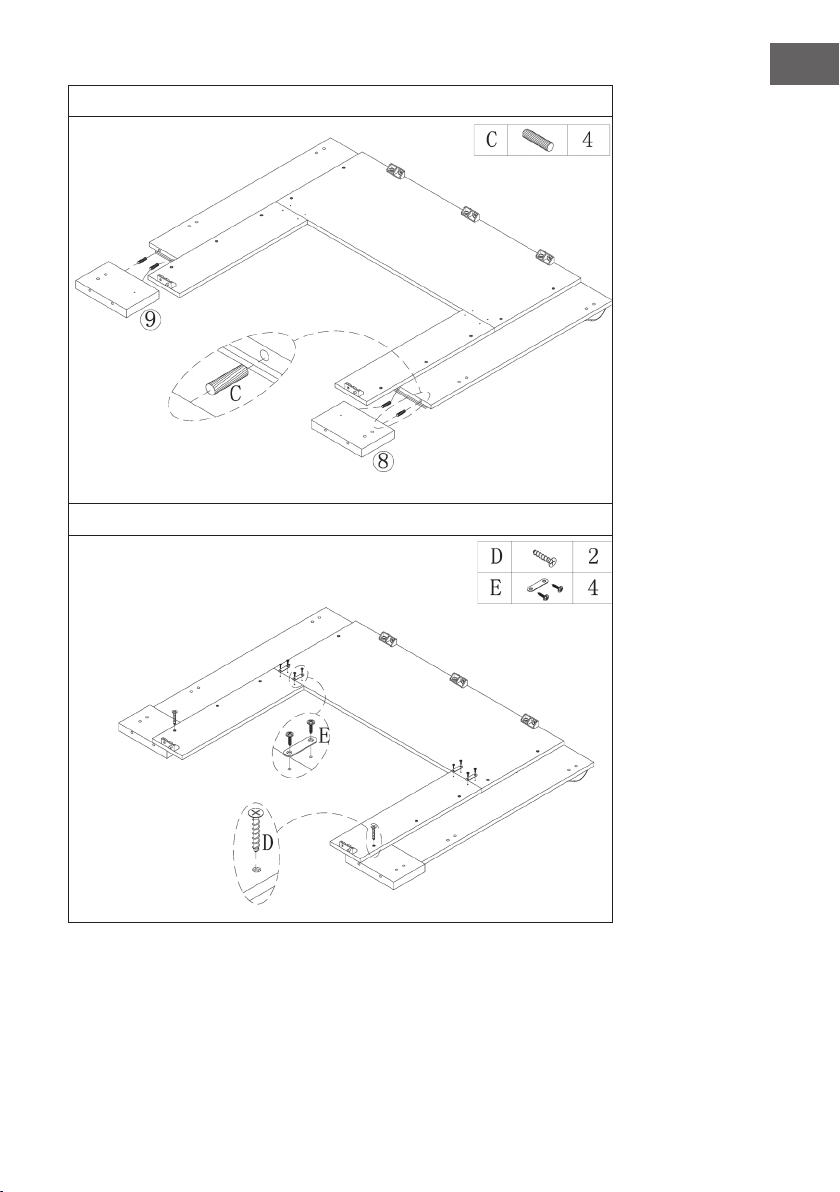
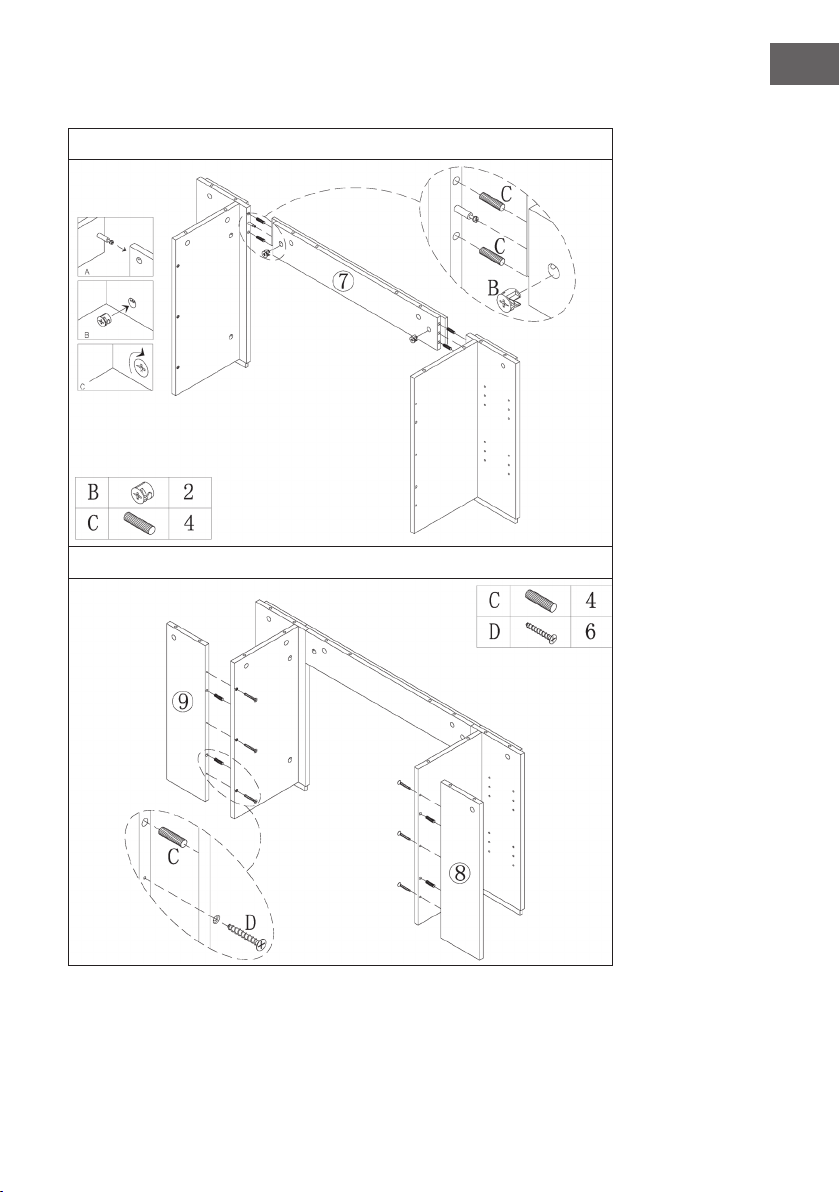
3
4
36
DE
5
6

37
DE
7
Schieben Sie den Elektrischen Kamin in das Gehäuse und befestigen Sie ihn mit den
M4*12 Schrauben.

39
EN
Dear Customer,
Congratulations on purchasing this device. Please read the
following instructions carefully and follow them to prevent
possible damages. We assume no liability for damage caused
by disregard of the instructions and improper use. Scan the QR
code to get access to the latest user manual and more product
information.
CONTENT
Safety Instructions40
Device Overview41
Display Indicators42
Start-up and Operation43
Troubleshooting47
Hints on Disposal50
Producer50
Installation Vulsini Dawn51
Installation Vulsini Nightfall60
Installation Vulsini Hideaway68
TECHNICAL DATA
Item number 10035037 10035038
Item name Vulsini Vulsini Dawn
Power supply 220-240 V ~ 50 Hz
Power 1700-1900 W
Item number 10035039 10035040
Item name Vulsini Nightfall Vulsini Hideawy
Power supply 220-240 V ~ 50 Hz
Power 1700-1900 W

40
EN
SAFETY INSTRUCTIONS
• Check that the voltage indicates on the data plate corresponds with that of the local
network before connecting the appliance to the mains power supply.
• If the supply cord is damaged, it must be replaced by a quali ed engineer in order
to avoid a hazard.
• The replace heater must not be positioned directly under the power socket.
• Keep furniture, curtains and other ammable material at least 1 meter away from
the appliance.
• Keep out of reach of children and do not allow them to operate this appliance.
• This appliance is intended for household use only and should not be used for
industrial purposes.
• Do not operate this appliance after a malfunction or after being damaged in any way.
• Repairs to electrical appliances should only be performed by a quali ed electrician.
• Improper repairs may place user at serious risk.
• Do not run the mains cable under carpets, rugs, etc.
• Do not allow the mains cable to hang over sharp edges or come in contact with hot surfaces.
• In order to avoid overheating, do not cover the heater.
• Do not use this heater with a programmer, timer, separate remote control system or
any other device that switches the heater on automatically, since a re risk exists if
the heater is covered or positioned incorrectly.
• Never immerse the product in water or any other liquid for any reasons.
• Do not use this heater in the immediate surroundings of a bath, a shower or a
swimming pool.
• Do not use the appliance outdoors.
• Do not use if you have wet hands.
• Never use the appliance on or near hot surfaces.
• Do not operate with a damaged cord.
• Before cleaning the appliance, make sure it is unplugged from the power and that it is
completely cooled.
• Do not clean the appliance with abrasive chemicals.
• Never use accessories that are not recommended or supplied by the manufacturer.
It could cause danger to the user or damage to the appliance.
• This device may be only used by children 8 years old or older and persons with
limited physical, sensory and mental capabilities and / or lack of experience
and knowledge, provided that they have been instructed in use of the device by a
responsible person who understands the associated risks.
• Children should be supervised to ensure that they do not play with the appliance.
CAUTION
Risk of burns! Some parts of this product can become very hot and
cause burns. Particular attention has to be given where children and
vulnerable people are present.

41
EN
DEVICE OVERVIEW
Front view
Note:
• The device can be used with the supplied remote control as well as with the control
panel, which is located on the upper right side of the device.
• The unit has a power switch which regulates the power supply. The power switch
must be in the „On“ position to use the unit.
• The rst time you turn on the unit, you must set the time immediately. Otherwise, the
time will only be displayed as „00:00“ and the weekly timer will not be available.
Display Control panel

42
EN
Rear view
DISPLAY INDICATORS
Main switch
Timer
Temperature
Timer start
WeekdayTimer shutdownAuto mode
Backlight
Wood Cracking
Time
Timer mode
Heater
F°/ C° Flame indicator
43
EN
Note: When you switch on the heater, the time will light up. After 60 seconds the
heater will automatically switch off. You can switch it on again with any button.
Backlight and the Wood Cracking function are not available on this model.
START-UP AND OPERATION
Manual operation
Press this button to switch the device on/off or press and hold this button for
10 seconds to enable/disable the parental lock. Once the child safety lock is
activated, the heating function is switched off but the ame remains on.
Press this button repeatedly to select „L1“, „L2“, „L3“, „L4“ or "OFF" (4
brightness levels that can be selected).
Press this button repeatedly to set the following functions: Room temperature
between 17 °C and 27 °C (62 °F - 82 °F) > Heating continuously ON >
Heating OFF. After setting, the temperature you set ashes 5 times on the
screen and is then saved. Press and hold for 5 seconds to switch between
Fahrenheit and Celsius.
Press this button repeatedly to set the operating time of the appliance. You can
set the operating time to 1 > 2 > 3 > 4 > 5 > 6 > 7 > 8 > 9 > OFF > 1 (...). It is
not possible to operate the weekly timer manually. When the weekly timer is
activated, the normal timer is not available.
Timer
Heating
function
Flame On/Off
44
EN
Using the Remote Control
Before using the remote control, make sure that the power plug of the appliance is
plugged in and that the power switch is in the „ON“ position.
Note: When using the remote control, make sure that you align the remote control
with the screen of the product when you press any of the buttons. A beep sounds.
There may be a slight delay in signal transmission from the transmitter to the receiver.
During operation, do not press the respective button more than once within 2
seconds.
Function Description
Switching on/off
Press this button to switch the unit on/off. Press it
once to turn on the appliance and the ame effects.
Press this button again to turn off the appliance and
the ame effects and the appliance is in standby
mode.
Press and hold for 10 seconds to activate or
deactivate the child lock. Once activate the child
lock, the heater will be turned off but the ame still
on.
Flame Four brightness levels can be selected (L1-L4).
Timer
Press the Timer button to select one of the following
timer settings: 1 > 2 > 3 > 4 > 5 > 6 > 7 > 8 > 9 >
OFF > 1 (...)
Heating function
Press this button repeatedly to set the following
functions: Room temperature between 17 °C
and 27 °C (62 °F - 82 °F) > Heating continuously
ON > Heating OFF.
Press and hold for 10 seconds to activate or
deactivate the child lock. Once activate the child
lock, the heater will be turned off but the ame still
on.
Press and hold the button for 5 seconds to toggle
between Fahrenheit and Celsius.
45
EN
Function Description
Setting
When the unit is on or in standby, press and hold
the setting icon on the remote control for 3 seconds
or press the timer button on the control panel for 3
seconds in standby. The [00:00] indicator will ash.
Set the current time rst. Press the [+] button on the
remote control to set the hour and the [-] button to
set the minute.
Weekly timer After setting the current time, press the setting icon
again to activate the weekly timer, and then press
the calendar icon to select Sunday to Saturday. The
selected date will light up. Then press the settings
icon to set the power off time and power on time in
succession, and then press the OK button directly to
complete the weekly timer settings.
Note: The current time must be set after the rst
power on or power off, otherwise the clock will
remain in the "00:00" state and the timer function
cannot be used.
The clock automatically lights up when the power is
turned on. The clock will automatically turn off the
display after 60 seconds in the standby state. Press
any function key to display the clock again then.
If you are not in the settings, press the calendar icon
directly to select the Weekly Timer setting.

46
EN
Important notes on battery replacement
• Old and new batteries must not be mixed.
• Use only standard AAA batteries. Make sure that
children do not swallow the batteries.
• Non-rechargeable batteries must not be
recharged.
• Insert the batteries with correct polarity (see
illustration).
• Remove dead batteries immediately from the
remote control.
• Always purchase the correct size and type of
batteries that are best suited for the intended use.
• Replace all batteries in a set at the same time.
• Clean the battery contacts and also those of the
device before inserting the battery.
• Dispose of used batteries immediately as
indicated in the „Disposal“ section.

47
EN
TROUBLESHOOTING
Problem Possible cause Approach
EE" is displayed on the
screen.
Short circuit. Contact customer service
to have the thermostat
sensor replaced
88" is displayed on the
screen.
No warm air is blown out
and the fan does not work.
Set the power switch to
the "off" position and wait
at least 10 minutes. Then
return the power switch to
the "on" position.
The screen displays "OP". The open window warning
(if the ambient temperature
drops by 4 °C/ 8°F or
more within 10 minutes
and the temperature does
not rise within 42 minutes)
is activated and the unit
turns off automatically.
Inspect the appliance
and make sure that the
air inlets and outlets are
not blocked, as this could
cause the appliance to
overheat. Unplug the
appliance from the power
outlet for 30 minutes to
allow the appliance to
cool down. Then, plug
the power plug back
into the power outlet and
turn the appliance on.
If the problem persists,
contact your service
representative.
No power, the logs do
not glow.
The power plug is not
plugged in.
Make sure that the power
plug of the machine is
plugged into a 220-240V
power outlet. Press the
power button several times
and make sure that the
power switch is in the "on"
position.

48
EN
Problem Possible cause Approach
No warm air is blown out. Cooling cycle Normal operation will
continue for a few minutes
before switching off.
The time depends on the
current temperature. Cold
air is blown out during
this time.
The thermostat setting
prevents the heating
function from being
activated.
Adjust the temperature
setting so that the
thermostat is set higher
than the current room
temperature.
The logs glow but there is
no ame effect.
The ame effect is
deactivated.
Press the ame button
repeatedly.
The ame effect works but
the heating function does
not work, the glowing bed
lights up when the heating
button is pressed.
The heating function is
deactivated
When the appliance is on,
press and hold the On/
Off button for 10 seconds.
As soon as the heating
function is reactivated, the
re bed lights up several
times.
The heating function does
not work.
The safety switch has been
activated.
Turn off the power switch,
wait 15 minutes and then
turn it on again.
Check the fuse. If it is
broken, the fuse must be
replaced.

49
EN
Problem Possible cause Approach
The remote control does
not work when buttons are
pressed.
No batteries. Replace the batteries
Poor signal transmission. Make sure that the
distance between
transmitter and receiver is
not too great.
Press the buttons on the
remote control with a
smooth movement and
gentle pressure.
Repeated pressing of the
buttons in rapid succession
may cause the transmitter
to malfunction.
Distance too great. Operate the remote
control less than 20 feet
from the front of the unit;
point the remote control at
the control panel.
50
EN
DISPOSAL CONSIDERATIONS
If there is a legal regulation for the disposal of electrical
and electronic devices in your country, this symbol on the
product or on the packaging indicates that this product must
not be disposed of with household waste. Instead, it must be
taken to a collection point for the recycling of electrical and
electronic equipment. By disposing of it in accordance with
the rules, you are protecting the environment and the health of
your fellow human beings from negative consequences. For
information about the recycling and disposal of this product,
please contact your local authority or your household waste
disposal service.
This product contains batteries. If there is a legal regulation
for the disposal of batteries in your country, the batteries must
not be disposed of with household waste. Find out about local
regulations for disposing of batteries. By disposing of them in
accordance with the rules, you are protecting the environment
and the health of your fellow human beings from negative
consequences.
MANUFACTURER & IMPORTER (UK)
Manufacturer:
Chal-Tec GmbH, Wallstrasse 16, 10179 Berlin, Germany.
Importer for Great Britain:
Chal-Tec UK limited
Unit 6 Riverside Business Centre
Brighton Road
Shoreham-by-Sea
BN43 6RE
United Kingdom

51
EN
INSTALLATION VULSINI DAWN
Overview

52
EN
Parts List
No Description Pc.
1 Obere Platte 1
2 Untere Platte 1
3 Linke Seitenplatte 1
4 Rechte Seitenplatte 1
5 Oberes kleines Brett 1
6 Linke Frontplatte 1
7 Rechte Frontplatte 1
8 Linker Fuß 1
9 Rechter Fuß 1
10 Linkes kleines Brett 1
11 Rechtes kleines Brett 4
12 Elektrischer Kamin 1
No Description Pc.
A Kreuzschlitzschraube 38 + 1
B Metallklemme 19
C Dübel 16
D Schraube 10
E Platte mit 2 Schrauben 4
F M4*12 Gewindeschneidschraube 8
G Antikippvorrichtung 1

53
EN
Assembly
1
2

54
EN
3
4

55
EN
5
6

56
EN
7
8

57
EN
9

58
EN
10
Slide the electric replace into the housing and fasten it with the M4*12 screws.

59
EN
11
One side of the cable is xed to the wall with a screw, the other side of the cable is
xed to the mantelpiece and then the cable is tightened.
Wall

60
EN
INSTALLATION VULSINI NIGHTFALL
Overview

61
EN
Parts list
No Description Pc.
1 Upper plate 1
2 Lower plate 1
3 Left side plate 1
4 Right side plate 1
5 Left front panel 1
6 Right front panel 1
7 Upper front panel 1
8 Left back plate 1
9 Right rear panel 1
10 Baseboard 1
11 Adjustable shelf 4
12 Electric replace 1
No Description Pc.
A Metal bolts 19 + 1
B Metal cam 19 + 1
C Dowels 24 + 1
D Screw 14
E Shelf pin 16 + 1
F M4*12 thread tapping screw

62
EN
Assembly
1
2

63
EN
3
4

64
EN
5
6

65
EN
7
8

66
EN
9
10
67
EN
11
Slide the electric replace into the housing and fasten it with the M4*12 screws.
68
EN
INSTALLATION VULSINI HIDEAWAY
Overview

69
EN
Parts list
No Description Pc.
1 Upper plate 1
2 Lower plate 1
3 Side plate 2
4 Front panel 2
5 Electric replace 1
No Description Pc.
A Metal bolts 4
B Metal clamp 4
C Dowels 4
D Screw 24
E Connector 12
F M4*12 thread tapping screw 8

70
EN
Assembly
1
2

71
EN
3
4

72
EN
5
6

73
EN
7
Slide the electric replace into the housing and fasten it with the M4*12 screws.


75
ES
Estimado cliente:
Le felicitamos por la adquisición de este producto. Lea
atentamente el siguiente manual y siga cuidadosamente las
instrucciones de uso con el n de evitar posibles daños. La
empresa no se responsabiliza de los daños ocasionados por
un uso indebido del producto o por haber desatendido las
indicaciones de seguridad. Escanee el código QR para obtener
acceso al manual de usuario más reciente y otra información
sobre el producto:
ÍNDICE DE CONTENIDOS
Indicaciones de seguridad76
Descripción del aparato77
Indicadores de la pantalla78
Puesta en marcha y funcionamiento79
Solución de problemas83
Retirada del aparato86
Fabricante86
Instalación vulsini dawn87
Instalación vulsini nightfall96
Instalación vulsini hideaway104
DATOS TÉCNICOS
Número del artículo 10035037 10035038
Nombre del artículo Vulsini Vulsini Dawn
Corriente eléctrica 220-240 V ~ 50 Hz
Potencia 1700-1900 W
Número del artículo 10035039 10035040
Nombre del artículo Vulsini Nightfall Vulsini Hideawy
Corriente eléctrica 220-240 V ~ 50 Hz
Potencia 1700-1900 W

76
ES
INDICACIONES DE SEGURIDAD
• Antes de utilizar el aparato, compruebe la tensión en la placa técnica del mismo y
conecte el aparato solamente a tomas de corriente que se adecuen a dicha tensión.
• Si el cable de alimentación está dañado, deberá ser sustituido por un servicio técnico.
• No coloque la chimenea justo bajo una toma de corriente.
• Mantenga los materiales in amables, como muebles, cortinas o similares, a un
metro de distancia.
• Mantenga el aparato fuera del alcance de los niños. Los niños solamente podrán
manejar el aparato si se encuentran bajo supervisión.
• Este aparato no ha sido concebido para un uso comercial, sino doméstico o para
entornos similares.
• No utilice el aparato si detecta fallos en su funcionamiento o si se ha visto dañado
de otro modo.
• Las reparaciones solamente podrán realizarse por parte de un servicio técnico
cuali cado.
• Las reparaciones mal realizadas o por cuenta del usuario representan un riesgo de
lesiones.
• No coloque el cable de alimentación bajo alfombras.
• Asegúrese de que el cable de alimentación no entre en contacto con super cies
calientes ni cantos a lados.
• No cubra la chimenea para evitar un sobrecalentamiento.
• No conecte el aparato a tomas de corriente manejadas por control remoto ni con
temporizador ni otro aparato que encienda o apague automáticamente la chimenea.
• No sumerja el aparato en agua ni en ningún otro líquido.
• No utilice el aparato cerca de bañeras, duchas o piscinas.
• No utilice el aparato al aire libre.
• No manipule el aparato con las manos mojadas.
• No utilice el aparato encima o cerca de super cies calientes.
• No utilice el aparato con el cable de alimentación dañado.
• Desconecte el enchufe antes de limpiar el aparato y deje que este se enfríe por
completo.
• Para la limpieza, no utilice productos abrasivos.
• Utilice exclusivamente los accesorios recomendados por el fabricante.
• Este aparato puede ser utilizado por niños mayores de 8 años y personas con
discapacidades físicas, sensoriales y mentales y/o con falta de experiencia y
conocimientos, siempre y cuando hayan sido instruidos sobre el uso del aparato y
comprendan los peligros y riesgos asociados.
• Asegúrese de que los niños no jueguen con el aparato.
ATENCIÓN
Existe riesgo de quemaduras. Las piezas del aparato pueden
alcanzar temperaturas muy elevadas. Tenga cuidado de que los
niños no se quemen.

77
ES
DESCRIPCIÓN DEL APARATO
Delantera
Nota:
• La unidad puede utilizarse con el mando a distancia suministrado, y con el panel
de control, que se encuentra en la parte superior derecha de la unidad.
• La unidad tiene un interruptor de encendido que regula el suministro de energía. El
interruptor de encendido debe estar en la posición „On“ para usar la unidad.
• Cuando se enciende la unidad por primera vez, la hora debe ser ajustada
inmediatamente. De lo contrario, la hora sólo se mostrará como „00:00“ y el
temporizador semanal no estará disponible.
Pantalla Panel de mando

78
ES
Vista posterior
INDICADORES DE LA PANTALLA
Interruptor principal
Indicador del temporizador
Temperatura
Comienzo del
temporizador
Días de la semanaFin del temporizadorModo automático
Iluminación de fondo
Crepitar del
madera
Tiempo
Temporizador
Indicador de
calentamiento
F°/ C° Indicador de la llama

79
ES
Nota: Cuando encienda el calentador, el tiempo se iluminará. Después de 60
segundos el calentador se apagará automáticamente. Puedes volver a encenderlo
con cualquier botón. La retroiluminación y la función Wood Crackle no están
disponibles en este modelo.
PUESTA EN MARCHA Y FUNCIONAMIENTO
Uso manual
Presione este botón para encender o apagar el dispositivo o manténgalo
presionado durante 10 segundos para activar o desactivar el control
parental. Una vez que se activa el seguro para niños, la función de
calefacción se apaga pero la llama permanece encendida.
Presione este botón repetidamente para seleccionar „L1“, „L2“, „L3“, „L4“ u
"OFF" (4 niveles de brillo que pueden ser seleccionados).
Presione esta tecla repetidamente para ajustar las siguientes funciones:
Temperatura ambiente entre 17 °C y 27 °C (62 °F - 82 °F) > Calefacción
continua ON > Calefacción OFF. Después del ajuste, la temperatura que ha
establecido parpadea 5 veces en la pantalla y luego se guarda. Presione y
sostenga el botón por 5 segundos para alternar entre Fahrenheit y Celsius.
Pulse este botón repetidamente para ajustar el tiempo de funcionamiento de
la unidad. Puedes ajustar el tiempo de funcionamiento a 1 > 2 > 3 > 4 > 5 >
6 > 7 > 8 > 9 > OFF > 1 (...). No es posible operar el temporizador semanal
manualmente. Cuando se activa el temporizador semanal, el temporizador
normal no está disponible.
Temporizador Función
calor
Llama Encendido/
apagado
80
ES
Uso del control remoto
Antes de usar el mando a distancia, asegúrese de que el enchufe de la unidad está
conectado y que el interruptor de encendido está en la posición “ON“.
Nota: Cuando utilice el mando a distancia, asegúrese de dirigirlo hacia la pantalla
del dispositivo cuando pulse uno de los botones. Escuchará un bip. Puede haber un
ligero retraso en la transmisión de la señal desde el transmisor al receptor. Durante la
operación, no presione el botón respectivo más de una vez en 2 segundos.
Función Descripción
Encendido y
apagado
Pulse este botón para encender o apagar la
unidad. Presione una vez para encender el aparato
y los efectos de la llama. Presione este botón de
nuevo para apagar el aparato y los efectos de la
llama y entrar en modo de espera.
Mantenga pulsado el botón durante 10 segundos
para activar/desactivar el control parental. En
cuanto se activa el seguro para niños, el calentador
se apaga pero el efecto de la llama permanece
encendido.
Llama Se pueden seleccionar cuatro niveles de brillo
(L1-L4)
Temporizador
Presiona el botón del temporizador para
seleccionar uno de los siguientes ajustes del
temporizador: 1 > 2 > 3 > 4 > 5 > 6 > 7 > 8 > 9 >
OFF > 1 (...)
Calentador Presione este botón repetidamente para ajustar las
siguientes funciones: Temperatura ambiente entre 17
°C y 27 °C (62 °F - 82 °F) > Calefacción continua
ON > Calefacción OFF.
Mantenga pulsado el botón durante 10 segundos
para activar/desactivar el control parental. En
cuanto se activa el seguro para niños, el calentador
se apaga pero el efecto de la llama permanece
encendido.
Presione y sostenga el botón por 5 segundos para
alternar entre Fahrenheit y Celsius.
81
ES
Función Descripción
Conguración
Si el aparato está encendido o se encuentra en
modo de espera, mantenga pulsado durante
3 segundos el símbolo de ajustes en el mando
a distancia o pulse el botón del temporizador
del panel de control durante 3 segundos con el
aparato en modo de espera. El indicador [00:00]
parpadea. Seleccione primero la hora actual. Pulse
el botón [+] del mando a distancia para seleccionar
las horas y el botón [-] para seleccionar los minutos.
Programador semanal Cuando haya seleccionado la hora actual, pulse
de nuevo el símbolo de ajuste para activar el
temporizador semanal y pulse el símbolo del
calendario para elegir un día de domingo a
sábado. La fecha seleccionada se ilumina. A
continuación, pulse el símbolo de los ajustes
para seleccionar de manera consecutiva la hora
de apagado y de encendido y, a continuación,
pulse el botón OK para completar los ajustes del
temporizador semanal.
Nota: La hora actual debe seleccionarse tras el
primer encendido o apagado, o de lo contrario
la hora permanecerá en "00:00" y la función del
temporizador no podrá utilizarse.
La hora se ilumina automáticamente en cuanto se
activa el suministro eléctrico. La hora desaparece
de la pantalla a los 60 segundos con el aparato en
modo de espera. Pulse cualquier botón para volver
a mostrar la hora.
Si no se encuentra en los ajustes, pulse directamente
el símbolo del calendario para seleccionar la
conguración del temporizador semanal.
82
ES
Notas importantes sobre el reemplazo de las pilas
• Las pilas viejas y nuevas no deben mezclarse.
• Utilice sólo pilas AAA estándar. Asegúrese de
que los niños no se traguen las pilas.
• Las pilas no recargables no deben ser
recargadas.
• Inserte las pilas con la polaridad correcta (véase
la ilustración).
• Retire inmediatamente las pilas gastadas del
mando a distancia.
• Siempre compre el tamaño y el tipo de pilas
correctas que mejor se adapten al uso previsto.
• Reemplazar todas las baterías en un conjunto al
mismo tiempo.
• Limpie los contactos de la batería y también los
del dispositivo antes de insertar la pila.
• Deshágase de las baterías usadas
inmediatamente, como se especica en el
capítulo “Eliminación“.

83
ES
SOLUCIÓN DE PROBLEMAS
Problema Posible causa Solución
En la pantalla aparece
“EE”
Cortocircuito Contacte con el servicio
de atención al cliente para
que le cambien el sensor
del termostato
En la pantalla aparece
“88“
No sale aire caliente y el
ventilador no funciona.
Ponga el interruptor de
encendido en la posición
de „apagado“ y espere
al menos 10 minutos.
Entonces devuelve el
interruptor de encendido a
la posición „on“.
En la pantalla aparece
“OP“
La advertencia de
ventana abierta (si la
temperatura ambiente
desciende 4 °C/ 8 °F o
más en 10 minutos y la
temperatura no aumenta
en 42 minutos) se activa
y la unidad se apaga
automáticamente.
Inspeccione la unidad
y asegúrese de que las
entradas y salidas de aire
no estén bloqueadas,
ya que esto podría
causar que la unidad se
sobrecaliente. Desenchufe
el aparato durante 30
minutos para que el
aparato pueda enfriarse.
Luego vuelva a conectar
el enchufe de la red en
la toma de corriente y
encienda el aparato.
Si el problema persiste,
contacte con el servicio de
atención al cliente.
No hay energía, los
troncos no brillan.
El enchufe no está
conectado.
Asegúrese de que el
enchufe de la máquina
esté conectado a una
toma de corriente de
220-240V. Presione el
botón de encendido
repetidamente y
asegúrese de que el
interruptor de encendido
está en la posición „on“
84
ES
Problema Posible causa Solución
No sale aire caliente. Ciclo de enfriamiento El funcionamiento
normal continuará
durante unos minutos
antes de apagarse. El
tiempo depende de la
temperatura actual. El aire
frío se expulsa durante
este tiempo.
El ajuste del termostato
impide que se active la
función de calefacción.
Ajuste la temperatura
de manera que el
termostato se ajuste a una
temperatura superior a
la temperatura ambiente
actual.
Los troncos brillan pero no
hay efecto de llama.
El efecto de la llama está
desactivado.
Presiona el botón de la
llama varias veces.
El efecto de la llama
funciona, pero la función
de calentamiento no
funciona, la cama de
luz se enciende cuando
se presiona el botón de
calentamiento.
La función de
calentamiento está
desactivada
Cuando el aparato esté
encendido, mantenga
presionado el botón de
encendido/apagado
durante 10 segundos.
En cuanto se reactive la
función de calentamiento,
las brasas se encenderán
varias veces.
La función de
calentamiento no
funciona.
El interruptor de seguridad
ha sido activado.
Apague el interruptor,
espera 15 minutos y
vuelve a encenderlo.
Revise el fusible. Si está
roto, el fusible debe ser
reemplazado.

85
ES
Problema Posible causa Solución
El mando no funciona al
pulsar los botones
Las pilas están gastadas Cambie las pilas
Hay mala conexión Asegúrese de que la
distancia entre el mando
y el receptor no es
demasiado larga.
Presione los botones del
mando a distancia con un
movimiento suave y una
suave presión.
La pulsación repetida de
los botones en rápida
sucesión puede hacer que
el transmisor funcione mal.
Distancia demasiado
larga
Accione el mando a
distancia a menos de 20
pies de la parte delantera
de la unidad; apunte el
mando a distancia al
panel de control.

86
ES
INDICACIONES SOBRE LA RETIRADA DEL
APARATO
Si en su país existe una disposición legal relativa a la
eliminación de aparatos eléctricos y electrónicos, este
símbolo estampado en el producto o en el embalaje
advierte que no debe eliminarse como residuo doméstico.
En lugar de ello, debe depositarse en un punto de recogida
de reciclaje de aparatos eléctricos y electrónicos. Una
gestión adecuada de estos residuos previene consecuencias
potencialmente negativas para el medio ambiente y la salud
de las personas. Puede consultar más información sobre el
reciclaje y la eliminación de este producto contactando con
su administración local o con su servicio de recogida de
residuos.
Este producto contiene baterías. Si en su país existe una
disposición legal relativa a la eliminación de baterías, estas
no deben eliminarse como residuo doméstico. Infórmese
sobre la normativa vigente relacionada con la eliminación de
baterías. Una gestión adecuada de estos residuos previene
consecuencias potencialmente negativas para el medio
ambiente y la salud de las personas.
FABRICANTE E IMPORTADOR (REINO UNIDO)
Fabricante:
Chal-Tec GmbH, Wallstraße 16, 10179 Berlín, Alemania.
Importador para Gran Bretaña:
Chal-Tec UK limited
Unit 6 Riverside Business Centre
Brighton Road
Shoreham-by-Sea
BN43 6RE
United Kingdom

87
ES
INSTALACIÓN VULSINI DAWN
Vista general

88
ES
Lista de piezas
Núm. Descripción Uds.
1 Panel superior 1
2 Panel inferior 1
3 Panel lateral izquierdo 1
4 Panel lateral derecho 1
5 Tablero pequeño superior 1
6 Panel delantero izquierdo 1
7 Panel delantero derecho 1
8 Pata izquierda 1
9 Pata derecha 1
10 Tablero pequeño izquierdo 1
11 Tablero pequeño derecho 4
12 Chimenea eléctrica 1
Núm. Descripción Uds.
A Tornillo de estrella 38 + 1
B Abrazadera metálica 19
C Taco 16
D Tornillo 10
E Placa con 2 tornillos 4
F Tornillo autorroscante M4x12 8
G Mecanismo antivuelco 1

89
ES
Montaje
1
2
90
ES
3
4

91
ES
5
6

92
ES
7
8

93
ES
9

94
ES
10
Desplace la chimenea eléctrica hacia el interior de la estructura y fíjela con los
tornillos M4x12.

95
ES
11
Una parte del cable queda jado a la pared con un tornillo, mientras que la otra
parte se ja a la repisa y luego se tensa el cable.
Pared

96
ES
INSTALACIÓN VULSINI NIGHTFALL
Vista general

97
ES
Lista de piezas
Núm. Descripción Uds.
1 Panel superior 1
2 Panel inferior 1
3 Panel lateral izquierdo 1
4 Panel lateral derecho 1
5 Panel delantero izquierdo 1
6 Panel delantero derecho 1
7 Panel delantero superior 1
8 Panel trasero izquierdo 1
9 Panel trasero derecho 1
10 Listón 1
11 Balda ajustable 4
12 Chimenea eléctrica 1
Núm. Descripción Uds.
A Perno metálico 19 + 1
B Leva metálica 19 + 1
C Taco 24 + 1
D Tornillo 14
E Pin para la balda 16 + 1
F Tornillo autorroscante M4x12

98
ES
Montaje
1
2

99
ES
3
4

100
ES
5
6

101
ES
7
8
102
ES
9
10

103
ES
11
Desplace la chimenea eléctrica hacia el interior de la estructura y fíjela con los
tornillos M4x12.

104
ES
INSTALACIÓN VULSINI HIDEAWAY
Vista general

105
ES
Lista de piezas
Núm. Descripción Uds.
1 Panel superior 1
2 Panel inferior 1
3 Panel lateral 2
4 Panel delantero 2
5 Chimenea eléctrica 1
Núm. Descripción Uds.
A Perno metálico 4
B Abrazadera metálica 4
C Taco 4
D Tornillo 24
E Conector 12
F Tornillo autorroscante M4x12 8

106
ES
Montaje
1
2

107
ES
3
4

108
ES
5
6

109
ES
7
Desplace la chimenea eléctrica hacia el interior de la estructura y fíjela con los tornillos
M4x12.


111
FR
Cher client,
Toutes nos félicitations pour l’acquisition de ce nouvel
appareil. Veuillez lire attentivement les instructions suivantes de
branchement et d’utilisation an d’éviter d’éventuels dommages.
Le fabricant ne saurait être tenu pour responsable des dommages
dus au non-respect des consignes de sécurité et à la mauvaise
utilisation de l’appareil. Scannez le QR-Code pour accéder à
la dernière version du mode d‘emploi et à d‘autres informations
concernant le produit:
SOMMAIRE
Consignes de sécurité112
Aperçu de l‘appareil113
Afchages de l‘écran114
Mise en marche et utilisation115
Résolution des problèmes119
Informations sur le recyclage122
Fabricant122
Installation de la vulsini dawn123
Installation de la vulsini nightfall132
Installation de la vulsini hideaway140
FICHE TECHNIQUE
Numéro d'article 10035037 10035038
Appellation de l'article Vulsini Vulsini Dawn
Alimentation 220-240 V ~ 50 Hz
Puissance 1700-1900 W
Numéro d'article 10035039 10035040
Appellation de l'article Vulsini Nightfall Vulsini Hideawy
Alimentation 220-240 V ~ 50 Hz
Puissance 1700-1900 W

112
FR
CONSIGNES DE SÉCURITÉ
• Avant utilisation, véri ez la tension sur l‘étiquette de l‘appareil et ne branchez
l‘appareil que sur des prises correspondant à la tension de l‘appareil.
• Si le câble d‘alimentation est endommagé, faites-le remplacer par un professionnel
quali é.
• Ne placez pas la cheminée directement sous une prise.
• Tenez l‘appareil à un mètre de distance des matériaux combustibles tels que
meubles, rideaux ou similaires.
• Utilisez l‘appareil hors de portée des enfants. Les enfants ne sont autorisés à utiliser
l‘appareil que sous surveillance.
• L‘appareil n‘est pas destiné à un usage commercial, mais seulement pour une
utilisation domestique et dans des environnements similaires.
• N‘utilisez pas l‘appareil s‘il fonctionne mal ou a été endommagé de quelque façon
que ce soit.
• Les réparations ne peuvent être effectuées que par des spécialistes quali és.
• Les réparations mal effectuées ou de votre propre chef représentent un risque de
blessure.
• Ne faites pas passer le câble d‘alimentation sous des tapis ou moquettes.
• Assurez-vous que le câble d‘alimentation ne passe pas sur des recoins pointus ou
des surfaces chaudes.
• Ne recouvrez pas la cheminée pour éviter la surchauffe.
• N‘utilisez pas l‘appareil avec une minuterie externe, une prise de courant
télécommandée ou un autre appareil qui allume et éteint automatiquement le poêle.
• Ne plongez pas l‘appareil dans l‘eau ou d‘autres liquides.
• N‘utilisez pas l‘appareil près d‘une baignoire, d‘une douche ou d‘une piscine.
• N‘utilisez pas l‘appareil à l‘extérieur.
• N‘utilisez pas l‘appareil avec des mains mouillées.
• N‘utilisez pas l‘appareil sur ou à proximité de surfaces chaudes.
• N‘utilisez pas l‘appareil avec un câble d‘alimentation endommagé.
• Avant le nettoyage, débranchez la che de la prise et laissez l‘appareil refroidir
complètement.
• N‘utilisez pas d‘abrasifs pour le nettoyage.
• N‘utilisez que des accessoires expressément approuvés par le fabricant.
• Cet appareil peut être utilisé par des enfants de 8 ans ou plus et des personnes
ayant des capacités physiques, sensorielles et mentales limitées et / ou
dénuées d‘expérience et de connaissances, à condition d‘avoir été instruits au
fonctionnement de l‘appareil par une personne responsable et d‘en comprendre les
risques associés.
• Veillez à ce que les enfants ne jouent pas avec l‘appareil.
ATTENTION
Risque de brûlures ! Certaines parties de l‘appareil peuvent devenir
très chaudes. Veillez à ne pas vous brûler ni vous-même ni vos
enfants.

113
FR
APERÇU DE L‘APPAREIL
Vue de face
Remarque :
• L‘appareil peut être utilisé à la fois avec la télécommande incluse et avec le
panneau de commande situé sur le côté supérieur droit de l‘appareil.
• L‘appareil dispose d‘un interrupteur d‘alimentation qui régule l‘alimentation.
L‘interrupteur d‘alimentation doit être en position „On“ pour utiliser l‘appareil.
• Lorsque vous allumez l‘appareil pour la première fois, vous devez régler l‘heure
immédiatement. Sinon, l‘heure restera sur „00:00“ et la minuterie hebdomadaire ne
sera pas disponible.
Ecran Panneau de commande

114
FR
Vue de dos
AFFICHAGES DE L‘ÉCRAN
Interrupteur principal
Afchage de la
minuterie
Température
Heure de début
de la minuterie
Jour de la semaine
Heure de n de la
minuterie
Mode auto
Rétroéclairage
Crépitement
du bois
Heure
Mode minuterie
Témoin de
chauffage
F°/ C° Témoin de amme

115
FR
Remarque : Lorsque vous allumez la cheminée, l‘heure s‘allume. Après 60
secondes, la cheminée s‘éteint automatiquement. Vous pouvez la rallumer avec
n‘importe quelle touche. Le rétroéclairage et la fonction „crépitement du bois“ ne sont
pas disponibles sur ce modèle.
MISE EN MARCHE ET UTILISATION
Utilisation manuelle
Appuyez sur cette touche pour allumer / éteindre l'appareil ou maintenez
cette touche pendant 10 secondes pour activer / désactiver la sécurité
enfants. Une fois que la sécurité enfants est activée, la fonction chauffage est
désactivée mais la amme reste allumée.
Appuyez plusieurs fois sur cette touche pour sélectionner „L1“, „L2“, „L3“,
„L4“ ou "OFF" (4 niveaux de luminosité).
Appuyez plusieurs fois sur cette touche pour régler les fonctions suivantes :
Température ambiante entre 17 °C et 27 °C (62 °F - 82 °F) > Chauffage
continu > Chauffage désactivé. Après le réglage, la température que vous
avez réglée clignote 5 fois sur l'écran puis est enregistrée. Maintenez
le bouton enfoncé pendant 5 secondes pour basculer entre les degrés
Fahrenheit et Celsius.
Appuyez plusieurs fois sur cette touche pour régler la durée de
fonctionnement de l'appareil. Vous pouvez régler la durée de fonctionnement
sur 1 > 2 > 3 > 4 > 5 > 6 > 7 > 8 > 9 > OFF > 1 (...). Il n'est pas possible
d'utiliser manuellement la minuterie hebdomadaire. Si la minuterie
hebdomadaire est activée, la minuterie normale n'est pas disponible.
Minuterie Fonction
chauffage
Flamme Marche/
arrêt
116
FR
Utilisation de la télécommande
Avant d‘utiliser la télécommande, assurez-vous que la che d‘alimentation de l‘appareil
est branchée et que l‘interrupteur d‘alimentation est en position „ON“.
Remarque : Lorsque vous utilisez la télécommande, assurez-vous de la pointer vers
l‘écran de l‘appareil lorsque vous appuyez sur l‘une des touches. Un son est émis. Il
peut y avoir un léger retard dans la transmission du signal de l‘émetteur au récepteur.
N‘appuyez pas sur la touche plus d‘une fois toutes les 2 secondes.
Fonction Description
Marche / arrêt
Appuyez sur cette touche pour allumer / éteindre
l‘appareil. Appuyez une fois pour allumer l‘appareil
et les effets de amme. Appuyez à nouveau pour
éteindre l‘appareil et les effets de amme, et
l‘appareil passe en mode veille.
Maintenez la touche pendant 10 secondes pour
activer / désactiver la sécurité enfants. Dès que la
sécurité enfants est activée, le chauffage s‘éteint
mais l‘effet de amme reste allumé.
Flamme Quatre niveaux de luminosité sont disponibles
(L1-L4).
Minuterie
Appuyez sur la touche de la minuterie pour régler
l'une des durées suivantes : 1 > 2 > 3 > 4 > 5 > 6 >
7 > 8 > 9 > OFF > 1 (…)
Fonction chauffage Appuyez plusieurs fois sur cette touche pour régler
les fonctions suivantes : Température ambiante
entre 17 °C et 27 °C (62 °F - 82 °F) > Chauffage
continuellement activé > Chauffage désactivé.
Maintenez la touche pendant 10 secondes pour
activer / désactiver la sécurité enfants. Dès que la
sécurité enfants est activée, le chauffage s'éteint
mais l'effet de amme reste allumé.
Maintenez la touche pendant 5 secondes pour
basculer entre Fahrenheit et Celsius.

117
FR
Fonction Description
Paramètre
Lorsque l'appareil est allumé ou en mode
veille, maintenez l'icône des paramètres sur la
télécommande pendant 3 secondes ou appuyez
sur la touche de la minuterie sur le panneau de
commande pendant 3 secondes en mode veille.
L'écran afche [00:00] en clignotant. Réglez
d'abord l'heure. Appuyez sur la touche [+] de la
télécommande pour régler l'heure et sur la touche
[-] pour régler les minutes.
Minuterie
hebdomadaire
Après avoir réglé l'heure actuelle, appuyez à
nouveau sur l'icône des paramètres pour activer la
minuterie hebdomadaire, puis appuyez sur l'icône
du calendrier pour sélectionner du dimanche au
samedi. La date sélectionnée s'allume. Appuyez
ensuite sur l'icône de réglage pour régler l'heure
d'arrêt et de mise en marche une par une, puis
appuyez directement sur OK pour terminer les
réglages de la minuterie hebdomadaire.
Remarque : L'heure actuelle doit être réglée
après la première mise en marche ou à l'arrêt,
sinon l'horloge reste sur "00:00" et la fonction de
minuterie ne peut pas être utilisée.
L'horloge s'allume automatiquement au démarrage.
L'horloge éteint automatiquement l'afchage en
mode veille après 60 secondes. Appuyez sur
n'importe quelle touche de fonction pour afcher à
nouveau l'horloge.
Si vous n'êtes pas dans les paramètres,
appuyez directement sur l'icône du calendrier
pour sélectionner le réglage de la minuterie
hebdomadaire.

118
FR
Remarques importantes pour le changement des piles
• Ne mélangez pas des piles neuves et des piles
usagées.
• Utilisez uniquement des piles AAA standard.
Assurez-vous que les enfants n‘avalent pas les
piles.
• Ne rechargez pas des piles non rechargeables.
• Insérez les piles en respectant la polarité (voir
illustration).
• Retirez immédiatement les piles usagées de la
télécommande.
• Achetez toujours la bonne taille et le bon type de
piles qui conviennent le mieux à l‘usage auquel
elles sont destinées.
• Remplacez toutes les piles en même temps.
• Nettoyez les contacts de la pile et de l‘appareil
avant d‘insérer la pile.
• Jetez immédiatement les piles usagées, comme
spécié dans le chapitre „Recyclage“.
119
FR
RÉSOLUTION DES PROBLÈMES
Problème Cause possible Solution
L'écran afche "EE". Court-circuit. Contactez le service client
pour faire remplacer la
sonde du thermostat
L'écran afche "88". L'appareil ne soufe
pas d'air chaud et le
ventilateur ne fonctionne
pas.
Mettez l'interrupteur
d'alimentation sur "off"
et attendez au moins
10 minutes. Remettez
ensuite l'interrupteur
d'alimentation sur "on".
L'écran afche "OP". L'avertissement de fenêtre
ouverte (si la température
ambiante baisse de 4 °C
/ 8 °F ou plus dans les
10 minutes et n'augmente
pas dans les 42 minutes)
se déclenche et l'appareil
s'éteint automatiquement.
Inspectez l'appareil et
assurez-vous que les
entrées et sorties d'air ne
sont pas bloquées car cela
pourrait provoquer une
surchauffe de l'appareil.
Retirez la che de la prise
pendant 30 minutes an
que l'appareil puisse
refroidir. Rebranchez
ensuite la che secteur
dans la prise et allumez
l'appareil. Si le problème
persiste, contactez le
service client.
Pas de courant, les bûches
ne rougeoient pas.
La che n'est pas
branchée.
Vériez que la che
secteur de l'appareil est
branchée sur une prise
220 - 240 V. Appuyez
plusieurs fois sur le bouton
marche / arrêt et assurez-
vous que l'interrupteur
d'alimentation est sur
"ON".

120
FR
Problème Cause possible Solution
Pas de production d'air
chaud.
Cycle de refroidissement Le fonctionnement
normal continue pendant
quelques minutes avant
de s'éteindre. La durée
dépend de la température
actuelle. Pendant ce
temps, l'appareil soufe
de l'air froid.
Le réglage du thermostat
empêche l'activation de la
fonction de chauffage.
Réglez la température de
sorte que le thermostat
soit réglé plus haut que
la température ambiante
actuelle.
Les bûches rougeoient
mais il n'y a pas d'effet de
amme.
L'effet de amme est
désactivé.
Appuyez plusieurs fois sur
la touche Flamme.
L'effet de amme
fonctionne mais la
fonction de chauffage ne
fonctionne pas, le lit de
braises s'allume lorsque
l'on appuie sur la touche
de chauffage.
La fonction de chauffage
est désactivée
L'appareil étant allumé,
maintenez la touche
Marche / Arrêt pendant
10 secondes. une fois que
la fonction de chauffage
a été réactivée, le lit de
braises s'allume plusieurs
fois.
La fonction de chauffage
ne fonctionne pas.
Le disjoncteur s'est
déclenché.
Éteignez l'interrupteur
d'alimentation, attendez
15 minutes et rallumez-le.
Vériez le fusible.
Remplacez-le si besoin.

121
FR
Problème Cause possible Solution
La télécommande ne
fonctionne pas les touches
ne réagissent pas.
Pas de piles. Remplacez les piles
Mauvaise transmission du
signal.
Assurez-vous que la
distance entre l'émetteur et
le récepteur n'est pas trop
grande.
Appuyez doucement
sur les touches de la
télécommande avec un
mouvement régulier.
Appuyer sur les touches
plusieurs fois et trop
rapidement peut entraîner
un dysfonctionnement de
l'émetteur.
Eloignement trop
important.
Utilisez la télécommande
à moins de 20 pieds de
l'avant de l'appareil ;
pointez la télécommande
vers le panneau de
commande.

122
FR
INFORMATIONS SUR LE RECYCLAGE
S‘il existe une réglementation pour l‘élimination ou le
recyclage des appareils électriques et électroniques dans
votre pays, ce symbole sur le produit ou sur l‘emballage
indique que cet appareil ne doit pas être jeté avec les
ordures ménagères. Vous devez le déposer dans un point
de collecte pour le recyclage des équipements électriques
et électroniques. La mise au rebut conforme aux règles
protège l‘environnement et la santé de vos semblables des
conséquences négatives. Pour plus d‘informations sur le
recyclage et l‘élimination de ce produit, veuillez contacter
votre autorité locale ou votre service de recyclage des
déchets ménagers.
Ce produit contient des piles. S‘il existe une réglementation
pour l‘élimination ou le recyclage des piles dans votre pays,
vous ne devez pas les jeter avec les ordures ménagères.
Renseignez-vous sur les dispositions locales relatives à la
collecte des piles usagées. La mise au rebut conforme aux
règles protège l‘environnement et la santé de vos semblables
des conséquences négatives.
FABRICANT ET IMPORTATEUR (UK)
Fabricant :
Chal-Tec GmbH, Wallstraße 16, 10179 Berlin, Allemagne.
Importateur pour la Grande Bretagne :
Chal-Tec UK limited
Unit 6 Riverside Business Centre
Brighton Road
Shoreham-by-Sea
BN43 6RE
United Kingdom

123
FR
INSTALLATION DE LA VULSINI DAWN
Aperçu

124
FR
Liste des pièces
N° Description qté
1 Panneau supérieur 1
2 Panneau inférieur 1
3 Panneau latéral gauche 1
4 Panneau latéral droit 1
5 Petite planche supérieure 1
6 Panneau frontal gauche 1
7 Panneau frontal droit 1
8 Pied gauche 1
9 Pied droit 1
10 Petite planche de gauche 1
11 Petite planche de droite 4
12 Cheminée électrique 1
N° Description qté
A Vis cruciforme 38 + 1
B Pince métallique 19
C Cheville 16
D Vis 10
E Panneau avec deux vis 4
F M4*12 vis auto taraudeuse 8
G Dispositif anti basculement 1

125
FR
Assemblage
1
2

126
FR
3
4

127
FR
5
6
128
FR
7
8

129
FR
9
130
FR
10
Glissez la cheminée électrique dans le boîtier et xez-la avec les vis M4 * 12.
131
FR
11
Un côté de la corde se xe au mur avec une vis, l‘autre côté de la corde se xe à la
cheminée. Serrez ensuite la corde.
Mur

132
FR
INSTALLATION DE LA VULSINI NIGHTFALL
Aperçu

133
FR
Liste des pièces
N° Description qté
1 Panneau supérieur 1
2 Panneau inférieur 1
3 Panneau latéral gauche 1
4 Panneau latéral droit 1
5 Panneau frontal gauche 1
6 Panneau frontal droit 1
7 Panneau frontal supérieur 1
8 Panneau arrière gauche 1
9 Panneau arrière droit 1
10 Plinthe 1
11 Etagère réglable 4
12 Cheminée électrique 1
N° Description qté
A Boulons métalliques 19 + 1
B Came métallique 19 + 1
C Cheville 24 + 1
D Vis 14
E Goupille d'étagère 16 + 1
F M4*12 vis auto taraudeuse
134
FR
Assemblage
1
2
135
FR
3
4
136
FR
5
6
137
FR
7
8

138
FR
9
10

139
FR
11
Glissez la cheminée électrique dans le boîtier et xez-la avec les vis M4 * 12.

140
FR
INSTALLATION DE LA VULSINI HIDEAWAY
Aperçu

141
FR
Liste des pièces
N° Description qté
1 Panneau supérieur 1
2 Panneau inférieur 1
3 Panneau latéral 2
4 Panneau frontal 2
5 Cheminée électrique 1
N° Description qté
A Boulon métallique 4
B Pince métallique 4
C Cheville 4
D Vis 24
E Pièce de raccordement 12
F M4*12 vis auto taraudeuse 8
142
FR
Assemblage
1
2

14 3
FR
3
4

144
FR
5
6

14 5
FR
7
Glissez la cheminée électrique dans le boîtier et xez-la avec les vis M4 * 12.


147
IT
Gentile cliente,
La ringraziamo per aver acquistato il dispositivo. La preghiamo
di leggere attentamente le seguenti istruzioni per l’uso e di
seguirle per evitare possibili danni tecnici. Non ci assumiamo
alcuna responsabilità per danni scaturiti da una mancata
osservazione delle avvertenze di sicurezza e da un uso
improprio del dispositivo. Scansionare il codice QR seguente,
per accedere al manuale d’uso più attuale e per ricevere
informazioni sul prodotto.
INDICE
Avvertenze di sicurezza148
Descrizione del prodotto149
Visualizzazioni a display150
Messa in funzione e utilizzo151
Correzione degli errori155
Smaltimento158
Produttore158
Installazione vulsini dawn159
Installazione vulsini nightfall168
Installazione vulsini hideaway176
DATI TECNICI
Codice articolo 10035037 10035038
Nome articolo Vulsini Vulsini Dawn
Alimentazione 220-240 V ~ 50 Hz
Potenza 1700-1900 W
Codice articolo 10035039 10035040
Nome articolo Vulsini Nightfall Vulsini Hideawy
Alimentazione 220-240 V ~ 50 Hz
Potenza 1700-1900 W

148
IT
AVVERTENZE DI SICUREZZA
• Prima dell‘uso, controllare la tensione sulla targhetta del dispositivo e collegare il
dispositivo solo ad una presa che corrisponde alla tensione indicata.
• Se il cavo di alimentazione è danneggiato, farlo sostituire da un tecnico quali cato.
• Non posizionare il dispositivo direttamente sotto la presa.
• Tenere materiali in ammabili come mobili, tende o simili ad un metro di distanza.
• Tenere il dispositivo fuori dalla portata dei bambini. I bambini possono utilizzare il
dispositivo solo se sorvegliati.
• Il dispositivo non è per un uso commerciale, bensì per un uso domestico e per
ambienti simili.
• Non utilizzare il dispositivo se presenta malfunzionamenti o se è danneggiato in
qualche modo.
• Le riparazioni possono essere eseguite solo da un tecnico quali cato.
• Le riparazioni eseguite in modo errato o autonomamente comportano il rischio di
infortuni.
• Non sistemare il cavo di alimentazione sotto tappeti o simili.
• Assicurarsi che il cavo di alimentazione non sia collocato su spigoli vivi o super ci
calde.
• Non coprire il dispositivo per evitare il pericolo di surriscaldamento.
• Non utilizzare il dispositivo con un timer esterno, una presa con telecomando o un
altro apparecchio che accende e spenge automaticamente il dispositivo.
• Non immergere il dispositivo in acqua o in altri liquidi.
• Non utilizzare il dispositivo vicino a vasche da bagno, docce o piscine.
• Non utilizzare il dispositivo all‘aperto.
• Non utilizzare il dispositivo con le mani bagnate.
• Non utilizzare il dispositivo sopra o vicino a super ci calde.
• Non utilizzare il dispositivo con un cavo di alimentazione danneggiato.
• Prima di eseguire la pulizia, disinserire la spina dalla presa e far raffreddare
completamente il dispositivo.
• Non utilizzare prodotti abrasivi per la pulizia.
• Utilizzare solo accessori espressamente approvati dal produttore.
• Questo dispositivo può essere utilizzato da bambini a partire da 8 anni e da
persone con limitate capacità siche e psichiche o con conoscenza ed esperienza
limitate, solo se sono stati istruiti sulle modalità d’uso e comprendono i rischi e i
pericoli connessi.
• Assicurarsi che i bambini non giochino con il dispositivo.
ATTENZIONE
Pericolo di ustioni! Alcuni componenti del dispositivo possono
diventare molto caldi. Prestare la massima attenzione in presenza di
bambini e di persone vulnerabili.
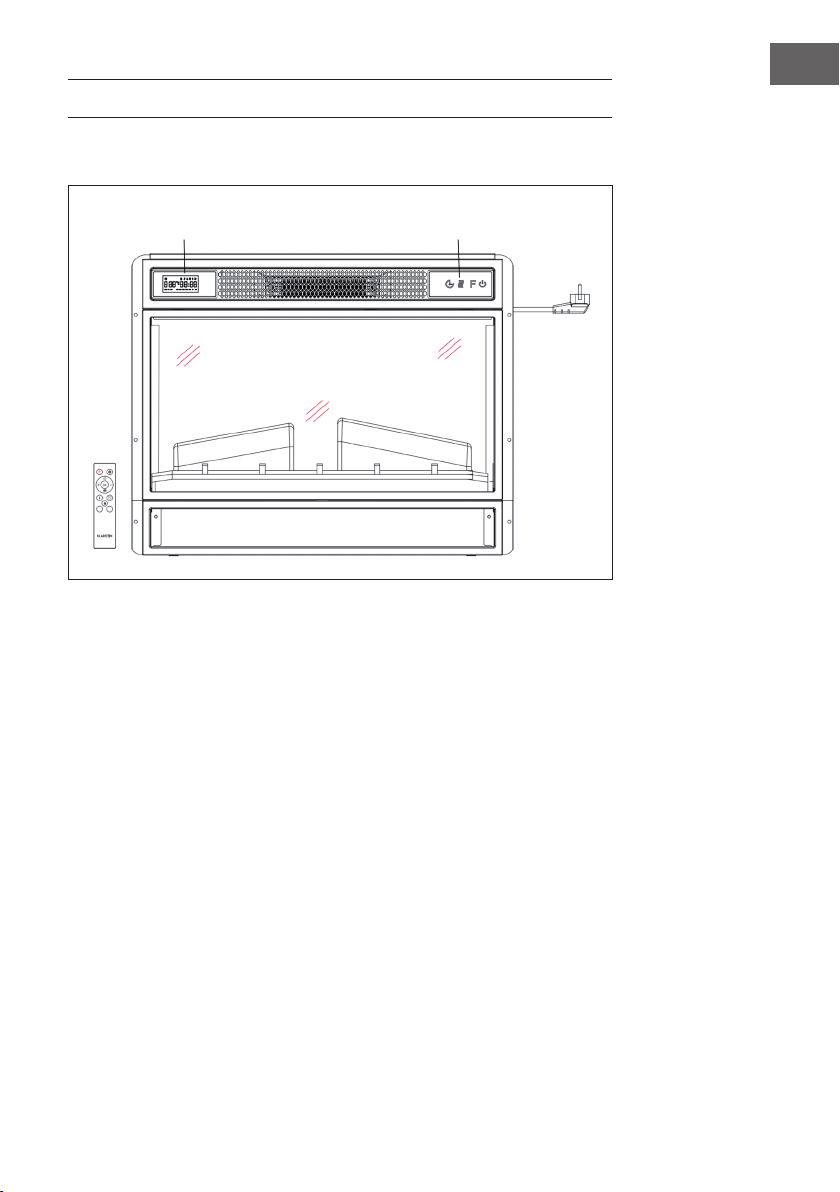
149
IT
DESCRIZIONE DEL PRODOTTO
Vista frontale
Nota:
• Il dispositivo può essere utilizzato sia con il telecomando contenuto nel volume di
consegna sia tramite il pannello di controllo, che si trova sul lato destro in alto del
camino.
• Il dispositivo dispone di un interruttore generale per l’apporto di energia elettrica.
L’interruttore deve essere in posizione “On” (acceso) per poter usare il dispositivo.
• Quando si accende il dispositivo per la prima volta bisogna impostare subito l’ora.
In caso contrario viene visualizzata l’ora “00:00” e il timer settimanale non è
disponibile.
Display Pannello di controllo
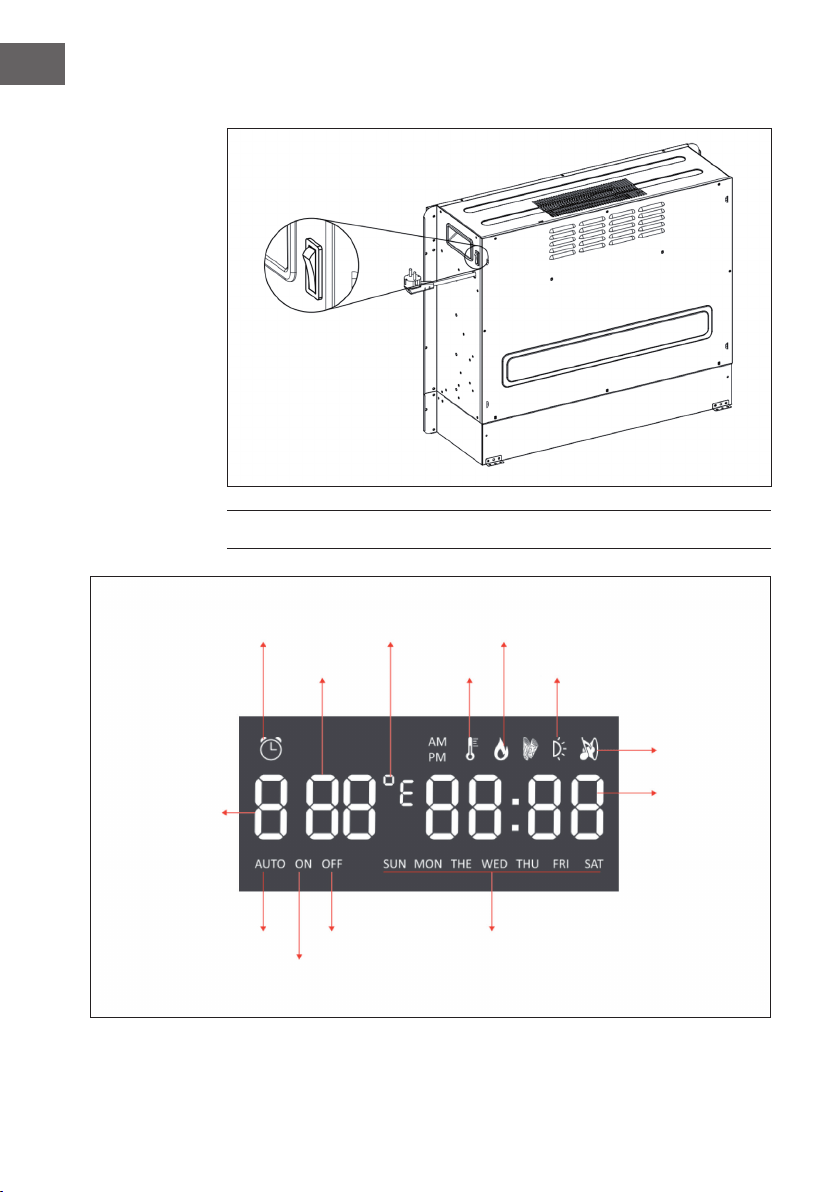
150
IT
Vista posteriore
VISUALIZZAZIONI A DISPLAY
Interruttore principale
Indicatore timer
Temperatura
Inizio timer
giorno settimanaleFine timerModalità auto
Retroilluminazione
Fuoco
scoppiettante
Ora
Modalità timer
Indicatore
calore
F°/ C° Indicatore amma
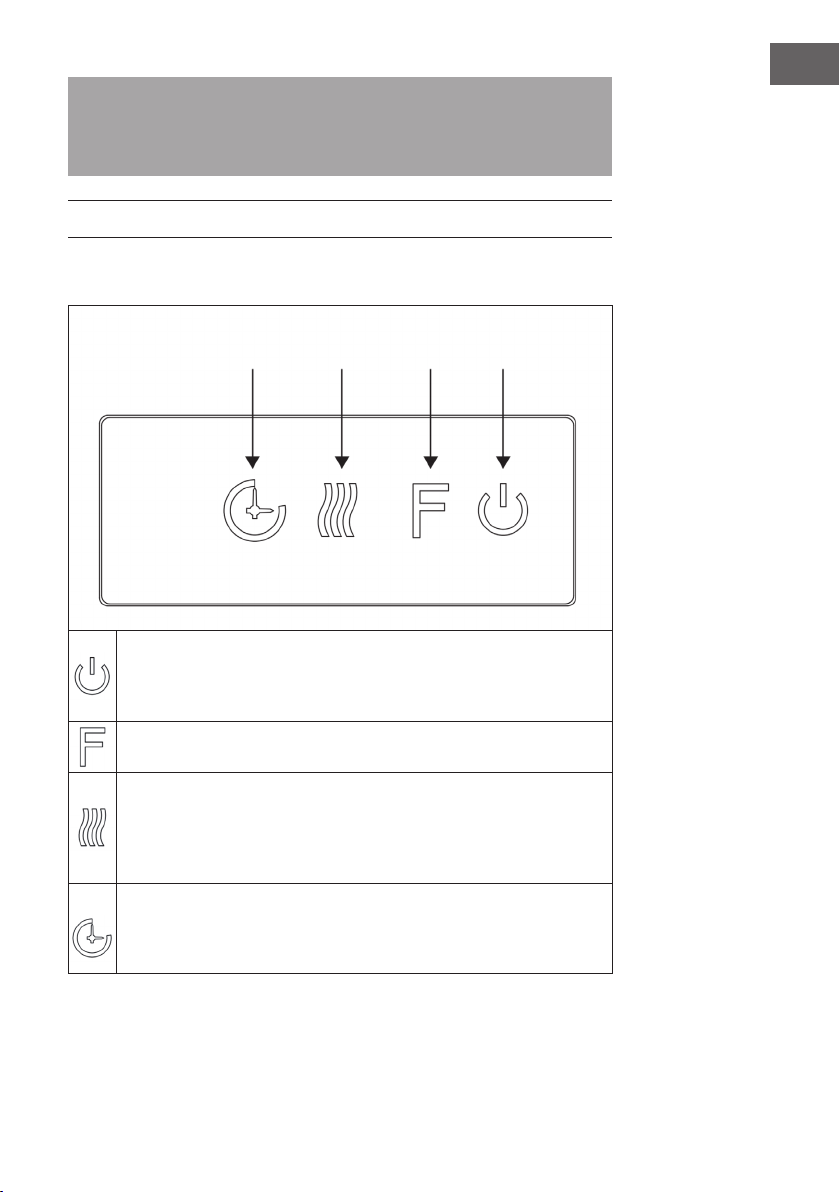
151
IT
Nota: Quando si accende il camino lampeggia l’ora. Dopo 60 secondi il camino si
spegne automaticamente. È possibile riaccenderlo premendo un tasto qualsiasi. La
retroilluminazione e la funzione “fuoco scoppiettante” non sono disponibili su questo
modello.
MESSA IN FUNZIONE E UTILIZZO
Utilizzo manuale
Premere questo tasto per accendere/spegnere il dispositivo o tenere premuto
il tasto per 10 secondi per attivare/disattivare il blocco di sicurezza bambini.
Non appena il blocco viene attivato, la funzione riscaldamento si spegne, ma
la amma resta accesa.
Premere più volte questo tasto per selezionare „L1“, „L2“, „L3“, „L4“ oppure
“OFF” (spento) (si possono selezionare 4 livelli di luminosità).
Premere più volte questo tasto per impostare le funzioni seguenti: temperatura
ambiente tra 17 °C e 27 °C (62 °F – 82 °F) > riscaldamento continuamente
ACCESO > riscaldamento SPENTO. Dopo aver effettuato l’impostazione,
la temperatura lampeggia 5 volte sullo schermo e viene poi memorizzata.
Tenere premuto il pulsante per 5 secondi per passare da Fahrenheit a Celsius.
Premere più volte questo tasto per impostare la durata di funzionamento del
dispositivo. È possibile impostarla su 1 > 2 > 3 > 4 > 5 > 6 > 7 > 8 > 9 > OFF > 1 (…).
Non è possibile gestire manualmente il timer settimanale. Quando lo si attiva,
il timer normale non è disponibile.
Timer Funzione
riscaldamento
Fiamma On/Off
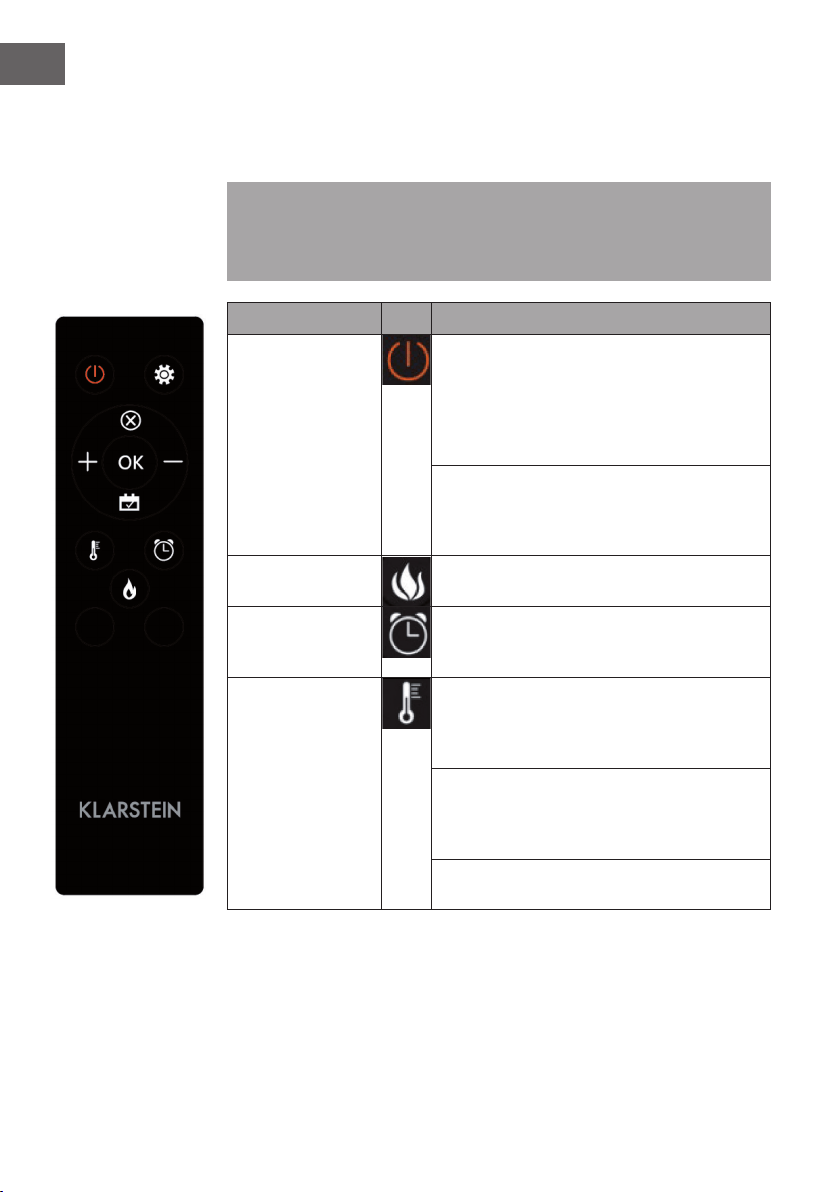
152
IT
Utilizzo del telecomando
Prima di utilizzare il telecomando assicurarsi che la spina del dispositivo sia inserita
nella presa e che l’interruttore si trovi in posizione “ON”.
Nota: Assicurarsi di orientare il telecomando verso il display quando si preme uno
dei tasti. Viene emesso un segnale acustico. È possibile che ci sia un leggero ritardo
tra la trasmissione del segnale dal trasmettitore al ricevitore. Premere il tasto relativo
non più di una volta ogni 2 secondi.
Funzione Descrizione
Accensione/
spegnimento
Premere questo tasto per accendere/spegnere il
dispositivo. Premere il tasto una volta per accendere
il dispositivo e attivare l’effetto amma. Premendo
nuovamente il tasto si spengono il dispositivo
e l’effetto amma. Ora il dispositivo si trova in
modalità standby.
Tenere premuto il tasto per 10 secondi per attivare/
disattivare il blocco di sicurezza bambini. Non
appena il blocco viene attivato, si spegne il
riscaldamento, ma l’effetto amma resta acceso.
Fiamma E’ possibile selezionare 4 livelli di illuminazione
(L1-L4).
Timer
Premere il tasto timer per selezionare una delle
seguenti impostazioni: 1 > 2 > 3 > 4 > 5 > 6 > 7 > 8
> 9 > OFF > 1 (…)
Funzione
riscaldamento
Premere questo tasto più volte per impostare le
seguenti funzioni: temperatura ambiente tra 17
°C e 27 °C (62 °F – 82 °F) > riscaldamento
continuamente ACCESO > riscaldamento SPENTO.
Tenere premuto il tasto per 10 secondi per attivare/
disattivare il blocco di sicurezza bambini. Non
appena il blocco viene attivato, si spegne il
riscaldamento, ma l’effetto amma resta acceso.
Tenere premuto il tasto per 5 secondi per passare
da Fahrenheit a Celsius.
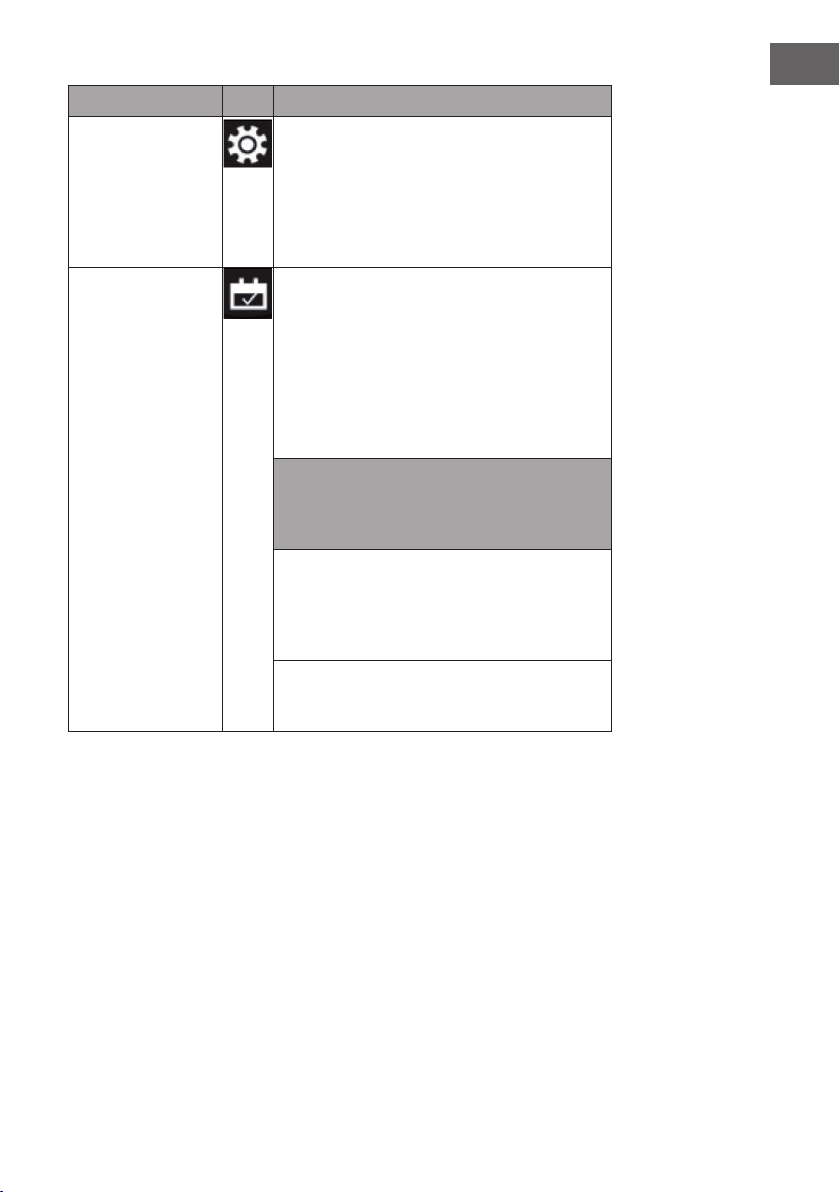
153
IT
Funzione Descrizione
Impostazione
Quando il dispositivo è acceso o in standby, tenere
premuto per 3 secondi il simbolo delle impostazioni
sul telecomando o premere Timer sul pannello di
controllo per 3 secondi a dispositivo in standby.
L’indicazione (00:00) lampeggia. Impostare prima
l’ora. Premere + sul telecomando per impostare l’ora
e – per impostare i minuti.
Timer settimanale Dopo aver impostato l’ora attuale, premere di
nuovo il simbolo delle impostazioni per attivare
il timer settimanale e premere poi il simbolo del
calendario per scegliere da domenica a sabato. La
data selezionata si illumina. Premere poi il simbolo
delle impostazioni per impostare in successione
l’ora di spegnimento e accensione e premere poi
direttamente OK per chiudere l’impostazione del
timer settimanale.
Nota: l’ora attuale deve essere impostata dopo la
prima accensione o il primo spegnimento, altrimenti
l’ora rimane su “00:00” e la funzione timer non può
essere utilizzata.
L’orologio si illumina automaticamente quando
l’alimentazione è attiva. L’orologio spegne
automaticamente il display in standby dopo 60
secondi. Premere un tasto funzione a piacere per
mostrare nuovamente l’orologio.
Quando ci si trova nelle impostazioni, premere
direttamente il simbolo del calendario per
selezionare l’impostazione del timer settimanale.

154
IT
Avvertenze importanti sulla sostituzione delle pile
• Non mischiare le pile nuove con quelle vecchie.
• Utilizzare solo pile standard AAA. Assicurarsi che
i bambini non le ingoino.
• Le pile non ricaricabili non devono essere
ricaricate.
• Inserire le pile facendo attenzione alla polarità
corretta (vedi gura).
• Rimuovere le pile scariche dal telecomando.
• Comprare sempre pile di dimensioni e tipo adatto
all’uso.
• Sostituire tutte le pile contemporaneamente.
• Pulire i contatti delle pile e del dispositivo prima
di inserirle.
• Smaltire immediatamente le pile scariche come
indicato nel capitolo “smaltimento”.

155
IT
CORREZIONE DEGLI ERRORI
Problema Possibile causa Soluzione
Il display indica “EE”. Cortocircuito. Contattare il servizio
d’assistenza per sostituire il
sensore del termostato.
Il display indica “88”. Non viene buttata fuori
aria calda e il ventilatore
non funziona.
Posizionare l’interruttore
su “off” e aspettare
almeno 10 minuti.
Dopodiché posizionare
l’interruttore su “on”.
Il display indica “OP”. Si attiva l’avviso di nestra
aperta (se la temperatura
ambiente scende nel giro
di 10 minuti di 4 °C/ 8
°F o più e la temperatura
non sale entro 42 minuti)
e il dispositivo si spegne
automaticamente.
Ispezionare il dispositivo e
assicurarsi che gli ingressi
e le uscite d’aria non
siano bloccati, perché
potrebbero causare un
surriscaldamento del
dispositivo. Tenere la
spina staccata dalla presa
per 30 minuti per lasciar
raffreddare il dispositivo.
Dopodiché reinserire
la spina nella presa e
accendere il dispositivo.
Se il problema persiste
rivolgersi al servizio
d’assistenza.
Non c’è corrente, i
tronchetti di legno non
bruciano.
La spina non è inserita. Assicurarsi che la spina
sia inserita in una presa
da 220 – 240 V. premere
più volte il tasto di
accensione/spegnimento
e assicurarsi che
l’interruttore sia su “on”.
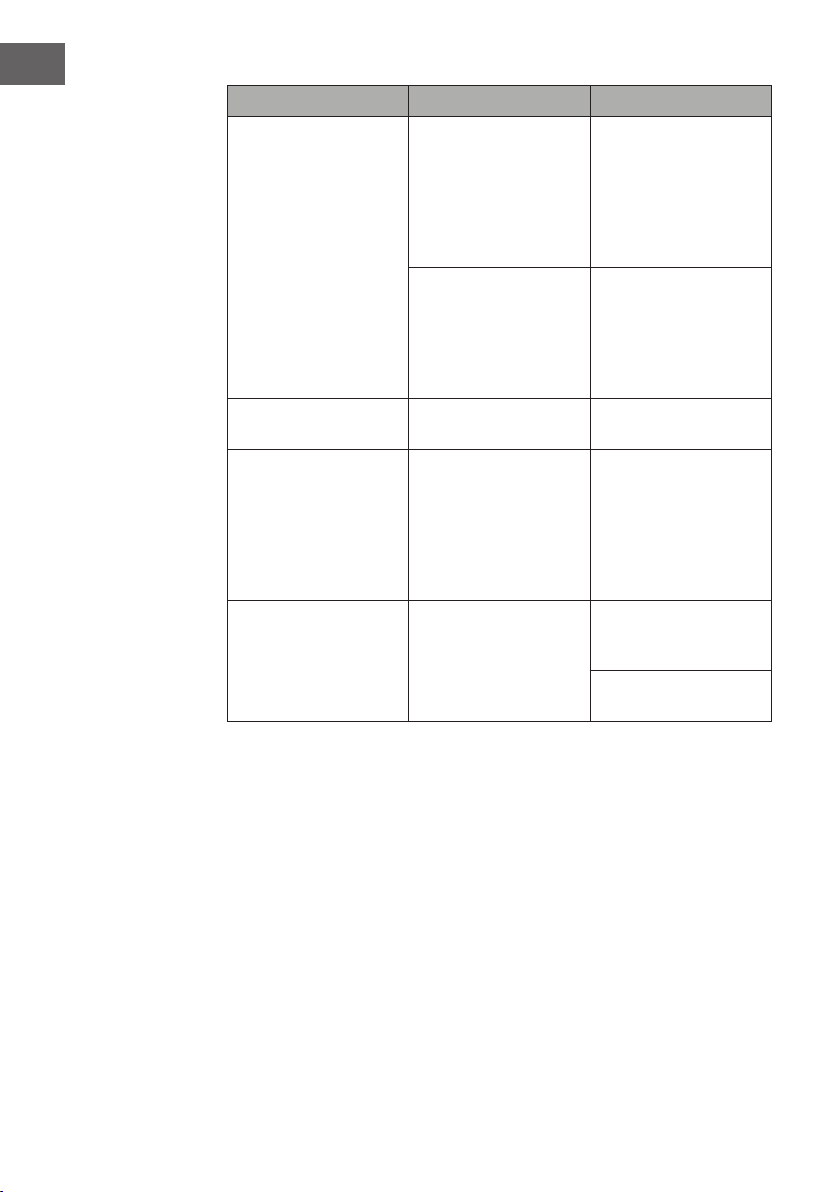
156
IT
Problem Mögliche Ursache Lösungsansatz
L’aria calda non viene
buttata fuori.
Ciclo di raffreddamento Il dispositivo funziona
normalmente per alcuni
minuti prima di spegnersi.
La durata dipende dalla
temperatura attuale. In
quel lasso di tempo viene
buttata fuori aria fredda.
L’impostazione del
termostato impedisce
che la funzione di
riscaldamento venga
attivata.
Regolare la temperatura
in modo tale che il
termostato sia impostato a
un valore più alto rispetto
alla temperatura ambiente
attuale.
I tronchetti bruciano, ma
non c’è l’effetto amma.
L’effetto amma è
disattivato.
Premere più volte il tasto
amma.
L’effetto amma funziona,
ma non va la funzione
di riscaldamento. Il letto
di brace brilla quando
si preme il tasto di
riscaldamento.
La funzione di
riscaldamento è
disattivata.
Tenere premuto per 10
secondi il tasto on/off
quando il dispositivo è in
funzione. Non appena la
funzione di riscaldamento
si riattiva, il letto di brace
riprende a brillare.
La funzione di
riscaldamento non
funziona.
L’interruttore di sicurezza è
stato attivato.
Spegnere l’interruttore
elettrico, aspettare 15
minuti e riaccenderlo.
Vericare il fusibile. Se è
rotto bisogna sostituirlo.

157
IT
Problema Possibile causa Soluzione
Il telecomando non
funziona quando si
premono i tasti.
Non ci sono le pile. Sostituire le pile.
Pessima trasmissione del
segnale.
Assicurarsi che non ci
sia troppa distanza tra
trasmettitore e ricevitore.
Premere i tasti del
telecomando con un
movimento regolare e una
pressione dolce.
Premere i tasti
velocemente e
ripetutamente
può comportare
malfunzionamenti al
trasmettitore.
La distanza è troppo
grande.
Tenere il telecomando
a non più di 20 piedi di
distanza dal lato frontale
del dispositivo; dirigere
il telecomando verso il
pannello di controllo.

158
IT
AVVISO DI SMALTIMENTO
Se nel proprio paese si applicano le regolamentazioni
inerenti lo smaltimento di dispositivi elettrici ed elettronici,
questo simbolo sul prodotto o sulla confezione segnala che
questi prodotti non possono essere smaltiti con i riuti normali
e devono essere portati a un punto di raccolta di dispositivi
elettrici ed elettronici. Grazie al corretto smaltimento dei
vecchi dispositivi si tutela il pianeta e la salute delle persone
da possibili conseguenze negative. Informazioni riguardanti il
riciclo e lo smaltimento di questi prodotti si ottengono presso
l’amministrazione locale oppure il servizio di gestione dei
riuti domestici.
Il prodotto contiene batterie. Se nel proprio paese si
applicano le regolamentazioni inerenti lo smaltimento di
batterie, non possono essere smaltite con i normali riuti
domestici. Preghiamo di informarvi sulle regolamentazioni
vigenti sullo smaltimento delle batterie. Grazie al corretto
smaltimento dei vecchi dispositivi si tutela l’ambiente e la
salute delle persone da conseguenze negative.
PRODUTTORE E IMPORTATORE (UK)
Produttore:
Chal-Tec GmbH, Wallstraße 16, 10179 Berlino, Germania.
Importatore per la Gran Bretagna:
Chal-Tec UK limited
Unit 6 Riverside Business Centre
Brighton Road
Shoreham-by-Sea
BN43 6RE
United Kingdom
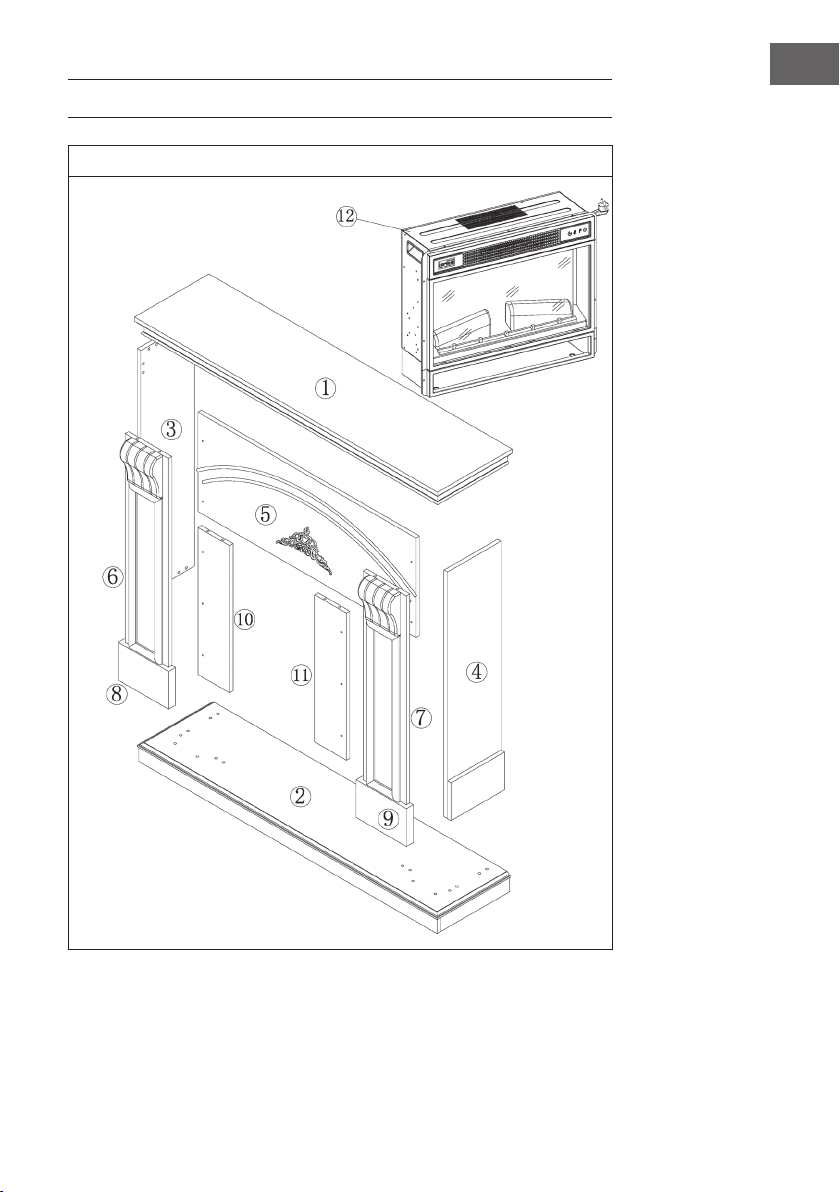
159
IT
INSTALLAZIONE VULSINI DAWN
Panoramica

160
IT
Lista dei componenti
N° Descrizione Quantità
1 Pannello superiore 1
2 Pannello inferiore 1
3 Pannello laterale sinistro 1
4 Pannello laterale destro 1
5 Asse piccola superiore 1
6 Pannello frontale sinistro 1
7 Pannello frontale destro 1
8 Piede d’appoggio sinistro 1
9 Piede d’appoggio destro 1
10 Asse piccola sinistra 1
11 Asse piccola destra 4
12 Camino elettrico 1
Lettera Descrizione Quantità.
A Vite a croce 38 + 1
B Morsetto metallico 19
C Dado 16
D Vite 10
E Pannello con 2 viti 4
F Vite autoperforante M4 x 12 8
G Sistema antiribaltamento 1

161
IT
Assemblaggio
1
2

162
IT
3
4

163
IT
5
6

164
IT
7
8
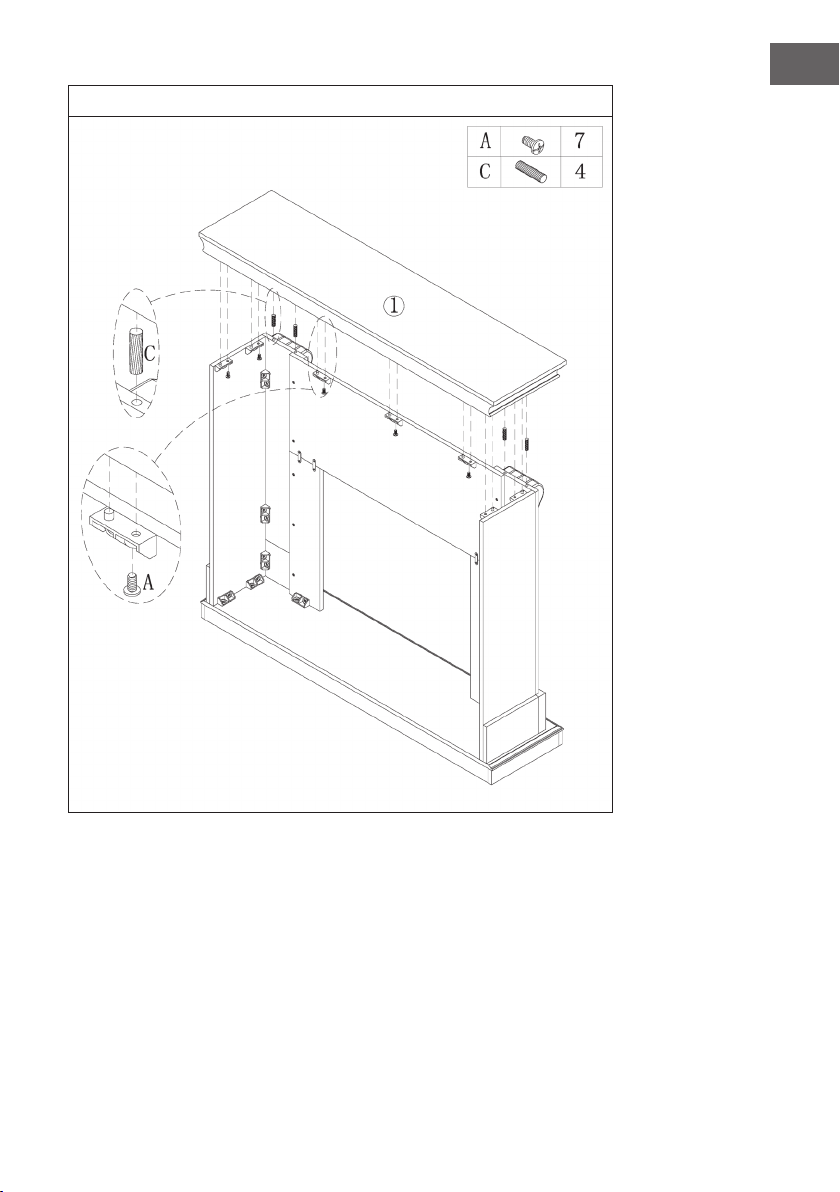
165
IT
9

166
IT
10
Inserire il camino elettrico nell’alloggiamento e ssarlo con le viti M4 x 12.

167
IT
11
Un lato del cavo viene ssato al muro con una vite e l’altro lato viene ssato alla
mensola del camino. Il cavo viene poi stretto.
Muro

168
IT
INSTALLAZIONE VULSINI NIGHTFALL
Panoramica
169
IT
Lista dei componenti
N° Descrizione Quantità
1 Pannello superiore 1
2 Pannello inferiore 1
3 Pannello laterale sinistro 1
4 Pannello laterale destro 1
5 Pannello frontale sinistro 1
6 Pannello frontale destro 1
7 Pannello frontale superiore 1
8 Pannello posteriore sinistro 1
9 Pannello posteriore destro 1
10 Asse piede d’appoggio 1
11 Mensola regolabile 4
4 Elektrischer Kamin 1
12 Camino elettrico 1
Lettera Descrizione Quantità
A Bullone in metallo 19 + 1
B Camma metallica 19 + 1
C Dado 24 + 1
D Vite 14
E Perno mensola 16 + 1
F Vite autoperforante M4 x 12

170
IT
Assemblaggio
1
2

171
IT
3
4

172
IT
5
6

173
IT
7
8

174
IT
9
10

175
IT
11
Inserire il camino elettrico nell’alloggiamento e ssarlo poi con le viti M4 x 12.

176
IT
INSTALLAZIONE VULSINI HIDEAWAY
Panoramica
177
IT
Lista dei componenti
N° Descrizione Quantità
1 Pannello superiore 1
2 Pannello inferiore 1
3 Pannello laterale 2
4 Pannello frontale 2
5 Camino elettrico 1
Lettera Descrizione Quantità.
A Bullone in metallo 4
B Camma metallica 4
C Dado 4
D Vite 24
E Connettore 12
F Vite autoperforante M4 x 12 8

178
IT
Assemblaggio
1
2
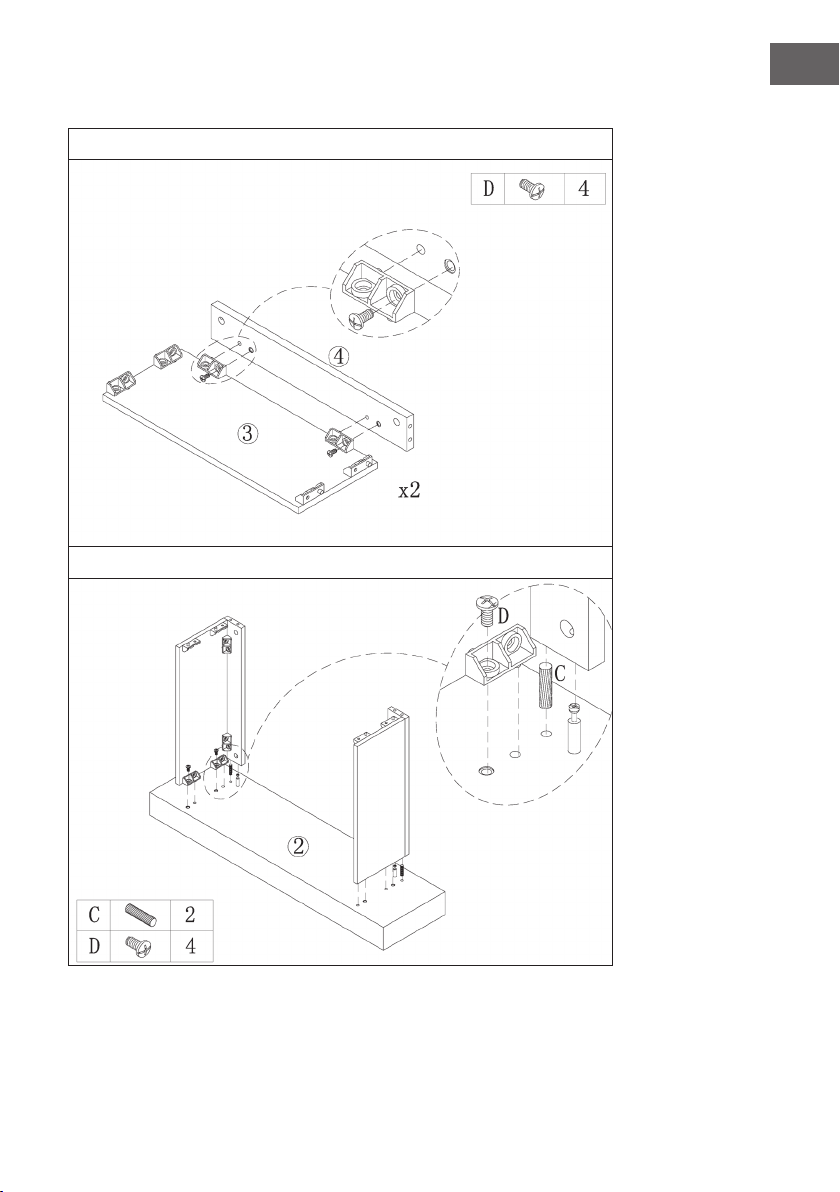
179
IT
3
4

180
IT
5
6
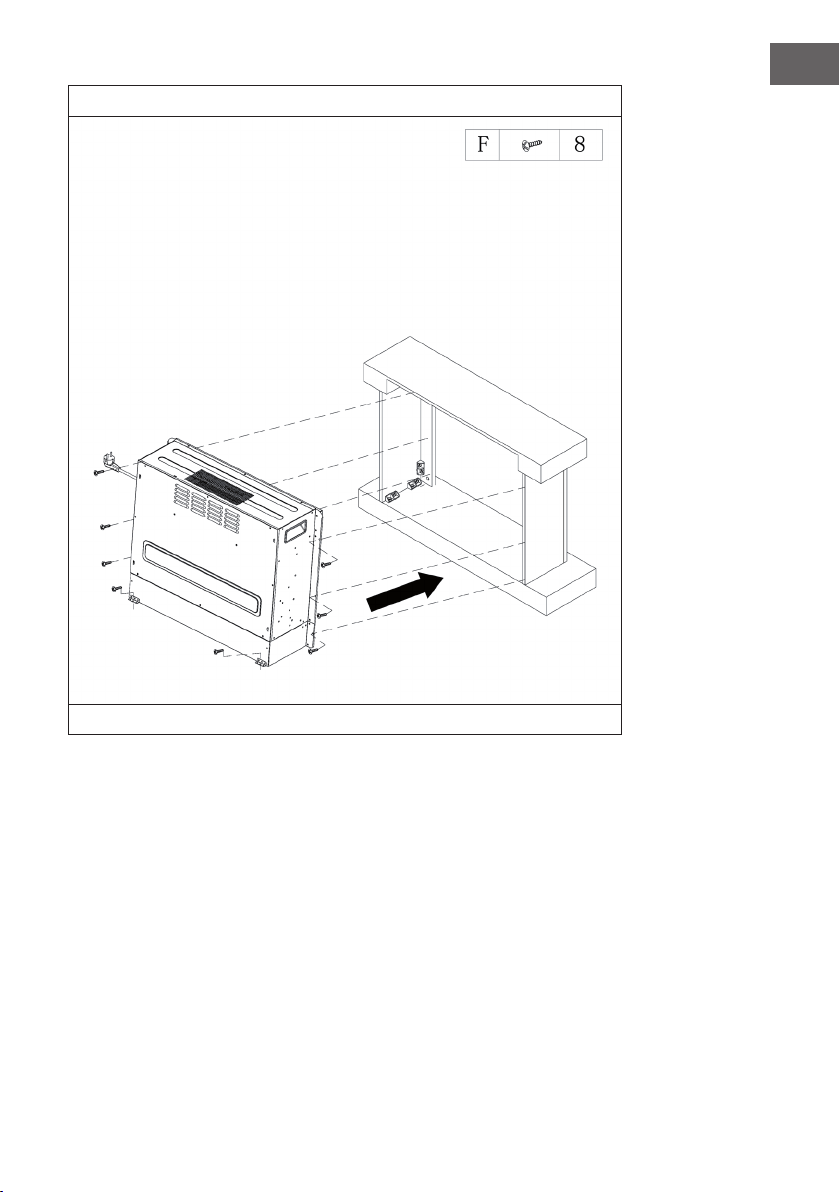
181
IT
7
Inserire il camino nell’alloggiamento e ssarlo con le viti M4 x 12.