Documents: Go to download!
- Owner's manual - (English, Spanish)

- FEATURES AND BENEFITS
- PROGRAMMING YOUR COFFEEMAKER
- CLEANING AND MAINTENANCE
- DECALCIFICATION
Table of contents
USER MANUAL COFFEEMAKER
FEATURES AND BENEFITS
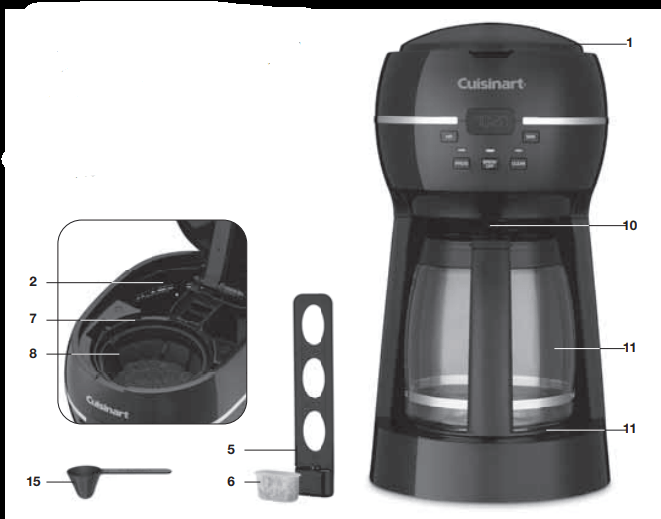
1. Reservoir Cover
Flips back for easy filling.
2. Water Reservoir
3. Showerhead (not shown)
Distributes water evenly over coffee, reducing temperature loss as water passes through grounds
4. Stair step water level indicator (Not Shown)
Convenient measure (by cup) of how much water is in the reservoir.
5. Charcoal Water Filter Holder
Holds filter firmly in place.
6. Charcoal Water Filter (shown on page 7) Eliminates chlorine, calcium and bad tastes and odors from tap water.
7. Filter Basket Holder
8. Filter Basket
Holds a #4 paper filter or a permanent filter.
9. Permanent Nylon Filter
Commercial-style filter eliminates the need for paper filters. NOTE: Some fine grounds may flow through the filter and appear as sediment in the carafe.
10. Brew Pause™
Stops flow of coffee from basket when carafe is removed (20 seconds max) from the heater plate, so a cup can be poured mid-brew.
11. 12-Cup Glass Carafe
The easy-pour, no-drip, 12-cup carafe has an ergonomic handle and brewed coffee markings for 2 to 12 cups.
12. Heating Plate
Scratch resistant with black, nonstick coating.
13. Ready Tone (not shown)
Signals the end of the brew cycle with 5 beeps.
14. Power Loss Backup System (not shown) One-minute protection if a breaker trips, unit is unplugged, or power fails. Holds all programmed information, including time of day, Auto On time and Auto Off time.
15. Measuring Scoop
16. BPA Free (not shown)
All materials that come in contact with water or coffee are BPA free.
CONTROL PANEL
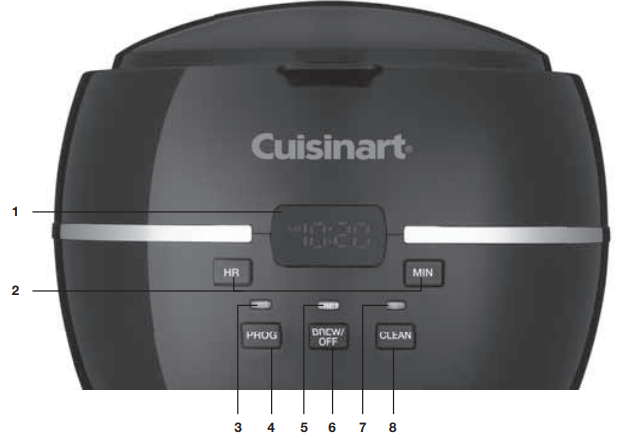
1. Clock Display
Displays time of day, Auto On time.
2. Hour and Minute Buttons
For use in setting hour and minutes for clock display, Programming time (Auto On), and Auto Off time.
3. Prog Indicator
Turns on when coffeemaker is in Programming Function and will turn off when brew cycle begins.
4. Prog (Program) Button
Press to set coffeemaker into Programming Function (Auto On) to Brew at time selected, up to 24 hours in advance. Hold button to adjust Programmed time for Auto On.
5. Brew Indicator
Turns on when coffeemaker is in a brew cycle.
6. Brew/Off and Auto Off Button with Indicator
Push to start/stop brew cycle and hold to adjust Auto Off feature.
7. Clean Indicator
Turns on when coffeemaker needs to run a Clean Function cycle.
8. Clean Button
Press to activate Clean Function.
BEFORE BREWING YOUR FIRST POT OF COFFEE
We recommend flushing out the system before brewing your first pot of coffee. Simply fill the reservoir and power on the unit, following steps #2, #4, #5 and #6 in BREWING COFFEE instructions on the next page.
DO NOT ADD COFFEE!
Once you’ve done that, brew a pot of coffee and get ready to enjoy Cuisinart at its best!
PROGRAMMING YOUR COFFEEMAKER
TO SET THE TIME
Press and hold the HOUR or MINUTE button. The clock will begin flashing.
- Set Hour: Press and hold the HOUR button to scroll through numbers quickly. When desired number approaches, press and release the button to advance one digit at a time.
NOTE: When the number count passes 12 PM will be displayed on the LCD. Be sure the PM indicator is on if a PM time is desired. - Set Minutes: Press and hold the MINUTE button to scroll through numbers quickly. When desired number approaches, press and release the button to advance one digit at a time. To finish setting time, simply wait until the numbers stop flashing.
TO PROGRAM THE AUTO ON TIME (BREW START TIME)
- To set up the time for Auto On, hold the PROG button until clock begins to flash. Set the time you want coffee to begin brewing by using the MINUTE and HOUR buttons.
Note: To use the previously selected Auto On time again for Programming, simply press PROG button once. The coffeemaker will remember the time set previously unless unplugged for more than 1 minute. - To activate Auto On mode, press the PROG button and release. The blue PROG indicator light will turn on to remind you that the programming function is in use. At the programmed time, the blue indicator light will turn off and the blue BREW/OFF indicator light
CHARCOAL WATER FILTER
Your coffeemaker comes with a charcoal water filter that eliminates chlorine, bad tastes and odors from tap water.
Inserting the Water Filter
- Remove the filter from the polybag and soak it, fully immersed, in cold tap water for 15 minutes.
- Lift the water filter holder out of the water reservoir (see diagram, page 5).
- Press down on the filter compartment and pull toward you to open.
- Place filter into the holder and snap it closed. Be careful - improper placementcan tear the filter skin.
- Flush filter by running cold tap water through holes in bottom of compartment for 10 seconds.
- Allow the filter to drain completely.
- Slide the water filter holder back into the channel in the water reservoir, pushing it down to the base of the unit.
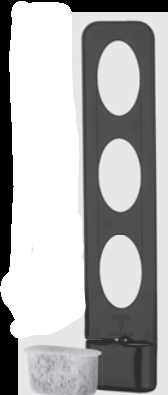
NOTE: We recommend changing the water filter every 60 days or after 60 uses, and more often if you have hard water.
POWER LOSS BACKUP SYSTEM
One-minute protection in case a breaker trips, the unit is unplugged, or the power fails. It holds all programmed information, including time of day, Auto On time and Auto Off time.
ADJUSTING THE AUTO OFF FEATURE
After the coffeemaker finishes a brew cycle, the heating plate underneath the carafe is programmed to keep your coffee warm for 2 hours (default time) and then automatically shut off. The Auto Off feature can be adjusted so that the keep warm time can last between 0-2 hours. To change the automatic shut off time, follow the instructions below:
- Press and hold the BREW/OFF button for two seconds, until the blue BREW/OFF indicator and the clock display begin flashing.
- The LCD display will show the program default time at 2:00, and will be flashing.
- Press the HOUR and MINUTE buttons to program your coffeemaker to automatically shut off from 0-2 hours.
Note: The Auto Off time ca n only be programmed before brewing
BREWING COFFEE
Before your first brew, please follow instructions in previous page - Before Brewing Your First Pot of Coffee.
- Insert charcoal water filter
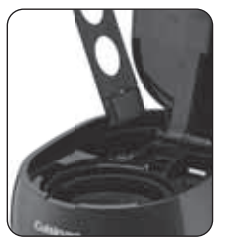
Follow directions for the preparation and insertion of the filter on previous page. - Fill the water reservoir
Open the coffeemaker reservoir cover by lifting it up. Pour in the desired amount of water using the stair step water level indicator located in the reservoir.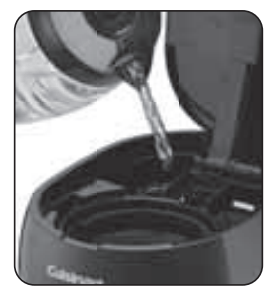
- Insert filter and add the ground coffee
Remove the filter basket by grasping the handle and lifting raight up. Insert a #4 paper filter or permanent nylon filter. Be sure that a paper filter is completely open and fully inserted in the basket. It may help to fold and flatten the seams of a paper filter beforehand. Add level scoop (1 tablespoon) of ground coffee per cup. Adjust the amount according to taste.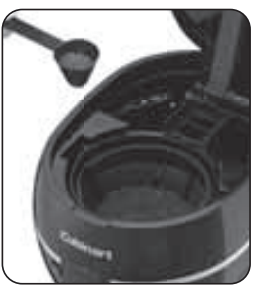
NOTE: The maximum capacity for ground coffee is 15 scoops (15 tablespoons) for this coffeemaker. Exceeding this amount may cause overflow if the coffee is too finely ground.
Replace the filter basket in the filter basket holder and press firmly on cover to be sure it closes securely. - Before brewing coffee
Make sure the glass carafe is in position on the heating plate and the top cover is closed. - Begin brewing
Press the BREW/OFF button, and the blue indicator light will turn on. Or, set the Auto On function (see page 7) and the Auto On indicator light will turn on.
NOTE: Press and release the BREW/OFF button again to turn off brewing at any time. - When the brewing cycle is complete, 5 beeps will sound. Coffee will continue to stream from the filter for several seconds.
- After brewing cycle is complete, coffeemaker will enter Keep Warm function. Heating plate will keep carafe warm for up to 2 hours.
NOTE: Reservoir cover may be hot during and directly after brewing. Wait at least 10 minutes before opening.
BREW PAUSE™ FEATURE
This feature interrupts the flow of coffee from the basket to let you pour that first cup mid-brew. Because the flavor profile of coffee brewed at the start of a cycle differs from that brewed toward the end, be aware that using this feature will weaken the flavor strength of the finished pot.
NOTE: Removing carafe for more than 20 seconds may cause filter basket to overflow.
CLEANING AND MAINTENANCE
Always turn coffeemaker off and remove the plug from the electrical outlet before cleaning. Remove and discard the paper filter and ground coffee. The filter basket can be washed in warm, soapy water and rinsed thoroughly, or cleaned in the upper rack of the dishwasher. Dry all parts after use.
Do not put any water in the unit once the filter basket has been removed. Wipe the area under the filter basket with a damp cloth.
Remove the carafe from the heating plate. Discard any remaining coffee. The carafe and lid can be washed in warm, soapy water and rinsed thoroughly, or placed in a dishwasher. The carafe should be placed on the upper rack. If handwashing the carafe, carefully hand-dry or air-dry carafe in an upright position.
Never immerse base unit in water or other liquids. To clean base, simply wipe with a clean, damp cloth and dry before storing. Fingerprints and other blemishes on the housing can be washed off with soap and water or a nonabrasive cleaning solution.
Wipe heating plate with a clean, damp cloth.
Never use rough, abrasive materials or cleansers to clean the heater plate or any part of the coffeemaker.
Do not dry the inside of the water reservoir with a cloth, as lint may remain.
The nylon filter may have some discoloration after a few uses even if rinsed thoroughly. This will not impact taste and quality of coffee.
MAINTENANCE
Any other servicing should be performed by an authorized service representative.
DECALCIFICATION
Decalcification refers to the removal of calcium deposits that form over time on the metal parts of the coffeemaker.
For best performance from your coffeemaker, decalcify the base unit from time to time.
The frequency depends upon the hardness of your tap water and how often you use the coffeemaker.
NOTE: Before decalcifying your coffeemaker, remember to remove the charcoal water filter from the water filter holder located in the water reservoir.
If the Clean indicator light is lit when the coffeemaker is plugged in, it is telling you that the calcium buildup is interfering with the functioning of your coffeemaker and the flavor of your coffee. To turn off the Clean indicator light, press the CLEAN button once. The Clean indicator light will turn off and regular brew cycle can start. The Clean indicator light will turn on again if a Clean cycle is not run.
To decalcify, fill the water reservoir to capacity with a mixture of 1/3 white vinegar and 2/3 water. Press the CLEAN button for two seconds. The Clean indicator light will begin to flash which means the coffeemaker is now in Clean mode and will start the clean cycle
One cycle should be sufficient to adequately clean the coffeemaker. When the cycle is completed and the 5 beeps sound, the coffeemaker will shut off. Turn the coffeemaker on to see if the Clean indicator continues to shine. If it does, then repeat the cleaning procedure with a fresh solution of vinegar and water.
If the Clean LED is no longer lit, run one cycle of fresh, cold water through the coffeemaker before using it again.
If your coffeemaker begins to brew slowly or there is residual water left over in the reservoir after a brew cycle, be sure to use the decalcification process above.
Notes on the Clean Function
Pressing the CLEAN button cancels all other settings. If it is pressed accidentally, press it again to return the coffeemaker to all its previous settings.
See other models: CPT-440CH CPT-540 CPT-520 CHW-16 TOB-260
