Loading ...
Loading ...
Loading ...
-
ASSEMBLY INSTRUCTIONS
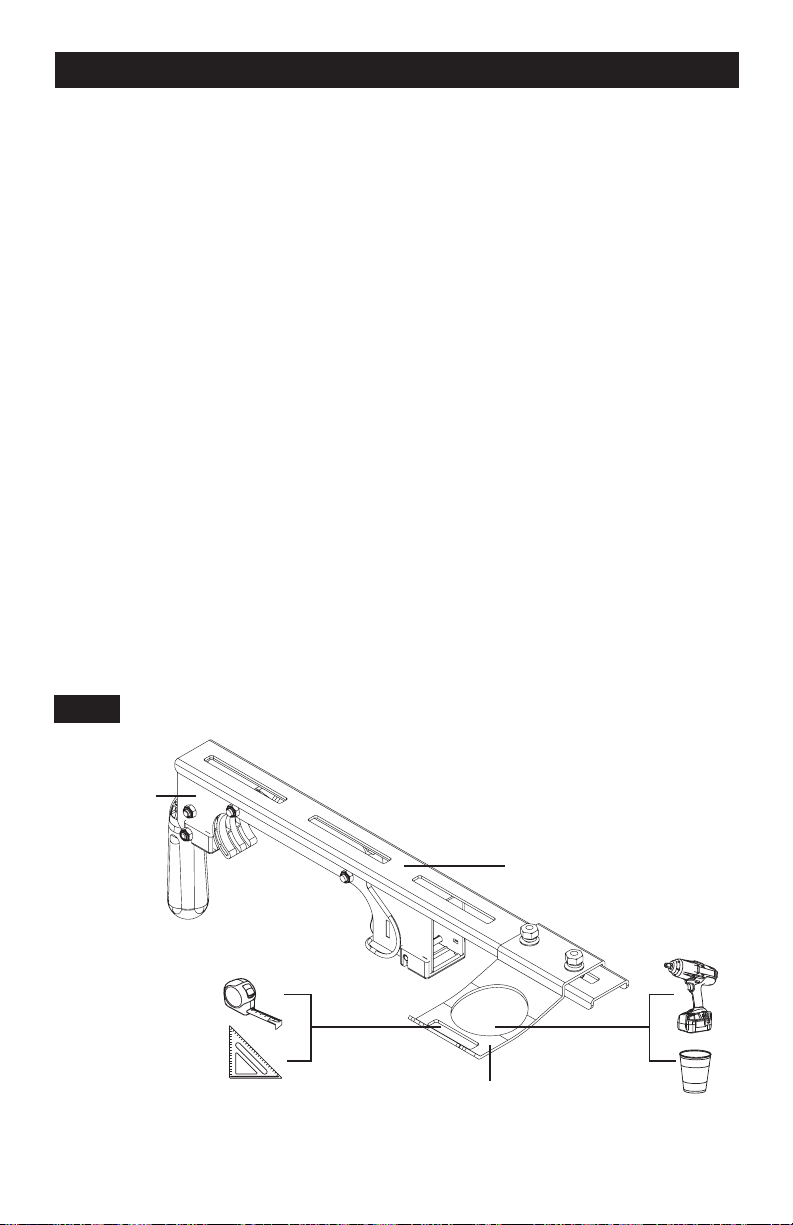
ASSEMBLING RAPID CLAMP TOOL MOUNTS
Figure 6
1. Lay out all parts before starting the assembly process.
2. Select one (21) storage handle and position it where desired on one (2) Rapid Clamp Tool
Mounting Rail. Run two (14) M8*20 carriage bolts through the slots in the rail arms and
attach using a (17) M8 washer and nut. These handles are designed to store tools and can
be located where most convenient for the user by sliding it along the rail. See Figure 6.
Tighten the bolts and repeat for the second arm. The handles should face opposite
directions (outward) when the two completed arms are next to each other.
3. Attach the rapid clamp tool mounting rail to the lower portions of the (2) rapid clamp tool
mounting base using one (in each) (14) M8*20 carriage bolts and one (in each) (15) M8
nuts, making sure that the threaded portion is facing down toward the base (only hand
tighten at this point).
4. To determine the best placement of the power tool on the rapid clamp tool mounting rail,
place the rapid clamp tool mounts onto the body of the Miter Saw Workstation and estimate
the tool’s center of gravity as it relates to the Miter Saw Workstation. The rapid clamp tool
mounting rail can be adjusted forward and/or backward as needed, as long as its excess
material doesn’t affect workflow during the normal use of the tool.
5. Tighten down the (15) M8 nuts that were placed in the rapid clamp tool mounting rail and
rapid clamp tool mount base in Step 3.
6. The rapid clamp tool handle and tool storage arms can be placed anywhere along the rapid
clamp tool mounting rail. Hold the rapid clamp tool handle and tool storage arms in place
using two (14) M8*20 carriage bolts and two (15) M8 nuts.
NOTE: If the tool has holes that do not line up with the slots in the tool mounts, then
use the Offset Mounting Brackets (see Figure 9).
FIG 6
Rapid Clamp Tool
Mount Base
Rapid Clamp Tool
Mounting Rail
Storage
Handle
Page 8
Loading ...
Loading ...
Loading ...