1 / EN
Dryer / User Manual
VD 24001 W
2960311281_EN/180117.1702
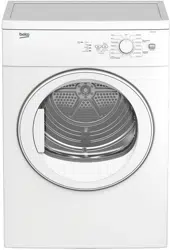
Front-Loading Dryer
Owner’s Guide:
Installation and Operation
Instructions
USA
This product was manufactured using the latest technology in environmentally friendly conditions.
Please read this user manual first!
Dear Customer,
Thank you for prefering a Beko product. We hope that your product which has been manufac-
tured with high quality and technology will give you the best results. We advise you to read
through this manual and the other accompanying documentation carefully before using your
product and keep it for future reference. If you transfer the product to someone else, give its
manual as well. Pay attention to all details and warnings specied in the user manual and fol-
low the instructions given therein.
Use this user manual for the model indicated on the cover page.
Read the instructions.
Explanation of symbols
Throughout this user manual the following symbols are used:
C
Important information or useful hints about usage.
A
Warning for hazardous situations with regard to life and property.
B
Warning against electric shock.
Warning against hot surfaces.
Warning against re hazard.
Packaging materials of the product are manufactured from recyclable materials in
accordance with our National Environment Regulations.
Do not dispose of the packaging wastes with the domestic waste or other wastes, discard
them to the dedicated collection points designated by the local authorities.
3 / EN
Dryer / User Manual
1 Your Dryer 4
2 Important Safety Instructions 5
3 Installation Instructions 9
3.1 Electrical connection ...................................9
3.2 Grounding Instructions ............................ 10
3.3 Appropriate installation location ..........11
3.4 Minimum Installation Clearances .........12
3.5 Use on top of a washer ............................. 12
3.6 Adjusting the feet ......................................13
3.7 Ventilation duct and connection .........13
3.8 Destroying packaging material ..............14
4 Operating Instructions 15
4.1 First Use ..........................................................15
4.2 Garments suitable for drying .................15
4.3 Garments unsuitable for drying ...........15
4.4 Preparing clothes to be dried ................16
4.5 Correct load capacity .................................16
5 Operating the product 17
5.1 Control panel .................................................17
5.2 Loading door .................................................17
5.3 Turning on the dryer .................................. 17
5.4 Main programs ............................................ 18
5.5 Special programs ........................................ 18
5.6 Starting the Program ............................... 19
5.7 Progress of program ................................. 19
5.8 Changing the program after the program
has started ............................................................ 20
5.9 Adding/removing laundry in stand-by
mode ........................................................................20
5.10 Auxiliary functions ..................................20
5.11 Child-proof lock ..........................................21
5.12 Warning indicators ...................................21
5.13 End of program ..........................................21
6 Technical Specifications 22
7 Quick Start-up Instructions 23
8 User maintenance and cleaning
instructions 24
8.1 Lint filter ........................................................ 24
8.2 Sensor ............................................................24
9 Troubleshooting 25
10 Warranty Statement 26
TABLE OF CONTENTS
4 / EN
Dryer / User Manual
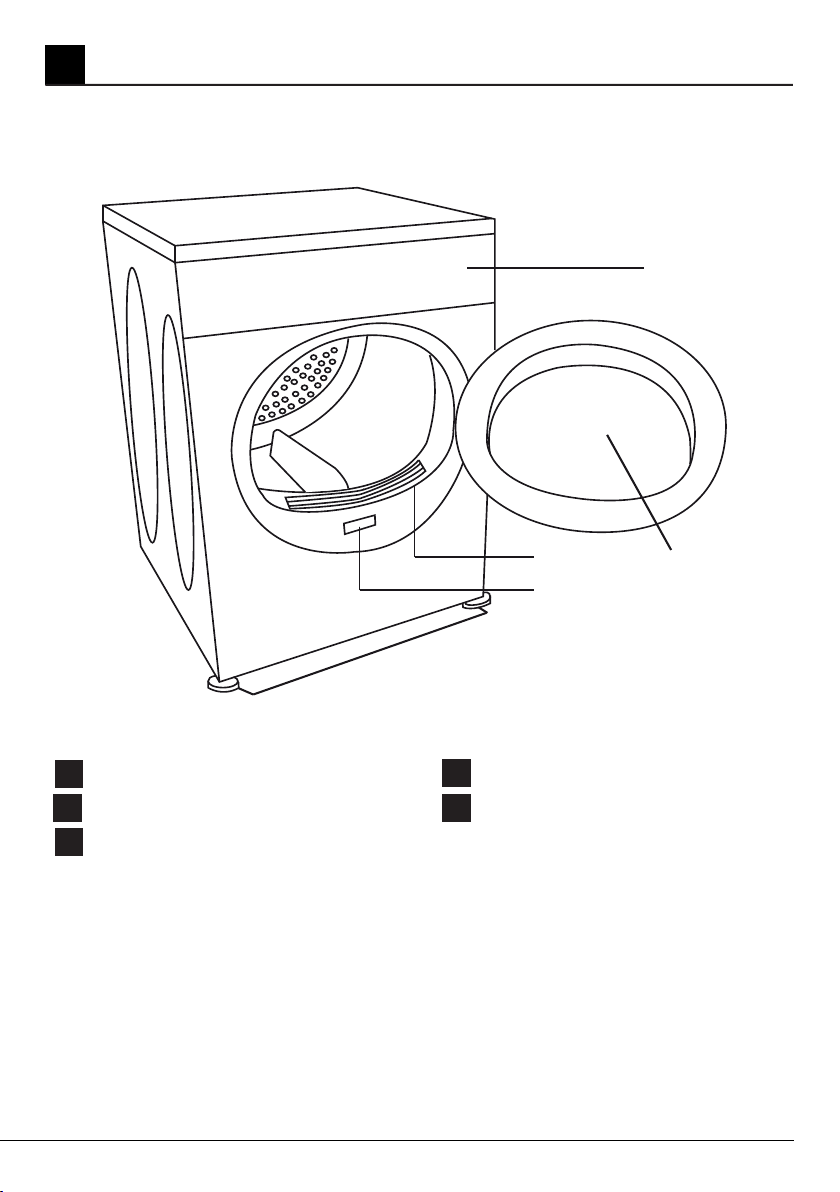
Overview
Figure 1
1
Your Dryer
1
2
5
1
2
3
4
5
3
4
Control Panel
Loading Door
Lint Filter
Type label
Adjustable Feet
NOTE: Specifications of this appliance may change without notice to improve the quality of
the product. Drawings in this manual are schematic and may not match your product exactly.
Values stated on the dryer labels or in the documentation accompanying it are obtained
in the laboratory in accordance with relevant standards. Depending on operational and
environmental conditions of the appliance, values may vary.

5 / EN
Dryer / User Manual
2 Important Safety Instructions
A
WARNING: To reduce the rsk of fre or electrc shock
resultng n serous njury or death when usng ths
applance, follow the basc precautons ncludng the
followng:
• Read all nstructons before usng the applance. Falure
to follow these nstructons wll ncrease the rsk of fre or
electrc shock and wll vod the warranty.
A
Ths product has been desgned for home use only.
• The applance must be operated at temperatures
between +5°C and +35°C. (41°F and +95°F)
• The applance must not be nstalled behnd a lockable
door, a sldng door or a door wth the hnges on the
opposte sde to that of the tumble dryer.
• Do not nstall or store ths applance where t wll be
exposed to weather.
• Do not tamper wth the controls.
• Do not repar or replace any part of the applance or
attempt any servcng unless specfcally recommended n
the user-mantenance nstructons or n publshed user-
repar nstructons that you understand and have the sklls
to carry out.
• Never wash the applance wth water.
• Never touch the plug wth wet hands.
• Never pull from the cable to unplug the dryer.
• Do not operate the applance f the power cord or plug s
damaged.
• For malfunctons that cannot be solved by nformaton
n the operatng manual: Turn off and unplug the applance
and call an authorzed servce provder.

6 / EN
Dryer / User Manual
• Ths applance must be grounded. In the event of
malfuncton or breakdown, groundng wll reduce the rsk
of electrc shock by provdng a path of least resstance
for electrc current. Ths applance s equpped wth a cord
havng an equpment-groundng conductor and a grounded
plug. The plug must be plugged nto an approprate outlet
that s properly nstalled and grounded n accordance wth
all local codes and ordnances.
B
WARNING: Improper connecton of the equpment-
groundng conductor can result n a rsk of electrc
shock. Check wth a qualfed electrcan or servce
representatve or personnel f you are n doubt as to
whether the applance s properly grounded.
• Power cord plug must be wthn easy reach after
nstallaton.
• To reduce the rsk of fre or electrc shock, do not use
extenson cords, mult-plugs or an adapter to connect the
dryer to electrcal mans.
• Do not modfy the plug provded wth the applance: f
t wll not ft the outlet, have a proper outlet nstalled by a
qualfed electrcan.
• If the power supply cord s damaged, t must be replaced
by the manufacturer, ts servce agent or smlarly qualfed
persons n order to avod an electrcal hazard.
• The applance must not be operated unless t s repared!
• Ventlaton openngs n the base must not be obstructed
by carpets, etc.
• Exhaust ar must not be dscharged nto a flue used for
exhaustng fumes from applances burnng gas or other
fuels.
• Adequate ventlaton must be provded to avod the back
flow of gases nto the room from applances burnng other
fuels, ncludng open fres.

7 / EN
Dryer / User Manual
• Do not dry artcles that have been prevously cleaned n,
washed n, soaked n or spotted wth gasolne, dry-cleanng
solvents or other flammable or explosve substances as they
gve off vapors that could gnte or explode.
• Do not use the tumble dryer f ndustral chemcals have
been used for cleanng what you want to dry.
• Do not dry unwashed tems n the tumble dryer.
• Do not place tems exposed to cookng ols n your dryer.
Items contamnated wth cookng ols may contrbute to a
chemcal reacton that could cause a load to catch fre.
• Items such as foam rubber (latex foam), shower caps,
waterproof textles, rubber-backed artcles and clothes or
pllows ftted wth foam rubber pads should not be dred n
the tumble dryer.
• Do not use fabrc softeners or products to elmnate statc
unless recommended by the manufacturer of the fabrc
softener or product.
• The applance may only be used for the dryng of textles
that are marked accordngly.
• Undergarments that contan metal renforcements should
not be placed n a tumble dryer. Damage to the tumble dryer
can result f any of the metal renforcement come loose
durng dryng.
• Before loadng check all garments for lghters, cons,
metal peces, needles, etc.
• The use of fabrc softener sheets s not recommended.
• The fnal part of a tumble dryer cycle occurs wthout heat
(the cool-down cycle) to ensure that the tems are left at
a temperature that ensures the tems are not damaged by
gettng too hot.
A
WARNING: Never stop the tumble dryer before the
end of the dryng cycle unless all tems are quckly
removed and spread out to dsspate heat.

8 / EN
Dryer / User Manual
• Do not reach nto the applance f the drum s movng.
• Do not allow chldren to play on or n the applance.Close
supervson of chldren s necessary when the applance s
used near chldren.
• Keep pets away from the applance durng the dryng
cycle.
• Before the applance s removed from servce or
dscarded, remove the door to the dryng compartment.
• Close the loadng door when you leave the area where the
dryer s located.
• Ths applance s not ntended for use by persons
(ncludng chldren) wth reduced physcal, sensory or
mental capabltes, or lack of experence and knowledge,
unless they are supervsed or have been gven nstructons
concernng the use of the applance by a person responsble
for ther safety.
• Clean lnt flter before or after each load.
• Keep area around the exhaust vent and adjacent
surroundng areas free from the accumulaton of lnt, dust,
and drt.
• The nteror of the applance and exhaust ductwork
should be cleaned perodcally by qualfed servce
personnel.
• Never use the dryer wthout the lnt flter.
• When your dryer s not n use or after the laundry s taken
out followng the completon of dryng process, turn off by
usng the On/Off button. In cases when the On/Off button
s n the On poston whle the dryer s plugged n, keep the
door of the dryer closed.
• For power savng n models wth lamps, when your dryer
s not n use, keep the door closed f the On/Off button s n
the On poston and the dryer s energzed.
SAVE THESE INSTRUCTIONS
9 / EN
Dryer / User Manual
WARNING: Failure to follow
these instructions could result
in a risk of fire
•The clothes dryer (“appliance‘) installation
must be performed by a qualified installer.
•Install the appliance according to the
manufacturer’s instructions and local codes.
•Do not install a clothes dryer with flexible
plastic venting materials. If flexible metal
(foil type) duct is installed, it must be of a
specific type identified by the ap pliance
manufacturer as suitable for use with clothes
dryers. Flexible venting materials are known
to collapse, be easily crushed, and trap lint.
These conditions will obstruct the clothes
dryer’s airflow and increase the risk of fire.
SAVE THESE INSTRUCTIONS
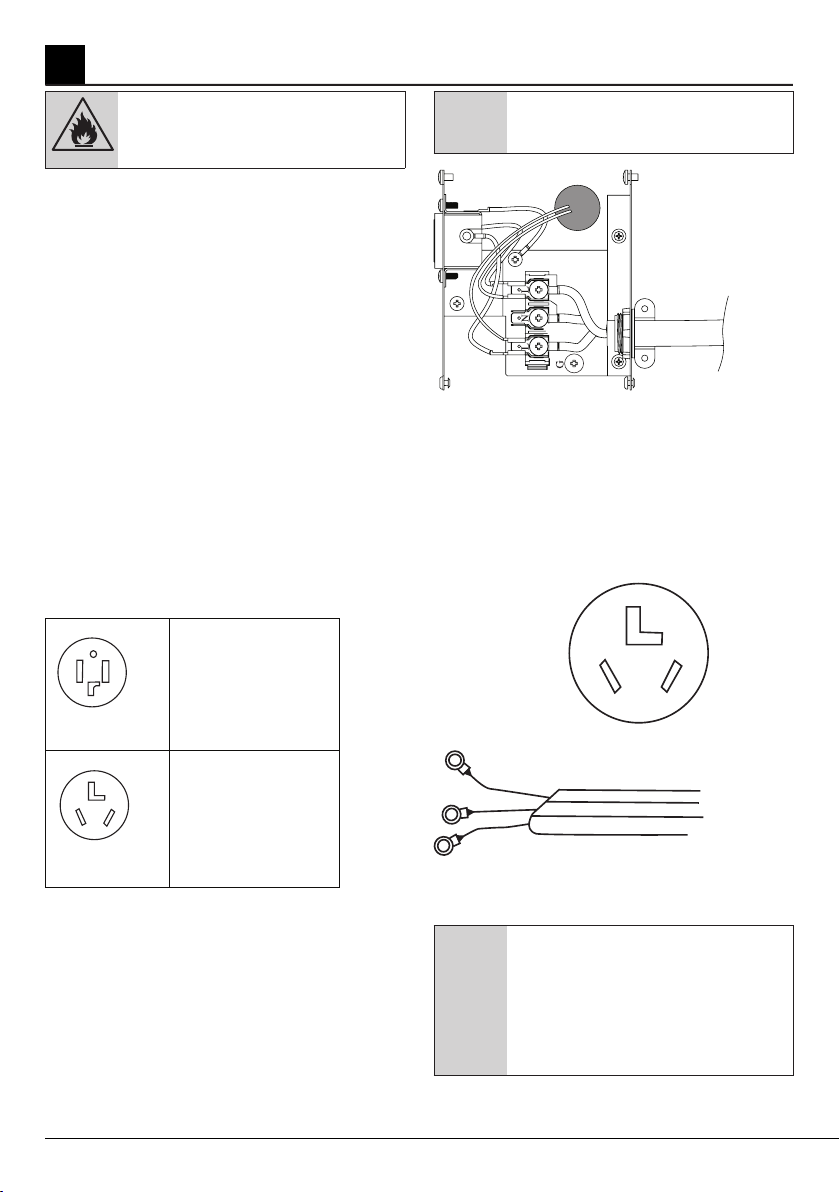
3.1 Electrical connection
Connect the appliance to a grounded outlet
protected by a fuse or circuit breaker of
suitable capacity.
4-wire receptacle
(14 -30R)
3-wire receptacle
(10 -30R)
If yo u have 3-wire receptacle, like
this , a 3-wire dryer cord mu st be
purchased locall y.
Dryer shipped with cord to fit this
type 4 -wire receptacle
C
Neutral conecction is not used in
this product
Power Cable
3-Wire Electrical Connection
If your receptacle is a 3-wire receptacle as
shown below, you must obtain a 3-wire dryer
cord. A dryer cord can usually be found at
your local hardware supply, electrical supply
or home center. Cord should have closed
loop or upturned end wire terminating
connectors. The cord kit must be marked “For
Use with Clothes Dryers”.
3- wire receptacle
( 10-30R)
Typical 3- Wire Dryer Cord 240V/30 amp
NEMA 10-30 Type SRDT
A
If the dryer is installed in a mobile
home, recreational vehicles, new
branch-circuit installations or in
areas where local codes do not
permit grounding through the
neutral conductor, only a 4-wire
power supply cord shall be used.
3 Installation Instructions
10 / EN
Dryer / User Manual
To change the cord:
1. Make sure that the dryer is not plugged
into any power outlet.
B
DO NOT plug end of dryer power
cord into a live receptacle before
connecting dryer power cord
to dryer terminals and closing
junction/splitter box as described
below.
B
DO NOT repair old power supply
cords. Power cord must be
changed only by a qualified
person. There is a risk of electric
shock!
2. Remove the screw from the cover of the
junction box located at the top rear of the
dryer.
3. Remove the red, white and black wire from
the terminal block.
4. Remove the green ground wire from the
ground terminal.
5. Loosen the strain relief clamp holding the
4-wire cable.
6. Thread the 4-wire cable out through the
strain relief clamp.
7. Thread the new 3-wire dryer cord through
the strain relief clamp.
8. Attach the power cord Ground conductor
(the center wire) to the terminal labeled
N. Connect the terminal labeled N and the
Ground terminal labeled G with the supplied
short cable. Tighten the terminals so that
they securely hold the conductors.
9. Attach the two remaining power cord
outer conductors to the 2 terminals labeled
L. Tighten both screws so that the power
conductors are securely held in place.
10. Tighten the strain relief so that the
power cord cannot be moved.
11. Replace the cover on the junction box and
fasten in place.
Power Cable
The dryer is now ready to be plugged into the
3-wire receptacle of the proper rating.
The receptacle should be located so that the
plug and receptacle will be accessible with
the dryer in its installed position.
3.2 Grounding Instructions
This appliance must be grounded. In
the event of malfunction or breakdown,
grounding will reduce the risk of electric
shock by providing a path of least resistance
for electric current. This appliance is
equipped with a cord having an equipment-
grounding conductor and a grounding
plug. The plug must be plugged into an
appropriate outlet that is properly installed
and grounded in accordance with all local
codes and ordinances.
• Power cord plug must be within easy reach
after installation.
• The voltage and the allowed fuse/breaker
protection are specified in the section
“Technical Specifications”.
• The stated voltage must match your mains
voltage.
• Connection via extension cords or multi-
plugs should not be made.
• The main fuse/breaker and switches must
have a contact distance of minimum 3 mm.

11 / EN
Dryer / User Manual
B
A damaged power cable must be
replaced by a qualified electrician.
B
WARNING – Improper
connection of the
equipment-grounding
conductor can result in a
risk of electric shock. Check
with a qualified electrician
or service representative
or personnel if you are
in doubt as to whether
the appliance is properly
grounded. Do not modify
the plug provided with
the appliance: if it will
not fit the outlet, have a
proper outlet installed by a
qualified electrician.
B
The appliance must not be
operated unless it is repaired!
There is the risk of electric shock!
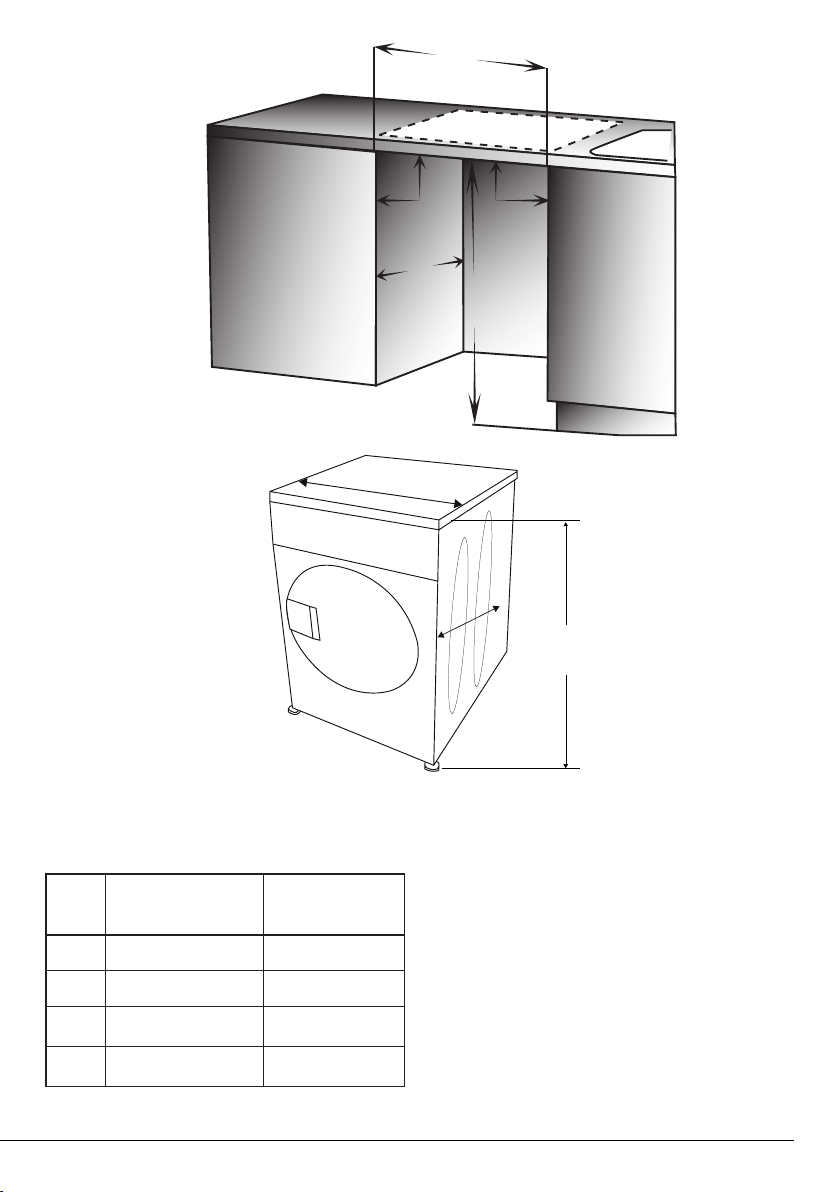
3.3 Appropriate installation
location
•Install your appliance in environments that
have no risk of freezing and are in a stable
and level position.
•Do not place your appliance on a high pile
rug or on similar surfaces.
•Operate your appliance in a well-ventilated,
dust-free environment.
•Do not block the air ducts in front of and
under the dryer.
B
Make sure that your appliance is
not placed on the power cable.
B
Keep appliance at least 0.6” (1.5
cm) from the edges of other
furniture.
12 / EN
Dryer / User Manual
Ventlaton Requrements
Closet door must have 2 openings, one
located 3.2 inches (8 cm) from bottom of
door having a minimum area of 16 sq. inches
(103 cm2) and the other one located 3 inches
(7.5 cm) from top of door having a minimum
area of 46 sq. inches (294 cm2).
3.5 Use on top of a washer
•A stacking-kit (Part no: 296 710 0100)
should be used between the washer and
dryer for use on top of a washer. The
stacking-kit should be installed by the
Authorized Service provider.
3.4 Minimum Installation
Clearances
Alcove or
Built-under
Closet
Sides 0.59 in. (15 mm) 0.59 in. (15 mm)
Top 2.68 in. (68 mm) 2.68 in. (68 mm)
Rear 0.59 in. (15 mm) 0.59 in. (15 mm)
Front 0.20 in. (5 mm) 0.20 in. (5 mm)
33½"
(
850 mm)
23½"
(595 mm )
21¼"
(540 mm)
90
0
90
0
36.14
(918 mm)
min.
22.05
560 mm
min.
24.6
(625 mm)
min.
”
”
”
13 / EN
Dryer / User Manual
•Place the appliance on a solid floor. If
it is to be placed on top of a washer, the
approximate weight together may reach 397
lbs (180 kg) when they are full. Therefore,
the floor must be capable of carrying the
load placed on it!
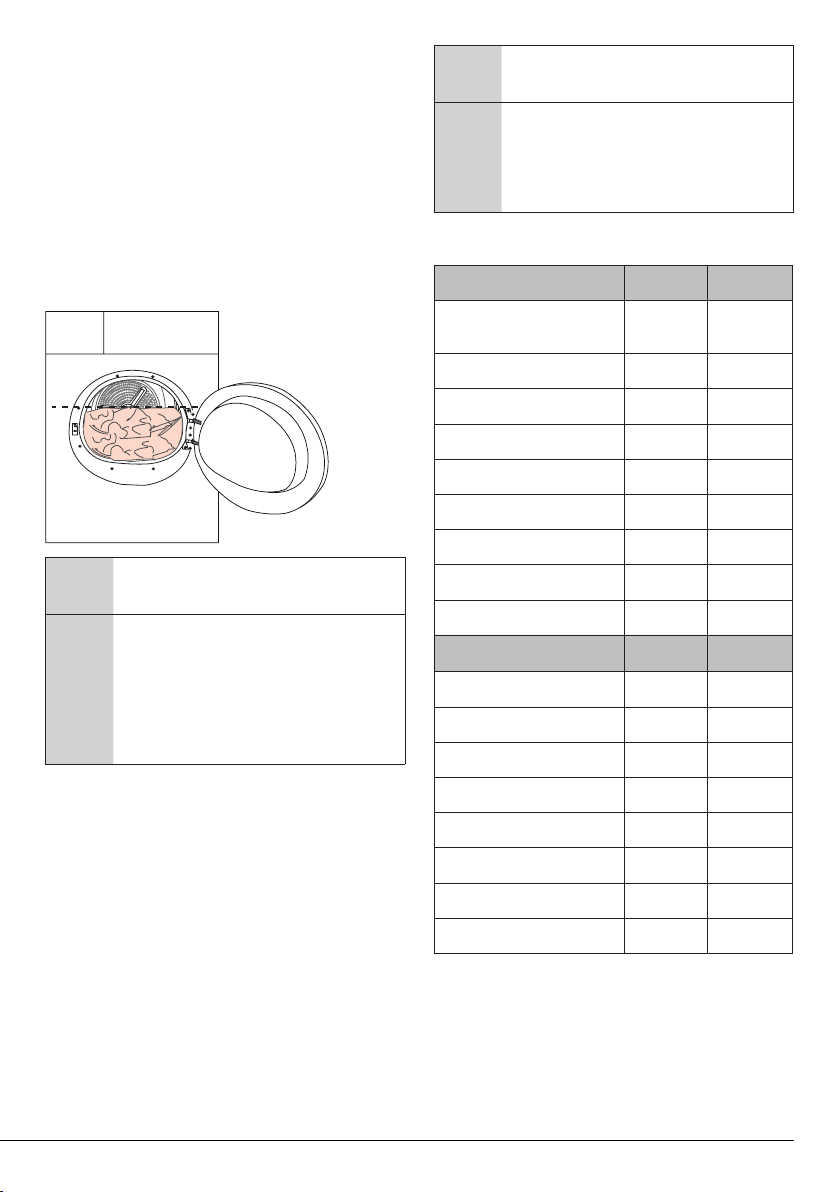
3.6 Adjusting the feet
In order to ensure that your appliance
operates almost silently and vibration-free,
it must stand level and balanced on its
feet. The front feet of the appliance can be
adjusted. Balance the appliance by adjusting
the feet.
C
Do not use any tools to loosen the
adjustable feet. Otherwise, they
may be damaged.
C
Never unscrew the adjustable feet
from their housings.
2 plastic pieces supplied together with
the Operating Instructions prevent your
appliance from slipping on wet and slippery
surfaces. To install these plastic parts:
1. Tilt the appliance backwards.
2. Fit the plastic parts to the front adjustable
feet. Press on the plastic parts to fix them in
their places.
3. Check the balance of the appliance again
and readjust the adjustable feet if necessary.
1. Loosen the feet by hand.
2. Adjust them until the
appliance stands level and
firmly.
3.7 Ventilation duct and
connection
Ventilation duct ensures exhaust of air from
inside the appliance.
The vented dryer has 1 air outlet.
A
Only rigid or flexible metal duct
should be used for exhausting.
• In Canada, the diameter of the duct to be
used should be 4” (102 mm). In United States,
the regulation for the required exhaust duct
diameter must be followed.
Maximum duct length is given in the table
below:
Metal Rigid Duct
Number of 90
0
C elbows Duct Lenght
2 72 ft (21.9 m)
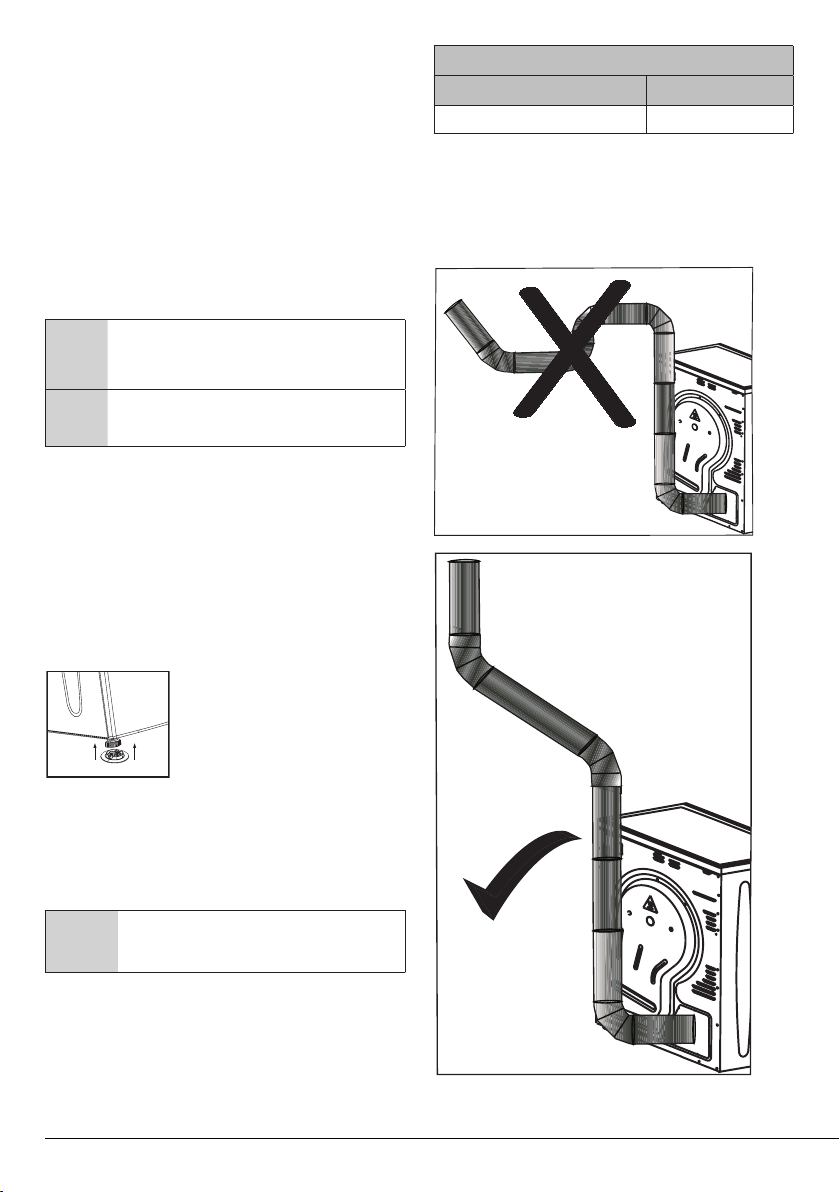
To connect a ventilation duct;
1.Connect the air outlet metal duct to the
spacer by turning it counter-clockwise.
2.Make the duct passages as shown in the
illustration below.

14 / EN
Dryer / User Manual
C
Exhaust of humid air from the
dryer into the room is to be
avoided. It may damage the walls
and furniture in the room.
C
The ventilation duct can be routed
outdoors via a window or it can
be connected to the air outlet in a
bathroom.
C
Air outlet duct must be extended
directly outdoors. There must be
a limited number of elbows to not
hinder air flow.
C
To prevent water accumulation in
the duct, make sure it is not folded
on the floor.
C
In Canada only those foil-type
flexible ducts, if any, specificially
identified for use with the
appliance by the manufacturer
shallbe used. In the United States,
only those foil-type flexible ducts,
if any, specifically identified for
use with the appliance by the
manufacturer and that comply
with the Outline for Clothes Dryer
Transition Duct, Subject 2158A,
shall be used.
A
The appliance should not be
vented into a chimney, a wall, a
ceiling, an attic, a crawl space or a
concealed space of a building.
A
Do not operate the appliance at
the same time with heaters such
as a coal or gas stove. Airflow may
cause the chimney to flare up.
C
Care must be taken not to pinch or
bend the ducts.
C
The end of the hose should not be
bent, it should not be stepped on
and it must not be folded between
the drain and the dryer.
C
The total length of flexible metal
duct shall not exceed 7.8 foot
(2.4 m).
C
The duct shall not be assembled
with screws or other fastening
means that extend inside the duct
to catch lint.
A
The appliance should not be
vented into a chimney, a wall, a
ceiling, an attic, a crawl space or a
concealed space of a building.
3.8 Destroying packaging
material
A
Packaging material can be
dangerous to children. Keep the
packaging materials out of the
reach of children or dispose of
them accordingly.
Do not dispose of them together with normal
domestic waste.
Packaging materials of your appliance are
manufactured from recyclable materials.

15 / EN
Dryer / User Manual
A
WARNING: To reduce the risk of fire, electric shock, or personal injury,
read the 2. IMPORTANT SAFETY INSTRUCTIONS before operating this
appliance.
4 Operating Instructions
Drying
Settings
At any temperature
At high temperature
At medium
temperature
At low temperature
Without heating
Hang to dry
Lay to dry
Hang wet to dry
Lay in shadow
to dry
Dry-cleanable
Iron -
IRON
Dry or Steam
Iron at high
temperature
Iron at medium
temperature
Iron at low
temperature
Do not iron
Iron without
steam
Maximum temperature
200
0
C
392
0
F
150
0
C
302
0
F
110
0
C
230
0
F
LAUNDRY DRYING SYMBOLS
Drying
Symbols
Suitable for
dryer
No Iron
Sensitive /
Delicate dry
Do not dry
with dryer
Do not dry
Do not dry-
clean
4.1 First Use
•When operating your dryer for the first time
check inside the drum for any foreign objects.
•Partly load the drum with wet clothes
and let the dryer run for approximately 15
minutes. This operation will clean the drum
before loading garments.
•You may smell an unpleasant odor and
excessive fiber/lint may accumulate during
the first drying cycle.
4.2 Garments suitable for
drying
Always follow the advice on garment labels.
Dry only laundry having a label stating that
they are suitable for tumble-drying.
4.3 Garments unsuitable for
drying
•Items with metal attachments like, belt
buckles and metal buttons can damage your
dryer.
•Do not dry items like woolens, silk garments
and nylon stockings, delicate embroidered
fabrics, garments with metal accessories and
items like sleeping bags in the dryer.
•Garments made of delicate and valuable
fabrics as well as lace curtains can be
permanently wrinkled. Do not dry these in
your dryer!
•Do not dry items made of hermetic fibers
such as pillows and quilts in the dryer.
•Garments made of foam or rubber may
deform.
•Do not dry clothes containing rubber in the
dryer.
•Do not dry clothes exposed to petroleum,
oil, combustible or explosive agents in the
dryer even if they are washed beforehand.
•Overly wet laundry or laundry with dripping
water must not be put into the dryer.
16 / EN
Dryer / User Manual
4.4 Preparing clothes to be
dried
•All laundry must be spun at the highest
possible spin speed the washer allows for
the textile type.
•Laundry may be tangled after washing.
Separate laundry before placing them into
your dryer.
•Sort laundry according to their types and
thicknesses. Dry similar types of laundry
together.
4.5 Correct load capacity
C
Please consult the information in
the “Program Selection” section.
A
Adding laundry to the dryer over
the level shown in the figure
is not recommended. Drying
performance will be reduced when
the dryer is overloaded. Doing so
may damage your dryer and your
clothes.
C
Place garments into the drum
loosely so they won’t get tangled.
C
Large items (e.g. bed sheets, quilt
covers, large tablecloths) may
bunch-up. Stop the dryer 1 or 2
times during drying process to
separate any bunched-up laundry.
The following weights are given as examples.
Home articles Weight (g)*Weight (lb)*
Cotton quit covers
(double)
1500 3 ¼
Cotton quit covers (single) 1000 2 ¼
Bed sheets (double) 500 1 1/8
Bed sheets (single) 350 ¾
Large tablecloths 700 1 ½
Small tablecloths 250 ½
Tea napkins 100 ¼
Bath towels 700 1 ½
Hand towels 350 ¾
Garments
Weight (g)*Weight (lb)*
Blouses 150 3/8
Cotton shirts 300 5/8
Shirts 200 ½
Cotton dresses 500 1 1/8
Dresses 350 ¾
Jeans 700 1 ½
Handkerchiefs (10 pieces) 100 ¼
T-Shirts 125 ¼
*Dry laundry weight before washing.
Approximate weights of average home laun-
dry type.
17 / EN
Dryer / User Manual
5 Operating the product
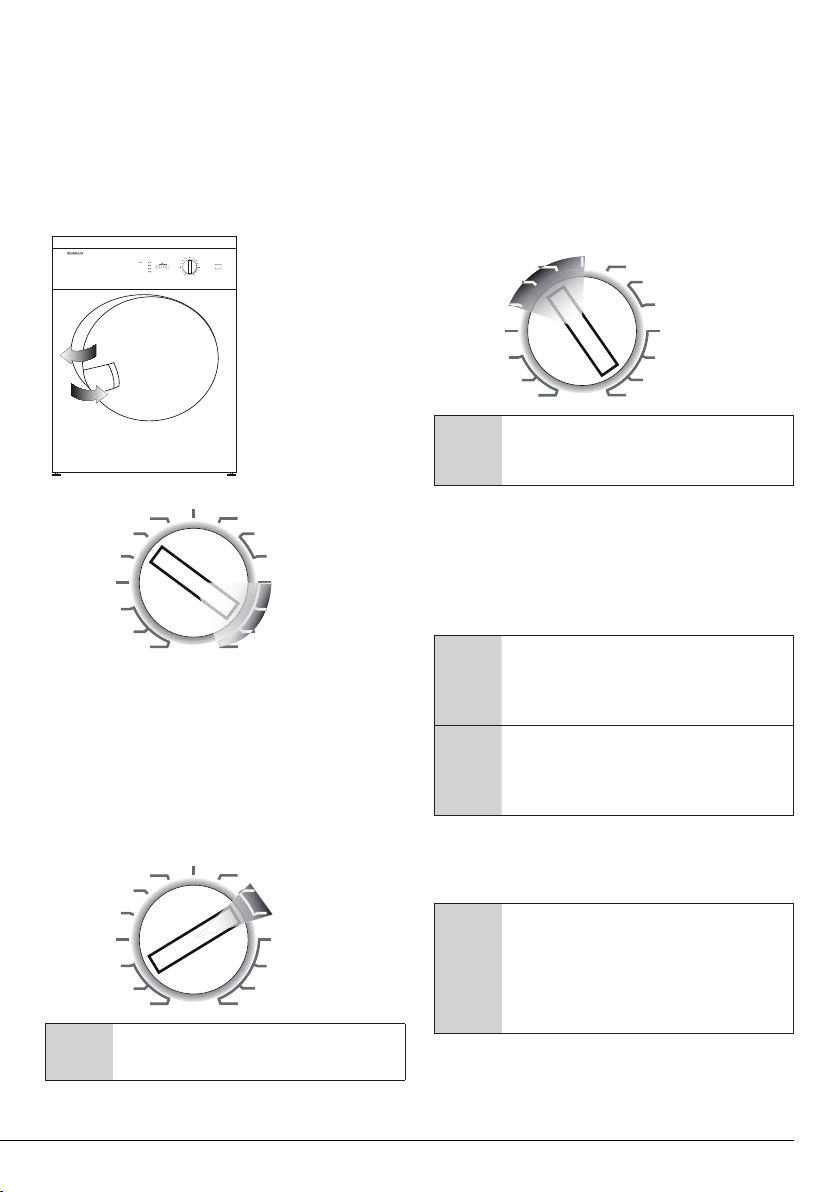
1. On/Off button
2. Program selector knob
3. Cancel Audio Warning
4. Program follow-up indicator
5. Filter cleaning warning LED
6. Start/Pause/Cancel button
Child Lock
Cancel 3 sec.
Start
Pause
Signal
Cancel
DryingClean Filter
Damp Dry
Regular Dry
End / Anticrease
Regular Dry +
Extra Dry
Cottons/Regular
Damp Dry
Regular Dry
Regular Dry
Permanent Press
On / O
Jeans
Delicates
Damp Dry
Mixed Fabric
Mini
Shirts
Timed Programs
15 min
Refresh
30 min
75 min
12
6
345
5.1 Control panel
5.2 Loading door
•Open loading door.
•Place laundry items loosely into the dryer.
•Push the loading door to close. Make sure
that no items are caught in the door.
5.3 Turning on the dryer
Prepare dryer for program selection by
pressing the On/Off button.
C
Pressing the On/Off button does
not mean the program has started.
Press the “Start/Pause/Cancel”
button of the dryer to start the
program.
Program selection
Extra Dry
Drying at a high
temperature, only for
cotton laundry. Thick and
multi layered laundry (e.g.
towels, linens, jeans) are
dried in a way that they
do not require ironing
before being put away.
Regular Dry /
Ready to Wear
Normal laundry (e.g.
tablecloths, underwear)
are dried in a way that
they do not require
ironing before being put
away.
Regular Dry+/
ready to Wear
Plus
Normal laundry (e.g.
tablecloths, underwear)
are dried in a way that
they do not require
ironing before being put
away, but more than
those in the ready to wear
option.
Damp Dry /
Ready to Iron
Normal laundry (e.g.
shirts, dresses) are dried
in a way that they are
ready to be ironed.
For optimum drying results, the dryer offers
different program groups and additional
options. There are automatic sensor
programs for different types of textiles and
timer programs.
Choose the appropriate program according
to the type of textile from the table below. It
also includes the level of dryness. Select the
desired program with the program selector
knob.
C
Always select the highest allowed
temperature for drying. High
temperature will ensure energy
and time savings.
18 / EN
Dryer / User Manual
5.4 Main programs
Depending on the type of textile, the
following main programs are available:
•Cottons / Regular (max. 7 kg)
Durable clothing can be dried with this
program at a normal temperature. It is
recommended for cotton items (e.g. bed
sheets, quilt cover, underwear).
Child Lock
Cancel 3 sec.
Start
Pause
Signal
Cancel
DryingClean Filter
Damp Dry
Regular Dry
End / Anticrease
Regular Dry +
Extra Dry
Cottons/Regular
Damp Dry
Regular Dry
Regular Dry
Permanent Press
On / Off
7kg
Jean
Delicates
Damp Dry
Mixed Fabric
Mini
Shirts
Timed Programs
15 min
Refresh
30 min
75 min
Regular Dry +
Extra Dry
Cottons/Regular
Damp Dry
Regular Dry
Regular Dry
Permanent Press
Jean
Delicates
Damp Dry
Mixed Fabric
Mini
Shirts
Timed Programs
15 min
Refresh
30 min
75 min
•Permanent Press / Synthetics
(max. 3.5 kg)
Less durable clothing can be dried with
this program at a at a lower temperature
compared to the cottons program. It is
recommended for synthetic clothing (e.g.
shirts, blouses, synthetic/cotton blended
garments).
Regular Dry +
Extra Dry
Cottons/Regular
Damp Dry
Regular Dry
Regular Dry
Permanent Press
Jean
Delicates
Damp Dry
Mixed Fabric
Mini
Shirts
T
imed Programs
15 min
Refresh
30 min
75 min
C
Do not dry curtains or lace in the
dryer.
Anti-creasing
A 2-hour anti creasing program to prevent
laundry from creasing will be activated if the
laundry is not taken out after the program
ended. This program rotates the laundry in
10-minute intervals to prevent wrinkling.
5.5 Special programs
For special cases, there are also extra
programs available:
Regular Dry +
Extra Dry
Cottons/Regular
Damp Dry
Regular Dry
Regular Dry
Permanent Press
Jean
Delicates
Damp Dry
Mixed Fabric
Mini
Shirts
T
imed Programs
15 min
Refresh
30 min
75 min
C
Additional programs may differ
according to the model of your
dryer.
•Automatic Dry / Mixed Fabric (max.
3.5 kg)
Mix program (Regular Dry) is for mixed loads
with different types of fabrics. Mixed laundry
can be dried at a lower temperature.
C
It is recommended to use a cloth
bag to avoid certain delicate
garments and laundry from being
wrinkled or damaged.
C
Remove garments immediately
from the dryer and hang them
after the program ends in order to
prevent wrinkling.
•Mini (max. 1.2 kg)
The cottons that are spun at high speeds in
your washer can be dried with this program.
C
In order to obtain better results
from the dryer programs, your
laundry must be washed with
suitable program and spun at the
recommended spin speeds in your
washer.

19 / EN
Dryer / User Manual
•Shirts (max. 1.5 kg)
Dries the shirts in a more sensitive way so
that they are less wrinkled and ironed easily.
C
Shirts may contain little amount
of dampness at the and of the
program. It is advised not to leave
the shirts in the dryer.
•Jeans (max. 4 kg)
The jeans that are spun at high speeds in
your washer can be dried with this program.
•Delicates (max. 1.75 kg)
Very delicate laundry (silk blouses, fine
underwear, etc.) can be dried at a lower
temperature that are suitable for drying
or for laundry that is advised to be hand-
washed.
Regular Dry +
Extra Dry
Cottons/Regular
Damp Dry
Regular Dry
Regular Dry
Permanent Press
Jean
Delicates
Damp Dry
Mixed Fabric
Mini
Shirts
Timed Programs
15 min
Refresh
30 min
75 min
D
D
D
D
D
D
D
D
D
D
D
D
D
D
D
D
D
D
•Refresh / Ventilation
Only cool air circulation is performed for 10
minutes without providing hot air.
Regular Dry +
Extra Dry
Cottons/Regular
Damp Dry
Regular Dry
Regular Dry
Permanent Press
Jean
Delicates
Damp Dry
Mixed Fabric
Mini
Shirts
Timed Programs
15 min
Refresh
30 min
75 min
•Timed Programs
One of the 15 min., 30 min., 75 min.
timer programs can be selected to reach
the desired final drying level at low
temperatures. The program dries for the
selected time regardless of dryness.
Regular Dry +
Extra Dry
Cottons/Regular
Damp Dry
Regular Dry
Regular Dry
Permanent Press
Jean
Delicates
Damp Dry
Mixed Fabric
Mini
Shirts
T
imed Programs
15 min
Refresh
30 min
75 min
5.6 Starting the Program
1. Press the “Start/Pause/Cancel” button to
start the program.
2. The Start/Pause/Cancel button will light
up to indicate that the program has started.
5.7 Progress of program
Progress of a running program is shown
through the program follow-up indicator.
At the beginning of each program step, the
related lamp will light up and the lamp of the
completed step will turn off.
“Drying”:
- Drying level will be illuminated during the
whole drying process until the dryness
reaches “Damp Dry / Ready to Iron”.
“Damp Dry / Ready to Iron”:
- Lamp lights when the dryer reaches the
“Damp Dry / Ready to Iron” step and remains
lit until the next step.
“Regular Dry / Ready to Wear”:
- Lamp lights when the dryer reaches the
“Regular Dry / Ready to Wear” step and
remains lit until the next step.
“End / Anticrease”:
- The lamp lights when the program comes
to an end and the anti-creasing function is
activated.
C
If more than one lamp lights or
flashes constantly, it means that
there is a malfunction or a failure
(Please see Troubleshooting).

20 / EN
Dryer / User Manual
5.8 Changing the program
after the program has started
Press and hold the Start/Pause/Cancel
button for around 3 seconds to Cancel the
program currently running.
Select another program by rotating the
program knob.
Press the “Start/Pause/Cancel” button again
to start the new program.
C
The program which is selected
first will go on even if the program
selector knob is moved and
another program is selected while
the dryer is operating. You must
cancel the current program to
change the drying program.
A
As the inside of the dryer will be
excessively hot when you cancel
the program when the dryer is
running, activate the ventilation
program to cool it down.
A
If the dryer is stopped during any
drying program, and if the position
of the program selector knob is
changed, a tone will be heard (if
the Cancel Audio Warning function
is not selected). The dryer will
not start even if the Start/Pause/
Cancel button is pressed, unless
the program selector knob is
returned to the initial program.
The paused program must be
cancelled in order to change the
drying program.
5.9 Adding/removing laundry
in stand-by mode
In order to add or take out laundry after the
start of the program;
1. Press the Start/Pause/Cancel button to
switch the dryer to Pause mode. the drying
process will stop.
2. Open the door at the Pause position and
close it again after adding or taking out
laundry.
3. Press the “Start/Pause/Cancel” button to
restart the program.
C
Laundry may be added or taken
out during a drying process, but
interrupting drying continuously
will extend the program’s time
and increase energy consumption.
Therefore, it is recommended to
add all laundry before the drying
program is started.
5.10 Auxiliary functions
Cancel Audio Warning Signal
Your dryer will send out a tone when the
program comes to an end. If you do not want
to hear this, you need to press the Cancel
Signal button. The relevant lamp will light
when this button is pressed and the tone will
not activate when the program ends.
C
You can select this function either
before or after the program starts.
21 / EN
Dryer / User Manual
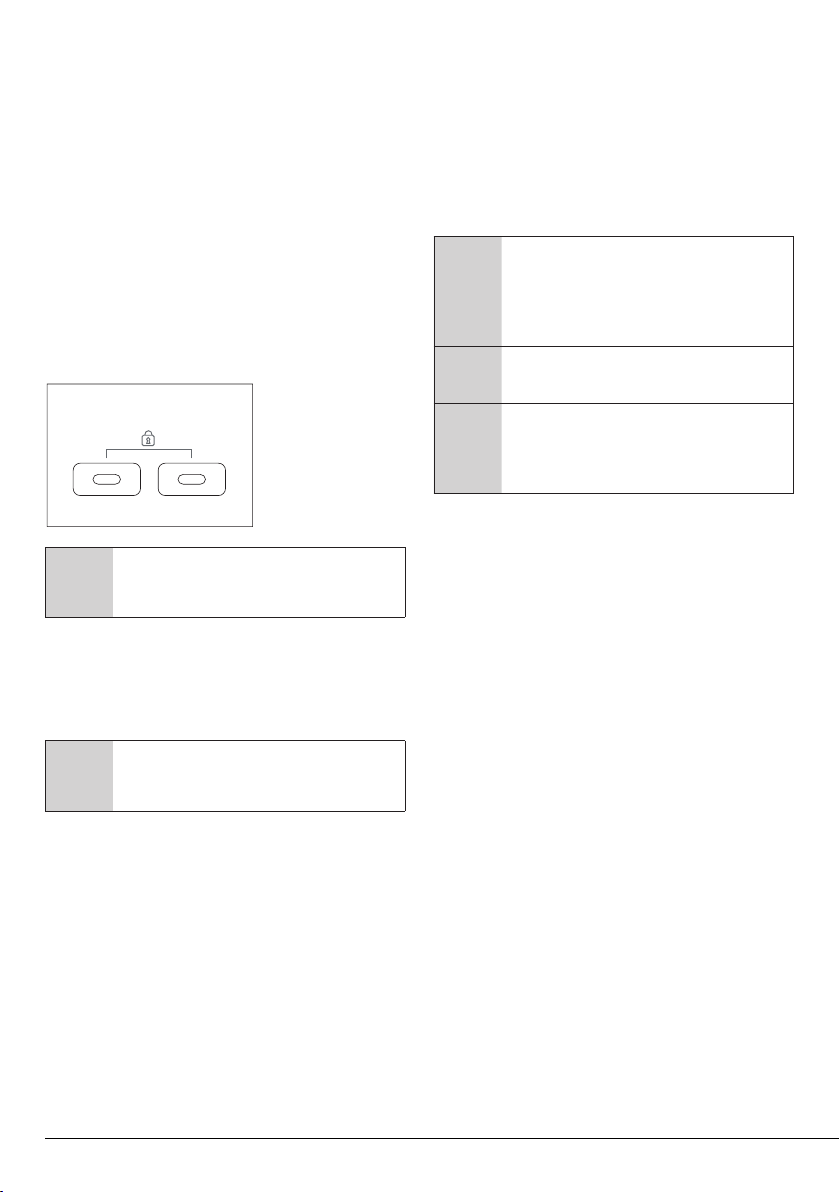
5.11 Child-proof lock
There is a childproof lock to prevent any
program interruption due to the pressing of
keys while a program is running. The loading
door and all buttons except the “On/Off” key
on the panel are deactivated when the child-
proof lock is active.
In order to activate the childproof lock, pres
the Start/Pause/Cancel and Cancel Audio
Warning buttons at the same time for 3
seconds.
To start a new program after the program
ends or to stop a program, the childproof
lock should be deactivated. To deactivate the
childproof lock, press the same two buttons
for 3 sec.
Child Lock
C
2 beeps when activating and 1
beep when deactivating the child-
proof lock will be heard.
5.12 Warning indicators
Filter cleaning
A warning lamp will light up to remind filter
cleaning after a program finishes.
C
If the filter cleaning warning
lamp flashes, please refer to
Troubleshooting.
5.13 End of program
The End/Anticrease and Clean Filter warning
lamps on the program follow up indicator will
light up when the program ends. The door
can be opened and the dryer becomes ready
for another load.
Press the On/Off button to shut down the
dryer.
C
A 2-hour anti creasing program to
prevent laundry from creasing will
be activated if you do not take the
laundry out after the program has
ended.
A
Clean the filter after each load!
C
At the end of the program, it is
recommended to press the On-Off
button Off before unloading the
dryer.
22 / EN
Dryer / User Manual
This appliance’s packaging material is recyclable. Help recycle it and protect the
environment by dropping it off at recycling locations provided for this purpose. Your
appliance also contains a large amount of recyclable material. It is marked with this
label to indicate that used appliances should not be mixed with other waste. This
way, the appliance recycling organised by your manufacturer will be done under the
best possible conditions, in compliance with European Directive 2002/96/EC on
Waste Electrical and Electronic Equipment. Contact your local government or your
retailer for used appliance collection points closest to your home. We thank you for
doing your part to protect the environment.
6 Technical Specifications
Model Vented Dryer with electronic sensor control
Height (in) 33 1/4
Witdth (in) 23 3/8
Depth (in) 20 7/8
Height adjustment of feet (in) 1/5
Net weight (plastic front door usage) (lbs) 73
Net weight (glass front door usage) (lbs) 78,5
Voltage / Frequency 208-240V ~ 60 Hz
Connected load 2000-2400 W
Dry Load Capacity 7kg / 15,5 lb
Capacity 3,7 cu-ft
23 / EN
Dryer / User Manual
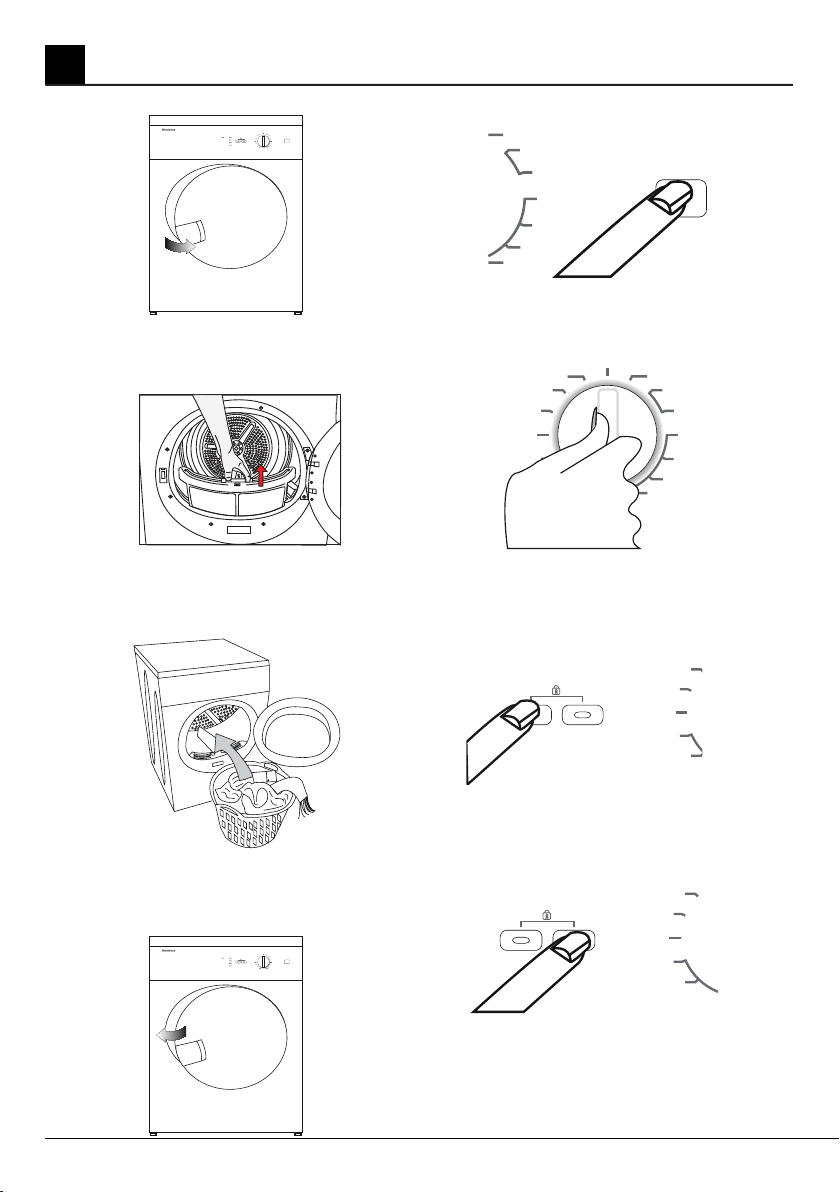
1. Open loading door.
2. Be sure it is clean.
3. Load laundry loosely into the
drum.
4. Push loading door closed. Ensure
no items are caught in the door.
5. Push the ON / OFF button to ON.
6. Select the appropriate Program.
7. If necessary, select additional
functions.
8. Push the start button.
Child Lock
Cancel 3 sec.
Start
Pause
Signal
Cancel
DryingClean Filter
Damp Dry
Regular Dry
End / Anticrease
Regular Dry +
Extra Dry
Cottons/Regular
Damp Dry
Regular Dry
Regular Dry
Permanent Press
On / Off
7kg
Jean
Delicates
Damp Dry
Mixed Fabric
Mini
Shirts
Timed Programs
15 min
Refresh
30 min
75 min
Regular Dry +
Extra Dry
Cottons/Regular
Damp Dry
Regular Dry
Regular Dry
Permanent Press
On / Off
Delicates
Damp Dry
Child Lock
Cancel 3 sec.
Start
Pause
Signal
Cancel
Mixed Fabric
Mini
Shirts
Timed Programs
15 min
Refresh
30 min
75 min
Regular Dry +
Extra Dry
Cottons/Regular
Damp Dry
Regular Dry
Regular Dry
Permanent Press
Jean
Delicates
Damp Dry
Mixed Fabric
Mini
Shirts
Timed Programs
15 min
Refresh
30 min
75 min
Child Lock
Cancel 3 sec.
Start
Pause
Signal
Cancel
Mixed Fabric
Mini
Shirts
Timed Programs
15 min
Refresh
30 min
75 min
7 Quick Start-up Instructions
24 / EN
Dryer / User Manual
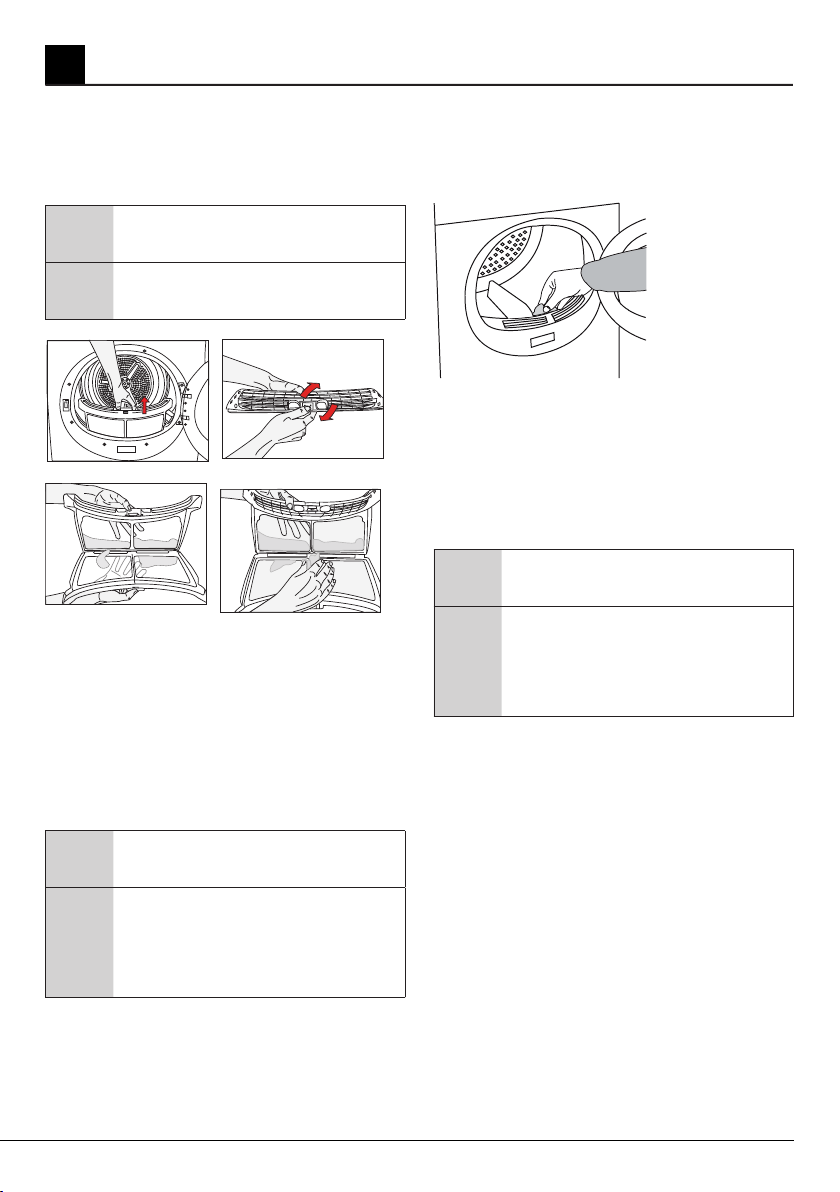
8.2 Sensor
There are humidity sensors in your dryer that
detect whether the laundry is dry or not.
For sensor cleaning;
1. Open loading door.
2. Allow dryer to cool off if drying has been
done recently.
3. Wipe the metal sensors with a soft cloth
dampened with vinegar and dry the sensors
afterwards.
C
Clean the metal sensors at regular
intervals (4 times a year).
A
WARNING: Never use solvents,
cleaning agents or similar
substances when cleaning as
these might cause fire and/or an
explosion!
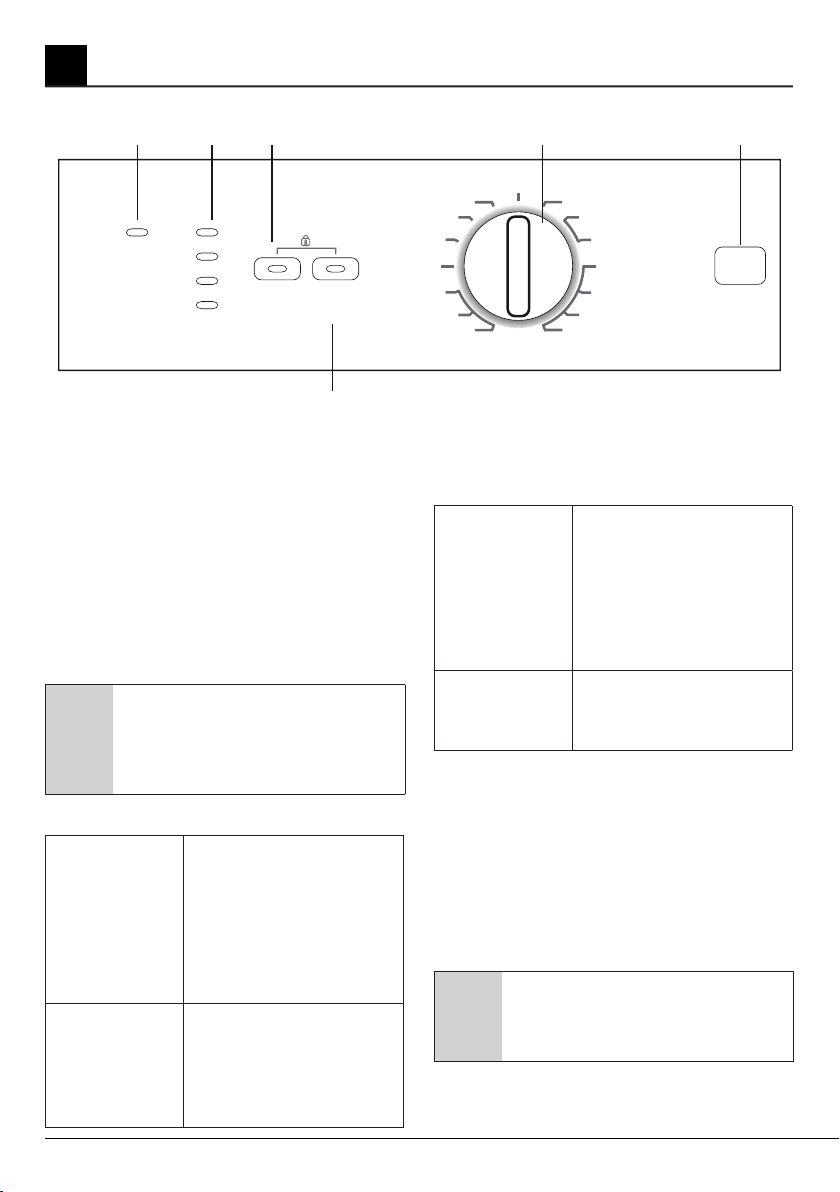
8.1 Lint filter
Lint and fibers released from the laundry
in to the air during the drying cycle are
collected in the “Lint Filter”.
C
Fibres and lint are formed during
wearing and washing.
A
WARNING: Always clean the filter
after each drying cycle.
To clean the Filter;
1. Open loading door.
2. Remove the lint filter by pulling it up and
open the filter.
3. Clean lint, fiber, and by hand or with a soft
piece of cloth.
4. Close the filter and put it back in place.
C
You can clean the filter and filter
area with a vacuum cleaner.
C
Clogging may arise on the filter
surface after using your dryer for
some time; if this occurs, wash the
filter with water and dry it before
using again.
8 User maintenance and cleaning instructions
25 / EN
Dryer / User Manual
9 Troubleshooting
Problem Cause Explanation / Solution
Drying process
takes too long.
Lint filter may not have been
cleaned.
* Clean the lint filter.
* Meshes of the filter may be
clogged. Wash with water.
Dryer does not
switch on or the
program does not
start. Dryer does
not start when
set.
* It may not plugged in.
* The loading door may be ajar.
* Program may not be set or the
“Start/Pause/Cancel” button may
not have been pressed.
* “Childproof lock” may be activated.
* Make sure that the dryer is
plugged in.
* Make sure the loading door is
properly closed.
* Make sure the program has been
set and it is not in “Pause” mode.
* Deactivate the childproof lock.
Program is
interrupted for no
reason.
* The loading door may be ajar.
* Electricity may be cut off.
* Make sure the loading door is
properly closed.
* Press the “Start/Pause/Cancel”
button to start the program.
Laundry has
shrunk, become
felted or has
deteriorated.
* A program not suitable for the
laundry type might have been used.
* Dry only the laundry which is
suitable for drying in the dryer. First
check the labels on the clothes.
* Select a program a suitable low
temperature setting for the laundry
type to dry the clothes.
“End / Anticrease”
LED flashes.
* The 2-hour anti creasing program
to prevent laundry from wrinkling
may have been activated.
* Turn off the dryer and take the
laundry out of the dryer.
“End / Anticrease”
LED is on.
* Program has come to an end.
* Turn off the dryerand take the
laundry out of the dryer.
“Filter cleaning”
LED flashes.
* Lint filter may not have been
cleaned.
* Clean the lint filter.
* Meshes of the filter may be
clogged. Wash with water.
The “Drying” LED
flashes.
* A heat sensor failure has occurred.
dryer ends the program without
heating.
* Turn off the dryer and remove the
laundry. Call the authorized service.
NOTE: Call an authorized service if the problem persists.
26 / EN
Dryer / User Manual
This product is fully tested and went through official
quality assurance inspections before leaving the
original manufacturing site. Warranty terms for this
Beko household appliance is not valid if the product is
altered, tampered, modifed, additional parts
assembled, fixed and re-packed by an authorized
distributor, servicer, a third party retailer, reseller or by
any other unauthorized person(s).
Beko
Beko
Beko
Beko
Beko
Beko
Beko
Please contact authorized Beko dealier
or visit www.beko.us to locate and
get information for the closest authorized
Beko service center.
Beko
Beko
Beko
WARRANTY STATEMENT FOR THE BEKO DRYERS
BEKO
BEKO
10 Warranty Statement


28 / EN
Dryer / User Manual
