Determine the programme suitable for the type, quantity and soiling level of the laundry in accordance with the "Programme and consumption table".
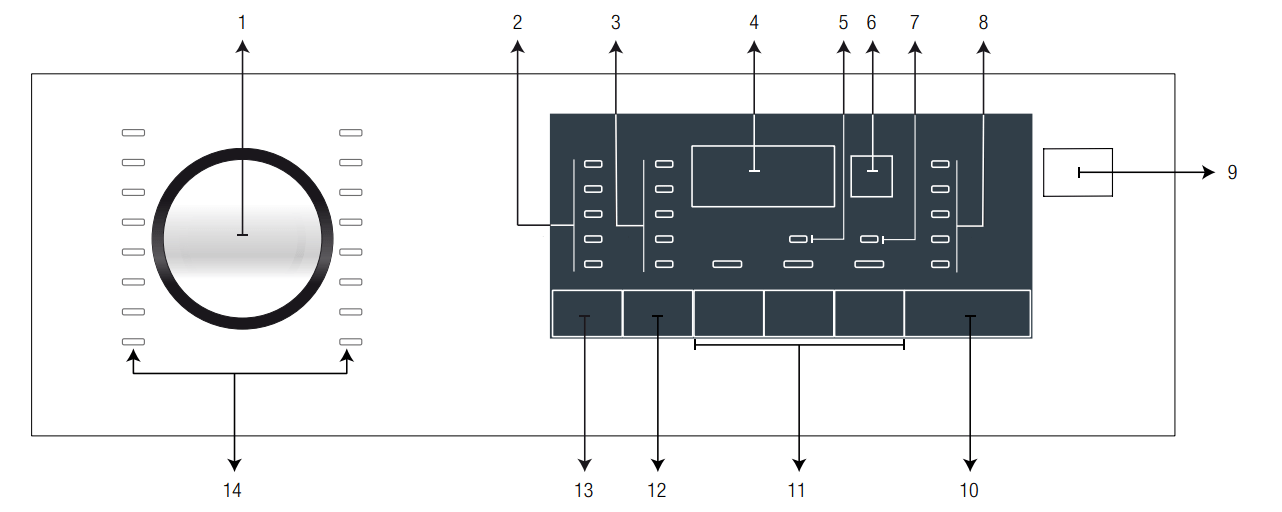
Select the desired programme with the “Programme Selection” knob.
Programmes
• Cottons
Use this programme for your durable whites and colourfast cotton clothes. This programme is suggested for washing heavily soiled items.
• Synthetics
Use to wash your synthetic clothes (shirts, blouses, synthetic/cotton blends, etc.). It washes with a gentle action and has a shorter washing cycle compared to the Cottons programme.
For curtains and tulle, use the Synthetic 40˚C programme with prewash and anti-creasing functions selected. As their meshed texture causes excessive foaming, wash the veils/tulle by putting little amount of detergent into the main wash compartment. Do not put detergent in the prewash compartment.
• Wool
Use to wash your woolen clothes. Select the appropriate temperature complying with the tags of your clothes. Use appropriate detergents for woolens.
• Cottons Eco
Use to wash your normally soiled, durable cotton and linen laundry. Although it washes longer than all other programmes, it provides high energy and water savings. Actual water temperature may be different from the stated wash temperature. When you load the machine with less laundry (e.g. ½ capacity or less), programme time may automatically get shorter. In this case, energy and water consumption will decrease more, providing a more economic wash. This programme is available in the models with the remaining time indicator.
• Anti-Allergy+
Use this programme for your laundry for which you require an anti-allergic and hygienic washing at high temperature with intensive and long washing cycle.
• Gentle Care 20°
Use it to wash your delicate laundry. It washes with a gentler action without any interim spins compared to the Synthetics program. It should be used for laundry for which sensitive wash is recommended.
• Hand wash
Use to wash your woolen/delicate clothes that bear “not machine-washable” tags and for which hand wash is recommended. It washes laundry with a very gentle washing action to not to damage clothes.
• Daily/Quick
Use this programme to wash your lightly soiled cotton clothes in a short time.
• Quick 14’
Use to wash your lightly soiled and unstained cotton laundry in a short time.
• Darkcare
Use this programme to wash your dark colored laundry or colored laundry that you do not want them get faded. Washing is performed with little mechanic action and at low temperatures. It is recommended to use liquid detergent or woolen shampoo for dark coloured laundry.
• Mix 40
Use this programme to wash your cotton and synthetic clothes together without sorting them.
• Aqua 40’ 40°
Use this programme to wash your lightly soiled and unstained cotton laundry in a short time.
• Sports & Outdoor
Use this programme to wash your garments that are worn for a short time such as sportswear. It is suitable to wash little amount of cotton / synthetic blended garments.
• Hygiene 20°
Use this programme for your laundry for which you require washing at lower temperature with intensive and long washing cycle. Use this programme for your laundry for which you require hygienic washing at lower temperature.
• Rinse
Use when you want to rinse or starch separately.
• Spin + Drain
Use to drain the water in the machine.
Temperature selection
Whenever a new programme is selected, the recommended temperature for the selected programme appears on the temperature indicator.
To decrease the temperature, press the Temperature Adjustment button. Temperature will decrease gradually.
Spin speed selection
Whenever a new programme is selected, the recommended spin speed of the selected programme is displayed on the spin speed indicator.
To decrease the spin speed, press the Spin Speed Adjustment button. Spin speed decreases gradually. Then, depending on the model of the product, "Rinse Hold" and "No Spin" options appear on the display. See "Auxiliary function selection" section for explanations of these options.
Auxiliary function selection
Select the desired auxiliary functions before starting the programme.
Whenever a programme is selected, if a relevant auxiliary function is selected its related indicator light will illuminate.
Furthermore, you may also select or cancel auxiliary functions that are suitable to the running programme after the washing cycle starts. If the wash cycle has reached a point where no auxiliary function can be selected, an audio warning will be given and the related auxiliary function's light will flash.
• Prewash
A Prewash is only worthwhile for heavily soiled laundry. Not using the Prewash will save energy, water, detergent and time.
• Quick
This function can be used in Cottons and Synthetics programmes. It decreases the washing times and also the number of rinsing steps for lightly soiled laundry.
• Rinse Hold
If you are not going to unload your clothes immediately after the programme completes, you can use rinse hold function to keep your laundry in the final rinsing water in order to prevent them from getting wrinkled when there is no water in the machine. Press Start / Pause button after this process if you want to drain the water without spinning your laundry. Programme will resume and complete after draining the water. If you want to spin the laundry held in water, adjust the Spin Speed and press Start / Pause button. The programme resumes. Water is drained, laundry is spun and the programme is completed.
• Pet hair removal
This function helps to remove pet hair that remain on your garments more effectively.
When you select this function, Prewash and Extra Rinse steps are added to the normal programme. Thus, washing is performed with more water (30%) and the pet hair is removed more effectively.
End Time
With the End Time function, the startup of the programme may be delayed up to 24 hours. After pressing End Time button, the programme's estimated ending time is displayed. If the End Time is adjusted, End Time indicator is illuminated.
In order for the End Time function to be activated and the programme to be completed at the end of the specified time, you must press Start / Pause button after adjusting the time.
If you want to cancel End Time function, press On / Off button to turn off and on the machine.
Open the loading door, place the laundry and put detergent, etc.
Select the washing programme, temperature, spin speed and, if required, the auxiliary functions.
Set the end time of your choice by pressing the End Time button. End Time indicator illuminates.
Press Start / Pause button. Time countdown starts. “:” sign in the middle of the end time on the display starts flashing.
Starting the programme
Press Start / Pause button to start the programme.
Programme follow-up light showing the startup of the programme will turn on.
Loading door lock
There is a locking system on the loading door of the machine that prevents opening of the door in cases when the water level is unsuitable.
"Door Locked" LED in the panel turns on when the loading door is locked.
Changing the selections after the programme has started
After the programme has started you can make the following changes.
Switching the machine to pause mode:
Press the Start/Pause button to switch the machine to pause mode while a programme is running. The light indicating the Start/Pause status and programme step starts flashing on the Programme Follow-up indicator to show that the machine has been switched to the pause mode. Also, Loading Door light will also flash until the door is ready to be opened. When the loading door is ready to be opened loading door light will will turn off and programme step indicator and Start / Stop LED continue to flash.
Also, when the loading door is ready to be opened, Loading Door light will also turn off in addition to the programme step light.
Changing the auxiliary function, speed and temperature
Depending on the step the programme has reached, you can cancel or select the auxiliary functions. See, "Auxiliary function selection".
You can also change the speed and temperature settings. See, "Spin speed selection" and "Temperature selection"
Adding or taking out laundry
Press the Start / Pause button to switch the machine to pause mode. The programme follow-up light of the relevant step during which the machine was switched into the pause mode will flash
Wait until the Loading Door can be opened.
Open the Loading Door and add or take out the laundry.
Close the Loading Door.
Make changes in auxiliary functions, temperature and speed settings if necessary.
Press Start/Pause button to start the machine.
Child Lock
Use Child Lock function to prevent children from tampering with the machine. Thus you can avoid any changes in a running programme.
To activate the child lock:
Press and hold Auxiliary Function button 2 for 3 seconds. In the programme selection display on the panel, "Child lock enabled" light will turn on. You can release Auxiliary Function button 2 when this warning is displayed.
To deactivate the child lock:
Press and hold Auxiliary Function button 2 for 3 seconds. In the programme selection display on the panel, "Child lock enabled" light will turn off.
Canceling the programme
The programme is cancelled when the machine is turned off and on again. Press and hold On / Off button for 3 seconds.
End of programme
End LED appears on the display when the programme is completed.
If you do not press any button for 10 minutes, the machine will switch to OFF mode. Display and all indicators are turned off.
Completed programme steps will be displayed if you press On / Off button.
Your machine features "Standby Mode".
After you switch on your machine with On-Off button, if no program is started or no other procedure is performed at the selection step or no action is taken within approx. 10 minutes after the selected program ends, your machine will switch to OFF mode automatically. Display and all indicators are turned off. Selected programme data will be displayed if you press On / Off button. Before you start the program, check the accuracy of your selections. If necessary, repeat them. This is not an error.
Maintenance and cleaning
Service life of product extends and frequently experienced problems will be reduced if it is cleaned at regular intervals.
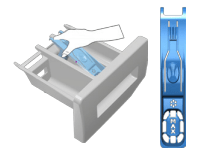
Cleaning the detergent drawer
Clean the detergent drawer at regular intervals (every 4-5 washing cycles) as shown below in order to prevent accumulation of powder detergent in time. Lift the rear part of the siphon to remove it as illustrated.
If more than normal amount of water and softener mixture starts to gather in the softener compartment, the siphon must be cleaned.
Press the dotted point on the siphon in the softener compartment and pull towards you until the compartment is removed from the machine.
Wash the detergent drawer and the siphon with plenty of lukewarm water in a washbasin. In order to prevent the residues to contact your skin, clean it with an appropriate brush by wearing a pair of gloves.
Insert the drawer back into its place after cleaning and make sure that it is seated well.
Cleaning the loading door and the drum
For products with drum cleaning programme, please see Operating the product - Programmes.
For products without drum cleaning, follow the below steps to clean the drum:
Select Additional Water or Extra Rinse auxiliary functions. Use a Cottons programme without pre-wash.
Set the temperature to the level recommended on the drum cleaning agent which can be provided from authorized services. Apply this procedure without any laundry in the product. Before starting the programme, put 1 pouch of special drum cleaning agent (if the special agent could not be supplied, put max. 100 g of powder anti-limescale) into the main wash detergent compartment (compartment no. „2“). If the antilimescale is in tablet form, put only one tablet into the main wash compartment no. „2“. Dry the inside of the bellow with a clean piece of cloth after the programme has come to an end.
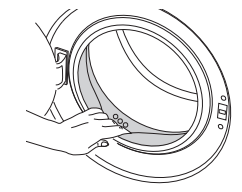
After every washing make sure that no foreign substance is left in the drum. If the holes on the bellow shown in the figure is blocked, open the holes using a toothpick.
Foreign metal substances will cause rust stains in the drum. Clean the stains on the drum surface by using cleaning agents for stainless steel.
Never use steel wool or wire wool. These will damage the painted, chromated and plastic surfaces.
Cleaning the body and control panel
Wipe the body of the machine with soapy water or non-corrosive mild gel detergents as necessary, and dry with a soft cloth.
Use only a soft and damp cloth to clean the control panel.
Cleaning the water intake filters
There is a filter at the end of each water intake valve at the rear of the machine and also at the end of each water intake hose where they are connected to the tap. These filters prevent foreign substances and dirt in the water to enter the washing machine. Filters should be cleaned as they do get dirty.
Close the taps.
Remove the nuts of the water intake hoses to access the filters on the water intake valves. Clean them with an appropriate brush. If the filters are too dirty, remove them from their places with a pliers and clean in this way.
Take out the filters on the flat ends of the water intake hoses together with the gaskets and clean thoroughly under running water.
Replace the seals and filters carefully and tighten their nuts by hand
Draining remaining water and cleaning the pump filter
The filter system in your machine prevents solid items such as buttons, coins and fabric fibers clogging the pump impeller during discharge of washing water. Thus, the water will be discharged without any problem and the service life of the pump will extend.
If the machine fails to drain water, the pump filter is clogged. Filter must be cleaned whenever it is clogged or in every 3 months. Water must be drained off first to clean the pump filter.
In addition, prior to transporting the machine (e.g., when moving to another house) and in case of freezing of the water, water may have to be drained completely.
In order to clean the dirty filter and discharge the water:
1. Unplug the machine to cut off the supply power.
2. Open the filter cover.
3. Follow the below procedures in order to drain water.
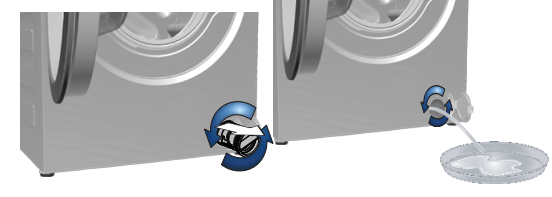
If the product has an emergency water draining hose, in order to drain the water:
a Pull the emergency draining hose out from its seat
b Place a large container at the end of the hose. Drain the water into the container by pulling out the plug at the end of the hose. When the container is full, block the inlet of the hose by replacing the plug. After the container is emptied, repeat the above procedure to drain the water in the machine completely.
c When draining of water is finished, close the end by the plug again and fix the hose in its place.
d Turn and remove the pump filter.
4. Clean any residues inside the filter as well as fibers, if any, around the pump impeller region.
5. Replace the filter.
6. If the filter cap is composed of two pieces, close the filter cap by pressing on the tab. If it is one piece, seat the tabs in the lower part into their places first, and then press the upper part to close.
Troubleshooting
Problem
Reason
Solution
Program does not start after closing the door.
Start / Pause / Cancel button was not pressed.
*Press the Start / Pause / Cancel button.
Programme cannot be started or selected.
Washing machine has switched to self protection mode due to a supply problem (line voltage, water pressure, etc.).
Press and hold On / Off button for 3 seconds. (see. "Cancellation of program")
Water in the machine
Some water might have remained in the product due to the quality control processes in the production.
This is not a failure; water is not harmful to the machine.
Machine does not fill with water.
Tap is turned off.
Turn on the taps.
Water inlet hose is bent.
Flatten the hose.
Water inlet filter is clogged.
Clean the filter.
Loading door may be open.
Close the door.
Machine does not drain water
Water drain hose might be clogged or twisted.
Clean or flatten the hose.
Pump filter is clogged.
Clean the pump filter.
Machine vibrates or makes noise.
Machine might be standing unbalanced.
Adjust the feet to level the machine.
A hard substance might have entered into the pump filter.
Clean the pump filter
Transportation safety bolts are not removed.
Remove the transportation safety bolts.
Laundry quantity in the machine might be too little.
Add more laundry to the machine.
Machine might be overloaded with laundry.
Take out some of the laundry from the machine or distribute the load by hand to balance it homogenously in the machine
Machine might be leaning on a rigid item.
Make sure that the machine is not leaning on anything
There is water leaking from the bottom of the washing machine.
Water drain hose might be clogged or twisted.
Clean or flatten the hose.
Pump filter is clogged.
Clean the pump filter.
Machine stopped shortly after the programme started.
Machine might have stopped temporarily due to low voltage.
It will resume running when the voltage restores to the normal level.
Machine directly discharges the water it takes in.
Draining hose might not be at adequate height.
Connect the water draining hose as described in the operation manual.
No water can be seen in the machine during washing.
The water level is not visible from outside of the washing machine.
This is not a failure.
Loading door cannot be opened.
Door lock is activated because of the water level in the machine.
Drain the water by running the Pump or Spin programme.
Machine is heating up the water or it is at the spinning cycle.
Wait until the programme completes.
Child lock is engaged. Door lock will be deactivated a couple of minutes after the programme has come to an end.
Wait for a couple of minutes for deactivation of the door lock.
Washing takes longer time than specified in the manual.(*)
Water pressure is low.
Machine waits until taking in adequate amount of water to prevent poor washing quality due to the decreased amount of water. Therefore, the washing time extends
Voltage might be low.
Washing time is prolonged to avoid poor washing results when the supply voltage is low.
Input temperature of water might be low.
Required time to heat up the water extends in cold seasons. Also, washing time can be lengthened to avoid poor washing results.
Number of rinses and/or amount of rinse water might have increased.
Machine increases the amount of rinse water when good rinsing is needed and adds an extra rinsing step if necessary
Excessive foam might have occurred and automatic foam absorption system might have been activated due to too much detergent usage.
Use recommended amount of detergent
Programme time does not countdown. (On models with display) (*)
Timer may stop during water intake.
Timer indicator will not countdown until the machine takes in adequate amount of water. The machine will wait until there is sufficient amount of water to avoid poor washing results due to lack of water. Timer indicator will resume countdown after this.
Timer may stop during heating step.
Timer indicator will not countdown until the machine reaches the selected temperature.
Timer may stop during spinning step.
Automatic unbalanced load detection system might be activated due to the unbalanced distribution of the laundry in the drum
Programme time does not countdown. (*)
There might be unbalanced load in the machine.
Automatic unbalanced load detection system might be activated due to the unbalanced distribution of the laundry in the drum.
Machine does not switch to spinning step. (*)
There might be unbalanced load in the machine.
Automatic unbalanced load detection system might be activated due to the unbalanced distribution of the laundry in the drum.
The machine will not spin if water is not drained completely.
Check the filter and the draining hose.
Excessive foam might have occurred and automatic foam absorption system might have been activated due to too much detergent usage.
Use recommended amount of detergent.
Washing performance is poor: Laundry turns gray. (**)
Insufficient amount of detergent has been used over a long period of time.
Use the recommended amount of detergent appropriate for water hardness and the laundry
Washing was made at low temperatures for a long time.
Select the proper temperature for the laundry to be washed.
Insufficient amount of detergent is used with hard water.
Using insufficient amount of detergent with hard water causes the soil to stick on the cloth and this turns the cloth into gray in time. It is difficult to eliminate graying once it happens. Use the recommended amount of detergent appropriate for water hardness and the laundry.
Too much detergent is used.
Use the recommended amount of detergent appropriate for water hardness and the laundry.
Washing performance is poor: Stains persist or the laundry is not whitened. (**)
Insufficient amount of detergent is used.
Use the recommended amount of detergent appropriate for water hardness and the laundry.
Excessive laundry was loaded in.
Do not load the machine in excess. Load with amounts recommended in the "Programme and consumption table"
Wrong programme and temperature were selected.
Select the proper programme and temperature for the laundry to be washed.
Wrong type of detergent is used.
Use original detergent appropriate for the machine.
Too much detergent is used.
Put the detergent in the correct compartment. Do not mix the bleaching agent and the detergent with each other
Washing performance is poor: Oily stains appeared on the laundry. (**)
Regular drum cleaning is not applied.
Clean the drum regularly. For this, please see 4.4.2.
Washing performance is poor: Clothes smell unpleasantly. (**)
Odours and bacteria layers are formed on the drum as a result of continuous washing at lower temperatures and/or in short programmes.
Leave the detergent drawer as well as the loading door of the machine ajar after each washing. Thus, a humid environment favorable for bacteria cannot occur in the machine
Colour of the clothes faded. (**)
Excessive laundry was loaded in.
Do not load the machine in excess
Detergent in use is damp.
Keep detergents closed in an environment free of humidity and do not expose them to excessive temperatures.
A higher temperature is selected.
Select the proper programme and temperature according to the type and soiling degree of the laundry.
It does not rinse well.
The amount, brand and storage conditions of the detergent used are inappropriate.
Use a detergent appropriate for the washing machine and your laundry. Keep detergents closed in an environment free of humidity and do not expose them to excessive temperatures.
Detergent is put in the wrong compartment.
If detergent is put in the prewash compartment although prewash cycle is not selected, machine can take this detergent during rinsing or softener step. Put the detergent in the correct compartment.
Pump filter is clogged.
Check the filter.
Drain hose is folded.
Check the drain hose.
Laundry became stiff after washing. (**)
Insufficient amount of detergent is used.
Using insufficient amount of detergent for the water hardness can cause the laundry to become stiff in time. Use appropriate amount of detergent according to the water hardness.
Detergent is put in the wrong compartment.
If detergent is put in the prewash compartment although prewash cycle is not selected, machine can take this detergent during rinsing or softener step. Put the detergent in the correct compartment.
Detergent might be mixed with the softener.
Do not mix the softener with detergent. Wash and clean the dispenser with hot water.
Laundry does not smell like the softener. (**)
Detergent is put in the wrong compartment.
If detergent is put in the prewash compartment although prewash cycle is not selected, machine can take this detergent during rinsing or softener step. Wash and clean the dispenser with hot water. Put the detergent in the correct compartment
Detergent might be mixed with the softener.
Do not mix the softener with detergent. Wash and clean the dispenser with hot water.
Detergent residue in the detergent drawer. (**)
Detergent is put in wet drawer.
Dry the detergent drawer before putting in detergent.
Detergent has gotten damp.
Keep detergents closed in an environment free of humidity and do not expose them to excessive temperatures
Water pressure is low.
Check the water pressure.
The detergent in the main wash compartment got wet while taking in the prewash water. Holes of the detergent compartment are blocked.
Check the holes and clean if they are clogged.
There is a problem with the detergent drawer valves.
Call the Authorized Service Agent.
Detergent might be mixed with the softener.
Do not mix the softener with detergent. Wash and clean the dispenser with hot water.
Regular drum cleaning is not applied.
Clean the drum regularly. For this, please see 4.4.2.
Too much foam forms in the machine. (**)
Improper detergents for the washing machine are being used.
Use detergents appropriate for the washing machine.
Excessive amount of detergent is used.
Use only sufficient amount of detergent
Detergent was stored under improper conditions.
Store detergent in a closed and dry location. Do not store in excessively hot places.
Some meshed laundry such as tulle may foam too much because of their texture.
Use smaller amounts of detergent for this type of item.
Detergent is put in the wrong compartment.
Put the detergent in the correct compartment.
Softener is being taken early.
There may be problem in the valves or in the detergent dispenser. Call the Authorized Service Agent.
Foam is overflowing from the detergent drawer.
Too much detergent is used.
Mix 1 tablespoonful softener and ½ l water and pour into the main wash compartment of the detergent drawer
Put detergent into the machine suitable for the programmes and maximum loads indicated in the “Programme and consumption table”. When you use additional chemicals (stain removers, bleachs and etc), reduce the amount of detergent.
Laundry remains wet at the end of the programme. (*)
Excessive foam might have occurred and automatic foam absorption system might have been activated due to too much detergent usage.
Use recommended amount of detergent.
(*) Machine does not switch to spinning step when the laundry is not evenly distributed in the drum to prevent any damage to the machine and to its surrounding environment. Laundry should be rearranged and re-spun.
(**) Regular drum cleaning is not applied. Clean the drum regularly. See 4.4.2
#1 My washing machine vibrates and moves forward mainly when I wash towels, I have tried loading evenly, on top of each other, etc I was everyday and don’t overload What am I doing wrong?
if you have done a self-installation you may not have removed the transit bolt from the rear of this machine generally, there are 4 transit bolts this stops the bowl moving while in transit, please refer to your installation manual to locate these bolts once removed you should be all good to go.
there is a standard factory warranty of two years however at the moment there are 3 extra years giving you a total of a 5-year warranty once you register online with Beko. Once you register with Beko online this will become a 5-year full factory warranty on all parts and labour with in-home service
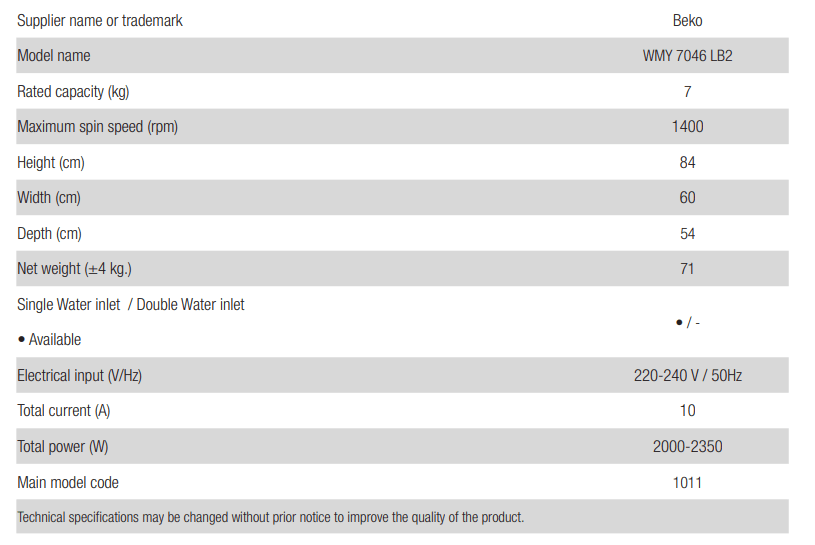
#3 I have a maximum cupboard depth of 600mm. Will the bell 7kg fit?
we do have the suppliers specification sheet and manual attached to this item to assist you with your measurements when I have opened the spec sheet looking at the overall depth including space at the rear of this washer the body itself and allowing for the front door this now has an overall depth of 591mm if you placing under a cupboard without a door closing in front you're all good however if there is the door will not close. Front-load washers were not designed to go behind cupboard doors this is something that designers have brought to light here and to hide appliances, suppliers measurements consist only of what would need to fit under a standard benchtop so the measurement of the worktop or lid is what they provide as the depth they do not allow for pipes coming up from behind the washer allow 40-50mm here plus the depth of the washer then add the front load washers door allow 100mm so the machine that you are looking at has a physical depth of 591mm plus 50mm for piping plus the cupboard door itself 20mm so without seeing this area you would need 661mm in total depth.
#4 Is this stackable? If not, what would we need to aid a beko dryer?
You can stack a dryer on top of a washing machine using a compatible stacking kit or anti-vibration rubber mat providing that the depth and width of the dryer is equal to or less than that of the washing machine underneath.
#5 Is the drum Stainless steel? If not what material is it ? Thanks