Black plate (1,1)
Owner’s Manual
Mode d’emploi
Manual de instrucciones
DVD RDS AV RECEIVER
AUTORADIO AV RDS LECTEUR DE DVD
RADIO AV RDS CON DVD
AVH-X5600BHS
AVH-X4600BT
AVH-X3600BHS
AVH-X2600BT
AVH-X1600DVD
Important (Serial number)
The serial number is located on the bottom of this unit. For your own security and
convenience, be sure to record this number on the enclosed warranty card.
Important (Numéro de série)
Le numéro de série se trouve au bas de cet appareil. Pour votre sécurité et votre
commodité, veillez à noter ce numéro sur la carte de garantie fournie.
Importante (Número de serie)
El número de serie se encuentra en la parte inferior de esta unidad. Por su
propia seguridad y comodidad, asegúrese de anotar este número en la tarjeta de
garantía que se adjunta.
<CRD4844-A>1
English EspañolFrançais
Black plate (2,1)
Precautions
IMPORTANT SAFEGUARDS 4
To ensure safe driving 4
To avoid battery exhaustion 4
Before you start
Information to User 5
The Safety of Your Ears is in Your
Hands 5
About this unit 5
DVD video disc region numbers 6
About this manual 6
After-sales service for Pioneer
products 6
Use and care of the remote control 6
Demo mode 6
What’s what
Head unit 7
Home display 7
Turning the source ON/OFF 8
Selecting a source 8
Adjusting the volume 8
Remote control 8
Common operations
Common operations for menu settings/
lists 9
Operating the scroll icon and the scrubber
bar 9
Activating the touch panel keys 10
Using the rear view 10
Using the rear monitor 10
Using sound retriever 10
Changing the wide-screen mode 10
Basic operations
Adjusting the angle of the LCD panel and
ejecting media 11
Setting the clock 11
HD Radioä tuner
About HD Radioä stations 11
HD Radio tuner operations 11
Storing and recalling stations 12
Storing the strongest stations 12
Tuning in to strong signals 12
Using iTunes tagging 12
Switching the seek mode 12
Switching the reception mode 12
Tuner
Tuner operations 13
Storing and recalling stations 13
Storing the strongest stations 13
Tuning in to strong signals 13
Using iTunes tagging 13
SiriusXM tuner
Introducing SiriusXM tuner
operations 14
Storing and recalling channels 14
Selecting a channel from the list
screen 14
Switching the list display 15
Selecting a SiriusXM channel directly 15
Replayä 15
Using iTunes tagging 15
Setting Parental Control 15
Setting SiriusXM TuneStartä 16
Scan options 16
Resetting to default 16
Disc (CD/DVD)
Introducing movie operations 17
Sound playback operations 18
Switching the media file type 18
Operating the DVD menu 18
Random play (shuffle) 19
Repeating playback 19
Searching for the part you want to
play 19
Selecting audio output 19
PBC playback 19
Selecting tracks from the track title
list 19
Selecting files from the file name list 19
Playing DivXâ VOD content 20
iPod
iPod control 20
Sound playback operations 20
Moving images operations 21
Using this unit’s iPod function from your
iPod 22
Shuffle play 22
Repeating playback 22
Playing videos from your iPod 22
Browsing for a video/music on the
iPod 22
Changing audiobook speed 23
Displaying lists related to the song currently
playing (link search) 23
AppRadio Mode
AppRadio Mode operation 23
Starting procedure 24
Setting the Keyboard 24
Smartphone link adaptor operations
Starting procedure 25
USB
Moving images operations 25
Sound playback operations 26
Music browse mode 26
Still image playback operations 27
Switching the media file type 27
Random play (shuffle) 27
Repeating playback 27
Selecting files from the file name list 27
Displaying lists related to the song currently
playing (link search) 27
Playing DivXâ VOD content 28
Capture an image in JPEG files 28
Bluetooth Audio
Sound playback operations 28
Setting up for Bluetooth audio 28
Random play (shuffle) 29
Repeating playback 29
Using MIXTRAX
MIXTRAX operation 29
MIXTRAX EZ operation 29
Starting MIXTRAX EZ operation 29
Setting MIXTRAX mode 29
Setting the effect 29
Streaming Pandoraâ
Pandora operations 30
Selecting and playing Pandoraâ stations/
shuffle 31
Bluetooth telephone
Bluetooth telephone operations 32
Calling a number in the phone book 33
Selecting a number by alphabet search
mode 33
Inverting names in phone book 33
Using the missed, received and dialed call
lists 33
Setting automatic answering 33
Adjusting the other party’s listening
volume 33
Switching the ring tone 33
Using the preset dial lists 34
Making a call by entering phone
number 34
Setting the private mode 34
Voice control 34
Settings
Menu operations 35
Audio adjustments
Using fader/balance adjustment 35
Using balance adjustment 35
Using the equalizer 35
Using the auto-equalizer 36
Using sonic center control 36
Adjusting loudness 36
Using subwoofer output 36
Boosting the bass 36
Using the high pass filter 36
Adjusting source levels 37
Contents
2
Contents
En
<CRD4844-A>2
Black plate (3,1)
Setting up the video player
Setting the subtitle language 37
Setting the audio language 37
Setting the menu language 37
Setting the multi-angle DVD display 38
Setting the aspect ratio 38
Setting the slideshow interval 38
Setting parental lock 38
Setting the DivX subtitle file 39
Displaying the DivXâ VOD registration
code 39
Automatic playback of DVDs 39
System settings
Switching the auxiliary setting 40
Setting AV input 40
Setting the navigation system 40
Setting the Pandora connect mode 40
Selecting MirrorLink Mode 40
Updating the firmware for the smartphone
link adaptor 40
Displaying the smartphone link adaptor
firmware version 40
Updating firmware 41
Displaying the firmware version 41
Setting MIXTRAX mode 41
Changing the picture adjustment
(Brightness, Contrast, Color, Hue, Dimmer
and Temperature) 41
Selecting the system language 41
Setting SiriusXM TuneStartä 42
Resetting to default 42
Setting Demo Mode 42
Switching sound muting/attenuation 42
Setting the rear output and subwoofer
controller 42
Using the keyboard 42
Setting the ever scroll 42
Setting the Bluetooth audio 42
Clearing Bluetooth memory 43
Updating Bluetooth software 43
Displaying the Bluetooth software
version 43
Setting the rear view camera (back up
camera) 43
Auto EQ (auto-equalizing) 43
Setting the video signal 44
Favorite menu
Using the Favorite menu 45
Bluetooth connection menu
Bluetooth connection menu
operations 45
Theme menu
Selecting the illumination color 46
Selecting the OSD (on-screen display)
color 46
Selecting the background display 46
Other functions
Adjusting the response positions of the
touch panels (Touch Panel
Calibration) 47
Using an AUX source 47
Resetting the microprocessor 48
Operating the sound mixer 48
Connection
Connecting the power cord 50
When connecting to separately sold power
amp 51
When connecting the external video
component and the display 51
When connecting with a rear view
camera 52
iPod with lightning connector 52
iPod with 30-pin connector 53
Optional Smartphone link adaptor (CD-
ML100) connection 53
Optional SiriusXM Tuner connection 54
Installation
Installation using the screw holes on the
side of the unit 54
Installing the microphone 55
Additional information
Troubleshooting 56
Error messages 57
Understanding auto EQ error
messages 60
Understanding messages 61
Indicator list 61
Handling guidelines 62
Audio compatibility (USB) 63
Compressed file compatibility (disc,
USB) 64
iPod compatibility 64
Sequence of audio files 65
Using the display correctly 65
Bluetooth profiles 66
License, Warranty Disclaimer & Limitation of
Liability 66
Language code chart for DVD 68
Specifications 69
English
Contents
3
Contents
En
<CRD4844-A>3
Black plate (4,1)
Thank you for purchasing this PIONEER
product.
To ensure proper use, please read through this
manual before using this product. It is especially
important that you read and observe WARN-
INGs and CAUTIONs in this manual. Please
keep the manual in a safe and accessible place for
future reference.
IMPORTANT SAFEGUARDS
Please read all of these instructions regarding
your display and retain them for future refer-
ence.
1 Do not install the display where it may
(i) obstruct the driver’s vision, (ii) impair
the performance of any of the vehicle’s
operating systems or safety features, in-
cluding air bags, hazard lamp buttons or
(iii) impair the driver’s ability to safely
operate the vehicle.
2 Do not operate this display if doing so in
any way will divert your attention from
the safe operation of your vehicle. Al-
ways observe safe driving rules and fol-
low all existing traffic regulations. If you
experience difficulty in operating the
system or reading the display, park your
vehicle in a safe location and make nec-
essary adjustments.
3 Please remember to wear your seat belt
at all times while operating your vehicle.
If you are ever in an accident, your inju-
ries can be considerably more severe if
your seat belt is not properly buckled.
4 Never use headphones while driving.
5 To promote safety, certain functions are
disabled unless the parking brake is on,
and the vehicle is not in motion.
6 Never set the volume of your display so
high that you cannot hear outside traffic
and emergency vehicles.
WARNING
! Do not attempt to install or service this
product by yourself. Installation or serv-
icing of this product by persons without
training and experience in electronic
equipment and automotive accessories
may be dangerous and could expose you
to the risk of electric shock, injury or
other hazards.
! Do not attempt to operate the unit while driv-
ing. Make sure to pull off the road and park
your vehicle in a safe location before at-
tempting to use the controls on the device.
To ensure safe driving
WARNING
! LIGHT GREEN LEAD AT POWER CONNEC-
TOR IS DESIGNED TO DETECT PARKED
STATUS AND MUST BE CONNECTED TO
THE POWER SUPPLY SIDE OF THE PARK-
ING BRAKE SWITCH. IMPROPER CON-
NECTION OR USE OF THIS LEAD MAY
VIOLATE APPLICABLE LAW AND MAY RE-
SULT IN SERIOUS INJURY OR DAMAGE.
! To avoid the risk of damage and injury and the
potential violation of applicable laws, this unit is
not for use with a video screen that is visible to
the driver.
! To avoid the risk of accident and the potential vio-
lation of applicable laws, no viewing of front seat
video should ever occur while the vehicle is
being driven.
! In some countries or states the viewing of images
on a display inside a vehicle even by persons
other than the driver may be illegal. Where such
regulations apply, they must be obeyed and this
unit’s video features should not be used.
When you attempt to watch a video image while
driving, the warning “Viewing of front seat
video source while driving is strictly prohib-
ited.” will appear on the front display.
To watch a video image on the front display, park
your vehicle in a safe place and apply the park-
ing brake.
Parking brake interlock
Certain functions (Video viewing and certain
touch panel keys) offered by this unit could be
dangerous and/or unlawful if used while driving.
To prevent such functions from being used while
the vehicle is in motion, there is an interlock sys-
tem that senses when the parking brake is set. If
you attempt to use the functions described
above while driving, they will become disabled
until you stop the vehicle in a safe place, and (1)
apply the parking brake, (2) release the parking
brake, and then (3) apply the parking brake
again. Please keep the brake pedal pushed
down before releasing the parking brake.
When using a display connected
to rear monitor output
The rear monitor output on this unit (V OUT)is
used to connect a rear display that allows pas-
sengers in the rear seats to watch videos.
WARNING
NEVER install the rear display in a location
where the driver can watch videos while driving.
When using the rear view camera
With an optional rear view camera, this unit can
be used as an aid to keep an eye on trailers, or
when backing into a tight parking spot.
WARNING
! SCREEN IMAGE MAY APPEAR RE-
VERSED.
! USE INPUT ONLY FOR REVERSE OR
MIRROR IMAGE REAR VIEW CAMERA.
OTHER USE MAY RESULT IN INJURY
OR DAMAGE.
CAUTION
! The rear view camera function is to be used
as an aid to keep an eye on trailers, or while
backing up. Do not use for entertainment
purposes.
! Please note that the edges of the rear view
camera images may differ slightly according
to whether full screen images are displayed
when backing up, and whether the images
are used for checking the rear when the ve-
hicle is moving forward.
To avoid battery exhaustion
Keep the vehicle engine running when using
this unit to avoid draining the battery power.
! When no power is supplied to this unit, such
as when the vehicle battery is being re-
placed, the microcomputer of this unit re-
turns to its initial condition. We recommend
that you transcribe the audio adjustment
data.
WARNING
Do not use with vehicles that do not feature an
ACC position.
Precautions
4
Section
Precautions
En
01
<CRD4844-A>4
Black plate (5,1)
Information to User
MODEL NO.: AVH-X5600BHS, AVH-X4600BT,
AVH-X3600BHS, AVH-X2600BT
Contains FCC ID: RKXFC6000S
Contains/Contient IC: 5119A-FC6000S
This device complies with Part 15 of FCC
Rules and Industry Canada licence-exempt
RSS standard(s). Operation is subject to the
following two conditions: (1) this device may
not cause interference, and (2) this device
must accept any interference, including inter-
ference that may cause undesired operation
of this device.
This transmitter must not be co-located or op-
erated in conjunction with any other antenna
or transmitter.
The Bluetooth antenna cannot be removed (or
replaced) by user.
This equipment complies with FCC/IC radia-
tion exposure limits set forth for an uncon-
trolled environment and meets the FCC radio
frequency (RF) Exposure Guidelines in Sup-
plement C to OET65 and RSS-102 of the IC
radio frequency (RF) Exposure rules. This
equipment has very low levels of RF energy
that it deemed to comply without maximum
permissive exposure evaluation (MPE). But it
is desirable that it should be installed and op-
erated keeping the radiator at least 20 cm or
more away from person’s body (excluding ex-
tremities: hands, wrists, feet and ankles).
MODEL NO.: AVH-X1600DVD
This device complies with Part 15 of the FCC
Rules. Operation is subject to the following
two conditions:
(1) this device may not cause harmful interfer-
ence, and (2) this device must accept any in-
terference received, including interference
that may cause undesired operation.
Alteration or modifications carried out with-
out appropriate authorization may invalidate
the user’s right to operate the equipment.
Note
This equipment has been tested and found
to comply with the limits for a Class B digital
device, pursuant to Part 15 of the FCC Rules.
These limits are designed to provide reason-
able protection against harmful interference
in a residential installation. This equipment
generates, uses and can radiate radio fre-
quency energy and, if not installed and used
in accordance with the instructions, may
cause harmful interference to radio commu-
nications. However, there is no guarantee
that interference will not occur in a particu-
lar installation. If this equipment does cause
harmful interference to radio or television re-
ception, which can be determined by turning
the equipment off and on, the user is encour-
aged to try to correct the interference by one
or more of the following measures:
- Reorient or relocate the receiving antenna.
- Increase the separation between the equip-
ment and receiver.
- Connect the equipment into an outlet on a
circuit different from that to which the re-
ceiver is connected.
- Consult the dealer or an experienced radio/
TV technician for help.
The Safety of Your Ears is in
Your Hands
Get the most out of your equipment by playing it
at a safe level—a level that lets the sound come
through clearly without annoying blaring or dis-
tortion and, most importantly, without affecting
your sensitive hearing. Sound can be deceiving.
Over time, your hearing “comfort level” adapts to
higher volumes of sound, so what sounds “nor-
mal” can actually be loud and harmful to your
hearing. Guard against this by setting your
equipment at a safe level BEFORE your hearing
adapts.
ESTABLISH A SAFE LEVEL:
! Set your volume control at a low setting.
! Slowly increase the sound until you can hear
it comfortably and clearly, without distortion.
! Once you have established a comfortable
sound level, set the dial and leave it there.
BE SURE TO OBSERVE THE
FOLLOWING GUIDELINES:
! Do not turn up the volume so high that you
can’t hear what’s around you.
! Use caution or temporarily discontinue use
in potentially hazardous situations.
! Do not use headphones while operating a
motorized vehicle; the use of headphones
may create a traffic hazard and is illegal in
many areas.
About this unit
The tuner frequencies on this unit are allocated
for use in North America. Use in other areas
may result in poor reception.
WARNING
Handling the cord on this product or cords asso-
ciated with accessories sold with the product
may expose you to chemicals listed on proposi-
tion 65 known to the State of California and
other governmental entities to cause cancer and
birth defect or other reproductive harm. Wash
hands after handling.
CAUTION:
USE OF CONTROL OR ADJUSTMENT OR
PERFORMANCE OF PROCEDURES
OTHER THAN THOSE SPECIFIED HEREIN
MAY RESULT IN HAZARDOUS RADIATION
EXPOSURE.
CAUTION:
THE USE OF OPTICAL INSTRUMENTS
WITH THIS PRODUCT WILL INCREASE
EYE HAZARD.
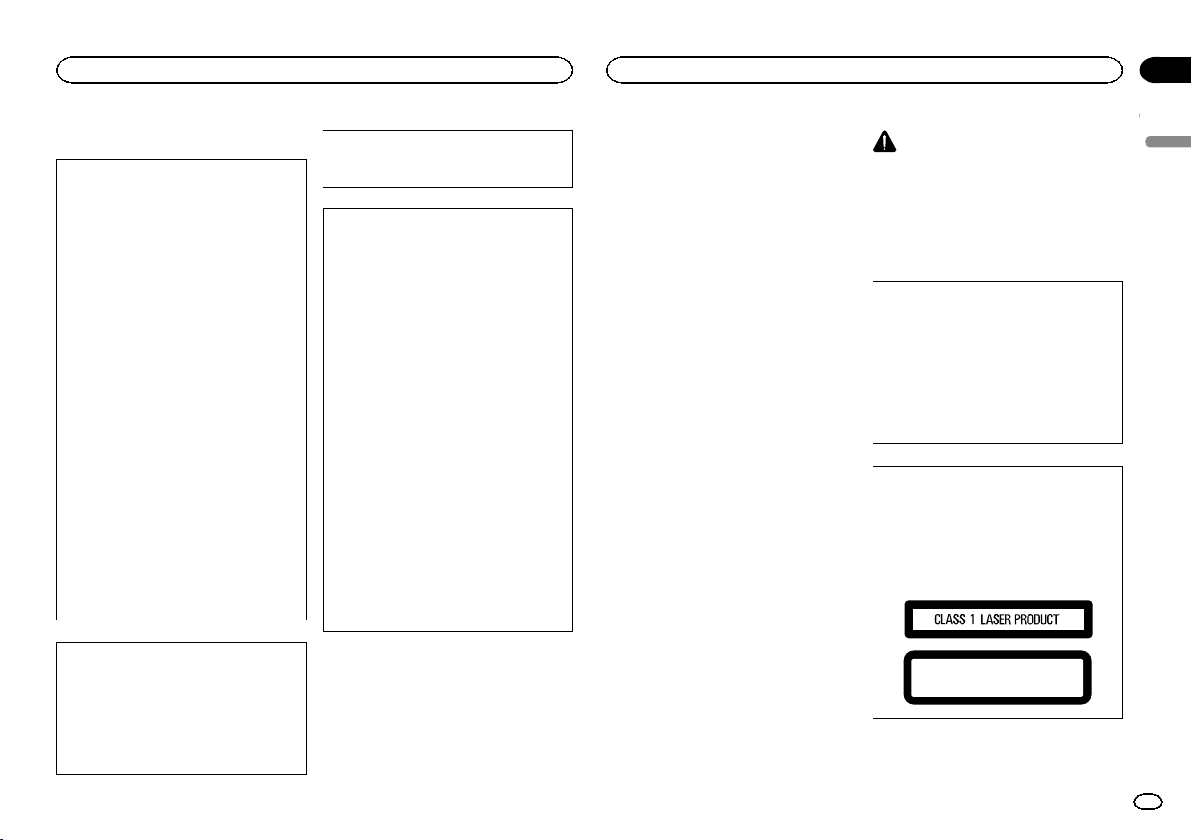
CAUTION
This product is a class 1 laser product classi-
fied under the Safety of laser products, IEC
60825-1:2007, and contains a class 1M laser
module. To ensure continued safety, do not re-
move any covers or attempt to gain access to
the inside of the product. Refer all servicing to
qualified personnel.
CAUTION—CLASS 1M VISIBLE AND INVISIBLE
LASER RADIATION WHEN OPEN, DO NOT VIEW
DIRECTLY WITH OPTICAL INSTRUMENTS.
English
Before you start
5
Section
Before you start
En
02
<CRD4844-A>5
Black plate (6,1)
CAUTION
! Do not allow this unit to come into contact
with liquids. Electrical shock could result.
Also, damage to this unit, smoke, and over-
heating could result from contact with
liquids.
! Keep this manual handy for future reference.
! Always keep the volume low enough to hear
outside sounds.
! Avoid exposure to moisture.
! If the battery is disconnected or discharged,
any preset memory will be erased.
DVD video disc region numbers
Only DVD video discs with compatible region
numbers can be played on this player. You can
find the region number of the player on the bot-
tom of this unit and in this manual (refer to
Specifications on page 69).
About this manual
! This unit features a number of sophisticated
functions to ensure superior reception and
operation. All the functions have been de-
signed for the easiest possible use, but many
are not self-explanatory. This operation man-
ual will help you benefit fully from this unit’s
potential and to maximize your listening en-
joyment.
! This manual uses diagrams of actual screens
to describe operations. However, the screens
on some units may not match those shown
in this manual depending on the model
used.
After-sales service for
Pioneer products
Please contact the dealer or distributor from
where you purchased this unit for after-sales
service (including warranty conditions) or any
other information. In case the necessar y infor-
mation is not available, please contact the com-
panies listed below:
Please do not ship your unit to the companies at
the addresses listed below for repair without ad-
vance contact.
U.S.A.
Pioneer Electronics (USA) Inc.
CUSTOMER SUPPORT DIVISION
P.O. Box 1760
Long Beach, CA 90801-1760
800-421-1404
CANADA
Pioneer Electronics of Canada, Inc.
CUSTOMER SATISFACTION DEPARTMENT
340 Ferrier Street
Unit 2
Markham, Ontario L3R 2Z5, Canada
1-877-283-5901
905-479-4411
For warranty information please see the Limited
Warranty sheet included with this unit.
Use and care of the remote
control
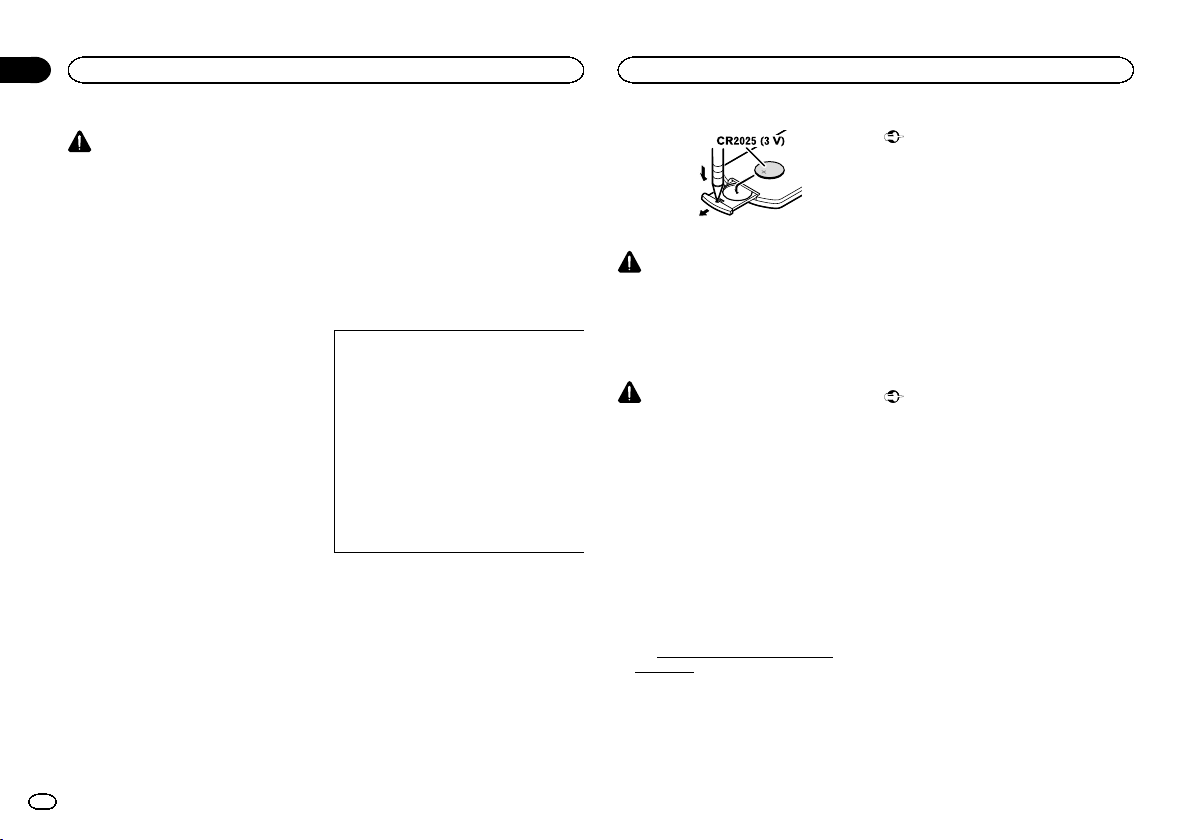
Installing the battery
Slide the tray on the back of the remote control
out and insert the battery with the plus (+) and
minus (–) poles aligned properly.
! When using for the first time, pull out the
film protruding from the tray.
WARNING
! Keep the battery out of the reach of children.
Should the battery be swallowed, consult a
doctor immediately.
! Batteries (battery pack or batteries installed)
must not be exposed to excessive heat such
as sunshine, fire or the like.
CAUTION
! Remove the battery if the remote control is
not used for a month or longer.
! There is a danger of explosion if the battery is
incorrectly replaced. Replace only with the
same or equivalent type.
! Do not handle the battery with metallic tools.
! Do not store the battery with metallic ob-
jects.
! If the battery leaks, wipe the remote control
completely clean and install a new battery.
! When disposing of used batteries, comply
with governmental regulations or environ-
mental public institutions’ rules that apply in
your country/area.
! “Perchlorate Material – special handling may
apply.
See
www.dtsc.ca.gov/hazardouswaste/
perchlorate. (Applicable to California,
U.S.A.)”
Using the remote control
Point the remote control in the direction of the
front panel to operate.
! The remote control may not function properly
in direct sunlight.
Important
! Do not store the remote control in high tem-
peratures or direct sunlight.
! Do not let the remote control fall onto the
floor, where it may become jammed under
the brake or accelerator pedal.
Demo mode
The feature demo automatically starts when you
select Off for the source and continues while
the ignition switch is set to ACC or ON. To can-
cel the feature demo, press and hold MUTE.
Press and hold MUTE again to restart. Operat-
ing the feature demo while the car engine is
turned off it may drain the battery power.
Important
The red lead (ACC) of this unit should be con-
nected to the ignition on/off function. Failure to
do so may result in battery drain.
Before you start
6
Section
Before you start
En
02
<CRD4844-A>6
Black plate (7,1)
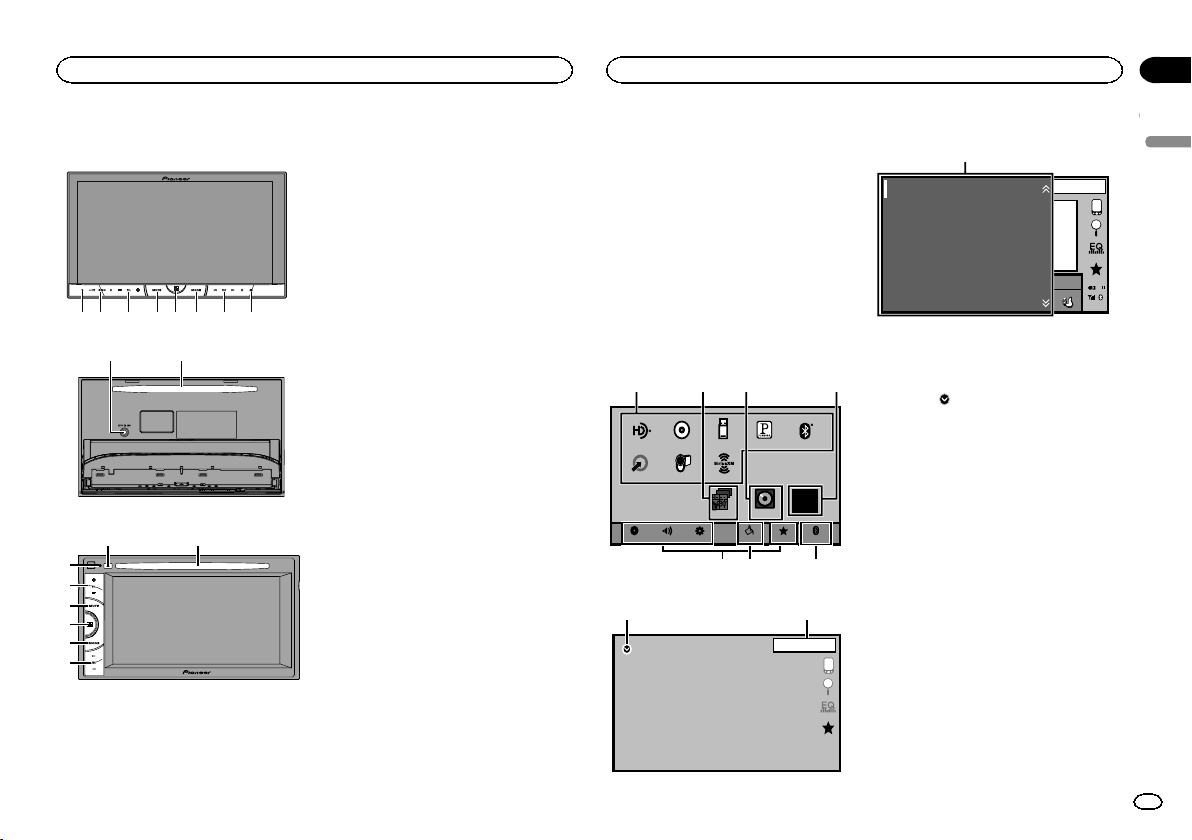
Head unit
AVH-X5600BHS and AVH-X4600BT
1 2 3 5 6 74
8
9 a
AVH-X3600BHS, AVH-X2600BTand AVH-X1600DVD
8a
1
3
4
5
6
7
1 RESET
For details refer to Resetting the microproces-
sor on page 48.
2 SRC/OFF
3 +/– (VOLUME/VOL)
4 MUTE
Press to mute. Press again to unmute.
5 Home button
Displaying the home display.
The display returns to the Launcher screen
while a 3rd-party application is being used in
AppRadio Mode.
Double-clicking the icon on the Launcher
screen returns the display to the home dis-
play.
6 MODE
When RGB input is not used
! Press MODE to turn the display off. Press
MODE again to turn the display on.
When RGB input is used
! Press and hold MODE to turn the display
off. Press MODE again to turn the display
on.
! When the navigation system is con-
nected, press MODE to switch to the nav-
igation display.
! When an iPhone that is running an appli-
cation that supports AppRadio Mode is
connected, press MODE to switch to the
application display. You can use the appli-
cation by touching the display.
! When a smartphone work with the Mirror-
Link function is connected, press MODE
to switch to the application display. You
can use the application by touching the
display.
7 c/d (TRK)
8 h (eject)
9 Auto EQ microphone input jack
Use to connect an auto EQ microphone.
a Disc loading slot
Notes
! For details on how to operate a navigation
system from this unit, refer to its operation
manual.
! For details on how to connect an iPod or
USB storage device to this unit, refer to
When connecting with optional CD-IU201V
cable on page 53.
! For details on how to connect a smartphone
with the MirrorLink function to this unit, refer
to Optional Smartphone link adaptor (CD-
ML100) connection on page 53.
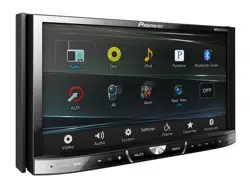
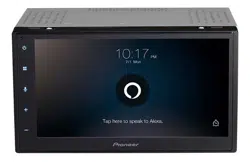
Home display
Home display
HD Radio
Disc USB/iPod
Pandora
Bluetooth Audio
AV
RearViewApps
OFF
AUX
Bluetooth
Favorites
ThemeSystem
Settings
AudioVideo
SiriusXM
1324
567
Source off display
OFF
1 JAN
AM
12:12
89
Source on display
JAN
AM
DB
12:22
Bluetooth Audio
SiriusXM
iPod
HD Radio
Pandora
Disc
S.Rtrv
Appr
ppr
App
pp
Ap p
1
1 Source icon
Selecting a favorite source.
When the source icon is not displayed, it can
be displayed by pressing the home key or
touching
.
2 Apps/MirrorLink key
Switching to AppRadio Mode/MirrorLink
Mode.
3 Rear view key
Displaying the rear view image.
For details refer to Using the rear view on
page 10.
4 Source off key
Turning the source off.
5 Bluetooth key
Displaying the Bluetooth connection menu.
6 Theme key
Displaying the Theme menu.
7 Menu icon
Displaying the menu.
8 Source key
Displaying the source menu.
English
What’s what
7
Section
What’s what
En
03
<CRD4844-A>7
Black plate (8,1)
9 Clock key
Switching to clock adjustment display.
Turning the source ON/OFF
(Function of AVH-X5600BHS/AVH-X4600BT)
Turning the source on using the buttons
1 Press SRC/OFF to turn the source on.
Turning the source off using the buttons
1 Press and hold SRC/OFF until the source turns
off.
Selecting a source
Available source modes
! SiriusXM – SiriusXM tuner
(AVH-X5600BHS/AVH-X3600BHS)
! HD Radio – HD Radio tuner
(AVH-X5600BHS/AVH-X3600BHS)
! Radio – Radio tuner
(AVH-X4600BT/AVH-X2600BT/AVH-X1600DVD)
! Disc – Built-in DVD and CD player
! USB, iPod,orUSB MTP – USB/iPod/MTP
! Pandora – Pandora
â
internet radio
! Bluetooth Audio – Built-in Bluetooth audio
(AVH-X5600BHS/AVH-X4600BT/AVH-
X3600BHS/AVH-X2600BT)
! AUX – AUX
! AV – AV input
Selecting a source
! Using SRC/OFF
(Function of AVH-X5600BHS/AVH-X4600BT)
1 Press SRC/OFF.
! Using the touch panel keys on the home dis-
play
1 Touch the source icon and then touch the
desired source name.
! When the source icon is not displayed, it
can be displayed by touching the screen.
! While operating the menu, you cannot se-
lect a source by touching the source icon.
Note
The USB/iPod icon will change as follows:
! USB/iPod is displayed when no device is con-
nected.
! USB is displayed when a USB storage device is
connected to USB input.
! iPod is displayed when an iPod is connected to
USB input.
! USB MTP is displayed when an MTP-compatible
Android device (running Android OS 4.0 or high-
er) is connected by MTP connection using a USB
cable.
Adjusting the volume
% Press +/– (VOLUME/VOL) to adjust the
volume.
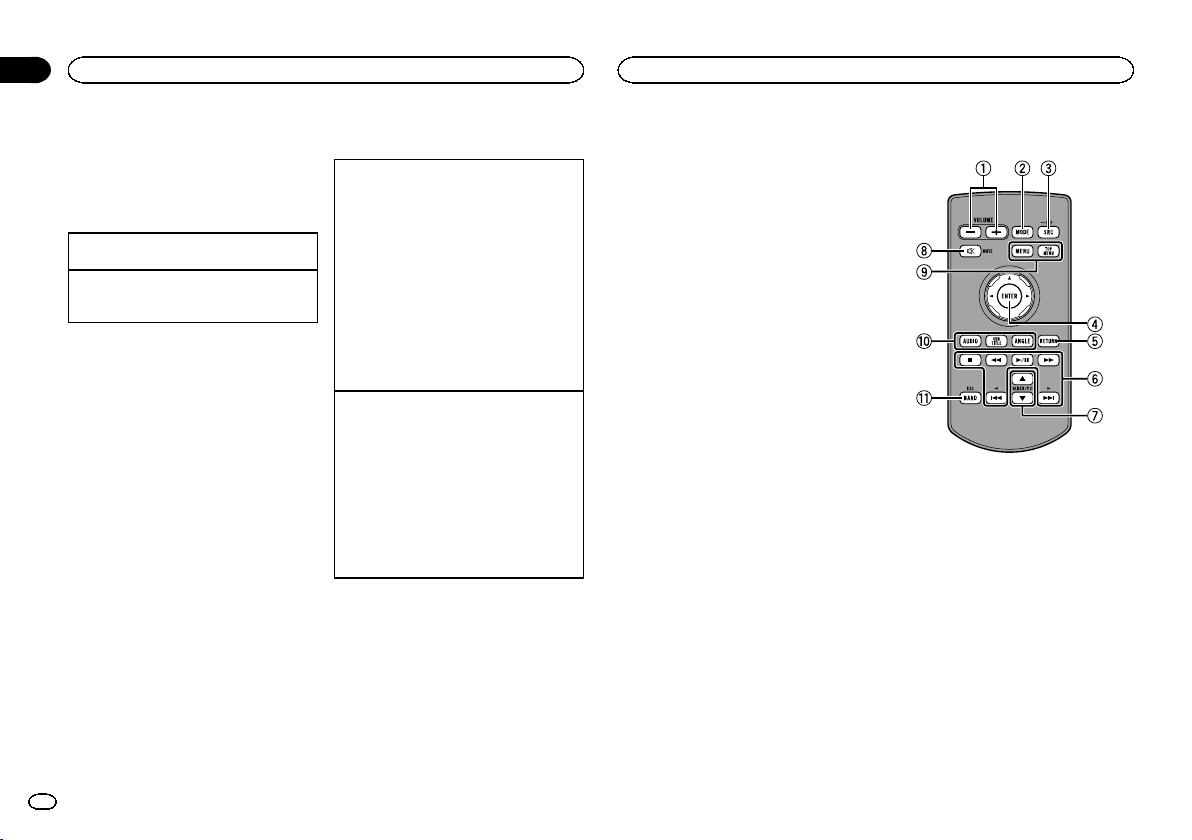
Remote control
1 +/– (VOLUME/VOL)
2 MODE
Turning the information display off.
3 SRC/OFF
Press to cycle through all the available sour-
ces. Press and hold to turn the source off.
4 Thumb pad
Use to select a menu on the DVD menu.
5 RETURN
Press to display the PBC (playback control)
menu during PBC playback.
6 f
Press to pause or resume playback.
m
Press to perform fast reverse.
Press to change the fast reverse speed.
What’s what
8
Section
What’s what
En
03
<CRD4844-A>8
Black plate (9,1)
n
Press to perform fast forward.
Press to change the fast forward speed.
o
Press to return to the previous track (chap-
ter).
p
Press to go to the next track (chapter).
g
Press to stop playback.
If you resume playback, playback will start
from the point where you stopped. Touch the
key again to stop playback completely.
7 FOLDER/P.CH
Press to select the next or previous disc or
folder.
Press to recall radio station frequencies as-
signed to preset tuning keys.
8 MUTE
Press to mute. Press again to unmute.
9 MENU
Press to display the DVD menu during DVD
playback.
TOP MENU
Press to return to the top menu during DVD
playback.
a AUDIO
Press to change the audio language during
DVD playback.
Press to switch audio output for DivX/
MPEG-4.
SUBTITLE
Press to change the subtitle language during
DVD/DivX/MPEG-4 playback.
ANGLE
Press to change the viewing angle during
DVD playback.
b BAND/ESC
Press to select the tuner band when tuner is
selected as a source. Also used to cancel the
control mode of functions.
Press to switch between modes when play-
ing the following types of data:
! Disc
Compressed audio and audio data
(CD-DA) such as with CD-EXTRA and
MIXED-MODE CDs
! USB storage device
Audio data, video data and photo data
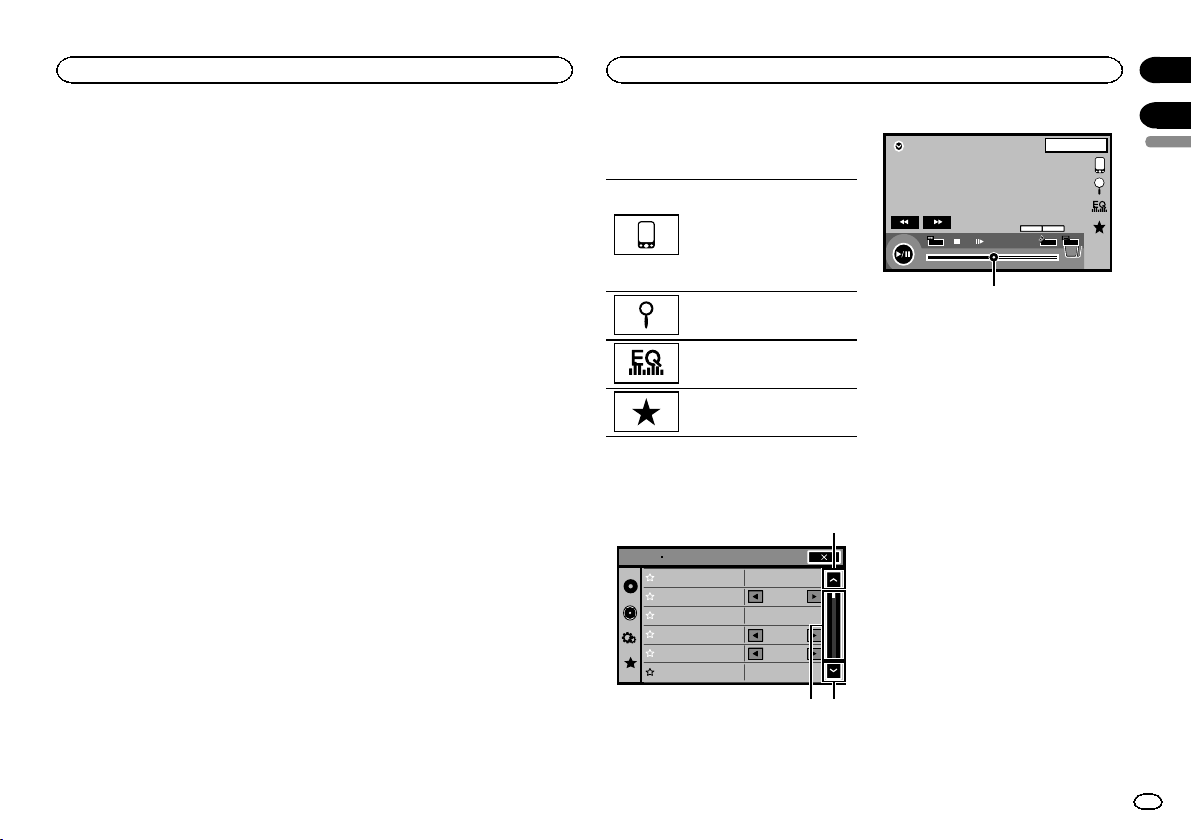
Common operations for
menu settings/lists
(Function of AVH-X5600BHS/
AVH-X4600BT/AVH-X3600BHS/
AVH-X2600BT)
Starting the Bluetooth telephone
menu.
For details refer to Bluetooth tele-
phone on page 32.
Displaying the list menu.
Starting the search function.
Displaying the EQ (Audio func-
tion menu).
Displaying the Favorite menu.
Operating the scroll icon
and the scrubber bar
Sonic Center Control
Loudness
Subwoofer
Bass Booster
High Pass Filter
Source Level Adjuster
L/R 0
Low
0
125Hz
0
On
Audio
1
12
DVD-V
00'20'' -119'51''
48kHz 16bit
Dolby D
MENU
MENU
TOP
1/2
Dolby DMulti ch
FULL
11
1JAN
PM
12:43
01 01
3
1 Scroll icon
Appears when selectable items are hidden.
Touch the scroll icon to view any hidden
items.
2 Scrubber bar
Appears when items cannot be displayed on
a single page only.
Drag the scrubber bar to view any hidden
items.
Also, you can drag the list to view any hidden
items.
3 Playback point
Specifying the playback point
Drag the playback point on the screen.
English
What’s what
9
Section
Common operations
En
03
04
<CRD4844-A>9
Black plate (10,1)
Activating the touch panel keys
Touch panel keys
DVD-V
00'20'' -119'51''
48kHz 16bit
Dolby D
MENU
MENU
TOP
1/2
Dolby DMulti ch
FULL
1 1
1JAN
PM
12:43
01 01
07'24'' -112'47''
2/2
L+R
Return
1
1
1
1 Tab key
Switching the touch panel keys on the dis-
play.
Using the rear view
A rear view camera sold separately is required
for using the rear view mode. The below func-
tions are available.
! Rear view camera
This unit can be setup to display the rear
view image automatically when you move
the shift lever to the REVERSE (R) position.
! Camera for rear view mode
The rear view can be turned on to display at
all times.
The rear view camera needs to be set to a set-
ting other than Off to turn on rear view
mode.
For details about the settings, refer to Setting the
rear view camera (back up camera) on page 43.
Using the rear view key to
display the rear view
Displaying the rear view image by
turning the rear view image on.
When the rear view image is dis-
played, you can switch to the
source display by touching the dis-
play. You can operate from the
source display temporarily at this
time. If you do not perform any op-
erations within a few seconds, the
display will return to the rear view
image.
To turn off the rear view image,
press the home button to return to
the home display and then press
this key again.
Using the rear monitor
Connecting a rear monitor, sold separately, to
this unit allows images and videos to be viewed
from the rear seats.
Notes
! You cannot use touch panel keys and opera-
tion screens from the rear monitor.
! Images and video will continue to be dis-
played whether the vehicle is in motion or
stopped.
Using sound retriever
Automatically enhances com-
pressed audio and restores rich
sound.
Off — —
! is more effective than .
Notes
! This function is enabled for playback on the
sources listed below.
— CD-DA
— MP3/WMA/AAC files on USB MTP storage
devices
— MP3/WMA/AAC/WAV files on USB storage
devices
— MP3/WMA/AAC files on CD media
— iPod
— Pandora (iPod with 30-pin connector only)
! The sound retriever setting is turned off
when the MIXTRAX function is used in USB
source mode.
Changing the wide-screen
mode
Selecting the appropriate screen
ratio for the playback video.
1 Display the screen mode.
2 Touch the desired wide mode setting.
FULL (full screen)
The 4:3 picture is enlarged in the horizontal di-
rection only, granting viewers a 4:3 TV picture
(normal picture) without any omissions.
ZOOM (zoom)
The 4:3 picture is enlarged in the same propor-
tion both vertically and horizontally; ideal for a
cinema sized picture (wide screen picture).
NORMAL (normal)
The 4:3 picture is displayed as is, granting view-
ers no sense of disparity as the proportions are
the same as that of the normal picture.
Notes
! You cannot operate this function while driv-
ing.
! Different settings can be stored for each
video source.
! When a video is viewed in a wide screen
mode that does not match its original aspect
ratio, it may appear different.
! Remember that using the wide mode feature
of this system for commercial or public view-
ing purposes may constitute an infringement
on the author’s rights protected by the Copy-
right Law.
! The video image will appear coarser when
viewed in ZOOM mode.
! This function is enabled for playback on the
sources listed below.
— Disc: DVD-V, Video-CD, DivX, MPEG -1,
MPEG-2, MPEG-4
— USB: DivX, MPEG-1, MPEG-2, MPEG-4, JPEG
— iPod: Video
— AV: A/V data
— AUX: A/V data
Common operations
10
Section
Common operations
En
04
<CRD4844-A>10
Black plate (11,1)
Adjusting the angle of the
LCD panel and ejecting media
CAUTION
Keep hands and fingers clear of the unit when
opening, closing, or adjusting the LCD panel. Be
especially cautious of children’s hands and fin-
gers.
Adjusting the LCD panel angle
(Function of AVH-X5600BHS/AVH-X4600BT)
1 Press h(eject) to display the ejecting
menu.
2 Adjust the LCD panel to an easily view-
able angle.
Laying the panel down.
Returning the panel to the upright
position.
# As the set angle is saved, the LCD panel will au-
tomatically be adjusted to the same position the next
time the LCD panel is opened.
Ejecting a disc
(Function of AVH-X5600BHS/AVH-X4600BT)
1 Press h(eject) to display the ejecting
menu.
2 Eject a disc.
Ejecting a disc.
Ejecting a disc
(Function of AVH-X3600BHS/AVH-X2600BT/AVH-
X1600DVD)
% Press h to eject a disc.
Setting the clock
1 Touch the Clock key.
The Clock Adjustment screen appears.
Refer to Clock key on page 8.
2 Select the item to set.
3 Touch a or b to set the correct date and
time.
Notes
! You can select the date format. Touch
dd/mm/yy, yy/mm/dd or mm/dd/yy.
! You can select the time clock format. Touch
12hr (12-hour clock) or 24hr (24-hour clock).
Indicates that the display is
closed.
About HD Radioä stations
(Function of AVH-X5600BHS/AVH-X3600BHS)
HD Radioä stations offer high-quality audio and
data services. HD Radio stations are brought to
you by local FM/AM stations.
HD Radio stations feature the following:
! High quality audio
! FM multicasting
! Data services
Program Service Data: Contributes to the superior user
experience of HD Radio Technology. Presents song name,
artist, station IDs, HD2/ HD3 Channel Guide, and other rel-
evant data streams.
Adjacent to tradition al main stations are extra local FM
channels. These HD2/HD3 Channels provide new, original
music as well as deep cuts into traditional genre.
Digital, CD-quality sound. HD Radio Technology enables
local radio stations to broadcast a clean digital signal.
AM sounds like today’s FM and FM sounds like a CD.
iTunes
â
Tagging provides you the opportunity to discover
a wide range of content and the means to “tag” that con-
tent for later review and purchase from the iTunes
â
Store.
Visual information related to content being played on
your HD Radio receiver, such as Album Art, historical
photographs, still art from live broadcasts, among other
related content.
HD Radioä Technology
HD Radio Technology manufactured under li-
cense from iBiquity Digital Corporation. U.S.
and Foreign Patents. HD Radioä and the HD,
HD Radio, and “Arc” logos are proprietary trade-
marks of iBiquity Digital Corp.
HD Radio tuner operations
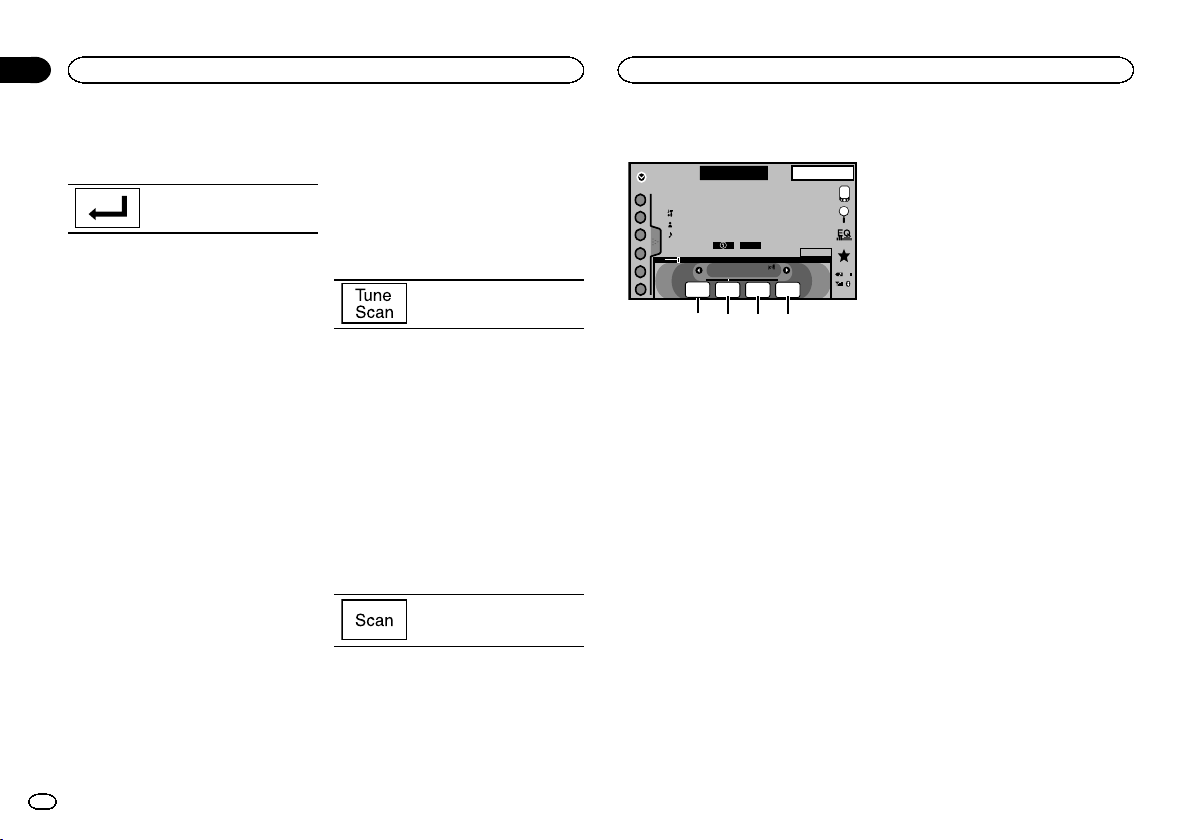
Touch panel keys
HD Radio
8 AUG
PM
12:05
1
2
3
4
5
6
FM AM1
HD
Local Seek
ALL
Blending
D/A Auto
87.9
MHz
DIGITAL
PS Data
Song Data
Artist Data
Album Data
Tag
HD8
1
2345678
1 Band key
Selecting a band (FM or AM) by touching the
band key.
The touch panel key for the selected band is
highlighted.
English
Basic operations
11
Section
HD Radioä tuner
En
05
06
<CRD4844-A>11
Black plate (12,1)
Switching between FM1, FM2, and FM3 by
touching the band key.
When AM is selected, you cannot switch to
another AM band by touching the band key.
2 Tag key
Saving song information (tag) from the
broadcasting station to your iPod.
3 Reception mode key
Switching to the analog broadcast of the
same frequency.
4 Seek mode key
Switching between Digital broadcasting sta-
tion seek and normal seek.
5 Local key
Setting the local seek level.
6 Tuning key
Tuning up or down manually.
Touch and hold down for more than two sec-
onds to skip stations. Seek tuning starts as
soon as you release. Touch again to cancel
seek tuning.
When an analog station is received, tuning
down operation is conducted within the ana-
log broadcasting. (6 d 2)
If a digital broadcast is not yet received, tun-
ing-up operation tunes in the next analog sta-
tion. (2 d 6)
Analog FM 1
Digital FM-1ch
3
Digital FM-2ch
4
Digital FM-3ch
5
Analog FM 2
Analog FM 6
7 List key
Displaying the preset channel list.
8 Preset channel key
Select a preset channel.
Basic operations
Switching preset channels using the buttons
1 Press c or d (TRK).
Seek tuning using the buttons
1 Press and hold c or d (TRK).
Note
Touch panel keys not listed under HD Radio
tuner operations may appear on the display.
Refer to Indicator list on page 61.
Storing and recalling stations
You can easily store up to six stations for each
band as presets.
1 Display the preset channel list screen.
Refer to HD Radio tuner operations on page 11.
The preset channel list appears in the display.
2 Touch and hold down one of the preset
tuning keys to store the selected frequency
to the memory.
The selected radio station frequency has been
stored in the memory.
3 Touch the appropriate preset tuning key
to select the desired station.
Storing the strongest stations
BSM (best stations memory) automatically
stores the six strongest stations in the order of
their signal strength.
Storing broadcast frequencies with BSM may re-
place broadcast frequencies you have saved
using the preset tuning keys.
1 Display the preset channel list screen.
Refer to HD Radio tuner operations on page 11.
The preset channel list appears in the display.
2 Touch BSM to turn BSM on.
The six strongest broadcast frequencies will be
stored under preset tuning keys in order of their
signal strength.
# To cancel the storage process, touch Cancel.
Tuning in to strong signals
Local seek tuning allows you to tune in to only
those radio stations with sufficiently strong sig-
nals for good reception.
FM: Off —
— — —
AM: Off — —
The more there are on the screen, the fewer
the stations that can be selected. Only stations
with the strongest signals in your local area can
be selected.
If there are fewer
, this unit will be able to re-
ceive broadcasts from weaker stations.
Using iTunes tagging
Note
For more details about iTunes tagging, refer to
About iTunes tagging on page 65.
Storing the tag information to
this unit
1 Tune in to the broadcast station.
2 Store the tag information to this unit.
Refer to HD Radio tuner operations on page 11.
You can store the information if the Tag indica-
tor is displayed while the desired song is being
broadcast.
# While storing the tag data on this unit, Tag
flashes.
# The tag information for up to 50 songs can be
stored on this unit.
# Depending on the timing of when the tag infor-
mation is stored, the tag information for the song
played before or after the currently playing song may
also be stored.
3 When completed, indicator turns
off and
indicator is displayed.
Storing the tagged information
to your iPod
1 Connect your iPod.
When your iPod is connected to this unit, your
iPod starts storing the tagged information auto-
matically.
2 When completed,
indicator turns off
and the tagged information is stored on
your iPod.
Switching the seek mode
There are two seek tuning settings, one is HD
(Digital broadcasting stations seek) and the
other is ALL (normal seek).
ALL—HD
Switching the reception mode
If the reception for a digital broadcast becomes
poor, this unit automatically switches to the ana-
log broadcast of the same frequency. If this
function is set to D/A AUTO, the tuner switches
between digital broadcast and analog broadcast
automatically. If this function is set to ANALOG,
the tuner will only receive analog broadcasts.
D/A AUTO—ANALOG
HD Radioä tuner
12
Section
HD Radioä tuner
En
06
<CRD4844-A>12
Black plate (13,1)
Tuner operations
(Function of AVH-X4600BT/AVH-X2600BT/AVH-
X1600DVD)
Touch panel keys
Radio
8 AUG
PM
12:05
1
2
3
4
5
6
FM AM1
Local
87.9
MHz
Tex t
Tag
1
3456
2
WWWWWWWW
WWWWWWWW
WWWWWWWW
1 Band key
Selecting a band (FM1, FM2 or FM3)by
touching the left icon. Switching to the AM
band by touching the right icon.
The icon for the selected band is highlighted.
2 Tag key
Saving song information (tag) from the
broadcasting station to your iPod.
3 Local key
Setting the local seek level.
4 Tuning key
Tuning up or down manually.
Touch and hold down for more than two sec-
onds to skip stations. Seek tuning starts as
soon as you release. Touch again to cancel
seek tuning.
5 List key
Displaying the preset channel list.
6 Preset channel key
Selecting a preset channel.
Basic operations
Switching preset channels using the buttons
1 Press c or d (TRK).
Seek tuning using the buttons
1 Press and hold c or d (TRK).
Notes
! Listening AM radio while an iPod is charged
from this unit may generate noise. In this
case, disconnect the iPod from this unit.
! Touch panel keys not listed under Tuner oper-
ations may appear on the display.
Refer to Indicator list on page 61.
Storing and recalling stations
You can easily store up to six stations for each
band as presets.
1 Display the preset screen.
Refer to Tuner operations on page 13.
The preset screen appears in the display.
2 Touch and hold down one of the preset
tuning keys to store the selected frequency
to the memory.
The selected radio station frequency has been
stored in the memory.
3 Touch the appropriate preset tuning key
to select the desired station.
Storing the strongest stations
BSM (best stations memory) automatically
stores the six strongest stations in the order of
their signal strength.
Storing broadcast frequencies with BSM may re-
place broadcast frequencies you have saved
using the preset tuning keys.
1 Display the preset screen.
Refer to Tuner operations on page 13.
The preset screen appears in the display.
2 Touch BSM to turn BSM on.
The six strongest broadcast frequencies will be
stored under preset tuning keys in order of their
signal strength.
# To cancel the storage process, touch Cancel.
Tuning in to strong signals
Local seek tuning allows you to tune in to only
those radio stations with sufficiently strong sig-
nals for good reception.
FM: Off —
— — —
AM: Off — —
The more there are on the screen, the fewer
the stations that can be selected. Only stations
with the strongest signals in your local area can
be selected.
If there are fewer
, this unit will be able to re-
ceive broadcasts from weaker stations.
Using iTunes tagging
Note
For more details about iTunes tagging, refer to
About iTunes tagging on page 65.
Storing the tag information to
this unit
1 Tune in to the broadcast station.
2 Store the tag information to this unit.
Refer to Tuner operations on page 13.
You can store the information if the Tag indica-
tor is displayed while the desired song is being
broadcast.
# While storing the tag data on this unit, Tag
flashes.
# The tag information for up to 50 songs can be
stored on this unit.
# Depending on the timing of when the tag infor-
mation is stored, the tag information for the song
played before or after the currently playing song may
also be stored.
3 When completed, indicator turns
off and
indicator is displayed.
Storing the tagged information
to your iPod
1 Connect your iPod.
When your iPod is connected to this unit, your
iPod starts storing the tagged information auto-
matically.
2 When completed,
indicator turns off
and the tagged information is stored on
your iPod.
English
Tuner
13
Section
Tuner
En
07
<CRD4844-A>13
Black plate (14,1)
Introducing SiriusXM tuner
operations
(Function of AVH-X5600BHS/AVH-X3600BHS)
You can use this unit to control SiriusXM Con-
nect Vehicle Tuner, which is sold separately.
For more information on how to install SiriusXM
Connect Vehicle Tuner, consult the installation
guide included with the tuner.
Everything worth listening to is on SiriusXM.
You’ll find channels and channels of program-
ming, including commercial-free music, plus
the best sports, news, talk and exclusive enter-
tainment. A SiriusXM Vehicle Tuner and Sub-
scription are required. For more information,
visit www.siriusxm.com in the US or www.sir-
iusxm.ca in Canada.
To subscribe to the SiriusXM
Satellite Radio service
1 Select SiriusXM as a source.
You should be able to tune in to Channel 1. If
you cannot get Channel 1, make sure that your
SiriusXM Connect Vehicle Tuner is installed cor-
rectly as described in the tuner installation
guide.
2 Switch to Channel 0 and check the Radio
ID.
The SiriusXM Radio ID can be found by tuning
to Channel 0. In addition, the Radio ID is located
on the bottom of the SiriusXM Connect Vehicle
Tuner.
Please note that the SiriusXM Radio ID does not
include the letters I, O, S or F.
You will need this number to activate your sub-
scription.
3 Activate the SiriusXM service online or
by phone.
For US Subscriptions:
! Visit www.siriusxm.com/activatenow
! Call SiriusXM Listener Care at 1-866-635-2349
For Canadian Subscriptions:
! Visit www.xmradio.ca and click on “ACTIVATE
RADIO” in the top right corner
! Call 1-877-438-9677
# The SiriusXM satellites will send an activation
message to your tuner. When the tuner has received
the message, “Subscription Updated” is displayed.
Press any key to clear the activation message.
The activation process usually takes 10 minutes to
15 minutes but may take up to an hour in some
cases. Do not turn off the unit until you clear the ac-
tivation message by pressing any key.
Touch panel keys
SiriusXM
22 JAN
AM
12:22
1
2
3
4
5
6
888
Tag
Channel Name
Category Name
Artist Name / Content Info
Song Title / -
CH
CH
Live
-01’ 00”
DB
SXM 1
34215
6798bac
1 List key
Displaying the preset channel list.
2 Information key
Switching the SiriusXM information.
Category name—Content information
3 Band key
Selecting a band from SXM1, SXM2 or
SXM3.
4 iTunes
â
song tagging key
Saving iTunes
®
song tagging from the broad-
casting station to your iPod.
5 Search key
Selecting a channel from the list screen.
6 Parental control key
The Parental Control screen appears.
7 Live key
Use to return to the live broadcast while in
Instant Replay mode.
8 Direct key
A numeric keypad appears, allowing you to
enter SiriusXM channel numbers directly.
9 Pause and play key
Use while in Instant Replay mode.
a Forward/Backward key
While in Instant Replay mode, use to skip up
or down or press and hold to fast forward or
fast rewind.
b Tuning key
Tuning up or down manually.
Touch and hold down for more than two sec-
onds to skip stations. Seek tuning starts as
soon as you release. Touch again to cancel
seek tuning.
c Preset channel key
Recalling the preset channels by touching
the key.
Storing the current station in the preset
channel list by touching and holding the key.
Basic operations
Manual tuning (step by step) using the buttons
1 Press c or d (TRK).
Seek tuning using the buttons
1 Press and hold c or d (TRK).
Note
Touch panel keys not listed under Introducing
SiriusXM tuner operations may appear on the dis-
play.
Refer to Indicator list on page 61.
Storing and recalling channels
You can easily store up to six channels for each
band as presets.
1 Display the preset channel list screen.
Refer to Introducing SiriusXM tuner operations on
page 14.
The preset channel list appears in the display.
2 Touch and hold down one of the preset
tuning keys to store the selected channel to
the memory.
The selected channel has been stored in the
memory.
3 Touch the appropriate preset channel key
to select the desired station.
Selecting a channel from the
list screen
Selecting a channel from the all
channel list
You can select a channel from any of the avail-
able channels.
1 Touch the search key to open the list
screen.
2 Select the all channels.
3 Select the desired channel.
SiriusXM tuner
14
Section
SiriusXM tuner
En
08
<CRD4844-A>14
Black plate (15,1)
4 Touch the close key to close the list
screen.
Display is closed.
Selecting a channel from the
category list
You can select a channel from the available cat-
egories.
The types of categories available will depend on
the types of channels available.
1 Touch the search key to open the list
screen.
2 Select a category from the list.
3 Select the desired channel.
4 Touch the close key to close the list
screen.
Display is closed.
Switching the list display
You can switch between list types while a list is
showing.
% Touch Info while a list is showing to
switch between list types.
The list displayed will switch between the below
types in the order given.
Channel Name—Artist Name—Song Title—Con-
tent Info
Selecting a SiriusXM
channel directly
You can select a SiriusXM channel directly by
entering the desired channel number.
1 Touch the direct key to switch to direct
input display.
2 Touch 0 to 9 to input the desired channel
number.
# To cancel the input numbers, touch C.
3 Select the SiriusXM channel of the en-
tered number.
The SiriusXM channel of the entered number is
selected.
Selecting the SiriusXM channel
of the entered number.
Replayä
You can pause, rewind and replay the current
live channel as well as when you tune to one of
your channels stored on the current band of pre-
sets.
! Touch Pause/Play key to pause or play.
! Touch Forward or Backward keys to skip
through content. Press and hold the Forward
or Backwards keys to fast scan through the
content.
! Touch Live key to exit Replay mode and go to
the live point in the broadcast.
Using iTunes tagging
Note
For more details about iTunes tagging, refer to
About iTunes tagging on page 65.
iTunes tagging of SiriusXM songs
1 Tune in to the broadcast station.
2 Touch the iTunes
â
song tagging key.
Store the tag information to this unit.
You can store the information if the Tag indica-
tor is displayed while the desired song is being
broadcast.
# While storing the tag data on this unit, Tag
flashes.
# The tag information for up to 50 songs can be
stored on this unit.
# Depending on the timing of when the tag infor-
mation is stored, the tag information for the song
played before or after the currently playing song may
also be stored.
3 When completed, indicator turns
off and
indicator is displayed.
Storing the tagged information
to your iPod
1 Connect your iPod.
When your iPod is connected to this unit, your
iPod starts storing the tagged information auto-
matically.
2 When completed,
indicator turns off
and the tagged information is stored on
your iPod.
Setting Parental Control
The Parental Control feature allows you to limit
access to any SiriusXM channels, including
those with mature content.
When enabled, the Parental Control feature re-
quires you to enter a passcode to tune to the
locked channels.
1 Touch the parental control key to open
the passcode confirmation screen.
2 Use the numeric keypad to enter the
four-digit passcode and then touch the Enter
key.
Touch to confirm the passcode.
The default passcode is 0000.
If a valid passcode is entered, the channel list
appears on the Parental Control screen together
with a lock or unlock icon.
3 The below operations can be completed
from the Parental Control screen.
Locking channels
Access to the current broadcast channel can be
locked. You will need to input your passcode
later on to listen to a locked channel.
% To lock a specific channel, touch the
name of the desired channel on the list.
A locked lock icon will appear next to the name
of a locked channel.
Touch the name of a locked channel a second
time to unlock the channel.
Clear All (clearing the locks
from all channels)
You can clear the locks from all locked channels
at the same time.
% Touch Clear All to unlock all locked chan-
nels at the same time.
Edit Code (changing the passcode)
You can change your passcode.
1 Touch Edit Code to switch to the pass-
code edit screen.
English
SiriusXM tuner
15
Section
SiriusXM tuner
En
08
<CRD4844-A>15
Black plate (16,1)
2 Use the numeric keypad to enter a new
four-digit passcode and then touch the Enter
key.
Touch to confirm the passcode.
Once the new passcode is set, the Parental Con-
trol screen will open.
Note
If Check Tuner displays instead, refer to
SiriusXM Satellite Radio on page 57.
Setting SiriusXM TuneStartä
When tuning using the preset channel buttons,
songs can play from the beginning if TuneStart
is enabled.
1 Press the home button to switch to the
home display.
2 Touch the system key to open the system
menu.
3 Touch SiriusXM Tune Start on the system
menu to turn SiriusXM Tune Start on or off.
On: The current broadcast audio song is played
back from the start of the song.
Off: The live broadcast is played for the current
audio channel.
Scan options
Channels and songs can be played back on this
unit by scan play.
TuneStart may take a few minutes to operate
after a power cycle or after changing to another
preset band.
TuneScanä
Scan through short previews of songs you may
have missed on music channels stored on the
current band of presets.
1 Touch the list key to display the preset
channel list.
2 Touch Tune Scan.
Each song in the current channel
plays for eight seconds at a time.
Refer to Scan play operations on page 16 for a
list of functions that can be used during scan
play.
Note
TuneScan is compatible with SXV200 or later
tuner models. Not compatible with SXV100.
Category scan
Scan through each channel in a category.
1 Touch the search key.
2 Touch the desired category.
3 Touch Scan.
The live broadcast for each chan-
nel in the current category plays
for five seconds at a time.
Refer to Scan play operations on page 16 for a
list of functions that can be used during scan
play.
Scan play operations
SiriusXM
22 JAN
AM
12:22
1
2
3
4
5
6
888
WWWWWWWWWWWWW
WWWWWWWWWWWWWWWW
WWWWWWWWWWWWWWWW
WWWWWWWWWWWWWWWW
CH
CH
DB
Scanning
SXM 1
Scan
Next
Scan
Esc
Scan
Back
2 3 4
1
Scan
Play
1 Scan play key
Selecting the channel or song playing
2 Scan back key
Switching to the previous song during the Tu-
neScan.
Switching to the previous channel during the
category scan.
3 Scan next key
Switching to the next song during the TuneS-
can
Switching to the next channel during the cat-
egory scan
4 Scan escape key
Quitting scan play
Resetting to default
The SiriusXM settings will be reset to the default
settings.
1 Turn the source off.
Refer to Turning the source ON/OFF on page 8.
2 Press the home button to switch to the
home display.
3 Touch the system key to open the system
menu.
4 Touch SiriusXM Reset on the system
menu.
5 Touch Reset.
A Completed message will appear once the set-
tings have been reset.
# If you do not want to reset, touch Cancel.
SiriusXM tuner
16
Section
SiriusXM tuner
En
08
<CRD4844-A>16
Black plate (17,1)
Introducing movie operations
You can use this unit to view DVD/DVD-R/DVD-
RW/CD/CD-R/CD-RW movie files.
Touch panel keys
DVD video
DVD-V
00'20'' -119'51''
48kHz 16bit
Dolby D
MENU
MENU
TOP
1/2
Dolby DMulti ch
FULL
11
1JAN
PM
12:43
01 01
07'24'' -112'47''
2/2
L+R
Return
1
a 987654
21
fedcg
b
3
Video CD
00'20'' -119'51''
L+R
FULL
Return
98h7 eg b
When playing a disc containing a mixture of vari-
ous media file types
00'15'' -00'59''
y
y
FULL
1
OFF
Media
987 i3e4
1 Fast forward key/Reverse key
Fast forwarding or reversing
Touch to change the fast forward and reverse
speed.
2 Search key
Starting the search function.
3 Switch subtitle language key
With DVDs/DivX files featuring multi-subtitle
recordings, you can switch between subtitle
languages during playback.
4 Switch audio language key
With DVDs/DivX files that provides audio
playback in different languages and different
audio systems (Dolby
â
Digital, DTS, etc.),
you can switch between languages/audio
systems during playback.
Depending on the setting, the video may not
be played back with the audio system used
to record the DVD.
5 TOP MENU key
Returning to the top menu during DVD play-
back.
6 MENU key
Displaying the DVD menu during DVD play-
back.
7 Slow-motion playback key
Moving the selection ahead one frame at a
time during playback.
Touch and hold down the key for more than
two seconds to slow down playback speed.
Touching the key increases the playback
speed over four incremental settings during
slow motion playback from DVD video/Video
CD.
8 Stop key
Stopping playback.
If you resume playback, playback will start
from the point where you stopped. Touch the
key again to stop playback completely.
9 Screen mode key
Changing the screen mode.
Refer to Changing the wide-screen mode on
page 10.
a Pause and play key
Pausing playback.
Returning to normal playback during
paused, stopped, slow motion, or frame-by-
frame playback.
b Return key
Returning to the specified scene to which
the DVD currently being played has been pre-
programmed to return.
This function cannot be used if a specified
scene has not been preprogrammed on the
DVD disc.
c Bookmark key
During playback, touch the point at which
you want to resume playback the next time
the disc is loaded.
! You can set one bookmark per DVD video.
You can set up to five bookmarks total.
! To clear the bookmark on a disc, touch
and hold the key during playback.
! The oldest bookmark is replaced by the
new one.
d Arrow key
Displaying arrow keys to operate the DVD
menu.
e Repeat key
Selecting the repeat range.
f Viewing angle key
With DVDs featuring multi-angle (scenes
shot from multiple angles) recordings, you
can switch among viewing angles during
playback.
g Audio output key
Switching the audio output, when playing
video discs recorded with LPCM audio.
h Slow key
Speeding down the playback speed in four
steps, during slow motion playback on Video
CD.
! There is no sound during slow motion
playback.
! Images during slow motion playback may
be unclear for some discs.
! Reverse slow motion playback is not avail-
able.
i Media key
Switching between media file types to play
on DVD/CD.
Basic operations
Playing back videos
1 Insert the disc into the disc loading slot with
the label side up.
Playback will automatically start.
! If you are playing a DVD or Video CD, a menu
may appear. Refer to Operating the DVD menu
on page 18 and PBC playback on page 19.
! When the automatic playback function is on,
the unit will skip the DVD menu and automati-
cally start playback from the first chapter of
the first title. Refer to Automatic playback of
DVDs on page 39.
! When the source icon is not displayed, it can
be displayed by touching the screen.
! If a message is displayed after loading a disc
containing DivX VOD content, touch Play.
Refer to Playing DivX
â
VOD content on page
20.
Ejecting a disc
! Refer to Ejecting a disc on page 11.
English
Disc (CD/DVD)
17
Section
Disc (CD/DVD)
En
09
<CRD4844-A>17

Black plate (18,1)
Selecting a chapter using the buttons
1 Press c or d (TRK).
Fast forwarding or reversing using the buttons
1 Press and hold c or d (TRK).
! Fast forward/fast reverse may not always be
possible on some discs. In such cases, normal
playback will automatically resume.
! The fast forward/fast reverse speed depends
on the length of time you press and hold down
c or d (TRK). This function is not available for
Video CD.
Notes
! This DVD player can play back a DivX file re-
corded on CD-R/RW, DVD-R/RW, or MPEG-1/
MPEG-2/MPEG-4. (Please see the following
section for files that can be played back.
Refer to DivX video files on page 63.)
! Do not insert anything other than a DVD-R/
RW or CD-R/RW into the disc loading slot.
! Some operations may not be available while
watching a media due to the programming
of the disc. In such cases, the
icon ap-
pears on the screen.
! There may be touch panel keys not listed
under Introducing movie operations on page
17 that appear on the screen.
Refer to Indicator list on page 61.
! With some DVDs, switching between lan-
guages/audio systems may only be possible
using a menu display.
! You can also switch between languages/
audio systems using Video Setup menu. For
details, refer to Setting the audio language on
page 37.
! This unit will return to normal playback if you
change the audio language during fast for-
ward/fast reverse, pause or slow motion play-
back.
! With some DVDs, switching between subtitle
languages may only be possible using a
menu display.
! You can also switch between subtitle lan-
guages using Video Setup menu. For de-
tails, refer to Setting the subtitle language on
page 37.
! This unit will return to normal playback if you
change the subtitle language during fast for-
ward/fast reverse, pause or slow motion play-
back.
! During playback of a scene shot from multi-
ple angles, the angle icon is displayed. Use
the Video Setup menu to turn the angle
icon display on or off. For details, refer to Set-
ting the multi-angle DVD display on page 38.
! You will return to normal playback if you
change the viewing angle during fast for-
ward/fast reverse, pause or slow motion play-
back.
Sound playback operations
You can use this unit to listen to DVD-R/DVD-
RW/CD/CD-R/CD-RW sound files.
Touch panel keys
ROM
S.Rtrv
11
Abcdefghi
Abcdefghi
Abcdefghi
Abcdefghi
1JAN
PM
12:43
00'37'' -08'43''
12
45678
3
Media
1 Information key
Switching the text information to display on
this unit when playing MP3/WMA/AAC files.
2 Search key
Displaying a list of track titles/file names to
select songs on a CD.
Displaying the file name list to select the
files.
3 Media key
Switching between media file types on a
DVD or CD.
4 Sound retriever key
Refer to Using sound retriever on page 10.
5 Random key
Playing songs in random order.
6 Repeat key
Selecting the repeat range.
7 Previous folder key/Next folder key
Selecting a folder.
8 Pause and play key
Pausing and starting playback.
Switching the media file type
When playing a digital media containing a mix-
ture of various media file types, such as DivX,
MPEG-1, MPEG-2, MPEG-4 and MP3, you can
switch between media file types to play.
% Touch Media to switch media file types.
CD-DA (audio data)—Music/ROM (compressed
audio)—Video (DivX, MPEG-1, MPEG-2, MPEG-4
video files)
Note
Audio data (CD-DA) files on DVD-R/RW/ROM
cannot be played back on this unit.
Operating the DVD menu
(Function for DVD video)
Some DVDs allow you to make a selection from
the disc contents using a menu.
Using the arrow keys
1 Display arrow keys to operate the DVD
menu.
2 Select the desired menu item.
Selecting the desired menu item.
Starting playback from the se-
lected menu item.
Operating the DVD menu by di-
rectly touching the menu item.
Back to previous display.
# When operating the DVD menu by directly touch-
ing the menu item, touch the icon to operate.
Returning to the normal DVD
video display.
Displaying arrow keys.
Disc (CD/DVD)
18
Section
Disc (CD/DVD)
En
09
<CRD4844-A>18
Black plate (19,1)
# Ways to display the menu will differ depending
on the disc.
# Depending on the contents of the DVD disc, this
function may not work properly. In such cases, use
the touch panel keys to operate the DVD menu.
Random play (shuffle)
% Touch the random key.
! On – Play back files in random order within
the repeat range, Folder and Disc.
! Off – Cancel random play.
Repeating playback
% Touch the repeat key.
! Disc – Play through the current disc
! Chapter – Repeat the current chapter
! Title – Repeat the current title
! Track – Repeat the current track
! File – Repeat the current file
! Folder – Repeat the current folder
! Disc/All – Repeat all files in the current disc
! All – Repeat all files
Notes
! This function cannot be operated during
Video CD playback featuring PBC (playback
control).
! If you perform chapter search, fast forward/
reverse, frame-by-frame playback or slow mo-
tion playback, the repeat play will stop.
! When playing discs with compressed audio
and audio data (CD-DA), playback is re-
peated within the type of data currently play-
ing even if Disc is selected.
! If you select another folder during repeat
play, the repeat play range changes to
Disc/All.
! If you perform track search or fast forward/
reverse during File, the repeat play range
changes to Folder.
! If you perform title/chapter search or fast for-
ward/reverse during Chapter, the repeat play
is set to off automatically.
! If you perform track search or fast forward/
reverse during Track, the repeat play range
changes to Disc.
! When Folder is selected, it is not possible to
play back a subfolder of that folder.
Searching for the part you
want to play
You can use the search function to find the part
you want to play.
For DVD videos, you can select Title (title),
Chapter (chapter) or 10key (numeric keypad).
For video CDs, you can select Track (track) or
10key (numeric keypad).
! Chapter search is not available when disc
playback is stopped.
! This function cannot be operated during
some DVD videos or Video CD playback fea-
turing PBC (playback control).
1 Start the search function.
Refer to Introducing movie operations on page
17.
2 Touch the desired search option (e.g.,
Chapter).
3 Touch 0 to 9 to input the desired number.
# To cancel the entered numbers, touch C.
4 Start playback from the selected part.
Registering the numbers and
starting playback.
Note
With discs featuring a menu, you can also use
the DVD menu to make your selection.
Refer to Introducing movie operations on page
17.
Selecting audio output
When playing DVD video discs recorded with
LPCM audio, you can switch the audio output.
When playing video CDs, you can switch be-
tween stereo and monaural audio output.
! This function is not available when disc play-
back is stopped.
% Touch the audio output key to switch
audio output types.
! L+R – Left and right
! Left – Left
! Right – Right
! Mix – Mixing left and right
Note
You may not be able to select or use this func-
tion depending on the disc and the playback lo-
cation.
PBC playback
(Function for Video CDs)
During playback of Video CDs featuring PBC
(playback control), PBC On is displayed.
1 Start the search function.
Refer to Introducing movie operations on page
17.
2 Touch 10key to display the numeric key-
pad.
3 Touch 0 to 9 corresponding to a menu
number.
4 Start playback from the selected part.
Registering the numbers and
starting playback.
Notes
! You can display the menu by touching
Return during PBC playback. For details,
refer to the instructions provided with the
disc.
! PBC playback of a Video CD cannot be can-
celed.
! During playback of Video CDs featuring PBC
(playback control), you cannot select the re-
peat play range or use the search function.
Selecting tracks from the
track title list
You can select tracks to playback using the track
title list which is a list of the tracks recorded on
a disc.
1 Display the track title list.
Refer to Sound playback operations on page 18.
2 Touch your favorite track title.
Playback begins.
Selecting files from the file
name list
(Function for compressed audio/DivX/MPEG-1/
MPEG-2/MPEG-4)
File name list is a list of file names (or folder
names) from which you can select a file (or fold-
er) to play back.
1 Touch the search key to display the file
(or folder) name list.
English
Disc (CD/DVD)
19
Section
Disc (CD/DVD)
En
09
<CRD4844-A>19

Black plate (20,1)
2 Touch your favorite file (or folder) name.
# When you have selected a folder, a list of the
names of the files (or the folders) in it can be viewed.
Repeat this operation to select the desired file name.
# If folder 1 (ROOT) contains no files, playback
starts from folder 2.
Note
If part of the recorded information does not dis-
play, a scroll key appears on the right side of list.
Touch the scroll key to scroll.
Playing DivX
â
VOD content
Some DivX video on demand (VOD) content may
only be playable a fixed number of times. When
you load a disc containing this type of content,
the number of times it has been played will be
shown on-screen. You can then decide whether
or not to play the disc.
! For DivX VOD content without this restriction,
you can load the disc into your player and
play the content as often as you like, with no
message displayed.
! You can confirm the number of times that
the content can be played by checking the
message, This DivX rental has used
out of views..
Important
! In order to play DivX VOD contents on this
unit, you first need to register the unit with
your DivX VOD contents provider. For details
on your registration code, refer to Displaying
the DivX
â
VOD registration code on page 39.
! DivX VOD content is protected by a DRM
(Digital Rights Management) system. This re-
stricts playback of content to specific, regis-
tered devices.
% If a message is displayed after loading a
disc containing DivX VOD content, touch
Play.
Playback of the DivX VOD content will start.
# To skip to the next file, touch Next Play.
# If you do not want to play the DivX VOD content,
touch Stop.
iPod control
This manual applies to the following iPod mod-
els.
iPod with 30-pin connector
— iPod touch 4th generation
— iPod touch 3rd generation
— iPod touch 2nd generation
— iPod touch 1st generation
— iPod classic 160GB
— iPod classic 120GB
— iPod classic
— iPod with video
— iPod nano 6th generation
— iPod nano 5th generation
— iPod nano 4th generation
— iPod nano 3rd generation
— iPod nano 2nd generation
— iPod nano 1st generation
— iPhone 4S
— iPhone 4
— iPhone 3GS
— iPhone 3G
— iPhone
iPod with lightning connector
— iPod touch 5th generation
— iPod nano 7th generation
— iPhone 5
Sound playback operations
You can use the unit to listen iPod sound files.
Notes
! The play time may not display correctly.
! Display is changed when you listen to music
other than iPod music.
(Except for Pandora)
Touch panel keys
iPod audio (Control Audio)
iPod
Appr
ppr
App
pp
Ap p
1JAN
PM
12:43
Abcdefghi
1/9
Abcdefghi
Abcdefghi
Abcdefghi
01'17'' -05'29''
S.Rtrv
All
All
All
x
1
2
54321
dcb a987 6
iPod audio (App Mode)
FULL
ef
1 Song title
Displaying the Songs list on the iPod.
The application name is displayed when you
listen to music other than iPod music.
(Except for Pandora)
2 Artist name
Displaying the Artists list on the iPod.
The song title is displayed when you listen to
music other than iPod music.
(Except for Pandora)
3 MIXTRAX EZ key
Starting MIXTRAX EZ.
Refer to MIXTRAX EZ operation on page 29.
4 Artwork
Starting link search on your iPod when you
touch the artwork display.
Disc (CD/DVD)
20
Section
iPod
En
09
10
<CRD4844-A>20
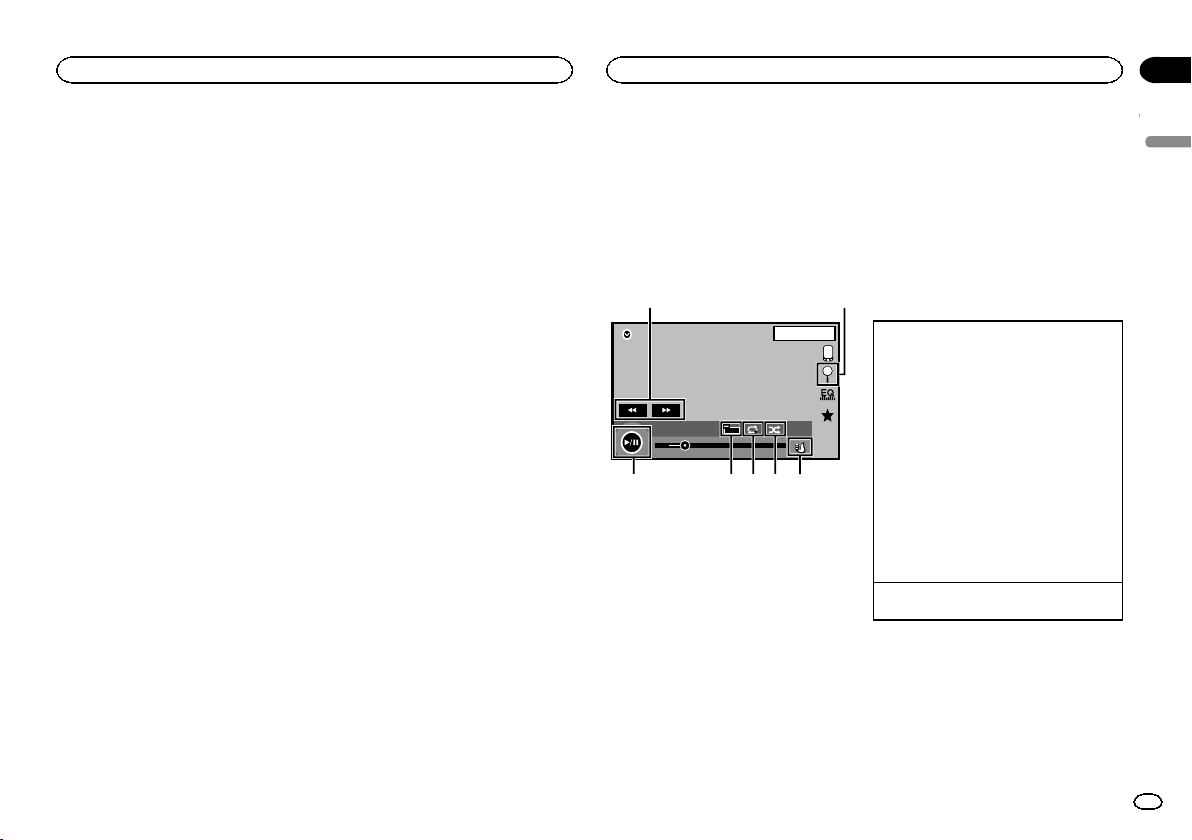
Black plate (21,1)
5 Search key
Displaying iPod menus.
6 Sound retriever key
Refer to Using sound retriever on page 10.
7 iPod control mode key
Conducting operation from your iPod and lis-
tening to it using your car’s speakers.
8 Shuffle key
Playing songs on the iPod in random order.
9 Repeat key
Selecting the repeat range.
a Change speed key
Changing the speed of audiobook playback
on the iPod.
b Genre
Displaying the Genres list on the iPod.
The album title is displayed when you listen
to music other than iPod music.
(Except for Pandora)
c Album title
Displaying the Albums list on the iPod.
The artist name is displayed when you listen
to music other than iPod music.
(Except for Pandora)
d Pause and play key
Pausing and starting playback.
e Unit operation key
Performing operations from this unit and lis-
tening to the music on your iPod using your
car’s speakers.
f Screen mode key
Changing the screen mode.
Sound playback operations for
Bluetooth
(Function of AVH-X5600BHS/AVH-X4600BT/AVH-
X3600BHS/AVH-X2600BT)
When all of the following settings are made,
audio can be enjoyed on this unit using a
Bluetooth connection.
1 Set Device connection.
Device connection can be set when all of the
following conditions are met.
— The iPhone is not connected.
— No Bluetooth connection.
— The source is turned off.
1 Turn the source off.
Refer to Source off key on page 7.
2 Press the home button to switch to the home
display.
3 Touch the system key to open the system
menu.
4 Touch Device connection on the system
menu.
5 Touch iPhone via Bluetooth to select.
2 Connect the iPhone and this unit via
Bluetooth connection.
Refer to Bluetooth connection menu on page 45.
Note
Artwork will not be displayed when sound play-
back operations are performed using a
Bluetooth connection.
Moving images operations
For iPod with 30-pin connector users
You can use the unit to view iPod movie files.
! Depending on your iPod, there may not be
any output unless you use CD-IU201S/CD-
IU201V (sold separately). Be sure to use CD-
IU201S/CD-IU201V to connect your iPod.
For iPod with lightning connector users
! To play movie files in iPod with this unit, con-
nect a CD-IV203 (sold separately) and Light-
ning Digital AV Adapter (Apple Inc. products)
(sold separately) and install the CarMedia-
Player app on your iPod. Refer to the CarMe-
diaPlayer manual for more information.
Refer to AppRadio Mode operation on page
23.
Touch panel keys
iPod
02'35'' -21'54''
1JAN
PM
12:43
FULL
1
Appr
ppr
App
pp
Ap p
2/3
2
1
654 37
2
1 Fast forward key/Reverse key
Fast forwarding or reversing
Touch to change the fast forward and reverse
speed.
2 Search key
Displaying iPod menus.
3 iPod control mode key
Conducting operation from your iPod and lis-
tening to it using your car’s speakers.
4 Shuffle key
Playing the video on your iPod in a random
order.
5 Repeat key
Selecting the repeat range.
6 Screen mode key
Changing the screen mode.
Refer to Changing the wide-screen mode on
page 10.
7 Pause and play key
Pausing playback.
Returning to normal playback during
paused, slow motion, or frame-by-frame play-
back.
Basic operations
Playing back videos
1 Touch the search key to pull up the iPod
menus.
2 Select a movie to play.
Refer to Playing videos from your iPod on page
22.
! When the source icon is not displayed, it
can be displayed by touching the screen.
! Disconnect headphones from the iPod be-
fore connecting it to this unit.
! Depending on the iPod model and the
amount of data stored in the iPod, it may
take some time for playback to begin.
! Use the touch panel keys to select the iPod
after connecting it to this unit.
! No Device is displayed when disconnect-
ing the iPod.
Fast forwarding or reversing using the buttons
1 Press and hold c or d (TRK).
Notes
! To ensure proper operation, connect the
dock connector cable from the iPod directly
to this unit.
! While the iPod is connected to this unit, the
iPod cannot be turned on or off.
! Touch panel keys not listed under Moving im-
ages operations may appear on the display.
Refer to Indicator list on page 61.
English
iPod
21
Section
iPod
En
10
<CRD4844-A>21
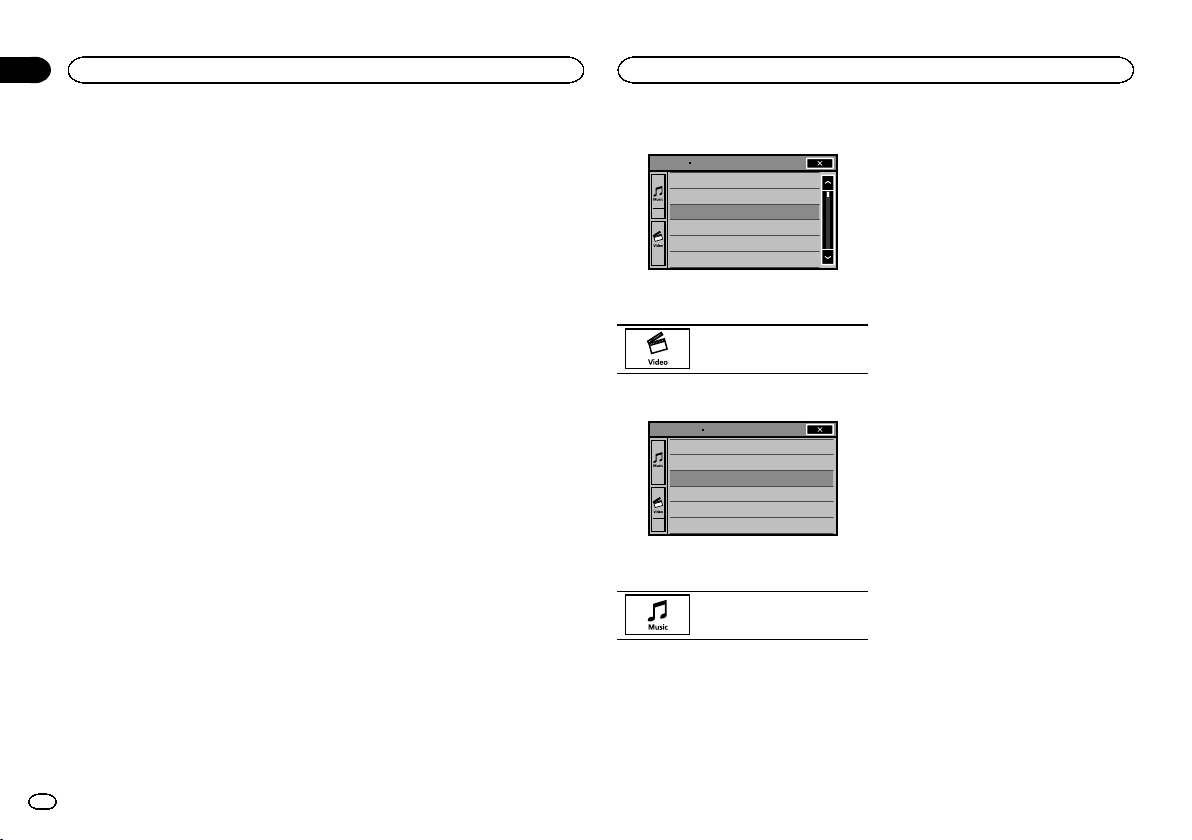
Black plate (22,1)
Using this unit’s iPod
function from your iPod
You can listen to sound from applications on
your iPod using the car’s speakers when
App Mode is selected.
This function is not compatible with the follow-
ing iPod models.
! iPod nano 1st generation
! iPod with video
Notes
! Video-related functions are not available to
iPod with lightning connector users.
! While this function is in use, the iPod will not
turn off even if the ignition key is turned off.
Operate the iPod to turn off the power.
1 Touch the iPod control mode key to
switch to App Mode.
2 Operate the connected iPod to select a
video/song and play.
Notes
! The following functions are still accessible
from the unit even if the control mode is set
to App Mode.
However, the operation will depend on your
applications.
— Playing/pausing
— Fast forwarding/reversing
— Tracking up/down
— Moving to a chapter up/down
! App Mode is compatible with the following
iPod models.
— iPod touch 4th generation
— iPod touch 3rd generation
— iPod touch 2nd generation
— iPod touch 1st generation
— iPod classic 160GB
— iPod classic 120GB
— iPod classic
— iPod nano 6th generation
— iPod nano 5th generation
— iPod nano 4th generation
— iPod nano 3rd generation
— iPod nano 2nd generation
— iPhone 4S
— iPhone 4
— iPhone 3GS
— iPhone 3G
— iPhone
Shuffle play
% Touch the shuffle key.
! Songs – Play back videos/songs in the se-
lected list in random order.
! Albums – Play back videos/songs from a ran-
domly selected album in order.
! Off – Turn off shuffle play.
Repeating playback
% Touch the repeat key.
! One – Repeat just the current video/song
! All – Repeat all videos/songs in the selected
list on the iPod
Playing videos from your iPod
Videos can be played on this unit if an iPod with
video capabilities is connected.
! This unit can play back “Movies”, “Music vid-
eos”, “TV show”, “Video Podcast” and “Rent-
ed Movies” which are downloaded from the
iTunes store.
Note
This function is not available to iPod with light-
ning connector users.
1 Touch Search to display iPod menus.
Refer to Search key on page 21.
2 Switch to iPod video mode.
Playlists
Artists
Albums
Songs
Podcasts
Genres
ROOT
# If you want to switch to iPod video mode, touch
the icon.
Switching to iPod video mode.
3 Play the video from the iPod.
Video Playlists
Movies
Music Videos
TV Shows
Video Podcasts
Rented Movies
ROOT
# If you want to switch to iPod music mode, touch
the icon.
Switching to iPod music mode.
Browsing for a video/music
on the iPod
To make operating and searching easy, opera-
tions to control an iPod with this unit are de-
signed to be as similar to the iPod as possible.
Note
Video-related functions are not available to iPod
with lightning connector users.
Searching for a video/music by
category
1 Touch the search key to pull up the iPod
menus.
Refer to Search key on page 21.
2 Touch one of the categories in which you
want to search for a video/music.
Category lists (for video)
! Video Playlists (video playlists)
! Movies (movies)
! Music Videos (music videos)
! TV Shows (TV shows)
! Video Podcasts (video podcasts)
! Rented Movies (rented movies)
! Video ITunesU (video ITunesU)
Category lists (for music)
! Playlists (playlists)
! Artists (artists)
! Albums (albums)
! Songs (songs)
! Podcasts (podcasts)
! Genres (genres)
! Composers (composers)
! Audiobooks (audiobooks)
3 Touch the title of the list that you want
to play.
Repeat this operation until you find the desired
video/music.
Notes
! Depending on the generation or version of
the iPod, some functions may not be avail-
able.
! You can play playlists created with the com-
puter application (MusicSphere). The appli-
cation will be available on our website.
iPod
22
Section
iPod
En
10
<CRD4844-A>22
Black plate (23,1)
! Playlists that you created with the computer
application (MusicSphere) are displayed in
abbreviated form.
Searching the list by alphabet
1 Select a category.
Refer to Searching for a video/music by category
on page 22.
2 Switch to alphabet search mode.
Switching to alphabet search
mode.
Alphabet search mode is displayed.
3 Touch the first letter of the title of the
video/song you are looking for.
While searching, touch panel key operation is
not available.
# To refine the search with a different letter, touch
Cancel.
4 Touch the title of the list that you want
to play.
Repeat this operation until you find the desired
song/video.
Changing audiobook speed
% Touch the change speed key to change
the speed.
2
Playback at a speed faster than
normal
1
Playback at normal speed
1/2
Playback at a speed slower than
normal
Displaying lists related to
the song currently playing
(link search)
Touch the artwork to open a list of the names of
songs on the album currently playing. Touch the
name of the song you want to play to start play-
ing that song.
Note
If part of the recorded information does not dis-
play, a scroll key appears on the right side of list.
Touch the scroll key to scroll.
AppRadio Mode operation
This system can switch to the AppRadio Mode,
which you can display and operate the applica-
tion for iPhone on the screen.
In AppRadio Mode, you can operate applica-
tions with finger gestures such as tapping, drag-
ging, scrolling or flicking on the screen of the
system.
Install the AppRadio app on your iPhone.
WARNING
Certain uses of an iPhone or smartphone
may not be legal while driving in your juris-
diction, so you must be aware of and obey
any such restrictions.
If in doubt as to a particular function, only
perform it while the car is parked.
No feature should be used unless it is safe
to do so under the driving conditions you
are experiencing.
CAUTION
While driving, you cannot enter text on your
iPod.
! Pioneer is not liable for any issues that
may arise from incorrect or flawed app-
based content.
! The content and functionality of the sup-
ported applications are the responsibility
of the App providers.
! In AppRadio Mode, functionality through
the product is limited while driving, with
available functions determined by the App
providers.
! Availability of AppRadio Mode functional-
ity is determined by the App provider, and
not determined by Pioneer.
! AppRadio Mode allows access to applica-
tions other than those listed (subject to
limitations while driving), but the extent to
which content can be used is determined
by the App providers.
Important
! When listening to music and sounds from appli-
cation simultaneously, see the following section.
Refer to Operating the sound mixer on page 48.
Notes
! Applications operable by switching this sys-
tem to AppRadio Mode are only those avail-
able for AppRadio Mode.
! Please check iPhone applications supported
AppRadio Mode at
http://www.pioneerelectronics.com/
AppRadioMode
in Canada
http://www.pioneerelectronics.ca/
AppRadioMode
iPhone compatibility
AppRadio Mode is compatible with the follow-
ing iPod models.
! iPod touch 5th generation (only with AVH-
X5600BHS/AVH-X4600BT/AVH-X3600BHS/
AVH-X2600BT)
English
iPod
23
Section
AppRadio Mode
En
10
11
<CRD4844-A>23
Black plate (24,1)
! iPod touch 4th generation
! iPhone 5 (only with AVH-X5600BHS/AVH-
X4600BT/AVH-X3600BHS/AVH-X2600BT)
! iPhone 4S
! iPhone 4
Starting procedure
1 Install the AppRadio app on your iPhone.
2 Set Device connection.
Device connection can be set when all of the
following conditions are met.
— The iPhone is not connected.
— No Bluetooth connection.
— The source is turned off.
1 Turn the source off.
Refer to Source off key on page 7.
2 Press the home button to switch to the home
display.
3 Touch the system key to open the system
menu.
4 Touch Device connection on the system
menu.
5 Touch the desired setting.
— iPhone via Bluetooth (for iPod with light-
ning connector users)
— iPhone via USB (for iPod with 30-pin con-
nector users)
3 After configuring Device connection, con-
nect the iPhone to this unit.
# For iPod with lightning connector users
(Function of AVH-X5600BHS/AVH-X4600BT/AVH-
X3600BHS/AVH-X2600BT)
— A Bluetooth connection is required for iPod
with lightning connector. Refer to Bluetooth
connection menu on page 45.
— Use the CD-IV203 (sold separately) and Light-
ning to VGA adapter (Apple Inc. products)
(sold separately) when you use this function.
— Refer to When connecting with optional CD-
IV203 cable on page 52.
# For iPod with 30-pin connector users
— Use the CD-IU201S (sold separately) when
you use this function.
— Refer to When connecting with optional CD-
IU201S cable on page 53.
4 Start an application available for
AppRadio Mode from the iPhone.
An image of the application is displayed on the
screen of this system.
! You can start an application available for
AppRadio Mode also from a launcher appli-
cation.
5 Press MODE.
# Press the home button to switch to the home dis-
play and then touch the Apps key to start the launch-
er application.
6 Operate the application.
Setting the Keyboard
CAUTION
For your safety, the keyboard functionality is only
available when the vehicle is stopped and the
parking brake is engaged.
Depending on the application, you can input
text on the display. In order to input text correctly
using keyboard which appears on this unit, you
need to set the language setting in this function.
When the AppRadio Mode is used, the lan-
guage setting for the keyboard set for the func-
tion and the language setting for the iPhone
keyboard need to be the same.
! Keyboard is available only in AppRadio
Mode.
When you tap a text input area of an application
for iPhone, a keyboard will be displayed on-
screen. You can input the desired text directly
from this system.
! The language preference for the keyboard of
this system should be same as the setting on
your iPhone.
If the settings for this product and the
iPhone are different, you may not be able to
enter characters properly.
1 Press the home button twice to switch
from the AppRadio Mode display to the
home display.
2 Touch the system key to open the system
menu.
3 Touch Keyboard on the System menu to
select desired language.
4 Touch the desired language.
French (French)—German (German)—Greek
(Greek)—Russian (Russian)—English (US Eng-
lish)—English (UK) (UK English)—Dutch
(Dutch)—Italian (Italian)—Norwegian (Norwe-
gian)—Swedish (Swedish)—Finnish (Finnish)
—Spanish (Spanish)—Portuguese (Portu-
guese)—Chinese(Simplified) (Simplified Chi-
nese)—Chinese(Traditional) (Traditional
Chinese)—Arabic (Arabic)—Hebrew (Hebrew)
—Thai (Thai)
5 Tap the text input area on the application
screen of the iPhone.
Touch
to hide the keyboard.
AppRadio Mode
24
Section
AppRadio Mode
En
11
<CRD4844-A>24

Black plate (25,1)
You can operate your smartphone on the unit’s
display by using this function.
Only compatible smartphones work with the
MirrorLink function.
— For details on how to connect with smart-
phone link adaptor (CD-ML100) (sold sepa-
rately), refer to Optional Smartphone link
adaptor (CD-ML100) connection on page 53.
— For details about MirrorLink setting, refer to
Selecting MirrorLink Mode on page 40.
— For details about the sound mixer, refer to
Operating the sound mixer on page 48.
Starting procedure
1 Connect your smartphone to the smart-
phone link adaptor (CD-ML100) (sold sepa-
rately) with the RGB input.
2 Press MODE.
# Press the home button to switch to the home dis-
play and then touch the MirrorLink key to start the
launcher application.
# The smartphone’s screen appears on the unit’s
display when you select MirrorLink and you can then
operate your smartphone on the display.
3 Operate the application.
— Press home button: Displays the home
screen for MirrorLink.
— Press home button twice: Displays the home
screen for the unit.
— Press d (TRK): Displays the menu screen for
MirrorLink.
— Press c (TRK): Displays the previous screen
for MirrorLink.
For details, refer to Head unit on page 7.
# You can operate the applications on the touch
panel screen as well as on your smartphone screen.
CAUTION
! Do not operate your smartphone while driv-
ing. Obey all relevant laws in your area.
! You must agree to obey the above rule on the
caution screen. Be sure to follow the on-
screen instructions.
This unit is compliant with USB MSC (Mass
Storage Class) and USB MTP (Media Transfer
Protocol).
You can also use USB MTP (connecting to MTP-
compatible Android devices using a USB cable);
however some functions are not supported for
MTP connection.
USB MSC USB MTP
MP3 11
WMA 11
WAV 1 —
AAC 11
DivX 1 —
MPEG-1 1 —
MPEG-2 1 —
MPEG-4 1 —
JPEG 1 —
Music browse mode 1 —
MIXTRAX EZ 1 —
Moving images operations
(Function of USB MSC)
You can use this unit to view USB storage device
files.
Touch panel keys
USB
00'20'' -119'51''
Dolby DMulti ch
FULL
11
1JAN
PM
12:43
01 01
Media
1
a987 5
643
2
1 Fast forward key/Reverse key
Fast forwarding or reversing
Touch to change the fast forward and reverse
speed.
2 Search key
Displaying the file name list to select the
files.
3 Switch subtitle language key
With DivX files featuring multi-subtitle re-
cordings, you can switch between subtitle
languages during playback.
4 Media key
Switching between media file types to play
on Music/Video/Photo.
5 Switch audio language key
With DivX files that provides audio playback
in different languages and different audio
systems (Dolby Digital, DTS, etc.), you can
switch between languages/audio systems
during playback.
6 Repeat key
Selecting the repeat range.
English
Smartphone link adaptor operations
25
Section
USB
En
12
13
<CRD4844-A>25
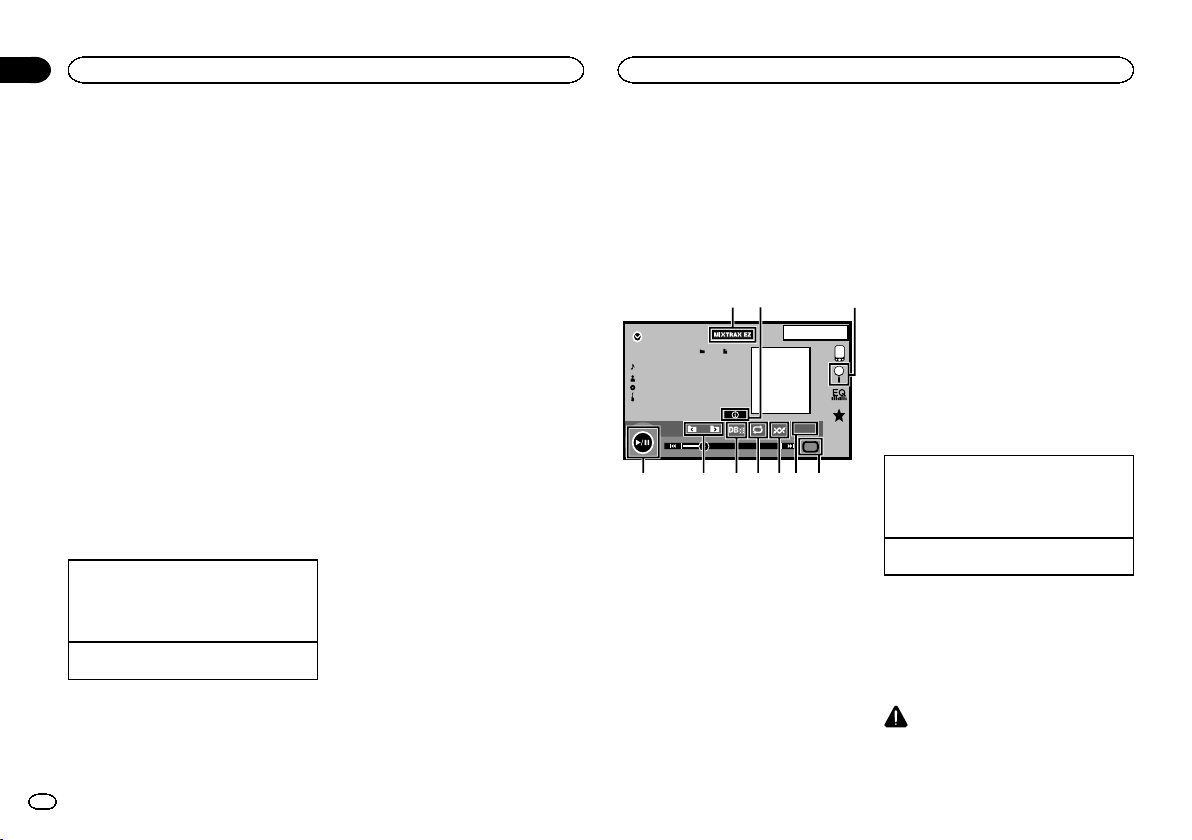
Black plate (26,1)
Refer to Repeating playback on page 27.
7 Slow-motion playback key
(Function for DivX file/MPEG-1/MPEG-2/
MPEG-4)
Moving the selection ahead one frame at a
time during playback.
Touch and hold down the key for more than
two seconds to slow down playback speed.
8 Stop key
Stopping playback.
If you resume playback, playback will start
from the point where you stopped. Touch the
key again to stop playback completely.
9 Screen mode key
Changing the screen mode.
Refer to Changing the wide-screen mode on
page 10.
a Pause and play key
Pausing playback.
Returning to normal playback during
paused, slow motion, or frame-by-frame play-
back.
Basic operations
Playing back videos
1 Connect the USB device.
Playback will automatically start.
When the source icon is not displayed, it can
be displayed by touching the screen.
Fast forwarding or reversing using the buttons
1 Press and hold c or d (TRK).
Notes
! Touch panel keys not listed under Moving im-
ages operations may appear on the display.
Refer to Indicator list on page 61.
! You can also switch between languages/
audio systems using Video Setup menu. For
details, refer to Setting the audio language on
page 37.
! This unit will return to normal playback if you
change the audio language during fast for-
ward/fast reverse, pause or slow motion play-
back.
! You can also switch between subtitle lan-
guages using Video Setup menu. For de-
tails, refer to Setting the subtitle language on
page 37.
! This unit will return to normal playback if you
change the subtitle language during fast for-
ward/fast reverse, pause or slow motion play-
back.
Sound playback operations
You can use this unit to listen to USB audio files.
MTP connection
USB MTP (connecting to MTP-compatible
Android devices using a USB cable) is sup-
ported only for MP3/WMA/AAC files in this func-
tion.
Notes
! The play time may not display correctly.
! When playing back files recorded as VBR
(variable bit rate) files, the play time will not
be correctly displayed if fast forward or re-
verse operations are used.
! To ensure proper operation, connect the
dock connector cable from the iPod directly
to this unit.
! While the iPod is connected to this unit, the
iPod cannot be turned on or off.
! If the characters recorded on the USB stor-
age device are not compatible with this unit,
those characters will not be displayed.
! Text information may not be correctly dis-
played depending on the recorded environ-
ment.
! Disconnect the USB portable audio player/
USB memory when you are done using it.
! When you select Speana on Selecting the
background display on page 46, the artwork is
not displayed.
Touch panel keys
00'01'' -00'03''
JAN
PM
12:43
USB
Abcdefghi
Abcdefghi
Abcdefghi
Abcdefghi
S.Rtrv
61
All
All
All
Media
21
a987654
3
1 MIXTRAX EZ key
Starting MIXTRAX EZ.
(Except for USB MTP)
2 Information key
Switching the text information to display on
this unit when playing MP3/WMA/AAC/WAV
files.
3 Search key
Displaying the file name list to select the
files.
4 Media key
Switching between media file types to play
on USB.
5 Sound retriever key
Refer to Using sound retriever on page 10.
6 Random key
Playing songs in random order.
7 Repeat key
Selecting the repeat range.
8 DB key
Creating a database that enables searches
by artist name, genre, and other options.
Refer to Music browse mode on page 26.
9 Previous folder key/Next folder key
Selecting a folder.
a Pause and play key
Pausing and starting playback.
Basic operations
Playing back tracks
1 Connect the USB device.
Playback will automatically start.
When the source icon is not displayed, it can
be displayed by touching the screen.
Fast forwarding or reversing using the buttons
1 Press and hold c or d (TRK).
Music browse mode
(Function for USB MSC)
This unit creates an index in order to facilitate
browsing for a song. You can search by the cate-
gories such as albums and artists.
CAUTION
! This function is not available when the USB
storage device is locked.
USB
26
Section
USB
En
13
<CRD4844-A>26
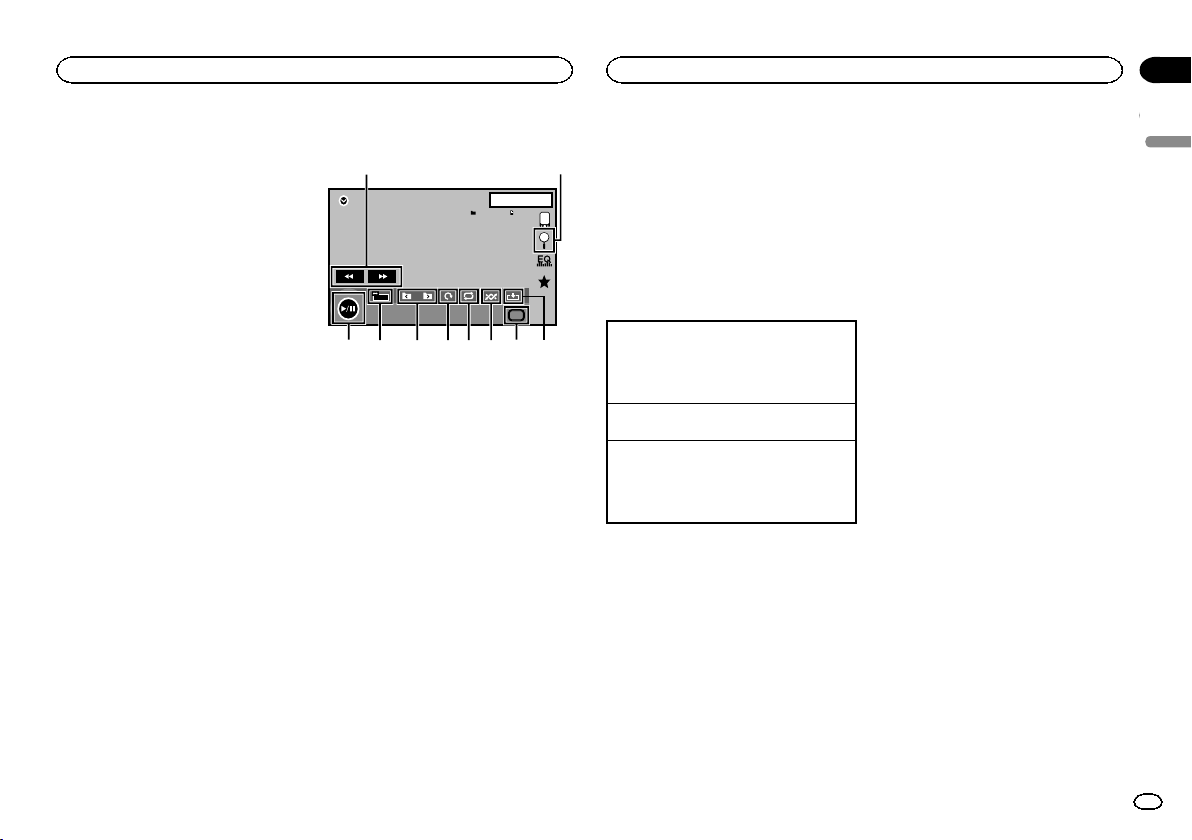
Black plate (27,1)
! This function is not available when the free
space of USB storage device is less than
5 MB.
! While this unit creates an index, do not turn
the unit off. It may cause loss of data on your
USB storage device.
! If you switch to video or JPEG image display
while a database is being created, or when a
database could not be created, a message
appears and database creation stops.
1 Touch DB to create a database in Music
browse mode.
Refer to Sound playback operations on page 26.
2 When “Save the Database to memory?”
is displayed, touch “Yes”.
Saving of the database is completed. If you do
not save it, touch “No”.
When the saving is completed, “Completed
saving Database to memory.” appears.
Music browse mode will start.
3 Display a list and touch the tag key.
4 Select a file.
Still image playback operations
(Function for USB MSC)
You can use this unit to view still images saved
on a USB storage device.
Touch panel keys
USB
NORMAL
1JAN
PM
12:43
44
All
All
All
Media
12
3456789a
1 Fast forward key/Reverse key
Selecting a picture.
2 Search key
Displaying the file name list to select the
files.
3 Capture key
Capturing an image in JPEG files.
4 Media key
Switching between media file types when
there is more than one media file type saved
to the USB device. This key does not appear
if there is only one media file type saved to
the USB device.
5 Random key
Playing files in a random order.
6 Repeat key
Selecting the repeat range.
7 Rotate key
Rotating the displayed picture 90° clockwise.
8 Previous folder key/Next folder key
Selecting a folder.
9 Screen mode key
Changing the screen mode.
Refer to Changing the wide-screen mode on
page 10.
a Pause and play key
Starting or pausing the slideshow.
Basic operations
Playing still images
1 Connect the USB device.
Playback will automatically start.
! When the source icon is not displayed, it can
be displayed by touching the screen.
Selecting a file using the buttons
1 Press c or d (TRK).
Fast file searching
1 Press and hold c or d (TRK).
! You can search 10 JPEG files at a time.
If there are fewer than 10 files, the search will
cover the first or last file.
Notes
! Files are played back in file number order
and folders are skipped if they contain no
files. (If folder 1 (ROOT) contains no files,
playback commences with folder 2.)
! Touch panel keys not listed under Still image
playback operations may appear on the dis-
play.
Refer to Indicator list on page 61.
Switching the media file type
% Touch Media to switch between media
file types.
Random play (shuffle)
% Touch the random key.
! On – Play back files in random order within
the repeat range, Folder and Media.
! Off – Cancel random play.
Repeating playback
% Touch the repeat key.
! Folder – Repeat the current folder
! All – Repeat all files
! When Folder is selected, it is not possible to
play back a subfolder of that folder.
! If you select USB source, the repeat play
range changes to All.
Selecting files from the file
name list
(Function for compressed audio/DivX/MPEG-1/
MPEG-2/MPEG-4)
Operation is the same as that for Disc.
Refer to Selecting files from the file name list on
page 19.
Displaying lists related to
the song currently playing
(link search)
Touch the artwork to open a list of the names of
songs on the album currently playing. Touch the
name of the song you want to play to start play-
ing that song.
Notes
! If part of the recorded information does not
display, a scroll key appears on the right side
of list. Touch the scroll key to scroll.
! This function is available for USB devices in
Music browse mode.
English
USB
27
Section
USB
En
13
<CRD4844-A>27
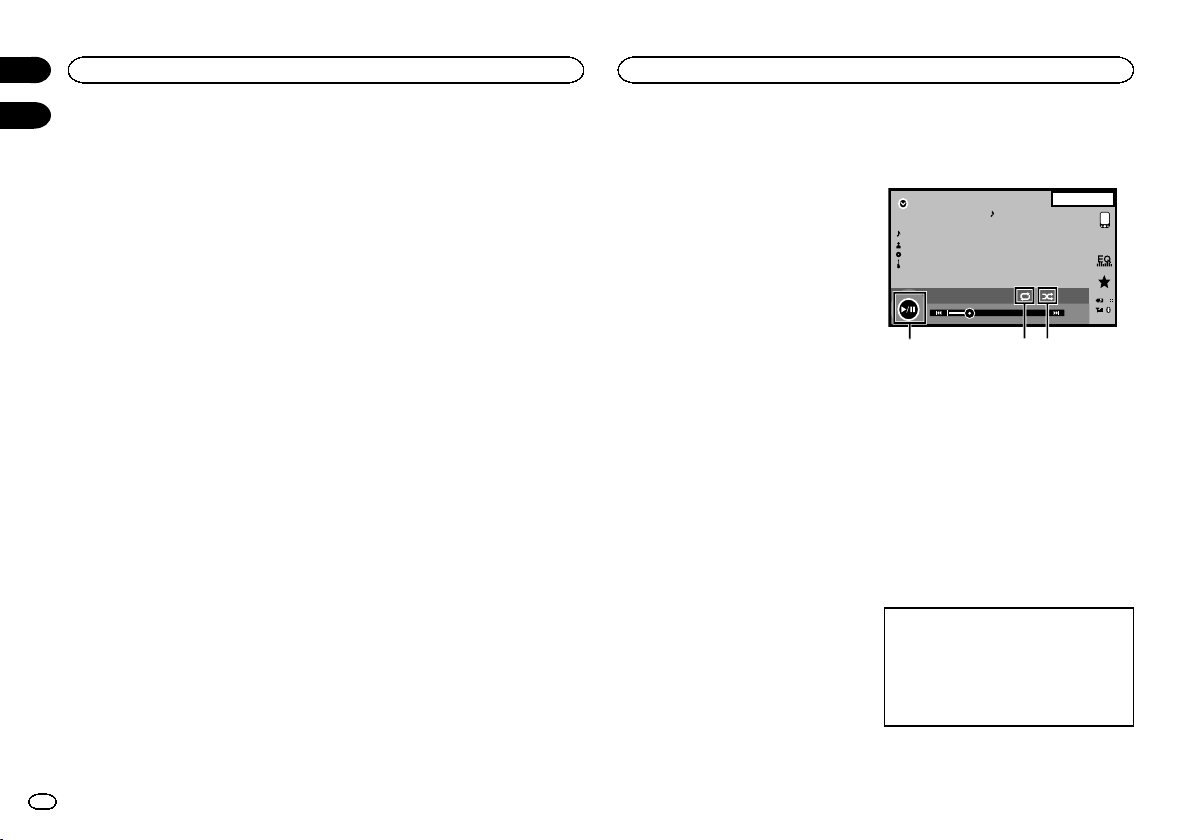
Black plate (28,1)
Playing DivX
â
VOD content
Operation is the same as that for Disc.
Refer to Playing DivX
â
VOD content on page 20.
Capture an image in JPEG files
You can capture image data and use it as wall-
paper. Images can be stored and recalled easily
in this unit.
! Only one image can be stored on this unit.
Old image is overwritten with the new one.
1 Touch f to pause the slide show when
the desired image is displayed.
2 Touch Capture to capture the desired
image.
3 When “Do you save this image?” is dis-
played, touch Yes.
While storing the image to this unit, “Saving
the image. During the save, please don’t
turn off the engine.” is displayed. When the
process is finished, “Image saved.” is dis-
played.
# To cancel the storage process, touch No.
Sound playback operations
(Function of AVH-X5600BHS/AVH-X4600BT/AVH-
X3600BHS/AVH-X2600BT)
You can use this unit to listen to Bluetooth audio
files.
Notes
! Depending on the Bluetooth audio player
connected to this unit, the available opera-
tions will be limited to the following two lev-
els:
— A2DP profile (Advanced Audio Distribution
Profile): You can only playback songs on your
audio player.
— AVRCP profile (Audio/Video Remote Control
Profile): You can perform playback, pause
playback, select songs, etc.
! As there is a wide variety of Bluetooth audio
players available on the market, operations
available with specific models may vary ex-
tensively. When attempting to run a
Bluetooth audio player using this unit, refer
to the instruction manual that came with the
player as well as to this manual for assis-
tance.
! As the signal from your cellular phone may
cause noise, avoid using it when you are lis-
tening to songs on your Bluetooth audio
player.
! The sound from a Bluetooth audio player
connected to this unit will be muted while a
call is in progress on a cellular phone con-
nected to this unit via Bluetooth wireless
technology.
! The play time may not display correctly.
! Depending on the type of Bluetooth audio
player you have connected to this unit, oper-
ation and information display may not be
available for some functions.
Touch panel keys
Bluetooth
88'88'' -88'88''
Abcdefghi
Abcdefgh
Abcdefgh
Abcdefgh
8888
22 JAN
AM
12:22
DB
32
1
1 Random key
Playing songs in random order.
2 Repeat key
Selecting the repeat range.
3 Pause and play key
Pausing and starting playback.
Setting up for Bluetooth audio
Before you can use the Bluetooth audio function
you must establish a Bluetooth wireless connec-
tion between the unit and your Bluetooth audio
player.
1 Connection
First, you need to connect a Bluetooth audio to
this unit.
For detailed instructions on connecting your
Bluetooth audio to this unit via Bluetooth wire-
less technology, refer to Bluetooth connection
menu on page 45.
USB
28
Section
Bluetooth Audio
En
13
14
<CRD4844-A>28

Black plate (29,1)
Notes
! When playing back files recorded as VBR
(variable bit rate) files, the play time will not
be correctly displayed if fast forward or re-
verse operations are used.
! To ensure proper operation, connect the
dock connector cable from the iPod directly
to this unit.
! While the iPod is connected to this unit, the
iPod cannot be turned on or off.
! If the characters recorded on your Bluetooth
audio player are not compatible with this
unit, those characters will not be displayed.
! Text information may not be correctly dis-
played depending on the recorded environ-
ment.
Random play (shuffle)
% Touch the random key.
! On – Play back files in random order.
! Off – Cancel random play.
Repeating playback
% Touch the repeat key.
! One – Repeat the current song only
! All – Repeat all songs
MIXTRAX operation
MIXTRAX is original technology for creating
non-stop mixes of selections from your audio li-
brary, complete with DJ effects that make them
sound as if a DJ is right there with you playing
the music.
MIXTRAX EZ operation
You can use this unit to play iPod/USB audio
files.
MIXTRAX EZ is used to add a variety of sound ef-
fects between songs for arranging the pauses
between songs. It allows you to enjoy listening
to music non-stop.
! This function is only available when a file on
a USB storage device or a song on an iPod is
being played.
! This function is not available when the con-
trol mode is set to App Mode.
! Depending on the file/song, sound effects
may not be available.
! Depending on the file/song, non-stop play-
back may not be available.
Note
You cannot use this function with USB MTP.
Starting MIXTRAX EZ operation
% Touch MIXTRAX EZ.
Refer to MIXTRAX EZ key on page 20 and 26.
Setting MIXTRAX mode
Turn on this function to play back audio files
using MIXTRAX.
1 Press the home button to switch to the
home display.
2 Touch the system key to open the system
menu.
3 Touch MIXTRAX Setup on the system
menu.
MIXTRAX setting items are displayed.
! Short Playback Mode – When turned on, se-
lect an audio track playback length.
60s (60 sec.)—90s (90 sec.)—120s (120 sec.)
—150s (150 sec.)—180s (180 sec.)—Random
(random)—Off (off)
When Random is selected, the playback time
varies between 60s, 90 s, 120 s, 150 s, and
180 s selected at random when the playback
song changes.
! Display Effect – When Display Effect is set
to on, the artwork display can be moved ac-
cording to the music type.
! Cut-In Effect – When Cut-In Effect is set to
on, sound effects will play between tracks.
! Effect Setting – Use Effect Setting to set up
the sound effect you want to insert between
tracks.
Setting the effect
You can change the settings for fixed sounds
and sound effects.
There are six different fixed sounds available
that can be inserted for playback between
tracks.
The sound effects are used as effects to signal
the end of a song being played and the begin-
ning of the next song in series.
The fixed sounds and sound effects are set as
combinations as MIXTRAX sounds.
Fixed sounds
! Phaser – A fixed sound that sounds like surg-
ing waves.
! Roll – A fixed sound that repeats playback of
a certain sound.
English
Bluetooth Audio
29
Section
Using MIXTRAX
En
14
15
<CRD4844-A>29

Black plate (30,1)
! Turntable – A fixed sound that mimics DJ
scratching.
! Flanger2 – A rushing sound that mimics
that rising and falling sounds of a jet engine.
! Reverb – A fixed sound effect that creates a
reverberation effect.
! Echo2 – A fixed sound effect that creates an
echoing effect.
Sound effects
! Cross Fade – A sound effect that creates a
fade in and fade out effect between songs.
! Flanger1 – A rushing sound that mimics
that rising and falling sounds of a jet engine.
! Echo1 – A sound effect that creates an echo-
ing effect.
! Loop – A sound effect that repeats playback
of one section of a song track.
Note
Cross Fade cannot be selected for iPod audio
files.
Setting sounds and sound effects
as presets usin g the preset key
The Standard and Simple sound effects are set
already as default presets.
% Touch Standard or Simple to check the
settings.
The registered preset sound effect for the key
that was touched is set as a preset.
Registering sounds and sound
effects as presets
Registers a desired combination of sounds and
sound effects to Custom.
Touch Custom to easily set the desired sound or
sound effect.
1 Touch Custom.
2 Add a check mark to the desired sound
effect by touching the option.
The marked sound effect is registered as a pre-
set in Custom.
Notes
! If a sound effect is touched in the selection
screen for Standard or Simple, the Custom
screen is automatically displayed and the
sound effect is registered to Custom.
! You can listen to fixed sounds to hear exam-
ples by touching the speaker icon.
Pandora operations
For iPhone users
— Connect an iPod to USB input.
— Set Pandora Connection to iPhone.
(Function of AVH-X5600BHS/AVH-X4600BT/
AVH-X3600BHS/AVH-X2600BT)
(This setting is not required for AVH-
X1600DVD.)
For smartphone users
(Function of AVH-X5600BHS/AVH-X4600BT/AVH-
X3600BHS/AVH-X2600BT)
— Set Pandora Connection to Android.
— A Bluetooth connection is required for
Android devices. Refer to Bluetooth connec-
tion menu on page 45.
Important
Requirements to access Pandora using the
Pioneer car audio/video products:
Connect an iPod to USB input or an Android de-
vice using Bluetooth to play Pandora on this
unit.
! Please update the firmware of the Pandora appli-
cation to the latest version before use.
! The latest version of the Pandora application can
be downloaded on iTunes App Store and Google
Play.
! Create a free or a paid account online. You can
create the account in the Pandora application
from your iPhone or on the website. The URL in
the following:
http://www.pandora.com/register
! If the Data Plan for your iPhone does not provide
for unlimited data usage, additional charges
from your carrier may apply for accessing the
Pandora service via 3G and/or EDGE networks.
! You need to connect to the Internet via 3G, EDGE
or Wi-Fi network to use the service from Pandora.
Limitations:
! Depending on the availability to the Internet, you
may not be able to receive Pandora service.
! Pandora service is subject to change without no-
tice. The service could be affected by any of the
following: firmware versions of iPhone, firmware
versions of Pandora application, changes to the
Pandora music service.
! Certain functions of the Pandora service are not
available when accessing the service through the
Pioneer car audio/video products. They include,
but not limited to the following: creating new sta-
tions, deleting stations, sending information
about current stations, buying tracks from
iTunes, viewing additional text information, log-
ging in to Pandora, adjusting Cell Network Audio
Quality.
Pandora internet radio is a music service not af-
filiated with Pioneer. More information is avail-
able at http://www.pandora.com.
The Pandora mobile application is available for
most iPhone and smartphone, please visit
www.pandora.com/everywhere/mobile for the
latest compatibility information.
Setting the Pandora connect mode
(Function of AVH-X5600BHS/AVH-X4600BT/AVH-
X3600BHS/AVH-X2600BT)
Note
This function is not available when
Device connection is set to iPhone via
Bluetooth.
1 Press the home button to switch to the
home display.
2 Touch the system key to open the system
menu.
3 Touch Pandora Connection repeatedly
until the desired setting appears on the
screen.
iPhone: An iPhone is connected using an actual
cable.
Using MIXTRAX
30
Section
Streaming Pandora
â
En
15
16
<CRD4844-A>30
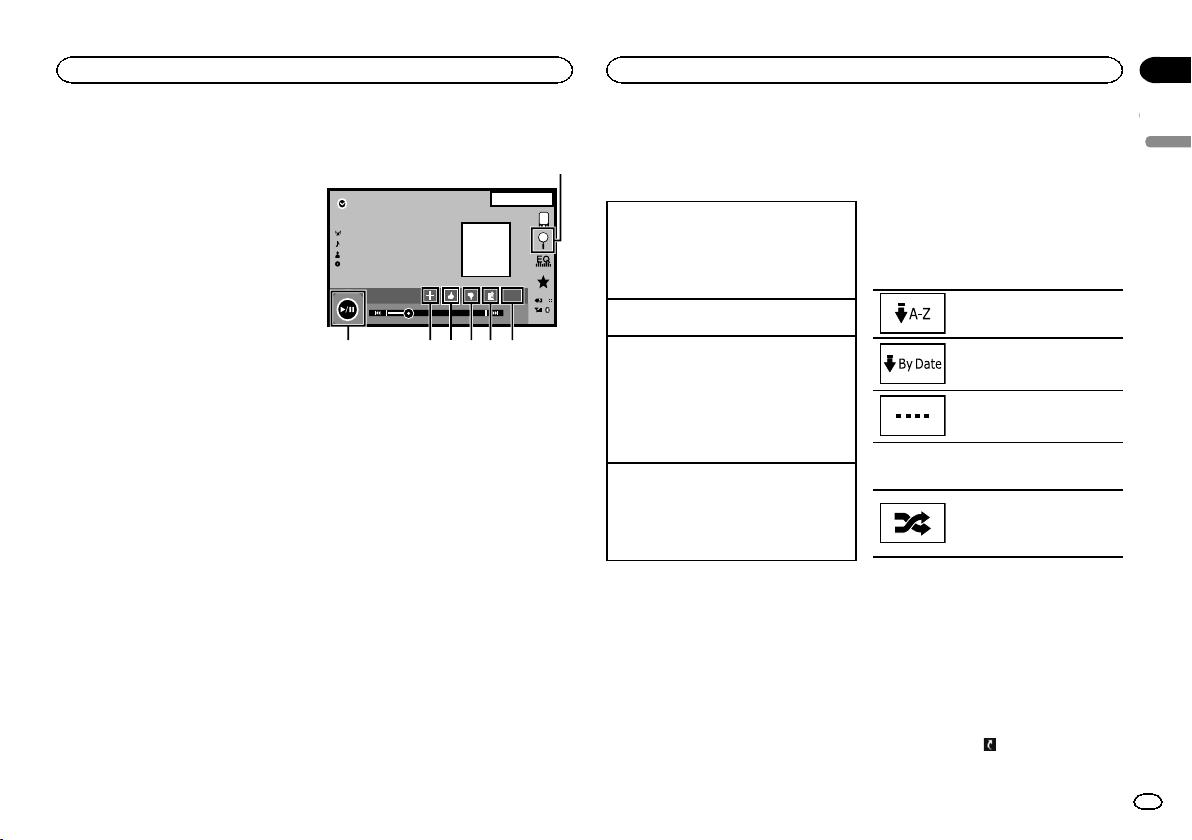
Black plate (31,1)
Android: An Android device is connected using
Bluetooth.
Touch panel keys
Pandora
88'88'' -88'88''
Abcdef ghi
Abcdef ghi
Abcdef ghi
Abcdef ghi
22 JAN
AM
12:22
DB
S.Rtrv
1
2345
67
1 Search key
Displays the shuffle/station list. Select the
desired station or shuffle mode.
2 Sound retriever key
(Only available on iPod)
Refer to Using sound retriever on page 10.
3 Bookmark key
Stores track information (Bookmark).
Bookmarks are viewable in your profile.
4 Thumbs-down key
Giving a “thumbs-down” tells Pandora you do
not like the current track. Pandora will skip to
the next track, and will not play that track on
the station again.
5 Thumbs-up key
Giving a “thumbs-up” tells Pandora that you
like the current track. Pandora will continue
to play that track and tracks like it on the sta-
tion.
6 Add station key
A new station is created.
7 Pause and play key
Pausing and starting playback.
Basic operations
Playing tracks
1 Connect an iPhone to USB input.
For an Android device, a Bluetooth connection
is required as well.
Refer to Pandora operations on page 30.
2 Switch the source to Pandora.
Skipping tracks
1 Press d (TRK).
Add station
A new station will be created from the information
for the artist or track of the station currently being
played.
1 Touch the Add station key.
2 Touch Track (from track) or Artist (from artist).
A new station is created.
! To cancel the Add station, touch Cancel.
Deleting stations
1 Display the shuffle/station list.
2 Touch the Delete station key.
3 Touch Yes.
The station will be deleted.
! To cancel, touch No.
Notes
! Touch panel keys not listed under Pandora op-
erations may appear on the display.
Refer to Indicator list on page 61.
! Pandora limits the number of skips allowed
on their service. If you attempt to skip tracks
beyond the limit, “Skip limit reached.” is dis-
played. If you have reached the skip limit and
you give a “thumbs-down”, the current track
will continue to play, but your feedback will
be registered.
! When the Connect key is displayed, man-
ually connect a registered Bluetooth device.
Selecting and playing
Pandora
â
stations/shuffle
Touch the list for your Pandora stations to select
one of them to play.
1 Display the shuffle/station list.
Refer to Search key on page 31.
2 Change the sort order.
You can sort the items in the list
alphabetically.
You can sort the items in the list
in order of the dates on which the
items were created.
You can scroll the titles in the list
while you touch and hold down
the scroll icon.
3 Select shuffle or the desired station.
Shuffle mode will play tracks
from your selected stations. You
can edit shuffle preferences on
your mobile device.
Adding a station from the
station list
1 Touch Genre in the station list.
2 Touch the station in the genre list that
you wish to add.
3 A new station is created.
Note
Stations indicated by
are shared stations.
English
Streaming Pandora
â
31
Section
Streaming Pandora
â
En
16
<CRD4844-A>31
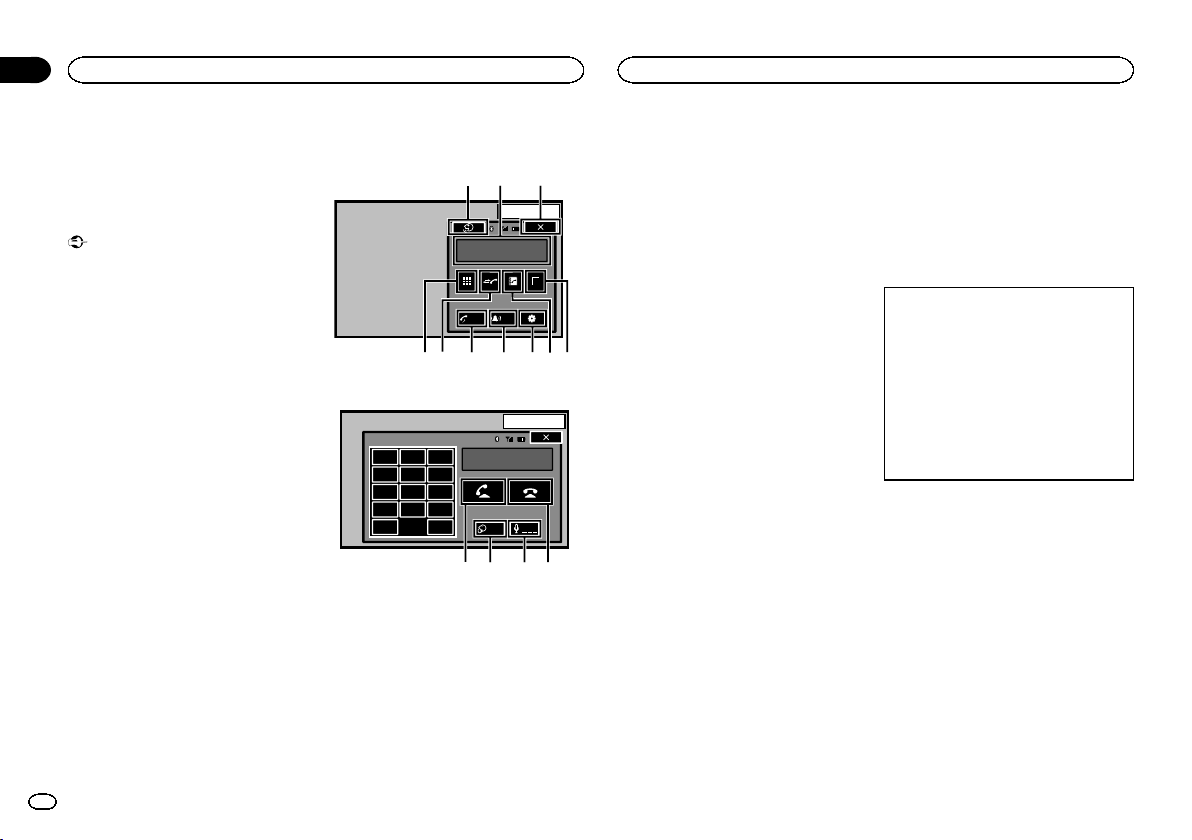
Black plate (32,1)
Bluetooth telephone
operations
(Function of AVH-X5600BHS/AVH-X4600BT/AVH-
X3600BHS/AVH-X2600BT)
You can use Bluetooth telephone.
Important
! Leaving the unit on standby to connect to
your phone via Bluetooth while the engine is
not running can drain the battery.
! Advanced operations that require attention
such as dialing numbers on the monitor,
using the phone book, etc., are prohibited
while driving. Be sure to park your vehicle in
a safe place and apply the parking brake be-
fore proceeding.
! Bluetooth connection menu cannot be se-
lected while driving.
! Operations available may be limited depend-
ing on the cellular phone connected to this
unit.
! If you are unable to complete the connection
using this unit, use the device to connect to
the unit.
! If you connect more than one device at a
time, connected device may not operate
properly. Connecting one device at a time is
recommended.
Touch panel keys
Telephone st andby display
13 ARP
PM
12:25
1
Abcdefghi
1234567890123456
Auto
ON
To n e
OFF
e1
2345678
d
When switching to the entering phone number
mode
13 APR
PM
12:25
1
123
456
789
*0#
C+
Abcdefghi
XXXXXXXXXXXXXXXX
Private
ON
Vol
9abc
1 Close key
Display is closed.
2 Preset dial key
Displaying the preset dial screen.
3 Phone book key
Switching to the phone book mode.
4 Setting key
Displaying the Bluetooth connection menu.
5 Tone key
Turning the ring tone for incoming calls on
or off.
6 Auto-answer key
Turning automatic answering on or off.
7 History key
Switching to the missed, received and dialed
call lists.
8 Key pad key
Switching the mode to enter the phone num-
ber directly.
9 On-hook key
Ending a call.
Rejecting an incoming call.
Canceling call waiting.
a Volume key
Adjusting the other party’s listening volume.
b Private mode key
Turning private mode on or off.
c Off-hook key
Accepting an incoming call.
Making a phone call, when selecting a
phone number.
Switching between callers on hold.
d Voice control key
Notes
! Private mode can only be operated while you
are talking on the phone.
! To end the call, both you and the other caller
must hang up your phones.
! Touch panel keys not listed under Bluetooth
telephone operations may appear on the dis-
play.
Refer to Indicator list on page 61.
Text information
e Incoming call notice
Indicates that an incoming call has been re-
ceived and has not been checked yet.
! Not displayed for calls made when your
cellular phone is disconnected from this
unit.
Setting up for hands-free phoning
1 Connection
First, you need to connect a Bluetooth tele-
phone to this unit.
For detailed instructions on connecting your
phone to this unit via Bluetooth wireless tech-
nology, refer to Pairing from this unit on page
45.
2 Volume adjustment
Adjust the earpiece volume of your cellular
phone to your preference. The unit will record
the adjusted volume level as the default set-
ting.
Notes
! The volume of the caller’s voice and ring
tone may vary depending on the type of cellu-
lar phone.
! If there is a large volume difference between
the ring tone and caller’s voice, the overall
volume level may become unstable.
! Make sure to adjust the volume to a proper
level before disconnecting the cellular phone
from the unit. If the volume is muted (zero
level) on your cellular phone, the volume
level of your cellular phone remains muted
even after the cellular phone is discon-
nected.
Bluetooth telephone
32
Section
Bluetooth telephone
En
17
<CRD4844-A>32
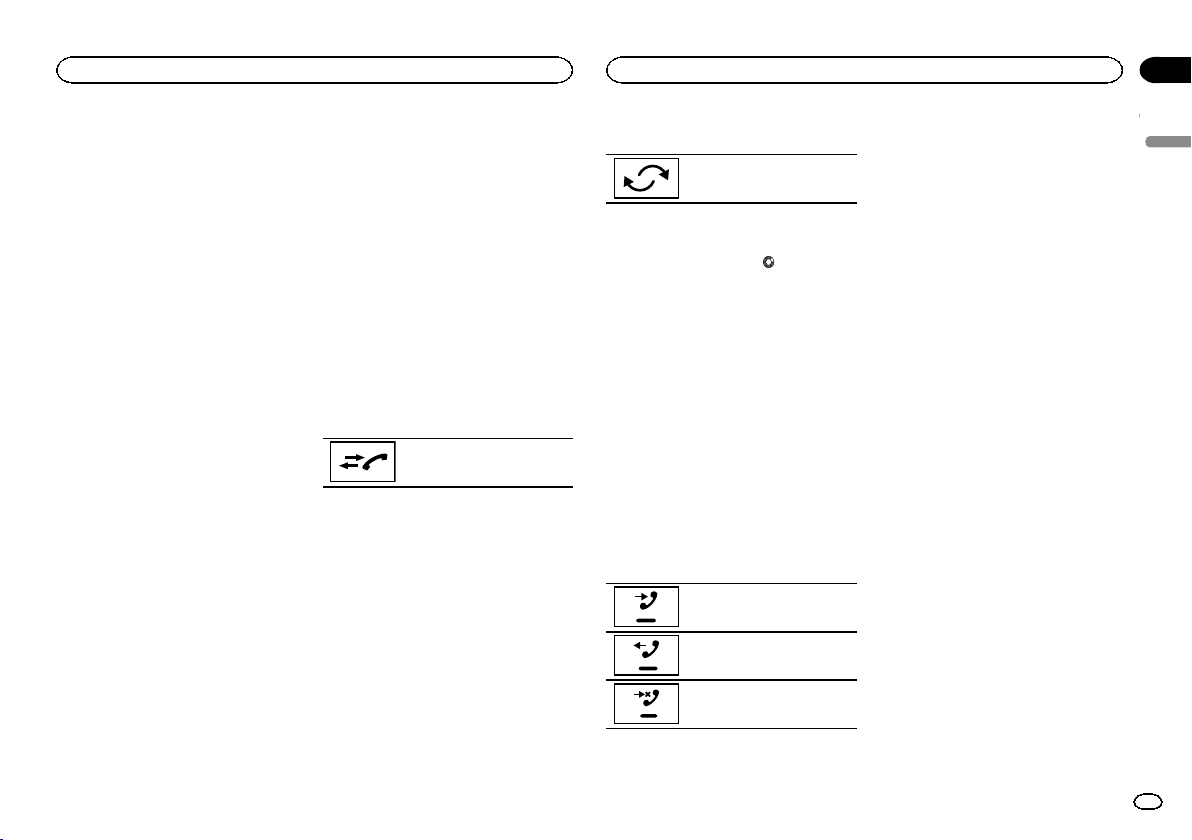
Black plate (33,1)
Calling a number in the
phone book
The contacts on your phone will normally be
transferred automatically when the phone is
connected. If it is not, use your phone menu to
transfer the contacts. The visibility of this unit
should be on when you use the phone menu.
Refer to Switching visible unit on page 46.
After finding the number you want to call in the
phone book, you can select the entry and make
the call.
1 Touch the phone book key to switch to
the phone book mode.
2 Select the phone number list.
The detailed phone number list of the selected
entry is displayed.
3 Select the phone number.
# If you want to store the phone number, touch and
hold the list.
4 Touch the off-hook key to make the call.
5 Touch the on-hook key to end the call.
Note
The contacts on your phone will normally be
transferred automatically when the phone is
connected. If it is not, use your phone menu to
transfer the contacts. The visibility of this unit
should be on when you use the phone menu.
Refer to Switching visible unit on page 46.
Selecting a number by
alphabet search mode
If a lot of numbers are registered in the phone
book, you can search for the phone number by
alphabet search mode.
1 Touch the phone book key to switch to
the phone book mode.
2 Touch ABC to switch to alphabet search
mode.
3 Touch the first letter of the entry you are
looking for.
The Phone Book entries starting with that letter
(e.g. “Ben”, “Brian” and “Burt” when “B” is se-
lected) will be displayed.
# The order of the first name and last name may be
different from that of the cellular phone.
4 Touch the list to display the phone num-
ber list of the selected entry.
# If several phone numbers are included in an
entry, select one by touching the list.
# If you want to switch to the call history list, touch
the icon.
Switching to the call history list.
5 Touch the off-hook key to make the call.
6 Touch the on-hook key to end the call.
Inverting names in phone book
When your cellular phone is connected to this
unit, the first and last names of your contacts
may be registered to the phone book in reverse
order. You can use this function to change the
order back.
(Inverting the names in the phone book)
1 Touch the phone book key to switch to
the phone book mode.
2 Invert names in phone books.
Inverting names in phone books.
3 “Would you like to invert all names?” ap-
pears. Touch Yes to continue.
While the names are inverted,
is displayed.
# If the inversion fails, “Invert Name Error” ap-
pears. In such cases, try again from the beginning.
Note
Inverting the names of your contacts from this
unit does not affect the data on your Bluetooth
device.
Using the missed, received
and dialed call lists
The 80 most recent calls dialed, received, and
missed are stored in the memory. You can
browse them and call numbers from these lists.
1 Touch the history key to display the call
history list.
2 Select Missed Calls, Dialed Calls or
Received Calls.
Displaying the received call list.
Displaying the dialed call list.
Displaying the missed call list.
3 Touch the list number to select a phone
number.
Name and phone number are displayed in the
detailed list.
# If you want to store the phone number, touch and
hold the list.
4 Touch the off-hook key to make the call.
5 Touch the on-hook key to end the call.
Setting automatic answering
If this function is on, this unit automatically an-
swers all incoming calls.
% Touch the auto-answer key to turn auto-
matic answering on or off.
Adjusting the other party’s
listening volume
To maintain the good sound quality, this unit
can adjust the other party’s listening volume. If
the volume is not loud enough for the other
party, use this function.
% Touch the volume key to select
Far-End VOL.
1—2—3
# This function can be performed even while talk-
ing on the phone.
# Settings can be stored for each device.
Switching the ring tone
You can select whether or not to use this unit’s
ring tone. If this function is set to on, the ring
tone for this unit will sound.
1 Connect your cellular phone to this unit.
English
Bluetooth telephone
33
Section
Bluetooth telephone
En
17
<CRD4844-A>33
Black plate (34,1)
2 Touch the tone key to turn the ring tone
on or off.
Using the preset dial lists
You can easily store up to six phone numbers as
presets.
1 Touch the preset dial key to display the
preset screen.
2 Touch one of the phone numbers to se-
lect.
# If you want to delete a preset phone number,
touch and hold the phone number you wish to de-
lete.
3 Touch the off-hook key to make the call.
4 Touch the on-hook key to end the call.
Making a call by entering
phone number
13 APR
PM
12:25
1
123
456
789
*0#
C
+
Abcdefghi
XXXXXXXXXXXXXXXX
Private
ON
Vol
1 Touch the key pad key to start entering
the phone number.
2 Touch the number icons to input the
numbers.
# Up to 32 digits can be entered.
3 Touch the off-hook key to make the call.
4 Touch the on-hook key to end the call.
Note
Entering phone number mode cannot be oper-
ated unless a Bluetooth telephone is connected
to this unit.
Setting the private mode
During a conversation, you can switch to private
mode (talk directly on your cellular phone).
% Touch the private mode key to turn pri-
vate mode on or off.
Voice control
If your cellular phone is equipped with the voice
control feature, you can use voice commands to
make calls, for example.
! Operation varies depending on the type of
cellular phone. Refer to the instruction man-
ual that came with your cellular phone for de-
tailed instructions.
! When an iPhone running iOS 6.1 or later is
used.
Siri Eyes Free Mode is available with this
product.
1 Touch the voice control key.
The display switches to the voice control screen.
You can also switch to the voice control screen
by pressing and holding down the home button
while the source is on.
13 ARP
PM
12:25
1
I'm Listening...
2 Start voice control.
Indicates that continuous calls
can be made uninterrupted.
Indicates that the display is
closed.
Notes
! In order for your voice commands to be rec-
ognized and interpreted correctly, ensure
that conditions are suitable for recognition.
! Please note that wind blowing through the
vehicle windows and noise coming from out-
side the vehicle can interfere with voice com-
mand operation.
! For optimum pick-up, the microphone should
be placed directly in front of the driver at a
suitable distance.
! Speaking too soon after the start of the com-
mand may cause voice recognition to fail.
! Speak slowly, deliberately, and clearly.
Bluetooth telephone
34
Section
Bluetooth telephone
En
17
<CRD4844-A>34
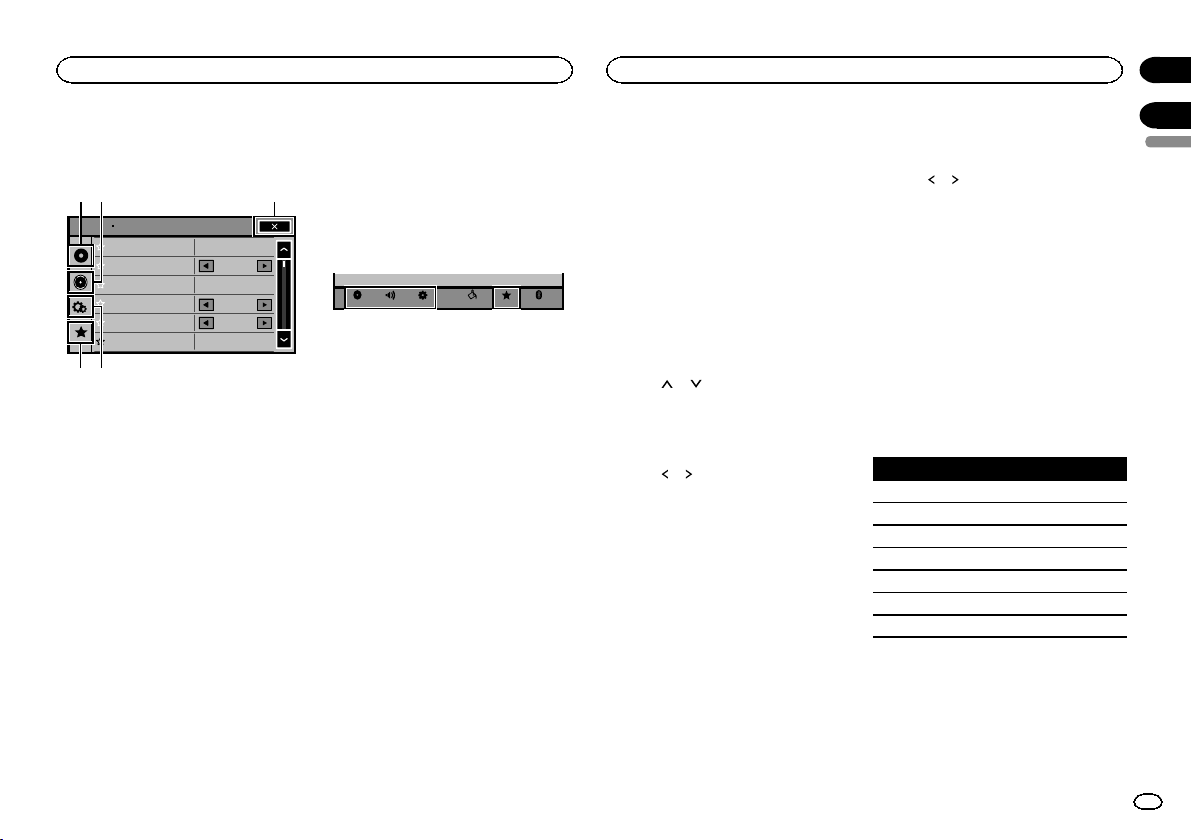
Black plate (35,1)
Menu operations
Touch panel keys
Sonic Center Control
Loudness
Subwoofer
Bass Booster
High Pass Filter
Source Level Adjuster
L/R 0
Low
0
125Hz
0
On
Audio
1
54
23
1 Video setup key
Refer to Setting up the video player on page
37.
2 Audio function key
Refer to Audio adjustments on page 35.
3 Close key
Returning to the current source display.
4 System key
Refer to System settings on page 40.
5 Favorite key
You can choose menus within each menu
(Audio function menu, etc.) and register
them to this favorite menu.
Refer to Favorite menu on page 45.
Notes
! You can display the Video Setup menu
when a Disc or USB source is selected.
! If you start the Video Setup menu, playback
is stopped.
! You cannot display the Audio function menu
when the mute function is on or a JPEG file
is playing.
1 Press the home button to switch to the
home display.
2 Touch any of the following touch panel
keys to select the menu to be adjusted.
BluetoothFavoritesThemeSystem
Settings
AudioVideo
Using fader/balance adjustment
Fader/Balance displays when Rear Speaker is
set to Full on the System Menu.
You can change the fader/balance setting to pro-
vide an ideal listening environment for all of the
occupied seats.
1 Press the home button to switch to the
home display.
2 Touch the audio function key to open the
audio menu.
3 Touch Fader/Balance on the audio func-
tion menu.
4 Touch
or to adjust the front/rear
speaker balance.
Range: F 15 L/R 0 to R 15 L/R 0
# Select F/R 0 L/R 0 when only using two speak-
ers.
5 Touch or to adjust the left/right
speaker balance.
Range: F/R 0 L 15 to F/R 0 R 15
Note
You can also set the fader/balance by dragging
the dot on the displayed table.
Using balance adjustment
Balance displays when Rear Speaker is set to
Subwoofer on the System Menu. This setting
will allow you to adjust the balance between
right/left sound output.
1 Press the home button to switch to the
home display.
2 Touch the audio function key to open the
audio menu.
3 Touch Balance on the audio function
menu.
4 Touch
or to adjust the left/right
speaker balance.
Range: L15to R15
Note
You can also set the balance by dragging the dot
on the displayed table.
Using the equalizer
You can adjust the equalization to match the
car’s interior acoustic characteristics as de-
sired.
Recalling equalizer curves
There are seven stored equalizer curves which
you can easily recall at any time. Here is a list of
the equalizer curves.
Display Equalizer curve
S.Bass Super bass
Powerful Powerful
Natural Natural
Vocal Vocal
Flat Flat
Custom1 Custom 1
Custom2 Custom 2
! The equalizer curves for Custom1 and
Custom2 can be adjusted.
! You cannot select Custom1 and Custom2
when using the auto-equalizer.
! When Flat, no changes are made to the
sound. You can check the effects of the
equalizer curves by switching alternatively
between Flat and another equalizer curve.
English
Settings
35
Section
Audio adjustments
En
18
19
<CRD4844-A>35

Black plate (36,1)
1 Press the home button to switch to the
home display.
2 Touch the audio function key to open the
audio menu.
3 Touch Graphic EQ on the audio function
menu.
# You cannot select or adjust the equalizer curves
of Custom1 and Custom2 when using the auto-
equalizer.
4 Touch the desired setting.
S.Bass—Powerful—Natural—Vocal—Flat—
Custom1—Custom2
Adjusting the 8-band graphic
equalizer
You can adjust the level of each band for the
equalizer curves.
! A separate Custom1 curve can be created
for each source. If you make adjustments
when a curve other than Custom2 is se-
lected, the equalizer curve settings will be
stored in Custom1.
! A Custom2 curve that is common for all
sources can be created. If you make adjust-
ments when the Custom2 curve is selected,
the Custom2 curve will be updated.
1 Press the home button to switch to the
home display.
2 Touch the audio function key to open the
audio menu.
3 Touch Graphic EQ on the audio function
menu.
4 Touch the desired setting.
S.Bass—Powerful—Natural—Vocal—Flat—
Custom1—Custom2
5 Touch the table to adjust the level of the
equalizer band.
Range: +12dB to –12dB
Using the auto-equalizer
The auto-equalizer is an equalizer curve created
by auto EQ (refer to Auto EQ (auto-equalizing) on
page 43).
You can turn the auto-equalizer on or off.
If you connect an optional microphone to this
unit, you can use this function.
1 Press the home button to switch to the
home display.
2 Touch the audio function key to open the
audio menu.
3 Touch Auto EQ to turn the auto-equalizer
on or off.
# You cannot use this function if auto EQ has not
been carried out.
Using sonic center control
Sound that is suited for the listening position
can easily be created with this function.
1 Press the home button to switch to the
home display.
2 Touch the audio function key to open the
audio menu.
3 Touch Sonic Center Control on the audio
function menu.
4 Touch
or to select a listening position.
Range: Left 7 to Right 7
Adjusting loudness
Loudness compensates for deficiencies in the
low-frequency and high-frequency ranges at low
volume.
1 Press the home button to switch to the
home display.
2 Touch the audio function key to open the
audio menu.
3 Touch c or d to select a desired level for
loudness.
Off (off)—Low (low)—Mid (mid)—High (high)
Using subwoofer output
This unit is equipped with a subwoofer output
which can be turned on or off.
! The cut-off frequency and output level can be
adjusted when the subwoofer output is on.
1 Press the home button to switch to the
home display.
2 Touch the audio function key to open the
audio menu.
3 Touch Subwoofer on the audio function
menu.
4 Touch On or Off next to Subwoofer to
turn the subwoofer output on or off.
5 Touch Normal or Reverse next to Phase
to select the phase of subwoofer output.
6 Touch c or d next to Level to adjust the
output level of the subwoofer.
Range: +6 to –24
7 Touch c or d next to Frequency to select
the cut-off frequency.
50Hz—63Hz—80Hz—100Hz—125Hz
Only frequencies lower than those in the se-
lected range are outputted from the subwoofer.
Boosting the bass
You can boost the bass level.
1 Press the home button to switch to the
home display.
2 Touch the audio function key to open the
audio menu.
3 Touch c or d to select a desired level.
Range: 0 to +6
Using the high pass filter
Use this function when wanting to listen only to
high-frequency sounds. Only frequencies higher
than the high-pass filter (HPF) cutoff are output
from the speakers.
1 Press the home button to switch to the
home display.
2 Touch the audio function key to open the
audio menu.
3 Touch c or d next to High Pass Filter to
select cut-off frequency.
Off (off)—50Hz—63Hz—80Hz—100Hz—
125Hz
Only frequencies higher than those in the se-
lected range are output from the front or rear
speakers.
Audio adjustments
36
Section
Audio adjustments
En
19
<CRD4844-A>36
Black plate (37,1)
Adjusting source levels
With SLA (source level adjustment), the volume
levels of each source can be adjusted to prevent
significant differences between sources.
! Settings are based on the FM volume level,
which remains unchanged.
1 Press the home button to switch to the
home display.
2 Touch the audio function key to open the
audio menu.
3 Compare the FM volume level with the
level of the source you wish to adjust.
4 Touch Source Level Adjuster on the audio
function menu.
5 Touch
or to adjust the source vol-
ume.
Range: +4 to –4
Notes
! Source Level Adjuster is not available when
FM is selected as the source.
! The AM volume level can also be adjusted
with this function.
! Video CD, CD, compressed audio, DivX,
MPEG-1, MPEG-2 and MPEG-4 are automati-
cally set to the same source level adjustment
volume.
Setting the subtitle language
You can set a desired subtitle language. When
available, the subtitles will be displayed in the
selected language.
1 Press the home button to switch to the
home display.
2 Touch the video setup key to open the
video setup menu.
3 Touch Subtitle Language on the
Video Setup menu.
A subtitle language menu is displayed.
4 Touch the desired language.
The subtitle language is set.
# If you have selected Others, refer to When you se-
lect Others on page 37.
Notes
! If the selected language is not available, the
language specified on the disc is displayed.
! You can also switch the subtitle language by
touching the switch subtitle languages key
during playback.
! The setting made here will not be affected
even if the subtitle language is switched dur-
ing playback using the switch subtitle lan-
guages key.
When you select Others
A language code input display is shown when
Others is selected. Refer to Language code chart
for DVD on page 68.
% Touch 0 to 9 to input the language code.
# To cancel the entered numbers, touch C.
# To register the code, touch the following touch
panel key.
Registering the code.
Setting the audio language
You can set the preferred audio language.
1 Press the home button to switch to the
home display.
2 Touch the video setup key to open the
video setup menu.
3 Touch Audio Language on the Video
Setup menu.
An audio language menu is displayed.
4 Touch the desired language.
The audio language is set.
# If you have selected Others, refer to When you se-
lect Others on page 37.
Notes
! If the selected language is not available, the
language specified on the disc is used.
! You can also switch the audio language by
touching the switch audio languages key
during playback.
! The setting made here will not be affected
even if the audio language is switched dur-
ing playback using the switch audio lan-
guages key.
Setting the menu language
You can set the preferred language in which the
menus recorded on a disc are displayed.
1 Press the home button to switch to the
home display.
English
Audio adjustments
37
Section
Setting up the video player
En
19
20
<CRD4844-A>37
Black plate (38,1)
2 Touch the video setup key to open the
video setup menu.
3 Touch Menu Language on the
Video Setup menu.
A menu language menu is displayed.
4 Touch the desired language.
The menu language is set.
# If you have selected Others, refer to When you se-
lect Others on page 37.
Note
If the selected language is not available, the lan-
guage specified on the disc is displayed.
Setting the multi-angle DVD
display
The angle icon can be set so it appears on
scenes where the angle can be switched.
1 Press the home button to switch to the
home display.
2 Touch the video setup key to open the
video setup menu.
3 Touch Multi Angle on the Video Setup
menu to turn angle icon display on or off.
Setting the aspect ratio
There are two kinds of display: a wide screen dis-
play that has a width-to-height ratio (TV aspect
ratio) of 16:9, and regular display that has a TV
aspect of 4:3. Be sure to select the correct TV as-
pect for the display connected to V OUT.
! When using regular display, select either
Letter Box or Pan Scan. Selecting 16:9 may
result in an unnatural picture.
! If you select the TV aspect ratio, the unit’s
display will change to the same setting.
1 Press the home button to switch to the
home display.
2 Touch the video setup key to open the
video setup menu.
3 Touch TV Aspect on the Video Setup
menu to select the TV aspect ratio.
Touch TV Aspect repeatedly until the desired as-
pect ratio appears.
! 16:9 – Wide screen picture (16:9) is displayed
as is (initial setting)
! Letter Box – The picture is the shape of a let-
terbox with black bands on the top and bot-
tom of the screen
! Pan Scan – The picture is cut short on the
right and left sides of the screen
Notes
! When playing discs that do not specify
Pan Scan, the disc is played back in
Letter Box display even if you select the
Pan Scan setting. Confirm whether the disc
package bears the
16 : 9 LB
mark.
! The TV aspect ratio cannot be changed for
some discs. For details, refer to the disc’s in-
structions.
Setting the slideshow interval
JPEG files can be viewed as a slideshow on this
unit. In this setting, the interval between each
image can be set.
1 Press the home button to switch to the
home display.
2 Touch the video setup key to open the
video setup menu.
3 Touch Time Per Photo Slide on the
Video Setup menu to select the slideshow in-
terval.
Touch Time Per Photo Slide repeatedly until the
desired setting appears.
! 5sec – JPEG images switch at intervals of 5
seconds
! 10sec – JPEG images switch at intervals of 10
seconds
! 15sec – JPEG images switch at intervals of 15
seconds
! Manual – JPEG images can be switched
manually
Setting parental lock
Some DVD video discs let you use parental lock
to restrict children from viewing violent and
adult-oriented scenes. You can set parental lock
to the desired level.
! When you have a parental lock level set and
play a disc featuring parental lock, code
number input indications may be displayed.
In such cases, playback will begin when the
correct code number is entered.
Setting the code number and level
A code number must be registered in order to
play back discs with parental lock.
1 Press the home button to switch to the
home display.
2 Touch the video setup key to open the
video setup menu.
3 Touch Parental on the Video Setup menu.
4 Touch 0 to 9 to input a four digit code
number.
# To cancel the entered numbers, touch C.
# To register the code, touch the following touch
panel key.
Registering the code.
The code number is set, and the level can now be
set.
5 Touch 1 to 8 to select the desired level.
6 Touch Enter.
The parental lock level is set.
! 8 – Playback of the entire disc is possible (ini-
tial setting)
! 7 to 2 – Playback of discs for children and
non-adult-oriented discs is possible
! 1 – Playback of discs for children only is pos-
sible
Notes
! We recommend to keep a record of your
code number in case you forget it.
! The parental lock level is stored on the disc.
Look for the level indication written on the
disc package, included literature or on the
disc itself. Parental lock of this unit is not
possible if a parental lock level is not stored
on the disc.
! With some discs, the parental lock may be
active only for certain levels of scenes. The
playback of those scenes will be skipped. For
details, refer to the instruction manual that
came with the disc.
Changing the level
You can change the set parental lock level.
1 Press the home button to switch to the
home display.
2 Touch the video setup key to open the
video setup menu.
3 Touch Parental on the Video Setup menu.
Setting up the video player
38
Section
Setting up the video player
En
20
<CRD4844-A>38
Black plate (39,1)
4 Touch 0 to 9 to input the registered code
number.
5 Registering the code.
Registering the code.
This sets the code number, and the level can
now be changed.
# If you enter an incorrect code number, the
icon is displayed. Touch C and enter the correct code
number.
# If you forget your code number, refer to If you for-
get your code number on page 39.
6 Touch 1 to 8 to select the desired level.
7 Touch Enter.
The new parental lock level is set.
If you forget your code number
% Press RESET.
Setting the DivX subtitle file
You can select whether or not to display DivX ex-
ternal subtitles.
! The DivX subtitles will be displayed even
when Custom is selected if no DivX external
subtitle files exist.
1 Press the home button to switch to the
home display.
2 Touch the video setup key to open the
video setup menu.
3 Touch DivX® Subtitle on the Video Setup
menu to select the desired subtitle setting.
! Original – Display the DivX subtitles
! Custom – Display the DivX external subtitles
Notes
! Up to 42 characters can be displayed on one
line. If more than 42 characters are set, the
line breaks and the characters are displayed
on the next line.
! Up to 126 characters can be displayed on
one screen. If more than 126 characters are
set, the excess characters will not be dis-
played.
Displaying the DivX
â
VOD
registration code
In order to play DivX VOD (video on demand)
contents on this unit, the unit must first be reg-
istered with a DivX VOD contents provider. For
registration, generate a DivX VOD registration
code and submit it to your provider.
! Keep a record of the code as you will need it
when you register your unit to the DivX VOD
provider.
1 Press the home button to switch to the
home display.
2 Touch the video setup key to open the
video setup menu.
3 Touch DivX® VOD on the Video Setup
menu.
Registration Code and Deregistration Code
appear.
4 Touch Registration Code.
Your registration code is displayed.
Displaying the deregistration code
If your device is already registered, deregister it
by entering the deregistration code.
1 Press the home button to switch to the
home display.
2 Touch the video setup key to open the
video setup menu.
3 Touch DivX® VOD on the Video Setup
menu.
4 Touch Deregistration Code.
# To cancel deregistration, touch Cancel.
5 Touch OK.
The deregistration is complete.
Automatic playback of DVDs
When a DVD disc with a DVD menu is inserted,
this unit will cancel the menu automatically and
start playback from the first chapter of the first
title.
! Some DVDs may not operate properly. If this
function is not fully operable, turn this func-
tion off and start playback.
1 Press the home button to switch to the
home display.
2 Touch the video setup key to open the
video setup menu.
3 Touch DVD Auto Play to turn automatic
playback on.
# To turn automatic playback off, touch
DVD Auto Play again.
English
Setting up the video player
39
Section
Setting up the video player
En
20
<CRD4844-A>39

Black plate (40,1)
Switching the auxiliary setting
Activate this setting when using an auxiliary de-
vice connected to this unit.
1 Press the home button to switch to the
home display.
2 Touch the system key to open the system
menu.
3 Touch AUX Input on the system menu to
turn AUX Input on or off.
Setting AV input
Activate this setting when using an external
video component connected to this unit.
1 Press the home button to switch to the
home display.
2 Touch the system key to open the system
menu.
3 Touch AV Input on the system menu to
turn AV Input on or off.
Setting the navigation system
Activate this setting when connecting a Pioneer
Add-on Navigation system (sold separately).
Device connection can be set when all of the
following conditions are met.
— The iPhone is not connected.
— No Bluetooth connection.
— The source is turned off.
1 Turn the source off.
Refer to Source off key on page 7.
2 Press the home button to switch to the
home display.
3 Touch the system key to open the system
menu.
4 Touch Device connection on the system
menu.
5 Touch NAVI to select.
NAVI – Navigation system
Setting the Pandora connect
mode
Refer to Setting the Pandora connect mode on
page 30.
Selecting MirrorLink Mode
You can select the MirrorLink Mode setting
whether you use third party applications in your
smartphone or not.
1 Press the home button to switch to the
home display.
2 Touch the system key to open the system
menu.
3 Touch the desired setting next to
CD-ML100 Setting.
! Car Mode – You can use the launcher appli-
cations in your smartphone on the unit’s
screen.
! App List Mode – You can use the third party
applications in your smartphone on the unit’s
screen.
Updating the firmware for
the smartphone link adaptor
This function is used to update the smartphone
link adaptor firmware with the latest firmware.
For about smartphone link adaptor firmware
and updating, refer to our website.
You can update only when smartphone link
adaptor is available.
Important
! The USB storage device for updating must
contain only the correct update file. If the
USB storage device contains multiple files,
the update will fail.
! Never turn the unit off and never disconnect
the USB storage device while the firmware is
being updated.
! You can only start the firmware update when
the vehicle is stopped and the parking brake
is engaged.
1 Downloading the firmware update files.
2 Connect a blank (formatted) USB storage
device to your computer, and then locate
and copy the correct update file onto the
USB storage device.
3 Turn the source off.
Refer to Turning the source ON/OFF on page 8.
4 Press the home button to switch to the
home display.
5 Touch the system key to open the system
menu.
6 Touch CD-ML100 Update on the system
menu.
7 Connect the USB storage device to the
smartphone link adaptor.
Refer to Connection for updating Smartphone
link adaptor firmware on page 53.
8 Touch Continue to display the update
mode.
Follow the on-screen instructions to finish up-
dating the smartphone link adaptor.
9 Remove the USB storage device from the
smartphone link adaptor.
10 Turn the ignition switch OFF and then to
ACC or ON.
Notes
! If update failed, please consult your dealer or
the nearest authorized PIONEER Service Sta-
tion.
! You cannot update while connected to
Bluetooth.
Displaying the smartphone
link adaptor firmware version
If smartphone link adaptor fails to operate prop-
erly, you may need to consult your dealer for re-
pair. In such cases, you may be asked to specify
the firmware version. Perform the following pro-
cedure to check the version on smartphone link
adaptor.
1 Turn the source off.
Refer to Turning the source ON/OFF on page 8.
2 Press the home button to switch to the
home display.
3 Touch the system key to open the system
menu.
4 Touch CD-ML100 Firmware Info to display
to the version of the firmware of smart-
phone link adaptor.
System settings
40
Section
System settings
En
21
<CRD4844-A>40
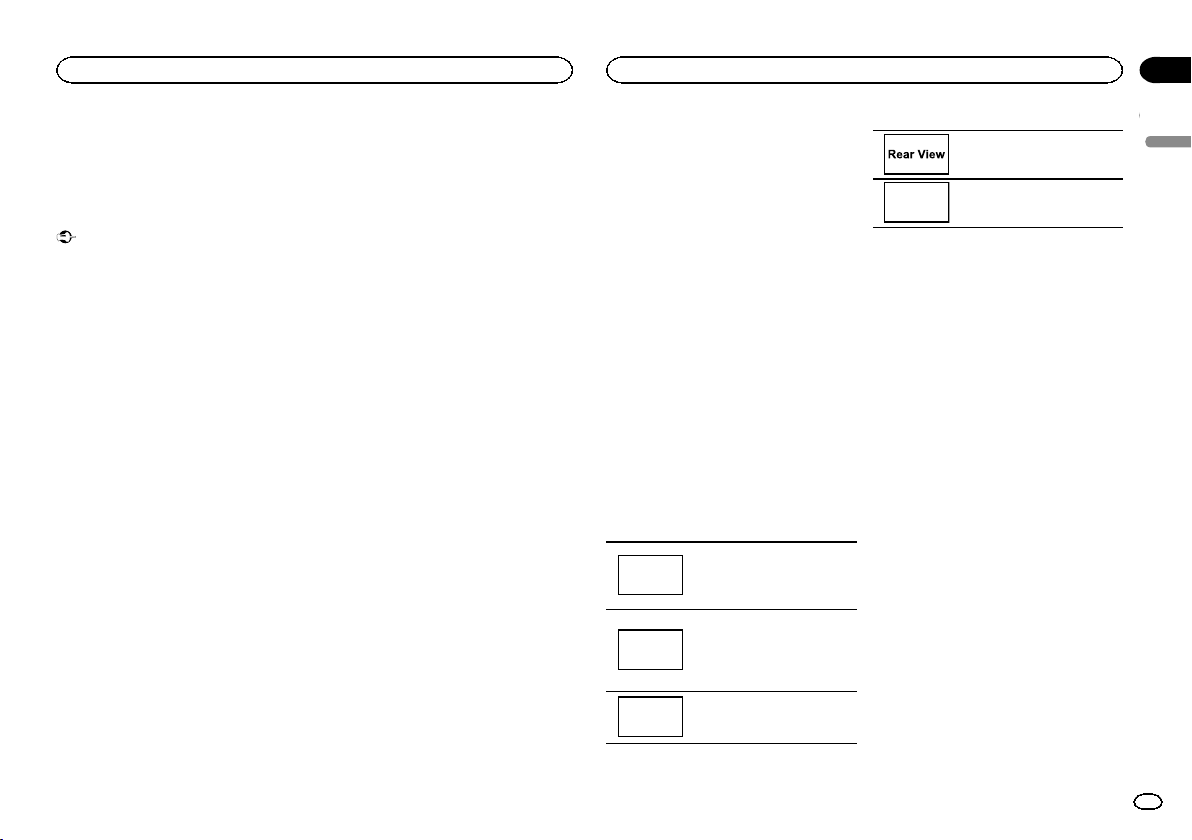
Black plate (41,1)
Updating firmware
This function is used to update this unit with the
latest firmware.
For about firmware and updating, refer to our
website.
Important
! The USB storage device for updating must
contain only the correct update file. If the
USB storage device contains multiple files,
the update will fail.
! Never turn the unit off and never disconnect
the USB storage device while the firmware is
being updated.
! You can only start the firmware update when
the vehicle is stopped and the parking brake
is engaged.
1 Downloading the firmware update files.
2 Connect a blank (formatted) USB storage
device to your computer, and then locate
and copy the correct update file onto the
USB storage device.
3 Turn the source off.
Refer to Turning the source ON/OFF on page 8.
4 Press the home button to switch to the
home display.
5 Touch the system key to open the system
menu.
You can check the current version of your unit’s
firmware. Touch Firmware Information on the
system menu to open the
Firmware Information screen.
6 Touch Firmware Update on the system
menu.
The confirmation screen appears on the display.
7 Connect the USB storage device accord-
ing to the on-screen messages.
8 Touch Continue to display the read file
mode.
Check any messages if warning screens appear
on the display.
9 Touch Start to display the data transfer
mode.
# Follow the on-screen instructions to finish updat-
ing the firmware.
# This unit will reset automatically after the firm-
ware update is completed if the update is success-
ful.
Note
If “Update Failed!” appears on the screen, turn
the ignition switch to OFF, then turn the ignition
switch to the ACC position to proceed and start
the recovery sequence.
Displaying the firmware
version
If this unit fails to operate properly, you may
need to consult your dealer for repair. In such
cases, you may be asked to specify the firmware
version. Perform the following procedure to
check the version on this unit.
1 Turn the source off.
Refer to Turning the source ON/OFF on page 8.
2 Press the home button to switch to the
home display.
3 Touch the system key to open the system
menu.
4 Touch Firmware Information to display to
the version of the firmware of this unit.
Setting MIXTRAX mode
Refer to Setting MIXTRAX mode on page 29.
Changing the picture
adjustment (Brightness,
Contrast, Color, Hue,
Dimmer and Temperature)
You can adjust the Brightness (brightness),
Contrast (contrast), Color (color) , Hue (hue),
Dimmer (dimmer), and Temperature (tempera-
ture) for each source and rear view camera.
! You cannot adjust Color and Hue for the
audio source.
! You cannot adjust Color and Hue for NAVI,
Apps and MirrorLink.
1 Press the home button to switch to the
home display.
2 Touch the system key to open the system
menu.
3 If you are adjusting the
Picture Adjustment, select the unit.
NAVI
Completing Picture Adjust-
ment for the Navigation system
when Device connection is set
to NAVI.
Apps
Completing Picture Adjust-
ment for the AppRadio Mode
when Device connection is set
to iPhone via USB or iPhone
via Bluetooth.
MirrorLink
Completing Picture Adjust-
ment for the MirrorLink
Mode.
Adjusting the Picture Adjust-
ment for the rear view camera.
Source
Adjusting the Picture Adjust-
ment for the source.
4 Touch any of the following touch panel
keys to select the function to be adjusted.
Picture Adjustment items are displayed.
! Brightness – Adjusts the black intensity
! Contrast – Adjusts the contrast
! Color – Adjusts the color saturation
! Hue – Adjusts the tone of color (red or green
is emphasized)
! Dimmer – Adjusts the brightness of the dis-
play
! Temperature – Adjusts the color tempera-
ture, resulting in a better white balance
# You can adjust Hue only when the color system
is set to NTSC.
# With some rear view cameras, picture adjust-
ment may not be possible.
5 Touch c or d to adjust the selected item.
Each time you touch c or d, the level of the se-
lected item increases or decreases.
# Brightness, Contrast, Color, and Hue can be ad-
justed from +24 to -24.
# Dimmer can be adjusted from +1 to +48.
# Temperature can be adjusted from +3 to –3.
Notes
! You cannot operate this function while driv-
ing.
! Different Brightness/Contrast/Dimmer set-
tings can be set for when the illumination
switch is on and when it is off.
Selecting the system language
The system language can be selected.
English
System settings
41
Section
System settings
En
21
<CRD4844-A>41

Black plate (42,1)
If text information such as the title name, artist
name or a comment is embedded in a European
language, they can also be displayed on this
unit.
! The language can be changed for the follow-
ing:
— Audio menu
— System menu
— Video Setup menu
— Bluetooth menu
— Language for cautions
Some operations on this unit are prohib-
ited from use while driving or require
careful attention when operated. In such
cases, a caution will appear on the dis-
play. You can change the language for
caution messages with this setting.
! If the embedded language and the selected
language setting are not the same, text infor-
mation may not display properly.
! Some characters may not be displayed prop-
erly.
1 Press the home button to switch to the
home display.
2 Touch the system key to open the system
menu.
3 Touch System Language on the system
menu to select the desired language.
4 Touch the desired language.
English (English)—Français (French)—Español
(Spanish)—Português (Portuguese)—中文
(Simplified Chinese)
Setting SiriusXM TuneStartä
Refer to Setting SiriusXM TuneStartä on page 16.
Resetting to default
Refer to Resetting to default on page 16.
Setting Demo Mode
Once Demo Mode is turned on, the Demo
screen appears.
Refer to Demo mode on page 6.
1 Press the home button to switch to the
home display.
2 Touch the system key to open the system
menu.
3 Touch Demo Mode on the system menu
to turn Demo Mode on or off.
! On – The Demo screen appears.
! Off – The Demo screen does not appear.
Switching sound muting/
attenuation
In order to use this function, the unit’s yellow/
black lead must be connected to equipment
with a mute function.
Refer to Connecting the power cord on page 50.
Sound from this system is automatically muted
or attenuated when a signal from equipment
with a mute function is received.
! Sound from this system returns to normal
when the muting or attenuation is canceled.
1 Press the home button to switch to the
home display.
2 Touch the system key to open the system
menu.
3 Touch Mute/ATT until the desired setting
appears.
Touch Mute/ATT until the desired setting ap-
pears in the display.
! Mute – Muting
! ATT –20dB – Attenuation (ATT –20dB has a
stronger effect than ATT –10dB)
! ATT –10dB – Attenuation
! Off – Turns the sound muting/attenuation off
Notes
! When Mute is displayed, the sound is turned
off and no audio adjustments can be made.
! When ATT is displayed, the sound is attenu-
ated and only the volume can be adjusted.
(No other audio adjustments can be made.)
! Operation returns to normal when the phone
connection is ended.
Setting the rear output and
subwoofer controller
This unit’s rear output (rear speaker leads out-
put and RCA rear output) can be used for full-
range speaker (Full) or subwoofer (Subwoofer)
connection. If you switch the rear output setting
to Subwoofer, you can connect a rear speaker
lead directly to a subwoofer without using an
auxiliary amp.
Initially, the unit is set for a rear full-range speak-
er connection (Full).
1 Turn the source off.
Refer to Turning the source ON/OFF on page 8.
2 Press the home button to switch to the
home display.
3 Touch the system key to open the system
menu.
4 Touch Rear Speaker on the system menu
to switch the subwoofer output or full-range
speaker.
# When no subwoofer is connected to the rear out-
put, select Full (full-range speaker).
# When a subwoofer is connected to the rear out-
put, select Subwoofer (subwoofer).
Notes
! Even if you change this setting, there will be
no output unless you turn the subwoofer out-
put on (refer to Using subwoofer output on
page 36).
! Both rear speaker lead outputs and RCA rear
output are switched simultaneously in this
setting.
Using the keyboard
Keyboard is available only in AppRadio Mode.
Refer to Setting the Keyboard on page 24.
Setting the ever scroll
When ever scroll is set to On, recorded text infor-
mation scrolls continuously in the display. Set to
Off if you prefer the information to scroll just
once.
1 Press the home button to switch to the
home display.
2 Touch the system key to open the system
menu.
3 Touch Ever Scroll on the system menu to
turn ever scroll on or off.
Setting the Bluetooth audio
(Function of AVH-X5600BHS/AVH-X4600BT/AVH-
X3600BHS/AVH-X2600BT)
System settings
42
Section
System settings
En
21
<CRD4844-A>42
Black plate (43,1)
You need to activate the Bluetooth Audio
source in order to use a Bluetooth audio player.
1 Press the home button to switch to the
home display.
2 Touch the system key to open the system
menu.
3 Touch Bluetooth Audio on the system
menu to turn Bluetooth audio on or off.
Clearing Bluetooth memory
Important
Never turn the unit off while the Bluetooth mem-
ory is being cleared.
1 Turn the source off.
Refer to Turning the source ON/OFF on page 8.
2 Press the home button to switch to the
home display.
3 Touch the system key to open the system
menu.
4 Touch Bluetooth Memory Clear on the
system menu.
5 Touch Clear.
After selecting a desired item, a confirmation
display appears. Touch OK to delete the memo-
ry.
# If you do not want to clear the memory, touch
Cancel.
Updating Bluetooth software
This function is used to update this unit with the
latest Bluetooth software. For about Bluetooth
software and updating, refer to our website.
Important
Never turn the unit off and never disconnect the
phone while the software is being updated.
1 Turn the source off.
Refer to Turning the source ON/OFF on page 8.
2 Press the home button to switch to the
home display.
3 Touch the system key to open the system
menu.
4 Touch BT Software Update.
5 Touch Start to display the data transfer
mode.
# Follow the on-screen instructions to finish updat-
ing the Bluetooth software.
Displaying the Bluetooth
software version
If this unit fails to operate properly, you may
need to consult your dealer for repair. In such
cases, you may be asked to specify the software
version. Perform the following procedure to
check the version on this unit.
1 Turn the source off.
Refer to Turning the source ON/OFF on page 8.
2 Press the home button to switch to the
home display.
3 Touch the system key to open the system
menu.
4 Touch Bluetooth Version Information to
display to the version of the Bluetooth mod-
ule of this unit.
Setting the rear view
camera (back up camera)
CAUTION
Pioneer recommends the use of a camera
which outputs mirror-reversed images. Oth-
erwise, the screen image will appear re-
versed.
This unit features a function that automatically
switches to the rear view camera video (R.C IN)
when a rear view camera is installed on your car
and the shift lever is moved to the REVERSE
(R) position. (For more details, consult your
dealer.)
You can also switch the rear view image by
pressing the touch panel key.
For details refer to Using the rear view on page
10.
! After you set up the rear view camera setting,
move the shift lever to REVERSE (R) and
confirm that the rear view camera video is
shown on the display.
! Change this setting if the display switches to
the rear view camera video by error while you
are driving forward.
! To stop watching the rear view camera video
and return to the source display, press and
hold MUTE.
! Touch the RearView source icon to display
the rear view camera image while driving.
Touch the source icon again to turn the rear
view camera off. For details, refer to Selecting
a source on page 8.
1 Press the home button to switch to the
home display.
2 Touch the system key to open the system
menu.
3 Touch Camera Polarity on the system
menu to select the appropriate setting.
! Battery – When the polarity of the connected
lead is positive while the shift lever is in RE-
VERSE (R) position
! Ground – When the polarity of the connected
lead is negative while the shift lever is in RE-
VERSE (R) position
! Off – When a rear view camera is not con-
nected to this unit
! The rear view key setting also turns off on the
home display screen.
Auto EQ (auto-equalizing)
The auto-equalizer automatically measures the
car’s interior acoustic characteristics, and then
creates an auto-equalizer curve based on that in-
formation.
! To perform this function, dedicated micro-
phone (e.g. CD-MC20) is required.
WARNING
As a loud tone (noise) may be emitted from the
speakers when measuring the car’s interior
acoustic characteristics, never perform auto EQ
while driving.
CAUTION
! Thoroughly check the conditions before per-
forming auto EQ as the speakers may be
damaged if these functions are performed
when:
— The speakers are incorrectly connected. (For
example, when a rear speaker is connected
as a subwoofer output.)
— A speaker is connected to a power amp deliv-
ering output higher than the speaker’s maxi-
mum input power capability.
English
System settings
43
Section
System settings
En
21
<CRD4844-A>43

Black plate (44,1)
! If the microphone is placed in an unsuitable
position the measurement tone may become
loud and measurement may take a long
time, resulting in battery drainage. Be sure
to place the microphone in the specified lo-
cation.
Before operating the auto EQ
function
! Carry out auto EQ in as quiet a place as pos-
sible, with the car engine and air condition-
ing switched off. Also cut power to car
phones or portable telephones in the car, or
remove them from the car before carrying
out auto EQ. Sounds other than the measure-
ment tone (surrounding sounds, engine
sound, telephones ringing etc.) may prevent
correct measurement of the car interior
acoustic characteristics.
! Be sure to carry out auto EQ using the op-
tional microphone. Using another micro-
phone may prevent measurement, or result
in incorrect measurement of the car interior
acoustic characteristics.
! In order to perform auto EQ, the front speak-
er must be connected.
! When this unit is connected to a power amp
with input level control, auto EQ may not be
possible if the power amp’s input level is set
below the standard level.
! When this unit is connected to a power amp
with an LPF, turn this LPF off before perform-
ing auto EQ. Also set the cut-off frequency
for the built-in LPF of an active subwoofer to
the highest frequency.
! The distance has been calculated by com-
puter to be the optimum delay to give accu-
rate results for the circumstances, so please
continue to use this value.
— The reflected sound within the car is
strong and delays occur.
— The LPF on active subwoofers or external
amps delay the lower sounds.
! Auto EQ changes the audio settings as fol-
lows:
— The fader/balance settings return to the
center position. (Refer to Using fader/bal-
ance adjustment on page 35.)
— The equalizer curve switches to Flat.
(Refer to Recalling equalizer curves on
page 35.)
— The front, center and rear speakers will
automatically be adjusted to a high pass
filter setting.
! Previous settings for auto EQ will be overwrit-
ten.
! If using an AVH-X3600BHS, AVH-X2600BT, or
AVH-X1600DVD, connect a microphone ex-
tension cable (sold separately) to the AUX
input in advance.
Performing auto EQ
1 Stop the car in a place that is quiet, close
all the doors, windows and sun roof, and
then turn the engine off.
If the engine is left running, engine noise may
prevent correct auto EQ.
2 Fix the optional microphone in the center
of the headrest of the driver’s seat, facing
forward.
The auto EQ may differ depending on where you
place the microphone. If desired, place the mi-
crophone on the front passenger seat to carry
out auto EQ.
3 Turn the ignition switch to ON or ACC.
If the car’s air conditioner or heater is turned on,
turn it off. Noise from the fan in the air condi-
tioner or heater may prevent correct auto EQ.
4 Press the home button to switch to the
home display.
5 Touch the system key to open the system
menu.
6 Touch Auto EQ Measurement to enter
auto EQ measurement mode.
7 Plug the microphone into the micro-
phone input jack on this unit.
AVH-X5600BHS and AVH-X4600BT
AVH-X3600BHS, AVH-X2600BTand AVH-
X1600DVD
AUX input
(AUX)
Extension Cable
(Sold separately)
Microphone
8 Touch Start to start auto EQ.
9 When the 10-second countdown starts,
get out of the car and close the door within
10 seconds.
A measurement tone (noise) is emitted from the
speakers, and auto EQ measurement begins.
When auto EQ is completed, The measurement
has finished. Please disconnect the micro-
phone and then push HOME key. is displayed.
When the car’s interior acoustic characteristics
cannot be measured correctly, an error message
will be displayed. (Refer to Understanding auto
EQ error messages on page 60.)
# It takes about nine minutes for auto EQ measure-
ment to be completed when all the speakers are con-
nected.
# To stop auto EQ, touch Stop.
10 Store the microphone carefully in the
glove compartment or another safe place.
If the microphone is subjected to direct sunlight
for an extended period, high temperatures may
cause distortion, color change or malfunction.
Setting the video signal
When you connect this unit to an AV equipment
to this unit, select the suitable video signal set-
ting.
! As this function is initially set to Auto, the
unit will automatically adjust the video signal
setting.
! You can operate this function only for the
video signal input into the AV input.
1 Press the home button to switch to the
home display.
2 Touch the system key to open the system
menu.
3 Touch Video Signal Setting on the system
menu.
Video Signal Setting items are displayed.
! AV – Adjusts the AV video signal
! AUX – Adjusts the AUX video signal
! Camera – Adjusts the rear view camera video
signal
4 Touch c or d to select the desired video
signal appears.
Auto—PAL—NTSC—PAL-M—PAL-N—SECAM
System settings
44
Section
System settings
En
21
<CRD4844-A>44
Black plate (45,1)
Using the Favorite menu
1 Display menu columns to register.
Refer to Menu operations on page 35.
# You can customize menus except Video Setup
menu.
2 Touch the star icon in the menu column
for the desired menu to register the menu.
The star icon for the selected menu is filled in.
# To cancel the registration, touch the star icon in
the menu column again.
3 Display the favorite menu and choose a
registered menu.
Refer to Menu operations on page 35.
Note
You can register up to 12 columns.
Bluetooth connection menu
operations
(Function of AVH-X5600BHS/AVH-X4600BT/AVH-
X3600BHS/AVH-X2600BT)
Note
If you are using a cellular phone that can be
connected via Bluetooth wireless technology, we
recommend that you use your phone to search
for this unit and establish a connection between
it and your phone. The PIN code is set to 0000
as default. The product name for this unit will
display on your phone as the device name. For
details, refer to Entering PIN code for Bluetooth
wireless connection on page 46. For further de-
tails concerning the procedures for establishing
Bluetooth wireless connections, refer to the in-
struction manual for the phone.
Pairing from this unit
1 Press the home button to switch to the
home display.
2 Touch the Bluetooth key to open the
Bluetooth connection menu.
3 Touch Connection to select a device.
4 Start to search.
Starting to search.
While searching, is displayed and when avail-
able devices are found, the device names or
Bluetooth device addresses (if names cannot be
obtained) are displayed.
# If you want to switch between the device names
and Bluetooth device addresses, touch the icon.
Switching between the device
names and Bluetooth device ad-
dresses.
# To cancel searching, touch Stop.
# If three devices are already paired, Memory Full
is displayed and pairing cannot be performed. In
such cases, delete a paired device first. Refer to
page 45.
# If no device can be found, Not Found is dis-
played. In such cases, check the status of the
Bluetooth device and search again.
5 Touch a device name to select the device
you want to connect to.
While connecting, Pairing is displayed. If the
connection is established, Paired is displayed.
# If your device support SSP (Secure Simple Pair-
ing), six-digit number appears on the display of this
unit. Once the connection is established, this num-
ber disappears.
# If the connection fails, Error is displayed. In such
cases, try again from the beginning.
# The PIN code is set to 0000 as the default, but
can be changed. Refer to Entering PIN code for
Bluetooth wireless connection on page 46.
# Once the connection is established, the device
name is displayed.
Touch the device name to disconnect.
# If you want to delete a paired Bluetooth tele-
phone, display Delete OK?. Touch Yes to delete the
device.
Deleting a paired device.
# Never turn the unit off while the paired Bluetooth
telephone is being deleted.
English
Favorite menu
45
Section
Bluetooth connection menu
En
22
23
<CRD4844-A>45
Black plate (46,1)
Connecting to a Bluetooth
device automatically
If this function is set to on, a connection be-
tween your Bluetooth device and this unit will
take place automatically as soon as the two devi-
ces are less than a few meters apart.
Initially, this function is set to on.
1 Press the home button to switch to the
home display.
2 Touch the Bluetooth key to open the
Bluetooth connection menu.
3 Touch Auto Connect to turn automatic
connection on.
If your Bluetooth device is ready for a Bluetooth
wireless connection, a connection to this unit
will automatically be established.
# To turn automatic connection off, touch
Auto Connect again.
If connection fails, “Auto connection failed.
Retry?” appears. Touch Yes to reconnect.
4 Once you turn your vehicle’s ACC switch
on again, a connection is established auto-
matically.
Switching visible unit
This function sets whether or not to make this
unit visible to the other device.
Initially, this function is set to on.
1 Press the home button to switch to the
home display.
2 Touch the Bluetooth key to open the
Bluetooth connection menu.
3 Touch Visibility to select visibility off.
# To turn visibility on, touch Visibility again.
Entering PIN code for Bluetooth
wireless connection
To connect your Bluetooth device to this unit via
Bluetooth wireless technology, you need to enter
a PIN code on your Bluetooth device to verify the
connection. The default code is 0000, but you
can change it with this function.
1 Press the home button to switch to the
home display.
2 Touch the Bluetooth key to open the
Bluetooth connection menu.
3 Touch PIN Code Input to select
PIN Code Input.
4 Touch 0 to 9 to input pin code.
5 After inputting PIN code (up to 8 digits),
store in this unit.
Storing the PIN code in this unit.
Displaying Bluetooth Device
address
This unit displays its Bluetooth device address.
1 Press the home button to switch to the
home display.
2 Touch the Bluetooth key to open the
Bluetooth connection menu.
3 Touch Device Information to display de-
vice information.
The Bluetooth device address is displayed.
Selecting the illumination color
This unit is equipped with multiple-color illumi-
nation.
Direct selection from preset
illumination colors
You can select an illumination color from the
color list.
1 Press the home button to switch to the
home display.
2 Touch the theme key to open the theme
settings.
3 Touch Illumination and then touch a color
on the list.
Red—Amber—Green—Blue—White—
Custom—Rainbow
# When Rainbow is selected, the illumination
color automatically changes.
Customizing the illumination color
1 Press the home button to switch to the
home display.
2 Touch the theme key to open the theme
settings.
3 Touch Illumination and then touch
Custom.
4 Display the customizing menu.
Displaying the customizing
menu.
5 Touch the color bar to customize the
color.
6 Touch c or d to fine-tune the color.
7 Touch and hold the icon to store the cus-
tomized color in the memory.
Memo
Storing the customized color in
the memory.
The customized color has been stored in the
memory.
The set color will be recalled from the memory
the next time you touch the same icon.
Selecting the OSD (on-screen
display) color
The OSD color can be changed.
1 Press the home button to switch to the
home display.
2 Touch the theme key to open the theme
settings.
3 Touch Screen.
4 Touch one of the colors on the list.
Selecting the background
display
You can switch the background that is displayed
when listening to a source.
1 Press the home button to switch to the
home display.
2 Touch the theme key to open the theme
settings.
3 Touch Background.
Bluetooth connection menu
46
Section
Theme menu
En
23
24
<CRD4844-A>46

Black plate (47,1)
4 Touch the desired setting.
# You can view the hidden settings by flicking the
display.
# If no JPEG images are stored in this unit, you
cannot select photo. To store a JPEG image to this
unit, refer to Capture an image in JPEG files on page
28.
# If you want to delete the captured JPEG image,
touch and hold the key of the JPEG image.
Adjusting the response
positions of the touch panels
(Touch Panel Calibration)
If you feel that the touch panel keys on the
screen deviate from the actual positions that re-
spond to your touch, adjust the response posi-
tions of the touch panel. There are two
adjustment methods: four-point adjustment, in
which you touch four corners of the screen; and
16-point adjustment, in which you make fine-ad-
justments on the entire screen.
! Park your car in a safe place and use this
function. Do not operate it while driving.
! Touch the screen gently for adjustment.
Forcefully pressing the touch panel may
damage the touch panel. Do not use a sharp
pointed tool such as a ballpoint pen or me-
chanical pen. Doing so may damage the
screen.
! If the touch panel cannot be adjusted prop-
erly, consult your local Pioneer dealer.
1 Turn the source off.
Refer to Turning the source ON/OFF on page 8.
2 Press and hold the home button to start
Touch Panel Calibration.
The four-point touch panel adjustment screen
appears. When two-point appears at once,
touch both.
3 Touch each of the arrows on the four cor-
ners of the screen.
# To cancel the adjustment, press and hold the
home button.
4 Press the home button to complete four-
point adjustment.
Data for the adjusted position is saved.
# Do not turn off the engine while the data is being
saved.
5 Press the home button to proceed to 16-
point adjustment.
The 16-point touch panel adjustment screen ap-
pears.
# To cancel the adjustment, press and hold the
home button.
6 Gently touch the center of the + mark dis-
played on the screen.
After you touch all the marks, the data for the
adjusted position is saved.
# Do not turn off the engine while the data is being
saved.
7 Press and hold the home button to com-
plete the adjustment.
Using an AUX source
An auxiliary device or portable device sold sepa-
rately can be connected to this unit.
About AUX connection methods
You can connect auxiliary devices to this unit.
Mini pin plug cable (AUX)
When connecting an auxiliary device using a
mini plug cable
iPods and portable audio/video players can be
connected to this unit via mini plug cable.
! If an iPod with video capabilities is con-
nected to this unit via 3.5 mm plug (four
pole) cable (such as the CD-V150M), you can
enjoy the video contents of the connected
iPod.
! A portable audio/video player can be con-
nected by using a 3.5mm plug (four pole)
with an RCA cable (sold separately). How-
ever, depending on the cable, a reverse con-
nection between the red (right side audio)
cable and yellow (video) cable may be re-
quired in order for the sound and video
image to be reproduced correctly.
English
Theme menu
47
Section
Other functions
En
24
25
<CRD4844-A>47
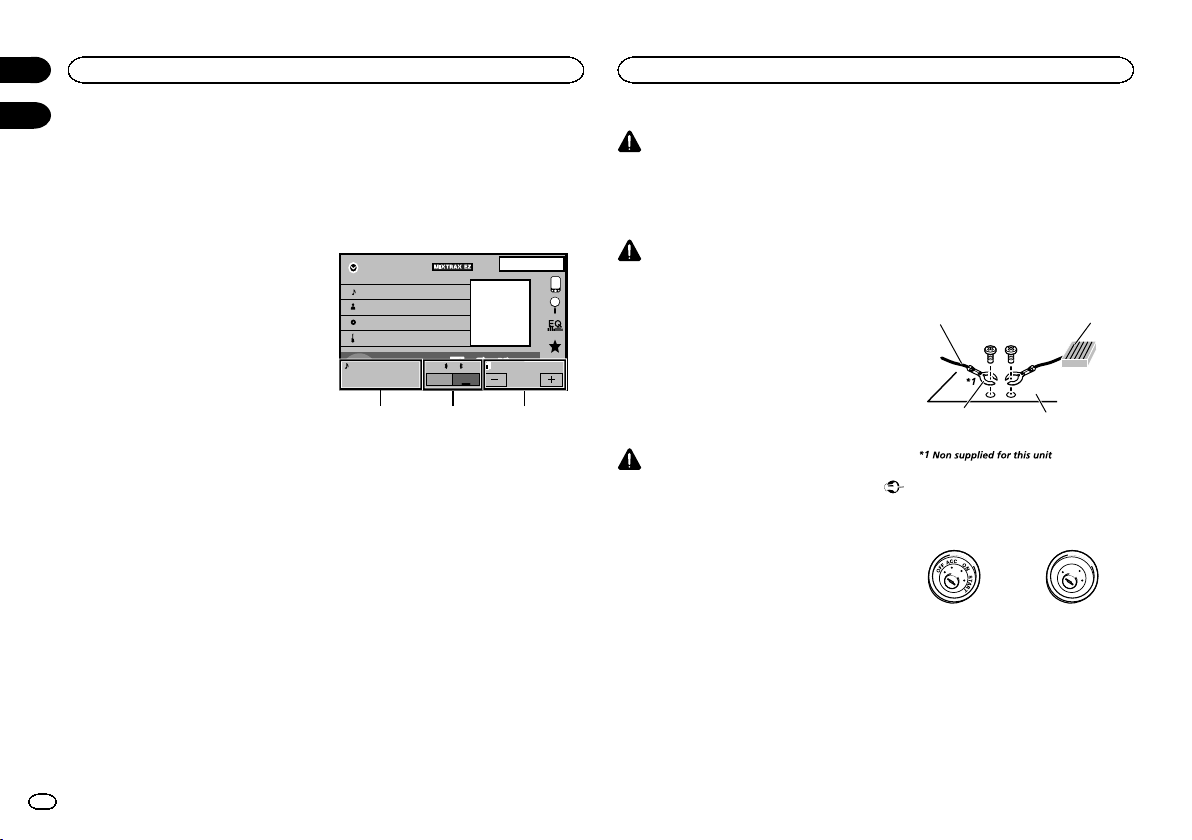
Black plate (48,1)
% Insert the stereo mini plug into the AUX
input jack on this unit.
Refer to Connecting the power cord on page 50.
Resetting the microprocessor
By pressing RESET, you can reset the microproc-
essor to its initial settings without changing the
bookmark information.
The microprocessor must be reset in the follow-
ing situations:
! Before using this unit for the first time after
installation
! If the unit fails to operate properly
! When strange or incorrect messages appear
on the display
1 Turn the ignition switch OFF.
2 Press RESET with a pen tip or other
pointed instrument.
Refer to What’s what on page 7.
Note
Switch your engine ON or set the ignition switch
to ACC ON before pressing RESET in the follow-
ing situations:
! After completing connections
! When erasing all stored settings
! When resetting the unit to its initial (factory) set-
tings
Operating the sound mixer
You can listen to audio from the unit and your
iPhone or smartphone simultaneously. The
main sound is from the unit. The sub sound is
from the iPhone or smartphone. You can control
the volume of the sub sound on the screen.
1 Connect your iPhone or smartphone to
the unit with the RGB input.
Refer to When connecting with optional CD-IV203
cable on page 52.
Refer to When connecting with optional CD-
IU201S cable on page 53.
Refer to Optional Smartphone link adaptor (CD-
ML100) connection on page 53.
2 Press +/– (VOLUME/VOL) to display the
sound mixer control bar.
The sound mixer screen appears.
iPod
Appr
ppr
App
pp
App
1JAN
PM
12:43
Abcdefghi
1/9
Abcdefghi
Abcdefghi
Abcdefghi
01'17'' -05'29''
S.Rtrv
All
All
All
x
1
2
iPod
Vol.12
Mix
ON
OFF
Vol.12
App Sound
1
23
1 Source sound – Press +/– (VOLUME/VOL)to
adjust the volume of the main sound. The
main sound volume level is displayed on the
Source sound screen.
2 Mix – Touch ON or OFF to switch the sound
mixer on or off. The sub sound is mute when
Mix is OFF.
Set to ON when you wish to output sound for
AppRadio Mode, such as the navigation
sound, from the unit.
Set to OFF when you wish to output sound for
AppRadio Mode, such as music, as the
main sound.
3 App Sound – Touch + or – on the screen to
adjust the sub sound volume. The sub sound
volume level is displayed on the App Sound
screen.
Notes
! You cannot adjust the volume of the main
sound on the screen.
! The sound mixer control bar is displayed for
four seconds. If the screen disappears, press
+/– (VOLUME/VOL) again. The screen reap-
pears.
WARNING
In some countries or states the viewing of im-
ages on a display inside a vehicle even by per-
sons other than the driver may be illegal. Where
such regulations apply, they must be obeyed
and this unit’s DVD features should not be used.
CAUTION
! Do not drill a hole into the engine compart-
ment to connect the yellow cable of the dis-
play unit to the vehicle battery. Engine
vibration may eventually cause the insulation
to fail at the point where the wire passes
from the passenger compartment into the
engine compartment. Take extra care in se-
curing the wire at this point.
! Make sure that cables will not interfere with
moving parts of the vehicle, such as the shift
lever, parking brake or seat sliding mecha-
nism.
WARNING
! Use speakers over 50 W (output value) and
between 4 W to 8 W (impedance value). Do
not use 1 W to 3 W speakers for this unit.
! The black cable is ground. When installing
this unit or power amp (sold separately),
make sure to connect the ground wire first.
Make sure that the ground cable is properly
connected to metal parts of the car body
using a spade terminal sold commercially.
The ground wire of the power amp and the
one of this unit or any other device must be
connected to the car separately with different
screws. If the screw for the ground wire loos-
ens or falls out, it could result in fire, genera-
tion of smoke or malfunction.
Ground wire
Metal parts of car’s body
POWER AMP
Other devices
(Another electronic
device in the car)
Important
! This unit cannot be installed in a vehicle
without ACC (accessory) position on the igni-
tion switch.
O
N
S
T
A
R
T
O
F
F
ACC position No ACC position
! Use this unit with a 12-volt battery and nega-
tive grounding only. Failure to do so may re-
sult in a fire or malfunction.
! To prevent a short-circuit, overheating or mal-
function, be sure to follow the directions
below.
— Disconnect the negative terminal of the bat-
tery before installation.
Other functions
48
Section
Connection
En
25
26
<CRD4844-A>48

Black plate (49,1)
— Secure the wiring with cable clamps or adhe-
sive tape. Wrap adhesive tape around wiring
that comes into contact with metal parts to
protect the wiring.
— Place all cables away from moving parts,
such as the shift lever and seat rails.
— Place all cables away from hot places, such
as near the heater outlet.
— Do not connect the yellow cable to the battery
by passing it through the hole to the engine
compartment.
— Cover any disconnected cable connectors
with insulating tape.
— Do not shorten any cables.
— Never cut the insulation of the power cable of
this unit in order to share the power with
other devices. The current capacity of the
cable is limited.
— Use a fuse of the rating prescribed.
— Never wire the negative speaker cable directly
to ground.
— Never band together negative cables of multi-
ple speakers.
! When this unit is on, control signals are sent
through the blue/white cable. Connect this
cable to the system remote control of an ex-
ternal power amp or the vehicle’s auto-anten-
na relay control terminal (max. 300 mA
12 V DC). If the vehicle is equipped with a
glass antenna, connect it to the antenna
booster power supply terminal.
! Never connect the blue/white cable to the
power terminal of an external power amp.
Also, never connect it to the power terminal
of the auto antenna. Doing so may result in
battery drain or a malfunction.
English
Connection
49
Section
Connection
En
26
<CRD4844-A>49
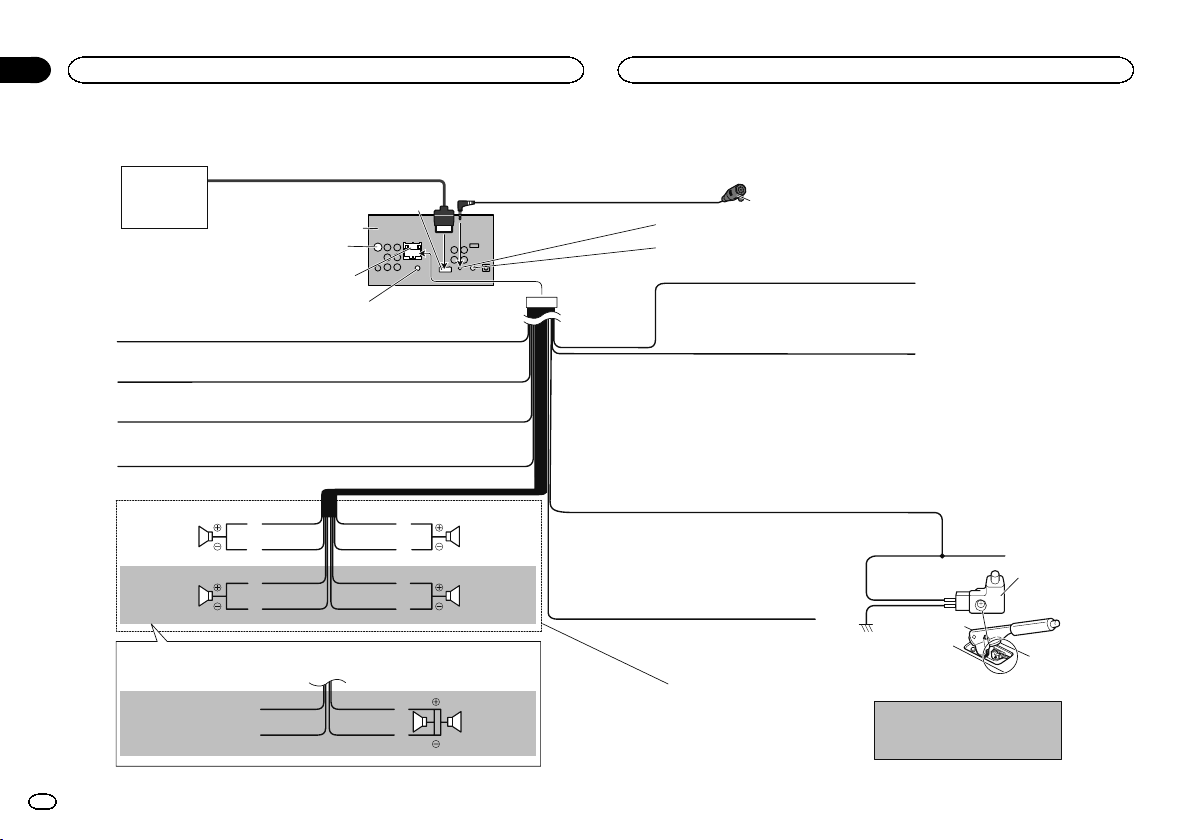
Black plate (50,1)
Connecting the power cord
Yellow/black
If you use an equipment with Mute function, wire this lead to
the Audio Mute lead on that equipment. If not, keep the Audio
Mute lead free of any connections.
Light green
Used to detect the ON/OFF status of the parking
brake. This lead must be connected to the power
supply side of the parking brake switch.
Blue/white
Connect to system control terminal of the power amp or
auto-antenna relay control terminal (max. 300 mA 12 V DC).
Ground side
Power supply side
Parking brake
switch
Yellow
Connect to the constant 12 V supply terminal.
Red
Connect to terminal controlled by ignition switch (12 V DC).
Black (chassis ground)
Connect to a clean, paint-free metal location.
Left Right
Front speaker Front speaker
Rear speaker or
Subwoofer (4 Ω)
White Gray
Gray/blackWhite/black
Green Violet
Green/black Violet/black
With a 2 speaker system, do not connect anything to the speaker leads
that are not connected to speakers.
Note:
· Change the initial setting of this unit. The
subwoofer output of this unit is monaural.
Violet
Violet/black
Not used.
Green
Green/black
When using a subwoofer of 70 W (2 Ω), be sure to connect with Violet and Violet/black leads of this unit.
Do not connect anything to Green and Green/black leads.
Subwoofer (4 Ω)
× 2
Rear speaker or
Subwoofer (4 Ω)
Fuse (10 A)
Violet/white
Of the two lead wires connected to the back lamp, connect the one
in which the voltage changes when the gear shift is in the
REVERSE (R) position. This connection enables the unit to
sense whether the car is moving forwards or backwards.
Orange/white
Connect to lighting switch terminal.
Microphone
(Function of AVH-X5600BHS/AVH-X4600BT/AVH-X3600BHS/AVH-X2600BT)
4 m (13 ft. 1 in.)
Microphone input
(Function of AVH-X5600BHS/AVH-X4600BT/AVH-X3600BHS/AVH-X2600BT)
This product
Antenna input
AUX jack (3.5 ø)
Use a mini plug cable to connect with auxiliary
device.
RGB input
Pioneer Add-on
Navigation system
(sold separately)
Please contact your dealer to
inquire about the connectable
navigation unit.
Insert the 26 pin cable in the direction
indicated in the figure.
26 pin cable (Supplied with navigation unit)
Wired remote input
Hard-wired remote control adapter can be connected
(sold separately).
Connection
50
Section
Connection
En
26
<CRD4844-A>50
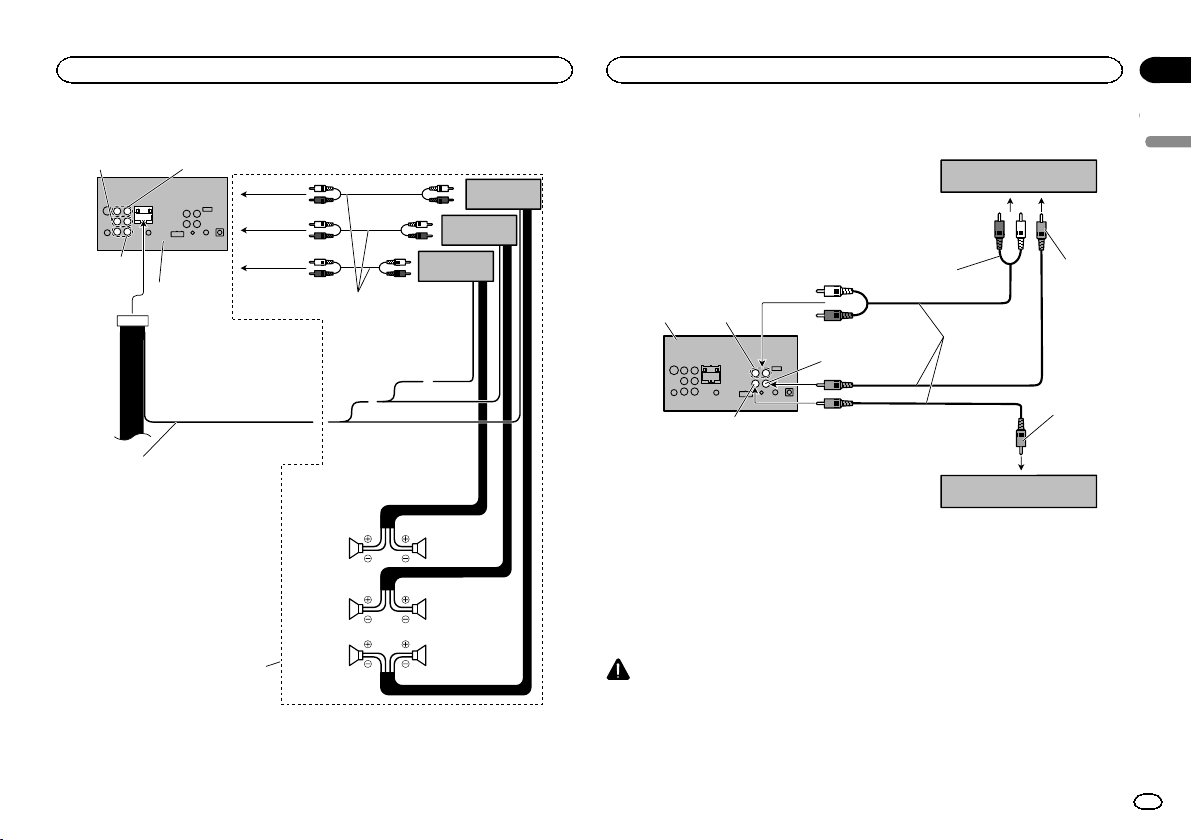
Black plate (51,1)
When connecting to separately sold power amp
Connect with RCA cables
(sold separately)
Rear speaker
Perform these connections when
using the optional amplifier.
System remote control
Front speaker Front speaker
Left Right
Rear speaker
Power amp
(sold separately)
Power amp
(sold separately)
Power amp
(sold separately)
Subwoofer
Subwoofer
To front output
To rear output
To subwoofer
output
Blue/white
Connect to system control terminal of the
power amp or auto-antenna relay control
terminal (max. 300 mA 12 V DC).
This product
Rear output
Front output
Subwoofer
output
When connecting the external video component and the display
External video component
(sold separately)
Audio inputs
(R IN, L IN)
Display with RCA input
jacks (sold separately)
To video
input
To video
output
To audio outputs
T
his product
RCA cables
(sold separately)
Rear monitor output
(V OUT)
Video input (V IN)
! It is necessary to change AV Input in the
system menu when connecting the external
video component.
Refer to Setting AV input on page 40.
This product’s rear video output is for connec-
tion of a display to enable passengers in the rear
seats to watch the DVD, etc.
WARNING
Never install a rear display in a location that is
visible to the driver while the vehicle is in mo-
tion.
English
Connection
51
Section
Connection
En
26
<CRD4844-A>51
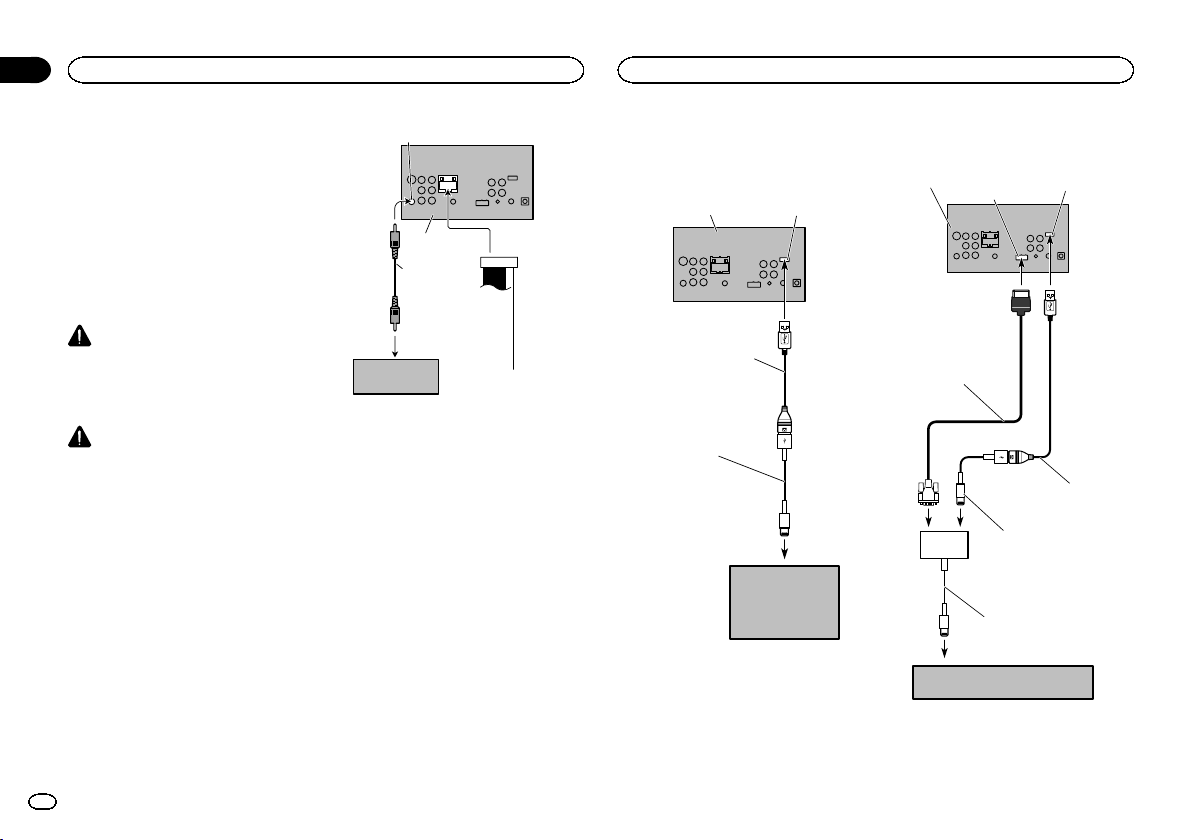
Black plate (52,1)
When connecting with a rear
view camera
If you switch the shift lever to REVERSE (R), the
display on this unit will automatically switch to
the rear view image. You need to set the
Camera Polarity properly in the system unit to
use. For details on settings, refer to Setting the
rear view camera (back up camera) on page 43.
You can also switch to the rear view image by
pressing the touch panel key. For details, refer to
Using the rear view on page 10.
WARNING
USE INPUT ONLY FOR REVERSE OR MIR-
ROR IMAGE REAR VIEW CAMERA. OTHER
USE MAY RESULT IN INJURY OR DAM-
AGE.
CAUTION
! You must use a camera which outputs
mirror reversed images.
! The screen image may appear reversed.
! The rear view camera function is to be used
as an aid to keep an eye on trailers, or while
backing up. Do not use for entertainment
purposes.
! Objects in the rear view may appear closer or
more distant than they actually are.
To video output
Rear view camera
(sold separately)
Rear view camera input (R.C IN)
Violet/white
Of the two lead wires
connected to the back lamp,
connect the one in which the
voltage changes when the
gear shift is in the REVERSE
(R) position. This connection
enables the unit to
sense whether the car is
moving forwards or
backwards.
This product
RCA cable
(sold separately)
iPod with lightning connector
When connecting with optional
CD-IU52 cable
iPod with lightning
connector
(sold separately)
USB cable
(Supplied with this unit)
Connect to separately sold
USB device.
Lightning to USB Cable
(CD-IU52) (sold separately)
This product
USB/iPod input
When connecting with optional
CD-IV203 cable
RGB input
iPod with lightning connector
(sold separately)
Lightning to VGA Adapter
(Apple Inc. products)
(sold separately)
USB/iPod input
This product
USB cable
(Supplied with this unit)
Connect to separately sold
USB device.
RGB to VGA Cable
(CD-IV203) (sold separately)
Lightning to USB Cable
(CD-IV203) (sold separately)
Connection
52
Section
Connection
En
26
<CRD4844-A>52
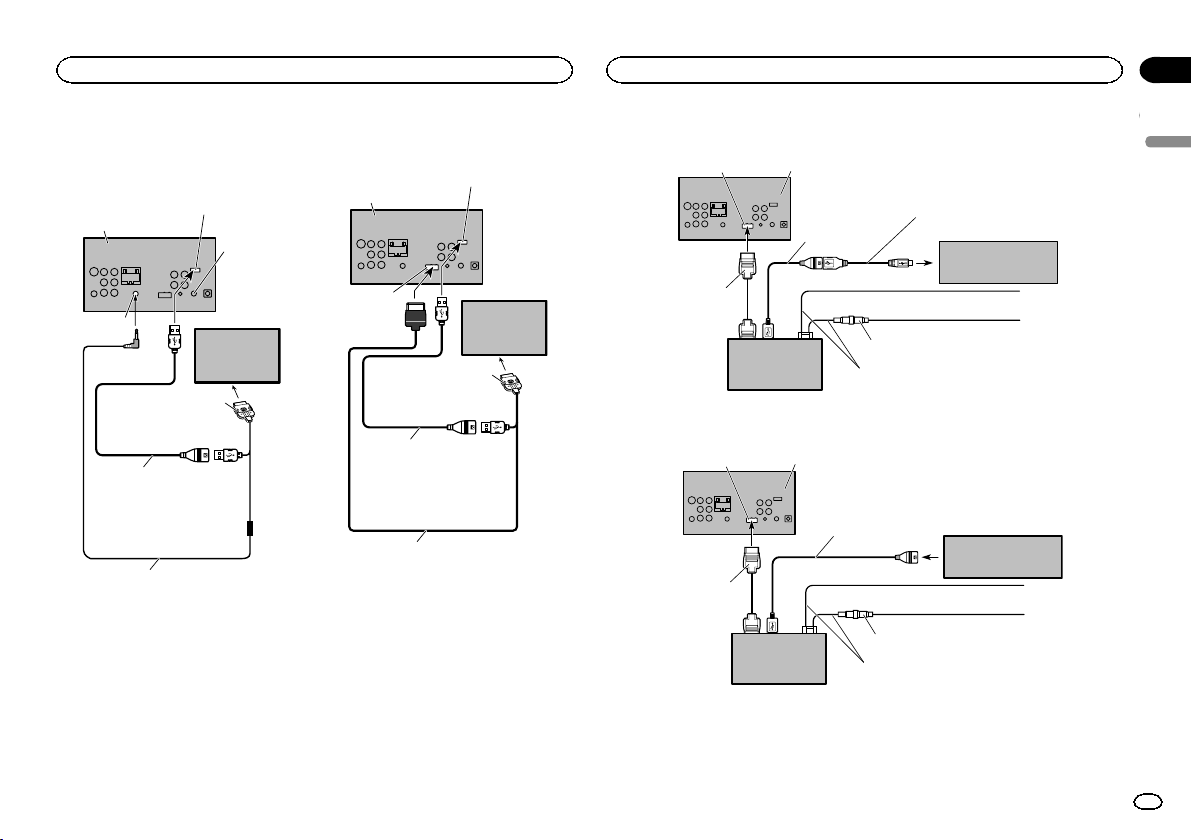
Black plate (53,1)
iPod with 30-pin connector
When connecting with optional
CD-IU201V cable
This product
Interface cable
(CD-IU201V) (sold separately)
AUX input
(AUX)
1.5 m (4 ft. 11 in.)
Dock connector
USB cable
(Supplied with this unit)
Connect to separately sold
USB device.
USB/iPod input
iPod with video
capabilities
(sold separately)
This is wired
remote
input.
Please note
that this is
not AUX
input.
When connecting with optional
CD-IU201S cable
This product
1.5 m (4 ft. 11 in.)
Dock connector
USB cable
(Supplied with this unit)
Connect to separately sold
USB device.
USB/iPod input
iPod with video
capabilities
(sold separately)
RGB input
Interface cable
(CD-IU201S) (sold separately)
Optional Smartphone link adaptor (CD-ML100) connection
RGB input
Smartphone with micro
USB connector (sold
separately)
This product
Black (ground)
To vehicle (metal) body
Yellow
To electric terminal controlled by
ignition switch (12 V DC) ON/OFF
Fuse (2 A)
Smartphone link
adaptor
(CD-ML100) (sold
separately)
Interface cable
(Supplied with
Smartphone
link adaptor)
USB - micro USB cable (Type USB A
- micro USB B) (Supplied with
Smartphone link adaptor)
USB cable (Supplied
with Smartphone
link adaptor)
Power cord (Supplied with Smartphone link
adaptor)
Connection for updating Smartphone link adaptor firmware
Even if music and/or image files are saved on the USB storage device, they cannot be played back.
RGB input
This product
Black (ground)
To vehicle (metal) body
Yellow
To electric terminal controlled by
ignition switch (12 V DC) ON/OFF
Fuse (2 A)
Smartphone link
adaptor
(CD-ML100) (sold
separately)
Interface cable
(Supplied with
Smartphone
link adaptor)
USB cable (Supplied with
Smartphone link adaptor)
Power cord (Supplied with Smartphone link
adaptor)
USB storage device
(sold separately)
English
Connection
53
Section
Connection
En
26
<CRD4844-A>53
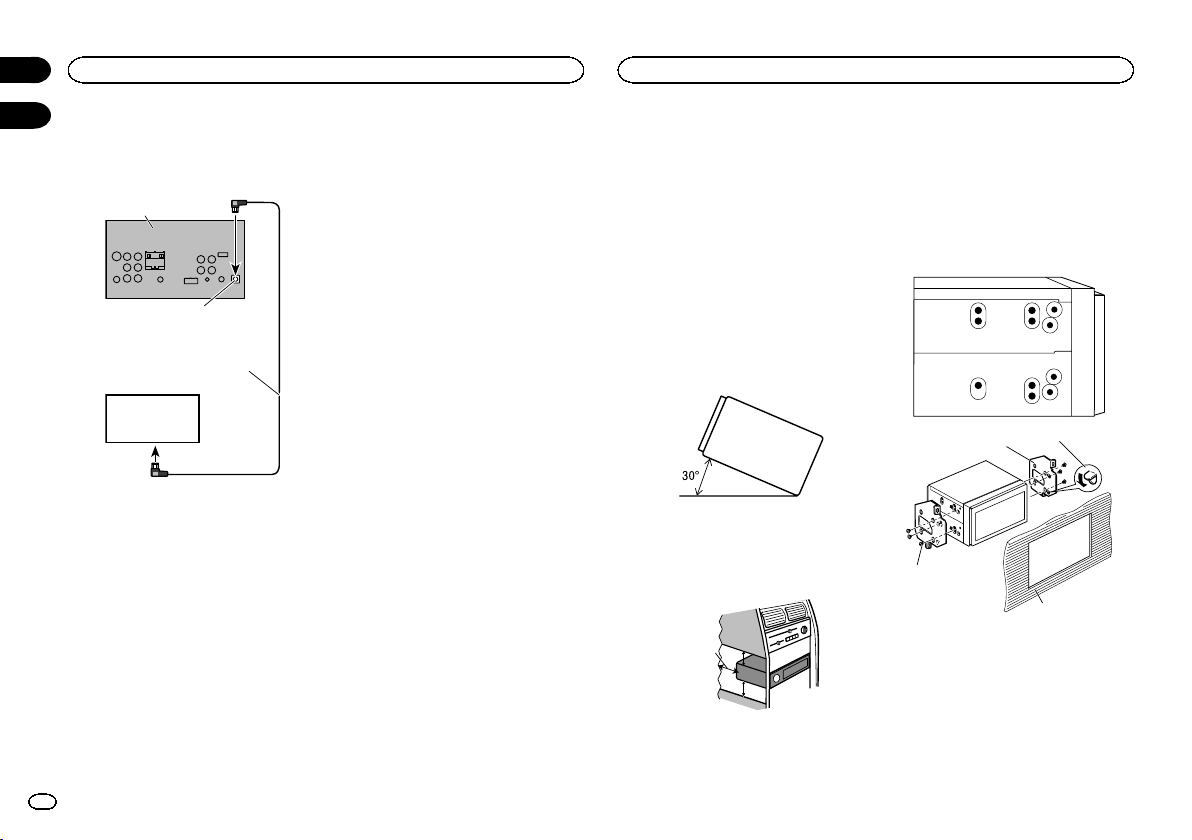
Black plate (54,1)
Optional SiriusXM Tuner
connection
(Function of AVH-X5600BHS/AVH-X3600BHS)
SiriusXM tuner
(sold separately)
T
his product
SiriusXM BUS cable
(Supplied with SiriusXM tuner)
SiriusXM BUS input
! A maximum of 500 mA can be supplied from
the unit to the SiriusXM tuner.
Notes
! Check all connections and systems before
final installation.
! Do not use unauthorized parts as this may
cause malfunctions.
! Consult your dealer if installation requires
drilling of holes or other modifications to the
vehicle.
! Do not install this unit where:
— it may interfere with operation of the vehicle.
— it may cause injury to a passenger as a result
of a sudden stop.
! The semiconductor laser will be damaged if
it overheats. Install this unit away from hot
places such as near the heater outlet.
! Optimum performance is obtained when the
unit is installed at an angle of less than 30°.
! When installing, to ensure proper heat dis-
persal when using this unit, make sure you
leave ample space behind the rear panel and
wrap any loose cables so they are not block-
ing the vents.
5cmcm
Leave ample
space
5 cm
5 cm
! To some types of vehicles, this unit cannot be
properly installed. In such case, use the op-
tional installation kit (ADT-VA133).
Installation using the screw
holes on the side of the unit
% Fastening the unit to the factory radio-
mounting bracket.
Position the unit so that its screw holes are
aligned with the screw holes of the bracket, and
tighten the screws at three locations on each
side.
1
2
3
4
1 If the pawl gets in the way, bend it down.
2 Factory radio mounting bracket
3 Use either truss (5mm × 8 mm) or flush sur-
face (5 mm × 9 mm) screws, depending on
the kind of screws that the mounting bracket
screw holes will accept.
4 Dashboard or console
Connection
54
Section
Installation
En
26
27
<CRD4844-A>54
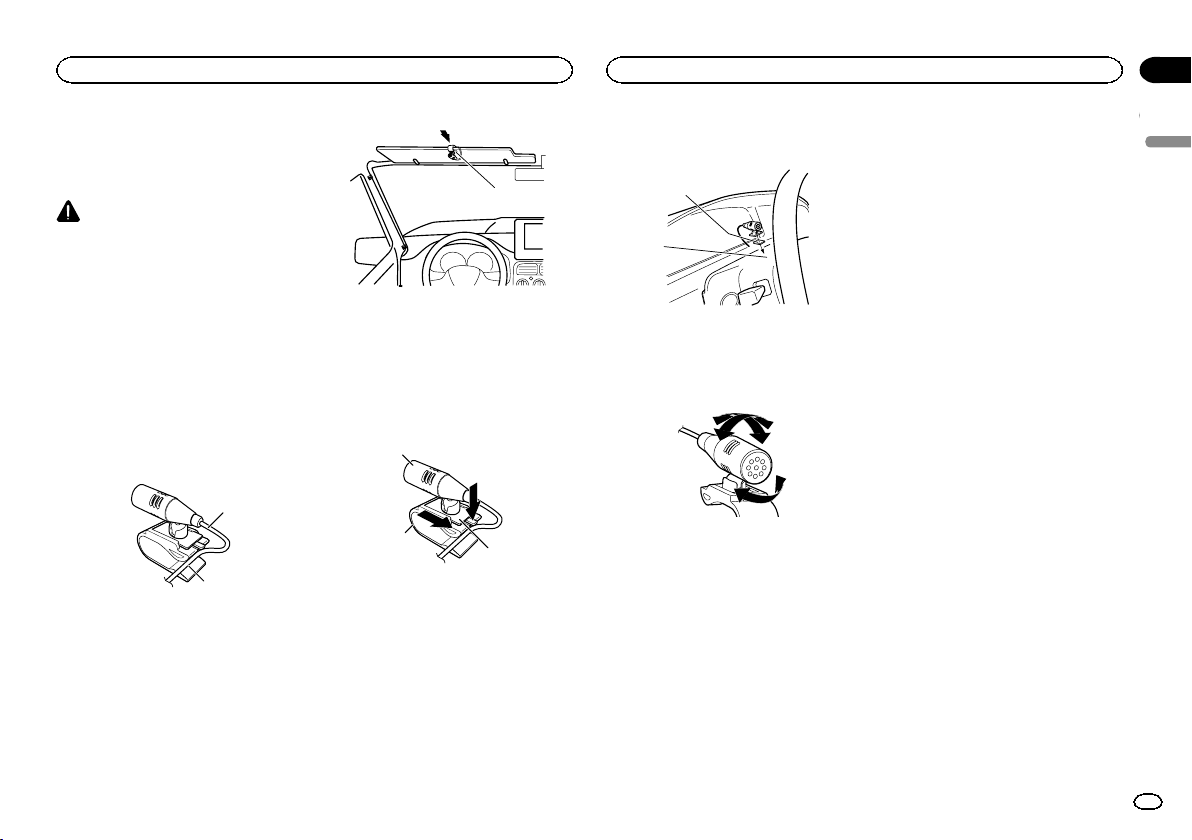
Black plate (55,1)
Installing the microphone
(Function of AVH-X5600BHS/AVH-X4600BT/AVH-
X3600BHS/AVH-X2600BT)
CAUTION
It is extremely dangerous to allow the micro-
phone lead to become wound around the steer-
ing column or shift lever. Be sure to install the
unit in such a way that it will not obstruct driv-
ing.
Notes
! Install the microphone in a position and ori-
entation that will enable it to pick up the
voice of the person operating the system.
! Use separately sold clamps to secure the
lead where necessary inside the vehicle.
When installing the microphone
on the sun visor
1 Fit the microphone lead into the groove.
1
2
1 Microphone lead
2 Groove
2 Install the microphone clip on the sun
visor.
With the sun visor up, install the microphone
clip. (Lowering the sun visor reduces the voice
recognition rate.)
1
1 Microphone clip
When installing the microphone
on the steering column
1 Detach the microphone base from the mi-
crophone clip.
To detach the microphone base from the micro-
phone clip, slide the microphone base.
1
2
3
1 Microphone
2 Microphone clip
3 Microphone base
2 Install the microphone on the steering
column.
1
2
1 Double-sided tape
2 Install the microphone on the rear side of the
steering column.
Adjusting the microphone angle
English
Installation
55
Section
Installation
En
27
<CRD4844-A>55
Black plate (56,1)
Troubleshooting
Symptoms are written in bold and causes in reg-
ular, non-indented text. Regular, indented text is
used to indicate actions to be taken.
Common
The power will not turn on.
The unit will not operate.
Leads and connectors are incorrectly connected.
Confirm once more that all connections are
correct.
The fuse is blown.
Rectify the cause and then replace the fuse. Be
sure to install a fuse with the same rating.
Noise and/or other factors are causing the built-in
microprocessor to operate incorrectly.
Press RESET. (Page 48)
Operation with the remote control is not possi-
ble.
The unit does not operate correctly even when
the appropriate remote control buttons are
pressed.
Battery power is low.
Load a new battery.
Some operations are prohibited with certain discs.
Try operating with another disc.
Playback is not possible.
The disc is dirty.
Clean the disc.
The type of disc loaded cannot be played on this
unit.
Check the disc type.
The disc loaded is not compatible with this video sys-
tem.
Change the disc to one that is compatible with
your video system.
There is no sound.
The volume level will not rise.
Cables are not connected correctly.
Connect the cables correctly.
The unit is performing still, slow motion or frame-by-
frame playback.
There is no sound during still, slow motion or
frame-by-frame playback.
There is no image displayed.
The parking brake cable is not connected.
Connect the parking brake cable, and apply the
parking brake.
The parking brake is not applied.
Connect the parking brake cable, and apply the
parking brake.
The
icon is displayed, and operation is not
possible.
The operation is prohibited for the disc.
This operation is not possible.
The operation is not compatible with the configura-
tion of the disc.
This operation is not possible.
The image displayed stops (pauses) and the unit
cannot be operated.
The data could no longer be read during playback.
Stop playback once, and start playback again.
There is no sound.
The volume level is low.
The volume level is low.
Adjust the volume level.
The attenuator is on.
Turn the attenuator off.
The sound and video skip.
The unit is not firmly secured.
Firmly secure the unit.
File size and transmission rate are above recom-
mended rates.
Create a DivX file that is within the
recommended size and transmission rate.
The aspect ratio is incorrect and the image is
stretched.
The aspect ratio setting is incorrect for the display.
Select the appropriate setting for your display.
(Page 38)
The motor sounds when the ignition switch is
turned ON (or is turned to ACC).
The unit is confirming whether or not a disc is
loaded.
This is a normal operation.
Nothing is displayed.
The touch panel keys cannot be used.
The rear view camera is not connected.
Connect a rear view camera.
Camera Polarity is at incorrect setting.
Press the home button to return to the source
display and then select the correct setting for
Camera Polarity. (Page 43)
No xxxx appears when a display is changed
(No Title, for example).
There is no embedded text information.
Switch the display or play another track/file.
Subfolders cannot be played back.
Folder repeat play has been selected.
Select the repeat range again.
The repeat range changes automatically.
Another folder was selected during repeat play.
Select the repeat range again.
Track search or fast forward/reverse was performed
during file repeat play.
Select the repeat range again.
DVD
Playback is not possible.
The loaded disc has a different region number from
this unit.
Replace the disc with one featuring the same
region number as this unit.
A parental lock message is displayed and play-
back is not possible.
Parental lock is activated.
Turn parental lock off or change the level. (Page
38)
Parental lock cannot be canceled.
The code number is incorrect.
Enter the correct code number. (Page 38)
You have forgotten your code number.
Press RESET. (Page 48)
Dialog language (and subtitle language) cannot
be switched.
The DVD being played does not feature multiple lan-
guage recordings.
The language cannot be switched if they are not
recorded on the disc.
You can only switch between items indicated in the
disc menu.
Switch the language using the disc menu.
No subtitles are displayed.
The DVD being played does not feature subtitles.
Subtitles are not displayed if they are not
recorded on the disc.
You can only switch between items indicated in the
disc menu.
Switch the language using the disc menu.
Additional information
56
Appendix
Additional information
En
<CRD4844-A>56
Black plate (57,1)
Playback is not performed with the audio
language and subtitle language settings selected
in Video Setup menu.
The DVD being played does not feature dialog or sub-
titles in the selected language.
The language cannot be switched if the selected
language is not recorded on the disc.
The viewing angle cannot be switched.
The DVD being played does not feature scenes shot
from multiple angles.
The viewing angle cannot be switched if the DVD
does not feature scenes recorded from multiple
angles.
You are trying to switch to multi-angle viewing for a
scene that was not recorded from multiple angles.
Switch between multiple angles when watching
scenes recorded from multiple angles.
The image is extremely unclear/distorted and
dark during playback.
Some discs feature a signal to prohibit copying.
Since this unit is compatible with the analog
copy generation management system, when
playing a disc that has a signal prohibiting
copying, horizontal stripes or other imperfections
may appear when viewed on some displays. This
is not a malfunction.
Video CD
The PBC (playback control) menu cannot be
called up.
The Video CD being played does not feature PBC.
This operation is not available for Video CDs that
do not feature PBC.
Repeat play and track/time search are not
possible.
The Video CD being played features PBC.
This operation is not available for Video CDs that
feature PBC.
iPod
The iPod does not operate correctly.
The cables are incorrectly connected.
Disconnect the cable from the iPod. Once the
iPod’s main menu is displayed, reconnect the
iPod and reset it.
The iPod version is old.
Update the iPod version.
Sound from the iPod cannot be heard.
The audio output direction may switch automatically
when the Bluetooth and USB connections are used
at the same time.
Use the iPod to change the audio output
direction.
Bluetooth audio/telephone
The sound from the Bluetooth audio source is
not played back.
There is a call in progress on a Bluetooth connected
cellular phone.
The sound will be played back when the call is
terminated.
A Bluetooth connected cellular phone is currently
being operated.
Do not use the cellular phone at this time.
A call was made with a Bluetooth connected cellular
phone and then immediately terminated. As a result,
communication between this unit and the cellular
phone was not terminated properly.
Reconnect the Bluetooth connection between
this unit and the cellular phone.
Error messages
When you contact your dealer or your nearest
Pioneer Service Center, be sure to note the error
message.
Error messages are written in bold and causes
in regular, non-indented text. Regular, indented
text is used to indicate actions to be taken.
Common
AMP Error
This unit fails to operate or the speaker connection is
incorrect; the protective circuit is activated.
Check the speaker connection. If the message
fails to disappear even after the engine is
switched off/on, contact your dealer or an
authorized Pioneer Service Station for
assistance.
Tuner
No Data Provided
This unit cannot receive artist name/song title infor-
mation.
Move to the desirable location with good
reception.
No Data
This unit cannot receive program service name infor-
mation.
Move to the desirable location with good
reception.
SiriusXM Satellite Radio
Check Antenna
The antenna connection is incorrect.
Check the antenna connection. If the message
fails to disappear even after the engine is
switched off/on, contact your dealer or an
authorized Pioneer Service Station for
assistance.
Check Tuner
The SiriusXM Connect Vehicle Tuner connection is
incorrect or the power failed.
Check the tuner connection and battery voltage.
If the message fails to disappear even after the
engine is switched off/on, contact your dealer or
an authorized Pioneer Service Station for
assistance.
No Signal
The SiriusXM Connect Vehicle Tuner is having diffi-
culty receiving the SiriusXM satellite signal.
! Verify that your vehicle is outdoors with a clear
view of the southern sky.
! Verify that the SiriusXM magnetic mount
antenna is mounted on a metal surface on the
outside the vehicle.
! Move the SiriusXM antenna away from any
obstructions.
Subscription Updated
This unit has detected a change in your SiriusXM
subscription status.
Press any key to clear the message.
Not Available
The channel that you have requested is not a valid
SiriusXM channel.
Check the SiriusXM channel lineup.
English
Additional information
57
Appendix
Additional information
En
<CRD4844-A>57
Black plate (58,1)
Channel Not Subscribed. Call SiriusXM to
Subscribe.
The channel that you have requested is not included
in your SiriusXM subscription package.
Check the content of your SiriusXM subscription
package.
Channel Locked
Locked by the radio Parental Control feature.
Release the channel lock.
DVD
Different Region Disc
The disc does not have the same region number as
this unit.
Replace the DVD with one bearing the correct
region number.
Error-02-XX/FF-FF
The disc is dirty.
Clean the disc.
The disc is scratched.
Replace the disc.
The disc is loaded upside down.
Check that the disc is loaded correctly.
There is an electrical or mechanical error.
Press RESET. (Page 48)
Unplayable Disc
This type of disc cannot be played on this unit.
Replace the disc with one that can be played on
this unit.
The inserted disc does not contain any playable files.
Replace the disc.
Protect
All the files on the inserted disc are embedded with
DRM.
Replace the disc.
Skipped
The inserted disc contains DRM protected files.
Play an audio file not embedded with Windows
Mediaä DRM 9/10.
TEMP
The temperature of the unit is outside the normal op-
erating range.
Wait until the unit returns to a temperature
within the normal operating limits.
This DivX rental has expired.
The inserted disc contains expired DivX VOD con-
tent.
Select a file that can be played.
Video resolution not supported
The inserted disc contains a high definition DivX/
MPEG-1/MPEG-2/MPEG-4 file.
Select a file that can be played.
It is not possible to write it in the flash.
This unit’s flash memory used as the temporary stor-
age area is full.
Select a file that can be played.
Your device is not authorized to play this DivX
protected video.
This unit’s DivX registration code has not been au-
thorized by the DivX VOD contents provider.
Register this unit to the DivX VOD contents
provider.
Unplayable File
This type of file cannot be played on this unit.
Select a file that can be played.
Format Read
Sometimes there is a delay between the start of play-
back and when you start to hear any sound.
Wait until the message disappears and you hear
sound.
Video frame rate not supported
DivX file’s frame rate is more than 30 fps.
Select a file that can be played.
Audio Format not supported
This type of file is not supported on this unit.
Select a file that can be played.
External storage device (USB)
Unplayable File
This type of file cannot be played on this unit.
Select a file that can be played.
There are no songs.
Transfer the audio files to the USB portable audio
player/USB memory and connect.
Security for the connected USB memory is enabled.
Follow the USB memory instructions to disable
security.
Format Read
Sometimes there is a delay between the start of play-
back and when you start to hear any sound.
Wait until the message disappears and you hear
sound.
Skipped
The connected USB portable audio player/USB
memory contains WMA files that are protected by
Windows Mediaä DRM 9/10.
Play an audio file not embedded with Windows
Mediaä DRM 9/10.
Protect
All the files on the connected USB portable audio
player/USB memory are protected by Windows
Media DRM 9/10.
Transfer audio files not protected by Windows
Media DRM 9/10 to the USB portable audio
player/USB memory and connect.
Incompatible USB
The connected USB device is not supported by this
unit.
Connect a USB portable audio player or USB
memory that is USB Mass Storage Class
compliant.
The USB device is not formatted with FAT12, FAT16
or FAT32.
The connected USB device should be formatted
with FAT12, FAT16 or FAT32.
Check USB
The USB connector or USB cable has short-
circuited.
Check that the USB connector or USB cable is
not caught in something or damaged.
The connected USB storage device consumes more
than maximum allowable current.
Disconnect the USB portable audio player/USB
memory and do not use it. Turn the ignition
switch to OFF, then to ACC or ON and then
connect a compliant USB portable audio player/
USB memory.
Error-02-9X/-DX
Communication failed.
Perform one of the following operations.
–Turn the ignition switch OFF and back ON.
–Disconnect the USB portable audio player/USB
memory.
–Change to a different source.
Then, return to the USB portable audio player/
USB memory.
Additional information
58
Appendix
Additional information
En
<CRD4844-A>58
Black plate (59,1)
This DivX rental has expired.
The inserted external storage device contains expired
DivX VOD content.
Select a file that can be played.
Video resolution not supported
The inserted external storage device contains a high
definition DivX/MPEG-1/MPEG-2/MPEG-4 file.
Select a file that can be played.
It is not possible to write it in the flash.
This unit’s flash memory used as the temporary stor-
age area is full.
Select a file that can be played.
Your device is not authorized to play this DivX
protected video.
This unit’s DivX registration code has not been au-
thorized by the DivX VOD contents provider.
Register this unit to the DivX VOD contents
provider.
Format Read
Sometimes there is a delay between the start of play-
back and when you start to hear any sound.
Wait until the message disappears and you hear
sound.
Video frame rate not supported
DivX file’s frame rate is more than 30 fps.
Select a file that can be played.
Audio Format not supported
This type of file is not supported on this unit.
Select a file that can be played.
Creating the Database has failed.
The mode was switched to video or JPEG image dis-
play while the database was being created.
Create the database again. (Page 26)
iPod
Format Read
Sometimes there is a delay between the start of play-
back and when you start to hear any sound.
Wait until the message disappears and you hear
sound.
Error-02-6X/-9X/-DX
Communication failed.
Disconnect the cable from the iPod. Once the
iPod’s main menu is displayed, reconnect the
iPod and reset it.
iPod failure.
Disconnect the cable from the iPod. Once the
iPod’s main menu is displayed, reconnect the
iPod and reset it.
Error-02-67
The iPod firmware version is old.
Update the iPod version.
Stop
There are no songs.
Transfer songs to the iPod.
There are no songs in the current list.
Select a list that contains songs.
Not Found
No related songs.
Transfer songs to the iPod.
iTunes tagging
iPod full. Tags not transferred.
Memory used for tag information on the iPod is full.
Sync the iPod with iTunes and clean up the
tagged playlist.
Memory full. Tags not stored. Connect iPod.
This unit’s flash memory used as the temporary stor-
age area is full.
The tag information on this unit is transferred to
the iPod automatically when an iPod is
connected.
Tag transfer failed. Reconnect your iPod.
This unit’s tag information cannot transfer to the
iPod.
Check the iPod and try again.
Tag store failed.
Tag information cannot be stored in this unit.
Try again.
Error-8D
Built-in FLASH ROM encountered an error.
Turn the ignition OFF or ON.
Already stored
This tag information is already stored in memory.
Tag information can only be saved once for any
given song. Tag information cannot be saved for
the same song more than once.
Bluetooth
Error-10
The power failed for the Bluetooth module of this
unit.
Turn the ignition switch OFF and then to ACC or
ON.
If the error message is still displayed after
performing the above action, please contact your
dealer or an authorized Pioneer Service Station.
Pandora
â
Error-19
Communication failed.
Disconnect the cable from the iPod. Once the
iPod’s main menu is displayed, reconnect the
iPod and reset it.
Start up the Pandora Application from your De-
vice.
The Pandora application has not started running yet.
Start up the Pandora application from your
iPhone.
Unable to save thumb rating. Try again later.
Unable to save thumb rating.
Try again later.
Unable to save Bookmark. Try again later.
Unable to save Bookmark.
Try again later.
Pandora system maintenance. Try again later.
Pandora system is undergoing maintenance.
Try again later.
Skip limit reached.
Skip limit reached.
Do not exceed the skip limit.
This version of the Pandora Application is not
supported.
This version of the Pandora application is not sup-
ported.
Connect an iPhone that has a compatible
version of the Pandora application installed.
Check Device
Device error message displayed in the Pandora appli-
cation.
Please check your iPhone.
English
Additional information
59
Appendix
Additional information
En
<CRD4844-A>59

Black plate (60,1)
Pandora is unable to play music. Please see your
Device.
Unable to play music from Pandora.
Please check your iPhone.
Please create station. Application on Device.
No station found.
Create a station in the Pandora application on
your iPhone.
No Active Station
No station selected.
Select a station.
Communication error occured. Please reconnect
your device.
If there is no ACK after 10 attempted retries at
750 ms, the accessory should assume that commu-
nication is interrupted and disconnect from
PandoraLink.
Please reconnect your iPhone and try again.
Device has not been registered. Go to “Bluetooth
Connection Menu” to register.
No Bluetooth device found.
Follow the instructions that appear on the
screen.
Connection failed. Press “Connect” to retry.
Bluetooth connection failed.
Follow the instructions that appear on the
screen.
Disconnected. Press “Connect” to reconnect the
device.
Bluetooth connection lost.
Follow the instructions that appear on the
screen.
MirrorLink
The application list could not be read out.
Failed to load the application list.
! Disconnect the cable from the smartphone,
and then connect the smartphone again after a
few seconds.
! Turn the ignition switch OFF and then to ACC
or ON.
If the error message is still displayed after
performing the above action, reset the
smartphone.
If the error message is still displayed after
performing the above action, please contact your
dealer or an authorized Pioneer Service Station.
There is no supported application on your Mirror-
Link device.
No supported applications can be found.
! Disconnect the cable from the smartphone,
and then connect the smartphone again after a
few seconds.
! Turn the ignition switch OFF and then to ACC
or ON.
If the error message is still displayed after
performing the above action, reset the
smartphone.
If the error message is still displayed after
performing the above action, please contact your
dealer or an authorized Pioneer Service Station.
Communication error occurred.
There was a communication error.
! Disconnect the cable from the smartphone,
and then connect the smartphone again after a
few seconds.
! Turn the ignition switch OFF and then to ACC
or ON.
If the error message is still displayed after
performing the above action, reset the
smartphone.
If the error message is still displayed after
performing the above action, please contact your
dealer or an authorized Pioneer Service Station.
Launching the application failed.
Failed to launch the application.
! Disconnect the cable from the smartphone,
and then connect the smartphone again after a
few seconds.
! Turn the ignition switch OFF and then to ACC
or ON.
If the error message is still displayed after
performing the above action, reset the
smartphone.
If the error message is still displayed after
performing the above action, please contact your
dealer or an authorized Pioneer Service Station.
USB connection was temporarily disabled for de-
vice protection. Do not connect this USB device
to the unit. To restart USB, restart the unit.
There is an over current error. Do not use this USB
storage device.
Turn the ignition switch OFF and then to ACC or
ON.
If the error message is still displayed after
performing the above action, please contact your
dealer or an authorized Pioneer Service Station.
Understanding auto EQ error
messages
When correct measurement of the car’s interior
acoustic characteristics is not possible using
auto EQ, an error message may appear on the
display. In such cases, refer to the table below to
see what the problem is and how it may be cor-
rected. After checking, try again.
Error messages are written in bold and causes
in regular, non-indented text. Regular, indented
text is used to indicate actions to be taken.
Please connect the microphone for
measurement. When finished, please push
HOME key.
The microphone is not connected.
Plug the optional microphone securely into the
jack.
Error. Please check xxxx speaker.
The microphone cannot pick up the measuring tone
of a speaker.
! Confirm that the speakers are connected
correctly.
! Correct the input level setting of the power
amp connected to the speakers.
! Plug the microphone securely into the jack.
Error. Please check noise.
The surrounding noise level is too high.
! Stop your car in a place that is quiet, and
switch off the engine, air conditioner and heater.
! Set the microphone correctly.
Error. Please check battery.
Power is not being supplied from the battery to this
unit.
! Connect the battery correctly.
! Check the battery voltage.
Additional information
60
Appendix
Additional information
En
<CRD4844-A>60
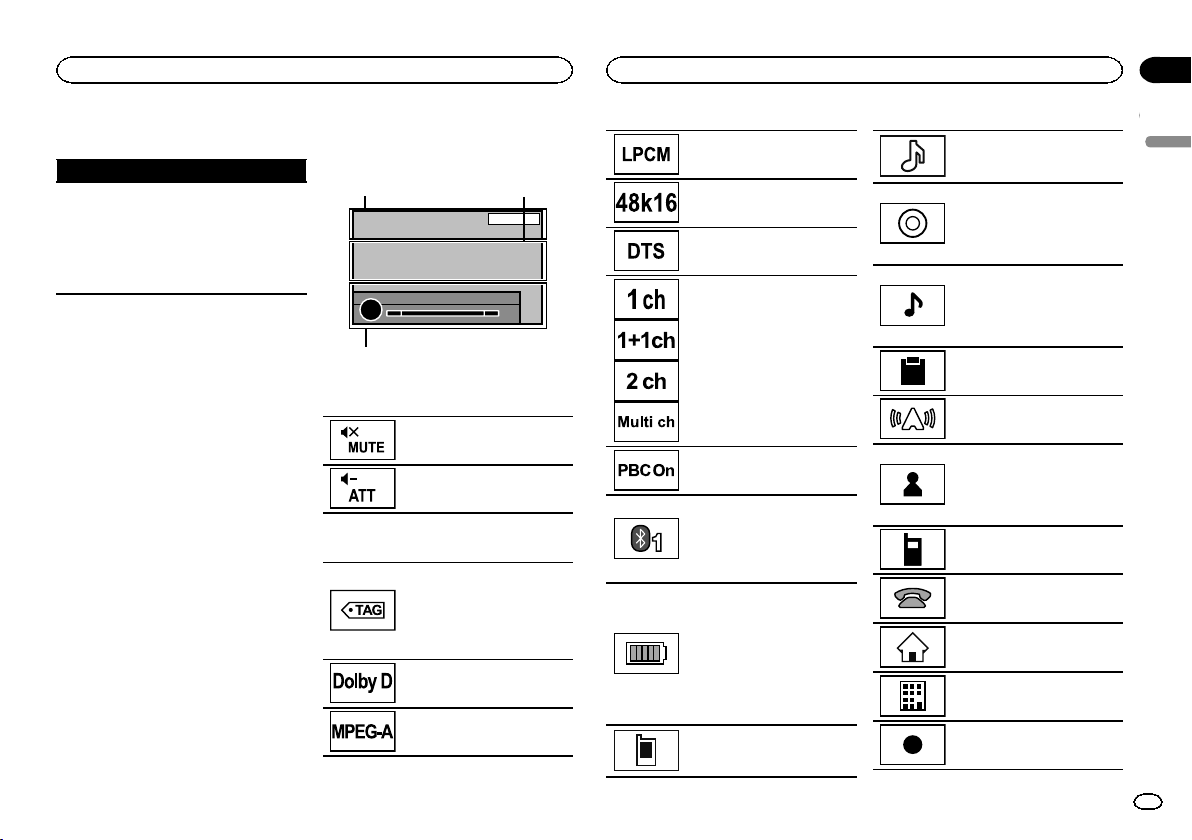
Black plate (61,1)
Understanding messages
Messages Translation
Screen image may
appear reversed.
Pioneer recommends
the use of a camera
which outputs mirror-
reversed images. Oth-
erwise, the screen
image will appear re-
versed.
Indicator list
Area 1 Area 2
Area 3
Area 1
Indicates that the mute function
is on.
Indicates that the sound is atte-
nuated.
Area 2
Shows when downloadable song
information (tag) from a radio sta-
tion is received.
Disabled while song information
(tag) from an HD Radio station is
being saved to this unit.
Indicates that the digital format is
Dolby Digital.
Indicates that the digital format is
MPEG Audio.
Indicates that the digital format is
Linear PCM.
Indicates the sampling fre-
quency.
Indicates that the digital format is
DTS.
Indicates the audio channel.
Indicates that a disc with PBC On
is being played.
! Indicates that a cellular
phone is connected.
! Indicates that an incoming
call has been received and
has not been checked yet.
Indicates the battery strength of
the cellular phone.
! The level shown on the indica-
tor may differ from the actual
battery strength.
! If the battery strength is not
available, nothing is displayed
in the battery strength indica-
tor area.
Indicates that the connected
Bluetooth device only supports
Bluetooth telephone.
Indicates that the connected
Bluetooth device only supports
Bluetooth audio.
Show the album title when receiv-
ing the tag information.
Shows the album title of the song
currently being played for MP3/
WMA/AAC/WAV files.
Shows the song title when receiv-
ing the tag information.
Shows the song title of the song
currently being played for MP3/
WMA/AAC/WAV files.
Shows the comment currently
being played.
Shows the station name currently
tuned in to.
Shows the artist name when re-
ceiving the tag information.
Shows the artist name of the ar-
tist currently being played for
MP3/WMA/AAC/WAV files.
Shows cellular phone informa-
tion.
Shows general phone informa-
tion.
Shows home phone information.
Shows office phone information.
Shows other phone information.
English
Additional information
61
Appendix
Additional information
En
<CRD4844-A>61

Black plate (62,1)
Shows the composer name.
Shows the category name.
Shows the folder name of the
folder containing the MP3/WMA/
AAC file currently being played.
Shows the file name of the MP3/
WMA/AAC file currently being
played.
Shows the preset number of the
station currently being tuned in
to.
Shows the channel currently
being tuned in to.
Shows SiriusXM information.
Shows the title number currently
being played.
Shows the chapter number cur-
rently being played.
Shows the replay time currently
being played.
Shows when the game alert func-
tion is on while receiving
SiriusXM stations.
Shows the genre of the track/
song currently being played.
Area 3
Indicates that the volume is ad-
justed.
Shows when radio signal is re-
ceived.
ANALOG
Shows when analog audio of
HD Radio signal is received.
DIGITAL
Shows when digital audio of
HD Radio signal is received.
Shows when HD Radio station in-
formation is received.
Touch to turn BSM on.
Indicates that Auto EQ is on.
Shows when this unit has the
song information (tag).
Indicates that the unit is currently
processing an operation such as
search.
DB
Shows when creating the data-
base in Music browse mode.
DB
Shows when saving the database
in Music browse mode.
Indicates the signal strength of
the cellular phone.
Indicates that a Bluetooth tele-
phone is connected.
Handling guidelines
Discs and player
Use discs featuring any of the following logos.
Use 12-cm discs.
The following types of discs cannot be used with
this unit:
! DualDiscs
! 8-cm discs: Attempts to use such discs with
an adapter may cause the unit to malfunction.
! Oddly shaped discs
! Damaged discs, including discs that are
cracked, chipped or warped
! CD-R/RW and DVD-R/RW discs that have not
been finalized
! DVD-RAM
Do not touch the recorded surface of the discs.
Store discs in their cases when not in use.
Do not attach labels, write on or apply chemicals
to the surface of the discs.
To clean a disc, wipe the disc with a soft cloth out-
ward from the center.
Condensation may temporarily impair the player’s
performance. Let it rest for about one hour to ad-
just to a warmer temperature. Also, wipe any
damp discs off with a soft cloth.
Playback of discs may not be possible because of
disc characteristics, disc format, recorded applica-
tion, playback environment, storage conditions,
and so on.
Road shocks may interrupt disc playback.
Certain functions may not be available for some
DVD video discs.
It may not be possible to play back some DVD
video discs.
This unit is not compatible with discs recorded in
AVCHD (Advanced Video Codec High Definition)
format. Do not insert AVCHD discs as you may not
be able to eject the disc.
When using discs that can be printed on label sur-
faces, check the instructions and the warnings of
the discs. Depending on the discs, inserting and
ejecting may not be possible. Using such discs
may result in damage to this equipment.
Do not attach commercially available labels or
other materials to the discs.
! The discs may warp making the disc unplay-
able.
! The labels may come off during playback and
prevent ejection of the discs, which may result
in damage to the equipment.
USB storage device
Depending on the external storage device (USB),
the following problems may occur.
! Operations may vary.
! The storage device may not be recognized.
! Files may not be played back properly.
Connections via USB hub are not supported.
Additional information
62
Appendix
Additional information
En
<CRD4844-A>62
Black plate (63,1)
Do not connect anything other than a USB stor-
age device.
Firmly secure the USB storage device when driv-
ing. Do not let the USB storage device fall onto the
floor, where it may become jammed under the
brake or accelerator pedal.
Depending on the USB storage device, the device
may cause noise to occur in the radio.
Copyright protected files that are stored in the
USB devices cannot be played back.
You cannot connect a USB portable audio player/
USB memory to this unit via USB hub.
Partitioned USB memory is not compatible with
this unit.
Depending on the kind of USB portable audio
player/USB memory you use, the device may not
be recognized or audio files may not be played
back properly.
Do not leave the USB portable audio player/USB
memory in direct sunlight for extended amounts
of time. Doing so may cause the device to mal-
function from the extreme rise in temperature.
iPod
To ensure proper operation, connect the dock con-
nector cable from the iPod directly to this unit.
Firmly secure the iPod when driving. Do not let the
iPod fall onto the floor, where it may become
jammed under the brake or accelerator pedal.
About iPod settings
! When an iPod is connected, this unit changes
the EQ (equalizer) setting of the iPod to off in
order to optimize the acoustics. When you dis-
connect the iPod, the EQ returns to the original
setting.
! You cannot set Repeat to off on the iPod when
using this unit. Repeat is automatically
changed to All when the iPod is connected to
this unit.
Incompatible text saved on the iPod will not be dis-
played by the unit.
DVD-R/RW discs
Unfinalized DVD-R/RW discs which have been re-
corded in the Video format (video mode) cannot
be played back.
Playback of DVD-R/RW discs may not be possible,
due to disc characteristics, scratches or dirt on
the disc, or dirt, condensation, etc. on the lens of
this unit.
Depending on the application settings and the en-
vironment, playback of discs recorded on a com-
puter may not be possible. (For details, contact the
manufacturer of the application.)
CD-R/RW discs
When CD-R/RW discs are used, playback is possi-
ble only for discs which have been finalized.
Playback of CD-R/RW discs recorded on a music
CD recorder or a computer may not be possible
due to disc characteristics, scratches or dirt on
the disc, or dirt, condensation, etc., on the lens of
this unit.
Depending on the application settings and the en-
vironment, playback of discs recorded on a com-
puter may not be possible. (For details, contact the
manufacturer of the application.)
Playback of CD-R/RW discs may become impossi-
ble in case of direct exposure to sunlight, high
temperatures, or the storage conditions in the ve-
hicle.
Titles and other text information recorded on a
CD-R/RW disc may not be displayed by this unit
(in the case of audio data (CD-DA)).
JPEG picture files
JPEG is short for Joint Photographic Experts
Group and refers to a still image compression
technology standard.
Files are compatible with Baseline JPEG and EXIF
2.1 still images up to a resolution of 8192 × 7 680.
(EXIF format is used most commonly with digital
still cameras.)
Playback of EXIF format files that were processed
by a computer may not be possible.
There is no progressive JPEG compatibility.
DivX video files
Depending on the composition of the file informa-
tion, such as the number of audio streams or file
size, there may be a slight delay when playing
back discs.
Some special operations may be prohibited due to
the composition of the DivX files.
Only DivX files downloaded from a DivX partner
site are guarantee for proper operation. Unauthor-
ized DivX files may not operate properly.
DRM rental files cannot be operated until play-
back is started.
Recommended file size: 2 GB or less with a trans-
mission rate of 2 Mbps or less.
The ID code of this unit must be registered to a
DivX VOD provider in order to playback DivX VOD
files. For information on ID codes, refer to Display-
ing the DivX
â
VOD registration code on page 39.
For more details about DivX, visit the following
site:
http://www.divx.com/
MPEG-1/MPEG-2/MPEG-4 video files
Elapsed playback time may not be displayed cor-
rectly.
Important
! When naming a JPEG image file, add the
corresponding file name extension (.jpg,
.jpeg or .jpe).
! This unit plays back files with these file name
extensions (.jpg, .jpeg or .jpe) as a JPEG
image file. To prevent malfunctions, do not
use these extensions for files other than
JPEG image files.
Audio compatibility (USB)
WAV
File extension: .wav
Quantization bits: 8 and 16 (LPCM), 4 (MS
ADPCM)
Sampling frequency: 16 kHz to 48 kHz (LPCM),
22.05 kHz and 44.1 kHz (MS ADPCM)
English
Additional information
63
Appendix
Additional information
En
<CRD4844-A>63
Black plate (64,1)
Compressed file
compatibility (disc, USB)
WMA
File extension: .wma
Bit rate: 48 kbps to 320 kbps (CBR), VBR
Sampling frequency: 32 kHz to 48 kHz
Windows Mediaä Audio Professional, Lossless,
Voice/DRM Stream/Stream with video: Not com-
patible
MP3
File extension: .mp3
Bit rate: 8 kbps to 320 kbps (CBR), VBR
Sampling frequency: 8 kHz to 48kHz (32 kHz,
44.1 kHz, 48 kHz for emphasis)
Compatible ID3 tag version: 1.0, 1.1, 2.2, 2.3, 2.4
(ID3 tag Version 2.x is given priority over Version
1.x.)
M3u playlist: Not compatible
MP3i (MP3 interactive), mp3 PRO: Not compatible
AAC
Compatible format: AAC encoded by iTunes
File extension: .m4a
Sampling frequency: 11.025 kHz to 48 kHz
Bit rate: 16 kbps to 320 kbps
Apple Lossless: Not compatible
AAC file bought from the iTunes Store (.m4p file
extension): Not compatible
DivX compatibility
Compatible format: DivX video format imple-
mented in relation to DivX standards
File extensions: .avi or .divx
DivX Ultra format: Not compatible
DivX HD format: Not compatible
DivX files without video data: Not compatible
DivX plus: Not compatible
Compatible audio codec: MP2, MP3, Dolby Digital
LPCM: Compatible
Bit rate: 8 kbps to 320 kbps (CBR), VBR
Sampling frequency: 8 kHz to 48kHz
Compatible external subtitle file extension: .srt
MPEG-1/MPEG-2/MPEG-4 video
File extensions: .mpg or .mpeg (MPEG-1/MPEG-2),
.avi (MPEG -4)
Compatible audio codec: MP2 (MPEG-1/MPEG-2),
MP2, MP3, Dolby Digital (MPEG-4)
H.264 (MPEG-4AVC): Not compatible
LPCM: Not compatible
Bit rate: 8 kbps to 320 kbps (CBR), VBR
Sampling frequency: 8 kHz to 48kHz
Supplemental information
Some characters in a file name (including the file
extension) or a folder name may not be displayed.
This unit may not work properly depending on the
application used to encode WMA files.
There may be a slight delay at the start of playback
of audio files embedded with image data or audio
files stored on a USB storage device that has nu-
merous folder hierarchies.
Disc (CD/DVD)
Playable folders: up to 99 for CD-R/RW
Playable folders: up to 700 for DVD-R/RW
Playable files: up to 999 for CD-R/RW
Playable files: up to 3 500 for DVD-R/RW
File system: ISO 9660 Level 1 and 2, Romeo, Joliet,
UDF 1.02 (DVD-R/RW)
Multi-session playback: Compatible
Packet write data transfer: Not compatible
Regardless of the length of blank sections be-
tween the songs from the original recording, com-
pressed audio discs play with a short pause
between songs.
External storage device (USB)
Playable folders: up to 1 500 (up to 700 for DivX/
MPEG-1/MPEG-2/MPEG-4)
Playable files: up to 15 000
Playback of copyright-protected files: Not compati-
ble
Partitioned external storage device (USB): Only the
first playable partition can be played.
There is no compatibility for Multi Media Cards
(MMC).
CAUTION
! Pioneer accepts no responsibility for data
lost on the USB memory/USB portable audio
player even if that data is lost while using
this unit.
! Pioneer cannot guarantee compatibility with
all USB mass storage devices and assumes
no responsibility for any loss of data on
media players, smart phones, or other devi-
ces while using this product.
! Do not leave the discs/external storage de-
vice (USB) or iPod in places with high tem-
peratures.
iPod compatibility
This unit supports only the following iPod mod-
els.
Made for
! iPod touch (5th generation)
! iPod touch (4th generation)
! iPod touch (3rd generation)
! iPod touch (2nd generation)
! iPod touch (1st generation)
! iPod classic
! iPod with video
! iPod nano (7th generation)
! iPod nano (6th generation)
! iPod nano (5th generation)
! iPod nano (4th generation)
! iPod nano (3rd generation)
! iPod nano (2nd generation)
! iPod nano (1st generation)
! iPhone 5
! iPhone 4S
! iPhone 4
Additional information
64
Appendix
Additional information
En
<CRD4844-A>64

Black plate (65,1)
! iPhone 3GS
! iPhone 3G
! iPhone
Depending on the generation or version of the
iPod, some functions may not be available.
Operations may vary depending on the software
version of iPod.
About the file/format compatibility, refer to the
iPod manuals.
Audiobook, Podcast: Compatible
CAUTION
Pioneer accepts no responsibility for data lost
on the iPod, even if that data is lost while this
unit is used.
About iTunes tagging
This function can be performed with the following
iPod models.
— iPod touch 4th generation
— iPod touch 3rd generation
— iPod touch 2nd generation
— iPod touch 1st generation
— iPod classic 160GB
— iPod classic 120GB
— iPod classic
— iPod with video
— iPod nano 6th generation
— iPod nano 5th generation
— iPod nano 4th generation
— iPod nano 3rd generation
— iPhone 5
— iPhone 4S
— iPhone 4
— iPhone 3GS
— iPhone 3G
— iPhone
The song information (tag) can be saved from
the broadcasting station to your iPod. The songs
will show up in a playlist called “Tagged playlist”
in iTunes the next time you sync your iPod. Then
you can directly buy the songs you want from
the iTunes Store.
The tagged songs and the song that you can buy
from the iTunes Store may be different. Make
sure to confirm the song before you make the
purchase.
If you cannot use this function normally, update
your iPod firmware.
Sequence of audio files
The user cannot assign folder numbers and
specify playback sequences with this unit.
Example of a hierarchy
Level 1 Level 2 Level 3 Level 4
01
02
03
04
05
: Folder
: Compressed
audio file
01 to 05: Folder
number
1 to 6 : Playback
sequence
Disc
Folder selection sequence or other operation
may differ depending on the encoding or writing
software.
External storage device (USB)
The playback sequence is the same as the re-
corded sequence in the external storage device
(USB).
To specify the playback sequence, the following
method is recommended.
1 Create a file name that includes numbers
that specify the playback sequence (e.g.,
001xxx.mp3 and 099yyy.mp3).
2 Put those files into a folder.
3 Save the folder that contains the files to the
external storage device (USB).
However, depending on the system environment,
you may not be able to specify the playback se-
quence.
For USB portable audio players, the sequence is
different and depends on the player.
Using the display correctly
CAUTION
! If liquid or foreign matter should get inside
this unit, turn off the power immediately and
consult your dealer or the nearest authorized
PIONEER Service Station. Do not use the
unit in this condition because doing so may
result in fire, electric shock, or other failure.
! If you notice smoke, a strange noise or smell,
or any other abnormal signs from the display,
turn off the power immediately and consult
your dealer or the nearest authorized
PIONEER Service Station. Using this unit in
this condition may result in permanent dam-
age to the system.
! Do not disassemble or modify this unit, as
there are high-voltage components inside
which may cause electric shock. Be sure to
consult your dealer or the nearest authorized
PIONEER Service Station for internal inspec-
tion, adjustments, or repairs.
Handling the display
! Never touch the screen with anything be-
sides your finger when operating the touch
panel function. The screen can scratch
easily.
! When the display is subjected to direct sun-
light for a long period of time, it will become
very hot resulting in possible damage to the
LCD screen. You should avoid exposing the
display unit to direct sunlight as much as
possible.
! The display should be used within the tem-
perature range of 14 °F to 140 °F.
At temperatures higher or lower than this op-
erating temperature range, the display may
not operate normally.
! The LCD screen is exposed in order to in-
crease its visibility within the vehicle. Do not
press it strongly on it as this may damage it.
! Do not push the LCD screen forcefully as
this may scratch it.
Liquid crystal display (LCD) screen
! Heat from the heater may damage the LCD
screen, and cool air from the cooler may
cause moisture to form inside the display re-
sulting in possible damage.
! Small black dots or white dots (bright dots)
may appear on the LCD screen. These are
due to the characteristics of the LCD screen
and do not indicate a malfunction.
! When using a cellular phone, keep the an-
tenna away from the display to prevent dis-
ruption of the video image by the
appearance of spots, colored stripes, etc.
LED (light-emitting diode) backlight
! At low temperatures, using the LED backlight
may increase image lag and degrade the
image quality due to the characteristics of
the LCD screen. Image quality will improve
with an increase in temperature.
! To protect the LED backlight, the display will
darken in the following environments:
— In the direct sunlight
— Near the heater vent
English
Additional information
65
Appendix
Additional information
En
<CRD4844-A>65

Black plate (66,1)
! The product lifetime of the LED backlight is
more than 10 000 hours. However, it may de-
crease if used in high temperatures.
! If the LED backlight reaches the end of its
product lifetime, the screen will become dark
and the image will no longer be projected. In
such cases, please consult your dealer or the
nearest authorized PIONEER Service Station.
Keeping the display in good
condition
! When removing dust from the screen or
cleaning the display, first turn the system
power off, then wipe with a soft dry cloth.
! When wiping the screen, take care not to
scratch the surface. Do not use harsh or
abrasive chemical cleaners.
Bluetooth profiles
In order to use Bluetooth wireless technology,
devices must be able to interpret certain pro-
files. This unit is compatible with the following
profiles.
! GAP (Generic Access Profile)
! SDP (Service Discovery Protocol)
! OPP (Object Push Profile)
! HFP (Hands Free Profile)
! HSP (Head Set Profile)
! PBAP (Phone Book Access Profile)
! A2DP (Advanced Audio Distribution Profile)
! AVRCP (Audio/Video Remote Control Profile)
1.3
! SPP (Serial Port Profile) 1.1
License, Warranty Disclaimer
& Limitation of Liability
SAFETY PROVISIONS
Disclaimer
THE WARRANTIES SET FORTH IN PIONEER’S
LIMITED WARRANTY ARE THE ONLY WARRAN-
TIES MADE BY PIONEER OR ANY OF ITS LICEN-
SORS, AS APPLICABLE. PIONEER AND ITS
LICENSORS EXPRESSLY DISCLAIM ALL OTHER
WARRANTIES, EXPRESS OR IMPLIED, INCLUD-
ING, WITHOUT LIMITATION, WARRANTIES OF
MERCHANTABILITY AND FITNESS FOR A PAR-
TICULAR PURPOSE.
Limitation of Liability
TO THE MAXIMUM EXTENT PERMISSIBLE
UNDER APPLICABLE LAW, NEITHER PIONEER
NOR ITS LICENSORS WILL BE LIABLE TO YOU
OR TO ANY OTHER PARTY FOR ANY INDIRECT,
CONSEQUENTIAL, INCIDENTAL, PUNITIVE, OR
SPECIAL DAMAGES, REGARDLESS OF THE
FORM OF ACTION, WHETHER IN CONTRACT
OR IN TORT, INCLUDING NEGLIGENCE, EVEN IF
SUCH PARTIES HAVE BEEN ADVISED OF THE
POSSIBILITY OF SUCH DAMAGES.
TO THE MAXIMUM EXTENT PERMISSIBLE
UNDER APPLICABLE LAW, PIONEER’S, OR ITS
LICENSORS’, TOTAL LIABILITY OF ANY KIND
ARISING OUT OF OR RELATED TO YOUR USE
OF THE PRODUCTS, INCLUDING, BUT NOT LIM-
ITED TO, ANY WARRANTY CLAIMS, OR ANY
CLAIMS FOR PROPERTY DAMAGE, DEATH OR
DISABILITY, REGARDLESS OF THE FORUM
AND REGARDLESS OF WHETHER ANY ACTION
OR CLAIM IS BASED ON CONTRACT, TORT, (IN-
CLUDING NEGLIGENCE), STRICT PRODUCT LI-
ABILITY, OR ANY OTHER LEGAL THEORY, WILL
NOT EXCEED ONE THOUSAND DOLLARS (USD
$1 000).
SOME JURISDICTIONS DO NOT ALLOW THE
EXCLUSION OF DAMAGES OR LIMITATION OF
LIABILITY, SO THE ABOVE EXCLUSIONS OR
LIMITATIONS, TO THE EXTENT PROHIBITED BY
APPLICABLE LAW, MAY NOT APPLY TO YOU.
YOUR SPECIFIC RIGHTS MAY VARY FROM JU-
RISDICTION TO JURISDICTION.
libpng
Please be aware in advance that Pioneer will not
respond to questions concerning the contents
of the source code.
This licence was originally written in English
and translated here only to help the reader
understand its content. Therefore, please note
that translated licence is NOT legally identified
with the original English text.
This copy of the libpng notices is provided for
your convenience. In case of any discrepancy
between this copy and the notices in the file
png.h that is included in the libpng distribution,
the latter shall prevail.
COPYRIGHT NOTICE, DISCLAIMER, and LI-
CENSE:
If you modify libpng you may insert additional
notices immediately following this sentence.
This code is released under the libpng license.
libpng versions 1.2.6, August 15, 2004, through
1.5.0, January 6, 2011, are Copyright (c) 2004,
2006-2010 Glenn Randers-Pehrson, and are dis-
tributed according to the same disclaimer and li-
cense as libpng-1.2.5 with the following
individual added to the list of Contributing Au-
thors
Cosmin Truta
libpng versions 1.0.7, July 1, 2000, through 1.2.5
- October 3, 2002, are Copyright (c) 2000-2002
Glenn Randers-Pehrson, and are distributed ac-
cording to the same disclaimer and license as
libpng-1.0.6 with the following individuals added
to the list of Contributing Authors
Simon-Pierre Cadieux
Eric S. Raymond
Gilles Vollant
and with the following additions to the disclaim-
er:
There is no warranty against interference with
your enjoyment of the library or against infringe-
ment. There is no warranty that our efforts or
the library will fulfill any of your particular pur-
poses or needs. This library is provided with all
faults, and the entire risk of satisfactory quality,
performance, accuracy, and effort is with the
user.
libpng versions 0.97, January 1998, through
1.0.6, March 20, 2000, are Copyright (c) 1998,
1999 Glenn Randers-Pehrson, and are distrib-
uted according to the same disclaimer and li-
cense as libpng-0.96, with the following
individuals added to the list of Contributing Au-
thors:
Tom Lane
Glenn Randers-Pehrson
Willem van Schaik
libpng versions 0.89, June 1996, through 0.96,
May 1997, are Copyright (c) 1996, 1997 Andreas
Dilger Distributed according to the same dis-
claimer and license as libpng-0.88, with the fol-
lowing individuals added to the list of
Contributing Authors:
John Bowler
Kevin Bracey
Sam Bushell
Magnus Holmgren
Greg Roelofs
Tom Tanner
libpng versions 0.5, May 1995, through 0.88, Jan-
uary 1996, are Copyright (c) 1995, 1996 Guy Eric
Schalnat, Group 42, Inc.
For the purposes of this copyright and license,
"Contributing Authors" is defined as the follow-
ing set of individuals:
Additional information
66
Appendix
Additional information
En
<CRD4844-A>66
Black plate (67,1)
Andreas Dilger
Dave Martindale
Guy Eric Schalnat
Paul Schmidt
Tim Wegner
The PNG Reference Library is supplied "AS IS".
The Contributing Authors and Group 42, Inc. dis-
claim all warranties, expressed or implied, in-
cluding, without limitation, the warranties of
merchantability and of fitness for any purpose.
The Contributing Authors and Group 42, Inc. as-
sume no liability for direct, indirect, incidental,
special, exemplary, or consequential damages,
which may result from the use of the PNG Refer-
ence Library, even if advised of the possibility of
such damage.
Permission is hereby granted to use, copy, modi-
fy, and distribute this source code, or portions
hereof, for any purpose, without fee, subject to
the following restrictions:
1. The origin of this source code must not be
misrepresented.
2. Altered versions must be plainly marked as
such and must not be misrepresented as being
the original source.
3. This Copyright notice may not be removed or
altered from any source or altered source distri-
bution.
The Contributing Authors and Group 42, Inc.
specifically permit, without fee, and encourage
the use of this source code as a component to
supporting the PNG file format in commercial
products. If you use this source code in a prod-
uct, acknowledgment is not required but would
be appreciated.
A "png_get_copyright" function is available, for
convenient use in "about" boxes and the like:
printf("%s",png_get_copyright(NULL));
Also, the PNG logo (in PNG format, of course) is
supplied in the files "pngbar.png" and
"pngbar.jpg (88x31) and "pngnow.png" (98x31).
Libpng is OSI Certified Open Source Software.
OSI Certified Open Source is a certification
mark of the Open Source Initiative.
Glenn Randers-Pehrson
glennrp at users.sourceforge.net
January 6, 2011
Copyright and trademark notice
This item incorporates copy protection technol-
ogy that is protected by U.S. patents and other
intellectual property rights of Rovi Corporation.
Reverse engineering and disassembly are pro-
hibited.
Bluetooth
The Bluetooth
â
word mark and logos are regis-
tered trademarks owned by Bluetooth SIG, Inc.
and any use of such marks by PIONEER
CORPORATION is under license. Other trade-
marks and trade names are those of their re-
spective owners.
DVD video
is a trademark of DVD Format/Logo
Licensing Corporation.
iTunes
Apple and iTunes are trademarks of Apple Inc.,
registered in the U.S. and other countries.
MP3
Supply of this product only conveys a license for
private, non-commercial use and does not con-
vey a license nor imply any right to use this prod-
uct in any commercial (i.e. revenue-generating)
real time broadcasting (terrestrial, satellite,
cable and/or any other media), broadcasting/
streaming via internet, intranets and/or other
networks or in other electronic content distribu-
tion systems, such as pay-audio or audio-on-de-
mand applications. An independent license for
such use is required. For details, please visit
http://www.mp3licensing.com.
WMA
Windows Media is either a registered trademark
or trademark of Microsoft Corporation in the
United States and/or other countries.
This product includes technology owned by
Microsoft Corporation and cannot be used or
distributed without a license from Microsoft
Licensing, Inc.
iPod & iPhone
iPhone, iPod, iPod classic, iPod nano, and iPod
touch are trademarks of Apple Inc., registered in
the U.S. and other countries.
Lightning is a trademark of Apple Inc.
“Made for iPod” and “Made for iPhone” mean
that an electronic accessory has been designed
to connect specifically to iPod or iPhone, respec-
tively, and has been certified by the developer to
meet Apple performance standards. Apple is
not responsible for the operation of this device
or its compliance with safety and regulatory
standards. Please note that the use of this ac-
cessory with iPod or iPhone may affect wireless
performance.
Androidä & Google Play
Android and Google Play are trademarks of
Google Inc.
Dolby Digital
Manufactured under license from Dolby
Laboratories. Dolby and the double-D symbol
are trademarks of Dolby Laboratories.
DivX
DivX
â
, DivX Certified
â
and associated logos are
trademarks of Rovi Corporation or its subsidia-
ries and are used under license.
ABOUT DIVX VIDEO: DivX
â
is a digital video
format created by DivX, LLC, a subsidiary of Rovi
Corporation. This is an official DivX Certified
â
device that plays DivX video. Visit divx.com for
more information and software tools to convert
your files into DivX videos.
ABOUT DIVX VIDEO-ON-DEMAND: This
DivX Certified
â
device must be registered in
order to play purchased DivX Video-on-Demand
(VOD) movies. To obtain your registration code,
locate the DivX VOD section in Displaying the
DivX
â
VOD registration code. Go to vod.divx.com
for more information on how to complete your
registration.
SiriusXM Satellite Radio
Sirius, XM and all related marks and logos are
trademarks of Sirius XM Radio, Inc. All rights re-
served.
Pandora
®
internet radio
PANDORA, the PANDORA logo, and the
Pandora trade dress are trademarks or regis-
tered trademarks of Pandora Media, Inc. Used
with permission.
MIXTRAX
MIXTRAX is a trademark of the PIONEER
CORPORATION.
MirrorLink
MirrorLink Certifiedä, the Design Onlyä Certifi-
cation Logo, MirrorLinkä and the MirrorLinkä
Logo are certification marks and trademarks of
the Car Connectivity Consortium LLC. Unauthor-
ized use is strictly prohibited.
English
Additional information
67
Appendix
Additional information
En
<CRD4844-A>67
Black plate (68,1)
Language code chart for DVD
Language (code), input code
Japanese (ja), 1001 Dzongkha (dz), 0426 Kurdish (ku), 1121 Kinyarwanda (rw), 1823
English (en), 0514 Ewe (ee), 0505 Komi (kv), 1122 Sanskrit (sa), 1901
French (fr), 0618 Esperanto (eo), 0515 Cornish (kw), 1123 Sardinian (sc), 1903
Spanish (es), 0519 Estonian (et), 0520
Kirghiz, Kyrgyz (ky),
1125
Sindhi (sd), 1904
German (de), 0405 Basque (eu), 0521 Latin (la), 1201
Northern Sami (se),
1905
Italian (it), 0920 Persian (fa), 0601
Luxembourgish (lb),
1202
Sangho (sg), 1907
Chinese (zh), 2608 Fulah (ff), 0606 Ganda (lg), 1207 Sinhala (si), 1909
Dutch, Flemish (nl),
1412
Finnish (fi), 0609 Limburgan (li), 1209 Slovak (sk), 1911
Portuguese (pt), 1620 Fijian (fj), 0610 Lingala (ln), 1214 Slovenian (sl), 1912
Swedish (sv), 1922 Faroese (fo), 0615 Lao (lo), 1215 Samoan (sm), 1913
Russian (ru), 1821
Western Frisian (fy),
0625
Lithuanian (lt), 1220 Shona (sn), 1914
Korean (ko), 1115 Irish (ga), 0701 Luba-Katanga (lu), 1221 Somali (so), 1915
Greek (el), 0512 Gaelic (gd), 0704 Latvian (lv), 1222 Albanian (sq), 1917
Afar (aa), 0101 Galician (gl), 0712 Malagasy (mg), 1307 Serbian (sr), 1918
Abkhazian (ab), 0102 Guarani (gn), 0714 Marshallese (mh), 1308 Swati (ss), 1919
Avestan (ae), 0105 Gujarati (gu), 0721 Maori (mi), 1309
Sotho, Southern (st),
1920
Afrikaans (af), 0106 Manx (gv), 0722 Macedonian (mk), 1311 Sundanese (su), 1921
Akan (ak), 0111 Hausa (ha), 0801 Malayalam (ml), 1312 Swahili (sw), 1923
Amharic (am), 0113 Hebrew (he), 0805 Mongolian (mn), 1314 Tamil (ta), 2001
Aragonese (an), 0114 Hindi (hi), 0809 Marathi (mr), 1318 Telugu (te), 2005
Arabic (ar), 0118 Hiri Motu (ho), 0815 Malay (ms), 1319 Tajik (tg), 2007
Assamese (as), 0119 Croatian (hr), 0818 Maltese (mt), 1320 Thai (th), 2008
Avaric (av), 0122 Haitian (ht), 0820 Burmese (my), 1325 Tigrinya (ti), 2009
Aymara (ay), 0125 Hungarian (hu), 0821 Nauru (na), 1401 Turkmen (tk), 2011
Azerbaijani (az), 0126 Armenian (hy), 0825 Bokmal (nb), 1402 Tagalog (tl), 2012
Bashkir (ba), 0201 Herero (hz), 0826
Ndebele, North (nd),
1404
Tswana (tn), 2014
Belarusian (be), 0205 Interlingua (ia), 0901 Nepali (ne), 1405 Tonga (to), 2015
Bulgarian (bg), 0207 Indonesian (id), 0904 Ndonga (ng), 1407 Turkish (tr), 2018
Bihari (bh), 0208 Interlingue (ie), 0905 Nynorsk (nn), 1414 Tsonga (ts), 2019
Bislama (bi), 0209 Igbo (ig), 0907 Norwegian (no), 1415 Tatar (tt), 2020
Bambara (bm), 0213 Sichuan Yi (ii), 0909
Ndebele, South (nr),
1418
Twi (tw), 2023
Language (code), input code
Bengali (bn), 0214 Inupiaq (ik), 0911
Navajo, Navaho (nv),
1422
Tahitian (ty), 2025
Tibetan (bo), 0215 Ido (io), 0915 Chichewa (ny), 1425
Uighur, Uyghur (ug),
2107
Breton (br), 0218 Icelandic (is), 0919 Occitan (oc), 1503 Ukrainian (uk), 2111
Bosnian (bs), 0219 Inuktitut (iu), 0921 Ojibwa (oj), 1510 Urdu (ur), 2118
Catalan (ca), 0301 Javanese (jv), 1022 Oromo (om), 1513 Uzbek (uz), 2126
Chechen (ce), 0305 Georgian (ka), 1101 Oriya (or), 1518 Venda (ve), 2205
Chamorro (ch), 0308 Kongo (kg), 1107 Ossetian (os), 1519 Vietnamese (vi), 2209
Corsican (co), 0315 Kikuyu, Gikuyu (ki), 1109
Panjabi, Punjabi (pa),
1601
Volapük (vo), 2215
Cree (cr), 0318 Kuanyama (kj), 1110 Pali (pi), 1609 Walloon (wa), 2301
Czech (cs), 0319 Kazakh (kk), 1111 Polish (pl), 1612 Wolof (wo), 2315
Church Slavic (cu), 0321 Kalaallisut (kl), 1112
Pashto, Pushto (ps),
1619
Xhosa (xh), 2408
Chuvash (cv), 0322
Central Khmer (km),
1113
Quechua (qu), 1721 Yiddish (yi), 2509
Welsh (cy), 0325 Kannada (kn), 1114 Romansh (rm), 1813 Yoruba (yo), 2515
Danish (da), 0401 Kanuri (kr), 1118 Rundi (rn), 1814
Zhuang, Chuang (za),
2601
Divehi (dv), 0422 Kashmiri (ks), 1119 Romanian (ro), 1815 Zulu (zu), 2621
Additional information
68
Appendix
Additional information
En
<CRD4844-A>68
Black plate (69,1)
Specifications
General
Power source ................... 14.4 V DC (10.8 V to 15.1 V al-
lowable)
Grounding system ............ Negative type
Maximum current consumption
................................... 10.0 A
Dimensions (W × H × D):
D
Chassis ............................ 178mm × 100mm × 165mm
(7 in. × 3-7/8 in. × 6-1/2 in.)
Nose ................................ 171mm × 97mm × 18mm
(6-3/4 in. × 3-7/8 in. × 3/4 in.)
(AVH-X5600BHS/AVH-X4600BT)
Nose ................................ 171mm× 97 mm ×9mm
(6-3/4 in.× 3-7/8 in. × 3/8 in.)
(AVH-X3600BHS/AVH-X2600BT/AVH-X1600DVD)
Weight ............................. 2.0kg (4.4 lbs)
(AVH-X5600BHS/AVH-X4600BT)
Weight ............................. 1.7 kg (3.7 lbs)
(AVH-X3600BHS/AVH-X2600BT/AVH-X1600DVD)
Display
Screen size/aspect ratio ... 6.95 inch wide/16:9
(effective display area:
156.6 mm × 81.6 mm)
(AVH-X5600BHS/AVH-X4600BT)
Screen size/aspect ratio ... 6.1 inch wide/16:9
(effective display area:
136.2 mm × 72.0 mm)
(AVH-X3600BHS/AVH-X2600BT/AVH-X1600DVD)
Pixels ............................... 1 152000 (2 400 × 480)
Display method ................ TFTactive matrix, driving type
Color system .................... NTSC/PAL/PAL-M/PAL-N/
SECAM compatible
Durable temperature range (power off)
................................... –4 °F to +176 °F
Audio
Maximum power output ... 50 W × 4
70 W × 1/2 W (for subwoofer)
Continuous power output
................................... 22W × 4 (50Hz to 15 000Hz,
5 %THD, 4 W load, both chan-
nels driven)
Load impedance .............. 4 W (4 W to 8 W (2 W for 1 ch)
allowable)
Preout maximum output level
................................... 4.0V
(AVH-X5600BHS/AVH-X4600BT)
Preout maximum output level
................................... 2.0V
(AVH-X3600BHS/AVH-X2600BT/AVH-X1600DVD)
Equalizer (8-Band Graphic Equalizer):
Frequency ........................ 40Hz/80 Hz/200 Hz/400 Hz/
1 kHz/2.5 kHz/8 kHz/10 kHz
Gain ................................ ±12 dB
HPF:
Frequency ........................ 50Hz/63 Hz/80 Hz/100 Hz/
125 Hz
Slope ............................... –12 dB/oct
Subwoofer (mono):
Frequency ........................ 50Hz/63 Hz/80 Hz/100 Hz/
125 Hz
Slope ............................... –18 dB/oct
Gain ................................ +6dB to –24 dB
Phase .............................. Normal/Reverse
Bass boost:
Gain ................................ +12 dB to 0 dB
DVD Player
System ............................ DVD video, Video CD, CD,
WMA, MP3, AAC, DivX,
MPEG player
Usable discs .................... DVD video, Video CD, CD, CD-
R/RW, DVD-R/RW/R DL
Region number ................ 1
Frequency response ......... 5 Hz to 44000 Hz (with DVD,
at sampling frequency 96 kHz)
Signal-to-noise ratio ......... 96dB (1kHz) (IHF-A network)
(RCA level)
(AVH-X5600BHS/AVH-X4600BT)
Signal-to-noise ratio ......... 91 dB (1 kHz) (IHF-A network)
(RCA level)
(AVH-X3600BHS/AVH-X2600BT/AVH-X1600DVD)
Output level:
Video ............................... 1.0 Vp-p/75 W (±0.2 V)
Number of channels ........ 2 (stereo)
MP3 decoding format ...... MPEG-1 & 2 Audio Layer 3
WMA decoding format ..... Ver. 7, 7.1, 8, 9, 10, 11, 12 (2ch
audio)
(Windows Media Player)
AAC decoding format ....... MPEG-4 AAC (iTunes encoded
only) (.m4a)
(Ver. 10.6 and earlier)
DivX decoding format ....... Home Theater Ver. 3, 4, 5.2, 6
(Except ultra and HD) (.avi,
.divx)
MPEG video decoding format
................................... MPEG1, MPEG2, MPEG4
(part2), MS-MPEG4 (ver. 3)
USB
USB standard specification
................................... USB 1.1, USB 2.0 full speed
(For video files)
USB 2.0 high speed (For
audio files)
Maximum current supply
................................... 1.0A
USB Class ....................... MSC (Mass Storage Class),
MTP (Media Transfer Protocol)
File system ....................... FAT16, FAT32
MP3 decoding format ...... MPEG-1 & 2 Audio Layer 3
WMA decoding format ..... Ver. 7, 7.1, 8, 9, 10, 11, 12 (2ch
audio)
(Windows Media Player)
AAC decoding format ....... MPEG-4 AAC (iTunes encoded
only)
(Ver. 10.6 and earlier)
WAV (MSC Mode only):
WAV signal format ........... Linear PCM, MS ADPCM
(.wav)
Sampling Frequency ........ Linear PCM:16 kHz, 22.05 kHz,
24 kHz, 32 kHz, 44.1 kHz,
48 kHz
MS ADPCM:22.05 kHz,
44.1 kHz
JPEG (MSC Mode only):
JPEG decoding format ..... .jpeg, .jpg, .jpe
Pixel Sampling ................. 4:2:2, 4:2:0
Decode Size ..................... MAX:8192(H) x 7 680(W),
MIN:32(H) x 32(W)
DivX decoding format (MSC Mode only)
................................... Home Theater Ver. 3, 4, 5.2, 6
(Except ultra and HD) (.avi,
.divx)
MPEG video decoding format (MSC Mode only)
................................... MPEG1, MPEG2, MPEG4
(part2), MS-MPEG4 (ver. 3)
FM tuner
Frequency range .............. 87.9 MHz to 107.9 MHz
Usable sensitivity ............. 9dBf (0.8 µV/75W, mono, S/N:
30 dB)
Signal-to-noise ratio ......... 80 dB (digital broadcasting)
(IHF-A network)
(AVH-X5600BHS/AVH-X3600BHS)
Signal-to-noise ratio ......... 72 dB (analog broadcasting)
(IHF-A network)
AM tuner
Frequency range .............. 530kHz to 1710 kHz (10kHz)
Usable sensitivity ............. 25µV (S/N: 20 dB)
Signal-to-noise ratio ......... 80 dB (digital broadcasting)
(IHF-A network)
(AVH-X5600BHS/AVH-X3600BHS)
Signal-to-noise ratio ......... 62 dB (analog broadcasting)
(IHF-A network)
Bluetooth
(AVH-X5600BHS/AVH-X4600BT/AVH-X3600BHS/AVH-
X2600BT)
Version ............................ Bluetooth 3.0 certified
Output power ................... +4dBm Maximum
(Power class 2)
CEA2006 Specifications
Power output ................... 14 W RMS × 4 Channels (4 W
and ≦ 1 % THD+N)
S/N ratio .......................... 91dBA (reference: 1 W into
4 W)
Note
Specifications and the design are subject to
modifications without notice.
English
Additional information
69
Appendix
Additional information
En
<CRD4844-A>69
Black plate (70,1)
Précautions
RÈGLES DE PROTECTION
IMPORTANTES 72
Pour une conduite en toute sécurité 72
Pour éviter l’épuisement de la
batterie 73
Avant de commencer
La protection de votre ouïe est entre vos
mains 73
Quelques mots sur cet appareil 73
Numéros de région des disques DVD
vidéo 74
Quelques mots sur ce mode d’emploi 74
Service après-vente des produits
Pioneer 74
Utilisation et entretien de la
télécommande 74
Mode de démonstration 75
Description de l’appareil
Appareil central 75
Afficheur d’accueil 76
Mise en/hors service de la source 76
Choix d’une source 76
Réglage du volume 77
Télécommande 77
Opérations communes
Utilisation standard des éléments de menu/
listes 78
Utilisation de l’icône de défilement et de la
barre de lecture 78
Activation des touches du clavier
tactile 78
Utilisation de la vue arrière 78
Utilisation du moniteur arrière 78
Utilisation du correcteur de son 79
Changer le mode écran large 79
Opérations de base
Réglage de l’angle du panneau LCD et
éjection du support 79
Réglage de l’horloge 79
Syntoniseur HD Radioä
À propos des stations HD Radioä 80
Utilisation du syntoniseur HD Radio 80
Mise en mémoire et rappel des
stations 81
Mise en mémoire des stations les plus
fortes 81
Accord sur les signaux puissants 81
Utilisation de l’étiquetage iTunes 81
Changement de mode de recherche 81
Changement de mode de réception 81
Syntoniseur
Utilisation du syntoniseur 82
Mise en mémoire et rappel des
stations 82
Mise en mémoire des stations les plus
fortes 82
Accord sur les signaux puissants 82
Utilisation de l’étiquetage iTunes 82
Syntoniseur SiriusXM
Présentation des opérations du syntoniseur
SiriusXM 83
Mise en mémoire et rappel des
canaux 84
Sélection d’un canal dans l’écran de la
liste 84
Changement de l’affichage de la liste 84
Sélection directe d’un canal SiriusXM 84
Replayä 85
Utilisation de l’étiquetage iTunes 85
Réglage du contrôle parental 85
Réglage de SiriusXM TuneStartä 85
Options d’examen 85
Réinitialisation des réglages par
défaut 86
Disque (CD/DVD)
Présentation de l’utilisation vidéo 87
Utilisation de la lecture audio 88
Changement de type de fichier média 88
Utilisation du menu DVD 89
Lecture aléatoire (shuffle) 89
Répétition de la lecture 89
Recherche de la partie que vous souhaitez
lire 89
Choix de la sortie audio 90
Lecture PBC 90
Choix des plages à partir de la liste des titres
de plages 90
Choix des fichiers à partir de la liste des
noms de fichiers 90
Lecture du contenu VOD d’un DivXâ 90
iPod
Contrôle de l’iPod 91
Utilisation de la lecture audio 91
Utilisation des images de vidéos 92
Utilisation de la fonction iPod de cet
appareil sur votre iPod 92
Lecture aléatoire 93
Répétition de la lecture 93
Lecture de vidéos à partir de votre
iPod 93
Recherche d’une vidéo/musique sur
l’iPod 93
Modification de la vitesse d’un livre
audio 94
Affichage de listes liées à la plage musicale
en cours de lecture (recherche de
liaison) 94
AppRadio Mode
Utilisation de AppRadio Mode 94
Démarrage de la procédure 95
Réglage du clavier 95
Utilisation de l’adaptateur de liaison de
smartphone
Démarrage de la procédure 96
USB
Utilisation des images de vidéos 96
Utilisation de la lecture audio 97
Mode de navigation Musique 98
Utilisation de la lecture d’images
fixes 98
Changement de type de fichier média 99
Lecture aléatoire (shuffle) 99
Répétition de la lecture 99
Choix des fichiers à partir de la liste des
noms de fichiers 99
Affichage de listes liées à la plage musicale
en cours de lecture (recherche de
liaison) 99
Lecture du contenu VOD d’un DivXâ 99
Capture d’ une image dans des fichiers
JPEG 99
Audio Bluetooth
Utilisation de la lecture audio 99
Réglage de l’audio Bluetooth 99
Lecture aléatoire (shuffle) 100
Répétition de la lecture 100
Utilisation de MIXTRAX
Utilisation de MIXTRAX 100
Utilisation de MIXTRAX EZ 100
Exécution de MIXTRAX EZ 100
Réglage du mode MIXTRAX 100
Réglage de l’effet 100
Lecture en continu de Pandoraâ
Utilisation de Pandora 101
Sélection et lecture de stations de radio
Pandoraâ/aléatoire 102
Téléphone Bluetooth
Utilisation du téléphone Bluetooth 103
Appel d’un numéro de l’annuaire 104
Sélection d’un numéro à l’aide du mode de
recherche par ordre alphabétique 104
Inversion des noms dans l’annuaire 105
Utilisation des listes des appels reçus,
manqués et composés 105
Réglage de la réponse automatique 105
Réglage du volume d’écoute du
destinataire 105
Mise en service ou hors service de la
sonnerie 105
Utilisation des listes de présélection des
numéros d’appel 105
Exécution d’un appel par saisie d’un
numéro de téléphone 105
Réglage du mode privé 106
Contrôle vocal 106
Réglages
Utilisation des menus 106
Réglages sonores
Utilisation du réglage de l’équilibre avant-
arrière/droite-gauche 107
Réglage de l’équilibre sonore 107
Utilisation de l’égaliseur 107
Utilisation de l’égalisation
automatique 107
Table des matières
70
Table des matières
Fr
<CRD4844-A>70
Black plate (71,1)
Utilisation du sonic center control 107
Réglage de la correction
physiologique 108
Utilisation de la sortie haut-parleur
d’extrêmes graves 108
Accentuation des graves 108
Utilisation du filtre passe-haut 108
Ajustement des niveaux des
sources 108
Configuration du lecteur vidéo
Choix de la langue des sous-titres 109
Choix de la langue audio 109
Choix de la langue des menus 109
Réglage de l’affichage des DVD sous
plusieurs angles 109
Définition du ratio d’aspect 109
Réglage de l’intervalle du
diaporama 110
Réglage du verrouillage parental 110
Paramétrage du fichier de sous-titres
DivX 110
Affichage de votre code d’enregistrement
VOD DivXâ 111
Lecture automatique des DVD 111
Réglages système
Mise en service ou hors service de l’entrée
auxiliaire 111
Réglage de l’entrée AV 111
Réglage du système de navigation 111
Réglage du mode de connexion
Pandora 111
Sélection du mode MirrorLink 111
Mise à jour du firmware de l’adaptateur de
liaison de smartphone 112
Affichage de la version du firmware de
l’adaptateur de liaison de
smartphone 112
Mise à jour du firmware 112
Affichage de la version du firmware 113
Réglage du mode MIXTRAX 113
Modification des réglages de l’image
(Luminosité, Contrast, Couleur, Teinte,
Dimmer et Température couleur) 113
Sélection de la langue du système 113
Réglage de SiriusXM TuneStartä 114
Réinitialisation des réglages par
défaut 114
Réglage du mode démonstration 114
Mise en service ou hors service de la
coupure/atténuation du son 114
Réglage de la sortie arrière et du contrôleur
de haut-parleur d’extrêmes graves 114
Utilisation du clavier 114
Réglage du défilement permanent 114
Réglage de l’audio Bluetooth 114
Effacement de la mémoire
Bluetooth 115
Mise à jour du logiciel Bluetooth 115
Affichage de la version du logiciel
Bluetooth 115
Réglage de la caméra de vue arrière
(caméra de recul) 115
EQ auto (égalisation automatique) 115
Réglage du signal vidéo 117
Menu Favori
Utilisation du menu Favori 117
Menu de connexion Bluetooth
Utilisation du menu de connexion
Bluetooth 118
Menu de thème
Choix de la couleur de l’éclairage 119
Choix de la couleur OSD (affichage à
l’écran) 119
Choix de l’affichage d’arrière-plan 119
Autres fonctions
Réglage des positions de réponse des
claviers tactiles (calibrage du clavier
tactile) 120
Utilisation d’une source AUX 120
Réinitialisation du microprocesseur 121
Utilisation de la fonction de mixage
audio 121
Connexion
Connexion du cordon
d’alimentation 123
Lors de la connexion à un amplificateur de
puissance vendu séparément 124
Lors de la connexion du composant vidéo
externe et de l’écran 124
Lors de la connexion à une caméra de vue
arrière 125
iPod avec connecteur Lightning 125
iPod avec connecteur 30 broches 126
Connexion d’un adaptateur de liaison de
smartphone optionnel (CD-
ML100) 126
Connexion du syntoniseur SiriusXM en
option 127
Installation
Installation à l’aide des trous de vis sur les
côtés de l’appareil 127
Installation du microphone 128
Informations complémentaires
Dépannage 129
Messages d’erreur 130
Signification des messages d’erreur du
réglage EQ auto 134
Signification des messages 134
Liste des indicateurs 134
Conseils sur la manipulation 136
Formats audio compatibles (USB) 137
Formats de fichiers compressés
compatibles (disque, USB) 137
Compatibilité iPod 138
Séquence des fichiers audio 139
Utilisation correcte de l’afficheur 139
Profils Bluetooth 139
Licence, exonération de garantie et limite de
responsabilité 140
Tableau des codes de langue pour les
DVD 142
Caractéristiques techniques 143
Français
Table des matières
71
Table des matières
Fr
<CRD4844-A>71
Black plate (72,1)
Nous vous remercions d’avoir acheté cet ap-
pareil PIONEER.
Pour garantir une utilisation correcte, lisez bien
ce mode d’emploi avant d’utiliser cet appareil. Il
est particulièrement important que vous lisiez et
respectiez les indications ATTENTION et PRÉ-
CAUTION de ce mode d’emploi. Conservez-le
dans un endroit sûr et facilement accessible pour
toute consultation ultérieure.
RÈGLES DE PROTECTION
IMPORTANTES
Veuillez lire toutes les instructions concernant
votre écran et les conserver pour référence ulté-
rieure.
1 N’installez pas l’écran là où il peut (i)
gêner la vision du conducteur, (ii) dégra-
der le fonctionnement de systèmes d’uti-
lisation ou les dispositifs de sécurité du
véhicule, incluant les airbags, les
commandes du signal de détresse, ou
(iii) dégrader la capacité du conducteur à
utiliser le véhicule en sécurité.
2 N’utilisez pas cet écran si cela peut dé-
tourner votre attention de la conduite du
véhicule en toute sécurité. Observez tou-
jours des règles de conduite sûre et res-
pectez toutes les régulations existantes
du code de la route. Si l’utilisation du
système ou la lecture de l’écran vous po-
sent des difficultés, garez votre véhicule
dans un endroit sûr et effectuez les régla-
ges nécessaires.
3 N’oubliez pas de toujours mettre votre
ceinture de sécurité lorsque vous condui-
sez votre véhicule. Si vous avez un acci-
dent, vos blessures peuvent être
considérablement plus graves si votre
ceinture n’est pas bouclée correctement.
4 N’utilisez jamais des écouteurs en
conduisant.
5 Pour renforcer la sécurité, certaines fonc-
tions sont désactivées si le frein de park-
ing n’est pas serré et si le véhicule n’est
pas à l’arrêt.
6 Ne réglez jamais le volume de votre
écran à un niveau tel que vous ne puis-
siez pas entendre la circulation exté-
rieure et les véhicules de secours.
ATTENTION
! N’essayez pas d’installer cet appareil ou
d’en faire l’entretien vous-même. L’instal-
lation ou l’entretien de cet appareil par
des personnes sans formation et sans ex-
périence en équipement électronique et
en accessoires automobiles peut être
dangereux et vous exposer à des risques
d’électrocution ou à d’autres dangers.
! N’essayez pas de démonter ou de modifier
cet appareil. Veillez à quitter la route et garer
votre véhicule en lieu sûr avant d’essayer d’u-
tiliser les commandes de l ’appareil.
Pour une conduite en toute
sécurité
ATTENTION
! LE FIL VERT CLAIR DU CONNECTEUR D’A-
LIMENTATION EST PRÉVU POUR DÉTEC-
TER L’ÉTAT STATIONNÉ ET DOIT ÊTRE
CONNECTÉ À L’ALIMENTATION DU
COMMUTATEUR DU FREIN DE PARKING.
UNE MAUVAISE CONNEXION OU UNE UTI-
LISATION INCORRECTE DU FIL PEUT VIO-
LER LA LOI APPLICABLE ET SE TRADUIRE
PAR DES DOMMAGES CORPORELS OU
MATÉRIELS GRAVES.
! Pour éviter les risques de dommages matériels
ou corporels et une violation éventuelle des lois
applicables, cet appareil ne doit pas être utilisé
avec un écran vidéo visible par le conducteur.
! Pour éviter le risque d’accident et une violation
potentielle des lois applicables, l’écran du siège
avant ne doit en aucun cas être regardé pendant
la conduite du véhicule.
! Dans certains états ou pays, il peut être illégal
même pour des personnes autres que le conduc-
teur de regarder des images sur un écran à l’inté-
rieur d’un véhicule. Quand cette réglementation
est applicable, elle doit être respectée, et les
fonctions vidéo de cet appareil ne doivent pas
être utilisées.
Si vous essayez de regarder une image vidéo
pendant que vous conduisez, l’avertissement
“Regarder la vidéo à l'avant en roulant est in-
terdit” s’affiche sur l’écran avant.
Pour regarder une image vidéo sur l’écran
avant, garez votre voiture dans un endroit sûr et
serrez le frein de parking.
Verrouillage par le frein de parking
L’utilisation pendant la conduite de certaines
des fonctions offertes par cet appareil (visualisa-
tion d’une vidéo ou l’utilisation de certaines tou-
ches du clavier tactile) peut être dangereuse et/
ou illégale. Pour empêcher l’utilisation de ces
fonctions quand le véhicule est en mouvement,
il existe un système de blocage qui détecte la
position serrée du frein de parking. Si vous es-
sayez d’utiliser les fonctions mentionnées ci-
dessus pendant que vous conduisez, elles se-
ront désactivées jusqu’à ce que vous arrêtiez le
véhicule dans un endroit sûr, et (1) serriez le
frein de parking, (2) le desserriez, puis (3) le ser-
riez à nouveau. Maintenez la pédale de frein en-
foncée avant de relâcher le frein de parking.
Lors de l’ utilisation d’un écran
connecté à la sortie moniteur
arrière
La sortie moniteur arrière de cet appareil (V
OUT) est utilisée pour connecter un écran ar-
rière qui permet aux passagers assis à l’arrière
de regarder des vidéos.
ATTENTION
NE JAMAIS installer l’écran arrière dans un
emplacement où le conducteur peut regarder
des vidéos pendant qu’il conduit.
Quand vous utilisez la caméra
de vue arrière
Avec une caméra de vue arrière optionnelle, cet
appareil peut être utilisé pour vous aider à gar-
der un œil sur une remorque ou faire une mar-
che arrière dans un emplacement de parking
étroit.
ATTENTION
! L’IMAGE À L’ÉCRAN PEUT APPARAÎ-
TRE INVERSÉE.
! UTILISEZ CETTE ENTRÉE SEULEMENT
POUR UNE CAMÉRA DE VUE ARRIÈRE
DONNANT UNE IMAGE INVERSÉE OU
MIROIR. TOUTE AUTRE UTILISATION
PEUT PROVOQUER DES BLESSURES
OU DES DOMMAGES.
PRÉCAUTION
! La fonction caméra de vue arrière doit être
utilisée comme une aide pour avoir un œil
sur une remorque ou lors d’une marche ar-
rière. Ne l’utilisez pas à des fins de divertisse-
ment.
Précautions
72
Section
Précautions
Fr
01
<CRD4844-A>72
Black plate (73,1)
! Veuillez noter que les bords des images de la
caméra de vue arrière peuvent différer légère-
ment selon que des images plein écran sont
affichées pendant une marche arrière, ou
que ces images sont utilisées pour surveiller
l’arrière quand le véhicule est en marche
avant.
Pour éviter l’épuisement de
la batterie
Laissez tourner le moteur du véhicule lorsque
vous utilisez cet appareil pour éviter de déchar-
ger la batterie.
! Quand cet appareil n’est plus alimenté, no-
tamment lors d’un remplacement de la batte-
rie de la voiture, le microprocesseur de
l’appareil revient à sa condition initiale. Nous
vous recommandons de noter les données
de réglage audio.
ATTENTION
N’utilisez pas cet appareil avec des véhicules
qui ne possèdent pas de position ACC.
MODÈLE Nº: AVH-X5600BHS, AVH-X4600BT,
AVH-X3600BHS, AVH-X2600BT
Contains FCC ID : RKXFC6000S
Contains/Contient IC : 5119A-FC6000S
Le présent appareil est conforme aux la partie
15 des règles de la FCC et CNR d’Industrie Ca-
nada applicables aux appareils radio exempts
de licence. L’exploitation est autorisée aux
deux conditions suivantes: (1) l’appareil ne
doit pas produire de brouillage, et (2) l’utilisa-
teur de l’appareil doit accepter tout brouillage
radioélectrique subi, même si le brouillage
est susceptible d’en compromettre le fonc-
tionnement.
L'antenne Bluetooth ne peut pas etre sup-
prime (ou remplace) par l'utilisateur.
Cet équipement est conforme aux limites
d’exposition aux rayonnements énoncées
pour un environnement non contrôlé et res-
pecte les règles les radioélectriques (RF) de la
FCC lignes directrices d'exposition dans le
Supplément C à OET65 et d’exposition aux fré-
quences radioélectriques (RF) CNR-102 de
l’IC. Cet équipement émet une énergie RF très
faible qui est considérée conforme sans éva-
luation de l’exposition maximale autorisée.
Cependant, cet équipement doit être installé
et utilisé en gardant une distance de 20 cm
ou plus entre le dispositif rayonnant et le
corps (à l’exception des extrémités: mains,
poignets, pieds et chevilles).
La protection de votre ouïe
est entre vos mains
Pour assurer le rendement optimal de votre ma-
tériel et – plus important encore – la protection
de votre ouïe, réglez le volume à un niveau rai-
sonnable. Pour ne pas altérer votre sens de la
perception, le son doit être clair mais ne pro-
duire aucun vacarme et être exempt de toute
distorsion. Votre ouïe peut vous jouer des tours.
Avec le temps, votre système auditif peut en
effet s’adapter à des volumes supérieurs, et ce
qui vous semble un « niveau de confort normal
» pourrait au contraire être excessif et contri-
buer à endommager votre ouïe de façon perma-
nente. Le réglage de votre matériel à un volume
sécuritaire AVANT que votre ouïe s’adapte vous
permettra de mieux vous protéger.
CHOISISSEZ UN VOLUME
SÉCURITAIRE :
! Réglez d’abord le volume à un niveau infé-
rieur.
! Montez progressivement le volume jusqu’à
un niveau d’écoute confortable ; le son doit
être clair et exempt de distorsions.
! Une fois que le son est à un niveau confor-
table, ne touchez plus au bouton du volume.
N’OUBLIEZ PAS DE RESPECTER LES
DIRECTIVES SUIVANTES :
! Lorsque vous montez le volume, assurez-
vous de pouvoir quand même entendre ce
qui se passe autour de vous.
! Faites très attention ou cessez temporaire-
ment l’utilisation dans les situations pouvant
s’avérer dangereuses.
! N’utilisez pas des écouteurs ou un casque
d’écoute lorsque vous opérez un véhicule
motorisé ; une telle utilisation peut créer des
dangers sur la route et est illégale à de nom-
breux endroits.
Quelques mots sur cet appareil
Les fréquences du syntoniseur de cet appareil
sont attribuées pour une utilisation en Amérique
du Nord. Son utilisation dans d’autres régions
peut se traduire par une réception de mauvaise
qualité.
Français
Avant de commencer
73
Section
Avant de commencer
Fr
01
<CRD4844-A>73
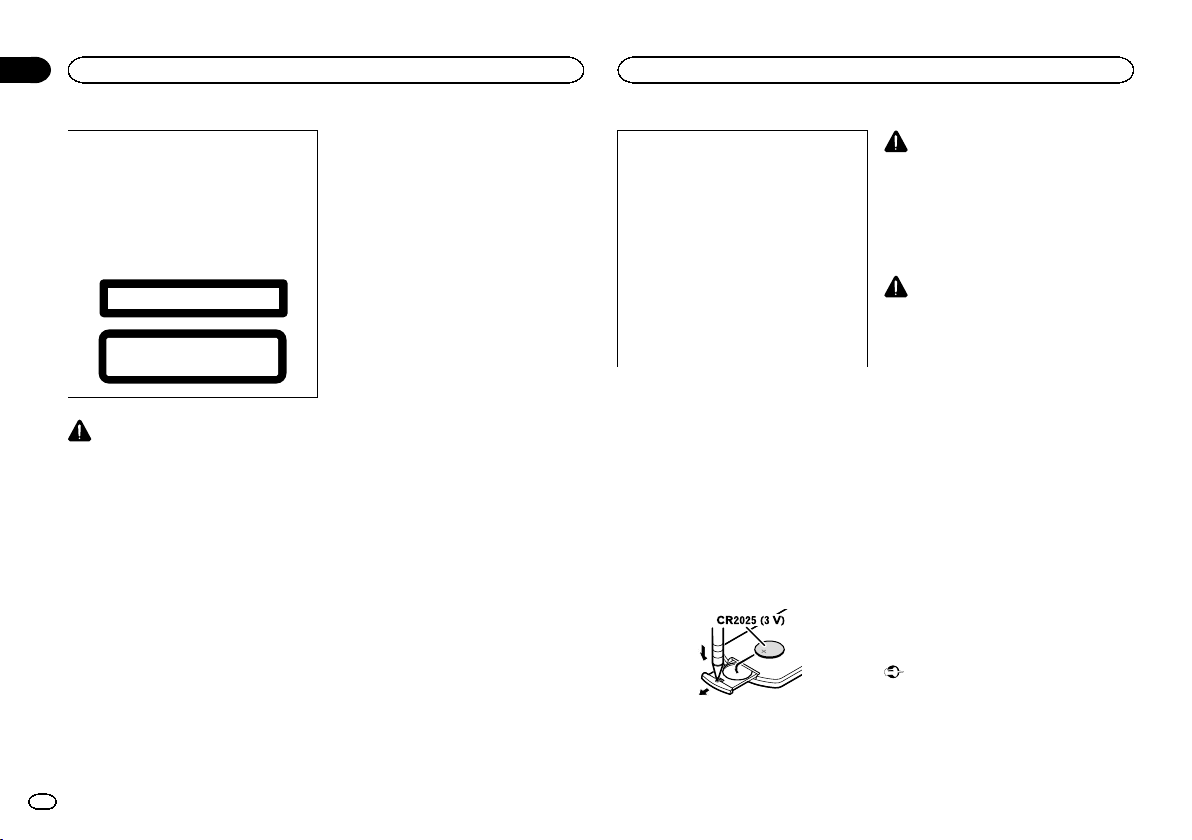
Black plate (74,1)
PRÉCAUTION
Ce produit est classifié comme produit laser
de classe 1 selon la norme IEC 60825-1:2007
“Sécurité des appareils à laser” et contient un
module laser de classe 1M. Pour assurer une
sécurité permanente, n’enlevez aucun couver-
cle et n’essayez pas d’accéder à l’intérieur du
produit. Faites effectuer l’entretien par du per-
sonnel qualifié.
APPAREIL À LASER DE CLASSE 1
ATTENTION—ÉMISSIONS DE RADIATIONS LASER VISIBLES ET
INVISIBLES DE CLASSE 1M SI OUVERT. NE PAS OBSERVER
DIRECTEMENT AVEC DES INSTRUMENTS OPTIQUES.
PRÉCAUTION
! Ne laissez pas cet appareil entrer en contact
avec des liquides. Cela pourrait provoquer
une électrocution. Tout contact avec des li-
quides pourrait également provoquer des
dommages, de la fumée et une surchauffe
de l’ appareil.
! Conservez ce mode d’emploi à portée de
main pour référence ultérieure.
! Maintenez le niveau d’écoute à une valeur
telle que vous puissiez entendre les sons pro-
venant de l’extérieur.
! Évitez tout contact avec l ’humidité.
! Si la batterie est débranchée ou déchargée,
le contenu de la mémoire sera effacé.
Numéros de région des
disques DVD vidéo
Seuls les disques DVD vidéo qui ont des numé-
ros de région compatibles peuvent être lus sur
ce lecteur. Vous trouverez le numéro de région
du lecteur sur le fond de l’appareil et dans ce
mode d’emploi (reportez-vous à la page 143, Ca-
ractéristiques techniques).
Quelques mots sur ce mode
d’emploi
! Cet appareil possède des fonctions sophisti-
quées permettant d’assurer une réception et
un fonctionnement de haute qualité. Toutes
ces fonctions ont été conçues pour en facili-
ter au maximum l’utilisation, mais un grand
nombre d’entre elles ne sont pas auto-expli-
catives. Ce mode d’emploi vous aidera à pro-
fiter pleinement du potentiel de cet appareil
et à maximiser votre plaisir d’écoute.
! Ce manuel utilise des illustrations d’écrans
réels pour décrire les opérations. Cependant,
en fonction du modèle utilisé, les écrans de
certains appareils ne correspondent pas aux
illustrations présentées dans ce manuel.
Service après-vente des
produits Pioneer
Veuillez contacter le revendeur ou le distributeur
auprès duquel vous avez acheté cet appareil
pour le service après-vente (y compris les condi-
tions de garantie) ou pour toute autre informa-
tion. Dans le cas où les informations
nécessaires ne sont pas disponibles, veuillez
contacter les sociétés indiquées ci-dessous :
N’expédiez pas l’appareil pour réparation à l’une
des adresses figurant ci-dessous sans avoir pris
contact au préalable.
États-Unis
Pioneer Electronics (USA) Inc.
CUSTOMER SUPPORT DIVISION
P.O. Box 1760
Long Beach, CA 90801-1760
800-421-1404
CANADA
Pioneer Électroniques du Canada, Inc.
DÉPARTEMENT DE SERVICE AUX CONSOM-
MATEURS
340 Ferrier Street
Unit 2
Markham, Ontario L3R 2Z5, Canada
1-877-283-5901
905-479-4411
Pour connaître les conditions de garantie, repor-
tez-vous au document Garantie limitée qui ac-
compagne cet appareil.
Utilisation et entretien de la
télécommande
Installation de la pile
Sortez le porte-pile en le faisant glisser par l’ar-
rière de la télécommande et insérez la pile en
respectant les polarités (+) et (–).
! Lors de la première utilisation, retirez le film
qui dépasse du porte-pile.
ATTENTION
! Conservez la pile hors de portée des enfants.
Au cas où la pile serait avalée, consultez im-
médiatement un médecin.
! Les piles ne doivent pas être exposées à des
températures élevées telles que la lumière di-
recte du soleil, des flammes ou toute autre
source de chaleur similaire.
PRÉCAUTION
! Retirez la pile si la télécommande n’est pas
utilisée pendant un mois ou plus.
! Remplacer la pile de manière incorrecte peut
créer un risque d’explosion. Remplacez la
pile uniquement par une pile identique ou de
type équivalent.
! Ne manipulez pas la pile avec un outil métal-
lique.
! Ne conservez pas la pile avec des objets mé-
talliques.
! Si la pile fuit, nettoyez soigneusement la télé-
commande, puis insérez une pile neuve.
! Lors de la mise au rebut des piles usagées,
respectez les règlements nationaux ou les
instructions locales en vigueur dans le pays
ou la région en matière de conservation ou
de protection de l’environnement.
Utilisation de la télécommande
Pointez la télécommande dans la direction de la
face avant de l’appareil à télécommander.
! La télécommande peut ne pas fonctionner
correctement à la lumière directe du soleil.
Important
! Ne laissez pas la télécommande exposée à
des températures élevées ou à la lumière di-
recte du soleil.
! Ne laissez pas la télécommande tomber sur
le plancher, où elle pourrait gêner le bon
fonctionnement de la pédale de frein ou d’ac-
célérateur.
Avant de commencer
74
Section
Avant de commencer
Fr
01
<CRD4844-A>74
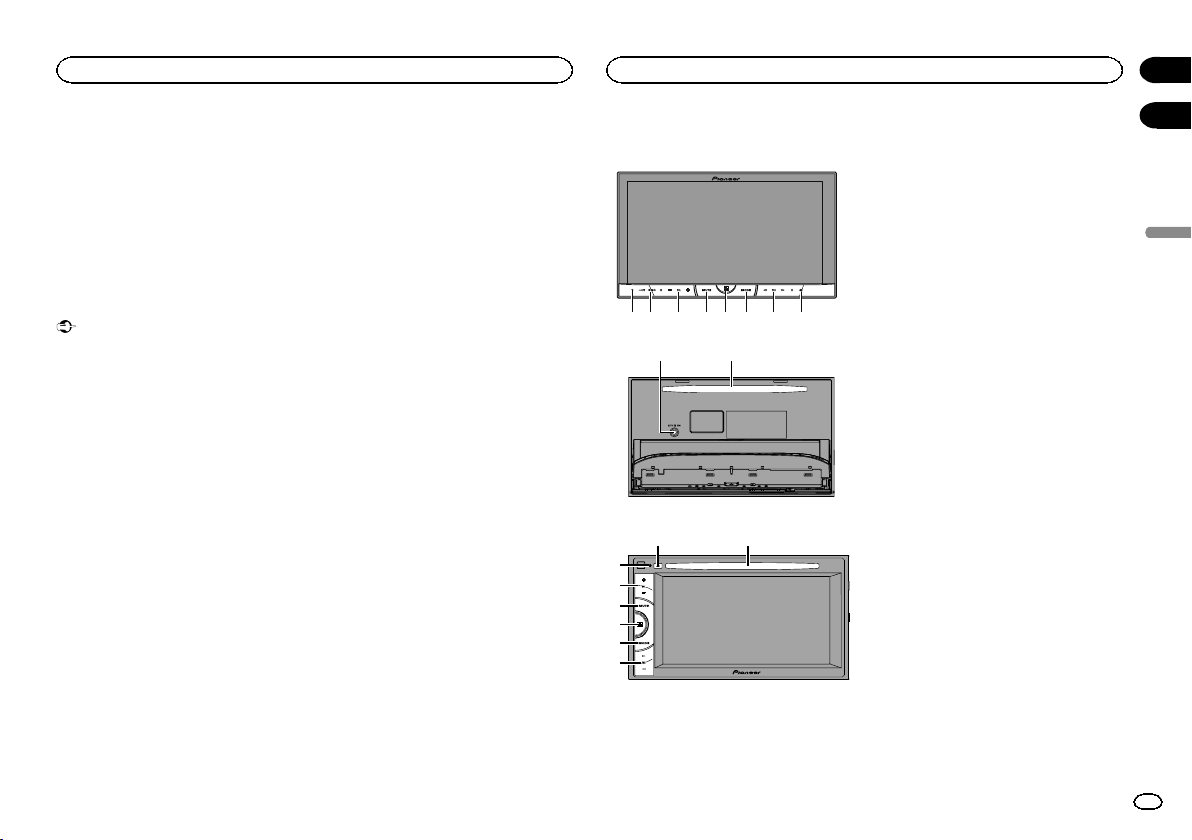
Black plate (75,1)
Mode de démonstration
La démonstration des fonctions démarre auto-
matiquement lorsque vous sélectionnez OFF
pour la source alors que le contact d’allumage
est en position ACC ou ON. Pour annuler la dé-
monstration des fonctions, appuyez de façon
prolongée sur MUTE. Appuyez à nouveau de
façon prolongée sur la touche MUTE pour redé-
marrer. Utiliser la démonstration des fonctions
lorsque le moteur du véhicule est coupé peut dé-
charger la batterie.
Important
Le fil rouge (ACC) de cet appareil doit être
connecté à la fonction de mise en/hors service.
Ne pas le faire peut entraîner le déchargement
de la batterie.
Appareil central
AVH-X5600BHS et AVH-X4600BT
1 2 3 5 6 74
8
9 a
AVH-X3600BHS, AVH-X2600BTet AVH-X1600DVD
8a
1
3
4
5
6
7
1 RESET
Pour les détails, reportez-vous à la page 121,
Réinitialisation du microprocesseur.
2 SRC/OFF
3 +/– (VOLUME/VOL)
4 MUTE
Appuyez sur cette touche pour couper le
son. Appuyez à nouveau pour réactiver le
son.
5 Touche accueil
Affichage de l’écran d’accueil.
L’affichage revient à l’écran de lancement
lorsqu’une application tierce est utilisée avec
AppRadio Mode.
Double-cliquez sur l’icône sur l’écran de lan-
cement pour revenir à l’ affichage de l’affi-
cheur d’accueil.
6 MODE
Lorsque l’entrée RGB n’est pas utilisée
! Appuyez sur MODE pour mettre l’affi-
chage hors service. Appuyez de nouveau
sur MODE pour activer l’affichage.
Lorsque l’entrée RGB est utilisée
! Maintenez la pression sur MODE pour
désactiver l’affichage. Appuyez de nou-
veau sur MODE pour activer l’affichage.
! Quand le système de navigation est
connecté, appuyez sur MODE pour affi-
cher l’écran de navigation.
! Lorsqu’un iPhone exécutant une applica-
tion qui prend en charge AppRadio
Mode est connecté, appuyez sur MODE
pour basculer sur l’écran des applica-
tions. Vous pouvez utiliser l’application en
touchant l’écran.
! Quand un smartphone compatible avec
la fonction MirrorLink est connecté, ap-
puyez sur MODE pour afficher l’écran
des applications. Vous pouvez utiliser
l’application en touchant l’écran.
7 c/d (TRK)
8 h (éjection)
Français
Avant de commencer
75
Section
Description de l’appareil
Fr
02
03
<CRD4844-A>75
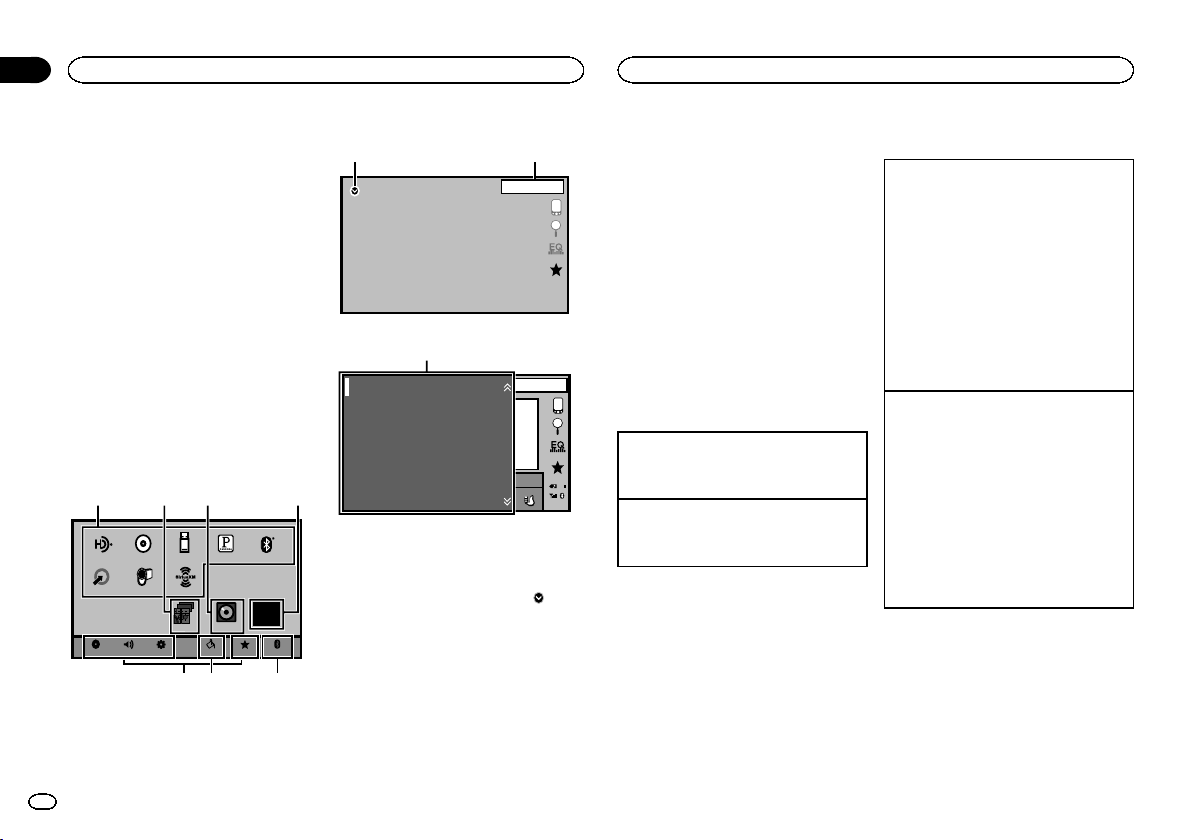
Black plate (76,1)
9 Jack d’entrée du microphone EQ auto
Utilisez ce jack pour connecter un micro-
phone EQ auto.
a Fente de chargement des disques
Remarques
! Pour plus de détails sur le fonctionnement
du système de navigation à partir de cette
unité, consultez le mode d’emploi approprié.
! Pour plus de détails sur la connexion d’un
iPod ou d’un périphérique de stockage USB
à cet appareil, reportez-vous à la page 126,
Lors de la connexion avec le câble CD-IU201V
en option.
! Pour des détails sur la connexion d’un smart-
phone avec la fonction MirrorLink à cet appa-
reil, reportez-vous à la page 126, Connexion
d’un adaptateur de liaison de smartphone op-
tionnel (CD-ML100).
Afficheur d’accueil
Afficheur d’accueil
HD Radio
Disc USB/iPod
Pandora
Bluetooth Audio
AV
RearViewApps
OFF
AUX
Bluetooth
Favorites
ThemeSystem
Settings
AudioVideo
SiriusXM
1324
567
Affichage de la source hors service
OFF
1 JAN
AM
12:12
89
Affichage de la source en service
JAN
AM
DB
12:22
Bluetooth Audio
SiriusXM
iPod
HD Radio
Pandora
Disc
S.Rtrv
Appr
ppr
App
pp
Ap p
1
1 Icône de la source
Sélection d’une source préférée.
Lorsque l ’icône de la source n’est pas affi-
chée, elle peut être affichée en appuyant sur
la touche d’accueil ou en touchant
.
2 Touche Apps/MirrorLink
Basculer sur AppRadio Mode/MirrorLink
Mode.
3 Touche de la vue arrière
Affichage de l’image de la vue arrière.
Pour les détails, reportez-vous à la page 78,
Utilisation de la vue arrière.
4 Source off touche
Mise hors service de la source.
5 Bluetooth touche
Affichage du menu de connexion Bluetooth.
6 thème touche
Affichage du menu thème.
7 Icône du menu
Affichage du menu.
8 Source touche
Affichage du menu source.
9 Clock touche
Passage à l’écran de réglage de l’horloge.
Mise en/hors service de la
source
(Fonction de AVH-X5600BHS/AVH-X4600BT)
Mise sous tension de la source à l’aide des tou-
ches
1 Appuyez sur SRC/OFF pour mettre la source
en service.
Mise hors tension de la source à l’aide des tou-
ches
1 Maintenez la pression sur SRC/OFF jusqu’àce
que la source soit mise hors service.
Choix d’une source
Modes sources disponibles
! SiriusXM – Syntoniseur SiriusXM
(AVH-X5600BHS/AVH-X3600BHS)
! HD Radio – Syntoniseur HD Radio
(AVH-X5600BHS/AVH-X3600BHS)
! Radio – Syntoniseur radio
(AVH-X4600BT/AVH-X2600BT/AVH-X1600DVD)
! Disc – Lecteur de DVD et CD intégré
! USB, iPod,ouUSB MTP – USB/iPod/MTP
! Pandora – Radio Pandora
â
sur Internet
! Bluetooth Audio – Audio Bluetooth intégré
(AVH-X5600BHS/AVH-X4600BT/AVH-
X3600BHS/AVH-X2600BT)
! AUX – AUX
! AV – Entrée AV
Choix d’une source
! Utilisation de la touche SRC/OFF
(Fonction de AVH-X5600BHS/AVH-X4600BT)
1 Appuyez sur SRC/OFF.
! Utilisation des touches du clavier tactile de
l’afficheur d’accueil
1 Touchez l’icône de la source, puis touchez
le nom de la source souhaitée.
! Quand l’icône de la source n’est pas affi-
chée, vous pouvez l’afficher en touchant
l’écran.
! Pendant que vous utilisez le menu, vous
ne pouvez pas sélectionner une source en
touchant son icône.
Remarque
L’icône USB/iPod change comme suit :
! USB/iPod est affiché quand aucun appareil n’est
connecté.
! USB est affiché quand un périphérique de stoc-
kage USB est connecté à l’entrée USB.
! iPod est affiché quand un iPod est connecté à
l’entrée USB.
Description de l’appareil
76
Section
Description de l’appareil
Fr
03
<CRD4844-A>76
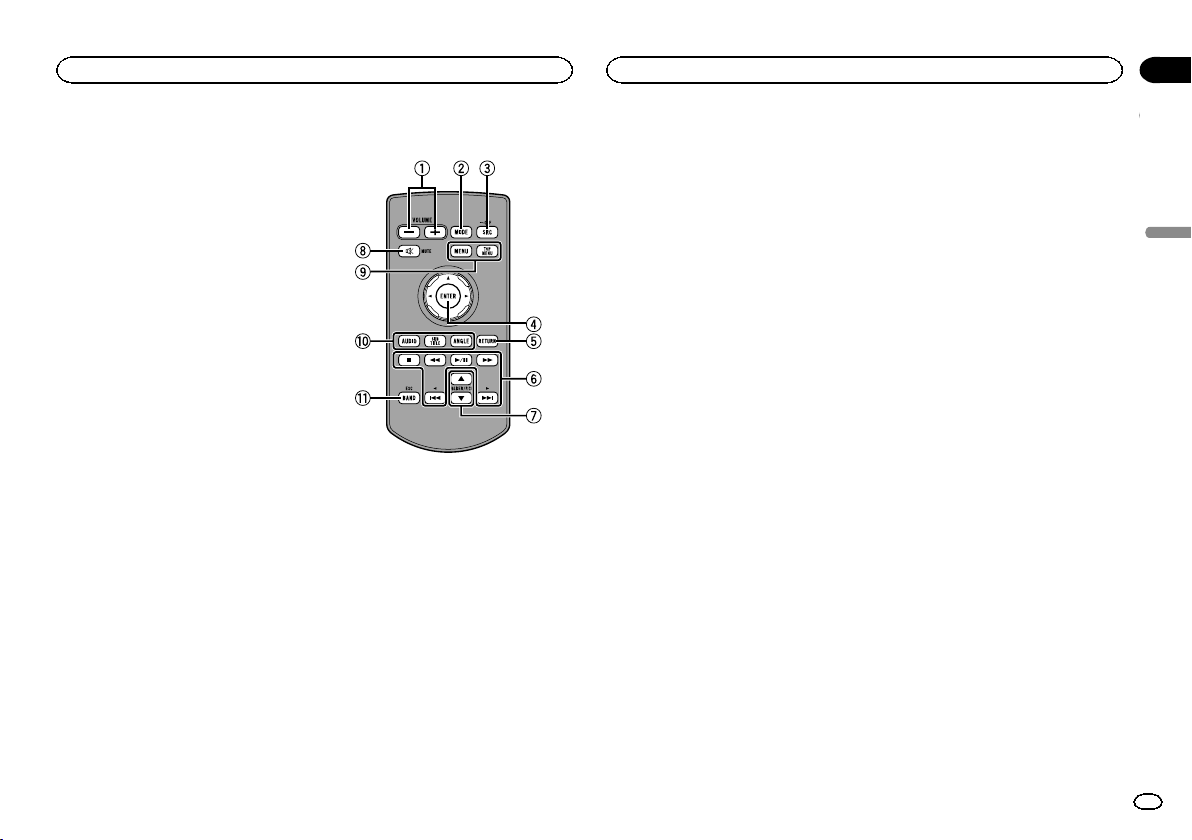
Black plate (77,1)
! USB MTP s’affiche lorsqu’un périphérique
Android compatible MTP (utilisant le système
d’exploitation Android 4.0 ou version supérieure)
peut être connecté via une connexion MTP à
l’aide d’un câble USB.
Réglage du volume
% Appuyez sur +/– (VOLUME/VOL) pour ré-
gler le volume.
Télécommande
1 +/– (VOLUME/VOL)
2 MODE
Mise hors service de l’écran d’information.
3 SRC/OFF
Appuyez sur cette touche pour parcourir les
différentes sources disponibles. Maintenez la
pression sur cette touche pour mettre la
source hors service.
4 Sélecteur multidirectionnel
Permet de sélectionner un menu dans le
menu DVD.
5 RETURN
Appuyez sur cette touche pour afficher le
menu PBC (contrôle de la lecture) pendant
la lecture PBC.
6 f
Appuyez sur cette touche pour mettre en
pause ou reprendre la lecture.
m
Appuyez sur cette touche pour effectuer un
retour rapide.
Appuyez sur cette touche pour changer la vi-
tesse du retour rapide.
n
Appuyez sur cette touche pour effectuer une
avance rapide.
Appuyez sur cette touche pour changer la vi-
tesse de l’avance rapide.
o
Appuyez sur cette touche pour revenir à la
plage précédente (au chapitre précédent).
p
Appuyez sur cette touche pour aller à la
plage suivante (au chapitre suivant).
g
Appuyez sur cette touche pour arrêter la lec-
ture.
Si vous reprenez la lecture, cette dernière re-
prend là où vous l’aviez arrêtée. Touchez de
nouveau la touche pour arrêter totalement la
lecture.
7 FOLDER/P.CH
Appuyez sur cette touche pour choisir le
disque ou dossier suivant ou précédent.
Appuyez pour rappeler les fréquences des
stations de radio attribuées aux touches de
présélection.
8 MUTE
Appuyez sur cette touche pour couper le
son. Appuyez à nouveau pour réactiver le
son.
9 MENU
Appuyez sur cette touche pour afficher le
menu DVD pendant la lecture d’un DVD.
TOP MENU
Appuyez sur cette touche pour revenir au
menu principal pendant la lecture d’un DVD.
a AUDIO
Appuyez sur cette touche pour changer la
langue audio pendant la lecture d’un DVD.
Appuyez pour changer de sortie audio pour
les DivX/MPEG-4.
SUBTITLE
Appuyez sur cette touche pour changer la
langue des sous-titres pendant la lecture
d’un DVD/DivX/fichier MPEG-4.
ANGLE
Appuyez sur cette touche pour changer l’an-
gle de vue pendant la lecture d’un DVD.
b BAND/ESC
Appuyez sur cette touche pour choisir la
bande du syntoniseur quand le syntoniseur
est sélectionné comme source. Utilisée aussi
pour annuler le mode commande des fonc-
tions.
Appuyez sur cette touche pour basculer d’un
mode à l’autre lors de la lecture des types de
données suivants:
! Disque
Audio compressé et données audio
(CD-DA) tels que les disques CD-EXTRA
et MIXED-MODE
! Périphérique de stockage USB
Données audio, données vidéo et don-
nées photo
Français
Description de l’appareil
77
Section
Description de l’appareil
Fr
03
<CRD4844-A>77
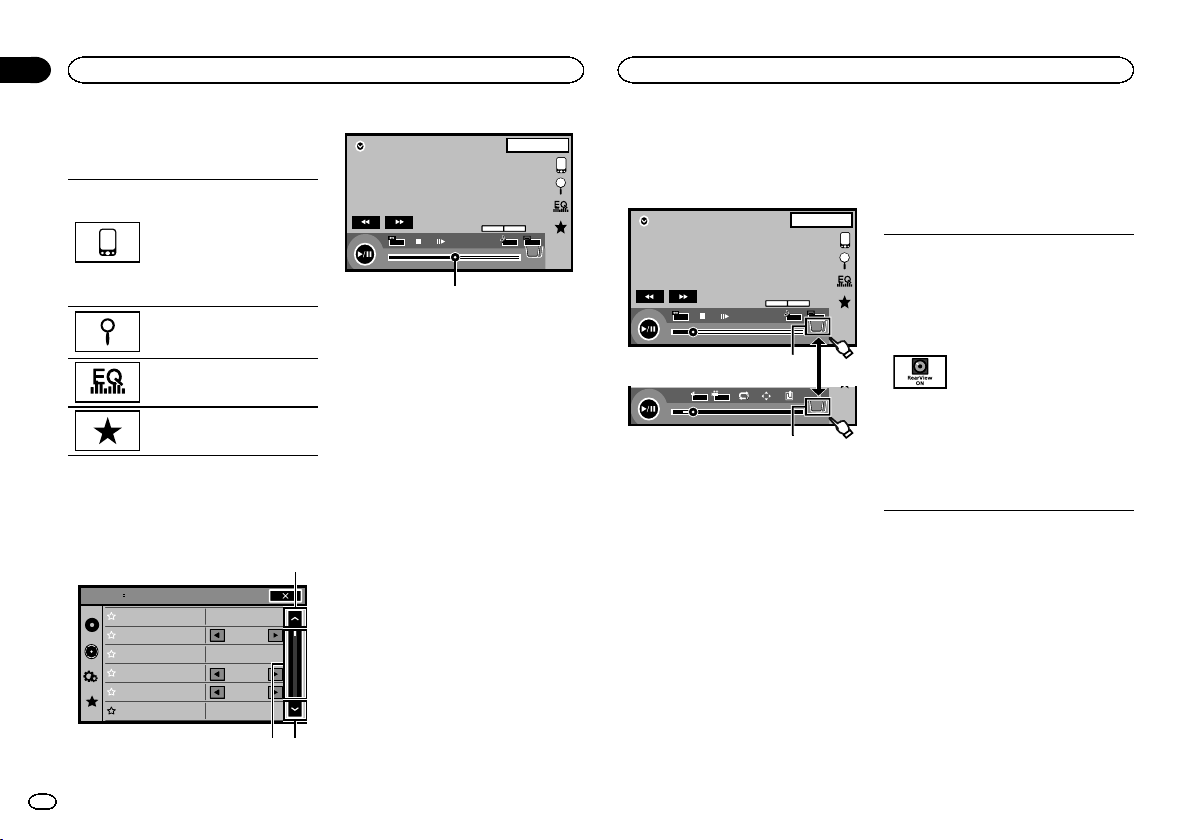
Black plate (78,1)
Utilisation standard des
éléments de menu/listes
(Fonction de AVH-X5600BHS/
AVH-X4600BT/AVH-X3600BHS/
AVH-X2600BT)
Ouverture du menu du téléphone
Bluetooth.
Pour les détails, reportez-vous
à la page 103, Téléphone
Bluetooth.
Affichage du menu de listes.
Exécution de la fonction de re-
cherche.
Affichage du réglage EQ (menu
des fonctions audio).
Affichage du menu Favori.
Utilisation de l’icône de
défilement et de la barre de
lecture
Sonic Center Control
Loudness
Subwoofer
Bass Booster
High Pass Filter
Source Level Adjuster
L/R 0
Low
0
125Hz
0
On
Audio
1
12
DVD-V
00'20'' -119'51''
48kHz 16bit
Dolby D
MENU
MENU
TOP
1/2
Dolby DMulti ch
FULL
11
1JAN
PM
12:43
01 01
3
1 Icône de défilement
Apparaît lorsque des éléments sélectionna-
bles sont masqués.
Touchez l’icône de défilement pour afficher
les éléments masqués.
2 Barre de lecture
Apparaît lorsque les éléments ne peuvent
pas être affichés sur une seule page.
Faites glisser la barre de lecture pour afficher
tout élément caché.
Vous pouvez également faire glisser la liste
pour afficher tout élément caché.
3 Point de lecture
Spécification du point de lecture
Faites glisser le point de lecture à l’écran.
Activation des touches du
clavier tactile
Touches du clavier tactile
DVD-V
00'20'' -119'51''
48kHz 16bit
Dolby D
MENU
MENU
TOP
1/2
Dolby DMulti ch
FULL
1 1
1JAN
PM
12:43
01 01
07'24'' -112'47''
2/2
L+R
Return
1
1
1
1 Touche d’onglet
Basculer sur les touches du clavier tactile à
l’écran.
Utilisation de la vue arrière
Une caméra de vue arrière, vendue séparément,
est nécessaire pour utiliser le mode vue arrière.
Les fonctions ci-dessous sont disponibles.
! Caméra de vue arrière
Cet appareil peut être configuré pour afficher
automatiquement l’image de la vue arrière
lorsque vous placez le levier de vitesse en po-
sition MARCHE ARRIÈRE (R).
! Caméra pour le mode vue arrière
Vous pouvez activer la vue arrière à l’écran à
tout moment.
Pour activer le mode vue arrière, la caméra
de vue arrière peut être réglée sur n’importe
quel réglage mais ne doit surtout pas être
éteinte.
Pour des détails sur les réglages, reportez-vous
à la page 115, Réglage de la caméra de vue arrière
(caméra de recul).
Utilisation de la touche de la vue
arrière pour afficher la vue arrière
Affichage de l’image de la vue ar-
rière via la mise en service de l’i-
mage de la vue arrière.
Lorsque l’image de la vue arrière
s’affiche, vous pouvez basculer sur
l’affichage de la source en tou-
chant l’écran. Vous pouvez alors
temporairement effectuer des opé-
rations à partir de l’affichage de la
source à ce stade. Si vous n’effec-
tuez aucune opération pendant
quelques secondes, l’écran revient
àl’image de la vue arrière.
Pour mettre l’image de la vue ar-
rière hors service, appuyez sur la
touche accueil pour revenir à l’é-
cran d’accueil, puis appuyez à nou-
veau sur cette touche.
Utilisation du moniteur arrière
La connexion d’un moniteur arrière (vendu sépa-
rément) à cet appareil permet d’afficher des
images et des vidéos à partir des sièges arrière.
Remarques
! Vous ne pouvez pas utiliser les touches du
clavier tactile ni les écrans d’opérations à
partir du moniteur arrière.
! Les images et vidéos continuent d’être affi-
chées que le véhicule soit en mouvement ou
arrêté.
Opérations communes
78
Section
Opérations communes
Fr
04
<CRD4844-A>78
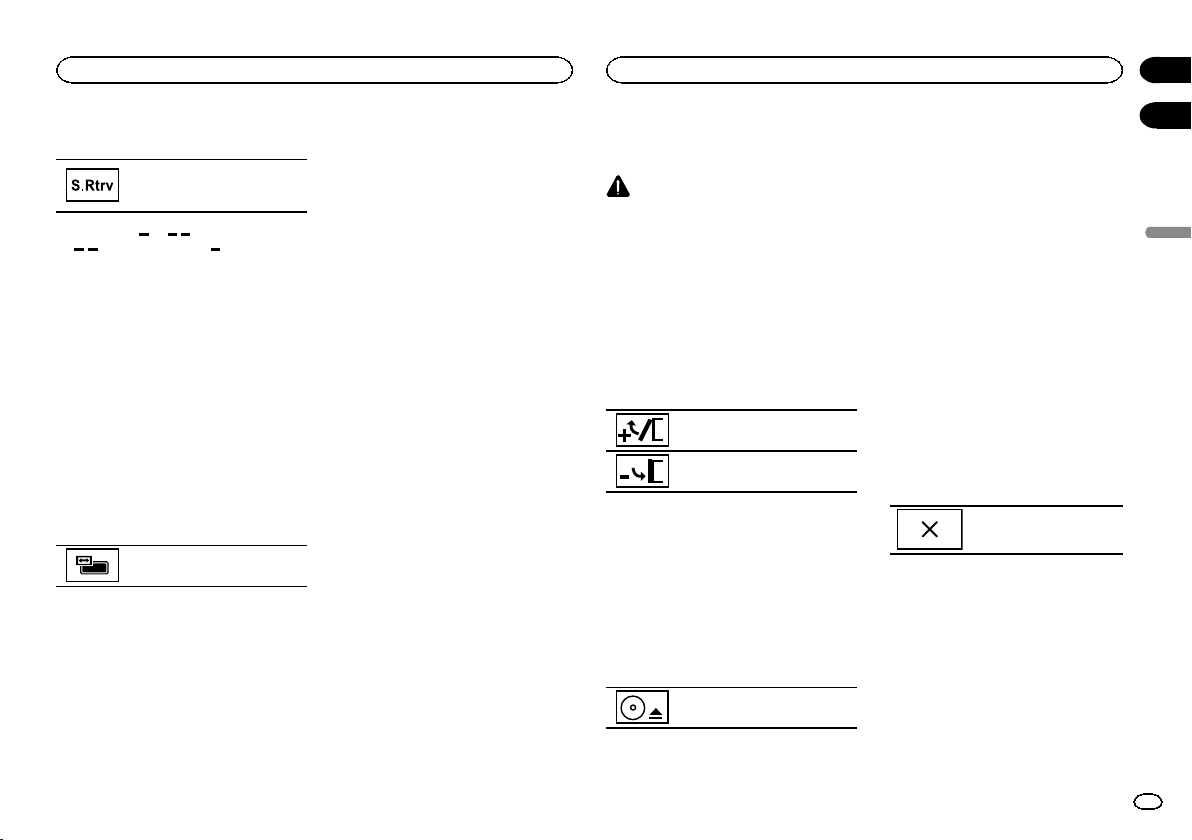
Black plate (79,1)
Utilisation du correcteur de son
Améliore automatiquement l’audio
compressé et restaure un son
riche.
Hors service — —
! est plus efficace que .
Remarques
! Cette fonction est activée pour la lecture des
sources répertoriées ci-dessous.
— CD-DA
— Fichiers MP3/WMA/AAC sur des périphéri-
ques de stockage MTP USB
— Fichiers MP3/WMA/AAC/WAV sur des péri-
phériques de stockage USB
— Fichiers MP3/WMA/AAC sur un support CD
— iPod
— Pandora (iPod avec connecteur 30 broches
uniquement)
! Le réglage de correction du son est désactivé
lorsque la fonction MIXTRAX est utilisée en
mode source USB.
Changer le mode écran large
Sélection du format d’écran appro-
prié pour la lecture vidéo.
1 Afficher le mode écran.
2 Touchez le réglage du mode écran large
désiré.
FULL (plein écran)
L’image 4:3 est agrandie dans la direction hori-
zontale seulement, ce qui aux utilisateurs de bé-
néficier d’ une image TV 4:3 (image normale)
sans en perdre une partie.
ZOOM (zoom)
L’image 4:3 est agrandie dans la même propor-
tion verticalement et horizontalement ; idéal
pour une image de taille cinéma (image écran
large).
NORMAL (normal)
L’image 4:3 est affichée telle quelle, ce qui ne
donne aux utilisateurs aucune sensation de dis-
parité puisque ses proportions sont les mêmes
que celles de l’image normale.
Remarques
! Vous ne pouvez pas utiliser cette fonction
pendant la conduite.
! Des réglages différents peuvent être enregis-
trés pour chaque source vidéo.
! Quand une source vidéo est visualisée dans
un mode écran large qui ne correspond pas
à son ratio d’aspect original, elle peut appa-
raître différente.
! Rappelez-vous que l’utilisation de la fonction
écran large de ce système dans un but
commercial ou de présentation publique
peut constituer une violation des droits d’au-
teur protégés par les lois sur le copyright.
! L’image vidéo apparaîtra plus grossière
quand elle est visualisée en mode ZOOM.
! Cette fonction est activée pour la lecture des
sources répertoriées ci-dessous.
— Disc: DVD-V, CD Vidéo, DivX, MPEG-1,
MPEG-2, MPEG-4
— USB: DivX, MPEG-1, MPEG-2, MPEG-4, JPEG
— iPod: Vidéo
— AV : Données A/V
— AUX: Données A/V
Réglage de l’angle du panneau
LCD et éjection du support
PRÉCAUTION
Prenez garde à vos mains et à vos doigts lorsque
vous ouvrez, fermez ou réglez le panneau LCD.
Faites tout particulièrement attention aux mains
et aux doigts des enfants.
Réglage de l’angle du panneau LCD
(Fonction de AVH-X5600BHS/AVH-X4600BT)
1 Appuyez sur h (éjection) pour afficher le
menu d’éjection.
2 Réglez le panneau LCD suivant un angle
offrant une visibilité aisée.
Abaisser l’écran.
Remettre l’écran à la verticale.
# Une fois l’angle mémorisé, le panneau LCD retro-
uvera automatiquement la même position à sa pro-
chaine ouverture.
Éjection d’un disque
(Fonction de AVH-X5600BHS/AVH-X4600BT)
1 Appuyez sur h (éjection) pour afficher le
menu d’éjection.
2 Éjectez un disque.
Éjecter un disque.
Éjection d’un disque
(Fonction de AVH-X3600BHS/AVH-X2600BT/
AVH-X1600DVD)
% Appuyez sur h pour éjecter un disque.
Réglage de l’horloge
1 Touchez Clock.
L’écran Clock Adjustment s’affiche.
Reportez-vous à la page 76, Clock touche.
2 Sélectionnez l’élément à régler.
3 Touchez a ou b pour régler la date et
l’heure correctes.
Remarques
! Vous pouvez sélectionner le format de la
date. Touchez jj/mm/aa, aa/mm/jj ou
mm/jj/aa.
! Vous pouvez sélectionner le format de l’hor-
loge. Touchez 12hr (horloge 12 heures) ou
24hr (horloge 24 heures).
Indique que l’affichage est
fermé.
Français
Opérations communes
79
Section
Opérations de base
Fr
04
05
<CRD4844-A>79
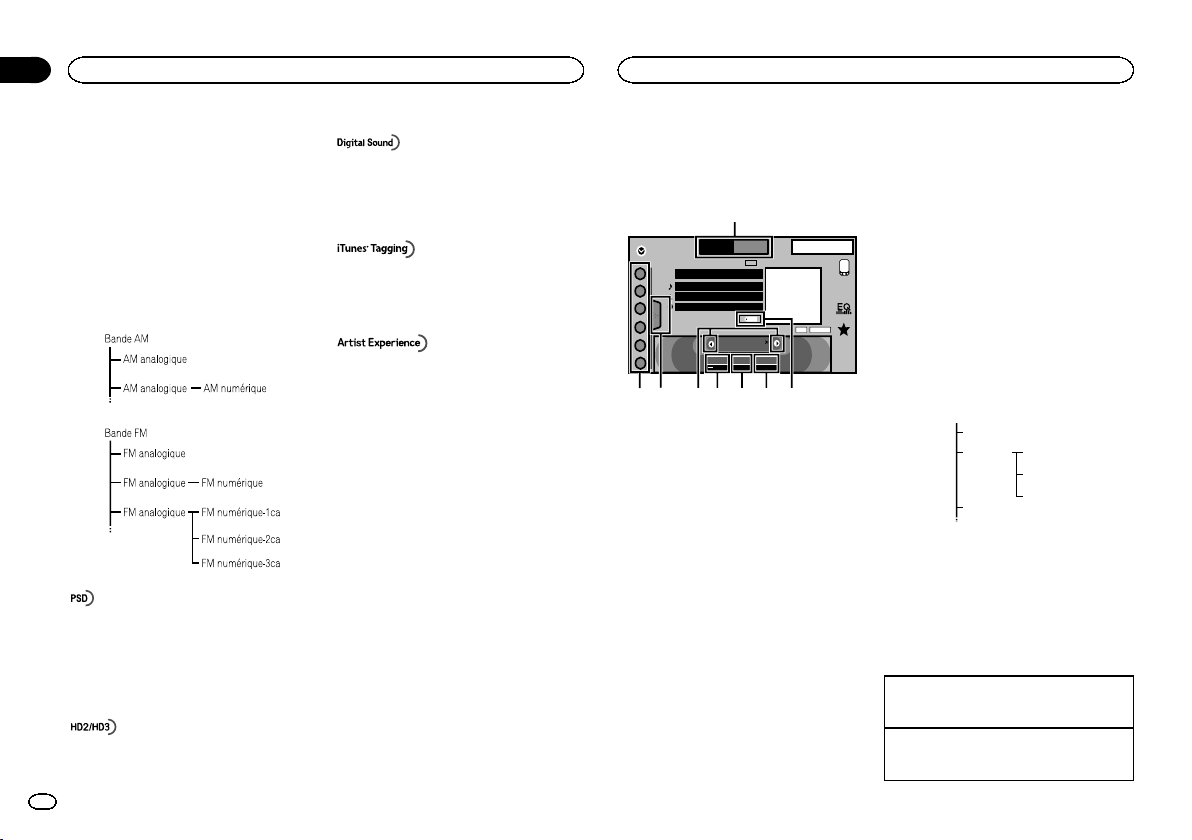
Black plate (80,1)
À propos des stations
HD Radioä
(Fonction de AVH-X5600BHS/AVH-X3600BHS)
Les stations HD Radioä offre des services de
transmission audio et de données de haute qua-
lité. Les stations HD Radio vous sont fournies
par vos stations locales FM/AM.
Les caractéristiques des stations HD Radio sont
les suivantes:
! Audio de haute qualité
! Multidiffusion FM
! Services de données
Données du service de programm e :
- Permettent à l'utilisateur de bénéficier de la technologie
avancée de HD Radio.
- Indiquent le titre des plages musicales, le nom de l'inter-
prète, les codes d’identification des stations, le guide des
canaux HD2/HD3, ainsi que d'autres flux de données uti-
les.
Les canaux HD2/HD3, canaux FM locaux adjacents au
canal principal, offrent une musique nouvelle et originale,
ainsi qu'une grande variété de genres musicaux.
Son numérique de qualité CD. La technologie HD Radio
permet aux stations de radio locales d'émettre un signal
numérique clair. Le son de la bande AM s’apparente au
son de la bande FM et le son de la bande FM s’apparente
à celui d'un CD.
La fonction iTunes
â
Tagging vous permet de découvrir
une large gamme de contenus et également d’« étiqueter
» ce contenu pour con sultation ultérieure et l’achat dans
la boutique iTunes
â
.
Informations visuelles relatives au contenu lu sur votre ré-
cepteur HD Radio, comme les pochettes d’album, les
photographies anciennes, les captures d’émissions en di-
rect, entre autres contenus connexes.
Technologie HD Radioä
Technologie HD Radio fabriquée sous licence
possédée par iBiquity Digital Corporation. U.S.
et des brevets étrangers. HD Radioä et les logos
HD, HD Radio et « Arc » sont des marques
commerciales de iBiquity Digital Corp.
Utilisation du syntoniseur
HD Radio
Touches du clavier tactile
HD Radio
8 AUG
PM
12:05
1
2
3
4
5
6
FM AM1
HD
Local Seek
ALL
Blending
D/A Auto
87.9
MHz
DIGITAL
PS Data
Song Data
Artist Data
Album Data
Tag
HD8
1
2345678
1 Touche de bande
Sélection d’une bande (FM ou AM) en sélec-
tionnant la touche correspondante.
La touche de la bande sélectionnée est mise
en surbrillance sur l’écran tactile.
Basculement entre FM1, FM2 et FM3 en ap-
puyant sur la touche de la bande.
Lorsque AM est sélectionné, vous ne pouvez
pas basculer sur une autre bande AM en ap-
puyant sur la touche de la bande.
2 Touche d’étiquette
Enregistrement sur votre iPod des informa-
tions sur la plage musicale (étiquette) de la
station d’émission.
3 Touche de mode de réception
Commutation vers la diffusion analogique de
la même fréquence.
4 Touche de mode de recherche
Commutation entre la recherche d’accord
sur les stations d’émission numériques et la
recherche normale.
5 Touche de station locale
Réglage de l’accord automatique sur une
station locale.
6 Touche de présélection
Accord manuel vers le haut ou le bas.
Enfoncez la touche de façon prolongée pen-
dant plus de deux secondes pour ignorer des
stations. L’accord automatique démarre dès
que vous relâchez la touche. Appuyez à nou-
veau sur la touche pour annuler l’accord au-
tomatique.
Lorsqu’une station analogique est reçue,
l’accord vers le bas est exécuté lors de l’é-
mission analogique. (6 d 2)
Si une émission numérique n’est pas encore
reçue, l’accord vers le haut est exécuté au ni-
veau de la station analogique suivante. (2
d 6)
FM analogique 1
FM numérique-1ca 3
FM numérique-2ca 4
FM numérique-3ca 5
FM analogique 2
FM analogique 6
7 Touche de liste
Affichage de la liste des canaux présélection-
nés.
8 Touche de canal présélectionné
Sélectionnez un canal présélectionné.
Opérations de base
Basculement entre des canaux présélectionnés à
l’aide des touches
1 Appuyez sur c ou d (TRK).
Accord automatique à l’aide des touches
1 Appuyez de façon prolongée sur c ou d
(TRK).
Syntoniseur HD Radioä
80
Section
Syntoniseur HD Radioä
Fr
06
<CRD4844-A>80
Black plate (81,1)
Remarque
Les touches du clavier tactile non indiquées à
Utilisation du syntoniseur HD Radio peuvent s’af-
ficher à l’écran.
Reportez-vous à la page 134, Liste des indica-
teurs.
Mise en mémoire et rappel
des stations
Vous pouvez facilement mettre en mémoire jus-
qu’à six stations pour chaque gamme.
1 Affichez l’écran de la liste des canaux
présélectionnés.
Reportez-vous à la page 80, Utilisation du synto-
niseur HD Radio.
La liste des canaux présélectionnés apparaît à
l’écran.
2 Touchez de façon prolongée l’une des
touches de présélection pour mettre en mé-
moire la fréquence sélectionnée.
La fréquence de la station de radio sélectionnée
a été mise en mémoire.
3 Touchez la touche de présélection appro-
priée pour sélectionner la station désirée.
Mise en mémoire des
stations les plus fortes
La fonction BSM (mémoire des meilleures sta-
tions) mémorise automatiquement les six sta-
tions les plus fortes dans l’ordre de la force du
signal.
La mise en mémoire de fréquences à l’aide de la
fonction BSM peut provoquer le remplacement
d’autres fréquences déjà conservées grâce aux
touches d’accord sur présélection.
1 Affichez l’écran de la liste des canaux
présélectionnés.
Reportez-vous à la page 80, Utilisation du synto-
niseur HD Radio.
La liste des canaux présélectionnés apparaît à
l’écran.
2 Touchez BSM pour mettre en service
BSM.
Les six stations d’émission des plus fortes sont
enregistrées dans les touches d’accord sur pré-
sélection dans l’ordre de la force du signal.
# Pour annuler la mise en mémoire, touchez
Cancel.
Accord sur les signaux
puissants
L’accord automatique sur une station locale ne
s’intéresse qu’aux stations de radio dont le si-
gnal reçu est suffisamment puissant pour ga-
rantir une réception de bonne qualité.
FM : Hors service —
— — —
AM : Hors service — —
Plus le nombre de affichés à l’écran est im-
portant, et plus le nombre de stations pouvant
être sélectionnées est faible. Seules les stations
avec les signaux les plus forts dans votre zone
locale peuvent être sélectionnés.
Si le nombre de
est inférieur, cet appareil sera
en mesure de recevoir des émissions de stations
plus faibles.
Utilisation de l’étiquetage
iTunes
Remarque
Pour plus d’informations sur l’étiquetage iTunes,
reportez-vous à la page 138, Quelques mots sur
l’étiquetage iTunes.
Enregistrement des informations
d’étiquette sur cet appareil
1 Réglez la station de diffusion.
2 Enregistrez les informations d’étiquette
sur cet appareil.
Reportez-vous à la page 80, Utilisation du synto-
niseur HD Radio.
Vous pouvez enregistrer les informations si l’in-
dicateur Ta g s’affiche alors que la plage musi-
cale désirée est en cours de diffusion.
# Quand vous enregistrez les données d’étiquette
sur cet appareil, Tag clignote.
# Il est possible d’enregistrer sur cet appareil des
informations d’étiquettes pour 50 plages musicales.
# En fonction du moment de l’enregistrement des
informations d’étiquettes, les informations d’étiquet-
tes de la plage musicale lue avant ou après la plage
musicale en cours de lecture peuvent également
être enregistrées.
3 Lorsque l ’enregistrement est terminé,
l’indicateur
s’éteint et l’indicateur
s’affiche.
Enregistrement des informations
étiquetées sur votre iPod
1 Connectez votre iPod.
Lorsque votre iPod est connecté à cet appareil,
votre iPod commence à enregistrer automati-
quement les informations étiquetées.
2 Lorsque le transfert est terminé, l’indica-
teur
s’éteint et les informations étiquetées
sont enregistrées sur votre iPod.
Changement de mode de
recherche
Il existe deux réglages de recherche d’accord,
HD (recherche d’accord sur les stations d’émis-
sion numériques) et ALL (recherche d’accord
normale).
ALL—HD
Changement de mode de
réception
Si la réception d’une émission numérique de-
vient médiocre, cet appareil passe automatique-
ment sur l’émission analogique du même
niveau de fréquence. Si cette fonction est réglée
sur D/A AUTO, le syntoniseur bascule automati-
quement entre émission numérique et émission
analogique. Si cette fonction est réglée sur
ANALOG, le syntoniseur ne recevra que les
émissions analogiques.
D/A AUTO—ANALOG
Français
Syntoniseur HD Radioä
81
Section
Syntoniseur HD Radioä
Fr
06
<CRD4844-A>81
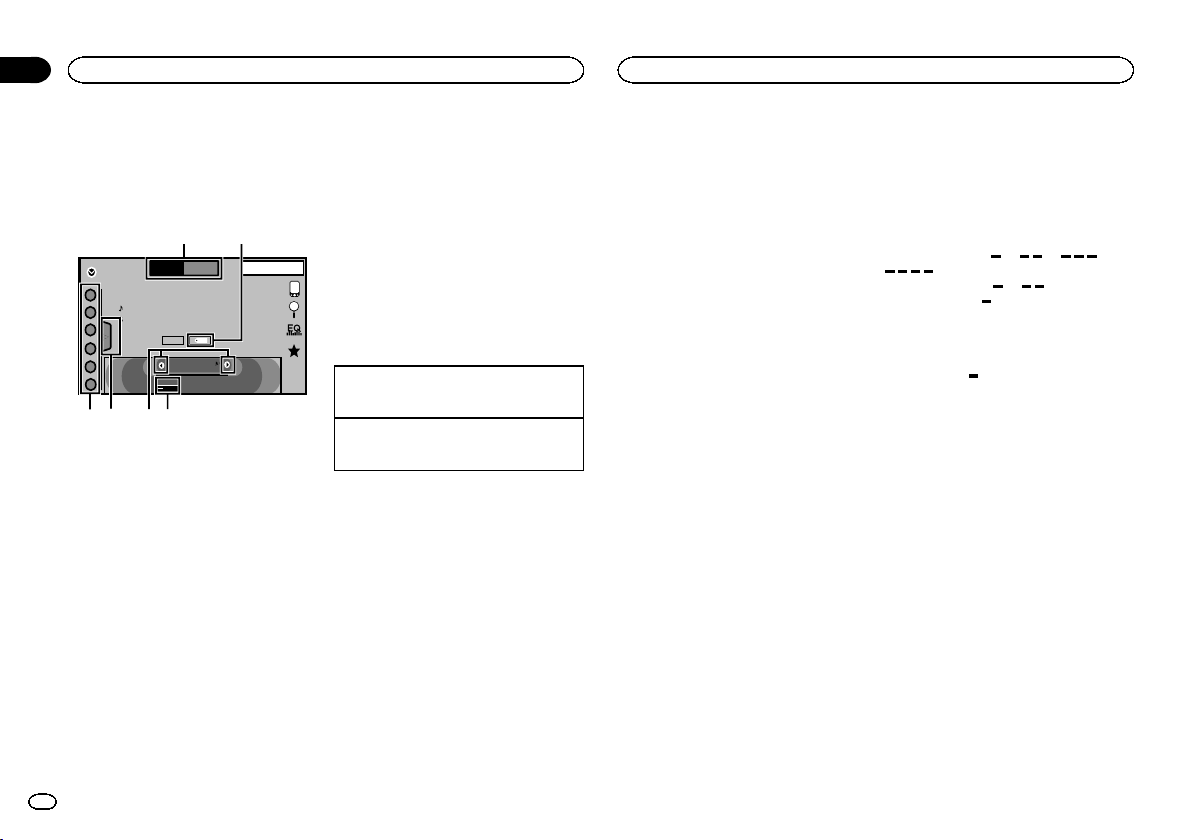
Black plate (82,1)
Utilisation du syntoniseur
(Fonction de AVH-X4600BT/AVH-X2600BT/AVH-
X1600DVD)
Touches du clavier tactile
Radio
8 AUG
PM
12:05
1
2
3
4
5
6
FM AM1
Local
87.9
MHz
Tex t
Tag
1
3456
2
WWWWWWWW
WWWWWWWW
WWWWWWWW
1 Touche de bande
Sélection d’une bande (FM1, FM2 ou FM3)
en touchant l’icône gauche. Basculement
sur la bande AM en touchant l’icône droite.
L’icône de la bande sélectionnée est mise en
surbrillance.
2 Touche d’étiquette
Enregistrement sur votre iPod des informa-
tions sur la plage musicale (étiquette) de la
station d’émission.
3 Touche de station locale
Réglage de l’accord automatique sur une
station locale.
4 Touche de présélection
Accord manuel vers le haut ou le bas.
Enfoncez la touche de façon prolongée pen-
dant plus de deux secondes pour ignorer des
stations. L’accord automatique démarre dès
que vous relâchez la touche. Appuyez à nou-
veau sur la touche pour annuler l’accord au-
tomatique.
5 Touche de liste
Affichage de la liste des canaux présélection-
nés.
6 Touche de canal présélectionné
Sélection d’un canal présélectionné.
Opérations de base
Basculement entre des canaux présélectionnés à
l’aide des touches
1 Appuyez sur c ou d (TRK).
Accord automatique à l’aide des touches
1 Appuyez de façon prolongée sur c ou d
(TRK).
Remarques
! L’écoute de la radio AM pendant qu’un iPod
est chargé à partir de cet appareil peut géné-
rer du bruit. Dans ce cas, déconnectez l’iPod
de cet appareil.
! Les touches du clavier tactile non indiquées
à Utilisation du syntoniseur peuvent s’affi-
cher à l’écran.
Reportez-vous à la page 134, Liste des indica-
teurs.
Mise en mémoire et rappel
des stations
Vous pouvez facilement mettre en mémoire jus-
qu’à six stations pour chaque gamme.
1 Affichage de l’écran de présélection.
Reportez-vous à la page 82, Utilisation du synto-
niseur.
L’écran de présélection s’affiche.
2 Touchez de façon prolongée l’une des
touches de présélection pour mettre en mé-
moire la fréquence sélectionnée.
La fréquence de la station de radio sélectionnée
a été mise en mémoire.
3 Touchez la touche de présélection appro-
priée pour sélectionner la station désirée.
Mise en mémoire des
stations les plus fortes
La fonction BSM (mémoire des meilleures sta-
tions) mémorise automatiquement les six sta-
tions les plus fortes dans l’ordre de la force du
signal.
La mise en mémoire de fréquences à l’aide de la
fonction BSM peut provoquer le remplacement
d’autres fréquences déjà conservées grâce aux
touches d’accord sur présélection.
1 Affichage de l’écran de présélection.
Reportez-vous à la page 82, Utilisation du synto-
niseur.
L’écran de présélection s’affiche.
2 Touchez BSM pour mettre en service
BSM.
Les six stations d’émission des plus fortes sont
enregistrées dans les touches d’accord sur pré-
sélection dans l’ordre de la force du signal.
# Pour annuler la mise en mémoire, touchez
Cancel.
Accord sur les signaux
puissants
L’accord automatique sur une station locale ne
s’intéresse qu’aux stations de radio dont le si-
gnal reçu est suffisamment puissant pour ga-
rantir une réception de bonne qualité.
FM : Hors service —
— — —
AM : Hors service — —
Plus le nombre de affichés à l’écran est im-
portant, et plus le nombre de stations pouvant
être sélectionnées est faible. Seules les stations
avec les signaux les plus forts dans votre zone
locale peuvent être sélectionnés.
Si le nombre de
est inférieur, cet appareil sera
en mesure de recevoir des émissions de stations
plus faibles.
Utilisation de l’étiquetage
iTunes
Remarque
Pour plus d’informations sur l’étiquetage iTunes,
reportez-vous à la page 138, Quelques mots sur
l’étiquetage iTunes.
Enregistrement des informations
d’étiquette sur cet appareil
1 Réglez la station de diffusion.
2 Enregistrez les informations d’étiquette
sur cet appareil.
Reportez-vous à la page 82, Utilisation du synto-
niseur.
Vous pouvez enregistrer les informations si l’in-
dicateur Ta g s’affiche alors que la plage musi-
cale désirée est en cours de diffusion.
# Quand vous enregistrez les données d’étiquette
sur cet appareil, Tag clignote.
Syntoniseur
82
Section
Syntoniseur
Fr
07
<CRD4844-A>82
Black plate (83,1)
# Il est possible d’enregistrer sur cet appareil des
informations d’étiquettes pour 50 plages musicales.
# En fonction du moment de l’enregistrement des
informations d’étiquettes, les informations d’étiquet-
tes de la plage musicale lue avant ou après la plage
musicale en cours de lecture peuvent également
être enregistrées.
3 Lorsque l ’enregistrement est terminé,
l’indicateur
s’éteint et l’indicateur
s’affiche.
Enregistrement des informations
étiquetées sur votre iPod
1 Connectez votre iPod.
Lorsque votre iPod est connecté à cet appareil,
votre iPod commence à enregistrer automati-
quement les informations étiquetées.
2 Lorsque le transfert est terminé, l’indica-
teur
s’éteint et les informations étiquetées
sont enregistrées sur votre iPod.
Présentation des opérations
du syntoniseur SiriusXM
(Fonction de AVH-X5600BHS/AVH-X3600BHS)
Vous pouvez utiliser cet appareil pour comman-
der un syntoniseur de véhicule SiriusXM
Connect, vendu séparément.
Pour plus d’informations sur l’installation d’un
syntoniseur de véhicule SiriusXM Connect,
consultez le guide d’installation fourni avec le
syntoniseur.
Toutes les nouveautés à écouter sont sur
SiriusXM. Vous y trouverez un grand nombre de
canaux de programmes, notamment de mu-
sique gratuite, de sports, d’informations, de dis-
cussion et de divertissements en exclusivité. Un
syntoniseur de véhicule SiriusXM et un abonne-
ment sont nécessaires. Pour plus d’informa-
tions, visitez www.siriusxm.com aux États-Unis
ou www.siriusxm.ca au Canada.
Pour vous abonner au service
Radio Satellite SiriusXM
1 Sélectionnez SiriusXM comme source.
Vous devez être en mesure d’accorder sur le
canal 1. Si vous ne parvenez pas à obtenir le
canal 1, vérifiez que le syntoniseur de véhicule
SiriusXM Connect est correctement installé
comme décrit dans le guide d’installation du
syntoniseur.
2 Basculez sur le canal 0 et vérifiez l’ID de
la radio.
L’ID de la radio SiriusXM peut être trouvé en ac-
cédant au canal 0. Il est également indiqué au
bas du syntoniseur de véhicule SiriusXM
Connect.
Notez que cet ID de radio SiriusXM Radio ID
n’inclut pas les lettres I, O, S et F.
Ce numéro est obligatoire pour activer votre
abonnement.
3 Activez le service SiriusXM en ligne ou
par téléphone.
Pour les abonnements américains :
! Visitez www.siriusxm.com/activatenow
! Appelez SiriusXM Listener Care au 1-866-635-
2349
Pour les abonnements canadiens :
! Visitez www.xmradio.ca et cliquez sur “ACTI-
VATE RADIO” (Activer la radio) dans le coin
supérieur droit
! Appelez le 1-877-438-9677
# Les satellites SiriusXM envoient un message
d’activation à votre syntoniseur. Une fois que le syn-
toniseur tuner a reçu le message,
“Abonnement mis à jour” apparaît. Appuyez sur
une touche pour effacer le message d’activation.
Le processus d’activation prend généralement entre
10 et 15 minutes mais peut nécessiter jusqu’à une
heure dans certains cas. Ne mettez pas l’appareil
hors tension tant que vous n’avez pas effacé le mes-
sage d’activation en appuyant sur une touche.
Touches du clavier tactile
SiriusXM
22 JAN
AM
12:22
1
2
3
4
5
6
888
Tag
Channel Name
Category Name
Artist Name / Content Info
Song Title / -
CH
CH
Live
-01’ 00”
DB
SXM 1
34215
6798bac
1 Touche de liste
Affichage de la liste des canaux présélection-
nés.
Français
Syntoniseur
83
Section
Syntoniseur SiriusXM
Fr
07
08
<CRD4844-A>83
Black plate (84,1)
2 Touche d’informations
Changement des informations SiriusXM.
Nom de la catégorie—Informations sur le
contenu
3 Touche de bande
Sélection d’une bande à partir de SXM1,
SXM2 ou de SXM3.
4 Touche d’étiquetage des plages musicales
iTunes
â
Enregistrement de l’étiquetage des plages
musicales iTunes
®
à partir de la station de
diffusion sur votre iPod.
5 Touche de recherche
Sélection d’un canal dans l’écran de la liste.
6 Touche de contrôle parental
L’écran Parental Control s’affiche.
7 Touche Live
Utilisez pour revenir à l’ émission en direct
lorsque vous êtes en mode Relecture instan-
tanée.
8 Touche de direct
Un clavier numérique s’affiche et vous per-
met de saisir directement les numéros de ca-
naux SiriusXM.
9 Touche de pause et lecture
Utilisez lorsque vous êtes en mode Relecture
instantanée.
a Touche d’avance/de retour
Lorsque vous êtes en mode Relecture instan-
tanée, utilisez pour avancer ou reculer ou ap-
puyez de façon prolongée pour avancer ou
reculer rapidement.
b Touche de présélection
Accord manuel vers le haut ou le bas.
Enfoncez la touche de façon prolongée pen-
dant plus de deux secondes pour ignorer des
stations. L’accord automatique démarre dès
que vous relâchez la touche. Appuyez à nou-
veau sur la touche pour annuler l’accord au-
tomatique.
c Touche de canal présélectionné
Rappel des canaux présélectionnés en tou-
chant la touche.
Mise en mémoire de la station actuelle dans
la liste des canaux présélectionnés en tou-
chant de façon prolongée la touche.
Opérations de base
Accord manuel (pas à pas) à l’aide des touches
1 Appuyez sur c ou d (TRK).
Accord automatique à l’aide des touches
1 Appuyez de façon prolongée sur c ou d
(TRK).
Remarque
Les touches du clavier tactile non indiquées à
Présentation des opérations du syntoniseur
SiriusXM peuvent s’afficher à l’écran.
Reportez-vous à la page 134, Liste des indica-
teurs.
Mise en mémoire et rappel
des canaux
Vous pouvez facilement mettre en mémoire jus-
qu’à six canaux pour chaque gamme.
1 Affichez l’écran de la liste des canaux
présélectionnés.
Reportez-vous à la page 83, Présentation des opé-
rations du syntoniseur SiriusXM.
La liste des canaux présélectionnés apparaît à
l’écran.
2 Touchez de façon prolongée l’une des
touches de présélection pour mettre en mé-
moire le canal sélectionné.
Le canal sélectionné a été mis en mémoire.
3 Touchez la touche de présélection appro-
priée pour sélectionner le canal désiré.
Sélection d’un canal dans
l’écran de la liste
Sélection d’un canal à partir de
la liste de tous les canaux
Vous pouvez sélectionner un canal parmi les ca-
naux disponibles.
1 Touchez la touche de recherche pour ou-
vrir l’écran de la liste.
2 Sélectionnez le réglage Tous les canaux.
3 Sélectionnez le canal souhaité.
4 Touchez la touche de fermeture pour fer-
mer l’écran de la liste.
L’écran est fermé.
Sélection d’un canal à partir de
la liste de catégories
Vous pouvez sélectionner un canal parmi les ca-
tégories disponibles.
Les types de catégories disponibles dépendent
des types de canaux disponibles.
1 Touchez la touche de recherche pour ou-
vrir l’écran de la liste.
2 Sélectionnez une catégorie dans la liste.
3 Sélectionnez le canal souhaité.
4 Touchez la touche de fermeture pour fer-
mer l’écran de la liste.
L’écran est fermé.
Changement de l’affichage
de la liste
Vous pouvez basculer entre les types de liste
lorsqu’une liste s’affiche.
% Touchez Info lorsqu’une liste apparaît
pour basculer entre les types de liste.
La liste affichée bascule entre les types suivants
dans l’ordre donné.
Nom du canal—Nom de l’interprète—Titre de la
plage musicale—Informations sur le contenu
Sélection directe d’un canal
SiriusXM
Vous pouvez sélectionner un canal SiriusXM di-
rectement en saisissant le numéro de canal sou-
haité.
1 Touchez la touche de direct pour basculer
sur l’écran de saisie directe.
2 Touchez 0 à 9 pour saisir le numéro de
canal désiré.
# Pour annuler les chiffres entrés, touchez C.
3 Sélectionnez le canal SiriusXM correspon-
dant au numéro saisi.
Le canal SiriusXM ayant le numéro saisi est sé-
lectionné.
Syntoniseur SiriusXM
84
Section
Syntoniseur SiriusXM
Fr
08
<CRD4844-A>84
Black plate (85,1)
Sélection du canal SiriusXM cor-
respondant au numéro saisi.
Replayä
Vous pouvez effectuer une pause, un retour ra-
pide ou une relecture du canal actuellement en
direct ainsi que lorsque vous vous accordez sur
un canal enregistré sur la bande présélection-
née actuelle.
! Touchez Pause/Lecture pour mettre en pause
ou lire.
! Touchez les touches d’avance ou de retour
pour ignorer le contenu. Appuyez de façon
prolongée sur les touches d’avance et de re-
tour pour parcourir rapidement le contenu.
! Touchez Live pour quitter le mode Relecture
et accéder au point en direct de l’émission.
Utilisation de l’étiquetage
iTunes
Remarque
Pour plus d’informations sur l’étiquetage iTunes,
reportez-vous à la page 138, Quelques mots sur
l’étiquetage iTunes.
Étiquetage iTunes des plages
musicales SiriusXM
1 Réglez la station de diffusion.
2 Touchez la touche d’étiquetage des pla-
ges musicales iTunes
â
.
Enregistrez les informations d’étiquette sur cet
appareil.
Vous pouvez enregistrer les informations si l’in-
dicateur Ta g s’affiche alors que la plage musi-
cale désirée est en cours de diffusion.
# Quand vous enregistrez les données d’étiquette
sur cet appareil, Tag clignote.
# Il est possible d’enregistrer sur cet appareil des
informations d’étiquettes pour 50 plages musicales.
# En fonction du moment de l’enregistrement des
informations d’étiquettes, les informations d’étiquet-
tes de la plage musicale lue avant ou après la plage
musicale en cours de lecture peuvent également
être enregistrées.
3 Lorsque l ’enregistrement est terminé,
l’indicateur
s’éteint et l’indicateur
s’affiche.
Enregistrement des informations
étiquetées sur votre iPod
1 Connectez votre iPod.
Lorsque votre iPod est connecté à cet appareil,
votre iPod commence à enregistrer automati-
quement les informations étiquetées.
2 Lorsque le transfert est terminé, l’indica-
teur
s’éteint et les informations étiquetées
sont enregistrées sur votre iPod.
Réglage du contrôle parental
La fonction contrôle parental vous permet de li-
miter l’accès de n’importe quel canal SiriusXM,
y compris ceux réservés aux adultes.
Lorsqu’elle est activée, la fonction Contrôle pa-
rental vous demander d’entrer un code pour
pouvoir vous accorder sur les canaux verrouil-
lés.
1 Touchez la touche de contrôle parental
pour ouvrir l’écran de confirmation du code
de passe.
2 Utilisez le clavier numérique pour saisir le
code de passe à quatrechiffres, puis effleu-
rez la touche Enter.
Touchez pour confirmer le code
de passe.
Le code par défaut est 0000.
Si un code de passe correct est saisi, la liste des
canaux s’affiche sur l’écran Contrôle parental
ainsi qu’une icône de verrouillage ou de déver-
rouillage.
3 Les opérations ci-dessous peuvent être
effectuées dans l’écran Contrôle parental.
Verrouillage de canaux
L’accès au canal d’émission en cours peut être
verrouillé. Vous devrez saisir votre code de passe
ultérieurement pour écouter un canal verrouillé.
% Pour verrouiller un canal spécifique, tou-
chez le nom du canal souhaité dans la liste.
Une icône de verrouillage verrouillée s’affiche
en regard du nom d’un canal verrouillé.
Touchez une seconde fois le nom d’un canal ver-
rouillé pour le déverrouiller.
Clear All (suppression des
verrous de tous les canaux)
Vous pouvez supprimer les verrous de tous les
canaux verrouillés simultanément.
% Touchez Clear All pour déverrouiller tous
les canaux verrouillés simultanément.
Edit Code (changement de code)
Vous pouvez modifier votre code de passe.
1 Touchez Edit Code pour passer à l’écran
d’édition du code de passe.
2 Utilisez le clavier numérique pour saisir
un nouveau code de passe à quatre chiffres,
puis effleurez la touche Enter.
Touchez pour confirmer le code
de passe.
Une fois le nouveau code de passe défini, l’é-
cran Contrôle parental s’affiche.
Remarque
Si Vérification Tuner apparaît, reportez-vous à
la page 130, Radio Satellite SiriusXM.
Réglage de SiriusXM
TuneStartä
Lors de l’accord avec les touches des canaux
présélectionnés, les plages musicales peuvent
être lues depuis le début si TuneStart est en ser-
vice.
1 Appuyez sur la touche accueil pour pas-
ser à l’écran d’accueil.
2 Touchez la touche système pour ouvrir le
menu système.
3 Touchez SiriusXM Tune Start sur le menu
système pour mettre SiriusXM Tune Start en
ou hors service.
Marche : la plage musicale en cours est lue à
partir du début de la plage.
Off : L’émission en direct est lue pour le canal
audio en cours.
Options d’examen
Les canaux et les plages musicales peuvent être
lus sur cette unité à l’aide d’un examen du
disque.
Français
Syntoniseur SiriusXM
85
Section
Syntoniseur SiriusXM
Fr
08
<CRD4844-A>85
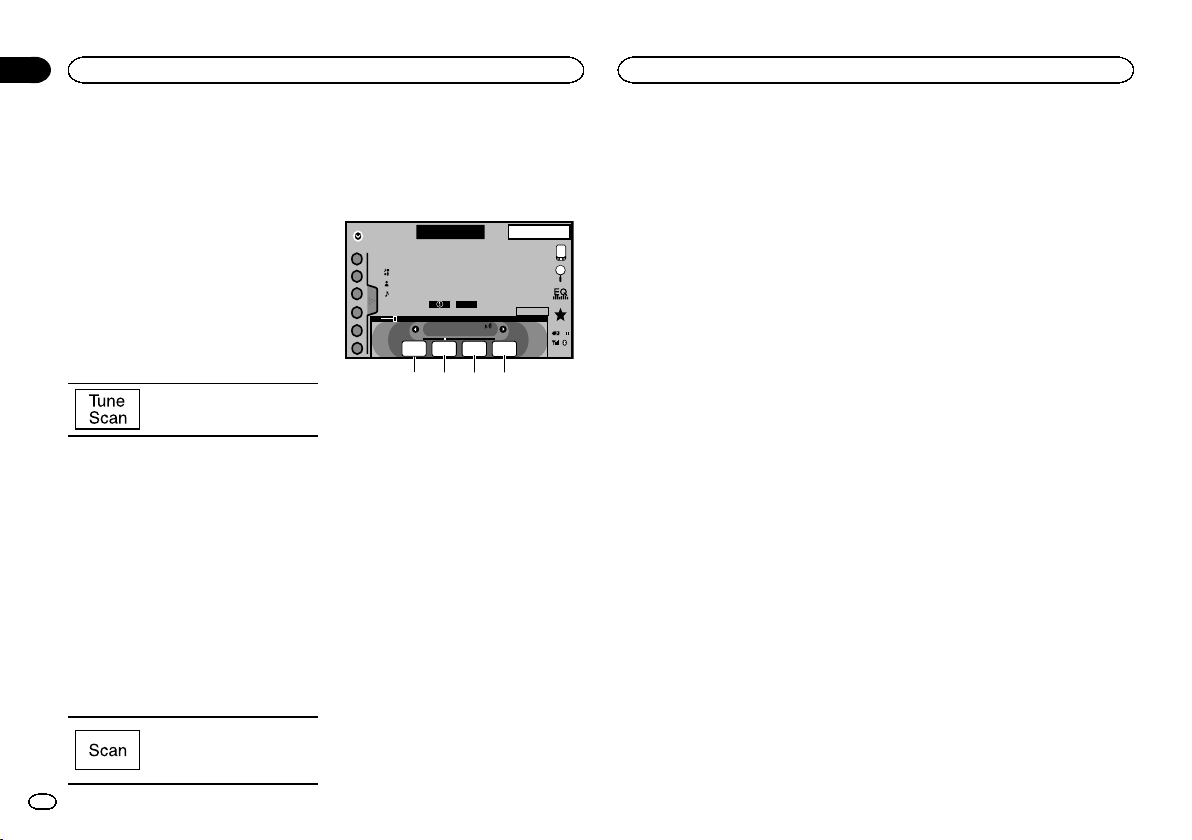
Black plate (86,1)
Le fonctionnement de TuneStart peut prendre
quelques minutes après un arrêt puis une re-
mise sous tension ou après le changement sur
une autre bande présélectionnée.
TuneScanä
Cette fonction vous permet d’écouter un court
passage des plages musicales que vous n’avez
pas encore écoutées sur les canaux musicaux
enregistrés sur la bande présélectionnée ac-
tuelle.
1 Touchez la touche de liste pour afficher la
liste des canaux présélectionnés.
2 Touchez Examen de l’accord.
Chaque plage dans le canal en
cours est joué pendant huit se-
condes.
Reportez-vous à la page 86, Utilisation du ba-
layage pour obtenir une liste des fonction que
vous pouvez utiliser pendant le balayage.
Remarque
TuneScan est compatible avec SXV200 ou les
modèles de syntoniseur ultérieurs. Non compa-
tible avec SXV100.
Examen de la catégorie
Parcourez chaque canal d’une catégorie.
1 Touchez la touche de recherche.
2 Touchez la catégorie désirée.
3 Touchez Examen.
L’émission en direct de chaque
canal de la catégorie en cours est
lue pendant cinq secondes à tour
de rôle.
Reportez-vous à la page 86, Utilisation du ba-
layage pour obtenir une liste des fonction que
vous pouvez utiliser pendant le balayage.
Utilisation du balayage
SiriusXM
22 JAN
AM
12:22
1
2
3
4
5
6
888
WWWWWWWWWWWWW
WWWWWWWWWWWWWWWW
WWWWWWWWWWWWWWWW
WWWWWWWWWWWWWWWW
CH
CH
DB
Scanning
SXM 1
Scan
Next
Scan
Esc
Scan
Back
2 3 4
1
Scan
Play
1 Touche d’examen du disque
Sélection du canal ou de la plage musicale
en cours de lecture
2 Touche d’examen précédent
Passage à la plage musicale précédente pen-
dant l’utilisation de TuneScan.
Passer au canal précédent pendant l’examen
de la catégorie.
3 Touche d’examen suivant
Passage à la plage musicale suivante pen-
dant l’utilisation de TuneScan
Passage au canal suivant pendant l’examen
de la catégorie
4 Touche de sortie d’examen
Sortie de l’examen du disque
Réinitialisation des réglages
par défaut
Les réglages SiriusXM reprennent leurs réglages
par défaut.
1 Mettez la source hors service.
Reportez-vous à la page 76, Mise en/hors service
de la source.
2 Appuyez sur la touche accueil pour pas-
ser à l’écran d’accueil.
3 Touchez la touche système pour ouvrir le
menu système.
4 Touchez Réinitialiser SirusXM sur le menu
système.
5 Touchez Reset.
Un message Terminé. s’affiche une fois les ré-
glages réinitialisés.
# Si vous ne voulez pas réinitialiser, touchez
Cancel.
Syntoniseur SiriusXM
86
Section
Syntoniseur SiriusXM
Fr
08
<CRD4844-A>86
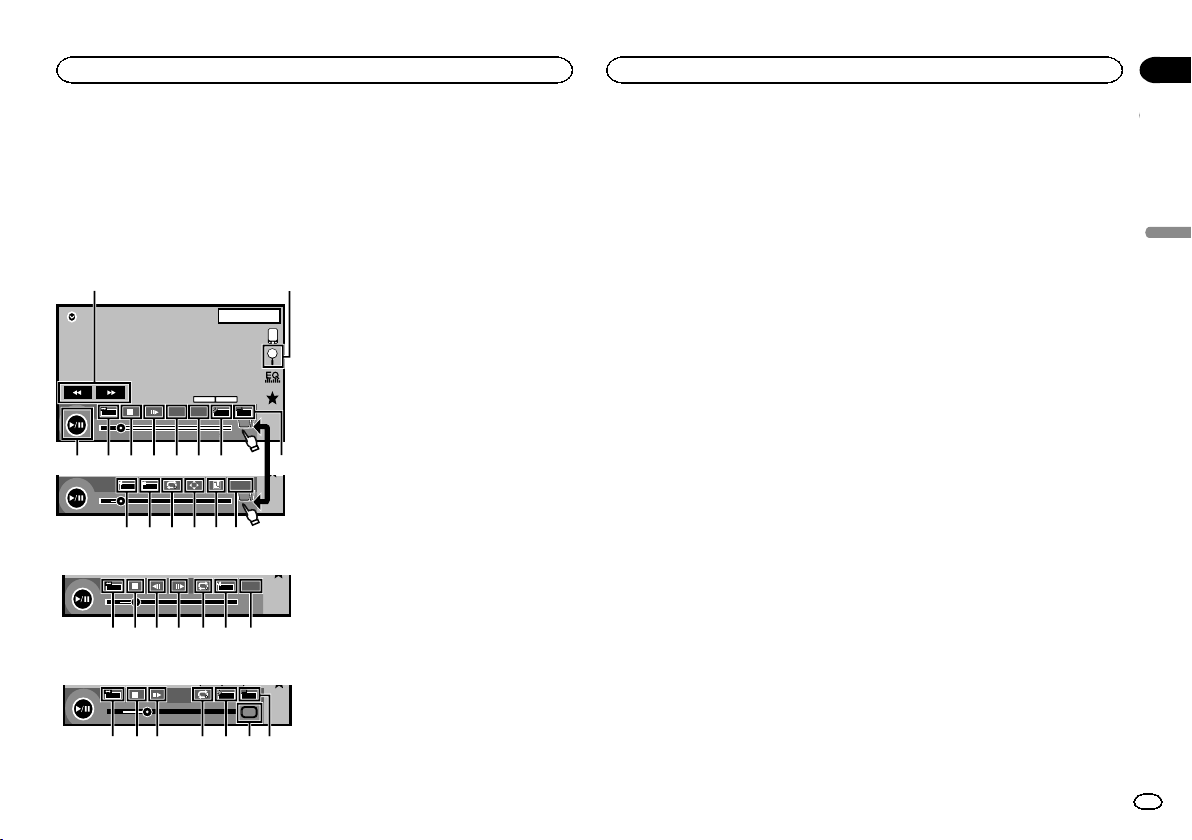
Black plate (87,1)
Présentation de l’utilisation
vidéo
Vous pouvez utiliser cet appareil pour visualiser
les fichiers vidéo DVD/DVD-R/DVD-RW/CD/CD-
R/CD-RW.
Touches du clavier tactile
DVD vidéo
DVD-V
00'20'' -119'51''
48kHz 16bit
Dolby D
MENU
MENU
TOP
1/2
Dolby DMulti ch
FULL
11
1JAN
PM
12:43
01 01
07'24'' -112'47''
2/2
L+R
Return
1
a 987654
21
fedcg
b
3
CD Vidéo
00'20'' -119'51''
L+R
FULL
Return
98h7 eg b
Lors de la lecture d’un disque contenant un mé-
lange de divers types de fichiers média
00'15'' -00'59''
y
y
FULL
1
OFF
Media
987 i3e4
1 Touche d’avant rapide/Touche de retour
rapide
Avance ou retour rapide
Touchez pour modifier la vitesse d’avance ra-
pide/de retour rapide.
2 Touche de recherche
Exécution de la fonction de recherche.
3 Touche de changement de langue des
sous-titres
Avec les DVD/DivX supportant des enregis-
trements multi-sous-titres, vous pouvez chan-
ger de langue des sous-titres pendant la
lecture.
4 Touche de changement de langue audio
Avec les DVD/DivX pouvant offrir la lecture
audio en différentes langues et dans diffé-
rents systèmes audio (Dolby
â
Digital, DTS,
etc.), vous pouvez changer de langue/de sys-
tème audio pendant la lecture.
Suivant le réglage, la vidéo peut ne pas être
lue avec le système audio utilisé pour enre-
gistrer le DVD.
5 Touche du menu principal
Retour au menu principal pendant la lecture
d’un DVD.
6 Touche MENU
Affichage du menu DVD pendant la lecture
d’un DVD.
7 Touche Lecture au ralenti
Avance image par image dans la sélection
pendant la lecture.
Touchez de façon prolongée pendant plus de
deux secondes pour ralentir la vitesse de lec-
ture.
Le fait de toucher augmente la vitesse de lec-
ture entre quatre réglages incrémentiels pen-
dant la lecture au ralenti d’un DVD Vidéo/CD
Vidéo.
8 Touche d’arrêt
Arrêt de la lecture.
Si vous reprenez la lecture, cette dernière re-
prend là où vous l’aviez arrêtée. Touchez de
nouveau la touche pour arrêter totalement la
lecture.
9 Touche de mode d’écran
Changement du mode écran.
Reportez-vous à la page 79, Changer le mode
écran large.
a Touche de pause et lecture
Pause de la lecture.
Retour en mode de lecture normal pendant
une lecture en pause, arrêtée, au ralenti ou
image par image.
b Touche de retour
Retour à la scène spécifiée pour laquelle un
retour a été préprogrammé sur le DVD en
cours de lecture.
Cette fonction ne peut pas être utilisée si une
scène spécifiée n’a pas été préprogrammée
sur le disque DVD.
c Touche de signet
Pendant la lecture, touchez le point où vous
voulez reprendre la lecture au prochain char-
gement du disque.
! Vous pouvez définir un signet par DVD
vidéo. Vous pouvez définir jusqu’à cinq si-
gnets au total.
! Pour supprimer le signet sur un disque,
maintenez la pression sur la touche pen-
dant la lecture.
! Le signet le plus ancien est remplacé par
le nouveau.
d Touche fléchée
Affichage des touches fléchées pour utiliser
le menu DVD.
e Touche de répétition
Sélection de l’étendue de répétition.
f Touche d’angle de vue
Avec les DVD offrant des enregistrements
multi-angle (scènes filmées sous plusieurs
angles), vous pouvez changer d’angle de vue
pendant la lecture.
g Touche de sortie audio
Changement de sortie audio lors de la lec-
ture de disques vidéo enregistrés avec audio
LPCM.
h Touche de ralenti
Ralentissement de la vitesse de lecture en
quatre pas pendant la lecture au ralenti d’un
CD vidéo.
! Il n’y a pas de son pendant la lecture au
ralenti.
! Il est possible que les images ne soient
pas nettes en lecture au ralenti avec cer-
tains disques.
! La lecture au ralenti en arrière n’est pas
disponible.
i Touche de support
Commutation entre les types de fichiers
média pour lire les informations des sup-
ports DVD/CD.
Français
Disque (CD/DVD)
87
Section
Disque (CD/DVD)
Fr
09
<CRD4844-A>87
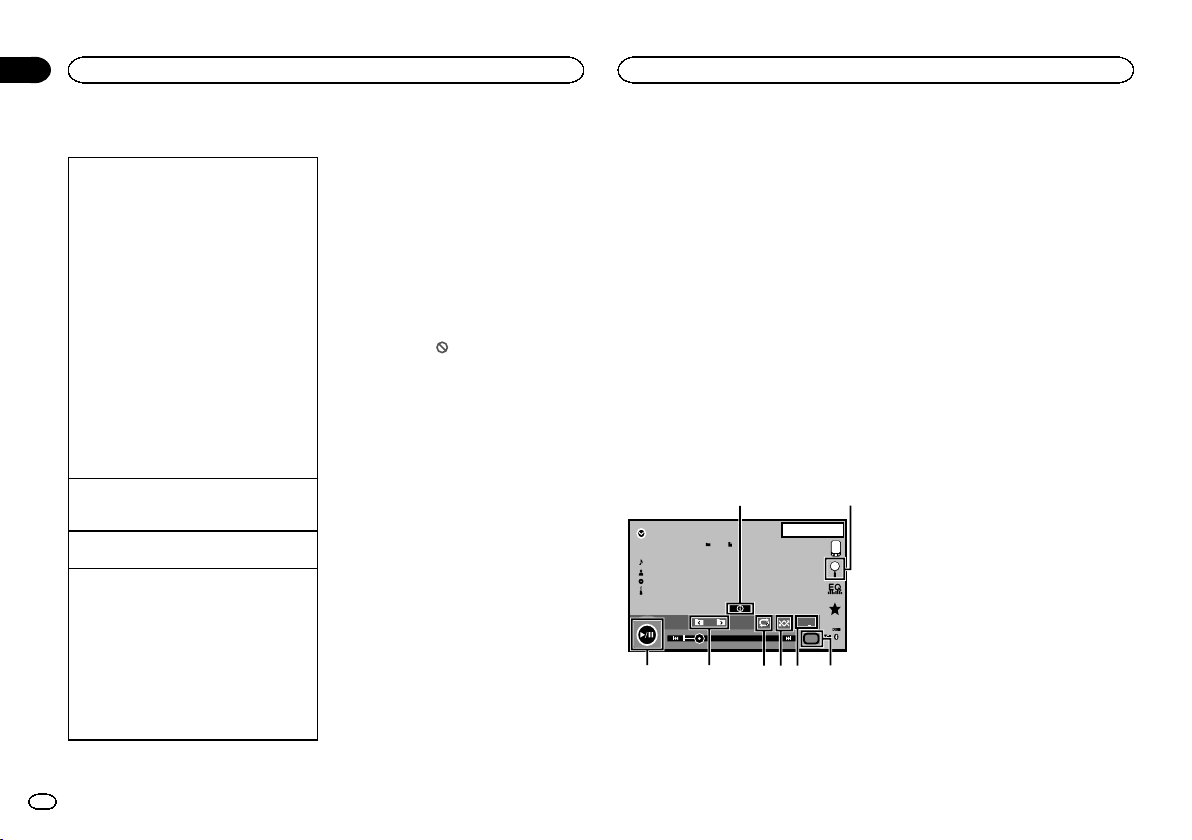
Black plate (88,1)
Opérations de base
Lecture de vidéos
1 Introduisez un disque, l’étiquette vers le haut,
dans le logement de chargement des disques.
La lecture commence automatiquement.
! Si vous lisez un DVD ou un CD Vidéo, un
menu peut s’afficher. Reportez-vous à la page
89, Utilisation du menu DVD et la page 90, Lec-
ture PBC.
! Quand la fonction de lecture automatique est
en service, l’appareil ignore le menu DVD et
démarre automatiquement la lecture à partir
du premier chapitre du premier titre. Reportez-
vous à la page 111, Lecture automatique des
DVD.
! Quand l’icône de la source n’est pas affichée,
vous pouvez l’afficher en touchant l’écran.
! Si un message est affiché après le charge-
ment d’un disque contenant un contenu VOD
DivX, touchez Play.
Reportez-vous à la page 90, Lecture du contenu
VOD d’un DivX
â
.
Éjection d’un disque
! Reportez-vous à la page 79, Éjection d’un
disque.
Sélection d’un chapitre à l’aide des touches
1 Appuyez sur c ou d (TRK).
Avance ou retour rapide à l’aide des touches
1 Appuyez de façon prolongée sur c ou d
(TRK).
! L’avance/le retour rapide n’est pas toujours
disponible sur certains disques. Le cas
échéant, la lecture normale reprend automati-
quement.
! L’avance/le retour rapide dépend de la durée
pendant laquelle vous maintenez la pression
sur c ou d (TRK). Cette fonction n’est pas dis-
ponible pour les CD vidéo.
Remarques
! Ce lecteur DVD peut lire un fichier DivX enre-
gistré sur un CD-R/RW, DVD-R/RW ou un fi-
chier MPEG-1/MPEG-2/MPEG-4. (Veuillez
vous reporter à la section suivante pour
connaître les fichiers qui peuvent être lus.
Reportez-vous à la page 137, Fichiers vidéo
DivX.)
! Insérez uniquement un DVD-R/RW ou un
CD-R/RW dans le logement de chargement
des disques.
! Certaines opérations peuvent ne pas être dis-
ponibles lors du visionnage d’un média du
fait de la programmation du disque. Le cas
échéant, l’ icône
apparaît à l’écran.
! Des touches du panneau tactile non réperto-
riées dans la page 87, Présentation de l’utili-
sation vidéo peuvent également s’afficher sur
l’écran.
Reportez-vous à la page 134, Liste des indica-
teurs.
! Avec certains DVD, le changement de lan-
gue/système audio ne peut être possible
qu’en utilisant l’affichage d’un menu.
! Vous pouvez aussi utiliser le menu
Réglage vidéo pour changer de langue/sys-
tème audio. Pour les détails, reportez-vous à
la page 109, Choix de la langue audio.
! Cet appareil revient en lecture normale si
vous modifiez la langue audio pendant l’a-
vance/le retour rapide, la pause ou la lecture
au ralenti.
! Avec certains DVD, le changement de langue
des sous-titres ne peut être possible qu’en
utilisant l’affichage d’un menu.
! Vous pouvez aussi utiliser le menu
Réglage vidéo pour changer la langue des
sous-titres. Pour les détails, reportez-vous à
la page 109, Choix de la langue des sous-ti-
tres.
! Cet appareil revient en lecture normale si
vous modifiez la langue des sous-titres pen-
dant l’avance/le retour rapide, la pause ou la
lecture au ralenti.
! Pendant la lecture d’une scène prise sous
plusieurs angles, l’icône d’angle est affichée.
Utilisez le menu Réglage vidéo pour mettre
l’affichage de l’icône d’angle en service ou
hors service. Pour les détails, reportez-vous à
la page 109, Réglage de l’affichage des DVD
sous plusieurs angles.
! Vous reviendrez en lecture normale si vous
modifiez l ’angle d’affichage pendant l’a-
vance/le retour rapide, la pause ou la lecture
au ralenti.
Utilisation de la lecture audio
Vous pouvez utiliser cet appareil pour écouter
les fichiers audio DVD-R/DVD-RW/CD/CD-R/CD-
RW.
Touches du clavier tactile
ROM
S.Rtrv
11
Abcdefghi
Abcdefghi
Abcdefghi
Abcdefghi
1JAN
PM
12:43
00'37'' -08'43''
12
45678
3
Media
1 Touche d’informations
Modification des informations à afficher sur
cet appareil lors de la lecture de fichiers
MP3/WMA/AAC.
2 Touche de recherche
Affichage d’une liste de titres de plages/
noms de fichiers pour sélectionner les pla-
ges musicales sur un CD.
Affichage de la liste de noms de fichiers pour
sélectionner les fichiers.
3 Touche de support
Commutation entre les types de fichiers
média pour lire les informations des sup-
ports DVD ou CD.
4 Touche Sound Retriever
Reportez-vous à la page 79, Utilisation du cor-
recteur de son.
5 Touche Aléatoire
Écoute de plages musicales dans un ordre
aléatoire.
6 Touche de répétition
Sélection de l’étendue de répétition.
7 Touche de dossier précédent/Touche de
dossier suivant
Sélection d’un dossier.
8 Touche de pause et lecture
Pause et démarrage de la lecture.
Changement de type de
fichier média
Lors de la lecture d’un média numérique conte-
nant un mélange de divers types de fichiers
média tels que DivX, MPEG-1, MPEG-2, MPEG-4
et MP3, vous pouvez basculer entre les types de
fichiers média à lire.
Disque (CD/DVD)
88
Section
Disque (CD/DVD)
Fr
09
<CRD4844-A>88
Black plate (89,1)
% Touchez Média pour changer de type de
fichier média.
CD-DA (données audio)—Musique/ROM (audio
compressé)—Vidéo (fichiers vidéo DivX, MPEG-
1, MPEG-2, MPEG-4)
Remarque
Il est impossible de lire les fichiers de données
audio (CD-DA) enregistrés sur DVD-R/RW/ROM
à partir de cet appareil.
Utilisation du menu DVD
(Fonction pour les DVD vidéo)
Certains DVD vous permettent d’effectuer une
sélection dans le contenu du disque à l’ aide
d’un menu.
Utilisation des touches fléchées
1 Affichage des touches fléchées pour utili-
ser le menu DVD.
2 Sélectionnez l’élément de menu désiré.
Sélection de l’élément de menu
désiré.
Démarrage de la lecture à partir
de l’élément de menu sélec-
tionné.
Utilisation du menu DVD en tou-
chant directement l’élément de
menu.
Retour à l’affichage précédent.
# Quand vous utilisez le menu DVD en touchant di-
rectement l’élément de menu, touchez l’icône pour
exécuter la fonction souhaitée.
Retour à l’affichage normal de
vidéo DVD.
Affichage des touches fléchées.
# La façon d’afficher le menu diffère selon le
disque.
# Selon le contenu du disque DVD, cette fonction
peut ne pas fonctionner correctement. Le cas
échéant, l’utilisation des touches du clavier tactile
permet d’accéder au menu DVD.
Lecture aléatoire (shuffle)
% Touchez la touche de lecture aléatoire.
! On – Lecture de fichiers dans un ordre aléa-
toire à l’intérieur de l’étendue de répétition
Folder ou Disc.
! Off – Annulation de la lecture aléatoire.
Répétition de la lecture
% Touchez la touche de répétition.
! Disc – Lecture continue du disque en cours
! Chapter – Répétition du chapitre en cours de
lecture
! Title – Répétition du titre en cours de lecture
! Track – Répétition de la plage en cours de
lecture
! File – Répétition du fichier en cours de lec-
ture
! Folder – Répétition du dossier en cours de
lecture
! Disc/All – Répétition de tous les fichiers du
disque en cours de lecture
! All – Répétition de tous les fichiers
Remarques
! Cette fonction ne peut pas être utilisée pen-
dant la lecture de CD Vidéo disposant de la
fonction PBC (contrôle de la lecture).
! Si vous effectuez une recherche de chapitre,
une avance rapide/un retour rapide, une lec-
ture image par image ou une lecture au ra-
lenti, la répétition de lecture s’arrêtera.
! Lors de la lecture de disques comportant de
l’audio compressé et des données audio
(CD-DA), la répétition de lecture s’effectue à
l’intérieur du type de données en cours de
lecture même si Disc est sélectionné.
! Si vous choisissez un autre dossier pendant
la répétition de la lecture, l’étendue de répéti-
tion changera en Disc/All.
! Si pendant la répétition File, vous recherchez
une plage ou commandez une avance rapide
ou un retour rapide, l’étendue de répétition
de la lecture changera en Folder.
! Si, pendant la répétition Chapter, vous effec-
tuez une recherche de titre/chapitre ou
commandez une avance rapide ou un retour
rapide, la plage de répétition est mise auto-
matiquement hors service.
! Si pendant la répétition Track, vous recher-
chez une plage ou commandez une avance
rapide ou un retour rapide, l’étendue de répé-
tition de la lecture changera en Disc.
! Quand Folder est sélectionné, il n’est pas
possible de lire un sous-dossier de ce dos-
sier.
Recherche de la partie que
vous souhaitez lire
Vous pouvez utiliser la fonction de recherche
pour trouver la partie que vous souhaitez lire.
Pour les DVD vidéo, vous pouvez sélectionner
Title (titre), Chapter (chapitre) ou 10key (pavé
numérique).
Pour les CD vidéo, vous pouvez sélectionner
Track (plage) ou 10key (pavé numérique).
! La recherche de chapitre n’est pas dispo-
nible quand la lecture est arrêtée.
! Cette fonction ne peut pas être utilisée pen-
dant la lecture de vidéo DVD ou CD vidéo dis-
posant de la fonction PBC (contrôle de la
lecture).
1 Exécutez la fonction de recherche.
Reportez-vous à la page 87, Présentation de l’uti-
lisation vidéo.
2 Touchez l’option de recherche désirée
(par exemple, Chapter).
3 Touchez 0 à 9 pour saisir le numéro dé-
siré.
# Pour annuler les chiffres saisis, touchez C.
4 Démarrez la lecture à partir de la partie
sélectionnée.
Enregistrement des numéros et
démarrage de la lecture.
Remarque
Avec les disques qui offrent un menu, vous pou-
vez également appuyer sur le menu DVD pour
effectuer votre sélection.
Reportez-vous à la page 87, Présentation de l’uti-
lisation vidéo.
Français
Disque (CD/DVD)
89
Section
Disque (CD/DVD)
Fr
09
<CRD4844-A>89
Black plate (90,1)
Choix de la sortie audio
Lors de la lecture de disques DVD vidéo enregis-
trés avec audio LPCM, vous pouvez changer de
sortie audio.
Pendant la lecture de CD Vidéo, vous pouvez
basculer entre sortie audio stéréo et monaurale.
! Cette fonction n’est pas disponible quand la
lecture est arrêtée.
% Touchez la touche de sortie audio pour
basculer entre les types de sortie audio.
! L+R – Gauche et droite
! Left – Gauche
! Right – Droite
! Mix – Mixage gauche et droite
Remarque
Il se peut que vous ne puissiez pas sélectionner
ou utiliser cette fonction en fonction du disque
et de l’emplacement de la lecture.
Lecture PBC
(Fonction pour les CD vidéo)
Pendant la lecture de CD Vidéo disposant de la
fonction PBC (contrôle de la lecture), PBC On
est affiché.
1 Exécutez la fonction de recherche.
Reportez-vous à la page 87, Présentation de l’uti-
lisation vidéo.
2 Touchez 10key pour afficher le pavé nu-
mérique.
3 Touchez une des touches 0 à 9 correspon-
dant à un numéro de menu.
4 Démarrez la lecture à partir de la partie
sélectionnée.
Enregistrement des numéros et
démarrage de la lecture.
Remarques
! Vous pouvez afficher le menu en touchant
Return pendant la lecture PBC. Pour les dé-
tails, reportez-vous aux instructions fournies
avec le disque.
! La lecture PBC d’un CD Vidéo ne peut pas
être annulée.
! Pendant la lecture de CD vidéo supportant la
fonction PBC (contrôle de la lecture), vous
ne pouvez pas sélectionner l’étendue de la
répétition de lecture ni utiliser la fonction de
recherche.
Choix des plages à partir de
la liste des titres de plages
Vous pouvez sélectionner des plages musicales
à écouter à l’aide de la liste des titres de plage
enregistrés sur un disque.
1 Affichez la liste des titres des plages.
Reportez-vous à la page 88, Utilisation de la lec-
ture audio.
2 Touchez le titre de votre plage favorite.
La lecture commence.
Choix des fichiers à partir de
la liste des noms de fichiers
(Fonction pour l’audio compressé/DivX/MPEG-1/
MPEG-2/MPEG-4)
La fonction liste des noms des fichiers permet
d’accéder à la liste des noms de fichiers (ou de
dossiers) depuis laquelle vous pouvez sélection-
ner un fichier (dossier) à lire.
1 Touchez la touche de recherche pour affi-
cher la liste des noms de fichiers (dossiers).
2 Touchez votre nom de fichier (ou de dos-
sier) favori.
# Quand vous avez sélectionné un dossier, une
liste des noms des fichiers (ou des dossiers) qu’il
contient peut être visualisée. Répétez cette opération
pour sélectionner le nom de fichier désiré.
# Si le dossier 1 (ROOT) ne contient pas de fichier,
la lecture commence au dossier 2.
Remarque
Si une partie des informations enregistrées ne
s’affichent pas, une touche de défilement appa-
raît à droite de la liste. Touchez la touche de défi-
lement pour parcourir.
Lecture du contenu VOD
d’un DivX
â
Certains contenus VOD (vidéo à la demande)
DivX peuvent être lus un nombre de fois défini
uniquement. Lorsque vous chargez un disque
contenant ce type de contenu, le nombre de lec-
tures effectuées apparaît à l’écran. Vous pouvez
choisir de lire ou non le disque.
! Pour le contenu VOD DivX sans cette restric-
tion, vous pouvez charger le disque dans
votre lecteur et en jouer le contenu aussi
souvent que vous le voulez, et aucun mes-
sage n’est affiché.
! Vous pouvez vérifier le nombre de lectures
restantes du contenu en consultant le mes-
sage Ce DivX de location a été vu
parmis les autorisés..
Important
! Pour pouvoir jouer des contenus VOD DivX
sur cet appareil, vous devez d’abord enregis-
trer l’ appareil auprès de votre fournisseur de
contenu VOD DivX. Pour les détails sur votre
code d’enregistrement, reportez-vous à la
page 111, Affichage de votre code d’enregistre-
ment VOD DivX
â
.
! Le contenu VOD DivX est protégé par un sys-
tème DRM (Digital Rights Management).
Ceci restreint la lecture du contenu à des ap-
pareils spécifiques et enregistrés.
% Si un message est affiché après le charge-
ment d’un disque contenant un contenu
VOD DivX, touchez Play.
La lecture du contenu VOD DivX démarrera.
# Pour sauter au fichier suivant, touchez
Next Play.
# Si vous ne voulez pas jouer le contenu VOD DivX,
touchez Stop.
Disque (CD/DVD)
90
Section
Disque (CD/DVD)
Fr
09
<CRD4844-A>90
Black plate (91,1)
Contrôle de l’iPod
Ce mode d’emploi concerne les modèles d’iPod
suivants.
iPod avec connecteur 30 broches
— iPod touch 4ème génération
— iPod touch 3ème génération
— iPod touch 2ème génération
— iPod touch 1ère génération
— iPod classic 160 Go
— iPod classic 120 Go
— iPod classic
— iPod avec vidéo
— iPod nano 6ème génération
— iPod nano 5ème génération
— iPod nano 4ème génération
— iPod nano 3ème génération
— iPod nano 2ème génération
— iPod nano 1ère génération
— iPhone 4S
— iPhone 4
— iPhone 3GS
— iPhone 3G
— iPhone
iPod avec connecteur Lightning
— iPod touch 5ème génération
— iPod nano 7ème génération
— iPhone 5
Utilisation de la lecture audio
Vous pouvez utiliser cet appareil pour écouter
les fichiers audio d’un iPod.
Remarques
! Le temps de lecture peut ne pas s’afficher
correctement.
! L’affichage change lorsque vous écoutez de
la musique autre que celle de l’iPod.
(Sauf pour Pandora)
Touches du clavier tactile
Audio iPod (contrôle de l’audio)
iPod
Appr
ppr
App
pp
Ap p
1JAN
PM
12:43
Abcdefghi
1/9
Abcdefghi
Abcdefghi
Abcdefghi
01'17'' -05'29''
S.Rtrv
All
All
All
x
1
2
54321
dcb a987 6
Audio iPod (App Mode)
FULL
ef
1 Titre de la plage musicale
Affichage de la liste Morceaux sur l’iPod.
Le nom de l’application s’affiche lorsque
vous écoutez de la musique autre que celle
de l’ iPod.
(Sauf pour Pandora)
2 Nom de l’interprète
Affichage de la liste Artistes sur l’iPod.
Le titre de la plage musicale s’affiche lorsque
vous écoutez de la musique autre que celle
de l’ iPod.
(Sauf pour Pandora)
3 Touche MIXTRAX EZ
Démarrage de MIXTRAX EZ.
Reportez-vous à la page 100, Utilisation de
MIXTRAX EZ.
4 Pochettes d’album
Démarrage de la recherche de liaison sur
votre iPod lorsque vous touchez l’affichage
des pochettes d’album.
5 Touche de recherche
Affichage des menus de l’iPod.
6 Touche Sound Retriever
Reportez-vous à la page 79, Utilisation du cor-
recteur de son.
7 Touche de mode de commande iPod
Exécution d’opérations à partir de votre iPod
et écoute de plage audio depuis les haut-par-
leurs de votre véhicule.
8 Touche Shuffle
Écoute des plages musicales de l’iPod dans
un ordre aléatoire.
9 Touche de répétition
Sélection de l’étendue de répétition.
a Touche de changement de vitesse
Modification de la vitesse de lecture du livre
audio sur l’iPod.
b Genre
Affichage de la liste Genres sur l’iPod.
Le titre de l’album s’affiche lorsque vous
écoutez de la musique autre que celle de
l’iPod.
(Sauf pour Pandora)
c Titre de l’album
Affichage de la liste Albums sur l’iPod.
Le nom de l’interprète s’affiche lorsque vous
écoutez de la musique autre que celle de
l’iPod.
(Sauf pour Pandora)
d Touche de pause et lecture
Pause et démarrage de la lecture.
e Touche d’utilisation de l’appareil
Exécution d’opérations depuis cet appareil et
écoute de musique sur votre iPod via les
haut-parleurs de votre véhicule.
f Touche de mode d’écran
Changement du mode écran.
Utilisation de la lecture audio
pour Bluetooth
(Fonction de AVH-X5600BHS/AVH-X4600BT/
AVH-X3600BHS/AVH-X2600BT)
Lorsque tous les réglages sont terminés, vous
pouvez profiter de l’audio sur cet appareil via
une connexion Bluetooth.
1 Réglez Connexion smartphone .
Connexion smartphone peut être réglé
lorsque toutes les conditions suivantes sont sa-
tisfaites.
— L’iPhone n’est pas connecté.
— Il n’y a pas de connexion Bluetooth.
— La source est hors tension.
1 Mettez la source hors service.
Reportez-vous à la page 76, Source off tou-
che.
2 Appuyez sur la touche accueil pour passer à
l’écran d’accueil.
3 Touchez la touche système pour ouvrir le
menu système.
4 Touchez Connexion smartphone sur le
menu système.
5 Touchez iPhone via Bluetooth pour sélec-
tionner.
2 Connectez l’iPhone à l’appareil via une
connexion Bluetooth.
Reportez-vous à la page 118, Menu de connexion
Bluetooth.
Français
iPod
91
Section
iPod
Fr
10
<CRD4844-A>91
Black plate (92,1)
Remarque
Les pochettes d’album ne s’affichent pas lors
d’une lecture audio via une connexion
Bluetooth.
Utilisation des images de
vidéos
Pour les utilisateurs d’un iPod avec connec-
teur 30 broches
Vous pouvez utiliser cet appareil pour afficher
les fichiers vidéos d’un iPod.
! Selon le type de votre iPod, l’absence de sor-
tie est possible si vous n’utilisez pas un CD-
IU201S/CD-IU201V (vendu séparément). Veil-
lez à utiliser un CD-IU201S/CD-IU201V pour
connecter votre iPod.
Pour les utilisateurs d’un iPod avec connec-
teur Lightning
! Pour lire des fichiers vidéo de l’iPod sur cet
appareil, connectez un CD-IV203 (vendu sé-
parément) et un adaptateur Lightning AV nu-
mérique (produits d’Apple Inc.) (vendu
séparément), puis installez l’application Car-
MediaPlayer sur votre iPod. Reportez-vous au
manuel de CarMediaPlayer pour plus d’infor-
mations.
Reportez-vous à la page 94, Utilisation de
AppRadio Mode.
Touches du clavier tactile
iPod
02'35'' -21'54''
1JAN
PM
12:43
FULL
1
Appr
ppr
App
pp
Ap p
2/3
2
1
654 37
2
1 Touche d’avant rapide/Touche de retour
rapide
Avance ou retour rapide
Touchez pour modifier la vitesse d’avance ra-
pide/de retour rapide.
2 Touche de recherche
Affichage des menus de l’iPod.
3 Touche de mode de commande iPod
Exécution d’opérations à partir de votre iPod
et écoute de plage audio depuis les haut-par-
leurs de votre véhicule.
4 Touche Shuffle
Lecture de la vidéo de votre iPod dans un
ordre aléatoire.
5 Touche de répétition
Sélection de l’étendue de répétition.
6 Touche de mode d’écran
Changement du mode écran.
Reportez-vous à la page 79, Changer le mode
écran large.
7 Touche de pause et lecture
Pause de la lecture.
Retour en mode de lecture normal pendant
une lecture en pause, au ralenti ou image
par image.
Opérations de base
Lecture de vidéos
1 Touchez la touche de recherche pour dérouler
les menus de l’iPod.
2 Sélectionnez une vidéo à lire.
Reportez-vous à la page 93, Lecture de vidéos à
partir de votre iPod.
! Quand l’icône de la source n’est pas affi-
chée, vous pouvez l’afficher en touchant
l’écran.
! Débranchez les écouteurs de l’iPod avant
de le connecter à cet appareil.
! Suivant le modèle de l’iPod et la quantité
de données enregistrées sur l’iPod, le lan-
cement de la lecture peut prendre un cer-
tain temps.
! Utilisez les touches du clavier tactile pour
sélectionner l’iPod, une fois ce dernier
connecté à cet appareil.
! pas de dispositif s’affiche lors de la dé-
connexion de l’iPod.
Avance ou retour rapide à l’aide des touches
1 Appuyez de façon prolongée sur c ou d
(TRK).
Remarques
! Pour garantir un fonctionnement correct, re-
liez le câble du connecteur de la station d’ac-
cueil de l’iPod directement à cet appareil.
! Lorsque l ’iPod est connecté à cet appareil, il
ne peut pas être mis en service ou hors ser-
vice.
! Les touches du clavier tactile non indiquées
à Utilisation des images de vidéos peuvent
s’afficher à l’écran.
Reportez-vous à la page 134, Liste des indica-
teurs.
Utilisation de la fonction iPod
de cet appareil sur votre iPod
Vous pouvez écouter l’audio des applications de
votre iPod depuis les haut-parleurs du véhicule
lorsque App Mode est sélectionné.
Cette fonction n’est pas compatible avec les mo-
dèles d’iPod suivants.
! iPod nano 1ère génération
! iPod avec vidéo
Remarques
! Les fonctions liées à la vidéo ne sont pas dis-
ponibles sur un iPod avec connecteur Lightn-
ing.
! Quand cette fonction est en cours d’utilisa-
tion, l’iPod n’est pas mis hors service même
lorsque le contact est coupé. Pour le mettre
hors service, utilisez l’ iPod.
1 Touchez le mode de commande iPod pour
passer à App Mode.
2 Utilisez l’iPod connecté pour sélectionner
une vidéo/une plage musicale et la jouer.
Remarques
! Les fonctions suivantes sont toujours acces-
sibles à partir de l’appareil même si le mode
de commande est réglé sur App Mode.
Cependant, le fonctionnement dépend de
vos applications.
— Lecture/pause
— Avance/retour rapide
— Avance/retour d’une plage
— Avance/retour d’un chapitre
! App Mode est compatible avec les modèles
d’iPod suivants.
— iPod touch 4ème génération
— iPod touch 3ème génération
iPod
92
Section
iPod
Fr
10
<CRD4844-A>92
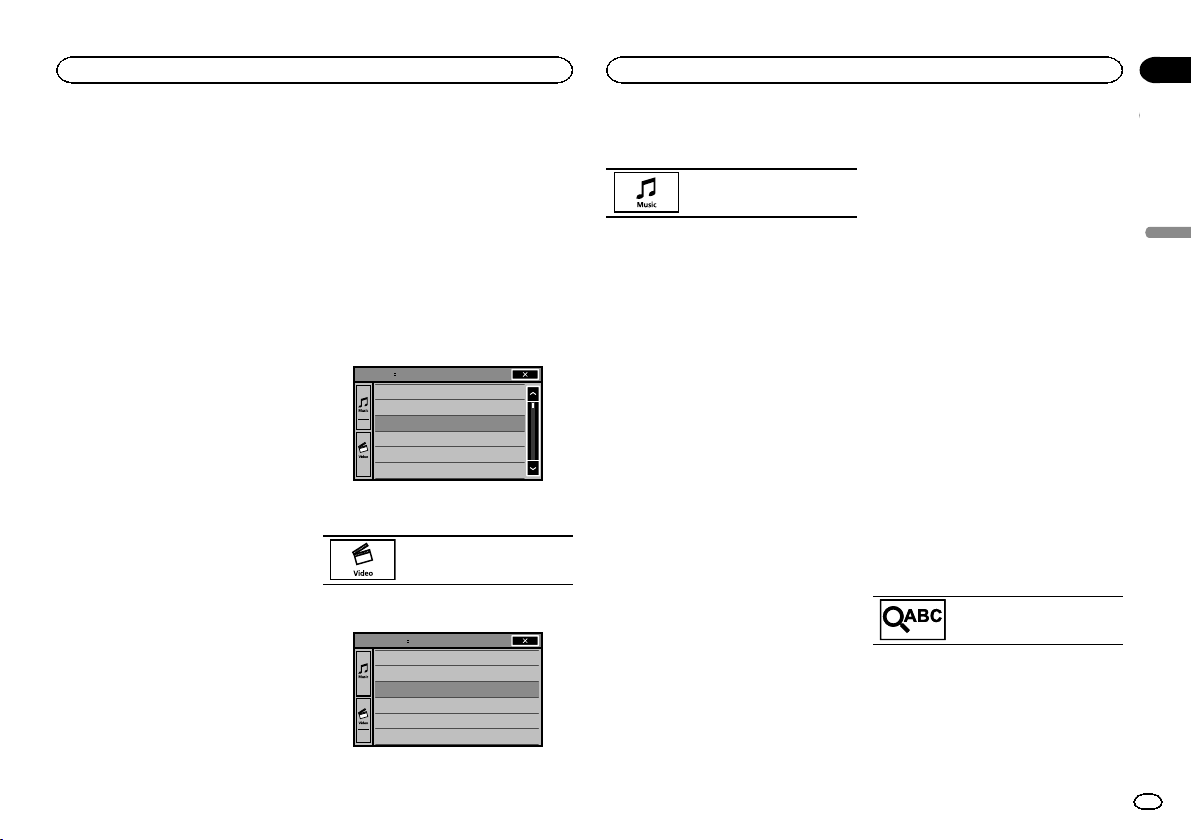
Black plate (93,1)
— iPod touch 2ème génération
— iPod touch 1ère génération
— iPod classic 160 Go
— iPod classic 120 Go
— iPod classic
— iPod nano 6ème génération
— iPod nano 5ème génération
— iPod nano 4ème génération
— iPod nano 3ème génération
— iPod nano 2ème génération
— iPhone 4S
— iPhone 4
— iPhone 3GS
— iPhone 3G
— iPhone
Lecture aléatoire
% Touchez la touche de lecture aléatoire.
! Songs – Lecture des vidéos/plages musicales
dans un ordre aléatoire à l’intérieur de la liste
sélectionnée.
! Albums – Lecture dans l’ordre de vidéos/pla-
ges musicales à partir d’un album sélec-
tionné au hasard.
! Off – Désactivez la lecture aléatoire.
Répétition de la lecture
% Touchez la touche de répétition.
! One – Répétition uniquement de la vidéo/
plage musicale en cours de lecture
! All – Répétition de toutes les vidéos/plages
musicales de la liste sélectionnée sur l’iPod
Lecture de vidéos à partir de
votre iPod
Cet appareil peut lire des vidéos si un iPod dis-
posant de fonctions vidéo est connecté.
! Cet appareil peut lire des “Films”, “Vidéos
musicales”, “Émissions TV”, “Podcasts vidéo”
et “Films loués” qui peuvent être téléchargés
à partir du magasin iTunes Store.
Remarque
Cette fonction n’est pas disponible sur un iPod
avec connecteur Lightning.
1 Touchez Search pour afficher les menus
iPod.
Reportez-vous à la page 92, Touche de recher-
che.
2 Basculez vers le mode vidéo de l’iPod.
Playlists
Artists
Albums
Songs
Podcasts
Genres
ROOT
# Si vous voulez basculer sur le mode vidéo de
l’iPod, touchez l’icône.
Commutation vers le mode vidéo
de l’iPod.
3 Lisez la vidéo à partir de l’iPod.
Video Playlists
Movies
Music Videos
TV Shows
Video Podcasts
Rented Movies
ROOT
# Si vous voulez afficher le mode musique de
l’iPod, touchez l’icône.
Commutation vers le mode mu-
sique de l’iPod.
Recherche d’une vidéo/
musique sur l’iPod
Pour faciliter son utilisation et la recherche des
plages musicales, les opérations à effectuer
pour contrôler un iPod avec cet appareil sont
conçues pour être aussi semblables que pos-
sible à celles de l’iPod.
Remarque
Les fonctions liées à la vidéo ne sont pas dispo-
nibles sur un iPod avec connecteur Lightning.
Recherche d ’ une vidéo/musique
par catégorie
1 Touchez la touche de recherche pour dé-
rouler les menus de l’iPod.
Reportez-vous à la page 92, Touche de recher-
che.
2 Touchez une des catégories dans laquelle
vous voulez rechercher une vidéo/musique.
Listes de catégories (pour la vidéo)
! Video Playlists (listes de lecture vidéo)
! Movies (films)
! Music Videos (vidéos musicales)
! TV Shows (émissions TV)
! Video Podcasts (podcasts vidéo)
! Rented Movies (films loués)
! Video ITunesU (vidéo ITunesU)
Listes de catégories (pour la musique)
! Listes (listes de lecture)
! Artistes (interprètes)
! Albums (albums)
! Morceaux (plages musicales)
! Podcasts (podcasts)
! Genres (genres)
! Compositeurs (compositeurs)
! Livres audio (livres audio)
3 Touchez le titre de la liste que vous vou-
lez lire.
Répétez cette opération jusqu’à ce que vous
trouviez la vidéo/musique désirée.
Remarques
! Selon la génération ou la version de l’ iPod,
certaines fonctions peuvent ne pas être dis-
ponibles.
! Vous pouvez lire les listes de lecture créées à
l’aide de l’application de l’ordinateur
(MusicSphere). L’application sera disponible
sur notre site web.
! Les listes de lecture créées à l’aide de l’appli-
cation de l’ordinateur (MusicSphere) sont af-
fichées sous forme abrégée.
Recherche par ordre
alphabétique dans la liste
1 Sélectionnez une catégorie.
Reportez-vous à la page 93, Recherche d’une
vidéo/musique par catégorie.
2 Passez en mode de recherche par ordre
alphabétique.
Commutation vers le mode de re-
cherche par ordre alphabétique.
Le mode recherche par ordre alphabétique s’affi-
che.
3 Touchez la première lettre du titre de la
vidéo/plage musicale que vous recherchez.
Lors de cette recherche, l’utilisation des touches
du clavier tactile n’est pas disponible.
Français
iPod
93
Section
iPod
Fr
10
<CRD4844-A>93
Black plate (94,1)
# Pour affiner la recherche avec une autre lettre,
touchez Cancel.
4 Touchez le titre de la liste que vous vou-
lez lire.
Répétez cette opération jusqu’à ce que vous
trouviez la plage musicale/la vidéo désirée.
Modification de la vitesse
d’un livre audio
% Touchez la touche de changement de vi-
tesse pour modifier la vitesse.
2
Lecture plus rapide que la vitesse
normale
1
Lecture à la vitesse normale
1/2
Lecture plus lente que la vitesse
normale
Affichage de listes liées à la
plage musicale en cours de
lecture (recherche de liaison)
Touchez la pochette d’album pour afficher la
liste des noms des plages musicales de l’album
en cours de lecture. Touchez le nom de la plage
musicale que vous souhaitez lire pour en démar-
rer la lecture.
Remarque
Si une partie des informations enregistrées ne
s’affichent pas, une touche de défilement appa-
raît à droite de la liste. Touchez la touche de défi-
lement pour parcourir.
Utilisation de AppRadio Mode
Ce système peut basculer sur AppRadio Mode
qui permet d’afficher et d’utiliser l’application
pour iPhone à l’écran.
Avec AppRadio Mode, vous pouvez utiliser les
applications de façon tactile (frappe, glissement,
défilement ou déplacement) à partir de l’écran
du système.
Installez l’application AppRadio sur votre
iPhone.
ATTENTION
Certaines utilisations d’un iPhone ou smart-
phone en conduisant peuvent être interdites
dans votre juridiction. Vous devez connaître
et respecter ces restrictions.
En cas de doute pour une fonction spéci-
fique, ne l’exécutez que si le véhicule est
stationné.
Aucune fonction ne doit être utilisée que si
cela est fait en toute sécurité par rapport à
votre conduite.
PRÉCAUTION
Pendant que vous conduisez, vous ne pouvez
pas saisir de texte sur votre iPod.
! Pioneer ne pourra être tenu responsable
des problèmes résultant d’un contenu in-
correct ou reposant sur une mauvaise ap-
plication.
! Le contenu et les fonctionnalités des appli-
cations prises en charge sont de la respon-
sabilité des fournisseurs de l’application.
! Avec AppRadio Mode, les fonctionnalités
du produit sont limitées pendant que vous
conduisez, les fonctions disponibles étant
déterminées par les fournisseurs de l’ap-
plication.
! La disponibilité de la fonctionnalité de
AppRadio Mode est déterminée par le
fournisseur de l’application et non par
Pioneer.
! AppRadio Mode permet d’accéder aux
applications qui ne figurent pas sur la liste
(conformément aux limitations en vigueur
pendant la conduite), mais l’utilisation du
contenu est déterminée par les fournis-
seurs de l’application.
Important
! Lorsque vous écoutez simultanément de la mu-
sique et des sons depuis une application, consul-
tez la section suivante. Reportez-vous à la page
121, Utilisation de la fonction de mixage audio.
Remarques
! Seules les applications compatibles avec
AppRadio Mode fonctionnent par commu-
tation de ce système sur AppRadio Mode.
! Veuillez vérifier les applications iPhone pri-
ses en charge par AppRadio Mode àl’a-
dresse :
http://www.pioneerelectronics.com/
AppRadioMode
au Canada
http://www.pioneerelectronics.ca/
AppRadioMode
iPod
94
Section
AppRadio Mode
Fr
10
11
<CRD4844-A>94
Black plate (95,1)
Compatibilité iPhone
AppRadio Mode est compatible avec les modè-
les d’iPod suivants.
! iPod touch 5ème génération (uniquement
avec AVH-X5600BHS/AVH-X4600BT/AVH-
X3600BHS/AVH-X2600BT)
! iPod touch 4ème génération
! iPhone 5 (uniquement avec AVH-X5600BHS/
AVH-X4600BT/AVH-X3600BHS/AVH-
X2600BT)
! iPhone 4S
! iPhone 4
Démarrage de la procédure
1 Installez l’application AppRadio sur votre
iPhone.
2 Réglez Connexion smartphone .
Connexion smartphone peut être réglé
lorsque toutes les conditions suivantes sont sa-
tisfaites.
— L’iPhone n’est pas connecté.
— Il n’y a pas de connexion Bluetooth.
— La source est hors tension.
1 Mettez la source hors service.
Reportez-vous à la page 76, Source off tou-
che.
2 Appuyez sur la touche accueil pour passer à
l’écran d’accueil.
3 Touchez la touche système pour ouvrir le
menu système.
4 Touchez Connexion smartphone sur le
menu système.
5 Touchez le réglage désiré.
— iPhone via Bluetooth (pour les utilisa-
teurs d’un iPod avec connecteur Lightn-
ing)
— iPhone via USB (pour les utilisateurs
d’un iPod avec connecteur 30 broches)
3 Une fois la configuration de
Connexion smartphone effectuée, connec-
tez l’iPhone à cet appareil.
# Pour les utilisateurs d’un iPod avec connec-
teur Lightning
(Fonction de AVH-X5600BHS/AVH-X4600BT/AVH-
X3600BHS/AVH-X2600BT)
— Une connexion Bluetooth est requise pour un
iPod avec connecteur Lightning. Reportez-
vous à la page 118, Menu de connexion
Bluetooth.
— Utilisez le CD-IV203 (vendu séparément) et
l’adaptateur Lightning VGA (produits
d’Apple Inc.) (vendu séparément) lorsque
vous utilisez cette fonction.
— Reportez-vous à la page 125, Lors de la conne-
xion avec le câble CD-IV203 en option.
# Pour les utilisateurs d’un iPod avec connec-
teur 30 broches
— Utilisez le CD-IU201S (vendu séparément)
lorsque vous utilisez cette fonction.
— Reportez-vous à la page 126, Lors de la conne-
xion avec le câble CD-IU201S en option.
4 Démarrez une application disponible
avec AppRadio Mode à partir de l’iPhone.
Une image de l’application apparaît sur l’écran
de ce système.
! Vous pouvez également démarrer une appli-
cation disponible pour AppRadio Mode à
partir d’une application de démarrage.
5 Appuyez sur MODE.
# Appuyez sur la touche accueil pour passer à l’é-
cran d’accueil, puis touchez la touche Apps pour
lancer l’application de démarrage.
6 Utilisez l’application.
Réglage du clavier
PRÉCAUTION
Pour votre sécurité, le clavier est uniquement
disponible lorsque le véhicule est à l’arrêt et le
frein à main serré.
Selon l’ application, vous pouvez saisir du texte
sur l’écran. Pour saisir du texte correctement à
l’aide du clavier qui s’affiche sur cet appareil,
vous devez définir le paramètre de langue de
cette fonction.
Lorsque AppRadio Mode est utilisé, le réglage
de la langue du clavier défini pour la fonction et
le réglage de la langue du clavier de l’iPhone
doivent être identiques.
! Le clavier est disponible uniquement avec
AppRadio Mode.
Lorsque vous renseignez une zone de texte
d’une application pour iPhone, un clavier appa-
raît à l’écran. Vous pouvez saisir le texte sou-
haité directement depuis ce système.
! La préférence de langue du clavier de ce sys-
tème doit être identique à la configuration de
votre iPhone.
Si la configuration de ce produit et de
l’iPhone sont différentes, vous ne pourrez
pas saisir les caractères correctement.
1 Appuyez deux fois sur la touche accueil
pour passer de l’écran AppRadio Mode à l’é-
cran d’accueil.
2 Touchez la touche système pour ouvrir le
menu système.
3 Touchez Clavier sur le menu Système
pour sélectionner la langue désirée.
4 Touchez la langue désirée.
Français (Français)—Allemand (Allemand)—
Grec (Grec)—Russe (Russe)—Anglais (Anglais
américain)—Anglais (Royaume-Uni) (Anglais -
RU)—Néerlandais (Néerlandais)—Italien (Ita-
lien)—Norvégien (Norvégien)—Suédois (Sué-
dois)—Finnois (Finnois)—Espagnol (Espagnol)
—Portugais (Portugais)—Chinois simplifié
(Chinois simplifié)—Chinois traditionnel (Chi-
nois traditionnel)—Arabe (Arabe)—Hébreu
(Hébreu)—Thailandais (Thaï)
5 Renseignez la zone de texte à partir de
l’écran de l’application de l’iPhone.
Touchez
pour masquer le clavier.
Français
AppRadio Mode
95
Section
AppRadio Mode
Fr
11
<CRD4844-A>95
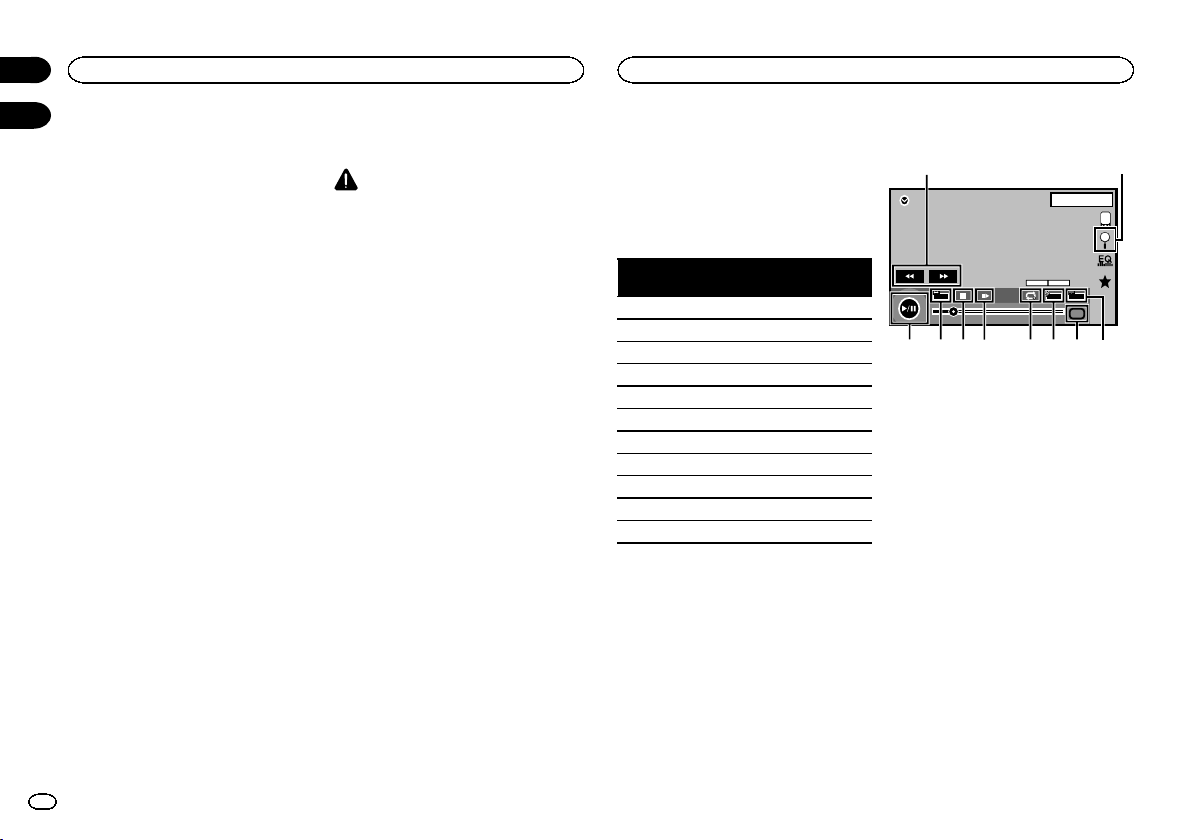
Black plate (96,1)
Vous pouvez utiliser votre smartphone via l’affi-
chage de l’appareil à l’aide de cette fonction.
Seuls les smartphones compatibles peuvent
être utilisés avec la fonction MirrorLink.
— Pour des détails sur la connexion d’un adap-
tateur de liaison de smartphone (CD-ML100)
(vendu séparément), reportez-vous à la page
126, Connexion d’un adaptateur de liaison de
smartphone optionnel (CD-ML100).
— Pour des détails sur le réglage de la fonction
MirrorLink, reportez-vous à la page 111, Sé-
lection du mode MirrorLink.
— Pour des détails sur la fonction de mixage
audio, reportez-vous à la page 121, Utilisation
de la fonction de mixage audio.
Démarrage de la procédure
1 Connectez votre smartphone à l’adapta-
teur de liaison de smartphone (CD-ML100)
(vendu séparément) à l’aide de l’entrée RGB.
2 Appuyez sur MODE.
# Appuyez sur la touche accueil pour passer à l’é-
cran d’accueil, puis touchez la touche MirrorLink
pour lancer l’application de démarrage.
# L’écran du smartphone s’affiche sur l’affichage
de l’appareil lorsque vous sélectionnez la fonction
MirrorLink. Vous pouvez ensuite utiliser votre smart-
phone via l’affichage de l’appareil.
3 Utilisez l’application.
— Appuyez sur la touche accueil : Affiche l’é-
cran d’accueil de la fonction MirrorLink.
— Appuyez deux fois sur la touche accueil : Affi-
che l’écran d’accueil de l’appareil.
— Appuyez sur d (TRK): Affiche l’écran de
menu de la fonction MirrorLink.
— Appuyez sur c (TRK): Affiche l’écran précé-
dent de la fonction MirrorLink.
Pour des détails, reportez-vous à la page 75, Ap-
pareil central.
# Vous pouvez utiliser les applications sur l’écran
du clavier tactile et sur l’écran de votre smartphone.
PRÉCAUTION
! N’utilisez pas votre smartphone pendant la
conduite. Respectez toutes les lois applica-
bles dans votre région.
! Vous devez toujours respecter la règle ci-des-
sus de l’écran des précautions. Veillez à bien
suivre les instructions à l’écran.
Cet appareil est compatible avec les protocoles
USB MSC (Mass Storage Class) et MTP (Media
Transfer Protocol).
Vous pouvez également utiliser le protocole USB
MTP (connexion aux périphériques Android
compatibles MTP à l’aide d’un câble USB) ; cer-
taines fonctions ne sont toutefois pas prises en
charge par la connexion MTP.
USB
MSC
USB
MTP
MP3 11
WMA 11
WAV 1 —
AAC 11
DivX 1 —
MPEG-1 1 —
MPEG-2 1 —
MPEG-4 1 —
JPEG 1 —
Mode de navigation Musique 1 —
MIXTRAX EZ 1 —
Utilisation des images de
vidéos
(Fonction du protocole USB MSC)
Vous pouvez utiliser cet appareil pour visualiser
les fichiers d’un périphérique de stockage USB.
Touches du clavier tactile
USB
00'20'' -119'51''
Dolby DMulti ch
FULL
11
1JAN
PM
12:43
01 01
Media
1
a987 5
643
2
1 Touche d’avant rapide/Touche de retour
rapide
Avance ou retour rapide
Touchez pour modifier la vitesse d’avance ra-
pide/de retour rapide.
2 Touche de recherche
Affichage de la liste de noms de fichiers pour
sélectionner les fichiers.
3 Touche de changement de langue des
sous-titres
Avec les fichiers DivX supportant des enre-
gistrements multi-sous-titres, vous pouvez
changer de langue des sous-titres pendant la
lecture.
4 Touche de support
Commutation entre les types de fichiers
média pour lire les informations des sup-
ports Musique/Vidéo/Photo.
Utilisation de l’adaptateur de liaison de smartphone
96
Section
USB
Fr
12
13
<CRD4844-A>96
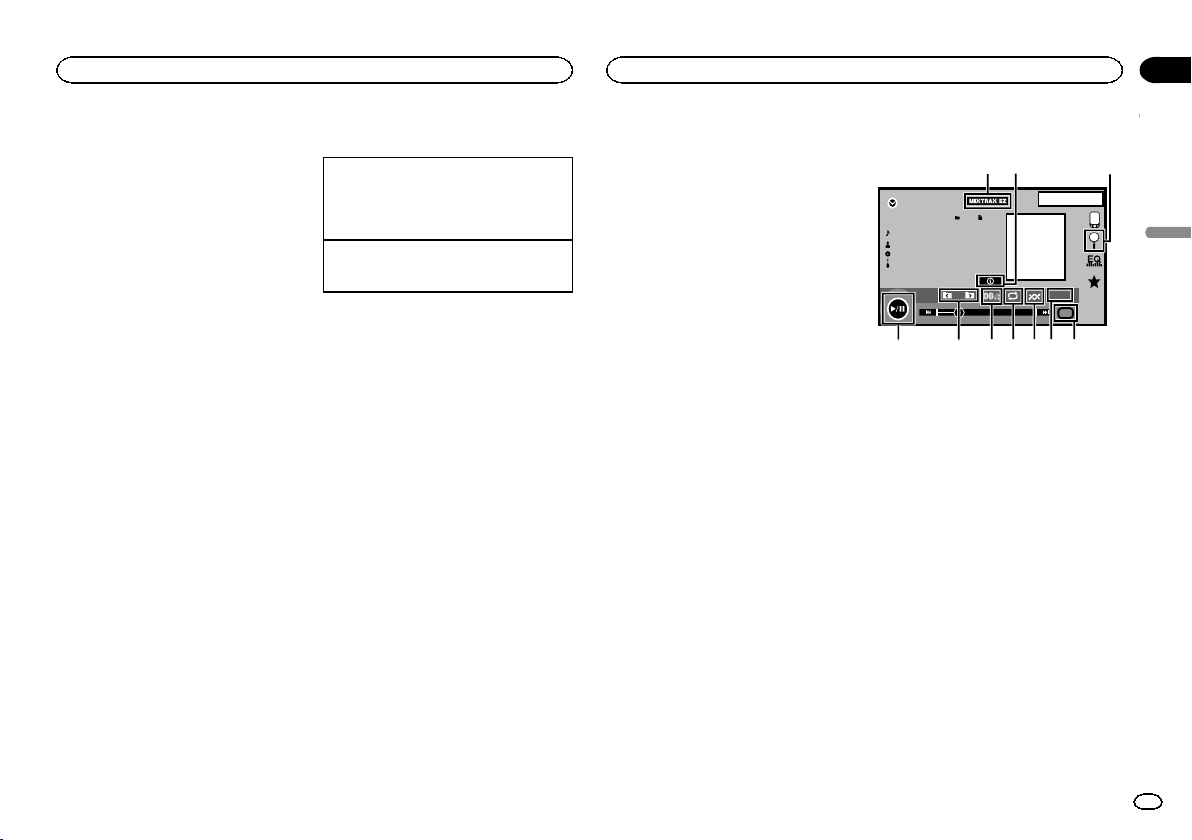
Black plate (97,1)
5 Touche de changement de langue audio
Avec les fichiers DivX pouvant offrir la lecture
audio en différentes langues et dans diffé-
rents systèmes audio (Dolby Digital, DTS,
etc.), vous pouvez changer de langue/de sys-
tème audio pendant la lecture.
6 Touche de répétition
Sélection de l’étendue de répétition.
Reportez-vous à la page 99, Répétition de la
lecture.
7 Touche Lecture au ralenti
(Fonction pour les fichiers DivX/MPEG-1/
MPEG-2/MPEG-4)
Avance image par image dans la sélection
pendant la lecture.
Touchez de façon prolongée pendant plus de
deux secondes pour ralentir la vitesse de lec-
ture.
8 Touche d’arrêt
Arrêt de la lecture.
Si vous reprenez la lecture, cette dernière re-
prend là où vous l’aviez arrêtée. Touchez de
nouveau la touche pour arrêter totalement la
lecture.
9 Touche de mode d’écran
Changement du mode écran.
Reportez-vous à la page 79, Changer le mode
écran large.
a Touche de pause et lecture
Pause de la lecture.
Retour en mode de lecture normal pendant
une lecture en pause, au ralenti ou image
par image.
Opérations de base
Lecture de vidéos
1 Connectez le périphérique USB.
La lecture commence automatiquement.
Quand l’icône de la source n’est pas affichée,
vous pouvez l’afficher en touchant l’écran.
Avance ou retour rapide à l’aide des touches
1 Appuyez de façon prolongée sur c ou d
(TRK).
Remarques
! Les touches du clavier tactile non indiquées
à Utilisation des images de vidéos peuvent
s’afficher à l’écran.
Reportez-vous à la page 134, Liste des indica-
teurs.
! Vous pouvez aussi utiliser le menu
Réglage vidéo pour changer de langue/sys-
tème audio. Pour les détails, reportez-vous à
la page 109, Choix de la langue audio.
! Cet appareil revient en lecture normale si
vous modifiez la langue audio pendant l’a-
vance/le retour rapide, la pause ou la lecture
au ralenti.
! Vous pouvez aussi utiliser le menu
Réglage vidéo pour changer la langue des
sous-titres. Pour les détails, reportez-vous à
la page 109, Choix de la langue des sous-ti-
tres.
! Cet appareil revient en lecture normale si
vous modifiez la langue des sous-titres pen-
dant l’avance/le retour rapide, la pause ou la
lecture au ralenti.
Utilisation de la lecture audio
Vous pouvez utiliser cet appareil pour écouter
des fichiers audio USB.
Connexion MTP
USB MTP (connexion à des périphériques
Android compatibles MTP à l’aide d’un câble
USB) est pris en charge uniquement pour les fi-
chiers MP3/WMA/AAC dans cette fonction.
Remarques
! Le temps de lecture peut ne pas s’afficher
correctement.
! Lors de la lecture de fichiers enregistrés
comme des fichiers VBR (débit binaire va-
riable), le temps de lecture n’est pas affiché
correctement si on utilise des opérations d’a-
vance rapide ou de retour rapide.
! Pour garantir un fonctionnement correct, re-
liez le câble du connecteur de la station d’ac-
cueil de l’iPod directement à cet appareil.
! Lorsque l ’iPod est connecté à cet appareil, il
ne peut pas être mis en service ou hors ser-
vice.
! Si les caractères enregistrés sur le périphé-
rique de stockage USB ne sont pas compati-
bles avec cet appareil, ils ne seront pas
affichés.
! Les informations textuelles peuvent ne pas
s’afficher correctement en fonction de leur
environnement d’enregistrement.
! Déconnectez le lecteur audio portable USB/
la mémoire USB lorsque vous ne l’utilisez
plus.
! Lorsque vous sélectionnez Speana à la page
119, Choix de l’affichage d’arrière-plan, les po-
chettes d’album ne s’affichent pas.
Touches du clavier tactile
00'01'' -00'03''
JAN
PM
12:43
USB
Abcdefghi
Abcdefghi
Abcdefghi
Abcdefghi
S.Rtrv
61
All
All
All
Media
21
a987654
3
1 Touche MIXTRAX EZ
Démarrage de MIXTRAX EZ.
(Sauf pour USB MTP)
2 Touche d’informations
Modification des informations à afficher sur
cet appareil lors de la lecture de fichiers
MP3/WMA/AAC/WAV.
3 Touche de recherche
Affichage de la liste de noms de fichiers pour
sélectionner les fichiers.
4 Touche de support
Commutation entre les types de fichiers
média pour lire les informations des sup-
ports USB.
5 Touche Sound Retriever
Reportez-vous à la page 79, Utilisation du cor-
recteur de son.
6 Touche Aléatoire
Écoute de plages musicales dans un ordre
aléatoire.
Français
USB
97
Section
USB
Fr
13
<CRD4844-A>97
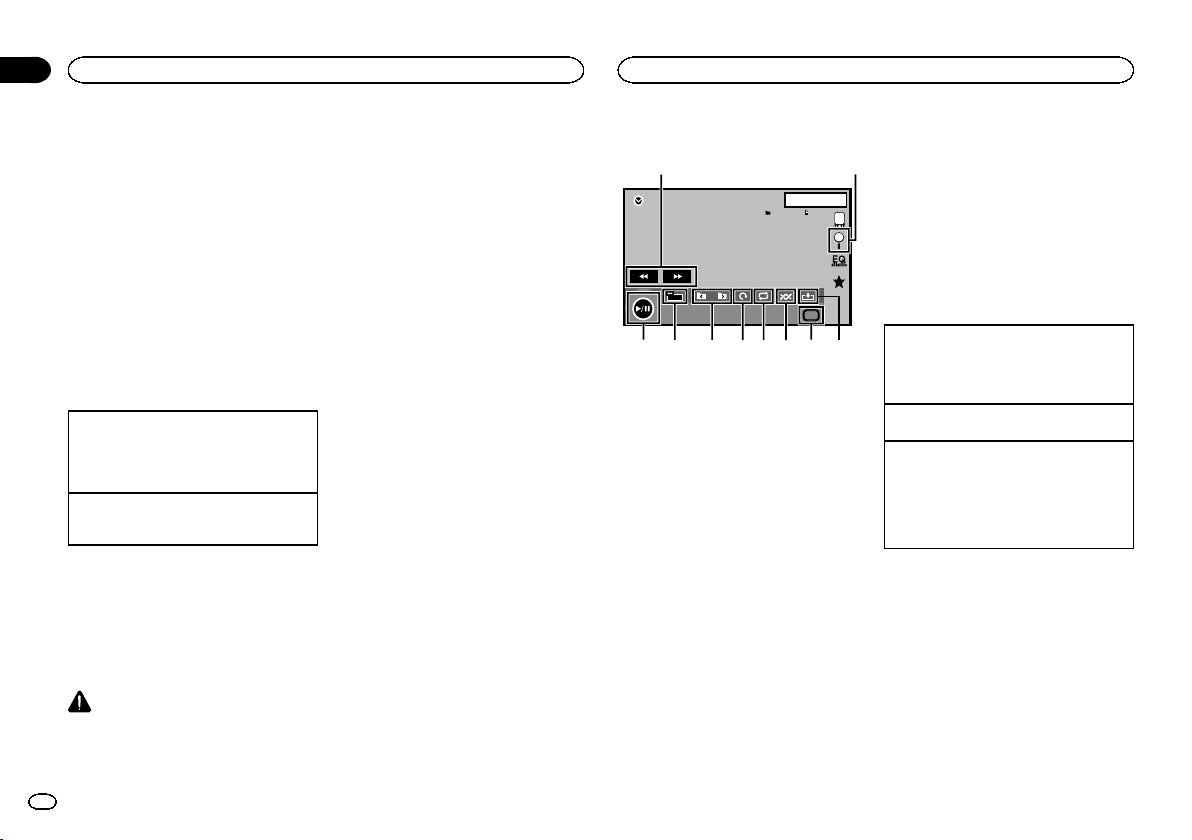
Black plate (98,1)
7 Touche de répétition
Sélection de l’étendue de répétition.
8 Touche DB
Création d’une base de données qui permet
d’effectuer des recherches par noms d’ar-
tiste, genre et d’autres options.
Reportez-vous à la page 98, Mode de naviga-
tion Musique.
9 Touche de dossier précédent/Touche de
dossier suivant
Sélection d’un dossier.
a Touche de pause et lecture
Pause et démarrage de la lecture.
Opérations de base
Lecture des plages
1 Connectez le périphérique USB.
La lecture commence automatiquement.
Quand l’icône de la source n’est pas affichée,
vous pouvez l’afficher en touchant l’écran.
Avance ou retour rapide à l’aide des touches
1 Appuyez de façon prolongée sur c ou d
(TRK).
Mode de navigation Musique
(Fonction pour USB MSC)
Cet appareil crée un index afin de simplifier la
recherche d’une plage musicale. Vous pouvez
rechercher par catégories, comme les albums et
les artistes par exemple.
PRÉCAUTION
! Cette fonction n’est pas disponible lorsque le
périphérique de stockage USB est verrouillé.
! Cette fonction n’est pas disponible lorsque
l’espace libre sur le périphérique de stockage
USB est inférieur à 5Mo.
! Lorsque cet appareil crée un index, ne le
mettez pas hors tension. Ceci peut entraîner
une perte de données sur votre périphérique
de stockage USB.
! Si vous activez la lecture vidéo ou l’affichage
d’images JPEG alors qu’une base de don-
nées est en cours de création ou si la base
de données n’a pu être créée, un message
s’affiche et la création de la base de données
s’arrête.
1 Touchez DB pour créer une base de don-
nées en mode de navigation Musique.
Reportez-vous à la page 97, Utilisation de la lec-
ture audio.
2 Quand “Souvegarde de la base de don-
nées sur la mémoire?” est affiché, touchez
“Oui”.
L’enregistrement de la base de données est ter-
miné. Si vous ne l’enregistrez pas, touchez
“Non”.
Lorsque l ’enregistrement est terminé, “Sauve-
garde de la base de données effectuée” s’affi-
che.
Le mode de navigation Musique démarre.
3 Affichez une liste et touchez la touche
Étiquette.
4 Sélectionnez un fichier.
Utilisation de la lecture
d’images fixes
(Fonction pour USB MSC)
Vous pouvez utiliser cet appareil pour afficher
les images fixes enregistrées sur un périphé-
rique de stockage USB.
Touches du clavier tactile
USB
NORMAL
1JAN
PM
12:43
44
All
All
All
Media
12
3456789a
1 Touche d’avant rapide/Touche de retour
rapide
Sélection d’une image.
2 Touche de recherche
Affichage de la liste de noms de fichiers pour
sélectionner les fichiers.
3 Touche de capture
Capture d’ une image dans des fichiers JPEG.
4 Touche de support
Basculement entre les types de fichiers
média lorsque plusieurs types de fichiers
média sont enregistrés sur le périphérique
USB. Cette touche ne s’affiche pas si un seul
type de fichier média est enregistré sur le pé-
riphérique USB.
5 Touche Aléatoire
Lecture de fichiers dans un ordre aléatoire.
6 Touche de répétition
Sélection de l’étendue de répétition.
7 Touche de rotation
Rotation de l’image affichée de 90° dans le
sens des aiguilles d’une montre.
8 Touche de dossier précédent/Touche de
dossier suivant
Sélection d’un dossier.
9 Touche de mode d’écran
Changement du mode écran.
Reportez-vous à la page 79, Changer le mode
écran large.
a Touche de pause et lecture
Exécution ou interruption du diaporama.
Opérations de base
Lecture d’images fixes
1 Connectez le périphérique USB.
La lecture commence automatiquement.
! Quand l’icône de la source n’est pas affichée,
vous pouvez l’afficher en touchant l’écran.
Sélection d’un fichier à l’aide des touches
1 Appuyez sur c ou d (TRK).
Recherche rapide de fichier
1 Appuyez de façon prolongée sur c ou d
(TRK).
! Vous pouvez rechercher 10 fichiers JPEG à la
fois.
S’il y a moins de 10 fichiers, la recherche cou-
vrira le premier ou le dernier fichier.
Remarques
! Les fichiers sont lus suivant l’ordre de numé-
rotation des fichiers et les dossiers ne conte-
nant aucun fichier sont ignorés. (Si le
dossier 1 (ROOT) ne contient pas de fichier,
la lecture commence au dossier 2.)
! Les touches du clavier tactile non indiquées
à Utilisation de la lecture d’images fixes peu-
vent s’ afficher à l’écran.
Reportez-vous à la page 134, Liste des indica-
teurs.
USB
98
Section
USB
Fr
13
<CRD4844-A>98
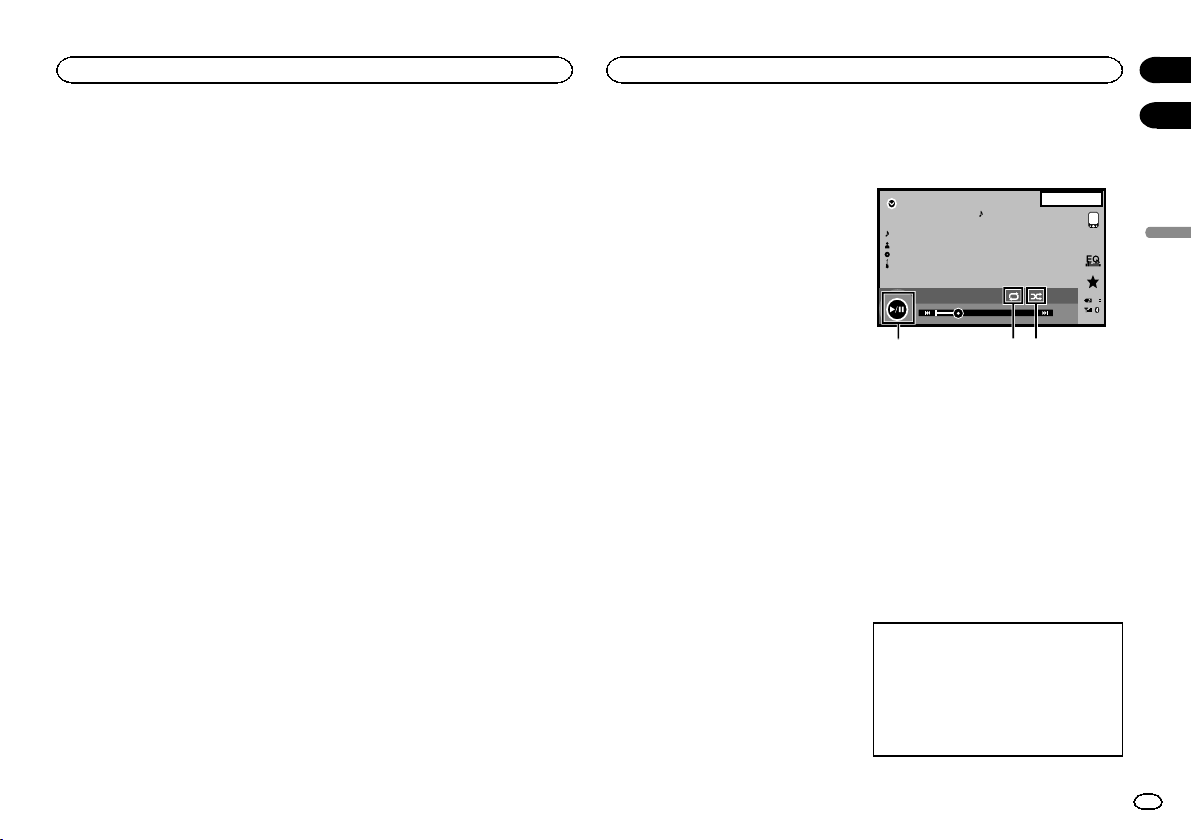
Black plate (99,1)
Changement de type de
fichier média
% Touchez Media pour changer de type de
fichier média.
Lecture aléatoire (shuffle)
% Touchez la touche de lecture aléatoire.
! On – Lecture de fichiers dans un ordre aléa-
toire à l’intérieur de l’étendue de répétition
Folder ou Media.
! Off – Annulation de la lecture aléatoire.
Répétition de la lecture
% Touchez la touche de répétition.
! Folder – Répétition du dossier en cours de
lecture
! All – Répétition de tous les fichiers
! Quand Folder est sélectionné, il n’est pas
possible de lire un sous-dossier de ce dossier.
! Si vous sélectionnez une source USB, l’éten-
due de répétition de la lecture changera en
All.
Choix des fichiers à partir de
la liste des noms de fichiers
(Fonction pour l’audio compressé/DivX/MPEG-1/
MPEG-2/MPEG-4)
L’opération est la même que pour Disque.
Reportez-vous à la page 90, Choix des fichiers à
partir de la liste des noms de fichiers.
Affichage de listes liées à la
plage musicale en cours de
lecture (recherche de liaison)
Touchez la pochette d’album pour afficher la
liste des noms des plages musicales de l’album
en cours de lecture. Touchez le nom de la plage
musicale que vous souhaitez lire pour en démar-
rer la lecture.
Remarques
! Si une partie des informations enregistrées
ne s’affichent pas, une touche de défilement
apparaît à droite de la liste. Touchez la tou-
che de défilement pour parcourir.
! Cette fonction est disponible avec les péri-
phériques USB en mode de navigation Mu-
sique.
Lecture du contenu VOD
d’un DivX
â
L’opération est la même que pour Disque.
Reportez-vous à la page 90, Lecture du contenu
VOD d’ un DivX
â
.
Capture d’une image dans
des fichiers JPEG
Vous pouvez capturer des données image et les
utiliser en papier peint. Ces images peuvent être
stockées dans cet appareil, et rappelées facile-
ment.
! Seule une image peut être enregistrée sur
cet appareil. L’ancienne image est écrasée
par la nouvelle.
1 Touchez f pour mettre le diaporama
en pause lorsque l’image souhaitée est affi-
chée.
2 Touchez Capture pour capturer l’image
souhaitée.
3 Quand “Voulez-vous souvegarder
l'image?” est affiché, touchez Oui.
Pendant le stockage de l’image sur l’appareil,
“Sauvegarde image Pendant la sauvegarde,
ne pas éteindre le moteur” s’affiche. Une fois
le processus terminé, “Image sauvegardée.”
s’affiche.
# Pour annuler la mise en mémoire, touchez Non.
Utilisation de la lecture audio
(Fonction de AVH-X5600BHS/AVH-X4600BT/
AVH-X3600BHS/AVH-X2600BT)
Vous pouvez utiliser cet appareil pour écouter
des fichiers audio Bluetooth.
Remarques
! Selon le lecteur audio Bluetooth connecté à
cet appareil, les opérations disponibles sont
limitées aux deux niveaux suivants :
— Profil A2DP (Advanced Audio Distribution
Profile): Vous pouvez seulement écouter des
plages musicales sur votre lecteur audio.
— Profil AVRCP (Audio/Video Remote Control
Profile): Vous pouvez écouter, interrompre la
lecture, sélectionner des plages musicales,
etc.
! Comme il existe une grande variété de lec-
teurs audio Bluetooth disponibles sur le mar-
ché, les opérations disponibles avec certains
modèles peuvent varier sensiblement.
Lorsque vous tentez d’exécuter un lecteur
audio Bluetooth avec cet appareil, reportez-
vous au mode d’emploi livré avec le lecteur
ainsi qu’au présent mode d’emploi pour ob-
tenir de l’aide.
! Le signal provenant de votre téléphone cellu-
laire pouvant occasionner des interférences,
évitez de l’utiliser lorsque vous écoutez des
plages musicales sur votre lecteur audio
Bluetooth.
! Le son d’un lecteur audio Bluetooth
connecté à cet appareil est coupé lorsque
vous passez un appel sur avec un téléphone
cellulaire connecté à cet appareil via la tech-
nologie sans fil Bluetooth.
! Le temps de lecture peut ne pas s’afficher
correctement.
! Selon le type de lecteur audio Bluetooth
connecté à cet appareil, l’affichage des opé-
rations et informations de certaines fonc-
tions peut ne pas être disponible.
Touches du clavier tactile
Bluetooth
88'88'' -88'88''
Abcdefghi
Abcdefgh
Abcdefgh
Abcdefgh
8888
22 JAN
AM
12:22
DB
32
1
1 Touche Aléatoire
Écoute de plages musicales dans un ordre
aléatoire.
2 Touche de répétition
Sélection de l’étendue de répétition.
3 Touche de pause et lecture
Pause et démarrage de la lecture.
Réglage de l’audio Bluetooth
Avant de pouvoir utiliser la fonction audio
Bluetooth, vous devez établir une connexion
sans fil Bluetooth entre l’appareil et votre lecteur
audio Bluetooth.
1 Connexion
Vous devez, tout d’abord, connecter un lecteur
audio Bluetooth à cet appareil.
Pour des instructions détaillées sur la conne-
xion de votre lecteur audio Bluetooth à cet ap-
pareil via la technologie sans fil Bluetooth,
reportez-vous à la page 118, Menu de conne-
xion Bluetooth.
Français
USB
99
Section
Audio Bluetooth
Fr
13
14
<CRD4844-A>99

Black plate (100,1)
Remarques
! Lors de la lecture de fichiers enregistrés
comme des fichiers VBR (débit binaire va-
riable), le temps de lecture n’est pas affiché
correctement si on utilise des opérations d’a-
vance rapide ou de retour rapide.
! Pour garantir un fonctionnement correct, re-
liez le câble du connecteur de la station d’ac-
cueil de l’iPod directement à cet appareil.
! Lorsque l ’iPod est connecté à cet appareil, il
ne peut pas être mis en service ou hors ser-
vice.
! Si les caractères enregistrés sur votre lecteur
audio Bluetooth ne sont pas compatibles
avec cet appareil, ils ne seront pas affichés.
! Les informations textuelles peuvent ne pas
s’afficher correctement en fonction de leur
environnement d’enregistrement.
Lecture aléatoire (shuffle)
% Touchez la touche de lecture aléatoire.
! On – Lecture des fichiers dans un ordre aléa-
toire.
! Off – Annulation de la lecture aléatoire.
Répétition de la lecture
% Touchez la touche de répétition.
! One – Répétition de la plage musicale en
cours de lecture uniquement
! All – Répétition de toutes les plages musica-
les
Utilisation de MIXTRAX
MIXTRAX est une technologie originale de créa-
tion de mixage sans interruption à partir d’une
sélection audio de votre bibliothèque audio, qui
comprend des effets DJ permettant d’obtenir
des sons de qualité DJ professionnelle.
Utilisation de MIXTRAX EZ
Vous pouvez utiliser cet appareil pour lire des fi-
chiers audio iPod/USB.
MIXTRAX EZ permet d’ajouter divers effets sono-
res entre les plages musicales afin d’organiser
les pauses entre chaque plage musicale. Il per-
met d’écouter de la musique en boucle.
! Cette fonction n’est disponible que lorsqu’un
fichier sur un périphérique de stockage USB
ou une plage musicale sur un iPod est en
cours de lecture.
! Cette fonction n’est pas disponible lorsque le
mode de commande est défini sur
App Mode.
! Selon le fichier/la plage musicale, des effets
sonores peuvent ne pas être disponibles.
! Selon le fichier/la musique, la lecture sans
interruption peut ne pas être disponible.
Remarque
Vous ne pouvez pas utiliser cette fonction avec
USB MTP.
Exécution de MIXTRAX EZ
% Touchez MIXTRAX EZ.
Reportez-vous à la page 91, Touche MIXTRAX
EZ et 97.
Réglage du mode MIXTRAX
Activez cette fonction pour lire des fichiers
audio à l’aide de MIXTRAX.
1 Appuyez sur la touche accueil pour pas-
ser à l’écran d’accueil.
2 Touchez la touche système pour ouvrir le
menu système.
3 Touchez Réglages MIXTRAX sur le menu
système.
Les éléments de réglage MIXTRAX s’affichent.
! Mode lecture courte – Lorsqu’il est activé,
sélectionnez la durée de lecture de la plage
musicale.
60s (60 sec.)—90s (90 sec.)—120s (120 sec.)
—150s (150 sec.)—180s (180 sec.)—
Aléatoire (aléatoire)—Off (désactivé)
Lorsque le réglage Aléatoire est sélectionné,
le temps de lecture varie entre 60 s, 90 s,
120 s, 150 s et 180 s de manière aléatoire à
chaque changement de plage musicale pen-
dant la lecture.
! Effet affichage – Lorsque Effet affichage
est activé, l’affichage des pochettes d’album
peut être modifié en fonction du type de mu-
sique.
! Effet coupure – Lorsque Effet coupure est
en service, des effets sonores sont lus entre
les plages musicales.
! Réglages effets – Utilisez Réglages effets
pour régler l’effet sonore que vous souhaitez
insérer entre les plages musicales.
Réglage de l’effet
Vous pouvez modifier les réglages des sons fixes
et des effets sonores.
Six sons fixes différents sont disponibles et peu-
vent être insérés afin d’être lus entre les plages.
Les effets sonores sont utilisés pour signaler la
fin d’une plage musicale en cours de lecture et
le début de la plage musicale suivante.
Les sons fixes et les effets sonores sont définis
comme des combinaisons comme les sons
MIXTRAX.
Audio Bluetooth
100
Section
Utilisation de MIXTRAX
Fr
14
15
<CRD4844-A>100

Black plate (101,1)
Sons fixes
! Phaser – Un son fixe qui ressemble à la
houle.
! Roll – Un son fixe qui répète la lecture d’un
son donné.
! Turntable – Un son fixe qui imite le scratch
d’un DJ.
! "Flange2" – Un son strident qui imite le
vrombissement d’un réacteur.
! Reverb – Un son fixe qui crée un effet de ré-
verbération.
! Echo2 – Un son fixe qui crée un effet d’écho.
Effets sonores
! "Cross Fade" – Un effet sonore qui crée un
effet de fondu entrant et sortant entre les pla-
ges musicales.
! "Flanger1" – Un son strident qui imite le
vrombissement d’un réacteur.
! "Echo1" – Un son qui crée un effet d’écho.
! "Loop" – Un effet sonore qui répète la lec-
ture d’ une section d’une piste musicale.
Remarque
"Cross Fade" ne peut pas être sélectionné pour
les fichiers audio de l’iPod.
Présélection de sons et d’effets
sonores à l’aide de la touche de
présélection
Les effets sonores Standard et Simple sont déjà
réglés comme présélections par défaut.
% Touchez Standard ou Simple pour vérifier
les réglages.
L’effet sonore présélectionné enregistré sous la
touche qui a été effleurée est réglé en tant que
présélection.
Enregistrement des sons et des
effets sonores en tant que
présélections
Enregistre une combinaison de sons et d’effets
sonores souhaitée dans Custom.
Touchez Personnalisation pour régler facile-
ment le son ou l’effet sonore souhaité.
1 Touchez Personnalisation.
2 Sélectionnez l’effet sonore souhaité en
touchant l ’option.
L’effet sonore indiqué est enregistré en tant que
présélection sous Custom.
Remarques
! Si vous touchez un effet sonore sur l’écran
de sélection Standard ou Simple,l’écran
Custom s’affiche automatiquement et l’effet
sonore est enregistré sous Custom.
! Vous pouvez écouter des sons fixes à titre
d’exemple en touchant l’icône haut-parleur.
Utilisation de Pandora
Pour les utilisateurs d’iPhone
— Connectez un iPod à l’entrée USB.
— Réglez Connexion Pandora sur iPhone.
(Fonction de AVH-X5600BHS/AVH-X4600BT/
AVH-X3600BHS/AVH-X2600BT)
(Ce réglage n’est pas requis pour AVH-
X1600DVD.)
Pour les utilisateurs de smartphone
(Fonction de AVH-X5600BHS/AVH-X4600BT/
AVH-X3600BHS/AVH-X2600BT)
— Réglez Connexion Pandora sur Android.
— Une connexion Bluetooth est requise pour
les périphériques Android. Reportez-vous à la
page 118, Menu de connexion Bluetooth.
Important
Conditions requises pour l’accès à la radio
Pandora à l’aide d’appareils audio/vidéo pour vé-
hicule Pioneer :
Connectez un iPod à l’entrée USB ou un péri-
phérique Android via la technologie Bluetooth
pour écouter Pandora sur cet appareil.
! Veuillez mettre à jour le firmware de l’application
Pandora vers la dernière version avant utilisation.
! La dernière version de l’application Pandora peut
être téléchargée depuis iTunes App Store et Goo-
gle Play.
! Créez un compte gratuit ou payant en ligne.Vous
pouvez créer le compte dans l’application
Pandora depuis votre iPhone ou sur le site Web.
Voici l’URL :
http://www.pandora.com/register
! si le forfait “Data Plan” de votre iPhone ne fournit
pas une utilisation de données illimitée, votre
fournisseur peut appliquer des frais supplémen-
taires pour l’accès au service Pandora via les ré-
seaux 3G et/ou EDGE.
! Vous devez vous connecter à Internet via un ré-
seau 3G, EDGE ou Wi-Fi pour utiliser le service à
partir de Pandora.
Restrictions :
! En fonction de la disponibilité d’Internet, il se
peut que vous ne puissiez pas recevoir le service
Pandora.
! Le service Pandora peut être modifié sans pré-
avis.Le service peut être affecté par n’importe
quel élément suivant : versions de firmware
d’iPhone, versions de firmware de l’application
Pandora, modification du service de musique
Pandora.
! Certaines fonctions du service Pandora ne sont
pas disponibles lors de l’accès au service via les
appareils audio/vidéo pour véhicule Pioneer.Sont
comprises, mais sans s’y limiter, les fonctions
suivantes : création de nouvelles stations, sup-
pression de stations, envoi d’informations sur les
stations actuelles, achat de plages sur iTunes, af-
fichage d’informations textuelles supplémentai-
res, connexion à Pandora, réglage de la qualité
sonore du réseau de téléphonie mobile.
La radio Pandora sur Internet est un service de
musique non affilié à Pioneer. Plus d’informa-
tions sont disponibles à l’adresse
http://www.pandora.com.
L’application mobile Pandora est disponible
pour la plupart des iPhones et smartphones.
Veuillez visitez le site
www.pandora.com/everywhere/mobile pour en
savoir plus sur les dernières informations en
matière de compatibilité.
Réglage du mode de connexion
Pandora
(Fonction de AVH-X5600BHS/AVH-X4600BT/
AVH-X3600BHS/AVH-X2600BT)
Remarque
Cette fonction n’est pas disponible lorsque
Connexion smartphone est réglé sur iPhone
via Bluetooth.
1 Appuyez sur la touche accueil pour pas-
ser à l’écran d’accueil.
Français
Utilisation de MIXTRAX
101
Section
Lecture en continu de Pandora
â
Fr
15
16
<CRD4844-A>101
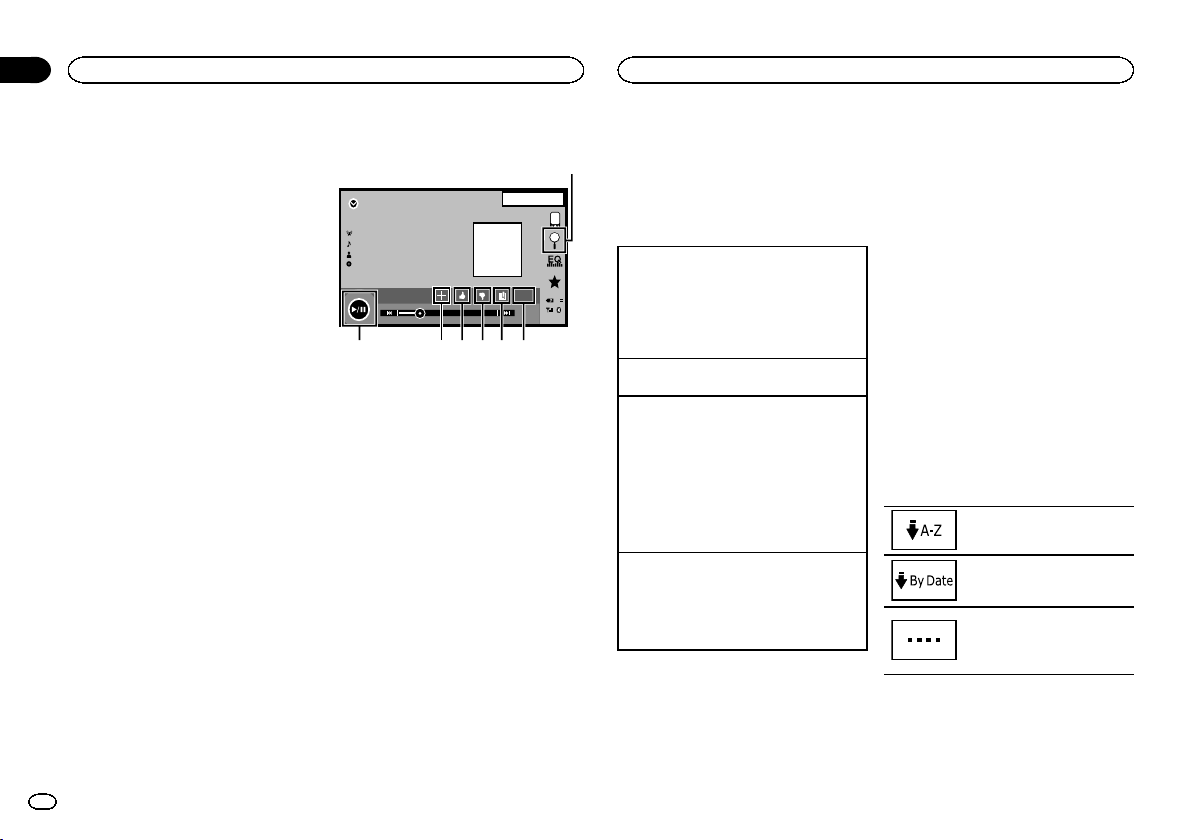
Black plate (102,1)
2 Touchez la touche système pour ouvrir le
menu système.
3 Touchez Connexion Pandora de manière
répétée jusqu’à ce que le réglage souhaité
apparaisse sur l’écran.
iPhone : Un iPod est connecté à l’aide d’un
câble physique.
Android: Un périphérique Android est connecté
via la technologie Bluetooth.
Touches du clavier tactile
Pandora
88'88'' -88'88''
Abcdef ghi
Abcdef ghi
Abcdef ghi
Abcdef ghi
22 JAN
AM
12:22
DB
S.Rtrv
1
2345
67
1 Touche de recherche
Affiche la liste aléatoire/de stations. Sélec-
tionnez le mode aléatoire ou la station dési-
rée.
2 Touche Sound Retriever
(Uniquement disponible iPod)
Reportez-vous à la page 79, Utilisation du cor-
recteur de son.
3 Touche de signet
Met en mémoire des informations sur la
plage (signet).
Les signets sont visibles dans votre profil.
4 Touche de pouce tourné vers le bas
Un « pouce tourné vers le bas » indique à
Pandora que vous n’aimez pas la piste ac-
tuelle. Pandora passe à la piste suivante et
ne rejouera plus la piste ignorée sur la sta-
tion.
5 Touche de pouce tourné vers le haut
Un « pouce tourné vers le haut » indique à
Pandora que vous aimez la piste actuelle.
Pandora continue de lire la piste et la relira
sur la station.
6 Touche d’ajout de station
Une nouvelle station est créée.
7 Touche de pause et lecture
Pause et démarrage de la lecture.
Opérations de base
Lecture des plages
1 Connectez un iPhone à l’entrée USB.
Une connexion Bluetooth est également re-
quise pour un périphérique Android.
Reportez-vous à la page 101, Utilisation de
Pandora.
2 Basculez la source sur Pandora.
Saut de plage
1 Appuyez sur d (TRK).
Ajouter une station
Une nouvelle station est créée à partir des infor-
mations relatives à l’interprète ou à la plage de la
station en cours de lecture.
1 Touchez la touche d’ajout de station.
2 Touchez Morceau (à partir de la piste) ou Ar-
tiste (à partir de l’interprète).
Une nouvelle station est créée.
! Touchez Annuler pour abandonner l’ajout
de station.
Suppression de stations
1 Affichage de la liste aléatoire/de stations.
2 Touchez la touche de suppression de station.
3 Touchez Oui.
La station est supprimée.
! Pour annuler, touchez Non.
Remarques
! Les touches du clavier tactile non indiquées
à Utilisation de Pandora peuvent s’afficher à
l’écran.
Reportez-vous à la page 134, Liste des indica-
teurs.
! Pandora limite le nombre de sauts autorisés
sur son service. Si vous tentez de passer des
plages au-delà de cette limite,
“Limite atteinte.” s’affiche. Si vous avez at-
teint la limite de sauts et que vous donnez un
avis défavorable à la plage musicale, la plage
en cours continue à être lue mais vos retours
d’informations sont enregistrés.
! Lorsque la touche Connect s’affiche,
connectez un appareil Bluetooth enregistré
manuellement.
Sélection et lecture de stations
de radio Pandora
â
/aléatoire
Touchez la liste de vos stations Pandora pour sé-
lectionner celle à écouter.
1 Affichage de la liste aléatoire/de sta-
tions.
Reportez-vous à la page 102, Touche de recher-
che.
2 Modifiez l’ordre de tri.
Vous pouvez trier les éléments de
la liste par ordre alphabétique.
Vous pouvez trier les éléments de
la liste par ordre de date de créa-
tion.
Vous pouvez parcourir les titres
de la liste tout appuyant de ma-
nière prolongée sur l’icône de dé-
filement.
Lecture en continu de Pandora
â
102
Section
Lecture en continu de Pandora
â
Fr
16
<CRD4844-A>102
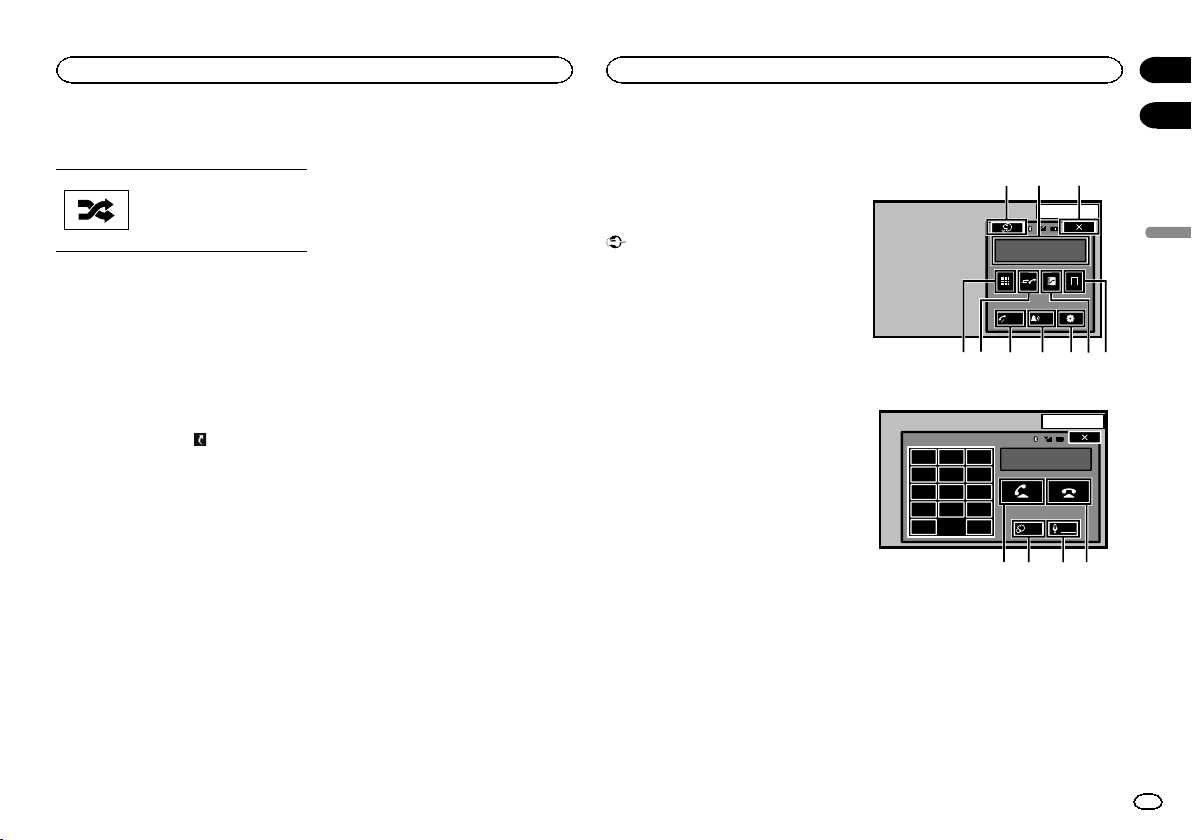
Black plate (103,1)
3 Sélectionnez la lecture aléatoire ou la sta-
tion souhaitée.
Le mode aléatoire lit les plages
sur les stations sélectionnées.
Vous pouvez modifier les préfé-
rences de lecture aléatoire sur
votre périphérique mobile.
Ajout d’une station à la liste de
stations
1 Touchez Genre dans la liste de stations.
2 Touchez la station dans la liste de genres
que vous voulez lire.
3 Une nouvelle station est créée.
Remarque
Les stations indiquées par
sont des stations
partagées.
Utilisation du téléphone
Bluetooth
(Fonction de AVH-X5600BHS/AVH-X4600BT/
AVH-X3600BHS/AVH-X2600BT)
Vous pouvez utiliser le téléphone Bluetooth.
Important
! Laisser l’appareil en attente d’une connexion
à votre téléphone via Bluetooth alors que le
moteur est arrêté peut décharger la batterie.
! Les opérations avancées qui requièrent votre
attention, telles que composer des numéros
sur le moniteur, utiliser l’annuaire, etc. sont
interdites pendant que vous conduisez.
Lorsque vous effectuez cette opération, assu-
rez-vous de garer votre véhicule dans un en-
droit sûr avant de continuer.
! Le menu de connexion Bluetooth ne peut
pas être sélectionné pendant la conduite.
! Les opérations disponibles peuvent être limi-
tées en fonction du téléphone cellulaire
connecté à cet appareil.
! Si vous ne parvenez pas à exécuter la conne-
xion à l’aide de cet appareil, utilisez le péri-
phérique à connecter à l’appareil.
! Si vous connectez plusieurs appareils simul-
tanément, l’appareil connecté peut ne pas
fonctionner correctement. La connexion d’un
seul appareil à la fois est recommandée.
Touches du clavier tactile
Affichage de l’attente téléphone
13 ARP
PM
12:25
1
Abcdefghi
1234567890123456
Auto
ON
To n e
OFF
e1
2345678
d
Quand vous passez en mode de saisie du numé-
ro de téléphone
13 APR
PM
12:25
1
123
456
789
*0#
C+
Abcdefghi
XXXXXXXXXXXXXXXX
Private
ON
Vol
9abc
1 Touche de fermeture
L’écran est fermé.
2 Touche de présélection
Affichage de l’écran de présélection des nu-
méros d’appel.
3 Touche d’annuaire
Commutation vers le mode d’annuaire télé-
phonique.
Français
Lecture en continu de Pandora
â
103
Section
Téléphone Bluetooth
Fr
16
17
<CRD4844-A>103
Black plate (104,1)
4 Touche de réglage
Affichage du menu de connexion Bluetooth.
5 Touche de tonalité
Mise en service ou hors service de la sonne-
rie pour les appels entrants.
6 Touche de réponse automatique
Mise en ou hors service du répondeur auto-
matique.
7 Touche d’historique
Commutation entre les listes des appels
reçus, manqués et composés.
8 Touche du clavier
Commutation vers le mode pour saisir direc-
tement le numéro de téléphone.
9 Touche raccroché
Fin d’un appel.
Rejet d’un appel entrant.
Annulation des appels en attente.
a Touche de volume
Réglage du volume d’écoute du destinataire.
b Touche de mode privé
Mise en ou hors service du mode privé.
c Touche décroché
Acceptation d’un appel entrant.
Exécution d’un appel lors de la sélection
d’un numéro de téléphone.
Commutation entre les appelants en attente.
d Touche de contrôle vocal
Remarques
! Vous ne pouvez utiliser le mode privé que
lorsque vous parlez au téléphone.
! Pour terminer l’appel, vous et l’appelant doi-
vent raccrocher le téléphone.
! Les touches du clavier tactile non indiquées
à Utilisation du téléphone Bluetooth peuvent
s’afficher à l’écran.
Reportez-vous à la page 134, Liste des indica-
teurs.
Informations textuelles
e Notification d’appel entrant
Indique qu’un appel entrant a été reçu et
qu’il n’a pas encore été pris en compte.
! Pas d’affichage pour les appels effectués
alors que votre téléphone cellulaire est
déconnecté de cet appareil.
Réglage pour la téléphonie
mains libres
1 Connexion
Vous devez, tout d’abord, connecter un télé-
phone Bluetooth à cet appareil.
Pour des instructions détaillées sur la conne-
xion de votre téléphone à cet appareil via la
technologie sans fil Bluetooth, reportez-vous
à la page 118, Appairage à partir de cet appareil.
2 Réglage du volume
Réglez le volume de l’écouteur sur votre télé-
phone cellulaire à votre convenance. L’appareil
enregistrera le niveau de volume défini
comme réglage par défaut.
Remarques
! Le volume de la voix de l’appelant et de la
sonnerie peut varier en fonction du type de
téléphone cellulaire.
! Si la différence entre le volume de la sonne-
rie et celui de la voix de l’appelant est impor-
tante, le niveau de volume global peut
devenir instable.
! Assurez-vous de régler correctement le vo-
lume avant de déconnecter le téléphone cel-
lulaire de l’appareil. Si le volume est réglé
sur silencieux (niveau zéro) sur votre télé-
phone cellulaire, ce volume reste sur silen-
cieux même après la déconnexion de votre
téléphone cellulaire.
Appel d’un numéro de
l’annuaire
Les contacts sur votre téléphone sont générale-
ment et automatiquement transférés lorsque le
téléphone est connecté. Si ce n’est pas le cas,
utilisez le menu de votre téléphone pour transfé-
rer les contacts. La visibilité de cet appareil doit
être activée lorsque vous utilisez le menu du té-
léphone. Reportez-vous à la page 118, Commu-
tation vers un appareil visible.
Après avoir trouvé dans l’annuaire le numéro
que vous voulez appeler, vous pouvez sélection-
ner l’entrée et effectuer l’appel.
1 Touchez la touche d’annuaire pour acti-
ver le mode d’annuaire téléphonique.
2 Sélectionnez la liste des numéros de télé-
phone.
La liste détaillée des numéros de téléphone de
l’entrée sélectionnée est affichée.
3 Sélectionnez le numéro de téléphone.
# Si vous voulez enregistrer le numéro de télé-
phone, touchez de façon prolongée la liste.
4 Touchez la touche décroché pour passer
un appel.
5 Touchez la touche raccroché pour mettre
fin à l’appel.
Remarque
Les contacts sur votre téléphone sont générale-
ment et automatiquement transférés lorsque le
téléphone est connecté. Si ce n’est pas le cas,
utilisez le menu de votre téléphone pour transfé-
rer les contacts. La visibilité de cet appareil doit
être activée lorsque vous utilisez le menu du té-
léphone. Reportez-vous à la page 118, Commu-
tation vers un appareil visible.
Sélection d’un numéro à
l’aide du mode de recherche
par ordre alphabétique
Si un grand nombre de numéros sont enregis-
trés dans l’annuaire, vous pouvez rechercher le
numéro de téléphone à l’aide du mode de re-
cherche par ordre alphabétique.
1 Touchez la touche d’annuaire pour acti-
ver le mode d’annuaire téléphonique.
2 Touchez ABC pour passer en mode de re-
cherche par ordre alphabétique.
3 Touchez la première lettre de l’entrée re-
cherchée.
Les entrées de l’annuaire commençant par cette
lettre (par exemple “Ben”, “Brian” et “Burt”
quand “B ” est sélectionné) s’affichent.
# L’ordre du prénom et du nom peut être différent
de celui du téléphone cellulaire.
4 Touchez la liste pour afficher la liste des
numéros de téléphone de l’entrée sélection-
née.
# Si une entrée comporte plusieurs numéros de té-
léphone, sélectionnez-en un en touchant la liste.
# Si vous voulez afficher la liste de l’historique des
appels, touchez l’icône.
Téléphone Bluetooth
104
Section
Téléphone Bluetooth
Fr
17
<CRD4844-A>104
Black plate (105,1)
Commutation vers la liste de
l’historique des appels.
5 Touchez la touche décroché pour passer
un appel.
6 Touchez la touche raccroché pour mettre
fin à l’appel.
Inversion des noms dans
l’annuaire
Lorsque votre téléphone portable est connecté à
cet appareil, les noms et prénoms de vos
contacts peuvent être enregistrés dans l’an-
nuaire dans l’ordre inverse. Vous pouvez utiliser
cette fonction pour restaurer l’ordre.
(Inversion des noms dans l’annuaire)
1 Touchez la touche d’annuaire pour acti-
ver le mode d’annuaire téléphonique.
2 Inversez les noms dans les annuaires.
Inversion des noms dans les an-
nuaires.
3 “Voulez vous inverser tous les noms?”
s’affiche. Touchez Oui pour continuer.
s’affiche lorsque les noms sont inversés.
# Si l’inversion échoue, “Inversion Nom Erreur”
s’affiche. Le cas échéant, réessayez depuis le début.
Remarque
L’inversion des noms de vos contacts à partir de
cet appareil n’affecte pas les données conte-
nues sur votre appareil Bluetooth.
Utilisation des listes des appels
reçus, manqués et composés
Les 80appels les plus récents composés, reçus
et manqués sont enregistrés dans la mémoire.
Vous pouvez les parcourir et appeler des numé-
ros à partir de ces listes.
1 Touchez la touche d’historique pour affi-
cher la liste de l’historique des appels.
2 Sélectionnez Appels manqués,
Appels composés ou Appels reçus.
Affichage de la liste des appels
reçus.
Affichage de la liste des appels
effectués.
Affichage de la liste des appels
manqués.
3 Touchez un numéro de téléphone dans la
liste pour le sélectionner.
Le nom et numéro de téléphone sont affichés
dans la liste détaillée.
# Si vous voulez enregistrer le numéro de télé-
phone, touchez de façon prolongée la liste.
4 Touchez la touche décroché pour passer
un appel.
5 Touchez la touche raccroché pour mettre
fin à l’appel.
Réglage de la réponse
automatique
Si cette fonction est en service, cet appareil ré-
pond automatiquement à tous les appels en-
trants.
% Touchez la touche de réponse automa-
tique pour activer ou désactiver le répondeur
automatique.
Réglage du volume d’écoute
du destinataire
Pour conserver une excellente qualité audio, cet
appareil peut régler le volume d’écoute du desti-
nataire. Si le volume n’est pas assez fort côté
destinataire, utilisez cette fonction.
% Touchez la touche de volume pour sélec-
tionner Far-End VOL.
1—2—3
# Cette fonction peut être exécutée même pendant
que vous parlez au téléphone.
# Il est possible de mémoriser les réglages pour
chaque appareil.
Mise en service ou hors
service de la sonnerie
Vous pouvez choisir d’utiliser ou non la sonnerie
de cet appareil. Si cette fonction est activée, la
sonnerie de cet appareil retentira.
1 Connectez votre téléphone cellulaire à
cet appareil.
2 Touchez la touche de tonalité pour acti-
ver ou désactiver la sonnerie.
Utilisation des listes de
présélection des numéros
d’appel
Vous pouvez facilement mettre en mémoire jus-
qu’à six numéros de téléphone.
1 Touchez la touche de présélection pour
afficher l’écran de présélection.
2 Touchez un des numéros de téléphone
pour le sélectionner.
# Si vous souhaitez supprimer un numéro de télé-
phone présélectionné, touchez de façon prolongée
le numéro de téléphone que vous souhaitez suppri-
mer.
3 Touchez la touche décroché pour passer
un appel.
4 Touchez la touche raccroché pour mettre
fin à l’appel.
Exécution d’un appel par saisie
d’un numéro de téléphone
13 APR
PM
12:25
1
123
456
789
*0#
C
+
Abcdefghi
XXXXXXXXXXXXXXXX
Private
ON
Vol
1 Touchez la touche du clavier pour saisir le
numéro de téléphone.
2 Touchez les icônes de numéro pour saisir
les numéros.
# Vous pouvez entrer un maximum de 32 chiffres.
Français
Téléphone Bluetooth
105
Section
Téléphone Bluetooth
Fr
17
<CRD4844-A>105
Black plate (106,1)
3 Touchez la touche décroché pour passer
un appel.
4 Touchez la touche raccroché pour mettre
fin à l’appel.
Remarque
Le mode de saisie du numéro de téléphone ne
peut être utilisé, sauf si un téléphone Bluetooth
est connecté à cet appareil.
Réglage du mode privé
Pendant une conversation, vous pouvez passer
en mode privé (discussion directe sur votre télé-
phone cellulaire).
% Touchez la touche de mode privé pour ac-
tiver ou désactiver le mode privé.
Contrôle vocal
Si votre téléphone cellulaire est équipé d’une
fonction de contrôle vocal, vous pouvez utiliser
les commandes vocales pour passer des appels,
par exemple.
! Le mode opératoire dépend du type de télé-
phone cellulaire. Reportez-vous au mode
d’emploi fourni avec votre téléphone cellu-
laire pour les instructions détaillées.
! Lorsqu’un iPhone exécutant iOS 6.1 ou ver-
sion ultérieure est utilisé.
Le mode Siri Eyes Free Mode est disponible
avec ce produit.
1 Touchez la touche de contrôle vocal.
L’affichage bascule sur l’écran de contrôle
vocal.
Vous pouvez également passer à l’écran de
contrôle vocal en appuyant de façon prolongée
sur le bouton d’accueil lorsque la source est en
service.
13 ARP
PM
12:25
1
I'm Listening...
2 Démarrez le contrôle vocal.
Indique que vous pouvez passer
des appels continus sans inter-
ruption.
Indique que l’affichage est fermé.
Remarques
! Pour que les commandes vocales soient cor-
rectement reconnues et interprétées, veillez
à ce que les conditions soient appropriées
pour la reconnaissance vocale.
! Veuillez noter que le vent soufflant à travers
les vitres du véhicule et le bruit provenant de
l’extérieur du véhicule peuvent provoquer
des interférence avec le fonctionnement de
la commande vocale.
! Pour une reconnaissance optimale, le micro
doit être placé directement devant le conduc-
teur à une distance appropriée.
! Parler trop tôt après l’exécution de la
commande peut provoquer l’échec de la re-
connaissance vocale.
! Parlez lentement, posément et clairement.
Utilisation des menus
Touches du clavier tactile
Sonic Center Control
Loudness
Subwoofer
Bass Booster
High Pass Filter
Source Level Adjuster
L/R 0
Low
0
125Hz
0
On
Audio
1
54
23
1 Touche de configuration vidéo
Reportez-vous à la page 109, Configuration
du lecteur vidéo.
2 Touche de fonction audio
Reportez-vous à la page 107, Réglages sono-
res.
3 Touche de fermeture
Retour à l’affichage de la source actuelle.
4 Touche système
Reportez-vous à la page 111, Réglages sys-
tème.
5 Touche de favori
Vous pouvez choisir les menus dans chaque
menu (menu des fonctions audio, etc.) et les
enregistrer dans ce menu favori.
Reportez-vous à la page 117, Menu Favori.
Remarques
! Vous pouvez afficher le menu Réglage vidéo
lorsque la source Disc ou USB est sélection-
née.
! Si vous lancez le menu Réglage vidéo,la
lecture est arrêtée.
! Il est impossible d’afficher le menu des fonc-
tions Audio lorsque la fonction silencieux est
en service ou lors de la lecture d’un fichier
JPEG.
1 Appuyez sur la touche accueil pour pas-
ser à l’écran d’accueil.
2 Touchez n’importe quelle touche du cla-
vier tactile pour sélectionner le menu à ré-
gler.
BluetoothFavoritesThemeSystem
Settings
AudioVideo
Téléphone Bluetooth
106
Section
Réglages
Fr
17
18
<CRD4844-A>106
Black plate (107,1)
Utilisation du réglage de
l’équilibre avant-arrière/
droite-gauche
Fader/Balance s’affiche lorsque le haut-parleur
arrière est réglé sur HP sur le menu système.
Vous pouvez modifier l’équilibre avant-arrière et
droite-gauche de manière que l’écoute soit opti-
male quel que soit le siège occupé.
1 Appuyez sur la touche accueil pour pas-
ser à l’écran d’accueil.
2 Touchez la touche de fonction audio pour
ouvrir le menu système.
3 Touchez Fader/Balance sur le menu des
fonctions audio.
4 Touchez
ou pour régler l’équilibre
sonore entre les haut-parleurs avant et ar-
rière.
Plage : Av 15 G/D 0 à Ar 15 G/D 0
# Sélectionnez Av/Ar 0 G/D 0 lorsque deux haut-
parleurs seulement sont utilisés.
5 Touchez ou pour régler l’équilibre so-
nore entre les haut-parleurs gauche et droit.
Plage : Av/Ar 0 G 15 à Av/Ar 0 D 15
Remarque
Vous pouvez également régler l’équilibre avant-
arrière/droite-gauche en faisant glisser le point
sur l’écran.
Réglage de l’équilibre sonore
Balance s’affiche lorsque le haut-parleur arrière
est réglé sur Subwoofer sur le menu système.
Ce réglage vous permet d’ajuster l’équilibre
entre la sortie audio droite/gauche.
1 Appuyez sur la touche accueil pour pas-
ser à l’écran d’accueil.
2 Touchez la touche de fonction audio pour
ouvrir le menu système.
3 Touchez Balance sur le menu des fonc-
tions audio.
4 Touchez
ou pour régler l’équilibre so-
nore entre les haut-parleurs gauche et droit.
Plage : G15à D15
Remarque
Vous pouvez également régler l’équilibre en fai-
sant glisser le point sur l’écran.
Utilisation de l’égaliseur
Vous pouvez corriger les caractéristiques sono-
res de l’intérieur du véhicule en fonction de vos
goûts.
Rappel d’une courbe d’égalisation
Il existe sept courbes d’égalisation enregistrées
que vous pouvez facilement rappeler à n’importe
quel moment. Voici une liste des courbes d’éga-
lisation.
Affichage Courbe d’égalisation
S.Bass Accentuation des graves
Puissant Accentuation de la puissance
Naturel Sonorité naturelle
Vocal Chant
Plat Absence de correction
Perso1 Courbe personnalisée 1
Perso2 Courbe personnalisée 2
! Les courbes d’égalisation de Perso1 et
Perso2 peuvent être réglées.
! Vous ne pouvez pas sélectionner Perso1 et
Perso2 lors de l’utilisation de l’égalisation
automatique.
! Avec Plat, aucun ajustement n’est apporté
au son. Vous pouvez vérifier les effets des
courbes d’égalisation en basculant entre
Plat et une autre courbe d’égalisation.
1 Appuyez sur la touche accueil pour pas-
ser à l’écran d’accueil.
2 Touchez la touche de fonction audio pour
ouvrir le menu système.
3 Touchez Egaliseur graphique sur le menu
des fonctions audio.
# Vous ne pouvez pas sélectionner ou régler les
courbes d’égalisation de Perso1 et Perso2 lors de
l’utilisation de l ’égalisation automatique.
4 Touchez le réglage désiré.
S.Bass—Puissant—Naturel—Vocal—Plat—
Perso1—Perso2
Réglage de l’égaliseur
graphique 8 bandes
Vous pouvez régler l’amplitude de chacune des
bandes des courbes d’égalisation.
! Une courbe Perso1 distincte peut être créée
pour chaque source. Si vous effectuez des ré-
glages quand une courbe d ’égalisation autre
que Perso2 est sélectionnée, les paramètres
de la courbe d’égalisation seront enregistrés
dans Perso1.
! Il est possible de créer une courbe Perso2
commune à toutes les sources. Si vous effec-
tuez des ajustements quand la courbe
Perso2 est sélectionnée, la courbe Perso2
est mise à jour.
1 Appuyez sur la touche accueil pour pas-
ser à l’écran d’accueil.
2 Touchez la touche de fonction audio pour
ouvrir le menu système.
3 Touchez Egaliseur graphique sur le menu
des fonctions audio.
4 Touchez le réglage désiré.
S.Bass—Puissant—Naturel—Vocal—Plat—
Perso1—Perso2
5 Touchez la table de mixage pour régler le
niveau de la bande de l’égaliseur.
Plage : +12dB à –12dB
Utilisation de l’égalisation
automatique
L’égalisation automatique est une courbe d’éga-
lisation créée par EQ auto (reportez-vous à la
page 115, EQ auto (égalisation automatique)).
Vous pouvez mettre l’égalisation automatique
en service ou hors service.
Si vous connectez un microphone en option à
cet appareil, vous pouvez utiliser cette fonction.
1 Appuyez sur la touche accueil pour pas-
ser à l’écran d’accueil.
2 Touchez la touche de fonction audio pour
ouvrir le menu système.
3 Touchez Égal. auto pour mettre l’égalisa-
tion automatique en service ou hors service.
# Vous ne pouvez pas utiliser cette fonction si les
réglages EQ auto n’ont pas été effectués.
Utilisation du sonic center
control
Le son adapté à la position d’écoute peut être fa-
cilement créé avec cette fonction.
Français
Réglages sonores
107
Section
Réglages sonores
Fr
19
<CRD4844-A>107

Black plate (108,1)
1 Appuyez sur la touche accueil pour pas-
ser à l’écran d’accueil.
2 Touchez la touche de fonction audio pour
ouvrir le menu système.
3 Touchez Sonic Center Cpntrol sur le menu
des fonctions audio.
4 Touchez
ou pour sélectionner une po-
sition d ’écoute.
Plage : Gauche 7 à Droit 7
Réglage de la correction
physiologique
La correction physiologique a pour objet d’ac-
centuer les hautes et les basses fréquences à
bas niveaux d’écoute.
1 Appuyez sur la touche accueil pour pas-
ser à l’écran d’accueil.
2 Touchez la touche de fonction audio pour
ouvrir le menu système.
3 Touchez c ou d pour sélectionner le ni-
veau de correction physiologique désiré.
Off (hors service)—Bas (faible)—Moy (moyen)
—Haut (élevé)
Utilisation de la sortie haut-
parleur d’extrêmes graves
Cet appareil est équipé d’une sortie haut-parleur
d’extrêmes graves qui peut être mise en service
ou hors service.
! La fréquence de coupure et le niveau de sor-
tie peuvent être réglés lorsque la sortie haut-
parleur d’extrêmes graves est activée.
1 Appuyez sur la touche accueil pour pas-
ser à l’écran d’accueil.
2 Touchez la touche de fonction audio pour
ouvrir le menu système.
3 Touchez Subwoofer sur le menu des fonc-
tions audio.
4 Touchez Act ou Dés près de Subwoofer
pour activer ou désactiver la sortie du haut-
parleur d’extrêmes graves.
5 Touchez Normal ou Inverser à côté de
Phase pour choisir la phase de la sortie haut-
parleur d’extrêmes graves.
6 Touchez c ou d à côté de Niveau pour ré-
gler le niveau de sortie du haut-parleur d’ex-
trêmes graves.
Plage : +6 à –24
7 Touchez c ou d à côté de Fréquence
pour choisir la fréquence de coupure.
50Hz—63Hz—80Hz—100Hz—125Hz
Seules les fréquences inférieures à celles de la
plage sélectionnée sont produites par le haut-
parleur d’extrêmes graves.
Accentuation des graves
Vous pouvez renforcer le niveau des graves.
1 Appuyez sur la touche accueil pour pas-
ser à l’écran d’accueil.
2 Touchez la touche de fonction audio pour
ouvrir le menu système.
3 Touchez c ou d pour sélectionner le ni-
veau désiré.
Plage : 0 à +6
Utilisation du filtre passe-haut
Utilisez cette fonction lorsque vous souhaitez
uniquement écouter des sons aigus. Seules les
fréquences supérieures à la coupure du filtre
passe-haut (HPF) sont émises en sortie via les
haut-parleurs.
1 Appuyez sur la touche accueil pour pas-
ser à l’écran d’accueil.
2 Touchez la touche de fonction audio pour
ouvrir le menu système.
3 Touchez c ou d en regard de
Filtre passe-haut pour choisir la fréquence de
coupure.
Dés (hors service)—50Hz—63Hz—80Hz—
100Hz—125Hz
Seules les fréquences supérieures à celles de la
plage sélectionnée sont émises par les haut-par-
leurs avant ou arrière.
Ajustement des niveaux des
sources
Avec le réglage SLA (ajustement du niveau de la
source), les niveaux de volume de chaque
source peuvent être ajustés pour éviter toute dif-
férence significative entre les sources.
! Les réglages sont basés sur le niveau du vo-
lume FM qui lui, demeure inchangé.
1 Appuyez sur la touche accueil pour pas-
ser à l’écran d’accueil.
2 Touchez la touche de fonction audio pour
ouvrir le menu système.
3 Comparez le niveau du volume FM au ni-
veau de la source que vous voulez régler.
4 Touchez Ajustement niveau des sources
sur le menu des fonctions audio.
5 Touchez
ou pour régler le volume de
la source.
Plage : +4 à –4
Remarques
! Ajustement niveau des sources n’est pas
disponible lorsque FM est sélectionné
comme source.
! Le niveau du volume AM peut également
être réglé avec cette fonction.
! Les sources CD Vidéo, CD, audio compressé,
DivX, MPEG-1, MPEG-2 et MPEG-4 sont ré-
glées automatiquement sur le même vo-
lume.
Réglages sonores
108
Section
Réglages sonores
Fr
19
<CRD4844-A>108
Black plate (109,1)
Choix de la langue des sous-
titres
Vous pouvez choisir une langue pour les sous-ti-
tres. Lorsque cette fonction est disponible, les
sous-titres seront affichés dans la langue sélec-
tionnée.
1 Appuyez sur la touche accueil pour pas-
ser à l’écran d’accueil.
2 Touchez la touche de configuration vidéo
pour ouvrir le menu de configuration vidéo.
3 Touchez Langue sous-titre sur le menu
Réglage vidéo.
Un menu des langues des sous-titres s’affiche.
4 Touchez la langue désirée.
La langue des sous-titres est définie.
# Si vous avez sélectionné Autres, reportez-vous à
la page 109, Quand vous sélectionnez Autres.
Remarques
! Si la langue sélectionnée n’est pas dispo-
nible, la langue spécifiée sur le disque est af-
fichée.
! Vous pouvez également changer de langue
des sous-titres en touchant la touche de
changement de la langue des sous-titres
pendant la lecture.
! Le réglage effectué ici ne sera pas affecté
même si la langue des sous-titres est modi-
fiée pendant la lecture à l’aide de la touche
de changement de la langue des sous-titres.
Quand vous sélectionnez Autres
L’entrée du code de langue apparaît si Autres
est sélectionné. Reportez-vous à la page 142, Ta-
bleau des codes de langue pour les DVD.
% Touchez 0 à 9 pour saisir le code de lan-
gue.
# Pour annuler les chiffres saisis, touchez C.
# Pour enregistrer le code, touchez la touche sui-
vante du clavier tactile.
Enregistrement du code.
Choix de la langue audio
Vous pouvez définir la langue audio préférée.
1 Appuyez sur la touche accueil pour pas-
ser à l’écran d’accueil.
2 Touchez la touche de configuration vidéo
pour ouvrir le menu de configuration vidéo.
3 Touchez Langue audio sur le menu de
configuration vidéo.
Un menu des langues audio s’affiche.
4 Touchez la langue désirée.
La langue audio est définie.
# Si vous avez sélectionné Autres, reportez-vous à
la page 109, Quand vous sélectionnez Autres.
Remarques
! Si la langue sélectionnée n’est pas dispo-
nible, la langue spécifiée sur le disque est
utilisée.
! Vous pouvez également changer de langue
audio en touchant la touche de changement
de la langue audio pendant la lecture.
! Le réglage effectué ici ne sera pas affecté
même si la langue audio est modifiée pen-
dant la lecture à l’aide de la touche de chan-
gement de la langue audio.
Choix de la langue des menus
Vous pouvez choisir la langue préférée dans la-
quelle afficher les menus enregistrés sur un
disque.
1 Appuyez sur la touche accueil pour pas-
ser à l’écran d’accueil.
2 Touchez la touche de configuration vidéo
pour ouvrir le menu de configuration vidéo.
3 Touchez Menu langue sur le menu
Réglage vidéo.
Un menu des langues des menus s’affiche.
4 Touchez la langue désirée.
La langue des menus est définie.
# Si vous avez sélectionné Autres, reportez-vous à
la page 109, Quand vous sélectionnez Autres.
Remarque
Si la langue sélectionnée n’est pas disponible,
la langue spécifiée sur le disque est affichée.
Réglage de l’affichage des
DVD sous plusieurs angles
L’icône d’angle peut être définie pour apparaître
sur les scènes où l’angle peut être changé.
1 Appuyez sur la touche accueil pour pas-
ser à l’écran d’accueil.
2 Touchez la touche de configuration vidéo
pour ouvrir le menu de configuration vidéo.
3 Touchez Multi Angle sur le menu
Réglage vidéo pour mettre l’affichage de l’i-
cône d’angle en ou hors service.
Définition du ratio d’aspect
Il existe deux types d’affichage : un affichage
écran large possédant un ratio largeur à hauteur
(ratio d’ aspect TV) de 16:9 et un affichage stan-
dard possédant un aspect TV de 4:3. Assurez-
vous de sélectionner l’aspect TV approprié pour
l’écran connecté à V OUT.
! Quand vous utilisez un affichage standard,
sélectionnez Letter Box ou Pan Scan. Sélec-
tionner 16:9 peut résulter en une image non
naturelle.
! Si vous choisissez le ratio d’aspect TV, l’affi-
chage de l’appareil s’adapte en fonction de
ce réglage.
1 Appuyez sur la touche accueil pour pas-
ser à l’écran d’accueil.
2 Touchez la touche de configuration vidéo
pour ouvrir le menu de configuration vidéo.
3 Touchez Format TV sur le menu
Réglage vidéo pour choisir le ratio d’aspect
TV.
Touchez répétitivement Format TV jusqu’àce
que le ratio d’aspect souhaité apparaisse.
! 16:9 – L’image écran large (16:9) est affichée
telle quelle (réglage initial)
! Letter Box – L’image a la forme d’une boîte à
lettre avec des bandes noires en haut et en
bas de l’écran
! Pan Scan – L’image est tronquée à droite et à
gauche de l’écran
Remarques
! Lors de la lecture de disques qui ne spéci-
fient pas Pan Scan, le disque est lu suivant
l’affichage Letter Box même si vous sélec-
tionnez le réglage Pan Scan. Confirmez si
l’emballage du disque porte le marquage
16 : 9 LB
.
Français
Configuration du lecteur vidéo
109
Section
Configuration du lecteur vidéo
Fr
20
<CRD4844-A>109
Black plate (110,1)
! Il est impossible de modifier le ratio d’aspect
TV de certains disques. Pour les détails, re-
portez-vous aux instructions du disque.
Réglage de l’intervalle du
diaporama
Il est possible de consulter les fichiers JPEG
sous forme de diaporama sur cet appareil. Dans
ce réglage, l’intervalle entre chaque image peut
être défini.
1 Appuyez sur la touche accueil pour pas-
ser à l’écran d’accueil.
2 Touchez la touche de configuration vidéo
pour ouvrir le menu de configuration vidéo.
3 Touchez Durée image diaporama sur le
menu Réglage vidéo pour sélectionner l’in-
tervalle du diaporama.
Touchez répétitivement
Durée image diaporama jusqu’à ce que le ré-
glage souhaité apparaisse.
! 5sec – Les images JPEG changent avec un in-
tervalle de 5 secondes
! 10sec – Les images JPEG changent avec un
intervalle de 10 secondes
! 15sec – Les images JPEG changent avec un
intervalle de 15 secondes
! Manuel – Vous pouvez changer d’image
JPEG manuellement
Réglage du verrouillage
parental
Certains disques DVD vidéo vous permettent
d’utiliser le verrouillage parental pour empêcher
les enfants de regarder des scènes violentes ou
destinées aux adultes. Vous pouvez régler le ver-
rouillage parental sur le niveau souhaité.
! Quand vous avez défini un niveau de verrouil-
lage parental et que vous lisez un disque dis-
posant du verrouillage parental, des
indications sur l’entrée d’un code peuvent
s’afficher. Le cas échéant, la lecture
commencera quand le code approprié aura
été saisi.
Réglage du code et du niveau
Un code doit être enregistré pour lire les disques
disposant du verrouillage parental.
1 Appuyez sur la touche accueil pour pas-
ser à l’écran d’accueil.
2 Touchez la touche de configuration vidéo
pour ouvrir le menu de configuration vidéo.
3 Touchez Parental sur le menu
Réglage vidéo.
4 Touchez 0 à 9 pour entrer un code à qua-
tre chiffres.
# Pour annuler les chiffres saisis, touchez C.
# Pour enregistrer le code, touchez la touche sui-
vante du clavier tactile.
Enregistrement du code.
Le code est défini et le niveau peut désormais être
défini.
5 Touchez 1 à 8 pour sélectionner le niveau
désiré.
6 Touchez Enter.
Le niveau de verrouillage parental est défini.
! 8 – La lecture de la totalité du disque est pos-
sible (réglage initial)
! 7 à 2 – La lecture des disques pour enfants et
tout public est possible
! 1 – Seule la lecture de disques pour enfants
est possible
Remarques
! Nous vous recommandons de garder une
trace de votre code dans le cas où vous l’ou-
blieriez.
! Le niveau de verrouillage parental est enre-
gistré sur le disque. Recherchez l’indication
de ce niveau écrite sur l’emballage du
disque, la documentation incluse ou le
disque lui-même. Le verrouillage parental de
cet appareil n’est pas utilisable si le niveau
de verrouillage parental n’est pas enregistré
sur le disque.
! Avec certains disques, le verrouillage paren-
tal peut n’être actif que pour certains niveaux
de scènes. La lecture de ces scènes sera sau-
tée. Pour les détails, reportez-vous au mode
d’emploi fourni avec le disque.
Changement du niveau
Vous pouvez changer le niveau de verrouillage
parental programmé.
1 Appuyez sur la touche accueil pour pas-
ser à l’écran d’accueil.
2 Touchez la touche de configuration vidéo
pour ouvrir le menu de configuration vidéo.
3 Touchez Parental sur le menu
Réglage vidéo.
4 Touchez 0 à 9 pour saisir le code enregis-
tré.
5 Enregistrement du code.
Enregistrement du code.
Le code est défini et le niveau peut désormais
être modifié.
# Si vous entrez un numéro de code incorrect, l’i-
cône
s’affiche. Touchez C et entrez le code cor-
rect.
# Si vous oubliez votre numéro de code, reportez-
vous à la page 110, Si vous oubliez votre code.
6 Touchez 1 à 8 pour sélectionner le niveau
désiré.
7 Touchez Enter.
Le nouveau niveau de verrouillage parental est
défini.
Si vous oubliez votre code
% Appuyez sur RESET.
Paramétrage du fichier de
sous-titres DivX
Vous pouvez choisir d’afficher ou non les sous-
titres externes DivX.
! S’il n’existe aucun fichier de sous-titres exter-
nes DivX, les sous-titres DivX seront affichés
même quand Personnalisé est sélectionné.
1 Appuyez sur la touche accueil pour pas-
ser à l’écran d’accueil.
2 Touchez la touche de configuration vidéo
pour ouvrir le menu de configuration vidéo.
3 Touchez Sous titres DivX® sur le menu
Réglage vidéo pour sélectionner le réglage
des sous-titres désiré.
! Original – Affichage des sous-titres DivX
! Personnalisé – Affichage des sous-titres ex-
ternes DivX
Configuration du lecteur vidéo
110
Section
Configuration du lecteur vidéo
Fr
20
<CRD4844-A>110

Black plate (111,1)
Remarques
! Un maximum de 42 caractères peut être affi-
ché sur une ligne. Si plus de 42 caractères
sont définis, les caractères sont affichés sur
la ligne suivante.
! Un maximum de 126 caractères peuvent être
affichés sur un écran. Si plus de 126 caractè-
res sont définis, les caractères en excès ne
seront pas affichés.
Affichage de votre code
d’enregistrement VOD DivX
â
Pour pouvoir lire des contenus VOD (vidéo à la
demande) DivX sur cet appareil, vous devez d’a-
bord enregistrer l’appareil auprès de votre four-
nisseur de contenus VOD DivX. Pour
l’enregistrement, générez un code d’enregistre-
ment VOD DivX et soumettez-le à votre fournis-
seur.
! Conservez ce code car vous en aurez besoin
lors de l’enregistrement de votre appareil au-
près d’un fournisseur de VOD DivX.
1 Appuyez sur la touche accueil pour pas-
ser à l’écran d’accueil.
2 Touchez la touche de configuration vidéo
pour ouvrir le menu de configuration vidéo.
3 Touchez DivX® VOD sur le menu
Réglage vidéo.
Code d'enregistrement et
Code de désenregistrement s’affichent.
4 Touchez Code d'enregistrement.
Votre code d’enregistrement s’affiche.
Affichage du code de
désenregistrement
Si votre périphérique est déjà enregistré, désen-
registrez-le en saisissant le code de désenregis-
trement.
1 Appuyez sur la touche accueil pour pas-
ser à l’écran d’accueil.
2 Touchez la touche de configuration vidéo
pour ouvrir le menu de configuration vidéo.
3 Touchez DivX® VOD sur le menu
Réglage vidéo.
4 Touchez Code de désenregistrement.
# Pour annuler le désenregistrement, touchez
Annuler.
5 Touchez OK.
Le désenregistrement est terminé.
Lecture automatique des DVD
Quand un disque DVD avec un menu DVD est
inséré, l’appareil annule automatiquement le
menu et commence la lecture à partir du pre-
mier chapitre du premier titre.
! Certains DVD peuvent ne pas fonctionner
correctement. Si cette fonction n’est pas plei-
nement opérationnelle, mettez-la hors ser-
vice et commencez la lecture.
1 Appuyez sur la touche accueil pour pas-
ser à l’écran d’accueil.
2 Touchez la touche de configuration vidéo
pour ouvrir le menu de configuration vidéo.
3 Touchez Lecture DVD automatique pour
activer la lecture automatique.
# Touchez à nouveau Lecture DVD automatique
pour désactiver la lecture automatique.
Mise en service ou hors
service de l’entrée auxiliaire
Activez ce réglage lorsque vous utilisez un appa-
reil auxiliaire connecté à cet appareil.
1 Appuyez sur la touche accueil pour pas-
ser à l’écran d’accueil.
2 Touchez la touche système pour ouvrir le
menu système.
3 Touchez Entrée AUXILIAIRE sur le menu
système pour mettre Entrée AUXILIAIRE en
ou hors service.
Réglage de l’entrée AV
Activez ce réglage lorsque vous utilisez un
composant vidéo externe connecté à cet appa-
reil.
1 Appuyez sur la touche accueil pour pas-
ser à l’écran d’accueil.
2 Touchez la touche système pour ouvrir le
menu système.
3 Touchez Entrée Audio/Vidéo sur le menu
système pour mettre Entrée Audio/Vidéo en
ou hors service.
Réglage du système de
navigation
Activez ce réglage lors de la connexion d’un sys-
tème de navigation Pioneer auxiliaire (vendu sé-
parément).
Connexion smartphone peut être réglé
lorsque toutes les conditions suivantes sont sa-
tisfaites.
— L’iPhone n’est pas connecté.
— Il n’y a pas de connexion Bluetooth.
— La source est hors tension.
1 Mettez la source hors service.
Reportez-vous à la page 76, Source off touche.
2 Appuyez sur la touche accueil pour pas-
ser à l’écran d’accueil.
3 Touchez la touche système pour ouvrir le
menu système.
4 Touchez Connexion smartphone sur le
menu système.
5 Touchez NAVI pour sélectionner.
NAVI – Système de navigation
Réglage du mode de
connexion Pandora
Reportez-vous à la page 101, Réglage du mode
de connexion Pandora.
Sélection du mode MirrorLink
Vous pouvez sélectionner le réglage du mode
MirrorLink que vous utilisiez des applications
tiers ou non sur votre smartphone.
1 Appuyez sur la touche accueil pour pas-
ser à l’écran d’accueil.
2 Touchez la touche système pour ouvrir le
menu système.
3 Touchez le réglage souhaité en regard de
Réglages CD-ML100.
! Car Mode – Vous pouvez utiliser les applica-
tions de démarrage sur votre smartphone sur
l’écran de cet appareil.
! Mode App liste – Vous pouvez utiliser les ap-
plications tierces sur votre smartphone sur
l’écran de cet appareil.
Français
Configuration du lecteur vidéo
111
Section
Réglages système
Fr
20
21
<CRD4844-A>111

Black plate (112,1)
Mise à jour du firmware de
l’adaptateur de liaison de
smartphone
Cette fonction est utilisée pour effectuer une
mise à jour d’adaptateur de liaison de smart-
phone avec le firmware le plus récent.
Pour en savoir plus sur l’adaptateur de liaison
de smartphone et la mise à jour, consultez notre
site Web.
Vous ne pouvez mettre à jour que lorsque l’adap-
tateur de liaison de smartphone est disponible.
Important
! Le périphérique de stockage USB utilisé pour
la mise à jour ne doit contenir que le fichier
de mise à jour approprié. Si le périphérique
de stockage USB contient plusieurs fichiers,
la mise à jour échouera.
! Ne mettez jamais l’appareil hors service et
ne débranchez jamais le périphérique de
stockage USB lors de la mise à jour du firm-
ware.
! Vous ne pouvez démarrer la mise à jour du
firmware que lorsque le véhicule est à l’arrêt
et le frein à main serré.
1 Téléchargement des fichiers de mise à
jour du firmware.
2 Connectez un périphérique de stockage
USB vide (formaté) à votre ordinateur, puis
recherchez et copiez le fichier de mise à jour
approprié sur le périphérique de stockage
USB.
3 Mettez la source hors service.
Reportez-vous à la page 76, Mise en/hors service
de la source.
4 Appuyez sur la touche accueil pour pas-
ser à l’écran d’accueil.
5 Touchez la touche système pour ouvrir le
menu système.
6 Touchez Mise à jour CD-ML100 sur le
menu système.
7 Connectez le périphérique de stockage
USB à l’adaptateur de liaison de smartphone.
Reportez-vous à la page 126, Connexion pour la
mise à jour du firmware de l’adaptateur de liaison
de smartphone.
8 Touchez Continuer pour afficher le mode
de mise à jour.
Suivez les instructions à l’écran pour finir la
mise à jour de l’adaptateur de liaison de smart-
phone.
9 Retirez le périphérique de stockage USB
de l’adaptateur de liaison de smartphone.
10 Mettez le contact sur OFF, puis sur ACC
ou ON.
Remarques
! En cas d’échec de la mise à jour, consultez
votre revendeur ou le Centre d’Entretien
agréé par PIONEER le plus proche.
! Vous ne pouvez pas mettre à jour lors d’une
connexion Bluetooth.
Affichage de la version du
firmware de l’adaptateur de
liaison de smartphone
Si l’ adaptateur de liaison de smartphone ne
fonctionne pas correctement, vous devrez peut-
être consulter votre revendeur pour le faire répa-
rer. Le cas échéant, vous serez invité à spécifier
la version du firmware. Exécutez la procédure
suivante pour vérifier la version sur l’adaptateur
de liaison de smartphone.
1 Mettez la source hors service.
Reportez-vous à la page 76, Mise en/hors service
de la source.
2 Appuyez sur la touche accueil pour pas-
ser à l’écran d’accueil.
3 Touchez la touche système pour ouvrir le
menu système.
4 Touchez Info firmware CD-ML100 pour
afficher la version du firmware de l’adapta-
teur de liaison de smartphone.
Mise à jour du firmware
Cette fonction est utilisée pour effectuer une
mise à jour de cet appareil avec le firmware le
plus récent.
Pour en savoir plus sur le firmware et la mise à
jour, consultez notre site Web.
Important
! Le périphérique de stockage USB utilisé pour
la mise à jour ne doit contenir que le fichier
de mise à jour approprié. Si le périphérique
de stockage USB contient plusieurs fichiers,
la mise à jour échouera.
! Ne mettez jamais l’appareil hors service et
ne débranchez jamais le périphérique de
stockage USB lors de la mise à jour du firm-
ware.
! Vous ne pouvez démarrer la mise à jour du
firmware que lorsque le véhicule est à l’arrêt
et le frein à main serré.
1 Téléchargement des fichiers de mise à
jour du firmware.
2 Connectez un périphérique de stockage
USB vide (formaté) à votre ordinateur, puis
recherchez et copiez le fichier de mise à jour
approprié sur le périphérique de stockage
USB.
3 Mettez la source hors service.
Reportez-vous à la page 76, Mise en/hors service
de la source.
4 Appuyez sur la touche accueil pour pas-
ser à l’écran d’accueil.
5 Touchez la touche système pour ouvrir le
menu système.
Vous pouvez vérifier la version actuelle du firm-
ware de votre appareil. Touchez
Information système sur le menu système
pour ouvrir l’écran Information système.
6 Touchez Mise à jour système sur le menu
système.
L’écran de confirmation apparaît sur l’affichage.
7 Connectez le périphérique de stockage
USB conformément aux messages à l’écran.
8 Touchez Continuer pour afficher le mode
de lecture de fichier.
Lisez les messages si des écrans d’avertisse-
ment apparaissent sur l’affichage.
9 Touchez Démar. pour afficher le mode de
transfert des données.
# Suivez les instructions à l’écran pour finir la mise
à jour du firmware.
# Cet appareil se réinitialise automatiquement une
fois la mise à jour du firmware terminée si celle-ci a
réussi.
Réglages système
112
Section
Réglages système
Fr
21
<CRD4844-A>112
Black plate (113,1)
Remarque
Si “La mise à jour n'a pas réussi” apparaît à l’é-
cran, coupez le contact, puis placez-le en posi-
tion ACC pour poursuivre et démarrer la
séquence de récupération.
Affichage de la version du
firmware
Si cet appareil ne fonctionne pas correctement,
vous devrez peut-être consulter votre revendeur
pour le faire réparer. Dans ce cas, vous devrez
peut-être indiquer la version du firmware. Procé-
dez comme suit pour vérifier la version sur cet
appareil.
1 Mettez la source hors service.
Reportez-vous à la page 76, Mise en/hors service
de la source.
2 Appuyez sur la touche accueil pour pas-
ser à l’écran d’accueil.
3 Touchez la touche système pour ouvrir le
menu système.
4 Touchez Information système pour affi-
cher la version du firmware de cet appareil.
Réglage du mode MIXTRAX
Reportez-vous à la page 100, Réglage du mode
MIXTRAX.
Modification des réglages de
l’image (Luminosité, Contrast,
Couleur, Teinte, Dimmer et
Température couleur)
Vous pouvez régler Luminosité (luminosité),
Contrast (contraste), Couleur (couleur), Teinte
(teinte), Dimmer (atténuateur de luminosité) et
Température couleur (température de couleur)
pour chaque source et caméra de vue arrière.
! Vous ne pouvez pas régler Couleur et Teinte
pour la source audio.
! Vous ne pouvez pas régler Couleur et Teinte
pour NAVI, Apps et MirrorLink.
1 Appuyez sur la touche accueil pour pas-
ser à l’écran d’accueil.
2 Touchez la touche système pour ouvrir le
menu système.
3 Si vous souhaitez régler
Ajustment image, sélectionnez l’unité.
NAVI
Exécution de Ajustment image
pour le système de navigation
lorsque Connexion smart-
phone est réglé sur NAVI.
Apps
Exécution de Ajustment image
pour le AppRadio Mode
lorsque Connexion smart-
phone est réglé sur iPhone
via USB ou iPhone via
Bluetooth.
MirrorLink
Exécution de Ajustment image
pour le MirrorLink Mode.
Réglage du Ajustment image
pour la caméra de vue arrière.
Source
Réglage du Ajustment image
de la source.
4 Touchez n’importe quelle touche du cla-
vier tactile pour sélectionner la fonction à ré-
gler.
Les éléments de Ajustment image s’affichent.
! Luminosité – Règle l’intensité du noir
! Contrast – Règle le contraste
! Couleur – Règle la saturation de la couleur
! Teinte – Règle la tonalité de la couleur (le
rouge ou le vert est accentué)
! Dimmer – Règle la luminosité de l’écran
! Température couleur – Règle la température
de couleur, ce qui se traduit par un meilleur
équilibre des blancs
# Vous pouvez régler Teinte uniquement lorsque le
système de couleur est réglé sur NTSC.
# Avec certaines caméras de vue arrière, le réglage
de l’image peut ne pas être possible.
5 Touchez c ou d pour régler l’élément sé-
lectionné.
Chaque fois que vous touchez c ou d, le niveau
de l’ élément sélectionné augmente ou diminue.
# Luminosité, Contrast, Couleur et Teinte peu-
vent être réglés de +24 à -24.
# Dimmer peut être réglé de +1 à +48.
# Température couleur peut être réglé de +3 à –3.
Remarques
! Vous ne pouvez pas utiliser cette fonction
pendant la conduite.
! Différents réglages Luminosité/Contrast/
Dimmer peuvent être définis lorsque le
commutateur d’éclairage est en position ON
ou OFF.
Sélection de la langue du
système
Vous pouvez choisir la langue du système.
Si des informations textuelles telles que le nom
du titre, le nom de l’interprète ou un commen-
taire sont incorporées dans une langue euro-
péenne, cet appareil peut également les afficher.
! La langue peut être changée pour les menus
suivants :
— Menu audio
— Menu système
— Menu de configuration vidéo
— Menu Bluetooth
— Langue des informations de précaution
Certaines opérations sur cet appareil sont
interdites pendant la conduite ou requiè-
rent votre attention. Dans ce cas, un mes-
sage de précaution s’affiche sur l’écran.
Vous pouvez changer la langue des mes-
sages de précaution à l’aide de ce ré-
glage.
! Si la langue incorporée et la langue sélec-
tionnée sont différentes, les informations tex-
tuelles peuvent ne pas s’afficher
correctement.
! Certains caractères peuvent ne pas s’afficher
correctement.
1 Appuyez sur la touche accueil pour pas-
ser à l’écran d’accueil.
2 Touchez la touche système pour ouvrir le
menu système.
3 Touchez Système de langue sur le menu
système pour sélectionner la langue désirée.
4 Touchez la langue désirée.
English (Anglais)—Français (Français)—
Español (Espagnol)—Português (Portugais)—
中文 (Chinois simplifié)
Français
Réglages système
113
Section
Réglages système
Fr
21
<CRD4844-A>113

Black plate (114,1)
Réglage de SiriusXM
TuneStartä
Reportez-vous à la page 85, Réglage de SiriusXM
TuneStartä.
Réinitialisation des réglages
par défaut
Reportez-vous à la page 86, Réinitialisation des
réglages par défaut.
Réglage du mode
démonstration
Lorsque le mode démonstration est activé, l’é-
cran de démonstration s’affiche.
Reportez-vous à la page 75, Mode de démonstra-
tion.
1 Appuyez sur la touche accueil pour pas-
ser à l’écran d’accueil.
2 Touchez la touche système pour ouvrir le
menu système.
3 Touchez Mode démonstration sur le
menu système pour mettre
Mode démonstration en ou hors service.
! on – L’écran de démonstration s’affiche.
! off – L’écran de démonstration ne s’affiche
pas.
Mise en service ou hors
service de la coupure/
atténuation du son
Afin de pouvoir utiliser cette fonction, le fil
jaune/noir de l’appareil doit être connecté à un
équipement possédant la fonction silencieux.
Reportez-vous à la page 123, Connexion du cor-
don d’alimentation.
Le son émis par l’appareil est automatiquement
coupé ou atténué quand un signal en prove-
nance d’un équipement possédant la fonction
silencieux est reçu.
! Le son émis par l’appareil redevient normal
quand la coupure ou atténuation du son est
annulée.
1 Appuyez sur la touche accueil pour pas-
ser à l’écran d’accueil.
2 Touchez la touche système pour ouvrir le
menu système.
3 Touchez Atténuation audio jusqu’àce
que le réglage souhaité apparaisse.
Touchez Atténuation audio jusqu’à ce que le
réglage désiré apparaisse sur l’écran.
! Mute – Silencieux
! ATT -20dB – Atténuation (ATT -20dB aun
effet plus fort que ATT-10dB)
! ATT -10dB – Atténuation
! Off – Met hors service la coupure/atténua-
tion du son
Remarques
! Si Mute s’affiche, le son est coupé et aucun
réglage audio n’est possible.
! Si ATT s’affiche, le son est atténué et seul le
volume peut être réglé. (Aucun autre réglage
audio n’est possible.)
! Le fonctionnement retourne à la normale
quand la connexion téléphonique est termi-
née.
Réglage de la sortie arrière
et du contrôleur de haut-
parleur d’extrêmes graves
La sortie arrière de cet appareil (sortie de conne-
xion des haut-parleurs arrière et sortie arrière
RCA) peut être utilisée pour la connexion d’un
haut-parleur pleine gamme (HP)oud’un haut-
parleur d’extrêmes graves (Subwoofer). Si vous
basculez le réglage de la sortie arrière sur
Subwoofer, vous pouvez connecter une borne
de haut-parleur arrière à un haut-parleur d’extrê-
mes graves directement, sans utiliser un amplifi-
cateur auxiliaire.
Initialement, cet appareil est réglé pour la
connexion d’un haut-parleur pleine gamme
(HP).
1 Mettez la source hors service.
Reportez-vous à la page 76, Mise en/hors service
de la source.
2 Appuyez sur la touche accueil pour pas-
ser à l’écran d’accueil.
3 Touchez la touche système pour ouvrir le
menu système.
4 Touchez HP arrière dans le menu système
pour changer le réglage de la sortie haut-par-
leur d’extrêmes graves ou de la sortie haut-
parleur pleine gamme.
# Quand aucun haut-parleur d’extrêmes graves
n’est connecté à la sortie arrière, sélectionnez HP
(haut-parleur pleine gamme).
# Quand un haut-parleur d’extrêmes graves est
connecté à la sortie arrière, choisissez Subwoofer
(haut-parleur d’extrêmes graves).
Remarques
! Même si vous modifiez ce réglage, aucun si-
gnal ne sera émis aussi longtemps que la
sortie vers le haut-parleur d’extrêmes graves
n’est pas en service (reportez-vous à la page
108, Utilisation de la sortie haut-parleur d’ex-
trêmes graves).
! Les sorties de connexion des haut-parleurs
arrière et la sortie RCA sont commutées si-
multanément par ce réglage.
Utilisation du clavier
Clavier est uniquement disponible avec
AppRadio Mode.
Reportez-vous à la page 95, Réglage du clavier.
Réglage du défilement
permanent
Quand la fonction de défilement permanent est
réglée sur on, les informations textuelles enre-
gistrées défilent en permanence. Réglez la fonc-
tion sur off si vous préférez que l’information
défile une fois seulement.
1 Appuyez sur la touche accueil pour pas-
ser à l’écran d’accueil.
2 Touchez la touche système pour ouvrir le
menu système.
3 Touchez Toujours défiler sur le menu sys-
tème pour mettre le défilement permanent
en ou hors service.
Réglage de l’audio Bluetooth
(Fonction de AVH-X5600BHS/AVH-X4600BT/
AVH-X3600BHS/AVH-X2600BT)
Pour utiliser un lecteur audio Bluetooth, vous
devez activer la source Bluetooth Audio.
Réglages système
114
Section
Réglages système
Fr
21
<CRD4844-A>114
Black plate (115,1)
1 Appuyez sur la touche accueil pour pas-
ser à l’écran d’accueil.
2 Touchez la touche système pour ouvrir le
menu système.
3 Touchez Bluetooth Audio sur le menu
système pour mettre l’audio Bluetooth en ou
hors service.
Effacement de la mémoire
Bluetooth
Important
Ne mettez jamais l’appareil hors service lors de
l’effacement de la mémoire Bluetooth.
1 Mettez la source hors service.
Reportez-vous à la page 76, Mise en/hors service
de la source.
2 Appuyez sur la touche accueil pour pas-
ser à l’écran d’accueil.
3 Touchez la touche système pour ouvrir le
menu système.
4 Touchez Effacer mémoire Bluetooth sur le
menu système.
5 Touchez Néttoyé.
Après que vous avez sélectionné un élément dé-
siré, un affichage de confirmation apparaît. Tou-
chez OK pour effacer la mémoire.
# Si vous ne voulez pas effacer la mémoire, tou-
chez Annuler.
Mise à jour du logiciel
Bluetooth
Cette fonction est utilisée pour effectuer une
mise à jour de cet appareil avec le logiciel
Bluetooth le plus récent. Pour plus de détails
sur le logiciel Bluetooth et la mise à jour, consul-
tez notre site Web.
Important
Ne mettez jamais l’appareil hors service et ne
débranchez jamais le téléphone lors de la mise
à jour du logiciel.
1 Mettez la source hors service.
Reportez-vous à la page 76, Mise en/hors service
de la source.
2 Appuyez sur la touche accueil pour pas-
ser à l’écran d’accueil.
3 Touchez la touche système pour ouvrir le
menu système.
4 Touchez MAJ logiciel Bluetooth.
5 Touchez Démar. pour afficher le mode de
transfert des données.
# Suivez les instructions à l’écran pour finir la mise
à jour du logiciel Bluetooth.
Affichage de la version du
logiciel Bluetooth
Si l’ appareil ne fonctionne pas correctement,
vous devrez peut-être consulter votre revendeur
pour le faire réparer. Le cas échéant, vous serez
invité à spécifier la version du logiciel. Exécutez
la procédure suivante pour vérifier la version sur
cet appareil.
1 Mettez la source hors service.
Reportez-vous à la page 76, Mise en/hors service
de la source.
2 Appuyez sur la touche accueil pour pas-
ser à l’écran d’accueil.
3 Touchez la touche système pour ouvrir le
menu système.
4 Touchez Version logicielle Bluetooth pour
afficher la version du module Bluetooth de
cet appareil.
Réglage de la caméra de vue
arrière (caméra de recul)
PRÉCAUTION
Pioneer recommande d’utiliser une caméra
qui génère des images inversées (images
miroir). Dans le cas contraire, l’image sur
l’écran peut apparaître inversée.
Cet appareil possède une fonction qui bascule
automatiquement sur la vidéo de la caméra de
vue arrière (R.C IN) quand une caméra de vue ar-
rière est installée sur votre voiture et que le levier
de vitesse est en position MARCHE ARRIÈRE
(R). (Pour plus de détails, consultez votre reven-
deur.)
Vous pouvez également basculer sur l’image de
vue arrière en appuyant sur la touche du clavier
tactile.
Pour les détails, reportez-vous à la page 78, Utili-
sation de la vue arrière.
! Après avoir effectué le réglage de la caméra
de vue arrière, placez le levier de vitesse en
position MARCHE ARRIÈRE (R) et vérifiez
qu’une image vidéo de la caméra de vue ar-
rière est visible sur l’écran.
! Modifiez ce réglage si l’écran bascule sur la
vidéo de la caméra de vue arrière par erreur
pendant une marche avant.
! Pour arrêter de regarder la vidéo de caméra
de vue arrière et revenir à l’affichage de la
source, appuyez de façon prolongée sur
MUTE.
! Touchez l’icône de la source Vue arrière
pour afficher l’image de la caméra de vue ar-
rière tout en conduisant. Touchez à nouveau
l’icône de la source pour mettre hors service
la caméra de vue arrière. Pour les détails, re-
portez-vous à la page 76, Choix d’une source.
1 Appuyez sur la touche accueil pour pas-
ser à l’écran d’accueil.
2 Touchez la touche système pour ouvrir le
menu système.
3 Touchez Polarité caméra sur le menu sys-
tème pour sélectionner le réglage approprié.
! Batterie – Quand la polarité du fil connecté
est positive lorsque le levier de vitesse est
dans la position MARCHE ARRIÈRE (R)
! Masse – Quand la polarité du fil connecté est
négative lorsque le levier de vitesse est dans
la position MARCHE ARRIÈRE (R)
! off – Quand il n’y a pas de caméra de vue ar-
rière connectée à l’appareil
! Le réglage de la touche de vue arrière est éga-
lement désactivé sur l’écran d’accueil.
EQ auto (égalisation
automatique)
L’égalisation automatique mesure automatique-
ment les caractéristiques acoustiques de l’habi-
tacle de la voiture puis crée une courbe
d’égalisation automatique en fonction de ces in-
formations.
! Pour réaliser cette fonction, un microphone
dédié (par exemple, CD-MC20) est requis.
Français
Réglages système
115
Section
Réglages système
Fr
21
<CRD4844-A>115
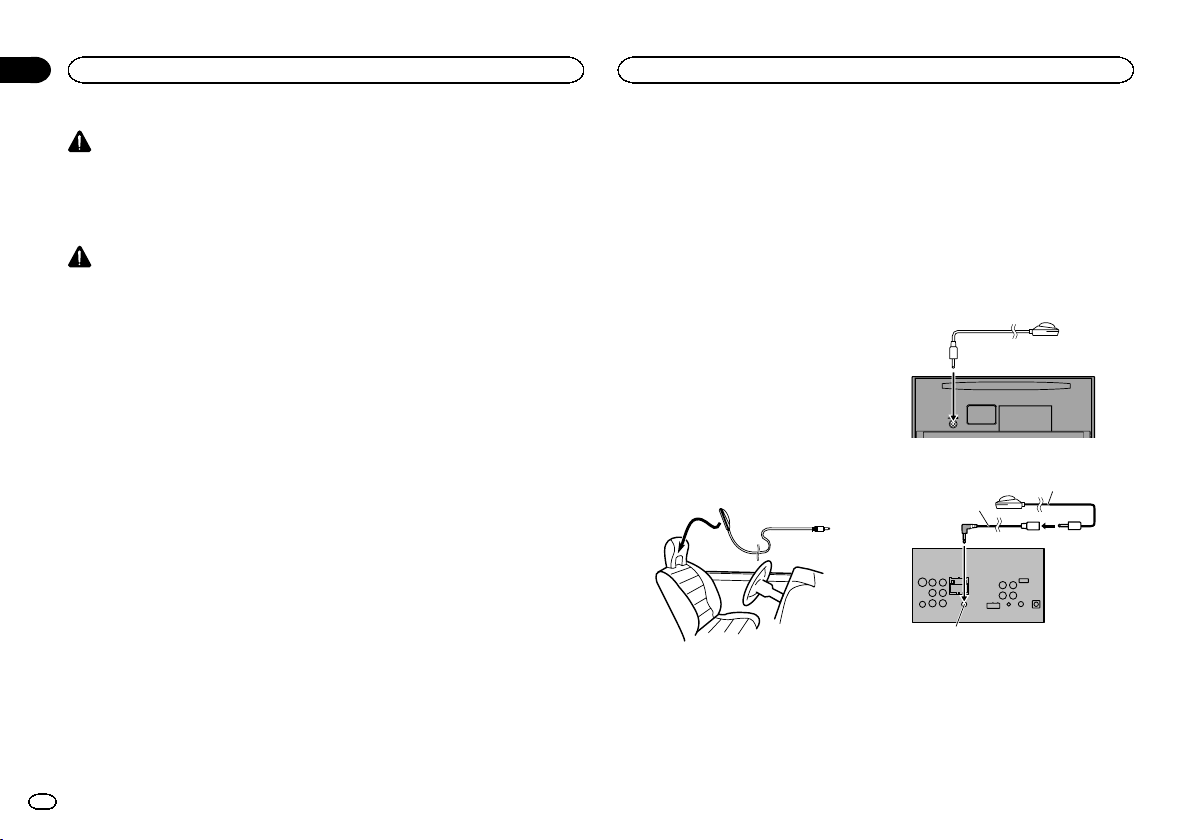
Black plate (116,1)
ATTENTION
Comme une forte tonalité (bruit) peut être émise
à partir des haut-parleurs lors de la mesure des
caractéristiques acoustiques de l’habitacle, n’ef-
fectuez jamais le réglage EQ auto lorsque vous
conduisez.
PRÉCAUTION
! Vérifiez soigneusement les conditions avant
d’exécuter le réglage EQ auto car vous pour-
riez endommager les haut-parleurs si ces
fonctions sont exécutées lorsque :
— Les haut-parleurs sont connectés de manière
incorrecte. (Par exemple, un haut-parleur ar-
rière est connecté à la sortie haut-parleur
d’extrêmes graves.)
— Un haut-parleur est connecté à un amplifica-
teur de puissance délivrant une puissance de
sortie supérieure à la puissance d’entrée
maximum admissible par le haut-parleur.
! Si le microphone est placé dans une position
inadéquate, la tonalité de mesure peut deve-
nir forte et la mesure peut prendre long-
temps, ce qui entraîne une décharge de la
batterie. Assurez-vous de placer le micro-
phone à l’emplacement spécifié.
Avant d’utiliser la fonction EQ auto
! Effectuez le réglage EQ auto dans un endroit
aussi calme que possible, avec le moteur et
la climatisation coupés. Mettez également
hors tension les téléphones de voiture ou les
téléphones portables qui se trouvent dans la
voiture, ou sortez-les de la voiture avant d’ef-
fectuer le réglage EQ auto. Les sons autres
que la tonalité de mesure (sons environ-
nants, son du moteur, sonneries de télépho-
nes, etc.) peuvent empêcher une mesure
correcte des caractéristiques acoustiques de
l’habitacle de la voiture.
! Assurez-vous d’effectuer le réglage EQ auto
en utilisant le microphone en option. L’utili-
sation d’un autre microphone peut empê-
cher la mesure, ou conduire à une mesure
incorrecte des caractéristiques acoustiques
de l’ habitacle de la voiture.
! Pour exécuter la fonction EQ auto, vous
devez connecter le haut-parleur avant.
! Quand cet appareil est connecté à un ampli-
ficateur de puissance disposant d’un
contrôle du niveau d’entrée, le réglage EQ
auto peut ne pas être possible si le niveau
d’entrée de l’amplificateur de puissance est
inférieur au niveau standard.
! Quand cet appareil est connecté à un ampli-
ficateur de puissance équipé d’un filtre
passe-bas, mettez le filtre passe-bas hors ser-
vice avant d’effectuer le réglage EQ auto. Dé-
finissez également la fréquence de coupure
pour le filtre passe-bas intégré d’un haut-par-
leur d’extrêmes graves actif sur la fréquence
la plus haute.
! La distance a été calculée par ordinateur
comme étant le retard optimum pour donner
des résultats précis pour les circonstances
considérées, veuillez donc continuer à utili-
ser cette valeur.
— Le son réfléchi à l’intérieur du véhicule
est fort et des retards se produisent.
— Le filtre passe bas sur les haut-parleurs
d’extrêmes graves ou les amplis externes
retardent les sont inférieurs.
! Le réglage EQ auto modifie les réglages
audio comme suit :
— Les réglages équilibre avant-arrière/
droite-gauche reviennent à la position
centrale. (Reportez-vous à la page 107,
Utilisation du réglage de l’équilibre avant-
arrière/droite-gauche.)
— La courbe d’égalisation bascule sur Plat.
(Reportez-vous à la page 107, Rappel
d’une courbe d’égalisation.)
— Les haut-parleurs avant, central et arrière
seront automatiquement réglés au
moyen d’un réglage de filtre passe-haut.
! Le réglage EQ auto précédent sera écrasé.
! Si vous utilisez un AVH-X3600BHS, AVH-
X2600BT ou AVH-X1600DVD, branchez au
préalable un câble d’extension du micro-
phone (vendu séparément) à l’entrée AUX.
Exécution de la fonction EQ auto
1 Arrêtez la voiture dans un endroit calme,
fermez toutes les portières, les vitres et le
toit ouvrant, puis coupez le moteur.
Si vous laissez tourner le moteur, son bruit peut
empêcher un réglage EQ auto correct.
2 Attachez le microphone fourni au centre
du repose-tête du conducteur, en l’orientant
vers l’avant.
Le résultat du réglage EQ auto peut différer
selon l’endroit où vous placez le microphone. Si
vous le désirez, placez le microphone sur le
siège du passager avant pour effectuer le ré-
glage EQ auto.
3 Placez le contact d’allumage sur ON ou
ACC.
Si la climatisation ou le chauffage de la voiture
sont en service, coupez-les. Le bruit du ventila-
teur de la climatisation ou du chauffage peut
empêcher une exécution correcte du réglage EQ
auto.
4 Appuyez sur la touche accueil pour pas-
ser à l’écran d’accueil.
5 Touchez la touche système pour ouvrir le
menu système.
6 Touchez Calibrage Egaliseur automatique
pour passer en mode de mesure EQ auto.
7 Branchez le microphone dans le jack d’en-
trée microphone sur cet appareil.
AVH-X5600BHS et AVH-X4600BT
AVH-X3600BHS, AVH-X2600BTet AVH-
X1600DVD
Câble d'extension
(Vendu séparément)
Microphone auto EQ
(Panneau arrière)
Entrée AUX
(AUX)
8 Touchez Démar. pour exécuter la fonction
EQ auto.
Réglages système
116
Section
Réglages système
Fr
21
<CRD4844-A>116

Black plate (117,1)
9 À partir du début du décomptage de 10
secondes, sortez de la voiture et fermez la
porte dans les 10 secondes.
La tonalité de mesure (bruit) est émise par les
haut-parleurs, et la mesure EQ auto commence.
Quand la fonction EQ auto est terminée, Me-
sure terminée Merci de déconnecter le micro-
phone et appuyer sur HOME s’affiche.
Si une mesure correcte des caractéristiques
acoustiques de l’habitacle de la voiture est im-
possible, un message d’erreur s’affiche. (Repor-
tez-vous à la page 134, Signification des
messages d’erreur du réglage EQ auto.)
# Il faut environ neuf minutes pour terminer la me-
sure EQ auto lorsque tous les haut-parleurs sont
connectés.
# Pour arrêter la fonction EQ auto, touchez STOP.
10 Conservez le microphone dans la boîte à
gants ou un autre endroit sûr.
Si le microphone est exposé à la lumière directe
du soleil pendant une période prolongée, les
températures élevées peuvent provoquer une
distorsion, une modification de la couleur ou un
dysfonctionnement.
Réglage du signal vidéo
Lorsque vous connectez un équipement AV à
cet appareil, sélectionnez le réglage du signal
vidéo approprié.
! Comme cette fonction est initialement réglée
sur Automatique,l’appareil règle automati-
quement les paramètres du signal vidéo.
! Vous ne pouvez utiliser cette fonction que
pour l’entrée d’un signal vidéo dans l’entrée
AV.
1 Appuyez sur la touche accueil pour pas-
ser à l’écran d’accueil.
2 Touchez la touche système pour ouvrir le
menu système.
3 Touchez Réglage signal vidéo sur le menu
système.
Les éléments de Réglage signal vidéo s’affi-
chent.
! AV – Règle le signal vidéo AV
! AUX – Règle le signal vidéo AUX
! Camera – Règle le signal vidéo de la caméra
de vue arrière
4 Touchez c ou d pour sélectionner le si-
gnal vidéo désiré.
Automatique—PAL—NTSC—PAL-M—PAL-N
—SECAM
Utilisation du menu Favori
1 Affichez les colonnes de menu à enregis-
trer.
Reportez-vous à la page 106, Utilisation des
menus.
# Vous pouvez personnaliser les menus à l’excep-
tion du menu Réglage vidéo.
2 Touchez l’icône en forme d’étoile dans la
colonne menu du menu souhaité pour l’enre-
gistrer.
L’icône en forme d’étoile du menu sélectionné
est remplie.
# Pour supprimer l’enregistrement, touchez à nou-
veau l’icône en forme d’étoile de la colonne menu.
3 Affichez le menu Favori et sélectionnez
un menu enregistré.
Reportez-vous à la page 106, Utilisation des
menus.
Remarque
Vous pouvez enregistrer jusqu’à 12 colonnes.
Français
Réglages système
117
Section
Menu Favori
Fr
21
22
<CRD4844-A>117

Black plate (118,1)
Utilisation du menu de
connexion Bluetooth
(Fonction de AVH-X5600BHS/AVH-X4600BT/
AVH-X3600BHS/AVH-X2600BT)
Remarque
Si vous utilisez un téléphone cellulaire pouvant
être connecté via la technologie sans fil
Bluetooth, nous vous conseillons d’utiliser votre
téléphone pour rechercher cet appareil et pour
établir une connexion entre l’appareil et votre té-
léphone. Par défaut, le code PIN est fixé à 0000.
Le nom de produit de cet appareil s’affiche sur
votre téléphone en tant que nom de l ’appareil.
Pour les détails, reportez-vous à la page 118, Sai-
sie du code PIN pour la connexion sans fil
Bluetooth. Pour de plus amples détails sur les
procédures d’établissement d’une connexion
sans fil Bluetooth, reportez-vous au mode d’em-
ploi du téléphone.
Appairage à partir de cet appareil
1 Appuyez sur la touche accueil pour pas-
ser à l’écran d’accueil.
2 Touchez la touche Bluetooth pour ouvrir
le menu de connexion Bluetooth.
3 Touchez Connexion pour sélectionner un
périphérique.
4 Démarrez la recherche.
Démarrage de la recherche.
Pendant la recherche, s’affiche et, quand des
périphériques disponibles sont trouvés, leur
nom ou adresse de périphérique Bluetooth (si le
nom ne peut pas être obtenu) s’affiche.
# Si vous voulez basculer entre les noms d’appareil
et les adresses de périphérique Bluetooth, touchez
cette icône.
Basculer entre les noms d’appa-
reil et les adresses de périphé-
rique Bluetooth.
# Pour annuler la recherche, touchez Stop.
# Si trois périphériques sont déjà appairés,
Mémoire pleine apparaît et l’appairage est impos-
sible. Le cas échéant, supprimez un périphérique ap-
pairé au préalable. Reportez-vous à la page 118.
# S’il est impossible de trouver des périphériques,
Introuvable apparaît. Le cas échéant, vérifiez l’état
du périphérique Bluetooth et recommencez la re-
cherche.
5 Touchez un nom de périphérique pour sé-
lectionner le périphérique à connecter.
Pendant la connexion, Jumelage s’affiche. Si la
connexion est établie, Jumelé s’affiche.
# Si votre périphérique prend en charge SSP (Se-
cure Simple Pairing, appairage simple et sécurisé),
un nombre de six chiffres s’affiche sur l’écran de
l’appareil. Une fois la connexion établie, ce nombre
disparaît.
# Si la connexion échoue, Erreur s’affiche. Le cas
échéant, réessayez depuis le début.
# Le code PIN est défini sur 0000 par défaut mais
vous pouvez le modifier. Reportez-vous à la page 118,
Saisie du code PIN pour la connexion sans fil
Bluetooth.
# Une fois la connexion établie, le nom de l’appa-
reil s’affiche.
Touchez le nom de l’appareil pour le déconnecter.
# Si vous souhaitez supprimer un téléphone
Bluetooth appairé, affichez Delete OK?. Touchez
Yes pour supprimer le périphérique.
Suppression d’un périphérique
appairé.
# Ne mettez jamais l’appareil hors service lorsque
le téléphone Bluetooth appairé est en cours de sup-
pression.
Connexion automatique à un
périphérique Bluetooth
Si cette fonction est activée, la connexion entre
votre périphérique Bluetooth et cet appareil s’ef-
fectuera automatiquement dès que les deux
équipements sont à une distance inférieure à
quelques mètres l’un de l’autre.
Initialement, cette fonction est en ser vice.
1 Appuyez sur la touche accueil pour pas-
ser à l’écran d’accueil.
2 Touchez la touche Bluetooth pour ouvrir
le menu de connexion Bluetooth.
3 Touchez Connexion automatique pour ac-
tiver la connexion automatique.
Si votre périphérique Bluetooth est prêt pour
une connexion sans fil Bluetooth, la connexion
à cet appareil sera établie automatiquement.
# Touchez à nouveau Connexion automatique
pour désactiver la connexion automatique.
Si la connexion échoue, “Le connexion automa-
tique a échoué. Réessayer?” s’affiche. Touchez Oui
pour rétablir la connexion.
4 Lorsque vous tournez de nouveau le
contact ACC de votre véhicule en position
sous tension, une connexion est établie auto-
matiquement.
Commutation vers un appareil
visible
Cette fonction permet de définir si cet appareil
est visible par l’autre périphérique.
Initialement, cette fonction est en ser vice.
1 Appuyez sur la touche accueil pour pas-
ser à l’écran d’accueil.
2 Touchez la touche Bluetooth pour ouvrir
le menu de connexion Bluetooth.
3 Touchez Visibilité pour désactiver la visi-
bilité.
# Touchez à nouveau Visibilité pour activer la visi-
bilité.
Saisie du code PIN pour la
connexion sans fil Bluetooth
Pour connecter votre périphérique Bluetooth à
cet appareil via la technologie sans fil Bluetooth,
vous devez entrer un code PIN sur le périphé-
rique Bluetooth pour vérifier la connexion. Le
code par défaut est 0000, mais vous pouvez le
modifier en utilisant cette fonction.
1 Appuyez sur la touche accueil pour pas-
ser à l’écran d’accueil.
2 Touchez la touche Bluetooth pour ouvrir
le menu de connexion Bluetooth.
3 Touchez Entrée code pour sélectionner
Entrée code.
4 Touchez 0 à 9 pour saisir le code PIN.
Menu de connexion Bluetooth
118
Section
Menu de connexion Bluetooth
Fr
23
<CRD4844-A>118
Black plate (119,1)
5 Après avoir entré le code PIN (jusqu’à8
chiffres), enregistrez-le sur cet appareil.
Enregistrement du code PIN sur
cet appareil.
Affichage de l’adresse du
périphérique Bluetooth
Cet appareil affiche son adresse de périphérique
Bluetooth.
1 Appuyez sur la touche accueil pour pas-
ser à l’écran d’accueil.
2 Touchez la touche Bluetooth pour ouvrir
le menu de connexion Bluetooth.
3 Touchez Information appareil pour affi-
cher les informations sur le périphérique.
L’adresse du périphérique Bluetooth s’affiche.
Choix de la couleur de
l’éclairage
Cet appareil dispose d’un éclairage multicolore.
Sélection directe à partir des
couleurs d’éclairage
présélectionnée
Vous pouvez sélectionner une couleur d’éclai-
rage dans la liste des couleurs.
1 Appuyez sur la touche accueil pour pas-
ser à l’écran d’accueil.
2 Touchez la touche de thème pour ouvrir
les réglages de thème.
3 Touchez Illumination, puis une couleur
dans la liste.
Red—Amber—Green—Blue—White—
Personnalisation—Rainbow
# Lorsque Rainbow est sélectionné, la couleur d’é-
clairage change.
Personnalisation de la couleur
d’éclairage
1 Appuyez sur la touche accueil pour pas-
ser à l’écran d’accueil.
2 Touchez la touche de thème pour ouvrir
les réglages de thème.
3 Touchez Illumination puis
Personnalisation.
4 Affichez le menu de personnalisation.
Affichage du menu de personna-
lisation.
5 Touchez la barre de couleurs pour per-
sonnaliser la couleur.
6 Touchez c ou d pour un ajustement fin
de la couleur.
7 Touchez l’icône de manière prolongée
pour enregistrer la couleur personnalisée en
mémoire.
Memo
Mémorisation de la couleur per-
sonnalisée.
La couleur personnalisée a été enregistrée dans
la mémoire.
La couleur en mémoire est rappelée lorsque
vous touchez à nouveau la même icône.
Choix de la couleur OSD
(affichage à l’écran)
Vous pouvez modifier la couleur OSD.
1 Appuyez sur la touche accueil pour pas-
ser à l’écran d’accueil.
2 Touchez la touche de thème pour ouvrir
les réglages de thème.
3 Touchez Ecran.
4 Touchez une des couleurs de la liste.
Choix de l’affichage
d’arrière-plan
Vous pouvez modifier l’arrière-plan visible lors
de l’ écoute d’une source.
1 Appuyez sur la touche accueil pour pas-
ser à l’écran d’accueil.
Français
Menu de connexion Bluetooth
119
Section
Menu de thème
Fr
23
24
<CRD4844-A>119

Black plate (120,1)
2 Touchez la touche de thème pour ouvrir
les réglages de thème.
3 Touchez Fond d'écran.
4 Touchez le réglage désiré.
# Vous pouvez afficher les réglages masqués en
déplaçant l’écran.
# Si aucune image JPEG n’a été stockée dans cet
appareil, vous ne pouvez pas sélectionner de photos.
Pour enregistrer une image JPEG sur cet appareil,
consultez la page 99, Capture d’une image dans des
fichiers JPEG.
# Si vous voulez supprimer l’image JPEG capturée,
touchez de façon prolongée la touche de l’image
JPEG.
Réglage des positions de
réponse des claviers tactiles
(calibrage du clavier tactile)
Si vous pensez que les touches du clavier tactile
àl’écran ont dévié des positions réelles qui ré-
pondent à votre toucher, réglez les positions de
réponse du clavier tactile. Il existe deux métho-
des de réglage : réglage en quatre points, dans
lequel vous touchez les quatre coins de l’écran ;
et réglage en 16 points, dans lequel vous affinez
le réglage de l’écran entier.
! Garez votre voiture dans un endroit sûr pour
utiliser cette fonction. N’utilisez pas cette
fonction pendant la conduite.
! Touchez doucement l’écran pour effectuer
les réglages. Appuyez avec force sur le cla-
vier tactile peut l’endommager. N’utilisez pas
un outil pointu comme un stylo bille ou un
stylo mécanique. Ceci peut endommager l’é-
cran.
! S’il est impossible de régler correctement le
clavier tactile, consultez votre distributeur
local Pioneer.
1 Mettez la source hors service.
Reportez-vous à la page 76, Mise en/hors service
de la source.
2 Appuyez de façon prolongée sur la tou-
che accueil pour lancer l’étalonnage de l’é-
cran tactile.
L’écran de réglage du clavier tactile en quatre
points s’affiche. Lorsque deux points s’affichent
en même temps, touchez les deux.
3 Touchez chacune des flèches dans les
quatre coins de l’écran.
# Pour annuler le réglage, appuyez de façon pro-
longée sur la touche accueil.
4 Appuyez sur la touche accueil pour termi-
ner le réglage en quatre points.
Les données de la position réglée sont sauvegar-
dées.
# Ne coupez pas le moteur pendant la sauvegarde
des données.
5 Appuyez sur la touche accueil pour effec-
tuer le réglage en 16 points.
L’écran de réglage du clavier tactile en 16 points
s’affiche.
# Pour annuler le réglage, appuyez de façon pro-
longée sur la touche accueil.
6 Touchez doucement le centre de la
marque + affichée sur l’écran.
Après avoir touché toutes les marques, les don-
nées de la position réglée sont sauvegardées.
# Ne coupez pas le moteur pendant la sauvegarde
des données.
7 Appuyez de façon prolongée sur la tou-
che accueil pour effectuer le réglage.
Utilisation d’une source AUX
Un appareil auxiliaire ou portable vendu séparé-
ment peut être connecté à cet appareil.
Quelques mots sur les méthodes
de connexion AUX
Vous pouvez connecter des périphériques auxi-
liaires à cet appareil.
Câble à mini prise (AUX)
Lors de la connexion d’un appareil auxiliaire
avec un câble à mini prise
Un iPod et un lecteur audio/vidéo portable peu-
vent être connectés à cet appareil via un câble à
mini prise.
Menu de thème
120
Section
Autres fonctions
Fr
24
25
<CRD4844-A>120
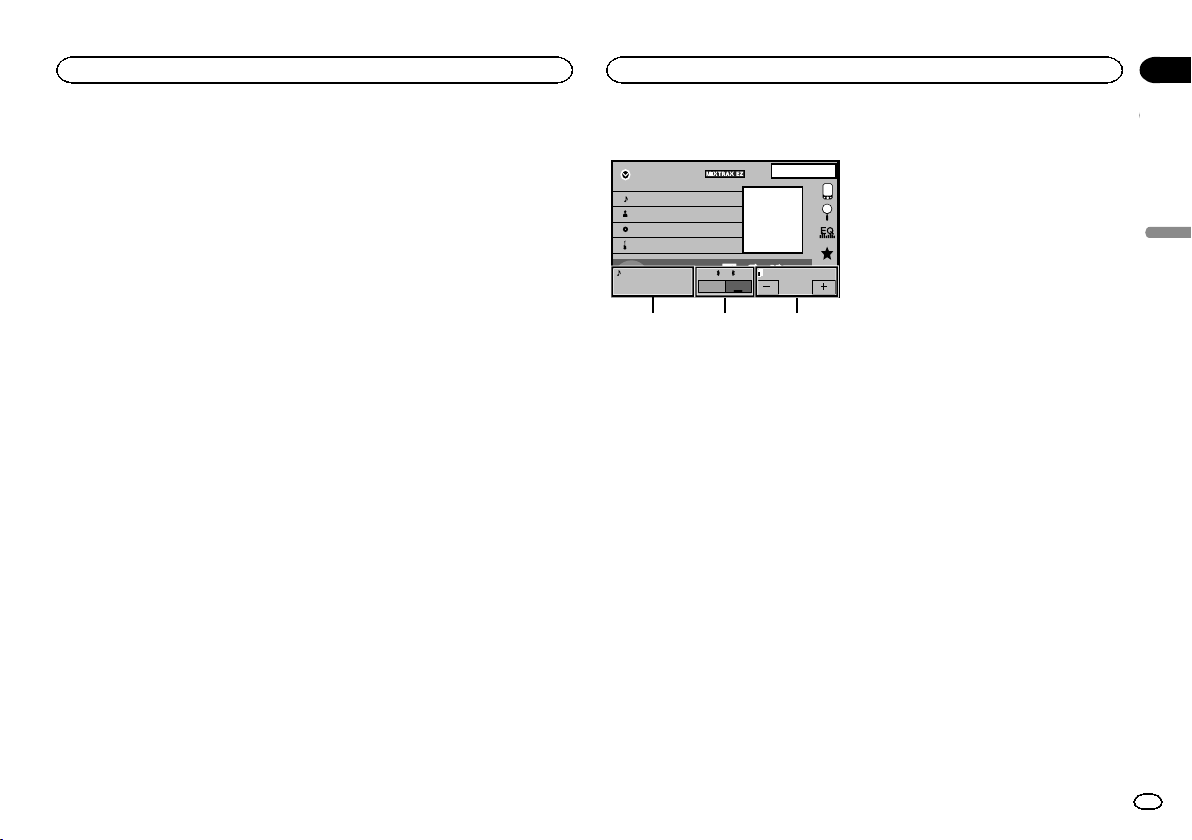
Black plate (121,1)
! Si un iPod disposant de fonctions vidéo est
connecté à cet appareil avec un câble à prise
3,5 mm (quatre pôles) (par exemple CD-
V150M), vous pouvez profiter du contenu
vidéo de l’iPod connecté.
! Vous pouvez connecter un lecteur audio/
vidéo portable à l’aide d’un câble à prise
3,5 mm (quatre pôles) avec un câble RCA
(vendu séparément). Toutefois, selon le
câble, une connexion inverse entre le câble
rouge (audio côté droit) et le câble jaune
(vidéo) peut être requise pour reproduire cor-
rectement le son et l’ image vidéo.
% Insérez la mini prise stéréo dans le jack
d’entrée AUX de cet appareil.
Reportez-vous à la page 123, Connexion du cor-
don d’alimentation.
Réinitialisation du
microprocesseur
En appuyant sur RESET, vous pouvez réinitialiser
le microprocesseur sur ses réglages initiaux
sans changer les informations de signets.
Le microprocesseur doit être réinitialisé dans les
situations suivantes:
! Avant d’utiliser cet appareil après son instal-
lation
! En cas d’anomalie de fonctionnement de
l’appareil
! Quand des messages étranges ou incorrects
s’affichent sur l’écran
1 Coupez le contact.
2 Appuyez sur RESET avec la pointe d’un
stylo ou un autre instrument pointu.
Reportez-vous à la page 75, Description de l’ap-
pareil.
Remarque
Mettez le moteur de la voiture en route ou placez
le contact en position ACC ou ON avant d’ap-
puyer sur RESET dans les situations suivantes :
! Après avoir effectué toutes les connexions
! Lors de la suppression de tous les paramètres
enregistrés
! Lors de la réinitialisation des réglages usine ini-
tiaux de l’appareil
Utilisation de la fonction de
mixage audio
Vous pouvez écouter l’audio de l’appareil et de
votre iPhone ou smartphone simultanément. Le
son principal provient de l’appareil. Le son se-
condaire provient de l’iPhone ou du smart-
phone. Vous pouvez régler le volume du son
secondaire sur l’écran.
1 Connectez votre iPhone ou smartphone à
l’appareil à l’aide de l’entrée RGB.
Reportez-vous à la page 125, Lors de la conne-
xion avec le câble CD-IV203 en option.
Reportez-vous à la page 126, Lors de la conne-
xion avec le câble CD-IU201S en option.
Reportez-vous à la page 126, Connexion d’un
adaptateur de liaison de smartphone optionnel
(CD-ML100).
2 Appuyez sur +/– (VOLUME/VOL) pour af-
ficher la barre de commande de la fonction
de mixage audio.
L’écran de la fonction de mixage audio s’affiche.
iPod
Appr
ppr
App
pp
App
1JAN
PM
12:43
Abcdefghi
1/9
Abcdefghi
Abcdefghi
Abcdefghi
01'17'' -05'29''
S.Rtrv
All
All
All
x
1
2
iPod
Vol.12
Mix
ON
OFF
Vol.12
App Sound
1
23
1 Source sonore – Appuyez sur +/–
(VOLUME/VOL) pour régler le volume du son
principal. Le niveau de volume du son princi-
pal s’affiche sur l’écran Source sonore.
2 Mix – Touchez ON ou OFF pour mettre le mi-
xage audio en fonction ou hors fonction. Le
son secondaire est coupé lorsque Mix est
réglé sur OFF.
Réglez sur ON si vous souhaitez émettre le
son pour le AppRadio Mode, le son de navi-
gation par exemple, depuis l’appareil.
Réglez sur OFF si vous souhaitez émettre le
son pour le AppRadio Mode, la musique par
exemple, en tant que son principal.
3 App Sound – Touchez + ou – sur l’écran
pour régler le volume du son secondaire. Le
niveau de volume du son secondaire s’affiche
sur l’écran App Sound.
Remarques
! Vous ne pouvez pas régler le volume du son
principal sur l’écran.
! La barre de commande de la fonction de mi-
xage audio s’affiche pendant quatre secon-
des. Si l’écran disparaît, appuyez à nouveau
sur +/– (VOLUME/VOL). L’écran réapparaît.
Français
Autres fonctions
121
Section
Autres fonctions
Fr
25
<CRD4844-A>121
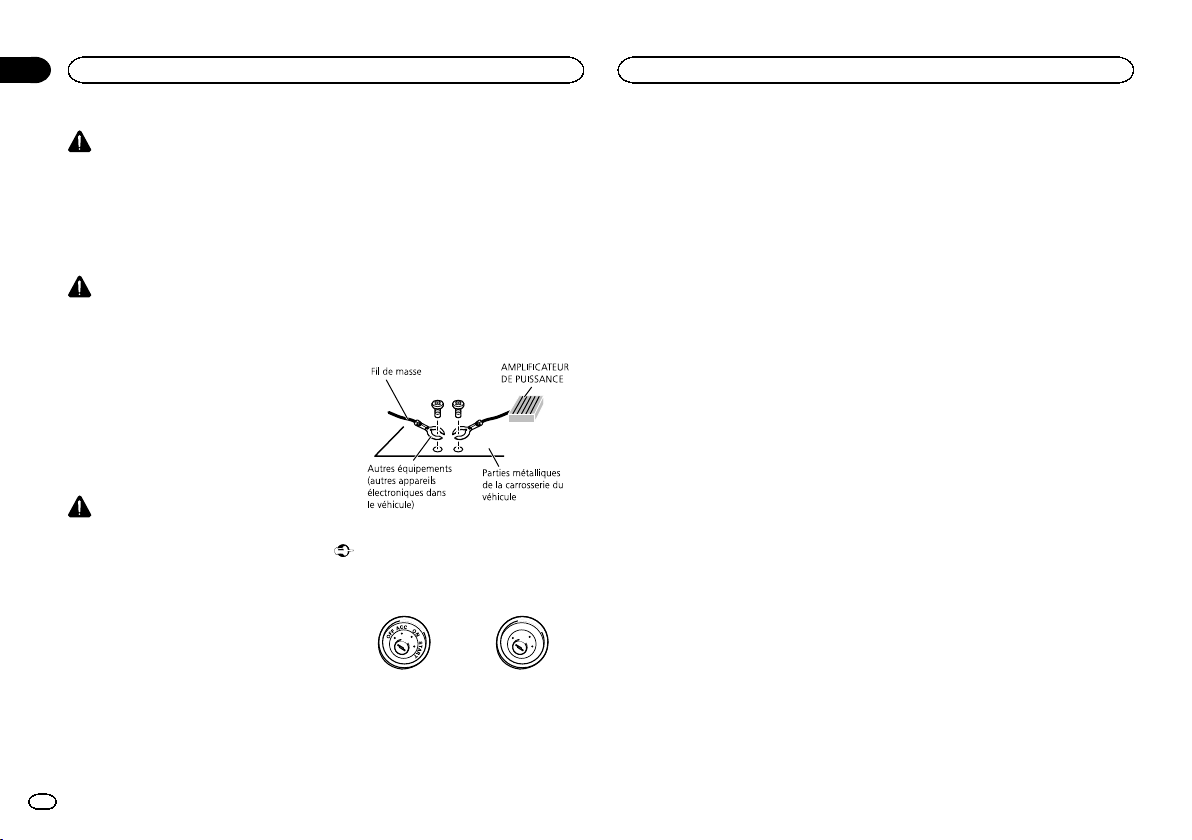
Black plate (122,1)
ATTENTION
Dans certains états ou pays, il peut être illégal
même pour des personnes autres que le
conducteur de regarder des images sur un
écran à l’intérieur d’un véhicule. Quand cette ré-
glementation est applicable, elle doit être res-
pectée, et les fonctions DVD de cet appareil ne
doivent pas être utilisées.
PRÉCAUTION
! Ne percez pas de trous vers le compartiment
moteur pour connecter le câble jaune de l’é-
cran à la batterie du véhicule. Les vibrations
du moteur peuvent provoquer un défaut d’is-
olement à l’endroit où le fil passe du compar-
timent passager au compartiment moteur.
Apportez une attention particulière à la fixa-
tion du fil à cet endroit.
! Assurez-vous que les câbles n’interfèrent pas
avec des parties mobiles du véhicule, telles
que le levier de vitesse, le frein de parking ou
le mécanisme de glissement des sièges.
ATTENTION
! Utilisez des haut-parleurs avec une puis-
sance de sortie de 50 W et une impédance
de 4 W à8W.N’utilisez pas des haut-parleurs
d’impédance 1 W à3W avec cet appareil.
! Le câble noir est la masse. Lorsque vous in-
stallez cet appareil ou un amplificateur de
puissance (vendu séparément), assurez-vous
de connecter le fil de masse en premier. As-
surez-vous que le fil de masse est connecté
correctement aux parties métalliques de la
carrosserie du véhicule à l’ aide d’une cosse
à fourche disponible dans le commerce. Le
fil de masse de l’amplificateur de puissance
et celui de cet appareil ou de tout autre appa-
reil doivent être connectés au véhicule sépa-
rément et avec des vis différentes. Si la vis du
fil de masse se desserre ou tombe, il peut en
résulter un incendie, de la fumée ou un dys-
fonctionnement.
Non fourni avec cet appareil
*1
*1
Important
! Cet appareil ne peut pas être installé dans
un véhicule ne disposant pas d’une position
ACC (accessoire) sur le contact d’allumage.
O
N
S
T
A
R
T
O
F
F
Avec position ACC Sans position ACC
! Utilisez cet appareil uniquement sur des vé-
hicules avec une batterie 12 volts et une
mise à la masse du négatif. Le non respect
de cette prescription peut engendrer un in-
cendie ou un dysfonctionnement.
! Pour éviter un court-circuit, une surchauffe
ou un dysfonctionnement, assurez-vous de
respecter les instructions suivantes.
— Déconnectez la borne négative de la batterie
avant l’installation.
— Fixez le câblage avec des serre-fils ou de la
bande adhésive. Pour protéger le câblage, en-
roulez dans du ruban adhésif les parties du
câblage en contact avec des pièces en métal.
— Placez les câbles à l’écart de toutes les par-
ties mobiles, telles que le levier de vitesse et
les rails des sièges.
— Placez les câbles à l’écart de tous les endroits
chauds, par exemple les sorties de chauf-
fage.
— Ne reliez pas le câble jaune à la batterie à tra-
vers le trou dans le compartiment moteur.
— Recouvrez tous les connecteurs de câbles qui
ne sont pas connectés avec du ruban adhésif
isolant.
— Ne raccourcissez pas les câbles.
— Ne coupez jamais l’isolation du câble d’ali-
mentation de cet appareil pour partager l’ali-
mentation avec d’autres appareils. La
capacité en courant du câble est limitée.
— Utilisez un fusible correspondant aux caracté-
ristiques spécifiées.
— Ne câblez jamais le câble négatif du haut-par-
leur directement à la masse.
— Ne réunissez jamais ensemble les câbles né-
gatifs de plusieurs haut-parleurs.
! Lorsque cet appareil est sous tension, les si-
gnaux de commande sont transmis via le
câble bleu/blanc. Connectez ce câble à la té-
lécommande du système d’un amplificateur
de puissance externe ou à la borne de
commande du relais de l’antenne motorisée
du véhicule (max. 300 mA 12 V CC). Si le véhi-
cule est équipé d’une antenne intégrée à la
lunette arrière, connectez-le à la borne d’ali-
mentation de l’amplificateur d’antenne.
! Ne reliez jamais le câble bleu/blanc à la
borne d’alimentation d’un amplificateur de
puissance externe. De même, ne le reliez pas
à la borne d’alimentation de l’antenne moto-
risée. Dans le cas contraire, il peut en résul-
ter un déchargement de la batterie ou un
dysfonctionnement.
Connexion
122
Section
Connexion
Fr
26
<CRD4844-A>122
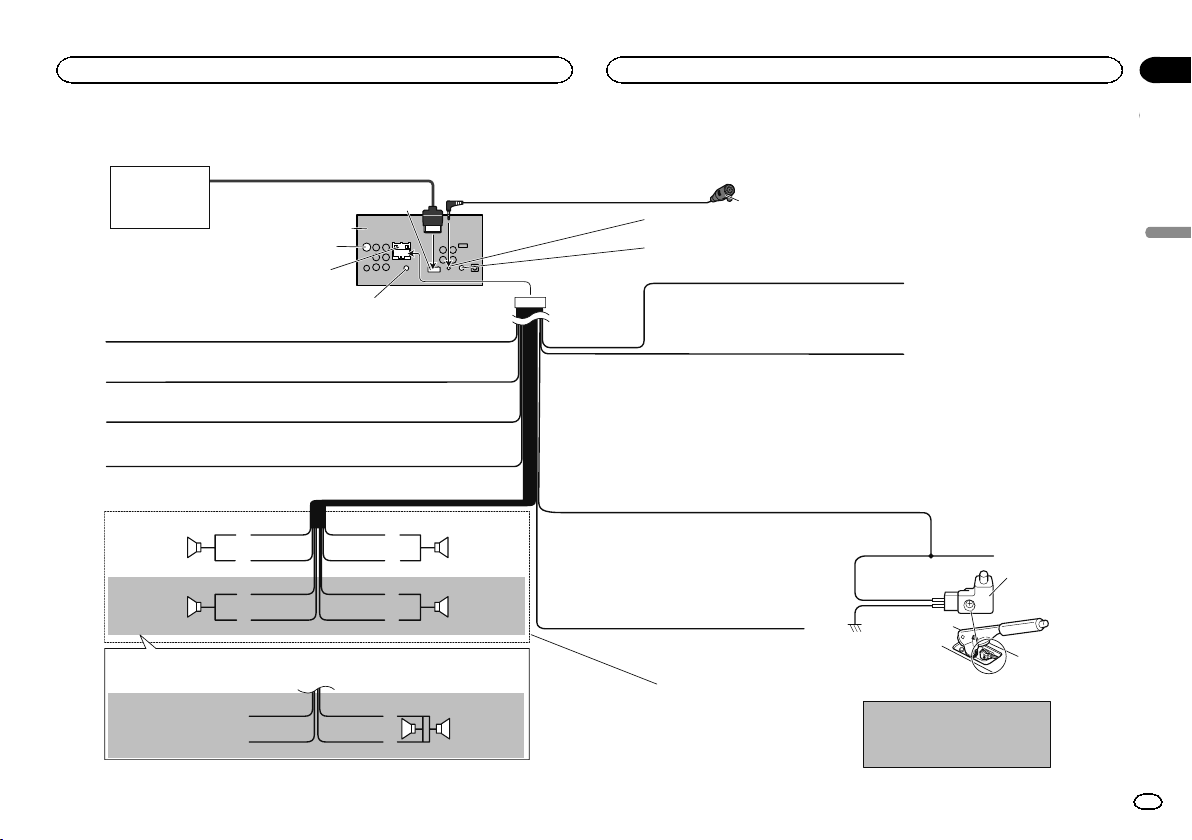
Black plate (123,1)
Connexion du cordon d’alimentation
Jaune/noir
Si vous utilisez un équipement avec la fonction Coupure du son, câblez ce fil
au fil Coupure Audio de cet équipement. Sinon, ne connectez rien au fil
Coupure Audio.
Vert clair
Utilisé pour détecter l’état ON/OFF du frein à main.
Ce conducteur doit être raccordé sur l’alimentation
du contacteur de frein à main.
Bleu/blanc
Connectez à la prise de commande du système de l’amplificateur
de puissance ou à la prise du contrôle de relais de l’antenne
automatique (max. 300 mA, 12 V DC).
Côté mise à terre
Côté alimentation
Contacteur de
frein à main
Jaune
Connectez à une prise d’alimentation constante 12 V.
Rouge
Connectez à une prise commandée par le commutateur d’allumage (12 V DC).
Noire (masse au châssis)
Connectez à une section métallique propre et sans
peinture.
Gauche Droit
Enceinte avant Enceinte avant
Blanc Gris
Gris/noirBlanc/noir
Vert Violet
Vert/noir Violet/noir
Avec un système à 2 enceintes, ne connectez rien aux câbles d’enceinte qui
ne sont pas connectés aux enceintes.
Remarque:
· Change le réglage initial de cet appareil
(reportez-vous aux mode d’emploi). La
sortie de caisson de grave de cet appareil
est monophonique.
Violet
Violet/noir
Non utilisé.
Vert
Vert/noir
Lors de l’utilisation d’un haut-parleur d’extrêmes graves de 70 W (2 Ω), assurez-vous de le raccorder aux
conducteurs violet et violet/noir de cet appareil. Ne raccordez rien aux conducteurs vert et vert/noir.
Caisson de
grave (4 Ω) × 2
Enceinte arrière
ou caisson de
grave (4 Ω)
Enceinte arrière
ou caisson de
grave (4 Ω)
Fusible (10 A)
Violet/blanc
Des deux conducteurs connectés au feu de recul, connectez celui pour lequel
la tension change quand le sélecteur de vitesse est sur la position REVERSE
(R). Cette connexion permet à l’appareil de détecter si la voiture se déplace
vers l’avant ou vers l’arrière.
Orange/blanc
Connectez à la prise du commutateur d’éclairage.
Microphone
(Fonction de l’AVH-X5600BHS/AVH-X4600BT/AVH-X3600BHS/AVH-X2600BT)
4 m
Entrée microphone
(Fonction de l’AVH-X5600BHS/AVH-X4600BT/AVH-X3600BHS/AVH-X2600BT)
Cet appareil
Entrée d’antenne
Prise AUX (3,5 ø)
Utilisez un câble a fiches mini pour raccorder un appareil auxiliaire.
Entrée RGB
Ajout Pioneer sur
système de navigation
(vendu séparément).
Veuillez contacter votre
revendeur pour en savoir
plus sur les unités de
navigation pouvant être
raccordées.
Insérez le câble 26 broches dans la
direction indiquée sur la figure.
Câble 26 broches (fourni avec l’unité de navigation)
Entrée pour télécommande câblée
Un adaptateur de télécommande câblée peut être
connecté à cette prise (vendu séparément)
Français
Connexion
123
Section
Connexion
Fr
26
<CRD4844-A>123
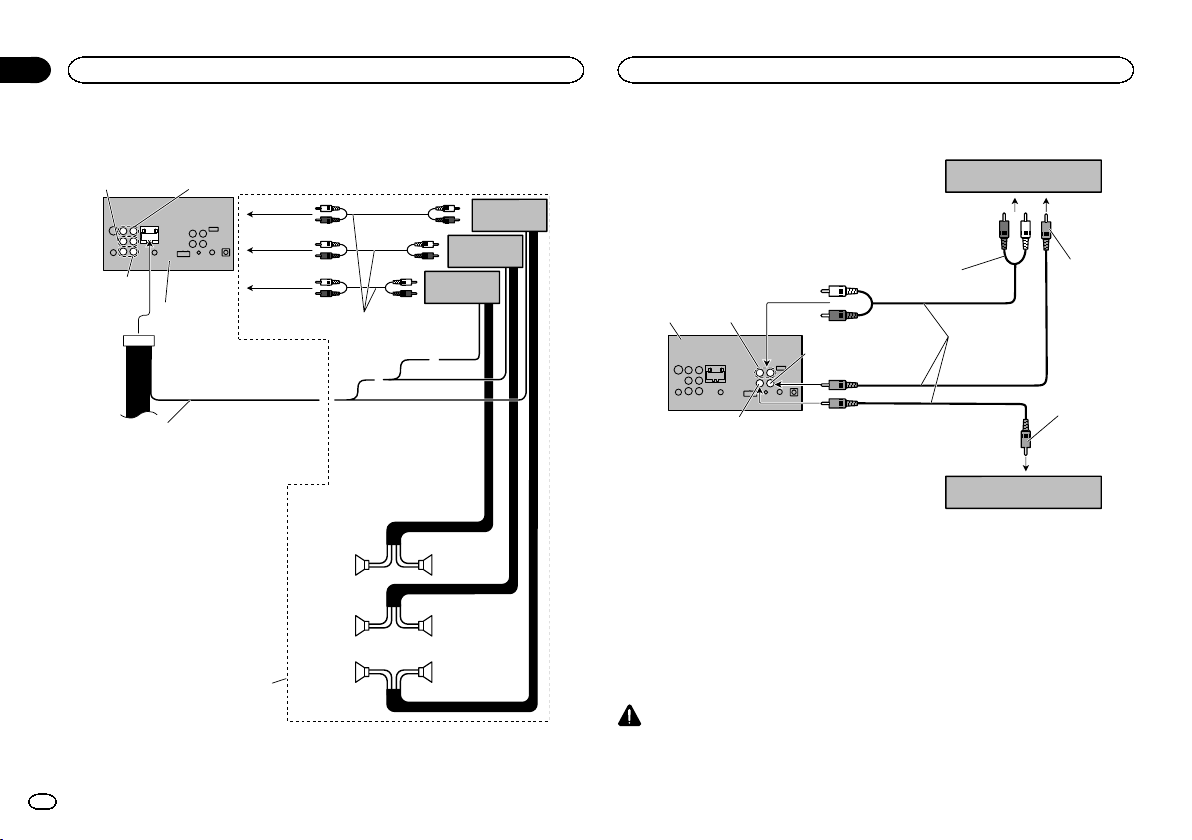
Black plate (124,1)
Lors de la connexion à un amplificateur de puissance vendu
séparément
Connectez aux câbles cinch
(RCA) (vendus séparément)
Enceinte arrière
Enceinte arrière
Réalisez ces connexions lors de
l’utilisation de l’amplificateur en
option.
Télécommande du système
Enceinte avant
Enceinte avant
Gauche Droit
Amplificateur de
puissance (vendu
séparément)
Amplificateur de
puissance (vendu
séparément)
Amplificateur de
puissance (vendu
séparément)
Caisson de
grave
Caisson de
grave
À la sortie arrière
À la sortie avant
À la sortie du
caisson de grave
Bleu/blanc
Connectez à la prise de commande du
système de l’amplificateur de puissance ou
à la prise du contrôle de relais de l’antenne
automatique (max. 300 mA, 12 V DC).
Cet appareil
Sortie arrière Sortie avant
Sortie du
caisson
de grave
Lors de la connexion du composant vidéo externe et de l’écran
Appareil vidéo externe (vendu
séparément)
Entrée audio
(R IN, L IN)
Écran muni de prises d’entrée Cinch
(RCA) (vendu séparément)
Vers l’entrée
vidéo
À la sortie
vidéo
Aux sorties
audio
Cet appareil
Câbles à fiches
Cinch (RCA)
(vendu séparément)
Sortie du moniteur arrière
(V OUT)
Entrée vidéo (V IN)
! Il est nécessaire de remplacer
Entrée Audio/Vidéo dans le menu système
lors de la connexion du composant vidéo ex-
terne.
Reportez-vous à la page 111, Réglage de l’en-
trée AV.
La sortie vidéo arrière de cet appareil est prévue
pour connecter un écran afin de permettre aux
passagers des sièges arrières de regarder des
DVD, etc.
ATTENTION
N’installez jamais d’écran arrière dans un en-
droit où il est visible du conducteur lorsque le
véhicule circule.
Connexion
124
Section
Connexion
Fr
26
<CRD4844-A>124
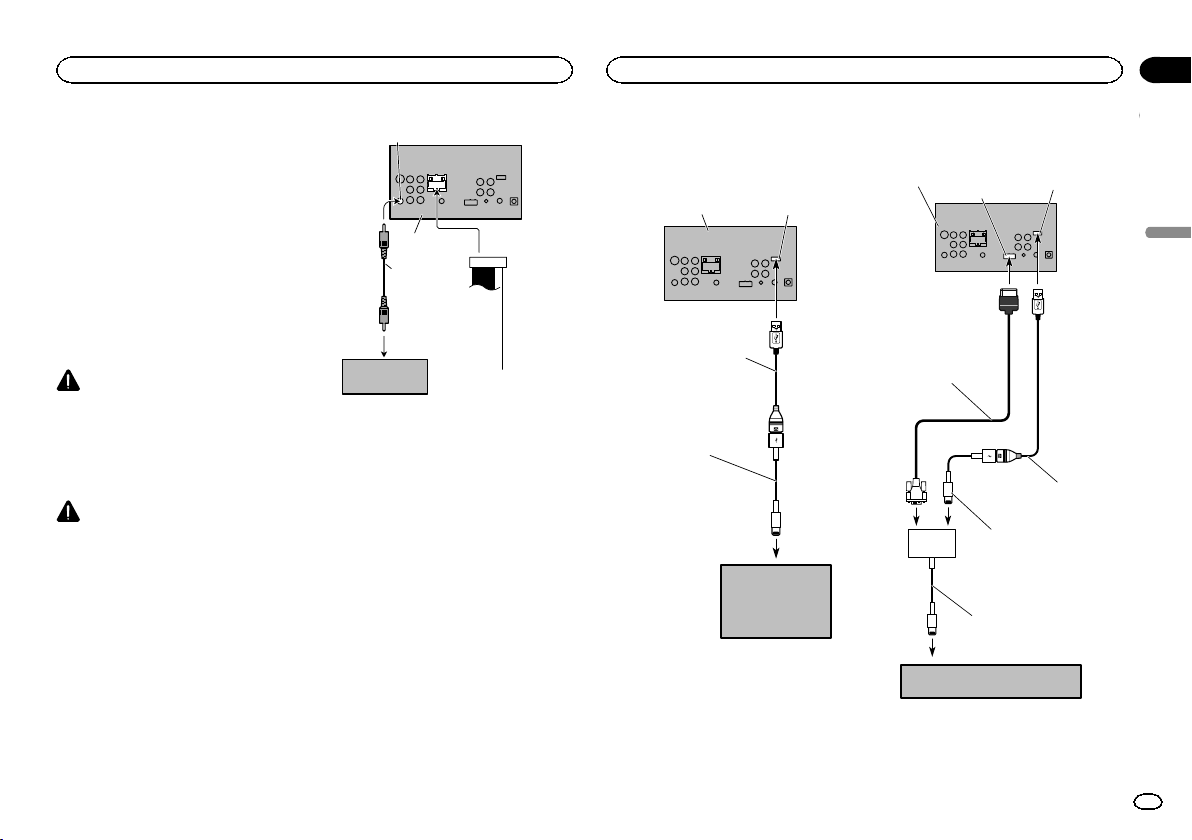
Black plate (125,1)
Lors de la connexion à une
caméra de vue arrière
Si vous mettez le levier de vitesse en position
MARCHE ARRIÈRE (R), l’affichage basculera
automatiquement sur l’image de vue arrière.
Vous devez régler Polarité caméra correcte-
ment dans le menu système de l’appareil à utili-
ser. Pour des détails sur les réglages, reportez-
vous à la page 115, Réglage de la caméra de vue
arrière (caméra de recul).
Vous pouvez également basculer sur l’image de
vue arrière en appuyant sur la touche du clavier
tactile. Pour les détails, reportez-vous à la page
78, Utilisation de la vue arrière.
ATTENTION
UTILISEZ CETTE ENTRÉE SEULEMENT
POUR UNE CAMÉRA DE VUE ARRIÈRE
DONNANT UNE IMAGE INVERSÉE OU MI-
ROIR. TOUTE AUTRE UTILISATION PEUT
PROVOQUER DES BLESSURES OU DES
DOMMAGES.
PRÉCAUTION
! Vous devez utiliser une caméra qui gé-
nère des images inversées (images mi-
roir).
! L’image sur l’écran peut apparaître inversée.
! La fonction caméra de vue arrière doit être
utilisée comme une aide pour avoir un œil
sur une remorque ou lors d’une marche ar-
rière. Ne l’utilisez pas à des fins de divertisse-
ment.
! Les objets sur la vue arrière peuvent apparaî-
tre plus près ou plus loin qu’ils ne le sont en
réalité.
À la sortie vidéo
Caméra de recul
(vendu séparément)
Entrée de la caméra de recul (R.C IN)
Violet/blanc
Des deux conducteurs
connectés au feu de recul,
connectez celui pour lequel la
tension change quand le
sélecteur de vitesse est sur la
position REVERSE (R). Cette
connexion permet à l’appareil
de détecter si la voiture se
déplace vers l’avant ou vers
l’arrière.
Cet appareil
Câble à fiches
Cinch (RCA)
(vendu séparément)
iPod avec connecteur Lightning
Lors de la connexion avec le
câble CD-IU52 en option
Câble USB
(fourni avec cette unité)
Connectez à un périphérique
USB vendu séparément.
Câble Lightning vers USB
(CD-IU52) (vendu séparément)
iPod avec connecteur
lightning
(vendu séparément)
Cet appareil
Entrée USB/iPod
Lors de la connexion avec le
câble CD-IV203 en option
Cet appareil
Entrée RGB
Entrée USB/iPod
Câble RGB vers VGA
(CD-IV203)
(vendu séparément)
Adaptateur Lightning vers VGA
(produits Apple Inc.)
(vendu séparément)
iPod avec connecteur lightning
(vendu séparément)
Câble Lightning vers
USB (CD-IV203)
(vendu séparément)
Câble USB
(fourni avec cette unité)
Raccordez à la mémoire
USB vendue séparément.
Français
Connexion
125
Section
Connexion
Fr
26
<CRD4844-A>125

Black plate (126,1)
iPod avec connecteur 30
broches
Lors de la connexion avec le
câble CD-IU201V en option
Cet appareil
Câble d’interface
(CD-IU201V) (vendu séparément)
Entrée AUX
(AUX)
1,5 m
Connecteur Dock
Câble USB
(Fourni avec cet appareil)
Connectez à un périphérique
USB vendu séparément.
Entrée USB/iPod
iPod avec
capacité vidéo
(vendu séparément)
Entrée à
distance
câblée.
Notez qu'il
ne s'agit
pas d'une
entrée AUX.
Lors de la connexion avec le
câble CD-IU201S en option
Cet appareil
1,5 m
Connecteur Dock
Câble USB
(Fourni avec cet appareil)
Connectez à un périphérique
USB vendu séparément.
Entrée USB/iPod
iPod avec
capacité vidéo
(vendu séparément)
Entrée RGB
Câble d’interface
(CD-IU201S) (vendu séparément)
Connexion d’un adaptateur de liaison de smartphone
optionnel (CD-ML100)
Fusible (2 A)
Cet appareil
Entrée RGB
Câble d'interface
(Fourni avec le
boîtier
adaptateur pour
connexion
Smartphone)
Boîtier adaptateur pour
connexion Smartphone
(CD-ML100) (vendu
séparément)
Câble d'alimentation (Fourni avec le boîtier
adaptateur pour connexion Smartphone)
Noir (masse)
Vers la carrosserie (métal)
Câble USB (Fourni avec le
boîtier adaptateur pour
connexion Smartphone)
USB - micro câble USB (Type USB A -
micro USB B) (Fourni avec le boîtier
adaptateur pour connexion Smartphone)
Smartphone avec
connecteur micro USB
(vendu séparément)
Jaune
Vers la borne électrique contrôlée
par le démarreur (12 V DC) ON/OFF
Connexion pour la mise à jour du firmware de l’adaptateur de
liaison de smartphone
Même si de la musique et/ou des fichiers image sont enregistrés sur un périphérique de stockage USB, ils ne
peuvent pas être lus.
Fusible (2 A)
Cet appareil
Entrée RGB
Câble d'interface
(Fourni avec le
boîtier
adaptateur pour
connexion
Smartphone)
Boîtier adaptateur pour
connexion Smartphone
(CD-ML100) (vendu
séparément)
Câble d'alimentation (Fourni avec le boîtier
adaptateur pour connexion Smartphone)
Noir (masse)
Vers la carrosserie (métal)
Câble USB (Fourni avec le boîtier
adaptateur pour connexion
Smartphone)
Jaune
Vers la borne électrique contrôlée
par le démarreur (12 V DC) ON/OFF
Mémoire USB
(vendu séparément)
Connexion
126
Section
Connexion
Fr
26
<CRD4844-A>126
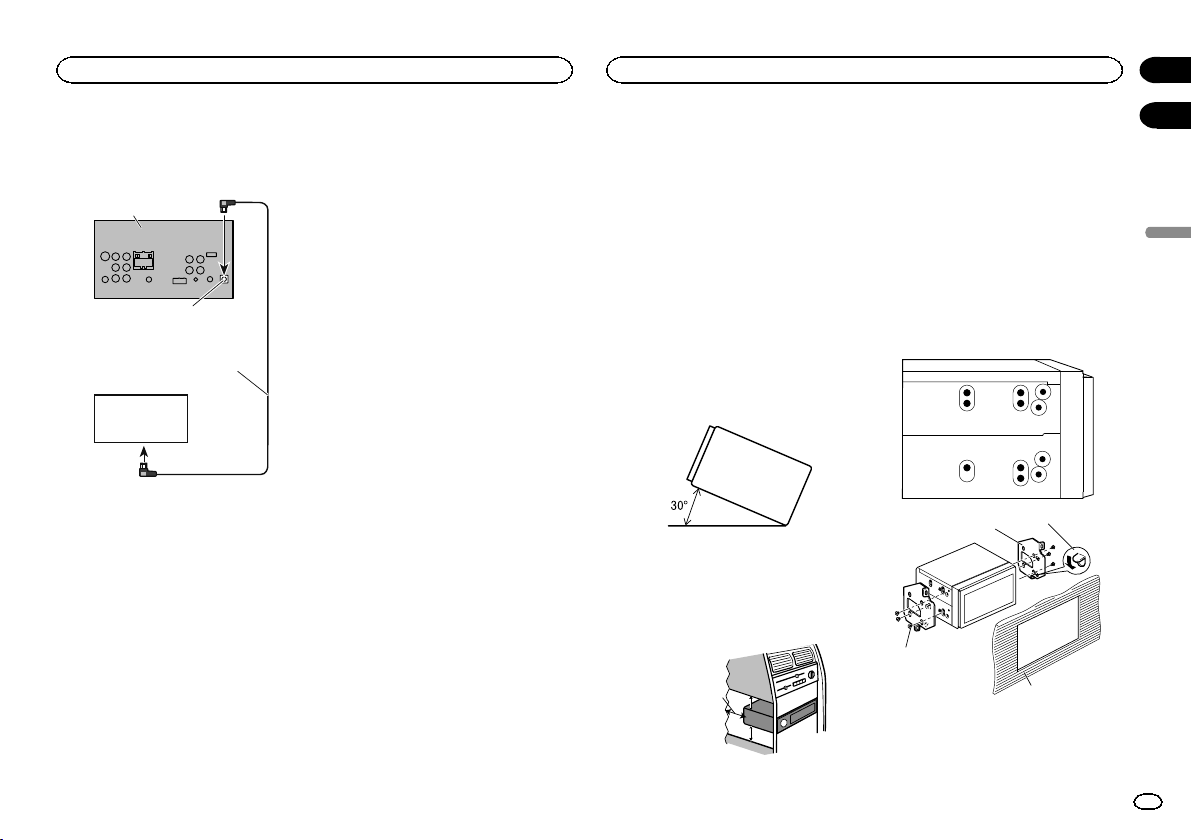
Black plate (127,1)
Connexion du syntoniseur
SiriusXM en option
(Fonction de AVH-X5600BHS/AVH-X3600BHS)
Tuner SiriusXM
(vendu séparément)
Cet appareil
Câble SiriusXM BUS
(fourni avec le tuner SiriusXM)
Entrée SiriusXM BUS
! Cet appareil peut alimenter 500 mA maxi-
mum au syntoniseur SiriusXM.
Remarques
! Vérifiez toutes les connexions et tous les sys-
tèmes avant l’installation finale.
! N’utilisez pas de pièces non autorisées car il
peut en résulter des dysfonctionnements.
! Consultez votre revendeur si l’installation né-
cessite le perçage de trous ou d’autres modi-
fications du véhicule.
! N’installez pas cet appareil là où :
— il peut interférer avec l’utilisation du véhicule.
— il peut blesser un passager en cas d’arrêt
soudain du véhicule.
! Le laser à semi-conducteur sera endommagé
s’il devient trop chaud. Installez cet appareil
àl’écart de tous les endroits chauds, par
exemple les sorties de chauffage.
! Des performances optimales sont obtenues
quand l’appareil est installé à un angle infé-
rieur à 30°.
! Lors de l’installation, pour assurer une dis-
persion correcte de la chaleur quand cet ap-
pareil est utilisé, assurez-vous de laisser un
espace important derrière la face arrière et
enroulez les câbles volants de façon qu’ils ne
bloquent pas les orifices d’aération.
5cmcm
Laissez suffisamment
d’espace
5 cm
5 cm
! Cet appareil ne peut pas être correctement
installé dans certains véhicules. Dans ce
cas, utilisez le kit d’installation en option
(ADT-VA133).
Installation à l’aide des trous
de vis sur les côtés de l’appareil
% Fixation de l’appareil sur le support de
montage radio d’usine.
Positionnez l’appareil de sorte que les trous des
vis soient alignés avec les trous des vis sur le
support, puis serrez les vis aux trois emplace-
ments de chaque côté de l’appareil.
1
2
3
4
1 Courbez la languette vers le bas si elle gêne.
2 Support de montage radio d’usine
Français
Connexion
127
Section
Installation
Fr
26
27
<CRD4844-A>127
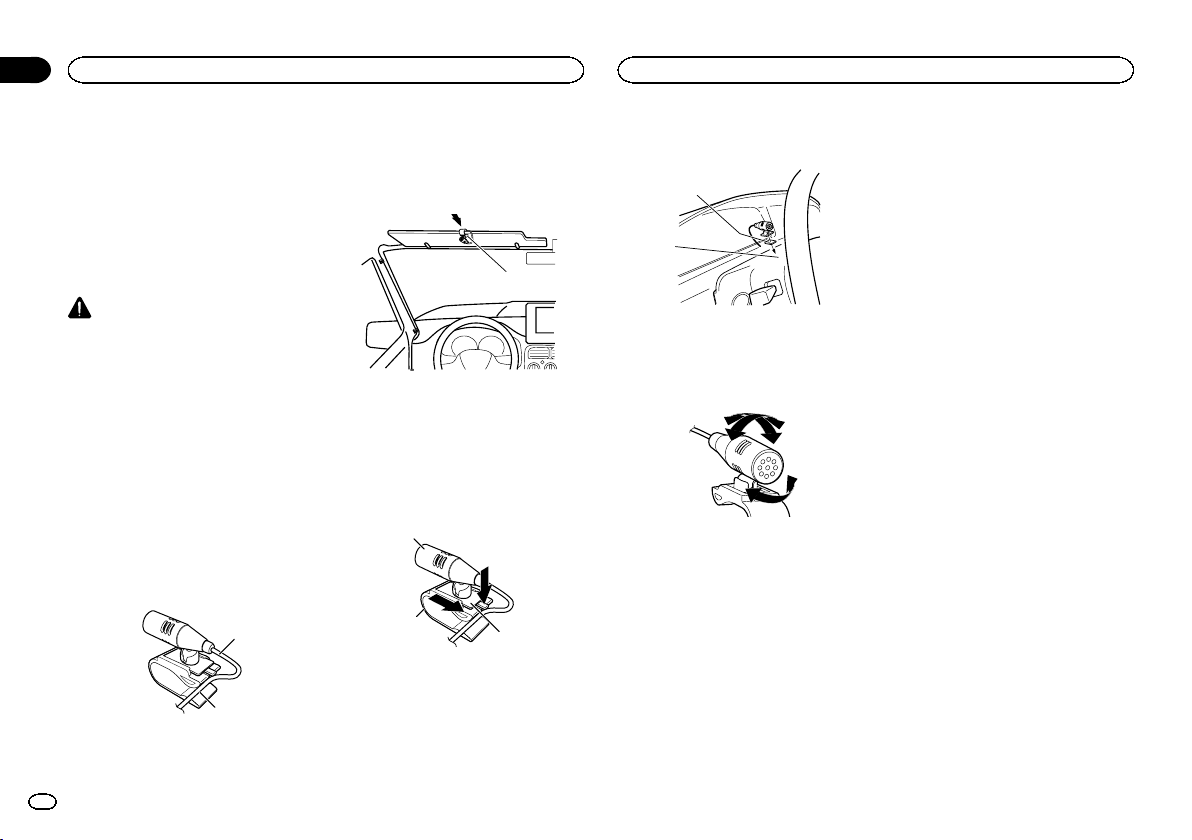
Black plate (128,1)
3 Utilisez des vis à tête bombée (5 mm × 8 mm)
ou des vis en affleurement (5 mm × 9 mm),
selon le type de vis accepté par le support de
montage.
4 Tableau de bord ou console
Installation du microphone
(Fonction de AVH-X5600BHS/AVH-X4600BT/
AVH-X3600BHS/AVH-X2600BT)
PRÉCAUTION
Il est extrêmement dangereux de laisser le fil du
microphone s’enrouler autour de la colonne de
direction ou du levier de vitesse. Assurez-vous
d’installer cet appareil de telle manière qu’il ne
gêne pas la conduite.
Remarques
! Installez le microphone dans une position et
une orientation qui lui permette de capter la
voix de la personne qui utilise le système.
! Utilisez des serre-fils vendus séparément
pour fixer le fil là où c’est nécessaire dans le
véhicule.
Si vous installez le microphone
sur le pare-soleil
1 Insérez le fil du microphone dans la
fente.
1
2
1 Fil du microphone
2 Rainure
2 Installez le clip microphone sur le pare-
soleil.
Avec le pare-soleil relevé, installez le clip micro-
phone. (Abaisser le pare-soleil réduit le taux de
reconnaissance vocale.)
1
1 Clip microphone
Si vous installez le microphone
sur la colonne de direction
1 Détachez la base pour microphone du
clip microphone.
Pour détacher la base pour microphone du clip
microphone, faites-la glisser.
1
2
3
1 Microphone
2 Clip microphone
3 Base pour microphone
2 Installez le microphone sur la colonne de
direction.
1
2
1 Bande double face
2 Installez le microphone sur la face arrière de
la colonne de direction.
Réglage de l’angle du microphone
Installation
128
Section
Installation
Fr
27
<CRD4844-A>128
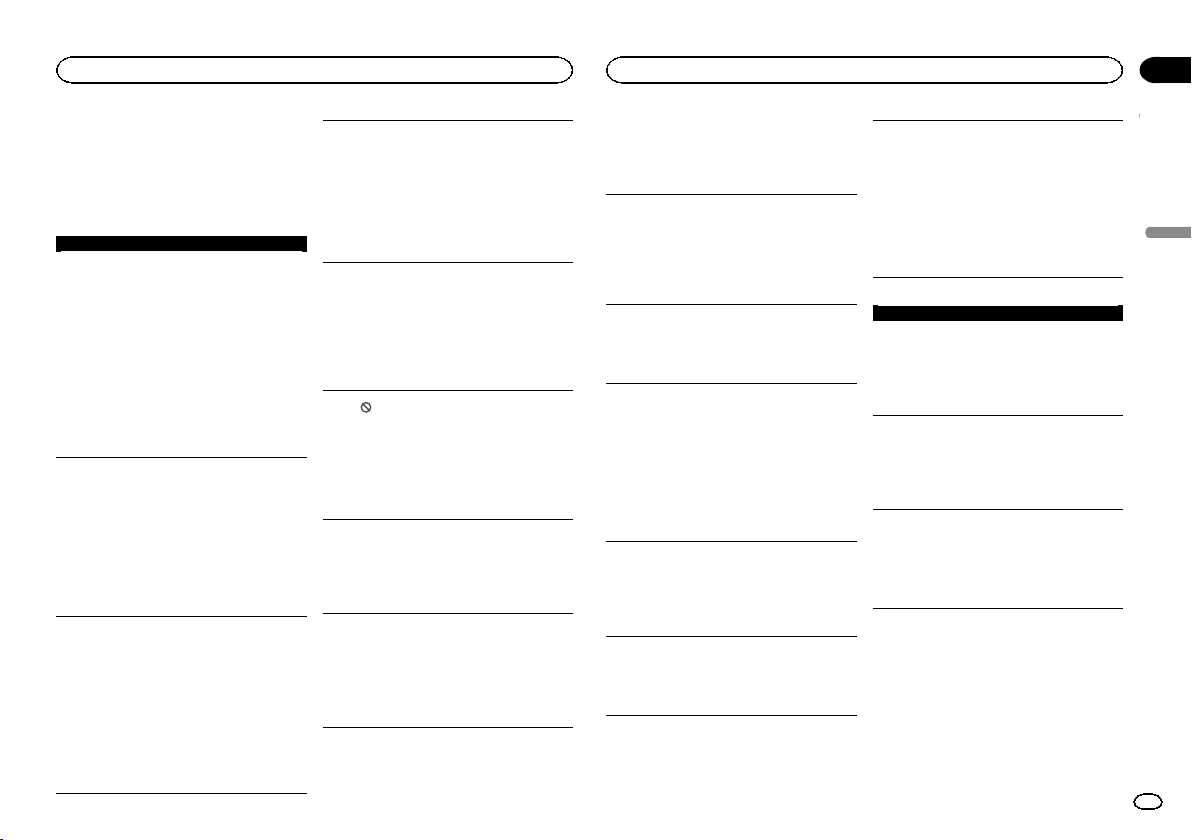
Black plate (129,1)
Dépannage
Les symptômes apparaissent en gras et les cau-
ses sous la forme de texte régulier non indenté.
Le texte régulier indenté est utilisé pour indiquer
les actions à mettre en œuvre.
Commun
L’alimentation ne se met pas en service.
L’appareil ne fonctionne pas.
Les fils et les connecteurs sont mal connectés.
Vérifiez encore une fois que toutes les
connexions sont correctes.
Le fusible a sauté.
Rectifiez la cause et remplacez le fusible.
Assurez-vous de bien installer un fusible de
même intensité.
Du bruit et/ou d’autres facteurs provoquent un mau-
vais fonctionnement du microprocesseur intégré.
Appuyez sur RESET. (Page 121)
L’appareil ne fonctionne pas avec la télécom-
mande.
L’appareil ne fonctionne pas correctement même
si l’on appuie sur les touches appropriées de la
télécommande.
Le niveau de la pile est faible.
Installez une nouvelle pile.
Des opérations sont interdites avec certains disques.
Essayez d’utiliser un autre disque.
La lecture n’est pas possible.
Le disque est sale.
Nettoyez le disque.
Le type de disque chargé ne peut pas être lu par cet
appareil.
Vérifiez le type de disque.
Le disque chargé n’est pas compatible avec ce sys-
tème vidéo.
Remplacez le disque par un autre qui est
compatible avec ce système vidéo.
Absence de son.
Le volume ne veut pas augmenter.
Les câbles ne sont pas connectés correctement.
Connectez les câbles correctement.
L’appareil est en mode de lecture image fixe, ralenti
ou image par image.
Il n’y a aucun son en mode de lecture image fixe,
ralenti ou image par image.
Aucune image n’est affichée.
Le câble du frein de parking n’est pas connecté.
Connectez un câble de frein de parking, et serrez
le frein de parking.
Le frein de parking n’est pas serré.
Connectez un câble de frein de parking, et serrez
le frein de parking.
L’icône
est affichée, et l’opération n’est pas
possible.
L’opération est interdite pour le disque.
Cette opération n’est pas possible.
L’opération n’est pas compatible avec la configura-
tion du disque.
Cette opération n’est pas possible.
L’image affichée s’arrête (pause) et l’appareil ne
fonctionne pas.
Impossible de lire les données pendant la lecture.
Après avoir arrêté une fois la lecture,
recommencez-la.
Absence de son.
Le volume est faible.
Le volume est faible.
Réglez le volume.
L’atténuateur est en service.
Mettez l’atténuateur hors service.
Saut dans l’audio et la vidéo.
L’appareil n’est pas fixé fermement.
Fixez fermement l’appareil.
La taille de fichier et le débit de transmission sont
supérieurs aux valeurs recommandées.
Créez un fichier DivX de la taille et du débit de
transmission recommandés.
Le ratio d’aspect n’est pas correct et l’image est
étirée.
Le réglage du ratio d’aspect n’est pas le bon pour
l’afficheur.
Sélectionnez le réglage approprié pour votre
écran. (Page 109)
Le moteur est audible quand le contact d’allu-
mage est mis sur ON (ou en position ACC).
L’appareil confirme si un disque est chargé ou non.
Ceci est un fonctionnement normal.
Rien n’est affiché.
Les touches de l’écran tactile ne peuvent pas être
utilisées.
La caméra de vue arrière n’est pas connectée.
Connectez une caméra de vue arrière.
Le réglage Polarité caméra est incorrect.
Appuyez sur la touche accueil pour revenir à
l’affichage de la source, puis sélectionnez le
réglage correct pour Polarité caméra. (Page 115)
Pas xxxx s’affiche lors de la modification de l’affi-
chage (par exemple Pas de Titre).
Aucune information textuelle n’est intégrée.
Basculez l’affichage ou la lecture sur une autre
plage/un autre fichier.
Les sous-dossiers ne peuvent pas être lus.
La répétition de lecture du dossier a été sélection-
née.
Choisissez de nouveau l’étendue de répétition.
L’étendue de répétition de lecture change
automatiquement.
Un autre dossier a été sélectionné pendant la répéti-
tion de lecture.
Choisissez de nouveau l’étendue de répétition.
La recherche de plage ou l’avance/le retour rapide a
été exécuté pendant la répétition de lecture d’un fi-
chier.
Choisissez de nouveau l’étendue de répétition.
DVD
La lecture n’est pas possible.
Le disque chargé a un numéro de région différent de
celui de cet appareil.
Remplacez le disque par un autre ayant le même
numéro de région que cet appareil.
Un message de verrouillage parental est affiché
et la lecture n’est pas possible.
Le verrouillage parental est activé.
Désactivez le verrouillage parental ou changez le
niveau. (Page 110)
Le verrouillage parental ne peut pas être annulé.
Le code est incorrect.
Entrez le code correct. (Page 110)
Vous avez oublié votre numéro de code.
Appuyez sur RESET. (Page 121)
On ne peut pas changer la langue audio (et la
langue des sous-titres).
Le DVD en cours de lecture ne supporte pas les enre-
gistrements en plusieurs langues.
Vous ne pouvez pas choisir parmi plusieurs
langues si elles ne sont pas enregistrées sur le
disque.
Français
Informations complémentaires
129
Annexe
Informations complémentaires
Fr
<CRD4844-A>129
Black plate (130,1)
Vous pouvez seulement choisir entre les éléments in-
diqués sur le menu du disque.
Changez la langue en utilisant le menu du
disque.
Aucun sous-titre n’est affiché.
Le DVD en cours de lecture ne comporte pas de
sous-titres.
Les sous-titres ne sont pas affichés s’ils ne sont
pas enregistrés sur le disque.
Vous pouvez seulement choisir entre les éléments in-
diqués sur le menu du disque.
Changez la langue en utilisant le menu du
disque.
La lecture ne s’effectue pas avec les choix de lan-
gue audio et de langue des sous-titres sélection-
nés dans le menu Réglage vidéo.
Le DVD en cours de lecture ne comporte pas de dia-
logues ou de sous-titres dans la langue sélection-
née.
Vous ne pouvez pas basculer entre des langues
sélectionnées si elles ne sont pas enregistrées
sur le disque.
L’angle de vue ne peut pas être changé.
Le DVD en cours de lecture ne comporte pas de scè-
nes filmées sous plusieurs angles.
Impossible de commuter l’angle de vue si le DVD
ne comporte pas de scènes enregistrées sous
plusieurs angles.
Vous essayez de passer en visualisation sous plu-
sieurs angles d’une scène qui n’a pas été enregistrée
sous plusieurs angles.
Changez d’angle de vue quand vous regardez
des scènes enregistrées sous plusieurs angles.
L’image est très floue/distordue et sombre
pendant la lecture.
Certains disques comportent un signal interdisant la
copie.
Comme cet appareil est compatible avec le
système de protection contre la copie
analogique, l’image peut souffrir de bandes
horizontales ou d’autres imperfections lors de la
lecture sur certains afficheurs d’un disque qui
comporte un signal interdisant la copie. Ceci
n’est pas un dysfonctionnement.
CD Vidéo
Impossible d’appeler le menu PBC (contrôle de la
lecture).
Le CD Vidéo en cours de lecture ne prend pas en
charge la fonction PBC.
Cette opération n’est pas disponible avec des CD
Vidéo qui ne prennent pas en charge la fonction
PBC.
La répétition de lecture et la recherche de plage/
recherche temporelle ne sont pas possibles.
Le CD Vidéo en cours de lecture prend en charge la
fonction PBC.
Cette opération n’est pas disponible avec des CD
Vidéo qui prennent en charge la fonction PBC.
iPod
L’iPod ne fonctionne pas correctement.
Les câbles sont connectés de manière incorrecte.
Déconnectez le câble de l’iPod. Quand le menu
principal de l’iPod est affiché, reconnectez et
réinitialisez l’iPod.
La version de l’iPod est ancienne.
Mettez à jour la version de l’iPod.
Le son de l’iPod est inaudible.
La direction de sortie audio peut changer automati-
quement lorsque les connexions Bluetooth et USB
sont utilisées simultanément.
Changez la direction de sortie audio sur l’iPod.
Audio/Téléphone Bluetooth
Le son de la source audio Bluetooth n’est pas lu.
Un appel est en cours sur un téléphone portable
Bluetooth connecté.
Le son sera lu quand la communication sera
terminée.
Un téléphone portable Bluetooth connecté est en
cours d’utilisation.
N’utilisez pas le téléphone portable pour
l’instant.
Un appel a été fait avec un téléphone portable
Bluetooth connecté puis immédiatement coupé. Il
en résulte que la communication entre cet appareil
et le téléphone portable n’a pas été coupée correcte-
ment.
Refaites la connexion Bluetooth entre cet
appareil et le téléphone portable.
Messages d’erreur
Quand vous contactez votre distributeur ou le
Service d’entretien agréé par Pioneer le plus
proche, n’oubliez pas de noter le message d’er-
reur.
Les message d’erreur apparaissent en gras et
les causes sous la forme de texte régulier non
indenté. Le texte régulier indenté est utilisé pour
indiquer les actions à mettre en œuvre.
Commun
Erreur AMP.
Une anomalie de fonctionnement de l’appareil s’est
produite ou la connexion des haut-parleurs est incor-
recte. Le circuit de protection est activé.
Vérifiez la connexion des haut-parleurs. Si le
message ne disparaît pas même après avoir
éteint puis démarré le moteur, consultez votre
distributeur ou un centre d’entretien agréé par
Pioneer.
Syntoniseur
Pas de données fournies
Cet appareil ne peut pas recevoir les informations
sur le nom de l’artiste/le titre de la plage musicale.
Déplacez-le vers un endroit où la réception est
bonne.
Pas de données
Cet appareil ne peut pas recevoir les informations de
nom du service de programme.
Déplacez-le vers un endroit où la réception est
bonne.
Radio Satellite SiriusXM
Vérification de l'Antenne
La connexion de l’antenne est incorrecte.
Vérifiez la connexion de l’antenne. Si le message
ne disparaît pas même après avoir éteint puis
démarré le moteur, consultez votre distributeur
ou un centre d’entretien agréé par Pioneer.
Informations complémentaires
130
Annexe
Informations complémentaires
Fr
<CRD4844-A>130
Black plate (131,1)
Vérification Tuner
La connexion du syntoniseur de véhicule SiriusXM
Connect est incorrecte ou il y a eu une coupure de
courant.
Vérifiez la connexion du syntoniseur et la tension
de la batterie. Si le message ne disparaît pas
même après avoir éteint puis démarré le moteur,
consultez votre distributeur ou un centre
d’entretien agréé par Pioneer.
Pas de signal
Le syntoniseur de véhicule SiriusXM Connect ren-
contre des problèmes de réception du signal satellite
SiriusXM.
! Vérifiez que votre véhicule se trouve à
l’extérieur et que l’horizon au sud est dégagé.
! Vérifiez que l’antenne à montage magnétique
SiriusXM est installée sur une surface métallique
àl’extérieur du véhicule.
! Éloignez l’antenne SiriusXM de tout obstacle.
Abonnement mis à jour
Cet appareil a détecté un changement de l’état de
votre abonnement à SiriusXM.
Appuyez sur une touche pour effacer le
message.
Canal non disponible
Le canal que vous avez demandé n’est pas un canal
SiriusXM valide.
Vérifiez le réglage du canal SiriusXM.
Canal sans abonnement Appeler SiriusXM pour
l'abonnement
Le canal que vous avez demandé n’est pas inclus
dans votre abonnement à SiriusXM.
Vérifiez le contenu de votre abonnement à
SiriusXM.
Channel Locked
Verrouillé par la fonction Contrôle parental de la
radio.
Déverrouillez le canal.
DVD
Région DVD différente
Le disque n’a pas le même numéro de région que
cet appareil.
Remplacez le DVD par un autre avec le numéro
de région correct.
Error-02-XX/FF-FF
Le disque est sale.
Nettoyez le disque.
Le disque est rayé.
Utilisez un autre disque.
Le disque est chargé à l’envers.
Vérifiez que le disque est chargé correctement.
Une erreur mécanique ou électrique est survenue.
Appuyez sur RESET. (Page 121)
Disque illisible
Ce type de disque ne peut pas être lu sur cet appa-
reil.
Remplacez le disque par un disque que cet
appareil peut lire.
Le disque inséré ne contient pas de fichiers pouvant
être lus.
Utilisez un autre disque.
Protéger
Tous les fichiers sur le disque inséré intègrent la pro-
tection par DRM.
Utilisez un autre disque.
Passer
Le disque inséré contient des fichiers protégés par
DRM.
Lisez un fichier audio n’intégrant pas la
protection Windows Mediaä DRM 9/10.
TEMP
La température de l’appareil est en dehors de la
plage de fonctionnement normal.
Attendez que la température de l ’appareil
revienne dans les limites de fonctionnement
normal.
La Location a expirée
Le disque inséré contient un contenu VOD DivX ex-
piré.
Sélectionnez un fichier pouvant être lu.
Résolution vidéo non-compatible
Le disque inséré contient un fichier DivX/MPEG-1/
MPEG-2/MPEG-4 haute définition.
Sélectionnez un fichier pouvant être lu.
Ce n'est pas possible de l'écrire dans le flash
La mémoire flash de cet appareil utilisée pour le
stockage temporaire est pleine.
Sélectionnez un fichier pouvant être lu.
Votre appareil n’est pas autorisé à lire cette
vidéo protégée DivX.
Le code d’enregistrement DivX de cet appareil n’a
pas été autorisé par le fournisseur de contenu VOD
DivX.
Enregistrez cet appareil auprès du fournisseur de
contenu VOD DivX.
Fichier illisible
Ce type de fichier ne peut pas être lu sur cet appa-
reil.
Sélectionnez un fichier pouvant être lu.
Lecture format
Le début de la lecture et le début de l’émission des
sons sont parfois décalés.
Attendez que le message disparaisse pour
entendre les sons.
Vidéo format non-compatible
Le taux d’échantillonnage du fichier DivX est supéri-
eur à 30 fps.
Sélectionnez un fichier pouvant être lu.
Format audio non-compatible
Ce type de fichier n’est pas pris en charge par cet ap-
pareil.
Sélectionnez un fichier pouvant être lu.
Périphérique de stockage externe (USB)
Fichier illisible
Ce type de fichier ne peut pas être lu sur cet appa-
reil.
Sélectionnez un fichier pouvant être lu.
Absence de plages musicales.
Transférez les fichiers audio vers le lecteur audio
portable USB ou la mémoire USB et effectuez la
connexion.
La sécurité de la mémoire USB connectée est acti-
vée.
Suivez les instructions de la mémoire USB pour
désactiver la sécurité.
Lecture format
Le début de la lecture et le début de l’émission des
sons sont parfois décalés.
Attendez que le message disparaisse pour
entendre les sons.
Français
Informations complémentaires
131
Annexe
Informations complémentaires
Fr
<CRD4844-A>131
Black plate (132,1)
Passer
Le lecteur audio portable USB connecté ou la mé-
moire USB connectée contient des fichiers WMA qui
sont protégés par Windows Mediaä DRM 9/10.
Lisez un fichier audio n’intégrant pas la
protection Windows Mediaä DRM 9/10.
Protéger
Tous les fichiers sur le lecteur audio portable USB
connecté ou la mémoire USB connectée sont proté-
gés par Windows Media DRM 9/10.
Transférez des fichiers audio non protégés par
Windows Media DRM 9/10 vers le lecteur audio
portable USB ou la mémoire USB et effectuez la
connexion.
USB incompatible
Le périphérique USB connecté n’est pas pris en
charge par cet appareil.
Connectez un lecteur audio portable USB ou une
mémoire USB conforme à la norme USB Mass
Storage Class.
L’appareil USB n’est pas formaté avec FAT12, FAT16
ou FAT32.
L’appareil USB connecté doit être formaté avec
FAT12, FAT16 ou FAT32.
Vérification USB
Le connecteur USB ou le câble USB est en court-cir-
cuit.
Vérifiez que le connecteur USB ou le câble USB
n’est pas coincé ou endommagé.
Le périphérique de stockage USB connecté
consomme plus que le courant maximal autorisé.
Déconnectez le lecteur audio portable USB ou la
mémoire USB et ne l’utilisez pas. Mettez le
contact sur OFF, puis sur ACC ou ON, puis
connectez un lecteur audio portable USB ou la
mémoire USB compatible.
Error-02-9X/-DX
Panne de communication.
Effectuez une des opérations suivantes.
– Coupez et remettez le contact d’allumage.
– Déconnectez le lecteur audio portable USB ou
la mémoire USB.
– Choisissez une autre source.
Revenez ensuite au lecteur audio portable USB
ou à la mémoire USB.
La Location a expirée
Le périphérique de stockage externe inséré contient
un contenu VOD DivX expiré.
Sélectionnez un fichier pouvant être lu.
Résolution vidéo non-compatible
Le périphérique de stockage externe inséré contient
un fichier DivX/MPEG-1/MPEG-2/MPEG-4 haute défi-
nition.
Sélectionnez un fichier pouvant être lu.
Ce n'est pas possible de l'écrire dans le flash
La mémoire flash de cet appareil utilisée pour le
stockage temporaire est pleine.
Sélectionnez un fichier pouvant être lu.
Votre appareil n’est pas autorisé à lire cette
vidéo protégée DivX.
Le code d’enregistrement DivX de cet appareil n’a
pas été autorisé par le fournisseur de contenu VOD
DivX.
Enregistrez cet appareil auprès du fournisseur de
contenu VOD DivX.
Lecture format
Le début de la lecture et le début de l’émission des
sons sont parfois décalés.
Attendez que le message disparaisse pour
entendre les sons.
Vidéo format non-compatible
Le taux d’échantillonnage du fichier DivX est supéri-
eur à 30 fps.
Sélectionnez un fichier pouvant être lu.
Format audio non-compatible
Ce type de fichier n’est pas pris en charge par cet ap-
pareil.
Sélectionnez un fichier pouvant être lu.
La création de la base de données a échoué
Vous avez activé la lecture vidéo ou l’affichage d’ima-
ges JPEG alors qu’une base de données était en
cours de création.
Créez de nouveau la base de données. (Page 98)
iPod
Lecture format
Le début de la lecture et le début de l’émission des
sons sont parfois décalés.
Attendez que le message disparaisse pour
entendre les sons.
Error-02-6X/-9X/-DX
Panne de communication.
Déconnectez le câble de l’iPod. Quand le menu
principal de l’iPod est affiché, reconnectez et
réinitialisez l’iPod.
Panne iPod.
Déconnectez le câble de l’iPod. Quand le menu
principal de l’iPod est affiché, reconnectez et
réinitialisez l’iPod.
Error-02-67
La version du firmware de l’iPod est ancienne.
Mettez à jour la version de l’iPod.
Stop
Absence de plages musicales.
Transférez les plages musicales sur l’iPod.
Aucune plage musicale dans la liste en cours.
Sélectionnez une liste qui contient les plages
musicales.
Introuvable
Aucune plage musicale connexe.
Transférez les plages musicales sur l’iPod.
Étiquetage iTunes
iPod plein. Informations non-tranféré
La mémoire utilisée pour les informations d’étiquette
sur l’iPod est pleine.
Synchronisez l’iPod avec iTunes et remettez de
l’ordre dans la liste de lecture étiquetée.
Mémoire pleine. Titres non chargés. Connecter
iPod
La mémoire flash de cet appareil utilisée pour le
stockage temporaire est pleine.
Les informations d’étiquettes présentes sur cet
appareil sont transférées automatiquement vers
l’iPod lorsqu’un iPod est connecté.
Le transfert a échoué. Connecter l'iPod à nou-
veau
Les informations d’étiquette de cet appareil ne peu-
vent pas être transférées vers l’iPod.
Vérifiez l’iPod et essayez de nouveau.
enregistrement titre échoué
Les informations d’étiquette ne peuvent pas être en-
registrées sur cet appareil.
Essayez de nouveau.
Informations complémentaires
132
Annexe
Informations complémentaires
Fr
<CRD4844-A>132
Black plate (133,1)
Error-8D
Une erreur s’est produite sur la mémoire FLASH
ROM intégrée.
Coupez ou mettez le contact d’allumage.
Déjà enregistré
Ces informations d’étiquette sont déjà enregistrées
dans la mémoire.
Les informations d’étiquettes ne peuvent être
enregistrées qu’une fois par plage musicale
donnée. Il n’est pas possible de les enregistrer
plusieurs fois.
Bluetooth
Error-10
Coupure de courant au niveau du module Bluetooth
de cet appareil.
Mettez le contact sur OFF, puis sur ACC ou ON.
Si le message d’erreur s’affiche encore après
l’exécution de cette action, consultez votre
distributeur ou un centre d’entretien agréé par
Pioneer.
Pandora
â
Error-19
Panne de communication.
Déconnectez le câble de l’iPod. Quand le menu
principal de l’iPod est affiché, reconnectez et
réinitialisez l’iPod.
Démarrez app. Pandora à partir de l'appareil.
L’application Pandora n’a pas encore démarré.
Démarrez l’application Pandora à partir de votre
iPhone.
Impossible d'enregistrer l'évaluation. Réessayez.
Impossible d’enregistrer les évaluations de “Thumbs
Up” et “Thumbs Down”.
Réessayez ultérieurement.
Impossible d'enregistrer signet. Réessayez.
Impossible d’enregistrer les signets.
Réessayez ultérieurement.
Maintenance système Pandora. Réessayez.
Le système Pandora est en cours de maintenance.
Réessayez ultérieurement.
Limite atteinte.
Limite de saut atteinte.
Ne dépassez pas la limite de saut.
Cette version de l'app. Pandora n'est pas prise en
charge.
Cette version de l’application Pandora n’est pas pris
en charge.
Connectez un iPhone dont la version est
compatible avec l’application Pandora installée.
Vérification dispositif
Message d’erreur de périphérique affiché dans l’ap-
plication Pandora.
Vérifiez votre iPhone.
Pandora ne peut pas lire de musique. Vérifiez
l'appareil.
Impossible de lire de la musique à partir de Pandora.
Vérifiez votre iPhone.
Merci de créer une station Pandora sur l'appareil.
Aucune station trouvée.
Créez une station dans l’application Pandora sur
votre iPhone.
Pas de station active
Aucune station sélectionnée.
Sélectionnez une station.
Erreur de communication Merci de reconnecter
l'appareil.
En l’absence de confirmation après 10 tentatives à
750 ms, l’accessoire considère que la communica-
tion est interrompue et déconnecte PandoraLink.
Reconnectez votre iPod et essayez de nouveau.
L'appareil n'a pas été enregistré. Aller au “Menu
connexion Bluetooth” pour enregistrer l'appareil
Aucun périphérique Bluetooth trouvé.
Suivez les instructions qui s’affichent à l’écran.
La connection a échoué Appuyer sur “Connect”
pour recommancer
Échec de connexion Bluetooth.
Suivez les instructions qui s’affichent à l’écran.
Déconnexion Appuyer sur “Connect” pour recon-
necter l'appareil
Connexion Bluetooth perdue.
Suivez les instructions qui s’affichent à l’écran.
MirrorLink
The application list could not be read out.
Échec de chargement de la liste d’applications.
! Déconnectez le câble du smartphone, puis
reconnectez le smartphone après quelques
secondes.
! Mettez le contact sur OFF, puis sur ACC ou ON.
Si le message d’erreur s’affiche encore après
l’exécution de cette action, réinitialiser le
smartphone.
Si le message d’erreur s’affiche encore après
l’exécution de cette action, consultez votre
distributeur ou un centre d’entretien agréé par
Pioneer.
There is no supported application on your
MirrorLink device.
Impossible de trouver des applications prises en
charge.
! Déconnectez le câble du smartphone, puis
reconnectez le smartphone après quelques
secondes.
! Mettez le contact sur OFF, puis sur ACC ou ON.
Si le message d’erreur s’affiche encore après
l’exécution de cette action, réinitialiser le
smartphone.
Si le message d’erreur s’affiche encore après
l’exécution de cette action, consultez votre
distributeur ou un centre d’entretien agréé par
Pioneer.
Communication error occurred.
Une erreur de communication s’est produite.
! Déconnectez le câble du smartphone, puis
reconnectez le smartphone après quelques
secondes.
! Mettez le contact sur OFF, puis sur ACC ou ON.
Si le message d’erreur s’affiche encore après
l’exécution de cette action, réinitialiser le
smartphone.
Si le message d’erreur s’affiche encore après
l’exécution de cette action, consultez votre
distributeur ou un centre d’entretien agréé par
Pioneer.
Launching the application failed.
Échec du démarrage de l’application.
! Déconnectez le câble du smartphone, puis
reconnectez le smartphone après quelques
secondes.
! Mettez le contact sur OFF, puis sur ACC ou ON.
Si le message d’erreur s’affiche encore après
l’exécution de cette action, réinitialiser le
smartphone.
Si le message d’erreur s’affiche encore après
l’exécution de cette action, consultez votre
distributeur ou un centre d’entretien agréé par
Pioneer.
Français
Informations complémentaires
133
Annexe
Informations complémentaires
Fr
<CRD4844-A>133
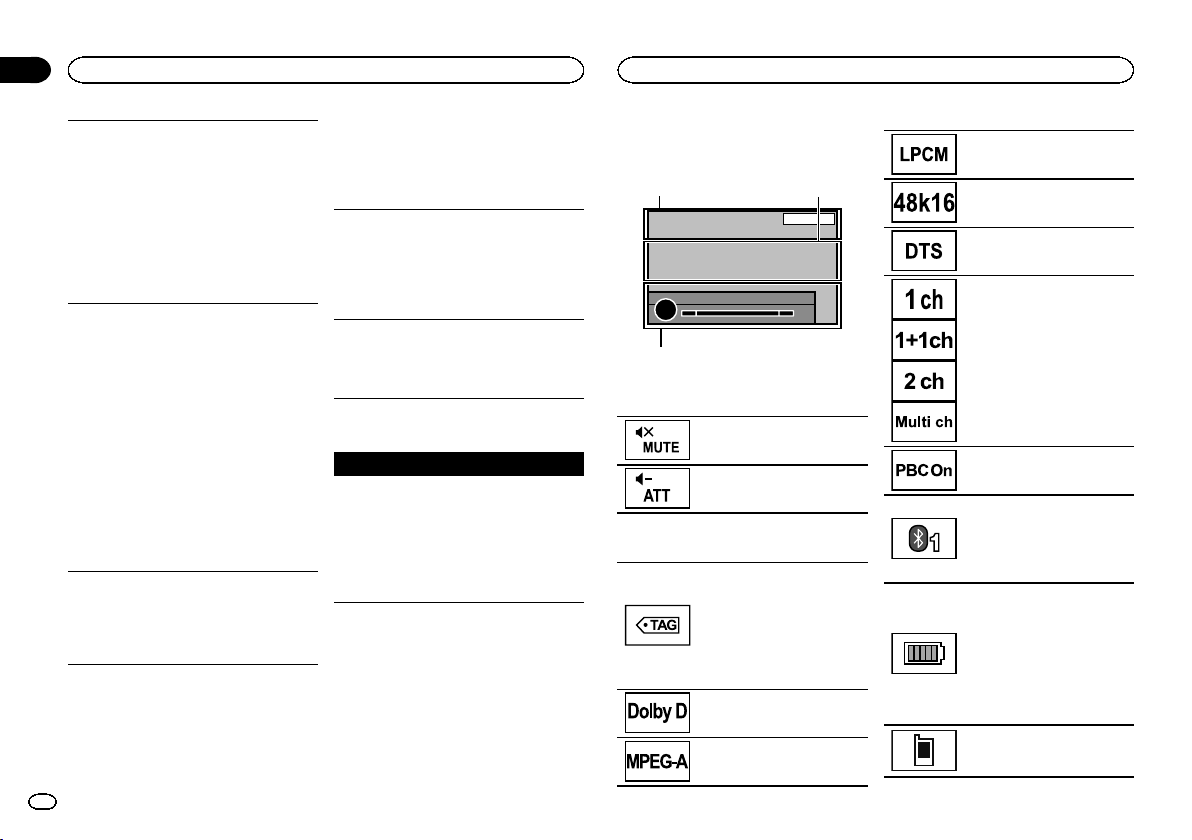
Black plate (134,1)
USB connection was temporarily disabled for
device protection. Do not connect this USB
device to the unit. To restart USB, restart the
unit.
Une erreur de surintensité s’est produite. N’utilisez
pas ce périphérique de stockage USB.
Mettez le contact sur OFF, puis sur ACC ou ON.
Si le message d’erreur s’affiche encore après
l’exécution de cette action, consultez votre
distributeur ou un centre d’entretien agréé par
Pioneer.
Signification des messages
d’erreur du réglage EQ auto
Quand une mesure correcte des caractéristi-
ques acoustiques de l’habitacle de la voiture
n’est pas possible à l’aide du réglage EQ auto,
un message d’erreur peut s ’afficher sur l’écran.
Le cas échéant, consultez le tableau ci-après
pour déterminer le problème et découvrir
comment y remédier. Après avoir vérifié, essayez
à nouveau.
Les message d’erreur apparaissent en gras et
les causes sous la forme de texte régulier non
indenté. Le texte régulier indenté est utilisé pour
indiquer les actions à mettre en œuvre.
Merci de connecter le microphone pour la
mesure Une fois terminé, appuyer sur HOME
Le microphone n’est pas connecté.
Branchez fermement le microphone en option
dans la prise.
Error. Please check xxxx speaker.
Le microphone ne peut pas détecter la tonalité de
mesure d’un des haut-parleurs.
! Confirmez que les haut-parleurs sont
connectés correctement.
! Corrigez le réglage du niveau d’entrée de
l’amplificateur de puissance connecté aux haut-
parleurs.
! Branchez fermement le microphone dans la
prise.
Erreur. Merci de vérifier le bruit
Le niveau de bruit environnant est trop élevé.
! Arrêtez votre voiture dans un endroit tranquille
et éteignez le moteur, la climatisation et le
chauffage.
! Placez le microphone correctement.
Erreur. Merci de vérifier la batterie
La batterie de cet appareil n’est plus alimentée.
! Connectez la batterie correctement.
! Vérifiez la tension de la batterie.
Signification des messages
Messages Traduction
L'image peut appa-
raître inversée
Pioneer recommande
d’utiliser une caméra
qui génère des images
inversées (images mi-
roir). Dans le cas
contraire, l’image sur
l’écran peut apparaître
inversée.
Liste des indicateurs
Zone 1 Zone 2
Zone 3
Zone 1
Indique que la fonction silencieux
est active.
Indique que le son est atténué.
Zone 2
Indique quand des informations
(étiquette) sur la plage musicale
téléchargeable d’une station de
radio sont reçues.
Désactivé lorsque des données
musicales (étiquette) d'une sta-
tion HD Radio sont en cours d'en-
registrement sur cette unité.
Indique que le format numérique
est le Dolby Digital.
Indique que le format numérique
est le MPEG Audio.
Indique que le format numérique
est le PCM Linéaire.
Indique la fréquence d’échantil-
lonnage.
Indique que le format numérique
est le DTS.
Indique le canal audio.
Indique qu’un disque avec PBC
actif est en cours de lecture.
! Indique qu’un téléphone cel-
lulaire est connecté.
! Indique qu’un appel entrant a
été reçu et qu’il n’a pas en-
core été pris en compte.
Indique la force de la batterie du
téléphone cellulaire.
! Le niveau affiché sur l’indica-
teur peut différer de la force
réelle de la batterie.
! Si la force de la batterie n’est
pas disponible, rien n’est affi-
ché dans la zone indicateur
de force de la batterie.
Indique que l’appareil Bluetooth
connecté prend en charge uni-
quement le téléphone Bluetooth.
Informations complémentaires
134
Annexe
Informations complémentaires
Fr
<CRD4844-A>134
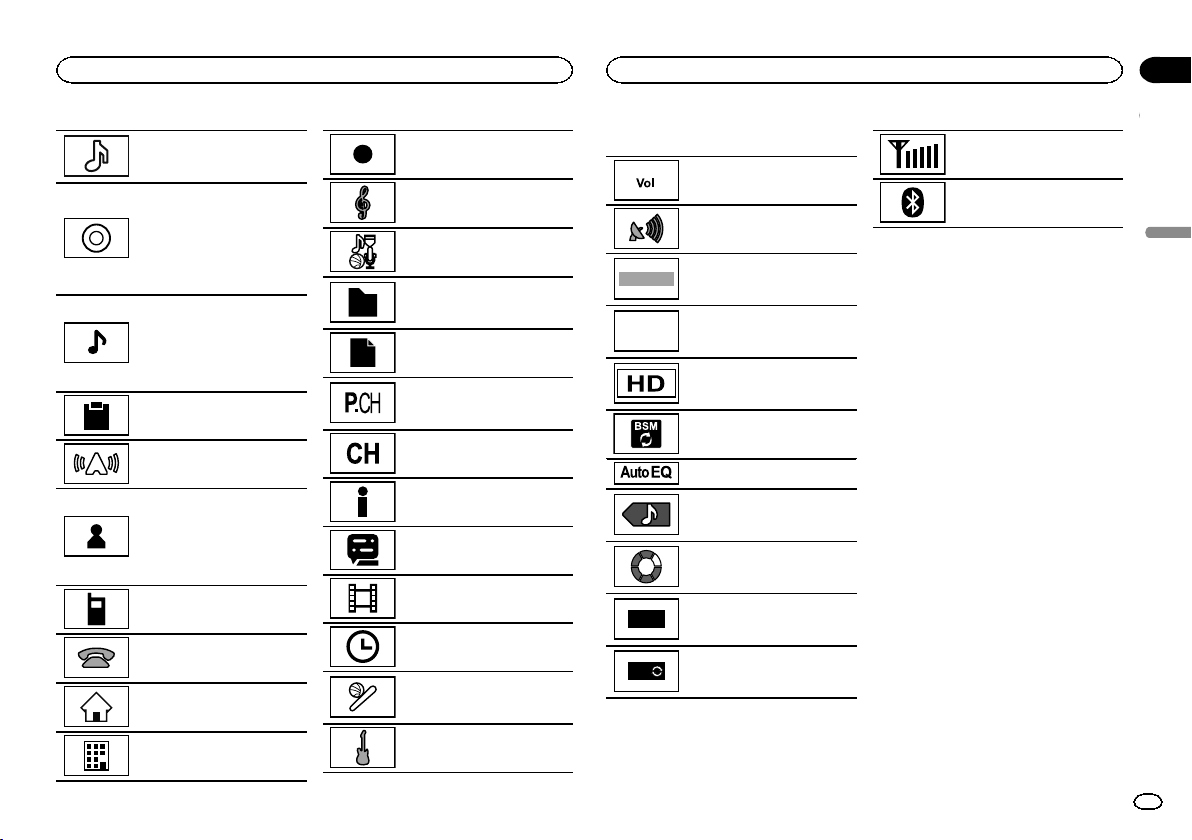
Black plate (135,1)
Indique que l’appareil Bluetooth
connecté prend en charge uni-
quement l’audio Bluetooth.
Indique le titre de l’album lors de
la réception des informations d’é-
tiquette.
Indique le titre de l’album de la
plage musicale en cours de lec-
ture pour les fichiers MP3/WMA/
AAC/WAV.
Indique le titre de la plage musi-
cale lors de la réception des infor-
mations d’étiquette.
Indique le titre de la plage musi-
cale en cours de lecture pour les
fichiers MP3/WMA/AAC/WAV.
Indique le commentaire en cours
de lecture.
Indique le nom de la station sur
laquelle vous êtes accordé.
Indique le nom de l’interprète
lors de la réception des informa-
tions d’étiquette.
Indique le nom de l’interprète en
cours de lecture pour les fichiers
MP3/WMA/AAC/WAV.
Indique les informations sur le té-
léphone cellulaire.
Indique les informations sur le té-
léphone général.
Indique les informations sur le té-
léphone du domicile.
Indique les informations sur le té-
léphone professionnel.
Indique les informations sur un
autre téléphone.
Indique le nom du compositeur.
Indique le nom de la catégorie.
Indique le nom du dossier conte-
nant le fichier MP3/WMA/AAC en
cours de lecture.
Indique le nom du fichier MP3/
WMA/AAC en cours de lecture.
Indique le numéro de présélec-
tion de la station sur laquelle
vous êtes accordé.
Indique le canal de la station sur
laquelle vous êtes accordé.
Affiche les informations
SiriusXM.
Indique le numéro du titre en
cours de lecture.
Indique le numéro du chapitre en
cours de lecture.
Indique le temps de relecture en
cours de lecture.
Indique lorsque la fonction alerte
match est activée lors de la ré-
ception de stations SiriusXM.
Indique le genre de la plage mu-
sicale en cours de lecture.
Zone 3
Indique que le volume est réglé.
Indique lorsqu’un signal radio est
reçu.
ANALOG
Indique lorsque l’audio analo-
gique du signal HD Radio est
reçue.
DIGITAL
Indique lorsque l’audio numé-
rique du signal HD Radio est
reçue.
Indique lorsque les informations
de la station HD Radio sont re-
çues.
Touchez pour mettre BSM en ser-
vice.
Indique que EQ auto est activé.
Indique lorsque cet appareil
contient des informations sur la
plage musicale (étiquette).
Indique que l’appareil traite ac-
tuellement une opération comme
une recherche.
DB
Indique quand créer la base de
données en mode de navigation
Musique.
DB
Indique quand enregistrer la
base de données en mode de na-
vigation Musique.
Indique la force du signal du télé-
phone cellulaire.
Indique qu’un téléphone
Bluetooth est connecté.
Français
Informations complémentaires
135
Annexe
Informations complémentaires
Fr
<CRD4844-A>135
Black plate (136,1)
Conseils sur la manipulation
Disques et lecteur
Utilisez des disques affichant l’un des logos sui-
vants.
Utilisez des disques 12 cm.
Les types de disques suivants ne peuvent pas être
utilisés avec cet appareil.
! DualDiscs
! Disques 8 cm : Les tentatives d’utilisation de
tels disques avec un adaptateur peuvent en-
traîner un dysfonctionnement de l’appareil.
! Disques de forme bizarre
! Disques endommagés, y compris les disques
fendillés, ébréchés ou voilés
! Disques CD-R/RW et DVD-R/RW non finalisés
! DVD-RAM
Ne touchez pas la surface enregistrée des dis-
ques.
Rangez les disques dans leur coffret dès que vous
ne les écoutez plus.
Ne posez aucune étiquette sur la surface des dis-
ques, n’écrivez pas sur un disque, n’appliquez
aucun agent chimique sur un disque.
Pour nettoyer un disque, essuyez le disque avec
un chiffon doux en partant du centre vers l’exté-
rieur.
La condensation peut perturber temporairement
le fonctionnement du lecteur. Laissez celui-ci s’a-
dapter à la température plus élevée pendant une
heure environ. Essuyez également les disques hu-
mides avec un chiffon doux.
La lecture de certains disques peut être impos-
sible en raison des caractéristiques du disque, de
son format, de l’application qui l’a enregistré, de
l’environnement de lecture, des conditions de
stockage ou d’autres conditions.
Les cahots de la route peuvent interrompre la lec-
ture d’un disque.
Certaines fonctions peuvent ne pas être disponi-
bles sur certains DVD vidéo.
Il peut ne pas être possible de lire certains disques
vidéo DVD.
Cet appareil n’est pas compatible avec des dis-
ques enregistrés au format AVCHD (Advanced
Video Codec High Definition). N’insérez pas de
disques AVCHD car vous risquez de ne pas pou-
voir les éjecter.
Lors de l’utilisation de disques dont la surface de
l’étiquette est imprimable, vérifiez les instructions
et les avertissements des disques. L’insertion et
l’éjection peuvent ne pas être possibles selon les
disques. L’utilisation d’un tel disque risque d’en-
dommager cet appareil.
Ne posez aucune étiquette disponible dans le
commerce ou tout autre matériau sur la surface
des disques.
! Les disques pourraient se déformer et devenir
injouables.
! Les étiquettes pourraient se décoller pendant
la lecture et empêcher l’éjection des disques,
ce qui pourrait endommager l’appareil.
Périphérique de stockage USB
En fonction du périphérique de stockage externe
(USB), les problèmes suivants peuvent survenir.
! Le fonctionnement peut varier.
! Le périphérique de stockage peut ne pas être
reconnu.
! Les fichiers peuvent ne pas être lus correcte-
ment.
Les connexions via un concentrateur USB ne sont
pas prises en charge.
Ne connectez aucun périphérique autre qu’un pé-
riphérique de stockage USB.
Fixez fermement le périphérique de stockage USB
lors de la conduite. Ne laissez pas le périphérique
de stockage USB tomber sur le plancher, où il
pourrait gêner le bon fonctionnement de la pédale
de frein ou d’accélérateur.
Selon les périphériques de stockage USB connec-
tés, du bruit radio peut être généré par le périphé-
rique.
Vous ne pouvez pas lire des fichiers protégés par
des droits d’auteur au moyen de périphériques
USB.
Vous ne pouvez pas connecter un lecteur audio
portable USB ou une mémoire USB à cet appareil
via un hub USB.
Une mémoire USB partitionnée n’est pas compa-
tible avec cet appareil.
Selon le type de lecteur audio portable USB/de
mémoire USB que vous utilisez, cet appareil peut
ne pas être reconnu ou les fichiers audio peuvent
ne pas être lus correctement.
Ne laissez pas le lecteur audio portable USB ou la
mémoire USB exposé(e) à la lumière directe du
soleil pendant une période prolongée. Ceci peut
entraîner un dysfonctionnement de l’appareil suite
à une hausse extrême de la température.
iPod
Pour garantir un fonctionnement correct, reliez le
câble du connecteur de la station d’accueil de
l’iPod directement à cet appareil.
Attachez fermement l’iPod pendant que vous
conduisez. Ne laissez pas l’iPod tomber sur le
plancher, où il pourrait gêner le bon fonctionne-
ment de la pédale de frein ou d’accélérateur.
Quelques mots sur les réglages de l’iPod
! Lorsqu’un iPod est connecté, cet appareil dés-
active le réglage EQ (égaliseur) de l’iPod afin
d’optimiser l’acoustique. Le réglage EQ origi-
nal est rétabli lorsque l’iPod est déconnecté.
! Vous ne pouvez pas mettre la fonction de répé-
tition hors service sur l’iPod quand vous utili-
sez cet appareil. La fonction de répétition est
positionnée automatiquement sur répétition
de toutes les plages quand vous connectez
l’iPod à cet appareil.
Tout texte incompatible enregistré sur l’iPod ne
sera pas affiché par cet appareil.
Disques DVD-R/RW
Les disques DVD-R/RW non finalisés qui ont été
enregistrés avec le format Vidéo (mode vidéo) ne
peuvent pas être lus.
La lecture de disques DVD-R/RW peut ne pas être
possible à cause des caractéristiques du disque,
de rayures ou de poussière sur le disque, ou de sa-
leté, de condensation, etc. sur la lentille de cet ap-
pareil.
Selon les paramètres de l’application et l’environ-
nement, la lecture de disques enregistrés sur un
ordinateur peut ne pas être possible. (Pour les dé-
tails, contactez le fabricant de l’application.)
Informations complémentaires
136
Annexe
Informations complémentaires
Fr
<CRD4844-A>136
Black plate (137,1)
Disques CD-R/RW
Quand vous utilisez des disques CD-R/RW, la lec-
ture n’est possible qu’avec des disques qui ont été
finalisés.
La lecture de disques CD-R/RW enregistrés sur un
graveur de CD musicaux ou un ordinateur peut ne
pas être possible à cause des caractéristiques du
disque, de rayures ou de poussière sur le disque,
ou de saleté, de condensation, etc. sur la lentille
de l’appareil.
Selon les paramètres de l’application et l’environ-
nement, la lecture de disques enregistrés sur un
ordinateur peut ne pas être possible. (Pour les dé-
tails, contactez le fabricant de l’application.)
La lecture de disques CD-R/RW peut devenir im-
possible en cas d’exposition directe à la lumière
du soleil, de températures élevées, ou en raison
des conditions de stockage dans le véhicule.
Les titres et autres informations textuelles gravées
sur les CD-R/RW peuvent ne pas être affichés par
cet appareil (en cas de données audio (CD-DA)).
Fichiers image JPEG
JPEG est un acronyme pour Joint Photographic
Experts Group et fait référence à un standard de
technologie de compression d’image fixe.
Les fichiers sont compatibles avec les images
fixes Baseline JPEG et EXIF 2.1 jusqu’à une résolu-
tion de 8192 × 7 680. (Le format EXIF est le plus
souvent utilisé avec les appareils photo numéri-
ques.)
La lecture de fichiers EXIF qui ont été traités par
un ordinateur peut ne pas être possible.
Il n’y a pas de compatibilité JPEG progressif.
Fichiers vidéo DivX
En fonction de la composition de l’information sur
les fichiers telle que le numéro de stream audio
ou la taille de fichier, il peut se produire un léger
retard lors de la lecture des disques.
Certaines opérations spéciales peuvent être inter-
dites à cause de la composition des fichiers DivX.
Des fichiers DivX téléchargés seulement à partir
d’un site partenaire DivX sont une garantie de
fonctionnement correct. Les fichiers DivX non au-
torisés peuvent ne pas fonctionner correctement.
Les fichiers de location DRM ne peuvent pas être
utilisés jusqu’à ce que la lecture ait démarré.
Taille de fichier recommandée : 2 Go maximum
avec un débit de transmission de 2 Mbits/s maxi-
mum.
Le code ID de cet appareil doit être enregistré au-
près d’un fournisseur de VOD DivX pour lire des fi-
chiers VOD DivX. Pour plus d’informations sur les
codes ID, reportez-vous à la page 111, Affichage de
votre code d’enregistrement VOD DivX
â
.
Pour plus de détails sur DivX, visitez le site sui-
vant :
http://www.divx.com/
Fichiers vidéo MPEG-1/MPEG-2/
MPEG-4
La durée de lecture écoulée peut ne pas être affi-
chée correctement.
Important
! Quand vous donnez un nom à un fichier
image JPEG, ajoutez l’extension de nom de
fichier correspondante (.jpg, .jpeg ou .jpe).
! Cet appareil lit des fichiers avec ces exten-
sions (.jpg, .jpeg ou .jpe) comme des fichiers
image JPEG. Pour éviter des dysfonctionne-
ments, n’utilisez pas ces extensions pour des
fichiers autres que des fichiers image JPEG.
Formats audio compatibles
(USB)
WAV
Extension de fichier : .wav
Bits de quantification: 8 et 16 (LPCM), 4 (MS
ADPCM)
Fréquence d’échantillonnage : 16 kHz à 48 kHz
(LPCM), 22,05 kHz et 44,1 kHz (MS ADPCM)
Formats de fichiers compressés
compatibles (disque, USB)
WMA
Extension de fichier : .wma
Débit binaire : 48 kbit/s à 320 kbit/s (CBR), VBR
Fréquence d’échantillonnage : 32 kHz à 48 kHz
Windows Mediaä Audio Professional, Lossless,
Voice/DRM Stream/Stream avec vidéo : incompa-
tible
MP3
Extension de fichier : .mp3
Débit binaire : 8 kbit/s à 320 kbit/s (CBR), VBR
Fréquence d’échantillonnage : 8 kHz à 48 kHz
(32 kHz, 44,1 kHz, 48 kHz pour accentuation)
Version étiquette ID3 compatible : 1.0, 1.1, 2.2, 2.3,
2.4 (la Version 2.x de l’étiquette ID3 a priorité sur la
Version 1.x.)
Liste de lecture m3u : incompatible
MP3i (MP3 interactif), mp3 PRO : incompatible
AAC
Format compatible : AAC encodé par iTunes
Extension de fichier : .m4a
Fréquence d’échantillonnage : 11,025 kHz à 48 kHz
Débit binaire : 16 Kbits/s à 320 Kbits/s
Apple Lossless : incompatible
Fichier AAC acheté sur le iTunes Store (extension
de fichier .m4p) : incompatible
Compatibilité DivX
Format compatible : format vidéo DivX implémenté
en relation avec les standards DivX
Extensions de fichier: .avi ou .divx
Format DivX Ultra : incompatible
Format DivX HD : incompatible
Fichiers DivX sans données vidéo : incompatible
DivX plus : incompatible
Codec audio compatible : MP2, MP3, Dolby Digital
LPCM : compatible
Débit binaire : 8 kbit/s à 320 kbit/s (CBR), VBR
Fréquence d’échantillonnage : 8 kHz à 48 kHz
Extension de fichier de sous-titres externes
compatible : .srt
Français
Informations complémentaires
137
Annexe
Informations complémentaires
Fr
<CRD4844-A>137
Black plate (138,1)
Vidéo MPEG-1/MPEG-2/MPEG-4
Extensions de fichier: .mpg ou .mpeg (MPEG-1/
MPEG-2), .avi (MPEG-4)
Codec audio compatible : MP2 (MPEG-1/MPEG-2),
MP2, MP3, Dolby Digital (MPEG-4)
H.264 (MPEG-4AVC): incompatible
LPCM : incompatible
Débit binaire : 8 Kbits/s à 320 Kbits/s (CBR), VBR
Fréquence d’échantillonnage : 8 kHz à 48 kHz
Informations supplémentaires
Certains caractères d’un nom de fichier (incluant
l’extension de fichier) ou d’un nom de dossier peu-
vent ne pas être affichés.
Cet appareil peut ne pas fonctionner correctement
selon l’application utilisée pour encoder les fi-
chiers WMA.
Il peut se produire un léger retard au début de la
lecture de fichiers audio intégrés avec des don-
nées image ou de fichiers audio stockés sur un pé-
riphérique de stockage USB avec de nombreuses
hiérarchies de dossiers.
Disque (CD/DVD)
Dossiers pouvant être lus : jusqu’à 99 sur CD-R/
RW
Dossiers pouvant être lus : jusqu’à 700 sur DVD-R/
RW
Fichiers pouvant être lus : jusqu’à 999 sur CD-R/
RW
Fichiers pouvant être lus : jusqu’à 3 500 sur DVD-
R/RW
Système de fichiers : ISO 9660 Niveau 1 et 2,
Romeo, Joliet, UDF 1.02 (DVD-R/RW)
Lecture multi-session : compatible
Transfert des données en écriture par paquet : in-
compatible
Quelle que soit la durée du silence entre les pla-
ges musicales de l’enregistrement original, la lec-
ture des disques d’audio compressé s’effectue
avec une courte pause entre les plages musicales.
Périphérique de stockage externe
(USB)
Dossiers pouvant être lus : jusqu’à 1 500 (jusqu’à
700 pour DivX/MPEG-1/MPEG-2/MPEG-4)
Fichiers pouvant être lus : jusqu’à 15 000
Lecture des fichiers protégés par des droits d’au-
teur : incompatible
Périphérique de stockage externe partitionné
(USB) : seule la première partition pouvant être lue
sera lue.
Les cartes MMC (Multi Media Card) ne sont pas
compatibles.
PRÉCAUTION
! Pioneer décline toute responsabilité en cas
de perte de données sur le lecteur audio por-
table USB ou la mémoire USB, même si la
perte de données se produit pendant l’utilisa-
tion de cet appareil.
! Pioneer ne garantit pas la compatibilité avec
tous les périphériques de stockage de masse
USB et décline toute responsabilité en cas
de perte de données sur des lecteurs multi-
média, smartphones ou autres périphériques
lors de l’utilisation de ce produit.
! Ne laissez pas les disques, le périphérique
de stockage externe (USB) ou l’iPod dans un
lieu où les températures sont élevées.
Compatibilité iPod
Cet appareil prend en charge uniquement les
modèles d’iPod suivants.
Conçu pour
! iPod touch (5ème génération)
! iPod touch (4ème génération)
! iPod touch (3ème génération)
! iPod touch (2ème génération)
! iPod touch (1ère génération)
! iPod classic
! iPod avec vidéo
! iPod nano (7ème génération)
! iPod nano (6ème génération)
! iPod nano (5ème génération)
! iPod nano (4ème génération)
! iPod nano (3ème génération)
! iPod nano (2ème génération)
! iPod nano (1ère génération)
! iPhone 5
! iPhone 4S
! iPhone 4
! iPhone 3GS
! iPhone 3G
! iPhone
Selon la génération ou la version de l’iPod, certai-
nes fonctions peuvent ne pas être disponibles.
Les opérations peuvent différer selon la version du
logiciel iPod.
Pour des détails sur la compatibilité fichier/format,
reportez-vous aux manuels de l’iPod.
Livre audio, podcast : compatible
PRÉCAUTION
Pioneer n’accepte aucune responsabilité en cas
de perte de données sur l’iPod, même si la perte
de données se produit pendant l’utilisation de
cet appareil.
Quelques mots sur l’ étiquetage
iTunes
Cette fonction ne peut pas être utilisée avec les
modèles d’iPods suivants.
— iPod touch 4ème génération
— iPod touch 3ème génération
— iPod touch 2ème génération
— iPod touch 1ère génération
— iPod classic 160 Go
— iPod classic 120 Go
— iPod classic
— iPod avec vidéo
— iPod nano 6ème génération
— iPod nano 5ème génération
— iPod nano 4ème génération
— iPod nano 3ème génération
— iPhone 5
— iPhone 4S
— iPhone 4
— iPhone 3GS
— iPhone 3G
— iPhone
Les informations sur la plage musicale (éti-
quette) peuvent être enregistrées sur votre iPod
à partir de la station d’émission. Les plages mu-
sicales se présenteront sous forme de liste de
lecture appelée “Liste de lecture étiquetée” dans
iTunes lors de la synchronisation suivante de
votre iPod. Vous pouvez ensuite directement
acheter des plages musicales auprès du maga-
sin iTunes Store.
Les plages musicales étiquetées et la plage mu-
sicale que vous pouvez acheter auprès du maga-
sin iTunes Store peuvent différer. N’oubliez pas
de valider la plage musicale avant de procéder à
son achat.
Si vous ne pouvez pas utiliser normalement
cette fonction, mettez à jour le firmware de votre
iPod.
Informations complémentaires
138
Annexe
Informations complémentaires
Fr
<CRD4844-A>138
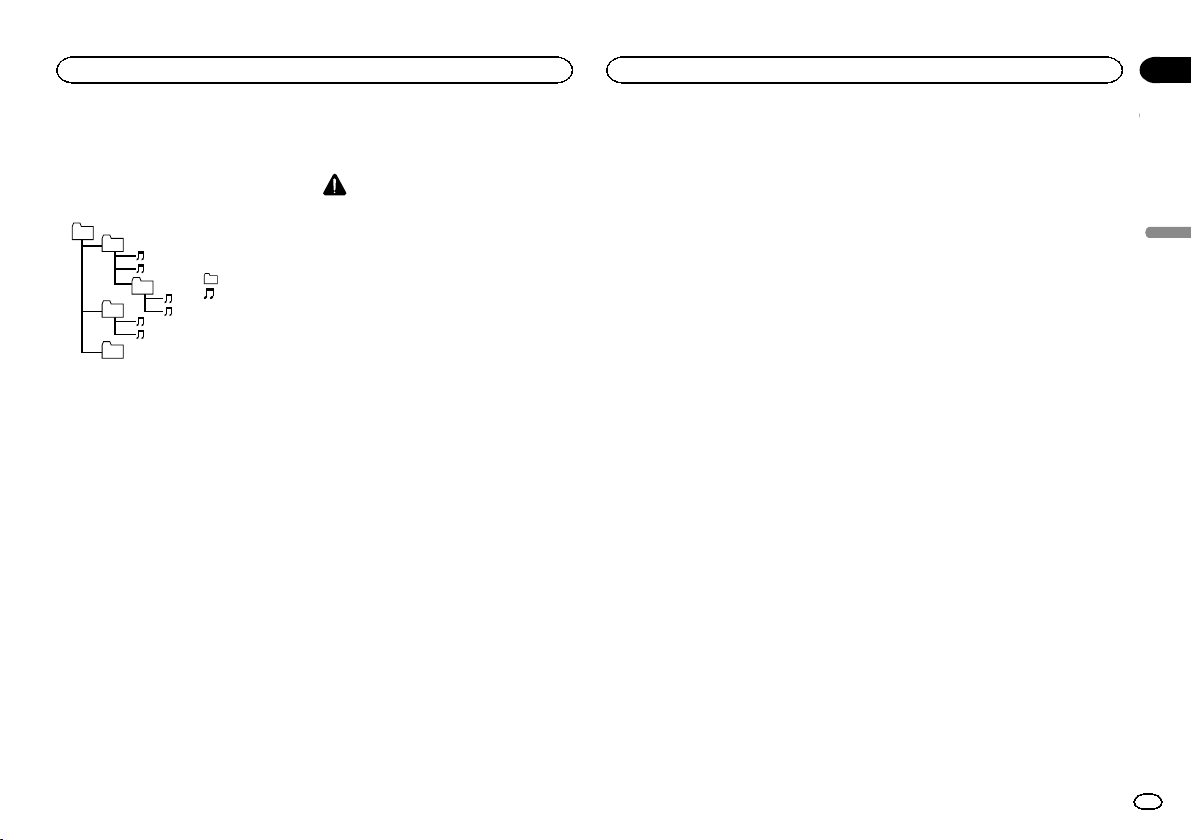
Black plate (139,1)
Séquence des fichiers audio
Sur cet appareil, l’utilisateur ne peut pas affecter
de numéros de dossier ni spécifier les séquen-
ces de lecture.
Exemple de hiérarchie
1
2
3
4
5
6
01
02
03
04
05
Niveau 1 Niveau 2 Niveau 3 Niveau 4
: Dossier
: Fichier d’audio
compressé
01 à 05 : Numéro de
dossier
1 à 6 : Séquence
de lecture
Disque
La séquence de sélection des dossiers ou d’au-
tres opérations peut différer en fonction du logi-
ciel de codage ou d’écriture.
Périphérique de stockage externe
(USB)
La séquence de lecture est la même que la sé-
quence enregistrée dans le périphérique de
stockage externe (USB).
Pour spécifier la séquence de lecture, la mé-
thode suivante est recommandée.
1 Créez un nom de fichier en incluant des
nombres qui spécifient la séquence de lec-
ture (par exemple, 001xxx.mp3 et
099yyy.mp3).
2 Placez ces fichiers dans un dossier.
3 Enregistrez le dossier contenant les fichiers
sur le périphérique de stockage externe
(USB).
Toutefois, avec certains environnements sys-
tème, vous ne pouvez pas spécifier la séquence
de lecture.
Pour les lecteurs audio portables USB, la sé-
quence est différente et dépend du lecteur.
Utilisation correcte de
l’afficheur
PRÉCAUTION
! Si un liquide ou un corps étranger pénètre à
l’intérieur de cet appareil, coupez immédiate-
ment l’alimentation et consultez votre reven-
deur ou le Centre d’Entretien agréé par
PIONEER le plus proche. N’utilisez pas l’ap-
pareil dans cette situation parce que cela
pourrait provoquer un incendie, une électro-
cution ou une autre panne.
! Si vous remarquez de la fumée, un bruit ou
une odeur étrange, ou tout autre signe anor-
mal en provenance de l’écran, coupez immé-
diatement l’alimentation et consultez votre
revendeur ou le Centre d’Entretien agréé par
PIONEER le plus proche. L’utilisation de cet
appareil dans cette situation peut provoquer
des dommages permanents pour le système.
! Ne démontez pas et ne modifiez pas cet ap-
pareil, car il existe à l’intérieur des compo-
sants haute tension qui peuvent provoquer
une électrocution. Consultez toujours votre
revendeur ou le Centre d’Entretien agréé par
PIONEER le plus proche pour tout examen,
réglage ou réparation internes.
Soin à apporter à l’afficheur
! Ne touchez jamais l’écran avec autre chose
que votre doigt quand vous utilisez la fonc-
tion clavier tactile. L’écran se raye facile-
ment.
! Quand l’écran est soumis à la lumière di-
recte du soleil pendant une période prolon-
gée, il devient très chaud, ce qui peut
entraîner des dommages pour l’écran LCD.
Évitez autant que possible d’exposer le mo-
dule d’affichage à la lumière directe du so-
leil.
! L’afficheur doit être utilisé dans les plages de
température comprises entre 14 °F et 140 °F.
À des températures supérieures ou inférieu-
res à cette plage de température de fonction-
nement, l’afficheur peut ne pas fonctionner
normalement.
! L’écran LCD est exposé pour accroître sa visi-
bilité à l’intérieur du véhicule. N’appuyez pas
fortement dessus car cela pourrait l’endom-
mager.
! Ne poussez pas l’écran LCD avec force car
cela pourrait le rayer.
Écran à cristaux liquides (LCD)
! La chaleur du chauffage peut endommager
l’écran LCD, et l’air froid de la climatisation
peut provoquer la formation d’humidité à l’in-
térieur de l’écran, pouvant entraîner des
dommages.
! Des petits points noirs ou blancs (points bril-
lants) peuvent apparaître sur l’écran LCD.
Ceux-ci sont dus au caractéristiques de l’é-
cran LCD et n’indiquent pas un dysfonction-
nement.
! Quand vous utilisez un téléphone cellulaire,
maintenez l’antenne éloignée de l’écran pour
éviter la perturbation des images vidéo par
l’apparition de taches, de bandes colorées,
etc.
Rétroéclairage à DEL (diode
électroluminescente)
! À des températures basses, l’utilisation du
rétroéclairage à DEL peut accentuer le retard
d’image et diminuer la qualité de l’image en
raison des caractéristiques de l’écran LCD.
La qualité de l’image s ’améliorera avec une
augmentation de la température.
! Pour protéger le rétroéclairage à DEL, l’affi-
cheur s ’assombrit dans les environnements
suivants :
— Sous le rayonnement direct du soleil
— Près d’un évent de chauffage
! La durée de vie du rétroéclairage à DEL est
supérieure à 10 000 heures. Elle peut toute-
fois diminuer lorsque les températures sont
élevées.
! Quand le rétroéclairage à DEL atteint la fin
de sa durée de vie, l’écran devient sombre et
l’image n’est plus affichée. Le cas échéant,
consultez votre revendeur ou le Centre d’En-
tretien agréé par PIONEER le plus proche.
Comment garder l’afficheur en
bon état
! Pour enlever la poussière de l’écran ou net-
toyer l’afficheur, mettez d’abord le système
hors tension, puis essuyez avec un chiffon
doux et sec.
! Quand vous essuyez l’écran, faites attention
de ne pas en rayer la surface. N’utilisez pas
de produits de nettoyage chimiques durs ou
abrasifs.
Profils Bluetooth
Pour utiliser la technologie sans fil Bluetooth,
les appareils doivent pouvoir interpréter certains
profils. Cet appareil est compatible avec les pro-
fils suivants.
! GAP (Generic Access Profile)
! SDP (Service Discovery Protocol)
! OPP (Object Push Profile)
! HFP (Hands Free Profile)
! HSP (Head Set Profile)
! PBAP (Phone Book Access Profile)
! A2DP (Advanced Audio Distribution Profile)
! AVRCP (Audio/Video Remote Control Profile)
1.3
! SPP (Serial Port Profile) 1.1
Français
Informations complémentaires
139
Annexe
Informations complémentaires
Fr
<CRD4844-A>139

Black plate (140,1)
Licence, exonération de
garantie et limite de
responsabilité
DISPOSITIONS EN MATIÈRE DE
SÉCURITÉ
Limitation de responsabilité
LES GARANTIES EXPRIMÉES DANS LA GARAN-
TIE LIMITÉE DE PIONEER SONT LES SEULES
GARANTIES FAITES PAR PIONEER OU UN
QUELCONQUE DE CES CONCÉDANTS DE LI-
CENCE, SELON LE CAS. PIONEER ET SES
CONCÉDANTS DE LICENCE DÉCLINENT EX-
PRESSÉMENT TOUTE AUTRE GARANTIE, EX-
PRESSE OU IMPLICITE, Y COMPRIS ET SANS
LIMITATION, LES GARANTIES DE QUALITÉ
MARCHANDE ET D’ADÉQUATION À UN USAGE
PARTICULIER.
Limites de responsabilité
DANS TOUTE LA MESURE PERMISE PAR LA
LOI EN VIGUEUR, NI PIONEER NI SES CONCÉ-
DANTS DE LICENCE NE SAURONT ÊTRE RES-
PONSABLES VIS-À-VIS DE VOUS DE TOUS
DOMMAGES INDIRECTS, CONSÉCUTIFS, AC-
CESSOIRES, PUNITIFS OU SPÉCIAUX,
QUELQUE SOIT LE FONDEMENT JURIDIQUE,
QUE CE SOIT SUR LE FONDEMENT DE SA RES-
PONSABILITÉ CONTRACTUELLE OU EXTRA-
CONTRACTUELLE, Y COMPRIS LA
NÉGLIGENCE, MÊME SI CES PARTIES ONT ÉTÉ
AVERTIES DE LA POSSIBILITÉ DE TELS DOM-
MAGES.
DANS TOUTE LA MESURE PERMISE PAR LA
LOI EN VIGUEUR, LA PLEINE RESPONSABILITÉ
DE PIONEER OU DE SES CONCÉDANTS DE LI-
CENCE DÉCOULANT DE OU LIÉE À VOTRE UTI-
LISATION DES PRODUITS, Y COMPRIS, SANS
LIMITATION, LES RÉCLAMATIONS AU TITRE DE
LA GARANTIE OU QUELCONQUE RÉCLAMA-
TION POUR DES DOMMAGES MATÉRIELS, LE
DÉCÈS OU L’INVALIDITÉ, INDÉPENDAMMENT
DE L’INSTANCE ET DU MOTIF JURIDIQUE IN-
VOQUÉ, CONTRACTUEL, RESPONSABILITÉ CI-
VILE OU PÉNALE (Y COMPRIS NÉGLIGENCE),
DE LA RESPONSABILITÉ DU FAIT DES PRO-
DUITS OU DE TOUT AUTRE PRINCIPE DE
DROIT, NE SAURAIT DÉPASSER MILLE DOL-
LARS (1 000 USD).
CERTAINES JURIDICTIONS N’AUTORISENT PAS
L’EXCLUSION DES DOMMAGES OU LIMITE DE
RESPONSABILITÉ, LES LIMITATIONS ET EXCLU-
SIONS CI-DESSUS, DANS LA MESURE OÙ
ELLES SONT INTERDITES PAR LA LOI EN VI-
GUEUR, PEUVENT DONC NE PAS S’APPLI-
QUER À VOUS. VOS DROITS SPÉCIFIQUES
PEUVENT VARIER D’UNE JURIDICTION À L’AU-
TRE.
libpng
Sachez que Pioneer ne répondra à aucune ques-
tion sur le contenu du code source.
Cette licence légale a été, à l’origine, rédigée en
anglais et ici traduite uniquement pour permet-
tre au lecteur d’en comprendre le contenu. En
conséquence, la licence traduite NE correspond
PAS légalement au texte anglais d’origine.
Cette copie des avis libpng est fournie pour
votre commodité. En cas de divergence entre
cette copie et les avis dans le fichier png.h fai-
sant partie de la distribution libpng, ce dernier
prévaut.
MENTION DE DROITS D’AUTEUR, LIMITATION
DE RESPONSABILITÉ et LICENCE :
Si vous modifiez libpng, vous pouvez insérer des
avis supplémentaires immédiatement après
cette phrase.
Ce code est accordé avec la licence libpng.
Les versions libpng 1.2.6, 15 août 2004, à 1.5.0, 6
janvier 2011 sont des droits d’auteur (c) 2004,
2006-2010 Glenn Randers-Pehrson, et sont distri-
buées conformément à l’avis de non-responsabi-
lité et à la licence de libpng-1.2.5 avec les
personnes suivantes ajoutées à la liste des au-
teurs de rédaction
Cosmin Truta
La version libpng 1.0.7 du 1er juillet 2000 à la ver-
sion 1.2.5 du 3 octobre 2002 sont protégées par
les droits d’auteur (c) 2000-2002 Glenn Randers-
Pehrson, et sont distribuées sous les mêmes
conditions de limitation de responsabilité et de
licence que libpng-1.0.6 avec les ajouts suivants
à la liste d’auteurs contributeurs
Simon-Pierre Cadieux
Eric S. Raymond
Gilles Vollant
et avec les ajouts suivants à la limitation de res-
ponsabilité :
Il n’existe aucune garantie contre les possibilités
de privation de jouissance de la bibliothèque ou
contre les infractions aux droits des tiers. Il n’ya
aucune garantie que notre travail ou la biblio-
thèque réponde à vos besoins ou usages parti-
culiers. Cette bibliothèque est fournie avec tous
les défauts qu’elle contient, l’utilisateur prend à
sa charge la totalité des risques de qualité satis-
faisante, de performances, d’exactitude et d’ef-
fort.
La version libpng 0.97 de janvier 1998 à la ver-
sion 1.0.6 du 20 mars 2000 sont protégées par
les droits d’auteur (c) 1998, 1999 Glenn Randers-
Pehrson, et sont distribuées sous les mêmes
conditions de limitation de responsabilité et de
licence que libpng-0.96 avec les ajouts suivants
à la liste d’auteurs contributeurs:
Tom Lane
Glenn Randers-Pehrson
Willem van Schaik
La version libpng 0.89 de juin 1996 à la version
0.96 de mai 1997 sont protégées par les droits
d’auteur (c) 1996, 1997 Glenn Randers-Pehrson,
et sont distribuées sous les mêmes conditions
de limitation de responsabilité et de licence que
libpng-0.88 avec les ajouts suivants à la liste
d’auteurs contributeurs :
John Bowler
Kevin Bracey
Sam Bushell
Magnus Holmgren
Greg Roelofs
Tom Tanner
La version libpng 0.5 de mai 1995 à la version
0.88 de janvier 1996 sont protégées par les droits
d’auteur (c) 1995, 1996 Guy Eric Schalnat, Group
42, Inc.
Pour les besoins de cette mention de droits
d’auteur et de licence, "auteurs contributeurs"
est défini comme l’ensemble de personnes sui-
vantes :
Andreas Dilger
Dave Martindale
Guy Eric Schalnat
Paul Schmidt
Tim Wegner
La bibliothèque de référence PNG est fournie
"TEL QUELLE". Les auteurs contributeurs et
Group 42 Inc. réfutent toute garantie, explicite
ou implicite, y compris mais sans limitation, les
garanties de valeur marchande et d’adaptation
à un usage quelconque. Les auteurs contribu-
teurs et Group 42 Inc. ne sauraient être tenus
responsables des dommages directs, indirects,
accessoires, spéciaux, dommages et intérêts ou
dommages consécutifs, pouvant survenir suite
àl’utilisation de la bibliothèque de référence
PNG, même s’ils ont été avertis de la possibilité
de tels dommages.
Il est autorisé par le présent document d’ utiliser,
de copier, de modifier et de distribuer ce code
source, ou des portions de celui-ci, à quelque fin
que ce soit, gratuitement, sous réserve des res-
trictions suivantes :
1. L’origine de ce code source ne doit pas être
présentée de manière mensongère.
2. Les versions modifiées doivent être clairement
identifiées comme telles et ne doivent pas être
présentées fallacieusement comme étant la
source originale.
3. Cette mention de droit d’auteur ne doit pas
être ôtée ou modifiée de toute source ou distri-
bution de source modifiée.
Informations complémentaires
140
Annexe
Informations complémentaires
Fr
<CRD4844-A>140
Black plate (141,1)
Les auteurs contributeurs et Group 42, Inc. auto-
risent expressément, gratuitement, et encoura-
gent à l’utilisation de ce code source en tant
que composant soutenant le format de fichier
PNG dans les produits commerciaux. Si vous
utilisez ce code source dans un produit, nous
apprécierions que vous nous mentionniez, mais
ceci n’est pas une obligation.
Une fonction "png_get_copyright" vous est pro-
posée, que vous pourrez utiliser facilement dans
les cases "à propos de" et autres :
printf("%s",png_get_copyright(NULL));
De plus, le logo PNG (en format PNG évidem-
ment) est fourni dans les fichiers "pngbar.png" et
"pngbar.jpg" (88x31) et "pngnow.png" (98x31).
Libpng est un logiciel OSI Certified Open
Source. OSI Certified Open Source est une
marque de certification de l’Open Source Initia-
tive.
Glenn Randers-Pehrson
glennrp at users.sourceforge.net
6 janvier 2011
Avis concernant les droits d’auteur
et les marques commerciales
Ce produit fait appel à des principes technologi-
ques destinés à interdire la piraterie des œuvres
protégées par des droits d’auteur, principes qui
sont eux-mêmes couverts aux États-Unis par des
brevets et d’autres formes de propriété intellec-
tuelle appartenant à Rovi Corporation. La rétro-
technique et le désassemblage sont proscrits.
Bluetooth
La marque de mot et les logos Bluetooth
â
sont
des marques déposées appartenant à Bluetooth
SIG, Inc. et toute utilisation de ces marques par
PIONEER CORPORATION est faite sous licence.
Les autres marques de commerce ou noms
commerciaux sont la propriété de leur proprié-
taire respectif.
DVD vidéo
est une marque commerciale de DVD For-
mat/Logo Licensing Corporation.
iTunes
Apple et iTunes sont des marques commerciales
d’Apple Inc., enregistrées aux États-Unis et dans
d’autres pays.
MP3
La vente de ce produit comporte seulement une
licence d’utilisation privée, non commerciale, et
ne comporte pas de licence ni n’implique aucun
droit d’utilisation de ce produit pour une diffu-
sion commerciale (c’est-à-dire générant des re-
venus) en temps réel (terrestre, par satellite,
câble et/ou tout autre média), diffusion/stream-
ing via internet, des intranets et/ou d’autres sys-
tèmes électroniques de distribution de contenu,
telles que les applications audio payante ou
audio à la demande. Une licence indépendante
est requise pour de telles utilisations. Pour les
détails, veuillez visiter le site
http://www.mp3licensing.com.
WMA
Windows Media est une marque déposée ou
une marque commerciale de Microsoft
Corporation aux États-Unis et/ou dans d’autres
pays.
Ce produit intègre une technologie détenue par
Microsoft Corporation, qui ne peut être utilisée
et distribuée que sous licence de Microsoft
Licensing, Inc.
iPod et iPhone
iPhone, iPod, iPod classic, iPod nano et iPod
touch sont des marques commerciales
d’Apple Inc., déposées aux États-Unis et dans
d’autres pays.
Lightning est une marque commerciale
d’Apple Inc.
Les accessoires électroniques portant la men-
tion « Made for iPod » et « Made for iPhone »
ont été conçus pour fonctionner respectivement
avec un iPod ou un iPhone et sont certifiés
conformes aux exigences d’Apple par le fabri-
cant. Apple n’est pas responsable pour le fonc-
tionnement de cet appareil ou de sa
compatibilité avec les normes réglementaires et
de sécurité. Veuillez noter que l’emploi de cet
accessoire avec un iPod ou un iPhone peut af-
fecter les performances sans fil.
Androidä et Google Play
Android et Google Play sont des marques
commerciales de Google Inc.
Dolby Digital
Fabriqué sous licence de Dolby Laboratories.
Dolby et le symbole double-D sont des marques
déposées de Dolby Laboratories.
DivX
DivX
â
, DivX Certified
â
et les logos associés sont
des marques commerciales de Rovi Corporation
ou de ses filiales et sont utilisés sous licence.
À PROPOS DE LA VIDÉO DIVX : DivX
â
est
un format vidéo numérique créé par DivX, LLC,
qui est une filiale de Rovi Corporation. Ceci est
un appareil DivX Certified
â
officiel qui lit la
vidéo DivX. Visitez le site divx.com pour plus
d’informations sur les outils logiciels permettant
de convertir vos fichiers en vidéos DivX.
À PROPOS DE LA VIDÉO DIVX À LA DE-
MANDE : Cet appareil certifié DivX
â
doit être
enregistré afin de pouvoir lire des vidéos DivX à
la demande (VOD). Pour obtenir votre code d’en-
registrement, localisez la section VOD DivX
dans Affichage de votre code d’enregistrement
VOD DivX
â
. Allez sur le site vod.divx.com pour
savoir comment terminer votre enregistrement.
Radio Satellite SiriusXM
Sirius, XM et tous les autres logos et marques
connexes sont des marques de commerce de Si-
rius XM Radio, Inc. Tous droits réservés.
Radio Pandora
®
sur Internet
PANDORA, le logo PANDORA et la robe de la
marque Pandora sont des marques de
commerce ou des marques déposées de
Pandora Media, Inc. Utilisation soumise à auto-
risation.
MIXTRAX
MIXTRAX est une marque commerciale de
PIONEER CORPORATION.
MirrorLink
MirrorLink Certifiedä, le logo de certification De-
sign Only ä, MirrorLinkä et le logo MirrorLinkä
sont des marques de certification et des mar-
ques commerciales de Car Connectivity Consor-
tium LLC. Toute utilisation non autorisée est
strictement interdite.
Français
Informations complémentaires
141
Annexe
Informations complémentaires
Fr
<CRD4844-A>141
Black plate (142,1)
Tableau des codes de langue
pour les DVD
Langue (code), code d’entrée
Japonais (ja), 1001 Dzonga (dz), 0426 Kurde (ku), 1121 Kinyarwanda (rw), 1823
Anglais (en), 0514 Ewé (ee), 0505 Komi (kv), 1122 Sanskrit (sa), 1901
Français (fr), 0618 Espéranto (eo), 0515 Cornique (kw), 1123 Sarde (sc), 1903
Espagnol (es), 0519 Estonien (et), 0520 Kirghiz (ky), 1125 Sindhi (sd), 1904
Allemand (de), 0405 Basque (eu), 0521 Latin (la), 1201 Sami du Nord (se), 1905
Italien (it), 0920 Persan (fa), 0601
Luxembourgeois (lb),
1202
Sango (sg), 1907
Chinois (zh), 2608 Peul (ff), 0606 Ganda (lg), 1207 Singhalais (si), 1909
Hollandais, flamand (nl),
1412
Finnois (fi), 0609 Limbourgeois (li), 1209 Slovaque (sk), 1911
Portugais (pt), 1620 Fidjien (fj), 0610 Lingala (ln), 1214 Slovène (sl), 1912
Suédois (sv), 1922 Féroïen (fo), 0615 Laotien (lo), 1215 Samoan (sm), 1913
Russe (ru), 1821
Frison de l’ouest (fy),
0625
Lituanien (lt), 1220 Shona (sn), 1914
Coréen (ko), 1115 Irlandais (ga), 0701 Luba-Katanga (lu), 1221 Somali (so), 1915
Grec (el), 0512 Gaélique (gd), 0704 Letton (lv), 1222 Albanais (sq), 1917
Afar (aa), 0101 Galicien (gl), 0712 Malgache (mg), 1307 Serbe (sr), 1918
Abkhaze (ab), 0102 Guarani (gn), 0714 Marshallais (mh), 1308 Swazi (ss), 1919
Avestique (ae), 0105 Gujarâtî (gu), 0721 Maori (mi), 1309 Sotho du Sud (st), 1920
Afrikaans (af), 0106 Manx (gv), 0722 Macédonien (mk), 1311 Soudanais (su), 1921
Akan (ak), 0111 Hausa (ha), 0801 Malayalam (ml), 1312 Swahili (sw), 1923
Amharique (am), 0113 Hébreu (he), 0805 Mongol (mn), 1314 Tamil (ta), 2001
Aragonais (an), 0114 Hindi (hi), 0809 Marathi (mr), 1318 Télougou (te), 2005
Arabe (ar), 0118 Hiri-Motu (ho), 0815 Malais (ms), 1319 Tadjik (tg), 2007
Assamais (as), 0119 Croate (hr), 0818 Maltais (mt), 1320 Thaï (th), 2008
Avarique (av), 0122 Haïtien (ht), 0820 Birman (my), 1325 Tigrinya (ti), 2009
Aymara (ay), 0125 Hongrois (hu), 0821 Nauruan (na), 1401 Turkmène (tk), 2011
Azerbaïdjanais (az),
0126
Arménien (hy), 0825 Bokmål (nb), 1402 Tagalog (tl), 2012
Bachkir (ba), 0201 Héréro (hz), 0826
Ndébélé du Nord (nd),
1404
Setswana (tn), 2014
Biélorusse (be), 0205 Interlingua (ia), 0901 Népalais (ne), 1405 Tongien (to), 2015
Bulgare (bg), 0207 Indonésien (in), 0904 Ndonga (ng), 1407 Turc (tr), 2018
Bihari (bh), 0208 Interlingue (ie), 0905
Néo-norvégien (nn),
1414
Tsonga (ts), 2019
Bislama (bi), 0209 Igbo (ig), 0907 Norvégien (no), 1415 Tatar (tt), 2020
Bambara (bm), 0213 Yi du Sichuan (ii), 0909
Ndébéle du Sud (nr),
1418
Twi (tw), 2023
Langue (code), code d’entrée
Bengali (bn), 0214 Inupiaq (ik), 0911
Navajo, Navaho (nv),
1422
Tahitien (ty), 2025
Tibétain (bo), 0215 Ido (io), 0915 Chichewa (ny), 1425 Ouïghour (ug), 2107
Breton (br), 0218 Islandais (is), 0919 Occitan (oc), 1503 Ukrainien (uk), 2111
Bosniaque (bs), 0219 Inuktitut (iu), 0921 Ojibwé (oj), 1510 Urdû (ur), 2118
Catalan (ca), 0301 Javanais (jv), 1022 Oromo (om), 1513 Ouzbek (uz), 2126
Tchétchène (ce), 0305 Géorgien (ka), 1101 Oriya (or), 1518 Venda (ve), 2205
Chamorro (ch), 0308 Kikongo (kg), 1107 Ossète (os), 1519 Vietnamien (vi), 2209
Corse (co), 0315 Kikuyu (ki), 1109 Pendjabi (pa), 1601 Volapük (vo), 2215
Cri (cr), 0318 Kuanyama (kj), 1110 Pali (pi), 1609 Wallon (wa), 2301
Tchèque (cs), 0319 Kazakh (kk), 1111 Polonais (pl), 1612 Wolof (wo), 2315
Slavon (cu), 0321 Groenlandais (kl), 1112
Pashto, Pachto (ps),
1619
Xhosa (xh), 2408
Tchouvache (cv), 0322 Cambodgien (km), 1113 Quechua (qu), 1721 Yiddish (ji), 2509
Gallois (cy), 0325 Kannada (kn), 1114 Rhéto-Roman (rm), 1813 Yoruba (yo), 2515
Danois (da), 0401 Kanuri (kr), 1118 Kirundi (rn), 1814 Zhuang (za), 2601
Divehi (dv), 0422 Kashmiri (ks), 1119 Roumain (ro), 1815 Zoulou (zu), 2621
Informations complémentaires
142
Annexe
Informations complémentaires
Fr
<CRD4844-A>142
Black plate (143,1)
Caractéristiques techniques
Généralités
Tension d’alimentation ..... 14,4 V CC (10,8 V à 15,1 V ac-
ceptable)
Mise à la masse ............... Pôle négatif
Consommation maximale
................................... 10,0 A
Dimensions (L × H × P) :
D
Châssis ............................ 178mm × 100mm × 165mm
Panneau avant ................. 171mm × 97mm × 18mm
(AVH-X5600BHS/AVH-X4600BT)
Panneau avant ................. 171mm× 97 mm ×9mm
(AVH-X3600BHS/AVH-X2600BT/AVH-X1600DVD)
Poids ............................... 2,0 kg
(AVH-X5600BHS/AVH-X4600BT)
Poids ............................... 1,7 kg
(AVH-X3600BHS/AVH-X2600BT/AVH-X1600DVD)
Affichage
Taille de l’écran/ratio d’aspect
................................... 6,95 pouces de largeur/16:9
(surface d’affichage effective :
156,6 mm × 81,6 mm)
(AVH-X5600BHS/AVH-X4600BT)
Taille de l’écran/ratio d’aspect
................................... 6,1 pouces de largeur/16:9
(surface d’affichage effective :
136,2 mm × 72,0 mm)
(AVH-X3600BHS/AVH-X2600BT/AVH-X1600DVD)
Pixels ............................... 1 152000 (2 400 × 480)
Méthode d’affichage ........ TFT matrice active, type
conducteur
Système de couleurs ........ Compatible NTSC/PAL/PAL-
M/PAL-N/SECAM
Plage de temperature durable (hors tension)
................................... –4 °F a +176 °F
Audio
Puissance de sortie maximale
................................... 50 W × 4
70 W × 1/2 W (pour le haut-
parleur d’extrêmes graves)
Puissance de sortie continue
................................... 22W × 4 (50Hz à 15000 Hz,
THD 5 %, impédance de
charge 4 W, avec les deux ca-
naux entraînés)
Impédance de charge ...... 4 W (4 W à8W (2 W pour
1 canal) possible)
Niveau de sortie maximum de la sortie préamp
................................... 4,0V
(AVH-X5600BHS/AVH-X4600BT)
Niveau de sortie maximum de la sortie préamp
................................... 2,0V
(AVH-X3600BHS/AVH-X2600BT/AVH-X1600DVD)
Égaliseur (Égaliseur graphique à 8 bandes) :
Fréquence ........................ 40Hz/80 Hz/200 Hz/400 Hz/
1 kHz/2,5 kHz/8 kHz/10 kHz
Gain ................................ ±12 dB
HPF:
Fréquence ........................ 50Hz/63 Hz/80 Hz/100 Hz/
125 Hz
Pente ............................... –12 dB/octave
Haut-parleur d’extrêmes graves (mono) :
Fréquence ........................ 50Hz/63 Hz/80 Hz/100 Hz/
125 Hz
Pente ............................... –18 dB/octave
Gain ................................ +6dB à –24 dB
Phase .............................. Normale/Inverse
Accentuation des graves :
Gain ................................ +12 dB à 0 dB
Lecteur DVD
Système ........................... Lecteur DVD vidéo, CD Vidéo,
CD, WMA, MP3, AAC, DivX,
MPEG
Disques utilisables ........... DVD vidéo, CD Vidéo, CD, CD-
R/RW, DVD-R/RW/R DL
Numéro de région ............ 1
Réponse en fréquenc e ..... 5Hz à 44000Hz (avec DVD, à
la fréquence d’échantillon-
nage 96 kHz)
Rapport signal/bruit ......... 96dB (1kHz) (Réseau IHF-A)
(niveau RCA)
(AVH-X5600BHS/AVH-X4600BT)
Rapport signal/bruit ......... 91 dB (1 kHz) (Réseau IHF-A)
(niveau RCA)
(AVH-X3600BHS/AVH-X2600BT/AVH-X1600DVD)
Niveau de sortie :
Vidéo ............................... 1,0 Vc-c/75 W (±0,2 V)
Nombre de canaux ........... 2 (stéréo)
Format de décodage MP3
................................... MPEG-1 & 2 Couche Audio 3
Format de décodage WMA
................................... Ver. 7, 7.1, 8, 9, 10, 11, 12 (2 ca-
naux audio)
(Windows Media Player)
Format de décodage AAC
................................... MPEG-4 AAC (fichiers enco-
dés iTunes seulement) (.m4a)
(Ver. 10.6 et antérieures)
Format de décodage DivX
................................... Home Theater versions 3, 4,
5.2, 6 (sauf ultra et HD) (.avi,
.divx)
Format de décodage vidéo MPEG
................................... MPEG1, MPEG2, MPEG4 (par-
tie 2), MS-MPEG4 (version 3)
USB
Spécification standard USB
................................... USB 1.1, USB 2.0 pleine vi-
tesse (pour les fichiers vidéo)
USB 2.0 haut débit (pour les
fichiers audio)
Alimentation maximale .... 1,0 A
Classe USB ...................... MSC (Mass Storage Class),
MTP (Media Transfer Protocol)
Système de fichiers .......... FAT16, FAT32
Format de décodage MP3
................................... MPEG-1 & 2 Couche Audio 3
Format de décodage WMA
................................... Ver. 7, 7.1, 8, 9, 10, 11, 12 (2 ca-
naux audio)
(Windows Media Player)
Format de décodage AAC
................................... MPEG-4 AAC (fichiers enco-
dés iTunes seulement)
(Ver. 10.6 et antérieures)
WAV (mode MSC uniquement) :
Format du signal WAV ...... PCM Linéaire, MS ADPCM
(.wav)
Fréquence d’échantillonnage
................................... PCM Linéaire : 16 kHz,
22,05 kHz, 24 kHz, 32 kHz,
44,1 kHz, 48 kHz
MS ADPCM : 22,05 kHz,
44,1 kHz
JPEG (mode MSC uniquement) :
Format de décodage JPEG
................................... .jpeg, .jpg, .jpe
Échantillonnage des pixels
................................... 4:2:2, 4:2:0
Taille de décodage ............ MAX:8192(H) x 7 680(L), MIN :
32(H) x 32(L)
Format de décodage DivX (mode MSC uniquement)
................................... Home Theater version 3, 4,
5.2, 6 (sauf ultra et HD) (.avi,
.divx)
Format de décodage vidéo MPEG (mode MSC unique-
ment) ............................... MPEG1, MPEG2, MPEG4 (par-
tie 2), MS-MPEG4 (version 3)
Syntoniseur FM
Gamme de fréquence ....... 87,9 MHz à 107,9 MHz
Sensibilité utile ................ 9dBf (0,8 µV/75W, mono, S/B :
30 dB)
Rapport signal/bruit ......... 80 dB (diffusion numérique)
(Réseau IHF-A)
(AVH-X5600BHS/AVH-X3600BHS)
Rapport signal/bruit ......... 72 dB (diffusion analogique)
(Réseau IHF-A)
Syntoniseur AM
Gamme de fréquence ....... 530kHz à 1710kHz (10 kHz)
Sensibilité utile ................ 25µV (S/B : 20 dB)
Rapport signal/bruit ......... 80 dB (diffusion numérique)
(Réseau IHF-A)
(AVH-X5600BHS/AVH-X3600BHS)
Rapport signal/bruit ......... 62 dB (diffusion analogique)
(Réseau IHF-A)
Bluetooth
(AVH-X5600BHS/AVH-X4600BT/AVH-X3600BHS/AVH-
X2600BT)
Version ............................ Certifié Bluetooth 3.0
Puissance de sortie .......... +4dBm maximum
(Classe de puissance 2)
Caractéristiques CEA2006
Puissance de sortie .......... 14 W eff. x 4 voies (4 W et ≦ 1
% DHT+N)
Rapport S/B ..................... 91dBA (référence : 1 W sur
4 W)
Remarque
Les caractéristiques et la présentation peuvent
être modifiées sans avis préalable.
Français
Informations complémentaires
143
Annexe
Informations complémentaires
Fr
<CRD4844-A>143
Black plate (144,1)
Precauciones
INSTRUCCIONES DE SEGURIDAD
IMPORTANTES 146
Para garantizar la conducción segura del
vehículo 146
Para evitar la descarga de la batería 146
Antes de comenzar
Acerca de esta unidad 147
Números de región de discos DVD
vídeo 147
Acerca de este manual 147
Servicio posventa para productos
Pioneer 147
Uso y cuidado del mando a
distancia 148
Modo de demostración 148
Qué es cada cosa
Unidad principal 149
Pantalla de inicio 149
Activación y desactivación de la
fuente 150
Selección de una fuente 150
Ajuste del volumen 150
Mando a distancia 150
Operaciones comunes
Operaciones comunes para listas o ajustes
de menú. 151
Manejo del icono de desplazamiento y de la
barra de tiempo 151
Activación del teclado táctil 152
Uso de la vista trasera 152
Uso del monitor trasero 152
Utilización del sound retriever 152
Cambio del modo panorámico 152
Funcionamiento básico
Ajuste del ángulo de panel LCD y expulsión
de medios 153
Ajuste del reloj 153
Sintonizador de HD Radioä
Acerca de las emisoras HD Radioä 153
Funciones de sintonizador de
HD Radio 154
Almacenamiento y recuperación de
emisoras 154
Almacenamiento de las emisoras con las
señales más intensas 154
Sintonización de señales potentes 154
Uso del etiquetado de iTunes 154
Cambio del modo de búsqueda 155
Cambio del modo de recepción 155
Sintonizador
Funciones del sintonizador 155
Almacenamiento y recuperación de
emisoras 155
Almacenamiento de las emisoras con las
señales más intensas 156
Sintonización de señales potentes 156
Uso del etiquetado de iTunes 156
Sintonizador SiriusXM
Introducción a las funciones del
sintonizador SiriusXM 157
Almacenamiento y recuperación de
canales 157
Selección de un canal de la pantalla de
lista 158
Cambio de la visualización de lista 158
Selección directa de un canal
SiriusXM 158
Replayä 158
Uso del etiquetado de iTunes 158
Configuración del control de padres 158
Configurar SiriusXM TuneStartä 159
Opciones de exploración 159
Restablecer los ajustes
predeterminados 160
Disco (CD/DVD)
Introducción de funciones para
películas 160
Funciones de reproducción de
sonido 162
Cambio del tipo de archivo
multimedia 162
Uso del menú de DVD 162
Reproducción aleatoria (shuffle) 162
Repetición de reproducción 162
Búsqueda de la parte que desea
reproducir 163
Selección de la salida de audio 163
Reproducción PBC 163
Selección de pistas de la lista de títulos de
las pistas 163
Selección de ficheros de la lista de nombres
de ficheros 163
Reproducción del contenido DivXâ
VOD 164
iPod
Control de iPod 164
Funciones de reproducción de
sonido 164
Funciones de imágenes en
movimiento 165
Uso de la función iPod de la unidad desde el
iPod 166
Tecla de selección aleatoria 166
Repetición de reproducción 166
Reproducción de vídeos desde su
iPod 166
Búsqueda de un vídeo/tema musical en el
iPod 166
Cambio de la velocidad del
audiolibro 167
Visualización de listas relacionadas con la
canción que se está reproduciendo
(búsqueda de enlace) 167
AppRadio Mode
Operación de AppRadio Mode 168
Procedimiento de inicio 168
Configuración del teclado 168
Funciones del adaptador de conexión de
teléfonos inteligentes
Procedimiento de inicio 169
USB
Funciones de imágenes en
movimiento 170
Funciones de reproducción de
sonido 170
Modo de búsqueda de música 171
Funciones de reproducción de imágenes
fijas 171
Cambio del tipo de archivo
multimedia 172
Reproducción aleatoria (shuffle) 172
Repetición de reproducción 172
Selección de ficheros de la lista de nombres
de ficheros 172
Visualización de listas relacionadas con la
canción que se está reproduciendo
(búsqueda de enlace) 172
Reproducción del contenido DivXâ
VOD 172
Captura de una imagen en archivos
JPEG 172
Audio Bluetooth
Funciones de reproducción de
sonido 173
Ajuste de audio Bluetooth 173
Reproducción aleatoria (shuffle) 173
Repetición de reproducción 173
Uso de MIXTRAX
Función MIXTRAX 174
Función MIXTRAX EZ 174
Inicio de la función MIXTRAX EZ 174
Configuración del modo MIXTRAX 174
Configuración del efecto 174
Flujo continuo (streaming) de Pandoraâ
Funciones de Pandora 175
Selección y reproducción de la lista de
emisoras/selección aleatoria de
Pandoraâ 176
Teléfono Bluetooth
Funciones del teléfono Bluetooth 177
Llamada a un número del directorio de
teléfonos 178
Selección de número por modo de
búsqueda alfabético 178
Inversión de nombres en el directorio de
teléfonos 178
Uso de las listas de llamadas perdidas,
recibidas y marcadas 178
Ajuste de respuesta automática 178
Ajuste del volumen de escucha del
interlocutor 179
Cambio del tono de llamada 179
Uso de las listas de marcaciones
predefinidas 179
Índice
144
Índice
Es
<CRD4844-A>144
Black plate (145,1)
Realización de una llamada ingresando el
número de teléfono 179
Ajuste del modo privado 179
Control de voz 179
Configuración
Funcionamiento del menú 180
Ajustes de audio
Uso del ajuste del fader/balance 180
Uso del ajuste del balance 180
Uso del ecualizador 180
Uso del autoecualizador 181
Uso del control central de sonido 181
Ajuste de la sonoridad 181
Uso de la salida de subgraves 181
Intensificación de los graves 181
Uso del filtro de paso alto 181
Ajuste de los niveles de la fuente 182
Configuración del reproductor de vídeo
Ajuste del idioma de los subtítulos 182
Ajuste del idioma del audio 182
Ajuste del idioma de menús 183
Ajuste de la visualización multiángulo del
DVD 183
Ajuste del formato 183
Ajuste del intervalo del slideshow 183
Ajuste del control de padres 183
Ajuste del archivo de subtítulos
DivX 184
Visualización del código de registro de
DivXâ VOD 184
Reproducción automática de DVD 184
Ajustes del sistema
Cambio del ajuste de un equipo
auxiliar 185
Ajuste de la entrada de AV 185
Establecimiento del sistema de
navegación 185
Configuración del modo de conexión de
Pandora 185
Selección del modo MirrorLink 185
Actualización del firmware para el
adaptador de conexión del teléfono
inteligente 185
Visualización de la versión del firmware del
adaptador de conexión del teléfono
inteligente 186
Actualización del firmware 186
Visualización de la versión del
firmware 186
Configuración del modo MIXTRAX 186
Cambio del ajuste de la imagen (Brillo,
Contraste, Color, Matiz, Intensidad y
Temperatura) 186
Selección del idioma del sistema 187
Configurar SiriusXM TuneStartä 187
Restablecer los ajustes
predeterminados 187
Configuración del modo de
demostración 187
Cambio del silenciamiento/atenuación del
sonido 187
Ajuste de la salida posterior y del
controlador de subgraves 188
Uso del teclado 188
Ajuste del desplazamiento continuo 188
Ajuste de audio Bluetooth 188
Borrado de la memoria Bluetooth 188
Actualización del software de
Bluetooth 188
Visualización de la versión del software de
Bluetooth 188
Ajuste de la cámara retrovisora (cámara
posterior) 189
EQ automático (ecualización
automática) 189
Ajuste de la señal de vídeo 190
Menú de favoritos
Utilización del menú de favoritos 191
Menú de conexión Bluetooth
Funciones del menú de conexión
Bluetooth 191
Menú de tema
Selección de la iluminación en color 192
Selección del color OSD (on-screen
display) 192
Selección de la visualización de
fondo 192
Otras funciones
Ajuste de las posiciones de respuesta del
panel táctil (calibración del panel
táctil) 193
Uso de una fuente AUX 193
Reinicio del microprocesador 194
Utilización del mezclador de sonido 194
Conexión
Conexión del cable de alimentación 196
Conexión a un amplificador de potencia
comprado por separado 197
Conexión con el componente de vídeo
externo y el display 197
Conexión con una cámara
retrovisora 198
iPod con conector Lightning 198
iPod con conector de 30 patillas 199
Conexión opcional del adaptador de
conexión de teléfono inteligente (CD-
ML100) 199
Conexión del sintonizador opcional
SiriusXM 200
Instalación
Instalación usando los agujeros para
tornillos ubicados en ambos costados de
la unidad 200
Instalación del micrófono 201
Información adicional
Solución de problemas 202
Mensajes de error 203
Comprensión de los mensajes de error del
ajuste EQ automático 207
Comprensión de los mensajes 207
Lista de indicadores 207
Pautas para el manejo 209
Compatibilidad con audio (USB) 210
Compatibilidad con archivo comprimido
(disco, USB) 211
Compatibilidad con iPod 211
Secuencia de archivos de audio 212
Uso correcto del display 212
Perfiles Bluetooth 213
Licencia, exención de responsabilidad sobre
la garantía y limitación de
responsabilidad 213
Tabla de códigos de idioma para el
DVD 215
Especificaciones 216
Español
Índice
145
Índice
Es
<CRD4844-A>145
Black plate (146,1)
Gracias por haber adquirido este producto
PIONEER.
Lea con detenimiento este manual antes de utili-
zar el producto por primera vez para que pueda
darle el mejor uso posible. Es muy importante
que lea y cumpla con la información que apare-
ce bajo los mensajes de ADVERTENCIA y
PRECAUCIÓN de este manual. Una vez leído,
guarde el manual en un lugar seguro y a mano
para poder consultarlo en el futuro.
INSTRUCCIONES DE
SEGURIDAD IMPORTANTES
Lea íntegramente estas instrucciones sobre el
display y consérvelas para consultarlas en el fu-
turo.
1 No instale el display en un lugar que (i)
pueda obstaculizar la visión del conduc-
tor; (ii) pueda alterar el funcionamiento
de los sistemas operativos o los disposi-
tivos de seguridad del vehículo, en parti-
cular los airbags y los botones de las
luces de emergencia o (iii) pueda afectar
a la capacidad del conductor para condu-
cir el vehículo de manera segura.
2 No haga funcionar el display si al hacerlo
desvía de alguna manera su atención de
la conducción segura de su vehículo. Ob-
serve siempre las reglas de conducción
segura y obedezca todas las leyes de trá-
fico existentes. Si tiene dificultades para
hacer funcionar el sistema o leer el dis-
play, estacione el vehículo en un lugar
seguro y haga los ajustes necesarios.
3 Recuerde usar siempre el cinturón de se-
guridad cuando conduzca el vehículo. En
caso de accidente, las lesiones pueden
ser mucho más graves si el cinturón de
seguridad no está debidamente abrocha-
do.
4 Nunca use auriculares mientras conduce.
5 Para promover la seguridad, ciertas fun-
ciones permanecerán desactivadas a
menos que se active el freno de mano y
el vehículo no esté en movimiento.
6 Nunca suba el volumen del display de tal
manera que no pueda escuchar el tráfico
exterior y los vehículos de emergencia.
ADVERTENCIA
! No trate de instalar o reparar este pro-
ducto usted mismo. La instalación o la
reparación de este producto por parte de
personas sin cualificación ni experiencia
en equipos electrónicos y accesorios
para automóviles puede ser peligrosa y
puede exponerle al riesgo de sufrir una
descarga eléctrica u otros peligros.
! No intente utilizar la unidad mientras esté
conduciendo. Asegúrese de salir de la carre-
tera y aparcar su vehículo en un lugar seguro
antes de intentar utilizar los controles del dis-
positivo.
Para garantizar la conducción
segura del vehículo
ADVERTENCIA
! EL CABLE VERDE CLARO DEL CONECTOR
DE ALIMENTACIÓN ESTÁ DISEÑADO
PARA DETECTAR SI EL VEHÍCULO ESTÁ
ESTACIONADO Y DEBE CONECTARSE
CON EL LADO DE LA FUENTE DE ALIMEN-
TACIÓN DEL INTERRUPTOR DEL FRENO
DE MANO. LA CONEXIÓN O EL USO INCO-
RRECTO DE ESTE CABLE PUEDE INFRIN-
GIR LAS LEYES PERTINENTES Y
OCASIONAR LESIONES FÍSICAS O
DAÑOS GRAVES.
! Para evitar el riesgo de daños y lesiones y la posi-
ble violación de las leyes pertinentes, esta unidad
no debe usarse con una pantalla que sea visible
para el conductor.
! Para evitar el riesgo de accidentes y la posible
violación de las leyes pertinentes, no se debe
nunca visualizar el vídeo en el asiento delantero
mientras se esté conduciendo el vehículo.
! En algunos países o estados, puede ser ilícita la
visualización de imágenes en un display dentro
de un vehículo, incluso por otras personas que
no sean el conductor. En los casos en que resul-
ten aplicables, estas normas deben respetarse y
no deben usarse las funciones de vídeo de esta
unidad.
Cuando intente ver un vídeo mientras esté con-
duciendo, aparecerá el aviso “Queda estricta-
mente prohibido ver la fuente de video del
asiento delantero al conducir.” en el display
delantero.
Para ver una imagen de vídeo en el display de-
lantero, estacione el automóvil en un lugar se-
guro y active el freno de mano.
Bloqueo del freno de mano
Algunas funciones (la visualización de vídeo y
determinadas teclas del teclado táctil) de esta
unidad pueden resultar peligrosas y/o constituir
una infracción si se usan mientras conduce el
vehículo. Para evitar el uso de estas funciones
con el vehículo en marcha, hay un sistema de
bloqueo que detecta cuándo está puesto el
freno de mano. Si intenta utilizar las funciones
mencionadas mientras conduce, éstas se de-
sactivarán hasta que detenga el vehículo en un
lugar seguro y (1) ponga el freno de mano, (2)
suelte el freno de mano y luego (3) ponga de
nuevo el freno de mano. Mantenga pisado el
pedal del freno antes de soltar el freno de mano.
Uso de un display conectado a la
salida de monitor trasero
La salida del monitor trasero en esta unidad (V
OUT) se utiliza para conectar un display poste-
rior que permite ver vídeos a los pasajeros de
los asientos traseros.
ADVERTENCIA
NUNCA instale el display trasero en un lugar
en donde el conductor pueda ver vídeos mien-
tras conduce.
Al utilizar la cámara retrovisora
Con una cámara retrovisora opcional, esta uni-
dad puede utilizarse como ayuda extra para, por
ejemplo, tener siempre vigilado un remolque o
dar marcha atrás de manera segura al aparcar
en un espacio reducido.
ADVERTENCIA
! LA IMAGEN EN PANTALLA PUEDE APA-
RECER AL REVÉS.
! UTILICE SÓLO ENTRADAS PARA
VISTA AL REVÉS O IMAGEN DE ESPE-
JO EN LA CÁMARA RETROVISORA.
OTROS USOS PODRÍAN PROVOCAR
HERIDAS O DAÑOS.
PRECAUCIÓN
! la función de cámara retrovisora se debe uti-
lizar para tener siempre vigilados los trailers,
o al dar marcha atrás. No la utilice para fines
lúdicos.
! Tenga en cuenta que los bordes de las imá-
genes de la cámara retrovisora pueden ser li-
geramente diferentes dependiendo de si se
muestran las imágenes a pantalla completa
al dar marcha atrás y de si las imágenes se
utilizan para comprobar la parte trasera
cuando el vehículo se mueve hacia adelante.
Para evitar la descarga de la
batería
Mantenga el motor del vehículo encendido
mientras use esta unidad para evitar descargar
la batería.
Precauciones
146
Sección
Precauciones
Es
01
<CRD4844-A>146
Black plate (147,1)
! Si se interrumpe la alimentación eléctrica de
esta unidad, por motivos como la sustitución
de la batería del vehículo, el microprocesa-
dor de la unidad vuelve a su estado inicial.
Le recomendamos que transcriba los datos
de ajuste de audio.
ADVERTENCIA
No utilice la unidad con un vehículo que carez-
ca de la posición ACC.
Acerca de esta unidad
Las frecuencias del sintonizador de esta unidad
están asignadas para su uso en América del
Norte. El uso en otras áreas puede causar una
recepción deficiente.
PRECAUCIÓN
Este producto contiene un diodo de láser de
clase 1, clasificado en la directiva IEC 60825-
1:2007 concerniente a la Seguridad de los pro-
ductos láser. Para garantizar la seguridad
continua, no extraiga ninguna tapa ni intente
acceder a la parte interna del producto. Solici-
te a personal cualificado que realice todos los
trabajos de mantenimiento.
PRODUCTO LASER CLASE 1
PRECAUCIÓN—LOS PRODUCTOS LÁSER CLASE 1M EMITEN
RADIACIÓN VISIBLE E INVISIBLE UNA VEZ ABIERTOS. NO
LOS MIRE DIRECTAMENTE CON INSTRUMENTOS ÓPTICOS.
PRECAUCIÓN
! Evite que esta unidad entre en contacto con
líquidos, ya que puede producir una descar-
ga eléctrica. Además, el contacto con líqui-
dos puede causar daños en la unidad, humo
y recalentamiento.
! Conserve este manual a mano para consul-
tarlo en el futuro.
! Mantenga siempre el volumen lo suficiente-
mente bajo como para poder escuchar los
sonidos que provienen del exterior.
! Evite la exposición a la humedad.
! Si se desconecta o se descarga la batería,
todas las memorias preajustadas se borra-
rán.
Números de región de discos
DVD vídeo
Este reproductor sólo admite discos DVD vídeo
con números de región compatibles. Podrá en-
contrar el número de región del reproductor en
la parte inferior de esta unidad y en este manual
(consulte Especificaciones en la página 216).
Acerca de este manual
! Esta unidad incluye diversas funciones sofis-
ticadas que garantizan una recepción y un
funcionamiento de calidad superior. Por sus
características de diseño, todas las funcio-
nes se pueden usar con gran facilidad; sin
embargo, muchas de ellas necesitan una ex-
plicación. Este manual le ayudará a aprove-
char todo el potencial que ofrece esta unidad
y a disfrutar al máximo del placer de escu-
char.
! En este manual se emplean diagramas de
pantallas reales para describir las funciones.
Sin embargo, las pantallas de algunas unida-
des pueden no coincidir con aquellas mos-
tradas en el manual en función del modelo
empleado.
Servicio posventa para
productos Pioneer
Póngase en contacto con el concesionario o dis-
tribuidor al que compró esta unidad para obte-
ner el servicio posventa (incluidas las
condiciones de garantía) o cualquier otra infor-
mación. En caso de que no esté disponible la in-
formación necesaria, póngase en contacto con
las empresas enumeradas abajo.
No envíe su producto para su reparación a las
empresas cuyas direcciones se indican abajo
sin haberse puesto antes en contacto con ellas.
Español
Precauciones
147
Sección
Antes de comenzar
Es
01
02
<CRD4844-A>147
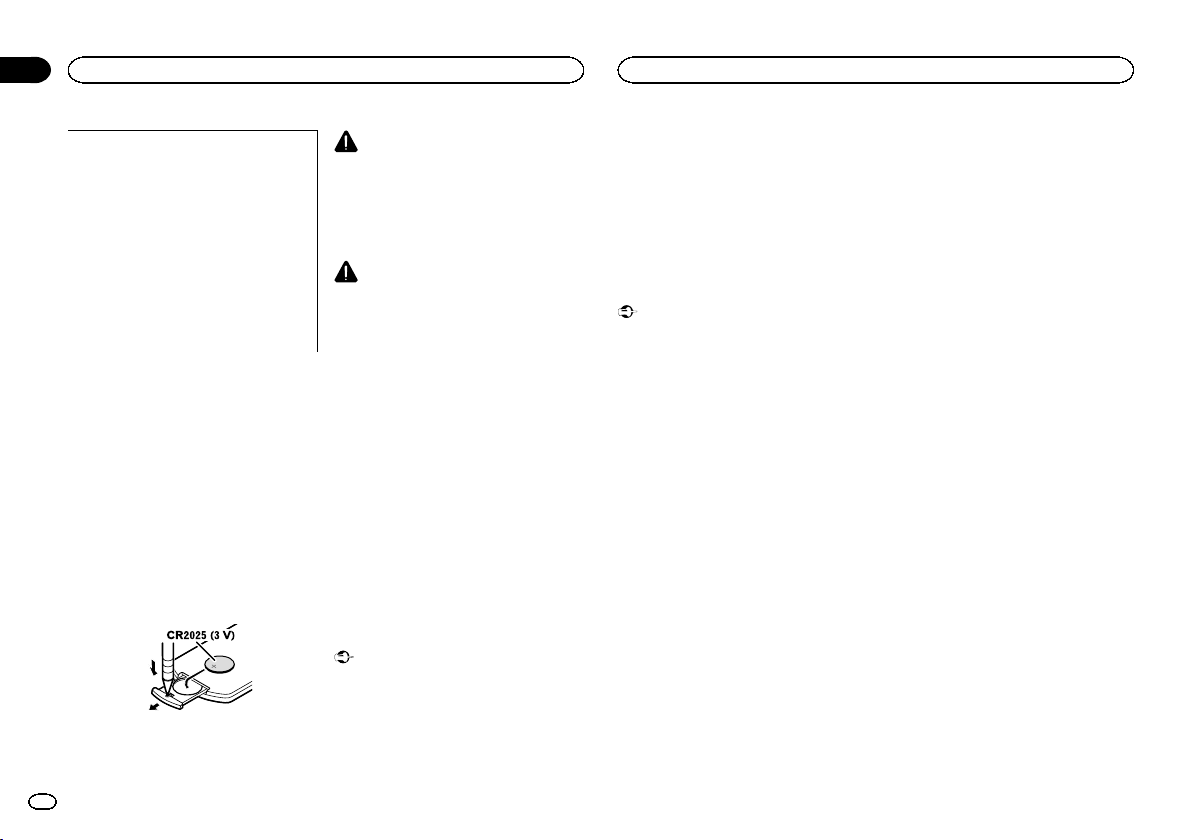
Black plate (148,1)
EE.UU.
Pioneer Electronics (USA) Inc.
CUSTOMER SUPPORT DIVISION
P.O. Box 1760
Long Beach, CA 90801-1760
800-421-1404
CANADÁ
Pioneer Electronics of Canada, Inc.
CUSTOMER SATISFACTION DEPARTMENT
340 Ferrier Street
Unit 2
Markham, Ontario L3R 2Z5, Canadá
1-877-283-5901
905-479-4411
Para obtener información sobre la garantía,
véase la hoja de Garantía limitada adjunta a este
producto.
Uso y cuidado del mando a
distancia
Instalación de la pila
Deslice y extraiga la bandeja de la parte poste-
rior del mando a distancia e inserte la pila con
los polos positivo (+) y negativo (–) en la direc-
ción correcta.
! Al utilizar el mando a distancia por primera
vez, extraiga la película que sobresale de la
bandeja.
ADVERTENCIA
! Mantenga la pila fuera del alcance de los
niños. En caso de ingestión accidental de
ésta, consulte a un médico de inmediato.
! Las pilas o baterías no deben exponerse a
altas temperaturas ni fuentes de calor como
el sol, el fuego, etc.
PRECAUCIÓN
! Extraiga la batería si no piensa utilizar el
mando a distancia durante un mes o más
tiempo.
! Si la pila se sustituye de forma incorrecta,
existe cierto riesgo de explosión. Reempláce-
la sólo por una del mismo tipo o equivalente.
! No manipule la batería con herramientas
metálicas.
! No guarde la pila junto a objetos metálicos.
! En el caso de que se produzcan fugas de la
pila, limpie completamente el mando a dis-
tancia e instale una pila nueva.
! Para desechar las pilas usadas, cumpla con
los reglamentos gubernamentales o las nor-
mas ambientales pertinentes de las institu-
ciones públicas aplicables en su país/zona.
Uso del mando a distancia
Apunte el mando a distancia hacia la carátula
para hacer funcionar la unidad.
! Es posible que el mando a distancia no fun-
cione correctamente si lo expone a la luz
solar directa.
Importante
! No guarde el mando a distancia en lugares
expuestos a altas temperaturas o a la luz
solar directa.
! No deje caer el mando a distancia al suelo,
ya que puede quedar atascado debajo del
freno o del acelerador.
Modo de demostración
La demostración de características se inicia
automáticamente cuando selecciona la fuente
OFF y continúa mientras la llave de encendido
esté en la posición ACC u ON. Para cancelar la
demostración de características, mantenga pre-
sionado MUTE. Para reiniciar, mantenga presio-
nado MUTE. Si este modo de demostración
sigue funcionando cuando el motor del vehículo
está apagado, se puede descargar la batería.
Importante
El cable rojo (ACC) de esta unidad debe conec-
tarse a la función de activación/desactivación
de encendido. De lo contrario, puede descargar-
se la batería.
Antes de comenzar
148
Sección
Antes de comenzar
Es
02
<CRD4844-A>148
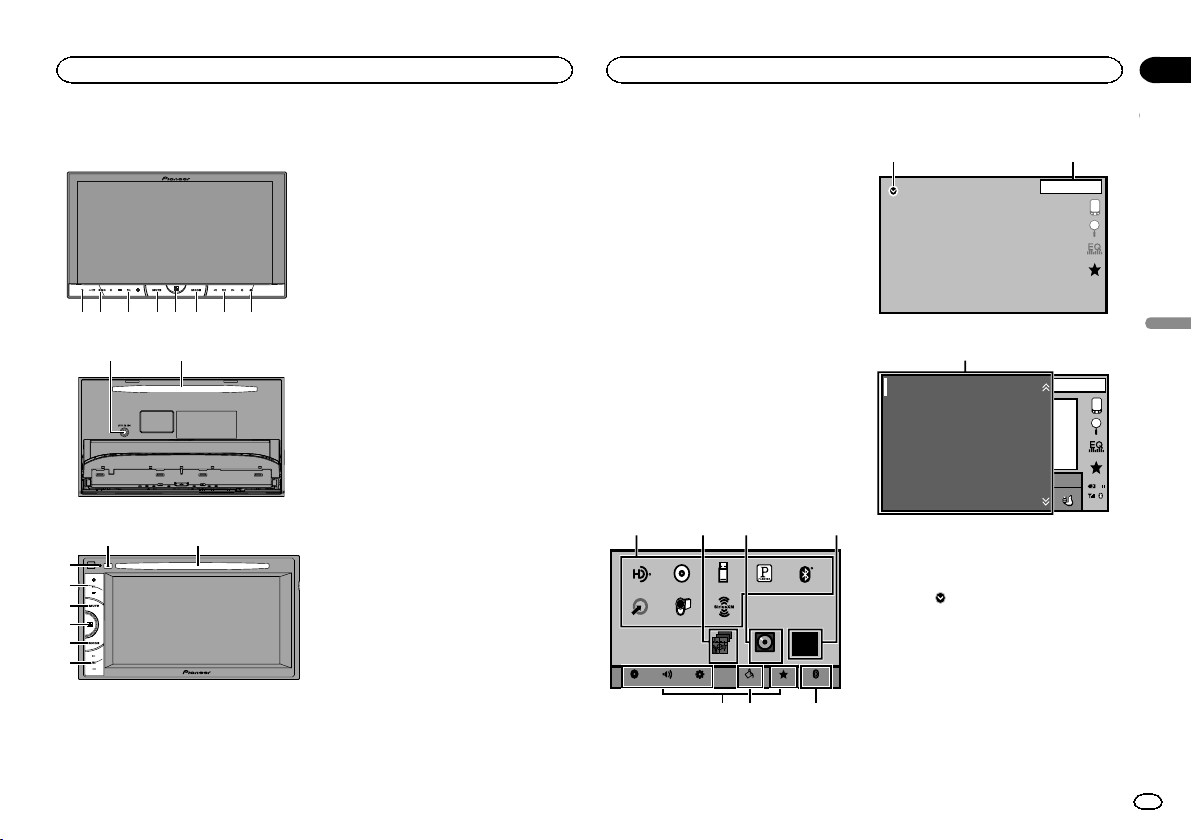
Black plate (149,1)
Unidad principal
AVH-X5600BHS y AVH-X4600BT
1 2 3 5 6 74
8
9 a
AVH-X3600BHS, AVH-X2600BT y AVH-X1600DVD
8a
1
3
4
5
6
7
1 RESET
Para obtener más información, consulte Rei-
nicio del microproce sador en la página 194.
2 SRC/OFF
3 +/– (VOLUME/VOL)
4 MUTE
Pulse para silenciar. Pulse de nuevo para de-
sactivar el silenciamiento.
5 Botón de inicio
Visualización de la pantalla de inicio.
La visualización vuelve a la pantalla de la
aplicación de arranque mientras una aplica-
ción de terceros se utiliza en AppRadio
Mode.
Al hacer doble clic en el icono de la pantalla
de la aplicación de arranque se cambia la vi-
sualización a la pantalla de inicio.
6 MODE
Cuando no se utiliza la entrada RGB
! Pulse MODE para apagar la pantalla.
Vuelva a pulsar MODE para encenderla.
Cuando se utiliza la entrada RGB
! Mantenga pulsado MODE para apagar la
pantalla. Vuelva a pulsar MODE para en-
cenderla.
! Cuando el sistema de navegación esté
conectado, pulse MODE para cambiar a
la visualización del sistema de navega-
ción.
! Si se conecta un iPhone que está ejecu-
tando una aplicación compatible con
AppRadio Mode, pulse MODE para
cambiar a la pantalla de la aplicación.
Puede utilizar la aplicación tocando la
pantalla.
! Cuando tenga conectado un teléfono in-
teligente con la función MirrorLink, pulse
MODE para cambiar a la pantalla de la
aplicación. Puede utilizar la aplicación to-
cando la pantalla.
7 c/d (TRK)
8 h (expulsar)
9 Toma de entrada del micrófono EQ auto-
mático
Utilícela para conectar un micrófono EQ
automático.
a Ranura de carga de discos
Notas
! Si desea obtener más información sobre
cómo manejar un sistema de navegación
desde esta unidad, consulte el manual de
instrucciones respectivo.
! Para información adicional sobre cómo co-
nectar un iPod o un dispositivo de almacena-
miento USB a esta unidad, consulte
Conexión con un cable CD-IU201V opcional en
la página 199.
! Para más información sobre cómo conectar
un teléfono inteligente con la función Mirror-
Link a esta unidad, consulte Conexión opcio-
nal del adaptador de conexión de teléfono
inteligente (CD-ML100) en la página 199.
Pantalla de inicio
Pantalla de inicio
HD Radio
Disc USB/iPod
Pandora
Bluetooth Audio
AV
RearViewApps
OFF
AUX
Bluetooth
Favorites
ThemeSystem
Settings
AudioVideo
SiriusXM
1324
567
Pantalla de fuente desactivada
OFF
1 JAN
AM
12:12
89
Pantalla de fuente activada
JAN
AM
DB
12:22
Bluetooth Audio
SiriusXM
iPod
HD Radio
Pandora
Disc
S.Rtrv
Appr
ppr
App
pp
Ap p
1
1 Icono de fuente
Seleccione la fuente deseada.
Cuando no se visualice el icono de fuente, se
podrá visualizar pulsando la tecla de inicio o
tocando
.
2 Tecla Apps/MirrorLink
Cambio a AppRadio Mode/MirrorLink
Mode.
3 Tecla de vista trasera
Se muestra la imagen de la vista trasera.
Para obtener más información, consulte Uso
de la vista trasera en la página 152.
4 Tecla Source off
Desactivación de la fuente.
Español
Qué es cada cosa
149
Sección
Qué es cada cosa
Es
03
<CRD4844-A>149
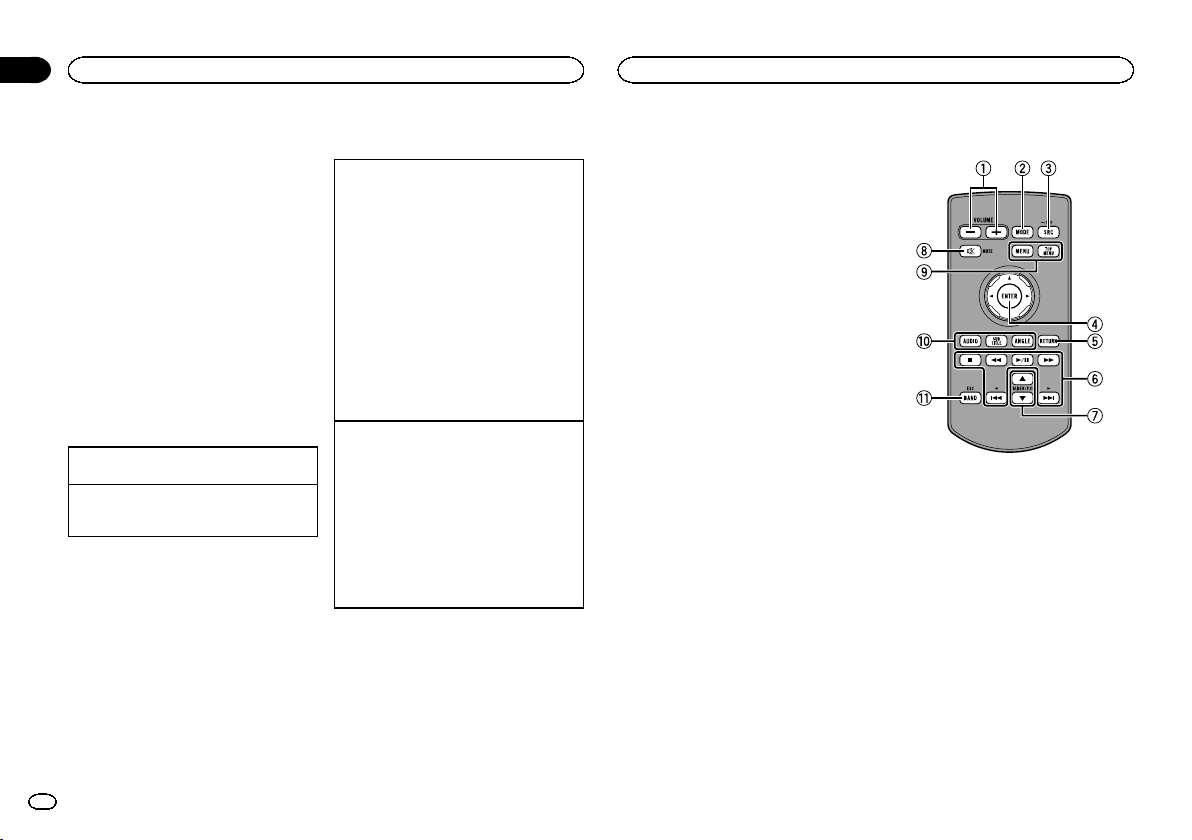
Black plate (150,1)
5 Tecla Bluetooth
Visualización del menú de conexión de
Bluetooth.
6 Tecla Tema
Visualización del menú Tema.
7 Icono de menú
Visualización del menú.
8 Tecla Source
Visualización del menú de fuente.
9 Tecla Clock
Cambio a la pantalla de ajuste del reloj.
Activación y desactivación
de la fuente
(Función de AVH-X5600BHS/AVH-X4600BT)
Activación de la fuente usando los botones
1 Pulse SRC/OFF para activar la fuente.
Desactivación de la fuente usando los botones
1 Mantenga pulsado SRC/OFF hasta que se apa-
gue la fuente.
Selección de una fuente
Modos de fuente disponibles
! SiriusXM – Sintonizador SiriusXM
(AVH-X5600BHS/AVH-X3600BHS)
! HD Radio – Sintonizador de HD Radio (radio
en alta definición)
(AVH-X5600BHS/AVH-X3600BHS)
! Radio – Sintonizador de radio
(AVH-X4600BT/AVH-X2600BT/AVH-X1600DVD)
! Disc – Reproductor de DVD y CD incorporado
! USB, iPod o USB MTP – USB/iPod/MTP
! Pandora – Pandora
â
internet radio
! Bluetooth Audio – Audio Bluetooth incorpo-
rado
(AVH-X5600BHS/AVH-X4600BT/AVH-
X3600BHS/AVH-X2600BT)
! AUX – AUX
! AV – Entrada de AV
Selección de una fuente
! Utilización de SRC/OFF
(Función de AVH-X5600BHS/AVH-X4600BT)
1 Presione SRC/OFF.
! Uso de las teclas del teclado táctil en la panta-
lla de inicio
1 Toque el icono de fuente y, a continuación,
toque el nombre de la fuente deseada.
! Si no se muestra el icono de fuente, toque
la pantalla para poder visualizarlo.
! Al utilizar el menú, no puede seleccionar
una fuente tocando el icono de fuente.
Nota
El icono USB/iPod cambiará de la siguiente ma-
nera:
! USB/iPod aparece cuando no hay conectado
ningún dispositivo.
! USB aparece cuando hay un dispositivo de alma-
cenamiento USB conectado a la entrada USB.
! iPod aparece cuando hay un iPod conectado a la
entrada USB.
! Aparece USB MTP cuando hay un dispositivo
Android compatible con MTP (con sistema ope-
rativo Android 4.0 o superior) conectado a través
de una conexión MTP utilizando un cable USB.
Ajuste del volumen
% Pulse +/– (VOLUME/VOL) para ajustar el
volumen.
Mando a distancia
1 +/– (VOLUME/VOL)
2 MODE
Desactivación de la visualización de informa-
ción.
3 SRC/OFF
Pulse para visualizar todas las fuentes dispo-
nibles. Manténgalo pulsado para apagar la
fuente.
4 Thumb pad
Úselo para seleccionar un menú en el menú
del DVD.
5 RETURN
Pulse para visualizar el menú PBC (control
de reproducción) durante la reproducción
con la función PBC.
Qué es cada cosa
150
Sección
Qué es cada cosa
Es
03
<CRD4844-A>150
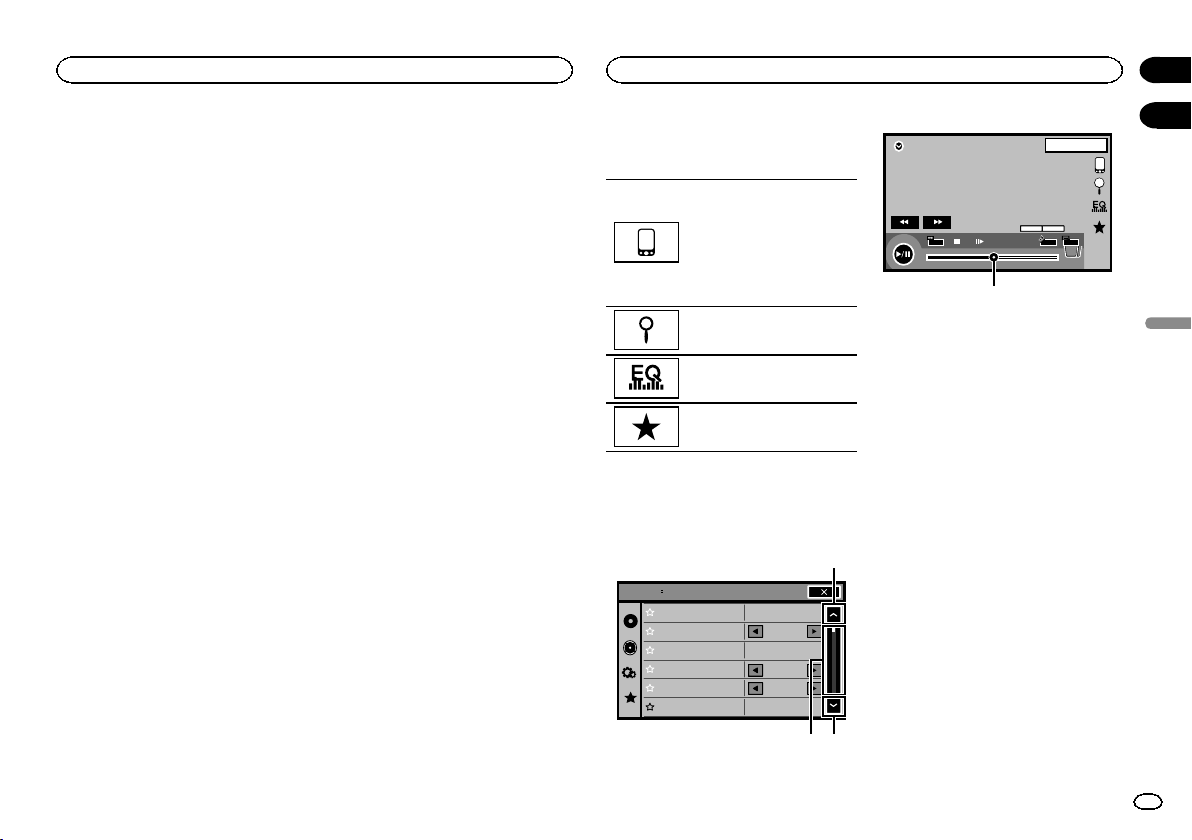
Black plate (151,1)
6 f
Pulse este botón para pausar o reanudar.
m
Pulse para utilizar el retroceso rápido.
Pulse para cambiar la velocidad de retroceso
rápido.
n
Pulse para utilizar el avance rápido.
Pulse para cambiar la velocidad de avance
rápido.
o
Pulse para volver a la pista (capítulo) ante-
rior.
p
Pulse para ir a la siguiente pista (capítulo).
g
Pulse para detener la reproducción.
Si reanuda la reproducción, ésta se iniciará
desde el punto en el que se detuvo. Vuelva a
tocar la tecla para detener totalmente la re-
producción.
7 FOLDER/P.CH
Pulse este botón para seleccionar la carpeta
o disco siguiente/anterior.
Púlselos también para recuperar frecuencias
de emisoras de radio asignadas a teclas de
ajuste de presintonías.
8 MUTE
Pulse para silenciar. Pulse de nuevo para de-
sactivar el silenciamiento.
9 MENU
Pulse para visualizar el menú de DVD duran-
te la reproducción de un DVD.
TOP MENU
Pulse para volver al menú superior durante
la reproducción de un DVD.
a AUDIO
Púlselo para cambiar el idioma del audio du-
rante la reproducción de un DVD.
Púlselo para cambiar la salida de audio a
DivX/MPEG-4.
SUBTITLE
Pulse para cambiar el idioma de los subtítu-
los durante la reproducción de un DVD/DivX/
MPEG-4.
ANGLE
Pulse para cambiar el ángulo de visión du-
rante la reproducción de un DVD.
b BAND/ESC
Presione este botón para seleccionar la
banda del sintonizador cuando se selecciona
el sintonizador como fuente. También sirve
para cancelar el modo de control de funcio-
nes.
Pulse este botón para cambiar entre modos
cuando se reproducen los siguientes tipos
de datos:
! Disco
Audio comprimido y datos de audio
(CD-DA), tales como CD-EXTRA y CDs de
MODO MIXTO (MIXED-MODE CD)
! Dispositivo de almacenamiento USB
Datos de audio, datos de vídeo y datos de
fotos
Operaciones comunes para
listas o ajustes de menú.
(Función de AVH-X5600BHS/
AVH-X4600BT/AVH-X3600BHS/
AVH-X2600BT)
Inicio del menú del teléfono
Bluetooth.
Para obtener más información,
consulte Teléfono Bluetooth en la
página 177.
Visualización del menú de listas.
Inicio de la función de búsqueda.
Visualización del EQ (menú de
funciones de audio).
Visualización del menú de favori-
tos.
Manejo del icono de
desplazamiento y de la
barra de tiempo
Sonic Center Control
Loudness
Subwoofer
Bass Booster
High Pass Filter
Source Level Adjuster
L/R 0
Low
0
125Hz
0
On
Audio
1
12
DVD-V
00'20'' -119'51''
48kHz 16bit
Dolby D
MENU
MENU
TOP
1/2
Dolby DMulti ch
FULL
11
1JAN
PM
12:43
01 01
3
1 Icono de desplazamiento
Aparece cuando los elementos selecciona-
bles permanecen ocultos.
Toque el icono de desplazamiento para ver
cualquier elemento oculto.
2 Barra de tiempo
Aparece cuando no se pueden mostrar ele-
mentos en una única página.
Arrastre la barra de tiempo para visualizar
cualquier elemento oculto.
Puede también arrastrar la vista para ver
cualquier elemento oculto.
3 Punto de reproducción
Especificación del lugar de reproducción
Arrastre el punto de reproducción en la pan-
talla.
Español
Qué es cada cosa
151
Sección
Operaciones comunes
Es
03
04
<CRD4844-A>151

Black plate (152,1)
Activación del teclado táctil
Teclas del teclado táctil
DVD-V
00'20'' -119'51''
48kHz 16bit
Dolby D
MENU
MENU
TOP
1/2
Dolby DMulti ch
FULL
1 1
1JAN
PM
12:43
01 01
07'24'' -112'47''
2/2
L+R
Return
1
1
1
1 Tecla de pestaña
Conmutación del teclado del panel táctil en
la pantalla.
Uso de la vista trasera
El uso del modo de vista trasera requiere una cá-
mara retrovisora, que se vende por separado.
Están disponibles las siguientes funciones.
! Cámara retrovisora
Esta unidad se puede configurar para mos-
trar la imagen de vista trasera automática-
mente cuando cambia la palanca de
cambios a la posición MARCHA ATRÁS
(R).
! Cámara para modo de vista trasera
La vista trasera se puede encender para ver
las imágenes en cualquier momento.
La cámara retrovisora deberá configurarse a
un ajuste que no sea OFF para encender el
modo de vista trasera.
Para obtener detalles sobre los ajustes, consulte
Ajuste de la cámara retrovisora (cámara posterior)
en la página 189.
Uso de la tecla que muestra la
vista trasera
Visualización de la imagen retrovi-
sora activándola.
Cuando se visualiza la imagen re-
trovisora, puede cambiar a la visua-
lización de la fuente tocando la
pantalla. En esta situación, podrá
operar temporalmente desde la
pantalla fuente. Si no realiza ningu-
na operación en unos segundos, la
pantalla volverá a la imagen retrovi-
sora.
Para apagar la imagen de vista tra-
sera, pulse el botón de inicio para
regresar a la pantalla de inicio y
pulse, a continuación, esta tecla de
nuevo.
Uso del monitor trasero
Si se conecta un monitor trasero (se vende por
separado) a esta unidad, se pueden ver imáge-
nes y vídeos desde los asientos traseros.
Notas
! No se puede utilizar el teclado del panel táctil
y las pantallas de funciones desde el monitor
trasero.
! Las imágenes y el vídeo se seguirán mostran-
do tanto si el vehículo está detenido como en
movimiento.
Utilización del sound retriever
Mejora automáticamente el audio
comprimido y restaura el sonido
óptimo.
Apagar — —
! es más eficaz que .
Notas
! Esta función está disponible para la repro-
ducción en las fuentes enumeradas a conti-
nuación.
— CD-DA
— Archivos MP3/WMA/AAC en dispositivos de
almacenamiento USB/MTP
— Archivos MP3/WMA/AAC/WAV en dispositi-
vos de almacenamiento USB
— Archivos MP3/WMA/AAC en medios CD
— iPod
— Pandora (solo para iPod con conector de 30
patillas)
! El ajuste de Sound Retriever (recuperador de
sonido) se apaga si se utiliza la función
MIXTRAX en el modo de fuente USB.
Cambio del modo panorámico
Selección de la relación de panta-
lla adecuada para la reproducción
de vídeo.
1 Visualice el modo de pantalla.
2 Toque el ajuste de modo panorámico de-
seado.
FULL (pantalla completa)
La imagen de 4:3 se amplía en sentido horizon-
tal solamente, lo que permite obtener una ima-
gen de TV de 4:3 (imagen normal) sin
omisiones.
ZOOM (zum)
La imagen de 4:3 se amplía en la misma propor-
ción en sentido vertical y horizontal; es ideal
para imágenes de tamaño cine (imágenes pano-
rámicas).
NORMAL (normal)
La imagen de 4:3 se visualiza como es, por lo
que no se perciben disparidades, ya que sus
proporciones son iguales a las de la imagen nor-
mal.
Notas
! No puede usar esta función al conducir.
! Se pueden almacenar los distintos ajustes
para cada fuente de vídeo.
! Cuando se ven imágenes en un modo pano-
rámico que no coincide con la relación de
aspecto original, es posible que aparezcan
de manera diferente.
! Recuerde que el uso del modo panorámico
de este sistema con fines comerciales o para
su exhibición al público puede constituir una
violación de los derechos de autor protegidos
por la legislación relativa a la propiedad inte-
lectual.
! La imagen de vídeo aparecerá con menor ca-
lidad cuando se visualice en el modo ZOOM.
! Esta función está disponible para la repro-
ducción en las fuentes enumeradas a conti-
nuación.
— Disc: DVD-V, CD de vídeo, DivX, MPEG-1,
MPEG-2, MPEG-4
— USB: DivX, MPEG-1, MPEG-2, MPEG-4, JPEG
— iPod: Vídeo
— AV: Datos A/V
— AUX: Datos A/V
Operaciones comunes
152
Sección
Operaciones comunes
Es
04
<CRD4844-A>152
Black plate (153,1)
Ajuste del ángulo de panel
LCD y expulsión de medios
PRECAUCIÓN
Mantenga sus manos y dedos alejados de la
unidad mientras abre, cierra o ajusta el panel
LCD. Sea especialmente cauteloso con las de
los niños.
Ajuste del ángulo del panel LCD
(Función de AVH-X5600BHS/AVH-X4600BT)
1 Pulse h (expulsar) para visualizar el
menú de expulsión.
2 Ajuste el panel LCD a un ángulo que se
pueda ver con facilidad.
Bajada del panel.
Puesta en posición vertical del
panel.
# Ya que el ángulo ajustado se guarda, el panel
LCD adquiere automáticamente la misma posición
al abrirlo la próxima vez.
Expulsión de un disco
(Función de AVH-X5600BHS/AVH-X4600BT)
1 Pulse h (expulsar) para visualizar el
menú de expulsión.
2 Expulse el disco.
Expulsión de un disco.
Expulsión de un disco
(Función de AVH-X3600BHS/AVH-X2600BT/AVH-
X1600DVD)
% Presione h para expulsar el disco.
Ajuste del reloj
1 Toque la tecla Clock.
Aparece la pantalla Clock Adjustment.
Consulte Tecla Clock en la página 150.
2 Seleccione el elemento que desea ajustar.
3 Toque a o b para ajustar la fecha y hora
correctas.
Notas
! Puede seleccionar el formato de fecha.
Toque dd/mm/aa, aa/mm/dd o mm/dd/aa.
! Puede seleccionar el formato de reloj. Toque
12hr (reloj de 12 horas) o 24hr (reloj de 24
horas).
Indica que el display está ce-
rrado.
Acerca de las emisoras
HD Radioä
(Función de AVH-X5600BHS/AVH-X3600BHS)
Las emisoras de HD Radio ä ofrecen servicios
de audio y datos de alta calidad que las emiso-
ras de FM/AM locales ponen a su disposición.
Las emisoras de HD Radio tienen los siguientes
recursos:
! Audio de alta calidad
! Emisión múltiple de FM
! Servicios de datos
Datos de Servicio del Programa (PSD): Contribuye a mejo-
rar la experiencia del usuario de la tecnología HD Radio.
Ofrece secuencias de datos referentes al nombre de la
canción, del artista, ID de la emisora o guía de canales
HD2/HD3.
Además de las emisoras principales de siempre, se inclu-
yen canales adiciona les de FM local. Estos canales de
HD2/HD3 emiten música nueva y original, además de re-
visiones de culto de los clásicos.
Sonido digital y de calidad CD. Gracias a la tecnología
HD Radio la señal digital que llega de las emisoras de
radio locales es limpia. El sonido de AM alcanza la cali-
dad del FM moderno y el sonido FM es como el de un CD.
Las etiquetas de iTunes
â
le ofrecen la oportunidad de
descubrir una amplia gama de contenido y la manera de
“etiquetar” ese contenido para su posterior revisión y
compra desde la tienda de iTunes
â
.
Información visual relativa al contenido reproducido en
su receptor de HD Radio, como diseño del álbum, foto-
grafías históricas e imágenes de representacion es en di-
recto, entre otros contenidos relacionados.
Tecnología de HD Radioä
Tecnología HD Radio fabricada bajo licencia de
iBiquity Digital Corporation. Patentes de EE.UU.
y de otros países. HD Radioä y los logotipos de
HD, HD Radio y del arco son marcas comercia-
les propiedad de iBiquity Digital Corp.
Español
Funcionamiento básico
153
Sección
Sintonizador de HD Radioä
Es
05
06
<CRD4844-A>153
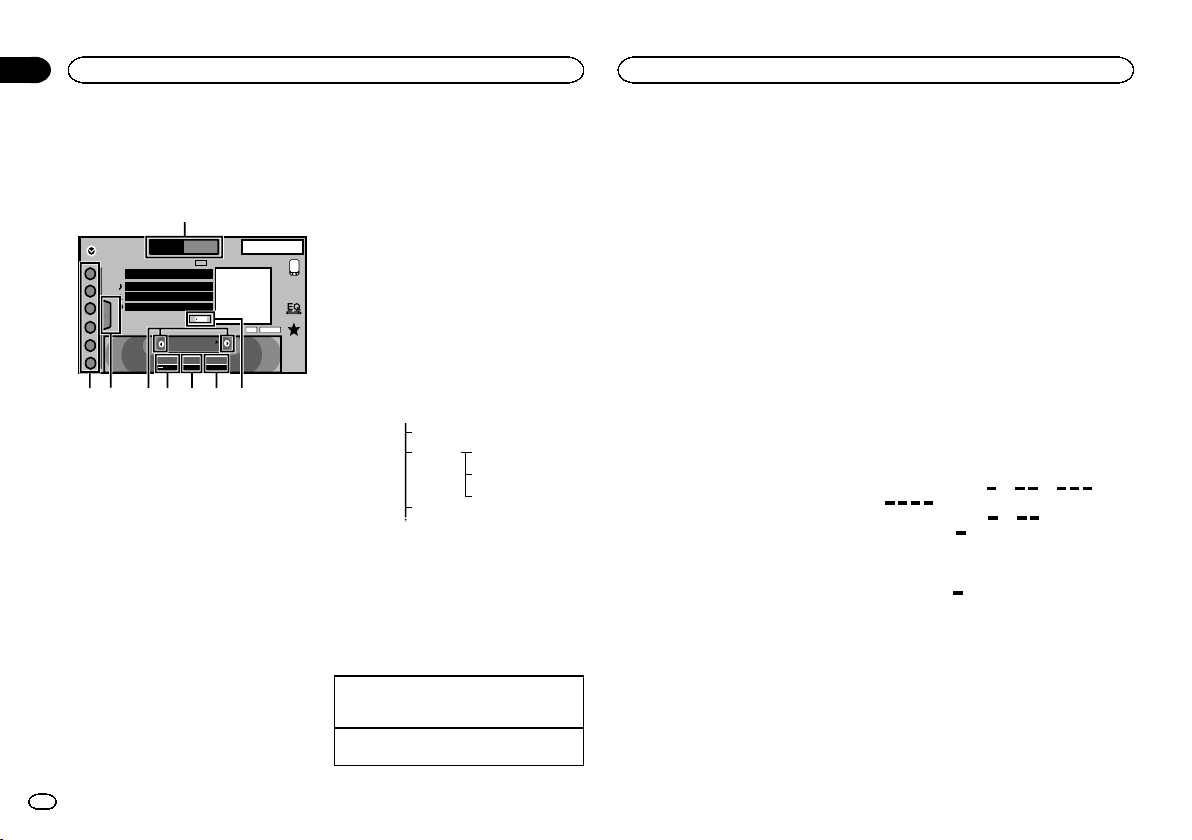
Black plate (154,1)
Funciones de sintonizador
de HD Radio
Teclas del teclado táctil
HD Radio
8 AUG
PM
12:05
1
2
3
4
5
6
FM AM1
HD
Local Seek
ALL
Blending
D/A Auto
87.9
MHz
DIGITAL
PS Data
Song Data
Artist Data
Album Data
Tag
HD8
1
2345678
1 Tecla de bandas
Selección de una banda (FM o AM) con tan
solo tocar la tecla de bandas.
La tecla del teclado táctil para la banda se-
leccionada aparece resaltada.
Cambio entre FM1, FM2 y FM3 con tan solo
tocar la tecla de bandas.
Cuando está seleccionado AM, no se puede
cambiar a otra banda de AM con tan solo
tocar la tecla de bandas.
2 Tecla de etiqueta
Guardado de información de canciones (eti-
queta) desde la emisora a su iPod.
3 Tecla de modo de recepción
Cambio a la emisión analógica de la misma
frecuencia.
4 Tecla de modo de búsqueda
Cambio entre búsqueda de emisoras digita-
les y búsqueda normal.
5 Tecla local
Ajuste del nivel de búsqueda local.
6 Tecla de sintonía
Sintonización en sentido ascendente o des-
cendente de forma manual.
Mantenga la tecla pulsada durante más de
dos segundos para saltarse emisoras. La sin-
tonización por búsqueda comienza en cuan-
to se suelta la tecla. Vuelva a tocarla para
cancelar la sintonización por búsqueda.
Cuando se recibe una emisora analógica, la
operación de sintonización en sentido des-
cendente se lleva a cabo dentro de la radiodi-
fusión analógica. (6 d 2)
Si no se ha recibido una emisión digital toda-
vía, la operación de sintonización en sentido
ascendente sintoniza la próxima emisora
analógica. ( 2 d 6)
FM analógico 1
Canal FM-1 digital 3
Canal FM-2 digital 4
Canal FM-3 digital 5
FM analógico 2
FM analógico 6
7 Tecla de lista
Visualización de la lista de canales presinto-
nizados.
8 Tecla de canal presintonizado
Seleccione un canal presintonizado.
Funcionamiento básico
Cambio de los canales de presintonía mediante
los botones
1 Pulse c o d (TRK).
Sintonización por búsqueda usando los botones
1 Mantenga presionado c o d (TRK).
Nota
Las teclas del teclado táctil no mencionadas en
el apartado Funciones de sintonizador de
HD Radio podrían aparecer en la pantalla.
Consulte Lista de indicadores en la página 207.
Almacenamiento y
recuperación de emisoras
Se pueden guardar con facilidad hasta seis emi-
soras presintonizadas por banda.
1 Muestra la pantalla de lista de canales
presintonizados.
Consulte Funciones de sintonizador de HD Radio
en la página 154.
La lista de canales presintonizados aparece en
la pantalla.
2 Mantenga pulsada una de las teclas de
ajuste de presintonías para almacenar la fre-
cuencia seleccionada en la memoria.
La frecuencia de la emisora de radio selecciona-
da se ha almacenado en la memoria.
3 Toque la tecla apropiada de ajuste de pre-
sintonías para seleccionar la emisora desea-
da.
Almacenamiento de las
emisoras con las señales
más intensas
BSM (memoria de las mejores emisoras) guarda
automáticamente las seis emisoras más fuertes
ordenadas por la intensidad de la señal.
Al almacenar frecuencias con la función BSM,
se pueden reemplazar las frecuencias que se al-
macenaron con las teclas de ajuste de presinto-
nías.
1 Muestra la pantalla de lista de canales
presintonizados.
Consulte Funciones de sintonizador de HD Radio
en la página 154.
La lista de canales presintonizados aparece en
la pantalla.
2 Toque BSM para activar la función BSM.
Las seis frecuencias de las emisoras más fuer-
tes se almacenarán en las teclas de ajuste de
presintonías ordenadas según la intensidad de
las señales.
# Para cancelar el proceso de almacenamiento,
toque Cancel.
Sintonización de señales
potentes
La sintonización por búsqueda local le permite
sintonizar sólo las emisoras de radio con seña-
les lo suficientemente intensas como para ase-
gurar una correcta recepción.
FM: desactivado —
— — —
AM: desactivado — —
Cuantas más haya en la pantalla, menor será
el número de emisoras que se pueden seleccio-
nar. Solo se pueden seleccionar emisoras con
las señales más intensas en su área local.
Si hay pocas
, esta unidad será capaz de reci-
bir emisiones de emisoras más débiles.
Uso del etiquetado de iTunes
Nota
Para obtener más información sobre las etique-
tas de iTunes, consulte Acerca del etiquetado de
iTunes en la página 212.
Sintonizador de HD Radioä
154
Sección
Sintonizador de HD Radioä
Es
06
<CRD4844-A>154
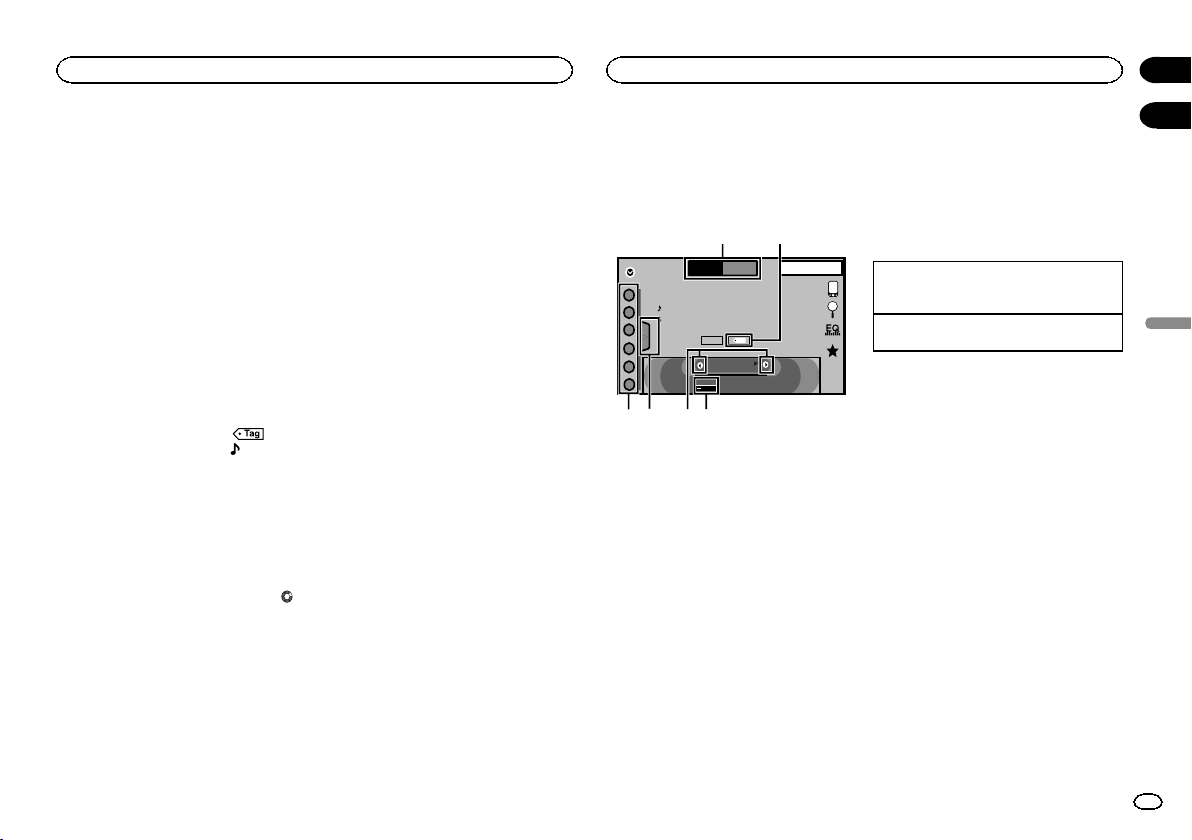
Black plate (155,1)
Guardar la información de
etiquetas en esta unidad
1 Sintonice la emisora que transmite.
2 Almacene la información de etiquetas en
esta unidad.
Consulte Funciones de sintonizador de HD Radio
en la página 154.
Puede almacenar la información si el indicador
Tag se muestra cuando se está emitiendo la
canción deseada.
# Mientras se guardan los datos de etiqueta en
esta unidad, Ta g parpadea.
# En esta unidad se puede almacenar información
de etiquetas para un máximo de 50 canciones.
# Según el momento en que se almacene, es posi-
ble que también se guarde la información de etique-
ta de la canción siguiente o anterior.
3 Al completarse, el indicador se
apaga y se muestra en su lugar
.
Guardar la información
etiquetada en el iPod
1 Conecte su iPod.
Cuando su iPod esté conectado a esta unidad,
empezará a almacenar la información etique-
tada automáticamente.
2 Al completarse se apaga el indicador
y
la información etiquetada se almacena en su
iPod.
Cambio del modo de búsqueda
Hay dos métodos de sintonización por búsque-
da, uno es HD (búsqueda de emisoras digitales)
y el otro ALL (búsqueda normal).
ALL—HD
Cambio del modo de recepción
Si la calidad de recepción de una emisión digital
se vuelve deficiente, esta unidad cambia auto-
máticamente a la emisión analógica en el
mismo nivel de frecuencia. Si se selecciona
D/A AUTO para esta función, el sintonizador
cambia entre emisión digital y analógica auto-
máticamente. Si se selecciona ANALOG para
esta función, la recepción será sólo analógica.
D/A AUTO—ANALOG
Funciones del sintonizador
(Función de AVH-X4600BT/AVH-X2600BT/AVH-
X1600DVD)
Teclas del teclado táctil
Radio
8 AUG
PM
12:05
1
2
3
4
5
6
FM AM1
Local
87.9
MHz
Tex t
Tag
1
3456
2
WWWWWWWW
WWWWWWWW
WWWWWWWW
1 Tecla de bandas
Selección de una banda (FM1, FM2 o FM3)
tocando el icono de la izquierda. Cambio a la
banda de AM tocando el icono de la dere-
cha.
El icono de la banda seleccionada aparece
resaltado.
2 Tecla de etiqueta
Guardado de información de canciones (eti-
queta) desde la emisora a su iPod.
3 Tecla local
Ajuste del nivel de búsqueda local.
4 Tecla de sintonía
Sintonización en sentido ascendente o des-
cendente de forma manual.
Mantenga la tecla pulsada durante más de
dos segundos para saltarse emisoras. La sin-
tonización por búsqueda comienza en cuan-
to se suelta la tecla. Vuelva a tocarla para
cancelar la sintonización por búsqueda.
5 Tecla de lista
Visualización de la lista de canales presinto-
nizados.
6 Tecla de canal presintonizado
Selección de un canal presintonizado.
Funcionamiento básico
Cambio de los canales de presintonía mediante
los botones
1 Pulse c o d (TRK).
Sintonización por búsqueda usando los botones
1 Mantenga presionado c o d (TRK).
Notas
! Escuchar radio en AM mientras un iPod se
carga desde esta unidad puede generar
ruido. Si esto ocurre, desconecte el iPod de
esta unidad.
! Las teclas del teclado táctil no mencionadas
en el apartado Funciones del sintonizador po-
drían aparecer en la pantalla.
Consulte Lista de indicadores en la página
207.
Almacenamiento y
recuperación de emisoras
Se pueden guardar con facilidad hasta seis emi-
soras presintonizadas por banda.
1 Acceda a la pantalla de presintonías.
Consulte Funciones del sintonizador en la página
155.
La pantalla de presintonías aparece en el dis-
play.
Español
Sintonizador de HD Radioä
155
Sección
Sintonizador
Es
06
07
<CRD4844-A>155
Black plate (156,1)
2 Mantenga pulsada una de las teclas de
ajuste de presintonías para almacenar la fre-
cuencia seleccionada en la memoria.
La frecuencia de la emisora de radio selecciona-
da se ha almacenado en la memoria.
3 Toque la tecla apropiada de ajuste de pre-
sintonías para seleccionar la emisora desea-
da.
Almacenamiento de las
emisoras con las señales
más intensas
BSM (memoria de las mejores emisoras) guarda
automáticamente las seis emisoras más fuertes
ordenadas por la intensidad de la señal.
Al almacenar frecuencias con la función BSM,
se pueden reemplazar las frecuencias que se al-
macenaron con las teclas de ajuste de presinto-
nías.
1 Acceda a la pantalla de presintonías.
Consulte Funciones del sintonizador en la página
155.
La pantalla de presintonías aparece en el dis-
play.
2 Toque BSM para activar la función BSM.
Las seis frecuencias de las emisoras más fuer-
tes se almacenarán en las teclas de ajuste de
presintonías ordenadas según la intensidad de
las señales.
# Para cancelar el proceso de almacenamiento,
toque Cancel.
Sintonización de señales
potentes
La sintonización por búsqueda local le permite
sintonizar sólo las emisoras de radio con seña-
les lo suficientemente intensas como para ase-
gurar una correcta recepción.
FM: desactivado —
— — —
AM: desactivado — —
Cuantas más haya en la pantalla, menor será
el número de emisoras que se pueden seleccio-
nar. Solo se pueden seleccionar emisoras con
las señales más intensas en su área local.
Si hay pocas
, esta unidad será capaz de reci-
bir emisiones de emisoras más débiles.
Uso del etiquetado de iTunes
Nota
Para obtener más información sobre las etique-
tas de iTunes, consulte Acerca del etiquetado de
iTunes en la página 212.
Guardar la información de
etiquetas en esta unidad
1 Sintonice la emisora que transmite.
2 Almacene la información de etiquetas en
esta unidad.
Consulte Funciones del sintonizador en la página
155.
Puede almacenar la información si el indicador
Tag se muestra cuando se está emitiendo la
canción deseada.
# Mientras se guardan los datos de etiqueta en
esta unidad, Ta g parpadea.
# En esta unidad se puede almacenar información
de etiquetas para un máximo de 50 canciones.
# Según el momento en que se almacene, es posi-
ble que también se guarde la información de etique-
ta de la canción siguiente o anterior.
3 Al completarse, el indicador se
apaga y se muestra en su lugar
.
Guardar la información
etiquetada en el iPod
1 Conecte su iPod.
Cuando su iPod esté conectado a esta unidad,
empezará a almacenar la información etique-
tada automáticamente.
2 Al completarse se apaga el indicador
y
la información etiquetada se almacena en su
iPod.
Sintonizador
156
Sección
Sintonizador
Es
07
<CRD4844-A>156
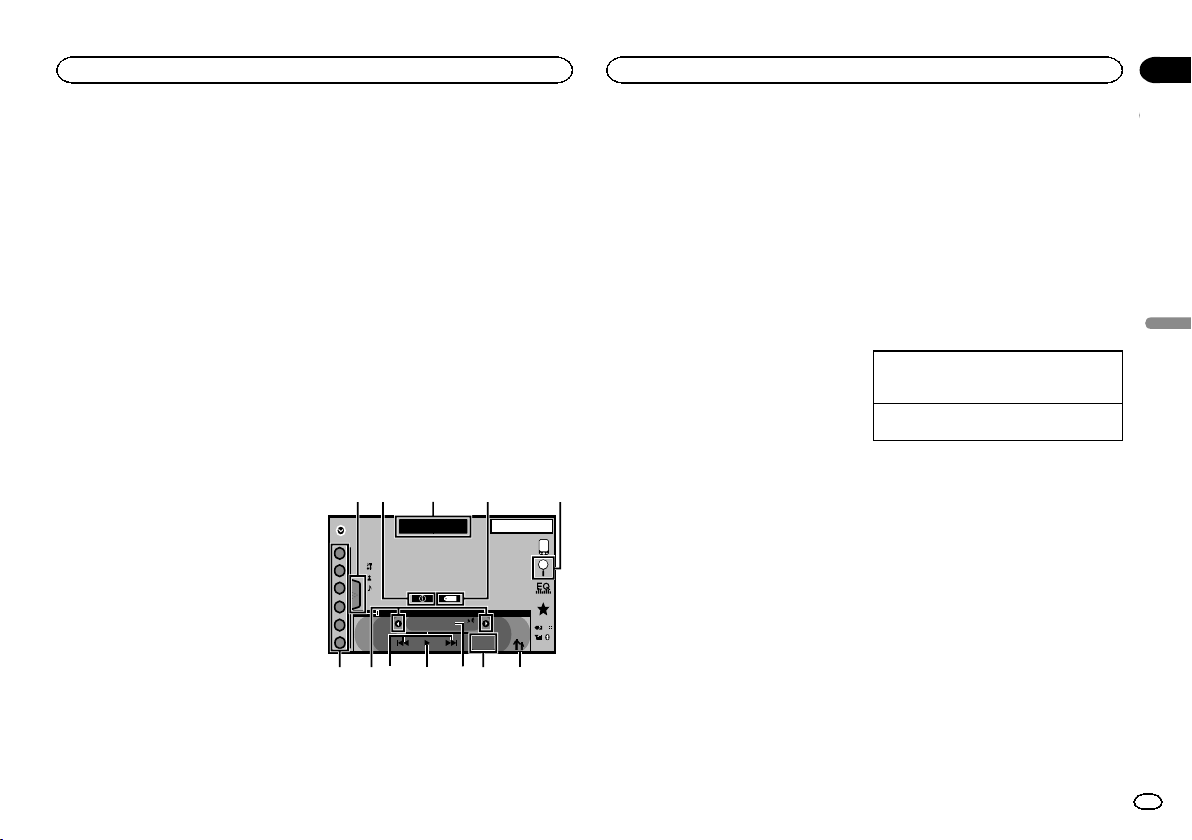
Black plate (157,1)
Introducción a las funciones
del sintonizador SiriusXM
(Función de AVH-X5600BHS/AVH-X3600BHS)
Se puede usar esta unidad para controlar un
sintonizador SiriusXM Connect Vehicle, que se
vende por separado.
Para más información sobre cómo instalar el
sintonizador SiriusXM Connect Vehicle, consulte
la guía de instalación que se entrega con el
mismo.
En SiriusXM encontrará todo aquello que mere-
ce la pena escuchar. Encontrará emisoras y ca-
nales de programación, incluida música sin
anuncios, la mejor información deportiva, noti-
cias, tertulias y entretenimiento exclusivo. Es ne-
cesario disponer de un sintonizador SiriusXM
Vehicle Tuner y estar suscrito. Para más informa-
ción, visite www.siriusxm.com en los EE.UU o
www.siriusxm.ca en Canadá.
Para suscribirse al servicio de
radio por satélite SiriusXM
1 Seleccione SiriusXM como fuente.
Debería poder sintonizar la emisora 1. Si no sin-
toniza la emisora 1, asegúrese de que su sintoni-
zador SiriusXM Connect Vehicle está bien
instalado según se explica en la guía de instala-
ción del sintonizador.
2 Cambie a la emisora 0 y compruebe la
identificación de radiofrecuencia.
La identificación de radiofrecuencia de
SiriusXM se puede encontrar sintonizando la
emisora 0. Además, la identificación de radiofre-
cuencia se encuentra en la parte inferior del sin-
tonizador SiriusXM Connect Vehicle.
Recuerde que la identificación de radiofrecuen-
cia de SiriusXM no incluye las letras I, O, S o F.
Necesitará este número para activar su suscrip-
ción.
3 Active el servicio SiriusXM online o por
teléfono.
Para abonados de EE.UU.:
! Visite www.siriusxm.com/activatenow
! Llame al número de teléfono del centro de
atención al cliente de SiriusXM 1-866-635-
2349
Para abonados de Canadá:
! Visite www.xmradio.ca y haga clic en “ACTI-
VATE RADIO” en la esquina derecha superior
! Llame al 1-877-438-9677
# Los satélites SiriusXM enviarán un mensaje de
activación a su sintonizador. Una vez que el sintoni-
zador haya recibido el mensaje, se muestra
“Suscripción actualizada”. Pulse cualquier tecla
para eliminar el mensaje de activación.
El proceso de activación suele llevar entre 10 y 15 mi-
nutos, pero en algunos casos puede demorarse
hasta una hora. No apague la unidad hasta que no
haya eliminado el mensaje de activación pulsando
cualquier tecla.
Teclas del teclado táctil
SiriusXM
22 JAN
AM
12:22
1
2
3
4
5
6
888
Tag
Channel Name
Category Name
Artist Name / Content Info
Song Title / -
CH
CH
Live
-01’ 00”
DB
SXM 1
34215
6798bac
1 Tecla de lista
Visualización de la lista de canales presinto-
nizados.
2 Tecla de información
Cambio de la información de SiriusXM.
Nombre de categoría—Información de con-
tenido
3 Tecla de bandas
Selección de una banda desde SXM1, SXM2
o SXM3.
4 Tecla de etiquetado de canciones de
iTunes
â
Guardado de etiquetados de canciones de
iTunes
®
desde la emisora a su iPod.
5 Tecla de búsqueda
Selección de un canal de la pantalla de lista.
6 Tecla de control de padres
Aparece la pantalla Parental Control.
7 Tecla de emisión en directo
Utilice esta tecla para volver a la emisión en
directo mientras se encuentra en el modo de
repetición instantánea.
8 Tecla directa
Aparece un teclado numérico que permite
introducir los números de canal de SiriusXM
directamente.
9 Tecla de pausa y reproducción
Utilice esta tecla mientras se encuentra en el
modo de repetición instantánea.
a Tecla de avance/retroceso
Mientras se encuentra en el modo de repeti-
ción instantánea, utilice esta tecla para
saltar hacia adelante o hacia atrás o mantén-
gala pulsada para avanzar o retroceder rápi-
damente.
b Tecla de sintonía
Sintonización en sentido ascendente o des-
cendente de forma manual.
Mantenga la tecla pulsada durante más de
dos segundos para saltarse emisoras. La sin-
tonización por búsqueda comienza en cuan-
to se suelta la tecla. Vuelva a tocarla para
cancelar la sintonización por búsqueda.
c Tecla de canal presintonizado
Recuperación de los canales preajustados
tocando la tecla.
Almacenamiento de la emisora actual en la
lista de canales preajustados manteniendo
pulsada la tecla.
Funcionamiento básico
Sintonización manual (paso a paso) usando los
botones
1 Pulse c o d (TRK).
Sintonización por búsqueda usando los botones
1 Mantenga presionado c o d (TRK).
Nota
Las teclas del teclado táctil no mencionadas en
el apartado Introducción a las funciones del sin-
tonizador SiriusXM podrían aparecer en la panta-
lla.
Consulte Lista de indicadores en la página 207.
Almacenamiento y
recuperación de canales
Se pueden almacenar con facilidad hasta seis
canales presintonizados por banda.
1 Muestra la pantalla de lista de canales
presintonizados.
Consulte Introducción a las funciones del sintoni-
zador SiriusXM en la página 157.
La lista de canales presintonizados aparece en
la pantalla.
Español
Sintonizador SiriusXM
157
Sección
Sintonizador SiriusXM
Es
08
<CRD4844-A>157
Black plate (158,1)
2 Mantenga pulsada una de las teclas de
ajuste de presintonías para almacenar el
canal seleccionado en la memoria.
El canal seleccionado se ha almacenado en la
memoria.
3 Toque la tecla apropiada de canal presin-
tonizado para seleccionar la emisora desea-
da.
Selección de un canal de la
pantalla de lista
Selección de un canal de la lista
de todos los canales
Puede seleccionar una emisora de las disponi-
bles.
1 Toque la tecla de búsqueda para abrir la
pantalla de lista.
2 Seleccione todos los canales.
3 Seleccione el canal deseado.
4 Toque la tecla de cierre para cerrar la pan-
talla de lista.
Se cierra la pantalla.
Selección de un canal de la lista
de categorías
Puede seleccionar un canal de las categorías
disponibles.
Los tipos de categorías disponibles dependerán
de los tipos de canales disponibles.
1 Toque la tecla de búsqueda para abrir la
pantalla de lista.
2 Seleccione una categoría de la lista.
3 Seleccione el canal deseado.
4 Toque la tecla de cierre para cerrar la pan-
talla de lista.
Se cierra la pantalla.
Cambio de la visualización
de lista
Se puede cambiar entre tipos de lista mientras
se muestra una lista.
% Toque Info mientras se muestra una lista
para cambiar entre los tipos de lista.
La lista mostrada cambiará entre los tipos si-
guientes en el orden indicado.
Nombre de canal—Nombre del artista—Título
de la canción—Información de contenido
Selección directa de un canal
SiriusXM
Puede seleccionar un canal SiriusXM directa-
mente introduciendo el número de canal desea-
do.
1 Toque la tecla directa para cambiar al dis-
play de introducción directa.
2 Toque 0 a 9 para introducir el número de
canal deseado.
# Para cancelar los números introducidos, toque
C.
Se selecciona el canal SiriusXM del número in-
troducido.
Selección del canal SiriusXM del
número introducido.
Replayä
Se puede poner en pausa, rebobinar o repetir la
reproducción del canal actual en directo del
mismo modo que cuando sintoniza uno de los
canales guardados en la banda actual de presin-
tonías.
! Toque la tecla de pausa/reproducción para
activar la pausa o la reproducción.
! Toque las teclas de avance o retroceso para
saltar entre los contenidos. Mantenga pulsa-
da las teclas de avance o retroceso para ex-
plorar rápidamente el contenido.
! Toque la tecla de emisión en directo para
salir del modo de repetición e ir al punto en
directo de la emisión.
Uso del etiquetado de iTunes
Nota
Para obtener más información sobre las etique-
tas de iTunes, consulte Acerca del etiquetado de
iTunes en la página 212.
Etiquetado iTunes de canciones
de SiriusXM
1 Sintonice la emisora que transmite.
2 Toque la tecla de etiquetado de canciones
de iTunes
â
.
Almacene la información de etiquetas en esta
unidad.
Puede almacenar la información si el indicador
Tag se muestra cuando se está emitiendo la
canción deseada.
# Mientras se guardan los datos de etiqueta en
esta unidad, Ta g parpadea.
# En esta unidad se puede almacenar información
de etiquetas para un máximo de 50 canciones.
# Según el momento en que se almacene, es posi-
ble que también se guarde la información de etique-
ta de la canción siguiente o anterior.
3 Al completarse, el indicador se
apaga y se muestra en su lugar
.
Guardar la información
etiquetada en el iPod
1 Conecte su iPod.
Cuando su iPod esté conectado a esta unidad,
empezará a almacenar la información etique-
tada automáticamente.
2 Al completarse se apaga el indicador
y
la información etiquetada se almacena en su
iPod.
Configuración del control de
padres
La función Control de padres le permite limitar
el acceso a los canales de SiriusXM, incluidos
aquellos con contenido para adultos.
Cuando está activada, la función Control de pa-
dres le solicitará una contraseña para poder sin-
tonizar las emisoras bloqueadas.
1 Toque la tecla de control de padres para
abrir la pantalla de confirmación de contrase-
ña.
2 Utilice el teclado numérico para introdu-
cir la contraseña de cuatro dígitos y toque la
tecla Enter.
Toque esta tecla para confirmar
la contraseña.
Sintonizador SiriusXM
158
Sección
Sintonizador SiriusXM
Es
08
<CRD4844-A>158
Black plate (159,1)
La contraseña por defecto es 0000.
Si se introduce una contraseña válida, aparece
la lista de canales en la pantalla Control de pa-
dres junto con un icono de bloqueo o desblo-
queo.
3 Las funciones siguientes se pueden com-
pletar desde la pantalla Control de padres.
Bloqueo de canales
El acceso al canal actual de emisión puede
estar bloqueado. Necesitará introducir su con-
traseña más tarde para poder escuchar un
canal bloqueado.
% Para bloquear un canal específico, toque
en la lista el nombre del canal deseado.
Aparecerá un icono de candado cerrado al lado
del nombre del canal bloqueado.
Toque el nombre de un canal bloqueado una se-
gunda vez para desbloquear el canal.
Clear All (eliminación de los
bloqueos de todos los canales)
Puede eliminar a la vez los bloqueos de todos
los canales bloqueados.
% Toque Clear All para desbloquear todos
los canales bloqueados a la vez.
Edit Code (cambio de contraseña)
Puede cambiar su contraseña.
1 Toque Edit Code para cambiar a la panta-
lla de edición de la contraseña.
2 Utilice el teclado numérico para introdu-
cir una contraseña de cuatro dígitos nueva y
toque la tecla Enter.
Toque esta tecla para confirmar
la contraseña.
Una vez establecida la nueva contraseña, se
abre la pantalla Control de padres.
Nota
Si se muestra Revise la radio en su lugar, con-
sulte Radio por satélite SiriusXM en la página
203.
Configurar SiriusXM
TuneStartä
Durante la sintonización mediante los botones
de canales presintonizados, las canciones se
pueden reproducir desde el inicio si está activa-
do TuneStart.
1 Pulse el botón de inicio para cambiar a la
pantalla de inicio.
2 Toque la tecla de sistema para abrir el
menú del sistema.
3 Toque SiriusXM Tune Start en el menú del
sistema para activar o desactivar SiriusXM
Tune Start.
Activado: La canción de audio actual emitida se
reproduce desde el inicio de la canción.
Desactivado: La emisión en directo se reproduce
para el canal de audio actual.
Opciones de exploración
Los canales y las canciones se pueden reprodu-
cir en esta unidad mediante la reproducción
con exploración.
TuneStart puede tardar unos minutos para fun-
cionar tras un ciclo de alimentación o tras cam-
biar a otra banda presintonizada.
TuneScanä
Explore a través de vistas previas breves de can-
ciones que puede haberse saltado en sus cana-
les presintonizados de música memorizados en
la banda actual de presintonías.
1 Toque la tecla de lista para mostrar la
lista de canales presintonizados.
2 Toque la exploración de sintonización.
Cada canción en el canal actual
se reproduce durante ocho se-
gundos una por una.
Consulte Funciones de la reproducción con explo-
ración en la página 159 para ver una lista de fun-
ciones que pueden utilizarse durante la
reproducción con exploración.
Nota
TuneScan es compatible con modelos de sinto-
nizador SXV200 o posteriores. No es compatible
con SXV100.
Exploración por categoría
Explore cada canal en una categoría.
1 Toque la tecla de búsqueda.
2 Toque la categoría deseada.
3 Toque la exploración.
La reproducción en vivo para
cada canal en la categoría actual
se reproduce durante cinco se-
gundos una por una.
Consulte Funciones de la reproducción con explo-
ración en la página 159 para ver una lista de fun-
ciones que pueden utilizarse durante la
reproducción con exploración.
Funciones de la reproducción
con exploración
SiriusXM
22 JAN
AM
12:22
1
2
3
4
5
6
888
WWWWWWWWWWWWW
WWWWWWWWWWWWWWWW
WWWWWWWWWWWWWWWW
WWWWWWWWWWWWWWWW
CH
CH
DB
Scanning
SXM 1
Scan
Next
Scan
Esc
Scan
Back
2 3 4
1
Scan
Play
1 Tecla de reproducción con exploración
Selección del canal o la canción que se está
reproduciendo
2 Tecla de exploración anterior
Cambio a la canción anterior durante la ex-
ploración de sintonización TuneScan.
Cambio al canal anterior durante la explora-
ción por categoría.
3 Tecla de exploración siguiente
Cambio a la canción siguiente durante la ex-
ploración de sintonización TuneScan.
Cambiar al siguiente canal durante la explo-
ración por categoría
4 Tecla de cancelación de la exploración
Salir de la reproducción con exploración
Español
Sintonizador SiriusXM
159
Sección
Sintonizador SiriusXM
Es
08
<CRD4844-A>159
Black plate (160,1)
Restablecer los ajustes
predeterminados
Los ajustes del SiriusXM se restablecerán a los
ajustes predeterminados.
1 Apague la fuente.
Consulte Activación y desactivación de la fuente
en la página 150.
2 Pulse el botón de inicio para cambiar a la
pantalla de inicio.
3 Toque la tecla de sistema para abrir el
menú del sistema.
4 Toque Resetear SiriusXM en el menú del
sistema.
5 Toque Reset.
Una vez restablecidos los ajustes, aparecerá un
mensaje Finalizado.
# Si no desea reiniciar, toque Cancel.
Introducción de funciones
para películas
Esta unidad se puede utilizar para ver archivos
de película DVD/DVD-R/DVD-RW/CD/CD-R/CD-
RW.
Teclas del teclado táctil
DVD vídeo
DVD-V
00'20'' -119'51''
48kHz 16bit
Dolby D
MENU
MENU
TOP
1/2
Dolby DMulti ch
FULL
11
1JAN
PM
12:43
01 01
07'24'' -112'47''
2/2
L+R
Return
1
a 987654
21
fedcg
b
3
Vídeo CD
00'20'' -119'51''
L+R
FULL
Return
98h7 eg b
Al reproducir un disco que contiene una mezcla
de varios tipos de archivos de medios
00'15'' -00'59''
y
y
FULL
1
OFF
Media
987 i3e4
1 Tecla de avance rápido/Tecla de retroceso
Avance rápido o retroceso
Toque para cambiar entre avance rápido y re-
troceso.
2 Tecla de búsqueda
Inicio de la función de búsqueda.
3 Tecla de cambio del idioma de los subtítu-
los
En el caso de los archivos DVD/DivX que vie-
nen con grabaciones multi-subtítulos, se
puede cambiar entre los idiomas de los sub-
títulos durante la reproducción.
4 Tecla de cambio del idioma de audio
Con los archivos de DVD/DivX que permitan
la reproducción del audio en distintos idio-
mas y con distintos sistemas de sonido
(Dolby
â
Digital, DTS, etc.), se puede cambiar
entre los idiomas/sistemas de audio durante
la reproducción.
De acuerdo con el ajuste realizado, es posi-
ble que el vídeo no se pueda reproducir con
el sistema de audio usado para grabar el
DVD.
5 Tecla MENÚ SUPERIOR
Regreso al menú superior durante la repro-
ducción de un DVD.
6 Tecla MENÚ
Visualización del menú de DVD durante la re-
producción de un DVD.
7 Tecla de reproducción en cámara lenta
La selección avanza un cuadro cada vez du-
rante la reproducción.
Mantenga pulsada la tecla durante más de
dos segundos para disminuir la velocidad de
reproducción.
Sintonizador SiriusXM
160
Sección
Disco (CD/DVD)
Es
08
09
<CRD4844-A>160
Black plate (161,1)
Al tocar la tecla aumenta la velocidad de re-
producción en cuatro ajustes graduales du-
rante la reproducción a cámara lenta en
DVD vídeo/Vídeo CD.
8 Tecla de detención
Detención de la reproducción.
Si reanuda la reproducción, ésta se iniciará
desde el punto en el que se detuvo. Vuelva a
tocar la tecla para detener totalmente la re-
producción.
9 Tecla de modo de pantalla
Cambio del modo de pantalla.
Consulte Cambio del modo panorámico en la
página 152.
a Tecla de pausa y reproducción
Interrupción de la reproducción.
Restablecimiento de la reproducción normal
durante la pausa o parada o la reproducción
en cámara lenta / cuadro por cuadro.
b Tecla de retorno
Regreso a la escena especificada adonde se
ha preprogramado que vuelva el DVD que
está reproduciendo.
Esta función no se puede usar si no se ha
preprogramado una escena específica en el
disco DVD.
c Tecla de marcador
Durante la reproducción, toque el lugar
donde desea que se reanude la reproducción
la próxima vez que se cargue el disco.
! Se puede establecer un marcador para
cada DVD vídeo. En total, se pueden esta-
blecer hasta cinco marcadores.
! Para borrar la marca de un disco, toque y
mantenga pulsada la tecla durante la re-
producción.
! La nueva marca reemplazará a la más
antigua.
d Tecla de flecha
Visualización de flechas para utilizar el menú
de DVD.
e Tecla de repetición
Selección de gama de repetición.
f Tecla de ángulo de visión
En el caso de los DVD que vienen con graba-
ciones multi-ángulo (escenas filmadas desde
múltiples ángulos), se puede cambiar entre
los ángulos de visión durante la reproduc-
ción.
g Tecla de salida de audio
Cambio de las salidas de audio al reproducir
discos de vídeo grabados con audio LPCM.
h Tecla de cámara lenta
Disminución de la velocidad de reproduc-
ción en cuatro pasos durante la reproduc-
ción en cámara lenta en vídeo CD.
! No se emiten sonidos durante la repro-
ducción en cámara lenta.
! Con algunos discos, las imágenes pue-
den aparecer borrosas durante la repro-
ducción en cámara lenta.
! La reproducción en cámara lenta hacia
atrás no está disponible.
i Tecla de medio
Cambio entre tipos de archivos multimedia
para reproducir en DVD/CD.
Funcionamiento básico
Reproducción de vídeos.
1 Inserte el disco en la ranura de carga de dis-
cos con el lado de la etiqueta hacia arriba.
La reproducción comenzará automáticamen-
te.
! Si está reproduciendo un DVD o un vídeo CD,
puede aparecer un menú. Consulte Uso del
menú de DVD en la página 162 y Reproducción
PBC en la página 163.
! Cuando la función de reproducción automáti-
ca está activada, la unidad pasará por alto el
menú de DVD y comenzará automáticamente
la reproducción desde el primer capítulo del
primer título. Consulte Reproducción automáti-
ca de DVD en la página 184.
! Si no se muestra el icono de fuente, toque la
pantalla para poder visualizarlo.
! Si se muestra el mensaje después de cargar
un disco que tenga contenido DivX VOD,
toque Play.
Consulte Reproducción del contenido DivX
â
VOD en la página 164.
Expulsión de un disco
! Consulte Expulsión de un disco en la página
153.
Selección de capítulo usando los botones
1 Pulse c o d (TRK).
Avance rápido o rebobinado usando los botones
1 Mantenga presionado c o d (TRK).
! Es posible que el rebobinado/avance rápido
no sea siempre posible en algunos discos. En
tal caso, la reproducción normal se reanudará
automáticamente.
! La velocidad de avance rápido / retroceso rápi-
do depende del tiempo que mantenga pulsado
c o d (TRK). Esta función no está disponible
para Vídeo CD.
Notas
! Este reproductor de DVD puede reproducir
archivos DivX grabados en CD-R/RW, DVD-R/
RW, o MPEG-1/MPEG-2/MPEG -4. (Consulte
Archivos de vídeo DivX en la página 210 para
comprobar los archivos que se pueden repro-
ducir).
! No introduzca otra cosa que no sea un DVD-
R/RW o CD-R/RW por la ranura de carga de
discos.
! Algunas operaciones pueden no estar dispo-
nibles al ver un medio debido a la propia pro-
gramación del disco. En tal caso, el icono
aparece en pantalla.
! Puede haber teclas del teclado táctil no men-
cionadas en el apartado Introducción de fun-
ciones para películas en la página 160 que
aparecen en la pantalla.
Consulte Lista de indicadores en la página
207.
! Con algunos DVD, sólo se podrá cambiar
entre los idiomas/sistemas de audio usando
una visualización de menú.
! También se puede cambiar entre los idio-
mas/sistemas de audio utilizando el menú
Ajuste de Video. Para obtener más informa-
ción, consulte Ajuste del idioma del audio en
la página 182.
! Esta unidad volverá a la reproducción normal
si cambia el idioma de audio durante el avan-
ce rápido/retroceso rápido, una pausa o la re-
producción a cámara lenta.
! Con algunos DVD, sólo se podrá cambiar
entre los idiomas de los subtítulos usando
una visualización de menú.
! También se puede cambiar entre los idiomas
de los subtítulos utilizando el menú
Ajuste de Video. Para obtener más informa-
ción, consulte Ajuste del idioma de los subtí-
tulos en la página 182.
Español
Disco (CD/DVD)
161
Sección
Disco (CD/DVD)
Es
09
<CRD4844-A>161
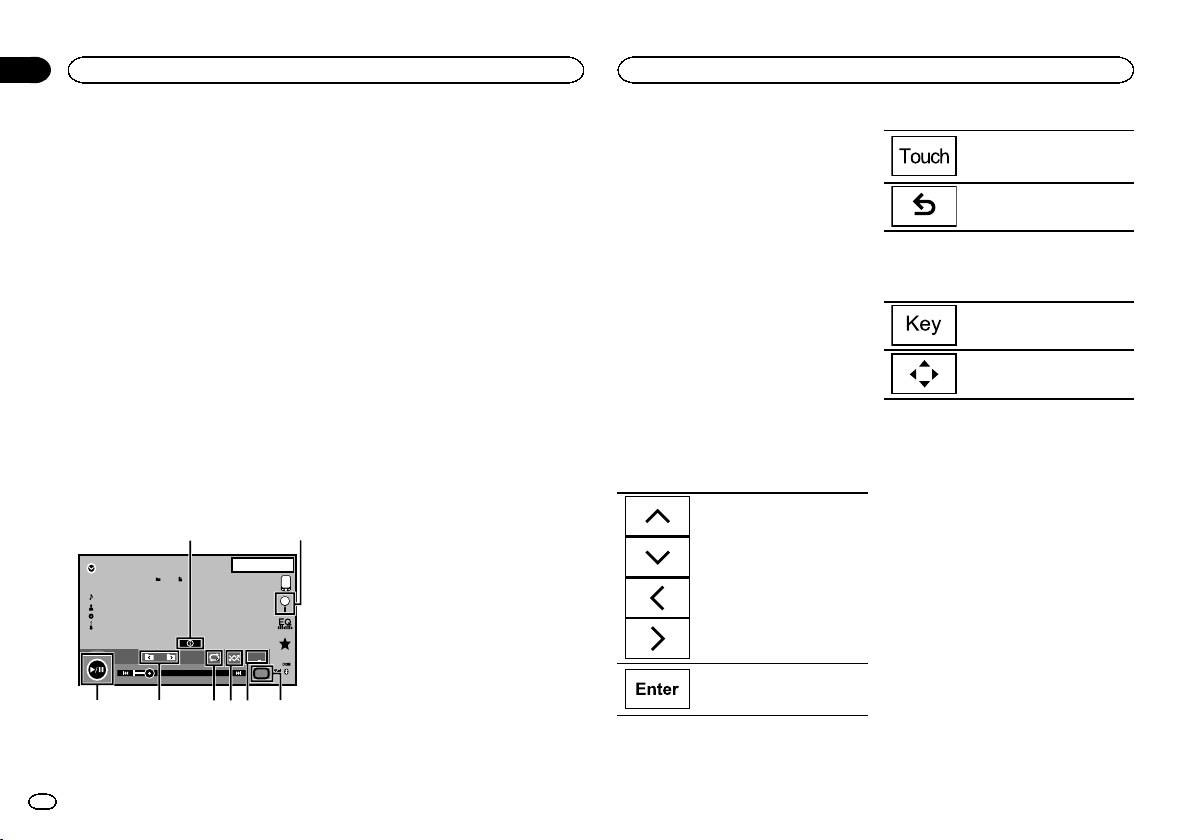
Black plate (162,1)
! Esta unidad volverá a la reproducción normal
si cambia el idioma de los subtítulos durante
el avance rápido/retroceso rápido, una pausa
o la reproducción a cámara lenta.
! Durante la reproducción de una escena fil-
mada desde múltiples ángulos, se visualiza
el icono de ángulo. Use el menú
Ajuste de Video para activar o desactivar la
visualización del icono de ángulo. Para obte-
ner más información, consulte Ajuste de la
visualización multiángulo del DVD en la pági-
na 183.
! Volverá a la reproducción normal si cambia
el ángulo de visión durante el avance rápido/
retroceso rápido, una pausa o la reproduc-
ción en cámara lenta.
Funciones de reproducción
de sonido
Esta unidad se puede utilizar para escuchar ar-
chivos de sonido DVD-R/DVD-RW/CD/CD-R/CD-
RW.
Teclas del teclado táctil
ROM
S.Rtrv
11
Abcdefghi
Abcdefghi
Abcdefghi
Abcdefghi
1JAN
PM
12:43
00'37'' -08'43''
12
45678
3
Media
1 Tecla de información
Cambio de la información de texto que se vi-
sualiza en esta unidad cuando se reprodu-
cen archivos MP3/WMA/AAC.
2 Tecla de búsqueda
Visualización de una lista de títulos de pista /
nombres de archivo entre los que seleccio-
nar canciones de un CD.
Visualización de la lista de nombres de archi-
vos para la selección de estos.
3 Tecla de medio
Cambio entre tipos de archivos multimedia
en DVD o CD.
4 Tecla de restauración de sonido
Consulte Utilización del sound retriever en la
página 152.
5 Tecla de reproducción aleatoria
Reproducción de las canciones en orden
aleatorio.
6 Tecla de repetición
Selección de gama de repetición.
7 Tecla de carpeta anterior/carpeta siguien-
te
Selección de una carpeta.
8 Tecla de pausa y reproducción
Pausa e inicio de la reproducción.
Cambio del tipo de archivo
multimedia
Cuando reproduzca un medio digital que tenga
una combinación de varios tipos de ficheros de
multimedia, tales como DivX, MPEG-1, MPEG-2,
MPEG-4 y MP3, puede cambiar entre los tipos
de ficheros multimedia que desee reproducir.
% Toque Media para cambiar entre los tipos
de archivos multimedia.
CD-DA (datos de audio (CD-DA))—Música/ROM
(audio comprimido)—Vídeo (archivos de vídeo
DivX, MPEG-1, MPEG-2, MPEG-4)
Nota
Esta unidad no permite reproducir datos de
audio (CD-DA) en discos DVD-R/RW/ROM.
Uso del menú de DVD
(Función para DVD vídeo)
Algunos DVD le permiten seleccionar una op-
ción del contenido del disco utilizando un
menú.
Uso de las flechas
1 Visualice las flechas para utilizar el menú
de DVD.
2 Seleccione el elemento de menú que
desea utilizar.
Selección del elemento de menú
que desea utilizar.
Inicio de la reproducción desde
el elemento del menú selecciona-
do.
Uso del menú de DVD tocando
directamente el elemento del
menú.
Vuelta a la pantalla anterior.
# Para utilizar el menú de DVD tocando directa-
mente el elemento de menú, toque este icono para
activar la opción.
Para volver a la visualización nor-
mal de DVD vídeo.
Visualización de las flechas.
# La manera en que se visualiza el menú varía
según el disco.
# Según el contenido de los discos DVD, es posible
que esta función no se ejecute correctamente. En tal
caso, las teclas del teclado táctil permitirán utilizar
el menú DVD.
Reproducción aleatoria
(shuffle)
% Toque la tecla de reproducción aleatoria.
! On – Reproducción de archivos en orden
aleatorio dentro de la gama de repetición,
Folder y Disc.
! Off – Cancela la reproducción aleatoria.
Repetición de reproducción
% Toque la tecla de repetición.
! Disc– Reproduce todo el disco actual
! Chapter – Repite el capítulo actual
! Title – Repite el título actual
! Track – Repite la pista actual
Disco (CD/DVD)
162
Sección
Disco (CD/DVD)
Es
09
<CRD4844-A>162
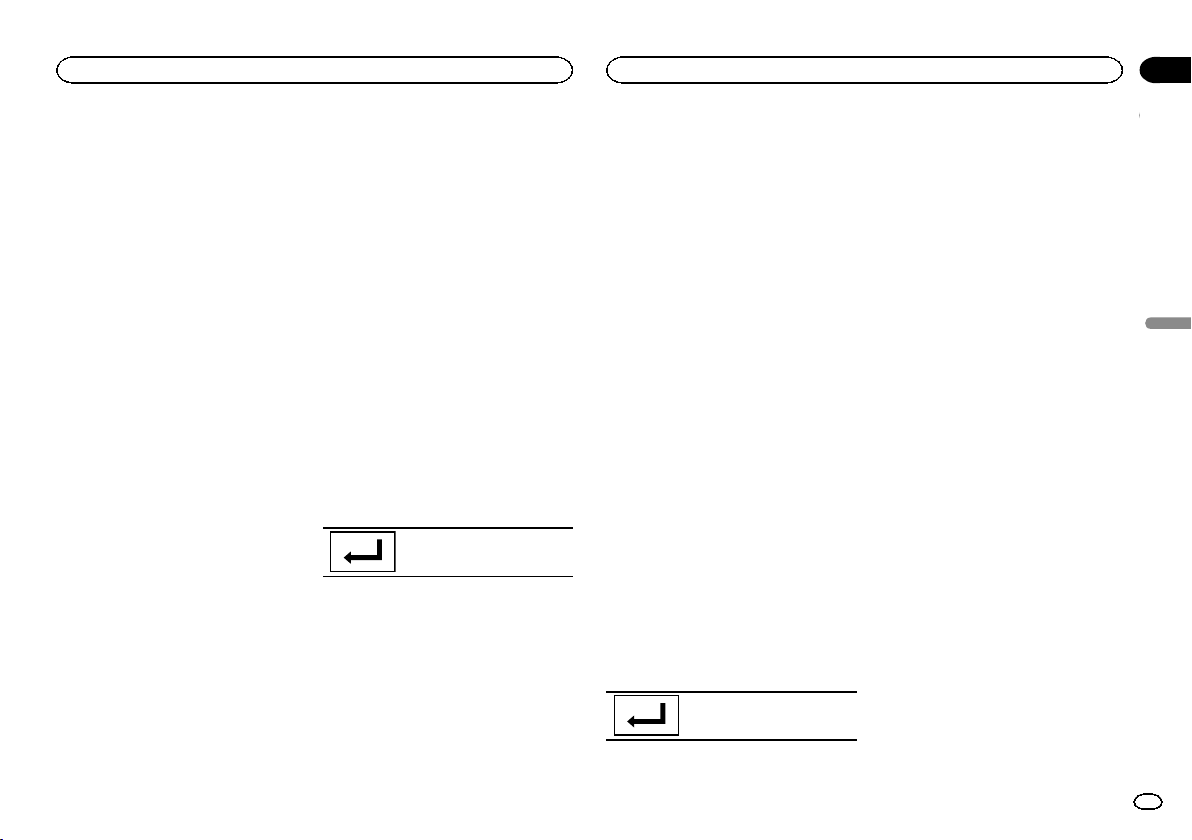
Black plate (163,1)
! File – Repite el archivo actual
! Folder – Repite la carpeta actual
! Disc/All – Repetir todos los archivos del
disco actual
! All – Repite todos los archivos
Notas
! Esta función no se puede utilizar durante la
reproducción de un vídeo CD con función
PBC (control de reproducción).
! Si se realiza una búsqueda de capítulos, el
avance rápido/retroceso, la reproducción
cuadro a cuadro o en cámara lenta, la repeti-
ción de reproducción se detendrá.
! Al reproducir discos con audio comprimido y
datos de audio (CD-DA), la reproducción se
repite dentro del tipo de datos que se está re-
produciendo, aunque se haya seleccionado
Disc.
! Si se selecciona otra carpeta durante la repe-
tición de reproducción, la gama de repeti-
ción cambia a Disc/All.
! Si se realiza una búsqueda de pista o un
avance rápido/retroceso durante File,la
gama de repetición de reproducción cambia
a Folder.
! Si se realiza una búsqueda de capítulos o tí-
tulos o el avance/retroceso rápido durante la
repetición Chapter, la repetición de repro-
ducción se desactiva automáticamente.
! Si se realiza una búsqueda de pista o un
avance rápido/retroceso durante Track,la
gama de repetición de reproducción cambia
a Disc.
! Cuando se selecciona Folder, no se puede
reproducir una subcarpeta de esa carpeta.
Búsqueda de la parte que
desea reproducir
Puede utilizar la función de búsqueda para bus-
car la parte que desee reproducir.
Para DVD vídeo, puede seleccionar Title (título),
Chapter (capítulo) o 10key (teclado numérico).
Para vídeo CD, puede seleccionar Track (pista) o
10key (teclado numérico).
! La función de búsqueda por capítulo no está
disponible una vez detenida la reproducción
del disco.
! Esta función no se puede utilizar durante la
reproducción de algunos DVD vídeos o ví-
deos CD con función PBC (control de repro-
ducción).
1 Inicie la función de búsqueda.
Consulte Introducción de funciones para pelícu-
las en la página 160.
2 Toque la opción de búsqueda deseada (p.
ej., Chapter).
3 Toque 0 a 9 para introducir el número de-
seado.
# Para cancelar los números introducidos, toque
C.
4 Inicie la reproducción a partir de la parte
seleccionada.
Registro de números e inicio de
la reproducción.
Nota
Con los discos que presenten un menú, también
se puede usar el menú del DVD para realizar su
selección.
Consulte Introducción de funciones para pelícu-
las en la página 160.
Selección de la salida de audio
Cuando se reproducen discos de DVD vídeo gra-
bados con audio LPCM, es posible cambiar la
salida de audio.
Cuando se reproducen discos de vídeo CDs,
puede cambiar entre la salida de audio estéreo y
monocanal.
! Esta función no está disponible una vez dete-
nida la reproducción del disco.
% Toque la tecla de salida de audio para
cambiar entre los tipos de salida de audio.
! L+R – izquierda y derecha
! Left – izquierda
! Right – derecha
! Mix – mezcla izquierda y derecha
Nota
Es posible que no se pueda seleccionar o usar
esta función, en función del tipo de disco y la
sección del mismo que se está reproduciendo.
Reproducción PBC
(Función para vídeo CD)
Durante la reproducción de un vídeo CD que
viene con la función PBC (control de reproduc-
ción), se visualiza PBC On.
1 Inicie la función de búsqueda.
Consulte Introducción de funciones para pelícu-
las en la página 160.
2 Toque 10key para mostrar el teclado nu-
mérico.
3 Toque 0 a 9 que corresponda al menú de-
seado.
4 Inicie la reproducción a partir de la parte
seleccionada.
Registro de números e inicio de
la reproducción.
Notas
! Se puede visualizar el menú tocando Return
durante la reproducción PBC. Para obtener
detalles, consulte las instrucciones suminis-
tradas con el disco.
! No se puede cancelar la reproducción PBC
de un vídeo CD.
! Durante la reproducción de un vídeo CD que
viene con la función PBC (control de repro-
ducción), no se puede utilizar la función de
búsqueda ni se puede seleccionar la gama
de repetición de reproducción.
Selección de pistas de la
lista de títulos de las pistas
Puede seleccionar pistas para su reproducción
usando la lista de títulos de pistas, que consiste
en una lista de las pistas grabadas en un disco.
1 Acceda a la lista de títulos de las pistas.
Consulte Funciones de reproducción de sonido
en la página 162.
2 Toque el título de la pista favorita.
Se inicia la reproducción.
Selección de ficheros de la
lista de nombres de ficheros
(Funciona con audio comprimido/DivX/MPEG-1/
MPEG-2/MPEG-4)
La lista de nombres de archivos es una lista con
los nombres de archivos (o nombres de carpe-
tas) entre los que puede seleccionar un archivo
(o carpeta) para su reproducción.
1 Toque la tecla de búsqueda para acceder
a la lista de nombres de archivos (o carpe-
tas).
Español
Disco (CD/DVD)
163
Sección
Disco (CD/DVD)
Es
09
<CRD4844-A>163
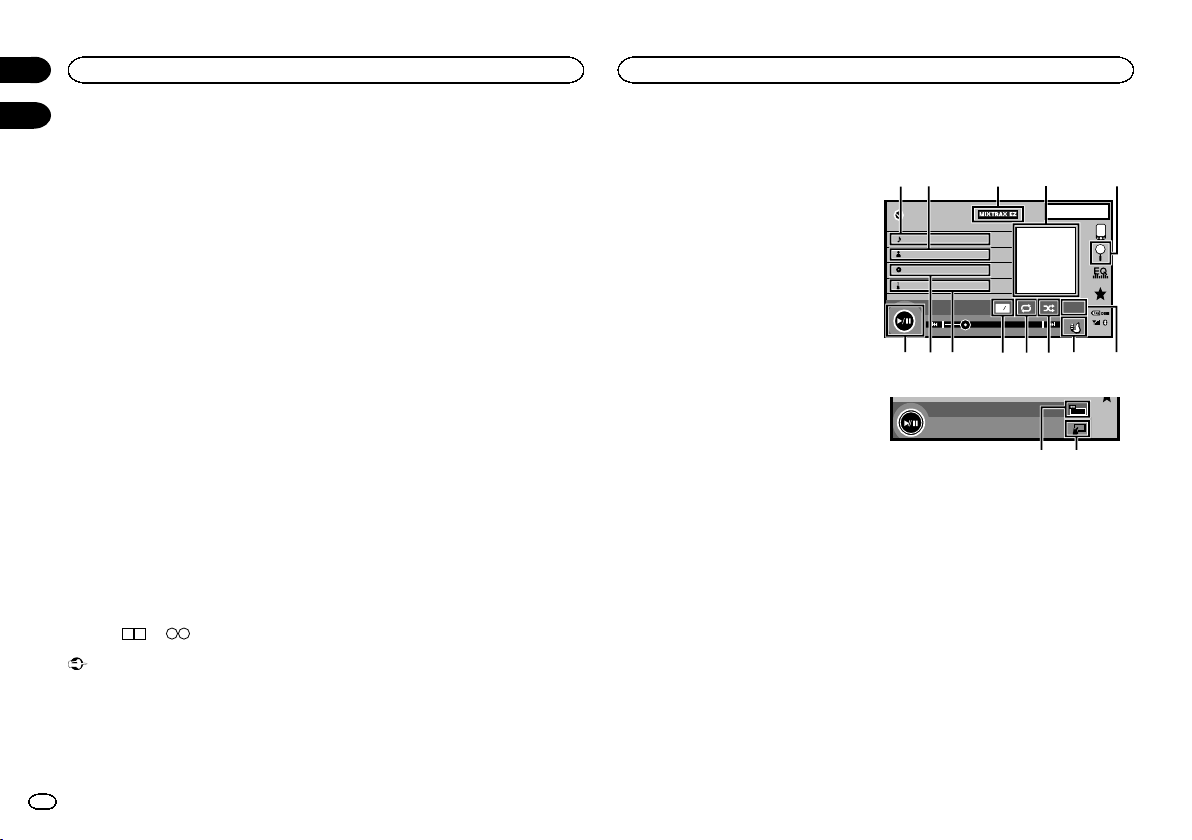
Black plate (164,1)
2 Toque el nombre del archivos (o carpeta)
favorito.
# Si se ha seleccionado una carpeta, se podrá vi-
sualizar una lista de los nombres de los archivos (o
las carpetas) en ella. Repita este procedimiento para
seleccionar el nombre del archivo deseado.
# Si la carpeta 1 (RAÍZ) no contiene archivos, la re-
producción comienza en la carpeta 2.
Nota
Si no se visualiza parte de la información graba-
da, aparecerá una tecla de desplazamiento a la
derecha de la lista. Toque la tecla de desplaza-
miento para desplazarse.
Reproducción del contenido
DivX
â
VOD
Es posible que parte del contenido de DivX bajo
demanda (VOD) se pueda reproducir solamente
un número fijo de veces. Cuando cargue un
disco que contenga este tipo de contenido, el
número de reproducciones realizadas se mues-
tra en la pantalla y luego tiene la opción de re-
producir el disco o bien detenerlo.
! Para el contenido DivX VOD sin esta restric-
ción, usted podrá cargar el disco en su repro-
ductor y reproducir el contenido tantas veces
como usted quiera, y no se visualizará nin-
gún mensaje.
! Puede confirmar el número de veces que se
puede reproducir un contenido comproban-
do el mensaje: Este Alquiler DivX ha
usado
de vistas..
Importante
! Para reproducir el contenido DivX VOD en
esta unidad, tendrá que registrar primero la
unidad con el proveedor del contenido de
DivX VOD. Consulte Visualización del código
de registro de DivX
â
VOD en la página 184
para obtener información sobre su código de
registro.
! El contenido de DivX VOD está protegido por
un sistema DRM (administración de dere-
chos digitales). Esto limita la reproducción
del contenido a los dispositivos específicos
registrados.
% Si se muestra el mensaje después de car-
gar un disco que tenga contenido DivX VOD,
toque Play.
Se iniciará la reproducción del contenido DivX
VOD.
# Para saltar al siguiente archivo, toque Next Play.
# Si no desea reproducir el contenido DivX VOD,
toque Stop.
Control de iPod
Este manual se aplica a los siguientes modelos
iPod.
iPod con conector de 30 patillas
— iPod touch de 4ª generación
— iPod touch de 3ª generación
— iPod touch de 2ª generación
— iPod touch de 1ª generación
— iPod classic de 160 GB
— iPod classic de 120 GB
— iPod classic
— iPod con vídeo
— iPod nano de 6ª generación
— iPod nano 5ª generación
— iPod nano de 4ª generación
— iPod nano de 3ª generación
— iPod nano de 2ª generación
— iPod nano 1ª generación
— iPhone 4S
— iPhone 4
— iPhone 3GS
— iPhone 3G
— iPhone
iPod con conector Lightning
— iPod touch de 5ª generación
— iPod nano de 7ª generación
— iPhone 5
Funciones de reproducción
de sonido
Se puede utilizar la unidad para escuchar archi-
vos de sonido de iPod.
Notas
! Podría no mostrarse el tiempo de reproduc-
ción correcto.
! La pantalla cambia al escuchar a música
que no sea del iPod.
Excepto para Pandora
Teclas del teclado táctil
Audio de iPod (Audio de control)
iPod
Appr
ppr
App
pp
Ap p
1JAN
PM
12:43
Abcdefghi
1/9
Abcdefghi
Abcdefghi
Abcdefghi
01'17'' -05'29''
S.Rtrv
All
All
All
x
1
2
54321
dcb a987 6
Audio de iPod (App Mode)
FULL
ef
1 Título de la canción
Visualización de la lista Canciones en el
iPod.
El nombre de la aplicación se muestra cuan-
do se escucha música que no sea del iPod.
Excepto para Pandora
2 Nombre del artista
Visualización de la lista Artistas en el iPod.
El título de la canción se muestra cuando se
escucha música que no sea del iPod.
Excepto para Pandora
3 Tecla MIXTRAX EZ
Inicio de MIXTRAX EZ.
Consulte Función MIXTRAX EZ en la página
174.
Disco (CD/DVD)
164
Sección
iPod
Es
09
10
<CRD4844-A>164
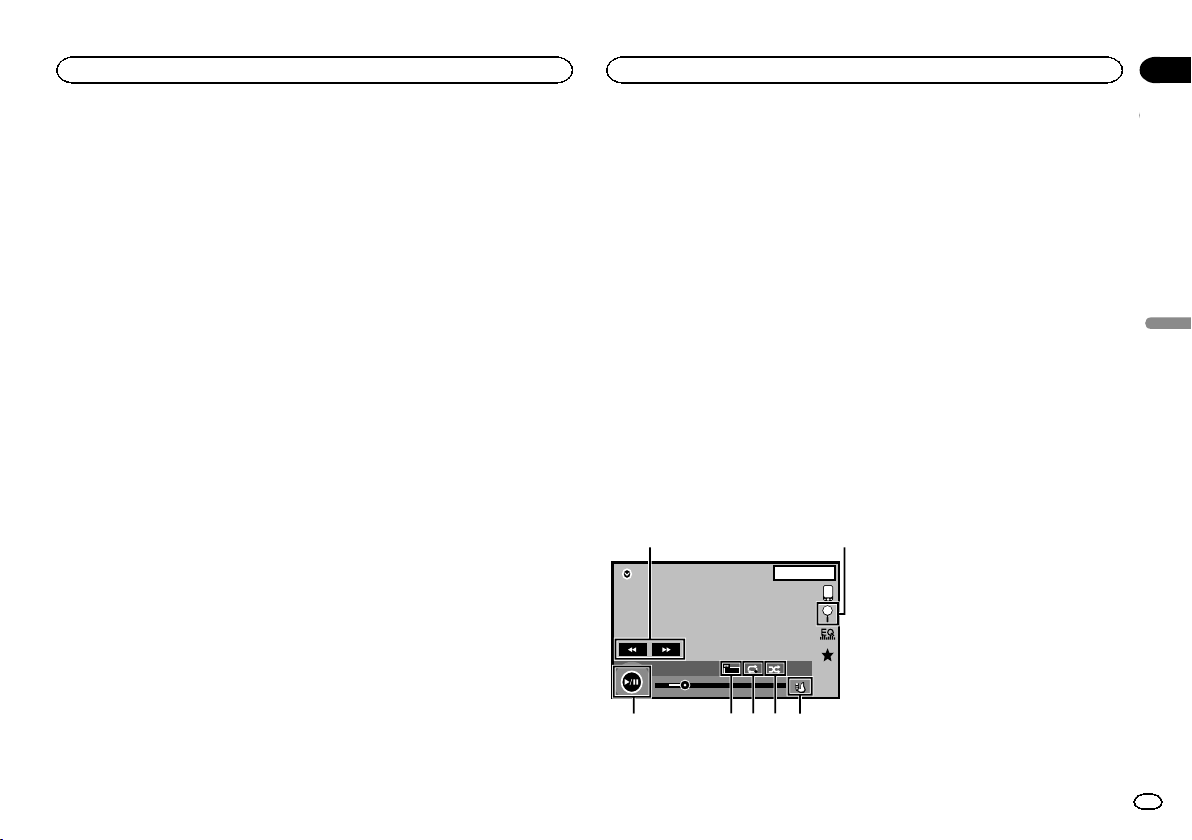
Black plate (165,1)
4 Material gráfico
Inicio de búsqueda de enlace en su iPod
cuando toca la visualización de material grá-
fico.
5 Tecla de búsqueda
Visualización de los menús del iPod.
6 Tecla de restauración de sonido
Consulte Utilización del sound retriever en la
página 152.
7 Tecla de modo de control de iPod
Realización de operaciones desde su iPod y
escucha a través de los altavoces de su auto-
móvil.
8 Tecla de selección aleatoria
Reproducción de las canciones del iPod en
orden aleatorio.
9 Tecla de repetición
Selección de gama de repetición.
a Tecla de cambio de velocidad
Cambio de la velocidad de reproducción del
audiolibro en el iPod.
b Género
Visualización de la lista Géneros en el iPod.
El título del álbum se muestra cuando se es-
cucha música que no sea del iPod.
Excepto para Pandora
c Título del álbum
Visualización de la lista Álbumes en el iPod.
El nombre del artista se muestra cuando se
escucha música que no sea del iPod.
Excepto para Pandora
d Tecla de pausa y reproducción
Pausa e inicio de la reproducción.
e Tecla de operación de la unidad
Operaciones desde esta unidad y reproduc-
ción de música en el iPod mediante los alta-
voces del coche.
f Tecla de modo de pantalla
Cambio del modo de pantalla.
Funciones de reproducción de
sonido para Bluetooth
(Función de AVH-X5600BHS/AVH-X4600BT/AVH-
X3600BHS/AVH-X2600BT)
Al realizar los siguientes ajustes, puede disfrutar
de audio en esta unidad utilizando una conexión
Bluetooth.
1 Ajuste Conexión de dispositivo.
Conexión de dispositivo se puede ajustar
cuando se cumplen todas las condiciones si-
guientes.
— El iPhone no está conectado.
— Sin conexión Bluetooth.
— La fuente está apagada.
1 Apague la fuente.
Consulte Tecla Source off en la página 149.
2 Pulse el botón de inicio para cambiar a la
pantalla de inicio.
3 Toque la tecla de sistema para abrir el menú
del sistema.
4 Toque Conexión de dispositivo en el menú
del sistema.
5 Toque iPhone via Bluetooth para seleccio-
nar.
2 Conecte el iPhone y esta unidad a través
de Bluetooth.
Consulte Menú de conexión Bluetooth en la pági-
na 191.
Nota
El material gráfico no se mostrará cuando las
funciones de reproducción de sonido se reali-
cen a través de una conexión Bluetooth.
Funciones de imágenes en
movimiento
Para usuarios de iPod con conector de 30
patillas
Se puede utilizar la unidad para ver archivos de
película de iPod.
! Según su iPod, es posible que no se produz-
ca ninguna emisión, a menos que utilice CD-
IU201S/CD-IU201V (se vende por separado).
Asegúrese de que utiliza CD-IU201S/CD-
IU201V para conectar el iPod.
Para usuarios de iPod con conector Light-
ning
! Para reproducir archivos de película en iPod
con esta unidad, conecte un CD-IV203 (se
vende por separado) y un adaptador AV digi-
tal Lightning (productos de Apple Inc.) (se
vende por separado) e instale la aplicación
CarMediaPlayer en su iPod. Consulte el ma-
nual de CarMediaPlayer para información
adicional.
Consulte Operación de AppRadio Mode en la
página 168.
Teclas del teclado táctil
iPod
02'35'' -21'54''
1JAN
PM
12:43
FULL
1
Appr
ppr
App
pp
Ap p
2/3
2
1
654 37
2
1 Tecla de avance rápido/Tecla de retroceso
Avance rápido o retroceso
Toque para cambiar entre avance rápido y re-
troceso.
2 Tecla de búsqueda
Visualización de los menús del iPod.
3 Tecla de modo de control de iPod
Realización de operaciones desde su iPod y
escucha a través de los altavoces de su auto-
móvil.
4 Tecla de selección aleatoria
Reproducción del vídeo en su iPod en orden
aleatorio.
5 Tecla de repetición
Selección de gama de repetición.
6 Tecla de modo de pantalla
Cambio del modo de pantalla.
Consulte Cambio del modo panorámico en la
página 152.
7 Tecla de pausa y reproducción
Interrupción de la reproducción.
Restablecimiento de la reproducción normal
durante la pausa o la reproducción en cáma-
ra lenta / cuadro por cuadro.
Español
iPod
165
Sección
iPod
Es
10
<CRD4844-A>165
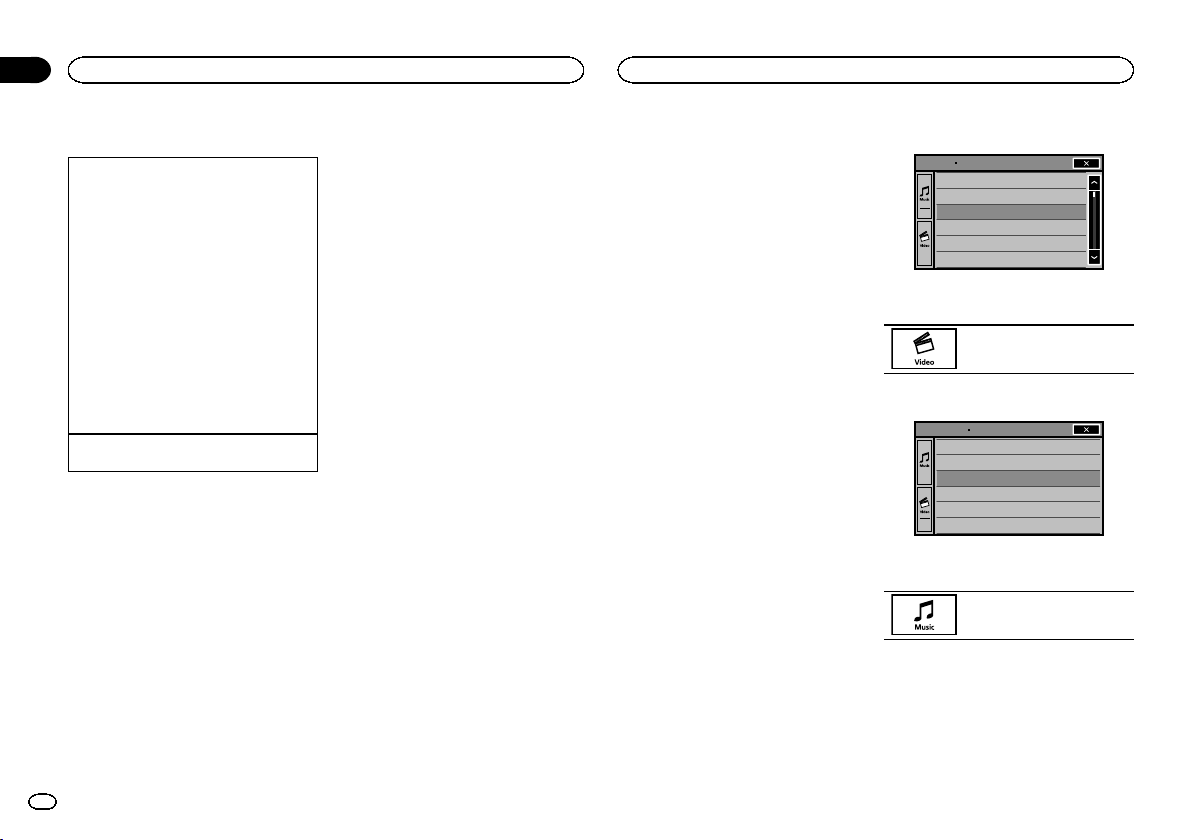
Black plate (166,1)
Funcionamiento básico
Reproducción de vídeos.
1 Toque la tecla de búsqueda para que aparez-
can los menús de iPod.
2 Seleccione una película para reproducirla.
Consulte Reproducción de vídeos desde su iPod
en la página 166.
! Si no se muestra el icono de fuente, toque
la pantalla para poder visualizarlo.
! Desconecte los auriculares del iPod antes
de conectarlo a esta unidad.
! En función del modelo de iPod y la canti-
dad de datos guardados en él, es posible
que la reproducción tarde un tiempo en
comenzar.
! Use el teclado táctil para seleccionar el
iPod tras conectarlo a esta unidad.
! Se muestra Sin dispositivo al desconectar
el iPod.
Avance rápido o rebobinado usando los botones
1 Mantenga presionado c o d (TRK).
Notas
! Para asegurar un funcionamiento correcto,
conecte el cable conector del Dock del iPod
directamente a esta unidad.
! Cuando el iPod está conectado a esta uni-
dad, no se puede encender ni apagar.
! Las teclas del teclado táctil no mencionadas
en el apartado Funciones de imágenes en mo-
vimiento podrían aparecer en la pantalla.
Consulte Lista de indicadores en la página
207.
Uso de la función iPod de la
unidad desde el iPod
Puede escuchar el sonido de las aplicaciones
que tenga en el iPod a través de los altavoces
del automóvil cuando está seleccionado
App Mode.
Esta función no es compatible con los siguien-
tes modelos de iPod.
! iPod nano 1ª generación
! iPod con vídeo
Notas
! Las funciones relacionadas con el vídeo no
están disponibles para usuarios de iPod con
conector Lightning.
! MIentras se utiliza esta función, aunque la
llave de encendido del vehículo se coloque
en posición de apagado, no se desactivará el
iPod. Para apagarlo, use el iPod.
1 Toque la tecla del modo de control de
iPod para cambiar a App Mode.
2 Utilice el iPod conectado para seleccionar
un vídeo/canción y reproducirlo.
Notas
! Las siguientes funciones estarán disponibles
en esta unidad incluso si se ajusta el modo
de control en App Mode:
Sin embargo, dicho funcionamiento depen-
derá de las aplicaciones.
— Reproducción/pausa
— Avance rápido/retroceso
— Avance/retroceso de pista
— Avance/retroceso de capítulo
! App Mode es compatible con los siguientes
modelos de iPod:
— iPod touch de 4ª generación
— iPod touch de 3ª generación
— iPod touch de 2ª generación
— iPod touch de 1ª generación
— iPod classic de 160 GB
— iPod classic de 120 GB
— iPod classic
— iPod nano de 6ª generación
— iPod nano 5ª generación
— iPod nano de 4ª generación
— iPod nano de 3ª generación
— iPod nano de 2ª generación
— iPhone 4S
— iPhone 4
— iPhone 3GS
— iPhone 3G
— iPhone
Tecla de selección aleatoria
% Toque la tecla de selección aleatoria.
! Songs – Reproduce canciones/vídeos si-
guiendo un orden aleatorio dentro de la lista
seleccionada.
! Albums – Reproduce canciones/vídeos en
orden desde un álbum seleccionado aleato-
riamente.
! Off – Desactiva la reproducción aleatoria.
Repetición de reproducción
% Toque la tecla de repetición.
! One – Sólo repite la canción/vídeo actual
! All – Repite todas las canciones/vídeos de la
lista seleccionada en el iPod
Reproducción de vídeos
desde su iPod
Los vídeos se pueden reproducir en esta unidad
si se conecta un iPod con funciones de vídeo.
! Esta unidad puede reproducir “películas”, “ví-
deos musicales”, “podcasts de vídeo”, “pro-
gramas de TV” y “películas alquiladas”
descargados desde la tienda de iTunes.
Nota
Esta función no está disponible para usuarios
de iPod con conector Lightning.
1 Toque Search para visualizar los menús
del iPod.
Consulte Tecla de búsqueda en la página 165.
2 Cambie al modo vídeo del iPod.
Playlists
Artists
Albums
Songs
Podcasts
Genres
ROOT
# Toque el icono si quiere cambiar al modo de
vídeo del iPod.
Cambio al modo vídeo del iPod.
3 Reproduzca el vídeo en el iPod.
Video Playlists
Movies
Music Videos
TV Shows
Video Podcasts
Rented Movies
ROOT
# Toque el icono si quiere cambiar al modo de mú-
sica del iPod.
Cambio al modo música del iPod.
Búsqueda de un vídeo/tema
musical en el iPod
Para facilitar el funcionamiento y la búsqueda,
las operaciones para controlar un iPod con esta
unidad se han diseñado para ser lo más pareci-
das posibles al funcionamiento del iPod.
iPod
166
Sección
iPod
Es
10
<CRD4844-A>166
Black plate (167,1)
Nota
Las funciones relacionadas con el vídeo no
están disponibles para usuarios de iPod con co-
nector Lightning.
Búsqueda de un vídeo/tema
musical por categoría
1 Toque la tecla de búsqueda para que apa-
rezcan los menús de iPod.
Consulte Tecla de búsqueda en la página 165.
2 Toque una de las categorías en que desee
buscar un vídeo/tema musical.
Listas de categoría (para vídeo)
! Video Playlists (listas de reproducción de
vídeo)
! Movies (películas)
! Music Videos (vídeos musicales)
! TV Shows (programas de TV)
! Video Podcasts (podcasts de vídeo)
! Rented Movies (películas alquiladas)
! Video ITunesU (vídeo ITunesU)
Listas de categoría (para música)
! Playlists (listas de reproducción)
! Artistas (artistas)
! Álbumes (álbumes)
! Canciones (canciones)
! Podcasts (podcasts)
! Géneros (géneros)
! Compositores (compositores)
! Audiolibros (audiolibros)
3 Toque el título de una lista que desee re-
producir.
Repita este procedimiento hasta encontrar el
vídeo/tema musical deseado.
Notas
! Según la generación o versión del iPod, es
posible que algunas funciones no estén dis-
ponibles.
! Es posible reproducir listas de reproducción
creadas con el programa de ordenador
(MusicSphere). Dicho programa estará dis-
ponible en nuestro sitio web.
! Las listas de reproducción creadas con el
programa de ordenador (MusicSphere) se
muestran de forma abreviada.
Búsqueda alfabética en las listas
1 Seleccione una categoría.
Consulte Búsqueda de un vídeo/tema musical
por categoría en la página 167.
2 Cambie al modo de búsqueda alfabético.
Cambio al modo de búsqueda al-
fabético.
Se muestra el modo de búsqueda alfabética.
3 Toque la primera letra del título del
vídeo/canción que está buscando.
Mientras se está realizando la búsqueda, no se
puede utilizar el teclado táctil.
# Para refinar la búsqueda con una letra diferente,
toque Cancel.
4 Toque el título de una lista que desee re-
producir.
Repita este procedimiento hasta encontrar la
canción/vídeo deseado.
Cambio de la velocidad del
audiolibro
% Toque la tecla de cambio de velocidad
para cambiar la velocidad.
2
Reproducción con velocidad su-
perior a la normal
1
Reproducción con velocidad nor-
mal
1/2
Reproducción con velocidad infe-
rior a la normal
Visualización de listas
relacionadas con la canción
que se está reproduciendo
(búsqueda de enlace)
Toque el material gráfico para abrir una lista de
los nombres de canciones del álbum que se
está reproduciendo. Toque el nombre de la can-
ción que desea reproducir para empezar su re-
producción.
Nota
Si no se visualiza parte de la información graba-
da, aparecerá una tecla de desplazamiento a la
derecha de la lista. Toque la tecla de desplaza-
miento para desplazarse.
Español
iPod
167
Sección
iPod
Es
10
<CRD4844-A>167
Black plate (168,1)
Operación de AppRadio Mode
Este sistema se puede cambiar a AppRadio
Mode, que se puede visualizar y permite mane-
jar la aplicación para iPhone en la pantalla.
En AppRadio Mode se pueden manejar las
aplicaciones mediante gestos de los dedos,
como pulsar, arrastrar, desplazar o sacudir la
pantalla del sistema.
Instale la app AppRadio en su iPhone.
ADVERTENCIA
Ciertos usos de un teléfono inteligente pue-
den no ser legales en su jurisdicción duran-
te la conducción, de modo que tendrá que
tener en cuenta y obedecer tales restriccio-
nes.
Si tiene alguna duda sobre una función en
particular, ejecútela solamente con el ve-
hículo aparcado.
No se deberá utilizar ninguna función a no
ser que sea seguro bajo las condiciones ac-
tuales de conducción.
PRECAUCIÓN
Durante la conducción, no se puede introducir
texto en el iPod.
! Pioneer no se responsabiliza de cualquier
problema que pueda surgir a causa de un
contenido incorrecto o defectuoso de la
aplicación.
! El contenido y funcionamiento de las apli-
caciones compatibles son responsabilidad
de los proveedores de las mismas.
! En AppRadio Mode, el funcionamiento
del producto queda limitado durante la
conducción; algunas funciones estarán
disponibles según los proveedores de la
aplicación.
! La disponibilidad de la función en
AppRadio Mode viene determinada por el
proveedor de la aplicación, no por Pioneer.
! AppRadio Mode permite acceder a apli-
caciones diferentes a las que aparecen lis-
tadas (sujetas a limitaciones durante la
conducción), pero el nivel de uso del con-
tenido lo determinan los proveedores de
las aplicaciones.
Importante
! Cuando se estén reproduciendo música y soni-
dos simultáneamente desde una aplicación, con-
sulte la sección siguiente. Consulte Utilización
del mezclador de sonido en la página 194.
Notas
! Las aplicaciones que se pueden manejar
cambiando este sistema a AppRadio Mode
sólo están disponibles en AppRadio Mode.
! Compruebe las aplicaciones de iPhone com-
patibles con AppRadio Mode en
http://www.pioneerelectronics.com/
AppRadioMode
en Canadá
http://www.pioneerelectronics.ca/
AppRadioMode
Compatibilidad con iPhone
AppRadio Mode es compatible con los siguien-
tes modelos de iPod:
! iPod touch de 5.ª generación (solo con AVH-
X5600BHS/AVH-X4600BT/AVH-X3600BHS/
AVH-X2600BT)
! iPod touch de 4ª generación
! iPhone 5 (solo con AVH-X5600BHS/AVH-
X4600BT/AVH-X3600BHS/AVH-X2600BT)
! iPhone 4S
! iPhone 4
Procedimiento de inicio
1 Instale la app AppRadio en su iPhone.
2 Ajuste Conexión de dispositivo.
Conexión de dispositivo se puede ajustar
cuando se cumplen todas las condiciones si-
guientes.
— El iPhone no está conectado.
— Sin conexión Bluetooth.
— La fuente está apagada.
1 Apague la fuente.
Consulte Tecla Source off en la página 149.
2 Pulse el botón de inicio para cambiar a la
pantalla de inicio.
3 Toque la tecla de sistema para abrir el menú
del sistema.
4 Toque Conexión de dispositivo en el menú
del sistema.
5 Toque el ajuste deseado.
— iPhone via Bluetooth (para usuarios de
iPod con conector Lightning)
— iPhone via USB (para usuarios de iPod
con conector de 30 patillas)
3 Después de haber configurado
Conexión de dispositivo, conecte el iPhone a
esta unidad.
# Para usuarios de iPod con conector Light-
ning
(Función de AVH-X5600BHS/AVH-X4600BT/AVH-
X3600BHS/AVH-X2600BT)
— Se requiere una conexión Bluetooth para el
conector Lightning de iPod. Consulte Menú
de conexión Bluetooth en la página 191.
— Utilice el CD-IV203 (se vende por separado) y
el adaptador Lightning a VGA (productos de
Apple Inc.) (se vende por separado) cuando
utilice esta función.
— Consulte Conexión con el cable opcional CD-
IV203 en la página 198.
# Para usuarios de iPod con conector de 30 pa-
tillas
— Cuando utilice esta función, utilice el CD-
IU201S (se vende por separado).
— Consulte Conexión con un cable CD-IU201S
opcional en la página 199.
4 Inicio de una aplicación disponible para
AppRadio Mode desde el iPhone.
Se visualiza una imagen de la aplicación en la
pantalla del sistema.
! También se puede iniciar una aplicación dis-
ponible para AppRadio Mode desde una
aplicación de arranque.
5 Pulse MODE.
# Pulse el botón de inicio para cambiar a la panta-
lla de inicio y a continuación toque la tecla Apps
para iniciar la aplicación de arranque.
6 Operación de la aplicación.
Configuración del teclado
PRECAUCIÓN
Por seguridad, el teclado solo está disponible
con el vehículo parado y con el freno de mano
activado.
AppRadio Mode
168
Sección
AppRadio Mode
Es
11
<CRD4844-A>168
Black plate (169,1)
Según la aplicación, se podrá introducir texto en
la pantalla. Para hacerlo correctamente, me-
diante el teclado que aparece en esta unidad,
deberá ajustar el idioma en esta función.
Cuando se utiliza AppRadio Mode, la configu-
ración de idioma para el teclado ajustada para
la función y la configuración de idioma para el
teclado del iPhone han de ser las mismas.
! El teclado sólo está disponible en AppRadio
Mode.
Al pulsar sobre el área de introducción de texto
de una aplicación de iPhone, aparecerá un te-
clado en la pantalla; entonces se podrá introdu-
cir el texto deseado directamente en el sistema.
! El idioma preferente para el teclado del siste-
ma deberá ser el mismo que el del iPhone.
Si la configuración de este producto difiere
de la del iPhone, no se podrán introducir ca-
racteres correctamente.
1 Pulse el botón de inicio dos veces para
cambiar desde la pantalla de AppRadio
Mode a la pantalla de inicio.
2 Toque la tecla de sistema para abrir el
menú del sistema.
3 Toque Teclado en el menú del sistema,
para seleccionar el idioma deseado.
4 Toque el idioma deseado.
Francés (francés)—Alemán (alemán)—Griego
(griego)—Ruso (ruso)—Inglés (inglés de EE.
UU.)—Inglés (Reino Unido) (inglés de Reino
Unido)—Neerlandés (holandés)—Italiano (ita-
liano)—Noruego (noruego)—Sueco (sueco)—
Finlandés (finés)—Español (español)—
Portugués (portugués)—Chino (simplificado)
(chino simplificado)—Chino (tradicional)
(chino tradicional)—árabe (árabe)—hebreo
(hebreo)—tailandés (tailandés)
5 Pulse sobre el área de introducción de
texto en la pantalla de la aplicación del
iPhone.
Toque
para ocultar el teclado.
Puede utilizar su teléfono inteligente en la pan-
talla de la unidad gracias a esta función.
Con la función MirrorLink solo funcionan los te-
léfonos inteligentes compatibles.
— Para más información sobre cómo conectar-
se con el adaptador de conexión de teléfono
inteligente (CD-ML100) (se vende por separa-
do), consulte Conexión opcional del adaptador
de conexión de teléfono inteligente (CD-
ML100) en la página 199.
— Para obtener detalles sobre los ajustes de Mi-
rrorLink, consulte Selección del modo Mirror-
Link en la página 185.
— Para obtener información sobre el mezclador
de sonido, consulte Utilización del mezclador
de sonido en la página 194.
Procedimiento de inicio
1 Conecte su teléfono inteligente al adap-
tador de conexión de teléfonos inteligentes
(CD-ML100) (se vende por separado) con la
entrada de RGB.
2 Pulse MODE.
# Pulse el botón de inicio para cambiar a la panta-
lla de inicio y luego toque la tecla MirrorLink iniciar
la aplicación de arranque.
# Al seleccionar MirrorLink, la pantalla del teléfono
inteligente aparece en la pantalla de la unidad;
ahora puede manejar su teléfono inteligente en la
pantalla de la unidad.
3 Operación de la aplicación.
— Pulse el botón de inicio: se visualiza la panta-
lla de inicio de MirrorLink.
— Pulse dos veces el botón de inicio: se visuali-
za la pantalla de inicio de la unidad.
— Pulse d (TRK): se visualiza la pantalla de
menú de MirrorLink.
— Pulse c (TRK): se visualiza la pantalla ante-
rior de MirrorLink.
Para obtener más información, consulte Unidad
principal en la página 149.
# Puede manejar las funciones en la pantalla táctil
así como en la pantalla de su teléfono inteligente.
PRECAUCIÓN
! No maneje el teléfono inteligente mientras
conduce. Obedezca toda la normativa perti-
nente de su región.
! En la pantalla de precaución debe acceder a
obedecer la norma anterior. Asegúrese de se-
guir las instrucciones que aparecen en pan-
talla.
Español
AppRadio Mode
169
Sección
Funciones del adaptador de conexión de teléfonos
inteligentes
Es
11
12
<CRD4844-A>169

Black plate (170,1)
Esta unidad es compatible con USB MSC (Mass
Storage Class) y USB MTP (Media Transfer Pro-
tocol).
También puede utilizar USB MTP (conexión a
dispositivos Android compatibles con MTP a tra-
vés de un cable USB); sin embargo, algunas
funciones no son compatibles con la conexión
MTP.
USB
MSC
USB
MTP
MP3 11
WMA 11
WAV 1 —
AAC 11
DivX 1 —
MPEG-1 1 —
MPEG-2 1 —
MPEG-4 1 —
JPEG 1 —
Modo de búsqueda de música 1 —
MIXTRAX EZ 1 —
Funciones de imágenes en
movimiento
Función de USB MSC
Puede utilizar esta unidad para visualizar archi-
vos de almacenamiento USB.
Teclas del teclado táctil
USB
00'20'' -119'51''
Dolby DMulti ch
FULL
11
1JAN
PM
12:43
01 01
Media
1
a987 5
643
2
1 Tecla de avance rápido/Tecla de retroceso
Avance rápido o retroceso
Toque para cambiar entre avance rápido y re-
troceso.
2 Tecla de búsqueda
Visualización de la lista de nombres de archi-
vos para la selección de estos.
3 Tecla de cambio del idioma de los subtítu-
los
En el caso de los archivos DivX que vienen
con grabaciones multi-subtítulos, se puede
cambiar entre los idiomas de los subtítulos
durante la reproducción.
4 Tecla de medio
Cambio entre tipos de archivo multimedia
para reproducir música/vídeo/fotografías.
5 Tecla de cambio del idioma de audio
Con los archivos de DivX que permitan la re-
producción del audio en distintos idiomas y
con distintos sistemas de sonido (Dolby Digi-
tal, DTS, etc.), se puede cambiar entre los
idiomas/sistemas de audio durante la repro-
ducción.
6 Tecla de repetición
Selección de gama de repetición.
Consulte Repetición de reproducción en la pá-
gina 172.
7 Tecla de reproducción en cámara lenta
(Función para archivos DivX/MPEG-1/
MPEG-2/MPEG-4)
La selección avanza un cuadro cada vez du-
rante la reproducción.
Mantenga pulsada la tecla durante más de
dos segundos para disminuir la velocidad de
reproducción.
8 Tecla de detención
Detención de la reproducción.
Si reanuda la reproducción, ésta se iniciará
desde el punto en el que se detuvo. Vuelva a
tocar la tecla para detener totalmente la re-
producción.
9 Tecla de modo de pantalla
Cambio del modo de pantalla.
Consulte Cambio del modo panorámico en la
página 152.
a Tecla de pausa y reproducción
Interrupción de la reproducción.
Restablecimiento de la reproducción normal
durante la pausa o la reproducción en cáma-
ra lenta / cuadro por cuadro.
Funcionamiento básico
Reproducción de vídeos.
1 Conecte el dispositivo USB.
La reproducción comenzará automáticamen-
te.
Si no se muestra el icono de fuente, toque la
pantalla para poder visualizarlo.
Avance rápido o rebobinado usando los botones
1 Mantenga presionado c o d (TRK).
Notas
! Las teclas del teclado táctil no mencionadas
en el apartado Funciones de imágenes en mo-
vimiento podrían aparecer en la pantalla.
Consulte Lista de indicadores en la página
207.
! También se puede cambiar entre los idio-
mas/sistemas de audio utilizando el menú
Ajuste de Video. Para obtener más informa-
ción, consulte Ajuste del idioma del audio en
la página 182.
! Esta unidad volverá a la reproducción normal
si cambia el idioma de audio durante el avan-
ce rápido/retroceso rápido, una pausa o la re-
producción a cámara lenta.
! También se puede cambiar entre los idiomas
de los subtítulos utilizando el menú
Ajuste de Video. Para obtener más informa-
ción, consulte Ajuste del idioma de los subtí-
tulos en la página 182.
! Esta unidad volverá a la reproducción normal
si cambia el idioma de los subtítulos durante
el avance rápido/retroceso rápido, una pausa
o la reproducción a cámara lenta.
Funciones de reproducción
de sonido
Puede utilizar esta unidad para escuchar archi-
vos de audio USB.
Conexión MTP
En esta función, USB MTP (la conexión a dispo-
sitivos Android compatibles con MTP a través de
un cable USB) es compatible solo para archivos
MP3/WMA/AAC.
Notas
! Podría no mostrarse el tiempo de reproduc-
ción correcto.
USB
170
Sección
USB
Es
13
<CRD4844-A>170
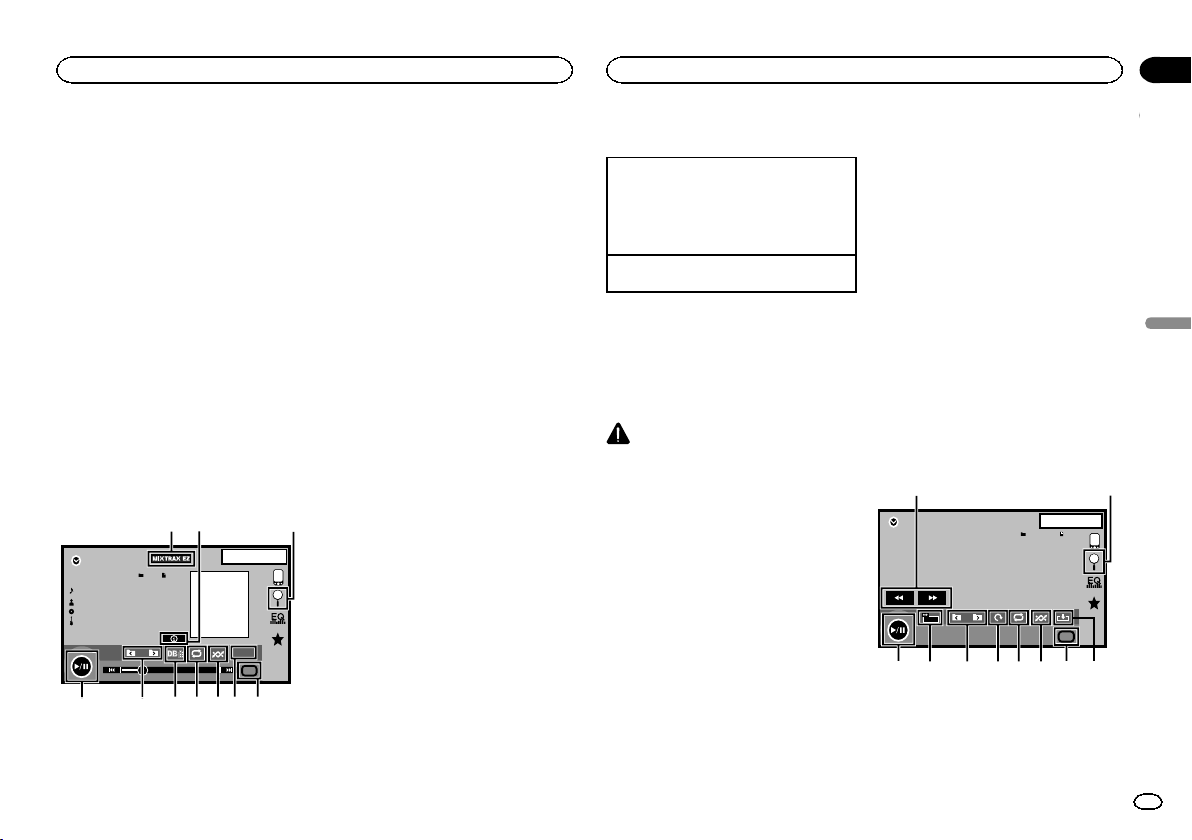
Black plate (171,1)
! Al reproducir archivos grabados como VBR
(velocidad de grabación variable), el tiempo
de reproducción no se visualizará correcta-
mente si se utilizan las funciones de avance
rápido o retroceso.
! Para asegurar un funcionamiento correcto,
conecte el cable conector del Dock del iPod
directamente a esta unidad.
! Cuando el iPod está conectado a esta uni-
dad, no se puede encender ni apagar.
! Si los caracteres grabados en el dispositivo
de almacenamiento USB no son compati-
bles con esta unidad, no aparecerán en la
pantalla.
! Dependiendo del entorno en que se grabó la
información de texto, puede que no se visua-
lice correctamente.
! Desconecte el reproductor de audio portátil
USB / memoria USB cuando no los esté utili-
zando.
! Al seleccionar Speana en Selección de la vi-
sualización de fondo en la página 192, no se
visualiza el material gráfico.
Teclas del teclado táctil
00'01'' -00'03''
JAN
PM
12:43
USB
Abcdefghi
Abcdefghi
Abcdefghi
Abcdefghi
S.Rtrv
61
All
All
All
Media
21
a987654
3
1 Tecla MIXTRAX EZ
Inicio de MIXTRAX EZ.
Excepto para USB MTP
2 Tecla de información
Cambio de la información de texto que se vi-
sualiza en esta unidad cuando se reprodu-
cen archivos MP3/WMA/AAC/WAV.
3 Tecla de búsqueda
Visualización de la lista de nombres de archi-
vos para la selección de estos.
4 Tecla de medio
Cambio entre tipos de archivos multimedia
para reproducir en USB.
5 Tecla de restauración de sonido
Consulte Utilización del sound retriever en la
página 152.
6 Tecla de reproducción aleatoria
Reproducción de las canciones en orden
aleatorio.
7 Tecla de repetición
Selección de gama de repetición.
8 Tecla DB
Creación de una base de datos que permite
búsquedas por nombre del artista, género y
otras opciones.
Consulte Modo de búsqueda de música en la
página 171.
9 Tecla de carpeta anterior/carpeta siguien-
te
Selección de una carpeta.
a Tecla de pausa y reproducción
Pausa e inicio de la reproducción.
Funcionamiento básico
Reproducción de pistas
1 Conecte el dispositivo USB.
La reproducción comenzará automáticamen-
te.
Si no se muestra el icono de fuente, toque la
pantalla para poder visualizarlo.
Avance rápido o rebobinado usando los botones
1 Mantenga presionado c o d (TRK).
Modo de búsqueda de música
Función para USB MSC
Esta unidad crea un índice para facilitar la bús-
queda de una canción. Se puede buscar por ca-
tegorías como álbumes y artistas.
PRECAUCIÓN
! Esta función no está disponible cuando el
dispositivo de almacenamiento USB está
bloqueado.
! Esta función no está disponible cuando el es-
pacio libre del dispositivo de almacenamien-
to USB es inferior a 5 MB.
! Mientras esta unidad crea un índice, no de-
sactive la unidad; podría provocar la pérdida
de datos de su dispositivo de almacenamien-
to USB.
! Si cambia a visualización de imagen JPEG o
vídeo mientras se está creando una base de
datos, o si no se ha podido crear una base
de datos, aparece un mensaje y se detiene la
creación de la base de datos.
1 Toque DB para crear una base de datos
en modo Búsqueda de música.
Consulte Funciones de reproducción de sonido
en la página 170.
2 Cuando se visualice “Salvar la base de
datos a la memoria?”, toque “Si”.
Se ha terminado de guardar la base de datos. Si
no quiere guardarla, pulse “No”.
Cuando se termine de guardar, aparecerá “Se
guardó la Base de Datos en la memoria.”.
Se iniciará el modo Búsqueda de música.
3 Visualice una lista y toque la tecla de eti-
queta.
4 Seleccione un archivo.
Funciones de reproducción
de imágenes fijas
Función para USB MSC
Puede utilizar esta unidad para visualizar imáge-
nes fijas guardadas en un dispositivo de almace-
namiento USB.
Teclas del teclado táctil
USB
NORMAL
1JAN
PM
12:43
44
All
All
All
Media
12
3456789a
1 Tecla de avance rápido/Tecla de retroceso
Selección de una imagen.
2 Tecla de búsqueda
Visualización de la lista de nombres de archi-
vos para la selección de estos.
Español
USB
171
Sección
USB
Es
13
<CRD4844-A>171
Black plate (172,1)
3 Tecla de captura
Captura de una imagen en archivos JPEG.
4 Tecla de medio
Cambio entre tipos de archivos multimedia
cuando hay más de un tipo en el dispositivo
USB. Esta tecla no aparecerá cuando solo
haya un tipo de archivo multimedia en el dis-
positivo USB.
5 Tecla de reproducción aleatoria
Reproducción de los archivos en un orden
aleatorio.
6 Tecla de repetición
Selección de gama de repetición.
7 Tecla de giro
Giro de la imagen mostrada 90° hacia la de-
recha.
8 Tecla de carpeta anterior/carpeta siguien-
te
Selección de una carpeta.
9 Tecla de modo de pantalla
Cambio del modo de pantalla.
Consulte Cambio del modo panorámico en la
página 152.
a Tecla de pausa y reproducción
Inicio o pausa del slideshow.
Funcionamiento básico
Reproducción de imágenes fijas
1 Conecte el dispositivo USB.
La reproducción comenzará automáticamen-
te.
! Si no se muestra el icono de fuente, toque la
pantalla para poder visualizarlo.
Selección de archivo usando los botones
1 Pulse c o d (TRK).
Búsqueda rápida de archivos
1 Mantenga presionado c o d (TRK).
! Puede buscar 10 archivos JPEG a la vez.
Si hay menos de 10 archivos, la búsqueda cu-
brirá el primer o el último archivo.
Notas
! Los archivos se reproducen por orden del nú-
mero de archivo y se saltan las carpetas que
no tienen archivos. (Si la carpeta 1 (RAÍZ) no
contiene archivos, la reproducción comienza
en la carpeta 2.)
! Las teclas del teclado táctil no mencionadas
en el apartado Funciones de reproducción de
imágenes fijas podrían aparecer en la panta-
lla.
Consulte Lista de indicadores en la página
207.
Cambio del tipo de archivo
multimedia
% Toque Media para cambiar entre los tipos
de archivos de medios.
Reproducción aleatoria
(shuffle)
% Toque la tecla de reproducción aleatoria.
! On – Reproduce archivos en orden aleatorio
dentro de la gama de repetición, Folder y
Media.
! Off – Cancela la reproducción aleatoria.
Repetición de reproducción
% Toque la tecla de repetición.
! Folder – Repite la carpeta actual
! All – Repite todos los archivos
! Cuando se selecciona Folder, no se puede re-
producir una subcarpeta de esa carpeta.
! Si se selecciona una fuente USB, la gama de
repetición cambia a All.
Selección de ficheros de la
lista de nombres de ficheros
(Funciona con audio comprimido/DivX/MPEG-1/
MPEG-2/MPEG-4)
El funcionamiento es el mismo que para Disco.
Consulte Selección de ficheros de la lista de nom-
bres de ficheros en la página 163.
Visualización de listas
relacionadas con la canción
que se está reproduciendo
(búsqueda de enlace)
Toque el material gráfico para abrir una lista de
los nombres de canciones del álbum que se
está reproduciendo. Toque el nombre de la can-
ción que desea reproducir para empezar su re-
producción.
Notas
! Si no se visualiza parte de la información gra-
bada, aparecerá una tecla de desplazamien-
to a la derecha de la lista. Toque la tecla de
desplazamiento para desplazarse.
! Esta función está disponible para dispositi-
vos USB en el modo Búsqueda de música.
Reproducción del contenido
DivX
â
VOD
El funcionamiento es el mismo que para Disco.
Consulte Reproducción del contenido DivX
â
VOD
en la página 164.
Captura de una imagen en
archivos JPEG
Puede capturar datos de imagen para utilizarlos
como papel tapiz. Las imágenes pueden alma-
cenarse en esta unidad y recuperarse fácilmen-
te.
! Esta unidad sólo puede almacenar datos de
una imagen. La imagen nueva sobrescribe la
anterior.
1 Toque f para poner en pausa el slides-
how cuando aparezca la imagen deseada.
2 Toque Capture para capturar la imagen
deseada.
3 Cuando se visualice “Guardar esta ima-
gen?”, toque Si.
Mientras se almacena la imagen en esta uni-
dad, se visualiza “Guardando la imagen. Mien-
tras guarda,No apague el motor”. Al finalizar
el proceso se mostrará “Imagen Guardada”.
# Para cancelar el proceso de almacenamiento,
toque No.
USB
172
Sección
USB
Es
13
<CRD4844-A>172
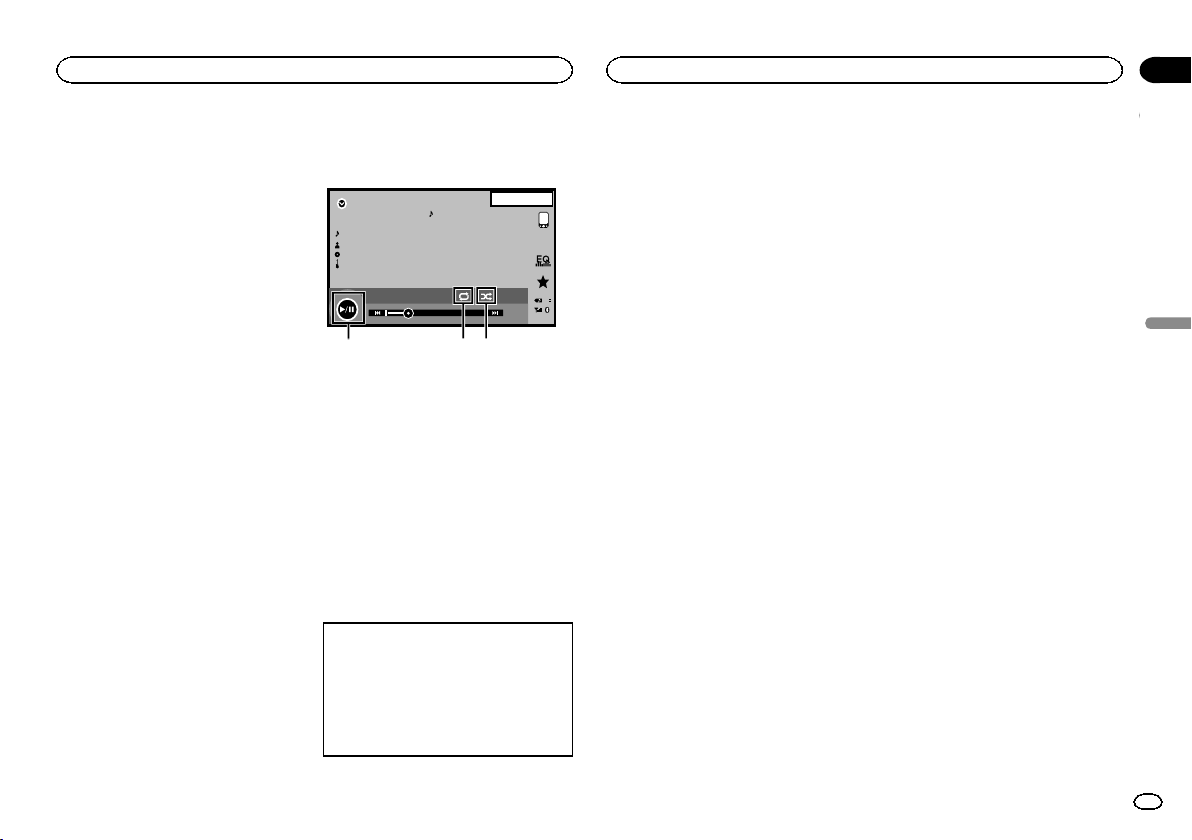
Black plate (173,1)
Funciones de reproducción
de sonido
(Función de AVH-X5600BHS/AVH-X4600BT/AVH-
X3600BHS/AVH-X2600BT)
Puede utilizar esta unidad para escuchar archi-
vos de audio Bluetooth.
Notas
! Según el reproductor de audio Bluetooth co-
nectado a esta unidad, las operaciones dis-
ponibles se limitan a los dos niveles
siguientes:
— Perfil A2DP (Advanced Audio Distribution
Profile): solo se pueden reproducir canciones
en su reproductor de audio.
— Perfil AVRCP (Audio/Video Remote Control
Profile): puede reproducir, detener la repro-
ducción, seleccionar canciones, etc.
! Como hay diversos reproductores de audio
Bluetooth disponibles en el mercado, las fun-
ciones disponibles pueden variar amplia-
mente en función del modelo específico.
Consulte el manual de instrucciones de su
reproductor, así como este manual, mientras
utilice un reproductor de audio Bluetooth
con esta unidad.
! Puesto que la señal de su teléfono móvil
puede ocasionar ruido, procure no utilizarlo
mientras esté escuchando canciones en su
reproductor de audio Bluetooth.
! Mientras habla con el teléfono móvil conec-
tado a esta unidad a través de tecnología ina-
lámbrica Bluetooth, el sonido del
reproductor de audio Bluetooth conectado a
esta unidad se silencia.
! Podría no mostrarse el tiempo de reproduc-
ción correcto.
! Según el tipo de reproductor de audio
Bluetooth que haya conectado a esta unidad,
es posible que la pantalla de funcionamiento
e información no tenga disponibles algunas
de las funciones.
Teclas del teclado táctil
Bluetooth
88'88'' -88'88''
Abcdefghi
Abcdefgh
Abcdefgh
Abcdefgh
8888
22 JAN
AM
12:22
DB
32
1
1 Tecla de reproducción aleatoria
Reproducción de las canciones en orden
aleatorio.
2 Tecla de repetición
Selección de gama de repetición.
3 Tecla de pausa y reproducción
Pausa e inicio de la reproducción.
Ajuste de audio Bluetooth
Antes de utilizar la función de audio Bluetooth,
deberá establecer una conexión inalámbrica
Bluetooth entre la unidad y su reproductor de
audio Bluetooth.
1 Conexión
Primero debe conectar un dispositivo de audio
Bluetooth.
Para ver instrucciones detalladas sobre cómo
conectar su dispositivo de audio Bluetooth a
esta unidad mediante la tecnología inalámbri-
ca Bluetooth, consulte Menú de conexión
Bluetooth en la página 191.
Notas
! Al reproducir archivos grabados como VBR
(velocidad de grabación variable), el tiempo
de reproducción no se visualizará correcta-
mente si se utilizan las funciones de avance
rápido o retroceso.
! Para asegurar un funcionamiento correcto,
conecte el cable conector del Dock del iPod
directamente a esta unidad.
! Cuando el iPod está conectado a esta uni-
dad, no se puede encender ni apagar.
! Si los caracteres grabados en el reproductor
de audio Bluetooth no son compatibles con
esta unidad, no aparecerán en la pantalla.
! Dependiendo del entorno en que se grabó la
información de texto, puede que no se visua-
lice correctamente.
Reproducción aleatoria
(shuffle)
% Toque la tecla de reproducción aleatoria.
! On – Reproducción de los archivos en orden
aleatorio.
! Off – Cancela la reproducción aleatoria.
Repetición de reproducción
% Toque la tecla de repetición.
! One – Repite sólo la canción actual
! All – Repite todas las canciones
Español
Audio Bluetooth
173
Sección
Audio Bluetooth
Es
14
<CRD4844-A>173

Black plate (174,1)
Función MIXTRAX
MIXTRAX es una tecnología original para crear
mezclas sin pausas de selecciones de la biblio-
teca de audio, que incluye efectos de DJ y pro-
porciona un sonido que hace pensar que el DJ
está ahí mezclando la música.
Función MIXTRAX EZ
Puede utilizar esta unidad para reproducir archi-
vos de audio USB/iPod.
MIXTRAX EZ se utiliza para añadir una serie de
efectos de sonido y para organizar pausas entre
canciones; permite disfrutar de la reproducción
de música sin pausas.
! Esta función solo está disponible si se está
reproduciendo un archivo en un dispositivo
de almacenamiento USB o una canción en
un iPod.
! Esta función no está disponible cuando el
modo de control se ajusta a App Mode.
! Según el archivo/canción, es posible que los
efectos de sonido no estén disponibles.
! Según el archivo/canción, es posible que la
reproducción sin pausas no esté disponible.
Nota
No puede utilizar esta función con USB MTP.
Inicio de la función MIXTRAX EZ
% Toque MIXTRAX EZ.
Consulte Tecla MIXTRAX EZ en la página 164 y
171.
Configuración del modo
MIXTRAX
Active esta función para reproducir archivos de
audio mediante MIXTRAX.
1 Pulse el botón de inicio para cambiar a la
pantalla de inicio.
2 Toque la tecla de sistema para abrir el
menú del sistema.
3 Toque Configurar MIXTRAX en el menú
del sistema.
Se muestran los elementos de configuración de
MIXTRAX.
! Modo Short Playback – Al activar este
modo, seleccione la longitud de reproduc-
ción de la pista de audio.
60s (60 seg.)—90s (90 seg.)—120s (120 seg.)
—150s (150 seg.)—180s (180 seg.)—Al azar
(aleatorio)—Off (desactivado)
Si se selecciona Al azar, el tiempo de repro-
ducción varía entre 60 s, 90 s, 120 s, 150 s y
180 s seleccionado en aleatorio cuando cam-
bia la canción reproducida.
! Desplegar efecto – Cuando
Desplegar efecto está activado, la visualiza-
ción de material gráfico se puede mover
según el tipo de música.
! Efecto de Corte de entrada – Al activar
Efecto de Corte de entrada, se insertan
efectos de sonido entre las pistas.
! Ajuste de Efecto – Utilice Ajuste de Efecto
para configurar el efecto de sonido que
desea insertar entre las pistas.
Configuración del efecto
Puede cambiar la configuración de sonidos fijos
y efectos de sonido.
Hay disponibles seis sonidos fijos diferentes que
se pueden insertar para la reproducción entre
pistas.
Los efectos de sonido se utilizan como efectos
para señalizar el final de una canción que se
está reproduciendo y el comienzo de la próxima
canción en serie.
Los sonidos fijos y los efectos de sonido se ajus-
tan como combinaciones como sonidos de
MIXTRAX.
Sonidos fijos
! Phaser – Un sonido fijo que suena como el
surcar de las olas.
! Roll – Un sonido fijo que repite la reproduc-
ción de un sonido específico.
! Turntable – Un sonido fijo que imita el raya-
do de los DJ.
! Flanger2 – Un sonido torrencial que imita
los sonidos de incremento y disminución de
un motor a reacción.
! Reverb – Un efecto de sonido fijo que crea
un efecto de reverberación.
! Echo2 – Un efecto de sonido fijo que crea un
efecto de eco.
Efectos de sonido
! Cross Fade – Un efecto de sonido que crea
un efecto de acercamiento y alejamiento so-
noro entre las canciones.
! Flanger1 – Un sonido torrencial que imita
los sonidos de incremento y disminución de
un motor a reacción.
! Eco1 – Un efecto de sonido que crea un efec-
to de eco.
! Loop – Un efecto de sonido que repite la re-
producción de una sección de una pista de
canción.
Nota
Cross Fade no se puede seleccionar para archi-
vos de audio iPod.
Ajuste de sonidos y efectos de
sonidos como preajustes
mediante la tecla de preajuste
Los efectos de sonido Standard y Simple ya
están ajustados como preajustes predetermina-
dos.
% Toque Standard o Simple para comprobar
los ajustes.
El efecto de sonido registrado preajustado para
la tecla que se ha tocado se ajusta como prea-
juste.
Registro de sonidos y efectos de
sonido como preajustes
Registra una combinación deseada de sonidos y
efectos de sonido en Custom.
Toque Personalizar para ajustar fácilmente el
sonido o el efecto de sonido deseados.
1 Toque Personalizar.
2 Añada una marca de verificación al efec-
to de sonido deseado tocando la opción.
El efecto de sonido marcado se registra como
preajustado en Custom.
Notas
! Si se toca un efecto de sonido en la pantalla
de selección para Standard o Simple,la
pantalla Custom se muestra automática-
mente y el efecto de sonido se registra en
Custom.
! Puede escuchar sonidos fijos como ejemplos
tocando el icono de altavoz.
Uso de MIXTRAX
174
Sección
Uso de MIXTRAX
Es
15
<CRD4844-A>174
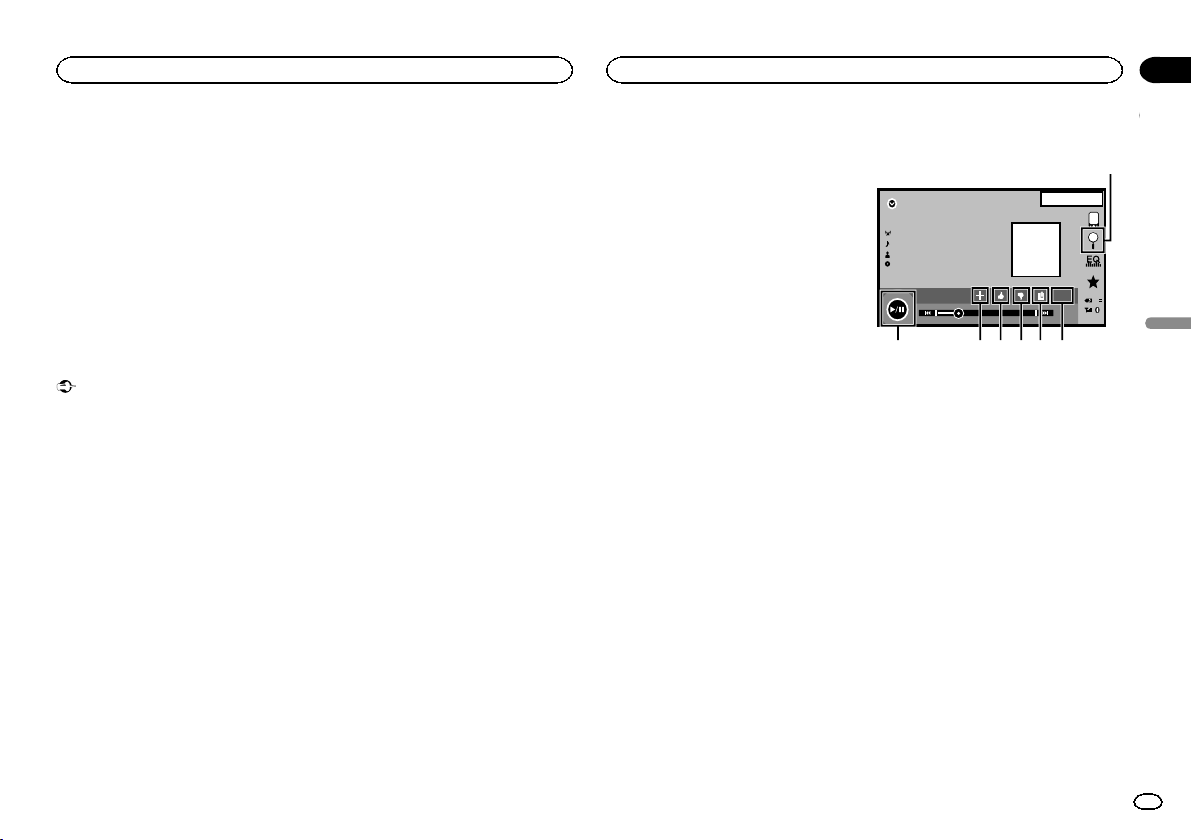
Black plate (175,1)
Funciones de Pandora
Para usuarios de iPhone
— Conecte un iPod a la entrada USB.
— Ajuste Conexión Pandora en iPhone.
(Función de AVH-X5600BHS/AVH-X4600BT/
AVH-X3600BHS/AVH-X2600BT)
(Este ajuste no se requiere para AVH-
X1600DVD.)
Para usuarios de teléfonos inteligentes
(Función de AVH-X5600BHS/AVH-X4600BT/AVH-
X3600BHS/AVH-X2600BT)
— Ajuste Conexión Pandora en Android.
— Se requiere una conexión Bluetooth para dis-
positivos Android. Consulte Menú de cone-
xión Bluetooth en la página 191.
Importante
Requisitos para acceder a Pandora mediante los
productos de audio/vídeo para automóvil de
Pioneer:
Conecte un iPod a la entrada USB o un disposi-
tivo Android que utilice Bluetooth para reprodu-
cir Pandora en esta unidad.
! Por favor, actualice el firmware de la aplicación
de Pandora a la última versión antes de utilizarla.
! Se puede descargar la última versión de la apli-
cación de Pandora en el iTunes App Store y en
Google Play.
! Cree una cuenta online gratuita o de pago.
Puede crear la cuenta en la aplicación de
Pandora desde su iPhone o en el sitio web. La di-
rección URL es la siguiente:
http://www.pandora.com/register
! Si el plan de datos para su iPhone no incluye
transferencia ilimitada de datos, pueden aplicar-
se cargos adicionales por parte de su proveedor
para acceder a Pandora a través de las redes 3G
y/o EDGE.
! Necesitará conectarse a Internet a través de 3G,
EDGE o una red WiFi para poder utilizar el servi-
cio de Pandora.
Limitaciones:
! Dependiendo de la disponibilidad de Internet, tal
vez no pueda recibir el servicio de Pandora.
! El servicio de Pandora está sujeto a cambios sin
previo aviso. El servicio puede verse afectado por
uno de los siguientes factores: versiones de firm-
ware de iPhone, versiones de firmware de las
aplicaciones de Pandora, cambios en el servicio
de música de Pandora.
! Ciertas operaciones del servicio de Pandora no
están disponibles cuando se accede al servicio a
través de los productos de audio/vídeo para auto-
móvil de Pioneer. Estas incluyen, pero no están li-
mitadas a lo siguiente: la creación de nuevas
emisoras, eliminación de emisoras, envío de in-
formación acerca de las emisoras actuales, com-
pra de canciones desde iTunes, visualización de
información de texto adicional, iniciar sesión en
Pandora y ajustar la calidad de audio de la red
móvil.
El servicio de música Pandora Internet Radio no
está asociado con Pioneer. Encontrará mas in-
formación en http://www.pandora.com.
La aplicación móvil de Pandora está disponible
para la mayoría de los iPhones y teléfonos inteli-
gentes; por favor, visite
www.pandora.com/everywhere/mobile para ob-
tener la última información sobre la compatibili-
dad.
Configuración del modo de
conexión de Pandora
(Función de AVH-X5600BHS/AVH-X4600BT/AVH-
X3600BHS/AVH-X2600BT)
Nota
Esta función no está disponible si
Conexión de dispositivo está ajustado en
iPhone via Bluetooth.
1 Pulse el botón de inicio para cambiar a la
pantalla de inicio.
2 Toque la tecla de sistema para abrir el
menú del sistema.
3 Toque Conexión Pandora repetidamente
hasta que el ajuste deseado aparezca en la
pantalla.
iPhone: se conecta un iPhone mediante un
cable real.
Android: Se conecta un dispositivo Android me-
diante Bluetooth.
Teclas del teclado táctil
Pandora
88'88'' -88'88''
Abcdef ghi
Abcdef ghi
Abcdef ghi
Abcdef ghi
22 JAN
AM
12:22
DB
S.Rtrv
1
2345
67
1 Tecla de búsqueda
Muestra la lista de emisoras/selección alea-
toria para seleccionar la emisora deseada o
la selección aleatoria.
2 Tecla de restauración de sonido
(Sólo disponible en iPod)
Consulte Utilización del sound retriever en la
página 152.
3 Tecla de marcador
Almacena información de las pistas (Marca-
dor).
Los marcadores se pueden ver en su perfil.
4 Tecla de voto negativo
Si se otorga un “voto negativo”, se indica a
Pandora que no le gusta la pista actual.
Pandora saltará a la próxima pista y no repro-
ducirá de nuevo esta pista en la emisora.
5 Tecla de voto positivo
Si se otorga un “voto positivo”, se indica a
Pandora que le gusta la pista actual.
Pandora continuará reproduciendo esta
pista y pistas similares en la emisora.
Español
Flujo continuo (streaming) de Pandora
â
175
Sección
Flujo continuo (streaming) de Pandora
â
Es
16
<CRD4844-A>175
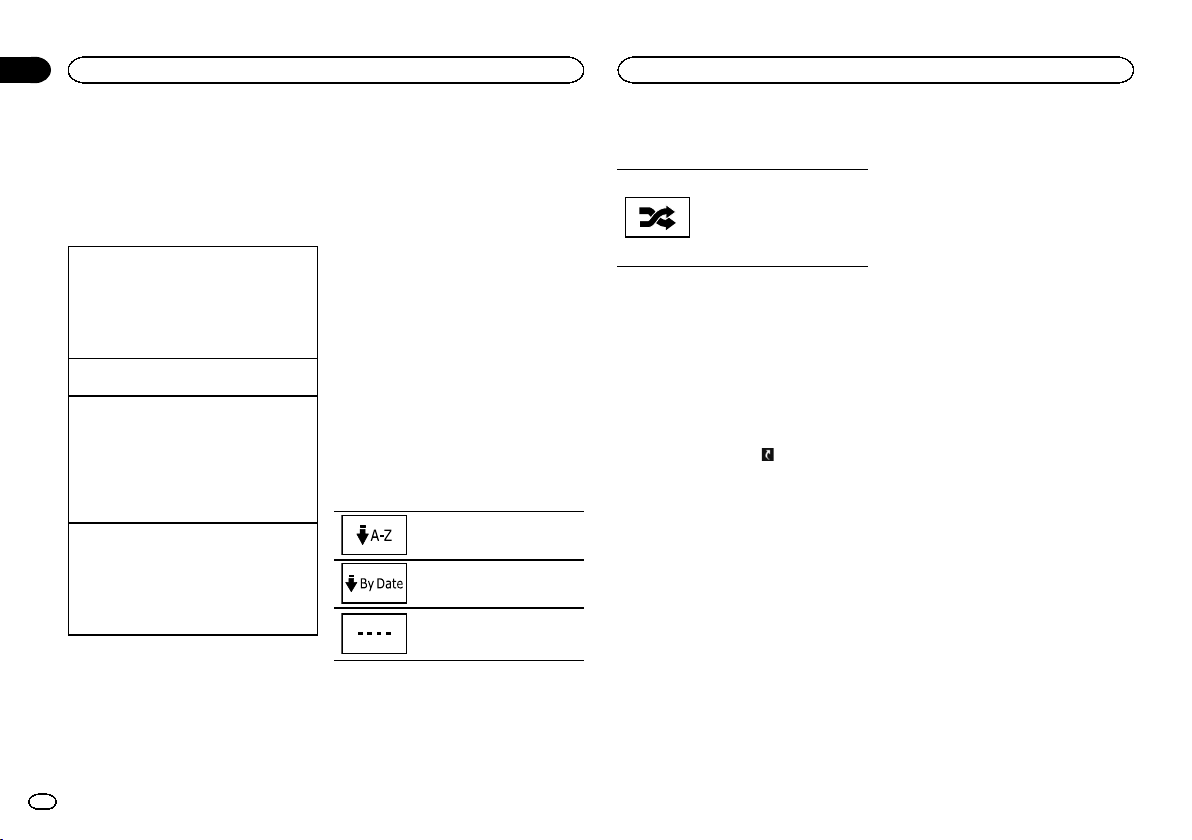
Black plate (176,1)
6 Tecla Añadir emisora
Se ha creado una nueva emisora.
7 Tecla de pausa y reproducción
Pausa e inicio de la reproducción.
Funcionamiento básico
Reproducción de pistas
1 Conecte un iPhone a una salida USB.
Para un dispositivo Android, también se nece-
sita una conexión Bluetooth.
Consulte Funciones de Pandora en la página
175.
2 Cambie la fuente a Pandora.
Saltar pistas
1 Presione d (TRK).
Añadir emisora
Se creará una nueva emisora con la información
del artista o pista que se está reproduciendo.
1 Toque la tecla Añadir emisora.
2 Toque Pista (de la pista) o Artista (del artista).
Se ha creado una nueva emisora.
! Para cancelar el proceso de añadir emiso-
ra, toque Cancelar.
Eliminar emisoras
1 Visualización de la lista de emisoras/selección
aleatoria.
2 Toque la tecla Eliminar emisora.
3 Toque Si.
Se eliminará la emisora.
! Para cancelar, toque No.
Notas
! Las teclas del teclado táctil no mencionadas
en el apartado Funciones de Pandora podrían
aparecer en la pantalla.
Consulte Lista de indicadores en la página
207.
! Pandora limita el número de canciones sal-
tadas permitidas en su servicio. Si se sobre-
pasa el límite de pistas saltadas, se muestra
“Se ha alcanzado el límite de omisiones.”.
Si ha alcanzado el límite de canciones sal-
tadas y otorga un “voto negativo”, se seguirá
reproduciendo la pista actual, pero se regis-
trará su valoración.
! Si se muestra la tecla Connect, conecte ma-
nualmente un dispositivo Bluetooth registra-
do.
Selección y reproducción de
la lista de emisoras/selección
aleatoria de Pandora
â
Toque la lista de emisoras de Pandora para se-
leccionar la que quiere reproducir.
1 Visualización de la lista de emisoras/se-
lección aleatoria.
Consulte Tecla de búsqueda en la página 175.
2 Cambie el criterio de ordenación.
Puede ordenar los elementos de
la lista alfabéticamente.
Puede ordenar los elementos de
la lista por fecha de creación.
Puede desplazar los títulos en la
lista mientras mantiene pulsado
el icono de desplazamiento.
3 Seleccione la reproducción aleatoria o la
emisora deseada.
El modo de reproducción aleato-
ria reproducirá pistas de sus emi-
soras seleccionadas. Podrá editar
las preferencias de la reproduc-
ción aleatoria en su dispositivo
móvil.
Añadir una emisora de la lista
de emisoras
1 Toque Genre en la lista de emisoras.
2 En la lista de géneros toque la emisora
que desea añadir.
3 Se ha creado una nueva emisora.
Nota
Las emisoras indicadas por
son emisoras
compartidas.
Flujo continuo (streaming) de Pandora
â
176
Sección
Flujo continuo (streaming) de Pandora
â
Es
16
<CRD4844-A>176
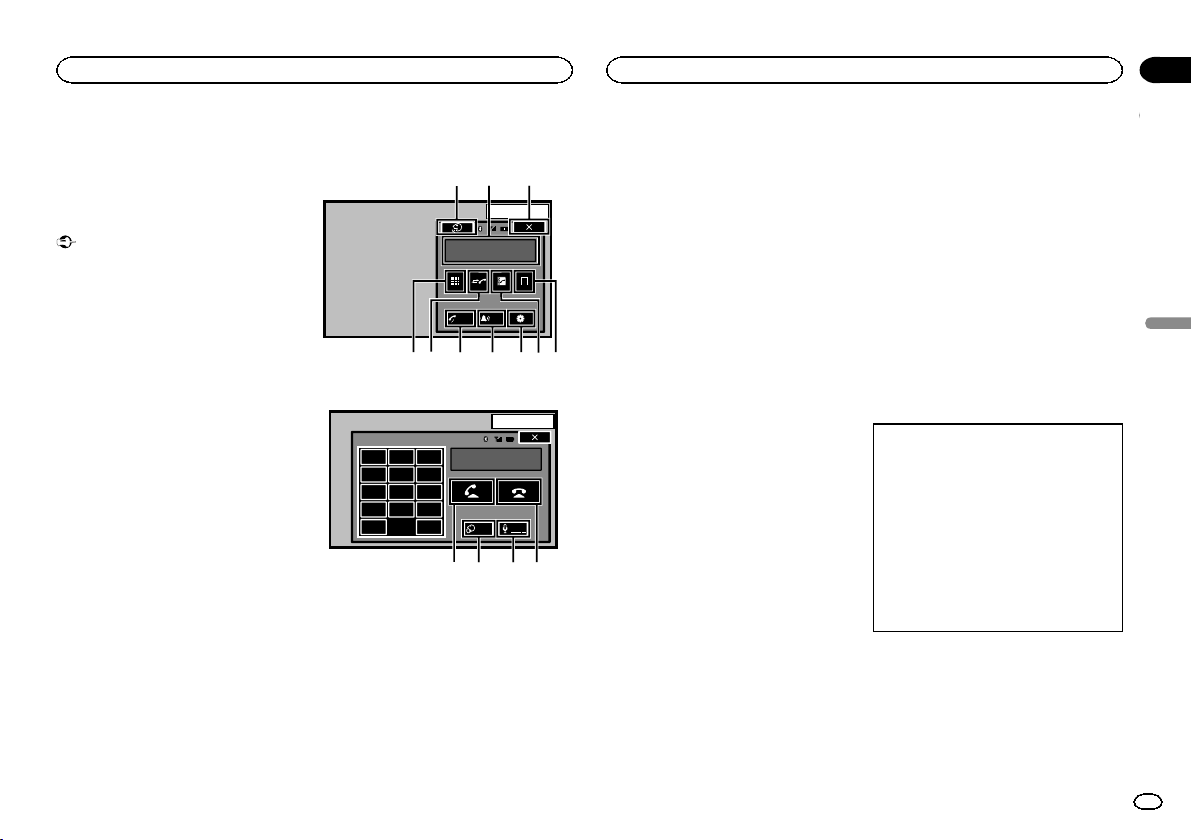
Black plate (177,1)
Funciones del teléfono
Bluetooth
(Función de AVH-X5600BHS/AVH-X4600BT/AVH-
X3600BHS/AVH-X2600BT)
Se puede usar un teléfono Bluetooth.
Importante
! Si deja la unidad en espera para conectar su
teléfono por Bluetooth mientras el motor no
está encendido puede agotar la batería.
! Las operaciones avanzadas que exigen con-
centración, como marcar números en la pan-
talla, usar el directorio de teléfonos, etc.,
están prohibidas mientras se conduce. Apar-
que el vehículo en un lugar seguro y accione
el freno de mano antes de continuar.
! El menú de conexión Bluetooth no se puede
seleccionar durante la conducción.
! Según el tipo de teléfono móvil conectado a
esta unidad, las operaciones disponibles
pueden estar limitadas.
! Si no puede completar la conexión utilizando
esta unidad, utilice el dispositivo para conec-
tarlo a la misma.
! Si conecta más de un dispositivo al mismo
tiempo, es posible que el dispositivo conec-
tado no funcione correctamente. Se reco-
mienda conectar un dispositivo por vez.
Teclas del teclado táctil
Visualización de la espera telefónica
13 ARP
PM
12:25
1
Abcdefghi
1234567890123456
Auto
ON
To n e
OFF
e1
2345678
d
Cuando cambie al modo de introducción de nú-
mero de teléfono
13 APR
PM
12:25
1
123
456
789
*0#
C+
Abcdefghi
XXXXXXXXXXXXXXXX
Private
ON
Vol
9abc
1 Tecla de cierre
Se cierra la pantalla.
2 Tecla de marcación predefinida
Visualización de la pantalla de marcaciones
predefinidas.
3 Tecla de directorio de teléfonos
Cambio al modo directorio de teléfonos.
4 Tecla de configuración
Visualización del menú de conexión de
Bluetooth.
5 Tecla de tono
Activación o desactivación del tono de las lla-
madas entrantes.
6 Tecla de respuesta automática
Activación o desactivación de la respuesta
automática.
7 Tecla de historial
Cambio a las listas de llamadas perdidas, re-
cibidas y marcadas.
8 Tecla de teclado
Cambio de modo para introducir directamen-
te el número de teléfono.
9 Tecla de conectado
Finalización de una llamada.
Rechazo de una llamada entrante.
Cancelación de una llamada en espera.
a Tecla de volumen
Ajuste del volumen de escucha del interlocu-
tor.
b Tecla de modo privado
Activación o desactivación del modo privado.
c Tecla de desconectado
Aceptar una llamada entrante.
Realización de una llamada seleccionando
un número de teléfono.
Cambio entre los interlocutores de llamadas
en espera.
d Tecla de control de voz
Notas
! El modo privado sólo se puede utilizar mien-
tras se habla por teléfono.
! Para finalizar la llamada, tanto usted como
su interlocutor deben colgar los teléfonos.
! Las teclas del teclado táctil no mencionadas
en el apartado Funciones del teléfono
Bluetooth podrían aparecer en la pantalla.
Consulte Lista de indicadores en la página
207.
Información de texto
e Aviso de llamada entrante
Indica que se ha recibido una llamada en-
trante que no ha sido revisada todavía.
! No se muestra para las llamadas reali-
zadas cuando el teléfono móvil está des-
conectado de la unidad.
Configuración de la función
manos libres
1 Conexión
Primero debe conectar un teléfono Bluetooth
a esta unidad.
Para ver instrucciones detalladas sobre cómo
conectar su teléfono a esta unidad mediante
la tecnología inalámbrica Bluetooth, consulte
Emparejado desde esta unidad en la página
191.
2 Ajuste del volumen
Ajuste a su antojo el volumen del audífono de
su teléfono móvil. Una vez ajustado, el nivel de
volumen se graba en la unidad como el valor
predefinido.
Notas
! El volumen de voz del autor de la llamada y
del tono pueden variar según el tipo de telé-
fono móvil.
! Si la diferencia entre el volumen del tono y el
volumen de voz de la persona que llama es
considerable, el nivel de volumen general
puede volverse inestable.
Español
Teléfono Bluetooth
177
Sección
Teléfono Bluetooth
Es
17
<CRD4844-A>177

Black plate (178,1)
! No olvide ajustar el volumen a un nivel ade-
cuado antes de desconectar el teléfono móvil
de esta unidad. Si el volumen ha sido silen-
ciado (nivel cero) en su teléfono móvil, per-
manecerá silenciado incluso después de que
desconecte dicho teléfono.
Llamada a un número del
directorio de teléfonos
Al conectar el teléfono, se deberán transferir
automáticamente los contactos del mismo. Si
no, utilice el menú del teléfono para transferir-
los. La visibilidad de la unidad deberá estar acti-
vada cuando utilice el menú del teléfono.
Consulte Cambio de visibilidad de la unidad en la
página 192.
Una vez encontrado el número al que desea lla-
mar en el directorio de teléfonos, puede selec-
cionar la entrada y hacer la llamada.
1 Toque la tecla de directorio de teléfonos
para cambiar al modo de directorio de teléfo-
nos.
2 Selección de la lista de números de telé-
fono.
Aparece la lista detallada de números de teléfo-
nos de la entrada seleccionada.
3 Seleccione el número de teléfono.
# Si quiere almacenar el número de teléfono,
toque la lista sin levantar el dedo.
4 Toque la tecla de descolgar para realizar
la llamada.
5 Toque la tecla de colgar para finalizar la
llamada.
Nota
Al conectar el teléfono, se deberán transferir
automáticamente los contactos del mismo. Si
no, utilice el menú del teléfono para transferir-
los. La visibilidad de la unidad deberá estar acti-
vada cuando utilice el menú del teléfono.
Consulte Cambio de visibilidad de la unidad en la
página 192.
Selección de número por
modo de búsqueda alfabético
Si se registran muchos números en el directorio
de teléfonos, puede buscar el número emplean-
do el modo de búsqueda alfabético.
1 Toque la tecla de directorio de teléfonos
para cambiar al modo de directorio de teléfo-
nos.
2 Toque ABC para cambiar al modo de bús-
queda alfabética.
3 Toque la primera letra de la entrada que
está buscando.
Se mostrarán las entradas del Directorio de telé-
fonos que empiecen por dicha letra (p. ej.: “Bár-
bara”, “Beatriz” y “Bruno” cuando “B” está
seleccionado).
# El orden del primer nombre y del último puede
variar respecto al del teléfono móvil.
4 Toque la lista para visualizar la lista de
números de teléfono de la entrada seleccio-
nada.
# Si una entrada incluye varios números de teléfo-
no, seleccione uno de ellos tocando la lista.
# Toque el icono si quiere cambiar a la lista del his-
torial de llamadas.
Cambio a la lista del historial de
llamadas.
5 Toque la tecla de descolgar para realizar
la llamada.
6 Toque la tecla de colgar para finalizar la
llamada.
Inversión de nombres en el
directorio de teléfonos
Cuando se conecte a esta unidad su teléfono
móvil, el nombre y los apellidos de sus contac-
tos podrían registrarse en el directorio de teléfo-
nos en orden inverso. Se puede utilizar esta
función para volver a cambiar el orden.
(Inversión de los nombres en el directorio de te-
léfonos)
1 Toque la tecla de directorio de teléfonos
para cambiar al modo de directorio de teléfo-
nos.
2 Invierta los nombres en el directorio de
teléfonos.
Inversión de los nombres en el di-
rectorio de teléfonos.
3 Aparece el mensaje “Le gustaría inverti-
dos todos los nombres?”. Toque Si para con-
tinuar.
Mientras se invierten los nombres, aparece
.
# Si la inversión, aparece “Error al invertir nom-
bre.”. En tal caso, vuelva a intentarlo desde el princi-
pio.
Nota
Invertir los nombres de sus contactos desde
esta unidad no afecta a los datos de su dispositi-
vo Bluetooth.
Uso de las listas de llamadas
perdidas, recibidas y marcadas
Las 80 últimas llamadas marcadas, recibidas y
perdidas se almacenan en la memoria. Puede
realizar una búsqueda dentro de ellas y llamar a
los números desde estas listas.
1 Toque la tecla de historial para mostrar la
lista del historial de llamadas.
2 Seleccione Llamadas Perdidas,
Llamadas salientes o Llamadas entrantes.
Visualización de la lista de llama-
das recibidas.
Visualización de la lista de llama-
das marcadas.
Visualización de la lista de llama-
das perdidas.
3 Toque el número de lista para seleccionar
un número de teléfono.
El nombre y el número de teléfono se visualizan
en la lista detallada.
# Si quiere almacenar el número de teléfono,
toque la lista sin levantar el dedo.
4 Toque la tecla de descolgar para realizar
la llamada.
5 Toque la tecla de colgar para finalizar la
llamada.
Ajuste de respuesta automática
Si esta función está activada, la unidad contes-
tará automáticamente todas las llamadas en-
trantes.
Teléfono Bluetooth
178
Sección
Teléfono Bluetooth
Es
17
<CRD4844-A>178
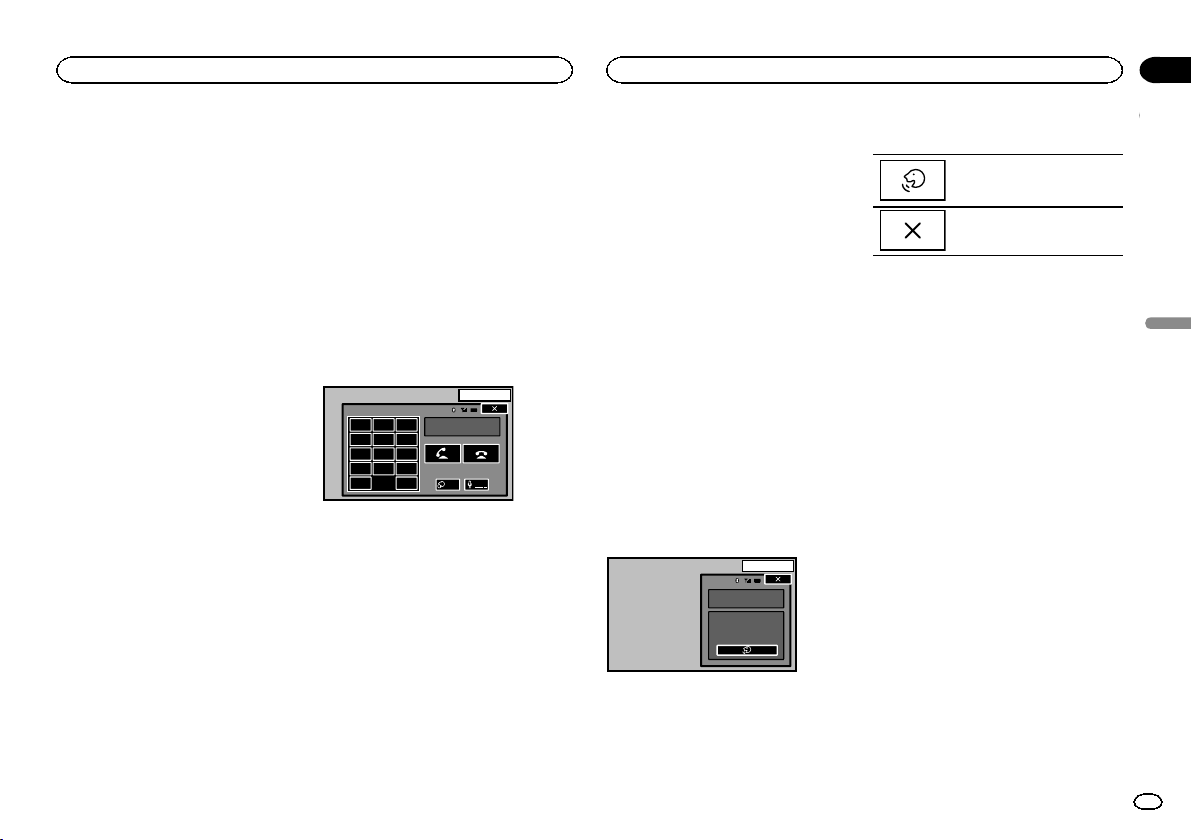
Black plate (179,1)
% Toque la tecla de respuesta automática
para activar o desactivar la función de res-
puesta automática.
Ajuste del volumen de
escucha del interlocutor
Para mantener la calidad del sonido, esta uni-
dad puede ajustar el volumen de escucha del in-
terlocutor. Si el volumen no es suficiente para el
interlocutor, use esta función.
% Toque la tecla de volumen para seleccio-
nar Far-End VOL.
1—2—3
# Esta función puede utilizarse incluso mientras se
habla por teléfono.
# Los ajustes se pueden almacenar para cada dis-
positivo.
Cambio del tono de llamada
Puede seleccionar si desea utilizar el tono de lla-
mada de esta unidad. Si se activa esta función,
sonará el tono de llamada de esta unidad.
1 Conecte su teléfono móvil a esta unidad.
2 Toque la tecla de tono para activar o de-
sactivar el tono de llamada.
Uso de las listas de
marcaciones predefinidas
Se pueden almacenar con facilidad hasta seis
números de teléfono como predefinidos.
1 Toque la tecla de marcación predefinida
para mostrar la pantalla de presintonías.
2 Toque uno de los números de teléfono
para seleccionarlo.
# Si desea borrar un número de teléfono predefini-
do, mantenga pulsado el número de teléfono que
desea borrar.
3 Toque la tecla de descolgar para realizar
la llamada.
4 Toque la tecla de colgar para finalizar la
llamada.
Realización de una llamada
ingresando el número de
teléfono
13 APR
PM
12:25
1
123
456
789
*0#
C
+
Abcdefghi
XXXXXXXXXXXXXXXX
Private
ON
Vol
1 Toque la tecla de teclado para empezar a
introducir el número de teléfono.
2 Toque los iconos de los números para in-
troducir los números deseados.
# Se pueden ingresar hasta 32 dígitos.
3 Toque la tecla de descolgar para realizar
la llamada.
4 Toque la tecla de colgar para finalizar la
llamada.
Nota
El modo de introducción de número de teléfono
solo se puede utilizar si hay un teléfono
Bluetooth conectado a esta unidad.
Ajuste del modo privado
Durante una conversación puede cambiar al
modo privado (hablar directamente por su telé-
fono móvil).
% Toque la tecla de modo privado para acti-
var o desactivar el modo privado.
Control de voz
Si su teléfono móvil está equipado con la fun-
ción de control de voz, se pueden utilizar, por
ejemplo, comandos de voz para realizar llama-
das.
! El funcionamiento es diferente según el tipo
de teléfono móvil. Consulte el manual de su
teléfono móvil para ver más instrucciones.
! Cuando se utiliza un iPhone con iOS 6.1 o
posterior.
Siri Eyes Free Mode está disponible con este
producto.
1 Toque la tecla de control de voz.
El display cambia a la pantalla de control de voz.
También puede cambiar a la pantalla de control
de voz manteniendo pulsado el botón de inicio
mientras la fuente esté activada.
13 ARP
PM
12:25
1
I'm Listening...
2 Inicie el control de voz.
Indica que se pueden realizar lla-
madas continuas ininterrumpida-
mente.
Indica que el display está cerra-
do.
Notas
! Para que sus comandos de voz puedan ser
reconocidos e interpretados correctamente,
asegúrese de las condiciones son aptas para
el reconocimiento.
! Observe que el viento que sopla a través de
las ventanas del vehículo y el ruido prove-
niente del exterior del vehículo pueden inter-
ferir con la función de comando de voz.
! Para una captación óptima, se deberá colo-
car el micrófono directamente delante del
conductor a una distancia adecuada.
! Si se habla demasiado pronto tras el inicio
del comando, puede fallar el reconocimiento
de voz.
! Hable lenta, pausada y claramente.
Español
Teléfono Bluetooth
179
Sección
Teléfono Bluetooth
Es
17
<CRD4844-A>179
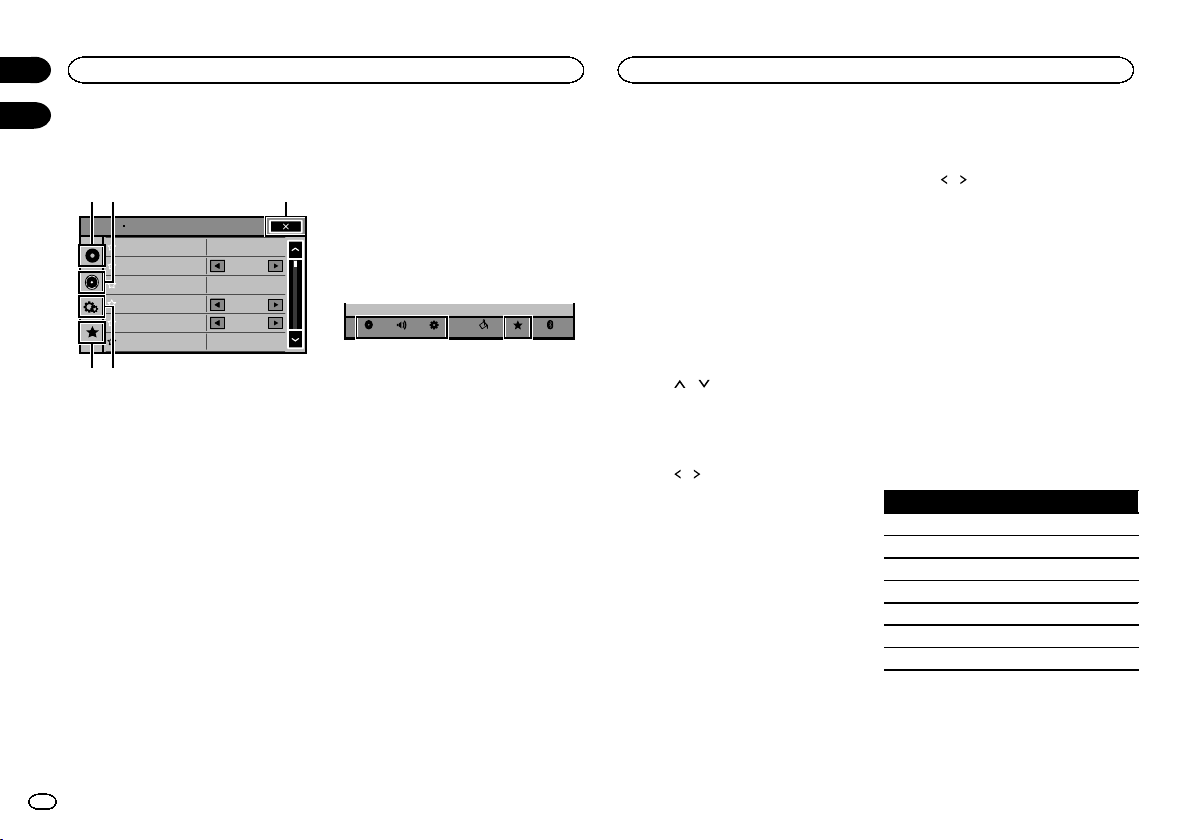
Black plate (180,1)
Funcionamiento del menú
Teclas del teclado táctil
Sonic Center Control
Loudness
Subwoofer
Bass Booster
High Pass Filter
Source Level Adjuster
L/R 0
Low
0
125Hz
0
On
Audio
1
54
23
1 Tecla de configuración de vídeo
Consulte Configuración del reproductor de
vídeo en la página 182.
2 Tecla de función de audio
Consulte Ajustes de audio en la página 180.
3 Tecla de cierre
Retorno a la visualización de fuente actual.
4 Tecla de sistema
Consulte Ajustes del sistema en la página
185.
5 Tecla de favoritos
Puede elegir menús dentro de cada menú
(menú de funciones de audio, etc.) y regis-
trarlos en este menú de favoritos.
Consulte Menú de favoritos en la página 191.
Notas
! Puede visualizar el menú Ajuste de Video al
seleccionar la fuente Disc o USB.
! Si inicia el menú Ajuste de Video, se deten-
drá la reproducción.
! No puede visualizar el menú de funciones de
audio cuando la función de silenciamiento
está activada o se está reproduciendo un ar-
chivo JPEG.
1 Pulse el botón de inicio para cambiar a la
pantalla de inicio.
2 Toque cualquiera de las siguientes teclas
del teclado táctil para seleccionar el menú
que desea ajustar.
BluetoothFavoritesThemeSystem
Settings
AudioVideo
Uso del ajuste del fader/balance
Fader/Balance muestra si el altavoz trasero está
ajustado en Lleno en el menú del sistema.
Se puede cambiar el ajuste de fader/balance
para proporcionar un entorno de audio ideal
para todos los asientos ocupados.
1 Pulse el botón de inicio para cambiar a la
pantalla de inicio.
2 Toque la tecla de función de audio para
abrir el menú de audio.
3 Toque Fader/Balance en el menú de fun-
ciones de audio.
4 Toque
o para ajustar el balance
entre los altavoces delanteros/traseros.
Gama: F 15 L/R 0 a R 15 L/R 0
# Seleccione F/R 0 L/R 0 en caso de usar sólo dos
altavoces.
5 Toque o para ajustar el balance entre
los altavoces izquierdos/derechos.
Gama: F/R 0 L 15 a F/R 0 R 15
Nota
También puede ajustar el fader/balance, arras-
trando el punto de la tabla que se muestra.
Uso del ajuste del balance
Balance muestra si el altavoz trasero está ajus-
tado en Sub bajo en el menú del sistema. Este
ajuste le permite configurar el balance entre la
salida de sonido izquierda/derecha.
1 Pulse el botón de inicio para cambiar a la
pantalla de inicio.
2 Toque la tecla de función de audio para
abrir el menú de audio.
3 Toque Balance en el menú de funciones
de audio.
4 Toque
o para ajustar el balance entre
los altavoces izquierdos/derechos.
Gama: L15a R15
Nota
También se puede ajustar el balance arrastran-
do el punto en la tabla mostrada.
Uso del ecualizador
Puede ajustar la ecualización de acuerdo con
las características acústicas del interior del
automóvil.
Recuperación de las curvas de
ecualización
Hay siete tipos de curvas de ecualización me-
morizadas que se pueden recuperar con facili-
dad en cualquier momento. A continuación se
ofrece una lista de estas curvas de ecualización.
Pantalla Curva de ecualización
S.bajo Supergraves
Potente Potente
Natural Natural
Vocal Vocal
Plano Plana
Pers1 Personalizada 1
Pers2 Personalizada 2
! Se pueden ajustar las curvas de ecualización
para Pers1 y Pers2,
! No se puede seleccionar Pers1 y Pers2 cuan-
do se utiliza el autoecualizador.
Configuración
180
Sección
Ajustes de audio
Es
18
19
<CRD4844-A>180

Black plate (181,1)
! En el caso de Plano, no se hacen ajustes al
sonido. Puede verificar el efecto de las cur-
vas de ecualización al alternar entre Plano y
otra curva de ecualización.
1 Pulse el botón de inicio para cambiar a la
pantalla de inicio.
2 Toque la tecla de función de audio para
abrir el menú de audio.
3 Toque EQ Gráfico en el menú de funcio-
nes de audio.
# Cuando se está utilizando el autoecualizador, no
se pueden seleccionar ni ajustar las curvas del ecua-
lizador Pers1 y Pers2.
4 Toque el ajuste deseado.
S.bajo—Potente—Natural—Vocal—Plano—
Pers1—Pers2
Ajuste del ecualizador gráfico
de 8 bandas
Se puede ajustar el nivel de cada banda para las
curvas de ecualización.
! Se puede crear una curva Pers1 separada
por cada fuente. Si se realizan ajustes cuan-
do una curva distinta a Pers2 está seleccio-
nada, los ajustes de la curva de ecualización
se guardarán en Pers1.
! Se puede crear una curva Pers2 común a
todas las fuentes. Si se realizan ajustes cuan-
do la curva Pers2 está seleccionada, la curva
Pers2 se actualizará.
1 Pulse el botón de inicio para cambiar a la
pantalla de inicio.
2 Toque la tecla de función de audio para
abrir el menú de audio.
3 Toque EQ Gráfico en el menú de funcio-
nes de audio.
4 Toque el ajuste deseado.
S.bajo—Potente—Natural—Vocal—Plano—
Pers1—Pers2
5 Toque la tabla para ajustar el nivel de la
banda de ecualización.
Gama: +12dB a –12dB
Uso del autoecualizador
El autoecualizador memoriza la curva de ecuali-
zación creada por la función EQ automática
(consulte EQ automático (ecualización automáti-
ca) en la página 189).
Se puede activar o desactivar el autoecualizador.
Puede emplear esta función al conectar un mi-
crófono opcional a esta unidad.
1 Pulse el botón de inicio para cambiar a la
pantalla de inicio.
2 Toque la tecla de función de audio para
abrir el menú de audio.
3 Toque Ecual. auto. para activar o desacti-
var el autoecualizador.
# No se puede usar esta función si no se ha reali-
zado el ajuste EQ automático.
Uso del control central de
sonido
Mediante esta función se puede crear fácilmen-
te el sonido adecuado para la posición del oyen-
te.
1 Pulse el botón de inicio para cambiar a la
pantalla de inicio.
2 Toque la tecla de función de audio para
abrir el menú de audio.
3 Toque Control de Centro Sónico en el
menú de funciones de audio.
4 Toque
o para seleccionar una posición
del oyente.
Gama: Izquierdo 7 a Derecho 7
Ajuste de la sonoridad
La sonoridad compensa las deficiencias en los
intervalos de frecuencias bajas y altas cuando
se escucha a un volumen bajo.
1 Pulse el botón de inicio para cambiar a la
pantalla de inicio.
2 Toque la tecla de función de audio para
abrir el menú de audio.
3 Toque c o d para seleccionar el nivel de
sonoridad deseado.
Off (desactivado)—Baj (bajo)—Media (medio)
—Alto (alto)
Uso de la salida de subgraves
Esta unidad está equipada con una salida de
subgraves que se puede activar o desactivar.
! Se puede ajustar la frecuencia de corte y el
nivel de salida cuando la salida de subgraves
está activada.
1 Pulse el botón de inicio para cambiar a la
pantalla de inicio.
2 Toque la tecla de función de audio para
abrir el menú de audio.
3 Toque Sub bajo en el menú de funciones
de audio.
4 Toque On o Off junto a Sub bajo para ac-
tivar o desactivar la salida del altavoz de sub-
graves.
5 Toque Normal o Retroceso junto a Fase
para seleccionar la fase de la salida de sub-
graves.
6 Toque c o d junto a Nivel para ajustar el
nivel de salida del altavoz de subgraves.
Gama: +6 a –24
7 Toque c o d junto a Frecuencia para se-
leccionar la frecuencia de corte.
50Hz—63Hz—80Hz—100Hz—125Hz
Solo las frecuencias más bajas que aquellas en
el intervalo seleccionado se generan por el alta-
voz de subgraves.
Intensificación de los graves
Puede intensificar el nivel de graves.
1 Pulse el botón de inicio para cambiar a la
pantalla de inicio.
2 Toque la tecla de función de audio para
abrir el menú de audio.
3 Toque c o d para seleccionar el nivel de-
seado.
Gama: 0 a +6
Uso del filtro de paso alto
Utilice esta función si desea escuchar solo soni-
dos de alta frecuencia. Solamente se emiten por
los altavoces frecuencias más altas que el corte
del filtro de paso alto (HPF).
1 Pulse el botón de inicio para cambiar a la
pantalla de inicio.
Español
Ajustes de audio
181
Sección
Ajustes de audio
Es
19
<CRD4844-A>181
Black plate (182,1)
2 Toque la tecla de función de audio para
abrir el menú de audio.
3 Toque c o d junto a Filtro Pasa Altos
para seleccionar la frecuencia de corte.
Off (desactivado)—50Hz—63Hz—80Hz—
100Hz—125Hz
Sólo las frecuencias más altas que aquellas en
la gama seleccionada se generan a través de los
altavoces delanteros o traseros.
Ajuste de los niveles de la
fuente
La función SLA (ajuste del nivel de fuente) per-
mite ajustar el nivel de volumen de cada fuente
para evitar cambios considerables entre fuen-
tes.
! Los ajustes se basan en el nivel de volumen
de FM, que se mantiene inalterado.
1 Pulse el botón de inicio para cambiar a la
pantalla de inicio.
2 Toque la tecla de función de audio para
abrir el menú de audio.
3 Compare el nivel de volumen de FM con
el de la fuente que desea ajustar.
4 Toque Nivel de ajuste de fuente en el
menú de funciones de audio.
5 Toque
o para ajustar el volumen de
la fuente.
Gama: +4 a –4
Notas
! Nivel de ajuste de fuente no está disponi-
ble si se ha seleccionado FM como fuente.
! El nivel del volumen de AM también se
puede ajustar con esta función.
! Las unidades de vídeo CD, CD, audio compri-
mido, DivX, MPEG-1, MPEG-2 y MPEG-4 se
definen automáticamente con el mismo
ajuste del nivel de fuente.
Ajuste del idioma de los
subtítulos
Se puede definir el idioma de los subtítulos de-
seado. Si está disponible, los subtítulos se visua-
lizarán en el idioma seleccionado.
1 Pulse el botón de inicio para cambiar a la
pantalla de inicio.
2 Toque la tecla de configuración de vídeo
para abrir el menú de configuración de
vídeo.
3 Toque Lenguaje de Subtítulos en el menú
Ajuste de Video.
Se visualizará un menú de idiomas de los subtí-
tulos.
4 Toque el idioma deseado.
El idioma de los subtítulos está definido.
# Si ha seleccionado la opción Otros, consulte Al
seleccionar Otros en la página 182.
Notas
! Si el idioma seleccionado no está disponible,
se visualizará el idioma especificado en el
disco.
! También se puede cambiar el idioma de los
subtítulos tocando la tecla de cambio del
idioma de los subtítulos durante la reproduc-
ción.
! La configuración realizada aquí no se verá
afectada aunque el idioma de los subtítulos
se cambie durante la reproducción usando
la tecla de cambio del idioma de los subtítu-
los.
Al seleccionar Otros
Se muestra una pantalla de introducción de có-
digo de idioma al seleccionar Otros. Consulte
Tabla de códigos de idioma para el DVD en la pá-
gina 215.
% Toque 0 a 9 para introducir el código de
idioma.
# Para cancelar los números introducidos, toque
C.
# Para registrar el código, toque la siguiente tecla
del panel táctil.
Registro del código.
Ajuste del idioma del audio
Se puede definir el idioma del audio preferido.
1 Pulse el botón de inicio para cambiar a la
pantalla de inicio.
2 Toque la tecla de configuración de vídeo
para abrir el menú de configuración de
vídeo.
3 Toque Lenguaje de Audio en el menú de
configuración de vídeo.
Se visualiza un menú de idiomas de audio.
4 Toque el idioma deseado.
El idioma del audio está definido.
# Si ha seleccionado la opción Otros, consulte Al
seleccionar Otros en la página 182.
Notas
! Si el idioma seleccionado no está disponible,
se usará el idioma especificado en el disco.
! También se puede cambiar el idioma de
audio tocando la tecla de cambio del idioma
de audio durante la reproducción.
! La configuración efectuada aquí no se verá
afectada aunque el idioma de audio se cam-
bie durante la reproducción usando la tecla
de cambio del idioma de audio.
Ajustes de audio
182
Sección
Configuración del reproductor de vídeo
Es
19
20
<CRD4844-A>182
Black plate (183,1)
Ajuste del idioma de menús
Se puede definir el idioma preferido para la vi-
sualización de los menús grabados en un disco.
1 Pulse el botón de inicio para cambiar a la
pantalla de inicio.
2 Toque la tecla de configuración de vídeo
para abrir el menú de configuración de
vídeo.
3 Toque Menú de Lenguaje en el menú
Ajuste de Video.
Se visualiza un menú de idiomas de menús.
4 Toque el idioma deseado.
El idioma de menús está definido.
# Si ha seleccionado la opción Otros, consulte Al
seleccionar Otros en la página 182.
Nota
Si el idioma seleccionado no está disponible, se
visualizará el idioma especificado en el disco.
Ajuste de la visualización
multiángulo del DVD
Se puede ajustar el icono de ángulo para que
aparezca en las escenas en que el ángulo se
puede cambiar.
1 Pulse el botón de inicio para cambiar a la
pantalla de inicio.
2 Toque la tecla de configuración de vídeo
para abrir el menú de configuración de
vídeo.
3 Toque Multi ángulos en el menú
Ajuste de Video para activar o desactivar la
visualización del icono de ángulo.
Ajuste del formato
Hay dos tipos de display: uno panorámico con
una relación de anchura/altura (formato de TV)
de 16:9, y uno normal con un formato de TV de
4:3. Asegúrese de seleccionar el formato de TV
correcto para el display conectado a la salida V
OUT.
! Al utilizar un display normal, seleccione
Letter Box o Pan Scan. Si selecciona 16:9,
puede aparecer una imagen poco natural.
! Si selecciona el formato de TV, el display de
la unidad cambiará al mismo ajuste.
1 Pulse el botón de inicio para cambiar a la
pantalla de inicio.
2 Toque la tecla de configuración de vídeo
para abrir el menú de configuración de
vídeo.
3 Toque Aspecto TV en el menú
Ajuste de Video para seleccionar la relación
de aspecto de TV.
Toque Aspecto TV repetidamente hasta que la
relación de aspecto deseada aparezca en el dis-
play.
! 16:9 – La imagen panorámica (16:9) se visua-
liza tal y como es (ajuste inicial)
! Letter Box – La imagen tiene la forma de un
buzón con bandas negras en las partes supe-
rior e inferior de la pantalla
! Pan Scan – La imagen se reduce en los lados
derecho e izquierdo de la pantalla
Notas
! Al reproducir discos que no especifican
Pan Scan, el disco se reproduce en el display
Letter Box incluso al seleccionar el ajuste
Pan Scan. Verifique si la caja del disco tiene
la marca
16 : 9 LB
.
! Algunos discos no permiten cambiar el for-
mato de TV. Para obtener más información,
consulte las instrucciones que se brindan
con el disco.
Ajuste del intervalo del
slideshow
Los archivos JPEG pueden visualizarse en forma
de slideshow en esta unidad. En este ajuste
puede definirse el intervalo entre cada imagen.
1 Pulse el botón de inicio para cambiar a la
pantalla de inicio.
2 Toque la tecla de configuración de vídeo
para abrir el menú de configuración de
vídeo.
3 Toque Diapositiva por Tiempo en el menú
Ajuste de Video para seleccionar el intervalo
del slideshow.
Toque Diapositiva por Tiempo repetidamente
hasta que el ajuste deseado aparezca en el dis-
play.
! 5seg. – Las imágenes JPEG cambian en in-
tervalos de 5 segundos
! 10seg. – Las imágenes JPEG cambian en in-
tervalos de 10 segundos
! 15seg. – Las imágenes JPEG cambian en in-
tervalos de 15 segundos
! Manual – Las imágenes JPEG pueden cam-
biarse manualmente
Ajuste del control de padres
Algunos discos de DVD vídeo permiten utilizar
el control de padres para impedir que los niños
vean escenas violentas u orientadas a adultos.
Se puede ajustar el nivel de control de padres al
nivel deseado.
! Cuando se ajusta un nivel de control de pa-
dres y se reproduce un disco que viene con
este control, se pueden visualizar indicacio-
nes para la introducción de un código. En
tales casos, la reproducción comenzará
cuando se introduzca el código correcto.
Ajuste del código y del nivel
Debe registrarse un código para reproducir dis-
cos con control de padres.
1 Pulse el botón de inicio para cambiar a la
pantalla de inicio.
2 Toque la tecla de configuración de vídeo
para abrir el menú de configuración de
vídeo.
3 Toque Parental en el menú
Ajuste de Video.
4 Toque 0 a 9 para introducir un número de
código de cuatro dígitos.
# Para cancelar los números introducidos, toque
C.
# Para registrar el código, toque la siguiente tecla
del panel táctil.
Registro del código.
El código ha quedado definido y ahora se puede
ajustar el nivel.
5 Toque 1 o 8 para seleccionar el nivel de-
seado.
6 Toque Enter.
Así quedará definido el nivel de control de pa-
dres.
! 8 – Se puede reproducir todo el disco (ajuste
inicial)
! 7 a 2 – Se pueden reproducir discos para
niños y aquellos no destinados a adultos
! 1 – Sólo se pueden reproducir discos para
niños
Notas
! Se recomienda anotar el código, por si acaso
llega a olvidarlo.
Español
Configuración del reproductor de vídeo
183
Sección
Configuración del reproductor de vídeo
Es
20
<CRD4844-A>183

Black plate (184,1)
! El nivel de control de padres está almacena-
do en el disco. Compruebe la marca de nivel
que se indica en la caja del disco, en el mate-
rial impreso incluido o en el propio disco. No
es posible utilizar el control de padres en
esta unidad si el disco no tiene almacenado
un nivel de control de padres.
! En algunos discos, el control de padres
puede estar activo sólo en las escenas con
niveles determinados. No se realizará la re-
producción de estas escenas. Para obtener
detalles, consulte el manual de instrucciones
que se incluye con el disco.
Cambio del nivel
Se puede cambiar el nivel de control de padres
definido.
1 Pulse el botón de inicio para cambiar a la
pantalla de inicio.
2 Toque la tecla de configuración de vídeo
para abrir el menú de configuración de
vídeo.
3 Toque Parental en el menú
Ajuste de Video.
4 Toque 0 a 9 para introducir el número de
código registrado.
5 Registro del código.
Registro del código.
Así se definirá el código, y ahora podrá cambiar
el nivel.
# Si se introduce un número de código incorrecto,
se visualizará el icono
. Toque C para introducir el
número de código correcto.
# Si no recuerda el código, consulte En caso de ol-
vidar el código en la página 184.
6 Toque 1 o 8 para seleccionar el nivel de-
seado.
7 Toque Enter.
El nuevo nivel de control de padres está defini-
do.
En caso de olvidar el código
% Pulse RESET.
Ajuste del archivo de
subtítulos DivX
Puede seleccionar si desea visualizar los subtí-
tulos externos DivX o no.
! Los subtítulos DivX se visualizarán, aunque
esté seleccionado Personalizado, si no exis-
ten archivos de subtítulos externos DivX.
1 Pulse el botón de inicio para cambiar a la
pantalla de inicio.
2 Toque la tecla de configuración de vídeo
para abrir el menú de configuración de
vídeo.
3 Toque Subtítulos DivX® en el menú
Ajuste de Video para seleccionar el ajuste de
subtítulos deseado.
! Original – Se visualizan los subtítulos DivX
! Personalizado – Se visualizan los subtítulos
externos DivX
Notas
! Se pueden mostrar hasta 42 caracteres en
una línea. Si se usan más de 42 caracteres,
los saltos de línea y los caracteres restantes
se visualizan en la siguiente línea.
! Se pueden mostrar hasta 126 caracteres en
una pantalla. Si se usan más de 126 caracte-
res, los caracteres sobrantes no se visualiza-
rán.
Visualización del código de
registro de DivX
â
VOD
Para reproducir contenidos DivX VOD (vídeo
bajo demanda) en esta unidad, tendrá que regis-
trar primero la unidad con el proveedor de con-
tenidos DivX VOD. Esto se realiza generando un
código de registro DivX VOD que debe enviar a
su proveedor.
! Anote el código, ya que lo necesitará cuando
registre su unidad con un proveedor de DivX
VOD.
1 Pulse el botón de inicio para cambiar a la
pantalla de inicio.
2 Toque la tecla de configuración de vídeo
para abrir el menú de configuración de
vídeo.
3 Toque VOD DivX® en el menú
Ajuste de Video.
Aparece Código de Registro y
Código de Desactivación.
4 Toque Código de Registro.
Se mostrará su código de registro.
Visualización del código de
anulación del registro
Si su dispositivo ya se ha registrado, anule su re-
gistro introduciendo el código de anulación del
registro.
1 Pulse el botón de inicio para cambiar a la
pantalla de inicio.
2 Toque la tecla de configuración de vídeo
para abrir el menú de configuración de
vídeo.
3 Toque VOD DivX® en el menú
Ajuste de Video.
4 Toque Código de Desactivación.
# Para detener el proceso, toque Cancelar.
5 Toque Listo.
La cancelación se completa.
Reproducción automática de
DVD
Cuando se introduce un disco DVD que viene
con un menú DVD, esta unidad cancela auto-
máticamente el menú y comienza la reproduc-
ción desde el primer capítulo del primer título.
! Es posible que algunos DVD no funcionen
correctamente. Si no puede utilizar esta fun-
ción, desactívela y comience la reproduc-
ción.
1 Pulse el botón de inicio para cambiar a la
pantalla de inicio.
2 Toque la tecla de configuración de vídeo
para abrir el menú de configuración de
vídeo.
3 Toque Reproducción Auto. de DVD para
activar la reproducción automática.
# Para desactivar la reproducción automática,
vuelva a tocar Reproducción Auto. de DVD.
Configuración del reproductor de vídeo
184
Sección
Configuración del reproductor de vídeo
Es
20
<CRD4844-A>184

Black plate (185,1)
Cambio del ajuste de un
equipo auxiliar
Active este ajuste si utiliza un dispositivo auxiliar
conectado a esta unidad.
1 Pulse el botón de inicio para cambiar a la
pantalla de inicio.
2 Toque la tecla de sistema para abrir el
menú del sistema.
3 Toque Entrada Auxiliar en el menú del
sistema para activar o desactivar
Entrada Auxiliar.
Ajuste de la entrada de AV
Active este ajuste si utiliza un componente de
vídeo externo conectado a esta unidad.
1 Pulse el botón de inicio para cambiar a la
pantalla de inicio.
2 Toque la tecla de sistema para abrir el
menú del sistema.
3 Toque Entrada A/V en el menú del siste-
ma para activar o desactivar Entrada A/V.
Establecimiento del sistema
de navegación
Active este ajuste al conectarse a un sistema de
navegación Pioneer Add-on (se vende por sepa-
rado).
Conexión de dispositivo se puede ajustar
cuando se cumplen todas las condiciones si-
guientes.
— El iPhone no está conectado.
— Sin conexión Bluetooth.
— La fuente está apagada.
1 Apague la fuente.
Consulte Tecla Source off en la página 149.
2 Pulse el botón de inicio para cambiar a la
pantalla de inicio.
3 Toque la tecla de sistema para abrir el
menú del sistema.
4 Toque Conexión de dispositivo en el
menú del sistema.
5 Toque NAV. para seleccionar.
NAV. – Sistema de navegación
Configuración del modo de
conexión de Pandora
Consulte Configuración del modo de conexión de
Pandora en la página 175.
Selección del modo MirrorLink
Puede seleccionar el ajuste del modo MirrorLink
tanto si usa aplicaciones de terceras partes en
su teléfono inteligente como si no.
1 Pulse el botón de inicio para cambiar a la
pantalla de inicio.
2 Toque la tecla de sistema para abrir el
menú del sistema.
3 Toque la opción deseada junto a
Ajustes de CD-ML100.
! Modo de Auto – Puede utilizar las aplicacio-
nes de arranque de su teléfono inteligente en
la pantalla de la unidad.
! Modo Lista de APP – Puede utilizar las apli-
caciones de terceras partes de su teléfono in-
teligente en la pantalla de la unidad.
Actualización del firmware
para el adaptador de conexión
del teléfono inteligente
Esta función se utiliza para actualizar el firmwa-
re del adaptador de conexión del teléfono inteli-
gente con la última versión disponible.
Para más detalles sobre el firmware y la actuali-
zación, consulte nuestro sitio web.
Solo puede realizar la actualización cuando el
adaptador de conexión del teléfono inteligente
está disponible.
Importante
! El dispositivo de almacenamiento USB para
la actualización ha de tener el archivo de ac-
tualización correcto. Si hubiera varios archi-
vos, la actualización no se llevará a cabo.
! No apague nunca la unidad ni desconecte el
dispositivo de almacenamiento USB mien-
tras se esté actualizando el firmware.
! Sólo se puede iniciar la actualización de
firmware cuando se detiene el vehículo y
está activado el freno de mano.
1 Descarga de los archivos de actualización
del firmware.
2 Conecte a su ordenador un dispositivo de
almacenamiento USB vacío (formateado) y
luego seleccione y copie el archivo de actuali-
zación correcto en el dispositivo de almace-
namiento USB.
3 Apague la fuente.
Consulte Activación y desactivación de la fuente
en la página 150.
4 Pulse el botón de inicio para cambiar a la
pantalla de inicio.
5 Toque la tecla de sistema para abrir el
menú del sistema.
6 Toque Actualiz. De CD-ML100 en el menú
del sistema.
7 Conecte el dispositivo de almacenamien-
to USB al adaptador de conexión del teléfo-
no inteligente.
Consulte Conexión para actualizar el firmware del
adaptador de conexión de teléfono inteligente en
la página 199.
8 Toque Continuar para visualizar el modo
de actualización.
Para finalizar la actualización del adaptador de
conexión del teléfono inteligente, siga las ins-
trucciones en pantalla.
9 Retire el dispositivo de almacenamiento
USB del adaptador de conexión del teléfono
inteligente.
10 Apague (posición OFF) la llave de encen-
dido y después cámbiela a ACC u ON.
Notas
! Si no puede realizar la actualización, consul-
te a su concesionario o al servicio técnico
oficial de PIONEER más próximo a su domi-
cilio.
! No podrá realizar la actualización mientras
esté conectado al Bluetooth.
Español
Ajustes del sistema
185
Sección
Ajustes del sistema
Es
21
<CRD4844-A>185

Black plate (186,1)
Visualización de la versión
del firmware del adaptador
de conexión del teléfono
inteligente
Si el adaptador de conexión del teléfono inteli-
gente no funcionara correctamente, es posible
que deba ponerse en contacto con un concesio-
nario para que realice la reparación. En ese
caso, probablemente tenga que indicar la ver-
sión del firmware. Realice el siguiente procedi-
miento para comprobar la versión del adaptador
de conexión del teléfono inteligente.
1 Apague la fuente.
Consulte Activación y desactivación de la fuente
en la página 150.
2 Pulse el botón de inicio para cambiar a la
pantalla de inicio.
3 Toque la tecla de sistema para abrir el
menú del sistema.
4 Toque CD-ML100 Firmware Info para vi-
sualizar la versión del firmware del adap-
tador de conexión del teléfono inteligente.
Actualización del firmware
Esta función se utiliza para actualizar esta uni-
dad con la última versión del firmware disponi-
ble.
Para más detalles sobre el firmware y la actuali-
zación, consulte nuestro sitio web.
Importante
! El dispositivo de almacenamiento USB para
la actualización ha de tener el archivo de ac-
tualización correcto. Si hubiera varios archi-
vos, la actualización no se llevará a cabo.
! No apague nunca la unidad ni desconecte el
dispositivo de almacenamiento USB mien-
tras se esté actualizando el firmware.
! Sólo se puede iniciar la actualización de
firmware cuando se detiene el vehículo y
está activado el freno de mano.
1 Descarga de los archivos de actualización
del firmware.
2 Conecte a su ordenador un dispositivo de
almacenamiento USB vacío (formateado) y
luego seleccione y copie el archivo de actuali-
zación correcto en el dispositivo de almace-
namiento USB.
3 Apague la fuente.
Consulte Activación y desactivación de la fuente
en la página 150.
4 Pulse el botón de inicio para cambiar a la
pantalla de inicio.
5 Toque la tecla de sistema para abrir el
menú del sistema.
Puede comprobar la versión actual del firmware
de la unidad. Toque Información de Firmware
en el menú del sistema para abrir la pantalla
Información de Firmware.
6 Toque Actualizar Firmware en el menú
del sistema.
Aparece la pantalla de confirmación en la pan-
talla.
7 Conecte el dispositivo de almacenamien-
to USB según los mensajes que aparecen en
pantalla.
8 Toque Continuar para visualizar el modo
de lectura de archivos.
Si en la pantalla aparecen mensajes de adver-
tencia, márquelos.
9 Toque Comenzar para mostrar el modo
de transferencia de datos.
# Para finalizar la actualización de firmware, siga
las instrucciones en pantalla.
# Esta unidad se restablecerá automáticamente
una vez que se haya completado la actualización del
firmware si la actualización se ha efectuado con
éxito.
Nota
Si en la pantalla aparece
“Falla en actualizacion!”, cambie la llave de en-
cendido del automóvil a la posición de desacti-
vación, luego a la posición ACC para continuar
y finalmente, inicie la secuencia de recupera-
ción.
Visualización de la versión
del firmware
Si se produce un fallo de funcionamiento en la
unidad, es posible que deba ponerse en contac-
to con un concesionario para que realice la re-
paración. En ese caso, probablemente tenga
que indicar la versión del firmware. Realice el si-
guiente procedimiento para comprobar la ver-
sión de esta unidad.
1 Apague la fuente.
Consulte Activación y desactivación de la fuente
en la página 150.
2 Pulse el botón de inicio para cambiar a la
pantalla de inicio.
3 Toque la tecla de sistema para abrir el
menú del sistema.
4 Toque Información de Firmware para
mostrar la versión del firmware de esta uni-
dad.
Configuración del modo
MIXTRAX
Consulte Configuración del modo MIXTRAX en la
página 174.
Cambio del ajuste de la imagen
(Brillo, Contraste, Color, Matiz,
Intensidad y Temperatura)
Puede ajustar las funciones de Brillo (brillo),
Contraste (contraste), Color (color) , Matiz
(tono), Intensidad (reductor de luz) y
Temperatura (temperatura) para cada fuente y
la cámara retrovisora.
! No se puede ajustar Color y Matiz para la
fuente de audio.
! No se puede ajustar Color y Matiz para
NAV., Aplicaciones y MirrorLink.
1 Pulse el botón de inicio para cambiar a la
pantalla de inicio.
2 Toque la tecla de sistema para abrir el
menú del sistema.
3 Si desea ajustar Ajuste de Imagen, selec-
cione la unidad.
NAVI
Completar Ajuste de Imagen
para el sistema de navegación
cuando Conexión de dispositi-
vo está en NAV.
Apps
Completar Ajuste de Imagen
para AppRadio Mode cuando
Conexión de dispositivo está
en iPhone via USB o iPhone
via Bluetooth.
MirrorLink
Completar Ajuste de Imagen
para el MirrorLink Mode.
Ajustes del sistema
186
Sección
Ajustes del sistema
Es
21
<CRD4844-A>186
Black plate (187,1)
Ajuste de Ajuste de Imagen
para la cámara retrovisora.
Source
Ajuste de Ajuste de Imagen
para la fuente.
4 Toque cualquiera de las siguientes teclas
del teclado táctil para seleccionar la función
que desea ajustar.
Se muestran los elementos de
Ajuste de Imagen.
! Brillo – Ajusta la intensidad del color negro
! Contraste – Ajusta el contraste
! Color – Ajusta la saturación de color
! Matiz – Ajusta el tono del color (se realza el
rojo o el verde)
! Intensidad – Ajusta el brillo del display
! Temperatura – Ajusta la temperatura del
color para obtener un mejor balance de blan-
cos
# Sólo se puede ajustar Matiz cuando la codifica-
ción de colores seleccionada sea NTSC.
# Con algunas cámaras retrovisoras, es posible
que no se pueda ajustar la imagen.
5 Toque c o d para ajustar el elemento se-
leccionado.
Cada vez que toca c o d, aumenta o disminuye
el nivel del elemento seleccionado.
# Brillo, Contraste, Color y Matiz se pueden
ajustar de +24 a -24.
# Intensidad se puede ajustar de +1 a +48.
# Temperatura se puede ajustar de +3 a –3.
Notas
! No puede usar esta función al conducir.
! Se pueden establecer ajustes diferentes para
Brillo/Contraste/Intensidad para cuando el
interruptor de iluminación esté encendido o
apagado.
Selección del idioma del
sistema
Es posible seleccionar el idioma del sistema.
Si hay integrada información de texto, como el
nombre del título, el nombre del artista o el co-
mentario en un idioma europeo, también se
pueden mostrar en esta unidad.
! El idioma se puede cambiar para las siguien-
tes opciones:
— Menú de audio
— Menú del sistema
— Menú de configuración de vídeo
— Menú de Bluetooth
— Idioma de avisos
Esta prohibido el uso de algunas opera-
ciones de esta unidad mientras se condu-
ce, o bien es necesario prestar especial
atención cuando se utilizan. En esos
casos, se mostrará una advertencia en el
display. Con este ajuste puede cambiar el
idioma en que se muestran los mensajes
de advertencia.
! Si el idioma integrado y el idioma selecciona-
do no coinciden, puede que la información
de texto no se muestre correctamente.
! Es posible que algunos caracteres no se vi-
sualicen correctamente.
1 Pulse el botón de inicio para cambiar a la
pantalla de inicio.
2 Toque la tecla de sistema para abrir el
menú del sistema.
3 Toque Lenguaje de Sistema en el menú
del sistema para seleccionar el idioma desea-
do.
4 Toque el idioma deseado.
English (Inglés)—Français (Francés)—Español
(Español)—Português (Portugués)—中文
(Chino simplificado)
Configurar SiriusXM
TuneStartä
Consulte Configurar SiriusXM TuneStartä en la
página 159.
Restablecer los ajustes
predeterminados
Consulte Restablecer los ajustes pr edetermina-
dos en la página 160.
Configuración del modo de
demostración
Una vez que se activa el modo de demostración
aparece la pantalla de demostración.
Consulte Modo de demostración en la página
148.
1 Pulse el botón de inicio para cambiar a la
pantalla de inicio.
2 Toque la tecla de sistema para abrir el
menú del sistema.
3 Toque Demo en el menú del sistema para
activar o desactivar Demo.
! Encendido – Aparece la pantalla de demos-
tración.
! Apagado – No aparece la pantalla de demos-
tración.
Cambio del silenciamiento/
atenuación del sonido
Para utilizar esta función, el cable amarillo/
negro de la unidad ha de estar conectado a un
equipo con función de silenciamiento.
Consulte Conexión del cable de alimentación en
la página 196.
El sonido proveniente de este sistema se silen-
cia o atenúa automáticamente cuando se recibe
una señal desde un equipo con función de silen-
ciamiento.
! El sonido proveniente de este sistema vuelve
a la normalidad cuando se cancela el silen-
ciador o la atenuación.
1 Pulse el botón de inicio para cambiar a la
pantalla de inicio.
2 Toque la tecla de sistema para abrir el
menú del sistema.
3 Toque Silencio/ATT hasta que el ajuste
deseado aparezca en la pantalla.
Toque Silencio/ATT hasta que el ajuste deseado
aparezca en la pantalla.
! Mudo – Silenciamiento
! ATT -20dB – Atenuación (ATT -20dB tiene un
efecto más potente que ATT -10dB)
! ATT -10dB – Atenuación
! Off – Desactiva el silenciamiento/la atenua-
ción del sonido
Notas
! Al visualizarse Mudo, el sonido se desactiva
y no se puede ajustar el audio.
! Al visualizarse ATT, el sonido se atenúa y
sólo se puede ajustar el volumen. (No se
puede realizar ningún otro ajuste de audio.)
! La operación vuelve a su estado normal
cuando se termina la llamada telefónica.
Español
Ajustes del sistema
187
Sección
Ajustes del sistema
Es
21
<CRD4844-A>187

Black plate (188,1)
Ajuste de la salida posterior y
del controlador de subgraves
La salida posterior de esta unidad (salida de ca-
bles de altavoces traseros y salida RCA poste-
rior) se puede usar para la conexión de
altavoces de toda la gama (Lleno) o subgraves
(Subwoofer). Si se cambia el ajuste de la salida
posterior a Subwoofer, se podrá conectar el
cable de altavoces traseros directamente al alta-
voz de subgraves sin necesidad de usar un am-
plificador auxiliar.
Inicialmente, la unidad está ajustada para una
conexión de altavoces traseros de toda la gama
(Lleno).
1 Apague la fuente.
Consulte Activación y desactivación de la fuente
en la página 150.
2 Pulse el botón de inicio para cambiar a la
pantalla de inicio.
3 Toque la tecla de sistema para abrir el
menú del sistema.
4 Toque Parlante Trasero en el menú del
sistema para cambiar la salida de subgraves
o el altavoz de gama completa.
# Si no se conecta un altavoz de subgraves a la sa-
lida posterior, seleccione Lleno (altavoz de toda la
gama).
# Si se conecta un altavoz de subgraves a la salida
posterior, seleccione Subwoofer (altavoz de subgra-
ves).
Notas
! Aunque cambie este ajuste, no se producirá
ningún sonido a menos que active la salida
de subgraves (consulte Uso de la salida de
subgraves en la página 181).
! Las salidas de cables de altavoces traseros y
la salida RCA posterior se cambian simultá-
neamente en este ajuste.
Uso del teclado
Teclado sólo está disponible en AppRadio
Mode.
Consulte Configuración del teclado en la página
168.
Ajuste del desplazamiento
continuo
Si la función de desplazamiento continuo está
ajustada en Encendido, la información de texto
que hay registrada se desplaza de manera inin-
terrumpida por el display. Desactive la función
(Apagado) si desea que la información se des-
place una sola vez.
1 Pulse el botón de inicio para cambiar a la
pantalla de inicio.
2 Toque la tecla de sistema para abrir el
menú del sistema.
3 Toque Desplazamiento Continuo en el
menú del sistema para activar o desactivar el
desplazamiento continuo.
Ajuste de audio Bluetooth
(Función de AVH-X5600BHS/AVH-X4600BT/AVH-
X3600BHS/AVH-X2600BT)
Es necesario activar la fuente Bluetooth Audio
para utilizar un reproductor de audio Bluetooth.
1 Pulse el botón de inicio para cambiar a la
pantalla de inicio.
2 Toque la tecla de sistema para abrir el
menú del sistema.
3 Toque Bluetooth Audio en el menú del
sistema para activar o desactivar audio
Bluetooth.
Borrado de la memoria
Bluetooth
Importante
No desconecte nunca la unidad mientras la me-
moria Bluetooth se está borrando.
1 Apague la fuente.
Consulte Activación y desactivación de la fuente
en la página 150.
2 Pulse el botón de inicio para cambiar a la
pantalla de inicio.
3 Toque la tecla de sistema para abrir el
menú del sistema.
4 Toque Memoria de BT despejada en el
menú del sistema.
5 Toque Libre.
Se mostrará una pantalla de confirmación des-
pués de seleccionar el elemento deseado. Toque
OK para eliminar la memoria.
# Si no desea borrar la memoria, toque Cancelar.
Actualización del software
de Bluetooth
Esta función se utiliza para actualizar esta uni-
dad con la última versión del software de blue-
tooth disponible. Para más detalles sobre el
software de bluetooth y la actualización, consul-
te nuestro sitio web.
Importante
No desconecte nunca la unidad ni el teléfono
mientras el software se esté actualizando.
1 Apague la fuente.
Consulte Activación y desactivación de la fuente
en la página 150.
2 Pulse el botón de inicio para cambiar a la
pantalla de inicio.
3 Toque la tecla de sistema para abrir el
menú del sistema.
4 Toque Actualizar Software de BT.
5 Toque Comenzar para mostrar el modo
de transferencia de datos.
# Para finalizar la actualización del software de
bluetooth, siga las instrucciones en pantalla.
Visualización de la versión
del software de Bluetooth
Si se produce un fallo de funcionamiento en la
unidad, es posible que deba ponerse en contac-
to con un concesionario para que realice la re-
paración. En ese caso, probablemente tenga
que indicar la versión del software. Realice el si-
guiente procedimiento para comprobar la ver-
sión de esta unidad.
1 Apague la fuente.
Consulte Activación y desactivación de la fuente
en la página 150.
2 Pulse el botón de inicio para cambiar a la
pantalla de inicio.
3 Toque la tecla de sistema para abrir el
menú del sistema.
4 Toque Información de versión de BT para
mostrar la versión del módulo Bluetooth de
esta unidad.
Ajustes del sistema
188
Sección
Ajustes del sistema
Es
21
<CRD4844-A>188
Black plate (189,1)
Ajuste de la cámara
retrovisora (cámara posterior)
PRECAUCIÓN
Pioneer recomienda utilizar una cámara que
genere imágenes invertidas de espejo; de lo
contrario, la imagen aparecerá invertida en
la pantalla.
Esta unidad incorpora una función que automá-
ticamente cambia a las imágenes de la cámara
retrovisora (R.C IN) cuando el vehículo tiene ins-
talada una cámara de este tipo y la palanca de
cambios está en la posición MARCHA ATRÁS
(R) (para obtener más información, consulte a
su concesionario).
También puede cambiar la imagen de vista tra-
sera pulsando la tecla del panel táctil.
Para obtener más información, consulte Uso de
la vista trasera en la página 152.
! Cuando configure el ajuste de la cámara re-
trovisora, mueva la palanca de cambios a la
posición MARCHA ATRÁS (R) y verifique
si se muestran las imágenes de cámara re-
trovisora en el display.
! Cambie este ajuste si el display cambia para
mostrar imágenes de la cámara retrovisora
por error mientras está avanzando.
! Para dejar de ver las imágenes de la cámara
retrovisora y regresar a la visualización de la
fuente, mantenga pulsado MUTE.
! Toque el icono de fuente Visión trasera para
visualizar la imagen de la cámara retrovisora
mientras se conduce. Toque el icono fuente
de nuevo para desactivar la cámara retroviso-
ra. Para obtener más información, consulte
Selección de una fuente en la página 150.
1 Pulse el botón de inicio para cambiar a la
pantalla de inicio.
2 Toque la tecla de sistema para abrir el
menú del sistema.
3 Toque Polaridad de Camara en el menú
del sistema para seleccionar el ajuste adecua-
do.
! Batería – Cuando la polaridad del cable co-
nectado es positiva mientras la palanca de
cambios está en la posición MARCHA
ATRÁS (R)
! Tierra – Cuando la polaridad del cable conec-
tado es negativa mientras la palanca de cam-
bios está en la posición MARCHA ATRÁS
(R)
! Apagado – Si no hay una cámara retrovisora
conectada a esta unidad
! El ajuste de la tecla de vista trasera también
se apaga en la pantalla de visualización de
inicio.
EQ automático (ecualización
automática)
El autoecualizador mide automáticamente las
características acústicas del interior del auto-
móvil y crea una curva de ecualización automá-
tica de acuerdo con la información recopilada.
! Para utilizar esta función, es necesario un
micrófono exclusivo (p. ej. CD-MC20).
ADVERTENCIA
Al medir las características acústicas del inte-
rior del vehículo se puede generar un tono alto
(ruido) por los altavoces, por lo que nunca
deben llevarse a cabo los ajustes EQ automáti-
cos mientras se conduce.
PRECAUCIÓN
! Revise a fondo las condiciones antes de efec-
tuar el ajuste EQ automático, ya que pueden
dañarse los altavoces si estas funciones se
llevan a cabo cuando:
— Los altavoces están conectados de manera
incorrecta. (Por ejemplo, cuando un altavoz
trasero está conectado a una salida de sub-
graves.)
— Un altavoz está conectado a un amplificador
de potencia cuya salida es superior a la capa-
cidad máxima de potencia de entrada del al-
tavoz.
! Si el micrófono está ubicado en un lugar ina-
decuado, el tono de medición puede ser alto
y la medición puede tardar mucho tiempo,
por lo que se puede descargar la batería.
Asegúrese de colocar el micrófono en el
lugar especificado.
Antes de utilizar la función EQ
automática
! Realice el ajuste EQ automático en un lugar
que sea lo más silencioso posible, con el
motor y el aire acondicionado del automóvil
apagados. También desconecte los teléfonos
móviles o portátiles del automóvil o quítelos
antes de hacer este ajuste. Los sonidos dis-
tintos al tono de medición (sonidos del entor-
no, sonidos del motor, teléfonos que suenan,
etc.) pueden impedir la medición correcta de
las características acústicas del interior del
vehículo.
! Asegúrese de realizar el ajuste EQ automáti-
co con el micrófono opcional. Si se utiliza
otro micrófono es posible que no se pueda
realizar la medición o que se obtenga una
medición incorrecta de las características
acústicas del interior del vehículo.
! Para poder realizar el ajuste EQ automático,
el altavoz delantero debe estar conectado.
! Cuando esta unidad está conectada a un
amplificador de potencia con control de nivel
de entrada, es posible que no se pueda reali-
zar el ajuste EQ automático si el nivel de en-
trada de potencia del amplificador se
encuentra por debajo del nivel estándar.
! Cuando esta unidad está conectada a un
amplificador de potencia con un filtro de
paso bajo (LPF), desactive este LPF antes de
realizar el ajuste EQ automático. Además, se
debe ajustar en el nivel máximo la frecuencia
de corte correspondiente al LPF incorporado
del altavoz de subgraves activo.
! La distancia calculada por el ordenador es el
retardo óptimo para brindar resultados preci-
sos dadas las circunstancias. Por ello, siga
utilizando este valor.
— El sonido reflejado en el interior del ve-
hículo es fuerte y se producen demoras.
— El LPF de los altavoces de subgraves acti-
vos o de amplificadores externos produce
demoras con sonidos bajos.
! El ajuste EQ automático cambia los ajustes
de audio según se indica a continuación:
— Los ajustes de fader/balance vuelven a la
posición central (consulte Uso del ajuste
del fader/balance en la página 180).
— La curva del ecualizador cambia a Plano
(consulte Recuperación de las curvas de
ecualización en la página 180).
— Se configurará automáticamente el ajus-
te del filtro de paso alto para los altavoces
delanteros, central y traseros.
! Se sobrescribirá la configuración anterior
para el ajuste EQ automático.
! Para los modelos AVH-X3600BHS, AVH-
X2600BT o AVH-X1600DVD, conecte primero
un cable de extensión de micrófono (adquiri-
do por separado) a la entrada AUX.
Realización del ajuste EQ
automático
1 Detenga el automóvil en un lugar silen-
cioso, cierre todas las puertas, ventanas y el
techo corredizo. Por último, apague el motor.
Si se deja en marcha el motor, el ruido puede
impedir que se realice correctamente el ajuste
EQ automático.
Español
Ajustes del sistema
189
Sección
Ajustes del sistema
Es
21
<CRD4844-A>189
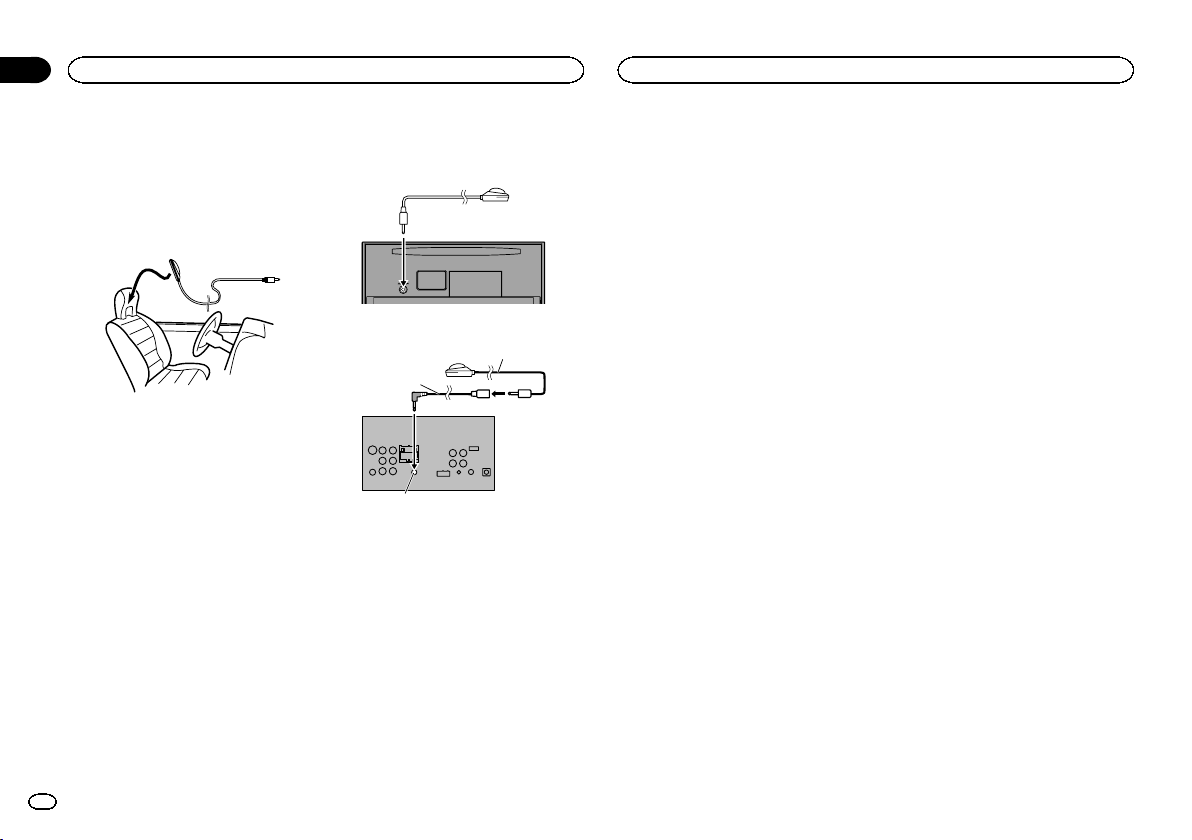
Black plate (190,1)
2 Coloque el micrófono opcional en el cen-
tro del reposacabezas del asiento del conduc-
tor, mirando hacia adelante.
El ajuste EQ automático puede presentar dife-
rencias de acuerdo con el lugar en que se colo-
que el micrófono. Si lo desea, coloque el
micrófono en el asiento delantero del acompa-
ñante para realizar el ajuste.
3 Coloque la llave de encendido del auto-
móvil en ON o ACC.
Si el aire acondicionado o la calefacción del
automóvil está encendido, apáguelo. El ruido
del ventilador del aire acondicionado o de la ca-
lefacción puede impedir que se realice el ajuste
EQ automático correctamente.
4 Pulse el botón de inicio para cambiar a la
pantalla de inicio.
5 Toque la tecla de sistema para abrir el
menú del sistema.
6 Toque Medición de EQ Automático para
introducir el modo de medición de EQ auto-
mático.
7 Enchufe el micrófono en el conector de
entrada de esta unidad.
AVH-X5600BHS y AVH-X4600BT
AVH-X3600BHS, AVH-X2600BT y AVH-
X1600DVD
Cable de
extensión
(Se vende
por separado)
Micrófono automático EQ
(Panel posterior)
Entrada AUX
(AUX)
8 Toque Comenzar para iniciar el ajuste EQ
automático.
9 Cuando comience la cuenta regresiva de
10 segundos, baje del automóvil y cierre la
puerta dentro de 10 segundos.
Se emite un tono de medición (ruido) por los al-
tavoces y comienza el ajuste EQ automático.
Una vez completado el ajuste EQ automático,
aparece La medición ha terminado. Por favor
desconecte el micrófono y luego pulse
HOME.
Cuando no se pueda obtener una medición co-
rrecta de las características del interior del ve-
hículo, aparecerá un mensaje de error (consulte
Comprensión de los mensajes de erro r del ajuste
EQ automático en la página 207).
# La medición del ajuste EQ automático tarda
unos nueve minutos en completarse cuando todos
los altavoces están conectados.
# Para detener el ajuste EQ automático, toque
PARAR.
10 Guarde el micrófono con cuidado en la
guantera o en otro lugar seguro.
Si el micrófono queda expuesto a la luz solar di-
recta durante mucho tiempo, se puede distorsio-
nar, alterar su color o funcionar
incorrectamente como consecuencia de las
altas temperaturas.
Ajuste de la señal de vídeo
Cuando conecte un equipo AV a esta unidad, se-
leccione el ajuste de señal de vídeo apropiado.
! Dado que esta función está configurada ini-
cialmente a Automático, la unidad configu-
rará de forma automática el ajuste de señal
de vídeo.
! Sólo puede utilizar esta función cuando la
entrada de la señal de vídeo está en la entra-
da de AV.
1 Pulse el botón de inicio para cambiar a la
pantalla de inicio.
2 Toque la tecla de sistema para abrir el
menú del sistema.
3 Toque Configurar Señal de Video en el
menú del sistema.
Se muestran los elementos de
Configurar Señal de Video.
! AV – Ajusta la señal de vídeo AV
! AUX – Ajusta la señal de vídeo AUX
! Camera – Ajusta la señal de vídeo de la cá-
mara retrovisora
4 Toque c o d para seleccionar la señal de
vídeo deseada.
Automático—PAL—NTSC—PAL-M—PAL-N—
SECAM
Ajustes del sistema
190
Sección
Ajustes del sistema
Es
21
<CRD4844-A>190
Black plate (191,1)
Utilización del menú de
favoritos
1 Acceda a las columnas de menús que
desea registrar.
Consulte Funcionamiento del menú en la página
180.
# Es posible personalizar los menús, excepto el
menú Ajuste de Video.
2 Toque el icono de estrella en la columna
de menú para el menú deseado para regis-
trar el menú.
Se rellena el icono de estrella para el menú se-
leccionado.
# Para cancelar el registro, toque de nuevo el icono
de estrella en la columna de menú.
3 Acceda al menú de favoritos y escoja un
menú registrado.
Consulte Funcionamiento del menú en la página
180.
Nota
Puede registrar un máximo de 12 columnas.
Funciones del menú de
conexión Bluetooth
(Función de AVH-X5600BHS/AVH-X4600BT/AVH-
X3600BHS/AVH-X2600BT)
Nota
Si está utilizando un teléfono móvil que se
puede conectar mediante la tecnología inalám-
brica Bluetooth, recomendamos que utilice su
teléfono para buscar esta unidad y establecer
una conexión. El código PIN es 0000, por defec-
to. El nombre de producto de esta unidad apare-
cerá en su teléfono como el nombre del
dispositivo. Para más información, consulte In-
troducción del código PIN para la conexión ina-
lámbrica Bluetooth en la página 192. Para más
información relacionada con el proceso para es-
tablecer las conexiones inalámbricas Bluetooth,
consulte el manual de instrucciones del teléfo-
no.
Emparejado desde esta unidad
1 Pulse el botón de inicio para cambiar a la
pantalla de inicio.
2 Toque la tecla Bluetooth para abrir el
menú de conexión Bluetooth.
3 Toque Conexión para seleccionar un dis-
positivo.
4 Inicie la búsqueda.
Inicio de la búsqueda.
Mientras se realiza la búsqueda aparecerá y,
cuando se encuentren dispositivos disponibles,
se mostrarán los nombres de los dispositivos o
las direcciones de los dispositivos Bluetooth (si
no se pueden obtener nombres).
# Toque el icono si quiere cambiar entre los nom-
bres de dispositivo y las direcciones de los dispositi-
vos Bluetooth.
Cambiar entre nombres de dispo-
sitivos y direcciones de dispositi-
vos Bluetooth.
# Para cancelar la búsqueda, toque Detener.
# Si ya hay tres dispositivos emparejados, se mos-
trará Memoria Llena y no se podrá realizar la fun-
ción de emparejado. En tal caso, será preciso
eliminar primero un dispositivo emparejado. Consul-
te la página 191.
# Si no se encuentra ningún dispositivo, se mostra-
rá No Encontrado. En tal caso, compruebe el estado
del dispositivo Bluetooth y vuelva a buscar.
5 Toque un nombre de dispositivo para se-
leccionar el dispositivo al que desea conec-
tarse.
Mientras se realiza la conexión, se mostrará
Vinculando. Si la conexión se establece, se vi-
sualizará Vinculada.
# Si su dispositivo es compatible con SSP (Secure
Simple Pairing), en el display de esta unidad verá un
número de seis dígitos, el cual desaparece una vez
establecida la conexión.
# Si la conexión falla, aparece Error. En tal caso,
vuelva a intentarlo desde el principio.
# El ajuste predefinido del código PIN es 0000.Si
desea cambiar este código, consulte Introducción del
código PIN para la conexión inalámbrica Bluetooth en
la página 192.
# Una vez establecida la conexión, se visualizará el
nombre del dispositivo.
Toque el nombre del dispositivo para conectarse.
# Si desea borrar un teléfono Bluetooth empareja-
do, visualice Delete OK?. Toque Yes para borrar el
dispositivo.
Eliminación de un dispositivo em-
parejado.
# No desconecte nunca la unidad mientras se esté
borrando el teléfono Bluetooth emparejado.
Español
Menú de favoritos
191
Sección
Menú de conexión Bluetooth
Es
22
23
<CRD4844-A>191
Black plate (192,1)
Conexión automática con un
dispositivo Bluetooth
Si esta función está activada, el dispositivo
Bluetooth y esta unidad se conectarán automáti-
camente en cuanto ambos dispositivos se en-
cuentren a menos de unos metros de distancia
entre sí.
El ajuste inicial de esta función es activado.
1 Pulse el botón de inicio para cambiar a la
pantalla de inicio.
2 Toque la tecla Bluetooth para abrir el
menú de conexión Bluetooth.
3 Toque Conexión Automática para activar
la conexión automática.
Si su dispositivo Bluetooth está preparado para
la conexión inalámbrica Bluetooth, la conexión
con esta unidad se establecerá automáticamen-
te.
# Para desactivar la conexión automática, vuelva a
tocar Conexión Automática.
Si falla la conexión, aparece el mensaje “Conexión
automática fallida. Volver a intentar?”. Toque Si
para repetir la conexión.
4 Cuando vuelva a activar el ACC del ve-
hículo, la conexión se establecerá automáti-
camente.
Cambio de visibilidad de la unidad
Emplee esta función para hacer visible o no esta
unidad al otro dispositivo.
El ajuste inicial de esta función es activado.
1 Pulse el botón de inicio para cambiar a la
pantalla de inicio.
2 Toque la tecla Bluetooth para abrir el
menú de conexión Bluetooth.
3 Toque Visibilidad para desactivar la visibi-
lidad.
# Para activar la visibilidad, vuelva a tocar
Visibilidad.
Introducción del código PIN para
la conexión inalámbrica Bluetooth
Para conectar su dispositivo Bluetooth a esta
unidad a través de tecnología inalámbrica
Bluetooth, debe introducir el código PIN en su
teléfono para verificar la conexión. El código pre-
definido es 0000, aunque puede cambiarlo con
esta función.
1 Pulse el botón de inicio para cambiar a la
pantalla de inicio.
2 Toque la tecla Bluetooth para abrir el
menú de conexión Bluetooth.
3 Toque Introducir Código PIN para selec-
cionar Introducir Código PIN.
4 Toque 0 a 9 para introducir el código PIN.
5 Después de introducir el código PIN
(hasta 8 dígitos), almacénelo en esta unidad.
Almacenamiento del código PIN
en esta unidad.
Visualización de la dirección del
dispositivo Bluetooth
Esta unidad muestra la dirección de su disposi-
tivo Bluetooth.
1 Pulse el botón de inicio para cambiar a la
pantalla de inicio.
2 Toque la tecla Bluetooth para abrir el
menú de conexión Bluetooth.
3 Toque Información de Dispositivo para
seleccionar la información del dispositivo.
Se muestra la dirección del dispositivo
Bluetooth.
Selección de la iluminación
en color
Esta unidad dispone de iluminación multicolor.
Selección directa desde los colores
de iluminación predeterminados
Es posible seleccionar un color de iluminación
de la lista de colores.
1 Pulse el botón de inicio para cambiar a la
pantalla de inicio.
2 Toque la tecla Theme (tema) para abrir la
configuración del tema.
3 Toque Iluminación y luego toque un color
de la lista.
Red—Amber—Green—Blue—White—
Personalizar—Rainbow
# Cuando se selecciona Rainbow, el color de ilu-
minación cambia automáticamente.
Personalización de la
iluminación en color
1 Pulse el botón de inicio para cambiar a la
pantalla de inicio.
2 Toque la tecla Theme (tema) para abrir la
configuración del tema.
3 Toque Iluminación y luego Personalizar.
4 Acceda al menú de personalización.
Visualización del menú de perso-
nalización.
5 Toque la barra de colores para personali-
zar el color.
6 Toque c o d para ajustar el color.
7 Mantenga pulsado el icono para almace-
nar el color personalizado en la memoria.
Memo
Almacenamiento del color perso-
nalizado en la memoria.
El color personalizado se ha almacenado en la
memoria.
La próxima vez que toque el mismo icono, el
color se recuperará de la memoria.
Selección del color OSD (on-
screen display)
El color de las indicaciones en pantalla (OSD)
se puede cambiar.
1 Pulse el botón de inicio para cambiar a la
pantalla de inicio.
2 Toque la tecla Theme (tema) para abrir la
configuración del tema.
3 Toque Pantalla.
4 Toque uno de los colores de la lista.
Selección de la visualización
de fondo
Puede cambiar el fondo que se muestra al escu-
char una fuente.
1 Pulse el botón de inicio para cambiar a la
pantalla de inicio.
2 Toque la tecla Theme (tema) para abrir la
configuración del tema.
Menú de conexión Bluetooth
192
Sección
Menú de tema
Es
23
24
<CRD4844-A>192

Black plate (193,1)
3 Toque Fondo.
4 Toque el ajuste deseado.
# Podrá ver los ajustes ocultos desplazando rápida-
mente la pantalla.
# Si no se ha almacenado ninguna imagen JPEG
en esta unidad, no podrá seleccionar una foto. Para
almacenar una imagen JPEG en esta unidad, con-
sulte Captura de una imagen en archivos JPEG en la
página 172.
# Si quiere borrar la imagen JPEG capturada, man-
tenga presionada la tecla de la imagen JPEG.
Ajuste de las posiciones de
respuesta del panel táctil
(calibración del panel táctil)
Si nota que las teclas del teclado táctil se des-
vían de las posiciones reales en la pantalla
cuando las toca, ajuste las posiciones de res-
puestas del teclado táctil. Existen dos métodos
de ajuste: Ajuste de cuatro puntos, en el que
toca las cuatro esquinas de la pantalla y ajuste
de 16 puntos, en el que realiza ajustes precisos
en toda la pantalla.
! Aparque su vehículo en un lugar seguro y
utilice esta función; no lo maneje durante la
conducción.
! Toque suavemente la pantalla para ajustar.
Procure no forzar el teclado táctil, ya que po-
dría dañarse. No utilice un instrumento de
punta afilada, como un bolígrafo o un lápiz
mecánico. De lo contrario, pueden producir-
se daños en la pantalla.
! Si el panel táctil no puede ajustarse correcta-
mente, consulte a su concesionario local
Pioneer.
1 Apague la fuente.
Consulte Activación y desactivación de la fuente
en la página 150.
2 Mantenga pulsado el botón de inicio
para iniciar la calibración del panel táctil.
Se muestra la pantalla de ajuste de cuatro pun-
tos del teclado táctil. Si aparecen dos puntos si-
multáneamente, toque ambas.
3 Toque cada una de las flechas situadas en
las cuatro esquinas de la pantalla.
# Para cancelar el ajuste, mantenga pulsado el
botón de inicio.
4 Pulse el botón de inicio para completar el
ajuste de cuatro puntos.
Los datos de la posición ajustada se almacena-
rán.
# No apague el motor mientras se estén guardan-
do los datos.
5 Pulse el botón de inicio para continuar
con el ajuste de 16 puntos.
Se muestra la pantalla de ajuste de 16 puntos
del panel táctil.
# Para cancelar el ajuste, mantenga pulsado el
botón de inicio.
6 Toque suavemente el centro de la marca
+ que se muestra en la pantalla.
Cuando haya tocado todas las marcas, los datos
de la posición ajustada se almacenarán.
# No apague el motor mientras se estén guardan-
do los datos.
7 Mantenga pulsado el botón de inicio
para completar el ajuste.
Uso de una fuente AUX
En esta unidad se puede conectar un dispositivo
auxiliar o un dispositivo portátil (de venta por se-
parado).
Acerca de los métodos de
conexión AUX
Puede conectar equipos auxiliares a esta uni-
dad.
Cable miniconector (AUX)
Al conectar un equipo auxiliar utilizando un
cable miniconector
Se puede conectar un iPod y un reproductor por-
tátil de audio/vídeo a esta unidad mediante un
cable miniconector.
Español
Menú de tema
193
Sección
Otras funciones
Es
24
25
<CRD4844-A>193
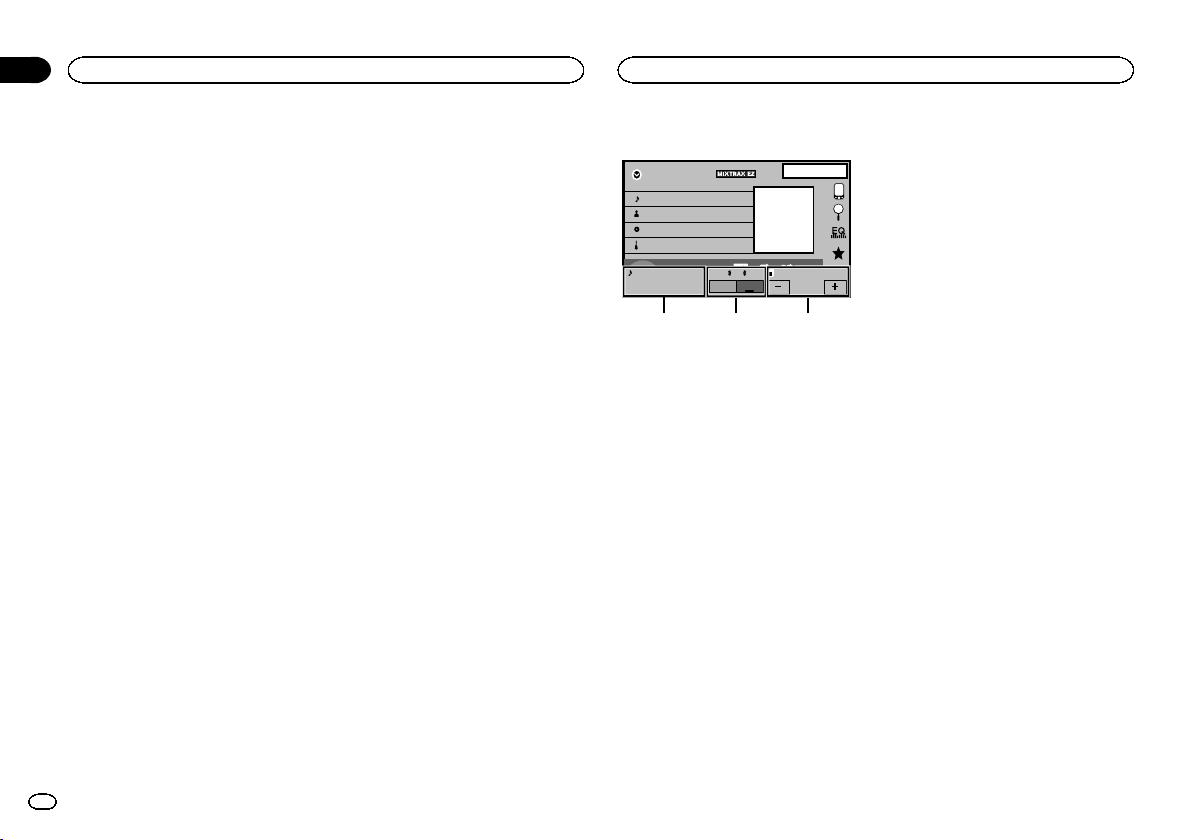
Black plate (194,1)
! Si se conecta un iPod con funciones de
vídeo a esta unidad mediante un cable co-
nector de 3,5 mm y cuatro polos (como el
CD-V150M), podrá disfrutar de los conteni-
dos de vídeo del iPod conectado.
! Se puede conectar un reproductor portátil de
audio/vídeo usando un cable conector de
3,5 mm (cuatro polos) con un cable RCA, que
se vende por separado. Sin embargo, depen-
diendo del cable, puede ser necesaria una
conexión invertida entre el cable rojo (audio
del lado derecho) y el cable amarillo (vídeo)
para que el sonido y la imagen de vídeo se re-
produzcan correctamente.
% Inserte el miniconector estéreo en el co-
nector de entrada AUX en esta unidad.
Consulte Conexión del cable de alimentación en
la página 196.
Reinicio del microprocesador
Al pulsar RESET se puede reiniciar el micropro-
cesador y restablecer sus ajustes iniciales sin
modificar la información del marcador.
Se debe reiniciar el microprocesador en los si-
guientes casos:
! Antes de utilizar esta unidad por primera vez
después de su instalación
! Si la unidad no funciona correctamente
! Cuando aparecen mensajes extraños o inco-
rrectos en el display
1 Gire la llave de contacto a la posición OFF
(apagado).
2 Pulse RESET con la punta de un lapicero u
otro instrumento con punta.
Consulte Qué es cada cosa en la página 149.
Nota
Ponga en marcha el motor o coloque la llave de
encendido del automóvil en la posición ACC u
ON antes de pulsar RESET en los siguientes
casos:
! Después de realizar las conexiones
! Al borrar todos los ajustes guardados
! Al restablecer los ajustes iniciales (de fábrica) de
la unidad
Utilización del mezclador de
sonido
Puede escuchar audio de la unidad y de su
iPhone o teléfono inteligente a la vez. El sonido
principal es el de la unidad. El secundario, del
iPhone o teléfono inteligente. Puede controlar el
volumen del sonido secundario en la pantalla.
1 Conecte el iPhone o teléfono inteligente
a la unidad con la entrada de RGB.
Consulte Conexión con el cable opcional CD-
IV203 en la página 198.
Consulte Conexión con un cable CD-IU201S op-
cional en la página 199.
Consulte Conexión opcional del adaptador de co-
nexión de teléfono inteligente (CD-ML100) en la
página 199.
2 Pulse +/– (VOLUME/VOL) para visualizar
la barra de control del mezclador de sonido.
Aparece la pantalla del mezclador de sonido.
iPod
Appr
ppr
App
pp
App
1JAN
PM
12:43
Abcdefghi
1/9
Abcdefghi
Abcdefghi
Abcdefghi
01'17'' -05'29''
S.Rtrv
All
All
All
x
1
2
iPod
Vol.12
Mix
ON
OFF
Vol.12
App Sound
1
23
1 Fuente sonora – Pulse +/– (VOLUME/VOL)
para ajustar el volumen de sonido principal.
En la pantalla de fuente sonora se visualiza el
nivel de volumen del sonido principal.
2 Mix – Toque ON o OFF para encender o apa-
gar el mezclador de sonido. Si Mix está en
OFF, el sonido secundario se silenciará.
Ajuste en ON cuando desee emitir sonido
para el AppRadio Mode, como el sonido de
navegación, desde la unidad.
Ajuste en OFF cuando desee emitir sonido
para elAppRadio Mode, como música,
como el sonido principal.
3 App Sound – Toque + o – en la pantalla para
ajustar el volumen del sonido secundario. En
la pantalla App Sound se visualiza el nivel
del volumen secundario.
Notas
! No puede ajustar el volumen del sonido prin-
cipal en la pantalla.
! Durante cuatro segundos se visualiza la
barra de control del mezclador de sonido. Si
la pantalla desaparece, pulse nuevamente
+/– (VOLUME/VOL) y la pantalla volverá a
aparecer.
Otras funciones
194
Sección
Otras funciones
Es
25
<CRD4844-A>194
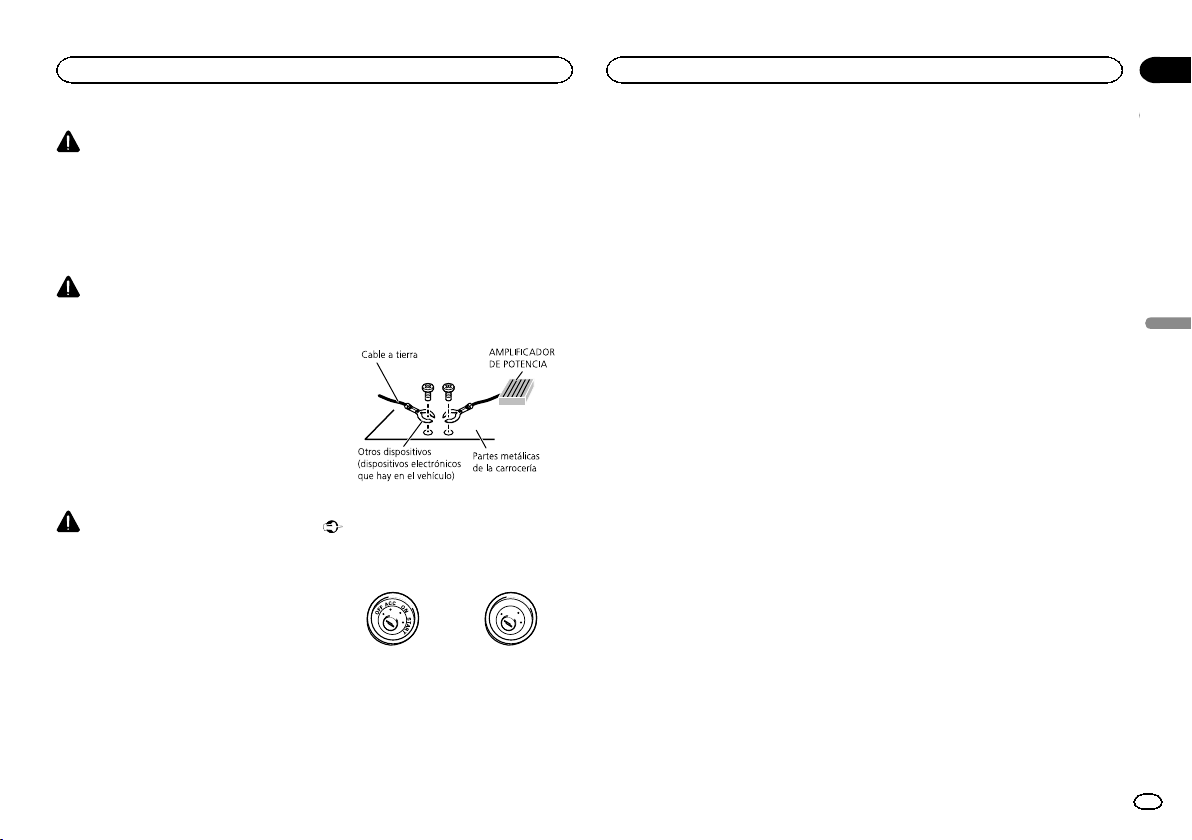
Black plate (195,1)
ADVERTENCIA
En algunos países o estados, puede ser ilícita la
visualización de imágenes en un display dentro
de un vehículo, incluso por otras personas que
no sean el conductor. En los casos en que resul-
ten aplicables, estas normas deben respetarse y
no deben usarse las funciones de DVD de esta
unidad.
PRECAUCIÓN
! No haya un agujero en el compartimento del
motor para conectar el cable amarillo de la
unidad de display a la batería del vehículo.
La vibración del motor podría provocar fallos
de aislamiento en el punto en el que el cable
pasa del compartimento de los pasajeros al
compartimento del motor. Tenga sumo cui-
dado al asegurar el cable en este punto.
! Asegúrese de que los cables no interfieran
con las partes móviles del vehículo, como la
palanca de cambios, el freno de mano o el
mecanismo de deslizamiento de los asien-
tos.
ADVERTENCIA
! Utilice altavoces de más de 50 W (valor de
salida) y de entre 4 W y8W (valor de impe-
dancia). No utilice altavoces de 1 W a3W
con esta unidad.
! El cable negro es el cable a tierra. Cuando
instale esta unidad o el amplificador de po-
tencia (vendido por separado), asegúrese de
conectar siempre primero el cable a tierra.
Compruebe que el cable de tierra está conec-
tado adecuadamente a las partes metálicas
de la carrocería del automóvil, mediante un
terminal de horquilla disponible en el merca-
do. El cable a tierra del amplificador, el de
esta unidad o el de cualquier otro dispositivo,
debe conectarse al automóvil por separado
usando tornillos diferentes. Si el tornillo para
el cable a tierra se afloja o se cae, puede pro-
vocar incendios, humo o averías.
No se suministra para esta unidad
*1
*1
Importante
! No es posible instalar esta unidad en un ve-
hículo con una llave de encendido que no
tenga la posición ACC (accesorio).
O
N
S
T
A
R
T
O
F
F
Posición ACC Sin posición ACC
! Utilice esta unidad únicamente con una ba-
tería de 12 voltios y conexión a tierra negati-
va. De lo contrario, pueden producirse
incendios o averías.
! Para evitar cortocircuitos, sobrecalentamien-
to o fallos de funcionamiento, asegúrese de
seguir las siguientes instrucciones.
— Desconecte el terminal negativo de la batería
antes de la instalación.
— Asegure el cableado con pinzas para cables
o cinta adhesiva. Envuelva con cinta adhesiva
las partes en contacto con piezas metálicas
para proteger el cableado.
— Mantenga los cables alejados de las partes
móviles, como la palanca de cambios y los
raíles de los asientos.
— Coloque todos los cables alejados de lugares
calientes, como cerca de la salida del calefac-
tor.
— No conecte el cable amarillo a la batería pa-
sándolo a través del orificio hasta el compar-
timiento del motor.
— Cubra con cinta aislante los conectores de
cables que queden desconectados.
— No acorte ningún cable.
— Nunca corte el aislamiento del cable de ali-
mentación de esta unidad para compartir la
corriente con otros equipos. La capacidad de
corriente del cable es limitada.
— Utilice un fusible con la intensidad nominal
indicada.
— Nunca conecte el cable negativo de los alta-
voces directamente a tierra.
— Nunca empalme los cables negativos de va-
rios altavoces.
! Cuando se enciende esta unidad, se emite
una señal de control a través del cable azul/
blanco. Conecte este cable al mando a dis-
tancia del sistema de un amplificador de po-
tencia externo o al terminal de control del
relé de la antena automática del vehículo
(máx. 300 mA 12 V cc). Si el vehículo posee
una antena integrada en el cristal del para-
brisas, conéctela al terminal de la fuente de
alimentación del amplificador de la antena.
! Nunca conecte el cable azul/blanco al termi-
nal de potencia de un amplificador de poten-
cia externo, ni al terminal de potencia de la
antena automática, de lo contrario, puede
descargarse la batería o producirse un fallo
de funcionamiento.
Español
Conexión
195
Sección
Conexión
Es
26
<CRD4844-A>195
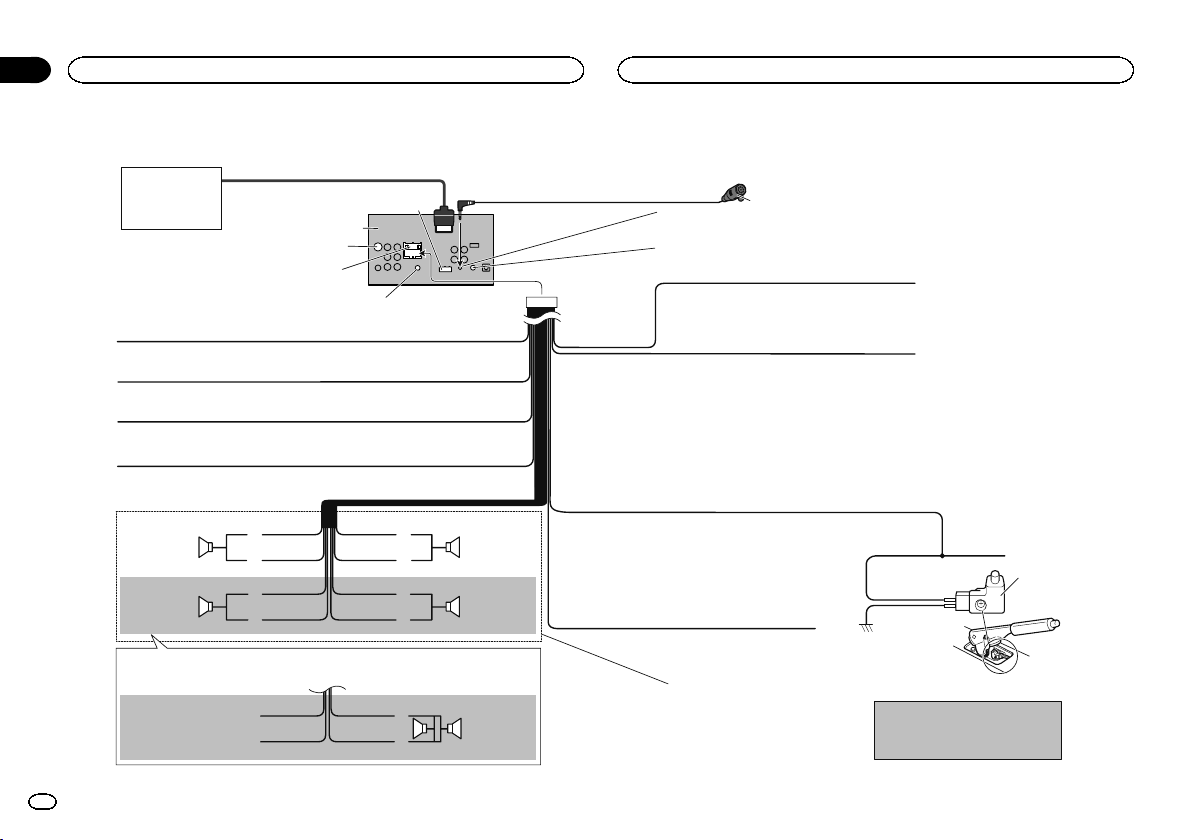
Black plate (196,1)
Conexión del cable de alimentación
Amarillo/negro
Si utiliza un equipo con función de silenciamiento, conecte este cable
con el cable de silenciamiento de audio de ese equipo. En caso contrario,
mantenga el cable de silenciamiento de audio sin ninguna conexión.
Verde claro
Se utiliza para detectar el estado ON/OFF del freno de
mano. Este cable debe conectarse al lado de
alimentación del interruptor del freno de mano.
Azul/blanco
Conecte al terminal de control de sistema del amplificador de
potencia o al terminal de control de relé de antena automática
(máx. 300 mA 12 V cc).
Lado de masa
Lado de alimentación
Interruptor del
freno de mano
Amarillo
Conecte el terminal de suministro de 12 V constante.
Rojo
Conecte al terminal controlado por del interruptor de encendido (12 V cc).
Negro (masa de la carrocería)
Conecte a un punto de metal limpio, libre de pintura.
Izquierda Derecha
Altavoz delantero Altavoz delantero
Altavoz trasero o
altavoz de
subgraves (4 Ω)
Blanco Gris
Gris/negroBlanco/negro
Verde Violeta
Verde/negro Violeta/negro
Con un sistema de 2 altavoces, no conecte nada a los hilos de altavoz
que no estén conectados a los altavoces.
Nota:
· Cambie el ajuste inicial de esta unidad
(refiérase al manual de operación). La
salida de altavoz de subgraves de esta
unidad es monofónica.
Violeta
Violeta/negro
No se usa.
Verde
Verde/negro
Cuando utilice un altavoz de subgraves de 70 W (2 Ω), asegúrese de conectarlo con los hilos Violeta y
Violeta/negro de esta unidad. No conecte nada a los hilos Verde y Verde/negro.
Altavoz de
subgraves (4 Ω)
× 2
Altavoz trasero o
altavoz de
subgraves (4 Ω)
Fusible (10 A)
Violeta/blanco
De los dos conductores conectados a la lámpara trasera, conecte el conductor
cuyo voltaje cambia cuando se desplaza la palanca de cambio de marcha a la
posición REVERSE (R). Esta conexión permite que la unidad detecte si el
vehículo está se moviendo hacia delante o hacia atrás.
Anaranjado/blanco
Conecte al terminal de interruptor de iluminación.
Micrófono
(Función de AVH-X5600BHS/AVH-X4600BT/AVH-X3600BHS/AVH-X2600BT)
4 m
Este producto
Entrada para antena
Toma AUX (3,5 ø)
Utilice un cable con enchufe miniatura para conectar a un dispositivo auxiliar.
Entrada RGB
Póngase en contacto con
su revendedor para
cuestiones sobre la unidad
de navegación que puede
conectarse.
Inserte el cable de 26 clavijas en la
dirección indicada en la figura.
Cable de 26 clavijas (Suministrado con la unidad de navegación)
Entrada remota cableada
Se puede conectar el adaptador de control remoto
cableado (vendido separadamente).
Entrada micrófono
(Función de AVH-X5600BHS/AVH-X4600BT/AVH-X3600BHS/AVH-X2600BT)
Sistema de
navegación adicional
Pioneer (vendida
separadamente).
Conexión
196
Sección
Conexión
Es
26
<CRD4844-A>196

Black plate (197,1)
Conexión a un amplificador de potencia comprado por separado
Conecte los cables RCA
(vendidos separadamente)
Altavoz
delantero
Realice estas conexiones cuando
utilice el amplificador opcional.
Control remoto de sistema
Altavoz
delantero
Izquierda Derecha
Altavoz trasero
Amplificador de
potencia (vendido
separadamente)
Altavoz de
subgraves
Altavoz de
subgraves
A la salida trasera
A la salida delantera
A salida de altavoz
de subgraves
Azul/blanco
Conecte al terminal de control de
sistema del amplificador de potencia o al
terminal de control de relé de antena
automática (máx. 300 mA 12 V cc).
Este producto
Salida trasera
Salida delantera
Salida de
altavoz de
subgraves
Amplificador de
potencia (vendido
separadamente)
Amplificador de
potencia (vendido
separadamente)
Altavoz trasero
Conexión con el componente de vídeo externo y el display
Componente de vídeo externo
(vendido separadamente)
Entrada de
audio
(R IN, L IN)
Pantalla con tomas de entrada RCA
(vendida separadamente)
A la entrada
de vídeo
A la salida
de vídeo
A las salidas
de audio
Este producto
Cable RCA (vendido
separadamente)
Salida de monitor
posterior (V OUT)
Entrada de vídeo (V IN)
! Es necesario cambiar Entrada A/V en el
menú del sistema al conectar el componente
de vídeo externo.
Consulte Ajuste de la entrada de AV en la pá-
gina 185.
La salida de vídeo posterior de este producto
sirve para conectar un display que permita a los
pasajeros de los asientos traseros ver un DVD,
etc.
ADVERTENCIA
No instale jamás un display trasero en una ubi-
cación que sea visible para el conductor mien-
tras el vehículo está en marcha.
Español
Conexión
197
Sección
Conexión
Es
26
<CRD4844-A>197
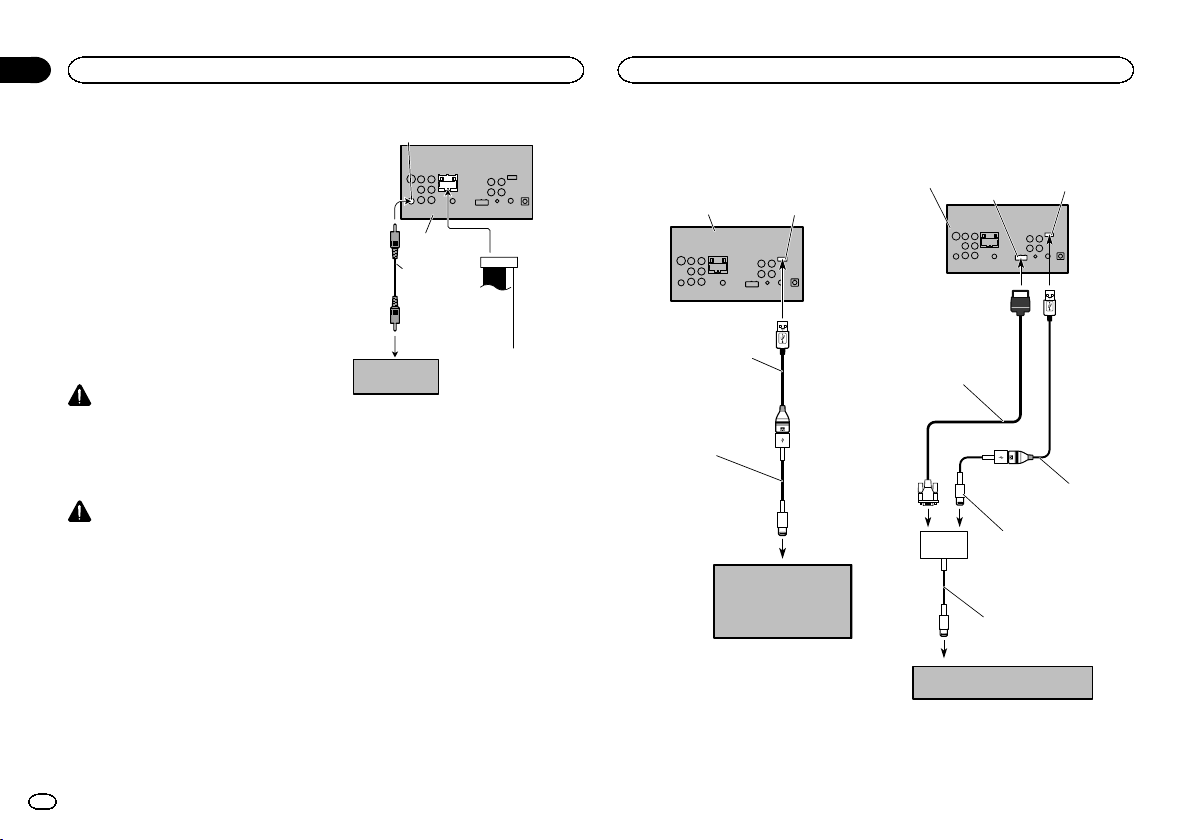
Black plate (198,1)
Conexión con una cámara
retrovisora
Si cambia la palanca de cambios a la posición
de MARCHA ATRÁS (R), la pantalla de esta uni-
dad se cambia automáticamente a la imagen de
vista trasera. Deberá configurar
Polaridad de Camara correctamente en la uni-
dad del sistema que se va a utilizar. Para obtener
más información sobre la configuración, consul-
te Ajuste de la cámara retrovisora (cámara poste-
rior) en la página 189.
También puede cambiar la imagen de vista tra-
sera pulsando la tecla del panel táctil. Para obte-
ner más información, consulte Uso de la vista
trasera en la página 152.
ADVERTENCIA
UTILICE SÓLO ENTRADAS PARA VISTA
AL REVÉS O IMAGEN DE ESPEJO EN LA
CÁMARA RETROVISORA. OTROS USOS
PODRÍAN PROVOCAR HERIDAS O
DAÑOS.
PRECAUCIÓN
! Debe utilizar una cámara que genere
imágenes invertidas de espejo.
! La imagen de la pantalla puede aparecer in-
vertida.
! la función de cámara retrovisora se debe uti-
lizar para tener siempre vigilados los trailers,
o al dar marcha atrás. No la utilice para fines
lúdicos.
! Los objetos de la vista trasera pueden pare-
cer más cercanos o más lejano de lo que en
realidad están.
A la salida de vídeo
Cámara de vista
trasera (vendido
separadamente)
Entrada para cámara de vista trasera (R.C IN)
Violeta/blanco
De los dos conductores
conectados a la lámpara
trasera, conecte el conductor
cuyo voltaje cambia cuando
se desplaza la palanca de
cambio de marcha a la
posición REVERSE (R). Esta
conexión permite que la
unidad detecte si el vehículo
está se moviendo hacia
delante o hacia atrás.
Este producto
Cable RCA
(vendido
separadamente)
iPod con conector Lightning
Conexión con el cable opcional
CD-IU52
Este producto
Entrada USB/iPod
Cable USB
(suministrado con esta unidad)
Se conecta al dispositivo USB
vendido separadamente.
Cable de conector
Lightning a USB (CD-IU52)
(vendido separadamente)
iPod con conector lightning
(vendido separadamente)
Conexión con el cable opcional
CD-IV203
Entrada de USB/iPod
Entrada RGB
Este producto
Cable RGB a VGA
(CD-IV203) (vendido
separadamente)
Cable USB
(Suministrado con esta unidad)
Conecte a dispositivo USB
vendido por separado.
Cable Lighting a USB
(CD-IV203) (vendido
separadamente)
Adaptador de conector
Lightning a VGA
(productos Apple Inc.)
(vendido separadamente)
iPod con conector lightning
(vendido separadamente)
Conexión
198
Sección
Conexión
Es
26
<CRD4844-A>198
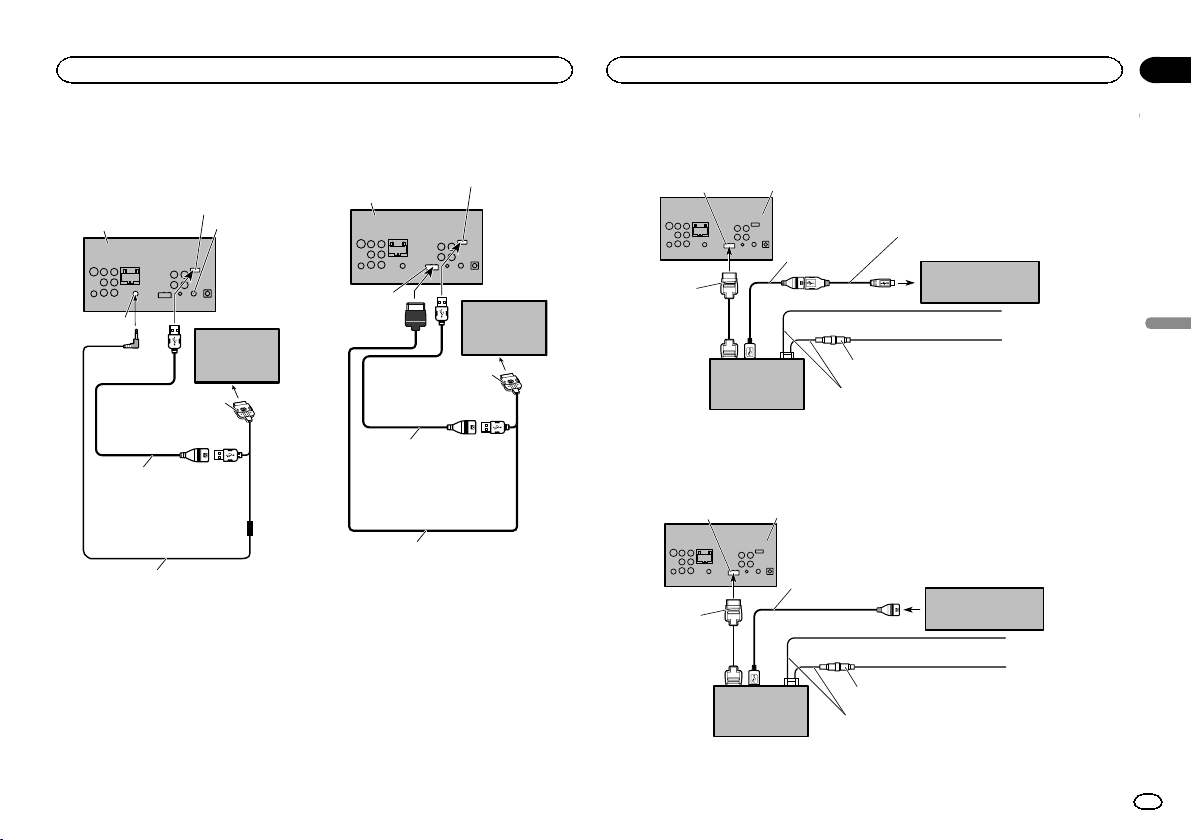
Black plate (199,1)
iPod con conector de 30 patillas
Conexión con un cable CD-
IU201V opcional
Este producto
Cable de interfaz
(CD-IU201V) (vendido separadamente)
Entrada AUX
(AUX)
1,5 m
Conector del Dock
Cable USB
(Suministrado con esta unidad)
Se conecta a dispositivos USB
vendidos por separado.
Entrada USB/iPod
iPod con
capacidades de
vídeo (vendido
separadamente)
Ésta es una
entrada
remota
conectada.
Tenga en
cuenta que
ésta no es la
entrada AUX.
Conexión con un cable CD-
IU201S opcional
Este producto
1,5 m
Conector del Dock
Cable USB
(Suministrado con esta unidad)
Se conecta a dispositivos USB
vendidos por separado.
Entrada USB/iPod
Entrada RGB
Cable de interfaz
(CD-IU201S) (vendido separadamente)
iPod con
capacidades de
vídeo (vendido
separadamente)
Conexión opcional del adaptador de conexión de teléfono
inteligente (CD-ML100)
Entrada RGB
Este producto
Cable de
conexión (Se
suministra con
el adaptador de
vínculo del
smartphone)
Adaptador de vínculo
del smartphone
(CD-ML100) (vendido
separadamente)
Cable de alimentación (Se suministra con
el adaptador de vínculo del smartphone)
Negro (tierra)
A la carrocería del vehículo (metal)
Amarillo
Al terminal eléctrico controlado por el
interruptor de arranque (12 V cc) ON/OFF
Fusible (2 A)
Cable USB - micro USB (Tipo
USB A - micro USB B) (Se
suministra con el adaptador de
vínculo del smartphone)
Cable USB (Se
suministra con el
adaptador de vínculo
del smartphone)
Smartphone con conector
micro USB (vendido
separadamente)
Conexión para actualizar el firmware del adaptador de conexión de
teléfono inteligente
Incluso si se guarda música y/o archivos de imágenes en el dispositivo de almacenamiento USB, no se pue-
den reproducir.
Entrada RGB
Este producto
Cable de
conexión (Se
suministra con
el adaptador de
vínculo del
smartphone)
Adaptador de vínculo
del smartphone
(CD-ML100) (vendido
separadamente)
Cable de alimentación (Se suministra con
el adaptador de vínculo del smartphone)
Negro (tierra)
A la carrocería del vehículo (metal)
Amarillo
Al terminal eléctrico controlado por el
interruptor de arranque (12 V cc) ON/OFF
Fusible (2 A)
Cable USB (Se suministra con el
adaptador de vínculo del
smartphone)
Dispositivo de
almacenamiento USB
(vendido separadamente)
Español
Conexión
199
Sección
Conexión
Es
26
<CRD4844-A>199
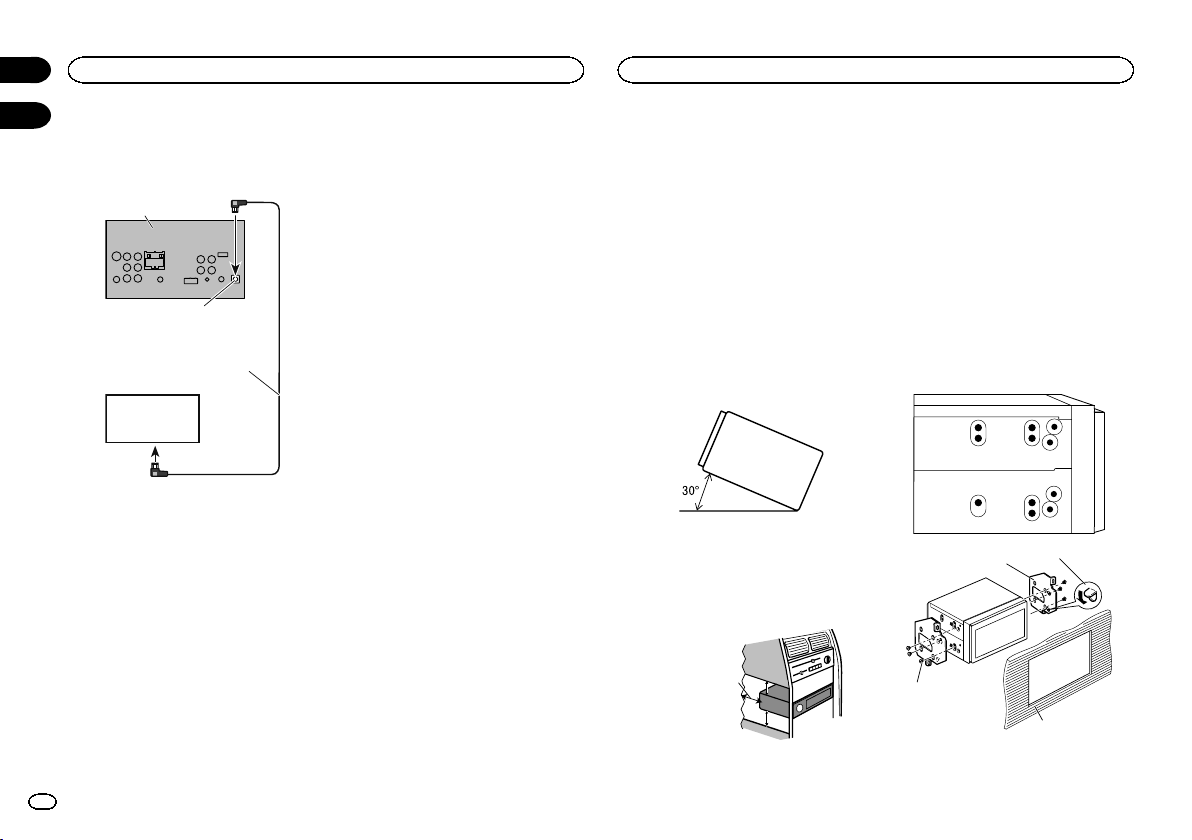
Black plate (200,1)
Conexión del sintonizador
opcional SiriusXM
(Función de AVH-X5600BHS/AVH-X3600BHS)
Sintonizador de
SiriusXM (vendido
separadamente)
Este producto
Cable SiriusXM BUS (suministrado
con el sintonizador de SiriusXM)
Entrada SiriusXM BUS
! Desde la unidad se pueden suministrar un
máximo de 500 mA al sintonizador SiriusXM.
Notas
! Compruebe todas las conexiones y sistemas
antes de la instalación final.
! No utilice piezas no autorizadas, ya que pue-
den causar fallos de funcionamiento.
! Consulte a su distribuidor si para la instala-
ción es necesario taladrar orificios o hacer
otras modificaciones al vehículo.
! No instale esta unidad en un lugar donde:
— Pueda interferir con el manejo del vehículo.
— Pueda lesionar a un pasajero como conse-
cuencia de un frenazo brusco.
! El láser semiconductor se dañará si se sobre-
calienta. Instale esta unidad alejada de
zonas que alcancen altas temperaturas,
como cerca de la salida del calefactor.
! Se logra un rendimiento óptimo si la unidad
se instala en un ángulo inferior a 30°.
! Cuando instale, para asegurar la dispersión
apropiada del calor durante el uso de esta
unidad, asegúrese de dejar un amplio espa-
cio por detrás del panel trasero y enrolle los
cables sueltos de modo que no bloqueen las
aberturas de ventilación.
5cmcm
Deje un amplio espacio
5 cm
5 cm
! En algunos vehículos, esta unidad no se
puede instalar correctamente. En ese caso,
use el kit de instalación opcional (ADT-
VA133).
Instalación usando los agujeros
para tornillos ubicados en
ambos costados de la unidad
% Fijar la unidad al soporte de montaje de
radio de fábrica.
Coloque la unidad de forma que los orificios
para los tornillos estén alineados con los orifi-
cios para los tornillos de la carcasa y, a conti-
nuación, apriete los tornillos en tres lugares en
cada lado.
1
2
3
4
1 Si la lengüeta supone un impedimento, dó-
blela hacia abajo.
Conexión
200
Sección
Instalación
Es
26
27
<CRD4844-A>200

Black plate (201,1)
2 Soporte de montaje de radio de fábrica
3 Utilice tornillos de cabeza redonda (5 mm ×
8 mm) o tornillos de cabeza embutida (5mm
× 9 mm), según los orificios roscados del so-
porte de montaje.
4 Salpicadero o consola
Instalación del micrófono
(Función de AVH-X5600BHS/AVH-X4600BT/AVH-
X3600BHS/AVH-X2600BT)
PRECAUCIÓN
Es muy peligroso que el cable del micrófono se
enrolle alrededor de la columna de dirección o
la palanca de cambios. Asegúrese de instalar la
unidad de tal forma que no dificulte la conduc-
ción.
Notas
! Instale el micrófono en una posición y orien-
tación que permita detectar la voz de la per-
sona que utiliza el sistema.
! Use las abrazaderas compradas por separa-
do para fijar el cable en los lugares del inte-
rior del vehículo donde sea necesario.
Instalación del micrófono en el
parasol
1 Ajuste el cable del micrófono en la ranu-
ra.
1
2
1 Cable del micrófono
2 Ranura
2 Instale la abrazadera del micrófono en el
parasol.
Levante el parasol e instale la pinza del micrófo-
no (si lo baja reduce la capacidad del reconoci-
miento de voz).
1
1 Pinza
Instalación del micrófono en la
columna de dirección
1 Suelte la base del micrófono de la abraza-
dera del micrófono.
Para soltar la base del micrófono de la abrazade-
ra del micrófono, deslice la base del micrófono.
1
2
3
1 Micrófono
2 Pinza
3 Base del micrófono
2 Instale el micrófono en la columna de di-
rección.
1
2
1 Cinta adhesiva de doble cara
2 Instale el micrófono en la parte trasera de la
columna de dirección.
Ajuste del ángulo del micrófono
Español
Instalación
201
Sección
Instalación
Es
27
<CRD4844-A>201
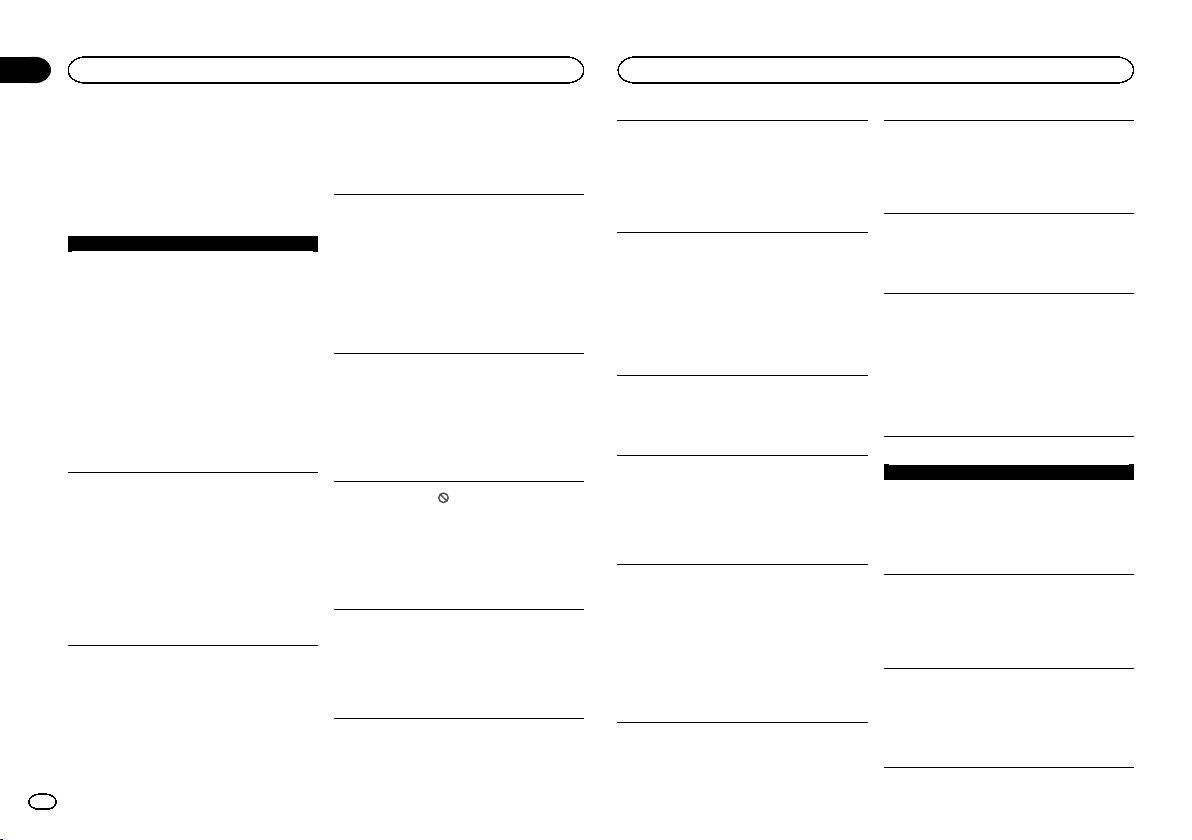
Black plate (202,1)
Solución de problemas
Los síntomas se escriben en negrita y las cau-
sas en escritura normal sin sangría. El texto nor-
mal con sangría se utiliza para indicar las
acciones que se han de tomar.
Comunes
La unidad no se enciende.
La unidad no funciona.
Los cables y conectores están conectados incorrec-
tamente.
Confirme una vez más que todas las conexiones
sean las correctas.
El fusible está fundido.
Corrija el problema por el cual se fundió el
fusible y cámbielo. Asegúrese de instalar un
fusible del mismo régimen.
El microprocesador incorporado funciona de mane-
ra incorrecta debido al ruido y/u otros factores.
Pulse RESET. (Página 194)
No se puede hacer funcionar la unidad con el
mando a distancia.
La unidad no funciona correctamente aunque se
pulsen los botones adecuados del mando a dis-
tancia.
La batería tiene poca energía.
Instale una batería nueva.
Algunas operaciones están prohibidas con determi-
nados discos.
Intente utilizar otro disco.
No se puede reproducir el disco.
El disco está sucio.
Limpie el disco.
Esta unidad no puede reproducir el tipo de disco
que se ha cargado.
Revise el tipo de disco.
El disco cargado no es compatible con este sistema
de vídeo.
Cámbielo por un disco que sea compatible con
el sistema de vídeo.
No se escucha el sonido.
El nivel del volumen no aumenta.
Los cables no están conectados correctamente.
Conecte los cables correctamente.
La unidad reproduce imágenes fijas, en cámara
lenta o cuadro a cuadro.
No se emite sonido durante la reproducción de
imágenes fijas, en cámara lenta o cuadro a
cuadro.
No se muestra ninguna imagen.
El cable del freno de mano no está conectado.
Conecte el cable del freno de mano y active el
freno.
El freno de mano no se activa.
Conecte el cable del freno de mano y active el
freno.
Se visualiza el icono
y no se puede hacer fun-
cionar la unidad.
La operación está prohibida para el disco.
Esta operación no es posible.
La operación no es compatible con la configuración
del disco.
Esta operación no es posible.
La imagen mostrada se detiene (hace una pausa)
y no se puede hacer funcionar la unidad.
Los datos no se pueden leer durante la reproduc-
ción.
Detenga la reproducción una vez y vuelva a
iniciarla.
No se emite sonido.
El nivel del volumen es bajo.
El nivel del volumen es bajo.
Ajuste el nivel del volumen.
El atenuador está activado.
Desactive el atenuador.
El sonido y el vídeo saltan.
La unidad no está bien colocada.
Coloque bien la unidad.
El tamaño de archivo y la velocidad de transmisión
superan las velocidades recomendadas.
Cree un archivo DivX que esté dentro de la
velocidad de transmisión y el tamaño
recomendado.
La imagen se estira y el formato es incorrecto.
El ajuste del formato es incorrecto para el display.
Seleccione el ajuste correcto para el display.
(Página 183)
Cuando la llave de encendido del vehículo se co-
loca en la posición de activación (o en la posición
ACC), suena el motor.
La unidad está confirmando si hay un disco carga-
do.
Es una operación normal.
No se visualiza ninguna imagen.
No se puede usar el teclado táctil.
La cámara retrovisora no está conectada.
Conecte una cámara retrovisora.
Polaridad de Camara está ajustado de manera in-
correcta.
Pulse el botón de inicio para volver al display de
la fuente y seleccione el ajuste correcto para
Polaridad de Camara. (Página 189)
Sin xxxx aparece cuando se cambia una pantalla
(Sin Titulo, por ejemplo).
No hay información de texto incorporada.
Cambie la pantalla o reproduzca otra pista/
archivo.
Las subcarpetas no se pueden reproducir.
Se ha seleccionado la reproducción de repetición de
carpeta.
Seleccione de nuevo la gama de repetición.
La gama de repetición cambia automáticamente.
Se ha seleccionado otra carpeta durante la repeti-
ción de reproducción.
Seleccione de nuevo la gama de repetición.
Se ha realizado una búsqueda de pista o el rebobina-
do/modo inverso durante la reproducción de repeti-
ción de archivo.
Seleccione de nuevo la gama de repetición.
DVD
No se puede reproducir el disco.
El disco cargado tiene un número de región que no
corresponde al de esta unidad.
Cambie el disco por uno que tenga el mismo
número de región que esta unidad.
Se visualiza un mensaje de control de padres y
no se puede reproducir el disco.
El control de padres está activado.
Desactive el control de padres o cambie el nivel.
(Página 183)
No se puede cancelar el control de padres.
El código es incorrecto.
Introduzca el código correcto. (Página 183)
No recuerda el código.
Pulse RESET. (Página 194)
Información adicional
202
Apéndice
Información adicional
Es
<CRD4844-A>202
Black plate (203,1)
No se puede cambiar el idioma del diálogo (y el
idioma de los subtítulos).
El DVD que se está reproduciendo no tiene grabacio-
nes en varios idiomas.
No se puede cambiar entre distintos idiomas si
no están grabados en el disco.
Sólo se puede cambiar entre los elementos que apa-
recen en el menú del disco.
Cambie el idioma usando el menú del disco.
No se visualizan los subtítulos.
El DVD que se está reproduciendo no tiene subtítu-
los.
Los subtítulos no se visualizan si no están
grabados en el disco.
Sólo se puede cambiar entre los elementos que apa-
recen en el menú del disco.
Cambie el idioma usando el menú del disco.
El disco no se reproduce con los ajustes de idioma
del audio y de los subtítulos seleccionados en el
menú Ajuste de Video.
El DVD que se está reproduciendo no tiene diálogos
ni subtítulos en el idioma seleccionado.
El idioma no se puede cambiar si el idioma
seleccionado no está grabado en el disco.
El ángulo de visión no se puede cambiar.
El DVD que se está reproduciendo no tiene escenas
filmadas desde distintos ángulos.
El ángulo de visión no se puede cambiar si el
DVD no tiene escenas grabadas desde varios
ángulos.
Está tratando de cambiar a la función de visión mul-
tiángulo con una escena que no está grabada desde
varios ángulos.
Cambie entre los distintos ángulos cuando vea
escenas grabadas desde ángulos múltiples.
La imagen aparece muy borrosa/distorsionada y
oscura durante la reproducción.
Algunos discos tienen una señal que prohíbe el co-
piado.
Debido a que esta unidad es compatible con el
sistema de administración de generación de
copias analógicas, al reproducir un disco que
tiene una señal que prohíbe el copiado, la
imagen puede presentar rayas horizontales u
otras imperfecciones cuando se visualiza en
algunas pantallas. Esto no quiere decir que la
unidad funcione incorrectamente.
Vídeo CD
No se puede acceder al menú PBC (control de re-
producción).
El vídeo CD que se está reproduciendo no tiene la
función PBC.
No se puede realizar esta operación con un vídeo
CD que no tenga la función PBC.
No se pueden utilizar las funciones de repetición
de reproducción y de búsqueda de pistas/por
tiempo.
El vídeo CD que se está reproduciendo tiene la fun-
ción PBC.
No se puede realizar esta operación con un vídeo
CD que tenga la función PBC.
iPod
El iPod no funciona correctamente.
Los cables están conectados incorrectamente.
Desconecte el cable del iPod. Una vez que
aparezca el menú principal del iPod, vuelva a
conectar el iPod y reinícielo.
La versión de iPod es antigua.
Actualice la versión del iPod.
No se escucha el sonido del iPod.
Es posible que la dirección de salida de audio haya
cambiado automáticamente cuando las conexiones
de Bluetooth y USB se utilicen a la vez.
Utilice el iPod para cambiar la dirección de
salida de audio.
Bluetooth audio/teléfono
El sonido de la fuente de audio Bluetooth no se
reproduce.
Está hablando con un teléfono móvil conectado por
Bluetooth.
El sonido se reproducirá cuando se termine la
llamada.
Un teléfono móvil conectado por Bluetooth está en
funcionamiento.
No utilice el teléfono móvil en este momento.
Se ha hecho una llamada con un teléfono móvil co-
nectado por Bluetooth y se ha terminado inmediata-
mente. Como resultado, la comunicación entre esta
unidad y el teléfono móvil no ha finalizado correcta-
mente.
Vuelva a establecer la conexión Bluetooth entre
esta unidad y el teléfono móvil.
Mensajes de error
Anote el mensaje de error antes de contactar
con su concesionario o con el servicio técnico
oficial de Pioneer más cercano.
Los mensajes de error se escriben en negrita y
producen un texto normal sin sangrado. El texto
normal y sangrado se emplea para indicar las
acciones que se han de tomar.
Comunes
Error AMP
La unidad no funciona o la conexión de los altavoces
es incorrecta; se activa el circuito de protección.
Compruebe la conexión de los altavoces. Si el
mensaje no desaparece aun después de apagar
y volver a encender el motor, contacte con su
distribuidor o con el Servicio técnico oficial
Pioneer.
Sintonizador
No hay datos provistos
Esta unidad no puede recibir información del nom-
bre del artista o del título de la canción.
Desplácese hasta la ubicación conveniente para
obtener una buena recepción.
No hay datos
Esta unidad no puede recibir información del nom-
bre del servicio de programa.
Desplácese hasta la ubicación conveniente para
obtener una buena recepción.
Radio por satélite SiriusXM
Revisar Antena
La conexión de la antena es incorrecta.
Compruebe la conexión de la antena. Si el
mensaje no desaparece aun después de apagar
y volver a encender el motor, contacte con su
distribuidor o con el Servicio técnico oficial
Pioneer.
Español
Información adicional
203
Apéndice
Información adicional
Es
<CRD4844-A>203
Black plate (204,1)
Revise la radio
La conexión del sintonizador SiriusXM Connect Vehi-
cle no es correcta o falló la alimentación eléctrica.
Compruebe la conexión del sintonizador y el
voltaje de la batería. Si el mensaje no desaparece
después de apagar y volver a encender el motor,
contacte con su distribuidor o con el Servicio
técnico oficial Pioneer.
No hay señal
El sintonizador SiriusXM Connect Vehicle no puede
recibir la señal de satélite de SiriusXM.
! Compruebe que su vehículo está en el exterior,
con una visión despejada del cielo del sur.
! Compruebe que la antena magnética SiriusXM
está montada en una superficie metálica en el
exterior del vehículo.
! Aleje la antena SiriusXM de cualquier
obstáculo.
Suscripción actualizada
La unidad ha detectado un cambio en su estado de
suscripción SiriusXM.
Pulse cualquier tecla para eliminar el mensaje.
Canal no disponible
La emisora solicitada no es una emisora SiriusXM
válida.
Compruebe el listado de emisoras de SiriusXM.
Canal no suscrito. Llame a SiriusXM para suscri-
birse.
La emisora solicitada no está incluida en su paquete
de suscripción de SiriusXM.
Compruebe el contenido de su paquete de
suscripción SiriusXM.
Channel Locked
Bloqueada por la función Control de padres.
Eliminar el bloqueo de emisoras.
DVD
Disco de differente región
El disco no tiene el mismo número de región que
esta unidad.
Cambie el DVD por uno que tenga el número de
región correcto.
Error-02-XX/FF-FF
El disco está sucio.
Limpie el disco.
El disco está rayado.
Sustituya el disco.
El disco está colocado al revés.
Compruebe que el disco se haya introducido
correctamente.
Se ha producido un error eléctrico o mecánico.
Pulse RESET. (Página 194)
Disco no Reproducible
Esta unidad no puede reproducir este tipo de disco.
Cambie el disco por uno que pueda reproducir
esta unidad.
El disco insertado no contiene archivos reproduci-
bles.
Sustituya el disco.
Protejido
Todos los archivos del disco insertado tienen DRM
integrado.
Sustituya el disco.
Saltado
El disco insertado contiene archivos protegidos con
DRM.
Reproduzca un archivo de audio que no esté
integrado con Windows Mediaä DRM 9/10.
TEMP
La temperatura de la unidad está fuera de la gama
normal de funcionamiento.
Espere hasta que la temperatura de la unidad se
encuentre nuevamente dentro de los límites
normales de funcionamiento.
Alquiler expirado.
El disco que se ha introducido tiene contenido DivX
VOD caducado.
Seleccione un archivo que se pueda reproducir.
Resolución de Video no soportada
El disco introducido contiene un archivo DivX/
MPEG-1/MPEG-2/MPEG-4 de alta definición.
Seleccione un archivo que se pueda reproducir.
No es posible escribir en la memoria flash.
La memoria flash de esta unidad utilizada como
área de almacenamiento temporal está llena.
Seleccione un archivo que se pueda reproducir.
Su dispositivo no está autorizado para reproducir
video DivX protegido.
El código de registro DivX de esta unidad no ha sido
autorizado por el proveedor de contenido DivX VOD.
Registre esta unidad con el proveedor de
contenido DivX VOD.
Archivo no Reproducible
Esta unidad no puede reproducir este tipo de archi-
vo.
Seleccione un archivo que se pueda reproducir.
Formato Leído
A veces se produce un retraso entre el comienzo de
la reproducción y la emisión del sonido.
Espere hasta que el mensaje desaparezca y oiga
sonido.
Tasa de cuadros de video no es soportada
La velocidad de cuadros del archivo DivX es superior
a 30 cps.
Seleccione un archivo que se pueda reproducir.
Formato de Audio no soportado
Esta unidad no es compatible con este tipo de archi-
vo.
Seleccione un archivo que se pueda reproducir.
Dispositivo de almacenamiento externo
(USB)
Archivo no Reproducible
Esta unidad no puede reproducir este tipo de archi-
vo.
Seleccione un archivo que se pueda reproducir.
No hay canciones.
Transfiera ficheros de audio al reproductor de
audio portátil USB/memoria USB y conéctelo.
La seguridad de la memoria USB conectada está ac-
tivada.
Para desactivar la seguridad, siga las
instrucciones de la memoria USB.
Formato Leído
A veces se produce un retraso entre el comienzo de
la reproducción y la emisión del sonido.
Espere hasta que el mensaje desaparezca y oiga
sonido.
Saltado
El reproductor de audio portátil USB/memoria USB
conectado contiene archivos WMA protegidos con
Windows Mediaä DRM 9/10.
Reproduzca un archivo de audio que no esté
integrado con Windows Mediaä DRM 9/10.
Información adicional
204
Apéndice
Información adicional
Es
<CRD4844-A>204
Black plate (205,1)
Protejido
Todos los archivos del reproductor de audio portátil
USB/memoria USB conectado están protegidos con
Windows Media DRM 9/10.
Transfiera archivos de audio no protegidos con
Windows Media DRM 9/10 al reproductor de
audio portátil USB/memoria USB y conéctelo.
USB incompatible
El dispositivo USB conectado no es compatible con
esta unidad.
Conecte un reproductor de audio portátil USB o
una memoria USB que cumpla con la clase de
almacenamiento masivo USB.
El dispositivo USB no está formateado con FAT12,
FAT16 o FAT32.
El dispositivo de almacenamiento USB debe
formatearse con FAT12, FAT16 o FAT32.
Revise USB
El conector USB o el cable USB está cortocircui-
tado.
Compruebe que el conector USB o el cable USB
no esté enganchado en algo ni dañado.
El dispositivo de almacenamiento USB consume
más de la corriente máxima admisible.
Desconecte el reproductor de audio portátil
USB/memoria USB y no lo utilice. Coloque la
llave de encendido del vehículo en posición OFF,
luego en ACC u ON y, a continuación, conecte
un reproductor de audio portátil USB/memoria
USB compatible.
Error-02-9X/-DX
Error de comunicación.
Realice una de las siguientes operaciones.
–Gire la llave de contacto a la posición OFF
(apagado) y luego a ON (encendido).
–Desconecte el reproductor de audio portátil
USB/memoria USB.
–Cambie a una fuente diferente.
Después, vuelva al reproductor de audio portátil
USB/memoria USB.
Alquiler expirado.
El dispositivo de almacenamiento externo que se ha
insertado tiene contenido DivX VOD caducado.
Seleccione un archivo que se pueda reproducir.
Resolución de Video no soportada
El dispositivo de almacenamiento externo introduci-
do contiene un archivo DivX/MPEG-1/MPEG-2/
MPEG-4 de alta definición.
Seleccione un archivo que se pueda reproducir.
No es posible escribir en la memoria flash.
La memoria flash de esta unidad utilizada como
área de almacenamiento temporal está llena.
Seleccione un archivo que se pueda reproducir.
Su dispositivo no está autorizado para reproducir
video DivX protegido.
El código de registro DivX de esta unidad no ha sido
autorizado por el proveedor de contenido DivX VOD.
Registre esta unidad con el proveedor de
contenido DivX VOD.
Formato Leído
A veces se produce un retraso entre el comienzo de
la reproducción y la emisión del sonido.
Espere hasta que el mensaje desaparezca y oiga
sonido.
Tasa de cuadros de video no es soportada
La velocidad de cuadros del archivo DivX es superior
a 30 cps.
Seleccione un archivo que se pueda reproducir.
Formato de Audio no soportado
Esta unidad no es compatible con este tipo de archi-
vo.
Seleccione un archivo que se pueda reproducir.
Creación de la Base de datos ha fallado.
Se ha cambiado el modo a visualización de imagen
JPEG o vídeo mientras se estaba creando la base de
datos.
Vuelva a crear la base de datos. (Página 171)
iPod
Formato Leído
A veces se produce un retraso entre el comienzo de
la reproducción y la emisión del sonido.
Espere hasta que el mensaje desaparezca y oiga
sonido.
Error-02-6X/-9X/-DX
Error de comunicación.
Desconecte el cable del iPod. Una vez que
aparezca el menú principal del iPod, vuelva a
conectar el iPod y reinícielo.
Fallo del iPod.
Desconecte el cable del iPod. Una vez que
aparezca el menú principal del iPod, vuelva a
conectar el iPod y reinícielo.
Error-02-67
La versión de firmware del iPod es antigua.
Actualice la versión del iPod.
Stop
No hay canciones.
Transfiera canciones al iPod.
No hay canciones en la lista actual.
Seleccione una lista que contenga canciones.
No Encontrado
No hay canciones relacionadas.
Transfiera canciones al iPod.
Etiquetas de iTunes
iPod lleno. Etiquetas no transferidas
La memoria utilizada para la información de etique-
tas del iPod está llena.
Sincronice el iPod con iTunes y borre la lista de
reproducción etiquetada.
La memoria está llena. Etiquetas no almacena-
das. Conecte el iPod.
La memoria flash de esta unidad utilizada como
área de almacenamiento temporal está llena.
La información de etiquetas en esta unidad se
transfiere automáticamente al iPod cuando éste
se conecta.
Reconecte su iPod
La información de etiqueta de esta unidad no se
puede transferir al iPod.
Compruebe el iPod y vuelva a intentarlo.
Almacenamiento de etiqueta fallida.
La información de etiquetas no se puede almacenar
en esta unidad.
Vuelva a intentarlo.
Español
Información adicional
205
Apéndice
Información adicional
Es
<CRD4844-A>205
Black plate (206,1)
Error-8D
La unidad FLASH ROM incorporada encontró un
error.
Gire la llave de contacto a la posición OFF
(apagado) u ON (encendido).
Ya ha sido guardado.
Esta información de etiquetas ya está almacenada
en la memoria.
La información de etiquetas sólo se puede
guardar una vez para una canción específica. La
información de etiquetas no se puede guardar
para la misma canción más de una vez.
Bluetooth
Error-10
Fallo de corriente en el módulo Bluetooth de esta
unidad.
Desconecte (posición OFF) la llave de encendido
y después colóquela en ACC o en ON.
Si el mensaje de error se sigue mostrando
después de hacer lo mencionado anteriormente,
no dude en contactar con el distribuidor o con el
servicio técnico oficial de Pioneer.
Pandora
â
Error-19
Error de comunicación.
Desconecte el cable del iPod. Una vez que
aparezca el menú principal del iPod, vuelva a
conectar el iPod y reinícielo.
Inicie la aplicación Pandora desde su dispositivo.
desde su dispositivo
La aplicación de Pandora no se ha iniciado aún.
Inicie la aplicación de Pandora desde su iPhone.
No se puede guardar la calificación. Inténtelo
más tarde.
No es posible guardar la puntuación.
Vuelva a intentarlo más tarde.
No se puede guardar el marcador. Inténtelo más
tarde.
No es posible guardar en Favoritos.
Vuelva a intentarlo más tarde.
Mantenimiento del sistema Pandora. Inténtelo
más tarde.
El sistema de Pandora se está sometiendo a tareas
de mantenimiento.
Vuelva a intentarlo más tarde.
Se ha alcanzado el límite de omisiones.
Se ha llegado al límite de canciones saltadas.
No sobrepasar el límite de canciones saltadas.
Esta versión de la aplicación Pandora no es com-
patible.
Esta versión de la aplicación de Pandora no es com-
patible.
Conecte un iPhone que tenga instalada una
versión compatible de Pandora.
Revisar dispositivo
Mensaje de error de dispositivo mostrado en la apli-
cación de Pandora.
Compruebe su iPhone.
Pandora no puede reproducir música. Comprue-
be su dispositivo.
No es posible reproducir música desde Pandora.
Compruebe su iPhone.
Crear Estacion Pandora en el dispositivo.
No se encuentran estaciones.
Cree una estación en la aplicación de Pandora
instalada en su iPhone.
Ninguna estación activa
No se ha seleccionado ninguna estación.
Seleccione una estación.
Error de comunicación. Por favor vuelva a co-
nectar el dispositivo.
Si no hay ninguna confirmación tras 10 intentos en
750 ms, el accesorio deberá asumir que la comuni-
cación se ha interrumpido y desconectarse de
PandoraLink.
Vuelva a conectar su iPhone e inténtelo de
nuevo.
El Dispositivo no ha sido registrado Ir a “Menú
de Conexión de Bluetooth” para registrar
No se encuentran dispositivos Bluetooth.
Siga las instrucciones que aparecen en la
pantalla.
Error de conexión. Presione “Connect” para rein-
tentar
Ha fallado la conexión Bluetooth.
Siga las instrucciones que aparecen en la
pantalla.
Desconectado presione “Connect” para reco-
nectar el dispositivo
Se ha perdido la conexión Bluetooth.
Siga las instrucciones que aparecen en la
pantalla.
MirrorLink
The application list could not be read out.
No se ha podido cargar la lista de aplicaciones.
! Desconecte el cable del teléfono inteligente y,
transcurridos unos segundos, vuelva a conectar
el teléfono inteligente.
! Apague (posición OFF) la llave de encendido y
después cámbiela a ACC u ON.
Si el mensaje de error se sigue mostrando
después de hacer lo mencionado anteriormente,
reinicie el teléfono inteligente.
Si el mensaje de error se sigue mostrando
después de hacer lo mencionado anteriormente,
no dude en contactar con el distribuidor o con el
servicio técnico oficial de Pioneer.
There is no supported application on your Mirror-
Link device.
No se han encontrado aplicaciones compatibles.
! Desconecte el cable del teléfono inteligente y,
transcurridos unos segundos, vuelva a conectar
el teléfono inteligente.
! Apague (posición OFF) la llave de encendido y
después cámbiela a ACC u ON.
Si el mensaje de error se sigue mostrando
después de hacer lo mencionado anteriormente,
reinicie el teléfono inteligente.
Si el mensaje de error se sigue mostrando
después de hacer lo mencionado anteriormente,
no dude en contactar con el distribuidor o con el
servicio técnico oficial de Pioneer.
Communication error occurred.
Se ha producido un error de comunicación.
! Desconecte el cable del teléfono inteligente y,
transcurridos unos segundos, vuelva a conectar
el teléfono inteligente.
! Apague (posición OFF) la llave de encendido y
después cámbiela a ACC u ON.
Si el mensaje de error se sigue mostrando
después de hacer lo mencionado anteriormente,
reinicie el teléfono inteligente.
Si el mensaje de error se sigue mostrando
después de hacer lo mencionado anteriormente,
no dude en contactar con el distribuidor o con el
servicio técnico oficial de Pioneer.
Información adicional
206
Apéndice
Información adicional
Es
<CRD4844-A>206
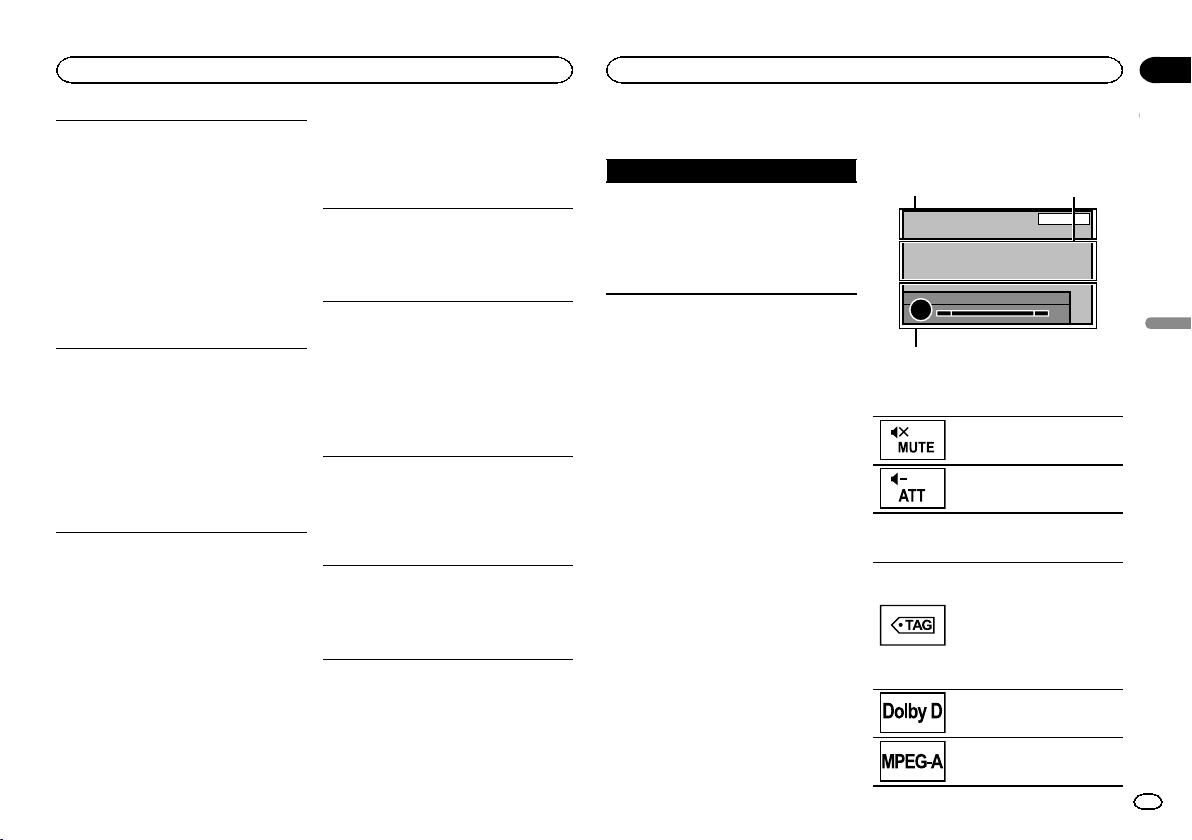
Black plate (207,1)
Launching the application failed.
No se ha podido iniciar la aplicación.
! Desconecte el cable del teléfono inteligente y,
transcurridos unos segundos, vuelva a conectar
el teléfono inteligente.
! Apague (posición OFF) la llave de encendido y
después cámbiela a ACC u ON.
Si el mensaje de error se sigue mostrando
después de hacer lo mencionado anteriormente,
reinicie el teléfono inteligente.
Si el mensaje de error se sigue mostrando
después de hacer lo mencionado anteriormente,
no dude en contactar con el distribuidor o con el
servicio técnico oficial de Pioneer.
USB connection was temporarily disabled for de-
vice protection. Do not connect this USB device
to the unit. To restart USB, restart the unit.
Hay un error de sobre corriente. No utilice este dis-
positivo de almacenamiento USB.
Desconecte (posición OFF) la llave de encendido
y después colóquela en ACC o en ON.
Si el mensaje de error se sigue mostrando
después de hacer lo mencionado anteriormente,
no dude en contactar con el distribuidor o con el
servicio técnico oficial de Pioneer.
Comprensión de los
mensajes de error del ajuste
EQ automático
Cuando no se puede obtener una medición co-
rrecta de las características acústicas del inte-
rior del automóvil con la función EQ automática,
aparece un mensaje de error. En ese caso, con-
sulte la siguiente tabla para determinar cuál es
el problema y el método sugerido para su reso-
lución. Después de verificarlo, vuelva a intentar
la operación.
Los mensajes de error se escriben en negrita y
producen un texto normal sin sangrado. El texto
normal y sangrado se emplea para indicar las
acciones que se han de tomar.
Por favor conecte el micrófono para la medición.
Cuando termine, pulse HOME.
El micrófono no está conectado.
Enchufe bien el micrófono opcional en el
conector.
Error. Please check xxxx speaker.
El micrófono no puede captar el tono de medición
de los altavoces.
! Verifique que los altavoces están conectados
de manera correcta.
! Corrija el ajuste de nivel de entrada del
amplificador de potencia conectado a los
altavoces.
! Enchufe bien el micrófono en el conector.
Error. Por Favor Verificar Ruido
El nivel de ruido del entorno es demasiado alto.
! Detenga el automóvil en un lugar silencioso y
apague el motor, el aire acondicionado y la
calefacción.
! Ajuste el micrófono correctamente.
Error. Por Favor Verificar Batería
La unidad no está recibiendo alimentación de la ba-
tería.
! Conecte la batería correctamente.
! Compruebe el voltaje de la batería.
Comprensión de los mensajes
Mensajes Traducción
Imagen en pantalla
puede aparecer al
revés
Pioneer recomienda
utilizar una cámara
que genere imágenes
invertidas de espejo;
de lo contrario, la ima-
gen aparecerá inverti-
da en la pantalla.
Lista de indicadores
Área 1 Área 2
Área 3
Área 1
Indica que la función de silencia-
miento está activada.
Indica que el sonido está atenua-
do.
Área 2
Aparece cuando se recibe la in-
formación descargable de can-
ción (etiqueta) de una emisora de
radio.
Se desactiva cuando se está
guardando en esta unidad la in-
formación de canción (etiqueta)
desde una emisora de HD Radio.
Indica que el formato digital es
Dolby Digital.
Indica que el formato digital es
MPEG Audio.
Español
Información adicional
207
Apéndice
Información adicional
Es
<CRD4844-A>207
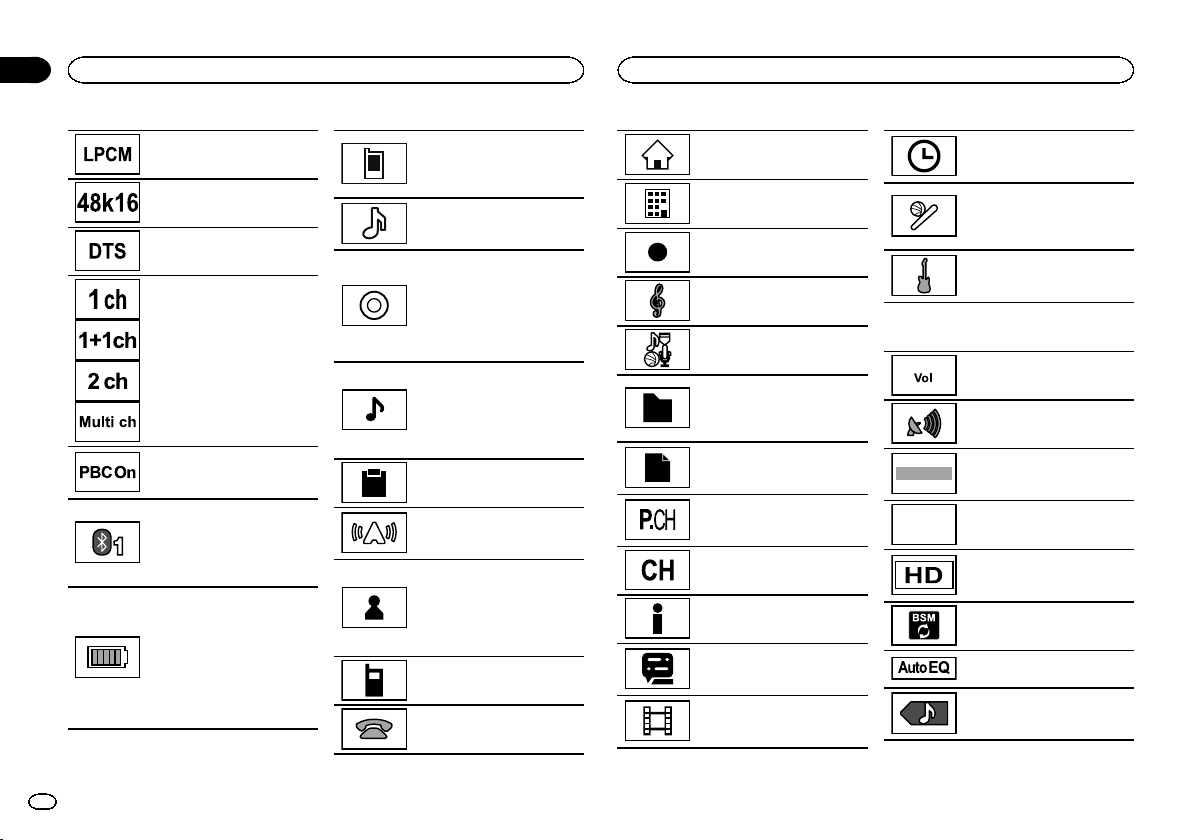
Black plate (208,1)
Indica que el formato digital es
PCM Lineal.
Indica la frecuencia de muestreo.
Indica que el formato digital es
DTS.
Indica el canal de audio.
Indica que se está reproduciendo
un disco con la función PBC acti-
vada.
! Indica que hay un teléfono
móvil conectado.
! Indica que se ha recibido una
llamada entrante que no ha
sido revisada todavía.
Indica la potencia de la batería
del teléfono móvil.
! El nivel que se muestra en el
indicador puede diferir de la
potencia real de la batería.
! Si no hay potencia en la bate-
ría, no se visualizará nada en
el área del indicador de po-
tencia de la batería.
Indica que el dispositivo
Bluetooth conectado solo es
compatible con teléfonos
Bluetooth.
Indica que el dispositivo
Bluetooth conectado solo es
compatible con audio Bluetooth.
Muestra el título del álbum cuan-
do se recibe información de eti-
queta.
Muestra el título del álbum de la
canción que se está reproducien-
do para archivos MP3/WMA/
AAC/WAV.
Muestra el título de la canción
cuando se recibe información de
etiqueta.
Muestra el título de la canción
que se está reproduciendo para
archivos MP3/WMA/AAC/WAV.
Muestra el comentario que se
está reproduciendo actualmente.
Muestra el nombre de la emisora
que se está sintonizando actual-
mente.
Muestra el título del intérprete
cuando se recibe información de
etiqueta.
Muestra el nombre del artista
que se está reproduciendo para
archivos MP3/WMA/AAC/WAV.
Muestra información sobre el te-
léfono móvil.
Muestra información sobre el te-
léfono general.
Muestra información sobre el te-
léfono de casa.
Muestra información sobre el te-
léfono de la oficina.
Muestra información sobre otros
teléfonos.
Muestra el nombre del composi-
tor.
Muestra el nombre de la catego-
ría.
Muestra el nombre de la carpeta
que contiene los archivos MP3/
WMA/AAC que se están reprodu-
ciendo.
Muestra el nombre de archivo del
archivo MP3/WMA/AAC que se
está reproduciendo.
Muestra el número de presinto-
nía de la emisora que se está sin-
tonizando actualmente.
Muestra el canal que se está sin-
tonizando actualmente.
Muestra la información de
SiriusXM.
Muestra el número del título que
se está reproduciendo actual-
mente.
Muestra el número del capítulo
que se está reproduciendo ac-
tualmente.
Muestra el tiempo de reproduc-
ción que se está reproduciendo
actualmente.
Aparece cuando la función de
alerta de partido está activada
mientras se reciben señales de
emisoras SiriusXM.
Muestra el género de la pista/
canción que se está reproducien-
do actualmente.
Área 3
Indica que el volumen está ajus-
tado.
Aparece cuando se recibe la
señal de radio.
ANALOG
Aparece cuando se recibe audio
analógico de la señal de
HD Radio.
DIGITAL
Aparece cuando se recibe audio
digital de la señal de HD Radio.
Aparece cuando se recibe la in-
formación de emisora de
HD Radio.
Toque para activar la función
BSM.
Indica que el ajuste EQ automáti-
co está activado.
Aparece cuando esta unidad
tiene la información de canción
(etiqueta).
Información adicional
208
Apéndice
Información adicional
Es
<CRD4844-A>208
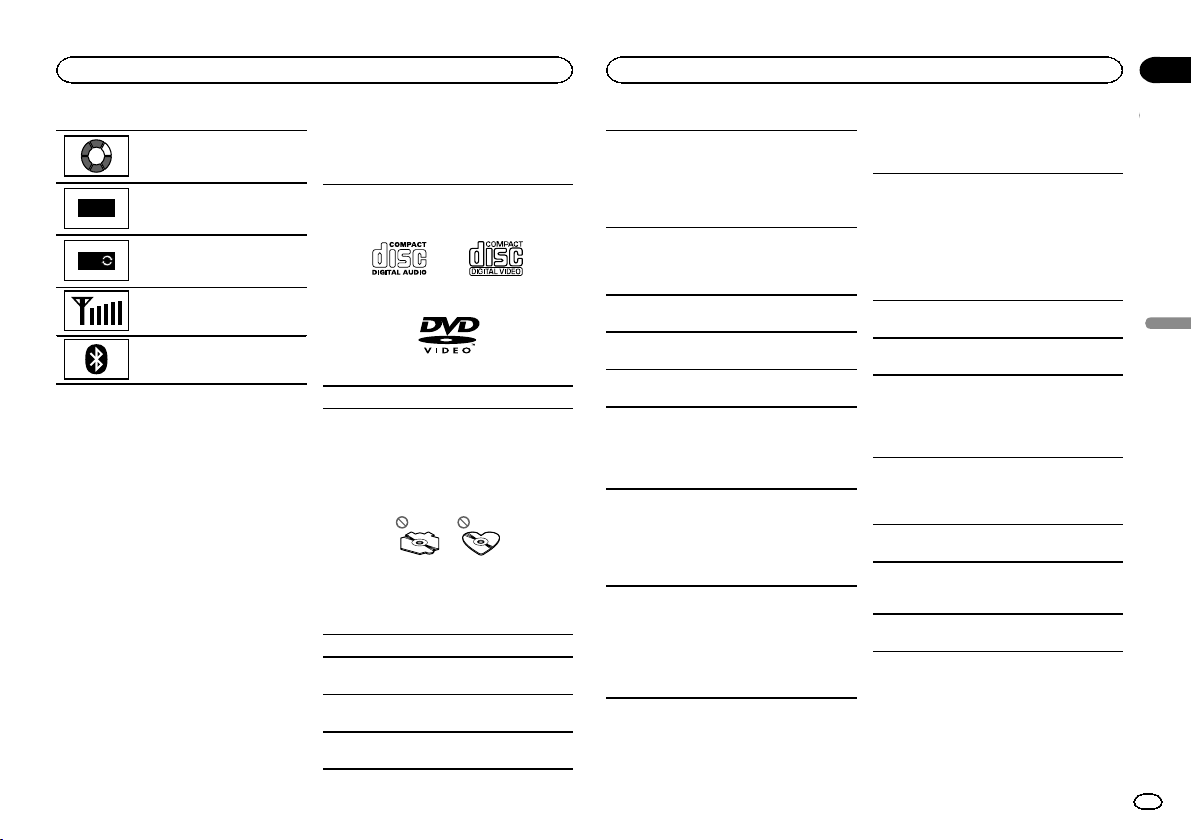
Black plate (209,1)
Indica que la unidad está proce-
sando actualmente una función
como una búsqueda.
DB
Muestra cuando se crea una
base de datos en modo Búsque-
da de música.
DB
Muestra cuando se guarda una
base de datos en modo Búsque-
da de música.
Indica la intensidad de la señal
del teléfono móvil.
Indica que hay un teléfono
Bluetooth conectado.
Pautas para el manejo
Discos y reproductor
Use discos que tengan cualquiera de los siguien-
tes logos.
Utilice discos de 12 cm.
Los siguientes tipos de discos no se pueden utili-
zar con esta unidad:
! DualDisc
! Discos de 8 cm: Si se utiliza este tipo de discos
con un adaptador, puede provocar el funciona-
miento defectuoso de la unidad.
! Discos con formas extrañas
! Discos dañados, incluido discos que estén
partidos, desconchados o deformados
! Discos CD-R/RW y DVD-R/RW que no estén fi-
nalizados
! DVD-RAM
No toque la superficie grabada de los discos.
Cuando no utilice los discos, guárdelos en sus
cajas.
No fije etiquetas, no escriba ni aplique sustancias
químicas en la superficie de los discos.
Para limpiar un disco, pásele un paño suave
desde el centro hacia afuera.
La condensación puede afectar temporalmente al
rendimiento del reproductor. Deje de usarlo duran-
te una hora aproximadamente para que se adapte
a la temperatura más cálida. Además, si los dis-
cos tienen humedad, séquelos con un paño
suave.
Quizá no pueda reproducir algunos discos debido
a sus características, formato, programas graba-
dos, entorno de reproducción, condiciones de al-
macenamiento u otras causas.
Las vibraciones en las carreteras pueden inte-
rrumpir la reproducción de un disco.
Es posible que ciertas funciones no estén disponi-
bles en algunos discos DVD vídeo.
Es posible que no se puedan reproducir algunos
discos DVD vídeo.
Esta unidad no es compatible con discos graba-
dos en formato AVCHD (códecs de vídeo avanza-
dos de alta definición). No introduzca discos
AVCHD. De hacerlo, es posible que el disco no
pueda expulsarse.
Al usar discos de superficie imprimible para eti-
quetas, lea primero las instrucciones y las adver-
tencias de los discos. Es posible que algunos
discos no puedan insertarse ni expulsarse. La utili-
zación de este tipo de discos puede dañar el equi-
po.
No pegue etiquetas compradas por separado ni
otro tipo de material a los discos.
! Los discos podrían combarse y no podrán re-
producirse.
! Las etiquetas pueden despegarse durante la
reproducción, evitando la expulsión del disco y
causando de este modo daños en el equipo.
Dispositivo de almacenamiento
USB
Se pueden producir los siguientes problemas
según el dispositivo de almacenamiento externo
(USB) que se utilice:
! Las operaciones pueden variar.
! Es posible que no se reconozca el dispositivo
de almacenamiento.
! Puede que los archivos no se reproduzcan co-
rrectamente.
No se admiten las conexiones a través de un con-
centrador USB.
No conecte ningún otro objeto que no sea un dis-
positivo de almacenamiento USB.
Cuando conduzca, fije el dispositivo de almacena-
miento USB firmemente. No deje caer el dispositi-
vo de almacenamiento USB al suelo, ya que
puede quedar atascado debajo del freno o del ace-
lerador.
Dependiendo de los dispositivos periféricos de al-
macenamiento que haya conectados, el sonido de
radio puede emitirse a través del dispositivo perifé-
rico.
No se podrán reproducir los archivos protegidos
almacenados en los dispositivos USB.
No se puede conectar el reproductor de audio por-
tátil USB/memoria USB a esta unidad a través de
un concentrador USB.
La memoria USB particionada no es compatible
con esta unidad.
Español
Información adicional
209
Apéndice
Información adicional
Es
<CRD4844-A>209

Black plate (210,1)
Según el tipo de reproductor de audio portátil
USB/memoria USB que utilice, es posible que no
se reconozca el dispositivo o que los archivos de
audio no se puedan reproducir correctamente.
No deje el reproductor de audio portátil USB/me-
moria USB expuestos a la luz solar directa durante
un largo periodo de tiempo, ya que puede causar
un fallo de funcionamiento como consecuencia
de la alta temperatura generada.
iPod
Para asegurar un funcionamiento correcto, conec-
te el cable conector del Dock del iPod directamen-
te a esta unidad.
Cuando conduzca, fije el iPod firmemente. No
deje caer el iPod al suelo, ya que puede quedar
atascado debajo del freno o del acelerador.
Acerca de los ajustes del iPod
! Cuando el iPod está conectado, esta unidad
desactiva el ajuste EQ (ecualizador) del iPod
para mejorar la acústica; al desconectar el
iPod, el EQ retoma su valor original.
! No puede desactivar la Repetición del iPod
cuando utiliza esta unidad. La Repetición se
cambiará automáticamente a Todo cuando el
iPod esté conectado a esta unidad.
La unidad no mostrará el texto incompatible guar-
dado en el iPod.
Discos DVD-R/RW
No se pueden reproducir discos DVD-R/-RW gra-
bados en formato de vídeo (modo de vídeo) que
no hayan sido finalizados (cerrados).
Es posible que no se puedan reproducir los discos
DVD-R/RW debido a sus características, por las
ralladuras y la suciedad que pueda tener el disco
o por la suciedad, condensación, etc. acumulada
en la lente de esta unidad.
Es posible que no se puedan reproducir los discos
grabados en un ordenador en función de los ajus-
tes de la aplicación y el entorno utilizados. (Para
obtener más información, póngase en contacto
con el fabricante de la aplicación.)
Discos CD-R/RW
Cuando se utilizan discos CD-R/RW, sólo se pue-
den reproducir los discos finalizados.
Es posible que no se puedan reproducir los discos
CD-R/RW grabados en un grabador de CD de mú-
sica o un ordenador debido a sus características,
por los arañazos o la suciedad que pueda tener el
disco, o por la suciedad, condensación, etc. acu-
mulada en la lente de esta unidad.
Es posible que no se puedan reproducir los discos
grabados en un ordenador en función de los ajus-
tes de la aplicación y el entorno utilizados. (Para
obtener más información, póngase en contacto
con el fabricante de la aplicación.)
Puede resultar imposible reproducir los discos
CD-R/RW en caso de exposición a la luz solar di-
recta, altas temperaturas o debido a las condicio-
nes de almacenamiento en el vehículo.
Es posible que no se puedan visualizar los títulos y
demás información de texto grabados en un disco
CD-R/RW en esta unidad (en el caso de datos de
audio (CD-DA)).
Archivos de imagen JPEG
JPEG es la sigla de Joint Photographic Experts
Group y se refiere a una norma de tecnología de
compresión de imágenes fijas.
Los archivos son compatibles con Baseline JPEG
y EXIF 2.1, resolución de imagen fija de hasta
8 192 × 7 680. (El formato EXIF se utiliza general-
mente con las cámaras fotográficas digitales.)
Es posible que no se puedan reproducir los archi-
vos con formato EXIF procesados por un ordena-
dor.
No existe compatibilidad progresiva JPEG.
Archivos de vídeo DivX
Según la composición de la información del archi-
vo, como por ejemplo el número de streams de
audio o el tamaño del archivo, es posible que se
produzca un ligero retardo al reproducir discos.
Es posible que algunas funciones especiales
estén prohibidas debido a la composición de los
archivos DivX.
Los archivos DivX descargados solamente de una
página web de socios de DivX tienen un funciona-
miento garantizado. Es posible que los archivos
DivX sin autorización no funcionen correctamen-
te.
Los archivos alquilados DRM no se pueden utilizar
hasta que se inicie la reproducción.
Tamaño de archivo recomendado: 2 GB o menos
con una velocidad de transmisión de 2 Mbps o in-
ferior.
El código de identificación de esta unidad debe
estar registrado con un proveedor de contenido
DivX VOD para poder reproducir los archivos DivX
VOD. Para obtener más información sobre los có-
digos de identificación, consulte Visualización del
código de registro de DivX
â
VOD en la página 184.
Para obtener más información sobre DivX, visite la
página web:
http://www.divx.com/
Archivos de vídeo MPEG-1/MPEG-2/
MPEG-4
Es posible que el tiempo de reproducción transcu-
rrido no se muestre correctamente.
Importante
! Al asignar un nombre a un archivo de ima-
gen JPEG, incluya la extensión correspon-
diente del nombre de archivo (.jpg, .jpeg o
.jpe).
! Esta unidad reproduce archivos con estas ex-
tensiones (.jpg, .jpeg o .jpe) como un archivo
de imagen JPEG. Para evitar fallos de funcio-
namiento, no use estas extensiones para ar-
chivos que no sean JPEG.
Compatibilidad con audio (USB)
WAV
Extensión de archivo: .wav
Bits de cuantificación: 8 y 16 (LPCM), 4 (MS
ADPCM)
Frecuencia de muestreo: 16 kHz a 48 kHz (LPCM),
22,05 kHz y 44,1 kHz (MS ADPCM)
Información adicional
210
Apéndice
Información adicional
Es
<CRD4844-A>210
Black plate (211,1)
Compatibilidad con archivo
comprimido (disco, USB)
WMA
Extensión de archivo: .wma
Velocidad de grabación: 48 kbps a 320 kbps
(CBR), VBR
Frecuencia de muestreo: 32 kHz a 48 kHz
Windows Mediaä Audio Professional, Lossless,
Voice/DRM Stream/Stream con vídeo: no compati-
ble
MP3
Extensión de archivo: .mp3
Velocidad de grabación: de 8 kbps a 320 kbps
(CBR), VBR
Frecuencia de muestreo: de 8 kHz a 48 kHz
(32 kHz, 44,1 kHz, 48 kHz para énfasis)
Versiones de etiqueta ID3 compatibles: 1.0, 1.1,
2.2, 2.3, 2.4 (la etiqueta ID3 versión 2.x tiene priori-
dad sobre la versión 1.x)
Lista de reproducción M3u: no compatible
MP3i (MP3 interactivo), mp3 PRO: no compatible
AAC
Formato compatible: AAC codificado con iTunes
Extensión de archivo: .m4a
Frecuencia de muestreo: de 11,025 kHz a 48 kHz
Velocidad de grabación: 16 kbps a 320 kbps
Apple Lossless: no compatible
Archivo AAC adquirido en iTunes Store (extensión
del archivo .m4p): no compatible
Compatibilidad con DivX
Formato compatible: Formato de vídeo DivX imple-
mentado conforme a las normas DivX
Extensiones de archivo: .avi o .divx
Formato DivX Ultra: no compatible
Formato DivX HD: no compatible
Archivos DivX sin datos de vídeo: no compatibles
DivX plus: No compatible
Códecs de audio compatibles: MP2, MP3, Dolby
Digital
LPCM: compatible
Velocidad de grabación: de 8 kbps a 320 kbps
(CBR), VBR
Frecuencia de muestreo: de 8 kHz a 48 kHz
Extensión de archivo de subtítulos externos com-
patible: .srt
Vídeo MPEG-1/MPEG-2/MPEG-4
Extensiones de archivos: mpg o .mpeg (MPEG-1/
MPEG-2), .avi (MPEG-4)
Códecs de audio compatibles: MP2 (MPEG-1/
MPEG-2), MP2, MP3, Dolby Digital (MPEG-4)
H.264 (MPEG-4AVC): Incompatible
LPCM: no compatible
Velocidad de grabación: de 8 kbps a 320 kbps
(CBR), VBR
Frecuencia de muestreo: de 8 kHz a 48 kHz
Información complementaria
Es probable que no se puedan visualizar algunos
caracteres en un nombre de archivo (incluida la
extensión del archivo) o en un nombre de carpeta.
Esta unidad puede no funcionar correctamente,
según la aplicación utilizada para codificar archi-
vos WMA.
Puede producirse una pequeña demora cuando
se inicie la reproducción de archivos de audio que
contienen datos de imágenes o archivos de audio
almacenados en un dispositivo USB con numero-
sas jerarquías de carpetas.
Disco (CD/DVD)
Carpetas reproducibles: hasta 99 para CD-R/RW
Carpetas reproducibles: hasta 700 para DVD-R/
RW
Archivos reproducibles: hasta 999 para CD-R/RW
Archivos reproducibles: hasta 3 500 para DVD-R/
RW
Sistema de archivos: ISO 9660 Nivel 1 y 2, Romeo,
Joliet, UDF 1.02 (DVD-R/RW)
Reproducción multisesión: compatible
Transferencia de datos en formato Packet Write:
no compatible
Independientemente de la longitud de la seccio-
nes en blanco que haya entre las canciones de la
grabación original, los discos de audio comprimi-
dos se reproducirán con una breve pausa entre
cada canción.
Dispositivo de almacenamiento
externo (USB)
Carpetas reproducibles: hasta 1 500 (hasta 700
para DivX/MPEG-1/MPEG-2/MPEG-4)
Archivos reproducibles: hasta 15 000
Reproducción de archivos protegidos por dere-
chos de autor: no compatible
Dispositivo de almacenamiento externo particio-
nado (USB): sólo se puede reproducir la primera
partición.
No existe compatibilidad con las tarjetas multime-
dia (MMC).
PRECAUCIÓN
! Pioneer no asume ninguna responsabilidad
por la pérdida de datos en la memoria USB/
el reproductor de audio portátil USB incluso
si la pérdida ocurre durante el uso de esta
unidad.
! Pioneer no garantiza la compatibilidad con
todos los dispositivos de almacenamiento
masivo USB y no se hace responsable de la
pérdida de los datos en los reproductores
multimedia, smartphones u otros dispositi-
vos, mientras se utilicen con este producto.
! No deje discos, dispositivos de almacena-
miento externo (USB) ni el iPod en lugares
expuestos a altas temperaturas.
Compatibilidad con iPod
Esta unidad sólo es compatible con los modelos
de iPod que se muestran a continuación.
Fabricado para
! iPod touch (5.ª generación)
! iPod touch (4.ª generación)
! iPod touch (3.ª generación)
! iPod touch (2.ª generación)
! iPod touch (1.ª generación)
Español
Información adicional
211
Apéndice
Información adicional
Es
<CRD4844-A>211

Black plate (212,1)
! iPod classic
! iPod con vídeo
! iPod nano (7.ª generación)
! iPod nano (6.ª generación)
! iPod nano (5.ª generación)
! iPod nano (4.ª generación)
! iPod nano (3.ª generación)
! iPod nano (2.ª generación)
! iPod nano (1.ª generación)
! iPhone 5
! iPhone 4S
! iPhone 4
! iPhone 3GS
! iPhone 3G
! iPhone
Según la generación o versión del iPod, es posible
que algunas funciones no estén disponibles.
Las funciones pueden variar según la versión de
software del iPod.
Si desea más información sobre la compatibilidad
de archivos y formatos, consulte los manuales del
iPod.
Audiolibro, podcast: compatible
PRECAUCIÓN
Pioneer no asume ninguna responsabilidad por
la pérdida de datos en el iPod, incluso si la pér-
dida ocurre durante el uso de esta unidad.
Acerca del etiquetado de iTunes
Esta función se puede utilizar en los siguientes
modelos de iPod.
— iPod touch de 4ª generación
— iPod touch de 3ª generación
— iPod touch de 2ª generación
— iPod touch de 1ª generación
— iPod classic de 160 GB
— iPod classic de 120 GB
— iPod classic
— iPod con vídeo
— iPod nano de 6ª generación
— iPod nano 5ª generación
— iPod nano de 4ª generación
— iPod nano de 3ª generación
— iPhone 5
— iPhone 4S
— iPhone 4
— iPhone 3GS
— iPhone 3G
— iPhone
La información de la canción (etiqueta) puede
copiarse en su iPod desde la emisora. Las can-
ciones aparecerán en iTunes la próxima vez que
sincronice su iPod, en una lista de reproducción
llamada “lista de reproducción de canciones eti-
quetadas”. De esta forma podrá comprar en
iTunes Store las canciones que ha etiquetado.
Es posible que la canción que ha etiquetado no
sea la misma que aparece en iTunes Store. Com-
pruebe y confirme la canción antes de efectuar
la compra.
Si encuentra algún problema al usar esta fun-
ción, actualice el firmware de su iPod.
Secuencia de archivos de audio
El usuario no puede asignar números de carpe-
ta ni especificar secuencias de reproducción
con esta unidad.
Ejemplo de una jerarquía
1
2
3
4
5
6
01
02
03
04
05
Nivel 1 Nivel 2 Nivel 3 Nivel 4
: carpeta
: archivo de audio
comprimido
01 a 05: número de
carpeta
1 a 6: secuencia
de reproducción
Disco
La secuencia de selección de carpetas u otras
operaciones pueden diferir, dependiendo del
software de codificación o escritura.
Dispositivo de almacenamiento
externo (USB)
La secuencia de reproducción es la misma que
la secuencia grabada en el dispositivo de alma-
cenamiento externo (USB).
Para especificar la secuencia de reproducción,
se recomienda el siguiente método.
1 Cree un nombre del archivo que incluya nú-
meros que especifiquen la secuencia de re-
producción (p. ej., 001xxx.mp3 y 099yyy.mp3).
2 Coloque esos archivos en una carpeta.
3 Guarde la carpeta que contiene los archivos
en el dispositivo de almacenamiento externo
(USB).
Sin embargo, dependiendo del entorno del siste-
ma, tal vez no pueda especificar la secuencia de
reproducción.
Para reproductores de audio portátiles USB, la
secuencia es diferente y depende del reproduc-
tor.
Uso correcto del display
PRECAUCIÓN
! En caso de que se introduzcan elementos ex-
traños o líquido en esta unidad, apáguela de
inmediato y consulte a su concesionario o al
servicio técnico oficial de PIONEER más pró-
ximo a su domicilio. No utilice la unidad en
este estado, ya que se puede producir un in-
cendio, una descarga eléctrica u otros fallos.
! Si detecta humo, ruidos u olores extraños, o
cualquier otro síntoma anormal en el display,
apáguelo de inmediato y consulte a su con-
cesionario o al servicio técnico oficial de
PIONEER más próximo a su domicilio. Si se
utiliza la unidad en este estado, el sistema
puede sufrir daños permanentes.
! No desarme ni modifique esta unidad, ya
que tiene componentes internos de alta ten-
sión que pueden causar una descarga eléc-
trica. Consulte a su concesionario o al
servicio técnico oficial de PIONEER más pró-
ximo a su domicilio cuando se trate de una
inspección interna, ajustes o reparaciones.
Manejo del display
! No toque nunca la pantalla con ningún obje-
to que no sea su dedo cuando utilice la fun-
ción de panel táctil. La pantalla puede
rayarse fácilmente.
! Si se expone el display a la luz solar directa
durante un período prolongado, se recalenta-
rá demasiado y se puede dañar la pantalla
LCD. Debería evitar exponer el display a la
luz solar directa en la mayor medida posible.
! El display se debe usar dentro de los interva-
los de temperatura de 14 °F a 140 °F.
Es posible que el display no funcione normal-
mente si lo expone a temperaturas superio-
res o inferiores a las de esta gama de
funcionamiento.
! La pantalla LCD está expuesta para au-
mentar su visibilidad dentro del vehículo. No
la presione con fuerza excesiva, ya que la
puede dañar.
! No empuje la pantalla LCD con energía, ya
que la puede rayar.
Información adicional
212
Apéndice
Información adicional
Es
<CRD4844-A>212

Black plate (213,1)
Pantalla de visualización de
cristal líquido (LCD)
! Por su parte, el calor de un calefactor puede
dañar la pantalla LCD y el aire frío del enfria-
dor puede hacer que se acumule humedad
en la parte interna del display, por lo que
puede dañarse.
! Pueden aparecer pequeños puntos negros o
blancos (puntos brillantes) en la pantalla
LCD. Estos puntos se deben a las caracterís-
ticas de la pantalla LCD y no indican un fallo
de funcionamiento.
! Al utilizar un teléfono móvil, mantenga la an-
tena alejada del display para evitar interrup-
ciones de la imagen de vídeo por la
aparición de manchas, rayas de color, etc.
Retroiluminación LED (diodo
emisor de luz)
! En temperaturas bajas, el uso de la retroilu-
minación LED puede aumentar la estela de
la imagen y degradar su calidad debido a las
características de la pantalla LCD. La calidad
de la imagen mejorará con el aumento de la
temperatura.
! Para proteger la retroiluminación LED, la
pantalla se oscurecerá en los siguientes
casos:
— Ante la exposición directa a la luz del sol
— Por proximidad a un calefactor
! La vida útil de la retroiluminación LED es su-
perior a 10 000 horas. No obstante, ésta
puede disminuir de utilizarse en entornos
con temperaturas elevadas.
! Cuando la retroiluminación LED alcanza el
final de la vida útil del producto, la pantalla
se oscurece y la imagen deja de proyectarse.
Si esto ocurre, diríjase a su distribuidor o al
servicio técnico oficial de PIONEER más pró-
ximo a su domicilio.
Mantenimiento del display en
buen estado
! Al eliminar el polvo de la pantalla o al limpiar
el display, primero apague el sistema y luego
limpie la pantalla con un paño suave y seco.
! Al limpiar la pantalla, tenga cuidado de no
rayar la superficie. No use productos quími-
cos de limpieza que sean fuertes o abrasivos.
Perfiles Bluetooth
Para utilizar la tecnología inalámbrica
Bluetooth, los dispositivos deben ser capaces de
interpretar ciertos perfiles. Esta unidad es com-
patible con los siguientes:
! GAP (Generic Access Profile)
! SDP (Service Discovery Protocol)
! OPP (Object Push Profile)
! HFP (Hands Free Profile)
! HSP (Head Set Profile)
! PBAP (Phone Book Access Profile)
! A2DP (Advanced Audio Distribution Profile)
! AVRCP (Audio/Video Remote Control Profile)
1.3
! SPP (Perfil de Puerto de Serie) 1.1
Licencia, exención de
responsabilidad sobre la
garantía y limitación de
responsabilidad
DISPOSICIONES DE SEGURIDAD
Exención de responsabilidad
LAS GARANTÍAS EXPUESTAS EN LA GARANTÍA
LIMITADA DE PIONEER SON LAS ÚNICAS GA-
RANTÍAS OTORGADAS POR PIONEER O CUAL-
QUIERA DE SUS LICENCIADORES, SEGÚN
CORRESPONDA. PIONEER Y SUS LICENCIA-
DORES RENUNCIAN EXPRESAMENTE A
TODAS LAS DEMÁS GARANTÍAS, EXPRESAS O
IMPLÍCITAS, INCLUIDAS SIN LIMITACIÓN, LAS
GARANTÍAS DE COMERCIALIZACIÓN Y APTI-
TUD PARA UN PROPÓSITO PARTICULAR.
Limitación de responsabilidad
HASTA DONDE LO PERMITE LA LEY VIGENTE,
NI PIONEER NI SUS LICENCIADORES SERÁN
RESPONSABLES FRENTE A USTED O FRENTE
A UN TERCERO POR NINGÚN DAÑO INDIREC-
TO, CONSECUENCIAL, INCIDENTAL, PUNIBLE
O ESPECIAL, INDISTINTAMENTE DE LA FORMA
DE ACCIÓN, YA SEAN CONTRACTUALES O EX-
TRACONTRACTUALES, INCLUIDA LA NEGLI-
GENCIA, INCLUSO SI TALES PARTES HAN SIDO
AVISADAS DE LA POSIBILIDAD DE TALES
DAÑOS.
HASTA DONDE LO PERMITE LA LEY VIGENTE,
LA RESPONSABILIDAD TOTAL DE PIONEER O
SUS LICENCIADORES DE CUALQUIER TIPO
SURGIDA O RELACIONADA CON EL USO QUE
USTED HAGA DE LOS PRODUCTOS, A TÍTULO
ENUNCIATIVO PERO NO LIMITATIVO, CUAL-
QUIER RECLAMACIÓN DE GARANTÍA O CUAL-
QUIER RECLAMACIÓN POR DAÑOS DE LA
PROPIEDAD, LA MUERTE O LA INVALIDEZ, IN-
DEPENDIENTEMENTE DE LA JURISDICCIÓN E
INDEPENDIENTEMENTE DE SI CUALQUIER AC-
CIÓN O RECLAMACIÓN TIENE SU ORIGEN EN
CONTRATOS, RESPONSABILIDADES EXTRA-
CONTRACTUALES, (INCLUIDA LA NEGLIGEN-
CIA), RESPONSABILIDADES ESTRICTAS DEL
PRODUCTO U OTRAS TEORÍAS LEGALES, NO
EXCEDERÁ LOS MIL DOLARES (1 000 USD$).
ALGUNAS JURISDICCIONES NO PERMITEN LA
EXCLUSIÓN POR DAÑOS O LA LIMITACIÓN DE
RESPONSABILIDAD, DE MODO QUE LAS EX-
CLUSIONES O LIMITACIONES INDICADAS
ARRIBA, HASTA DONDE LO PROHIBA LA LEY
VIGENTE, PUEDEN NO APLICARSE A USTED.
SUS DERECHOS ESPECÍFICOS PUEDEN VA-
RIAR EN FUNCIÓN DE LA JURISDICCIÓN.
libpng
Recuerde que Pioneer no solucionará dudas re-
lacionadas con el contenido del código fuente.
Esta licencia se redactó originalmente en inglés
y se tradujo únicamente para ayudar al lector a
comprender su contenido. Por tanto, tenga en
cuenta que la licencia traducida NO se identifi-
ca legalmente con el texto original en inglés.
Le proporcionamos esta copia de los avisos de
libpng para su comodidad. En caso de discre-
pancia entre esta copia y los avisos del archivo
png.h incluido en la distribución de libpng, pre-
valecerán estos últimos.
AVISO DE DERECHOS DE AUTOR, DESCARGO
DE RESPONSABILIDAD y LICENCIA:
Si modifica libpng podrá insertar avisos adicio-
nales inmediatamente después de esta frase.
Este código se libera con licencia libpng.
libpng versiones de la 1.2.6, 15 de agosto de
2004, a la 1.5.0, 6 de enero de 2011, son Copy-
right (c) 2004, 2006-2010 de Glenn Randers-Pehr-
son y se distribuyen según la responsabilidad y
licencia que libpng-1.2.5 agrega a la siguiente
persona a la lista de autores colaboradores
Cosmin Truta
Español
Información adicional
213
Apéndice
Información adicional
Es
<CRD4844-A>213
Black plate (214,1)
Los derechos de autor de las versiones de libpng
comprendidas entre la versión 1.0.7, de 1 de
julio de 2000, y la versión 1.2.5, de 3 de octubre
de 2002, ambas incluidas, (c) 2000-2002, son
propiedad de Glenn Randers-Pehrson, y dichas
versiones se distribuyen de acuerdo con el
mismo descargo de responsabilidad y la misma
licencia que libpng-1.0.6, con las siguientes per-
sonas añadidas a la lista de autores
Simon-Pierre Cadieux
Eric S. Raymond
Gilles Vollant
y con las siguientes adiciones al descargo de
responsabilidad:
No existe garantía alguna contra las perturba-
ciones que le pudieran impedir disfrutar de la bi-
blioteca ni contra las infracciones. No existe
garantía alguna de que nuestros esfuerzos o la
biblioteca sirvan a sus fines concretos o atien-
dan sus necesidades concretas. Esta biblioteca
se suministra con todos los defectos que pueda
tener, y el usuario asume todos los riesgos rela-
cionados con su calidad, sus resultados, su
exactitud y los esfuerzos que pudieran ser nece-
sarios.
Los derechos de autor de las versiones de libpng
comprendidas entre la versión 0.97, de enero de
1998, y la versión 1.0.6, de 20 de marzo de 2000,
ambas incluidas, (c) 1998, 1999, son propiedad
de Glenn Randers-Pehrson, y dichas versiones
se distribuyen de acuerdo con el mismo descar-
go de responsabilidad y la misma licencia que
libpng-0.96, con las siguientes personas añadi-
das a la lista de autores colaboradores:
Tom Lane
Glenn Randers-Pehrson
Willem van Schaik
Los derechos de autor de las versiones de libpng
comprendidas entre la versión 0.89, de junio de
1996, y la versión 0.96, de mayo de 1997, ambas
incluidas, (c) 1996, 1997, son propiedad de An-
dreas Dilger, y dichas versiones se distribuyen
de acuerdo con el mismo descargo de responsa-
bilidad y la misma licencia que libpng-0.88, con
las siguientes personas añadidas a la lista de
autores colaboradores:
John Bowler
Kevin Bracey
Sam Bushell
Magnus Holmgren
Greg Roelofs
Tom Tanner
Los derechos de autor de las versiones de libpng
comprendidas entre la versión 0.5, de mayo de
1995, y la versión 0.88, de enero de 1996, ambas
incluidas, (c) 1995, 1996, son propiedad de Guy
Eric Schalnat, Group 42, Inc.
A los efectos de estos derechos de autor y de
esta licencia, "autores colaboradores" son el si-
guiente grupo de personas:
Andreas Dilger
Dave Martindale
Guy Eric Schalnat
Paul Schmidt
Tim Wegner
La biblioteca de referencia PNG se suministra
"TAL CUAL". Los autores colaboradores y Group
42, Inc. se descargan de responsabilidad respec-
to a cualquier garantía, explícita o implícita, in-
cluidas, a título enunciativo pero no limitativo,
las garantías de comerciabilidad y de idoneidad
para cualquier fin. Los autores colaboradores y
Group 42, Inc. no asumirán responsabilidad al-
guna por los daños directos, indirectos, inciden-
tales, especiales, punitivos o consecuenciales
que puedan resultar del uso de la biblioteca de
referencia PNG, incluso si conociesen la posibi-
lidad de que se produjese dicho daño.
El presente documento autoriza el uso, la copia,
la modificación y la distribución de este código
fuente, o de partes del mismo, para cualquier
fin, de forma gratuita, con las siguientes limi-
taciones:
1. No debe falsearse el origen de este código
fuente.
2. Las versiones modificadas deben estar clara-
mente identificadas como tales, y no deben ha-
cerse pasar por la fuente original.
3. Este aviso de derechos de autor no debe elimi-
narse ni modificarse en las distribuciones de la
fuente o de la fuente modificada.
Los autores colaboradores y Group 42, Inc. per-
miten explícitamente el uso de este código fuen-
te de forma gratuita como componente que
permita la compatibilidad con el formato de ar-
chivo PNG en productos comerciales, y animan
a hacer uso de dicho código con tal fin. Si utiliza
este código fuente en un producto, no estará
obligado a dejar constancia de ello, aunque
sería de agradecer.
Existe una función "png_get_copyright", que
podrá utilizar cómodamente en cuadros "Acerca
de" y similares:
printf("%s",png_get_copyright(NULL));
Por otra parte, el logotipo de PNG (en formato
PNG, por supuesto) se incluye en los archivos
"pngbar.png" y "pngbar.jpg" (88 × 31) y en el ar-
chivo "pngnow.png" (98 × 31).
Libpng es software de código abierto certificado
por OSI. La certificación OSI Certified Open
Source la concede Open Source Initiative.
Glenn Randers-Pehrson
glennrp at users.sourceforge.net
6 de enero de 2011
Aviso de copyright y marcas
registradas
Este producto incorpora tecnología de protec-
ción contra la copia que está protegida por pa-
tentes de los EE.UU. y otros derechos de
propiedad intelectual de Rovi Corporation. La in-
geniería inversa y el desmontaje están prohibi-
dos.
Bluetooth
La marca literal y los logotipos Bluetooth
â
son
marcas registradas propiedad de Bluetooth SIG,
Inc., y cualquier uso de dichas marcas por
PIONEER CORPORATION se hace bajo licencia.
Otras marcas y nombres comerciales son pro-
piedad de sus respectivos propietarios.
DVD vídeo
es una marca comercial de DVD Format/
Logo Licensing Corporation.
iTunes
Apple e iTunes son marcas comerciales de
Apple Inc., registradas en los EE.UU. y en otros
países.
MP3
La venta de este producto solo otorga una licen-
cia para su uso privado, no comercial. No otorga
ninguna licencia ni concede ningún derecho a
utilizar este producto en transmisiones comer-
ciales (es decir, lucrativas) en tiempo real (te-
rrestres, vía satélite, por cable y/o por cualquier
otro medio), transmisiones/streaming por Inter-
net, intranets u otras redes o en otros sistemas
de distribución de contenido electrónico, como
por ejemplo, aplicaciones de pago por escucha
(pay-audio) o audio bajo demanda (audio-on-de-
mand). Se necesita una licencia independiente
para su uso comercial. Para obtener más infor-
mación, visite
http://www.mp3licensing.com.
WMA
Windows Media es una marca registrada o una
marca de fábrica de Microsoft Corporation en
los Estados Unidos y/u otros países.
Este producto incluye tecnología propiedad de
Microsoft Corporation, y no se puede usar ni dis-
tribuir sin una licencia de Microsoft Licensing,
Inc.
iPod y iPhone
iPhone, iPod, iPod classic, iPod nano y iPod
touch son marcas comerciales de Apple Inc., re-
gistradas en los EE. UU. y en otros países.
Lightning es una marca comercial de Apple Inc.
Información adicional
214
Apéndice
Información adicional
Es
<CRD4844-A>214
Black plate (215,1)
“Made for iPod” y “Made for iPhone” significan
que un accesorio electrónico ha sido diseñado
para ser conectado específicamente a un iPod o
a un iPhone, respectivamente, y ha sido homolo-
gado por quien lo desarrolló para cumplir con
las normas de funcionamiento de Apple. Apple
no es responsable del funcionamiento de este
aparato ni de que cumpla con las normas de se-
guridad y reguladoras. Tenga presente que el
empleo de este accesorio con un iPod o iPhone
puede afectar la operación inalámbrica.
Androidä & Google Play
Android y Google Play son marcas de fábrica de
Google Inc.
Dolby Digital
Fabricado con la licencia de Dolby Laboratories.
Dolby y el símbolo de la doble D son marcas co-
merciales de Dolby Laboratories.
DivX
DivX
â
, DivX Certified
â
y los logotipos asociados
son marcas comerciales de Rovi Corporation o
sus filiales, y se utilizan bajo licencia.
ACERCA DE VÍDEO DIVX: DivX
â
es un for-
mato de vídeo digital creado por DivX, LLC, una
filial de Rovi Corporation. Este es un dispositivo
oficial con el sello de certificación DivX Certifie-
d
â
que reproduce vídeo DivX. Visite divx.com
para obtener más información y herramientas
de software para convertir sus archivos a vídeo
DivX.
ACERCA DE DIVX VIDEO-ON-DEMAND
(VÍDEO BAJO DEMANDA): este dispositivo
con el sello de certificación por DivX Certified
â
debe estar registrado para poder reproducir los
vídeos DivX VOD (vídeo bajo demanda) que haya
comprado. Para obtener su código de registro,
localice la sección de DivX VOD en Visualización
del código de registro de DivX
â
VOD. Visite
vod.divx.com para obtener más información
sobre cómo completar el proceso de registro.
Radio por satélite SiriusXM
Sirius, XM y todas las marcas y logotipos rela-
cionados son marcas comerciales de Sirius XM
Radio, Inc. Todos los derechos reservados.
Pandora
®
internet radio
PANDORA, el logotipo de PANDORA y la ima-
gen comercial Pandora son marcas comerciales
o registradas de Pandora Media, Inc. y se usan
con su permiso.
MIXTRAX
MIXTRAX es una marca comercial de PIONEER
CORPORATION.
MirrorLink
MirrorLink Certifiedä, el logotipo de Design
Onlyä, MirrorLinkä y el logotipo de MirrorLinkä
son marcas de certificación y marcas comercia-
les de Car Connectivity Consortium LLC. El uso
no autorizado de los mismos está estrictamente
prohibido.
Tabla de códigos de idioma
para el DVD
Idioma (código), código de entrada
Japonés (ja), 1001 Dzongkha (dz), 0426 Kurdo (ku), 1121 Kinyarwanda (rw), 1823
Inglés (en), 0514 Ewe (ee), 0505 Komi (kv), 1122 Sánscrito (sa), 1901
Francés (fr), 0618 Esperanto (eo), 0515 Córnico (kw), 1123 Sardo (sc), 1903
Español (es), 0519 Estonio (et), 0520 Kirguís (ky), 1125 Sindhi (sd), 1904
Alemán (de), 0405 Euskera (eu), 0521 Latín (la), 1201
Sami septentrional (se),
1905
Italiano (it), 0920 Persa (fa), 0601
Luxemburgués (lb),
1202
Sangho (sg), 1907
Chino (zh), 2608 Fula (ff), 0606 Ganda (lg), 1207 Cingalés (si), 1909
Neerlandés, flamenco
(nl), 1412
Finés (fi), 0609 Limburgués (li), 1209 Eslovaco (sk), 1911
Portugués (pt), 1620 Fiyiano (fj), 0610 Lingala (ln), 1214 Esloveno (sl), 1912
Sueco (sv), 1922 Feroés (fo), 0615 Laosiano (lo), 1215 Samoano (sm), 1913
Ruso (ru), 1821
Frisón occidental (fry),
0625
Lituano (lt), 1220 Shona (sn), 1914
Coreano (ko), 1115 Irlandés (ga), 0701 Luba-Katanga (lu), 1221 Somalí (so), 1915
Griego (el), 0512 Gaélico (ga), 0704 Letón (lv), 1222 Albanés (sq), 1917
Afar (aa), 0101 Gallego (gl), 0712 Malgache (mg), 1307 Serbio (sr), 1918
Abjasio (ab), 0102 Guaraní (gn), 0714 Marshalés (mh), 1308 Suazi (ss), 1919
Avéstico (ae), 0105 Guyaratí (gu), 0721 Maorí (mi), 1309
Sesotho meridional
(sot), 1920
Afrikaans (af), 0106 Manés (gv), 0722 Macedonio (mk), 1311 Sundanés (su), 1921
Acano (ak), 0111 Hausa (ha), 0801 Malayalam (ml), 1312 Swahili (sw), 1923
Amharic (am), 0113 Hebreo (he), 0805 Mongol (mn), 1314 Tamil (ta), 2001
Aragonés (an), 0114 Hindi (hi), 0809 Maratí (mr), 1318 Telugu (te), 2005
Árabe (ar), 0118
Pidgin motuano (ho),
0815
Malayo (ms), 1319 Tayiko (tg), 2007
Asamés (as), 0119 Croata (hr), 0818 Maltés (mt), 1320 Tailandés (th), 2008
Ávaro (av), 0122
Criollo haitiano (ht),
0820
Birmano (my), 1325 Tigrinya (ti), 2009
Aymara (ay), 0125 Húngaro (hu), 0821 Nauru (na), 1401 Turcomano (tk), 2011
Azerí (az), 0126 Armenio (hy), 0825 Bokmal (nb), 1402 Tagalo (tl), 2012
Bashkir (ba), 0201 Herero (hz), 0826
Ndebele del norte (nd),
1404
Setsuana (tn), 2014
Bielorruso (be), 0205 Interlingua (ia), 0901 Nepalí (ne), 1405 Tongano (to), 2015
Búlgaro (bg), 0207 Indonesio (id), 0904 Ndonga (ng), 1407 Turco (tr), 2018
Biharí (bh), 0208 Interlingue (ie), 0905 Nynorsk (nn), 1414 Tsonga (ts), 2019
Bislama (bi), 0209 Igbo (ig), 0907 Noruego (no), 1415 Tártaro (tt), 2020
Español
Información adicional
215
Apéndice
Información adicional
Es
<CRD4844-A>215
Black plate (216,1)
Idioma (código), código de entrada
Bambara (bm), 0213 Yi de Sichuan (ii), 0909
Ndebele del sur (nr),
1418
Twi (tw), 2023
Bengalí (bn), 0214 Inupiak (ik), 0911 Navajo (nv), 1422 Tahitiano (ty), 2025
Tibetano (bo), 0215 Ido (io), 0915 Chichewa (ny), 1425 Uigur (ug), 2107
Bretón (br), 0218 Islandés (is), 0919 Occitano (oc), 1503 Ucraniano (uk), 2111
Bosnio (bs), 0219 Inuktitut (iu), 0921 Ojibwa (oj), 1510 Urdu (ur), 2118
Catalán (ca), 0301 Javanés (jv), 1022 Oromo (om), 1513 Uzbeko (uz), 2126
Checheno (ce), 0305 Georgiano (ka), 1101 Oriya (or), 1518 Venda (ve), 2205
Chamorro (ch), 0308 Kongo (kg), 1107 Osetio (os), 1519 Vietnamita (vi), 2209
Corso (co), 0315 Kikuyu (ki), 1109 Punyabí (pa), 1601 Volapük (vo), 2215
Cree (cr), 0318 Kuanyama (kj), 1110 Pali (pi), 1609 Valón (wa), 2301
Checo (cs), 0319 Kazakh (kk), 1111 Polaco (pl), 1612 Wolof (wo), 2315
Eslavo eclesiástico (cu),
0321
Groenlandés (kl), 1112 Pastún (ps), 1619 Xhosa (xh), 2408
Chuvasio (cv), 0322
Jemer central (khm),
1113
Quechua (qu), 1721 Yidis (yi), 2509
Galés (cy), 0325 Kannada (kn), 1114 Romanche (rm), 1813 Yoruba (yo), 2515
Danés (da), 0401 Kanuri (kr), 1118 Kirundi (rn), 1814 Chuan (za), 2601
Divehi (dv), 0422 Cachemir (ks), 1119 Rumano (ro), 1815 Zulú (zu), 2621
Especificaciones
Generales
Fuente de alimentación .... 14,4 V cc (10,8 V a 15,1 V per-
misible)
Sistema de derivación a tierra
................................... Tipo negativo
Consumo máximo de corriente
................................... 10,0 A
Dimensiones (An × Al × Pr):
D
Bastidor ........................... 178mm × 100mm × 165mm
Cara anterior .................... 171mm × 97mm × 18mm
(AVH-X5600BHS/AVH-X4600BT)
Cara anterior .................... 171mm×97mm× 9 mm
(AVH-X3600BHS/AVH-X2600BT/AVH-X1600DVD)
Peso ................................ 2,0kg
(AVH-X5600BHS/AVH-X4600BT)
Peso ................................ 1,7 kg
(AVH-X3600BHS/AVH-X2600BT/AVH-X1600DVD)
Pantalla
Tamaño de la pantalla/relación de aspecto
................................... 6,95 pulgadas de ancho/16:9
(área efectiva de visualización:
156,6 mm × 81,6 mm)
(AVH-X5600BHS/AVH-X4600BT)
Tamaño de la pantalla/relación de aspecto
................................... 6,1pulgadas de ancho/16:9
(área efectiva de visualización:
136,2 mm × 72,0 mm)
(AVH-X3600BHS/AVH-X2600BT/AVH-X1600DVD)
Píxeles ............................. 1 152000 (2 400 × 480)
Método de visualización ... Matriz activa TFT, tipo transmi-
sivo
Sistema de color .............. Compatible con NTSC/PAL/
PAL-M/PAL-N/SECAM
Gama de temperatura de resistencia (apagado)
................................... –4 °F a +176 °F
Audio
Potencia de salida máxima
................................... 50 W × 4
70 W × 1/2 W (para altavoz de
subgraves)
Potencia de salida continua
................................... 22W × 4 (50Hz a 15000 Hz,
5 %THD, 4 W de carga, ambos
canales activados)
Impedancia de carga ....... 4 W (4 W a8W (2 W para
1 canal) permisible)
Nivel de salida máxima del preamplificador
................................... 4,0V
(AVH-X5600BHS/AVH-X4600BT)
Nivel de salida máxima del preamplificador
................................... 2,0V
(AVH-X3600BHS/AVH-X2600BT/AVH-X1600DVD)
Ecualizador (Ecualizador gráfico de 8 bandas):
Frecuencia ....................... 40 Hz/80 Hz/200Hz/400 Hz/
1 kHz/2.5 kHz/8 kHz/10 kHz
Ganancia ......................... ±12 dB
HPF:
Frecuencia ....................... 50 Hz/63 Hz/80Hz/100 Hz/
125 Hz
Pendiente ........................ –12 dB/oct
Altavoz de subgraves (mono):
Frecuencia ....................... 50 Hz/63 Hz/80Hz/100 Hz/
125 Hz
Pendiente ........................ –18 dB/oct
Ganancia ......................... +6dB a –24 dB
Fase ................................. Normal/Inversa
Intensificación de graves:
Ganancia ......................... +12 dB a 0 dB
Reproductor de DVD
Sistema ........................... Reproductor de DVD vídeo,
Vídeo CD, CD, WMA, MP3,
AAC, DivX y MPEG
Discos utilizables ............. DVD vídeo, Víd eo CD, CD, CD-
R/RW, DVD-R/RW/R DL
Número de región ............ 1
Respuesta de frecuencia
................................... 5 Hz a 44000 Hz (con DVD, a
una frecuencia de muestreo
de 96 kHz)
Relación de señal a ruido
................................... 96dB (1kHz) (red IHF-A) (nivel
RCA)
(AVH-X5600BHS/AVH-X4600BT)
Relación de señal a ruido
................................... 91 dB (1 kHz) (red IHF-A)
(nivel RCA)
(AVH-X3600BHS/AVH-X2600BT/AVH-X1600DVD)
Nivel de salida:
Vídeo ............................... 1,0 Vp-p/75 W (±0,2 V)
Número de canales .......... 2 (estéreo)
Formato de decodificación MP3
................................... MPEG-1 & 2 Audio Layer 3
Formato de decodificación WMA
................................... Ver. 7, 7.1, 8, 9, 10, 11, 12
(audio 2 canales)
(Windows Media Player)
Información adicional
216
Apéndice
Información adicional
Es
<CRD4844-A>216
Black plate (217,1)
Formato de decodificación AAC
................................... MPEG-4 AAC (sólo codificado
con iTunes) (.m4a)
(Ver. 10.6 y anteriores)
Formato de decodificación DivX
................................... Home Theater Ver. 3, 4, 5.2, 6
(excepto ultra y HD) (.avi,
.divx)
Formato de decodificación de vídeo MPEG
................................... MPEG1, MPEG2, MPEG4
(parte 2), MS-MPEG4 (ver. 3)
USB
Especificación de la norma USB
................................... USB 1.1, USB 2.0 velocidad
máxima (para archivos de
vídeo)
USB 2.0 velocidad alta (para
archivos de audio)
Consumo máximo de corriente
................................... 1,0A
USB Class ....................... dispositivo MSC (Mass Stora-
ge Class), dispositivo MTP
(Media Transfer Protocol)
Sistema de archivos ......... FAT16, FAT32
Formato de decodificación MP3
................................... MPEG-1 & 2 Audio Layer 3
Formato de decodificación WMA
................................... Ver. 7, 7.1, 8, 9, 10, 11, 12
(audio 2 canales)
(Windows Media Player)
Formato de decodificación AAC
................................... MPEG-4 AAC (sólo codificado
con iTunes)
(Ver. 10.6 y anteriores)
WAV (solo modo MSC):
Formato de señal WAV ..... PCM lineal, MS ADPCM
(.wav)
Frecuencia de muestreo ... PCM lineal: 16 kHz, 22,05 kHz,
24 kHz, 32 kHz, 44,1 kHz,
48 kHz
MS ADPCM: 22,05 kHz,
44,1 kHz
JPEG (solo modo MSC):
Formato de decodificación JPEG
................................... .jpeg, .jpg, .jpe
Muestreo de píxeles ......... 4:2:2, 4:2:0
Tamaño de decodificación
................................... MAX:8192(Al) x 7 680(An),
MIN:32(Al) x 32(An)
Formato de decodificación DivX (solo modo MSC)
................................... Home Theater Ver. 3, 4, 5.2, 6
(excepto ultra y HD) (.avi,
.divx)
Formato de decodificación de vídeo MPEG (solo modo
MSC) ............................... MPEG1, MPEG2, MPEG4
(parte 2), MS-MPEG4 (ver. 3)
Sintonizador de FM
Intervalo de frecuencias ... de 87,9 MHz a 107,9 MHz
Sensibilidad utilizable ...... 9 dBf (0,8 µV/75 W, mono,
señal/ruido: 30 dB)
Relación de señal a ruido
................................... 80 dB (emisión digital) (red
IHF-A)
(AVH-X5600BHS/AVH-X3600BHS)
Relación de señal a ruido
................................... 72 dB (emisión analógica)
(red IHF-A)
Sintonizador de AM
Gama de frecuencias ....... 530 kHz a 1 710 kHz (10 kHz)
Sensibilidad utilizable ...... 25 µV (señal/ruido: 20dB)
Relación de señal a ruido
................................... 80 dB (emisión digital) (red
IHF-A)
(AVH-X5600BHS/AVH-X3600BHS)
Relación de señal a ruido
................................... 62 dB (emisión analógica)
(red IHF-A)
Bluetooth
(AVH-X5600BHS/AVH-X4600BT/AVH-X3600BHS/AVH-
X2600BT)
Versión ............................ Certificada para Bluetooth 3.0
Potencia de salida ............ Máxima +4 dBm
(Clase de potencia 2)
Especificaciones CEA2006
Potencia de salida ............ 14 W RMS × 4 canales (4 W y
≦ 1 % THD+N)
Relación de señal a ruido
................................... 91dBA (referencia: 1 W a 4 W)
Nota
Las especificaciones y el diseño están sujetos a
modificaciones sin previo aviso.
Español
Información adicional
217
Apéndice
Es
<CRD4844-A>217

Black plate (218,1)
218 Es
<CRD4844-A>218

Black plate (219,1)
Español
219Es
<CRD4844-A>219
Black plate (220,1)
PIONEER CORPORATION
1-1, Shin-ogura, Saiwai-ku, Kawasaki-shi,
Kanagawa 212-0031, JAPAN
PIONEER ELECTRONICS (USA) INC.
P.O. Box 1540, Long Beach, California 90801-1540, U.S.A.
TEL: (800) 421-1404
PIONEER EUROPE NV
Haven 1087, Keetberglaan 1, B-9120 Melsele, Belgium/Belgique
TEL: (0) 3/570.05.11
PIONEER ELECTRONICS ASIACENTRE PTE. LTD.
253 Alexandra Road, #04-01, Singapore 159936
TEL: 65-6472-7555
PIONEER ELECTRONICS AUSTRALIA PTY. LTD.
5 Arco Lane, Heatherton, Victoria, 3202 Australia
TEL: (03) 9586-6300
PIONEER ELECTRONICS OF CANADA, INC.
340 Ferrier Street, Unit 2, Markham, Ontario L3R 2Z5, Canada
TEL: 1-877-283-5901
TEL: 905-479-4411
PIONEER ELECTRONICS DE MEXICO, S.A. de C.V.
Blvd.Manuel Avila Camacho 138 10 piso
Col.Lomas de Chapultepec, Mexico, D.F. 11000
TEL: 55-9178-4270
先鋒股份有限公司
台北市內湖區瑞光路407號8樓
電話: 886-(0)2-2657-3588
先鋒電子(香港)有限公司
香港九龍長沙灣道909號5樓
電話: 852-2848-6488
ã 2013-2014 PIONEER CORPORATION. All rights reserved.
ã 2013-2014 PIONEER CORPORATION. Tous droits de reproduction et de traduction réservés.
<CRD4844-A> UC
Visit our website / Visitez notre site Web / Visite nuestro sitio Web
1 Register your product. We will keep the details of your purchase on file to
help you refer to this information in the event of an insurance claim such
as loss or theft.
2 Receive updates on the latest products and technologies.
3 Download owner’s manuals, order product catalogues, research new
products, and much more.
4 Your feedback is important in our continual effort to design and build the
most advanced, consumer-focused product in the industry.
1 Enregistrez votre produit. Nous conserverons les détails de votre achat
dans nos fichiers pour vous aider à faire référence à ces informations
pour une déclaration d’assurance en cas de perte ou de vol.
2 Recevez les mises à jour sur les derniers produits et les technologies les
plus récentes.
3 Téléchargez les modes d’emploi, commandez les catalogues des
produits, recherchez de nouveaux produits, et bien plus.
4 Vos retours d’informations sont importants pour garantir nos efforts
continus en matière de conception et de fabrication optimales de
produits répondant aux attentes des clients.
1 Registre su producto. Los datos de su compra permanecerán archivados
para que pueda consultar esta información en caso de reclamar a la
compañía de seguros por pérdida o robo.
2 Reciba informes actualizados sobre los últimos productos y tecnologías.
3 Descargue manuales de instrucciones, solicite catálogos de productos,
busque nuevos productos y disfrute de muchos beneficios más.
4 Su opinión es importante en nuestro continuo esfuerzo a la hora de
diseñar y construir los productos más avanzados y más orientados al
consumidor de la industria.
<KOKZ14F>
<CRD4844-A>220