Loading ...
Loading ...
Loading ...
4
GETTING TO KNOW YOUR SHARPENER
Before using your sharpener you may wish to become familiar with its features. Do not plug the
sharpener cord into the an outlet. (Refer to Figures 1 and 2).
1. Place the heel area of a knife blade in one of the sharpening slots of Stage 2 or 3 (Figure
3). Loosen your grip. You will notice that the knife will be pulled to the side of the slot and
down into the slot by a magnet. Feel the pull of the magnet.
2. Now, while holding the knife with a secure yet relatively loose grip as shown in Figure 4,
pull the knife towards you while allowing the knife blade to be pulled against the magnet.
Let the magnet establish the blade angle. Except when sharpening the tip, keep the knife
blade level with the table. Grip as shown in Figure 4. You now have a feel for how the
magnets operate and are ready to proceed to the following instructions.
Place the Chef’sChoice
®
on a stable surface. Plug the sharpener cord into an appropriate electri-
cal outlet. (Voltage rating is indicated on label.) Press the switch to “ON.”
TO SHARPEN A KNIFE FOR THE FIRST TIME
Stage 1: Hold knife with the illustrated grip below (Figure 4). Place the heel area of the knife
blade in the left PRE-SHARPENING slot, Stage 1. Let the knife rest against the magnet on the
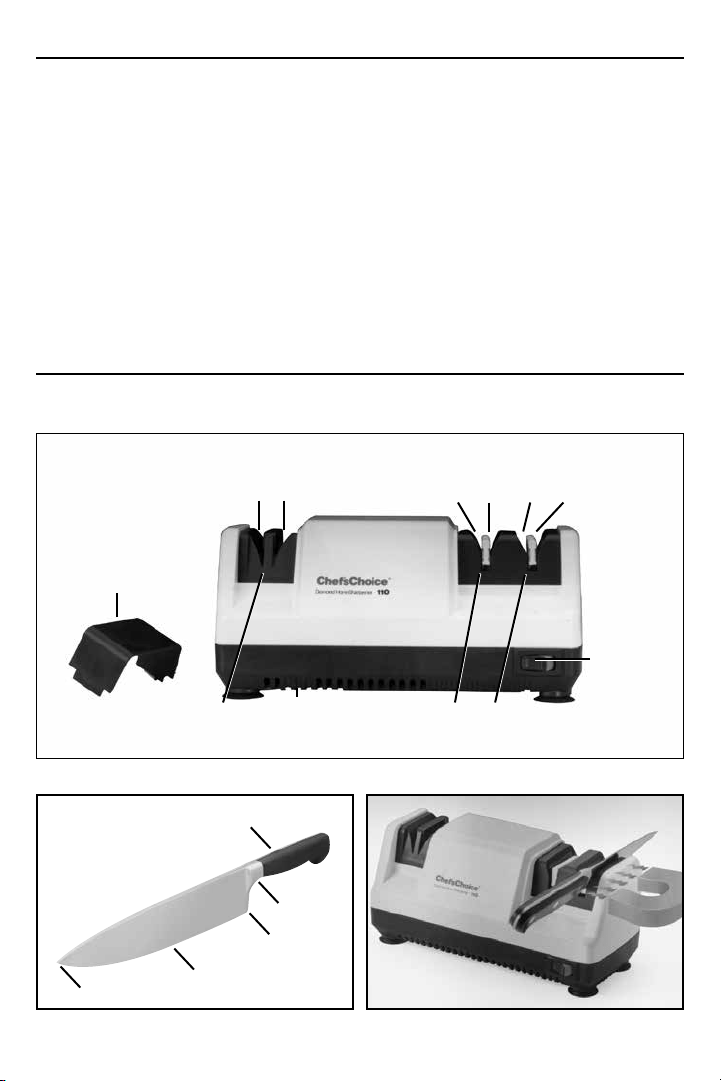
Figure 3. Magnets control the blade angle.Figure 2. Typical kitchen knife.
Heel
Bolster
Handle
Edge
Tip
Figure 1. Chef’sChoice
®
Professional Model 110.
Stage 1 Pre-sharpening
(Diamond disk)
Pre-sharpening slots
Left
Left Left
Right
Right Right
Sharpening slots Honing slots
On/Off
Switch
Stage 2 Sharpening
(Orbiting Diamonds
®
)
Clean out
plug
Cover for
pre-sharpening
slots
Stage 3 Honing
(Orbiting Diamonds
®
)
Loading ...
Loading ...
Loading ...