Remove the heater from the packaging. Check that neither the heater nor the power cable has been damaged during transport. Do not operate the heater if damaged. Remove all publicity material present on the appliance. Your heater is suitable for either freestanding or wall mounting usage. Do not assemble the feet if wall mounting.
Electrical connection
Before plugging in the appliance, check that your supply voltage is the same as that shown on the rating plate of the appliance and that the power supply is able to with stand the power consumption (Watts) shown on the rating plate.
If using more than one appliance at a time, it is important to ensure that the power supply is able to with stand the power requirements.
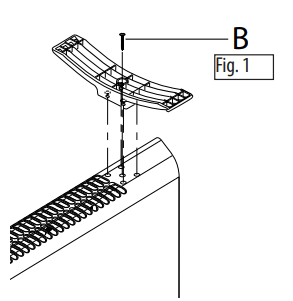
Mounting the feet
Turn the appliance upside down on a rug or soft surface in order to prevent damaging the paint finish. Fix the feet to the appliance with the screws B supplied
Wall-Mounting Installation
The wall mounting kit contains:
4 metal brackets (A)
2 screws 4,8x13 PH (B)
4 screws 4,5x25 PH (C)
4 plastic anchors 6x30 (D)
Required tools for assembly and estimated assembly time
Screwdriver PH 2 x 100 (Phillips type)
Estimated assembly time: 30 minutes
Before installing the unit , make sure of the following:
The heater is not located directly below a power outlet.
The power outlet can be easily reached by the plug and after installation.
No electric cables or other pipes could be damaged during the installation.
Keep away from curtains or flammable materials.
To wall-mount, proceed as follows:
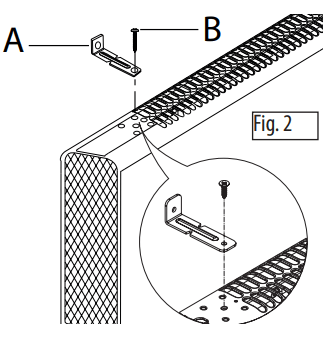
Turn the appliance upside down on a flat stable surface . Using a screwdriver, fix the 2 brackets A with the 2 screws B
For brick walls use a 6 mm concrete drill bit . For plaster board or false (hollow) walls, it is recommended to use appropriate screws and anchors (not supplied).
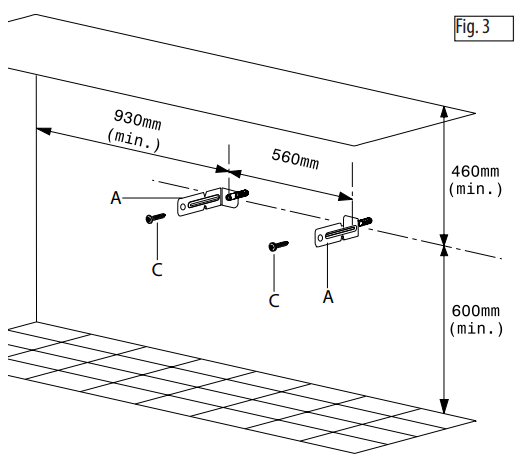
1. Before drilling the wall, mark the exact points, respecting the minimum distances
2. Drill the wall where previously marked, and insert the plastic anchors D.
3. Fix the 2 metal brackets A using the two screws C provided.
4. Hang the appliance on the bracket.
5. Mark out the 2 lower fixing points. Remove the appliance, drill the lower holes and insert the wall anchors D.
6. Now, you can hang back the heater on the bracket and fix the lower part of the appliance with the 2 remaining screws C.
USE
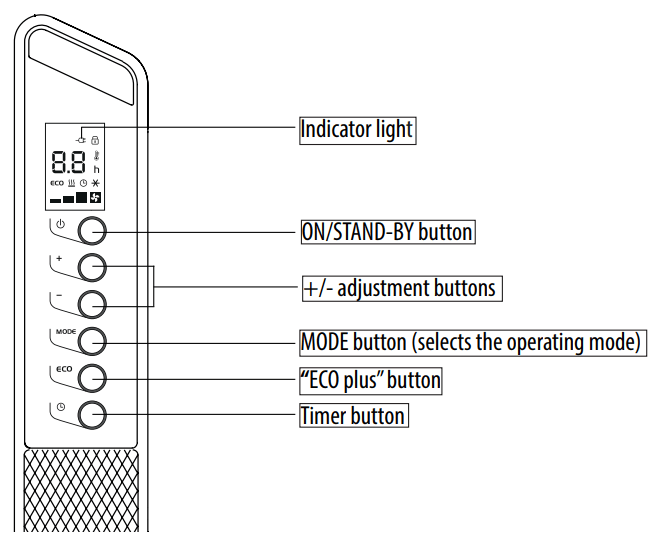
Operation and use
1. Plug into the mains socket.
2. The appliance emits a beep. The indicator light comes on and remains lit while the appliance is powered.
3. The appliance switches to stand-by. A dot flashing on the display means the tip over device has been activated.
4. Press the ON/STAND-BY to turn the appliance on. It begins heating the room according to the current settings.
5. Press the MODE button to select one of the following operating modes:
Freeze prevention
Heating 1
Heating 2
Heating 3
Heating 3 + Fan
5.1. Freeze prevention
In this mode, the appliance keeps the room at a temperature of 7°C to avoid freezing.
5.2. Heating 1, 2, 3 and Heating 3 + Fan
In this mode, the desired temperature can be selected by pressing the adjustment buttons + and –. By pushing the + or - button once, the temperature (shown on the display) will increase or decrease by 1°C.
Heating 1
The appliance operates at low power.
Heating 2
The appliance operates at medium power.
Heating 3
The appliance operates at high power.
Heating 3 + Fan
The appliance operates at the maximum power with the fan.
The setting temperature range available is from 16°C to 32°C.
6. “ECO plus” function
The “ECO plus” function is available in Heating 1, 2 3 and 3 + fan modes only.
To activate the function, press the “ECO plus” button. When this function is active the appliance automatically sets the most appropriate power level to guarantee optimum comfort while reducing energy consumption. While the “ECO plus” function is active, the appliance may switch automatically to a lower heating power than the one displayed.
Working indicator
The symbol indicates the heating status by means of its colors.
RED: the unit is heating at the maximum power.
YELLOW: the unit is heating at the medium power.
GREEN: the unit is heating at the minimum power.
absent: the unit is not heating.
Brightness of the display
The appliance allows two different brightness settings for the display. The highest is active when any key button is pressed. After a few seconds of keyboard inactivity, the brightness will decrease to the operating brightness level.
Key lock
In order to avoid accidental operation, you can lock the keyboard using the keylock function.
To activate this function press buttons + and - together for at least 3 seconds. The display shows the symbol and a double acoustic signal will be emitted. To deactivate the function proceed in the same way.
Timer function
This function can be activated in two different ways.
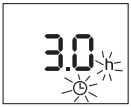
Delayed start: With the appliance on-standby, press the timer button (F) .
The symbol is displayed flashing together with the hours left before the appliance comes on.
Change the hours using the + and - buttons, then wait a few seconds for the program to be stored.
The display will return to off and the symbols remains on. When the programmed time has elapsed, the appliance will come on with the previous settings.
Delayed stop: with the appliance on, press the timer button . The symbol is displayed flashing together with the hours left before the appliance goes on-standby. Change the hours using the + and - buttons, then wait a few seconds for the program to be stored.
The current settings and symbol are displayed.
At the end of the set time the appliance switches on-standby automatically. To go back to operating without the timer, press the timer button twice.
The timer symbol disappears from the display.
Note: the time is settable from 0.5 to 24 hours.
Changing of the temperature scale
The display can show the temperature in both °F (Fahrenheit) and °C (Celsius). To select the desired temperature scale, when the unit is in standby position, press and hold the "+" key for at least 10 seconds, then release.
The change of scale will be indicated by two short beeps.
MAINTENANCE
Before carrying out any maintenance, unplug the heater from the mains and wait for it to cool off completely. This heater requires no particular maintenance. It is sufficient to remove the dust with a soft, dry cloth. Never use abrasive powders or solvents. If necessary remove concentrated areas of dirt with a vacuum cleaner.
TROUBLESHOOTING
PROBLEM
CAUSE
SOLUTION
The appliance doesn't work
Be sure it is plugged in and that the electrical outlet is working
Plug into the power outlet
The temperature may be set too low
Set the temperature to a higher position
The Key lock may be activated
See the section "Key lock"
The appliance doesn't work (the display could blink and you cuold hear an intermittent "beep")
The air intake or outlet grille is obstructed
Remove the obstruction remove the plug from the mains and let the appliance cool down. After few minutes plug the appliance again. If the appliance doesn't work please contact a Customer Experience
The display shows a blinking dot and you hear an intermittend "beep"
The appliance could be tipped over or is positioned in an improper way
Make sure the appliance is standing upright on a flat surface. Position the appliance correctly
The display shows ""
The temperature sensor is malfunctioning
Contact the nearest customer service
The display shows "" blincking (the heating power will progressively and automatically be reduced)
The internal temperature is too high
To remove the cause of this alarm check that the unit is not covered or obstructed


 indicates the heating status by means of its colors.
  and a double acoustic signal will be emitted. To deactivate the function proceed in the same way.
  .
. 
 "
" " blincking (the heating power will progressively and automatically be reduced)