
De’Longhi Appliances via Seitz, 47 31100 Treviso Italy www.delonghi.com
5713248141_01_0620
ECAM35075
FULLY AUTOMATIC
ESPRESSO AND COFFEE
MACHINE
Instructions for use. Keep these instructions
Visit www.delonghi.com for a list of service
centers near you.
ELECTRIC CHARACTERISTICS
120 V~ 60 Hz 1250 W
MACHINE À CAFÉ
Mode d’emploi . Conservez cette notice
Visitez www.delonghi.com pour y voir une liste
des centres de réparation proches de chez vous.
CARACTÉRISTIQUES ÉLECTRIQUES
120 V~ 60 HZ 1250 W
CAFETERA
Repase y guarde estas instrucciones.
Lea cuidadosamente este instructivo antes de
usar su aparato.
Visite www.delonghi.com para ver la lista de
centros de servicios cercanos a usted.
CARACTERISTICAS ELECTRICAS:
120 V~ 60 HZ 1250 W
2
A
A2
A1
A5
A4
A3
A6
A7
A22
B
A8
A9
A12
A17
A18
A11
A10
A14
A15
A13
A16
A20
A19
A21

3
EN
FR
ES
page 6 page 25 Pàg. 47
B
C
B1
B2
B3
B4
B6
B7
B10
B9
B13
B5
B8
B11
B14
B15B12
C2
C1
C3
D
C5
C6
D1
D2
D3
D4
D5
C4

4
CONTENTS
1. SAFETY WARNINGS ....................................6
1.1 Symbols used in these instructions ...............6
1.2 Designated use ..............................................6
1.3 User manual ..................................................6
2. INTRODUCTION ..........................................6
2.1 Letters in brackets .........................................6
2.2 Troubleshooting and repairs ..........................6
3. DESCRIPTION.............................................6
3.1 Description of the appliance .........................6
3.2 Description of the touch screen .....................7
3.3 Description of the accessories ........................7
3.4 Description of the milk container ..................7
4. BEFORE USE...............................................7
4.1 Checking the appliance .................................7
4.2 Installing the appliance .................................7
4.3 Connecting the appliance ..............................7
4.4 Setting up the appliance ...............................7
5. TURNING THE MACHINE ON ........................8
6. TURNING THE APPLIANCE OFF ....................8
7. MENU SETTINGS ........................................9
7.1 Language ......................................................9
7.2 Maintenance .................................................9
7.3 Program beverages .......................................9
7.4 Program My beverages..................................9
7.5 General .........................................................9
7.6 Statistics ......................................................10
8. RINSING ..................................................10
9. MAKING COFFEE .......................................11
9.1 Adjusting the coee grinder ........................11
9.2 Tips for a hotter coee.................................11
9.3 Making automatic recipes using coee beans .
..................................................................11
9.4 Temporarily varying the coee aroma .........12
9.5 Making coee using pre-ground coee .......12
10. TRUEBREW OVER ICE™ COFFEE .................. 13
11. MAKING MILK-BASED RECIPES .................13
11.1 Filling and attaching the milk container ......13
11.2 Adjusting the amount of froth .....................14
11.3 Making cappuccino and milk-based coees
automatically ..............................................14
11.4 Cleaning the milk container after use .........14
12. “ ” PROGRAMMING AND SELECTING ..
............................................................... 15
13. DELIVERING HOT WATER ..........................15
14. CLEANING................................................15
14.1 Cleaning the machine .................................15
14.2 Cleaning the machine's internal circuit .......15
14.3 Cleaning the coee grounds container ........16
14.4 Cleaning the drip tray and condensate tray .16
14.5 Cleaning the inside of the coee machine ...16
14.6 Cleaning the water tank ..............................16
14.7 Cleaning the coee spouts ..........................17
14.8 Cleaning the pre-ground coee funnel .......17
14.9 Cleaning the infuser ....................................17
14.10 Cleaning the milk container ........................17
14.11 Cleaning the hot water nozzle .....................18
15. DESCALING .............................................. 18
16. SETTING WATER HARDNESS ...................... 19
16.1 Measuring water hardness ..........................19
16.2 Setting water hardness ...............................19
17. WATER SOFTENER FILTER .........................19
17.1 Installing the lter ......................................19
17.2 Replacing the lter ......................................20
17.3 Removing the lter .....................................20
18. DISPLAYED MESSAGES ..............................21
19. TROUBLESHOOTING ................................. 23

5
IMPORTANT SAFEGUARDS
When using electrical appliances, basic safety precautions should always be followed, including the following.
• Read all instructions carefully.
• Make sure the voltage of your electrical system corresponds to the voltage shown on the bottom of the
machine.
• Do not touch hot surfaces. Use handles or knobs.
• To protect against re, electrical shock and personal injury, do not immerse cord, plug or appliance in
water or other liquid.
• Keep the appliance out of the reach of children and do not leave appliance unattended while in operation.
• Unplug from the outlet when not in use and before cleaning.
• Do not operate with a damaged cord or plug, or after the appliance malfunctions, or has been damaged
in any manner. Return the appliance to the nearest authorized service facility for examination, repair or
adjustment.
• The use of accessory attachments not recommended by the manufacturer may result in re, electrical
shock, or personal injury.
• Do not use outdoors.
• Make sure the power cord does not hang over the edge of the table or counter-top to avoid getting acci-
dentally caught or entangled.
•
Do not place the appliance or its electrical parts on or near electric stoves, cooking surfaces, or gas burners.
• Plug cord into the wall outlet. To disconnect, rst turn machine “o”, then remove plug from wall outlet.
• Do not use the appliance for other than the intended use. This appliance is to be utilized for domestic
use only. The manufacturer declines all responsibility for any damage caused by improper, incorrect, or
irresponsible use.
WARNING: To reduce the risk of re or electric shock, do not remove the cover or the exterior of
the unit. Don’t attempt to repair or modify the machine, doing so will void the warranty. Repair
should be done by authorized service personnel only!
SAVE THESE INSTRUCTIONS
THIS APPLIANCE IS FOR HOUSEHOLD USE ONLY
SHORT CORD INSTRUCTIONS
- A short power cord is provided to reduce risks resulting from becoming entangled in or tripping over a
longer cord.
- Longer, detachable power supply cords or extension cords are available and may be used if care is exer-
cised in their use.
- If an extension cord is used, the marked electrical rating should be at least as great as the electrical rating
of the appliance. If the appliance is provided with 3- wire, grounding type cord, the extension should be
a GROUNDING TYPE 3 - WIRE CORD. The longer cord should be arranged so that it will not drape over the
counter-top or table top where it can be pulled on by children or tripped over.
- Your product is equipped with a polarized alternating current line plug (a plug having one blade wider
than the other). This plug will t into the power outlet only one way. This is a safety feature. If you are un-
able to insert the plug fully into the outlet, try reversing the plug. If the plug should still fail to t, contact
your electrician to replace your obsolete outlet. Do not defeat the safety purpose of the polarized plug.
6
1. SAFETY WARNINGS
1.1 Symbols used in these instructions
Important warnings are identied by these symbols. It is vital to
respect these warnings.
Danger!
Failure to observe the warning may result in life threatening
injury by electric shock.
Important!
Failure to observe the warning could result in injury or damage
to the appliance.
Danger of burns!
Failure to observe the warning could result in scalds or burns.
Please note:
This symbol identies important advice or information for the
user.
Danger!
This is an electrical appliance and may cause electric shock.
You should therefore follow these safety warnings:
• Never touch the appliance with damp hands or feet.
• Never touch the plug with damp hands.
• Make sure the socket used is freely accessible at all times,
enabling the appliance to be unplugged when necessary.
• Unplug directly from the plug only. Never pull the cord as
you could damage it.
• To disconnect the appliance completely you must unplug it
from the mains socket.
• If the appliance is faulty, do not attempt to repair.
Turn it o, unplug from the mains socket and contact Cus-
tomer Services.
• Before cleaning the appliance, turn it o, unplug from the
mains socket and allow to cool.
Important:
Keep all packaging (plastic bags, polystyrene foam) away from
children.
Danger of burns!
This appliance produces hot water and steam may form while
it is in operation.
Avoid contact with splashes of water or hot steam.
When the appliance is in operation, the cup shelf could become
very hot.
1.2 Designated use
This appliance is designed and made to prepare coee and heat
beverages.
Any other use is considered improper and thus dangerous. The
manufacturer is not liable for damage deriving from improper
use of the appliance.
1.3 User manual
Read this Instruction for Use carefully before using the appli-
ance. Failure to follow this Instruction for Use may result in
burns or damage to the appliance.
The manufacturer is not liable for damage deriving from failure
to respect this Instruction for Use.
Please note:
Keep this Instruction for Use.
2. INTRODUCTION
Thank you for choosing this fully automatic espresso machine.
We hope you enjoy using your new appliance. Take a few min-
utes to read this Instruction for Use. This will avoid all risks and
damage to the appliance.
2.1 Letters in brackets
The letters in brackets refer to the legend in the description of
the appliance on pages 2-3.
2.2 Troubleshooting and repairs
In the event of problems, rst try and resolve them by reading
the information given in sections “18. Displayed messages” and
“19. Troubleshooting”.
If this does not resolve the problem or you require further in-
formation, you should consult Customer Services by calling the
number given on the warranty card.
3. DESCRIPTION
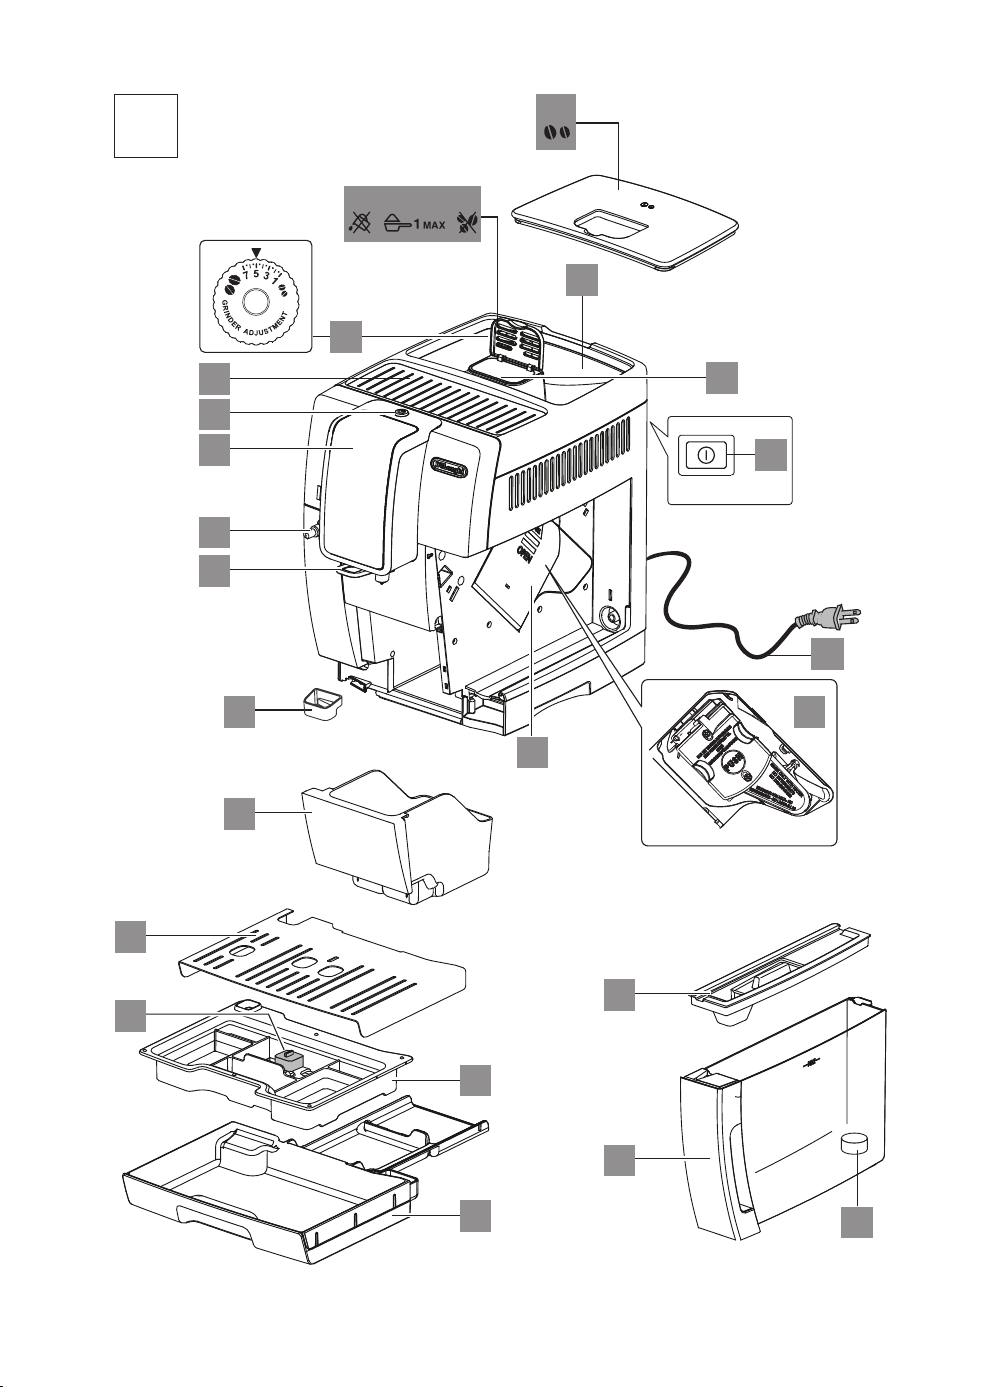
3.1 Description of the appliance
(page 2 - A)
A1. Beans container lid
A2. Pre-ground coee funnel lid
A3. Beans container
A4. Pre-ground coee funnel
A5. Grinding adjustment dial
A6. Cup shelf
A7. button: to turn the appliance on and o (standby)
A8. Hot water and steam connection nozzle
A9. Coee spouts (adjustable height)
A10. Condensate tray
A11. Coee grounds container
A12. Cup tray
A13. Drip tray water level indicator
A14. Drip tray grille
A15. Drip tray
A16. Water tank lid
A17. Water tank
A18. Water softener lter housing
7
A19. Infuser door
A20. Infuser
A21. Power cord
A22. Main switch
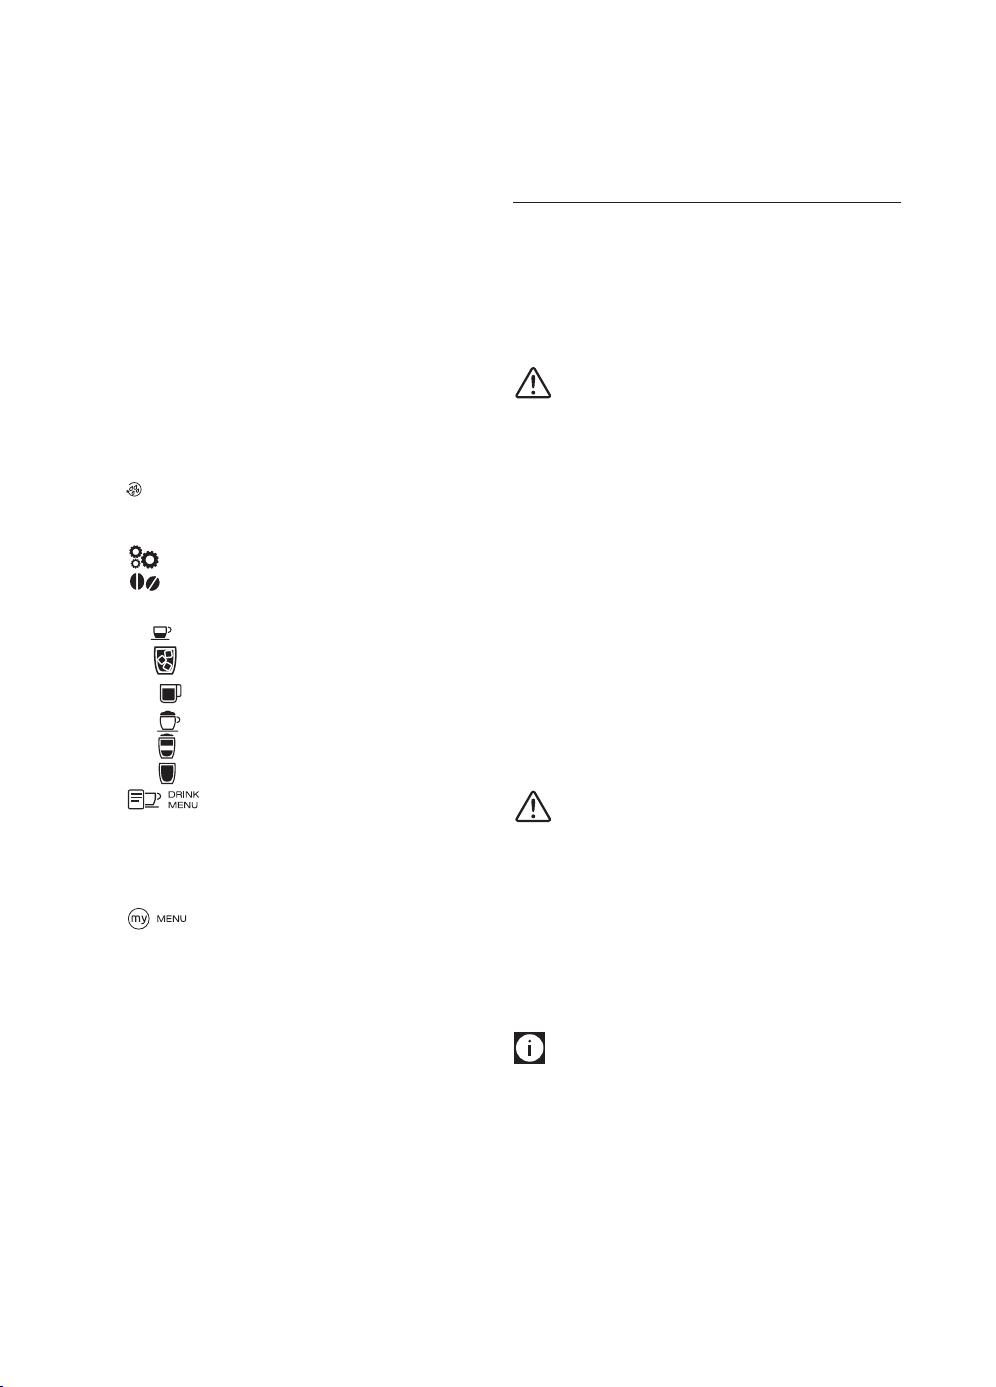
3.2 Description of the touch screen
(page 3 - B )
A number of buttons on the panel have a dual function. This is
indicated in brackets in the description.
B1. Display: guides the user in using the appliance. The current
selection is at the center between two dotted lines.
B2. ▼ Selection arrow(“ESC”: when programming beverages,
press to exit without saving the change)
B3. OK: to conrm the selection(During the rst few seconds of
"espresso", "ristretto" or "Lungo" delivery, press for 2 cups)
B4. ▲ Selection arrow(“STOP” - When delivering/program-
ming beverages, press to interrupt/programme)
B5. /ESC: to perform a rinse cycle.
(When in the settings menu, it acts as the "ESC" button to exit
from the selected function and go back to the main menu)
B6. : appliance settings menu
B7. : aroma selection
Directly selected beverages:
B8.
: Espresso
B9. : TrueBrew Over Ice
(TM)
Coee
B10.
: Long
B11. : Cappuccino
B12. : Latte
B13. : Hot Milk
B14. : Select additional beverages available from
the Drink Menu: Lungo, Ristretto, Double Espresso+, Cap-
puccino+, Cappuccino Mix, Latte Macchiato, Flat White,
Espresso Macchiato, 2 Espresso, 2 Ristretto, 2 Lungo, Hot
Water
B15. : Customize and select recipes from the My
Menu. Beverages on the My Menu are automatically set to
default settings, until customized.
3.3 Description of the accessories
(page 3 - C )
C1. Water hardness indicator paper
C2. Pre-ground coee measure
C3. Descaler
C4. Water softener lter (certain models only)
C5. Cleaning brush
C6. Hot water spout
3.4 Description of the milk container
(page 3 - D )
D1. Froth adjustment and CLEAN dial
D2. Milk container lid
D3. Milk container
D4. Milk intake tube
D5. Frothed milk spout (adjustable)
4. BEFORE USE
4.1 Checking the appliance
After removing the packaging, make sure the product is com-
plete and undamaged and that all accessories (C) are pres-
ent. Do not use the appliance if it is visibly damaged. Contact
De’Longhi Customer Services.
4.2 Installing the appliance
Important!
When you install the appliance, you should respect the follow-
ing safety warnings:
• The machine gives o heat. After positioning the machine
on the worktop, leave a space of at least 1.18 in / 3 cm be-
tween the surfaces of the machine and the side and rear
walls and at least 5.6 in / 15 cm above the coee maker.
• Water penetrating the machine could cause damage.
Do not place the appliance near taps or sinks.
• The appliance could be damaged if the water it contains
freezes.
Do not install the appliance in a room where the tempera-
ture could drop below freezing point.
• Arrange the cord (C7) in such a way that it cannot be dam-
aged by sharp edges or come with contact with hot surfac-
es (e.g. electric hot plates).
4.3 Connecting the appliance
Important!
Check that the mains power supply voltage corresponds to that
indicated on the rating plate on the bottom of the appliance.
Connect the appliance to an eciently earthed and correctly
installed socket with a minimum current rating of 10A only.
If the power socket does not match the plug on the appliance,
have the socket replaced with a suitable type by a qualied
professional.
4.4 Setting up the appliance
Please note:
• Coee has been used to factory test the appliance and it is
therefore completely normal for there to be traces of coee
in the grinder. The machine is, however, guaranteed to be
new.
• You should customise water hardness as soon as possible
following the instructions in section “16.2 Setting water
hardness”.
8
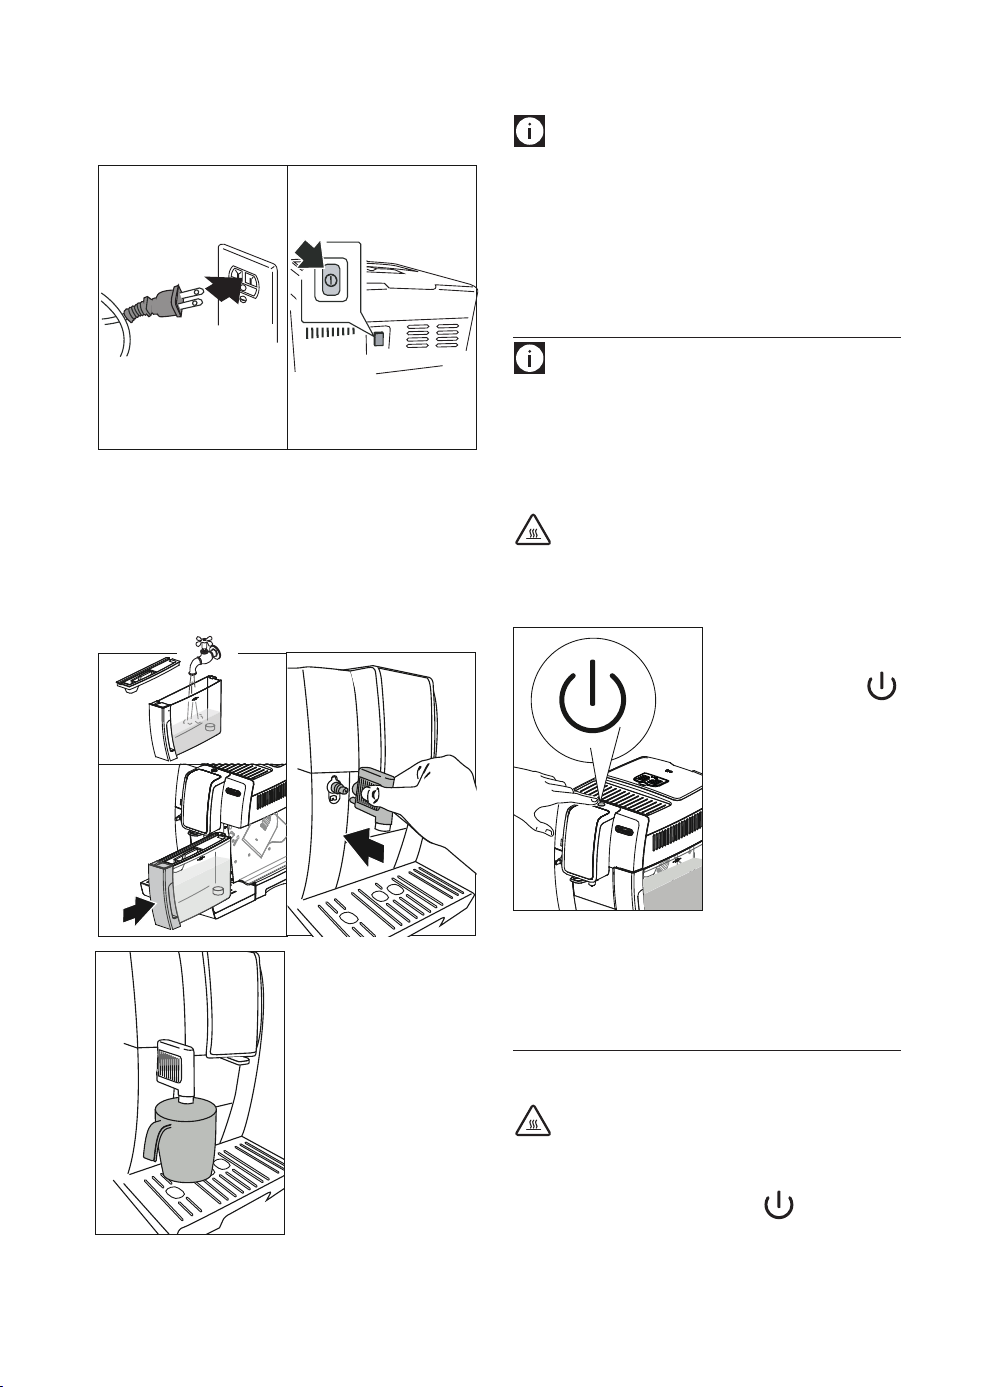
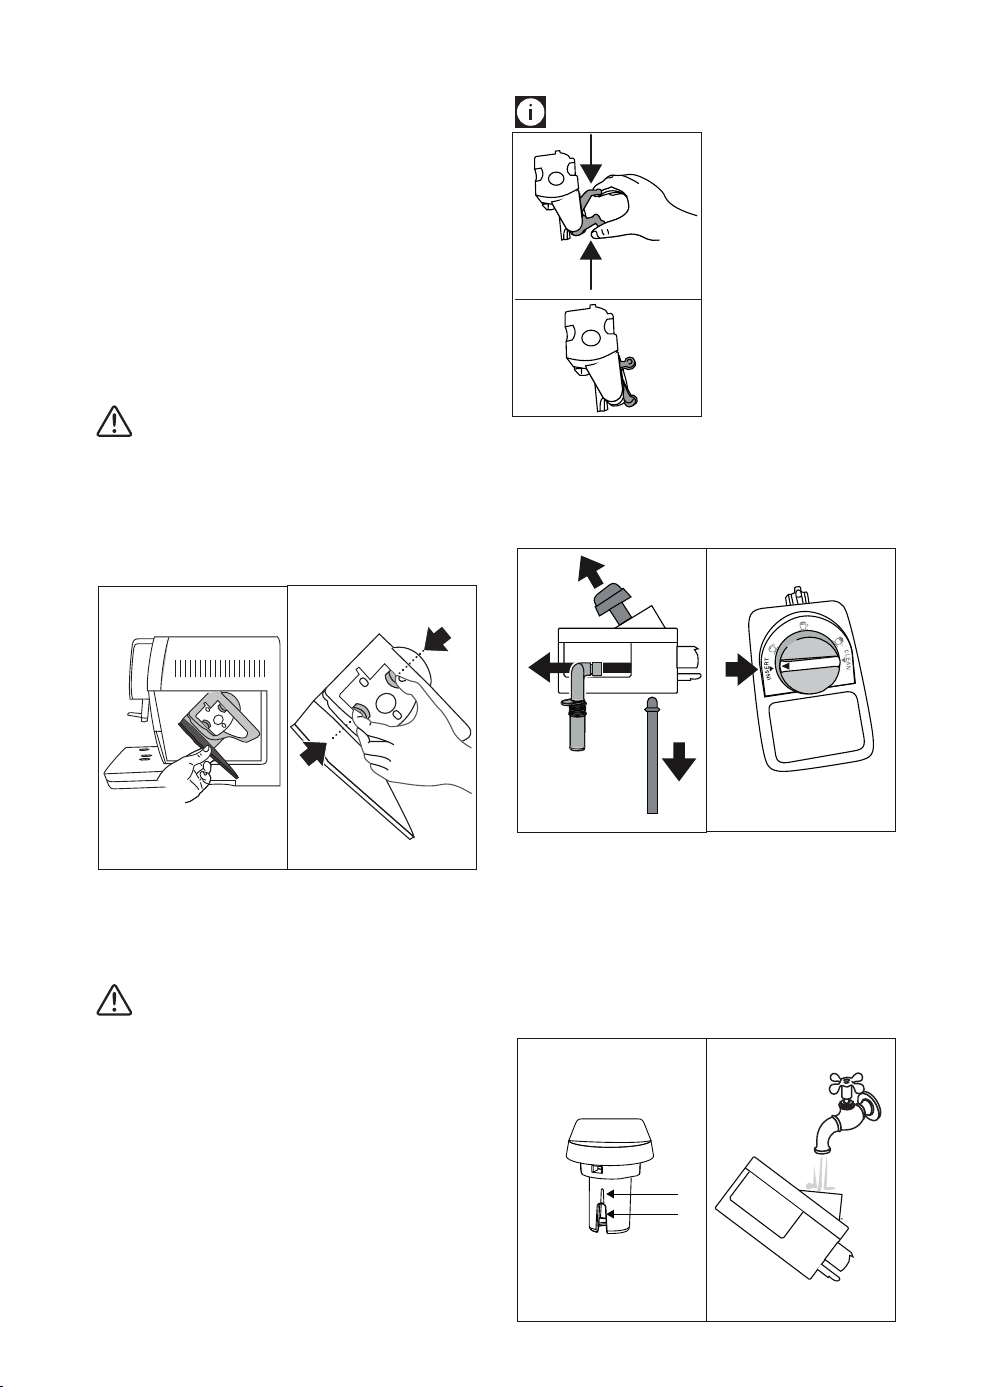
1. Plug the machine into the mains socket and press the main
switch
(g. 1). Make sure the main switch (A22) at the back
of the appliance is pressed (g. 2);
21
The following messages will show on the display
(B1)
:
2. "Language": press the selection arrow (B2) until the re-
quired language is displayed between the two dotted
lines, then press OK (B3) to conrm.
3. “Fill tank”: remove the water tank (A17), ll to the MAX
line with fresh water (g. 3A), then place back in machine
(g. 3B);
3B
3A
3A
4
4. "Insert water spout":
Check that the hot water
spout (C6) is inserted on
the connection nozzle
(A8) (g. 4) and place a
container holding a min-
imum of 3.38 oz/100 ml
underneath (g. 5);
5. "Water circuit empty,
Fill water circuit, Hot
water, Conrm?";
6. Press the OK button
to conrm. The appli-
ance delivers hot water from the spout then goes o
automatically.
5
The coee machine is now ready for normal use.
Please note:
• The rst time you use the machine, you need to make 4-5
cappuccinos before it starts to give optimal results.
• To enjoy your coee even more and improve the perfor-
mance of your appliance, we recommend installing a
water softener lter (C4) as described in section “17. Water
softener lter”.
5. TURNING THE MACHINE ON
Please note:
Before turning the appliance on, make sure the main switch
(A22) on the back of the appliance is pressed (g. 2).
Each time the appliance is turned on, it performs an automatic
preheat and rinse cycle which cannot be interrupted. The appli-
ance is ready for use only after completion of this cycle.
Danger of burns!
During rinsing, hot water comes out of the coee spouts (A9)
and is collected in the drip tray (A15) underneath. Avoid contact
with splashes of water.
• To turn the appliance
on, press the
button (A7) (g. 6). The
message "Heating Please
wait" appears on the dis-
play (B1).
After heating, the message
"Rinsing" is displayed, togeth-
er with a progress bar which
gradually lls as preparation
proceeds. As well as heating
the boiler, the appliance also
heats the internal circuits by circulating hot water.
The appliance is ready when the message "Select your bever-
age" is displayed.
6. TURNING THE APPLIANCE OFF
Whenever the machine is turned o after being used to make
espresso or coee, it performs an automatic rinse cycle.
Danger of burns!
During rinsing, hot water ows from the coee spouts (A9).
Avoid contact with splashes of water.
• To turn the appliance o, press the button (A7) (g.
6);
6
9
• The message "Turning o underway Please wait" appears
on the display (B1), then the appliance performs a rinse
cycle and goes o (standby).
Please note!
If you will not be using the appliance for some time, unplug
from the mains socket:
• rst turn the appliance o by pressing the button
(g. 6);
• press the main switch (A22) (g. 2).
Important!
Never press the main switch while the appliance is on.
7. MENU SETTINGS
This menu has the following options, each explained in detail
in this section.
• Language;
• Maintenance:
- Descale,
- Install lter,
- (if a lter has been installed): Replace lter,
- (if a lter has been installed): Remove lter;
• Prg. beverages;
• Prg. my beverages;
• General:
- Set temperature,
- Water hardness,
- Auto-o,
- Energy saving,
- Beep,
- Default beverages,
- Default values;
• Statistics.
7.1 Language
To modify the language of the display (B1), proceed as follows:
1. Press (B6) to enter the "Settings" menu;
2. Press OK (B3) to select "Language". The available languag-
es are displayed;
3. Press the selection arrows (B2 and B4) until the required
language is displayed between the two lines;
4. Press OK to conrm;
5. The appliance goes back to the "Settings" menu;
6. Press /ESC (B5) to exit the menu.
7.2 Maintenance
Here you can nd all the maintenance operations required by
the appliance over time:
• Descale: For instructions on descaling, see section “15.
Descaling”.
• Install lter: For instructions on how to install the lter
(C4), see section “17.1 Installing the lter”.
To select the operation you require, proceed as follows:
1. Press (B6) to enter the "Settings" menu;
2. Press the selection arrows (B2 and B4) until "Maintenance"
is displayed between the two lines;
3. Press OK (B3) to conrm;
4. Press the selection arrows to display the operation to be
performed;
5. Press OK to conrm and perform the operations as de-
scribed in the corresponding sections.
7.3 Program beverages
The appliance is set by default to automatically deliver standard
quantities. To change these quantities and customise the direct-
ly selected beverages and the (B14), proceed as
follows:
1. Press (B6) to enter the "Settings" menu;
2. Press the selection arrows (B2 and B4) until "Prg. beverag-
es" is displayed between the two lines;
3. Press OK (B3) to conrm: the appliance lists the beverages
you can customise;
4. Press the selection arrows until the beverage you want to
customise is displayed, then press OK to conrm;
5. Beverages with coee: "Program aroma" appears on
the display: press the selection arrows (B2 and B4) or
(B7) until the required aroma is selected (see section “9.4
Temporarily varying the coee aroma”), then press OK.
"Program coee" appears on the display together with a
bar which gradually lls as delivery progresses. When the
required quantity is reached, press OK;
Cappuccinos and milk-based recipes: after selecting
the aroma, "Program milk" appears on the display togeth-
er with a bar which gradually lls as milk delivery pro-
gresses. When the required quantity is reached, press OK.
The appliance then makes the coee. Press OK to interrupt
delivery when the required quantity of coee is reached.
Hot water: press OK. Delivery begins: press OK when the
required quantity is reached.
6. "Save parameters?": to save the settings, press OK (other-
wise press /ESC - B2 or B5).
7.4 Program My beverages
To customize recipes under the My Menu, follow the procedures
described in previous section “ “7.3 Program beverages” by se-
lecting “Prg. my beverages” OR by programing directly under
the My Menu by following instructions described in section “12.
Programming and selecting”.
7.5 General
Here you can nd the settings to customise the basic functions
of the appliance:
1. Press (B6) to enter the "Settings" menu;
10
2. Press the selection arrows (B2 and B4) until "General" is
displayed between the two lines;
3. Press OK (B3) to conrm and select the required item with
the selection arrows. Then follow the instructions for each
setting.
• Set temperature:
To modify the temperature of the water used to make the coee,
proceed as follows:
4. Press OK (B3). The current value appears on the display
(B1) and the "New" value ashes;
5. Select the new value you want to set using the selection
arrows (B2 or B4);
6. When the required value (low, medium, high, maximum)
has been selected, press OK.
The display goes back to the previous screen.
• Water hardness:
For instructions on identifying and setting water hardness, see
section “16. Setting water hardness”.
• Auto-o (standby):
Auto-o can be set so that the appliance goes o after 15 or 30
minutes, or 1, 2 or 3 hours
4. Press OK. The current value appears on the display (B1) and
the "New" value ashes;
5. Select the new value you want to set using the selection
arrows (B2 or B4);
6. When the required value (low, medium, high, maximum)
has been selected, press OK.
The display goes back to the previous screen.
• Energy saving:
Use this function to enable or disable energy saving. When ena-
bled, the function reduces energy consumption.
To disable or enable "Energy Saving", proceed as follows:
4. Press OK. The current state ("Enabled" or "Disabled") and
the operation to be performed ("Disable?" or "Enable?") is
displayed. Press OK to conrm;
5. Press OK to disable or enable the function.
The display goes back to the previous screen.
Please note!
• when the function is enabled, the symbol “ECO” appears
on the display.
• When in energy saving mode, a few seconds elapse before
the rst coee, cappuccino or milk-based coee is deliv-
ered as the appliance must heat up again.
• If the milk container (D) is inserted, "Energy Saving" can-
not be activated.
• Beep:
Use this function to enable or disable the beep. Proceed as
follows:
4. Press OK. The current state ("Enabled" or "Disabled") and
the operation to be performed ("Disable?" or "Enable?") is
displayed. Press OK to conrm;
5. Press OK to disable or enable the function.
The display goes back to the previous screen.
• Default beverages:
Use this function to reset the default values for all the beverag-
es, or the individual beverages programmed previously. Select
the beverage, then proceed as follows:
4.
Select "All" to reset the aroma and quantity settings to the
default values, or select the required beverage, then press OK;
5. The machine will display “Reset?”. To conrm, press OK;
6. The machine will now display “Reset complete” and goes
back to previous screen.
To reset another beverage, repeat from point 4 or to exit, press
/ESC (B5).
• Default values:
Use this function to reset all settings of the machine to factory
values, keeping only the language option in use.
To proceed with the reset, select Default values from the General
menu (section “7.5 General”):
4. The “Reset” message will display”. Press OK;
5. The machine will conrm displaying “Reset complete” and
it goes back to previous screen.
To exit, press /ESC (B5).
7.6 Statistics
This displays statistics relating to the machine. To display the
statistics, proceed as follows:
1. Press (B6) to enter the "Settings" menu;
2. Press the selection arrows (B2 and B4) until "Statistics" is
displayed between the two lines;
3. Press OK (B3): statistics on the appliance are displayed, use
the selection arrows to scroll through the items;
4. Press /ESC (B5) to exit.
To go back to the main screen, press /ESC.
8. RINSING
Use this function to deliver hot water from the coee spouts
(A9) and hot water spout (C6), if inserted, to clean and heat the
appliance’s internal circuit.
Place a container with a minimum capacity of 3.38 oz/100ml
under the coee and hot water spouts.
Important! Danger of burns.
Do not leave the appliance unattended while hot water is being
delivered.
1) To enable this function, press (B5). "RINSING" appears
on the display (B1);
11
2) After a few seconds, hot water is delivered rst from the
coee spouts, then from the hot water spout (if inserted).
A progress bar is displayed and lls gradually as rinsing
proceeds;
3) To interrupt, press the arrow corresponding to "STOP" (B4).
Please note!
• If the appliance is not used for more than 3-4 days, when
switched on again, we strongly recommend performing
2/3 rinses before use;
• After cleaning, it is normal for the coee grounds container
(A11) to contain water.
9. MAKING COFFEE
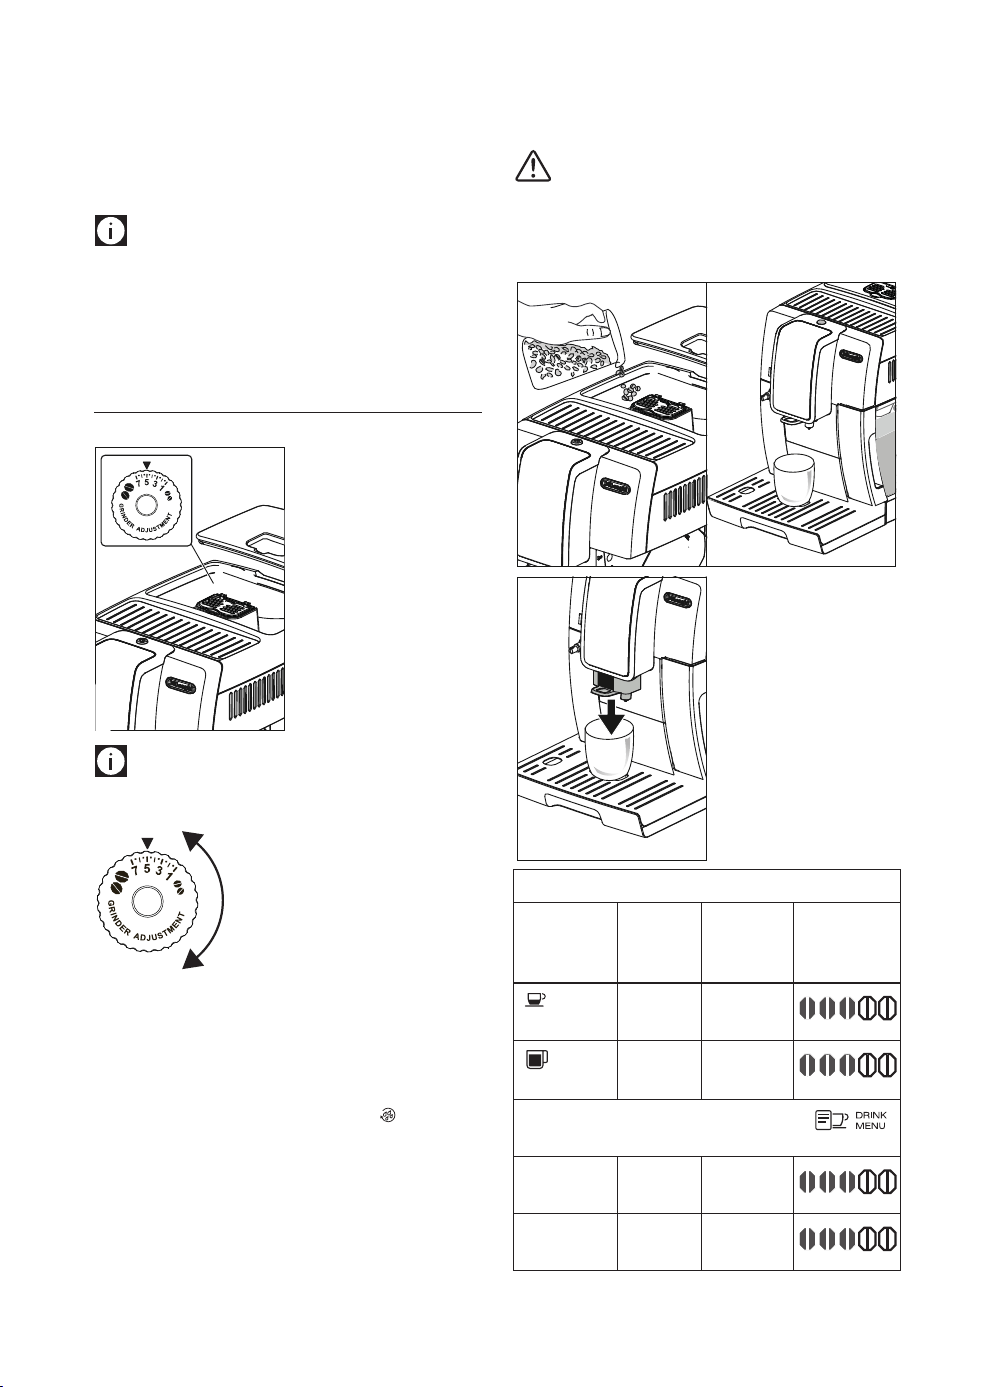
9.1 Adjusting the coee grinder
The coee grinder is set by
default to prepare coee cor-
rectly and should not require
regulating initially.
However, if after making the
rst few coees you nd that
the coee is either too weak
and not creamy enough or
delivery is too slow (a drop at
a time), this can be corrected
by adjusting the grinding dial
(A5) (g. 7).
Please note:
The grinding adjustment dial must only be turned when the
coee grinder is in operation.
If the coee is delivered too slowly or not
at all, turn one click clockwise.
For fuller bodied creamier coee, turn
one click anticlockwise (do not turn more
than one click at a time).
These adjustments will only be evident
after at least 2 cups of coee have been delivered. If this adjust-
ment does not obtain the desired result, turn the dial another
click.
9.2 Tips for a hotter coee
For hotter coee, you should:
• rinse the machine prior to brewing, press /ESC (B5) (see
section “8. RINSING”);
• warm the cups with hot water using the hot water function
(see section “13. Delivering hot water”);
• increase the coee temperature in the "Settings" menu
(see section “7.5 General”).
7
10
9.3 Making automatic recipes using coee
beans
Important!
Do not use green, avoured, caramelised or candied coee
beans as they could stick to the coee grinder and make it
unusable.
1. Fill the container (A3) (g. 8) with coee beans;
8 9
2. Place under the coee
spouts (A9):
- 1 cup, if you want to
make 1 coee (g. 9);
- 2 cups if you want 2
coees.
3. Lower the spouts as
near as possible to the
cup. This makes a creami-
er coee (g. 10);
4. Then select the desired
recipe coee:
Directly selected beverages
Recipe Quantity Program-
mable
quantity
Default
aroma
Espresso (B8)
≃ 40 ml from ≃30
to ≃ 80ml
+
Long (B10)
≃ 160 ml from ≃115
to ≃250ml
+
Beverages with coee selectable from the
(B14)
Lungo
≃ 120 ml from ≃80
to ≃180ml
+
Ristretto
≃ 30 ml from ≃20
to ≃40ml
+
12
Double
Espresso+
≃ 120 ml from ≃80
to ≃180ml
+
Coee
≃ 180 ml from ≃100
to ≃240ml
+
2 Espresso
≃ 40 ml x
2 cups
--
+
2 Lungo
≃ 120 ml
x 2 cups
--
+
2 Ristretto
≃ 30 ml x
2 cups
--
+
5. Preparation begins. A progress bar appears on the display
(B1) and gradually lls as preparation proceeds.
Please note:
• You can prepare 2 cups of RISTRETTO, ESPRESSO or LUNGO
coee at the same time by pressing "2X" (B3) during
preparation of single beverages (the 2X image is displayed
for a few seconds at the start of preparation).
• While the machine is making coee, delivery can be inter-
rupted at any time by pressing the selection arrow corre-
sponding to "STOP" (B4).
• At the end of delivery, to increase the quantity of coee in
the cup, just press and hold (within 3 seconds) one of the
coee buttons (B8 or B10).
Once the coee has been made, the appliance is ready to make
the next beverage.
Please note:
• Various alarm messages could be displayed while using the
appliance (ll tank, empty grounds container, etc.). Their
meaning is explained in section “18. Displayed messages”.
• For hotter coee, see section “9.2 Tips for a hotter coee”.
• If the coee is delivered a drop at a time, too weak and not
creamy enough or too cold, read the tips in section “19.
Troubleshooting”.
• To customise the beverages according to personal taste,
see sections “7.3 Program beverages” and “7.4 Program My
beverages”.
9.4 Temporarily varying the coee aroma
To temporarily vary the aroma of the coee in the automatic
recipes, press (B7):
+
AUTO
Custom (if programmed) /
Standard
+
EXTRA LIGHT
+
LIGHT
+
MEDIUM
+
STRONG
+
X-STRONG
(see “9.5 Making coee
using pre-ground coee”)
Please note:
• The variation in aroma is not saved and the next time a
beverage is delivered automatically, the appliance selects
the default value (
+
AUTO).
• If a few seconds elapse between temporary customising of
the aroma and delivery of the beverage, the aroma returns
to the default value (
+
AUTO).
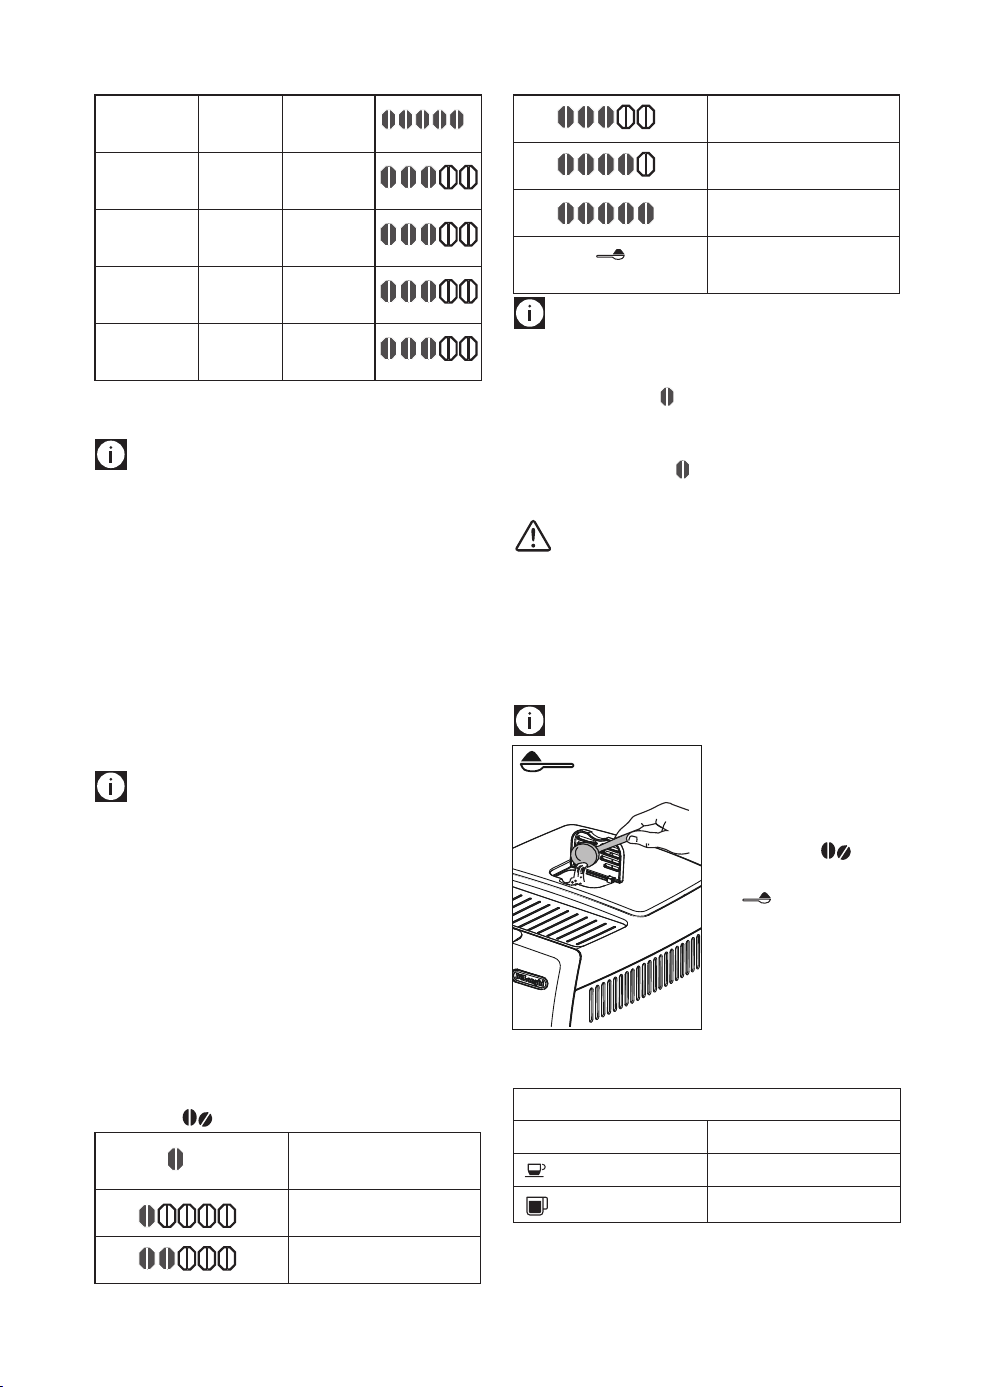
9.5 Making coee using pre-ground coee
Important!
• Never add pre-ground coee when the machine is o or it
could spread through the inside of the machine and dam-
age it. This could damage the appliance.
• Never use more than 1 level measure (C2) or it could dam-
age the inside of the coee machine or block the funnel
(A4).
Please note:
If you use pre-ground
coee, you can only make
one cup of coee at a
time.
1. Press the button
(B7) repeatedly until "
" appears on the dis-
play (B1).
2. Make sure the funnel is
clean, then add one level
measure of pre-ground
coee (g. 11).
3. Place a cup under the coee spouts (A9) (g. 9).
4. Then select your required coee:
Directly selected beverages
Recipe Quantity
Espresso (B8)
≃ 40 ml
Long (B10)
≃ 160 ml
11
13
Beverages with coee selectable from the
(B14)
Lungo
≃ 120 ml
Ristretto
≃ 30 ml
Coee
≃ 180 ml
5. Preparation begins. The beverage selected appears on the
display together with a progress bar which gradually lls
as preparation proceeds.
Important! Making LONG coee :
Halfway through preparation, the message "Add pre-ground
coee" appears on the display (B1). Add one level measure of
pre-ground coee and press OK (B3).
Please note:
If "Energy Saving" mode is active, you may have to wait a few
seconds before the rst coee is delivered.
10. TRUEBREW OVER ICE™ COFFEE
1. Add ice to a large glass about half way full (g. 12), press
the strength selector (B8) to choose a strength
(strong or extra strong recommended), and place the glass
under the brewing unit;
13
12
2. Then, press the TrueBrew Over Ice™ (B9) button to
brew the coee (g. 13);
3. Add additional ice to the glass/coee plus any syrup,
sweetener or milk desired and enjoy
Important!
Always use glasses resistant to thermal shock.
Recipe Quantity Programmable
quantity
TrueBrew Over
Ice coee™ (B9)
≃ 3.38 oz /
100 ml
from ≃ 1.35 oz/
40 ml to ≃8.11
oz / 240ml
11. MAKING MILK-BASED RECIPES
Please note:
• To avoid milk with poor froth or large bubbles, always
clean the milk container lid (D2) and hot water connection
nozzle (A8) as described in sections “11.4 Cleaning the milk
container after use”, “14.10 Cleaning the milk container”
and “14.11 Cleaning the hot water nozzle”.
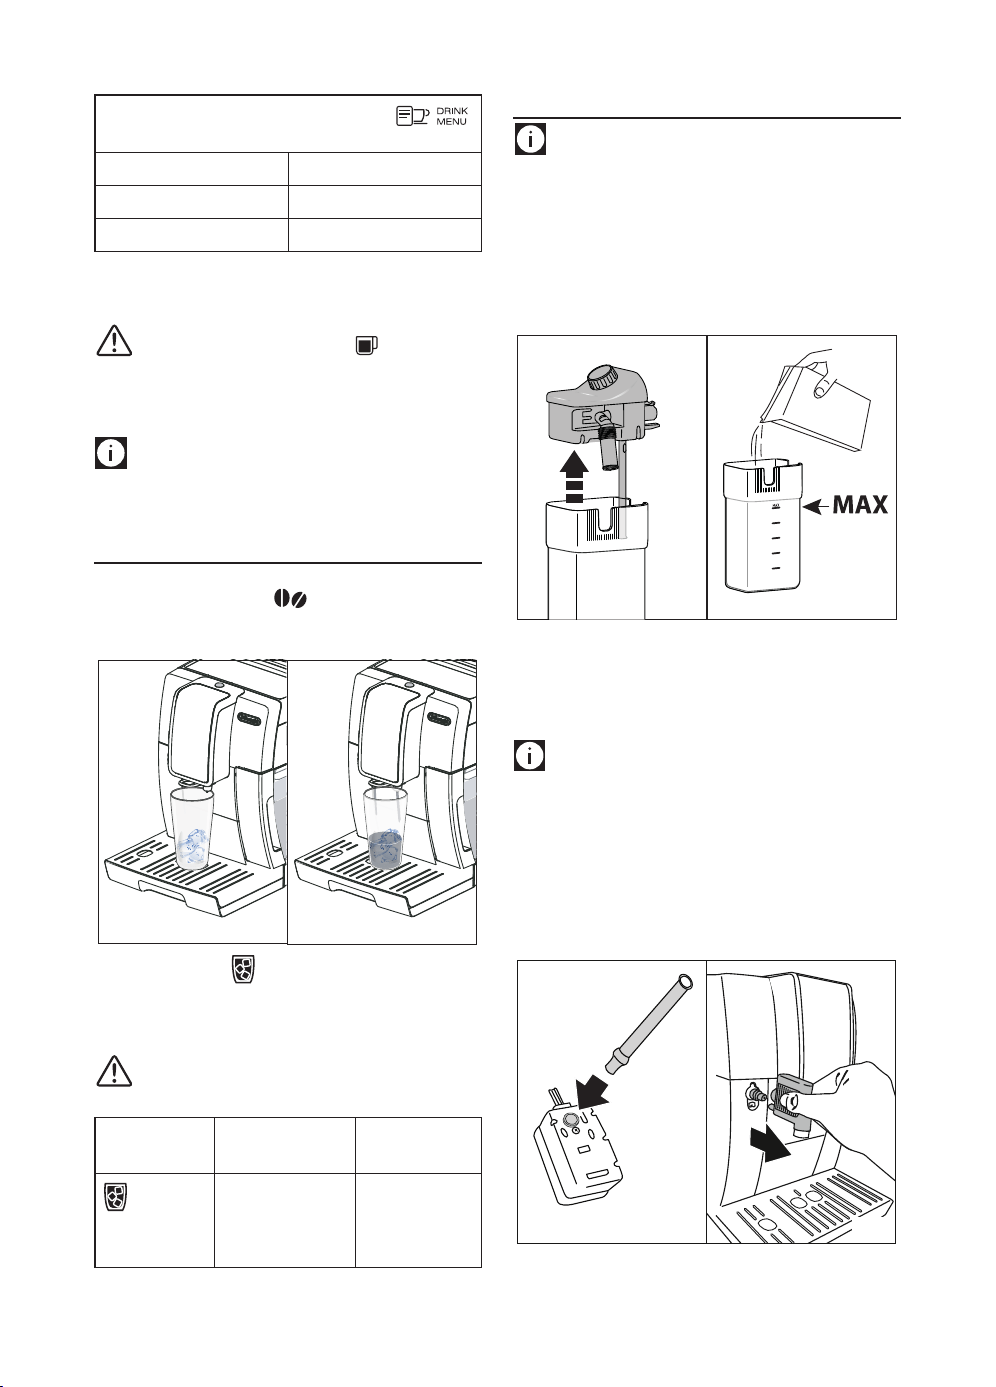
11.1 Filling and attaching the milk container
1. Remove the lid (D2) (g. 14);
15
MILK
14
2. Fill the milk container (D3) with a sucient quantity of
milk, not exceeding the MAX level marked on the handle
(g. 15). Each mark on the side of the container corre-
sponds to 3.38 oz/ 100 ml of milk;
Please note:
• For a denser more even froth, you must use skimmed or
partially skimmed milk at refrigerator temperature (about
41°F/ 4°C).
• If "Energy Saving" mode is enabled, you may have to wait
a few seconds before the rst cappuccino is delivered.
3. Make sure the milk intake tube (D4) is correctly inserted in
the bottom of the milk container lid (g. 16);
16 17
4. Place the lid back on the milk container;

14
5. Remove the hot water spout (C6) from the connection noz-
zle (A8) (g. 17);
6. Attach the container to the connection nozzle and push
as far as it will go (g. 18). The machine emits a beep (if
enabled);
1618 19
7. Place a suciently large cup under the coee spouts (A9)
and frothed milk spout (D5). Adjust the length of the milk
spout. To move it nearer the cup, simply pull it downwards
(g. 19);
8. Follow the instructions below for each function.
11.2 Adjusting the amount of froth
Turn the froth adjustment dial
(D1) (g. 20) to adjust the
amount of froth on the milk de-
livered while making cappucci-
nos and milk-based coees.
Dial
position
Description Recommended for…
No froth HOT MILK (not frothed) /
LATTE
Min. froth LATTE MACCHIATO/
FLAT WHITE
Max. froth CAPPUCCINO/ CAPPUCCI-
NO+ / ESPRESSO MACCHIA-
TO / HOT MILK (frothed)
20
11.3 Making cappuccino and milk-based coees
automatically
1. Fill the milk container (D) and attach it as described above;
2. Select the desired beverage:
Directly selected beverages:
•
: CAPPUCCINO (B11)
• : Latte (B12)
• : Hot Milk (B13)
Select by pressing (B14):
• Cappuccino+
• Latte macchiato
• Flat white
• Espresso macchiato;
3. After a few seconds, preparation begins automatically, a
progress bar appears on the display and gradually lls as
preparation proceeds;
4. After delivering the milk, the machine automatically
makes the coee (if required by the recipe).
Please note:
• If you want to interrupt preparation during delivery, press
the arrow corresponding to "STOP" (B4).
• Do not leave the milk container out of the refrigerator for
long periods. The warmer the milk (41°F / 5°C is ideal), the
poorer the quality of froth produced.
• The beverages can be customised (see sections “7.3 Pro-
gram beverages” and “7.4 Program My beverages”).
11.4 Cleaning the milk container after use
Important! Danger of burns
• When cleaning the internal tubes of the milk container (D),
a little hot water and steam may leak out out of the milk
spout (D5). Avoid contact with splashes of water.
"Set dial to CLEAN, ESC to cancel" appears on the display (B1)
each time you use a milk function. Clean as described to elim-
inate all milk residues (or press “
/ESC” (B5) to clean later):
1. Leave the milk container (D) in the machine (you do not
need to empty it);
2. Place a cup or other recipient under the frothed milk spout;
2221
15
3. Turn the froth adjustment dial (D1) to “CLEAN” (g. 21).
“Cleaning underway” appears on the display, together
with a progress bar which gradually lls as the operation
proceeds. Cleaning stops automatically;
4. Turn the dial back to one of the froth selections;
5. Remove the milk container and always clean the steam
connection nozzle (A8) with a sponge (g. 22).
Please note!
• To prepare a number of cappuccinos or milk-based coees,
clean the milk container after you have prepared the last
beverage only. In this case, press /ESC (B5) to go back to
the main menu.
• The milk container can be kept in the refrigerator.
• In some cases, before cleaning you must wait for the appli-
ance to heat up.
12. “ ” PROGRAMMING AND SELECTING
In you can select beverages customised to your per-
sonal tastes. If the beverages have not yet been programmed,
the appliance will request the customisation procedure before
proceeding with delivery:
1. Press (B15);
2. Press the selection arrows (B2 and B4) until the required
beverage is displayed between the two lines;
Unprogrammed beverages:
3. Press OK (B3) to select;
4. Beverages with coee: "Program aroma" appears
on the display. Press the selection arrows (B2 and B4) or
(B7) until the required aroma is selected. Press OK.
"Program coee" appears on the display together with a
bar which gradually lls as delivery progresses. When the
required quantity is reached, press OK.
5. Cappuccinos and milk-based coees: After select-
ing the aroma, "Program milk" appears on the display
together with a bar which gradually lls as milk delivery
progresses. When the required quantity is reached, press
OK.
6. The appliance then makes the coee. Press OK to interrupt
delivery when the required quantity of coee is reached.
7. "Save parameters?": to save the settings, press OK (other-
wise press ESC - B2 or B5).
8. "Parameters saved" (or "Parameters not saved"). The ap-
pliance is ready for use again.
Programmed beverages:
3. Press OK (B3) to select;
4. Preparation begins according to the previously pro-
grammed settings.
Please note:
Two cups of a beverage can only be selected when the corre-
sponding single beverages have been programmed.
13. DELIVERING HOT WATER
Important! Danger of burns.
Never leave the machine unattended while delivering hot water.
1. Make sure the hot water spout (C6) is attached correctly;
2. Place a container under the water spout (as close as possi-
ble to avoid splashes) (g. 5);
3. Press (B14) and scroll through the beverages
in the menu by pressing the selection arrows (B2 or B4)
until "Hot water" is selected;
4. Press OK (B3). A progress bar appears and gradually lls as
preparation proceeds;
5. The machine delivers about 8.45 oz / 250 ml of hot
water, then delivery stops automatically. To interrupt hot
water delivery manually, press the selection arrow corre-
sponding to "STOP" (B4) again.
Please note:
• If "Energy Saving" mode is active, you may have to wait a
few seconds before hot water is delivered.
• The quantity of water delivered can be customised (see
section “7.3 Program beverages”).
14. CLEANING
14.1 Cleaning the machine
The following parts of the machine must be cleaned regularly:
- the appliance’s internal circuit;
- coee grounds container (A11);
- drip tray (A15) and condensate tray (A10);
- water tank (A17);
- coee spouts (A9);
- pre-ground coee funnel (A4);
- infuser (A20), accessible after opening the infuser door
(A19);
- milk container (D);
- hot water/steam connection nozzle (A8);
Important!
• Do not use solvents, abrasive detergents or alcohol to clean
the coee machine.
• None of the components of the appliance can be washed
in a dishwasher with the exception of the drip tray grille
(A14) and milk container (D).
• Do not use metal objects to remove coee deposits as they
could scratch metal or plastic surfaces.
14.2 Cleaning the machine's internal circuit
If the appliance is not used for more than 3/4 days, before using
it again, we strongly recommend switching it on and:
- performing 2-3 rinse cycles by pressing (B5);
- delivering hot water for a few seconds (section “13. Deliv-
ering hot water”).
16
and cleaned otherwise the water may overow the edge and
damage the appliance, the surface it rests on or the surrounding
area.
To remove the drip tray:
1. Remove the drip tray and the coee grounds container
(A11) (g. 23);
2. Remove the cup tray (A12) and drip tray grille (A14), then
empty the drip tray and grounds container and wash all
components;
3. Check the red condensate tray (A10) and empty if
necessary;
4. Replace the drip tray complete with grille and grounds
container.
14.5 Cleaning the inside of the coee machine
Danger of electric shock!
Before cleaning internal parts, the machine must be turned o
(see section “6. Turning the appliance o”) and unplugged from
the mains power supply. Never immerse the coee machine in
water.
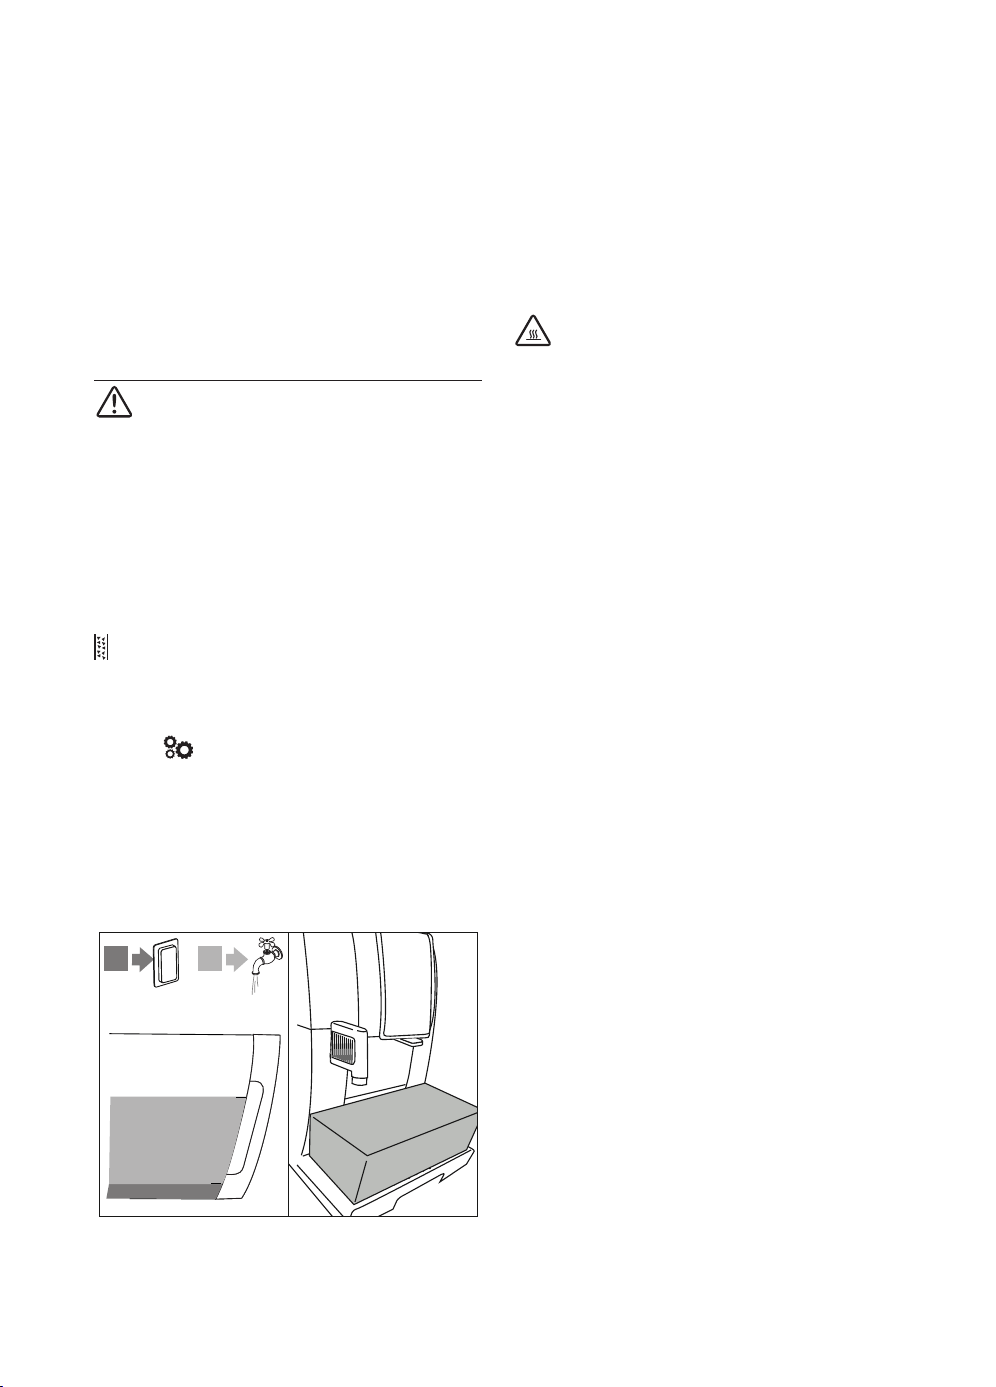
1. Check regularly (about
once a month) that the
inside of the appliance
(accessible after remov-
ing the drip tray, A15)
is not dirty. If necessary,
remove coee deposits
with the brush (C5) sup-
plied and a sponge;
2. Remove all the residues
with a vacuum cleaner
(g. 25).
14.6 Cleaning the water tank
1. Clean the water tank (A17) regularly (about once a month)
and whenever you replace the water softener lter (C4) (if
provided) with a damp cloth and a little mild washing up
liquid;
2. Remove the lter (C4) (if
present) and rinse with
running water;
3. Replace the lter (if
provided), ll the tank
with fresh water and
replace the tank;
4. (Models with water sof-
tener lter only) Deliver
about 3.38 oz / 100ml
of water.
25
26A
26B
Please note:
After cleaning, it is normal for the coee grounds container
(A11) to contain water.
14.3 Cleaning the coee grounds container
When "Empty grounds container" appears on the display (B1),
the grounds container must be emptied and cleaned. The ap-
pliance cannot be used to make coee until you have cleaned
the grounds container (A11). Even if not full, the empty grounds
container message appears on the display 72 hours after the
rst coee has been prepared. For the 72 hours to be calculated
correctly, the machine must never be turned o with the main
switch (A22).
Important! Danger of burns
If you make a number of cappuccinos one after the other, the
metal cup tray (A12) becomes hot. Wait for it to cool down be-
fore touching it and handle it from the front only.
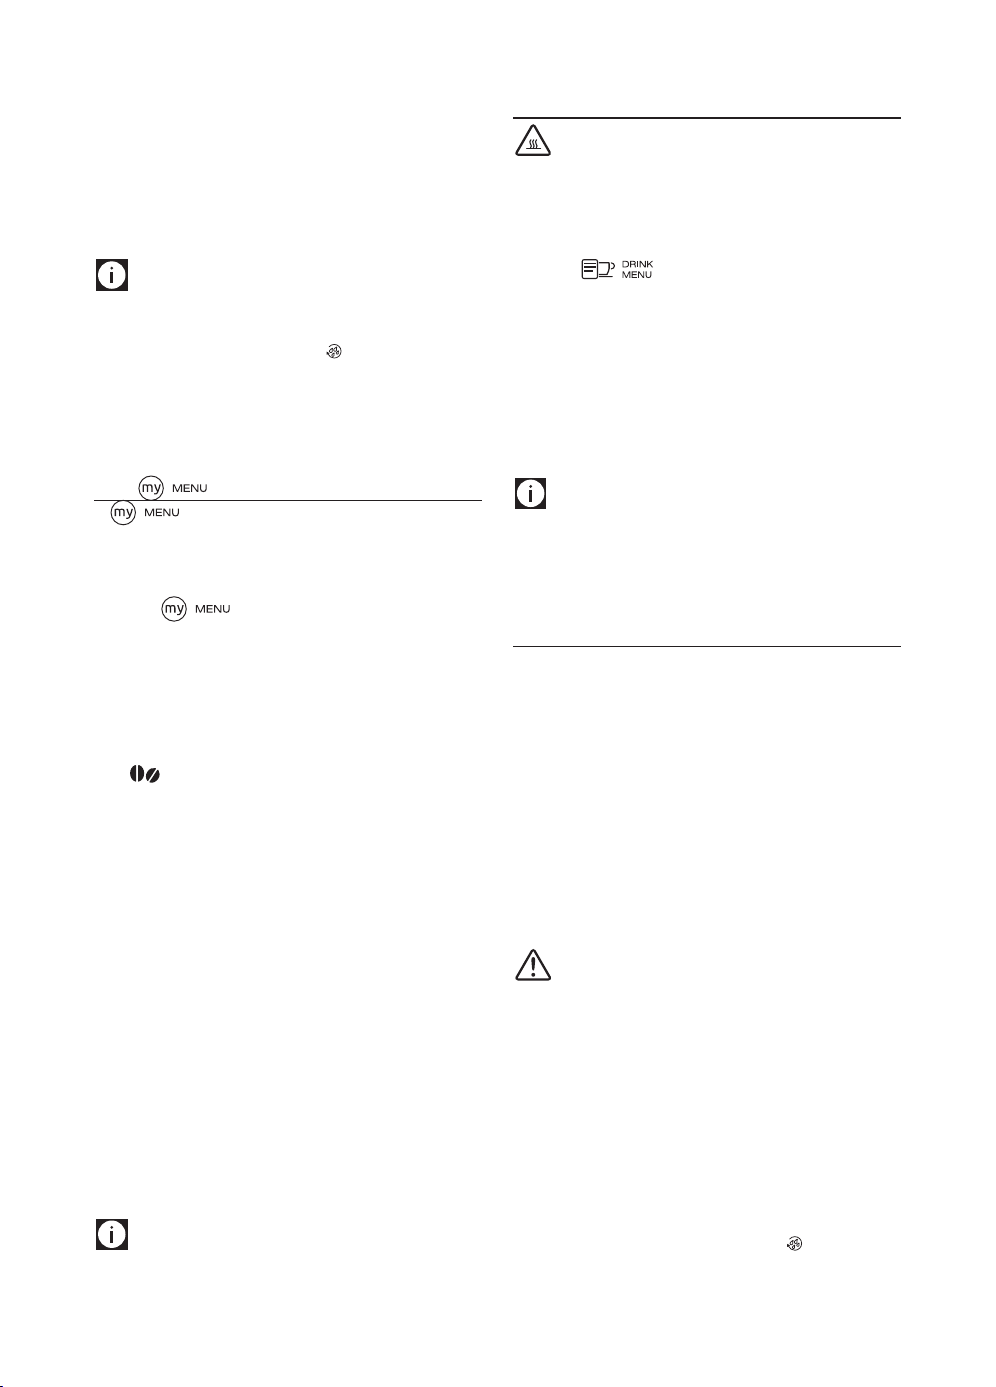
To clean (with the machine on):
• Remove the drip tray
(A15) (g. 23), empty
and clean.
• Empty the grounds con-
tainer (A11) and clean
thoroughly to remove
all residues left on the
bottom. This can be done
with the spatula on the
brush (C5) provided.
• Check the condensate
tray (A10) (red) and
empty if necessary.
Important!
When removing the drip tray, the grounds container must be
emptied, even if it contains few grounds.
If this is not done, when you make the next coees, the grounds
container may ll up more than expected and clog the machine.
14.4 Cleaning the
drip tray and
condensate tray
Important!
The drip tray (A15) is tted
with a level indicator (A13)
(red) showing the level of
water it contains (g. 24).
Before the indicator protrudes
from the cup tray (A12), the
drip tray must be emptied
23
24
17
14.7 Cleaning the coee spouts
1. Clean the coee spouts (A9) regularly with a sponge or
cloth (g. 26A);
2. Check that the holes in the coee spouts are not blocked.
If necessary, remove coee deposits with a toothpick (g.
26B).
14.8 Cleaning the pre-ground coee funnel
Check regularly (about once a month) that the pre-ground
coee funnel (A4) is not blocked. If necessary, remove coee
deposits with the brush (C5) supplied.
14.9 Cleaning the infuser
The infuser (A20) must be cleaned at least once a month.
Important!
The infuser may not be extracted when the machine is on.
1. Make sure the machine is correctly turned o (see “6. Turn-
ing the appliance o”);
2. Remove the water tank (A17);
3. Open the infuser door (A19) (g. 27) on the right side of
the appliance;
27
28
PUSH
PUSH
4. Press the two coloured release buttons inwards and at the
same time pull the infuser outwards (g. 28);
5. Soak the infuser in water for about 5 minutes, then rinse
under the tap;
Important!
RINSE WITH WATER ONLY
NO WASHING UP LIQUID - NO DISH WASHER
Clean the infuser without using soap as it could damage
the infuser.
6. Use the brush (C5) to remove any coee residues left in the
infuser housing, visible through the infuser door;
7. After cleaning, put back in place the infuser by sliding it
onto the internal support, then push the PUSH symbol fully
in until it clicks into place;
Please note:
If the infuser is dicult to in-
sert, before insertion, adapt it
to the right size by pressing the
two levers (g. 29).
8. Once inserted, make
sure the two coloured but-
tons have snapped out;
9. Close the infuser door;
10. Put the water tank back.
14.10 Cleaning the milk container
Clean the milk container (D) frequently as described below:
1. Remove the lid (D2);
2. Remove the milk spout (D5) and intake tube (D4) (g. 30);
30
31
3. Turn the froth adjustment dial (D1) counterclockwise to the
"INSERT" position (g. 31) and pull o upwards;
4. Wash all the components thoroughly with hot water and
mild soap. All components are dishwasher safe, placing
them in the top basket of the dishwasher.
Make sure there are no milk residues on the hollow and
groove under the dial (g. 32). If necessary, scrape the
groove with a toothpick;
3332
29
3332
18
5. Rinse inside the froth adjustment dial housing with run-
ning water (g. 33);
6. Check that the intake tube and milk spout are not clogged
with milk residues;
7. Put back in place the dial (in correspondence to the word
"INSERT"), spout and milk intake tube;
8. Place the lid back on the milk container (D3).
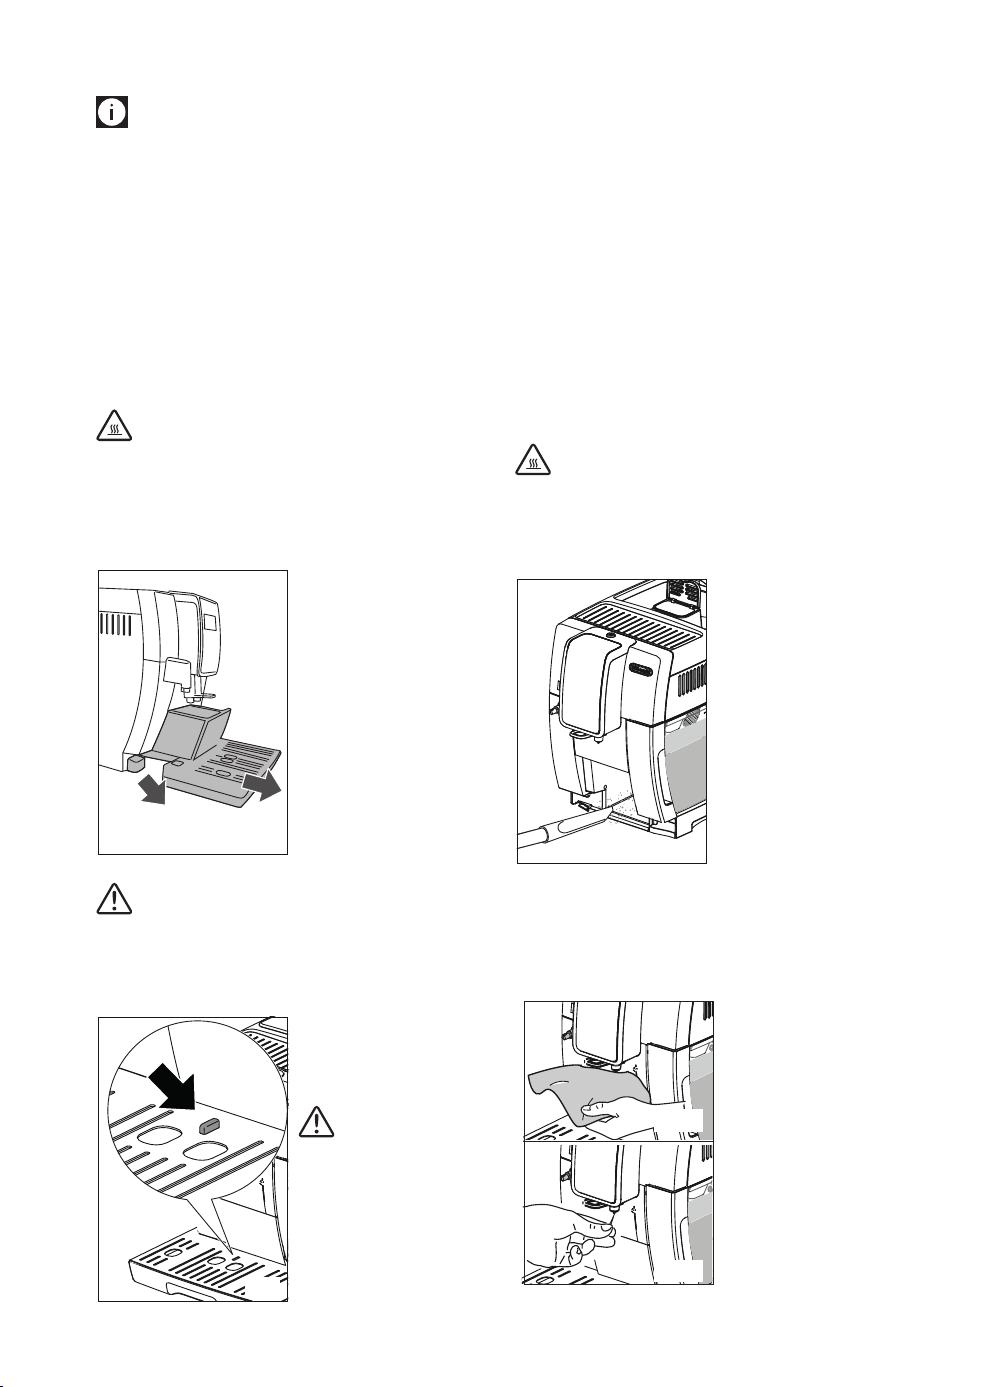
14.11 Cleaning the hot water nozzle
Each time you prepare milk, clean the connection nozzle (A8)
with a sponge to remove milk residues from the gaskets (g. 22).
15. DESCALING
Important!
• Before use descaler, read the instructions and the labelling
on the descaler pack.
• You should use De’Longhi descaler only. Using unsuitable
descaler and/or performing descaling incorrectly may re-
sult in faults not covered by the manufacturer's warranty.
Descale the machine when the message "Descale, ESC to cancel,
OK to descale (∼45 minutes)" appears on the display (B1). To
descale immediately, press OK (B3) and follow the instructions
from point 6. To descale the appliance later, press ESC (B5). The
symbol on the display reminds you that the appliance needs
descaling.
To access the descaling menu:
1.
Turn the appliance on and wait until it is ready for use;
2. Press (B6) to enter the "Settings" menu;
3. Press the selection arrows (B2 and B4) until "Maintenance" is
displayed between the two lines. Press OK (B3);
4. Press OK to select "Descale";
5. Conrm? (∼45 minutes)”. Press OK to conrm;
6. "Remove lter": extract the water tank (A17), remove the
water softener lter (C4) (if present) and empty the water
tank. Press OK;
B
A
A B
34
1,8 l
35
7. "Pour descaler and water into tank": Pour the descaler into
the tank up to level A (corresponding to a 61 oz /100 ml
pack) marked on the inner surface of the tank, then add
water (1 litre) up to level B (g. 34) and put the water tank
back. Press OK;
8. "Empty drip tray": Remove, empty and replace the drip
tray (A15) and grounds container (A11). Press OK;
9.
"Place 1.8L container empty under spouts": Place an empty
container with a minimum capacity of 1.8 litres / 61 oz
under the hot water spout (C6) and coee spouts (A9) (g.
35). Press OK
;
Important! Danger of burns
Hot water containing acid ows out of the coee spouts and
hot water spout. Take care to avoid contact with splashes of this
solution.
10.
"Descaling underway": The descale programme starts and
the descaler liquid comes out of the hot water and coee
spouts. A series of rinses and pauses is performed auto-
matically to remove all the scale residues inside the coee
machine;
After about 25 minutes, descaling stops. The following messag-
es will appear on the screen:
11. "Rinse tank and ll with water": the appliance is now
ready to rinse with fresh water. Empty the container used
to collect the descaler solution. Extract the water tank,
empty, rinse under running water, ll with fresh water up
to the MAX level and put back in the appliance. Press OK;
12. "Place 61 oz / 1.8L container empty under spouts": place
the container used to collect the descaler solution empty
under the coee spouts and hot water spout (g. 35) and
press OK";
13. "Rinsing Conrm?": press OK;
14. "Rinsing underway": hot water is delivered rst from the
coee spouts, then from the hot water spout;
15. When the water in the tank has run out, empty the con-
tainer used to collect the rinsing water;
16. "Rinse tank and ll with water": extract the water tank and
ll with fresh water up to the MAX level. Press OK;
17. "Insert lter": put the water softener lter (if removed)
back in its housing in the water tank, and replace the tank
in the appliance. Press OK;
18. "Place 1.8L container empty under spouts":
place the con-
tainer used to collect the descaler solution empty under
the hot water spout. Press OK;
19. "Rinsing Conrm?": press OK.
20. "Rinsing underway".
Hot water comes out of the hot water
spout;
21. "Empty drip tray": At the end of the second rinse, remove,
empty and replace the drip tray (A15) and grounds con-
tainer (A11). Press OK;
19
22. "Descale complete": press OK;
23. "Fill tank": empty the container used to collect the rinse
water, remove the water tank and ll with fresh water up
to the MAX level, then put back in the appliance.
Descaling is complete.
Please note!
• If the descaling cycle is not completed correctly (e.g. no
electricity) we recommend repeating the cycle;
• After descaling, it is normal for the grounds container
(A11) to contain water;
• If the water tank has not been lled to the MAX level, at
the end of descaling, the appliance requests a third rinse to
guarantee that the descaler solution has been completely
eliminated from the machine's internal circuits.
• The appliance may request descaling cycles at very short
intervals. This is normal and due to the appliance’s ad-
vanced control system.
16. SETTING WATER HARDNESS
The descale message is displayed after a period of time estab-
lished according to water hardness level.
The machine is set by default for a hardness level of 4. The ma-
chine can also be programmed according to the hardness of the
mains water in the various regions so that the machine needs to
be descaled less often.
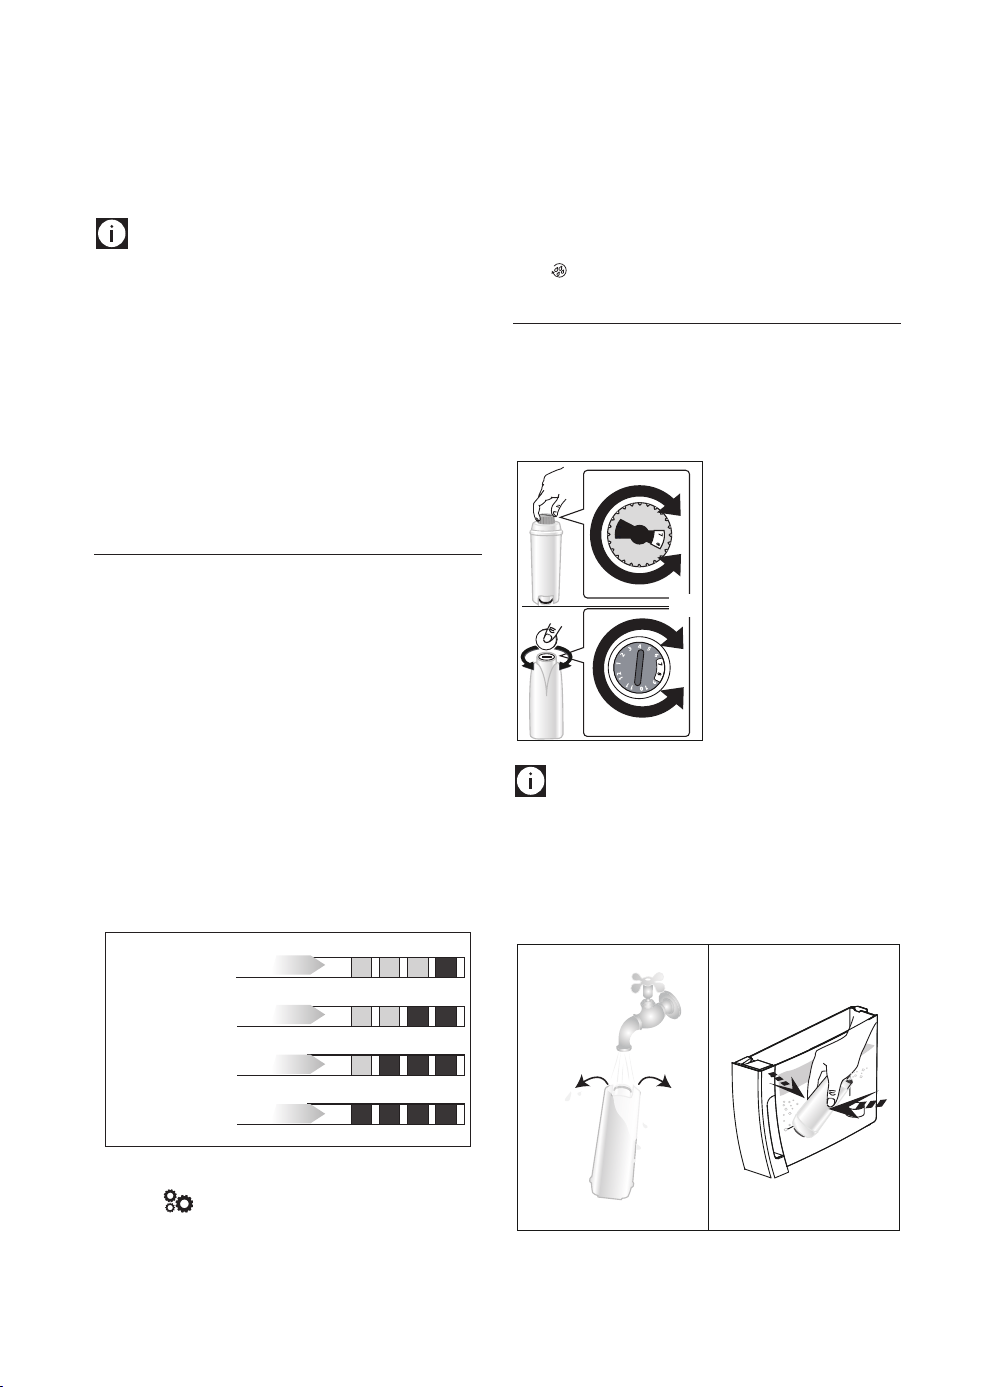
16.1 Measuring water hardness
1. Remove the "TOTAL HARDNESS TEST" indicator paper (C1)
from its pack (attached to the English instructions);
2. Immerse the paper completely in a glass of water for one
second;
3. Remove the paper from the water and shake lightly. After
about a minute, 1, 2, 3, or 4 red squares form, depending
on the hardness of the water. Each square corresponds to
one level;
soft water (level 1)
hard water (level 3)
very hard water (level 4)
slightly hard water (level 2)
16.2 Setting water hardness
1. Press (B6) to enter the "Settings" menu;
2. Press the selection arrows (B2 and B4) until "General" is
displayed between the two lines. Press OK;
3. Press the selection arrows until "Water hardness" is dis-
played, then press OK;
4. The current selection appears on the display and the new
selection ashes. Press the selection arrows until the re-
quired new selection is displayed. Press OK.
The new level is saved and the appliance goes back to the "Gen-
eral" menu.
Press /ESC (B5) twice to go back to the main screen.
17. WATER SOFTENER FILTER
Certain models are tted with a water softener lter (C4). If this
is not the case with your model, you are recommended to pur-
chase one from De’Longhi Customer Services.
To use the lter correctly, follow the instructions below.
17.1 Installing the lter
36
1. Remove the lter (C4)
from the packaging. The
date indicator disk varies
according to the lter
provided.
2. Turn the date indicator
disk (g. 36) until the
next 2 months of use are
displayed.
Please note
The lter lasts about two months if the appliance is
used normally. If the coee machine is left unused with the lter
installed, it will last a maximum of three weeks.
3. To activate the lter, run tap water through the hole in the
lter as shown in g. 37 until water comes out of the open-
ings at the side for more than a minute.;
37 38
0,5 L
4. Extract the tank (A17) from the appliance and ll with
water;
20
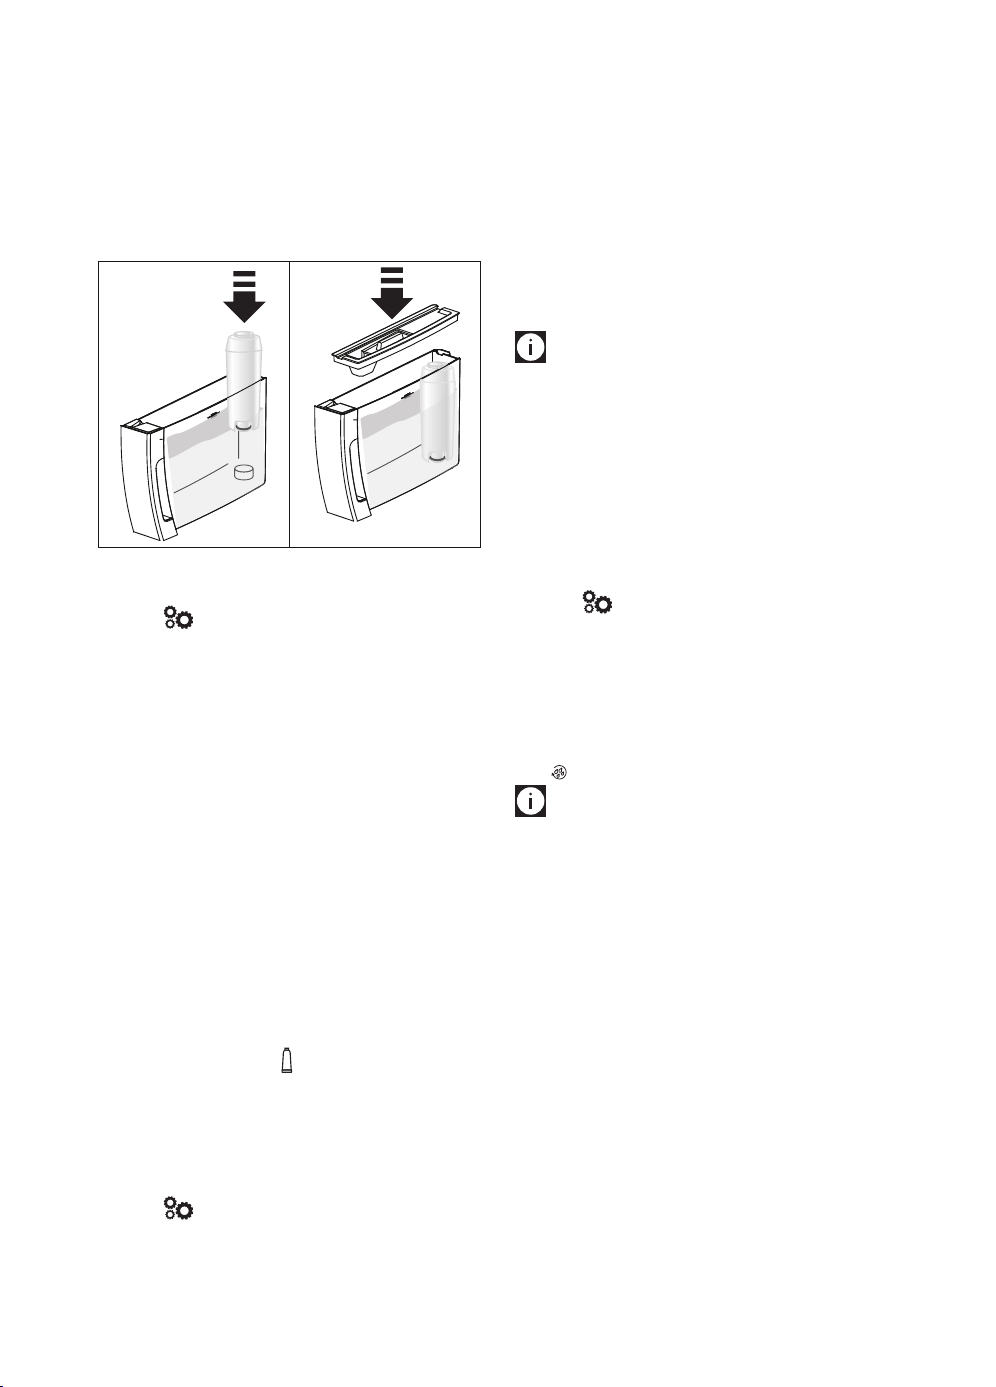
5. Insert the lter in the water tank and immerse it complete-
ly for about ten seconds, sloping it and pressing it lightly to
enable the air bubbles to escape (g. 38).
6. Insert the lter in the lter housing (A18) and press as far
as it will go (g. 39);
7. Close the tank with the lid (A16) (g. 40), then replace the
tank in the machine;
39 40
35
When you install the lter, you must notify the appliance of its
presence.
8. Press (B6) to enter the "Settings" menu;
9. Press the selection arrows (B2 and B4) until "Maintenance"
is displayed between the two lines. Press OK;
10. Press the selection arrows until "Install lter" is displayed,
then press OK;
11. Conrm?": press OK;
12. "Hot water, Conrm?": Position a container under the hot
water spout (C6) (min. capacity: 500 ml), then press OK;
13. The appliance begins hot water delivery and the message
"Please wait" is displayed;
14. After the ow of hot water stops, the appliance automati-
cally resets to "Ready for coee" status.
The lter is now active and you can use the coee machine.
17.2 Replacing the lter
Replace the lter (C4) when "Replace lter, ESC to cancel, OK to
replace" appears on the display (B1). To replace immediately,
press OK (B3) and follow the instructions from point 8. To re-
place later, press ESC (B5). The
symbol on the display reminds
you that the lter needs replacing.
To replace the lter, proceed as follows:
1. Extract the tank (A17) and exhausted lter;
2. Take the new lter out of its packet and proceed as illus-
trated in points 2, 3, 4, 5, 6 and 7 in the previous section;
3. Press (B6) to enter the "Settings" menu;
4. Press the selection arrows (B2 and B4) until "Maintenance"
is displayed between the two lines. Press OK;
5. Press the selection arrows until "Replace lter" is dis-
played, then press OK;
6. Conrm?": press OK;
7. "Hot water, Conrm?": Position a container under the hot
water spout (C6) (min. capacity: 500 ml), then press OK;
8. The appliance begins hot water delivery and the message
"Please wait" is displayed;
9. After the ow of hot water stops, the appliance automati-
cally resets to "Ready for coee" status.
The new lter is now active and you can use the coee machine.
Please note!
After two months (see date indicator) or when the appliance has
not been used for 3 weeks, you should replace the lter even if
the message has not yet been displayed.
17.3 Removing the lter
If you want to use the appliance without the lter (C4), you
must remove it and notify the appliance of its removal. Proceed
as follows:
1. Extract the tank (A17) and exhausted lter;
2. Press (B6) to enter the "Settings" menu;
3. Press the selection arrows (B2 and B4) until "Maintenance"
is displayed between the two lines. Press OK;
4. Press the selection arrows until "Remove lter" is dis-
played, then press OK;
5. "Conrm?": press OK to conrm removal. The appliance
goes back to the "Maintenance" menu;
Press /ESC (B5) to exit the menu.
Please note!
After two months (see date indicator) or when the appliance has
not been used for 3 weeks, you should replace the lter even if
the message has not yet been displayed.
21
18. DISPLAYED MESSAGES
DISPLAYED MESSAGE POSSIBLE CAUSE REMEDY
Fill tank Insucient water in the tank (A17). Fill the tank with water and/or insert it correct-
ly, pushing it as far as it will go until it clicks
into place (g. 3B).
Insert tank The tank (A17) is not correctly in place. Insert the tank correctly and press as far as it
will go (page 3B).
Empty grounds container The grounds container (A11) is full. Empty the grounds container and drip tray
(A15), clean and replace. Important: when
removing the drip tray, the grounds contain-
er MUST be emptied, even if it contains few
grounds. If this is not done, when you make
the next coees, the grounds container may ll
up more than expected and clog the machine.
Insert grounds container After cleaning, the grounds container (A11)
has not been replaced.
Remove the drip tray (A15) and insert the
grounds container.
Add pre-ground coee The "pre-ground coee" function has been se-
lected without placing any pre-ground coee
in the funnel (A4).
Place pre-ground coee in the funnel (g. 11)
or deselect the "pre-ground" function.
A LONG coee with pre-ground coee has
been requested
Put one level measure of pre-ground coee into
the pre-ground coee funnel (A4) and press OK
(B3) to continue and complete preparation.
Fill beans container The coee beans have run out. Fill the beans container (A3) (g. 8).
The pre-ground coee funnel (A4) is clogged. Empty the funnel with the help of the brush
(C5) as described in section “14.8 Cleaning the
pre-ground coee funnel”.
Ground too ne
Adjust grinder
The grinding is too ne and the coee is deliv-
ered too slowly or not at all.
Repeat coee delivery and turn the grinding
adjustment dial (A5) (g. 7) one click clockwise
towards 7 while the coee grinder is in opera-
tion. If after making at least 2 coees delivery
is still too slow, repeat the correction procedure,
turning the grinding adjustment dial another
click until delivery is correct (see section “9.1
Adjusting the coee grinder”r”. If the problem
persists, make sure the water tank (A17) is fully
inserted.
If the water softener lter (C4) is present, an
air bubble may have been released inside the
circuit, obstructing delivery.
Insert the hot water spout (C6) in the appli-
ance and deliver a little water until the ow
becomes regular.
Less coee Too much coee has been used.
Select a lighter taste by pressing
(B7) or
reduce the quantity of pre-ground coee.
Insert water spout The hot water spout (C6) is not inserted or is
inserted incorrectly.
Fully insert the hot water spout (g. 4).
→
22
DISPLAYED MESSAGE POSSIBLE CAUSE REMEDY
Insert milk container The milk container (D) is not inserted correctly. Insert the milk container as far as it will go (g.
18).
Insert infuser assembly The infuser (A20) has not been replaced after
cleaning.
Insert the infuser as described in section “14.9
Cleaning the infuser”.
Water circuit empty
Fill water circuit
Hot water
Conrm?
The water circuit is empty. Press OK (B3) to deliver water from the spout
(C6) until it ows out normally. If the problem
persists, make sure the water tank (A17) is fully
inserted.
Press OK to CLEAN The milk container (D) has been inserted with
the froth adjustment dial (D1) in the "CLEAN"
position.
To proceed with the CLEAN function press OK
or turn the froth adjustment dial to another
position.
Set dial to CLEAN
ESC to cancel
Milk has been delivered recently and the tubes
inside the milk container (D) must be cleaned.
Turn the froth adjustment dial (D1) to CLEAN
(g. 19).
Turn froth adjustment dial The milk container (D) has been inserted with
the froth adjustment dial (D1) in the "CLEAN"
position.
Turn the froth adjustment dial to one of the
milk froth positions.
Descale
ESC to cancel
OK to descale
(∼45 minutes)
The machine must be descaled. The descaling procedure described in section
“15. Descaling” needs to be performed.
Replace lter
ESC to cancel
OK to replace
The water softener lter (C4) is exhausted. Replace the lter or remove it as described in
section “17. Water softener lter”.
General alarm The inside of the appliance is very dirty. Clean the inside of the appliance thoroughly,
as described in section “14. Cleaning”. If the
message is still displayed after cleaning, con-
tact a service centre.
The tubes inside the milk container (D) must
be cleaned.
Turn the froth adjustment dial (D1) to CLEAN
(g. 21)
.
The water softener lter (C4) is exhausted and
must be replaced or removed.
Replace the lter or remove it as described in
section “17. Water softener lter”.
The machine must be descaled. The descaling procedure described in section
“15. Descaling” needs to be performed.
The appliance may request descaling cycles at
very short intervals. This is normal and due to
the appliance’s advanced control system.
ECO
Energy saving is enabled. To disable energy saving, proceed as described
in section “7.5 General” - “• Energy
saving:”
23
19. TROUBLESHOOTING
Below is a list of some of the possible malfunctions.
If the problem cannot be resolved as described, contact Customer Services.
PROBLEM POSSIBLE CAUSE REMEDY
The coee is not hot. The cups were not preheated. Warm the cups by rinsing them with hot
water (Please note: you can use the hot water
function).
The internal circuits of the appliance have
cooled down because 2/3 minutes have
elapsed since the last coee was made.
Before making coee, rinse the internal circuits
by pressing the
button (B5).
A low coee temperature is set. Set a higher coee temperature in the menu.
The coee is weak or not
creamy enough.
The coee is ground too coarsely. Turn the grinding adjustment dial (A5) one
click anticlockwise towards 1 while the coee
grinder is in operation (g. 7). Continue one
click at a time until coee delivery is satisfac-
tory. The eect is only visible after delivering
2 coees (see section “9.1 Adjusting the coee
grinder”).
The coee is unsuitable. Use coee beans for espresso machines.
The coee is delivered too
slowly or a drop at a time.
The coee is ground too nely. Turn the grinding adjustment dial (A5) one
click clockwise towards 7 while the coee
grinder is in operation (g. 7). Continue one
click at a time until coee delivery is satisfac-
tory. The eect is only visible after delivering
2 coees (see section “9.1 Adjusting the coee
grinder”).
The appliance will not make
coee
The appliance has detected impurities in its
internal circuits. "Please wait" is displayed.
Wait for the appliance to be ready for use again
and reselect the required beverage. Contact
Customer Services if the problem persists.
Coee does not come out of
one or both of the spouts.
The coee spouts (A9) are blocked. Clean the spouts with a toothpick (g. 26B).
The appliance does not come
on
It is not plugged into the mains socket. Plug into the mains socket (g. 1).
The main switch (A22) is not turned on. Place the main switch in the I position (g. 2).
The power cord (C7) connector is not inserted
correctly.
Insert the connector as far as it will go in the
socket at the back of the appliance (g. 1).
The infuser cannot be
extracted
The appliance has not been turned o correctly
Turn the appliance o by pressing the
button (A7) (g. 6) (see section “6. Turning the
appliance o”).
→
24
PROBLEM POSSIBLE CAUSE REMEDY
At the end of descaling, the
appliance requests a third
rinse
During the two rinse cycles, the water tank has
not been lled to the MAX level.
Follow the instructions displayed by the appli-
ance, but rst empty the drip tray to avoid the
water overowing.
The milk does not come out of
the milk spout (D5)
The lid (D2) of the milk container lid is dirty Clean the milk container lid as described in the
section “14.10 Cleaning the milk container”.
The milk contains large
bubbles and squirts out of
the milk spout (D5) or there is
little froth
The milk is not cold enough or is not
semi-skimmed.
Use skimmed or semi-skimmed milk at refrig-
erator temperature (about 5° C). If the result is
not as you wished, try changing brand of milk.
The froth adjustment dial (D1) is incorrectly
adjusted.
Adjust following the instructions in section
“11.2 Adjusting the amount of froth”.
The milk container lid (D2) or froth adjustment
dial (D1) is dirty
Clean the milk container lid and dial as de-
scribed in section “11.4 Cleaning the milk con-
tainer after use” and “14.10 Cleaning the milk
container”
The hot water connection nozzle (A8) is dirty Clean the connection nozzle as described in
section . “14.11 Cleaning the hot water nozzle”.

25
SOMMAIRE
1. CONSIGNES DE SÉCURITÉ .......................... 27
1.1 Symboles utilisés dans ce mode d'emploi ...27
1.2 Utilisation conforme à la destination...........27
1.3 Mode d'emploi ............................................27
2. INTRODUCTION ........................................ 27
2.1 Lettres entre parenthèses ............................27
2.2 Problèmes et réparations ............................27
3. DESCRIPTION...........................................28
3.1 Description de l'appareil .............................28
3.2 Description du panneau de commande .......28
3.3 Description des accessoires .........................28
3.4 Description du pot à lait ..............................28
4. OPÉRATIONS PRÉLIMINAIRES ................... 28
4.1 Contrôle de l'appareil ..................................28
4.2 Installation de l'appareil .............................28
4.3 Branchement de l'appareil ..........................29
4.4 Première mise en marche de la machine .....29
5. ALLUMAGE DE L'APPAREIL ........................ 30
6. ARRÊT DE L'APPAREIL ............................... 30
7. RÉGLAGES DU MENU ................................30
7.1 Langue ........................................................30
7.2 Entretien .....................................................30
7.3 Programme boissons ...................................31
7.4 Programme My boissons .............................31
7.5 Général .......................................................31
7.6 Statistiques ................................................32
8. RINÇAGE .................................................32
9. PRÉPARATION DU CAFÉ ............................ 32
9.1 Réglage du moulin à café ............................ 32
9.2 Conseils pour un café plus chaud .................33
9.3 Préparation de recettes automatiques avec du
café en grains ..............................................33
9.4 Variation temporaire de l'arôme du café .....34
9.5 Préparation du café en utilisant le café pré-
moulu .........................................................34
10. TRUEBREW OVER ICE™ CAFÈ .....................34
11. PRÉPARATION DE BOISSONS AU LAIT .........35
11.1 Remplir et replacer le pot à lait ...................35
11.2 Régler la quantité de mousse .....................35
11.3 Préparation automatique de boissons à base
de lait ..........................................................36
11.4 Nettoyage du pot à lait après chaque
utilisation ...................................................36
12. “ ” PROGRAMMATION ET SÉLECTION .
............................................................... 36
13. DISTRIBUTION D'EAU CHAUDE ..................37
14. NETTOYAGE .............................................37
14.1 Nettoyage de la machine ............................37
14.2 Nettoyage du circuit interne de la machine .37
14.3 Nettoyage du tiroir à marc de café ...............37
14.4 Nettoyage de l'égouttoir et du bac de
récupération de la condensation .................38
14.5 Nettoyage interne de la machine ................38
14.6 Nettoyage du réservoir à eau.......................38
14.7 Nettoyage des becs verseurs de café ...........38
14.8 Nettoyage de l’entonnoir pour l’introduction
du café pré-moulu.......................................38
14.9 Nettoyage de l'infuseur ...............................39
14.10 Nettoyage du pot à lait ................................39
14.11 Nettoyage du gicleur eau chaude ................40
15. DÉTARTRAGE ........................................... 40
16. PROGRAMMATION DE LA DURETÉ DE L'EAU 41
16.1 Mesure de la dureté de l'eau .......................41
16.2 Réglage de la dureté de l'eau .....................41
17. FILTRE ADOUCISSEUR ............................... 41
17.1 Installation du ltre ....................................41
17.2 Remplacement du ltre ..............................42
17.3 Enlever le ltre ............................................42
18. MESSAGES AFFICHÉS À L'ÉCRAN ................43
19. RÉSOLUTION DES PROBLÈMES ..................45

26
AVERTISSEMENTS IMPORTANTS
Lors de l’utilisation des appareils électriques, vous devez toujours respecter des précautions de base, et notam-
ment les suivantes.
• Lisez attentivement toutes les instructions.
• Assurez-vous que la tension de votre système électrique correspond à la tension indiquée sur le fond de
la machine.
• Ne touchez pas les surfaces chaudes. Utilisez les poignées ou les boutons.
• Pour vous protéger contre l’incendie, les électrocutions et les blessures, ne plongez pas le cordon, la che
ou l’appareil dans l’eau ou tout autre liquide.
• Conservez l’appareil hors de portée des enfants et ne laissez pas l’appareil sans surveillance lorsqu’il est
en marche.
• Débranchez-le de la prise lorsqu’il n’est pas utilisé et avant le nettoyage.
• N’utilisez pas l’appareil avec un cordon ou une che endommagés, si l’appareil présente un dysfonctionne-
ment ou s’il a subi des dégâts. Renvoyez l’appareil au centre assistance autorisé le plus proche pour un
examen, une réparation ou un ajustement.
• L’utilisation d’accessoires non recommandés par le fabricant peut provoquer un incendie, une électrocu-
tion ou des blessures.
• N’utilisez pas l’appareil à l’extérieur.
• Assurez-vous que le cordon d’alimentation ne pende pas du bord de la table ou du plan de travail an
d’éviter tout enchevêtrement.
• Ne placez pas l’appareil ou ses parties électriques au-dessus ou à proximité des cuisinières électriques,
surfaces de cuisson ou brûleurs à gaz.
• Branchez le cordon dans la prise murale. Pour le débrancher, mettez d’abord la machine hors tension, puis
retirez la che de la prise murale.
• N’utilisez pas l’appareil pour d’autres usages que ceux qui sont prévus. Cet appareil doit être utilisé dans
un milieu domestique uniquement. Le fabricant décline toute responsabilité quant aux dégâts causés par
une utilisation impropre, incorrecte ou irresponsable.
AVERTISSEMENT : An de réduire le risque d’incendie ou d’électrocution, ne retirez pas le capot
ou l’extérieur de l’unité. Ne tentez aucune réparation ou modication de la machine sous peine
d’annuler la garantie. Les réparations doivent être eectuées exclusivement par du personnel
d’assistance autorisé.
CONSERVEZ CES INSTRUCTIONS
CET APPAREIL DOIT ÊTRE UTILISÉ DANS UN MILIEU DOMESTIQUE UNIQUEMENT
INSTRUCTIONS POUR LE CORDON COURT
- Un cordon d’alimentation court est fourni pour réduire les risques d’enchevêtrement ou de trébuchement
sur un cordon plus long.
- Des cordons d’alimentation plus longs et amovibles ou des rallonges sont disponibles et peuvent être
utilisées à condition de prendre des précautions.
27
1. CONSIGNES DE SÉCURITÉ
1.1 Symboles utilisés dans ce mode d'emploi
Les consignes importantes sont accompagnées de ces symboles.
Il est absolument nécessaire de respecter ces consignes.
Danger !
Le non-respect peut être, ou est, la cause de blessures par dé-
charge électrique avec un risque pour la vie.
Attention !
Le non-respect peut être, ou est, la cause de blessures ou de
dommages à l'appareil.
Risque de brûlures !
Le non-respect peut être ou est la cause de brûlures.
Nota Bene :
Ce symbole met en évidence des recommandations et des infor-
mations importantes pour l'utilisateur.
Danger !
Étant donné que l'appareil fonctionne à l'électricité, il n'est pas à
exclure qu'il génère des décharges électriques.
Par conséquent, respecter les consignes de sécurité suivantes :
• Ne pas toucher l'appareil avec les mains ou les pieds
mouillés.
• Ne pas toucher la che avec les mains mouillées.
• S'assurer que la prise de courant utilisée est toujours libre-
ment accessible, an de garantir le débranchement en cas
de besoin.
• Pour débrancher la che de la prise, agir directement sur la
che. Ne jamais tirer le cordon, il pourrait s'abîmer.
• Pour débrancher complètement l'appareil, retirer la che
de la prise de courant.
• En cas de pannes de l'appareil, ne pas tenter de les réparer.
Éteindre l'appareil, retirer la che de la prise et s'adresser à
l'Assistance Technique.
• Avant de réaliser une quelconque opération de nettoyage,
éteindre la machine, retirer la che de la prise de courant et
laisser refroidir la machine.
Attention :
Conserver le matériel d'emballage (sachets en plastique, polys-
tyrène expansé) hors de la portée des enfants.
Risque de brûlures !
Cet appareil produit de l'eau chaude et, quand il est en marche,
de la vapeur d'eau peut se former.
Éviter tout contact avec les éclaboussures d'eau ou la vapeur
chaude.
Quand l'appareil est en marche, le plateau d'appui des tasses
pourrait chauer.
1.2 Utilisation conforme à la destination
Cet appareil est conçu pour la préparation à base de café, lait,
chocolat et pour chauer des boissons.
Toute autre utilisation est à considérer comme impropre et donc
dangereuse. Le constructeur ne répond pas des dommages
découlant d'une utilisation impropre de l'appareil.
1.3 Mode d'emploi
Lire attentivement ces instructions avant d'utiliser l'appareil. Le
non-respect de ces instructions peut causer des blessures et des
dommages à l'appareil.
Le constructeur ne répond pas des dommages découlant du non-
respect de ce mode d'emploi.
Nota Bene :
Conserver soigneusement ce mode d'emploi. En cas de cession
de l'appareil à d'autres personnes, leur remettre également ce
mode d'emploi.
2. INTRODUCTION
Merci d'avoir choisi la machine automatique pour café et
cappuccino.
Nous vous souhaitons de proter pleinement de votre nouvelle
machine. Prenez quelques minutes pour lire ce mode d'emploi.
Vous éviterez ainsi de vous exposer à des risques ou d'endom-
mager la machine.
2.1 Lettres entre parenthèses
Les lettres entre parenthèses correspondent à la légende indi-
quée dans la Description de l'appareil (pages 2-3).
2.2 Problèmes et réparations
En cas de problèmes, essayez avant tout de les résoudre en sui-
vant les instructions fournies dans les chapitres «18. Messages
achés à l’écran» et «19. Résolution des problèmes».
- En cas d’utilisation d’une rallonge, les caractéristiques électriques indiquées doivent être au moins
égales à celles de l’appareil. Si l’appareil est doté d’un cordon à 3 ls avec mise à la terre, la rallonge doit
être un CORDON À 3 FILS AVEC MISE À LA TERRE. Le cordon plus long doit être disposé de sorte qu’il ne
pende
pas du plan de travail ou de la table an d’éviter que les enfants tirent dessus ou qu’il provoque un
trébuchement.
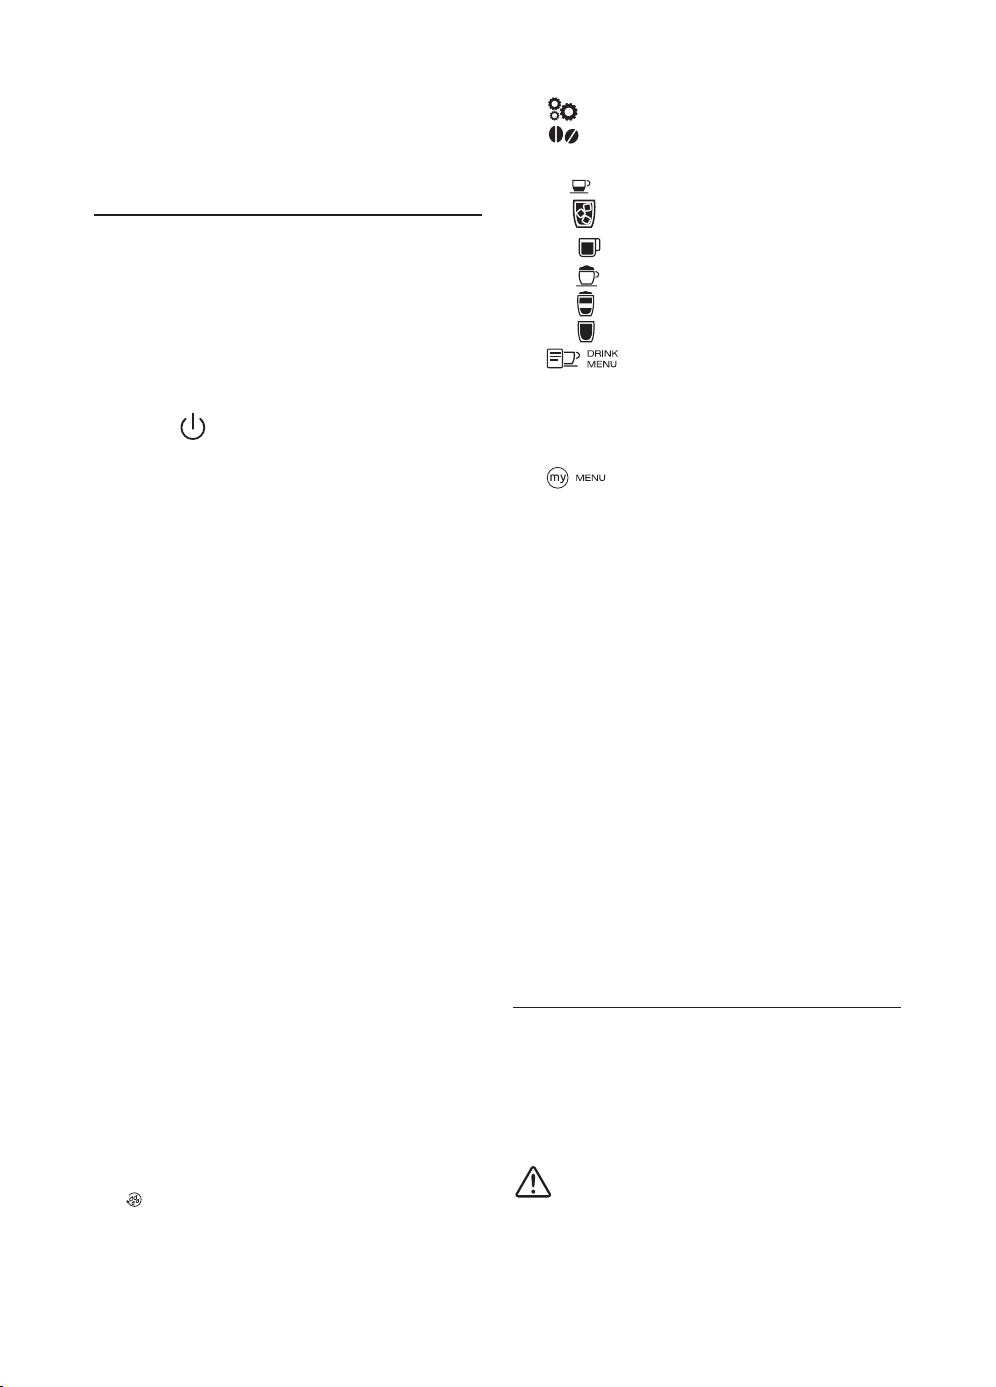
28
En cas d'inecacité ou pour plus d'informations, il est conseillé
de s'adresser au service client en téléphonant au numéro indi-
qué sur la garantie.
3. DESCRIPTION
3.1 Description de l'appareil
(page 2 - A )
A1. Couvercle du réservoir à grains
A2. Couvercle de l'entonnoir pour le café pré-moulu
A3. Réservoir à grains
A4. Entonnoir pour l'introduction de café pré-moulu
A5. Bouton de réglage du degré de mouture
A6. Plateau à tasses
A7. Touche : pour allumer ou éteindre la machine (veille)
A8. Gicleur eau chaude et vapeur
A9. Bec verseur café (hauteur réglable)
A10. Bac de récupération de la condensation
A11. Tiroir à marc de café
A12. Plateau d'appui pour tasses
A13. Indicateur du niveau de l'eau de l'égouttoir
A14. Grille égouttoir
A15. Égouttoir
A16. Couvercle réservoir à eau
A17. Réservoir à eau
A18. Logement du ltre adoucisseur d'eau
A19. Volet infuseur
A20. Infuseur
A21. Cordon d’alimentation
A22. Interrupteur général
3.2 Description du panneau de commande
(page 3 - B )
Certaines touches du panneau ont une double fonction: celle-ci est
signalée entre parenthèses, à l'intérieur de la description.
B1. Écran: il guide l'utilisateur durant l'utilisation de l'appareil.
L'option centrale entre les deux lignes de tirets est celle
sélectionnée.
B2. ▼ Flèche de délement (presser “ESC” pendant la pro-
grammation des boissons pour quitter sans mémoriser)
B3.
OK: pour conrmer la sélection (Durant les premières
secondes de préparation des cafés “espresso”, “ristretto”,
“espresso lungo”, cette touche permet de demander 2 tasses)
B4. ▲ Flèche de délement (“STOP” - Pendant la prépara-
tion/programmation des boissons, cette touche permet
d'interrompre/programmer)
B5.
/ESC: pour eectuer un rinçage.
(En accédant au menu "Réglages", cette touche a la fonction
"ESC": elle permet de quitter la fonction sélectionnée et de
revenir au menu principal)
B6. : menu réglages de l'appareil
B7. : sélection arôme
Boisson a sélection directe:
B8.
: Espresso
B9. : TrueBrew Over Ice
(TM)
Café
B10.
: Long
B11. : Cappuccino
B12. : Caelatte
B13. : Lait Chaud
B14. : Menu de sélection des boissons (diérentes
des boissons à sélection directe): Espresso Lungo, Ristretto,
Doppio+, Cappuccino+, Cappuccino Mix, Latte Macchiato,
Flat White, Espresso Macchiato, 2 Espresso, 2 Ristretto, 2
Espresso Lungo, Eau chaude
B15. : Menu de sélection des boissons personnelles
(my). À la première utilisation, si elles n'ont pas été déjà
programmées depuis le menu "Réglages" “8.4 Programme
My boissons”, il faut procéder directement à la personnali-
sation de la boisson.
3.3 Description des accessoires
(page 3 - C )
C1. Bande réactive
C2. Cuillère-doseuse pour café pré-moulu
C3. Détartrant
C4. Filtre adoucisseur (présent sur certains modèles)
C5. Pinceau de nettoyage
C6. Buse à eau chaude
3.4 Description du pot à lait
(page 3 - D )
D1. Bouton de réglage de la mousse et fonction CLEAN
D2. Couvercle du pot à lait
D3. Pot à lait
D4. Tube de prise du lait
D5. Tube de distribution du lait mousseux (réglable)
4. OPÉRATIONS PRÉLIMINAIRES
4.1 Contrôle de l'appareil
Après avoir retiré l'emballage, s'assurer de l'intégrité de l'appa-
reil et de la présence de tous les accessoires (C). Ne pas utiliser
l'appareil en présence de dommages évidents. S'adresser à
l'Assistance Technique De'Longhi.
4.2 Installation de l'appareil
Attention !
Lors de l'installation de l'appareil, respecter les consignes de
sécurité suivantes :
• La machine émet de la chaleur dans son environnement.
Après avoir placé l'appareil sur le plan de travail, vérier
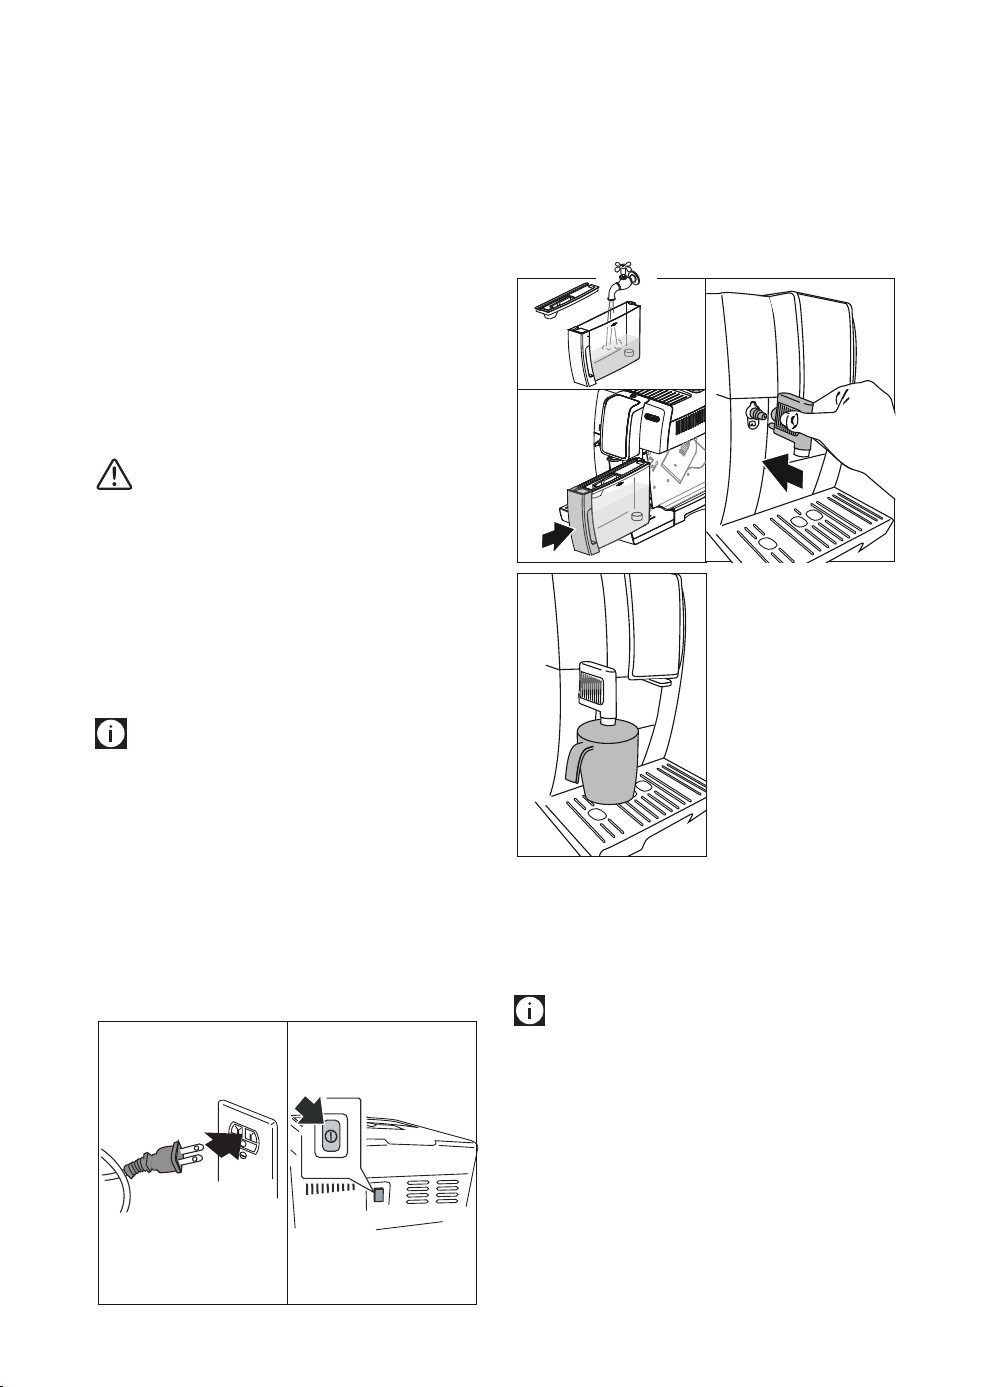
29
qu'il y ait un espace libre d'au moins 3 cm entre les sur-
faces de l'appareil, les parties latérales et la partie arrière,
ainsi qu'un espace libre d'au moins 15 cm au-dessus de la
machine à café.
• L’éventuelle pénétration d’eau dans l'appareil pourrait
l’endommager.
Ne pas placer l'appareil à proximité de robinets d'eau ou
d'éviers.
• L’appareil pourrait s'abîmer si l'eau gèle à l'intérieur.
Ne pas installer l'appareil dans un lieu où la température
peut descendre en dessous du point de congélation.
• Positionner le cordon d'alimentation (C7) an qu'il ne soit
pas abîmé par des arêtes tranchantes ou par le contact avec
des surfaces chaudes (par ex. plaques électriques).
4.3 Branchement de l'appareil
Attention !
S'assurer que la tension du secteur correspond à celle indiquée
sur la plaquette située au-dessous de l'appareil.
Branchez l’appareil exclusivement sur une prise de courant 10A
installée selon les règles de l'art et disposant d’une mise à la
terre ecace.
En cas d’incompatibilité entre la prise de courant et la che de
l'appareil, contacter un électricien qualié pour qu’il remplace
la prise.
4.4 Première mise en marche de la machine
Nota Bene :
• La machine a été contrôlée en usine en utilisant du café ;
il est donc tout à fait normal de trouver des traces de café
dans le moulin. Il est dans tous les cas garanti que cette
machine est neuve.
• Il est conseillé de personnaliser le plus rapidement possible
la dureté de l'eau en suivant la procédure décrite dans le
chapitre «16.2 Réglage de la dureté de l’eau».
1. Brancher l'appareil au secteur (g. 1) et vérier que l’inter-
rupteur général (A22), au dos de l'appareil, est enfoncé
(g. 2) ;
21
L’écran (B1) ache les messages:
2. “Language” (langue): presser la èche de délement (B2)
jusqu'à lire la langue souhaitée entre les deux lignes de
tirets: puis presser OK (B3) pour conrmer.
3. “Remplir le réservoir”: extraire le réservoir à eau (A17), le
remplir jusqu'à la ligne MAX avec de l'eau courante (g.
3A), puis réinsérer le réservoir (g. 3B);
3B
3A
3A
4
4. "Insérer la buse à eau":
Contrôler que la buse
à eau chaude (C6) est
insérée sur le gicleur (A8)
(g. 4) et positionner en
dessous un récipient (g.
5) d'une capacité mini-
male de 100 ml ;
5. L'écran ache le mes-
sage "Circuit d'eau vide,
Remplir circuit, Eau
Chaude, Conrmer?";
6. Appuyer sur la touche OK pour conrmer: l’appareil fait
couler de l'eau par la buse à eau chaude puis s'éteint
automatiquement.
Maintenant, la machine à café est prête pour être utilisée
normalement.
Nota Bene :
• À la première utilisation de la machine, il faut faire 4-5
cafés ou 4-5 cappuccinos avant d’obtenir un résultat
satisfaisant.
• Pour obtenir un café encore meilleur et des performances
optimales de la machine, nous conseillons d’installer le
ltre adoucisseur (C4) en suivant les indications du cha-
pitre «17. Filtre adoucisseur». Si le modèle n’est pas fourni
avec le ltre, il est possible de le demander aux centres
d’assistance agréés De’Longhi.
5
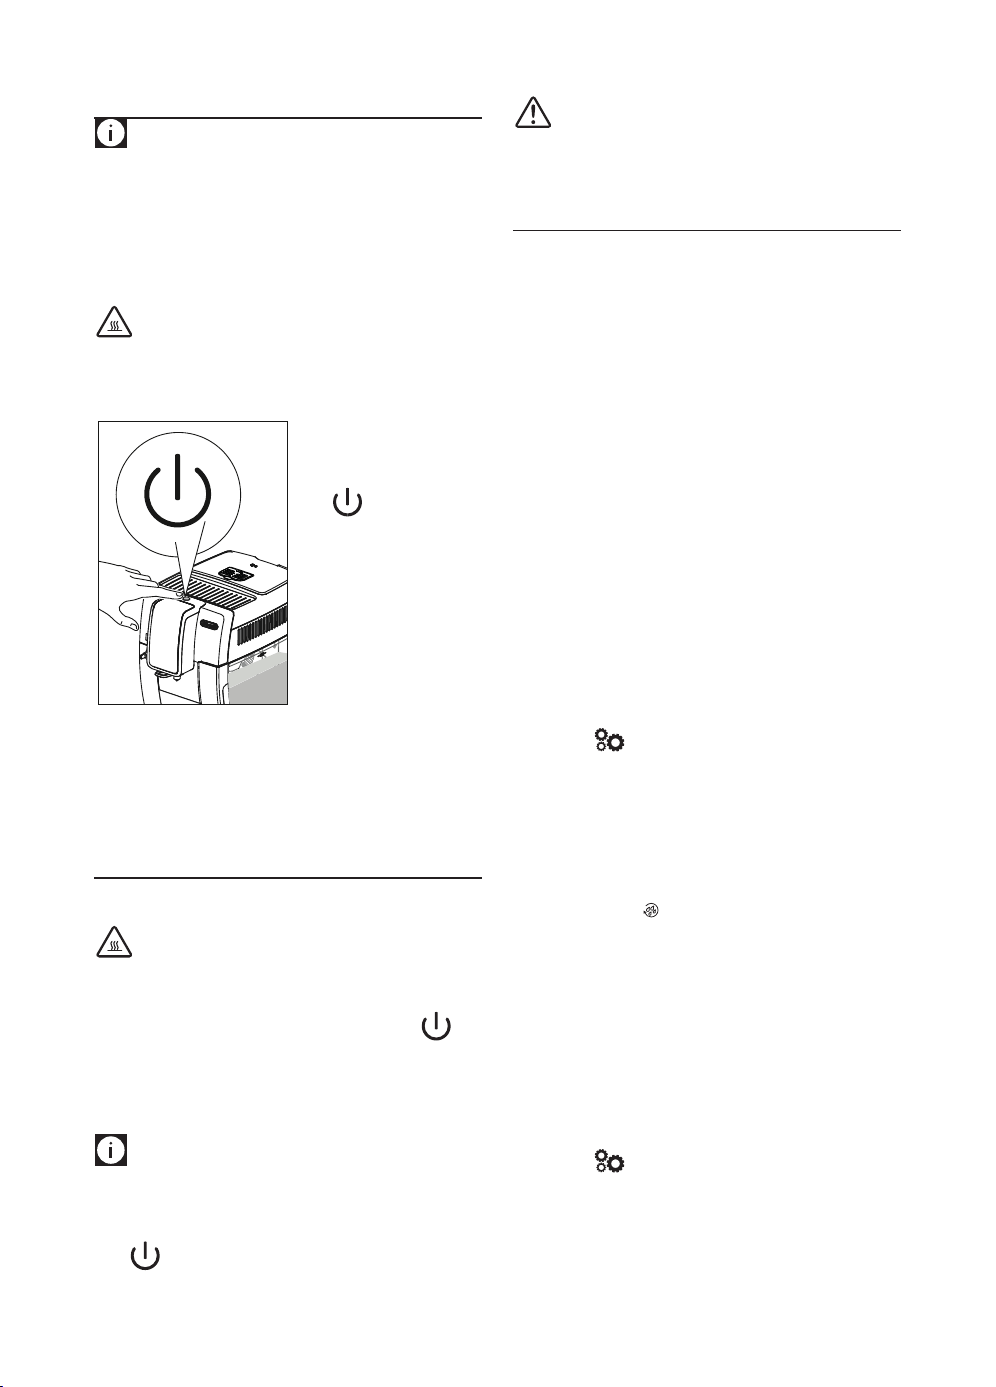
30
5. ALLUMAGE DE L'APPAREIL
Nota Bene :
Avant d'allumer la machine, vérier que l'interrupteur général
(A22) situé au dos de cette dernière soit enfoncé (g. 2).
À chaque allumage, l'appareil eectue automatiquement un
cycle de préchaue et de rinçage qui ne peut pas être interrom-
pu. L'appareil est prêt à l'emploi uniquement après l'exécution
de ce cycle.
Risque de brûlures !
Durant le rinçage, un peu d'eau chaude coule des becs verseurs
de café (A9) ; elle sera récupérée dans l’égouttoir (A15) situé au-
dessous. Éviter tout contact avec les éclaboussures d'eau.
• Pour allumer l'appareil,
appuyer sur la touche
(A7) (g. 6):
l'écran (B1) ache le
message “Chaue, Veuil-
lez patienter”.
Après avoir complété le chauf-
fage, l'écran ache le mes-
sage "Rinçage" et une barre
de progression se remplit au
fur et à mesure que la prépara-
tion avance; de cette manière,
l'appareil chaue la chaudière et fait circuler de l'eau chaude
dans les tuyaux internes pour qu'ils se réchauent.
L’appareil est à la bonne température quand l'écran ache le
message “Sélectionnez votre boisson”.
6. ARRÊT DE L'APPAREIL
À chaque arrêt, l'appareil eectue un rinçage automatique, si
un café a été préparé.
Risque de brûlures !
Durant le rinçage, un peu d'eau chaude coule des becs verseurs
de café (A9). Éviter tout contact avec les éclaboussures d'eau.
• Pour éteindre l'appareil, appuyer sur la touche (A7-
g. 6).
• L'écran ache le message “Arrêt en cours, Veuillez patien-
ter”: si prévu, l’appareil eectue le rinçage puis s'éteint
(veille).
Nota Bene !
Si l'appareil n'est pas utilisé pendant des périodes prolongées,
débrancher l'appareil du secteur :
• éteindre auparavant l'appareil en appuyant sur la touche
(g. 6) ;
• relâcher l'interrupteur général (A22) (g. 2).
6
Attention !
Ne jamais appuyer sur l'interrupteur général quand l'appareil
est allumé.
7. RÉGLAGES DU MENU
Le menu a 6 options, certaines desquelles sont composées de
sous-groupes:
• Langue;
• Entretien:
- Détartrage,
- Installer ltre,
- (si le ltre a été installé): Remplacer ltre,
- (si le ltre a été installé): Retirer le ltre;
• Prg. boissons;
• Prg. My boissons;
• Général:
- Programmer temp.,
- Dureté de l'eau,
- Arrêt automatique,
- Économie d’énergie,
- Signal sonore,
- Boissons d'usine,
- Valeurs d'usine;
• Statistiques.
7.1 Langue
Pour modier la langue de l’écran (B1), procéder comme suit :
1. Presser (B6) pour accéder au menu “Réglages”;
2. Presser OK (B3) pour sélectionner“Langue”. L'écran ache
les langues disponibles;
3. Presser les èches de sélection (B2 et B4) jusqu'à lire la
langue souhaitée entre les deux lignes de tirets;
4. Presser OK pour conrmer;
5. L’appareil revient au menu “Réglages”;
6. Presser ensuite /ESC (B5) pour quitter le menu.
7.2 Entretien
Cette option contient les opérations d'entretien que la machine
demandera au l du temps:
• Détartrage: Pour les instructions concernant le détar-
trage, consulter le chapitre «15. Détartrage».
• Installer ltre: Pour les instructions concernant l'instal-
lation du ltre (C4), consulter le paragraphe «17.1 Installa-
tion du ltre».
Pour sélectionner l'opération souhaitée, procéder comme suit :
1. Presser (B6) pour accéder au menu “Réglages”;
2. Presser les èches de sélection (B2 et B4) jusqu'à lire entre
les deux lignes de tirets le message “Entretien”;
3. Presser OK (B3) pour conrmer;
4. Presser les èches de sélection jusqu'à visualiser l'opéra-
tion souhaitée;
31
5. Presser OK pour conrmer et eectuer les opérations
comme illustré dans les paragraphes dédiés.
7.3 Programme boissons
La machine est préréglée en usine pour débiter des quantités
standards. Pour modier cette quantité et personnaliser les
boissons directes et du (B14), procéder ainsi:
1. Presser (B6) pour accéder au menu “Réglages”;
2. Presser les èches de sélection (B2 et B4) jusqu'à lire entre
les deux lignes de tirets “Prg. boissons”;
3. Presser OK (B3) pour conrmer: l’appareil énumère les
boissons qui peuvent être personnalisées;
4. Presser les èches de sélection jusqu'à lire la boisson à per-
sonnaliser: presser OK pour conrmer;
5. Boissons à base de café: l'écran ache le message
“Programme arôme”: presser les èches de sélection (B2
et B4) ou (B7) jusqu'à sélectionner l'arôme souhaité
(consulter le paragraphe «9.4 Variation temporaire de
l’arôme du café»), presser OK. L'écran ache le message
“Programme café” et une barre progression se remplit au
fur et à mesure que la préparation avance: une fois la quan-
tité souhaitée atteinte, presser OK;
Boissons à base de lait : après avoir sélectionné l'arôme,
l'écran ache le message “Programme lait” et une barre
progression se remplit au fur et à mesure que la prépara-
tion du lait avance: une fois la quantité souhaitée atteinte,
presser OK. L’appareil continue la préparation du café:
presser OK pour interrompre le débit une fois atteint la
quantité de café souhaitée.
Eau chaude : presser OK. La distribution commence: pres-
ser OK une fois atteint la quantité souhaitée.
6. “Enregistrer param.?”: pour sauvegarder la programma-
tion, presser OK (ou bien /ESC - B2 ou B5).
7. “Param.enregistrés” (ou “Param. non enregitr.”). L'appareil
est à nouveau prêt à l'emploi.
7.4 Programme My boissons
Suivre les procédures illustrées dans le paraphe précédent
«7.3 Programme boissons» pour personnaliser les boissons
du “ ” (B14) ou procéder avec la programmation
directe, comme décrit dans le chapitre «12. Programmation et
sélection».
7.5 Général
Cette option contient les réglages pour personnaliser les fonc-
tions de base de la machine:
1. Presser (B6) pour accéder au menu “Réglages”;
2. Presser les èches de sélection (B2 et B4) jusqu'à lire entre
les deux lignes de tirets “Général”;
3. Presser OK (B3) pour conrmer et sélectionner l'option
souhaitée avec les èches de sélection. Suivre les instruc-
tions pour chaque réglage.
• Programmer temp.:
Pour modier la température de l’eau utilisée pour faire le café,
procéder de la façon suivante :
4. Presser OK (B3). L'écran (B1) ache la valeur actuellement
programmée et le message “Nouveau” clignote;
5. Sélectionner la nouvelle valeur avec les èches de sélection
(B2 ou B4);
6. Après avoir sélectionné la valeur souhaitée (basse,
moyenne, haute, maxi), presser OK.
L'appareil revient à l'achage précédent.
• Dureté de l'eau:
Pour les instructions concernant la dénition et le réglage de la
dureté de l’eau, consulter le chapitre «16. Programmation de la
dureté de l’eau».
• Arrêt automatique (veille):
Il est possible de programmer l'arrêt automatique pour que la
machine s'éteigne au bout de 15 ou 30 minutes ou bien au bout
de 1, 2 ou 3 heures d’inutilisation.
4. Presser OK. L'écran (B1) ache la valeur actuellement pro-
grammée et le message “Nouveau” clignote;
5. Sélectionner la nouvelle valeur avec les èches de sélection
(B2 ou B4);
6. Après avoir sélectionné la valeur souhaitée (basse,
moyenne, haute, maxi), presser OK.
L'appareil revient à l'achage précédent.
• Économie d’énergie:
Cette fonction permet d'activer ou de désactiver le mode d'éco-
nomie d’énergie. Lorsque la fonction est active, elle garantit une
consommation d'énergie moindre, conformément aux normes
européennes en vigueur.
Pour désactiver ou réactiver le mode “économie d’énergie”, pro-
céder comme suit :
4. Presser OK. L'écran ache l'état actuel (“Actif” ou “Non
actif”) et l'opération qui sera eectuée en conrmant avec
OK (“Désactiver?” ou “Activer?”);
5. Presser OK pour désactiver ou activer la fonction.
L'appareil revient à l'achage précédent.
Nota Bene !
• Quand la fonction est activée l'écran ache “ECO”.
• En mode économie d'énergie la machine demander
quelques secondes avant de débiter le premier café ou
la première boisson à base de lait car elle doit d'abord
chauer.
• Si le pot à lait (D) est inséré, la fonction “économie d'éner-
gie” ne s'active pas.
• Signal sonore:
Cette fonction permet d'activer/désactiver le signal sonore. Pro-
céder de la manière suivante:
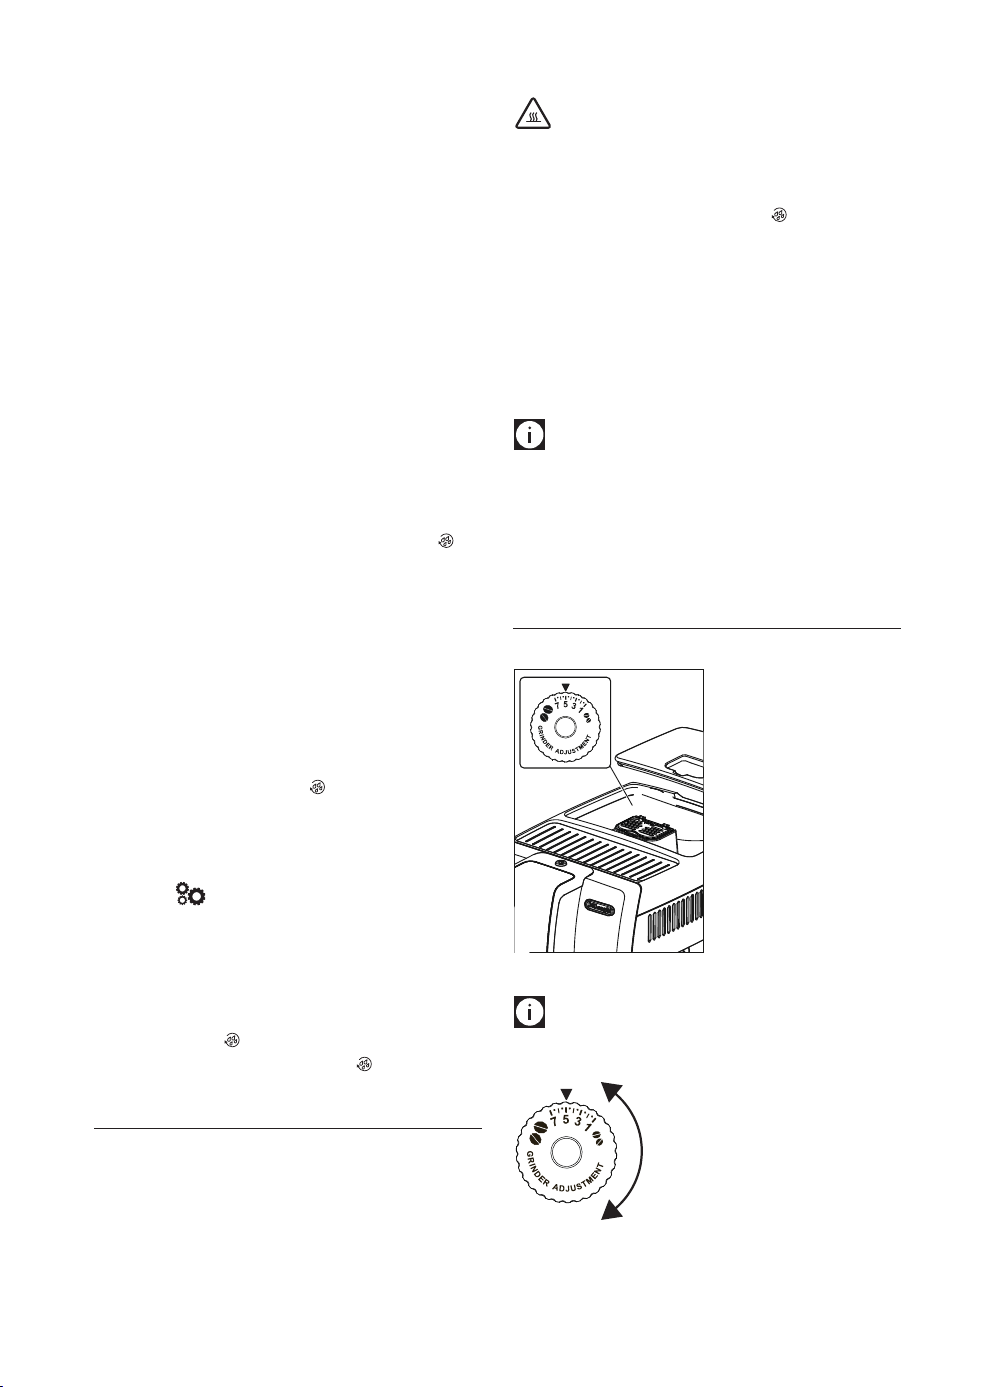
32
4. Presser OK. L'écran (B1) ache l'état actuel (“Actif” ou
“Non actif”) et l'opération qui sera eectuée en conrmant
avec OK (“Désactiver?” ou “Activer?”);
5. Presser OK pour désactiver ou activer la fonction.
L'appareil revient à l'achage précédent.
• Boissons d'usine:
Cette fonction permet de revenir aux réglages d'usine pour
toutes les boissons ou pour chaque boisson programmée. Après
avoir sélectionné la boisson, procéder ainsi:
4. Sélectionner “Toutes” pour revenir aux réglages d'arôme et
de quantité standards programmées en usine pour toutes
les boissons ou bien sélectionner la boisson souhaitée puis
presser OK;
5. “Réinitialiser?”: pour revenir aux valeurs d'usine, presser
OK.
6. “Réinitial. terminée”: l’appareil conrme la réinitialisation
et revient à l'achage précédent.
Pour réinitialiser une autre boisson, procéder à nouveau à partir
du point 4 ou bien, pour quitter cette fonction, presser /ESC
(B5) .
• Valeurs d'usine:
Cette fonction permet de réinitialiser tous les réglages de la
machine et des boissons (à l'exception de la langue qui reste
celle sélectionnée à la première mise en marche). Après avoir
sélectionné l'option, procéder ainsi:
4. “Réinitialiser?”: presser OK;
5. “Réinitial. terminée”: l’appareil conrme la réinitialisation
et revient à l'achage précédent.
Pour quitter cette fonction, presser /ESC (B5).
7.6 Statistiques
Cette fonction permet de visualiser les données statistiques de
la machine. Pour les visualiser, procéder comme suit :
1. Presser (B6) pour accéder au menu “Réglages”;
2. Presser les èches de sélection (B2 et B4) jusqu'à lire entre
les deux lignes de tirets “Statistiques”;
3. Presser OK (B3): l'écran ache les données statistiques
de la machine: faire déler les options avec les èches de
sélection;
4. Presser ensuite /ESC (B5) pour quitter le menu.
Pour revenir à l'achage principal, presser /ESC.
8. RINÇAGE
Cette fonction permet de faire sortir de l'eau chaude par le bec
verseur de café (A9) et par la buse à eau chaude (C6), si insérée,
de sorte à nettoyer et chauer le circuit interne de la machine.
Placer un récipient d'une capacité minimale de 100 ml sous le
bec verseur de café et d'eau chaude.
Attention ! Risque de brûlures.
Ne jamais laisser la machine sans surveillance quand de l'eau
chaude est en cours de distribution.
1) Pour activer cette fonction, presser (B5): l'écran (B1)
ache le message “Rinçage”;
2) Au bout de quelques secondes, de l'eau chaude sort
d'abord du bec verseur de café puis de la buse à eau chaude
(si insérée), pour nettoyer et chauer le circuit interne de
la machine : l’écran ache une barre de progression qui se
remplit au fur et à mesure que la préparation avance;
3) Pour interrompre la fonction, presser la èche correspon-
dant à “STOP” (B4).
Nota Bene !
• Pour des périodes d'inutilisation supérieures à 3-4 jours,
il est vivement conseillé d'eectuer, après avoir allumé la
machine, 2/3 rinçage avant de l'utiliser ;
• Il est tout à fait normal, après avoir eectué cette opéra-
tion, de trouver de l'eau dans le tiroir à marc de café (A11).
9. PRÉPARATION DU CAFÉ
9.1 Réglage du moulin à café
Le moulin à café ne doit pas
être réglé, du moins au début,
car il est déjà préréglé en usine
de sorte à obtenir une bonne
distribution de café.
Toutefois, si après avoir pré-
paré les premiers cafés, la
distribution s'avère peu dense
et avec peu de crème ou trop
lente (au goutte-à-goutte), il
est nécessaire d'eectuer une
correction à l'aide du bouton
de réglage du degré de mou-
ture (A5) (g. 7).
Nota Bene:
Le bouton de réglage doit être tourné uniquement pendant que
le moulin est en marche.
Si le café sort trop lentement ou s'il ne
sort pas du tout, tourner d'un cran dans
le sens des aiguilles d’une montre vers le
numéro 7.
Pour obtenir en revanche une distribution
de café plus dense et améliorer l'aspect
de la crème, tourner d'un cran dans le sens inverse des aiguilles
d’une montre vers le numéro 1 (pas plus d'un cran à la fois, au
risque que le café sorte au goutte-à-goutte).
7
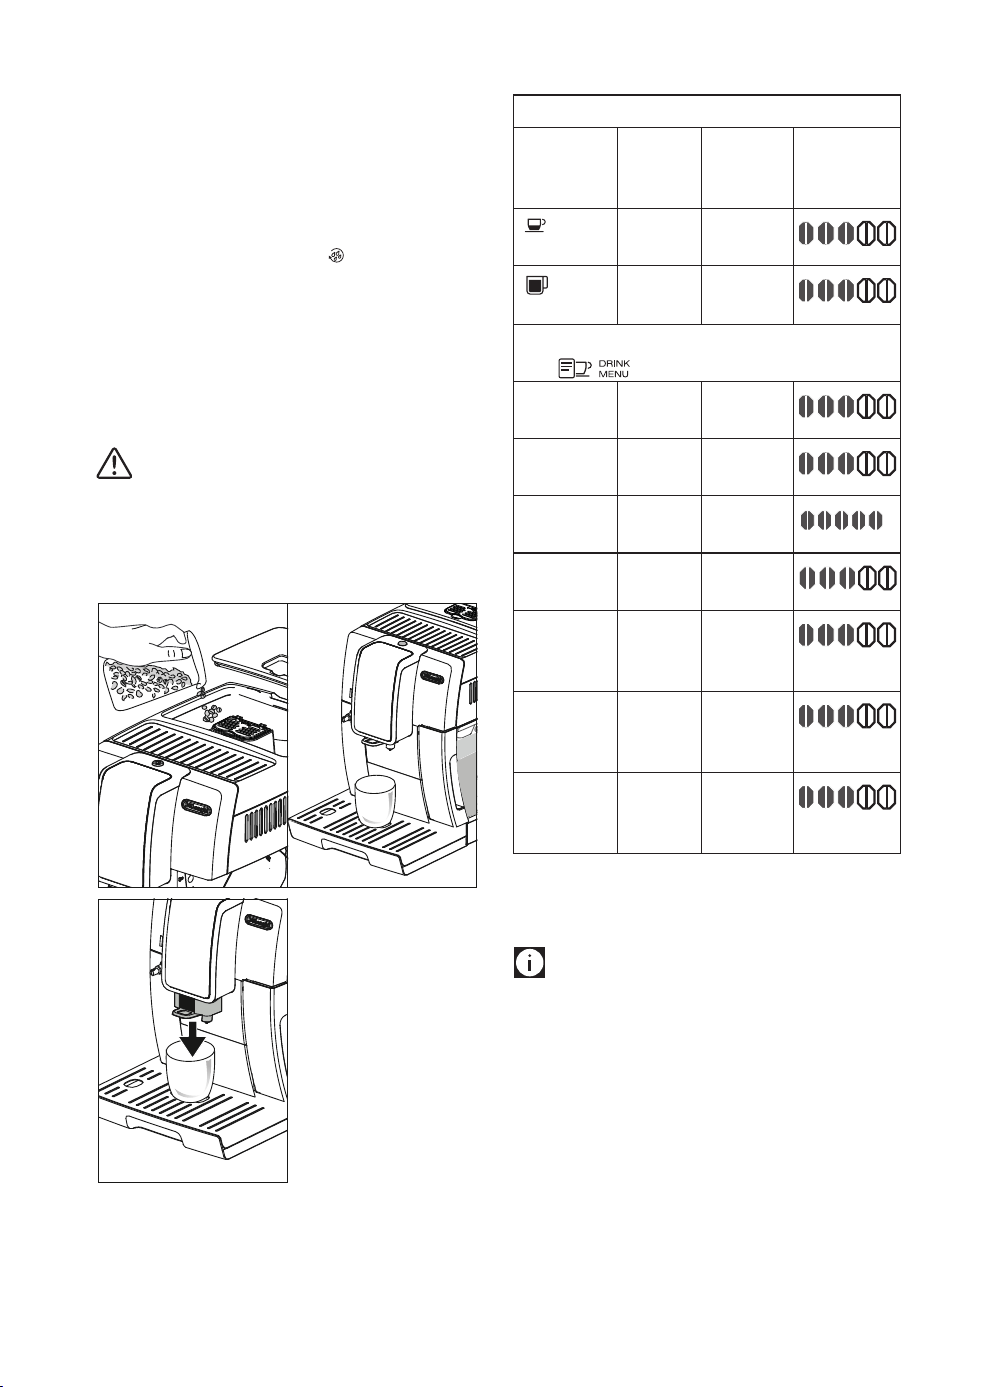
33
L'eet de cette correction se remarque uniquement après la pré-
paration d'au moins 2 cafés. Si après ce réglage, le résultat sou-
haité n'a pas été obtenu, il est nécessaire de répéter la correction
en tournant le bouton d'un autre cran.
9.2 Conseils pour un café plus chaud
Pour obtenir un café plus chaud il est conseillé de :
• eectuer un rinçage en pressant /ESC (B5) (consulter le
paragraphe «8. RINÇAGE»);
• chauer les tasses avec de l'eau chaude utiliser la fonction
eau chaude (voir chapitre «13. Distribution d’eau chaude»);
• augmenter la température du café dans le menu “Ré-
glages” (consulter le paragraphe «7.5 Général»).
9.3 Préparation de recettes automatiques avec
du café en grains
Attention !
Ne pas utiliser des grains de café verts, caramélisés ou conts,
car ils peuvent se coller au moulin à café et le rendre inutilisable.
1. Introduire le café en grains dans le réservoir prévu à cet
eet (A3) (g. 8) ;
8 9
2. Positionner sous les
becs verseurs de café
(A9) :
- 1 tasse, pour 1 café
(g. 9);
- 2 tasse, pour 2 cafés.
3. Baisser la buse de sorte
à l'approcher le plus pos-
sible de la tasse: la crème
sera ainsi meilleure (g.
10);
4. Sélectionner le café
souhaité :
10
Boissons à base de café a sélection directe
Recette Quantité Quantité
program-
mable
Arôme
prédéni
Espresso (B8)
≃ 40 ml
de ≃30 à
≃ 80ml
+
Long (B10)
≃ 160 ml de ≃115 à
≃250 ml
+
Boissons à base de café pouvant être sélectionnées
avec (B14)
Espresso
lungo
≃ 120 ml de≃80 à
≃180 ml
+
Ristretto
≃ 30 ml de ≃20 à
≃40 ml
+
Doppio+
≃ 120 ml de ≃80 à
≃180 ml
+
Coee
≃ 180 ml de ≃100 à
≃240ml
+
2 Espresso
≃ 40 ml
pour 2
tasses
--
+
2 Espresso
lungo
≃ 120
ml pour 2
tasses
--
+
2 Ristretto
≃ 30 ml
pour 2
tasses
--
+
5. La préparation commence et l’écran (B1) ache une barre
de progression qui se remplit au fur et à mesure que la pré-
paration s’eectue.
Nota Bene :
• Il est possible de préparer simultanément 2 tasses de
RISTRETTO, ESPRESSO, ESPRESSO LUNGO en appuyant sur
“2X“ (B3) durant la préparation de chaque boisson (le mes-
sage reste aché pendant quelques secondes au début de
la préparation).
• Pendant que la machine fait le café, la distribution peut
être interrompue à tout moment en appuyant sur la èche
correspondant à “ STOP” (B4).
• Une fois la distribution terminée, pour augmenter la
quantité de café dans la tasse, il sut de maintenir une
des touches de distribution du café appuyée au moins 3
secondes (B8 - B10).
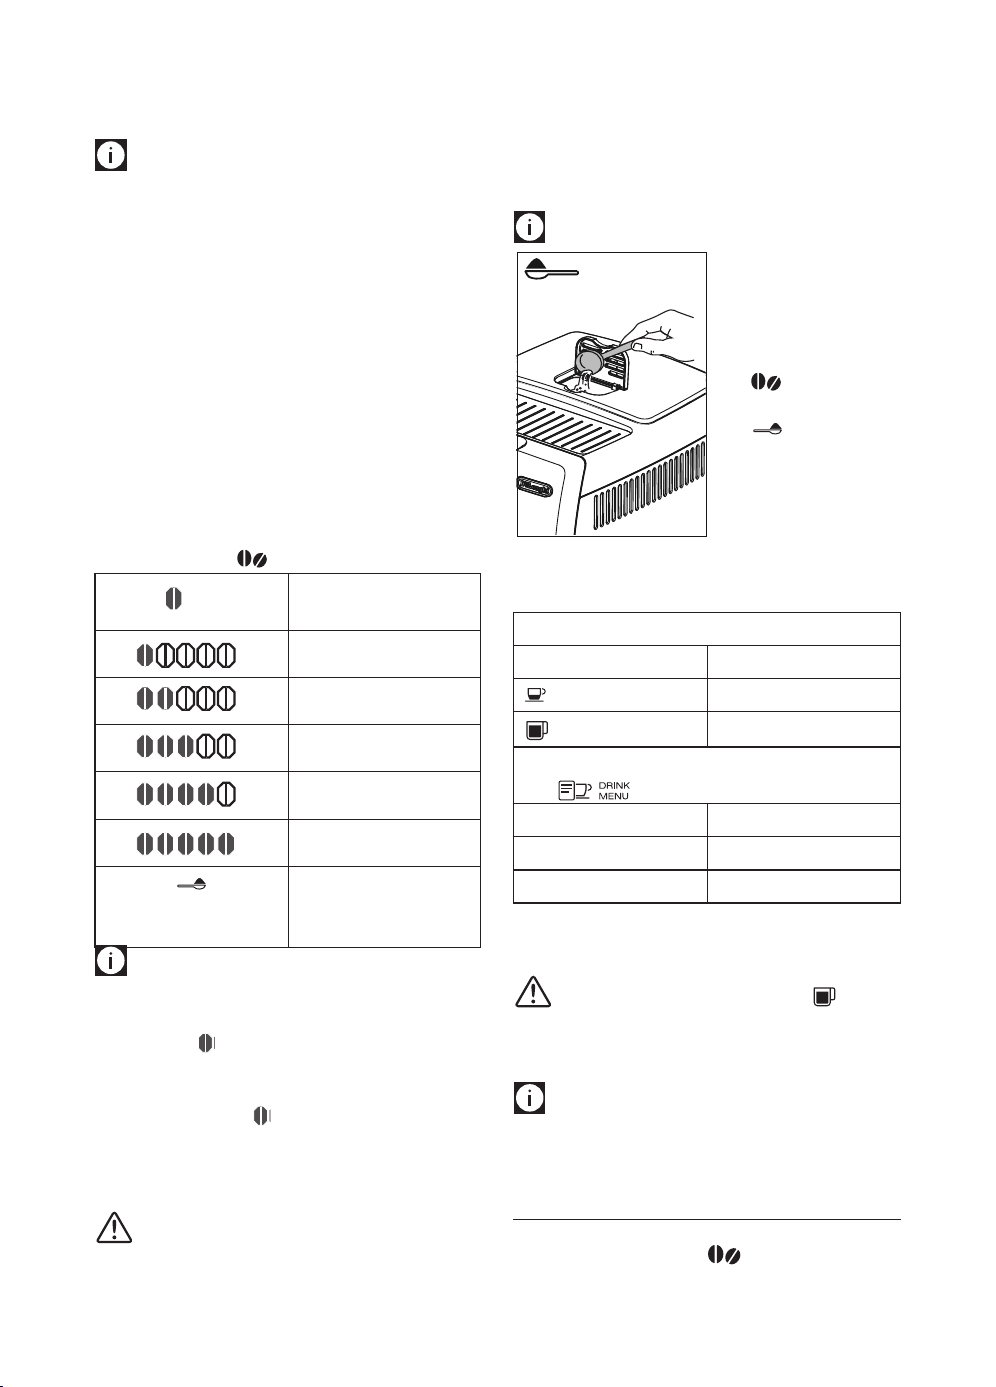
34
Une fois la préparation terminée, l'appareil est prêt pour une
nouvelle utilisation.
Nota Bene :
• Pendant l’utilisation, l’écran ache certains messages
(Remplir le réservoir, vider le tiroir à marc, etc.) dont la
fonction est indiquée dans le chapitre «18. Messages a-
chés à l’écran».
• Pour obtenir un café plus chaud, consulter le paragraphe
«9.2 Conseils pour un café plus chaud».
• Si le café sort au goutte-à-goutte ou s'il est trop liquide,
pas assez crémeux ou trop froid, consulter les conseils indi-
qués dans le paragraphe et dans le chapitre «19. Résolu-
tion des problèmes».
• Pour personnaliser chaque boisson, consulter les para-
graphes «7.3 Programme boissons» et «7.4 Programme
My boissons».
9.4 Variation temporaire de l'arôme du café
Pour personnaliser temporairement l'arôme du café des recettes
automatiques, presser (B7):
+
AUTO
Personnel (si programmé) /
Standard
+
X-LÉGER
+
LÉGER
+
MOYEN
+
FORT
+
X-FORT
Consulter le chapitre “9.5
Préparation du café en uti-
lisant le café pré-moulu”)
Nota Bene:
• La variation d'arôme n'est pas mémorisée et à la prochaine
préparation automatique l'appareil sélectionne la valeur
prédénie (
+
AUTO).
• Si la distribution ne se fait pas quelques secondes après la
personnalisation temporaire de l'arôme, celui-ci revient à
la valeur prédénie (
+
AUTO).
9.5 Préparation du café en utilisant le café
pré-moulu
Attention !
• Ne jamais introduire le café pré-moulu avec la machine
éteinte, pour éviter qu'il ne se répande à l'intérieur de la
machine et qu'il ne la salisse. Dans ce cas, la machine pour-
rait s'abîmer.
• Ne jamais introduire plus d'une cuillère-doseuse rase (C2),
l'intérieur de la machine pourrait se salir ou l'entonnoir
(A4) pourrait se boucher.
Nota Bene :
L’utilisation du café pré-
moulu, ne permet pas de
préparer plus d’une tasse
de café à la fois.
1. Presser plusieurs fois
(B7) jusqu'à ce
qu'à lire (B1) sur l'écran
“ ”.
2. S'assurer que l'enton-
noir ne soit pas bouché,
puis introduire une cuil-
lère-doseuse rase de café
pré-moulu (g. 11).
3. Placer une tasse sous les becs verseurs de café (A9) (g. 9).
4. Sélectionner le café souhaité :
Boissons à base de café a sélection directe
Recette Quantité
Espresso (B8)
≃ 40 ml
Long (B10)
≃ 160 ml
Boissons à base de café pouvant être sélectionnées
avec
(B14)
Espresso lungo
≃ 120 ml
Ristretto
≃ 30 ml
Coee
≃ 180 ml
5. La préparation commence et l’écran ache la boisson et
une barre de progression qui se remplit au fur et à mesure
que la préparation s’eectue.
Attention ! En préparant le café LONG :
Au milieu de la préparation, l'écran (B1), ache le message “In-
troduire le café pré-moulu”. Verser ensuite une cuillère-doseuse
rase de café pré-moulu et presser OK (B3).
Nota Bene:
Si le mode "Économie d'énergie" est activé, la distribution du
premier café pourrait demander quelques secondes d'attente.
10. TRUEBREW OVER ICE™ CAFÈ
1. Ajouter de la glace jusqu’à ce qu’un demi-verre soit rem-
pli (g. 12), appuyer sur (B8) jusqu’à sélectionner
11
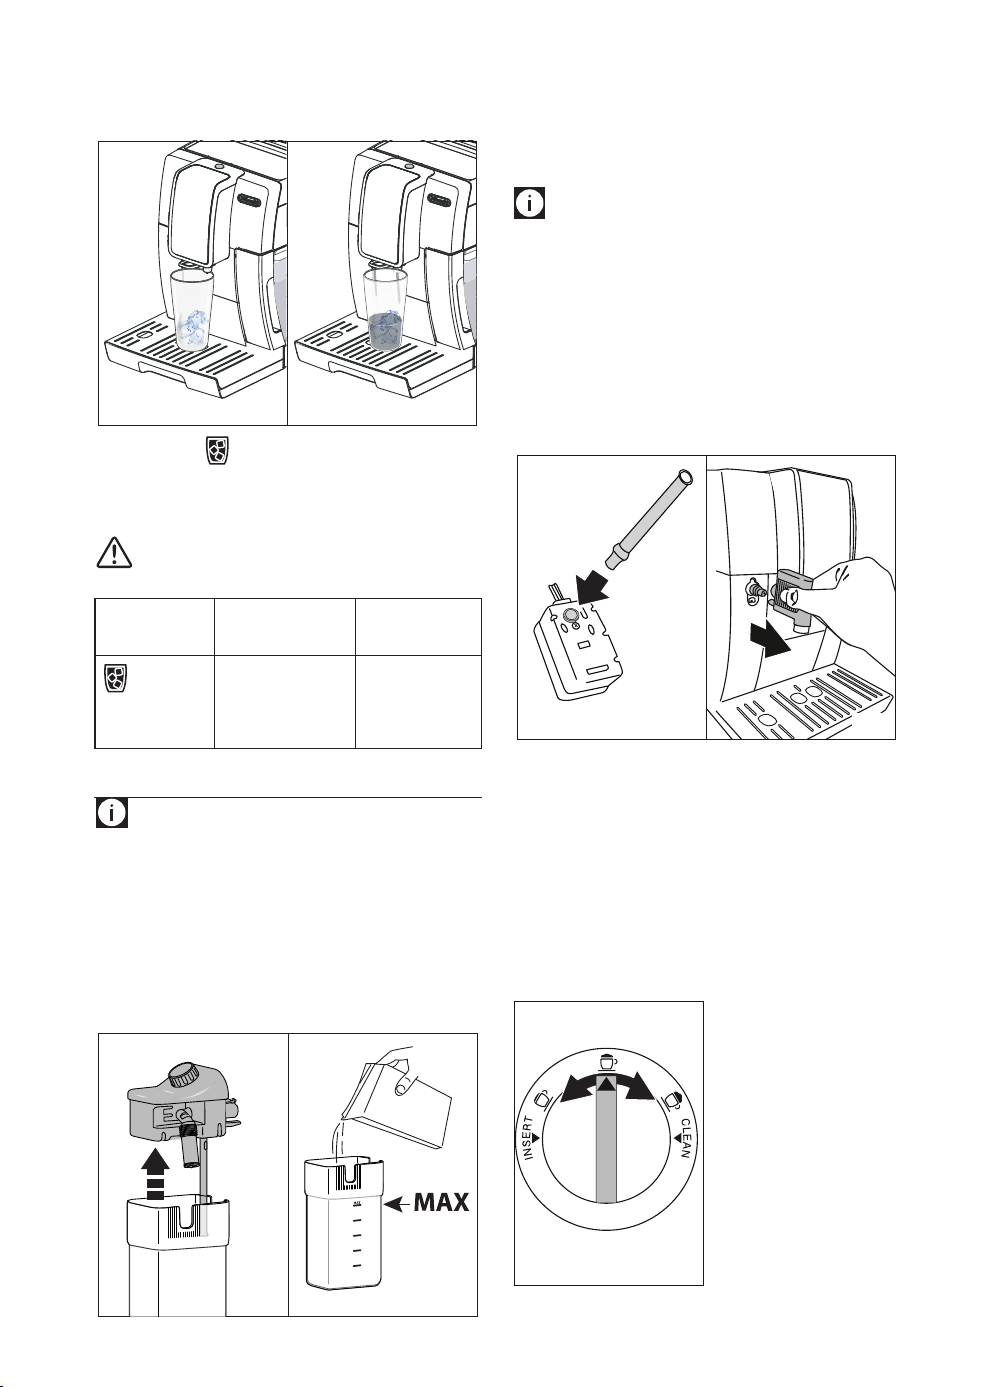
35
l’arôme souhaité (fort ou extra fort conseillè) et placez le
verre sous les becs verseurs de café;
13
12
2. Appuyer sur TrueBrew Over Ice™: la préparation com-
mence (g. 13);
3. Ajoutez 3 glaçons de plus dans le verre / café plus le sirop,
édulcorant ou lait souhaité et dégustez.
Attention !
Toujours utiliser des verres résistant aux chocs thermiques.
Recette Quantité Quantité
programmable
TrueBrew Over
Ice™ cafè (B9)
≃ 3.38 oz /
100 ml
de ≃ 1.35 oz/
40 ml à ≃8.11
oz / 240ml
11. PRÉPARATION DE BOISSONS AU LAIT
Nota Bene :
• Pour éviter d’avoir un lait peu mousseux ou avec de grosses
bulles, il faut toujours nettoyer le couvercle du pot à lait
(D2) et le gicleur d’eau chaude (A8) comme décrit dans les
paragraphes «11.4 Nettoyage du pot à lait après chaque
utilisation», «14.10 Nettoyage du pot à lait» et «14.11 Net-
toyage du gicleur eau chaude».
11.1 Remplir et replacer le pot à lait
1. Enlever le couvercle (D2) (g. 14) ;
15
MILK
14
2. Remplir le pot à lait (D3) avec une quantité de lait su-
sante, mais sans dépasser le niveau MAX inscrit sur le pot
(g. 15). Se rappeler que chaque cran imprimé sur le côté
du réservoir correspond à 100 ml de lait ;
Nota Bene:
• Pour obtenir une mousse plus dense et homogène, utili-
ser du lait écrémé ou demi-écrémé et à la température du
réfrigérateur (environ 5°C).
• Si le mode "Économie d'énergie" est activé, la distribution
du cappuccino pourrait demander quelques secondes
d'attente.
3. S'assurer que le tube de prise du lait (D4) soit bien inséré
dans le logement prévu sur le fond du couvercle du pot à
lait (g. 16);
16 17
4. Remettre le couvercle du pot à lait en place ;
5. Enlever la buse à eau chaude (C6) du gicleur (A8) (g. 17);
6. Accrocher le pot à lait au gicleur (g. 18) en le poussant à
fond : la machine émet un signal sonore (si la fonction est
active) ;
7. Placer une tasse susamment grande sous les becs ver-
seurs de café (A9) et sous le tube de distribution du lait
mousseux (D5) ; régler la longueur du tube de distribution
du lait pour l’approcher de la tasse, en le tirant simplement
vers le bas (g. 19);
8. Suivre les indications
reportées ci-après
pour chaque fonction
spécique.
11.2 Régler la quantité
de mousse
En tournant le bouton de
réglage de la mousse (D1), il
est possible de sélectionner la
quantité de mousse de lait qui
sera distribuée pendant la pré-
paration des boissons au lait.
20

36
Position
du bouton
Description Conseillé pour...
Pas de
mousse
LAIT CHAUD (non mousseux)
/CAFFELATTE
Peu de
mousse
LATTE MACCHIATO/
FLAT WHITE
Max. mousse CAPPUCCINO/ CAP-
PUCCINO+ / ESPRESSO
MACCHIATO / LAIT CHAUD
(mousseux)
11.3 Préparation automatique de boissons à
base de lait
1. Remplir et accrocher le pot à lait (D) de la façon illustrée
précédemment.
2. Sélectionner la boisson souhaitée :
À sélection directe:
•
: Cappuccino (B11)
• : Latte Macchiato (B12)
• : Lait Chaud (B13)
À sélectionner avec (B14):
• Cappuccino+
• Caelatte
• Flat white
• Espresso macchiato;
3. Après quelques secondes, l'appareil commence automa-
tiquement la préparation et l’écran ache une barre de
progression qui se remplit au fur et à mesure que la prépa-
ration s’eectue.
4. Après avoir préparé le lait la machine prépare automati-
quement le café (pour les boissons qui le prévoient).
Nota Bene :
• Pour interrompre la préparation pendant la distribution,
presser la èche correspondant à “STOP” (B4).
• Ne pas laisser le pot à lait trop longtemps hors du réfrigé-
rateur : plus la température du lait monte (5°C idéale), plus
la qualité de la mousse baisse.
• Les boissons peuvent être personnalisées (consulter les pa-
ragraphes «7.3 Programme boissons» et «7.4 Programme
My boissons»).
11.4 Nettoyage du pot à lait après chaque
utilisation
Attention ! Risque de brûlures
• Durant le nettoyage des conduits internes du pot à lait (D),
de la vapeur et un peu d'eau chaude sortent du tube de
distribution du lait mousseux (D5). Éviter tout contact avec
les éclaboussures d'eau.
Après chaque utilisation des fonctions lait, l'acheur (B1)
ache le message clignotant “Bouton sur CLEAN, ESC pour
annuler”. Lancer un nettoyage pour éliminer les résidus de lait
de la façon suivante “
/ESC” (B5) pour repousser l’opération):
1. Laisser le pot à lait (D) dans la machine (il n'est pas néces-
saire de le vider) ;
2. Placer une tasse ou un autre récipient sous le tube de sortie
du lait mousseux:
2221
3. Positionner le bouton mousse (D1) sur “CLEAN” (g. 21):
l'écran ache une barre de progression qui se remplit au
fur et à mesure que la préparation s'eectue et le message
“Nettoyage en cours”. Le nettoyage s’interrompt automati-
quement ;
4. Remettre le bouton de réglage sur l’une des sélections de
la mousse ;
5. Enlever le pot à lait et toujours nettoyer le gicleur vapeur
(A8) avec une éponge (g. 22).
Nota Bene !
• Pour préparer plusieurs tasses de boissons à base de lait,
procéder avec le nettoyage du pot à lait après la dernière
préparation: dans ce cas, presser /ESC - B5 pour revenir
au menu principal.
• Le lait resté dans le pot à lait peut être conservé au
réfrigérateur.
• Dans certains cas, pour eectuer le nettoyage, il faut at-
tendre la chaue de la machine.
12. “ ” PROGRAMMATION ET SÉLECTION
La fonction permet de sélectionner les boissons per-
sonnalisées selon ses propres goûts. Si les boisson n'ont jamais
été programmées, l'appareil en demande la personnalisation
avant de procéder à la préparation:
1. Presser (B15);
2. Presser les èches de sélection (B2 et B4) jusqu'à lire la
boisson souhaitée entre les deux lignes de tirets;
Boissons non programmées:
3. Presser OK (B3) pour sélectionner;
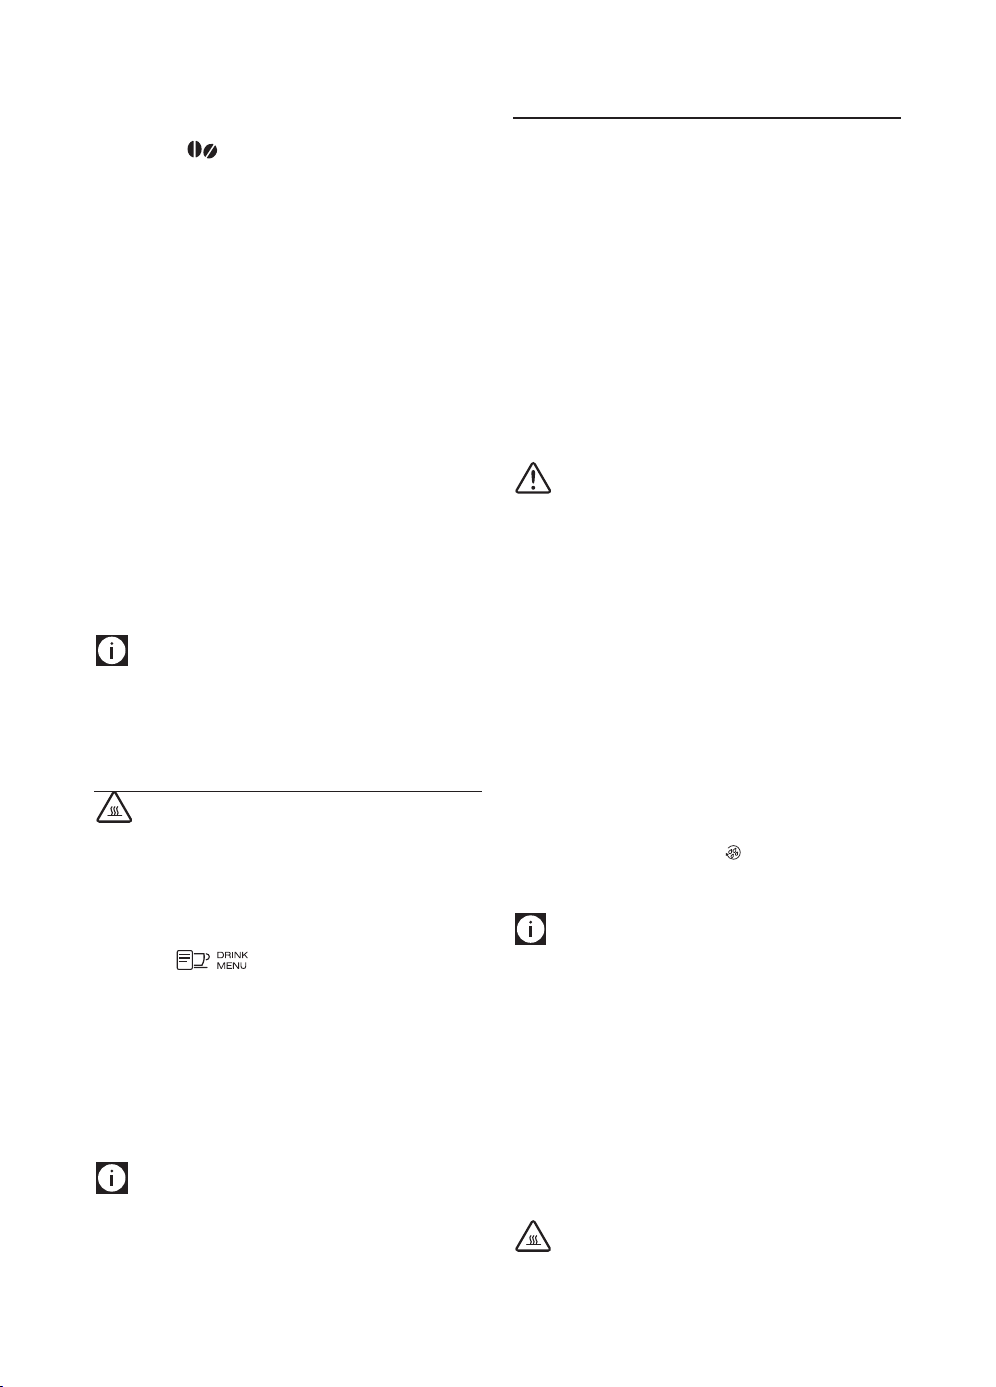
37
4. Boissons à base de café: l'écran ache le message
“Programme arôme”: presser les èches de sélection (B2
et B4) ou (B7) jusqu'à sélectionner l'arôme souhaité.
Presser OK: L'écran ache le message “Programme café” et
une barre progression se remplit au fur et à mesure que la
préparation avance: une fois la quantité souhaitée atteinte,
presser OK.
5. Boissons à base de lait : après avoir sélectionné l'arôme,
l'écran ache le message “Programme lait” et une barre
progression se remplit au fur et à mesure que la prépara-
tion du lait avance: une fois la quantité souhaitée atteinte,
presser OK.
6. L’appareil continue la préparation du café: presser OK pour
interrompre le débit une fois atteint la quantité de café
souhaitée.
7. “Enregistrer param.?”: pour sauvegarder la programma-
tion, presser OK (ou bien ESC - B2 ou B5).
8. “Param.enregistrés” (ou “Param. non enregitr.”). L'appareil
est à nouveau prêt à l'emploi.
Boissons programmées:
3. Presser OK (B3) pour sélectionner;
4. L'appareil commence la préparation selon les réglages pré-
cédemment eectués.
Nota Bene:
Les boissons pour 2 tasses pourront être sélectionnées seule-
ment quand après avoir programmé les boissons simples leur
correspondant.
13. DISTRIBUTION D'EAU CHAUDE
Attention ! Risque de brûlures.
Ne jamais laisser la machine sans surveillance quand de l'eau
chaude est en cours de distribution.
1. Contrôler que la buse à eau chaude (C6) soit bien accrochée;
2. Placer un récipient sous la buse (le plus près possible an
d’éviter les éclaboussures) (g. 5);
3. Presser (B14) et faire déler les boisson du
menu à l'aide des èches de sélection (B2 ou B4) jusqu'à
sélectionner “Eau chaude”;
4. Presser OK (B3): l'écran ache barre de progression qui se
remplit au fur et à mesure que la préparation s’eectue.
5. La machine fait couler environ 250 ml d’eau chaude
puis interrompt automatiquement la distribution. Pour
interrompre manuellement la distribution d’eau chaude,
appuyer sur la èche correspondant à “ STOP” (B4).
Nota Bene:
• Si le mode "Économie d’énergie" est activé, la sortie d'eau
chaude pourrait demander quelques secondes d'attente.
• La quantité d'eau débitée peut être personnalisée (consul-
ter le paragraphe «7.3 Programme boissons»).
14. NETTOYAGE
14.1 Nettoyage de la machine
Les pièces suivantes de la machine doivent être nettoyées péri-
odiquement :
- le circuit interne de la machine ;
- le tiroir à marc de café (A11) ;
- l'égouttoir(A15) et le bac de récupération de la condensa-
tion (A10);
- le réservoir à eau (A17) ;
- les becs verseurs de café (A9) ;
- l'entonnoir pour l'introduction de café pré-moulu (A4) ;
- l’infuseur (A20), accessible après avoir ouvert le volet de
service (A19) ;
- le pot à lait (D) ;
- le gicleur eau chaude/vapeur (A8) ;
Attention !
• Pour le nettoyage de la machine, ne pas utiliser de sol-
vants, de nettoyants abrasifs ou de l'alcool. Avec les super-
automatiques De'Longhi, il n'est pas nécessaire d'utiliser
d'adjuvants chimiques pour le nettoyage de la machine.
• Aucune partie de l'appareil ne peut être lavée au lave-vais-
selle, à l’exception de la grille égouttoir (A14) et du pot à
lait (D).
• Ne pas utiliser d'objets métalliques pour retirer les incrus-
tations ou les dépôts de café car ils pourraient rayer les
surfaces en métal ou en plastique.
14.2 Nettoyage du circuit interne de la machine
Pour des périodes d'inutilisation supérieures à 3/4 jours, il est
vivement conseillé, avant de l'utiliser, d'allumer la machine et
de faire :
- 2/3 rinçages en appuyant sur (B5);
• couleur de l'eau chaude, pendant quelques secondes (cha-
pitre «13. Distribution d’eau chaude»).
Nota Bene:
Il est tout à fait normal, après avoir eectué ce nettoyage, de
trouver de l'eau dans le tiroir à marc de café (A11).
14.3 Nettoyage du tiroir à marc de café
Lorsque l’écran (B1) ache le message “Vider le tiroir à marc”,
il faut le vider et le nettoyer. Tant que le tiroir à marc (A11) n'est
pas nettoyé, la machine ne peut pas faire de café. L'appareil
signale la nécessité de vider le tiroir à marc de café même s'il
n'est pas plein, si 72 heures se sont écoulées depuis la première
préparation eectuée (pour que le décompte des 72 heures soit
eectué correctement, la machine ne doit jamais être éteinte
avec l'interrupteur général - A22).
Attention ! Risque de brûlures
Après la distribution de plusieurs cappuccinos consécutifs, le
plateau métallique d'appui des tasses (A12) devient chaud.
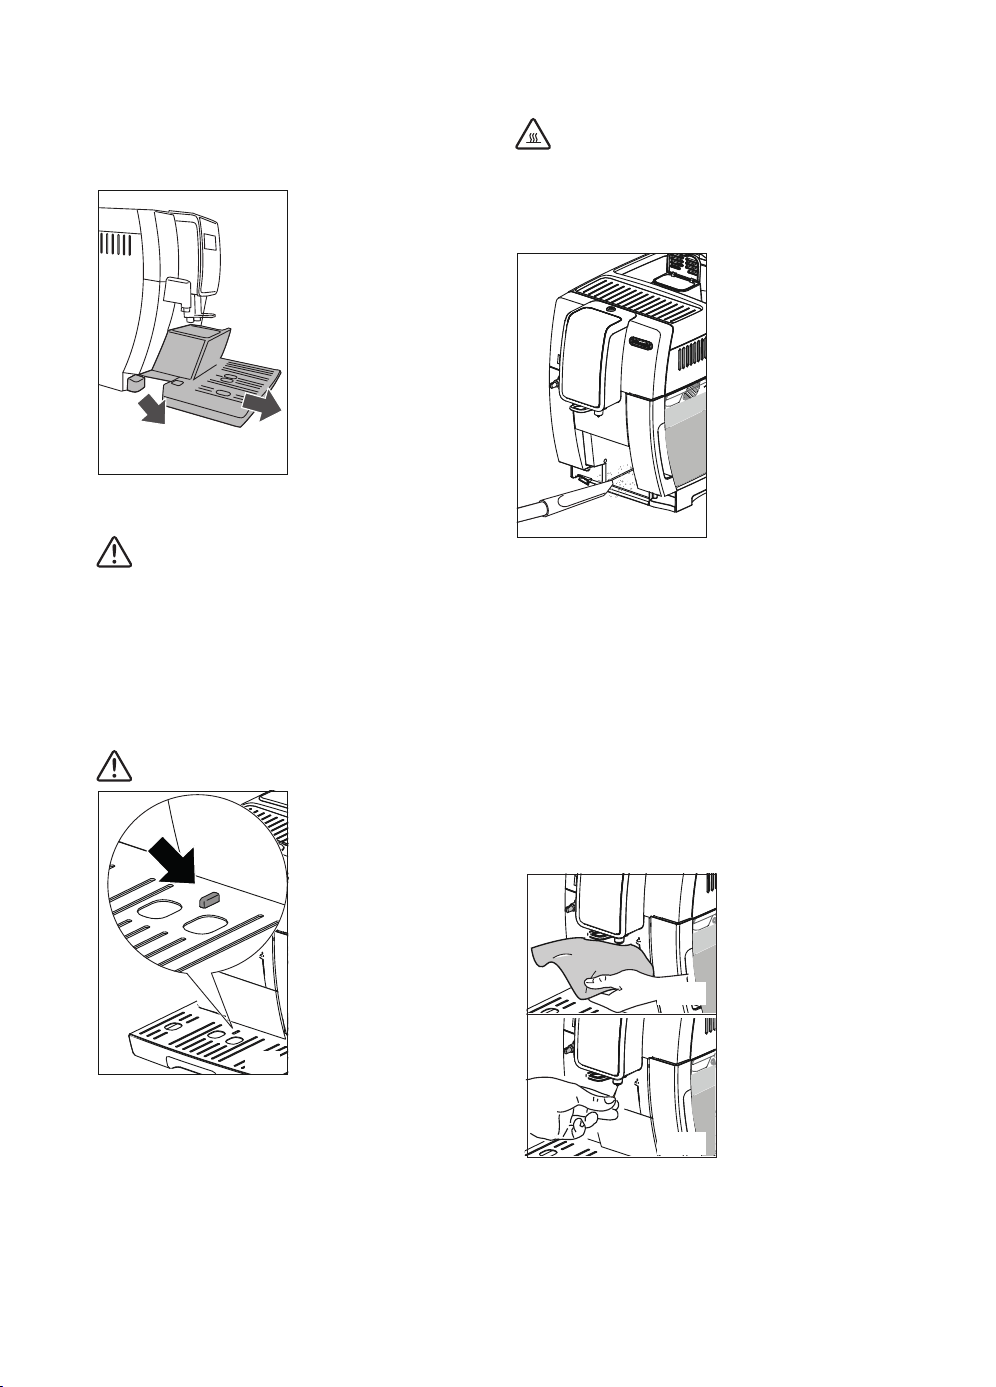
38
14.5 Nettoyage interne de la machine
Risque de décharges électriques !
Avant de réaliser les opérations de nettoyage des parties in-
ternes, la machine doit être éteinte (consulter le chapitre «6.
Arrêt de l’appareil») et débranchée du réseau électrique. Ne ja-
mais plonger la machine dans l'eau.
1. Contrôler régulière-
ment (environ une fois
par mois) que l’intérieur
de la machine (acces-
sible après avoir enlevé
l’égouttoir - A15) n’est
pas sale. Si nécessaire,
enlever les dépôts de
café à l'aide du pinceau
(C5) fourni et d'une
éponge.
2. Aspirer tous les résidus à l’aide d’un aspirateur (g. 25).
14.6 Nettoyage du réservoir à eau
1. Nettoyer régulièrement (environ une fois par mois) et à
chaque remplacement du ltre adoucisseur (C4)(si prévu)
le réservoir à eau (A17) à l'aide d'un chion humide et d'un
peu de nettoyant doux.
2. Retirer le ltre (C4) (si présent) et le rincer à l'eau courante;
3. Remettre le ltre (si prévu), remplir le réservoir avec de
l'eau fraîche et remettre le réservoir ;
4. (seulement pour les modèles équipés de ltre adoucisseur)
Faire couler 100 ml d'eau.
14.7 Nettoyage des becs verseurs de café
1. Nettoyer régulièrement
les becs verseurs de
café (A9) en utilisant
une éponge ou un chif-
fon (g. 26A) ;
2. Contrôler que les trous
des becs verseurs de
café ne soient pas
bouchés. Si nécessaire,
enlever les dépôts de
café à l'aide d'un cure-
dents (g. 26B).
14.8 Nettoyage de l’entonnoir pour
l’introduction du café pré-moulu
Contrôler périodiquement (environ une fois par mois) que
l’entonnoir pour l’introduction du café pré-moulu (A4) ne soit
25
26A
26B
Attendre qu’il refroidisse avant de le toucher, et le saisir unique-
ment par l'avant.
Pour eectuer le nettoyage (avec la machine allumée) :
• Extraire l'égouttoir
(A15) (g. 23), le vider et
le nettoyer.
• Vider et nettoyer soi-
gneusement le tiroir à
marc (A11) en prenant
soin de retirer tous les
résidus qui peuvent se
déposer au fond : le pin-
ceau fourni (C5) est doté
d'une brosse adaptée à
cette opération.
• Contrôler le bac de récupération de la condensation (A10)
(rouge) et le vider s'il est plein.
Attention !
Lors de l'extraction de l'égouttoir, il est obligatoire de toujours
vider le tiroir à marc de café même s'il est peu rempli.
Si cette opération n'est pas eectuée, lors de la préparation des
cafés suivants, le tiroir à marc de café peut se remplir plus que
prévu et obstruer la machine.
14.4 Nettoyage de l'égouttoir et du bac de
récupération de la condensation
Attention !
L'égouttoir (A15) est doté
d’un otteur (A13 - rouge)
qui indique le niveau d’eau
présent (g. 24). Avant que
cet indicateur ne commence
à dépasser du plateau métal-
lique d'appui des tasses (A12),
il faut vider l'égouttoir et le
nettoyer, autrement l'eau peut
déborder et endommager la
machine, le plan d'appui ou la
zone autour.
Pour retirer l'égouttoir:
1. Extraire l’égouttoir et le tiroir à marc de café (A11) (g. 21) ;
2. Retirer le plateau d'appui des tasses (A12), la grille égout-
toir (A14), vider ensuite l'égouttoir et le tiroir à marc de
café et laver tous les éléments;
3. Contrôler le bac de récupération de la condensation rouge
(A10) et le vider s'il est plein.
4. Remettre en place l’égouttoir, la grille et le tiroir à marc de
café.
23
24
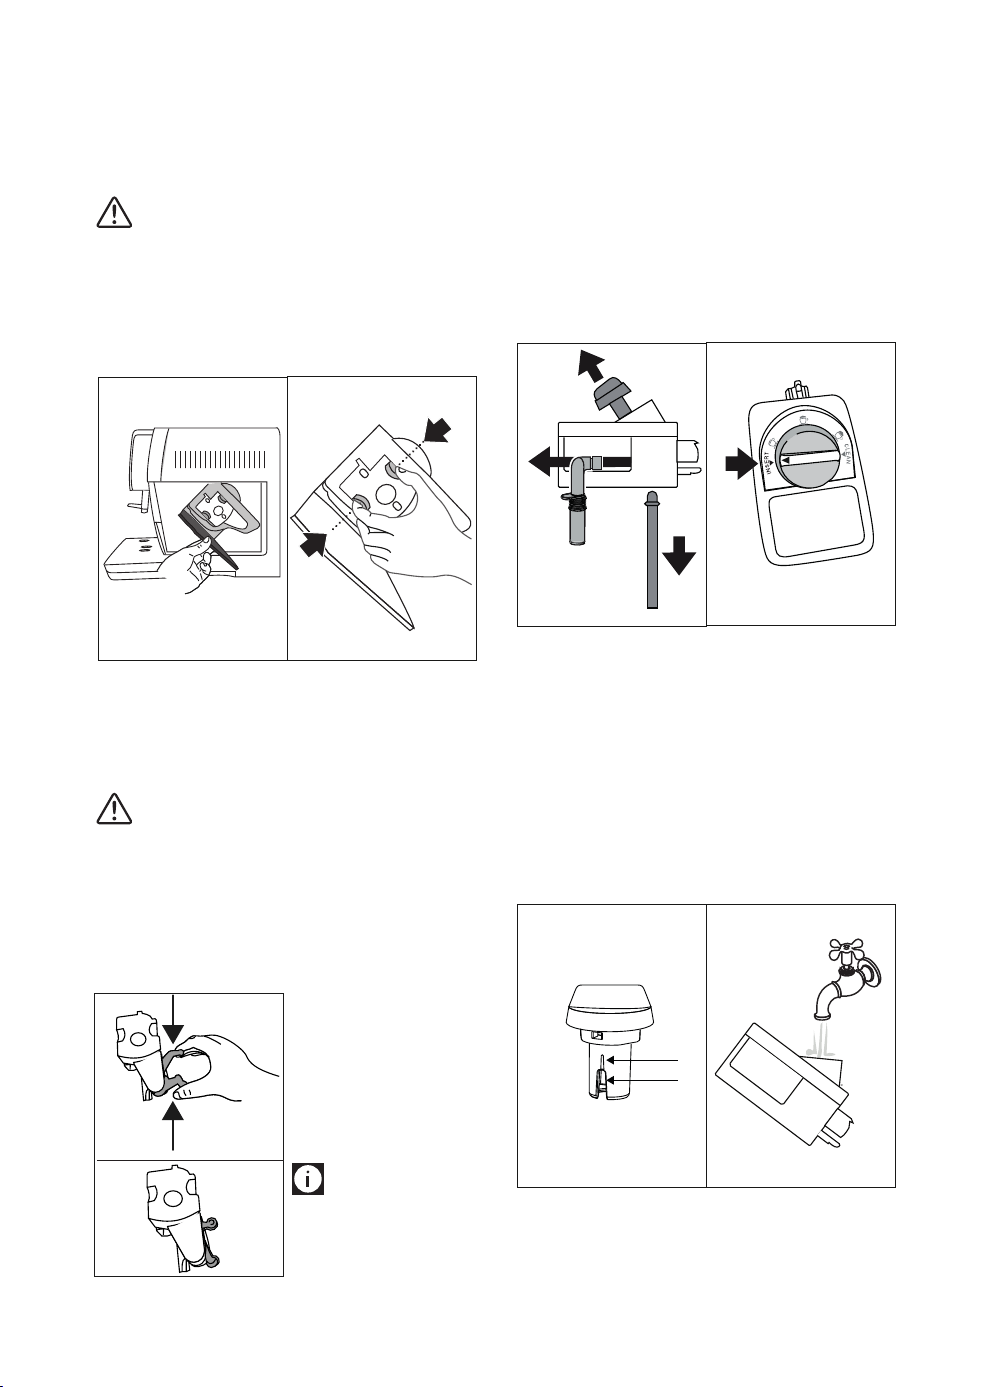
39
pas bouché. Si nécessaire, enlever les dépôts de café à l'aide du
pinceau (C5) fourni.
14.9 Nettoyage de l'infuseur
L’infuseur (A20) doit être nettoyé au moins une fois par mois.
Attention !
L'infuseur ne peut pas être extrait quand la machine est allumée.
1. S'assurer que la machine ait eectué correctement l'arrêt
(voir chapitre «6. Arrêt de l’appareil»);
2. Extraire le réservoir à eau (A17);
3. Ouvrir le volet infuseur (A19) ( g. 25) situé sur le côté
droit;
27
28
PUSH
PUSH
4. Pousser vers l’intérieur les deux boutons de décrochage
tout en tirant l’infuseur vers l’extérieur pour l’extraire (g.
28) ;
5. Plonger pendant environ 5 minutes l'infuseur dans l'eau
puis le rincer sous le robinet ;
Attention !
RINCER UNIQUEMENT À L'EAU
PAS DE NETTOYANTS - PAS DE LAVE-VAISSELLE
Nettoyer l'infuseur sans utiliser de nettoyants, il pourrait
s'abîmer.
6. À l'aide du pinceau (C5), nettoyer les éventuels résidus de
café sur le logement de l'infuseur, visibles par le volet
infuseur.
7. Après le nettoyage,
remettre l'infuseur
en place en l'enlant
dans le support; puis
appuyer sur l'inscription
PUSH jusqu'au « clic »
d'accrochage
Nota Bene :
Si l'infuseur est dicile à insé-
rer, il est nécessaire (avant l'in-
sertion) de le mettre à la bonne
dimension en appuyant sur les
deux leviers (g. 27).
29
8. Une fois inséré, s'assurer que les deux boutons rouges aient
joué (g. 29) ;
9. Fermer le volet infuseur.
10. Réinsérer le réservoir à eau
14.10 Nettoyage du pot à lait
Nettoyer le pot à lait (D) après chaque préparation du lait, en
suivant les instructions suivantes:
1. Extraire le couvercle (D2) ;
2. Retirer le tube de distribution du lait (D5) et le tube de
prise (D4 - g. 30);
30
31
3. Tourner dans le sens inverse des aiguilles d'une montre le
bouton de réglage de la mousse (D1) jusqu'à la position
"INSERT" (g. 31) et l'extraire en le tirant vers le haut.
4. Laver soigneusement tous les composants à l'eau chaude
et avec un nettoyant doux. Tous les composants peuvent
être lavés au lave-vaisselle, à condition de les placer dans
le panier supérieur.
Faire particulièrement attention à ce qu'il n'y ait pas de
résidus de lait sur le creux et le tube situés sous le bouton
(voir g. 32) : éventuellement racler le tube à l'aide d'un
cure-dent;
3332
5. Rincer l'intérieur du logement du bouton de réglage de la
mousse à l'eau courante (voir g. 33) ;
6. Vérier également que le tube de prise et le tube de distri-
bution du lait ne soient pas bouchés par des résidus de lait ;
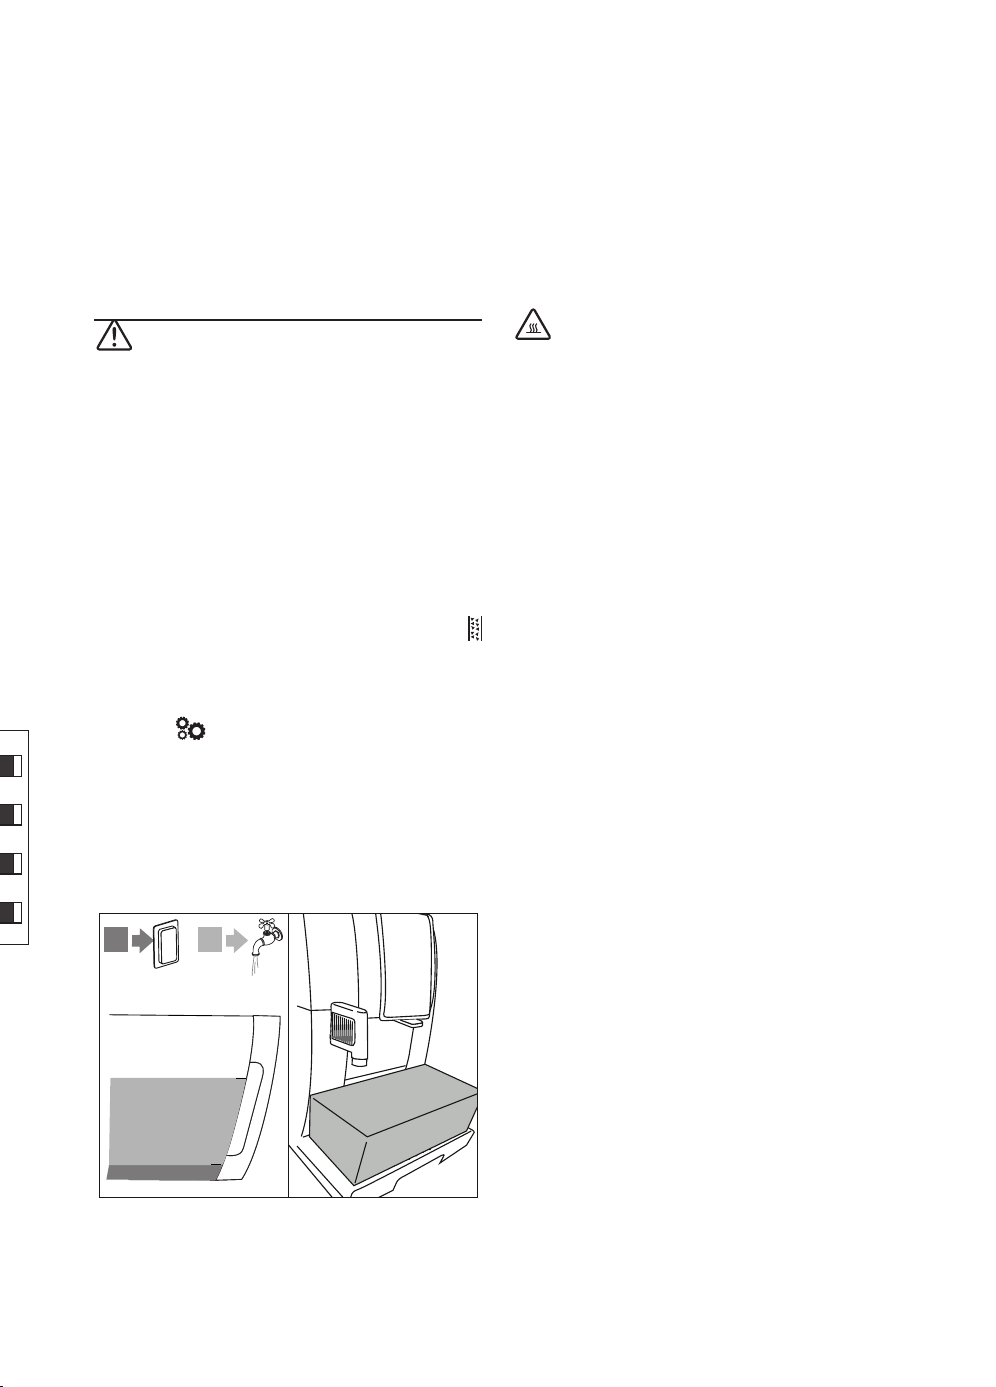
40
7. Remonter le bouton en l’insérant au niveau de "INSERT", le
tube de distribution et le tube de prise de lait ;
8. Remettre le couvercle du pot à lait en place (D3).
14.11 Nettoyage du gicleur eau chaude
Nettoyer le gicleur (A8) après chaque préparation de lait à l’aide
d’une éponge, en éliminant les résidus de lait déposés sur les
joints (g. 22).
15. DÉTARTRAGE
Attention !
• Avant l'utilisation, lire les instructions et l'étiquette du
détartrant reportées sur l'emballage du détartrant.
• Il est recommandé d'utiliser exclusivement du détartrant
De’Longhi. L'utilisation de détartrants non appropriés,
ainsi que le détartrage non régulièrement eectué, peut
entraîner l'apparition de défauts non couverts par la ga-
rantie du producteur.
Détartrer la machine, l'écran (B1) ache“Détartrer, ESC pour
annuler, OK pour détartrer (∼45 minutes)”. Si l'on souhaite pro-
céder tout de suite au détartrage, appuyer sur OK (B3) et suivre
les opérations depuis le point 6. Pour remettre le détartrage à
un autre moment, presser ESC (B5): sur l'écran le symbole
rappelle que l'appareil a besoin d'être détartré.
Pour accéder au menu de détartrage :
1. Éclairer la machine et attendre qu'elle soit prête à l'emploi;
2. Presser (B6) pour accéder au menu “Réglages”;
3. Presser les èches de sélection (B2 et B4) jusqu'à lire entre
les deux lignes de tirets “Entretien”: presser OK (B3);
4. Presser OK pour sélectionner“Détartrage”;
5. “Conrmer? (∼45 minutes)”: conrmer en pressant OK;
6. “Retirer le ltre”: extraire le réservoir à eau (A17), enlever
le ltre à eau (C4) (si présente), vider le réservoir à eau.
Presser OK.
B
A
A B
34
1,8 l
35
7. “Verser détartrant et eau dans le réservoir”: Verser dans
le réservoir à eau le détartrant jusqu'au niveau A (corres-
pondant à un emballage de 100 ml) imprimé sur le côté
interne du réservoir ; ajouter donc de l'eau (un litre) jusqu'à
atteindre le niveau B (g. 32); réinsérer le réservoir à eau.
Presser OK.
8. “Vider égouttoir”: Enlever, vider et réinsérer l'égouttoir
(A15) et le tiroir à marc de café (A11) . Presser OK.
9. “Récipient 1,8l vide sous les buses”: Placer un récipient
vide ayant une capacité minimale de 1,8 litres (g. 35)
sous la buse à eau chaude (C6) et sous le bec verseur de
café (A9); Presser OK.
Attention! Risque de brûlures
De l'eau chaude contenant des acides sort de la buse à eau
chaude et du bec verseur de café. Éviter tout contact avec cette
solution.
10. “Détartrage en cours”: le programme de détartrage com-
mence et le détartrant coule aussi bien de la buse à eau
chaude que du bec verseur de café et eectue automa-
tiquement toute une série de rinçages à intervalles pour
éliminer les résidus de calcaire de l'intérieur de la machine;
Après environ 25 minutes, l’appareil interrompt le détartrage :
11. “Rincer le réservoir et le remplir d'eau”: l’appareil est
maintenant prêt pour un processus de rinçage à l'eau
fraîche. Vider le récipient utilisé pour recueillir la solution
détartrante et extraire le réservoir à eau, le vider, le rincer à
l’eau courante, le remplir jusqu’au niveau MAX avec de l’eau
fraîche et l'insérer dans la machine: presser OK;
12. “Récipient 1,8l vide sous les buses”: replacer le récipient
utilisé pour récupérer la solution détartrante sous le bec
verseur de café et la buse à eau chaude (g. 33) et presser
OK;
13. “Rinçage Conrmer?”: presser OK;
14. “Rinçage en cours”: l’eau coule d'abord du bec verseur de
café puis de la buse à eau chaude;
15. Lorsque l'eau dans le réservoir est nie, vider le récipient
utilisé pour récupérer l'eau de rinçage ;
16. “Rincer le réservoir et le remplir d'eau”: extraire le réser-
voir à eau et le remplir jusqu'au niveau MAX avec de l'eau
fraîche. Presser OK.
17. “Insérer le ltre”: réinsérer, si enlevé précédemment, le
ltre adoucisseur dans son logement dans le réservoir à
eau, remettre le réservoir puis presser OK;
18. “Récipient 1,8l vide sous les buses”: replacer le récipient
vide utilisé pour récupérer la solution détartrante sous la
buse à eau chaude. Presser OK.
19. “Rinçage Conrmer?”: presser OK.
20. “Rinçage en cours”. L'eau chaude coule de la buse à eau
chaude;
21. “Vider égouttoir”: Au terme du rinçage, enlever, vider et
réinsérer l'égouttoir (A15) et le tiroir à marc de café (A11).
Presser OK;

41
22. “Détartrage terminé”: presser OK;
23. “Remplir le réservoir”: vider le récipient utilisé pour récu-
pérer l'eau de rinçage, extraire et remplir le réservoir avec
de l'eau fraiche jusqu'au niveau MAX et le réinsérer dans la
machine.
L'opération de détartrage est terminée.
Nota Bene !
• Si le cycle de détartrage ne se termine pas correctement
(ex. coupure de courant), nous conseillons de répéter le
cycle.
• Il est tout à fait normal, après avoir eectué le détartrage,
de trouver de l'eau dans le tiroir à marc de café (A11).
• L’appareil a besoin d’un troisième rinçage, si le réservoir
à eau n'a pas été rempli jusqu'au niveau MAX: ceci pour
s'assurer que la solution détartrante a complètement été
vidée des circuits internes de l'appareil.
• L’éventuelle demande de la machine de deux cycles de
détartrage à court terme est normale, cela dépend du sys-
tème de contrôle avancé installé sur la machine.
16. PROGRAMMATION DE LA DURETÉ DE L'EAU
La demande de détartrage s'ache uniquement après une
période de fonctionnement préréglée qui dépend de la dureté
de l’eau.
La machine est précongurée en usine sur le "niveau 4" de
dureté. Il est possible de programmer la machine en fonction
de la dureté réelle de l'eau courante dans les diérentes régions,
rendant ainsi l'opération de détartrage moins fréquente.
16.1 Mesure de la dureté de l'eau
1. Retirer la bande réactive fournie "TOTAL HARDNESS TEST "
(C1) de son emballage, accompagnée des instructions en
langue anglaise.
2. Plonger entièrement la bande réactive dans un verre d'eau
pendant environ une seconde.
3. Extraire la bande de l'eau et la secouer légèrement. Après
une minute, 1, 2, 3 ou 4 petits carrés rouges se forment, en
fonction de la dureté de l'eau ; chaque petit carré corres-
pond à 1 niveau.
eau douce (niveau 1)
eau dure (niveau 3)
eau très dure (niveau 4)
eau pas trop dure (niveau 2)
16.2 Réglage de la dureté de l'eau
1. Presser (B6) pour accéder au menu “Réglages”;
2. Presser les èches de sélection (B2 et B4) jusqu'à lire entre
les deux lignes de tirets le message “Général”: presser OK;
3. Presser les èches de sélection jusqu'à visualiser le mes-
sage “Dureté de l'eau “: presser OK;
4. L'écran ache la sélection actuelle et la nouvelle sélection
clignote: appuyer sur les èches de sélection jusqu'à visua-
liser la nouvelle sélection. Presser OK.
Le nouveau niveau est mémorisé et l'appareil revient au menu
"Général".
Appuyer ensuite 2 fois /ESC (B5) pour revenir à l'achage
principal.
17. FILTRE ADOUCISSEUR
Certains modèles sont dotés d'un ltre adoucisseur (C4) : si votre
modèle n'en est pas doté, nous vous conseillons de l'acheter
auprès des centres d'assistance agréés De'Longhi.
Pour une utilisation correcte du ltre, suivre les instructions
indiquées ci-après.
17.1 Installation du ltre
36
1. Retirer le ltre (C4) de
l'emballage. Le type de
dateur dépend du ltre
fourni.
2. Tourner le disque du
dateur (g. 36) an de
visualiser les 2 prochains
mois d'utilisation.
Nota Bene
Le ltre a une durée de deux
mois si l'appareil est utilisé
normalement, en revanche, si
la machine n'est pas utilisée tout en ayant le ltre installé, celui-
ci a une durée de 3 semaines maximum.
37 38
0,5 L
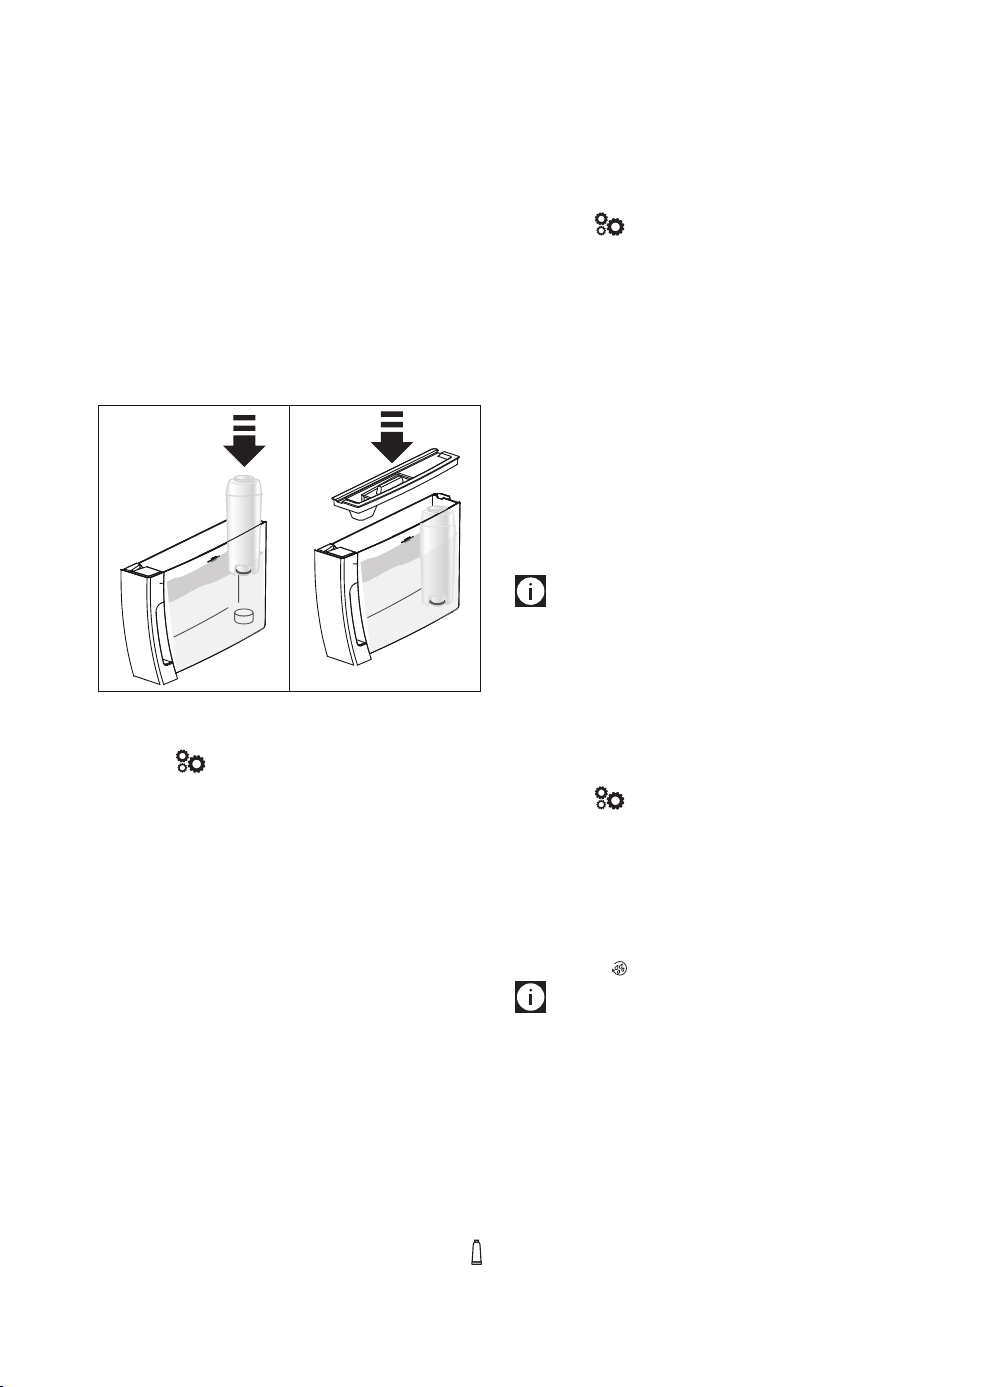
42
3. Pour activer le ltre, faire couler de l’eau du robinet dans
l’orice du ltre comme indiqué sur la g. 37, jusqu’à ce
que l’eau sorte par les ouvertures latérales pendant plus
d’une minute;
4. Extraire le réservoir (A17) de la machine et le remplir d'eau;
5. Insérer le ltre à l'intérieur du réservoir et le plonger com-
plètement pendant une dizaine de secondes, en l'inclinant
et en appuyant légèrement dessus an de permettre aux
bulles d'air de sortir (g. 38).
6. Insérer le ltre dans le logement prévu à cet eet (A18) et
l'enfoncer à fond (g. 39).
7. Refermer le réservoir avec le couvercle (A16 - g. 40), puis
réinsérer le réservoir dans la machine;
39 40
35
Après avoir installé le ltre il faut en signaler la présence à la
machine.
8. Presser (B6) pour accéder au menu “Réglages”;
9. Presser les èches de sélection (B2 et B4) jusqu'à lire entre
les deux lignes de tirets “Entretien”: presser OK ;
10. Presser les èches de sélection jusqu'à visualiser le mes-
sage “Installer ltre “: presser OK;
11. “Conrmer?”: presser OK;
12. “Eau chaude, Conrmer?”: positionner sous la buse à eau
chaude (C6) un récipient (d'une capacité minimale de 500
ml), puis presser OK;
13. L’appareil fait couler de l'eau et l'écran ache le message
“Veuillez patienter”;
14. Après avoir complété la distribution, l'appareil revient
automatiquement en mode “Café prêt”.
Le ltre est maintenant activé et il est possible de continuer à
utiliser la machine.
17.2 Remplacement du ltre
Le ltre (C4) doit être remplacé quand l'écran (B1) ache le
message “Remplacer ltre, ESC pour annuler, OK pour rempla-
cer”. Si l'on remplacer tout de suite le ltre, appuyer sur OK (B3)
et suivre les opérations depuis le point 8. Pour remettre le rem-
placement à un autre moment, presser ESC (B5): le symbole
s'ache pour rappeler qu'il faut remplacer le ltre.
Pour le remplacement, procéder comme suit :
1. Retirer le réservoir (A17) et le ltre usagé ;
2. Retirer le nouveau ltre de l'emballage et procéder en sui-
vant les instructions des points 2-3-4-5-6-7 du paragraphe
précédent;
3. Presser (B6) pour accéder au menu “Réglages”;
4. Presser les èches de sélection (B2 et B4) jusqu'à lire entre
les deux lignes de tirets “Entretien”: presser OK;
5. Presser les èches de sélection jusqu'à visualiser le mes-
sage “Remplacer ltre “: presser OK;
6. “Conrmer?”: presser OK;
7. “Eau chaude, Conrmer?”: positionner sous la buse à eau
chaude (C6) un récipient (d'une capacité minimale de 500
ml), puis presser OK;
8. L’appareil fait couler de l'eau et l'écran ache le
message “Veuillez patienter”;
9. Après avoir complété l'opération, l'appareil revient
automatiquement en mode “Café prêt”.
Le nouveau ltre est maintenant activé et il est possible de
continuer à utiliser la machine.
Nota Bene !
Quand les deux mois de durée se sont écoulés (voir dateur), ou si
l'appareil n'est pas utilisé pendant 3 semaines, procéder au rem-
placement du ltre même si la machine ne l'exige pas encore.
17.3 Enlever le ltre
Pour continuer à utiliser l'appareil sans ltre (C4) il faut l'enlever
et le signaler à la machine. Procéder de la manière suivante:
1. Retirer le réservoir (A17) et le ltre usagé ;
2. Presser (B6) pour accéder au menu “Réglages”;
3. Presser les èches de sélection (B2 et B4) jusqu'à lire entre
les deux lignes de tirets “Entretien”: presser OK ;
4. Presser les èches de sélection jusqu'à visualiser le mes-
sage “Retirer ltre “: presser OK;
5. “Conrmer?”: presser OK pour conrmer l'élimination:
l’appareil revient au menu “Entretien”;
Presser ensuite /ESC (B5) pour quitter le menu.
Nota Bene !
Quand les deux mois de durée se sont écoulés (voir dateur), ou
si l'appareil n'est pas utilisé pendant 3 semaines, procéder à
l'enlèvement du ltre même si la machine ne l'exige pas encore.
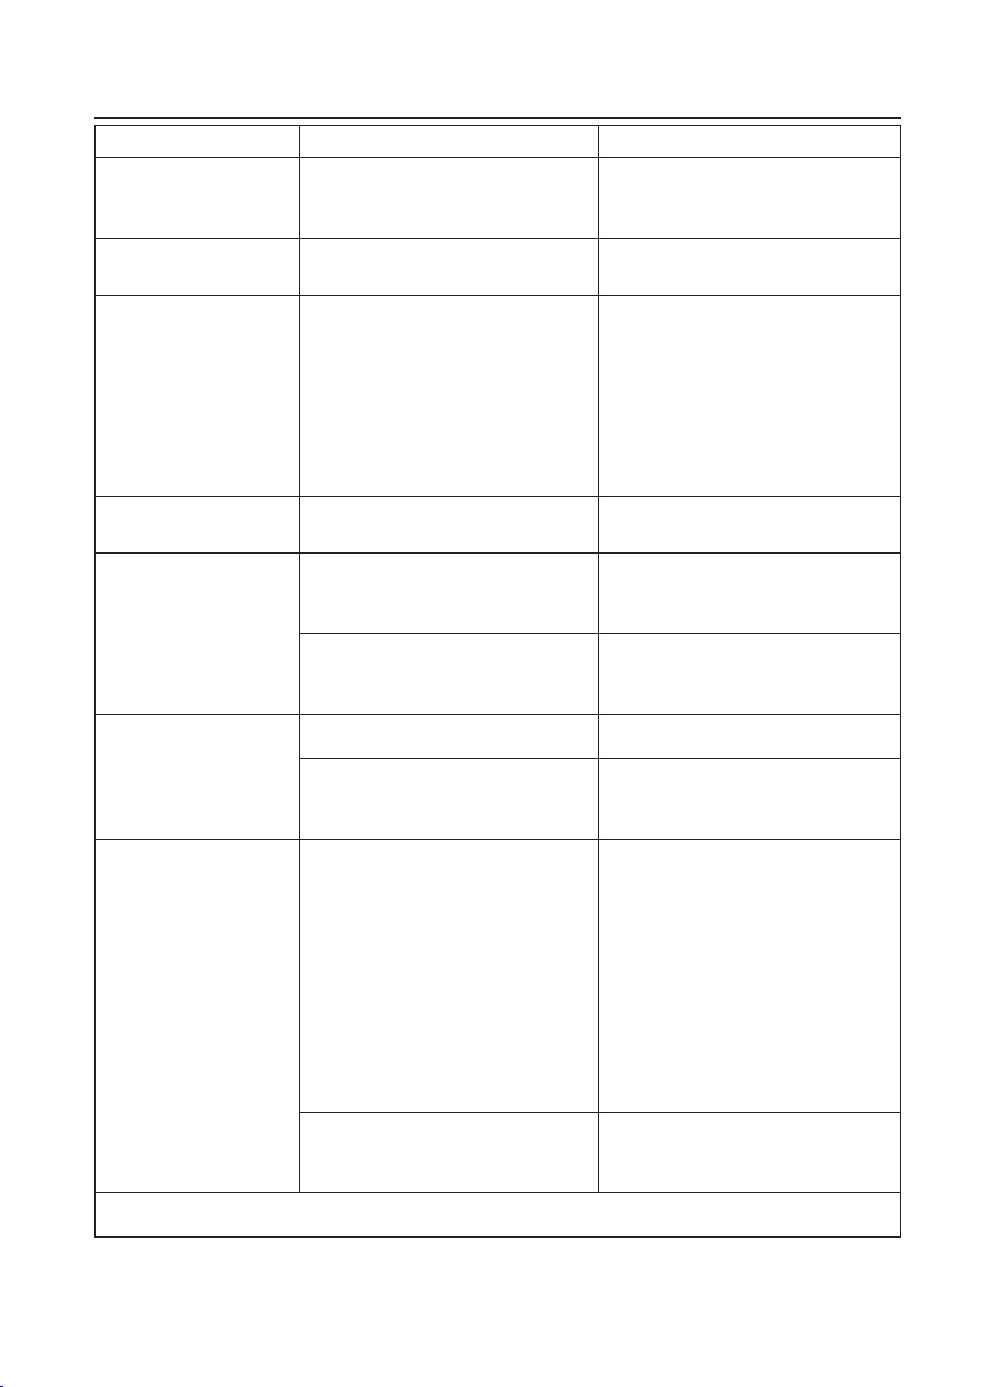
43
18. MESSAGES AFFICHÉS À L'ÉCRAN
MESSAGE AFFICHÉ CAUSE POSSIBLE SOLUTION
Remplir le réservoir L’eau dans le réservoir (A17) est insusante. Remplir le réservoir à eau et/ou l'insérer
correctement, en l'enfonçant au maximum
jusqu'à son accrochage (g. 3B).
Insérer le réservoir Le réservoir (A17) n'est pas correctement
installé.
Insérer correctement le réservoir en l’enfon-
çant à fond (g. 3B).
Vider le tiroir à marc Le tiroir à marc (A11) de café est plein. Vider le tiroir à marc, l'égouttoir (A15) et eec-
tuer le nettoyage, puis les réinsérer. Important
: lors de l'extraction de l'égouttoir, il est obliga-
toire de toujours vider le tiroir à marc de café
même s'il est peu rempli. Si cette opération
n'est pas eectuée, lors de la préparation des
cafés suivants, le tiroir à marc de café peut se
remplir plus que prévu et obstruer la machine.
insérer le tiroir à marc Après le nettoyage le tiroir à marc n'a pas été
inséré (A11).
Extraire l'égouttoir (A15) et insérer le tiroir à
marc de café.
Introduire le café prémoulu La fonction “café prémoulu” a été sélectionnée
mais le café prémoulu n'a pas été versé dans
l'entonnoir (A4).
Introduire le café pré-moulu dans l'entonnoir
(g. 11) ou désactiver la fonction prémoulu.
Un café LONG avec café prémoulu a été
demandé
Verser dans l'entonnoir (A4) une dose rase de
café prémoulu, presser OK (B3) pour continuer
et compléter la préparation.
Remplir le réservoir à grains Le café en grains est terminé. Remplir le réservoir à grains (A3 - g. 8).
L’entonnoir (A4) pour le café pré-moulu est
bouché.
Vider l'entonnoir à l'aide du pinceau (C5), de la
façon décrite dans le § «14.8 Nettoyage de l’en-
tonnoir pour l’introduction du café pré-moulu»
Mouture trop ne
Régler le moulin
La mouture est trop ne et le café sort par
conséquent trop lentement ou ne sort pas du
tout.
Répéter la distribution du café et tourner d'un
cran dans le sens des aiguilles d'une montre
vers le numéro 7 le bouton de réglage de la
mouture (A5) (g. 7) pendant que le moulin à
café est en marche. Si après avoir fait au moins
2 cafés, la distribution est encore trop lente,
répéter la correction en tournant le bouton de
réglage d'un autre cran (voir § «9.1 Réglage
du moulin à café»). Si le problème persiste,
vérier que le réservoir à eau (A17) soit inséré
à fond.
En présence du ltre adoucisseur (C4) une
bulle d'air a pu être relâchée à l'intérieur du
circuit et en a bloqué la distribution.
Insérer la buse à eau chaude (C6) dans la ma-
chine et débiter un peu d'eau jusqu'à ce que le
ux soit régulier.
→
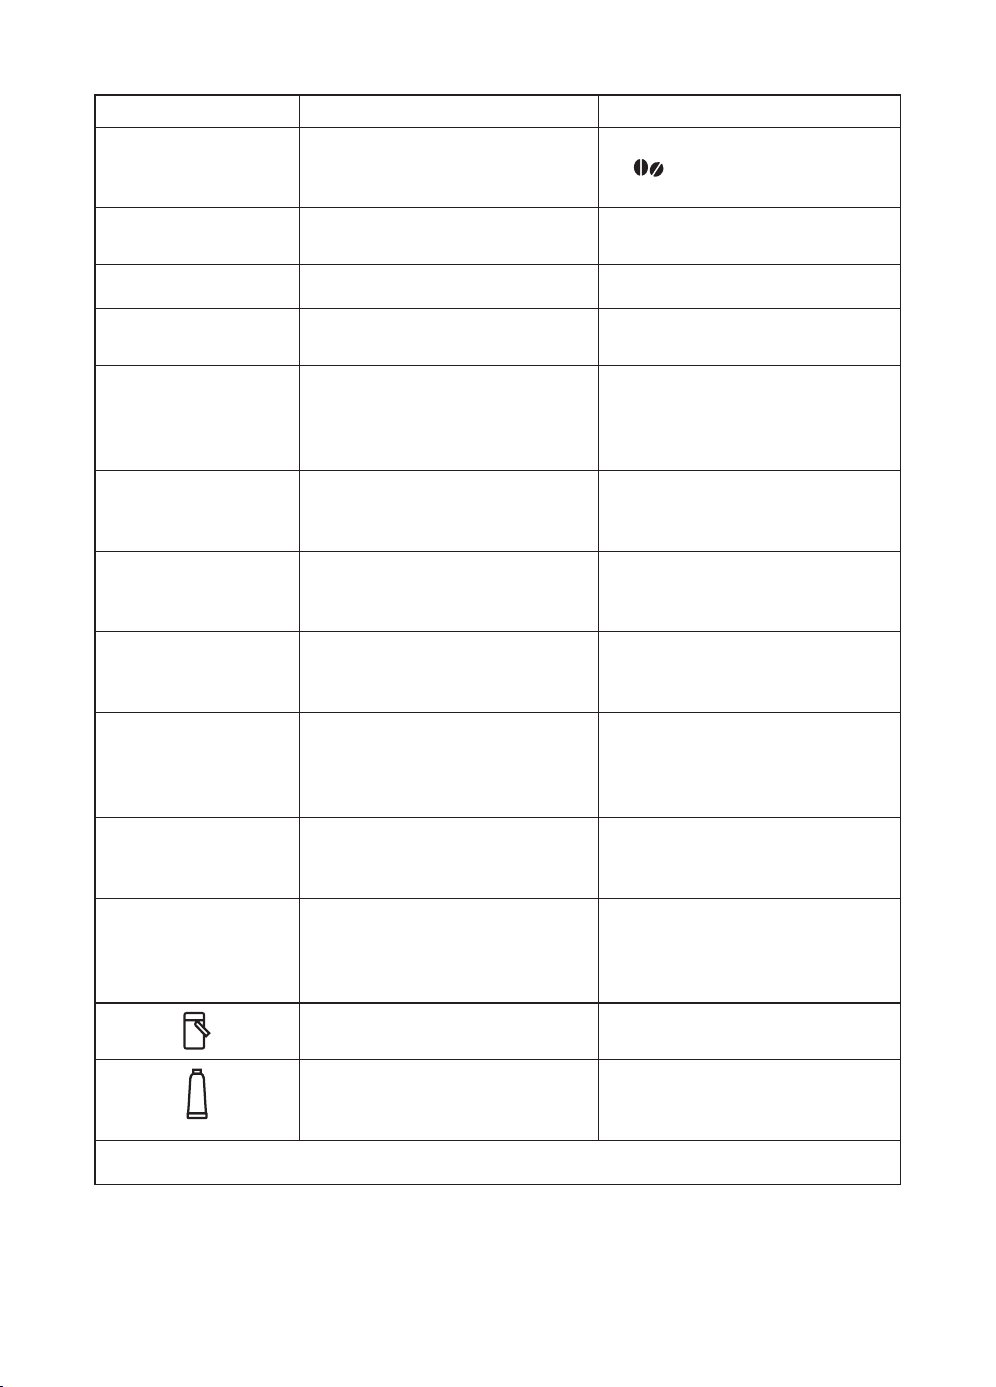
44
MESSAGE AFFICHÉ CAUSE POSSIBLE SOLUTION
Réduire dose café Trop de café a été utilisé. Sélectionner un arôme plus léger en appuyant
sur
(B7) ou diminuer la quantité de café
pré-moulu
Insérer buse à eau La buse à eau (C6) n'est pas insérée ou est mal
insérée.
Insérer la buse à eau à fond (g. 4).
Insérer pot à lait Le pot à lait (D) n'est pas inséré correctement. Insérer le pot à lait à fond (g. 16).
Insérer le groupe infuseur Après le nettoyage, l'infuseur (A20) n'a pas été
réinséré.
Insérer l'infuseur de la façon décrite dans le
par. «14.9 Nettoyage de l’infuseur»
Circuit d'eau vide
Remplir circuit
Eau chaude
Conrmer?
Le circuit hydraulique est vide. Presser OK (B3) et faire couler l'eau par la
buse (C6) jusqu'à obtenir un débit régulier. Si
le problème persiste, vérier que le réservoir à
eau (A17) soit inséré à fond.
Presser OK pour CLEAN Le pot à lait (D) a été inséré avec le bouton
de réglage de la mousse (D1) positionné sur
“CLEAN”.
Pour utiliser la fonction CLEAN, presser “OK” ou
tourner le bouton de réglage mousse dans une
autre position.
Bouton sur CLEAN
ESC pour annuler
Juste après la distribution du lait, il est né-
cessaire d'eectuer le nettoyage des conduits
internes du pot à lait (D).
Tourner le bouton de réglage de la mousse (D1)
sur CLEAN (g. 19).
Tourner le bouton de réglage
mousse
Le pot à lait (D) a été inséré avec le bouton
de réglage de la mousse (D1) positionné sur
“CLEAN”.
Tourner le bouton de réglage de la mousse
dans une des positions de réglage de la
mousse du lait.
Détartrer
ESC pour annuler
OK pour détartrer
(∼45 minutes)
Indique qu'il est nécessaire de détartrer la
machine.
Il est nécessaire d'eectuer au plus tôt le pro-
gramme de détartrage décrit dans le chap.
“«15. Détartrage»
Remplacer ltre
ESC pour annuler
OK pour remplacer
Le ltre adoucisseur (C4) est usagé. Remplacer le ltre ou le retirer en sui-
vant les instructions du chapitre «17. Filtre
adoucisseur».
Disfonctionnement : L'intérieur de la machine est très sale. Nettoyer soigneusement la machine de la
façon décrite dans le chap. «14. Nettoyage». Si
après le nettoyage, la machine ache encore
le message, s'adresser à un centre d'assistance.
Rappelle qu'il est nécessaire de nettoyer les
conduits internes du pot à lait (D).
Tourner le bouton de réglage de la mousse (D1)
sur CLEAN (g. 19)
.
Rappelle que le ltre adoucisseur (C4) est
épuisé et qu'il doit être remplacé ou enlevé.
Remplacer le ltre ou le retirer en sui-
vant les instructions du chapitre «17. Filtre
adoucisseur».
→
45
MESSAGE AFFICHÉ CAUSE POSSIBLE SOLUTION
Rappelle qu'il est nécessaire de détartrer la
machine.
Il est nécessaire d'eectuer au plus tôt le pro-
gramme de détartrage décrit dans le chap. “15.
Détartrage".
L’éventuelle demande de la machine de deux
cycles de détartrage à court terme est nor-
male, cela dépend du système de contrôle
avancé installé sur la machine.
ECO
Le mode économie d'énergie est activé. Pour désactiver le mode économie d'énergie,
procéder en suivant les instructions du § «7.5
Général» - “• Économie d'énergie”
19. RÉSOLUTION DES PROBLÈMES
Ci-après sont énumérés certains dysfonctionnements possibles.
Si le problème ne peut pas être résolu de la façon décrite, contacter l'Assistance Technique.
PROBLÈME CAUSE POSSIBLE SOLUTION
Le café n'est pas chaud. Les tasses n'ont pas été préchauées. Chauer les tasses en les rinçant avec de l'eau
chaude (N.B. il est possible d'utiliser la fonc-
tion eau chaude).
2 à 3 minutes se sont écoulées depuis le der-
nier café et les circuits internes de la machine
ont refroidi.
Il faut réchauer les circuits internes avec un
rinçage avant de préparer un café, presser donc
la touche
(B5).
La température du café dénie est trop basse. Régler une température plus haute depuis à
partir du menu.
Le café est trop liquide ou n'a
pas assez de crème.
Le café est moulu trop grossièrement. Tourner le bouton de réglage de la mouture
(A5) d'un cran vers le numéro 1 dans le sens
inverse des aiguilles d'une montre, pendant
que le moulin à café est en marche (g. 7). Pro-
céder un cran à la fois jusqu'à l'obtention d'une
distribution satisfaisante. L’eet est visible uni-
quement après la distribution de 2 cafés (voir
paragraphe «9.1 Réglage du moulin à café»).
Le café n'est pas approprié. Utiliser du café pour machines à café espresso.
Le café sort trop lentement ou
bien au goutte-à-goutte.
Le café est moulu trop nement. Tourner le bouton de réglage de la mou-
ture (A5) d'un cran dans le sens des aiguilles
d'une montre vers le numéro 7, pendant que
le moulin à café est en marche (g. 7). Procé-
der un cran à la fois jusqu'à l'obtention d'une
distribution satisfaisante. L’eet est visible uni-
quement après la distribution de 2 cafés (voir
paragraphe «9.1 Réglage du moulin à café»).
→
46
PROBLÈME CAUSE POSSIBLE SOLUTION
Le café ne coule pas. La machine détecte des impuretés: l'écran af-
che “Veuillez patienter”.
Attendre que l’appareil soit prêt à l’emploi et
sélectionner à nouveau la boisson souhaitée.
Si le problème persiste, s’adresser au Centre
d’Assistance Agréé.
Le café ne sort pas de l'un
ou des deux becs verseurs de
la buse.
Les becs verseurs de la buse à café (A9) sont
bouchés.
Nettoyer les becs verseurs à l'aide d'un cure-
dents (g. 24B).
L'appareil ne s'allume pas La che n'est pas branchée à la prise. Brancher la che à la prise (g. 1).
L'interrupteur général (A22) n'est pas allumé. Appuyer sur l'interrupteur général positionné
sur I (g. 2).
Le connecteur du cordon d'alimentation (C7)
n'est pas bien inséré.
Insérer le connecteur à fond dans son loge-
ment à l'arrière de l'appareil (g. 1).
L'infuseur ne peut pas être
extrait
L'arrêt n'a pas été eectué correctement
Arrêter la machine en pressant la touche
(A7) (g. 6) (consulter le chap. «6. Arrêt de
l’appareil»);
Au terme du détartrage,
l’appareil a besoin d’un tr-
oisième rinçage
Durant les deux cycles de rinçage, le réservoir
n’a pas été rempli jusqu’au niveau MAX.
Procéder comme requis par l’appareil, mais en
vidant d’abord l’égouttoir pour éviter que l’eau
ne déborde.
Le lait ne sort pas du tube de
distribution (D5).
Le couvercle (D2) du pot à lait est sale Nettoyer le couvercle du pot à lait de la façon
décrite dans le par. «14.10 Nettoyage du pot
à lait».
Le lait contient des grosses
bulles, sort par jets du tube de
distribution du lait (D5) ou est
peu mousseux
Le lait n'est pas susamment froid ou n'est
pas demi-écrémé.
Utiliser de préférence du lait écrémé ou de-
mi-écrémé, à la température du réfrigérateur
(environ 5ºC). Si le résultat n'est pas encore
le résultat souhaité, essayer de changer de
marque de lait.
Le bouton de réglage de la mousse (D1) est
mal réglé.
Régler en suivant les instructions du § «11.2
Adjusting the amount of froth»”.
Le couvercle (D2) ou le bouton de réglage de la
mousse (D1) du pot à lait est sale
Nettoyer le couvercle et le bouton du pot à lait
de la façon décrite dans le par. «11.4 Cleaning
the milk container after use» et «14.10 Clea-
ning the milk container»..
Le gicleur eau chaude (A8) est sale Nettoyer soigneusement le gicleur de la façon
décrite dans le paragraphe «14.11 Cleaning
the hot water nozzle».

47
SUMARIO
1. ADVERTENCIAS DE SEGURIDAD ................. 49
1.1 Símbolos utilizados en estas instrucciones ..49
1.2 USO CONFORME A SU DESTINO ....................49
1.3 Instrucciones de uso ....................................49
2. INTRODUCCIÓN ........................................ 49
2.1 Letras entre paréntesis ................................49
2.2 Problemas y reparaciones............................49
3. DESCRIPCIÓN........................................... 50
3.1 Descripción del aparato ..............................50
3.2 Descripción del panel de control ..................50
3.3 Descripción de los accesorios .......................50
3.4 Descripción del recipiente de la leche ..........50
4. OPERACIONES PRELIMINARES ..................50
4.1 Control del aparato ......................................50
4.2 Instalación del aparato ................................51
4.3 Conexión del aparato ..................................51
4.4 Primera puesta en marcha del aparato ........51
5. ENCENDIDO DEL APARATO ........................52
6. APAGADO DEL APARATO ...........................52
7. PROGRAMACIONES DEL MENÚ .................. 52
7.1 Idioma .........................................................52
7.2 Mantenimiento ...........................................53
7.3 Programación bebidas ................................53
7.4 Programación My bebidas ...........................53
7.5 General .......................................................53
7.6 Estadísticas ................................................. 54
8. ENJUAGUE ...............................................54
9. PREPARACIÓN DEL CAFÉ ........................... 54
9.1 Regulación del molinillo de café .................54
9.2 Consejos para obtener un café más caliente 55
9.3 Preparación de las recetas automáticas
utilizando el café en granos.........................55
9.4 Variación temporal del aroma del café ........56
9.5 Preparación del café con café premolido .....56
10. TRUEBREW OVER ICE™ CAFÉ .....................57
11. PREPARACIÓN DE BEBIDAS CON LECHE ......57
11.1 Llenado y enganche del recipiente de la leche
..................................................................57
11.2 Regulación de la cantidad de espuma .........58
11.3 Preparación automática de bebidas a base de
leche ...........................................................58
11.4 Limpieza del recipiente de la leche después de
cada uso .....................................................58
12. " " PROGRAMACIÓN Y SELECCIÓN . 59
13. SALIDA DEL AGUA CALIENTE ..................... 59
14. LIMPIEZA ................................................ 59
14.1 Limpieza de la cafetera ...............................59
14.2 Limpieza del circuito interno de la máquina ..
60
14.3 Limpieza del cajón de los posos de café .......60
14.4 Limpieza de la bandeja recogegotas y
de la bandeja recogedora del líquido de
condensación. .............................................60
14.5 Limpieza del interior de la máquina ............60
14.6 Limpieza del depósito de agua .................... 61
14.7 Limpieza de las boquillas del surtidor de café .
61
14.8 Limpieza del embudo para echar el café
premolido ...................................................61
14.9 Limpieza del grupo de infusión ...................61
14.10 Limpieza del recipiente de la leche ..............61
14.11 Limpieza de la boquilla de agua caliente .....62
15. DESCALCIFICACIÓN ..................................62
16. PROGRAMACIÓN DE LA DUREZA DEL AGUA .63
16.1 Medición de la dureza del agua ...................63
16.2 Programación de la dureza del agua ...........64
17. FILTRO ABLANDADOR ...............................64
17.1 Instalación del ltro ....................................64
17.2 Cambio del ltro ..........................................65
17.3 Extracción del ltro .....................................65
18. MENSAJES VISUALIZADOS EN EL DISPLAY .. 65
19. SOLUCIÓN DE LOS PROBLEMAS .................68

48
INSTRUCCIONES IMPORTANTEES
El
uso de casi cualquier aparato eléctrico implica la observación de algunas reglas ¡Importantees, entre las
que se incluyen las siguientes.
• Lea atentamente las instrucciones.
• Asegúrese de que la tensión (voltaje) de su instalación eléctrica corresponda a la indicada al fondo del
aparato.
• No toque las supercies calientes. Use las asas o las perillas.
• Para protegerse de incendios, descargas eléctricas y heridas personales, no sumerja el cable, la clavija o el
aparato en agua ni en ningún otro líquido.
• No deje el aparato al manejo de los niños, ni lo deje funcionando sin vigilancia.
• Desconecte la clavija del tomacorriente cuando no lo use y antes de limpiarlo.
• No ponga en funcionamiento al aparato con el cable o la clavija dañados, después de un funcionamiento
anómalo del aparato o cuando éste último presente cualquier tipo de daños. Lleve el aparato al centro de
servicios autorizado más cercano para que lo examinen, reparen o ajusten.
• El uso de accesorios no indicados por el fabricante puede ser la causa de incendio, descargas eléctricas o
heridas personales.
• No use el aparato a la intemperie.
• No deje que el cable de alimentación cuelgue de la mesa o supercie de trabajo para evitar enredarse o
tropezarse accidentalmente con éste.
• No coloque el aparato o las partes eléctricas sobre o cerca de hornillas eléctricas, parrillas, estufas y hor-
nos de gas.
• Inserte la clavija al tomacorriente. Para desconectarlo, apague el aparato y saque la clavija.
• No utilice el aparato para usos distintos a los que se indican. El aparato sólo debe ser utilizado para el uso
doméstico. El fabricante declina cualquier responsabilidad por los daños derivados del uso inapropiado,
incorrecto o irresponsable.
ADVERTENCIA: Para evitar el peligro de incendio o descargas eléctricas, no quite la cubierta o
la parte externa del aparato. No intente reparar o modicar la máquina pues esto anula la ga-
rantía. ¡Solamente personal de manutención autorizado ha de efectuar las reparaciones!
CONSERVE ESTAS INSTRUCCIONES
ESTE APARATO ESTÁ DESTINADO ÚNICAMENTE PARA EL USO DOMÉSTICO
INSTRUCCIONES CABLE CORTO DE ALIMENTACIÓN
- El aparato está dotado de un cable corto de alimentación para reducir riesgos derivados de la posibilidad
de enredar el cable y evitar tropezar con un cable demasiado largo.
- Es posible utilizar cables removibles o cables de extensión más largos prestando sin embargo mucha
atención durante su uso.
- Si se usan cables de extensión, deben ser compatibles para una potencia por lo menos equivalente a la
indicada en el aparato. Si el aparato se suministra con un cable con toma de tierra y de 3 hilos, el cable de
extensión ha de ser un CABLE DE 3 HILOS CON TOMA DE TIERRA. La parte del cable, que exceda de lo nece-
sario, debe ser dispuesta de modo que no caiga de la mesa o de la supercie de trabajo donde pudiera ser
tirado por los niños o bien con el que se pudiera uno tropezar.
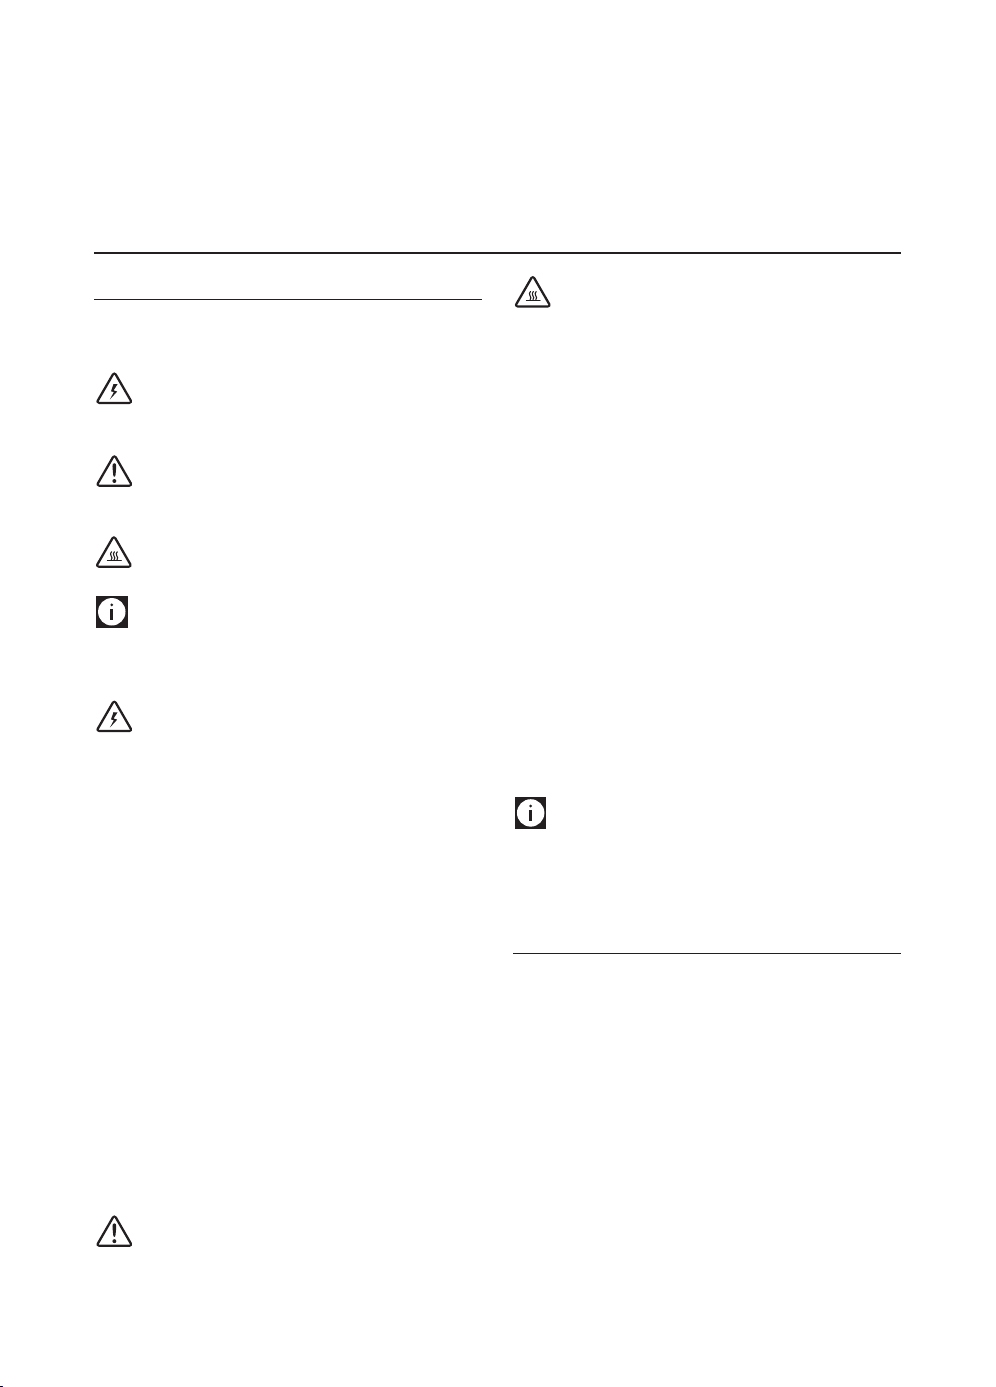
49
1. ADVERTENCIAS DE SEGURIDAD
1.1 Símbolos utilizados en estas instrucciones
Las advertencias importantes se acompañan de estos símbolos.
Es absolutamente necesario cumplir estas advertencias.
¡Peligro!
El incumplimiento puede ser, o es, causa de lesiones por descar-
ga eléctrica con peligro para la vida.
¡Atención!
El incumplimiento puede ser, o es, causa de lesiones o de daños
al aparato.
¡Peligro de quemaduras!
El incumplimiento puede ser, o es, causa de quemaduras.
Nota Bene:
Este símbolo destaca consejos e informaciones importantes
para el usuario.
¡Peligro!
Dado que el aparato funciona con corriente eléctrica no se puede
excluir que genere descargas eléctricas.
Así pues, aténgase a las siguientes advertencias de seguridad:
• No toque el aparato con las manos ni los pies mojados.
• No toque la clavija con las manos mojadas.
• Asegúrese de que sea posible acceder en todo momento y
libremente a la toma de corriente utilizada, dado que solo
así se podrá quitar la clavija cuando sea necesario.
• Si quiere quitar la clavija de la toma de corriente acció-
nela directamente. No tire nunca del cable, porque podría
dañarse.
• Para desconectar completamente el aparato quite la clavija
de la toma de corriente.
• En caso de que el aparato tenga una avería no intente
repararla.
Apague el aparato, quite la clavija de la toma y contacte el
servicio de asistencia técnica.
• Antes de llevar a cabo cualquier operación de limpieza de
las partes externas del aparato apague la máquina, quite la
clavija de la toma de corriente y deje enfriar la máquina.
Atención:
Conserve el material de embalaje (bolsas de plástico, poliestire-
no expandido) fuera del alcance de los niños.
¡Peligro de quemaduras!
Este aparato produce agua caliente, de forma que cuando está
en funcionamiento puede formarse vapor acuoso.
Procure no recibir salpicaduras de agua o vapor caliente.
Cuando el aparato está en funcionamiento la bandeja apoyata-
zas (A6) puede calentarse.
1.2 USO CONFORME A SU DESTINO
Este aparato se ha fabricado para preparar café y para calentar
bebidas.
Cualquier otro uso se considera impropio y, por tanto, peligroso.
El fabricante no responde por los daños derivados de un uso im-
propio del aparato.
1.3 Instrucciones de uso
Lea detenidamente estas instrucciones antes de usar el aparato.
Si no se respetan estas instrucciones se pueden producir lesiones
o daños al aparato.
El fabricante queda eximido de toda responsabilidad por los
daños derivados del incumplimiento de estas instrucciones de
uso.
Nota Bene:
Guarde meticulosamente estas instrucciones. Si traspasa el
aparato a otras personas deberá entregarles también estas ins-
trucciones de uso.
2. INTRODUCCIÓN
Gracias por haber elegido la máquina automática para café y
cappuccino.
Le deseamos que disfrute con su nuevo aparato. Dedique un par
de minutos a la lectura de estas instrucciones de uso. Así evitará
incurrir en peligros o dañar la máquina.
2.1 Letras entre paréntesis
Las letras entre paréntesis corresponden a la leyenda que se en-
cuentra en la Descripción del aparato (pág.2-3).
2.2 Problemas y reparaciones
En caso de problemas, intente antes de nada resolverlos siguien-
do las advertencias que guran en los capítulos "”18. Mensajes
visualizados en el display” y “19. Solución de los problemas”.
- Este producto está equipado con una clavija de corriente alterna polarizada (una clavija con un polo con
dimensiones mayores que las del otro). Esta clavija se inserta sólo en un sentido en el tomacorriente. Se
trata de un dispositivo de seguridad. Si la clavija no entra completamente en el tomacorriente, deberá gi-
rarla. Si tampoco así lo consigue, solicite la intervención de un electricista para sustituir el tomacorriente
obsoleto. No intente modicar la clavija polarizada para anular esta medida de seguridad.
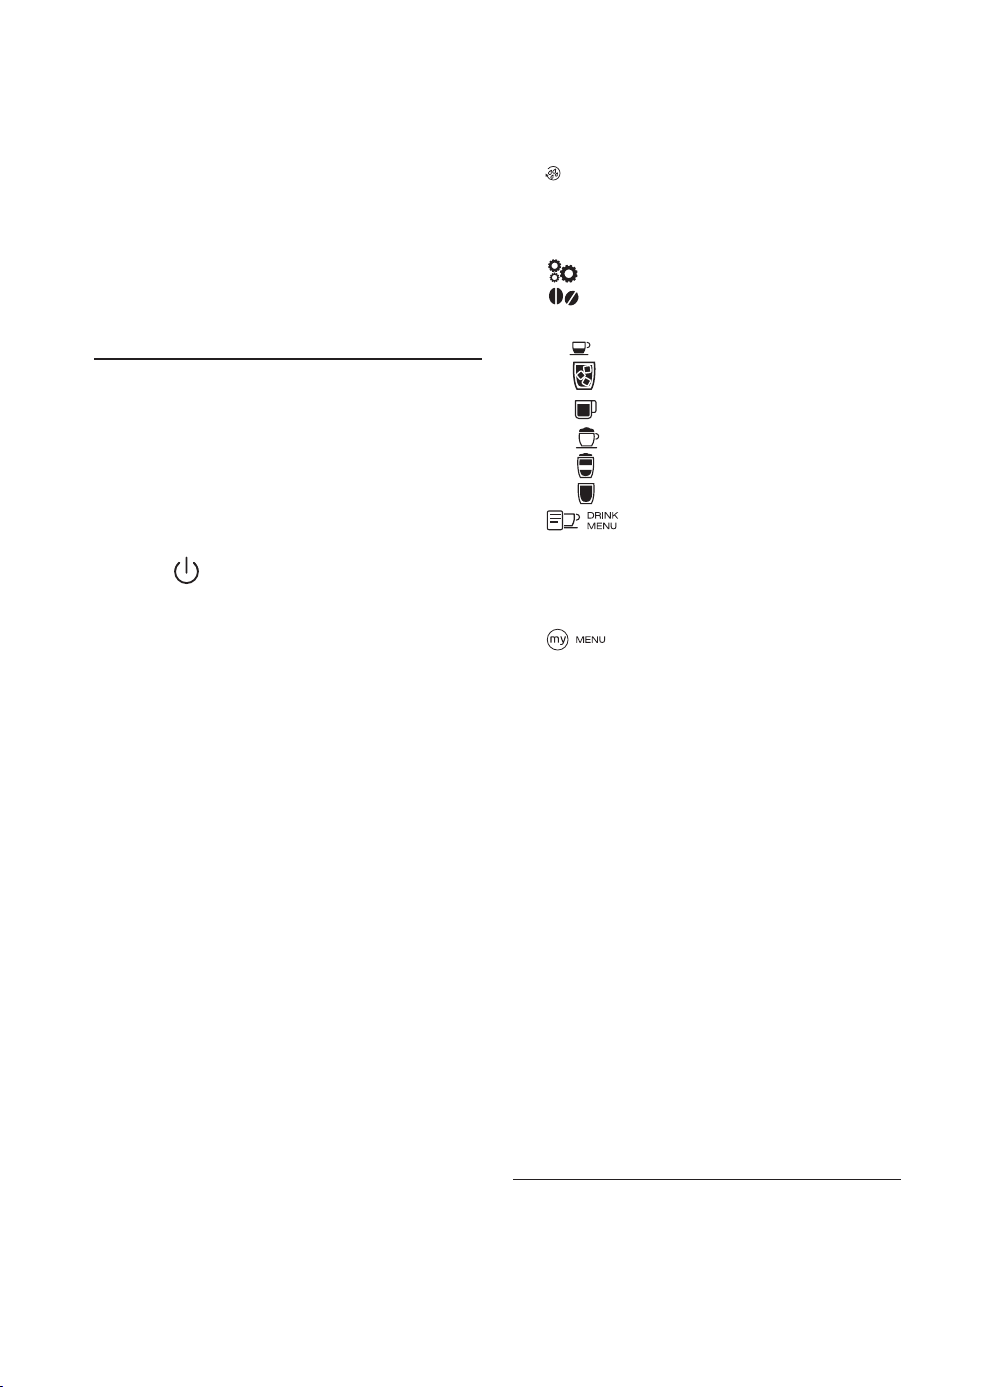
50
Si estas resultaran ser inecaces o para otras aclaraciones, se
aconseja contactar el centro de asistencia a la clientela llamando
por teléfono al número indicado en la hoja adjunta "Asistencia
clientes".
Si su país no está entre aquellos incluidos en la hoja, llame por
teléfono al número indicado en la garantía. Para cualquier re-
paración, póngase en contacto exclusivamente con la Asistencia
Técnica De’Longhi. Las direcciones están en el certicado de ga-
rantía entregado con la cafetera.
3. DESCRIPCIÓN
3.1 Descripción del aparato
(pág. 2 - A)
A1. Tapadera del recipiente para el café en granos
A2. Tapadera del embudo del café premolido
A3. Recipiente para el café en granos
A4. Embudo para echar el café premolido
A5. Regulador del grado de molienda
A6. Supercie para tazas
A7. Botón : para encender o apagar la máquina (standby)
A8. Boquilla agua caliente y vapor
A9. Surtidor café (altura regulable)
A10. Bandeja recogedora del líquido de condensación
A11. Cajón para posos del café
A12. Bandeja apoyatazas
A13. Indicador del nivel del agua de la bandeja recogegotas
A14. Rejilla bandeja
A15. Recipiente recogegotas
A16. Tapadera del depósito de agua
A17. Depósito del agua
A18. Soporte ltro ablandador de agua
A19. Portezuela del grupo infusor
A20. Grupo infusor
A21. Cable de alimentación
A22. Interruptor general
3.2 Descripción del panel de control
(pág. 3 - B )
Algunos botones del panel tienen doble función: ésta se señala
entre paréntesis en la descripción.
B1. Display: guía al usuario en el uso del aparato La opción
central entre las dos líneas punteadas es la seleccionada.
B2. ▼ Flecha de desplazamiento(“ESC”: durante la progra-
mación de las bebidas se pulsa para salir sin memorizar)
B3.
OK: para conrmar la selección (En los primeros segundos
de salida de “espresso”, “espresso corto”, “espresso largo”, se
pulsa para pedir 2 tazas)
B4. ▲ Flecha de desplazamiento (“STOP” - Durante la salida/
programación de las bebidas se pulsa para interrumpir/
programar)
B5.
/ESC para efectuar un enjuague.
(Cuando se accede al menú de programación, tiene la función
de "ESC": se pulsa para salir de la función seleccionada y vol-
ver al menú principal).
B6. : menú programaciones del aparato
B7. : selección aroma
Bebidas de selección directa:
B8.
: Espresso
B9. : TrueBrew Over Ice
(TM)
Café
B10
: Long
B11. : Cappuccino
B12: : Latte Macchiato
B13. : Leche caliente
B14. : Menú de selección de bebidas (selección
directa de varias bebidas): Espresso Lungo, Ristretto, Dop-
pio+, Cappuccino+, Cappuccino Mix, Latte Macchiato,
Flat White, Espresso Macchiato, 2 Espresso, 2 Ristretto, 2
Espresso Lungo, Agua caliente
B15. : Menú de selección de bebidas (my). En el pri-
mer uso, a menos que se hayan programado previamente
en el menú de programaciones "8.4 Pogramación My be-
bidas", se procede directamente a personalizar la bebida.
3.3 Descripción de los accesorios
(pág. 3 - C)
C1. Tira reactiva
D2. Medidor dosicador del café premolido
C3. Descalcicador
C4. Filtro ablandador (en algunos modelos)
C5. Pincel de limpieza
C6. Surtidor de agua caliente
3.4 Descripción del recipiente de la leche
(pág. 3 - D )
D1. Regulador de la espuma y de la función CLEAN
D2. Tapadera del recipiente de la leche
D3. Recipiente de la leche
D4. Tubo de aspiración de leche
D5. Tubo de salida de leche montada (regulable)
4. OPERACIONES PRELIMINARES
4.1 Control del aparato
Después de haber desembalado la cafetera, asegúrese de que
esté íntegra y de que no falten los accesorios (C). No utilice el
aparato si presenta desperfectos evidentes. Contacte con el ser-
vicio de asistencia técnica De’Longhi.
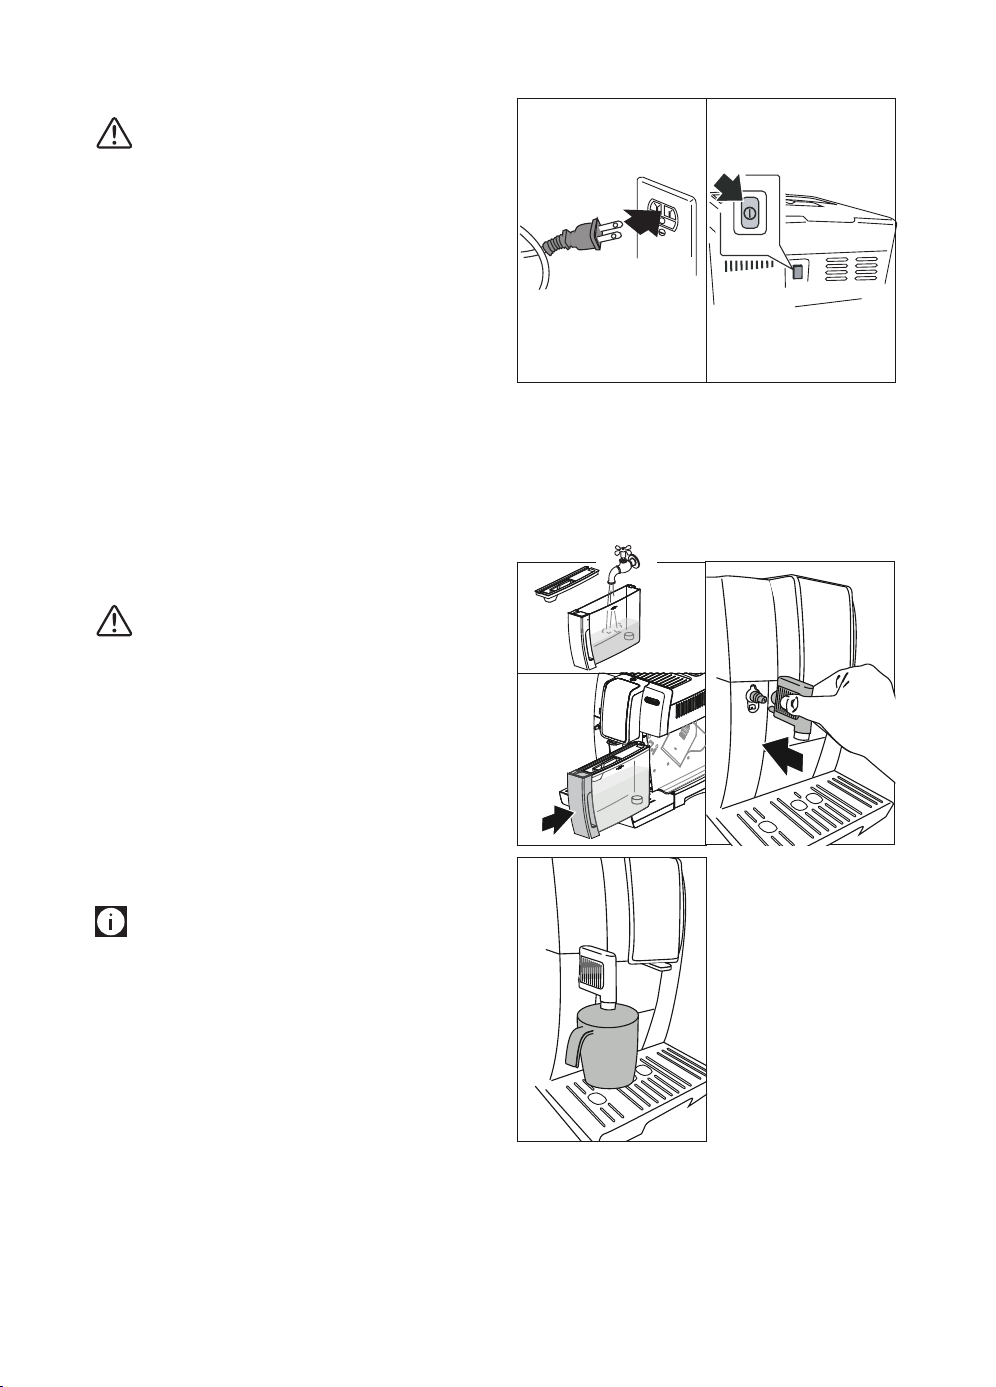
51
4.2 Instalación del aparato
¡Atención!
Cuando instale el aparato observe las siguientes advertencias de
seguridad:
• El aparato libera calor en el ambiente circundante. Tras
haber colocado el aparato en la supercie de trabajo, com-
pruebe que quede un espacio libre de, al menos, 3 cm entre
las supercies del aparato, las partes laterales y la parte
posterior, y un espacio libre mínimo de 15 cm por encima
de la cafetera.
• Si el agua penetrara en el aparato éste podría estropearse.
No coloque el aparato cerca de grifos de agua o de pilas.
• El aparato podría estropearse si el agua se congela en su
interior.
No instale el aparato en un ambiente donde la temperatura
puede descender por debajo del punto de congelación.
• Coloque el cable de alimentación (C7) de manera que no se
estropee con cantos cortantes o por contacto con super-
cies calientes (por ej. placas eléctricas).
4.3 Conexión del aparato
¡Atención!
Asegúrese de que la tensión de la red eléctrica corresponda
al valor indicado en la placa de datos situada en el fondo del
aparato.
Conecte el aparato sólo a un enchufe instalado en conformidad
con las normativas, con una capacidad mínima de 10 A y con una
toma de tierra eciente.
En caso de incompatibilidad entre la toma de corriente y la cla-
vija del aparato, haga sustituir la toma por otro adecuado por
personal cualicado.
4.4 Primera puesta en marcha del aparato
Nota Bene:
• La cafetera ha sido vericada en la fábrica empleando café,
por lo tanto es normal que se encuentre algún resto de café
en el molinillo. Sin embargo, le garantizamos que esta ca-
fetera es nueva.
• Le aconsejamos personalizar cuanto antes la dureza del
agua, para ello siga el procedimiento descrito en el capí-
tulo “16.2 Programación de la dureza del agua”.
1.
Conecte el aparato a la red eléctrica (g.1); asegúrese de
que el interruptor general (A2), situado en la parte posterior
del aparato, esté presionado (g.2).
Siga adelante con las instrucciones facilitadas en el display (B1)
del aparato:
21
2. “Language” (idioma): pulse la echa de desplazamiento
(B2) hasta visualizar entre las dos líneas punteadas el idio-
ma deseado: a continuación pulse OK (B3) para conrmar.
3. “LLEnar depósito”: extraiga el depósito del agua (A10),
llénelo hasta la línea MÁX con agua fresca (g. 3A) y vuelva
a colocar el depósito (g. 3B);
3B
3A
3A
4
4. "Coloque el surtidor de
agua". Controle que el
surtidor de agua calien-
te (C6) esté metido en
la boquilla (A8) (g.4)
y ponga debajo un reci-
piente (g. 5) con una
capacidad mínima de
100 ml.
5. En el display aparece el
mensaje "Circuito vacío,
Llenar circuito, Agua ca-
liente, ¿Conrmar?"
6. Pulse el botón OKpara conrmar: el aparato suministra
agua del surtidor y luego se apaga automáticamente.
La cafetera ya está lista para ser utilizada normalmente.
5
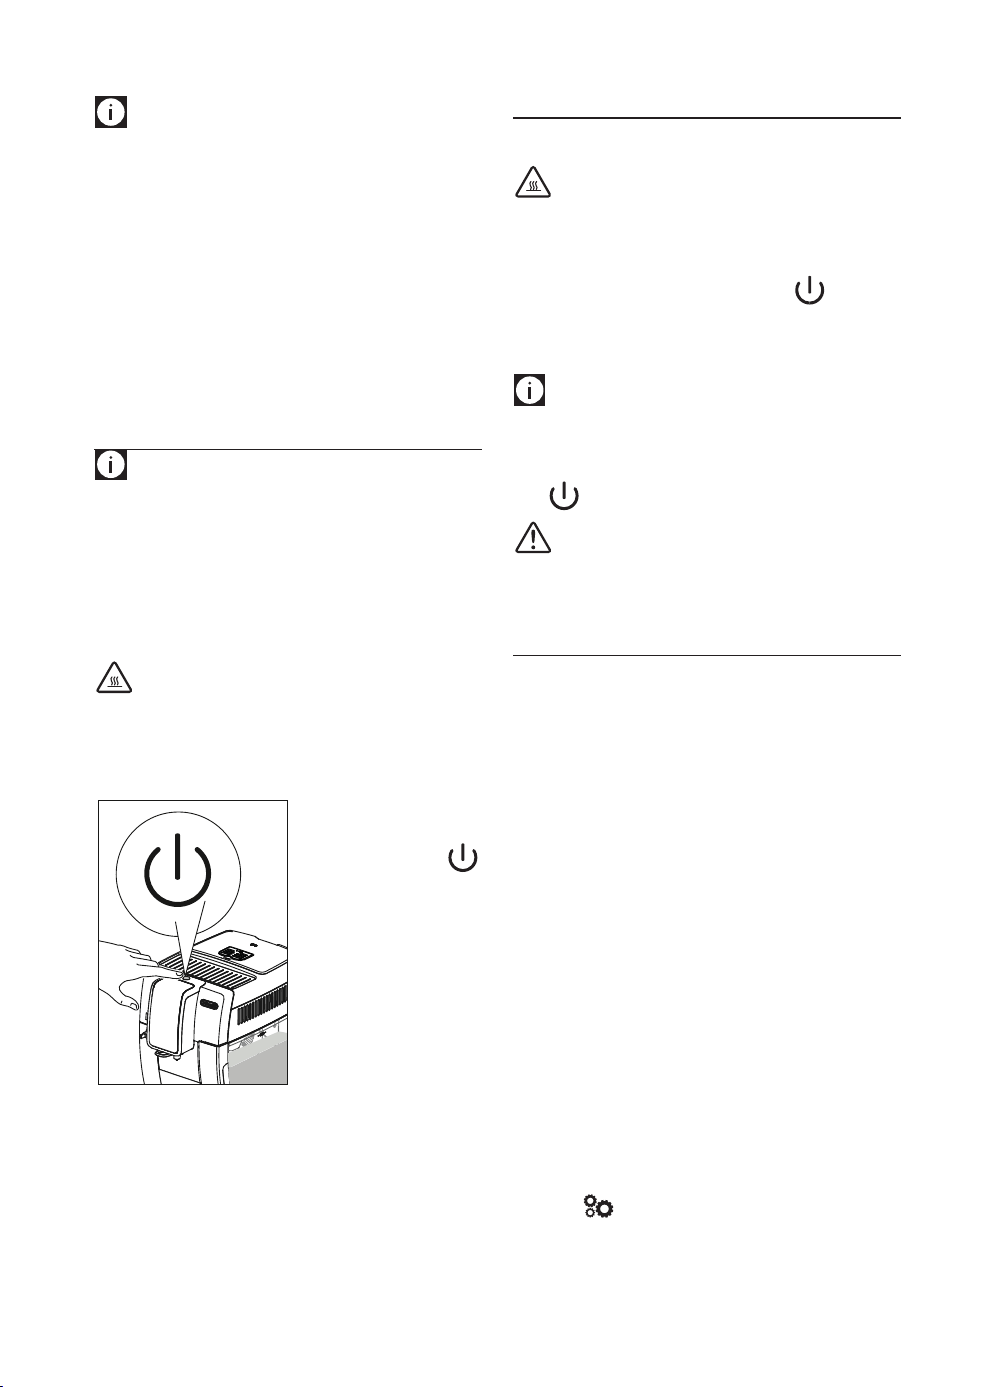
52
Nota Bene:
• Cuando utilice por primera vez la cafetera, será necesario
preparar 4-5 cafés o 4-5 capuchinos antes de obtener bue-
nos resultados.
• Durante la preparación de los primeros 5-6 capuchinos, es
normal sentir un ruido de agua hirviendo:
• Para disfrutar más del café y obtener mejores prestaciones
de la máquina, se recomienda instalar el ltro ablandador
(C4) siguiendo las instrucciones del capítulo “17. Filtro
ablandador”. Si su modelo de cafetera no lleva de serie el
ltro, es posible solicitarlo a los Centros de Asistencia Auto-
rizados De’Longhi.
5. ENCENDIDO DEL APARATO
Nota Bene:
Antes de encender el aparato, asegúrese de que el interruptor
general (A22) situado en la parte posterior del aparato esté pul-
sado (g. 2).
Cada vez que se enciende el aparato, se realiza automáticamen-
te un ciclo de precalentamiento y de enjuague que no se puede
interrumpir. El aparato está listo únicamente después de este
ciclo.
¡Peligro de quemaduras!
Durante el enjuague sale un poco de agua caliente del surtidor
de café (A9), que se recoge en la bandeja recogegotas (A15), que
se encuentra debajo. Tenga cuidado de no entrar en contacto
con salpicaduras de agua.
• Para encender el apara-
to pulse el botón
(A7) ( g. 6): en el display
(B1) aparece el mensaje
"Calentamiento Se ruega
esperar".
Una vez nalizado el calenta-
miento, en el display aparece
“Enjuague ” con una barra de
progresión que se va llenan-
do a medida que procede la
preparación; de esta forma,
además de calentar la caldera, el aparato hace correr el agua
caliente por los conductos internos, de forma que estos se ca-
lienten también.
El aparato se ha calentado cuando en el display aparece el men-
saje "Selecciona tu bebida".
6
6. APAGADO DEL APARATO
Cada vez que se apaga el aparato se activa un ciclo de enjuague
automático, siempre que se haya preparado un café.
¡Peligro de quemaduras!
Durante el enjuague sale un poco de agua caliente por las bo-
quillas del surtidor de café. (A9). Tenga cuidado de no entrar en
contacto con salpicaduras de agua.
• Para apagar el aparato presione el botón (A7 - g. 6).
• En el display (B1) aparece el mensaje “Apagado en curso,
Se ruega esperar”: en caso de que esté previsto el aparato
efectúa el enjuague y a continuación se apaga (stand-by).
Nota Bene:
Si no utiliza el aparato durante periodos prolongados, desconéc-
telo de la red eléctrica:
• antes de hacerlo, apague el aparato presionando el botón
(g. 6);
• suelte el interruptor general (A22) (g.2).
¡Atención!
No pulse nunca el interruptor general mientras el aparato esté
encendido.
7. PROGRAMACIONES DEL MENÚ
El menú se desarrolla en 6 opciones, algunas de las cuales tienen
subgrupos:
• Idioma
• Mantenimiento:
- Descalcicación;
- Instala ltro;
- (si el ltro se ha instalado): Cambiar el ltro,
- (si el ltro se ha instalado): Extraer el ltro
• Prg. bebidas;
• Prg. My bebidas;
• General:
- Programar temperatura,
- Dureza del agua
- Autoapagado,
- Ahorro energético,
- Señal acústica,
- Bebidas de fábrica,
- Valores de fábrica,
• Estadísticas.
7.1 Idioma
Si desea modicar el idioma del display (B1), proceda de la si-
guiente manera:
1. Pulse (B6) para entrar en el menú “Programaciones”;
2. Pulse OK (B3) para seleccionar “Idioma”. En el display se
visualizan los idiomas seleccionables;

53
3. Pulse las echas de selección (B2 y B4) hasta visualizar
entre las dos líneas punteadas el idioma deseado.
4. Pulse OK para conrmar;
5. El aparato vuelve al manú “Programaciones”;
6. Pulse /ESC (B5) para salir del menú.
7.2 Mantenimiento
En esta opción se encuentran las operaciones de mantenimiento
que la máquina requiere a lo largo del tiempo:
• Descalcicación : Para las instrucciones correspon-
dientes a la descalcicación, consulte el capítulo “15.
Descalcicación”.
• Instalación del ltro: Para las instrucciones correspon-
dientes a la instalación del ltro (C4) consulte el apartado
“17.1 Instalación del ltro”
Para seleccionar la operación deseada proceda de la siguiente
manera:
1. Pulse (B6) para entrar en el menú “Programaciones”;
2. Pulse las echas de selección (B2 y B4) hasta visualizar
entre las dos líneas punteadas “Mantenimiento”;
3. Pulse OK (B3) para conrmar;
4. Pulse las echas de selección hasta visualizar la operación
que es necesario realizar;
5. Pulse OK para conrmar y realizar las operaciones, como
ilustra en los apartados especícos.
7.3 Programación bebidas
La cafetera se programa en fábrica para producir cantidades
estándar. Si desea modicar esta cantidad para personalizar
las bebidas directas y del (B14), proceda de la
siguiente manera:
1. Pulse (B6) para entrar en el menú “Programaciones”;
2. Pulse las echas de selección (B2 y B4) hasta visualizar
entre las dos líneas punteadas “Prg. bebidas”;
3. Pulse OK (B3) para conrmar: el aparato enumera las bebi-
das que es posible personalizar;
4. Pulse las echas de selección hasta visualizar la bebida que
se quiere personalizar: pulse OK para conrmar;
5. Bebidas con café: en el display aparece “Programa
aroma”: pulse las echas de selección (B2 yB4) o
(B7) hasta seleccionar el aroma deseado (ver apartado “9.4
Variación temporal del aroma del café”), pulse OK. En el
display aparece “Programación café” y una barra que se
completa a medida que procede la salida: una vez obtenida
la cantidad deseada pulse OK;
Bebidas a base de leche: después de haber seleccionado
el aroma en el display aparece “Progr. leche” y una barra
que se completa a medida que va saliendo la leche: vez
obtenida la cantidad deseada pulse OK; El aparato prepara
entonces el café: pulse OKpara interrumpir la salida en el
momento en que la cantidad de café deseada ha salido.
Agua caliente pulse OK. La salida empieza: una vez obte-
nida la cantidad deseada, pulse OK.
6. “¿Salvar los parámetros?”: para salvar la programación
pulse OK (en caso contrario pulse /ESC - B2 o B5).
7. “Parámetros salvados” (o “Parámetros no salvados”). El
aparato se vuelve a poner en listo para el uso.
7.4 Programación My bebidas
Siga los procedimientos que se ilustran en el apartado anterior
“7.3 Programación bebidas” para personalizar las bebidas del “
” (B14) o efectuar la programación directa, como se
describe en el capítulo “12. Programación y selección”.
7.5 General
En esta opción se encuentran las programaciones para persona-
lizar las funciones básicas del aparato.
1. Pulse (B6) para entrar en el menú “Programaciones”;
2. Pulse las echas de selección (B2 y B4) hasta visualizar
entre las dos líneas punteadas “General ”;
3. Pulse OK (B3) para conrmar y seleccionar la opción de-
seada con las echas de selección. A continuación seguir
las indicaciones especicadas para cada programación.
• Programar temperatura:
Si desea modicar la temperatura del agua a la que se suminis-
tra el café siga los pasos descritos a continuación:
4. Pulse OK (B3). En el display (B1) se visualiza el valor actual-
mente programado y parpadea el valor “Nuevo”;
5. Seleccione el nuevo valor que se desea programar con las
echas de selección B2 o B4).
6. Una vez seleccionado el valor deseado (baja, media, alta,
máxima), pulse OK.
El aparato vuelve a la pantalla precedente.
• Dureza agua:
Para las instrucciones correspondientes a la denición y progra-
mación de la dureza del agua, consulte el capítulo "”16. Progra-
mación de la dureza del agua”.
• Autoapagado (standby):
Se puede programar el autoapagado para que el aparato
se apague tras 15 o 30 minutos, o bien tras 1, 2 o 3 horas de
inactividad.
4. Pulse OK. En el display (B1) se visualiza el valor actualmen-
te programado y parpadea el valor “Nuevo”;
5. Seleccione el nuevo valor que se desea programar con las
echas de selección B2 o B4).
6. Una vez seleccionado el valor deseado (baja, media, alta,
máxima), pulse OK.
El aparato vuelve a la pantalla precedente.
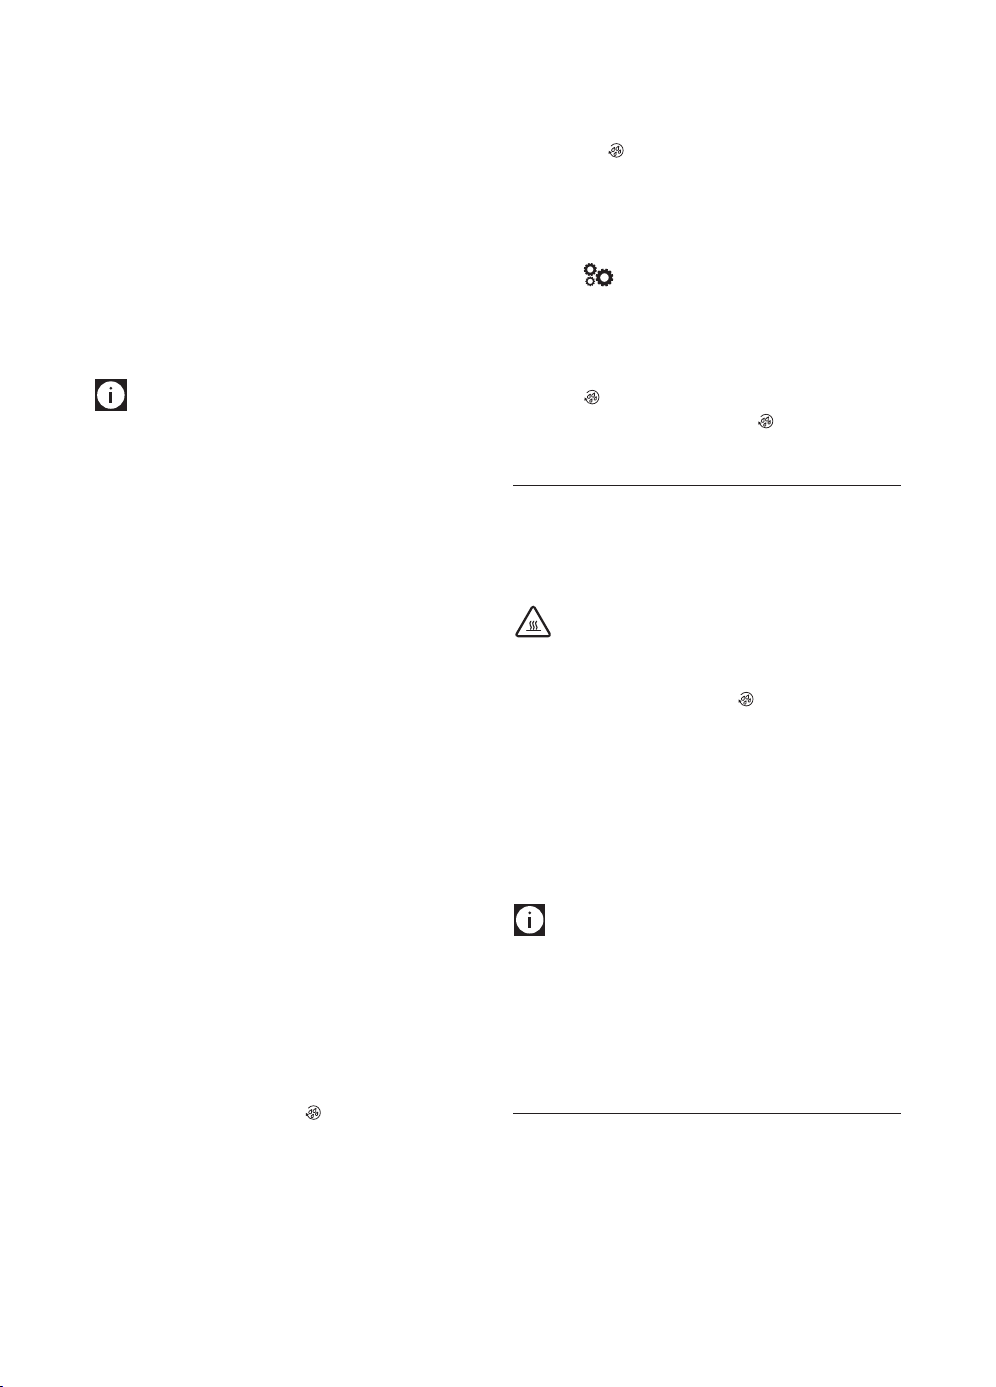
54
• Ahorro energético:
Esta función permite activar o desactivar el modo de ahorro
energético. Cuando la función está activada, se garantiza un
menor consumo energético, de acuerdo con las normativas eu-
ropeas vigentes.
Para activar o desactivar el modo “ahorro energético”, proceda
de la siguiente manera:
4. Pulse OK. En el display se visualiza tanto el estado actual
(“Activo” o “No activo”) como la operación que se efectuará
conrmando con OK (“¿Desactivar?” o “¿Activar?”);
5. Pulse OK para desactivar o activar la función.
El aparato vuelve a la pantalla precedente.
Nota Bene:
• Cuando la función está activa en el display aparece el sím-
bolo “ECO”.
• En modo de ahorro energético, la máquina se mantiene
algunos segundos en espera antes de suministrar el primer
café o la primera bebida con leche, ya que debe calentarse.
• Si el contenedor de leche está alojado en su asiento, la fun-
ción “ahorro energético” no se activa.
• Señal acústica:
Con esta función se activa o desactiva la señal acústica. Proceda
de la siguiente manera:
4. Pulse OK. En el display (B1) se visualiza tanto el estado ac-
tual (“Activo” o “No activo”) como la operación que se efec-
tuará conrmando con OK (“¿Desactivar?” o “¿Activar?”);
5. Pulse OK para desactivar o activar la función.
El aparato vuelve a la pantalla precedente.
• Bebidas de fábrica,
Con esta función es posible volver a las programaciones de fábri-
ca para todas las bebidas o para cada bebida programada. Una
vez seleccionadas las bebidas proceda de la siguiente manera:
4. Seleccione “Todas” si quiere volver a la programación de
aroma y cantidad, como estándar de fábrica de todas las
bebidas, o seleccionar la bebida deseada, a continuación
pulse OK;
5. “¿Restablecer?”: para volver a los valores de fábrica pulse
OK.
6. “Restablecimiento completado”: el aparato conrma el
restablecimiento y vuelve a la pantalla precedente.
Para proceder al restablecimiento de otra bebida reinicie desde
el punto cuatro o, para salir, pulse /ESC (B5) .
• Valores de fábrica:
Con esta función se restablecen todos los ajustes del aparato y
de las bebidas (salvo el idioma, que sigue siendo el seleccionado
en la primera puesta en marcha). Una vez seleccionada la op-
ción proceda de la siguiente manera:
4. “¿Restablecer?”: pulse OK;
5. “Restablecimiento completado”: el aparato conrma el
restablecimiento y vuelve a la pantalla precedente.
Para salir pulse /ESC (B5).
7.6 Estadísticas
Con esta función se visualizan los datos estadísticos de la cafete-
ra. Para verlos, proceda de la siguiente manera:
1. Pulse (B6) para entrar en el menú “Programaciones”;
2. Pulse las echas de selección (B2 y B4) hasta visualizar
entre las dos líneas punteadas “Estadísticas”;
3. Pulse OK (B3): el display visualiza los datos estadísticos de
la máquina: pase las opciones con las echas de selección;
4. Pulse /ESC (B5) para salir del menú.
Para volver a la pantalla principal pulse /ESC.
8. ENJUAGUE
Con esta función es posible hacer salir agua caliente del surtidor
de café (A9) y del surtidor de agua caliente (C6), si está introdu-
cido, a n de limpiar y calentar el circuito interno de la máquina.
Ponga bajo el surtidor de café y agua caliente un recipiente con
una capacidad mínima de 100 ml.
¡Atención! Peligro de quemaduras.
No deje la cafetera sin vigilancia mientras sale agua caliente.
1) Para activar esta función pulse (B5): en el display (B1)
aparece el mensaje "Enjuague ”;
2) Al cabo de unos segundos, primero del surtidor de café y
después del surtidor de agua caliente (si introducido) sale
agua caliente, que limpia y calienta el circuito interno de la
máquina: en el display aparece una barra progresiva que
se va llenando a medida que avanza la preparación;
3) Para interrumpir la función pulse la echa correspondiente
a "STOP" (B4).
¡Nota Bene!
• Para los periodos en que la máquina no se usa durante más
de 3-4 días se aconseja , una vez encendida, realizar 2/3
enjuagues antes de utilizarla.
• Es normal que, después de haber realizado dicha función,
haya agua en el cajón de los posos de café (A11).
9. PREPARACIÓN DEL CAFÉ
9.1 Regulación del molinillo de café
No se debe regular el molinillo de café, al menos inicialmente,
ya que se ha congurado previamente en fábrica de manera que
se obtenga una distribución correcta del café.
Sin embargo, si después de haber hecho el primer café, la distri-
bución resultara ser poco densa y con poca crema o demasiado
lenta (goteando), es necesario efectuar una corrección con el
botón de regulación del grado de molienda (A5) ( g. 7).
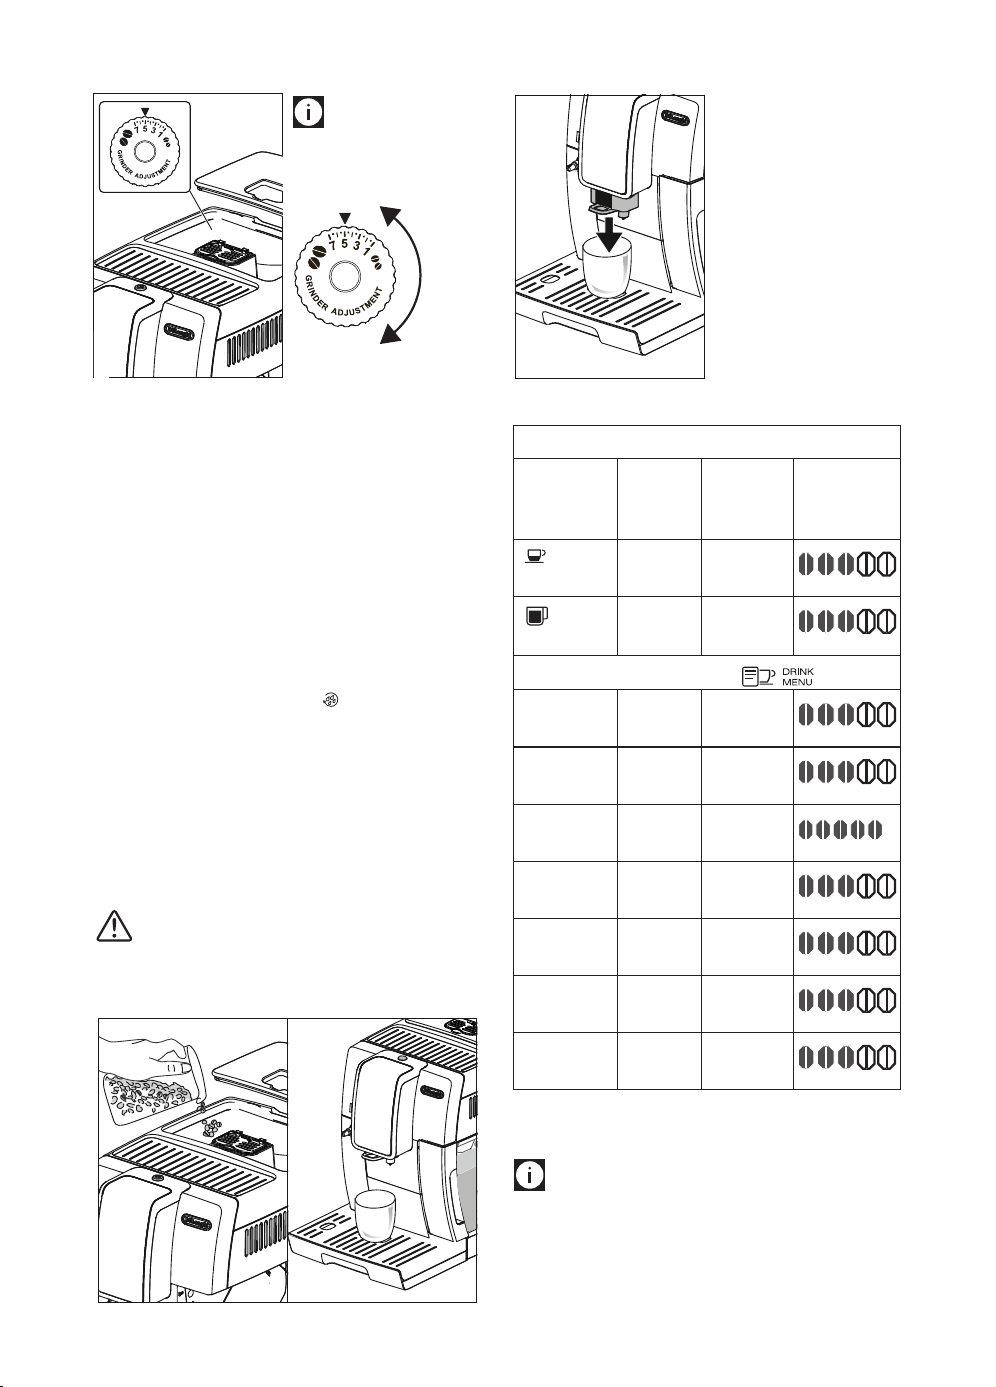
55
Nota Bene:
El regulador se debe girar sola-
mente cuando el molinillo de
café está funcionando.
Si el café
sale de-
masiado
lenta-
mente o
no sale,
gire el regulador en sentido
horario una posición hacia el
número 7.
Para obtener, en cambio, un suministro de café más denso y me-
jorar el aspecto de la crema, gire el regulador en el sentido de
las agujas del reloj hasta situarlo en el número 1 (un punto a la
vez, de lo contrario, el café puede salir a gotas).
El efecto de esta corrección se nota solamente después de haber
preparado por lo menos 2 cafés seguidos. Si tras esta regulación
no se obtiene el resultado deseado, habrá que repetir la correc-
ción girando el mando otra posición.
9.2 Consejos para obtener un café más caliente
Para obtener un café más caliente, le aconsejamos:
• efectúe un enjuague pulsando /ESC (B5) (ver capítulo
“8. ENJUAGUE”);
• caliente las tazas con agua caliente utilizando función
agua caliente (ver capítulo “13. Salida del agua caliente”);
• aumente la temperatura café en el menú "Programacio-
nes" (ver apartado “7.5 General”).
9.3 Preparación de las recetas automáticas
utilizando el café en granos
¡Atención!
No utilice granos de café verdes, con caramelo o contados por-
que se puede pegar en el molinillo del café y estropearlo.
1.
Eche el café en granos en el recipiente especíco (A3) (g. 8).
8 9
2. Ponga debajo de las
boquillas del surtidor de
café (A9):
- 1 taza, si desea 1 café
(g. 9);
- 2 tazas, si desea 2
cafés;
3. Baje el surtidor de café
a n de acercarlo lo más
posible a las tazas: de
esta forma se obtiene una
crema mejor (g.10).
4. Seleccione el café deseado:
Bebidas de selección directa:
Receta Cantidad Cantidad
program-
able
Aroma
predenido
Espresso (B8)
≃ 40 ml
de ≃30 a
≃ 80ml
+
Long (B10)
≃ 175 ml
de ≃115 a
≃250cc
+
Bebidas café seleccionables en (B14)
Espresso
largo
≃ 120 ml
de ≃80 a
≃180
+
Corto
≃ 30 ml
de ≃20 a
≃40cc
+
Doppio+
≃ 120 ml
de ≃80 a
≃180cc
+
Café
≃ 180 ml de ≃100 a
≃240cc
+
2 Espresso
≃ 40 ml x
2 tazas
--
+
2 espresso
largo
≃ 120 ml
x 2 tazas
--
+
2 espresso
corto
≃ 30 ml x
2 tazas
--
+
5. La preparación empieza y en el display (B1) aparece una
barra de progresión que se completa a medida que la pre-
paración avanza.
Nota Bene:
• Es posible preparar a la vez 2 tazas de ESPRESSO CORTO, ES-
PRESSO, ESPRESSO LARGO pulsando “2X “ durante la pre-
paración de las bebidas individuales (la imagen se visuali-
za durante varios segundos al principio de la preparación).
7
10
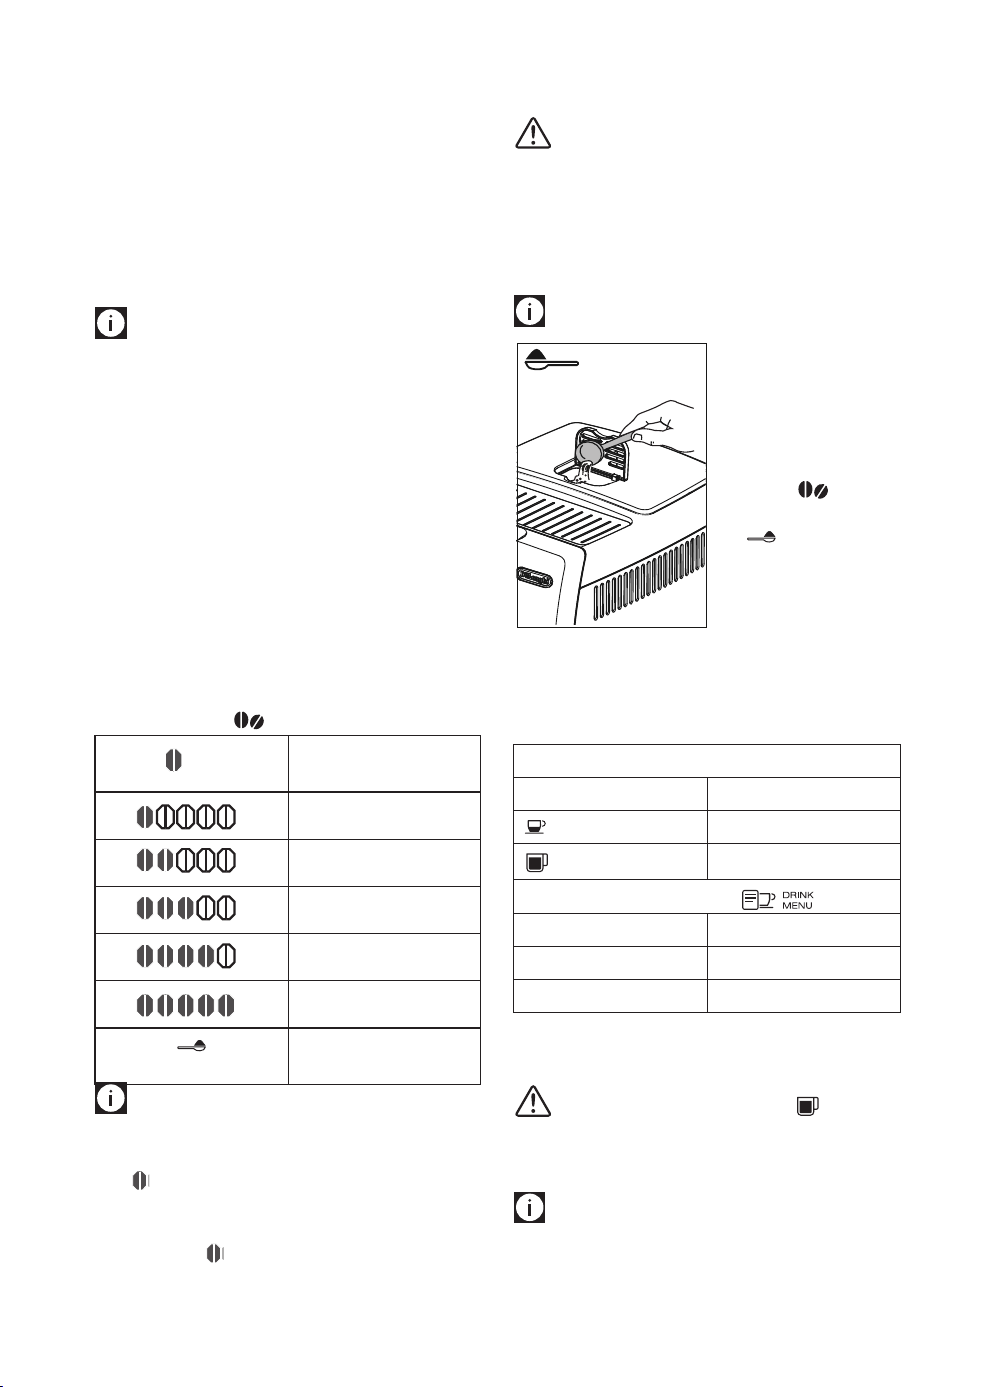
56
• Mientras la cafetera prepara el café, se puede interrumpir
su salida en cualquier momento pulsando la echa de se-
lección correspondiente a "STOP" (B4).
• En cuanto termina la salida, si se quiere aumentar la canti-
dad de café en la taza, es suciente mantener presionado
(no más de 3 segundos) uno de los botones de salida del
café (B8 - B10).
Cuando acaba la preparación, el aparato está listo para ser uti-
lizado de nuevo.
Nota Bene:
• Durante el uso, aparecerán algunos mensajes en el display
(llenar depósito, vaciar cajón de posos, etc.) cuyo signica-
do se reproduce en capítulo “18. Mensajes visualizados en
el display”.
• Para obtener un café más caliente, consulte el apartado
“9.2 Consejos para obtener un café más caliente”.
• Si el café sale goteando o con poco cuerpo y poca crema, o
está demasiado frío, lea los consejos recogidos en el capí-
tulo “19. Solución de los problemas”.
• Para personalizar según los propios gustos la bebida con-
sulte los apartados “7.3 Programación bebidas” y “7.4 Pro-
gramación My bebidas”.
9.4 Variación temporal del aroma del café
Para personalizar temporalmente el aroma del café de las rece-
tas automáticas pulse (B7):
+
AUTO
Personal (si programado) /
Estándar
+
X-SUAVE
+
SUAVE
+
MEDIO
+
FUERTE
+
X-FUERTE
(ver “9.5 Preparación del
café con café premolido”)
Nota:
• La variación de aroma no se memoriza y en la siguiente sa-
lida automática el aparato selecciona el valor predenido
(
+
AUTO).
• Si la salida no se produce al cabo de unos segundos de la
personalización temporal del aroma este vuelve al valor
predenido (
+
AUTO).
9.5 Preparación del café con café premolido
¡Atención!
• No eche nunca café premolido con la cafetera apagada
para evitar que se disperse en el interior, y lo ensucie. En
este caso, la cafetera se puede estropear.
• No eche más de 1 medidor (C2) raso de café porque se
puede ensuciar el interior de la cafetera o se puede obstruir
el embudo (A4).
Nota Bene:
Cuando se utiliza café
premolido, se puede pre-
parar solamente una taza
de café a la vez.
1. Pulse repetidamente el
botón (B7) hasta
que el (B1) visualice “
"
2. Asegúrese de que el
embudo no esté obs-
truido y eche entonces
un medidor raso de café
premolido (g. 11).
3. Coloque una taza bajo las boquillas del surtidor de café
(A9) (g. 9).
4. Seleccione el café deseado:
Bebidas de selección directa:
Receta Cantidad
Espresso (B8)
≃ 40 ml
Long (B10)
≃ 175 ml
Bebidas café seleccionables en
(B14)
Espresso largo
≃ 120 ml
Espreso corto
≃ 30 ml
Café
≃ 180 ml
5. La preparación empieza y en el display aparece la bebida
seleccionada y una barra de progresión que se completa a
medida que la preparación avanza.
¡Atención! Preparando el café LONG :
A mitad preparación en el display (B1) aparece el mensaje "In-
troducir café premolido". Introduzca a continuación un medidor
raso de café premolido y pulse OK (B3).
Nota:
Si el modo “Ahorro Energético” está activado, El primer café po-
dría tardar unos segundos en salir.
11
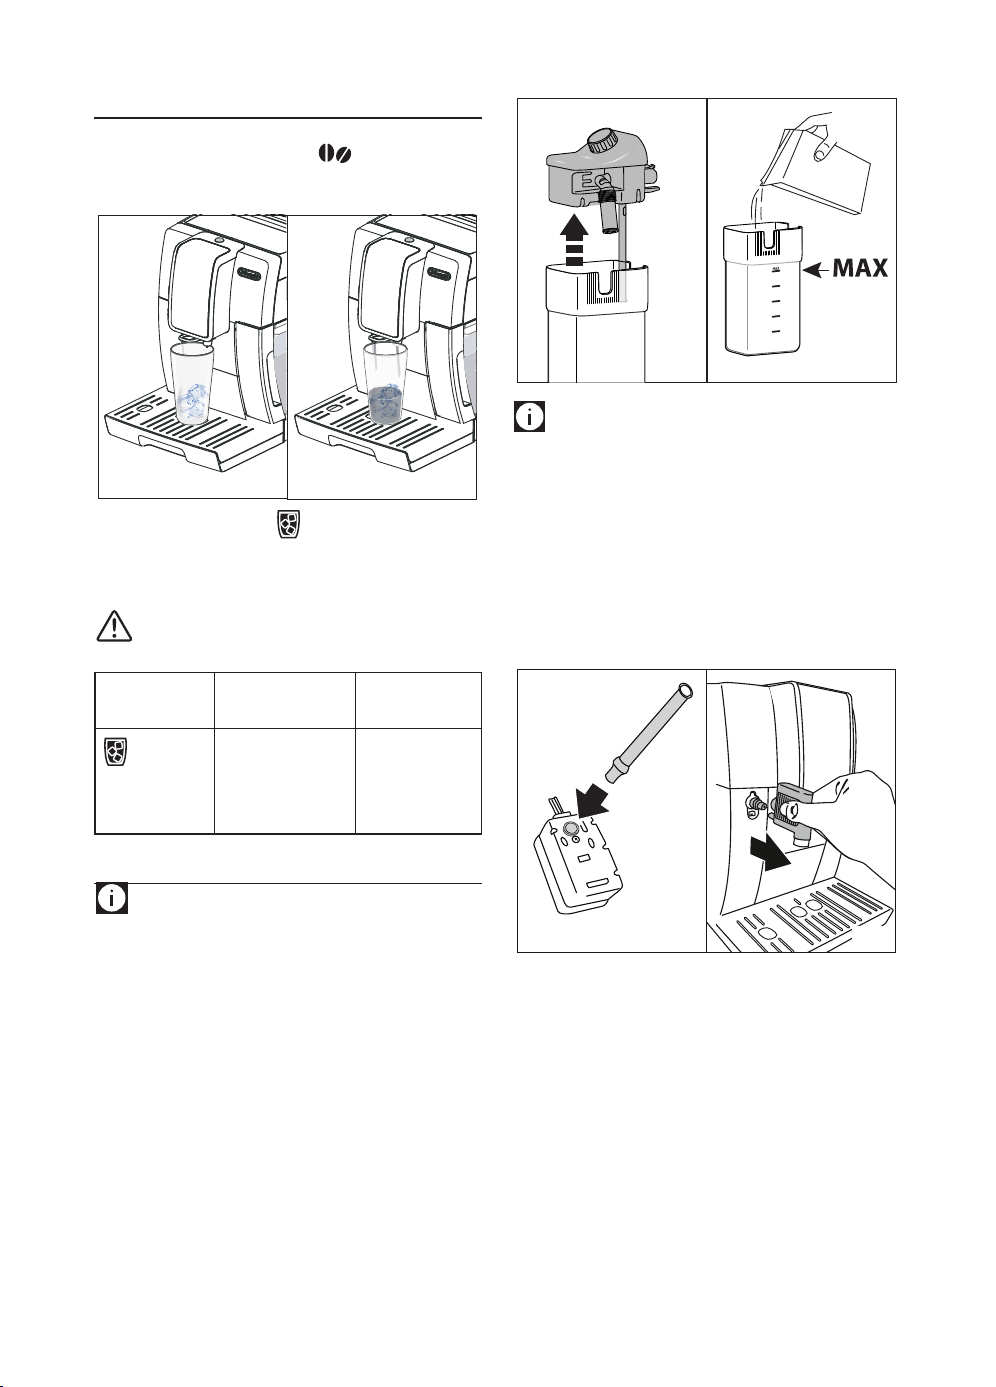
57
10. TRUEBREW OVER ICE™ CAFÉ
1. Agregue hielo hasta que se llene medio vaso (g. 12),
presione el selector de aroma (B8) (se recomienda
fuerte o extra fuerte) y coloque el vaso debajo de surtidor
de café;
13
12
2. Luego, presione el botón TrueBrew Over Ice™ (B9) para
preparar el café (g. 13);
3. Agregue otros cubitos de hielo al vaso / café más cualquier
jarabe, endulzante o leche que desee y disfrute.
Atención!
Utilice siempre gafas resistentes al choque térmico.
Receta Cantidad Cantidad
programable
TrueBrew Over
Ice coee™ (B9)
≃ 3.38 oz /
100 ml
desde ≃ 1.35
oz/ 40 ml a
≃8.11 oz /
240ml
11. PREPARACIÓN DE BEBIDAS CON LECHE
Nota Bene:
• Para evitar obtener una leche con poca espuma, o con bur-
bujas grandes, limpie la tapadera del recipiente de la leche
(D2) y la boquilla del agua caliente (A8) tal como se des-
cribe en los apartados “11.4 Limpieza del recipiente de la
leche después de cada uso”, “14.10 Limpieza del recipiente
de la leche” y “14.7 Limpieza de las boquillas del surtidor
de café”.
11.1 Llenado y enganche del recipiente de la
leche
1. Quite la tapadera (D2) (g. 14).
2. Llene el recipiente de la leche (D3) con una cantidad su-
ciente de leche, no supere el nivel MÁX. impreso en el
recipiente (g. 15). Tenga siempre presente que cada barra
impresa en el lateral del depósito corresponde a 100 ml de
leche.
15
MILK
14
¡Nota Bene!
• Para obtener una espuma más densa y rica, utilice leche
desnatada o semidesnatada y a temperatura de frigoríco
(alrededor de 5 °C).
• Si el modo “Ahorro energético” está activado, la prepa-
ración del cappuccino puede requerir unos segundos de
espera.
3. Asegúrese de que el tubo de aspiración de la leche (D4)
esté bien colocado en el alojamiento situado en el fondo
de la tapadera del recipiente de la leche (g. 16).
16 17
4. Ponga de nuevo la tapadera del recipiente de la leche.
5. Saque el surtidor de agua caliente (C6) de la boquilla (A8)
(g.17).
6. Enganche empujando a fondo el recipiente en la boqui-
lla (g.18): la máquina emite una señal acústica (si está
activa);

58
1618 19
7. Coloque una taza lo sucientemente grande bajo las bo-
quillas del surtidor de café (A9) y bajo el tubo de salida
de la leche montada (D5); regule la longitud del tubo de
salida de leche, para acercarlo a la taza, tirando de él sim-
plemente hacia abajo (g. 19).
8. Siga las indicaciones que se muestran a continuación para
cada función especíca.
11.2 Regulación de la cantidad de espuma
Girando el regulador de espu-
ma (D1), se selecciona la can-
tidad de espuma de leche que
saldrá durante la preparación
de las bebidas a base de leche.
Posición
del botón
Descripción Aconsejado para...
Sin espuma LECHE CALIENTE(no mon-
tada) /CAFFELATTE
Poca espuma LATTE MACCHIATO/
FLAT WHITE
Máx. espuma CAPPUCCINO/ CAPPUC-
CINO+ / ESPRESSO MAC-
CHIATO / LECHE CALIENTE
(montada)
20
11.3 Preparación automática de bebidas a base
de leche
1. Llenar y enganchar el recipiente de la leche como se ha
mostrado anteriormente.
2. Seleccione la bebida deseada:
De selección directa:
•
: Cappuccino (B11)
• : Latte Macchiato (B12)
• : Leche caliente (B13)
Selezionable pulsando (B3):
• Cappuccino+
• Caelatte
• Flat white
• Espresso macchiato;
3. Al cabo de unos segundos, el aparato inicia automática-
mente la preparación y en el display aparece una barra de
progresión que se completa a medida que la preparación
procede.
4. Después de haber suministrado la leche la máquina pre-
para automáticamente el café (para las bebidas que así lo
prevén).
Nota Bene:
• Si, durante la salida, quiere interrumpir la preparación,
pulse la echa correspondiente a “STOP” (B4).
• No deje mucho tiempo el recipiente de la leche fuera de la
nevera: cuánto más alta es la temperatura de la leche (5°C
ideal) peor es la calidad de la espuma.
• Las bebidas se pueden personalizar (ver apartados “7.3
Programación bebidas” y “7.4 Programación My bebidas”).
11.4 Limpieza del recipiente de la leche después
de cada uso
¡Atención! Peligro de quemaduras
• Durante la limpieza de los conductos internos del recipien-
te de la leche (D), sale un poco de agua caliente y vapor
por el tubo de salida de la leche (D5). Tenga cuidado de no
entrar en contacto con salpicaduras de agua.
Tras cada uso de las funciones de leche, en el display (B1) a
aparece el mensaje intermitente “Botón en CLEAN, ESC para
anular”. Efectúe la limpieza para eliminar los residuos de leche
procediendo de la siguiente manera (o pulse “
/ESC” (B5)
para posponer la operación):
1. Deje el recipiente de la leche (D) introducido en la máquina
(no es necesario vaciar el contenedor de leche);
2. Posicione una taza u otro recipiente debajo del tubo de
salida de leche montada.
3. Gire el mando de regulación de la espuma (D1) y póngalo
en "CLEAN" (g. 21): en el display aparece una barra de
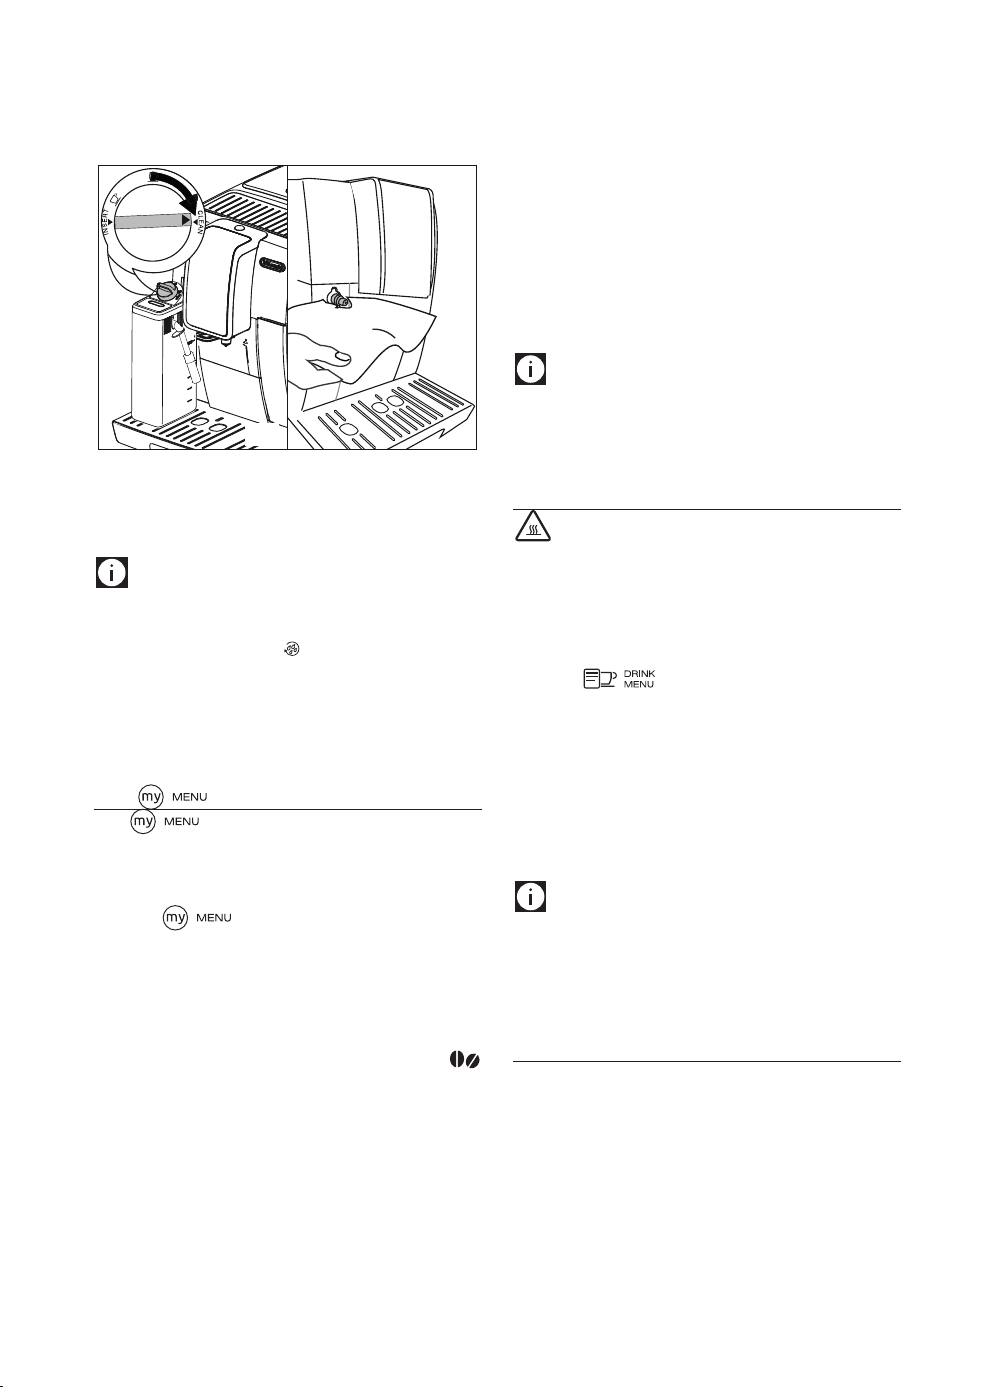
59
6. El aparato prepara entonces el café: pulse OKpara inte-
rrumpir la salida en el momento en que la cantidad de café
deseada ha salido.
7. “¿Salvar los parámetros?”: para salvar la programación
pulse OK (en caso contrario pulse /ESC - B2 o B5).
8. “Parámetros salvados” (o “Parámetros no salvados”. El apa-
rato se vuelve a poner en listo para el uso.
Bebidas no programadas:
3. Pulse OK (B3) para seleccionar;
4. El aparato inicia la preparación de acuerdo con las congu-
raciones previamente programadas.
¡Nota Bene!
Las bebidas para 2 tazas solo serán seleccionables en el mo-
mento en que las bebidas individuales correspondientes se
programen.
13. SALIDA DEL AGUA CALIENTE
¡Atención! Peligro de quemaduras.
No deje la cafetera sola cuando sale el agua caliente.
1. Controle que el surtidor de agua caliente (C6) esté correcta-
mente enganchado;
2. Ponga un recipiente debajo del surtidor (lo más cerca posi-
ble para evitar salpicaduras) (g. 5).
3. Pulse (B3) y pase las bebidas del menú pul-
sando las echas de selección (B2 o B4) hasta seleccionar
“Agua caliente”;
4. Pulse OK (B3): en el display aparece una barra de progre-
sión que se completa a medida que la preparación avanza.
5. La máquina suministra unos 250 ml de agua caliente y
después interrumpe automáticamente el suministro. Para
interrumpir manualmente la salida de agua caliente pulse
la echa de selección correspondiente a “STOP ” (B4).
¡Nota Bene!
• Si el modo “Ahorro energético” está activado, la salida del agua
caliente podría requerir unos segundos de espera..
• La cantidad de agua suministrada se puede personalizar
(ver apartado “8.3 Programación bebidas”).
14. LIMPIEZA
14.1 Limpieza de la cafetera
Las siguientes partes de la cafetera se deben limpiar
periódicamente:
- el circuito interno de la máquina;
- el cajón de los posos de café (A11),
- la bandeja recogegotas (A15) y la bandeja recoge conden-
sación (A14);
- el depósito de agua (A17);:
- las boquillas del surtidor de café (A9):
progresión que se va completando a medida que la opera-
ción avanza y el mensaje “Limpieza en curso”. La limpieza
se interrumpe automáticamente.
2221
4. Coloque el mando de regulación en una de las selecciones
de la espuma.
5. Quite el recipiente de la leche y limpie siempre la boquilla
de vapor (A8) con una esponja (g.22).
¡Nota Bene!
• Si hay que preparar varias tazas de bebidas a base de leche
limpie el recipiente de la leche después de la última prepa-
ración: en este caso pulse /ESC - B5 para volver al menú
principal.
• El recipiente con la leche puede conservarse en la nevera.
• En algunos casos, para efectuar la limpieza, es necesario
esperar a que la máquina se caliente.
12. " " PROGRAMACIÓN Y SELECCIÓN
En el se seleccionan las bebidas personalizadas de
acuerdo con el propio gusto. Si las bebidas nunca se ha progra-
mado el aparato requiere la personalización antes de proceder
a la salida:
1. Pulsa (B15);
2. Pulse las echas de selección (B2 y B4) hasta visualizar
entre las dos líneas punteadas la bebida deseada.
Bebidas no programadas:
3. Pulse OK (B3) para seleccionar;
4. Bebidas con café: en el display aparece “Programación
aroma”: pulse las echas de selección (B2 y B4) o
(B7) hasta seleccionar el aroma deseado. Pulse OK: en el
display aparece “Programación café” y una barra que se
completa a medida que procede la salida: una vez obtenida
la cantidad deseada pulse OK.
5. Bebidas a base de leche: después de haber seleccionado
el aroma en el display aparece “Programación leche” y una
barra que se completa a medida que va saliendo la leche:
vez obtenida la cantidad deseada pulse OK;
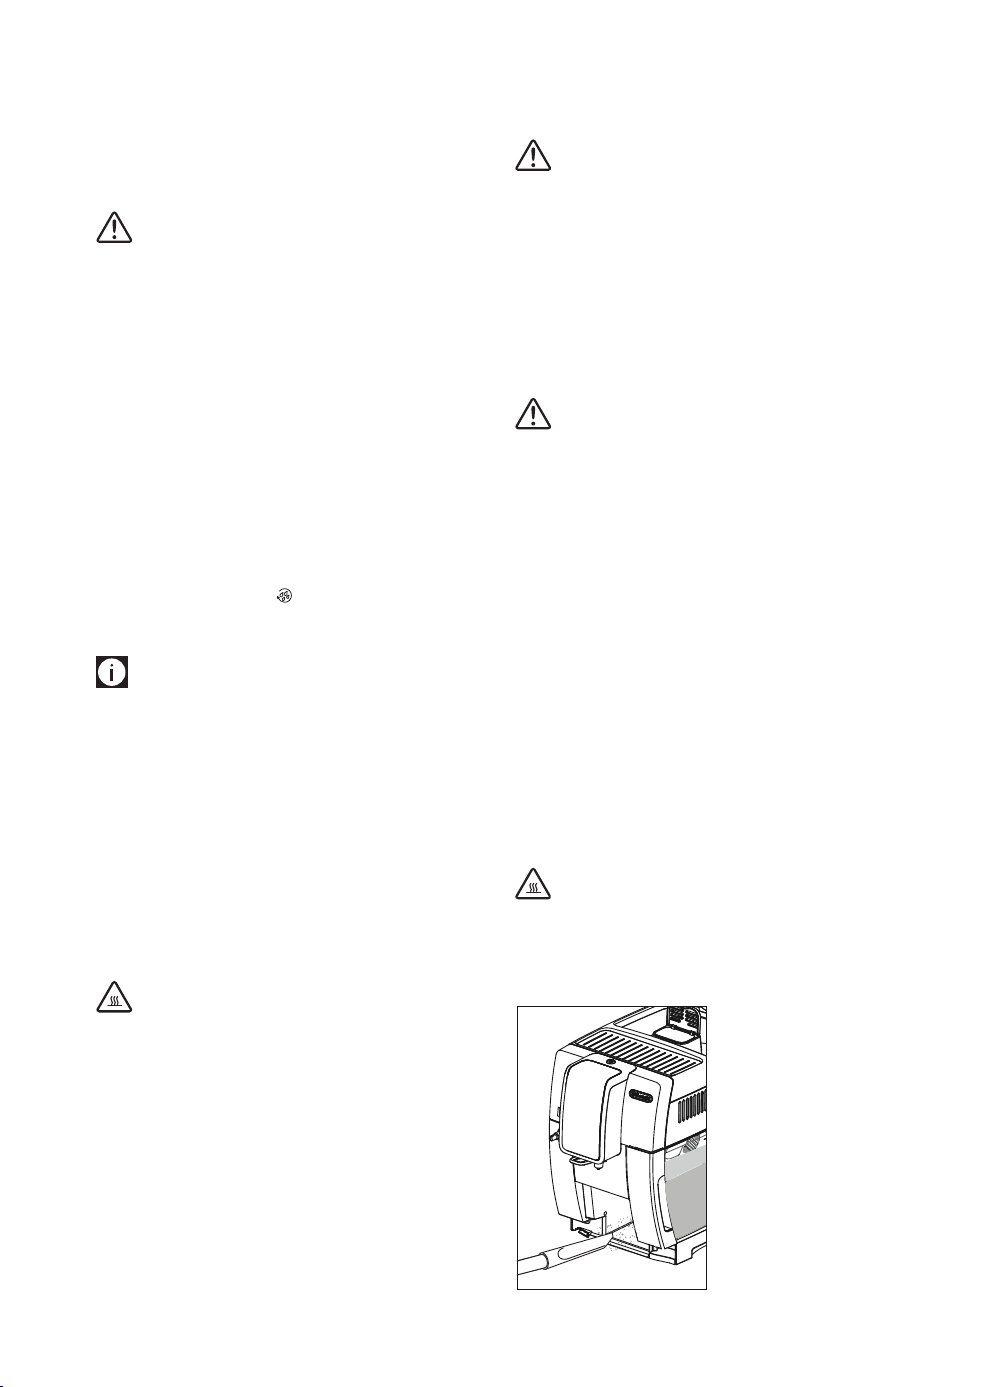
60
- el embudo para echar el café premolido (A4);
- el grupo infusor (A20), accesible después de haber abierto
la portezuela de servicio (A19),
- el recipiente de la leche (D);
- la boquilla agua caliente/vapor (A8);
¡Atención!
• Para limpiar la cafetera no use disolventes, detergentes
abrasivos ni alcohol. Con las superautomáticas De’Longhi
no hay que utilizar aditivos químicos para limpiar la
cafetera.
• Ninguno de los componentes del aparato puede lavarse en
el lavavajillas, salvo la rejilla bandeja (A14) y el recipiente
de leche (D).
• No utilice objetos metálicos para eliminar las incrustacio-
nes o los depósitos de café porque podrían rayar las super-
cies metálicas o plásticas.
14.2 Limpieza del circuito interno de la máquina
En caso de que la cafetera no se use en 3/4 días se aconseja viva-
mente, antes de utilizarla, encenderla y hacer salir:
- 2/3 enjuagues pulsando (B5);
- del agua caliente durante unos segundos (capítulo “13.
Salida del agua caliente”).
¡Nota Bene!
Es normal que, después de haber efectuado dicha limpieza, haya
agua en el cajón de los posos de café (A11).
14.3 Limpieza del cajón de los posos de café
Cuando en el display (B1) aparece el mensaje “Vaciar cajón de
posos”, es necesario vaciarlo y limpiarlo. Hasta que no se limpia
a fondo el cajón de los posos (A11) la máquina no puede hacer
el café. El aparato indica la necesidad de vaciar el recipiente
aunque no esté lleno, si han pasado 72 horas desde la primera
preparación realizada (para que la cuenta de las 72 horas se rea-
lice correctamente, la máquina no debe apagarse nunca con el
interruptor general - A22).
¡Atención! Peligro de quemaduras
Si se hacen muchos cappuccino seguidos, el soporte apoyatazas
(A12) de metal se calienta. Espere a que se enfríe antes de tocar-
lo y agárrelo solamente por la parte anterior.
Para efectuar la limpieza (con la máquina encendida):
• Extraiga la bandeja recogegotas (A15) (g. 23), vacíela y
límpiela;
• Vacíe y limpie meticulosamente el cajón de los posos (A11)
procurando quitar todos los residuos que se pueden haber
depositado en el fondo: el pincel (C5) está dotado de una
espátula adecuada para esta operación.
• Controle la bandeja recogedora de líquido de condensación
(A10) de color rojo y, si está llena, vacíela.
¡Atención!
Al extraer la bandeja recogegotas es obligatorio vaciar siempre
el cajón de los posos de café aunque no esté muy lleno.
Si esta operación no se realiza puede suceder que, al preparar
otros cafés sucesivamente, el cajón de los posos se puede llenar
más de lo previsto y se pueda obstruir la cafetera.
14.4 Limpieza de la bandeja recogegotas y
de la bandeja recogedora del líquido de
condensación.
¡Atención!
La bandeja recogegotas (A16) tiene un indicador otante (de
color rojo) (A13) del nivel de agua contenida (g. 24). Antes de
que este indicador empieza a asomar por la bandeja apoyatazas
(A12) es necesario vaciarla y limpiarla, en caso contrario el agua
puede rebosar por el borde y dañar la máquina, la supercie de
apoyo o la zona circunstante.
Para extraer la bandeja recogegotas:
1. Extraiga la bandeja recogegotas y el cajón de los posos de
café (A11) (g. 23);
2. Saque la bandeja apoyatazas (A12) y la rejilla bandeja
(A14), saque la bandeja recogegotas y el cajón de posos y
lave todos los componentes.
3. Controle la bandeja recogedora de líquido de condensación
de color rojo (A10) y, si está llena, vacíela;
4. Vuelva a colocar la bandeja recogegotas con la rejilla y el
cajón de los posos de café.
14.5 Limpieza del interior de la máquina
¡Peligro de descargas eléctricas!
Antes de llevar a cabo las operaciones de limpieza de las partes
internas, hay que apagar la máquina (véase capítulo "7. Apaga-
do del aparato") y desconectarla de la red eléctrica. No sumerja
nunca la cafetera en el agua.
1. Controle periódicamen-
te (más o menos una vez
al mes) que en el interior
de la máquina (al que
puede accederse una vez
extraída la bandeja reco-
gegotas) (A15) no esté
sucio. Si es necesario,
elimine los restos de café
con el pincel suministra-
do (C5) y una esponja.
25
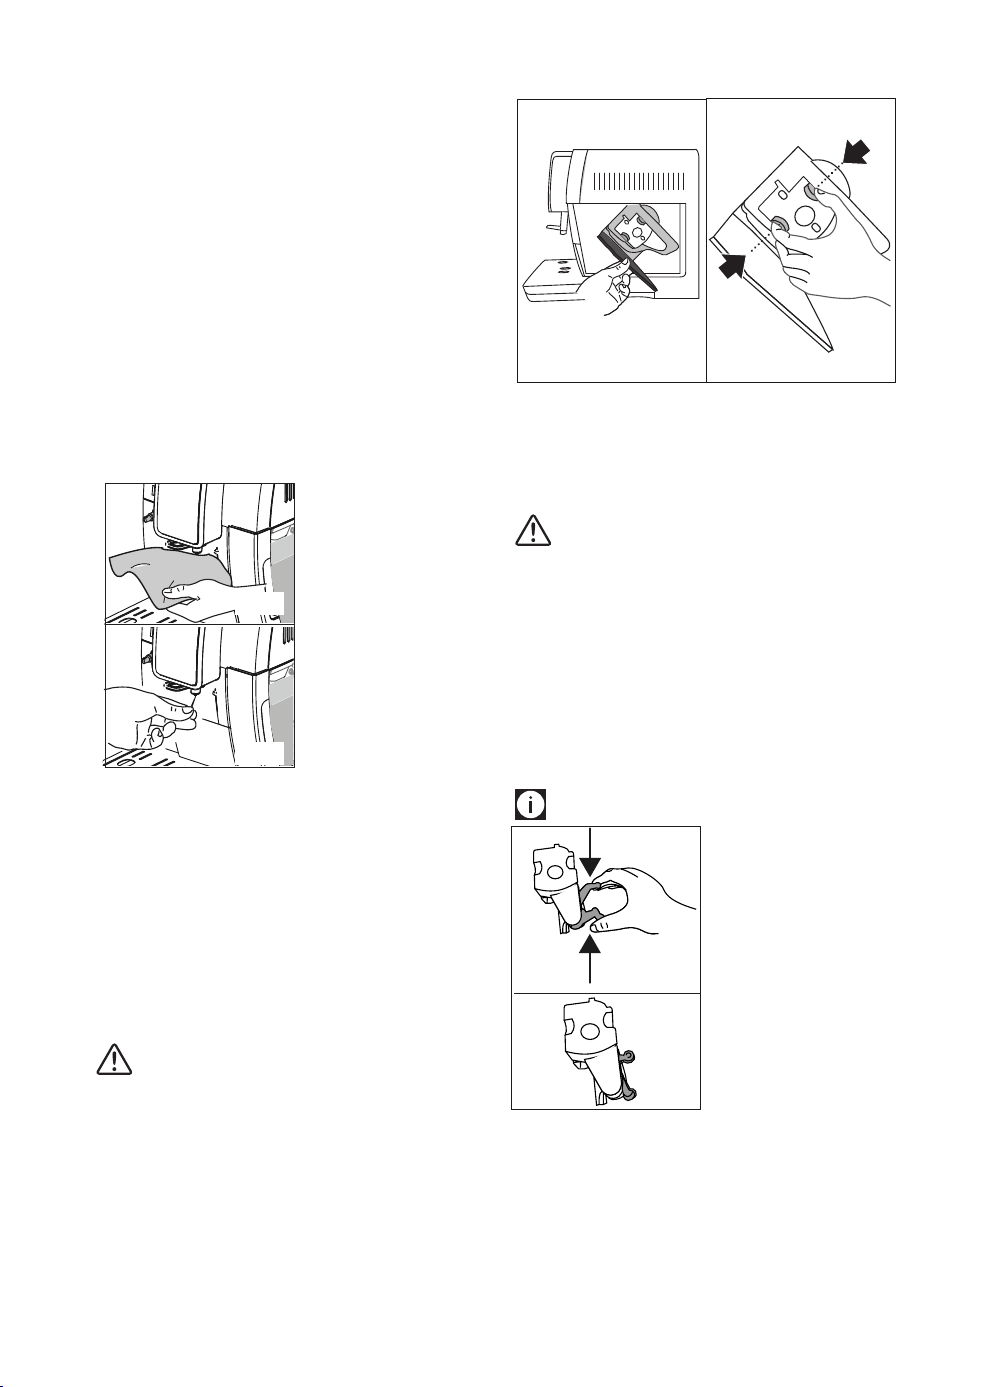
61
2. Aspire todos los restos con un aspirador (g. 25).
14.6 Limpieza del depósito de agua
1. Limpie periódicamente (una vez al mes aproximadamen-
te) y cada vez que cambie el ltro ablandador (C4 ) (si está
previsto) el depósito del agua (A7) con un paño húmedo y
un poco de detergente delicado;
2. Extraiga el ltro (C4) (si está presente) y enjuáguelo con
agua corriente;
3. Vuelva a montar el ltro (si está presente), llene el depósito
con agua fresca y móntelo de nuevo;
4. (sólo para modelos con ltro ablandador) Haga salir 100 ml
de agua.
14.7 Limpieza de las boquillas del surtidor de
café
1. Limpie periódicamente
las boquillas del surti-
dor de café (A9) utili-
zando una esponja o un
paño (g. 26A).
2. Compruebe que los
agujeros del surtidor
de café no están obs-
truidos. Si es necesario,
elimine los restos de
café con un palillo de
dientes (g. 26B).
14.8 Limpieza del embudo para echar el café
premolido
Controle periódicamente (una vez al mes aproximadamente)
que el embudo para echar el café premolido (A4) no esté obs-
truido. Si es necesario, elimine los restos de café con el pincel
(C5) suministrado.
14.9 Limpieza del grupo de infusión
El grupo infusor (A20) debe limpiarse por lo menos una vez al
mes.
¡Atención!
El grupo infusor no se puede extraer cuando la cafetera está
encendida.
1. Asegúrese de que la cafetera se haya apagado correcta-
mente (véase capítulo ”6. Apagado del aparato”);
2. Saque el depósito del agua (A17);
3. Abra la portezuela del grupo infusor (A19) (g. 25) ubicada
en el lado derecho.
26A
26B
27
28
PUSH
PUSH
4. Presione hacia adentro los dos botones de desenganche de
colores y, al mismo tiempo, extraiga el grupo de infusión
(g.32).
5. Sumerja durante 5 minutos aproximadamente el grupo
infusor en el agua y enjuáguelo bajo el grifo.
¡Atención!
ENJUAGUE SOLAMENTE CON AGUA
No use detergentes - No lave en lavavajillas
Limpie el grupo infusor sin usar detergentes ya que podría
estropearse.
6. Utilizando el pincel (C5), limpie los residuos de café presen-
tes en el asiento de la unidad de infusiones, visibles desde
la portezuela de la unidad.
7. Después de la limpieza, vuelva a colocar el grupo de infu-
sión en el soporte; a continuación presione sobre la palabra
PUSH hasta oír el clic de enganche.
Nota Bene:
Si le resulta difícil colocar el
grupo de infusión, (antes de
colocarlo) se debe llevar a la di-
mensión correcta presionando
las dos palancas (g. 29).
8. Después de haberlo co-
locado, asegúrese de que
los dos botones de colores
sobresalgan hacia afuera;
9. Cierre la portezuela del
grupo infusor.
10. Reintroduzca el depósito
del agua;
14.10 Limpieza del recipiente de la leche
Limpie el recipiente de la leche (D) después de cada preparación
de leche, como se indica a continuación:
1. Saque la tapadera (D2);
2. Extraiga el tubo de salida de la leche (D5) y el de aspira-
ción.(D4) (g. 30).
29
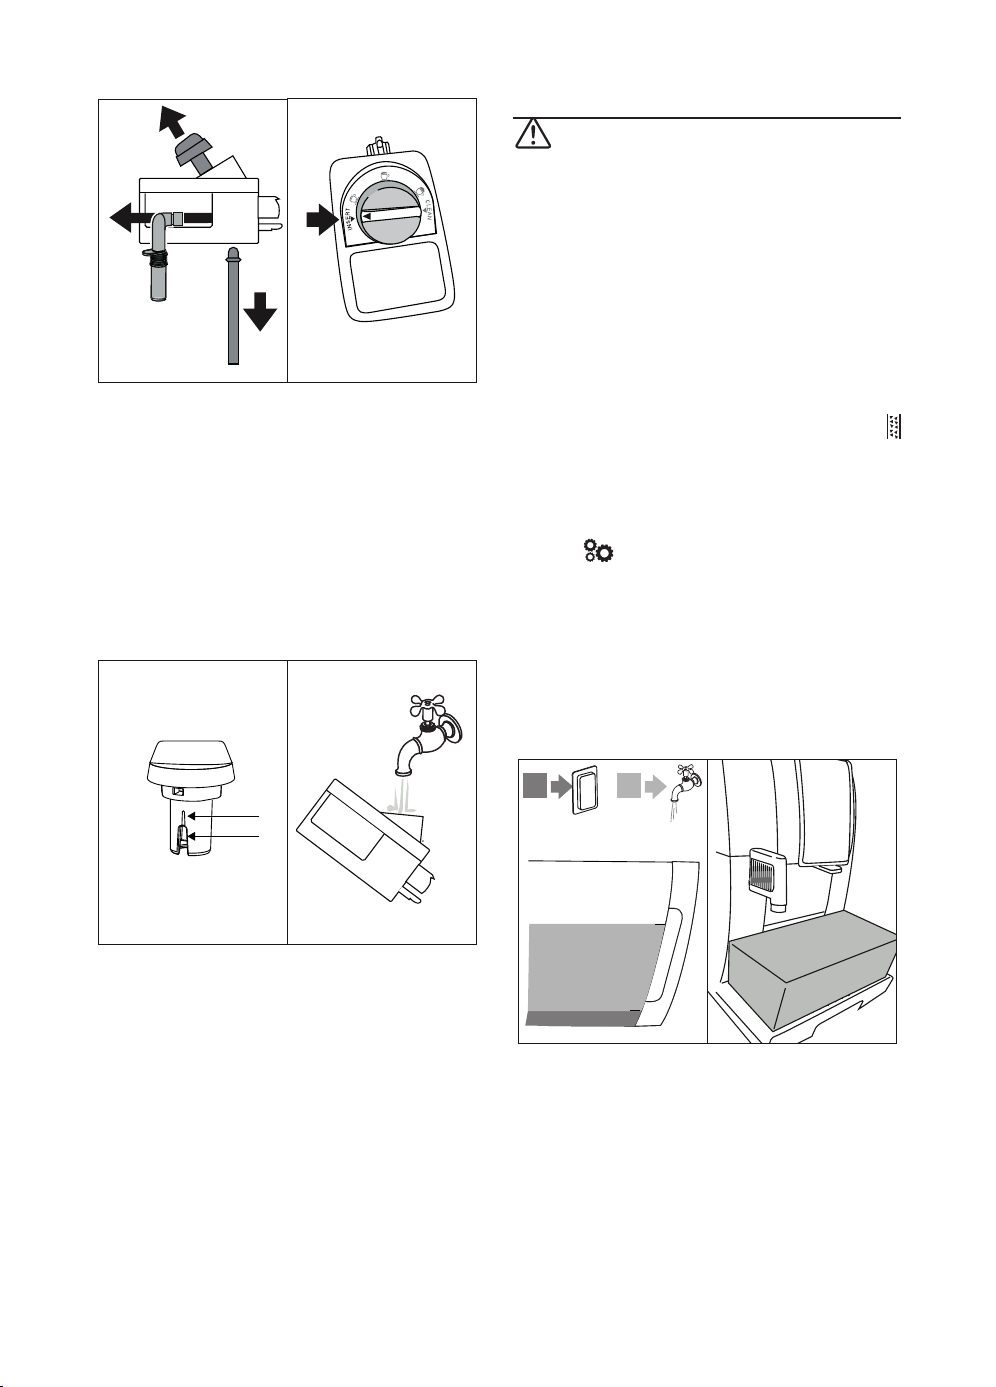
62
30
31
3. Gire en sentido horario el regulador de la espuma (D1)
hasta la posición “INSERT” (g. 31) y extráigala hacia
arriba.
4. Lave meticulosamente todos los componentes con agua
caliente y un detergente delicado. Todos los componentes
en el lavavajillas se pueden lavar, pero colocándolos en la
cesta superior del mismo.
Tenga especialmente cuidado de que dentro de la ranura
y del conducto situado bajo el botón (g.32), no queden
restos de leche: en su caso rasque el conducto con un palillo
de dientes.
3332
5. Enjuague el interior del soporte del regulador de la espuma
con agua corriente (g. 33).
6. Compruebe también que el tubo de aspiración y el tubo de
salida no estén obstruidos con restos de leche;
7. Monte de nuevo el mando haciéndolo coincidir con el
mensaje “INSERT”, el tubo de salida y el de aspiración de la
leche.
8. Ponga de nuevo la tapadera del recipiente de la leche (D3).
14.11 Limpieza de la boquilla de agua caliente
Limpie la boquilla (A8) tras cada preparación de leche, con una
esponja, eliminando los restos de leche depositados en las jun-
tas (g. 22).
15. DESCALCIFICACIÓN
¡Atención!
• Antes de luso lea las instrucciones y las etiquetas del des-
calcicador, que guran en el envase del mismo.
• Se recomienda usar solo descalcicador De’Longhi. El uso
de descalcicadores no idóneos, como también la descal-
cicación no realizada regularmente, puede comportar la
aparición de defectos no cubiertos por la garantía.
Descalcique la máquina cuando en el display (B1) aparezca
“Descalcicar, ESC para anular, OK para descalcicar (∼45 mi-
nutos)”. si desea cambiarlo enseguida pulse OK (B3) y siga las
operaciones a partir del punto 6. Para posponer la descalcica-
ción a otro momento pulse ESC (B5): en el display el símbolo
recuerda que el aparato debe ser descalcicado. .
Para acceder al menú de descalcicación:
1. Encienda la máquina y espere a que esté preparada para el
uso;
2. Pulse (B6) para entrar en el menú “Programaciones”;
3. Pulse las echas de selección (B2 y B4) hasta visualizar
entre las dos líneas punteadas “Mantenimiento”pulse OK
(B3);
4. Pulse OK para seleccionar “Descalcicación”.
5. “¿Conrmar? (∼45 minutos)”: conrmar pulsando OK;
6. "Extraer ltro ": saque el depósito de agua (A17), saque el
ltro de agua (C4) (si presente), vacíe el depósito de agua.
Pulse OK.
B
A
A B
34
1,8 l
35
7. “Introducir descalcicante y agua en el depósito”: Eche en
el depósito del agua el descalcicador hasta alcanzar el
nivel A (que corresponde a un envase de 100 ml) impreso
en el interior del depósito; y eche entonces agua (un litro)
hasta alcanzar el nivel B (g.34) ; vuelva a introducir el de-
pósito de agua. Pulse OK.
8. “Vaciar la bandeja recogegotas”: Saque, vacíe y vuelva a
meter la bandeja recogegotas (A15) y el cajón de posos del
café (A11). Pulse OK.
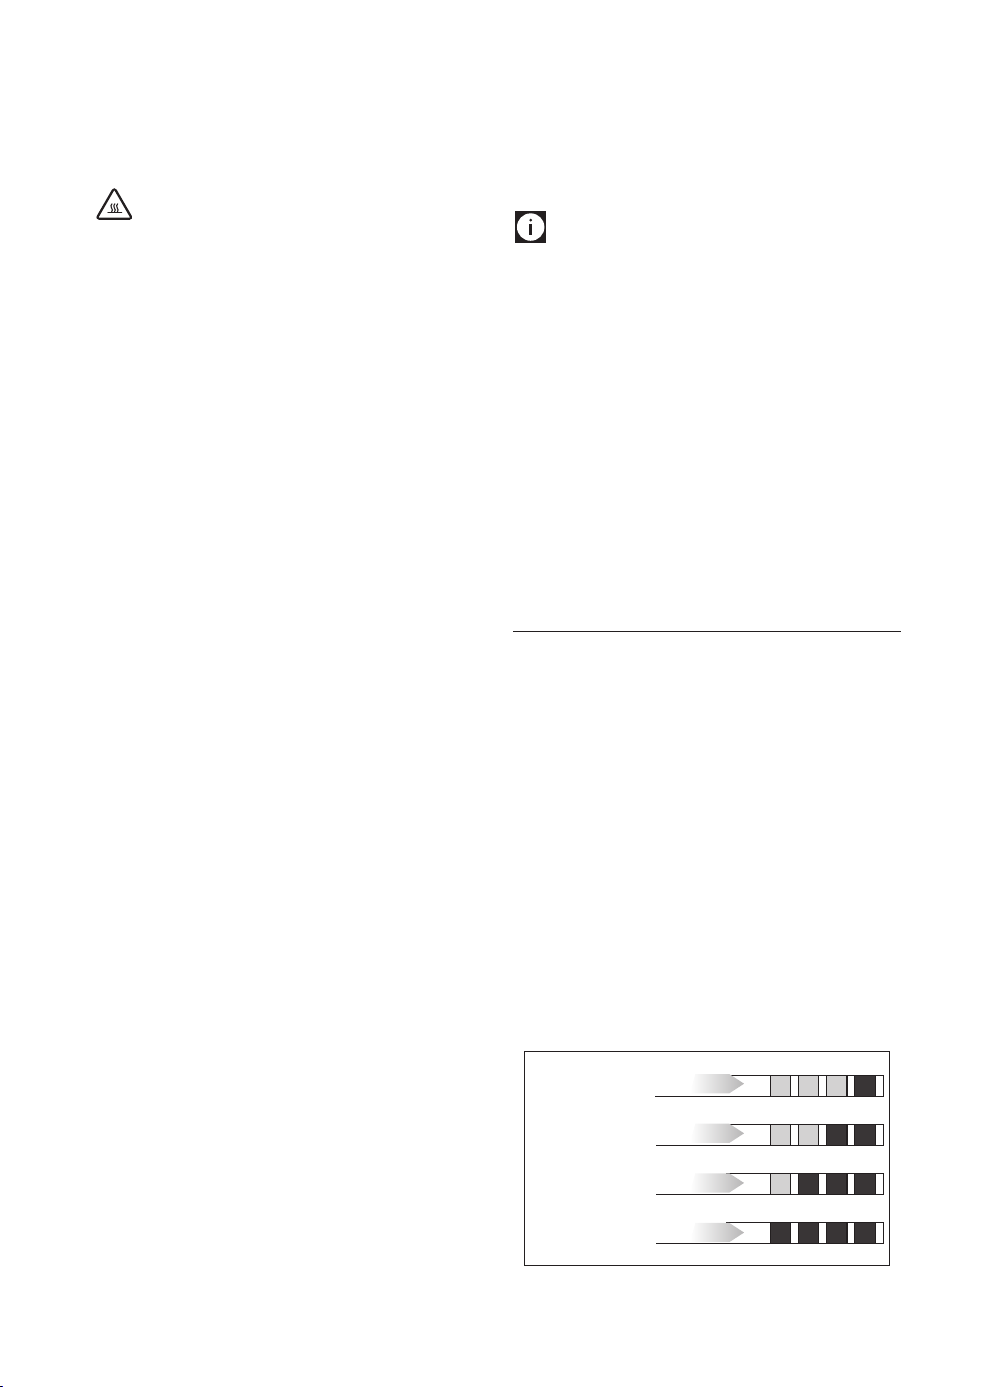
63
9. “Recipiente 1,8l vacío bajo los surtidores”: Ponga bajo el
surtidor de agua caliente (C6) y bajo el surtidor de café
(A9) un recipiente con una capacidad mínima de 1,8 litros
(g.35). Pulse OK.
¡Atención! Peligro de quemaduras
Del surtidor de agua caliente y del surtidor de café sale agua ca-
liente que contiene ácidos. Así pues, tenga cuidado de no entrar
en contacto con esta solución.
10. “Descalcicación”: iEl programa de descalcicación inicia y
la solución descalcicadora sale tanto del surtidor de agua
como del surtidor de café realizando a intervalos una serie
de enjuagues para eliminar los residuos de cal del interior
de la cafetera;
Al cabo de unos 25 minutos el aparato interrumpe la
descalcicación:
11. “Enjuagar el depósito y llenarlo con agua”: el aparato ya
está listo para un proceso de enjuague con agua fresca.
Vacíe el recipiente utilizado para recoger la solución des-
calcicadora y saque el depósito de agua, vacíelo, enjua-
guelo con agua corriente, llénelo hasta el nivel MÁX con
agua fresca e introdúzcalo en la máquina, pulse OK
12. “Recipiente 1,8l vacío bajo los surtidores”: Vuelva a poner
vacío el recipiente usado para recoger la solución descal-
cicadora bajo el surtidor de café y el surtidor de agua
caliente/vapor (g.35) y pulse OK;
13. “Enjuague ¿Conrmar?”: pulse OK;
14. “Enjuague en curso ”: el agua caliente sale antes del surti-
dor de café y luego del surtidor de agua caliente;
15. Cuando el agua del depósito se acabe vacíe el recipiente
usado para recoger el agua de enjuague;
16. “Enjuague el depósito y llénelo de agua”: saque el depósito
y llénelo hasta el nivel MÁX con agua fresca. Pulse OK.
17. “Introducir ltro”: vuelva a introducir, en caso de que lo
haya sacado previamente, el lro ablandador en su soporte
del depósito de agua, vuelva a meter eldepósito y pulse
OK;
18. “Recipiente 1,8l vacío bajo los surtidores”:
Vuelva a poner
el recipiente vacío para recoger la solución descalcicado-
ra bajo el surtidor de agua caliente. Pulse OK.
19. “Enjuague ¿Conrmar?”: pulse OK;
20. “Enjuague en curso”.
El agua caliente sale del surtidor de
agua caliente.
21. “Vaciar la bandeja recogegotas”: Al nalizar el segundo en-
juague saque, vacíe y vuelva a meter la bandeja recogego-
tas (A14) y el cajón de posos del café (A10): pulse "NEXT>";
Pulse OK.
22. “Descalcicación completada”: pulse OK;
23. "LLenar depósito": vacíe el recipiente usado para recoger
el agua del enjuague, saque y llene el depósito de agua
con agua fresca hasta el nivel MÁX y vuelva a meterlo en
la máquina.
La operación de descalcicación ha terminado.
¡Nota Bene!
• Si el ciclo de descalcicación no naliza correctamente (por
ejemplo, falta de suministro de energía eléctrica) se acon-
seja repetir el ciclo.
• Es normal que, después de haber realizado el ciclo de des-
calcicación , haya agua en el cajón de los posos de café
(A11).
• El aparato requiere un tercer enjuague en caso de que el
depósito de agua no se haya llenado hasta el nivel máx:
esto para garantizar que no haya solución descalcante en
los circuitos internos del aparato.
• La eventual exigencia, por parte de la máquina, de dos
ciclos de descalcicación muy próximos entre ellos deben
considerarse normal, como una consecuencia del sistema
evolucionado de control programado en la máquina.
16. PROGRAMACIÓN DE LA DUREZA DEL AGUA
La exigencia de descalcicación se visualiza al cabo de un pe-
rioro de funcionamiento predeterminado que depende de la
dureza del agua.
La cafetera se ha programado en la fábrica para el nivel 4 de du-
reza. Si se desea, se puede programar la cafetera en función de
la dureza efectiva del agua usada en las diferentes regiones para
reducir la frecuencia de la operación de descalcicación.
16.1 Medición de la dureza del agua
1. Saque del envase la tira reactiva (C1) “PRUEBA DUREZA
TOTAL” suministrada junto con el manual en inglés.
2. Sumerja completamente la tira en un vaso de agua durante
un segundo aproximadamente.
3. Saque la tira del agua y agítela ligeramente. Después de al-
rededor de un minuto se forman 1, 2, 3 o 4 cuadraditos de
color rojo, en función de la dureza del agua cada cuadradito
corresponde a 1 nivel.
acqua dolce (livello 1)
agua dura (nivel 3)
agua muy dura (nivel 4)
agua poco dura (nivel 2)
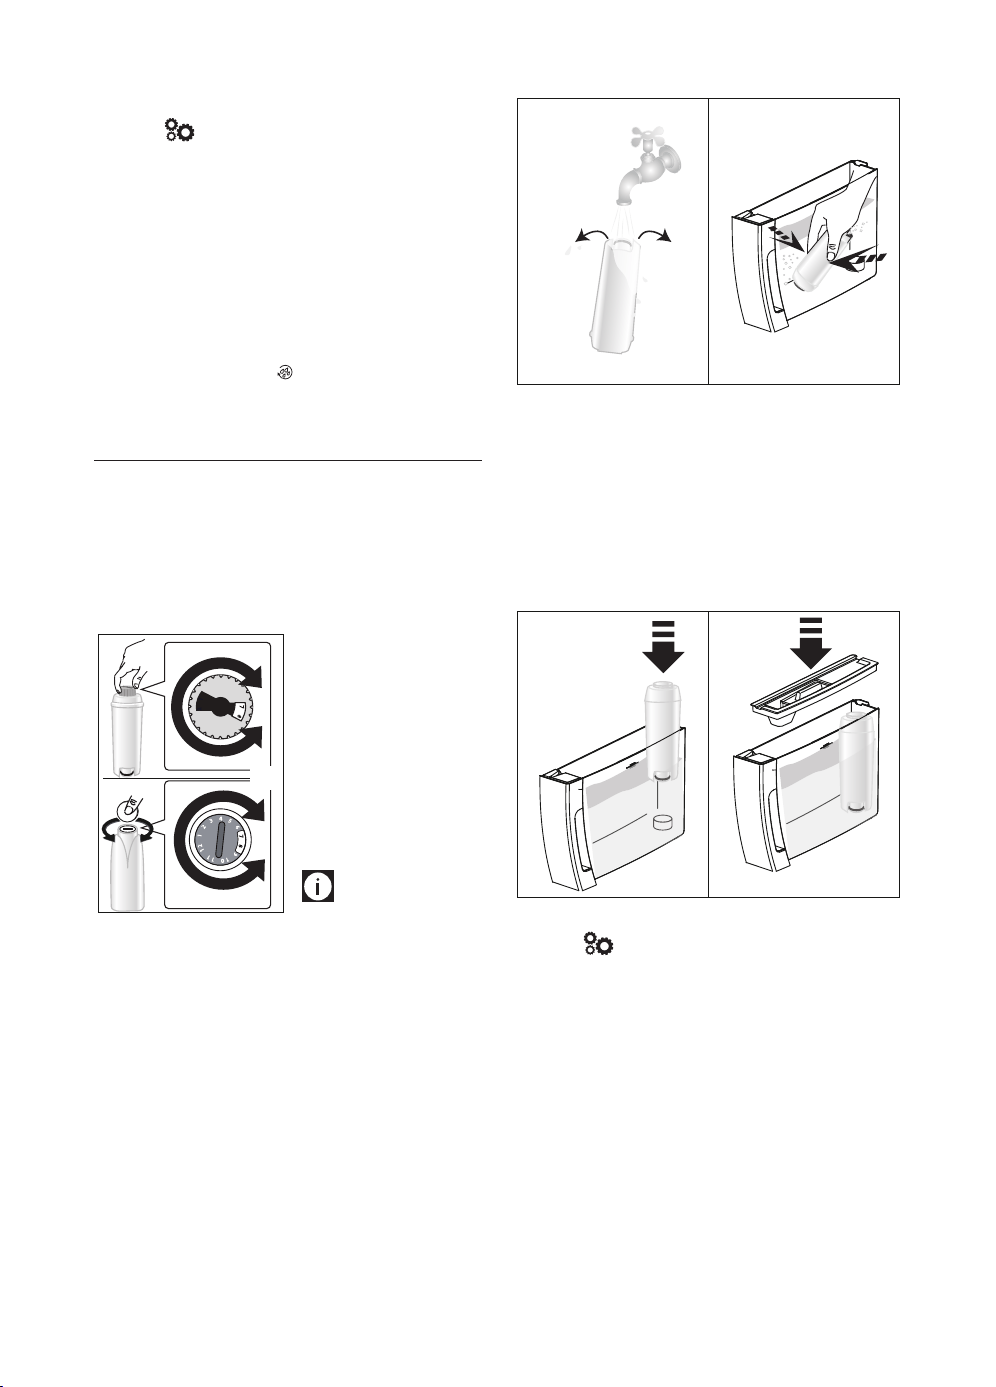
64
16.2 Programación de la dureza del agua
1. Pulse (B6) para entrar en el menú “Programaciones”;
2. Pulse las echas de selección (B2 y B4) hasta visualizar
entre las dos líneas punteadas “General”: pulse OK;
3. Pulse las echas de selección hasta visualizar “Dureza del
agua “: pulseOK;
4. En el display se visualiza la selección actual y parpadea la
selección nueva: pulse las echas de selección hasta visua-
lizar la nueva selección deseada. Pulse OK.
El nuevo nivel se memoriza y el aparato vuelve al menú
"General".
A continuación pulse 2 veces /ESC (B5) para volver a la pan-
talla principal.
17. FILTRO ABLANDADOR
Algunos modelos se suministran con el ltro ablandador C4) si
su modelo no cuenta con dicho ltro, le recomendamos com-
prarlo en un centro de asistencia autorizado De’Longhi.
Para el uso correcto del ltro, siga las instrucciones que encon-
trará a continuación.
17.1 Instalación del ltro
36
1. Saque el ltro (C4) del
envase. El programador
de fecha del disco varía
en función del ltro
suministrado.
2. Gire el botón del indi-
cador de fecha (g.36)
hasta que se visualicen
los 2 próximos meses de
utilización.
Nota Bene:
el ltro dura dos meses si el
aparato se ha utilizado nor-
malmente, pero si la cafetera no se utiliza y el ltro permanece
instalado dura al máximo tres semanas.
3. Para activar el ltro, haga pasar agua del grifo por el ori-
cio del ltro, tal como se indica en la g.37, hasta que el
agua salga por las aberturas laterales durante más de un
minuto.
37 38
0,5 L
4. Extraiga el depósito (A17) de la cafetera y llénelo de agua.
5. Introduzca el ltro en el depósito de agua y sumérjalo
completamente durante unos diez segundos, inclinándo-
lo y cogiéndolo ligeramente para permitir la salida de las
burbujas de aire (g. 38).
6. Introduzca el ltro en el respectivo soporte (g.18) y aprié-
telo hasta el fondo (g.39).
7. Cierre el depósito con la tapadera (A16 - g. 40), después
vuelva a poner el depósito en la cafetera;
39 40
35
Al instalar el ltro, es necesario indicar su presencia al aparato.
8. Pulse (B6) para entrar en el menú “Programaciones”;
9. Pulse las echas de selección (B2 y B4) hasta visualizar
entre las dos líneas punteadas “Mantenimiento”: pulse
OK;
10. Pulse las echas de selección hasta visualizar “Instalar ltro
“: pulseOK;
11. “ ¿Conrmar?”: pulse OK;
12. “Agua caliente ¿Conrmar?”: ponga bajo el surtidor de
agua caliente (C6) un recipiente (capacidad: min. 500ml), a
continuación pulse OK;
13. E l agua empieza a salir del aparato y en el display aparece
el mensaje“Se ruega esperar”;
14. Una vez completada la salida, el aparato regresa automáti-
camente a “Listo café”.
65
El ltro ha quedado activado y la máquina está ahora lista para
el uso.
17.2 Cambio del ltro
Cambie el ltro (C4) cuando en el display (B1) aparezca “Cambiar
ltro, ESC para anular, OK para sustituir”. Si desea cambiarlo en-
seguida pulse OK (B3) y siga las operaciones a partir del punto
8. Para posponer el cambio a otro momento pulse ESC (B5):
en el display el símbolo
recuerda que es necesario cambiar
el ltro.
Para cambiarlo proceda de la siguiente manera:
1. Extraiga el depósito (A17) y el ltro gastado;
2. Extraiga el nuevo ltro del envase y siga los pasos descritos
en los puntos 2-3-4-5-6-7 del apartado anterior.
3. Pulse (B6) para entrar en el menú “Programaciones”;
4. Pulse las echas de selección (B2 y B4) hasta visualizar
entre las dos líneas punteadas “Mantenimiento”: pulse
OK;
5. Pulse las echas de selección hasta visualizar “Cambiar l-
tro “: pulseOK;
6. “ ¿Conrmar?”: pulse OK;
7. “Agua caliente ¿Conrmar?”: ponga bajo el surtidor de
agua caliente (C6) un recipiente (capacidad: min. 500ml), a
continuación pulse OK;
8. E l agua empieza a salir del aparato y en el display aparece
el mensaje“Se ruega esperar”;
9. Una vez completado el suministro, el aparato regresa auto-
máticamente a “Listo café”.
El nuevo ltro ha quedado activado y la máquina está ahora lista
para el uso.
¡Nota Bene!
Cuando han transcurrido los dos meses de duración (véase
programador de fecha), o si no se utiliza el aparato durante 3
semanas, es necesario realizar el cambio del ltro incluso si la
máquina aún no lo requiere.
17.3 Extracción del ltro
Si se desea seguir utilizando el aparato sin el ltro (C4), habrá
que extraerlo e indicar la extracción. Proceda de la siguiente
manera:
1. Extraiga el depósito (A17) y el ltro gastado;
2. Pulse (B6) para entrar en el menú “Programaciones”;
3. Pulse las echas de selección (B2 y B4) hasta visualizar
entre las dos líneas punteadas “Mantenimiento”: pulse
OK;
4. Pulse las echas de selección hasta visualizar “Extraer ltro
“: pulseOK;
5. “¿Conrmar?”: pulse OK para conrmar la extracción: el
aparato vuelve al menú “Mantenimiento”;
Pulse /ESC (B5) para salir del menú.
¡Nota Bene!
Cuando han transcurrido los dos meses de duración (véase indi-
cador de fecha), o si no se utiliza el aparato durante 3 semanas,
es necesario realizar el cambio del ltro incluso si la máquina
aún no lo requiere.
18. MENSAJES VISUALIZADOS EN EL DISPLAY
MENSAJE VISUALIZADO POSIBLE CAUSA SOLUCIÓN
LLEnar depósito No hay suciente agua en el depósito (A17). Llene el depósito del agua o colóquelo correc-
tamente, presionándolo bien hasta oír el clic
del enganche (g. 3B).
Colocar depósito El depósito (A17) no está correctamente
introducido.
Coloque correctamente el depósito presionán-
dolo hasta el fondo (g.3B).
VACIARcajón de posos El cajón de los posos (A11) de café está lleno. Vacíe el cajón de los posos, la bandeja recoge-
gotas (A15), límpielos y vuelva a colocarlos.
Importante: al extraer la bandeja recogego-
tas es obligatorio vaciar siempre el cajón de
los posos de café aunque no esté muy lleno.
Si esta operación no se realiza puede suceder
que, al preparar otros cafés sucesivamente, el
cajón de los posos se llene más de lo previsto y
se obstruya la cafetera.
→
66
MENSAJE VISUALIZADO POSIBLE CAUSA SOLUCIÓN
Colocar cajón posos Después de la limpieza no se ha colocado el
cajón de los posos(A11).
Extraiga la bandeja recogegotas (A15) y colo-
que el cajón de los posos.
Echar café premolido Se ha seleccionado la función “café premolido”,
pero no se ha echado el café premolido en el
embudo (A4).
Eche el café premolido en el embudo (g. 11) o
desactive la función del café premolido
Se ha pedido un café LONG con café premolido Eche en el embudo (A4) una medida de café
premolido y pulse OK (B3) para continuar y
completar la preparación.
Llenar el recipiente del café
en granos
Se ha acabado el café en granos. Llene el recipiente de los granos (A3) (g.8).
El embudo para echar el café premolido (A4)
está obstruido.
Vacíe el embudo utilizando el pincel, como se
describe en el apartado “14.8 Limpieza del em-
budo para echar el café premolido”
Molienda demasiado na
Regule el molinillo
La molienda es demasiado na. Por lo tanto, el
café sale muy lentamente o no sale del todo.
Repita la distribución de café y gire el regu-
lador de molienda (A5) (g. 7) una posición
hacia el número 7, en sentido horario, mien-
tras el molinillo de café está funcionando. Si
después de preparar por lo menos 2 cafés, el
café sigue saliendo demasiado lentamente,
repita la corrección girando el botón regulador
a la posición sucesiva (véase apartado ““9.1
Regulación del molinillo de café”). Si el proble-
ma persiste verique que el depósito de agua
(A17) está bien introducido.
Si hay ltro ablandador (C4) podría haberse
producido una burbuja de aire en el interior
del circuito que ha bloqueado el suministro.
Introduzca el suministrador de agua caliente
(C6) en la máquina y haga salir un poco de
agua hasta que el ujo sea regular.
Reducir dosis café Se ha echado demasiado café. Seleccione un aroma más suave pulsando
(B7) o reduciendo la cantidad de café
premolido.
Introducir el surtidor de agua El surtidor de agua (C6) no está colocado o está
mal colocado.
Introduzca el dispensador de agua caliente
(g.4).
Introducir el recipiente de
la leche
El recipiente de la leche (D) no está bien
puesto.
Meta el recipiente de la leche hasta el fondo
(g.16).
Introducir grupo infusor Después de la limpieza no se ha colocado el
grupo infusor (A21).
Introduzca el grupo infusor como se describe
en el apartado 1”14.9 Limpieza del grupo de
infusión”.
Circuito vacío
Llenar circuito
Agua caliente
“¿Conrmar?
El circuito hidráulico está vacío. Pulse el botón OK(B3) y haga salir el agua del
surtidor (C6) hasta que el ujo sea regular. Si el
problema persiste verique que el depósito de
agua (A17) se ha introducido a fondo.
→
67
MENSAJE VISUALIZADO POSIBLE CAUSA SOLUCIÓN
Apretar OK para CLEAN El recipiente de la leche (D) se ha introducido
con el regulador de espuma (D1) en posición
CLEAN.
Para proceder con la función CLEAN pulse OK
o gire el regulador de espuma a otra posición.
Botón en CLEAN
ESC para anular
Acaba de salir leche, por lo tanto, es necesario
limpiar los conductos internos del recipiente
de la leche (D).
Gire el regulador de la espuma (D1) hasta la
posición CLEAN(g. 19).
Girar regulador de espuma El recipiente de la leche (D) se ha introducido
con el regulador de espuma (D1) en posición
CLEAN.
Gire el regulador de espuma a una de las posi-
ciones de regulación de la leche montada.
Descalcicar
ESC para anular
OK para descalcicar
(∼45 minutos)
Indica que es necesario descalcicar la
cafetera.
Es necesario ejecutar lo antes posible el pro-
grama de descalcicación descrito en el capí-
tulo “15. Descalcicación”
Cambiar el ltro
ESC para anular
OK para cambiar
Se ha agotado el ltro ablandador C4). Cambie el ltro o quítelo siguiendo las instruc-
ciones del capítulo “17. Filtro ablandador”.
Alarma general El interior de la cafetera está muy sucio. Limpie cuidadosamente la cafetera como se
describe en el cap.”14. Limpieza” Si después de
la limpieza aún aparece el mensaje diríjase a
un centro de asistencia.
Recuerde que es necesario limpiar los conduc-
tos internos del recipiente de la leche (D).
Gire el regulador de la espuma (D1) hasta la
posición CLEAN(g. 19)
.
Recuerde que el ltro ablandador (C4) está
gastado y es necesario cambiarlo o extraerlo.
Cambie el ltro o extráigalo siguiendo las ins-
trucciones del cap. “17. Filtro ablandador”.
Recuerde que es necesario descalcicar la
cafetera.
Es necesario ejecutar lo antes posible el pro-
grama de descalcicación descrito en el capí-
tulo “15. Descalcicación”
La eventual exigencia, por parte de la máqui-
na, de dos ciclos de descalcicación muy próxi-
mos entre ellos deben considerarse normal,
como una consecuencia del sistema evolucio-
nado de control programado en la máquina.
ECO
El ahorro energético está activo. Para desactivar el ahorro energético proceda
de acuerdo con lo indicado en el apartado “7.5
General” - “• Ahorro energético”
68
19. SOLUCIÓN DE LOS PROBLEMAS
A continuación, se enumeran algunos posibles funcionamientos incorrectos.
Si no puede resolverse el problema en el modo descrito, póngase en contacto con la asistencia técnica.
PROBLEMA POSIBLE CAUSA SOLUCIÓN
El café no está caliente. Las tazas no se han precalentado. Caliente las tazas enjuagándolas con agua
caliente (N.B: se puede utilizar la función agua
caliente).
Los circuitos internos de la máquina se han
enfriado porque han transcurrido 2/3 minutos
desde el último café.
Antes de hacer el café caliente los circuitos in-
ternos pulsando el botón
(B5).
La temperatura programada del café es baja. Programe en el menú la temperatura más alta.
El café tiene poco cuerpo o
poca crema.
El café se ha molido demasiado grueso. Gire el botón regulador de molienda (A5)
una posición hacia el número 1, en sentido
antihorario mientras el molinillo de café está
funcionando (g. 7) Gire el regulador en modo
gradual hasta que el café salga correctamente.
El efecto se nota solamente después de haber
preparado 2 cafés (véase el apartado “9.1 Re-
gulación del molinillo de café”).
El café no es adecuado. Use café para cafeteras de café expreso.
El café sale muy lentamente o
goteando.
El café se ha molido demasiado no. Gire el regulador de molienda (A5) una posi-
ción hacia el número 7, en sentido horario,
mientras el molinillo de café está funcionan-
do (g. 7) Gire el regulador en modo gradual
hasta que el café salga correctamente. El efec-
to se nota solamente después de haber prepa-
rado 2 cafés (véase el apartado “9.1 Regulación
del molinillo de café”).
El aparato no suministra café. El aparato detecta impurezas en su interior: el
display visualiza “Se ruega esperar”.
Espere a que el aparato vuelva a estar listo para
el uso y seleccione de nuevo la bebida deseada.
Si el problema persiste, contacte con el centro
de asistencia autorizado.
El café no sale por una o por
ninguna de las boquillas del
dispositivo de suministro.
Las boquillas del surtidor de café (A9) están
obturadas.
Limpie las boquillas con un palillo de dientes
(g. 24B).
El aparato no se enciende La clavija no está conectada a la toma. Conecte la clavija a la toma.(g.1)
El interruptor general (A22) no está encendido. Pulse el interruptor general en la posición I
(g.2).
El conector del cable de alimentación C7) no
está bien introducido.
Coloque a fondo el conector en el soporte ade-
cuado en la parte trasera del aparato (g. 1).
69
El grupo infusor no se puede
extraer
No se ha podido lograra el apagado de manera
correcta.
Apague pulsando el botón
(A7) (g. 6)
(ver cap. “6. Apagado del aparato”).
Al nalizar la descalcicación
el aparato requiere un tercer
enjuague.
Durante los dos ciclos de enjuague el depósito
no se ha llenado hasta el nivel MÁX.
Proceda como requiere el aparato, aunque va-
ciando antes la bandeja recogegotas para evitar
que rebose el agua.
La leche no sale por el tubo de
salida (D5).
La tapadera (D2) del recipiente de la leche
está sucia.
Limpie la tapadera de la leche como se descri-
be en el apartado “14.10 Limpieza del recipien-
te de la leche”.
La leche hace burbujas
grandes o sale a chorros por el
surtidor de la leche (D5) de la
leche o poco montada.
La leche no está lo sucientemente fría o no es
semidesnatada.
Utilice preferentemente leche desnatada o
semidesnatada, y a temperatura del frigoríco
(aproximadamente 5 °C). Si no se obtiene un
buen resultado, intente cambiar la marca de
la leche.
El mando de regulación de la espuma (D1) está
mal regulado.
Regule según las indicaciones del apartado
“11.2 Regulación de la cantidad de espuma”.
La tapadera (D2) o el botón de regulación de
la espuma (D1) del recipiente de leche están
sucios.
Limpie la tapadera y el botón del recipiente de
leche como se describe en el apartado. “11.4
Limpieza del recipiente de la leche después de
cada uso”” y “14.10 Limpieza del recipiente de
la leche”.
La boquilla de agua caliente (A8) está sucia. Limpie la boquilla como se describe en el apar-
tado “14.11 Limpieza de la boquilla de agua
caliente”.