Indicates cautions for preventing possible damages from abuse
Front panel
(Standby)
- Switches the unit ON or OFF
F (Function) - Select the function and input source by pressing F repeatedly.
Input source / Function
Display
Wi-Fi
WI-FI
Bluetooth
BT
Optical
ARC
e-ARC
LG Sound Sync (Wired)
OPT/HDMI ARC
HDMI IN 1
HDMI1
HDMI IN 2
HDMI2
USB
USB
You can use Bluetooth function after making Wi-Fi network connection by using Google Home app.
(Volume)
- Adjusts volume level
Starts playback. / Pauses playback.
(Mic mute) - Disables the detect voice recognition by pressing on the unit. All the Google Assistant LED turns amber and “The mic is muted.” is heard. To cancel it, press on the unit again. Google Assistant LED turns off and “The mic is back on.” is heard.
Enables Google Assistant to receive your voice commands. To cancel it, press again. (Page 38)
Microphone
Remote sensor
Google Assistant LED
- Changes LED status according to Google Assistant performance.
LED
Status
Description
All four LEDs are on.
Ready to listen to your voice command
All four LEDs blink
Responds to your voice command.
Microphone is off and the solid amber LED will be on.
Voice recognition is disable
Display Window
- Display window will be darkened automatically if there is no key input for 15 seconds. When you press any button, the display window will brighten.
Precautions in using the touch buttons
Use the touch buttons with clean and dry hands.
- In a humid environment, wipe out any moisture on the touch buttons before using.
Do not press the touch buttons hard to make it work.
- If you apply too much strength, it can damage the sensor of the touch buttons
Touch the button that you want to work in order to operate the function correctly.
Be careful not to have any conductive material such as metallic object on the touch buttons. It can cause malfunctions.
This unit will turn itself off to save electric consumption when the main unit is not connected to an external device and is not used for 15 minutes.
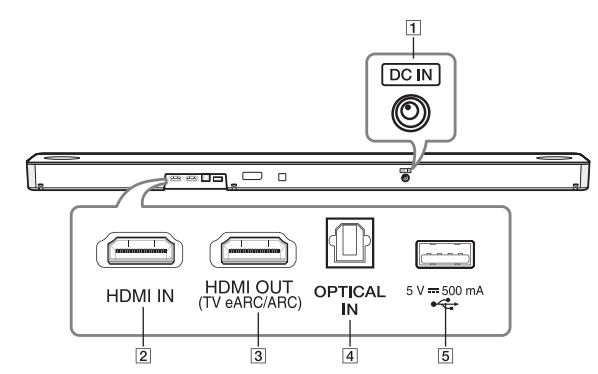
Rear panel
DC IN
- Connect to the AC adapter
HDMI IN
- Connect HDMI IN jack on the back of the unit to HDMI OUT jack on the external device. You can enjoy the sound and picture from HDMI connection on an external device.
HDMI OUT (TV eARC/ARC)
- Connect the HDMI OUT (TV eARC/ARC) jack on the back of the unit to ARC jack on the TV
OPTICAL IN
- Connect the OPTICAL IN jack on the back of the unit to OPTICAL OUT jack on the TV.
USB Port
- Connect USB memory device to the USB port on the back of the unit.
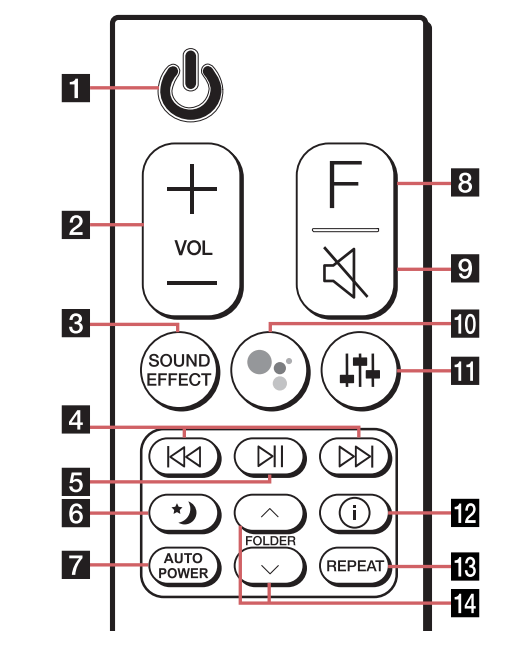
Remote control
Replacement of Battery
Remove the battery cover on the rear of the remote control, and insert the battery with and matched correctly.
Risk of fire or explosion if the battery is replaced by an incorrect type.
1
(Standby)
- Switches the unit ON or OFF
Networked standby: It allows the unit to switch to standby mode.
To turn on Networked standby function, Press .
To turn off Networked standby function, press for about 3 seconds
2
VOL (Volume) - Adjusts speaker volume
3
SOUND EFFECT - Selects a sound effect mode by using SOUND EFFECT.
On Display
Description
AI SOUND PRO
Analyzes the property of the input sound and provides the sound optimized for the content in real time.
BASS BLAST or BASS BLAST+
Reinforces the bass and powerful sound.
STANDARD
You can enjoy premium sound with MERIDIAN technology.
MOVIE
You can enjoy more immersive and cinematic surround sound.
MUSIC
You can enjoy more good sound for music source.
When this unit detects DOLBY ATMOS or DTS:X stream, you cannot change sound effect to any other. In this case, even though you press SOUND EFFECT, this unit does not respond. And you can see only “NOT SUPPORTED” on the display window.
TV remote: It allows you to control the volume of this unit by your TV remote control even by other company’s product. (Page 47) To turn on or off the TV Remote function, press and hold SOUND EFFECT for about 3 seconds and press it again
Supported TV brands
LG
Panasonic
Philips
Samsung
Sharp
Sony
Toshiba
Vizio
4
(Skip)
- Press to go to next or previous file
5
(Play/Pause)
- Starts playback. / Pauses playback.
6
(Night time)
- It is useful when you want to watch movies at low volume late at night. It makes to reduce the sound intensity and improve fineness and softness.
Press to activate Night time mode. To cancel it, press again.
7
AUTO POWER - It allows the unit to turn on and off automatically by input signal: Optical (Page 47)
8
F (Function)
- Select the function and input source by pressing F repeatedly.
9
(Mute)
- Press to mute your unit. To cancel it, press again
10
Enables Google Assistant to receive your voice commands while watching TV (not necessary when listening to music through Wi-Fi or Bluetooth, you can just say “Hey Google”).
To cancel it, press again. (Page 36)
11
(Sound tuning) - Adjusts sound level of each speaker. Select the speaker you want to adjust by using and adjust the sound level by using , and adjust the sound level by using VOL
Adjusting rear speakers level is applied only when the rear speakers are connected. , See the page 13 for more information of speakers. Display Description
Surround sound: It allows you to enjoy surround sound with rear speakers. (Page 22) To turn on or off the surround sound, press and hold for about 3 seconds and press it again.
12
(Information)
-You can display various information of the input source by pressing .
-Wi-Fi: Connected Application name
-BT (Bluetooth): Connected Bluetooth device name
-OPT (Optical)/ARC/E-ARC/HDMI (HDMI IN): Audio format
-USB: File information contained on a USB.
13
REPEAT
-Press REPEAT to select desired repeat or random mode.
14
FOLDER
- Searches a folder on USB device.
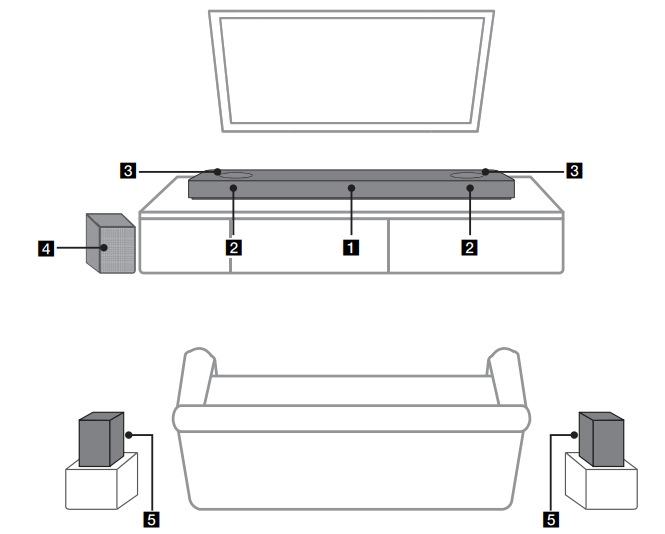
Speakers position
Center speaker
Front speakers
Top speakers
Subwoofer
Rear speakers
You can enjoy surround sound by using Wireless Rear Speaker kit. Wireless Rear Speakers Kit sold separately (SPK8-S)
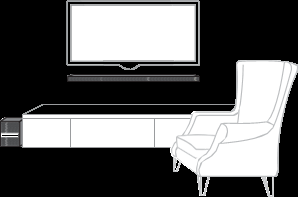
Installing the sound bar
You can hear the sound by connecting the unit to the other device: TV, Blu-ray disc player, DVD player, etc.
Place the unit in front of the TV and connect it to the device you want. (Pages 26 - 32)
You can place the wireless subwoofer anywhere in your room. But it is better to place the subwoofer near the main unit. Turn it slightly toward the center of the room to reduce the wall reflections.
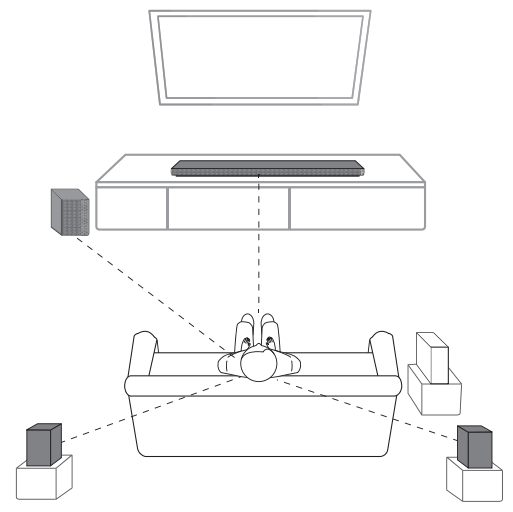
For the best surround sound, place the speakers as shown below.
Note
If the sound bar covers the remote sensor of the TV, please separate distance between the sound bar and TV by 10 ~ 15 cm (3.9 ~5.9 inch) or more.
The illustration above may differ from actual units.
You can enjoy surround sound by using Wireless Rear Speaker kit. Wireless Rear Speakers Kit sold separately (SPK8-S).
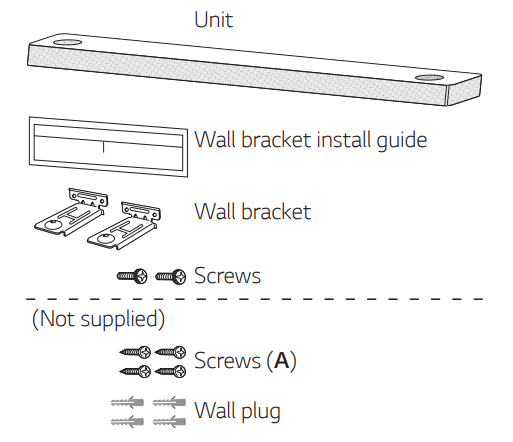
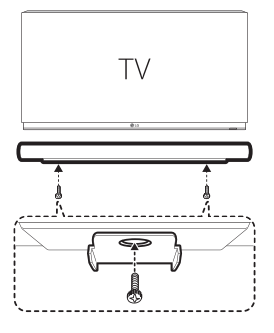
Mounting the unit on a wall
You can mount the main unit on a wall.
Caution
Because it is difficult to make a connection after installing this unit, you should connect the cables before installation.
Preparation materials
Note
Screws (A) and Wall Plugs are not supplied for mounting the unit. We recommend the Hilti (HUD-1 6 x 30) for the mounting
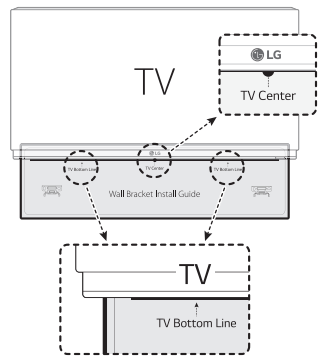
1. Match the TV’s BOTTOM EDGE of Wall bracket install guide with the bottom of TV and attach to the position.
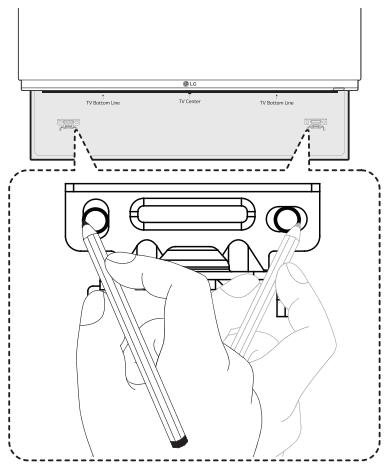
2. When you mount it on a wall (concrete), use the wall plugs. You should drill some holes. A guide sheet (Wall bracket install guide) is supplied to drill. Use the sheet to check the point to drill.
3.Remove the Wall bracket install guide.
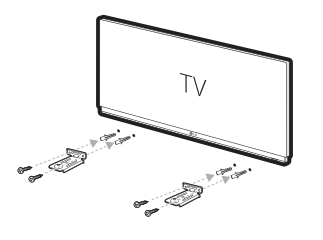
4.Fix the brackets with screws (A) as shown in the illustration below.
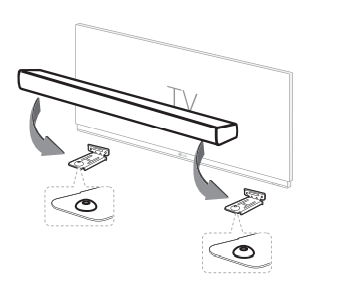
5. Put the unit on the brackets to match screw holes on the bottom of the unit.
6. Fix the unit with the screws firmly.
Collecting
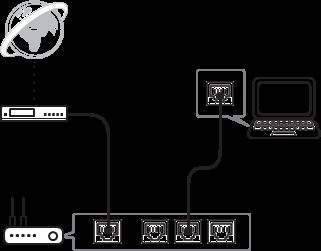
Network connection
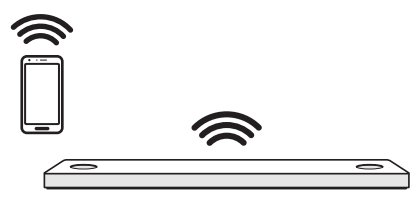
You can enjoy various functions of this sound bar by connecting to network and your smart device with “Google Home” app.
The “Google Home” app is required to connect the sound bar wirelessly to the network.
Note
In a network environment (Router, Internet and Internet Service Provider) that supports both IPv4 and IPv6, the network automatically connects to IPv4 or IPv6 when connecting to the network.
You can check the each network status by selecting the settings of My Speakers ([Settings]>[IP Info.]) on the “LG Wi-Fi Speaker” app.
Installing “Google Home” App
The “Google Home” app allows you to use various functions of this speaker through your smart device.
Requirements before setup
A wireless router must be connected to the internet. A smart device such as Android or iOS devices must be connected to the wireless router via Wi-Fi connection.
It needs Google account to use this app. During connect Wi-Fi, this app may request to create Google account.
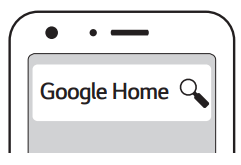
Through “Google Play” or “App Store”
1.Tap the“Google Play Store” icon or “App Store” icon on your smart device.
2.Type in “Google Home” in the search bar and tap “Search” on “Google Play” or “App Store”
3.Select “Google Home” in the search result list to download.
Organizing cables (Optional)
You can organize the cable with cable ties.
1.Hold the cables together with cable ties as shown below.
2.Tighten cable ties.
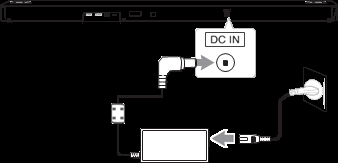
Connecting the AC Adapter
Connect the sound bar to the power supply with the supplied AC adapter.
1.Connect the supplied AC power cord to the AC adapter.
2.Connect the AC adapter cable to DC IN adapter input.
3.Plug the AC power cord into an AC outlet.
Wireless subwoofer and rear speaker (Sold Separately) connection
Wireless subwoofer connection
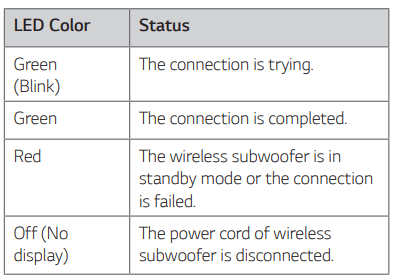
LED indicator of wireless subwoofer
Setting up the wireless subwoofer for the first time
1.Connect the power cord of the sound bar and the wireless subwoofer to the outlet.
2.Turn on the sound bar. The sound bar and the wireless subwoofer will be automatically connected.
- Pairing is completed. The green LED on the rear of the wireless subwoofer turns on.
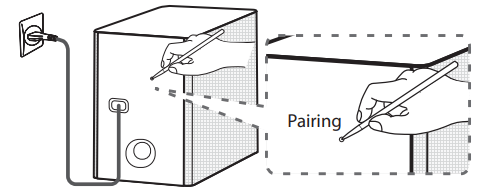
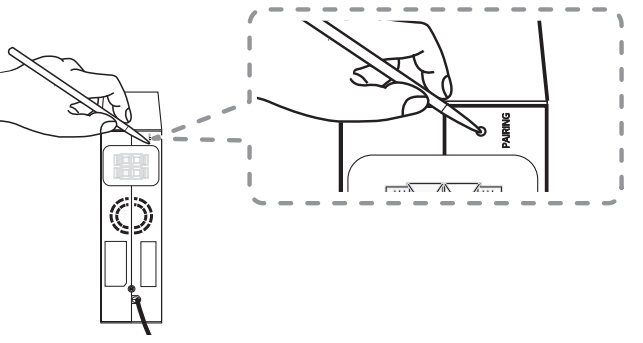
Manually pairing wireless subwoofer
When your connection is not completed, you can check red LED on the wireless subwoofer and the wireless subwoofer does not make sound. To solve the problem, follow the steps below.
1. Press Pairing on the rear of the wireless subwoofer.
- The green LED on the rear of the wireless subwoofer blinks quickly. (If the green LED does not blink, press and hold the Pairing.)
2. Turn on the sound bar.
- Pairing is completed. The green LED on the rear of the wireless subwoofer turns on.
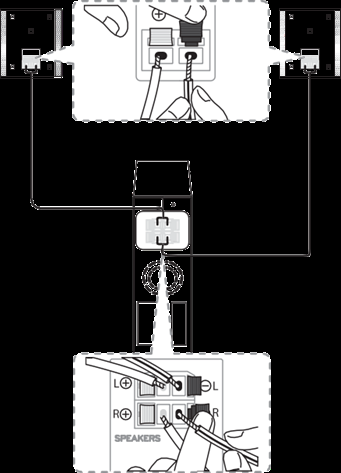
Rear speakers connection (Sold Separately)
Connecting the rear speakers
1. Connect the black stripe wire to the terminal marked - (minus) and the other end to the terminal marked + (plus).
2. Connect the wireless receiver and the rear speakers (left, right) with the speaker cables.
Color
Position
Blue
Rear left
Grey
Rear right
LED indicator of wireless receiver
2
LED Color
Status
Yellow - green (Blink)
The connection is trying.
Yellow - green
The connection is completed.
Red
The wireless receiver is in standby mode or the connection is failed.
Off
(No display)
The power cord of wireless receiver is disconnected.
Setting up the wireless receiver for the first time
1.Connect the power cord to the wireless receiver to the outlet.
2.Turn on the main unit: The sound bar and wireless receiver will be automatically connected.
- Yellow - green LED on the wireless receiver turns on.
Manually pairing wireless receiver
When your connection is not completed, you can see the red LED on the wireless receiver and rear speakers do not make sound. To solve the problem, follow the below steps.
1. Press PAIRING on the rear of the wireless receiver.
- The yellow - green LED on the wireless receiver blinks quickly.
2. Turn on the main unit
- Paring is completed. The yellow - green LED on the wireless receiver turns on.
Surround sound
You can enjoy magnificent surround sound for all the input sound source with rear speakers.
If you turn on the surround function, the whole speaker outputs sound.
When you turn off the surround function, the speakers output sound as an original input sound channel.
To turn on surround function, press and hold on the remote control for about 3 seconds and press it once again while “OFF - SURROUND” is scrolled.
To turn off surround function, press and hold on the remote control for about 3 seconds and press it once again while “ON - SURROUND” is scrolled.
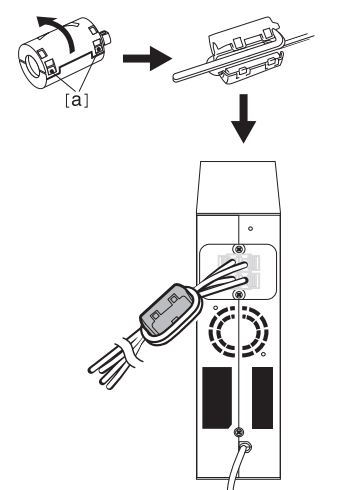
How to Affix the Ferrite Core
Ferrite core may not be provided depending on each nation’s regulations.
Affix the Ferrite Core for speaker cables
You must affix a ferrite core in order to reduce or eliminate electrical interference.
1.Pull the stopper [a] of the ferrite core to open.
2.Wind the speaker cables around the ferrite core twice.
3.Close the ferrite core until it clicks.
Troubleshooting
General
Symptoms
Cause & Solution
The unit does not work properly.
Turn off the power of this unit and the connected external device (TV, Woofer, DVD-player, Amplifier, etc.) and turn them on again.
Disconnect the power cord of this unit and the connected external device (TV, Woofer, DVD-player, Amplifier, etc.) and then try connecting again.
Previous setting may not be saved when device power is shut off.
The power does not turn on.
Is the power cord plugged into the outlet?
Connect the power plug to the outlet.
Sound is not produced.
Is the volume set to minimum?
Adjust the volume.
When you are using connection with a external device (set top box, Bluetooth device etc.), adjust volume level of the device.
Is the mute function activated?
Press or adjust the volume level to cancel the mute function. Is the function selected properly?
Check the input source and select the correct input source.
No woofer sound
Is the subwoofer plugged in?
Plug the power cord of subwoofer into the wall outlet securely. Is pairing between the unit and the subwoofer disconnected?
Connect the unit and the subwoofer. (Page 20)
The remote control does not work properly.
Is the remote control too far from the unit?
Operate the remote control within about 7 m (23 ft).
Is there an obstacle in the path of the remote control and the unit?
Remove the obstacle.
Are the batteries in the remote control exhausted?
Replace the batteries with new one.
The AUTO POWER function does not work.
Check connection of the external device such as TV, DVD/Blu-Ray player.
Check the state of SIMPLINK on your LG TV and turn off SIMPLINK.
Depending on the connected device, this function may not operate.
LG Sound Sync does not work.
Check whether your LG TV supports LG Sound Sync (Wired).
Check connection of LG Sound Sync (Wired).
Check sound setting of your TV and this unit.
When you feel the output sound of the unit is low.
Check the details below and adjust the unit according to them.
Switch the state of DRC function to [OFF] by using “LG Wi-Fi Speaker”.
With the sound bar connected with TV, change the AUDIO DIGITAL OUT setting on TV Setup Menu from [PCM] to [AUTO] or [BITSTREAM].
With the sound bar connected with Player, change the AUDIO DIGITAL OUT setting on Player Setup Menu from [PCM] to [PRIMARY PASS-THROUGH] or [BITSTREAM].
Change Audio DRC setting on connected device setup menu to [OFF] state.
Make sure that Night Time mode is not On. Turn off Night Time mode.
USB is not recognized
Format the USB device and connect it again.
When formatting the USB device, select the available file system. (Page 33)
Bluetooth pairing does not work well.
Be sure your Bluetooth device is on.
Switch Bluetooth off and on again on your Bluetooth device, then try pairing again.
Remove the obstacle in the path of the Bluetooth device and the unit.
Depending on the type of the Bluetooth device or surrounding environment, your device may not be paired with the unit.
The unit does not connect with Bluetooth device.
Make sure the speaker connects to Wi-Fi by using “Google Home” app.
Voice recognition does not work well.
The speaker may not be recognized because of the surrounding noise.
Instead of “Hey Google”, press .
Check and make sure the microphone is muted. Press on the unit.
Network
Symptoms
Cause & Solution
Cannot connect the speaker to your home network.
The wireless communication may be interrupted from household devices that are using radio frequencies. Move the speaker away from them.
Check your router. Try turning it off and back on.
Check that the Wi-Fi feature is turned on in your smart device.
Check that the speaker and your smart device are connected to same Wi-Fi.
Wi-Fi connection does not work well.
If you restart the router?
You need to turn the speaker’s power off and on again. If you install new router.
You need to perform a factory set and setup the network connection for speaker.
Application
Symptoms
Cause & Solution
The application doesn’t work properly.
Does an error occur when accessing the app?
Make sure that your smart device is compatible with the app.
Make sure that the application is the latest version.
Make sure that the connected unit turns on.
NOTES to use wireless
Symptoms
Cause & Solution
This device may have wireless interference.
Wireless may not operate normally in weak signal area.
Please install the device close enough to wireless subwoofer.
Do not install the device on metal furniture for optimum performance.
Bluetooth device may malfunction or make noise in the following cases.
When any part of your body contact the transceiver of the Bluetooth device or sound bar.
When there is an obstacle or wall or the device is installed in a secluded spot.
When there is a device (a wireless LAN, a medical equipment or a microwave) using same frequency, make the distance between the products as far away as possible each other.
When connecting the device to the Bluetooth device, make the distance between the products as close as possible each other.
When the device gets too far from the Bluetooth device, the connection is disconnected and also malfunction may occur.
NOTES to release Demo mode
Symptoms
Cause & Solution
Can not change input source with F such as BT (Bluetooth), HDMI etc. and only [DEMO] indication is showing in the front display.
Unplug the power cord and plug it in again.
If that doesn’t work, press and hold F (About 5 seconds) on the main unit until the display indicates current selected function.
 Note
Note Caution
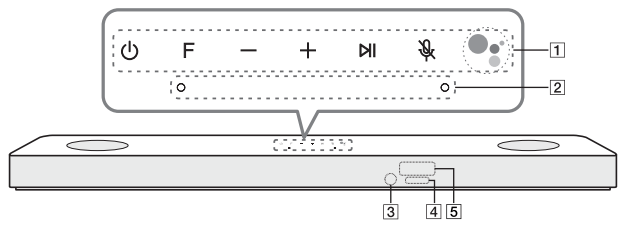

 (Standby)
 You can use Bluetooth function after making Wi-Fi network connection by using Google Home app.
 (Volume)
 Starts playback. / Pauses playback.
 (Mic mute) - Disables the detect voice recognition by pressing
  on the unit. All the Google Assistant LED turns amber and “The mic is muted.” is heard. To cancel it, press
  on the unit again. Google Assistant LED turns off and “The mic is back on.” is heard.
 Enables Google Assistant to receive your voice commands. To cancel it, press
  again. (Page 38)


 and
and  matched correctly.
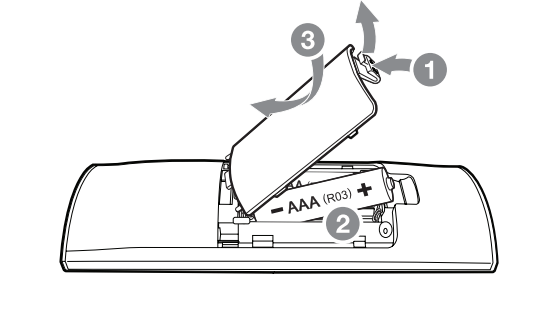
 (Standby)
 - Adjusts speaker volume
 (Skip)
 to go to next or previous file
 (Play/Pause)
 (Night time)
 (Mute)
  (Sound tuning) - Adjusts sound level of each speaker. Select the speaker you want to adjust by using and adjust the sound level by using
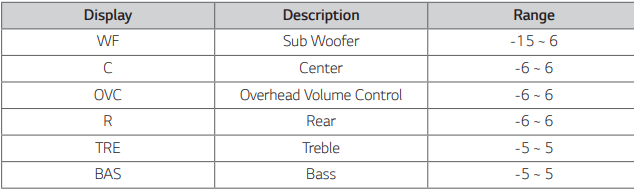
 (Information)

 on the remote control for about 3 seconds and press it once again while “OFF - SURROUND” is scrolled.