Remove the battery cover on the rear of the remote control, and insert the battery with matched correctly. Risk of fire or explosion if the battery is replaced by an incorrect type
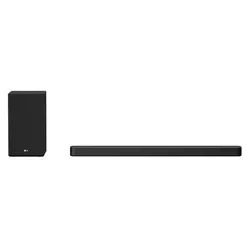
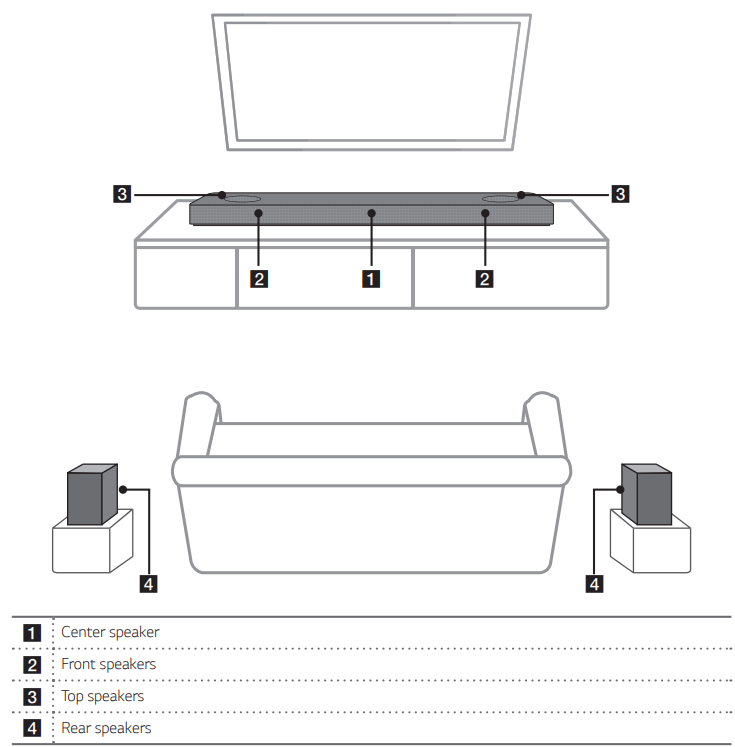
Speakers position
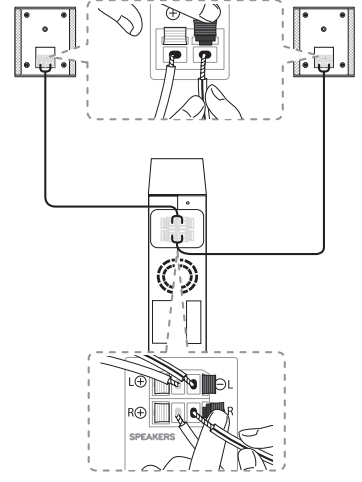
Connecting
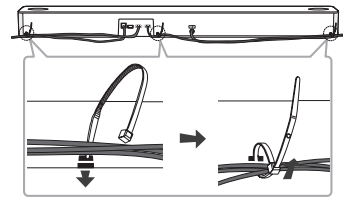
Organizing cables (Optional)
You can organize the cable with cable ties.
Hold the cables together with cable ties as shown below.
Tighten cable ties.
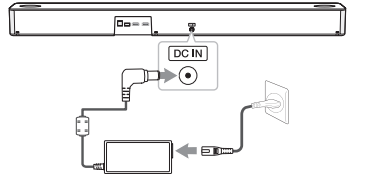
Connecting the AC Adapter
Connect the unit to the power supply with the supplied AC adapter.
Connect the supplied AC power cord to the AC adapter.
Connect the AC adapter cable to DC IN adapter input.
Plug the AC power cord into an AC outlet
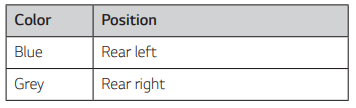
Rear speakers connection (Sold Separately)
Connecting the rear speakers
Connect the black stripe wire to the terminal marked - (minus) and the other end to the terminal marked + (plus).
2. Connect the wireless receiver and the rear speakers (left, right) with the speaker cables.
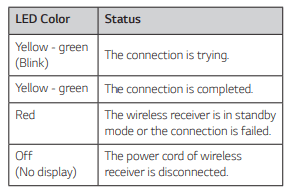
LED indicator of wireless receiver
Setting up the wireless receiver for the first time
1. Connect the power cord to the wireless receiver to the outlet.
2. Turn on the main unit : The sound bar and wireless receiver will be automatically connected.
Yellow - green LED on the wireless receiver turns on.
Manually pairing wireless receiver
When your connection is not completed, you can see the red LED on the wireless receiver and rear speakers are not made sound. To solve the problem, follow the below steps.
1. Press PAIRING on the rear of the wireless receiver
The yellow - green LED on the wireless receiver blinks quickly.
2. Turn on the main unit
Paring is completed. The yellow - green LED on the wireless receiver turns on.
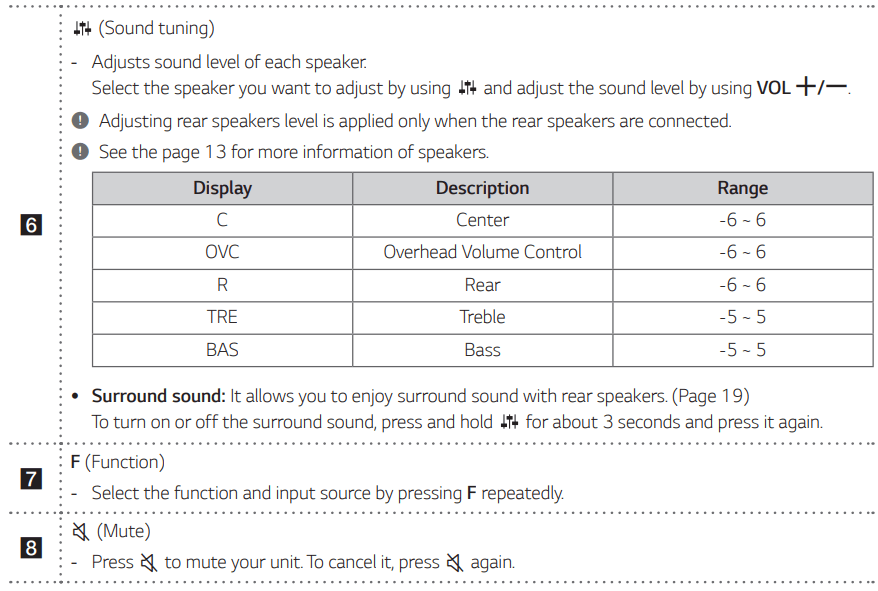
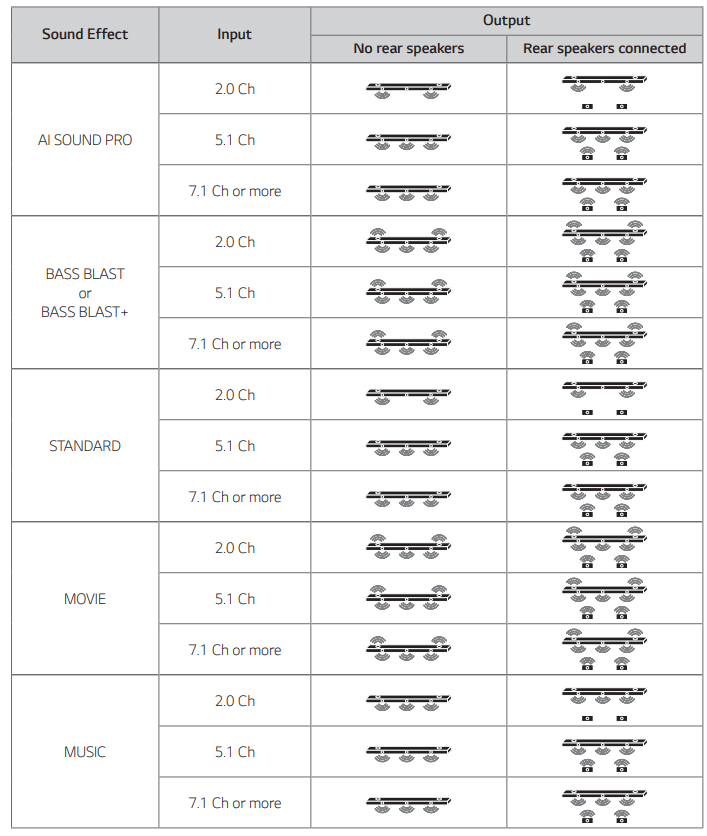
Surround sound
You can enjoy magnificent surround sound for all the input sound source with rear speakers.
If you turn on the surround function, the whole speaker outputs sound.
When you turn off the surround function, the speakers output sound as an original input sound channel.
To turn on surround function, press and hold on the remote control for about 3 seconds and press it once again while "OFF - SURROUND" is scrolled.
To turn off surround function, press and hold on the remote control for about 3 seconds and press it once again while "ON - SURROUND” is scrolled.
Surround function ON
Surround function OFF
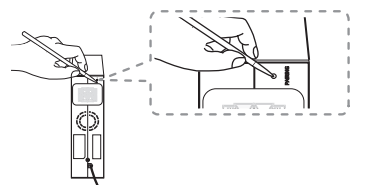
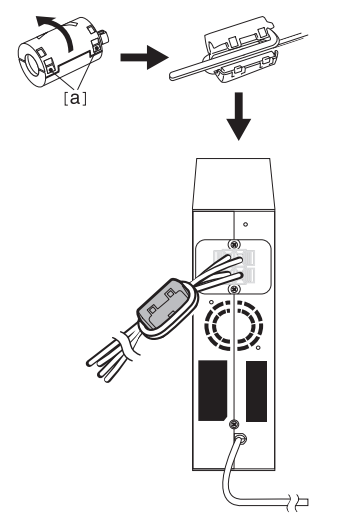
How to Affix the Ferrite Core
Ferrite core may not be provided depending on each nation's regulations.
Affix the Ferrite Core for speaker cables
You must affix a ferrite core in order to reduce or eliminate electrical interference.
1. Pull the stopper [a] of the ferrite core to open.
2. Wind the speaker cables around the ferrite core twice.
3. Close the ferrite core until it clicks.
Note
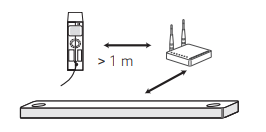
If there is a strong electromagnetic wave product nearby interference may occur Put the main unit and wireless receiver away from there.
The wireless receiver will automatically switch to standby mode in a few minutes after the sound bar is turned off.
When the wireless receiver is in standby mode, the LED will turn on in red.
When you turn on the sound bar, the wireless receiver will turn on and the LED will change to yellow - green and then the rear speakers makes sound within a few seconds.
It takes a few seconds (and may take longer) for the main unit and Wireless Receiver to communicate with each other
Use the rear speaker at least 30 cm away from either TV screen or PC monitor
When the wireless receiver is being connected or disconnected with the main unit, output sound may be interrupted.
Set the distance between the sound bar and the wireless receiver as close as possible and keep them away from the device (ex. wireless router microwave oven, etc.) over 1 m to prevent wireless interference.
Connecting to your TV
Please connect with this unit and TV using the optical digital cable or HDMI cable considering the state of the TV.
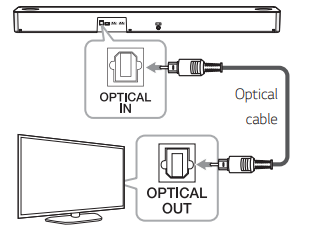
Using an OPTICAL cable
1. Connect the OPTICAL IN jack on the back of the unit to OPTICAL OUT jack on the TV using an OPTICAL cable.
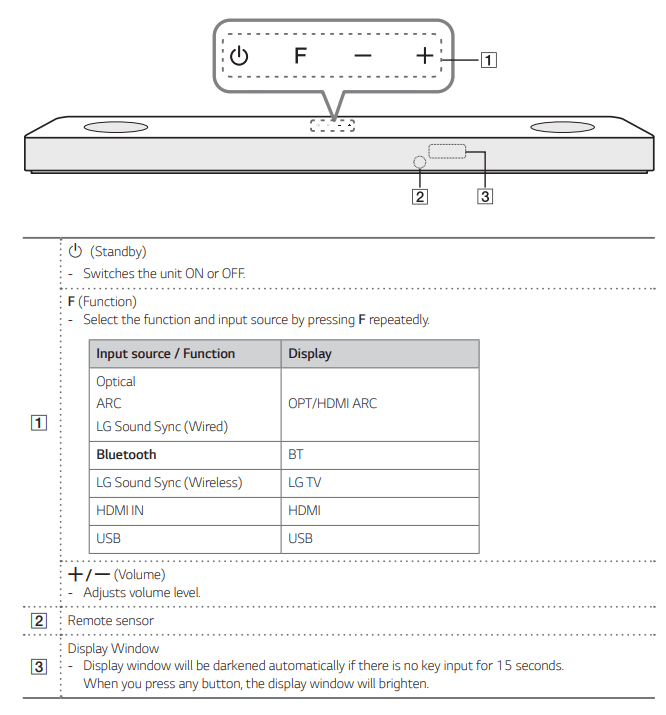
2. Select the input source to OPT/HDMI ARC by pressing F repeatedly. You can see “OPT” on the display window if connecting normally between this unit and your TV.
LG Sound Sync
You can control some functions of this unit by your TV’s remote control with LG Sound Sync. It is compatible with the LG TV that is supported LG Sound Sync. Make sure of the LG Sound Sync logo on your TV. Controllable function by LG TV’s remote control : Volume up/down, mute Make one of the following connections, depending on the capabilities of your equipment.
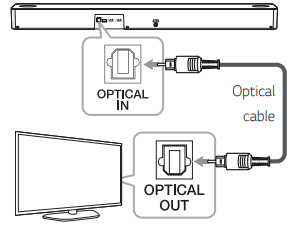
LG Sound Sync with wired connection
1. Connect your LG TV to the unit by using an optical cable.
2. Set up the sound output of TV to listen to the sound through this unit :
( Refer to the TV’s instruction manual for the details of LG Sound Sync.)
3. Turn on the unit by pressing .
4. Select the input source to OPT/HDMI ARC by pressing F repeatedly.
You can see “LGOPT” on the display window if connecting normally between this unit and your TV.
LG Sound Sync with wireless connection
Turn on the unit by pressing .
Select the LG TV function by pressing F repeatedly.
Set up the sound output of TV to listen to the sound through this unit :
"PAIRED” appears on the display window for about 3 seconds and then you can see “LG TV” on the display window if connecting normally between this unit and your TV.
(Refer to the TV’s instruction manual for the details of LG Sound Sync.)
Using an HDMI cable
If you connect this unit to a TV that supports HDMI CEC and ARC (Audio Return Channel), you can enjoy the TV audio through the speakers of this unit without connecting the optical cable.
1. Connect the HDMI OUT (TV ARC) jack on the back of the unit to ARC jack on the TV using an HDMI cable.
2. Select the input source to OPT/HDMI ARC by pressing F repeatedly. You can see “ARC” on the display window if connecting normally between this unit and your TV.
ARC (Audio Return Channel) function
The ARC function enables an HDMI capable TV to send the audio stream to HDMI OUT of the unit.
To use this function :
- Your TV must support the HDMI-CEC and ARC function and the HDMI-CEC and ARC must be set to On.
- The setting method of HDMI-CEC and ARC may differ depending on the TV. For details about ARC function, refer to your TV manual.
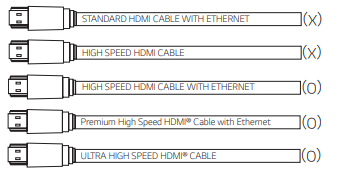
- You must use the HDMI cable (Type A, High Speed HDMI™ cable with Ethernet).
- You must connect the HDMI OUT on the unit with HDMI IN of the TV that supports ARC function using an HDMI cable.
- You can connect only one Sound bar to TV compatible with ARC.
Additional information for HDMI
When you connect an HDMI or DVI compatible device make sure of the following:
Try switching off the HDMI/DVI device and this unit. Next, switch on the HDMI/DVI device and leave it for around 30 seconds, then switch on this unit.
The connected devices video input is set correctly for this unit.
The connected device is compatible with 720 x 576p (or 480p), 1280 x 720p,1920 x 1080i, 1920 x 1080p, 4096 x 2160p or 3840 x 2160p video input.
Not all HDCP-compatible HDMI or DVI devices will work with this unit.
The picture will not be displayed properly with non-HDCP device.
HDMI cable Checklist
Some HDMI cables have poor signal transmission, which can cause problems with sound and video transmission. Even after HDMI cable connections, if no sound, sound interrupted, noise occurring from the sound bar and/or no video, no smooth video on your TV, the HDMI cable may be the problem. Use the cable marked with the premium HDMI certification logo. We recommend using “High Speed HDMI Cable with Ethernet” or later version.
Optional equipment connection
DOLBY ATMOS®
What is DOLBY ATMOS®?
Dolby Atmos gives you amazing experience you've never before by overhead sound, and all the richness, clarity and power of Dolby sound.
DTS:X®
What is DTS:X®
In the real world, sound is all around us, moving freely in any direction. DTS:X® is immersed in this natural, multi-dimensional sound experience as we go about our daily lives.
For using DOLBY ATMOS® and DTS:X®
DOLBY ATMOS® is available only in HDMI and ARC mode.
To use DOLBY ATMOS® in ARC mode, your TV has to support DOLBY ATMOS®.
DTS:X® is available only in HDMI mode
It is needed to set up an audio output on external devices (Blu-ray disc player TV etc.) to "No encoding” such as "Bitstream" "Auto" or "Bypass'.
If you can select audio output sampling rate, set it to 192 kHz.
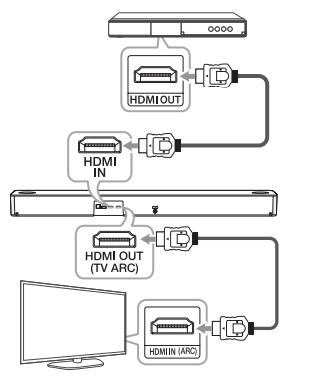
If your TV does not support DTS sound source, connect the playback (source) device to the HDMI IN or OPTICAL IN jack on the soundbar to listen to DTS audio.
1. Connect HDMI IN jack on the back of the unit to HDMI OUT jack on the external device such as Blu-ray disc player DVD player etc.
2. Connect HDMI OUT (TV ARC) jack on the back of the unit to HDMI IN (ARC) jack on the TV.
3. Select the input source to HDMI or OPT/HDMI ARC by pressing F repeatedly.
- If you select HDMI, you can hear the sound from the external device. Select it when playing the external device.
- If you select OPT/HDMI ARC, you can hear the sound from your TV. Select it when watching the TV.
You can see "DOLBY ATMOS” or "DTS:X" on the display window if connecting normally between this sound bar and your TV and the contents is played.
Troubleshooting
General
Symptoms
Cause & Solution
The unit does not work properly.
Turn off the power of this unit and the connected external device (TV, Woofer, DVD-player, Amplifier, etc.) and turn them on again.
Disconnect the power cord of this unit and the connected external device (TV, Woofer, DVD-player, Amplifier, etc.) and then try connecting again.
Previous setting may not be saved when device power is shut off
No Power
The power cord is unplugged. Plug in the power cord.
Check whether electricity failed. Check the condition by operating other electronic devices
No sound
Incorrect input source is selected. Check the input source and select the correct input source.
The mute function is activated. Press (Mute) or adjust the volume level to cancel the mute function.
When you are using connection with a external device (set top box, Bluetooth device etc.), adjust volume level of the device.
The remote control does not work properly.
The remote control is too far from the unit. Operate the remote control within about 7 m.
There is an obstacle in the path of the remote control and the unit. Remove the obstacle.
The batteries in the remote control is exhausted. Replace the batteries with new one.
The AUTO POWER function does not work
Check connection of the external device such as TV, DVD/Blu-Ray player or Bluetooth device.
Check the state of SIMPLINK on your LG TV and turn off SIMPLINK.
Depending on the connected device, this function may not operate
LG Sound Sync does not work.
Check whether your LG TV supports LG Sound Sync.
Check connection of LG Sound Sync (Optical or wireless).
Check sound setting of your TV and this unit
The unit does not connect with Bluetooth device
Turn off the Bluetooth connection lock function
When you feel the output sound of the unit is low
Check the details below and adjust the unit according to them.
With the sound bar connected with TV, change the AUDIO DIGITAL OUT setting on TV Setup Menu from [PCM] to [AUTO] or [BITSTREAM].
With the sound bar connected with Player, change the AUDIO DIGITAL OUT setting on Player Setup Menu from [PCM] to [PRIMARY PASS-THROUGH] or [BITSTREAM].
Change Audio DRC setting on connected device setup menu to [OFF] state.
Make sure Night time mode is not On. Turn [OFF] Night time mode.
USB is not recognized.
Format the USB device and connect it again. When formatting the USB device, select the available file system.
NOTES to use wireless
Symptoms
Cause & Solution
Bluetooth device may malfunction or make noise in the following cases.
When any part of your body contact the transceiver of the Bluetooth device or sound bar.
When there is an obstacle or wall or the device is installed in a secluded spot.
When there is a device (a wireless LAN, a medical equipment or a microwave) using same frequency, make the distance between the products as far away as possible each other.
When connecting the device to the Bluetooth device, make the distance between the products as close as possible each other.
When the device gets too far from the Bluetooth device, the connection is disconnected and also malfunction may occur
This device may have wireless interference.
Wireless may not operate normally in weak signal area.
Do not install the device on metal furniture for optimum performance
NOTES to release Demo mode
Symptoms
Cause & Solution
Can not change input source with F such as BT (Bluetooth), HDMI etc. and only [DEMO] indication is showing in the front display
Unplug the power cord and plug it in again. If that doesn’t work, after setting the volume to minimum, press and hold F (About 5 seconds) on the main unit until the display indicates current selected function
If your TV has either an optical or HDMI socket then you can attach the sound bar to your TV. I suppose you could also link it via Bluetooth if your TV supports that. Ideally though you want to connect it to your TV using HDMI to an HDMI/ARC connection as that will allow you to use your TVs remote control to also control the soundbar and any other device you connect to the soundbar (Blu-ray or DVD player for example).
#3 Can I see what sound format I’m using on soundbar
Yes you can see it on the soundbar digital screen: it will indicate, HDMI, Bluetooth, Optical. It will also indicate the type of sound you want: standard, music, movie.


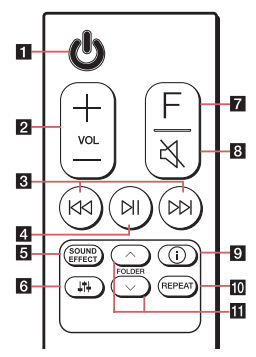
 Replacement of Battery
 matched correctly. Risk of fire or explosion if the battery is replaced by an incorrect type
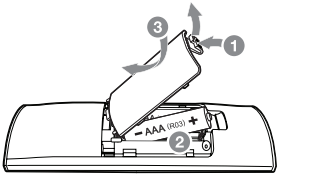
 on the remote control for about 3 seconds and press it once again while "OFF - SURROUND" is scrolled.
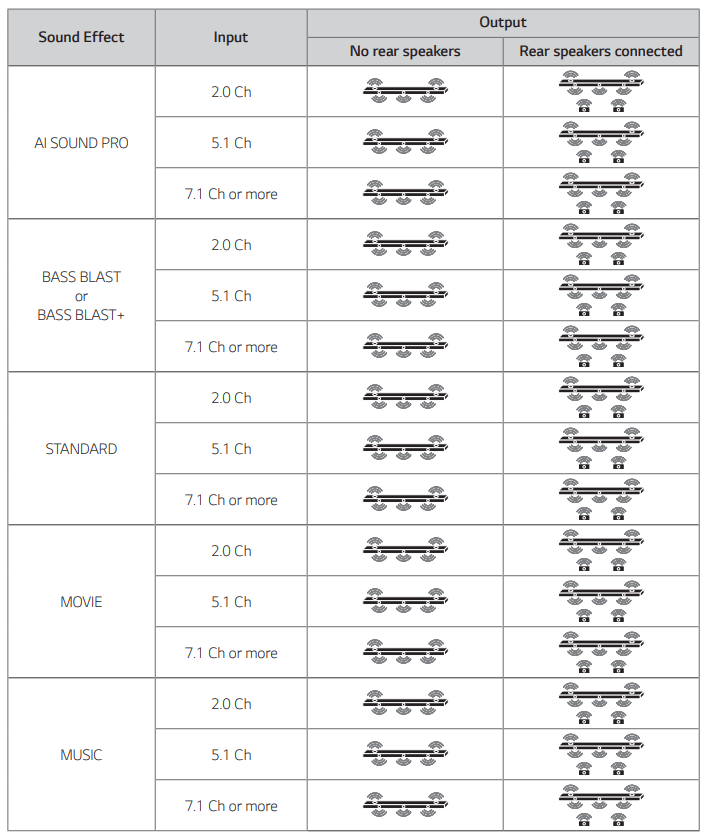
 .
.
 (Mute) or adjust the volume level to cancel the mute function.