Owners' Guide Sound Bar
Getting Started
Front panel
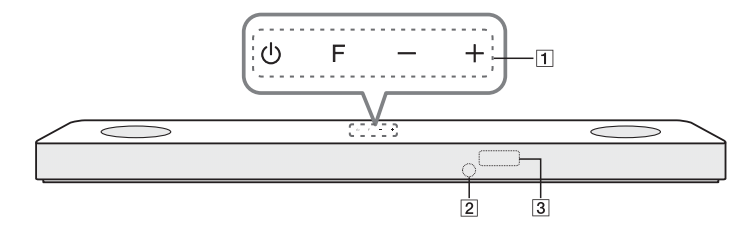
 (Standby)
- Switches the unit ON or OFF
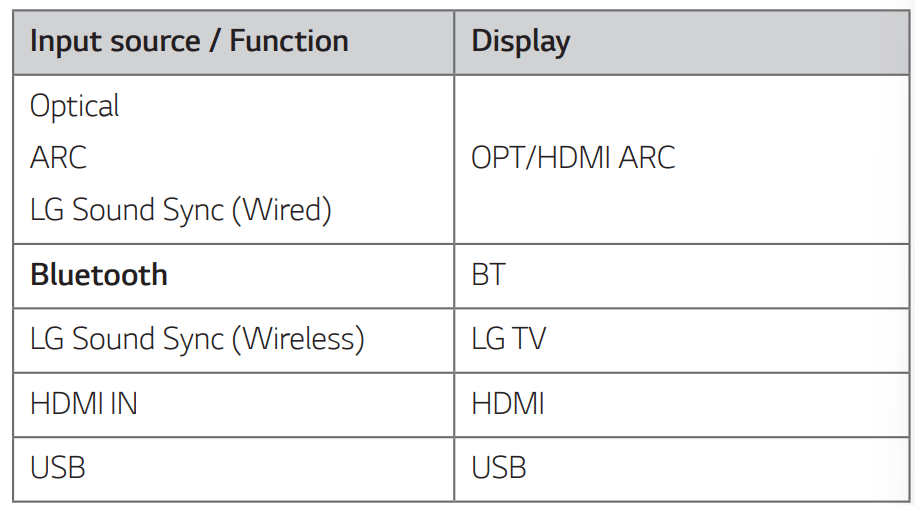
F (Function) - Select the function and input source by pressing F repeatedly.
 (Volume)
- Adjusts volume level- Remote sensor
- Display Window
- Display window will be darkened automatically if there is no key input for 15 seconds. When you press any button, the display window will brighten.
Precautions in using the touch buttons
- Use the touch buttons with clean and dry hands.
- In a humid environment, wipe out any moisture on the touch buttons before using.
- Do not press the touch buttons hard to make it work.
- If you apply too much strength, it can damage the sensor of the touch buttons.
- Touch the button that you want to work in order to operate the function correctly.
- Be careful not to have any conductive material such as metallic object on the touch buttons. It can cause malfunctions.
This unit will turn itself off to save electric consumption when the main unit is not connected to an external device and is not used for 15 minutes.
Rear panel
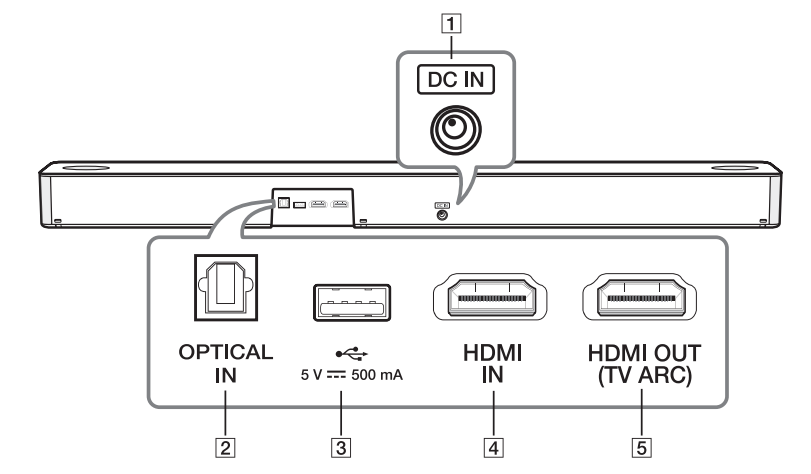
- DC IN
- Connect to the AC adapter
- OPTICAL IN
- Connect the OPTICAL IN jack on the back of the unit to OPTICAL OUT jack on the TV.
- USB Port
- Connect USB memory device to the USB port on the back of the unit.
- HDMI IN
- Connect HDMI IN jack on the back of the unit to HDMI OUT jack on the external device. You can enjoy the sound and picture from HDMI connection on an external device.
- HDMI OUT (TV ARC)
- Connect the HDMI OUT (TV ARC) jack on the back of the unit to ARC jack on the TV
Remote control
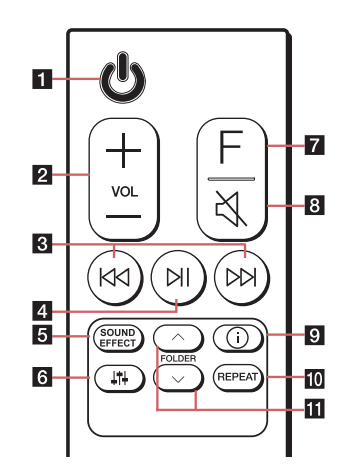
 (Standby)
- Switches the unit ON or OFF- VOL (Volume)

- Adjusts speaker volume.
 (Skip/Search)
- Press  to go to next or previous file.
- Press and hold  during playback and release it at the point you want.
 (Play/Pause)
- Starts playback. / Pauses playback.
- BT (Bluetooth) connection Lock: It allows you to connect a Bluetooth device only on Bluetooth and LG TV functions. (Page 38) To turn on or off the Bluetooth connection lock, press and hold  for about 3 seconds and press it again in BT (Bluetooth) function.
- SOUND EFFECT
- Selects a sound effect mode by using SOUND EFFECT.
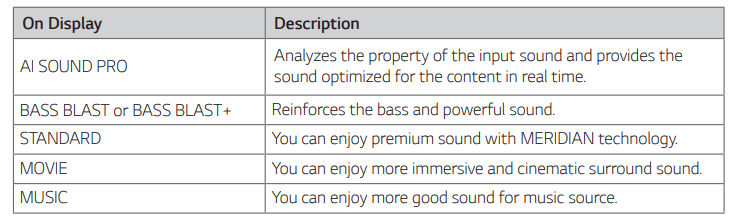
When this unit detects DOLBY ATMOS or DTS:X stream, you cannot change sound effect to any other. In this case, even though you press SOUND EFFECT, this unit does not respond. And you can see only “NOT SUPPORTED” on the display window.
- TV remote: It allows you to control the volume of this unit by your TV remote control even by other company’s product. (Page 33) To turn on or off the TV Remote function, press and hold SOUND EFFECT for about 3 seconds and press it again.
Supported TV brands

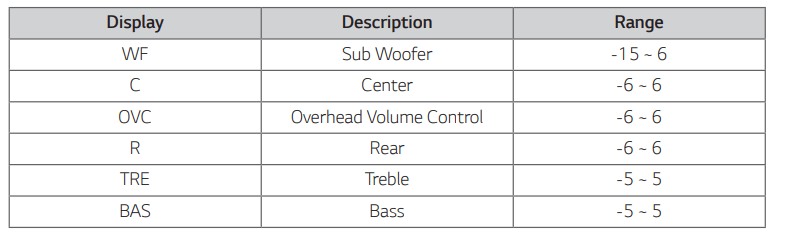
 (Sound tuning)
- Adjusts sound level of each speaker. Select the speaker you want to adjust by using  and adjust the sound level by using VOL
Adjusting rear speakers level is applied only when the rear speakers are connected.
See the page 13 for more information of speakers.
Surround sound: It allows you to enjoy surround sound with rear speakers. (Page 20) To turn on or off the surround sound, press and hold  for about 3 seconds and press it again.
- F (Function)
- Select the function and input source by pressing F repeatedly
 (Mute)
- Press  to mute your unit. To cancel it, press
  again.
 (Information)
- You can display various information of the input source by pressing  .
.
- OPT (Optical)/ARC/HDMI (HDMI IN) : Audio format
- BT (Bluetooth) : Connected Bluetooth device name
- USB : File information contained on a USB.
Auto Power ON/OFF: It allows the unit to turn on and off automatically by input signals : Optical, LG TV or Bluetooth (Page 34) To turn on or off AUTO POWER function, press and hold  for about 3 seconds and press it again.
- REPEAT
- Press REPEAT to select desired repeat or random mode.
- FOLDER

- Searches a folder on USB device.
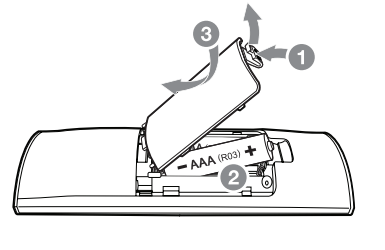
Replacement of Battery
Remove the battery cover on the rear of the remote control, and insert the battery with + and - matched correctly.
Risk of fire or explosion if the battery is replaced by an incorrect type.
Speakers position
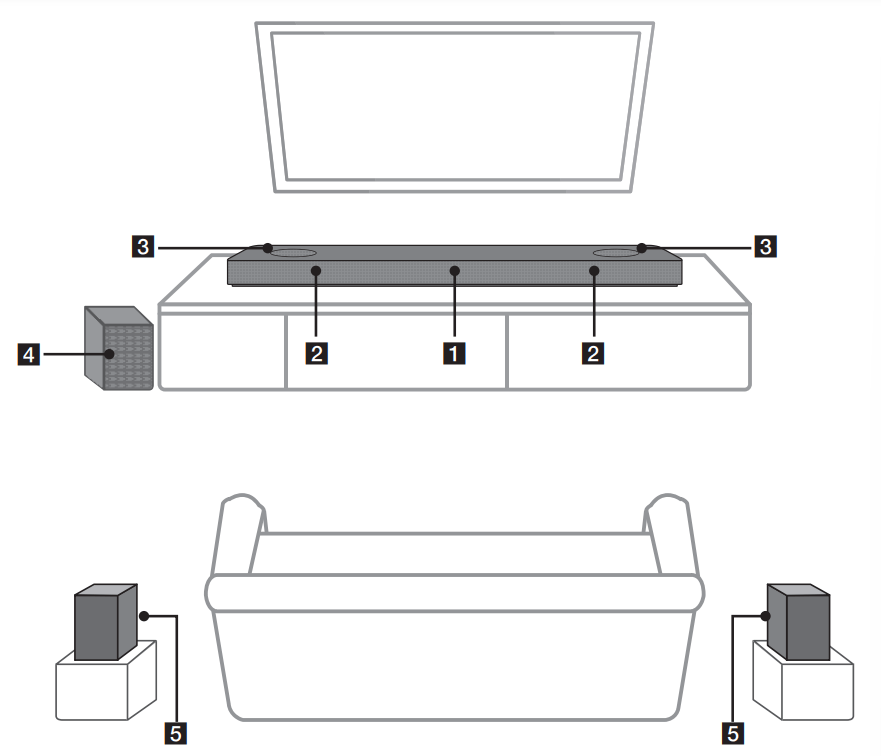
- Center speaker
- Front speakers
- Top speakers
- Subwoofer
- Rear speakers
You can enjoy surround sound by using Wireless Rear Speaker kit. Wireless Rear Speakers Kit sold separately (SPK8-S).
Connecting
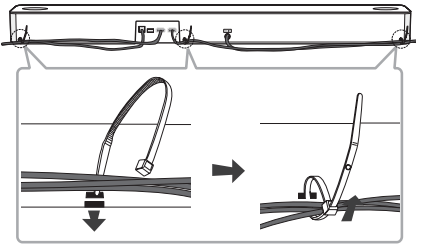
Organizing cables (Optional)
You can organize the cable with cable ties.
- Hold the cables together with cable ties as shown below.
- Tighten cable ties.
Note
- After all connections are completed, you can arrange cables as needed.
- Cable ties are not provided.
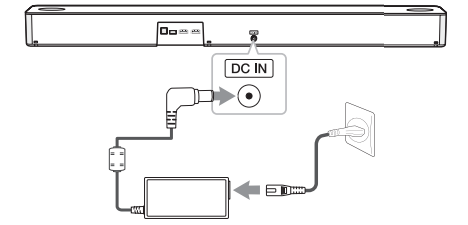
Connecting the AC Adapter
Connect the unit to the power supply with the supplied AC adapter.
- Connect the supplied AC power cord to the AC adapter.
- Connect the AC adapter cable to DC IN adapter input.
- Plug the AC power cord into an AC outlet
Caution
Only use the AC adapter supplied with this device. Do not use a power supply from another device or manufacturer. Using any other power cable or power supply may cause damage to the device and void your warranty
Wireless subwoofer and rear speaker (Sold Separately) connection
Wireless subwoofer connection
LED indicator of wireless subwoofer
| LED Color |
Status |
| Green (Blink) |
The connection is trying. |
| Green |
The connection is completed. |
| Red |
The wireless subwoofer is in standby mode or the connection is failed. |
| Off (No display) |
The power cord of wireless subwoofer is disconnected. |
Setting up the wireless subwoofer for the first time
- Connect the power cord of the sound bar and the wireless subwoofer to the outlet.
- Turn on the sound bar. The sound bar and the wireless subwoofer will be automatically connected.
- Green LED on the rear of wireless subwoofer turns on.
Manually pairing wireless subwoofer
When your connection is not completed, you can check red LED on the wireless subwoofer and the wireless subwoofer does not make sound. To solve the problem, follow the steps below.
- Press PAIRING on the rear of the wireless subwoofer
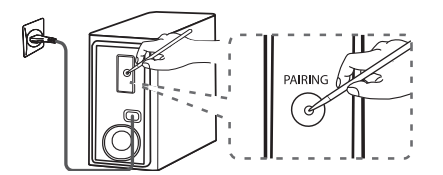
- The green LED on the rear of the wireless subwoofer blinks quickly. (If the green LED does not blink, press and hold the PAIRING.)
- Turn on the sound bar.
- Pairing is completed. The green LED on the rear of the wireless subwoofer turns on.
Note
- It takes a few seconds (and may take longer) for the main unit and the subwoofer to communicate with each other and make sounds.
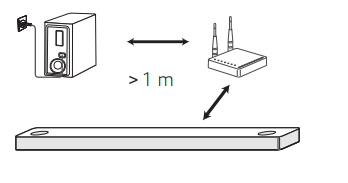
- The closer the main unit and the subwoofer, the better sound quality. It is recommended to install the main unit and the subwoofer as close as possible and avoid the cases below.
- There is an obstacle between the main unit and the subwoofer.
- There is a device using same frequency with this wireless connection such as a medical equipment, a microwave or a wireless LAN device.
- Keep the sound bar and the subwoofer away from the device (ex. wireless router, microwave oven, etc.) over 1 m to prevent wireless interference
Rear speakers connection (Sold Separately)
Connecting the rear speakers
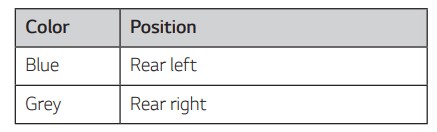
- Connect the black stripe wire to the terminal marked - (minus) and the other end to the terminal marked + (plus).
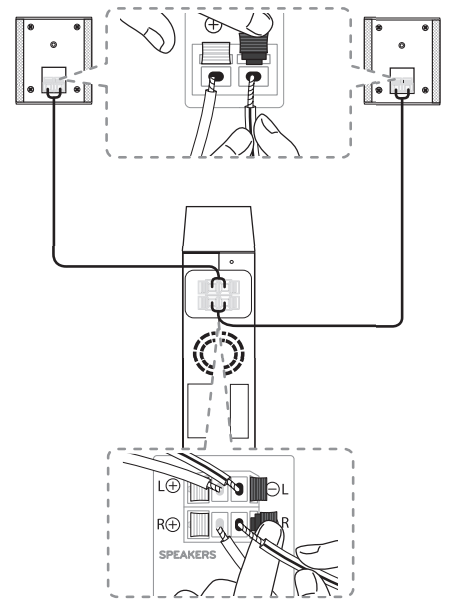
- Connect the wireless receiver and the rear speakers (left, right) with the speaker cables.
Note
You need to purchase the wireless rear speakers kit (SPK8-S) to enjoy surround sound.
Caution
- Use the speaker supplied with this unit only. Using any other speaker may cause malfunction.
- Be sure to match the speaker cable to the appropriate terminal on the components: + to + and – to –. If the cables are reversed, the sound will be distorted and will lack bass.
LED indicator of wireless receiver
| LED Color |
Status |
| Yellow - green (Blink) |
The connection is trying |
| Yellow - green |
The connection is completed |
| Red |
The wireless receiver is in standby mode or the connection is failed. |
| Off (No display |
The power cord of wireless receiver is disconnected. |
Setting up the wireless receiver for the first time
- Connect the power cord to the wireless receiver to the outlet.
- Turn on the main unit : The sound bar and wireless receiver will be automatically connected.
- Yellow - green LED on the wireless receiver turns on.
Manually pairing wireless receiver
When your connection is not completed, you can see the red LED on the wireless receiver and rear speakers are not made sound. To solve the problem, follow the below steps.
- Press PAIRING on the rear of the wireless receiver
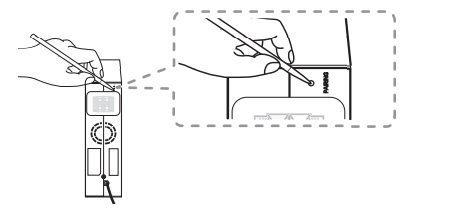
- The yellow - green LED on the wireless receiver blinks quickly
- Turn on the main unit
- Paring is completed. The yellow - green LED on the wireless receiver turns on.
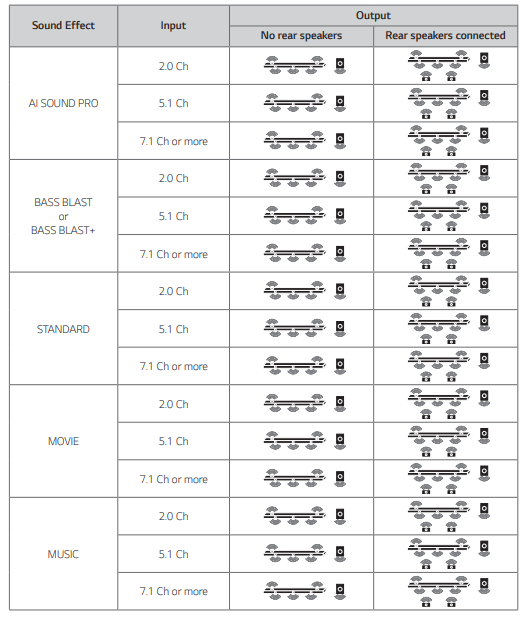
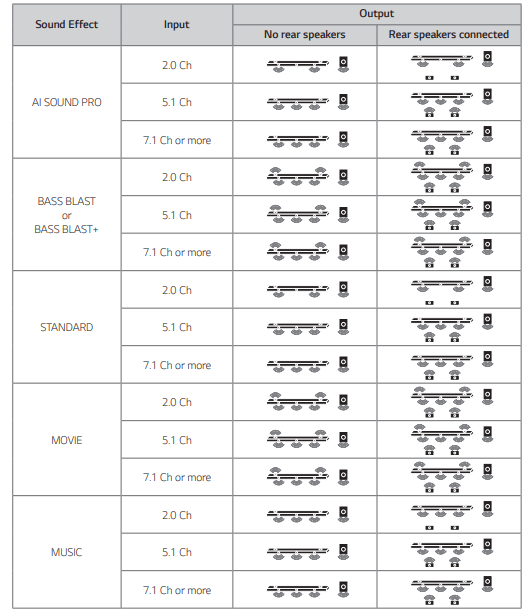
Surround sound
You can enjoy magnificent surround sound for all the input sound source with rear speakers.
If you turn on the surround function, the whole speaker outputs sound. When you turn off the surround function, the speakers output sound as an original input sound channel.
To turn on surround function, press and hold  on the remote control for about 3 seconds and press it once again while “OFF - SURROUND” is scrolled.
To turn off surround function, press and hold on the remote control for about 3 seconds and press it once again while “ON - SURROUND” is scrolled.
Surround function ON
Surround function OFF
Connecting to your TV
Please connect with this unit and TV using the optical digital cable or HDMI cable considering the state of the TV.
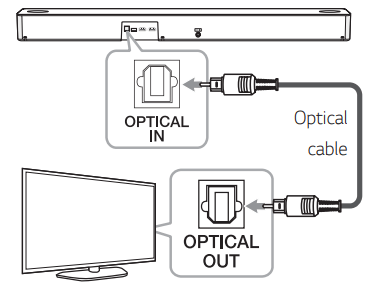
Using an OPTICAL cable
- Connect the OPTICAL IN jack on the back of the unit to OPTICAL OUT jack on the TV using an OPTICAL cable.
- Select the input source to OPT/HDMI ARC by pressing F repeatedly.
You can see “OPT” on the display window if connecting normally between this unit and your TV.
Note
- Before connecting the optical cable, be sure to remove the protection plug cover if your cable has the cover
- You can enjoy the TV audio through the speakers of this unit. In the case of some TV models, you must select the external speaker option from the TV menu. (For details, reference your TV user manual.)
- If this unit is connected by OPTICAL and ARC at the same time, the ARC signal has a higher priority.
Using an HDMI cable
If you connect this unit to a TV that supports HDMI CEC and ARC (Audio Return Channel), you can enjoy the TV audio through the speakers of this unit without connecting the optical cable.
- Connect the HDMI OUT (TV ARC) jack on the back of the unit to ARC jack on the TV using an HDMI cable.

- Select the input source to OPT/HDMI ARC by pressing F repeatedly. You can see “ARC” on the display window if connecting normally between this unit and your TV.
Note:
- You can enjoy the TV audio through the speakers of this unit. In the case of some TV models, you must select the external speaker option from the TV menu. (For details, reference your TV user manual.)
- Depending on your LG TV model, you may need to turn on the SIMPLINK function on your LG TV
- When you return to ARC function from another function, you need to select the input source to OPT/HDMI ARC. Then this unit changes to ARC function automatically.
ARC (Audio Return Channel) function
The ARC function enables an HDMI capable TV to send the audio stream to HDMI OUT of the unit.
To use this function :
- Your TV must support the HDMI-CEC and ARC function and the HDMI-CEC and ARC must be set to On.
- The setting method of HDMI-CEC and ARC may differ depending on the TV. For details about ARC function, refer to your TV manual.
- You must use the HDMI cable (Type A, High Speed HDMI™ cable with Ethernet).
- You must connect the HDMI OUT on the unit with HDMI IN of the TV that supports ARC function using an HDMI cable.
- You can connect only one Sound bar to TV compatible with ARC.
Additional information for HDMI
- When you connect an HDMI or DVI compatible device make sure of the following:
- Try switching off the HDMI/DVI device and this unit. Next, switch on the HDMI/DVI device and leave it for around 30 seconds, then switch on this unit.
- The connected device’s video input is set correctly for this unit.
- The connected device is compatible with 720 x 576p (or 480p), 1280 x 720p, 1920 x 1080i, 1920 x 1080p, 4096 x 2160p or 3840 x 2160p video input.
- Not all HDCP-compatible HDMI or DVI devices will work with this unit.
- The picture will not be displayed properly with non-HDCP device.
Note
- If a connected HDMI device does not accept the audio output of the unit, the HDMI device’s audio sound may be distorted or may not output.
- Changing the resolution when the connection has already been established may result in malfunctions. To solve the problem, turn off the unit and then turn it on again.
- When the HDMI connection with HDCP is not verified, TV screen is changed to black screen. In this case, check the HDMI connection, or disconnect the HDMI cable.
- If there are noises or lines on the screen, please check the HDMI cable (length is generally limited to 4.5 m).
- You cannot change the video resolution in the HDMI mode. Change the video resolution of the connected component.
- If the video output signal is abnormal when your personal computer is connected to HDMI IN jack, change the resolution of your personal computer to 576p (or 480p), 720p, 1080i or 1080p.
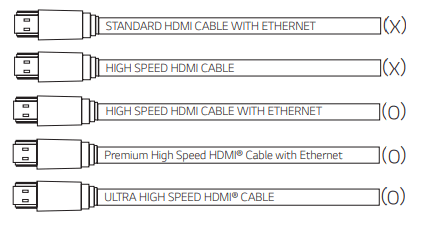
HDMI cable Checklist
Some HDMI cables have poor signal transmission, which can cause problems with sound and video transmission.
Even after HDMI cable connections, if no sound, sound interrupted, noise occurring from the sound bar and/or no video, no smooth video on your TV, the HDMI cable may be the problem.
Use the cable marked with the premium HDMI certification logo. We recommend using “High Speed HDMI Cable with Ethernet” or later version.
Connection through HDMI Cable*
Your television must support the newest HDMI features (HDMI CEC1) / ARC (Audio Return Channel)) to fully enjoy the Live broadcasting channel with audio system through an HDMI cable. Unless your TV supports these HDMI features, the audio system should be connected through an OPTICAL cable.
1) HDMI CEC (High-Definition Multimedia Interface Consumer Electronics Control)
Consumer Electronics Control (CEC) is an HDMI feature designed to allow the user to command and control the CEC-enabled devices, that are connected through HDMI by using only one of their remote controls.
* Trade names for CEC are SimpLink (LG) , Anynet+ (Samsung), BRAVIA Sync (Sony), EasyLink (Philips), etc.
HDMI IN connection
You can enjoy the sound from the external device which is connected to HDMI IN jack on this unit.
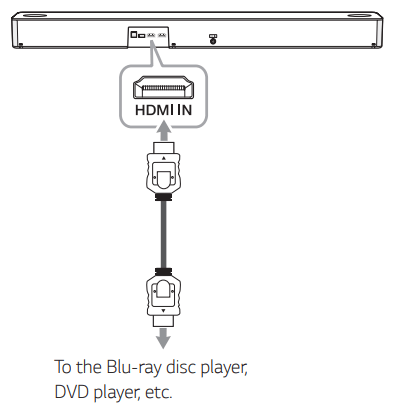
- Connect HDMI IN jack on the back of the unit to HDMI OUT jack on the audio device such as Bluray disc player, DVD player, etc.
- Select the input source to HDMI by pressing F repeatedly
OPTICAL IN connection
Connect an optical output jack of external devices to the OPTICAL IN jack.
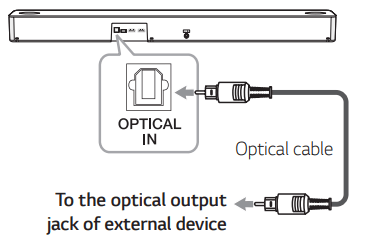
- Connect the OPTICAL IN jack on the back of the unit to optical out jack of your external device.
- Select the input source to OPT/HDMI ARC by pressing F repeatedly. You can see “OPT” on the display window if connecting normally between this unit and your device.
Note
Before connecting the optical cable, be sure to remove the protection plug cover if your cable has the cover
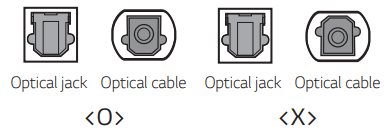
Caution
Make sure to properly align and connect the optical cable; improper alignment may cause damage to the jack.
USB connection
Connect USB memory device to the USB port on the back of the unit.
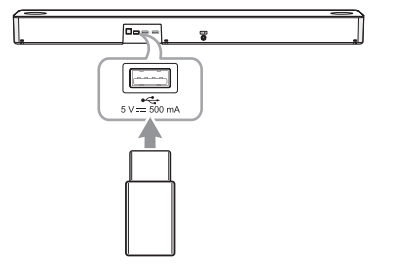
Note
It is recommended that you purchase a USB gender separately for the convenience of USB insertion and extraction. (Recommended USB gender type : USB 2.0 extension cable)
For more information of playing files on a USB, refer to the page 32.
Removing the USB Device from the unit.
- Choose a different function/mode.
- Remove the USB device from the unit.
Operating
Basic operations
USB operation
- Connect the USB device to the USB port.
- Select the USB function by pressing F repeatedly
Note
- The resume point may be cleared when you pull out the power cord or removing the USB device from the unit.
- Repeat/Random playback operates as follows.
| On Display |
Description |
| OFF |
Plays songs on USB device in order |
| ONE |
Plays a same song repeatedly. |
| FOLDER |
Plays songs in a folder repeatedly |
| ALL |
Plays all the songs on USB device repeatedly |
| SHUFFLE |
Plays all the songs once randomly, and stops the playback. |
Other operations
Using your TV remote control
You can control some functions of this unit by your TV remote control even by other company’s product. Controllable functions are volume up/down and mute.
Press and hold SOUND EFFECT on the remote control for about 3 seconds. “ON - TV REMOTE” appears and you can control this unit by your TV remote control.
To check the status of this function, press and hold SOUND EFFECT on the remote control.
To turn off this function, press and hold SOUND EFFECT on the remote control and press it once again while “ON - TV REMOTE” is scrolled.
Note
- Make sure that the sound output of your TV is set to [External speaker].
- This function does not operate on LG TV’s magic remote control.
- This function may not work well when some TV control functions such as HDMI CEC, SIMPLINK and LG Sound Sync set to ON.
- This function may not work well when the unit and the TV are connected with an HDMI cable.
- Some remote control may not be supported.
How to disconnect the wireless network connection or the wireless device
Set up the AUTO POWER ON/OFF function to off and turn off the unit.
AUTO POWER On/Off
This unit automatically turns on by an input source : Optical, LG TV or Bluetooth.
When you turn on your TV or an external device connected to this unit, this unit recognizes the input signal and selects the suitable function. You can hear the sound from your device.
If you try to connect your Bluetooth device, this unit turns on and the unit will be connected to your Bluetooth device.
To turn on this function, press and hold  on the remote control for about 3 seconds and press it once again while “OFF - AUTO POWER” is scrolled.
To check the status of this function, press and hold  on the remote control.
To turn off this function, press and hold  on the remote control for about 3 seconds and press it once again while “ON - AUTO POWER” is scrolled
Note
- After the unit is turned on by AUTO POWER function, it will be automatically turned off if there is no signal for a certain period of time from the TV connected by LG Sound Sync (Optical/Wireless).
- After the unit is turned on by AUTO POWER function, it will be automatically turned off if there is no signal for a certain period of time from the external device.
- If you turned off the unit directly, it cannot be turned on automatically by AUTO POWER function. However the unit can be turned on by AUTO POWER function when optical signal comes in after 5 seconds of no signal.
- Depending on the connected device, this function may not operate.
- If you disconnect Bluetooth connection by this unit, some Bluetooth devices try to connect to the unit continually. Therefore it is recommended to disconnect the connection before turning off the unit.
- When you turn on this unit for the first time, status of Auto Power function is turned on.
- To use this function, the main unit must be registered in paired devices list of Bluetooth device.
- You can set the Auto Power function only when this unit is turned on
Auto function change
This unit recognizes input signals such as Optical, HDMI ARC, Bluetooth and LG TV and then changes suitable function automatically.
When optical signal comes in
When you turn on the external device connected to this unit by an optical cable, this unit changes the function to optical. You can hear the sound from your device.
When you try to connect BLUETOOTH device
When you try to connect your Bluetooth device to this unit, Bluetooth function is selected. Play your music on the Bluetooth device.
When you turn on your TV or an external device
When you turn on your TV or an external device connected by the optical, LG sound sync (optical or wireless) or HDMI ARC this sound bar will change to a suitable function so you can listen to the sound through it.
Note
- This unit does not change the function to optical if SIMPLINK of the connected TV, Bluray disc player, set-top box or etc. device set to on or connected CEC supported device is turned on. If you want to use the auto function change, turn off SIMPLINK function on your LG TV. It takes for about 30 seconds to turn off SIMPLINK.
- If the Bluetooth connection lock function is set, Bluetooth connection will be only available on Bluetooth and LG TV function. (Page 38)
Quick Start
This unit can stay in standby mode with low power consumption, so that the unit can reduce boot time when you turn on this unit.
To turn on this function, press  on the unit for 3 seconds when the unit is turned on.
“ON - Q. START” appears in display.
To turn off this function, press  on the unit for 3 seconds again when the unit is turned on.
“OFF - Q. START” appears in display.
Note
- If the Quick start function is set and an AC power is accidently re-connected to the unit by power failure etc., the Quick start function will activate when the unit is turned on and off once.
- When the Quick start function is set, power consumption will be higher than when the Quick start is off.
- This function may not work depending on the models.
Troubleshooting
General
| Symptoms |
Cause & Solution |
| The unit does not work properly. |
- Turn off the power of this unit and the connected external device (TV, Woofer, DVD-player, Amplifier, etc.) and turn them on again.
- Disconnect the power cord of this unit and the connected external device (TV, Woofer, DVD-player, Amplifier, etc.) and then try connecting again.
- Previous setting may not be saved when device power is shut off
|
| No Power |
- The power cord is unplugged. Plug in the power cord.
- Check whether electricity failed. Check the condition by operating other electronic devices
|
| No sound |
- Incorrect input source is selected. Check the input source and select the correct input source.
- The mute function is activated. Press
 (Mute) or adjust the volume level to cancel the mute function (Mute) or adjust the volume level to cancel the mute function
- When you are using connection with a external device (set top box, Bluetooth device etc.), adjust volume level of the device.
|
| No woofer sound |
- The power cord of the subwoofer is not connected. Plug the power cord into the wall outlet securely
- Pairing between the unit and the subwoofer gets disconnected. Connect the unit and the subwoofer. (Page 18)
|
| The remote control does not work properly |
- The remote control is too far from the unit. Operate the remote control within about 7 m
- There is an obstacle in the path of the remote control and the unit. Remove the obstacle
- The batteries in the remote control is exhausted. Replace the batteries with new one.
|
| The AUTO POWER function does not work. |
- Check connection of the external device such as TV, DVD/Blu-Ray player or Bluetooth device.
- Check the state of SIMPLINK on your LG TV and turn off SIMPLINK.
- Depending on the connected device, this function may not operate.
|
| LG Sound Sync does not work. |
- Check whether your LG TV supports LG Sound Sync
- Check connection of LG Sound Sync (Optical or wireless)
- Check sound setting of your TV and this unit.
|
| The unit does not connect with Bluetooth device |
- Turn off the Bluetooth connection lock function. (Page 38)
|
| When you feel the output sound of the unit is low. |
Check the details below and adjust the unit according to them
- With the sound bar connected with TV, change the AUDIO DIGITAL OUT setting on TV Setup Menu from [PCM] to [AUTO] or [BITSTREAM].
- With the sound bar connected with Player, change the AUDIO DIGITAL OUT setting on Player Setup Menu from [PCM] to [PRIMARY PASS-THROUGH] or [BITSTREAM].
- Change Audio DRC setting on connected device setup menu to [OFF] state.
- Make sure Night time mode is not On. Turn [OFF] Night time mode.
|
| USB is not recognized |
- Format the USB device and connect it again. When formatting the USB device, select the available file system. (Page 30)
|
NOTES to use wireless
| Symptoms |
Cause & Solution |
| This device may have wireless interference. |
- Wireless may not operate normally in weak signal area.
- Please install the device close enough to wireless subwoofer.
- Do not install the device on metal furniture for optimum performance.
|
| Bluetooth device may malfunction or make noise in the following cases. |
- When any part of your body contact the transceiver of the Bluetooth device or sound bar.
- When there is an obstacle or wall or the device is installed in a secluded spot.
- When there is a device (a wireless LAN, a medical equipment or a microwave) using same frequency, make the distance between the products as far away as possible each other.
- When connecting the device to the Bluetooth device, make the distance between the products as close as possible each other.
- When the device gets too far from the Bluetooth device, the connection is disconnected and also malfunction may occur
|
NOTES to release Demo mode
| Symptoms |
Cause & Solution |
| Can not change input source with F such as BT (Bluetooth), HDMI etc. and only [DEMO] indication is showing in the front display |
Unplug the power cord and plug it in again. If that doesn’t work, after setting the volume to 2, press and hold F (About 5 seconds) on the main unit until the display indicates current selected function. |
| Remote Control does not work. (No response) |

 on the remote control.
 on the remote control.
 on the remote control to go to the next file.
 on the remote control to go to the previous file.
 on the remote control to go to the beginning of the file.
 on the remote control during playback and release it at the point you want to listen to.
 on the remote control.